1
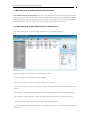
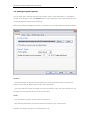
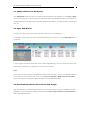
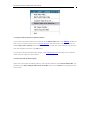
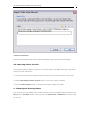
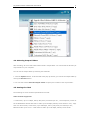
Any DVD Converter Professional User Manual
Any DVD Converter Professional
User Manual
1
Any DVD Converter Professional User Manual
2
1. Welcome to Any DVD Converter Professional...........................................................3
1.1 Main Window of Any DVD Converter Professional.............................................3
1.2 Setting Program Options..............................................................................4
1.3 Converting DVD/Videos to Any Output Formats ...............................................5
1.4 Supportable Formats ...................................................................................5
1.5 Ordering the Full Version .............................................................................6
1.6 Registering the Program ..............................................................................6
2. Adding Videos from Different Sources ....................................................................6
2.1 Adding Videos from Hard Drive .....................................................................7
2.2 Open DVD Movies .......................................................................................7
2.3 Downloading Videos from YouTube and Google................................................7
2.4 Capturing Videos from DV............................................................................9
3. Trimming and Viewing Videos ...............................................................................9
4. Setting Output Video Parameters ........................................................................ 10
4.1 Choosing Output Profile ............................................................................. 10
4.2 Selecting Output Folders............................................................................ 11
4.3 Settings for iPod ....................................................................................... 11
4.4 Settings for iPhone ................................................................................... 12
4.5 Settings for PSP ....................................................................................... 12
4.6 Settings for Zune...................................................................................... 13
4.7 Settings for Cell Phones............................................................................. 13
5. Starting Videos Encoding ................................................................................... 13
6. Opening Output Converted Videos ....................................................................... 13
7. FAQs............................................................................................................... 13
8. Glossary.......................................................................................................... 14
Any DVD Converter Professional User Manual
3
1. Welcome to Any DVD Converter Professional
Any DVD Converter Professional is an All-in-One DVD ripper and video converting tool which
helps you rip DVD movie to all popular video formats and convert video files between all popular
video formats with fast converting speed and excellent video quality. It also supports importing
video clips directly from YouTube as well as extracting .mp3 audios from videos.
1.1 Main Window of Any DVD Converter Professional
The main window of Any DVD Converter Professional is illustrated as follows:
The main window of the program is divided into four parts:
--The left window is the files panel of the program.
* Source Files: Click it to see all videos you add to the program.
* Converted: Files with same output profile are put in the same folder and you can approach them
directly.
* Downloaded: The folder containing videos you have downloaded from YouTube and Google.
--The middle window displays all videos you add and all videos which have been converted.
--The upper left window is for previewing the trimming added videos.
--The lower left window shows all setting of the profile you select, You can also customize output
profile here.
Any DVD Converter Professional User Manual
4
1.2 Setting Program Options
You can make other relevant settings such as audio volume, video parameters, in the Options
window of the program. Click the Options button in the left bottom of the main window and you
will see the Options window as the following:
There are five tabs in the Options window. In each tab, you can make different setting as follows:
General
--The output folder can also be set and opened here. Click the Browse button to change the
location, while click the Open button to open the output folder.
--You can choose the number of threads you use to encode the video. The more threads you use,
the more CPU the program will use to convert the video.
Audio
--You can adjust the audio volume in the converted files
--AAC and MP3 parameters can also be selected according to your requirements.
Normally, the default settings are recommended to use.
Any DVD Converter Professional User Manual
5
Video
--You can resize the video by only fitting its width or height.
Online Video
--You may log in your YouTube account here
--The number of retries means how many times the program tries to download the video from
YouTube and Google when having download problems
--Checking Use system internal cache when downloading can make the download quicker
DVD
--Check Don't separate a DVD video disc as titles option to prevent the program adding the DVD
movie as separated titles.
1.3 Converting DVD/Videos to Any Output Formats
With Any DVD Converter Professional, you can convert your DVD or videos to MPEG formats within
three steps:
Step One:
Add Videos from your DVD or hard drive and then trim added videos as you like.
Step Two:
Choose output profile and set technical parameters for output videos. Generally, default settings
are recommended to use.
Step Three:
Start converting videos by clicking Start Encoding button.
1.4 Supportable Formats
Supportable Input Formats: WMV, ASF, AVI, VOB, MPG, DV, M1V, M2V, MOV, MPEG-4, 3GP, RM,
RMVB, FLV, M4V, MKV
Supportable Output Formats: AVI、FLV、MP3、3GP、WMV、MPEG-1, MPEG-2 , MPEG-4.
Any DVD Converter Professional User Manual
6
1.5 Ordering the Full Version
With the trail version, you can only convert three minutes for each video file and after you order the
full version, you will be provided regname and regcode to unlock the limitation. Please visit
http://www.any-video-converter.com/buynow/buy_dvd.php to order the full version of Any DVD
Converter Professional.
1.6 Registering the Program
After you order the full version of Any DVD Converter Pro, you will receive registration code to
unlock time limitation in trial version. You can register the program as follows:
Run the program and choose Help> Enter License Code. There will be a registration popup
dialog. You may input the Name and Code manually. The registration name is case sensitive. And,
please do not add blank at the beginning or the end of the word. You can also copy and paste the
Name and Code into the registration popup dialog.
2. Adding Videos from Different Sources
With Any DVD Converter Professional, you can add videos by ripping files on DVD, selecting videos
saved on your hard drive, downloading videos from YouTube and Google, and even capturing
videos from your DV.
--Delete Videos
If you want to delete added videos, right-click on the selected video and you will see a pop-up and
then choose Remove to delete selected clip and choose Remove All to delete all added videos.
Any DVD Converter Professional User Manual
7
2.1 Adding Videos from Hard Drive
Click Add Video button to select your desired video clips from your hard drive. Press Ctrl or Shift
to select more than one video at one time in file folder. After you add desired videos, all of them will
be displayed on the left upper panel with their detailed information, including duration, format and
size, etc.
2.2 Open DVD Movies
1. Insert your DVD movie disc to the DVD drive and then run the program.
2. Normally, the program rips files on DVD automatically. If it doesn't, click the Open DVD button
to rip files.
3. The program checks the title with movie content automatically, so you just need to covert the
checked one. Generally, the longest one is the movie content.
Tips:
If you don't like the program to separate the DVD movie into titles, you can choose Edit>Options
menu and then click the DVD tab. You can check Don't separate a DVD video disc as titles
option to prevent the program adding the DVD movie as separated titles.
2.3 Downloading Videos from YouTube and Google
With the program, you can download videos from YouTube and then convert to MPEG-4 format
playable on your iPod, PSP or mobile phones. Choose File> Import Video to from Internet to
begin downloading videos.
Any DVD Converter Professional User Manual
8
1. Copy the link locations of desired videos
If you want to download videos from YouTube, click Online Video tab in the Options window to
sign in your YouTube account. Then visit YouTube.Com and right-click on the desired video to
choose Copy Link Location (this is for Firefox users) or open the video and then copy the URL
from the navigation bar (this is for IE users).
If you want to download videos from Google, Visit video.google.com and right-click on desired
video to choose Copy the Link Location.
2. Paste the link in the program
Right-click on the panel for adding videos in the program and then choose Paste Video URL. You
can also choose File> Import Video from YouTube and then click Add button to paste the URL
of the video.
Any DVD Converter Professional User Manual
9
3. Start to download
Double-click the pasted video URL to start downloading video from YouTube and Google.
2.4 Capturing Videos from DV
The program supports capturing videos from your DV directly, but IEEE 1394 card is required to
connect your DV with the PC.
1. Connect your DV with the computer. Make sure the DV is turned on and set to VCR mode.
2. Choose File>Capture Video from DV menu. You will see a pop-up window.
3. Click the Start Capture button in the pop-up window to capture the video.
3. Trimming and Viewing Videos
If you want to trim your added videos, please select the video in the added video list and then click
Play button in Preview window. Then you may click Start Point or End Point to trim the video
as you like.
Any DVD Converter Professional User Manual
10
4. Setting Output Video Parameters
With Any DVD Converter Professional, you can define all the technical parameters according to
your demands. Generally, the default settings in the program can produce videos in good quality.
Except video parameters, you can set program options in the Options window.
4.1 Choosing Output Profile
After adding videos to the program, you can choose an output profile to convert the video to.
Profiles for iPod, iPhone, PSP, Zune, DVD and cell phones are provided. You can even choose to
extract the audio only from the video in MP3 format. All default technical parameters of selected
profile will be displayed in the bottom right panel after you choose it.
Customizable WMV and AVI format are also available. You can change almost all settings to meet
your demand.
Any DVD Converter Professional User Manual
11
4.2 Selecting Output Folders
After encoding, all converted videos will be saved in output folder. You can choose the directory of
output folder on your computer.
You can set the output folder by following two methods:
1. Click the Options button. In General tab of the pop-up window, you can set the output folder by
clicking the Browse button.
2. You can also choose File>Set Output Folder to specify the location of the output folder.
4.3 Settings for iPod
The following are some technical specifications for iPod:
Video formats supported
* H.264 video, up to 1.5 Mbps, 640 by 480 pixels, 30 frames per sec., Low-Complexity version of
the H.264 Baseline Profile with AAC-LC audio up to 160 Kbps, 48 kHz, stereo audio in .m4v, .mp4,
and .mov file formats; H.264 video, up to 768 Kbps, 320 by 240 pixels, 30 frames per sec.,
Baseline Profile up to Level 1.3 with AAC-LC audio up to 160 Kbps, 48 kHz, stereo audio
Any DVD Converter Professional User Manual
12
in .m4v, .mp4, and .mov file formats; MPEG-4 video, up to 2.5 Mbps, 640 by 480 pixels, 30 frames
per sec., Simple Profile with AAC-LC audio up to 160 Kbps, 48 kHz, stereo audio in .m4v, .mp4,
and .mov file formats
Audio formats supported
* AAC (16 to 320 Kbps), Protected AAC (from iTunes Store), MP3 (16 to 320 Kbps), MP3 VBR,
Audible (formats 2, 3 and 4), Apple Lossless, AIFF and WAV.
4.4 Settings for iPhone
The following are some technical specifications for iPhone:
Video formats supported
* H.264 video, up to 1.5 Mbps, 640 by 480 pixels, 30 frames per second, Low-Complexity version
of the H.264 Baseline Profile with AAC-LC audio up to 160 Kbps, 48kHz, stereo audio in .m4v, .mp4,
and .mov file formats; H.264 video, up to 768 Kbps, 320 by 240 pixels, 30 frames per second,
Baseline Profile up to Level 1.3 with AAC-LC audio up to 160 Kbps, 48kHz, stereo audio
in .m4v, .mp4, and .mov file formats; MPEG-4 video, up to 2.5 Mbps, 640 by 480 pixels, 30 frames
per second, Simple Profile with AAC-LC audio up to 160 Kbps, 48kHz, stereo audio in .m4v, .mp4,
and .mov file formats
Audio formats supported
* AAC, Protected AAC, MP3, MP3 VBR, Audible (formats 1, 2, and 3), Apple Lossless, AIFF, and
WAV
4.5 Settings for PSP
The following are technical specifications of PSP:
Supported Videos
* "UMD": H.264/MPEG-4 AVC Main Profile Level3
* "Memory Stick": MPEG-4 SP,AAC
Suppoeted Audios:
"UMD": linear PCM,ATRAC3plus
* "Memory Stick": ATRAC3plus, MP3(MPEG1/2 Layer3)
Any DVD Converter Professional User Manual
13
4.6 Settings for Zune
The following are some technical specifications for Zune:
Video formats supported
* WMV, MPEG4, H.264 codec;
* Bit rate for video is not certain now;
* 320 by 240 pixel resolution. (Microsoft is discussing the options for higher resolution video
support)
Audio formats supported
* non-FairPlay AAC, MP3 and WMA (unprotected);
4.7 Settings for Cell Phones
Technical specifications may be different for different cell phones. Please visit
http://cellphones.about.com/od/allcellphonespecs/Find_Your_Phones_or_a_Phone_That_You_Ar
e_Considering_Main_Page.htm to find the specifications of your cell phone.
5. Starting Videos Encoding
Once you are done, you can click on Encode to start the exporting process. Your output file will be
saved automatically as a folder in your directed path. If you would like to cancel encoding, please
just click the Stop button and the encoding will be stopped.
After encoding finished, you can open the output folder to view the converted videos.
6. Opening Output Converted Videos
After encoding, you can choose File>Open Output Folder menu or click the
button in lower left window to open the output folder of the converted
files.
You can also open the output folder with the same output profile in the left window by clicking the
corresponding profile.
7. FAQs
Q: What is the difference between the trial and full version?
A: With the trail version, you can only convert three minutes for each video file. After you order the
full version, you will be provided regname and regcode to unlock the limitation.
Any DVD Converter Professional User Manual
14
Q: The video and audio is unsynchronized in converted videos. Why?
A: Make sure the video and the audio is synchronized in the original video. If this is not you case,
you can choose Default for A/V Sync option in Audio Options panel to force the audio to sync with
the video.
8. Glossary
The following are some useful technical terms you may need to refer when you set video
parameters.
Video Codec: Generally, the default setting for each format has been set by the program. In our
experience, the set codec works very well in terms of both quality and speed.
Video Size: This specifies the output video resolution. It is not advisable that you set this to a high
resolution, as the resulting video file will be huge, and it can take too long for your audience to
stream it.
Video Bitrate: The bitrate of the video specifies the amount of information stored in the video.
The higher the bitrate is, the clearer the video is . This setting will usually depend on your chosen
resolution, and it's best to leave it as Auto. Should you decide to make your video clearer, you can
try to increase this parameter.
Video Framerate: The framerate determines how fast the video frames refreshes. For video with
lots of fast moving action, you will need a higher framerate to combat jerkiness. The default value
will usually suffice for most cases.
Audio Bitrate: The audio bitrate determines the amount of information stored in the audio. A
higher bitrate will result in clearer audio, but comes at the expense of file size.
Audio Samplerate: The audio sample rate determines the "resolution" of the audio. The higher
the sampling rate is, the clearer the audio is. However, this comes at an expense of a bigger file
size.
Audio Channels: You can choose to use mono or stereo. This is set to stereo by default.
Any DVD Converter Professional User Manual
15