1
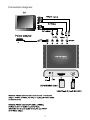
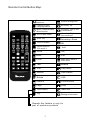
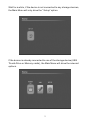
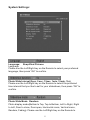
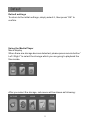
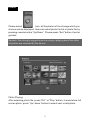
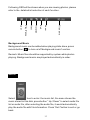
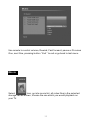
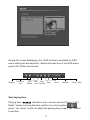
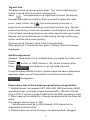
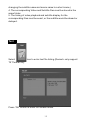
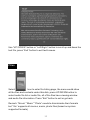
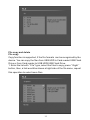
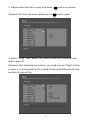
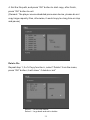
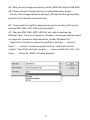
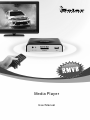
Media Player
User Manual
User Manual
Product Introduction:Media Player is a high quality multimedia
player. This manual will guide you through all of the
installation and instruction. You will be able to share many of
the exciting and useful features that make your multimedia
experience more enjoyable than ever before.
The user manual is for specific products; please check the
correct diagram with your model No. to install the
product. (battery)
Package contents:
Media Player
YPbPr cable
AV cable
Remote control(battery)
Power adapter
User manual
Connection diagram:
2
Remote Control Button Map:
Power: Standby/
Switch on
Channel: Audio/
Language switch
Mute: Enable/Disable
Mute function
AV/S-Video output
System setting menu
Arrow key: Up
Arrow key: Left or exit
present menu
Arrow key: Right or enter
into next menu
spare key
Arrow key: Down
YPbPr output
OK
Switch between:
16:9 and 4:3
Vol+
Vol-
Movie
Music
Exit
Photo
Main menu: back to
main menu
Text
Rewind
File
Play/Pause
Subtitle
Fast forward
Rotate
OSD
Zoom in
Previous one
Copy
Stop
Time display
Next one
Tag
Background music
Remark:this feature is only for
part of exclusive products
3
System Setting and Usage:
Preparation before using:
1: please refer to the right connection diagram
2: please set correct TV mode
If connect YPbPr cable to TV, the TV must be YPbPr input mode
If connect AV cable to TV, the TV must be AV input mode
If connect S-Video cable to TV, the TV must switch to S-Video input
mode
Connect the device to its power adapter and turn it on
Please connect Media Player to the power adapter, when Indication
LED lights, the OSD would appear & show system” Loading”
Remark: If cannot enter normal main menu, please try the following
steps:
Please make sure the above 2 points of <Preparation before using>,
then, press the remote button and set the correct TV mode according to
the media player output connection cable,( if use YPbPr output, you
need to press YPbPr button on remote twice until the color is normal)
4
Wait for a while, if the device is not connected to any storage devices,
the Main Menu will only show the “ Setup” option.
If the device is already connected to one of the storage device(USB
Thumb Drive or Memory cards), the Main Menu will show the relevant
options.
5
System Settings:
Language: Simplified Chinese
Language
Please use the Left/Right key on the Remote to select your preferred
language, then press “OK” to confirm.
Photo Slide Interval(3sec, 5 sec, 15sec, 1min, 15min, 1hr)
Please use the Left/Right key on the Remote to select the preferred
time interval that you like to set for your slideshows, then press “OK” to
confirm.
Photo Slide Mode Random
Photo display mode(Bottom to Top, Top to Bottom, Left to Right, Right
to Left, Door to close, Door open, Horizontal cross, Vertical cross,
Random, Fading): Please use the Left/Right key on the Remote to
6
select the preferred mode, then press “OK” to confirm.( This function
only supports photos in JPEG formats.
Music play mode
You can set the Music Play Mode as “Repeat one” or “Repeat All”.
Please use the Left/Right key on the Remote to select which one you
prefer, then press “OK” to confirm
Video Play Mode
You can set the Video Play Mode as “Repeat one” or “Repeat All”.
Please use the Left/Right key on the Remote to select, then press “OK”
to confirm.
Display Ratio
Screen display proportion
Set the Display Ratio (4:3 or 16:9) based on your TV screen ratio.
Please use the Left/Right key on the Remote to set the proper ratio,
then press “OK” to confirm.
TV Settings (NTSC Interlace, NTSC Progressive, PAL Interlace,
PAL Progressive, NTSC Composite, PAL composite, HD ( YPbPr ),
VGA):
Please use the Left/Right key on the Remote to select the proper TV
setting, then press “OK” to confirm.
Auto play
You may enable or disable the auto play function, Please use the
Left/Right key on the Remote to set your preference, then press “OK” to
confirm.
7
Default settings
To return to the initial settings, simply select it, then press “OK” to
confirm.
Using the Media Player
Menu display
When there are storage devices detected, please press remote button “
Left / Right “ to select the storage which you are going to playback the
files inside.
After you select the storage, sub-menu will be shown as following:
8
Photo
Please select
Icon, all the photos of the storage which you
choose can be displayed. User can select photo file list or photo file by
pressing remote button “Up/Down”. Please press “Exit “button if exit or
go back.
Remark: We strongly suggest users moving or playing back files after
all photos are scanned by the device.
Photo Playing
After selecting photo file, press “OK “ or “Play “button, it would show full
screen photo, press “Up / down “button to select next or last photo.
9
Following OSD will be shown when you are viewing photos, please
refer to the detailed introduction of each function.
File name
Zoom
Exit
Rotation
Next
Play/Panse
Last
Background Music
Background music can be added when playing slide show, press
remote button
to turn on/off background music f unction.
Remark: Music files should be supported by system while photos
playing. Background music are played automatically in order.
Music
Select
Icon to enter the music list, the menu shows the
music stored in this disk, press button “ Up / Down” to select audio file
list or audio file ,after selecting the audio file, it would automatically
play the audio file with file information. Press “Exit “button to exit or go
back.
10
Use remote to control volume, Rewind, Fast forward, pause or Previous
One, next One, pressing button “ Exit “ to exit or go back to last menu.
Movie
Select
Icon, go into movie list, all video files in the selected
storage can be shown, choose the one which you would playback on
your TV.
11
During full screen displaying, the “OSD “button is available for OSD
menu setting (as below photo). Select relevant icon of the OSD menu,
press “OK “button to proceed.
Rewind
Previous
one
Play
Pause
Next Fast
Stop
one Forward
Zoom
Subtitle
Player Time
Set playing time
Playing time
stands for hour, minute, second. Press “ Left /
Right “ button to set up the time until the icon shining blue
,
press “ Up / down “ button to adjust the playing time, press “ OK “ button
to confirm.
12
Tag and Jum
The playing time can be recorded, press “ Tag” button while playing
videos, it would start to record the playing time,
when
Icon appeared on up -right side of screen, the playing
time was recorded successfully. When you want to replay the video,
press “Jump “button, the
Icon would display on screen, it
jumps to the recorded time and go on playing from that time. Tag has
power stop memory, it can set a separate recording point of each video
(if to set many recording points on one video, only the last one is valid)
Remark: due to the differences of video coding, the tag function may
not be valid for some video formats)
Channel switch (Remark: need video files supported)
When playing 2.1 channel movies, press “Channel “button to change
languages.
Subtitle adjustment
(Remark: The subtitle is only available when you watch the video in AVI
format)
Press
button, or “OSD “button or “OK “button to adjust. After
finish,
Icon appears on up-right side of screen.
If need to cancel subtitle function, please repeat the above-mentioned
operation steps, you will successfully cancel this function when
Icon appears.
Please make sure of the following request when using subtitle:
1: Subtitle format: only support SRT, SSA, ASS, SMI four kinds of ANSI
encoding format, not support figure format subtitle. (Remark: Please
refer to FAQ-7 on how to make a subtitle file with ANSI encoding format)
2: When naming the subtitle file, it should correspond with the video file
name.
For example: Movie name: a. XXX
Subtitle name must be: a.XXX (Remark: XXX stands for the
supportable subtitle suffix)
3: Subtitle name can not be too long or complex symbols. (Suggest
13
changing the subtitle name and movie name to a short name)
4: The corresponding Video and Subtitle files must be stored in the
same folder.
5: The timing of video playback and subtitle display for the
corresponding files must be exact, or the subtitle would be ahead or
delayed.
Text
Select
TXT format file)
Icon to enter text file listing (Remark: only support
Press “OK “button to enter full-screen mode.
14
Use “UP/ DOWN” button or “Left/Right” button to scroll up and down the
text file, press “Exit “button to exit text browse.
Files
Select
Icon to enter file listing page, the menu would show
all the files and contents under this disk, press UP/DOWN button to
select audio file list or audio file, all of the files have viewing window
and audio file information. Press “Exit” button to exit or go back.
Remark: “Movie” “Music” “Photo” needs to discriminate their formats
but “ file” supports all movies, music, photo files (based on system
supported formats)
15
File copy and delete
File copy
Copy function is supported, if the file formats can be recognized by the
device. You can copy the files from USB HDD to Card reader/USB Flash
Drive or from Card reader to USB HDD/USB Flash Drive.
1: Enter the list with “ File” type, select the files to copy, press “ Right “
button, then, a tick would be shown at right side of the file name, repeat
this operation to select more files.
16
2, Please select the files to copy, and press
(Remark :Exit from the menu, please press
button on remote.
button again.
3: Select “Copy”, then, press “OK” button to set the file location you
wish to place it)
(Remark: after selecting the location, you need to press “Right” button
to enter it, or the file path for the copied file would be different with the
location of original file)
17
4: Set the file path, and press “OK” button to start copy, after finish,
press “OK” button to exit.
(Remark: The player uses embedded processor device, please do not
copy large capacity files, otherwise, it would copy too long time or stop
and pause)
Delete file
Repeat step 1, 2 of <Copy function>, select” Delete” from the menu,
press “OK” button, it will show ” if delete or not”
Select √ to execute delete.
Select × to go back and not to delete.
18
FAQ
Q1: Why can't enter the Main Menu or the Star-up screen looks
different?
A1: Please follow the steps below:
1.
Please check the cable connections. Have you properly
connected all of the necessary cables?(For example, the power cable
for the media player)
2.
Please check TV signal has set to right mode
3.
If your answer is no to No.2, please press the VGA/YPbPr/AV-S
keys on the Remote to switch to the correct output mode.
Q2: Media Player can not start.
A2: Please check if the power adapter was connected to the player; try
to reinsert the plug to connect the power.
Q3: Why there is no sound?
A3: Please check the connection of the audio adapters and audio
volume.
Q4: Remote control is not working well or not working
A4: If the remote distance too far or IR angle direction too large.
Please check if the remote battery connection is not good or lack of
power.
Q5: Why can not read USB hard disk enclosure
A5: Check if external HDD is connected right
Check if the HDD power supply is normal
Check if the HDD itself with problem. (Please use the good quality
products from reliable manufacturers).
19
Q6: Why can not recognize memory cards/ USB flash Drive/ USB HDD
A6: Please reinsert storage device or restart the player power.
Check if the storage device is damage. (Please use the good quality
products from reliable manufacturers)
Q7: I have read the subtitle usage requirements, but why still can not
encode SMI, SSA, SRT, ASS format subtitle?
A7: They are SMI, SSA, SRT, ASS file, but code format may be
different, then, it can not recognize. Please try to encode subtitle codes
on computer, operation steps as below: (Under Windows XP)
Right click of mouse to select the subtitle to encode——>select “
Open” ——>select “ choose program from list “ and click confirm——
>select “ Note Pad” and click confirm——>open subtitle file, click “ file”
menu——>Save as “ ANSI” as below diagram.
20