1
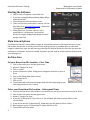
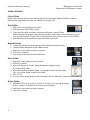
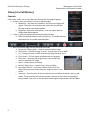
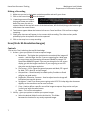
HoverCam Document Training Washington Local Schools Department of Information Systems HoverCam Document Camera Training Installing the Software Verify that you do not have the software Click on Start > Programs. You should see the ‘HoverCam Flex’ in the list. Note that the program does not sit inside any sub‐folder under Programs. Help Desk Ticket v. Self Install You can submit a Help Desk Ticket to have a DIS Technician install the software or you can do it yourself by going to http://WLSTeamwork > Resources > Downloads / Software > HoverCam Flex – If you see anything about installing Adobe Air Runtime you do want to do this. Setting up the Camera 1. Verify that you have the software. 2. Remove the camera and the USB cable from the bag. You do not need the mat if you do not want to use it. 3. Look at the back side of the camera. This is the side with the USB port on the base. 4. Note the arm latch. It is the gray tab within the blue ring. 5. Lift the gray tab to release the arm. 6. Gently extend the arm from the base tube. It extends to a maximum of about 10 inches from the base tube. You will see a finger slot on the front side of the arm tube. DO NOT pull the arm all the way out of the base. 7. Insert a finger into the slot on the front side of the arm tube. Gently lift the camera arm up and away from the base tube. You can now move the arm up and down as a type of zoom operation. 8. Insert the small almost square end of the USB cable into the camera 9. Insert the flat end of the USB cable into your computer (for most classrooms this can be plugged into the SmartBoard USB port – some older models will not support this.) 10. The computer will make several happy noises. After a few seconds you are ready to start the software. 11. At the end of the camera arm there is a small switch for the camera light. Depending upon the ambient light and the object being viewed you may get a better image with or without the light. 12. There is a microphone at the end of the camera. If you are recording a video the microphone will record anything being said. 13. There is a focus ring around the edge of the camera. This can be used to fine tune the focus. 1 HoverCam Document Training Washington Local Schools Department of Information Systems Starting the Software 1. Click on Start > Programs > HoverCam Flex 2. If you see a message about updating Adobe AIR go ahead and accept 3. You will now see the main option screen 4. There is a link to the online user’s manual. You can also find this at http://WLSTeamwork > Resources > Training Materials > HoverCam 5. Please ignore the ‘Connect’ option – this is experimental – the purpose is to share live HoverCam images between two people currently using a HoverCam. Main Screen Options If you have no interest in saving videos, images or scanned documents via the HoverCam you can skip the Archive Area section. If you do intend to save anything (such as a premade video or a scanned image of a document) then you will want to go through the Archive Section the first time you start the software on a computer. If you use multiple computers you will need to at least connect the Archive to your existing area. Archive Area Set your HoverCam File Location – First Time 1. 2. 3. 4. 5. 6. 7. 8. Click on the tools icon in the top right corner Move to ‘Change File Path…’ Click on ‘Other’ Use the ‘Browse for Folder’ dialog box to navigate to and click on your H: Drive Click on the ‘Make New Folder’ button Type ‘HoverCamT3’ Click on ‘OK’ The software will now close and reopen with the Archive pointing to your new empty folder on your H: drive. Select your HoverCam File Location – Subsequent Times 1. 2. 3. 4. You only need to do this if the folders in the Archive are not the correct ones from your H: Drive Click on the tools icon in the top right corner Move to ‘Change File Path…’ If you see ‘H:/HoverCamT3’ just click on it. The software will restart and you will be in the correct folder. 5. If you do not see the ‘H:/HoverCamT3’ folder then you will need to click on ‘Other…’ 6. Now navigate to your ‘H:/HoverCamT3’ folder and click o ‘OK’ 7. The software will now restart. 2 HoverCam Document Training Washington Local Schools Department of Information Systems Folder Activities Select Folder When in the ‘Archive’ tab click on a folder along the left‐hand edge. Whatever folder is selected becomes the target folder for either the video or the scanner tab. New Folder 1. Right click on the desired parent folder 2. Left click on the ‘New Folder’ option 3. There are times when the folder is automatically given a name of ‘New Folder’ without giving you a chance to type your own name. Other times it looks like you are over‐striking the name. The best bet is to just hit enter and accept the name of ‘New Folder.’ 4. Now follow the directions below to give the folder a real name. Rename Folder 1. 2. 3. 4. 5. In the left hand list, click on the parent of the folder you wish to rename The sub‐folders will appear in the middle section Right click on the folder you wish to rename Left click on ‘Rename’ Type a new name and press the <Enter> key Move Folder 1. Right click on the folder you wish to move 2. Left click on ‘Move’ 3. When the ‘Browse for Folder’ dialog box appears navigate to your H:/HoverCamT3/ folder 4. Now select the desired parent folder. For example we wish to move ‘Math CH1’ to be inside ‘Math’ so we click on ‘Math’ 5. Click on ‘OK’ 6. If I now click on ‘Math’ along the left hand edge I will see ‘Math CH1’ inside the ‘Math Folder’ Delete Folder 1. WARNING: There is no undo nor is there an ‘Are you sure’ warning. Once you click on ‘Delete’ the folder and all its contents will be gone. 2. Right click on the folder you wish to delete 3. Left click on ‘Delete’ 3 HoverCam Document Training Washington Local Schools Department of Information Systems Item Activities Renaming 1. Right click on the item you wish to rename 2. Left click on ‘Rename’ 3. Type the name and hit enter Moving Between Folders 1. To move a single item a. Left‐click hold on the item b. Drag the item to the target folder c. Release the left mouse button 2. To move multiple items a. Check mark each of the desired items from the same folder b. Left click hold on one of the check marked items c. Drag to the desired target folder d. Release the mouse button Copying to Other Programs (i.e. Word) 1. Have the other program running but down on the task bar 2. Left‐click hold on the desired item 3. A green border will appear, drag the item below the green border and onto the Word item in the task bar 4. Release the mouse button 5. The image will now be in Word Deleting 1. WARNING! There is no undo nor is there an ‘Are you sure’ warning. Once you click on ‘Delete’ the folder and all its contents will be gone. 2. To delete a single item a. Right click on the target item b. Left click on ‘Delete’ 3. To delete multiple items a. Check mark each of the items you wish to delete within the same folder b. Click on the ‘Delete’ button located in the top button bar 4 HoverCam Document Training Washington Local Schools Department of Information Systems Exporting 1. Check mark the item you wish to export. a. Be sure to only select like‐type items. For example only select images or only select videos. b. If you select more than one item then the items will be combined into a single file (such as a multiple page PDF) as opposed to a batch processing of multiple files. 2. Click on ‘Export’ in the top button bar 3. Use the ‘Browse’ button to select a target location such as a flash drive or other place on your computer / H: Drive 4. Select the desired file type 5. Click on ‘OK’ Printing 1. Check mark one or more items (note the items need to be printable – i.e., not a video) 2. Click on the ‘Print’ button in the button bar OCR Scanned Document 1. If you have a clean printed document you can scan it and by using OCR, convert it to text that you can then copy and paste into another program. 2. Check mark the scanned document you wish to OCR 3. Click on the OCR button in the button bar 4. A new screen will appear showing the original image and the text guess. 5. Select the desired text (or <CTRL> + <a> to select all of it) 6. Right click on the highlighted text and select ‘copy’ 7. Click on the red arrow near the top right corner to exit back the Archive area. Stacking / Unstacking 1. If you have multiple images you can assemble them into a ‘stack’ or slide show 2. Check each of the desired images within the same folder. The items will be stacked in the order selected. The name of the stack will be the same as the first image selected 3. Click on the ‘Stack’ button 4. All of the selected images will be combined into a single stack 5. To view the stack double click on it 6. You can change the order by using the sorter on the left 7. Click on the red arrow to return to the Archive 8. To unstuck a stack check mark the stack and click on unstack 5 HoverCam Document Training Washington Local Schools Department of Information Systems Video (Live Full Motion) Controls Click on the ‘Video’ tab, it may take a few seconds for the image to appear 1. Actions ‐ gives you options on how to capture videos a. Resolution – the lower the resolution, the faster the images will appear. The higher the resolution the more likely you will see blurring as objects are moved quickly. b. Brightness, Saturation and Contrast – You can adjust these to change how objects appear 2. Library – gives you options on where you capture videos a. Select the desired folder from the Archive list. This folder becomes the location for any newly captured videos 3. Near the bottom edge you will find several controls a. Rotate Left / Rotate Right – Used to rotate the video image b. Zoom Scale – Use this to zoom in or out. You can zoom in up to 400% c. 1:1 – Change the scale to 100% and crop anything that does not fit d. Fit to Screen – Fills the space available within the program e. Full Screen – Removes the program from view and fills the entire screen with the image f. Pause – Used to pause recording g. Record / Stop button – Used to start / stop recording h. Secondary Camera – If you have a Web camera (from the Skype class) you can actually show two images at once on the screen i. Annotate – Once you turn on the annotations you can add basic shapes / text to your videos. The annotations will remain stationary relative to the screen not the object being viewed. If you click on the Annotate button again the annotation will be hidden. 6 HoverCam Document Training Washington Local Schools Department of Information Systems Making a Recording 1. Make sure you are in the lowest resolution possible and verify your focus. 2. Click on the record icon near the bottom. 3. A warning screen will appear letting you know you need to define the area you wish to capture. Move to the top left corner of the desired area, left click hold, drag to the bottom right and release the mouse button. 4. Two buttons appear below the bottom left corner: Cancel and Start. Click on Start to begin capturing. 5. Small green chevrons will appear in the corners while recording. The video and any audio picked up by the microphone will now be captured. 6. Click on the stop icon to stop recording. Scan (Static HiResolution Images) Controls Click on the ‘Scan’ tab along the top left hand edge 1. Actions ‐ gives you options on how to capture images a. Resolution – The higher the resolution the more detail the image will contain… and the larger the file. If you are capturing for a Web page or to put into a word processing document 640x480 is enough. For PowerPoint 800x600 is good. If you are just doing this for live screen display, go with the largest resolution. If you are going to use OCR then also use the largest resolution. b. File Format – JPG is a good for general purpose and Web, GIF is good for Web, TIFF is best for no‐loss images c. Compression – Should actually be called quality. Excellent or Good will give you good results d. Brightness, Saturation, Contrast – Used to adjust how the image will look when you snap the picture. e. Straighten – Used if you know you are going to do OCR. This helps align the document digitally so the conversion can be more accurate. f. Crop – Used to define a specific area of the image to capture. Stays active until you ‘cancel crop’ with the same button. g. Mute – Turn off the microphone 2. Library – gives you options on where you capture images a. Select the desired folder from the Archive list. This folder becomes the location for any newly captured images 7 HoverCam Document Training Washington Local Schools Department of Information Systems 3. Display / Capture Controls – located below the image area a. Rotate Left / Rotate Right – Used to rotate the image b. Zoom Scale – Use this to zoom in or out. You can zoom in up to 400% c. 1:1 – Change the scale to 100% and crop anything that does not fit d. Fit to Screen – Fills the space available within the program e. Full Screen – Removes the program from view and fills the entire screen with the image f. Freeze Frame / Pause – Useful to lock the image while you annotate it. Click the same button a second time to return to live view g. Secondary Camera – If you have a Web camera (from the Skype class) you can actually show two images at once on the screen h. Take Picture – Click this button to save the current image i. Auto Capture / Time Lapse photography – See Time Lapse under ‘Taking a Picture’ j. Annotate – Once you turn on the annotations you can add basic shapes / text to your videos. The annotations will remain stationary relative to the screen not the object being viewed. If you click on the Annotate button again the annotation will be hidden. Taking a Picture Standard Images Using the controls above compose your picture or document scan. Click on the picture. The latest picture appears in the top right hand corner of the screen. icon to take a Time Lapse This is useful if you wish to take a series of images every X amount of time for either a specific number of images or until you tell the system to stop. 1. Click on the time lapse button. 2. Total images can either be a present number (up to 20) or until told to stop 3. Take a picture every X seconds can be selected or you can click on ‘more…’ to taking a picture every X hours, Y minutes, Z seconds. NOTE: All computers automatically shut down at 8:00 PM so multiple days will not be possible. 4. Start, pause and stop are used to control when the system takes pictures. 8 HoverCam Document Training Washington Local Schools Department of Information Systems Teaching Ideas? http://www.woodridge68.org/education/components/docmgr/default.php?sectiondetailid=6690 Display the pages of a book or a worksheet. • • • • • • • • While working with very young children, use the document camera to model concepts of print, such as tracking from left to right. Increased effectiveness in communicating to large group information from a book. Example: A page from a book can be displayed and viewed by all students to ensure they are on the correct page and paragraph. Display a picture to have student write about it. Use document camera to teach context clues and the meaning of unfamiliar words. It is easy to show and see words around the subject word. Text feature lesson: Table of Contents, Glossary, Index, etc. Preview a Selection: Titles, Graphics, Captions, Differences in Type Sizes, etc. Dictionary Skills: Teachers can model dictionary usage, layout, etc. by placing a dictionary under the camera. Point out parts of speech from a magazine. Display Student Work/Model Work • • • • • • • • • • • • • • • Display student work for evaluation by teacher or classmates. Model the steps included in a math concept. Display music books and sheet music. Helps with music reading skills. Students can read with the teacher and know exactly what she is talking about within the music. Students as teachers. Students can share their own published books. Illustrations in children’s books improve greatly when they know their peers are going to look at their work. Visual for slow learners, easy for them to follow along when the camera shows exactly what teacher is doing. Display newspaper articles. Go over tests with students to show the correct answers. Modeling note‐taking. Compare graphs. Making Words: Use letters to spell words from vocabulary or spelling. Show sorting Display student projects while students are presenting them instead of just holding them up Teacher does a “think‐aloud” while grading writing papers. Teacher can model writing: organization, handwriting, conventions, etc. Use the Zoom feature to display small text or intricate graphics. • • • 9 Directs students’ attention to specific text or elements of a drawing or illustration. Reading measurements on a ruler. Reading a calculator. HoverCam Document Training • • • • • • • • Washington Local Schools Department of Information Systems Showing parts of leaves and flowers during a plant unit. Watch chemical reactions during a lab experiment. Dissecting: fish, frogs, worms, Owl pellets, etc. Enlarge directions, workbook pages, and worksheets. Display the details of coins. Read a thermometer. During a health unit, read ingredients and dietary information on packages of food. Showing political cartoons in current world problems discussion. Use the Freeze feature to display a document or threedimensional object. • • • • Freeze to show the first steps in a math problem, then finish it with kids so they can check their work and start correctly. Teacher can freeze the pane ant then take the book or materials and walk around the room with them. What’s Missing Memory Game Students can draw the background scenery for a play or skit they will perform in class Display threedimensional objects to increase visual interest during instruction. • • • • • • • Use instead of ‘passing the object’ around the room Folding Origami, geometry solid figures, making patterns, symmetry Show and Tell Show step‐by‐step planting of a seed. Observe that seed daily as it grows into a plant. Journal the growth of the plant. Coins: Teaching money problems. Show instruments (musical, art or scientific) and how they work. Art Artifacts – show details on artifacts Capture notes and instructional materials on the computer. • • • • • • • • • • 10 Capture still and action shots to record demonstrations ahead of time for use during class. Capture steps of an experiment. Walk through experiment then have kids take the notes and pictures captured and do the experiment themselves. Capture instructions for review and for student who are absent. Saving images to the computer saves scanning time. Capture and compare the results from different groups of students. If reviewing for a test and students are absent, capture the notes and print. This way they have a copy of the oral discussion so they can study. Capture and print copies of notes for resource students who tend to have difficulties taking notes of their own. Capture student’s work that is not in electronic form and add to their portfolio. Capture pictures of students, student’s work, notes, etc. and add them to a web page. Capture pictures or documents for PowerPoint presentations.