1
HoverCam User's Manual
Version 1.0
For PC and Macintosh
© Copyright 2009 Pathway Innovation & Technology, Inc. (P.I.T.), San Diego, CA.
Legal and Notice Information
Warranty
The information contained herein is subject to change without notice. The only warranties for P.I.T. products are set forth in the
express warranty statements accompanying these products. Nothing herein should be construed as constituting an additional
warranty. P.I.T. Is not liable for any technical or editorial errors or omissions contained herein.
Trademarks
HoverCam is a trademark of Pathway Innovation & Technology, Inc.
HoverCam User's Manual
1
End-User License Agreement (EULA)
This copy of HoverCam Flex ("the Software Product") and accompanying documentation is licensed and not sold. This Software Product is protected by copyright laws and
treaties, as well as laws and treaties related to other forms of intellectual property. Pathway Innovations & Technologies, Inc. or its subsidiaries, affiliates, and suppliers
(collectively "P.I.T.") own intellectual property rights in the Software Product. The Licensee's ("you" or "your") license to download, use, copy, or change the Software Product
is subject to these rights and to all the terms and conditions of this End User License Agreement ("Agreement").
Acceptance
YOU ACCEPT AND AGREE TO BE BOUND BY THE TERMS OF THIS AGREEMENT BY SELECTING THE "ACCEPT" OPTION AND DOWNLOADING THE SOFTWARE
PRODUCT OR BY INSTALLING, USING, OR COPYING THE SOFTWARE PRODUCT. YOU MUST AGREE TO ALL OF THE TERMS OF THIS AGREEMENT BEFORE YOU WILL
BE ALLOWED TO DOWNLOAD THE SOFTWARE PRODUCT. IF YOU DO NOT AGREE TO ALL OF THE TERMS OF THIS AGREEMENT, YOU MUST SELECT "DECLINE" AND
YOU MUST NOT INSTALL, USE, OR COPY THE SOFTWARE PRODUCT.
License Grant
This Agreement entitles you to install and use one copy of the Software Product. In addition, you may make one archival copy of the Software Product. The archival copy must
be on a storage medium other than a hard drive, and may only be used for the reinstallation of the Software Product. This Agreement does not permit the installation or use of
multiple copies of the Software Product, or the installation of the Software Product on more than one computer at any given time, on a system that allows shared used of
applications, on a multi-user network, or on any configuration or system of computers that allows multiple users. Multiple copy use or installation is only allowed if you obtain an
appropriate licensing agreement for each user and each copy of the Software Product.
Restrictions on Transfer
Without first obtaining the express written consent of P.I.T., you may not assign your rights and obligations under this Agreement, or redistribute, encumber, sell, rent, lease,
sublicense, or otherwise transfer your rights to the Software Product.
Restrictions on Use
You may not use, copy, or install the Software Product on any system with more than one computer, or permit the use, copying, or installation of the Software Product by
more than one user or on more than one computer. If you hold multiple, validly licensed copies, you may not use, copy, or install the Software Product on any system with
more than the number of computers permitted by license, or permit the use, copying, or installation by more users, or on more computers than the number permitted by
license.
You may not decompile, "reverse-engineer", disassemble, or otherwise attempt to derive the source code for the Software Product.
Restrictions on Alteration
You may not modify the Software Product or create any derivative work of the Software Product or its accompanying documentation. Derivative works include but are not
limited to translations. You may not alter any files or libraries in any portion of the Software Product.
Restrictions on Copying
You may not copy any part of the Software Product except to the extent that licensed use inherently demands the creation of a temporary copy stored in computer memory
and not permanently affixed on storage medium. You may make one archival copy which must be stored on a medium other than a computer hard drive.
Disclaimer of Warranties and Limitation of Liability
UNLESS OTHERWISE EXPLICITLY AGREED TO IN WRITING BY P.I.T., P.I.T. MAKES NO OTHER WARRANTIES, EXPRESS OR IMPLIED, IN FACT OR IN LAW, INCLUDING,
BUT NOT LIMITED TO, ANY IMPLIED WARRANTIES OF MERCHANTABILITY OR FITNESS FOR A PARTICULAR PURPOSE OTHER THAN AS SET FORTH IN THIS
AGREEMENT OR IN THE LIMITED WARRANTY DOCUMENTS PROVIDED WITH THE SOFTWARE PRODUCT.
P.I.T. makes no warranty that the Software Product will meet your requirements or operate under your specific conditions of use. P.I.T. makes no warranty that operation of
the Software Product will be secure, error free, or free from interruption. YOU MUST DETERMINE WHETHER THE SOFTWARE PRODUCT SUFFICIENTLY MEETS YOUR
REQUIREMENTS FOR SECURITY AND UNINTERRUPTABILITY. YOU BEAR SOLE RESPONSIBILITY AND ALL LIABILITY FOR ANY LOSS INCURRED DUE TO FAILURE OF THE
SOFTWARE PRODUCT TO MEET YOUR REQUIREMENTS. P.I.T. WILL NOT, UNDER ANY CIRCUMSTANCES, BE RESPONSIBLE OR LIABLE FOR THE LOSS OF DATA ON
ANY COMPUTER OR INFORMATION STORAGE DEVICE.
UNDER NO CIRCUMSTANCES SHALL P.I.T., ITS DIRECTORS, OFFICERS, EMPLOYEES OR AGENTS BE LIABLE TO YOU OR ANY OTHER PARTY FOR INDIRECT,
CONSEQUENTIAL, SPECIAL, INCIDENTAL, PUNITIVE, OR EXEMPLARY DAMAGES OF ANY KIND (INCLUDING LOST REVENUES OR PROFITS OR LOSS OF BUSINESS)
HoverCam User's Manual
2
RESULTING FROM THIS AGREEMENT, OR FROM THE FURNISHING, PERFORMANCE, INSTALLATION, OR USE OF THE SOFTWARE PRODUCT, WHETHER DUE TO A
BREACH OF CONTRACT, BREACH OF WARRANTY, OR THE NEGLIGENCE OF P.I.T. OR ANY OTHER PARTY, EVEN IF P.I.T. IS ADVISED BEFOREHAND OF THE
POSSIBILITY OF SUCH DAMAGES. TO THE EXTENT THAT THE APPLICABLE JURISDICTION LIMITS P.I.T.'S ABILITY TO DISCLAIM ANY IMPLIED WARRANTIES, THIS
DISCLAIMER SHALL BE EFFECTIVE TO THE MAXIMUM EXTENT PERMITTED.
Limitation of Remedies and Damages
Your remedy for a breach of this Agreement or of any warranty included in this Agreement is the correction or replacement of the Software Product. Selection of whether to
correct or replace shall be solely at the discretion of P.I.T.. P.I.T. reserves the right to substitute a functionally equivalent copy of the Software Product as a replacement. If
P.I.T. is unable to provide a replacement or substitute Software Product or corrections to the Software Product, your sole alternate remedy shall be a refund of the purchase
price for the Software Product exclusive of any costs for shipping and handling.
Any claim must be made within the applicable warranty period. All warranties cover only defects arising under normal use and do not include malfunctions or failure resulting
from misuse, abuse, neglect, alteration, problems with electrical power, acts of nature, unusual temperatures or humidity, improper installation, or damage determined by P.I.T.
to have been caused by you. All limited warranties on the Software Product are granted only to you and are non-transferable. You agree to indemnify and hold P.I.T. harmless
from all claims, judgments, liabilities, expenses, or costs arising from your breach of this Agreement and/or acts or omissions.
Governing Law, Jurisdiction and Costs
This Agreement is governed by the laws of California, without regard to California's conflict or choice of law provisions.
Severability
If any provision of this Agreement shall be held to be invalid or unenforceable, the remainder of this Agreement shall remain in full force and effect. To the extent any express or
implied restrictions are not permitted by applicable laws, these express or implied restrictions shall remain in force and effect to the maximum extent permitted by such
applicable laws.
HoverCam User's Manual
3
Table of Contents
Overview........................................................................................................................... 6
Package content......................................................................................................... 6
Product overview................................ ........................................................................ 6
System Installation............................................................................................................. 7
System requirements.................................................................................................... 7
Software Installation.................................................................................................... 7
HoverCam Flex Software Features...................................................................................... 8
Using Your HoverCam........................................................................................................9
Scanning................................................................................................................... 9
Visual Presentation.................................................................................................... 14
Online Video Conferencing..........................................................................................15
Knowledge Base and Troubleshooting.............................................................................. 15
HoverCam User's Manual
4
Caution
This User's Manual provides the information you need to get started using the essential
features of your HoverCam (X300, X500, X500 PRO). Please read this instruction
manual carefully before using the product and keep it for future reference.
• Use HoverCam only under the rated electrical conditions.
• To avoid discoloration, deformation, or damage, do not leave the HoverCam
under direct sunlight or by heaters.
• Do not place the HoverCam in any humid, dusty, windy or vibrating location.
• Use a soft, dry cloth when cleaning. Do not use any volatile solvent, such as
paint thinner or benzene.
HoverCam User's Manual
5
Overview
Package contents
◦ HoverCam Unit
◦ USB 2.0 Cable
◦ Quick-start Guide
◦ Scanning Mat
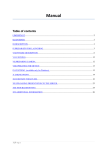
Product Overview
1
2
3
4
Computer (not included)
Light Control
Built-in Microphone
LED Lights
5 Camera Lens
6 USB port and Cable
7 Scanning Mat
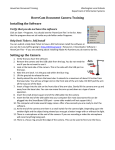
Software Installation and System Setup
System Requirements
Minimum Requirements For Windows PC*
OS Supported
CPU
Windows XP/2003/Vista/Windows 7 (32 or 64 bit)
1.6GHZ minimum, 2.0GHZ Recommended
RAM
Minimum 1GB, 2GB Recommended
Hard Disk Space
20 MB with over 60 GB total hard disk space
Color Display Monitor
1024H x 768V minimum, 1280H x 960V Recommended
HoverCam User's Manual
6
Minimum Requirements For Mac
OS Supported
10.5.1 or newer
CPU
Intel Core2 Duo
RAM
Minimum 1GB, 2GB Recommended
Hard Disk Space
20 MB with over 60 GB total hard disk space
Color Display Monitor
1024H x 768V minimum, 1280H x 960V Recommended
Software Installation
Our software resides entirely within Adobe Air, one of the industry’s most widely used and tested
platforms. Nonetheless, before installing our software, you first should back up your entire hard drive.
You should do so for your own peace of mind and because regular backups are always a good idea. On
any computer there is always a chance that a hardware problem is emerging, but not yet detected (e.g.,
hard disk starting to fail). With regular backups you can always recover from this kind of error.
Not only to help protect the environment, but to assure that you have our latest software, we are not
including an installation CD. HoverCam requires Adobe Air Version Adobe 2.0 B1 and will not work with
any other version. Even if you think that you have a recent version of Adobe Air, you will avoid problems
by uninstalling Adobe Air and reinstalling it from the latest version posted on our Web site. This procedure
will not affect any other program or saved files on your hard disk:
1. Close, if you can, all programs, especially anti-virus and anti-malware programs. If you are using
Windows 7, go to the Control Panel, click on Programs and Features, click on Adobe Air in the list
of installed programs if Adobe Air is present, click Uninstall. If you are using Windows XP, go to
Control Panel → System → Add Remove Programs, click on Adobe Air and uninstall it. If you are
using a Macintosh, uninstall Adobe Air from the Finder.
2. Download Adobe Air 2.0 B1 ONLY from our web site. Follow the link,
http://www.thehovercam.com/html/download.html, and click on the Air icon
in Step
One to download this version. After the download is complete, you may be asked—sometimes
more than once—if you wish to install the download. Indicate that you wish the installation to
proceed. Otherwise, find the download and double click AdobeAIRInstaller.exe. Following the
installation, reboot your computer.
3. Download the HoverCam software from our Web site, www.thehovercam.com/download.html.
Carefully follow the instructions listed here, install the software, and reboot again.
*: If your Windows computer doesn't meet the minimum system requirements, you may also use
HoverCam by downloading HoverCam Manager Software from the HoverCam Web site. See
http://www.thehovercam.com/html/hovercam_manager/win/HoverCamManagerVersion1.0.zip.
Using your HoverCam For the First Time
After installing our software, plug the supplied USB cable into the HoverCam and your PC or Mac.
HoverCam User's Manual
7
Open HoverCam Flex Software or HoverCam Manager Software to start using HoverCam.
HoverCam Flex Software Features
For convenience, we will refer to HoverCam Flex Software™ as “Flex” for short. Here‘s how to use it.
Digital file cabinet
File all of your documents digitally in the HoverCam Flex Library or move documents in and out the
Library at anytime. You also can access your files and folders directly from the Windows Explorer or
Macintosh Finder, as though they were regular directories. However, we provide additional image
enhancement and manipulation tools, elaborated below.
File stacking
Stack images into binders to organize multiple page documents. The images can be rearranged within the
binder, and the stacked images can be exported as a single PDF file.
Drag and Drop
Drag images to a folder, an external USB drive, or directly into a document that you are editing. You can
even move image files created with other software into Flex and let it organize as many files as you wish.
PDF File Generation
Create a multi-page PDF anytime and subsequently email, print, preview, or upload files to cloud servers.
Quick Scan
Scan an image in a split second. You thereby can focus on managing files instead of waiting for moving
parts to complete a grinding roundtrip, as you would with traditional flatbed scanners.
Auto Trimming
Automatically trim pages. Place pages on the black mat supplied with the HoverCam and the background
automatically will be masked out. For 3-D objects or pages with irregular borders, you also can trim
images manually.
Auto Straightening
Correct the alignment of pages during or after scanning. On traditional scanners, mages are frequently
misaligned, but our software can straighten pages automatically. Note, however, that pages with crooked
borders or misaligned by more than 25% cannot be straightened.
Auto Color Adjustment
Auto-correct images to achieve optimal brightness, contrast, and background.
Auto Capture
Continuously capture images every 3, 5, 8,10, or 20 seconds without pressing a button between scans.
The HoverCam is so fast that you may need to slow it down so that you don’t photograph your own
hand in the process of changing pages.
Real-time Video Projection
Stream video for real-time presentations. Not only is the HoverCam a scanner, but it also is a digital
projector that can zoom in and out. Alternative projectors cost thousands of dollars.
Cloud Integration (Stay Tuned)
HoverCam User's Manual
8
Beyond local management of your files, HoverCam Flex is designed to work with today’s most popular
cloud computing technologies. Already, you can email one or multiple documents with a click of a button.
Other capabilities are under development and will be added as automatic updates to Flex. Because we
value privacy, none of these features will become active unless you chose to use them.
Using Your HoverCam
The HoverCam often can be used with other software that recognizes USB-connected cameras, but we
support only our software. Below are step-by-step instructions for using Flex.
Scanning: Camera Mode:
Menu buttons:
•
Open HoverCam Flex Software.
•
Click on the
“HoverCam” button on the upper left corner to initialize
HoverCam and enter the “Camera/Preview” mode.
•
Place the object to be scanned, such as documents, receipts, bills, books, magazines,
newspapers, school work, artwork, or 3-D objects, and so on, on the scanning mat
or, without the mat, on the desktop space shown by the camera on your monitor.
What’s good about the mat, besides the neutral background, is that it shows you
HoverCam User's Manual
9
where to align the document or object to be scanned.
•
Use these buttons to preview the image:
•
“1:1” to show the image at 100%.
◦
“fit to window” to fit the scanning subject to the preview window.
◦
“full screen” to view the image in full screen mode.
◦
Start scanning in one of the two available modes:
◦
Manual capture mode: click this capture button for each document to be
scanned and scanned images will appear in the right panel.
◦
Auto capture mode: start “auto capture” by clicking the “auto capture”
button. Set the total number of images to be scanned and the number of
seconds for the scanning interval. Click the “Start” button. By default, the
HoverCam will automatically capture images every 3 seconds until you press the
“Stop” button, but you can increase this interval. To so, click the second down
arrow in the selection box that opens.
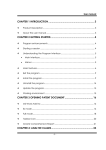
After scanning, double-clicking on any scanned image in the right panel will bring you to the “Image
Mode” for viewing or editing (see the screenshot below). Or you can click on the “Library” tab to enter
the “Library Mode” (File Management Mode).
HoverCam User's Manual
10
For image adjustment settings and functionality, see above under “HoverCam Flex Software Features.”.
HoverCam User's Manual
11
Library Mode (File Management Mode):
In “Library Mode” you can view, sort, delete, move, and stack/unstack scanned images, drag and drop
images to existing folders, or create new folders.
You can choose to combine a number of scanned images together, such as all the pages in an article
scanned from a magazine or bills for a given month. This “Stack” feature helps you keep track of
separate images and facilitates filing. Conversely, you can “Unstack” a series of images into individual
pages.
Double-clicking on an individual image will bring you to the “Image Mode”; double-clicking on a stack of
images will bring you to the “Binder Mode”.
HoverCam User's Manual
12
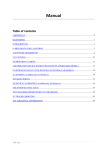
Binder Mode (Stacking Mode):
In “Binder Mode”, you can:
view images included in the stack;
sort, rearrange, and delete images;
export stacked images into one PDF file; or
email stacked images using your favorite email program;*
*The default email program (Microsoft Outlook, Microsoft Outlook Express, Thunderbird,
Apple Mail, Eudora, etc.) needs to be configured before you can use this feature.
HoverCam User's Manual
13
Image Mode:
In “Image Mode”, you have controls for:
Brightness, saturation, and contrast;
Automatic trimming, automatic straightening;
Cropping, rotating, and flipping of the image;
Emailing the image;
Conversion of the image into a PDF file;
Visual Presentation (HoverCam as a Document Camera)
Click on the “HoverCam”
button to initialize the HoverCam and enter the
“Camera/Preview” mode. At this point the monitor not only shows what you would capture if
wanted to start a scan, but, without starting a scan, also shows a local or remote audience the
same image. For this reason the HoverCam is superb for presentations.
To begin the presentation, place what you want to show in the HoverCam’s field of vision.
Preferably, use a solid background (scanning mat is NOT needed).
Connect your computer to a projector, LCD monitor, or SmartBoard.
Use the “zoom” button or the mouse wheel to zoom in or out of the live presentation. If you
want a full screen, click (guess what?) the “full screen”
button. To exit the full screen
mode, press the “Esc” key or else mouse over the screen bottom and click the “full screen”
button again.
HoverCam User's Manual
14
Tips:
The video performance is optimized at 1600 x 1200 pixels, so choose this setting.
You can show PowerPoint slides and Flex images simultaneously simply by shrinking
windows and showing two windows at once. At any time you can enlarge either window or
overlap one window with another.
Video Conferencing
To use the HoverCam for video conferencing, start, according to your preference:
Windows Live Messenger, or
Yahoo Messenger, or
Skype.
Taking Skype as an example, you would go to Skype preference → Video → Select and pick
“HoverCam Document Camera” as the camera. You would then be set up for your video
conference using Skype. In Windows Live Messenger or in Yahoo Messenger you would select
the HoverCam in the same fashion.
Knowledge Base and Troubleshooting
Go to www.thehovercam.com/html/support.html for further information about the HoverCam,
including ever-growing HoverCam applications, FAQs, Tips and Tricks, and troubleshooting guides.
Need help, open an support ticket at www.thehovercam.com/html/support
Question or Problem
Solution
When installing HoverCam
Flex Software, I got a
message saying: “This
application requires an
update to Adobe AIR that
is not available for your
system..."
Check to see whether you have Adobe AIR 2.0 b1 runtime
installed on your system. If you don't, download and install
Adobe AIR 2.0 runtime from our Web site. Other versions of
Adobe Air are problematic, and you must have the latest version.
You’ll hurt nothing by reinstalling this program. Uninstall any
previous version of Adobe AIR, then follow the instructions for
downloading the correct version at
www.thehovercam.com/download.html.
"The camera selected is
When you click on the "Camera" button in the upper left corner
HoverCam User's Manual
15
busy, try again?"
under the file menu, the HoverCam may produce a message that
says:
"The camera selected is busy, try again?"
Do the following:
• Click on "No";
• Close the "Camera" tab;
• Unplug from the PC the USB cable going to the
HoverCam;
• Wait 10 seconds;
• Plug the USB cable that you just unplugged back into
to the PC;
• Click on the “Camera” button again, bringing up the
HoverCam preview window. You should be good to
go.
Pathway Innovations & Technologies, Inc.
4445 Eastgate Mall, Suite 200,
San Diego, CA 92121
858-812-6358
http://www.thehovercam.com
HoverCam User's Manual
16