1
Arbeia Juno & Arbeia Vulcan
FREESTANDING STOVE RANGE
5 & 8 kW Nominal Outputs
Installation and Operating
Instructions
Please hand these instructions to the stove user when the installation is complete.
Leave the stove ready for operation and instruct the user in the correct use of the
appliance and operation of controls.
Important: – These products must be installed by a suitably
qualified installer.
DEFRA Clean Air Act Exemption
The Arbeia Juno 5kW & Arbeia Vulcan 8kW stoves only have been exempted under the
Clean Air Act 1993 to burn seasoned wood logs in designated smokeless zones in the UK.
This is subject to the correct fitting of the air control plate (the part and fitting instructions are
supplied separately) maintaining the air wash control at a minimum opening at all times.
Instructions for wood burning MUST be followed in order to ensure compliance at all
times.
Cast Tec Ltd
East Side
Tyne Dock
South Shields
NE33 5SP
T: 0191 497 4280
F: 0191 497 4288
PLEASE READ ALL THESE INSTRUCTIONS CAREFULLY!
For safety reasons it is essential that your stove is correctly installed and
operated. Cast Tec Stoves cannot accept responsibility for any fault or
consequential problems arising through incorrect installation or operation.
TABLE OF CONTENTS
Section
Page No
1. List of Components
2
2. Component Identification and Assembly
2
3. Installation Instructions
3
3.1 Warnings and important safety information
3
4 Installation Information
4
4.1 Chimney
4.2 Ventilation
4.3 Flue Draught
4.4 Connection to Chimney
4.5 Material Clearances
4.6 Hearths
4.7 Commissioning & Handover
4
5
5
5
6
6
6
5. Technical Data
7
6. Operating Instructions
8
6.1 DEFRA Clean Air Act
6.2 Air controls
6.3 Cleaning
6.4 Fuels
6.5 Important Notes for Wood Burning
6.6 Notes on Smokeless fuel (Ancit) burning
6.7 Lighting the stove
6.8 Re-fuelling
6.9 Shutting down
6.10Shutting down for prolonged periods
6.11 Maintenance
8
8
9
10
10
11
11
11
12
12
12
7. Safety Notes for your Guidance
12
8. Dimensions
14
8.1 Juno
8.2 Vulcan
14
14
9. Frequently Asked Questions
1
15
Juno & Vulcan Issue 01 06/13
1. List of Components
Description of Parts
Qty
Stove Assembly
Door Handle (screws into knob)
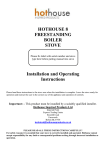
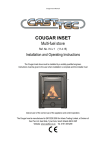
Multi Tool
Ash Pan
Flue Spigot Collar
Flue Blanking Plate
Spigot Collar fixing screws & nuts
Blanking plate M6 screws & nuts
Stove Operating Glove
1
1
1
1
1
1
3
3
1
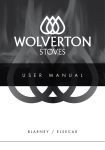
Fig 1 - Multi Tool Details
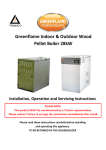
2. Component Identification and Assembly
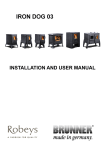
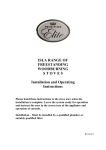
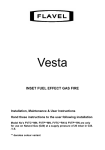
Fig 2 – Arbeia Juno 5kW & Arbeia Vulcan 8kW Stove Assembly and controls
Your stove comes packed in a plywood crate. Carefully remove the straps and lift
off the upper crate. Remove any plastic packaging, open the door and remove all
the contents. THE DOOR HANDLE MAY BE PACKED ON TOP OF THE BAFFLE
PLATE – REACH THROUGH THE TOP SPIGOT OPENING TO FIND IT. See List of
Components section and check contents carefully.
2.1 To remove the baffle plate, first remove the two stainless steel side firebox liner clips
by lifting them above the fuel retainer. Remove the two firebox side liners. Now
remove the firebox rear liner. Handle & store very carefully to one side where they
will not get broken.
2.2 Remove the front fuel retainer by lifting up and rotating until it can be lifted through
the open door of the firebox.
2.3 Now the baffle plate can be removed by lifting off its supports and bringing out
through the firebox door opening.
2
Juno & Vulcan Issue 01 06/13
2.4 Fit the flue spigot collar to the top or rear outlet (as required for the installation)
using the 4 x M6 set screws and washers supplied. Use 3mm ceramic gasket
provided or fire cement to seal.
2.5 Fit the blanking plate to the opening that is not required for use using the 4 x M6 set
screws and nuts provided. Thread each nut on to the screw first and then insert the
screw through the fixing hole into the blind hole in the blanking plate until tight. Now
screw up the nut on the thread to compress the gasket and seal the blanking plate to
the stove. Use 3mm ceramic gasket provided or fire cement to seal.
2.6 Now proceed to install the stove according to these instructions and current
installation standards or HETAS advice. The internal parts of the stove can be reassembled as the reverse of the previous removal instructions.
3 Installation Instructions
3.1
WARNINGS AND IMPORTANT SAFETY INFORMATION
3.1.1 READ THESE INSTRUCTIONS CAREFULLY BEFORE INSTALLATION!
These instructions cover the basic principles to ensure satisfactory installation of the stove,
although detail may need slight modification to suit particular local site conditions. In all cases the
installation must comply with current local regulations including Building Regulations, Local
Authority Byelaws and other specifications or regulations including UK or EU standards referred
to as they affect the installation of the stove. Approved Document J is particularly important for
England and Wales and can be downloaded for no cost at:
http://www.planningportal.gov.uk/england/professionals/en/4000000000503.html Also of
importance are Approved documents L1 A and B conservation of fuel and power. The Domestic
Heating Compliance Guide will also be found useful.
In addition to these instructions the requirements of BS 8303 and BS EN 15287 must be fulfilled.
The installation is a notifiable building works as defined in the building regulations and that it is a
legal requirement under England and Wales Building Regulations that the installation is either
carried out under Local Authority Building Control approval or is installed by a Competent Person
registered with a Government approved Competent Persons Scheme. HETAS Ltd operate such a
Scheme and a listing of their Registered Competent Persons can be found on their website at
www.hetas.co.uk .
3.1.2 Important Chimney Warning
This stove must not be installed into a chimney that serves any other heating appliance.
3.1.3 Extractor Fan Warning
There must not be an extractor fan fitted in the same room as the stove as this can
cause the stove to emit fumes into the room. If unavoidable the appliance must be
checked with A.D. 1.21 and necessary action taken.
3.1.4 Cleaning and Chimney Sweeping
The appliance, flue & chimney must be cleaned and checked internally and
externally regularly in use and especially after a period of disuse (e.g. after
summer). Lift down the baffle at least weekly to check for build up of soot or debris on
the top from the flue pipe. A slot is provided in the front edge of the baffle plate for the
multi tool to prevent the need to get hands dirty doing this job. Remove the baffle and
check the flue spigot and connector is fully clear at regular intervals. The chimney and
flue connector must be swept at least annually, more often when used with sooty fuels
or damp wood. A wire centred sweeps brush with guide wheel is recommended. Any
loose, broken or leaking joints or flue ways MUST be repaired immediately.
3
Juno & Vulcan Issue 01 06/13
3.1.5 Fuels
Only use recommended fuels which are seasoned (or kiln dried) wood logs or
smokeless briquetted fuels. The appliance can be damaged by burning petroleum coke,
liquid fuels or general rubbish and this will invalidate your warranty and risk your
personal safety. The appliance must not be used as a rubbish incinerator.
3.1.6 Maintenance
Annual checking and servicing of the appliance and flue by a competent engineer is
recommended.
3.1.7 Ventilation
Adequate ventilation is ESSENTIAL for the safe and efficient operation of any solid fuel
or wood burning appliance. Ventilation MUST be provided where required by the stove
output or flue under-performance. Keep all ventilation clear and free of blockage. SEE
VENTILATION in INSTALLATION section.
Health And Safety Precautions
Special care must be taken when installing this stove to meet all requirements of
the Health & Safety at Work act.
3.1.8 Handling
Adequate facilities must be available for unloading and site handling. Cast Tec Stoves
are very heavily built so always ask for assistance when lifting and siting the stoves.
3.1.9 Fire Cement
Some types of fire cement are caustic and should not be allowed to come into contact
with the skin. In case of skin contact, wash immediately with plenty of water.
3.1.10 Asbestos
This stove contains no asbestos. If there is a possibility of disturbing any asbestos in the
course of installation then please seek specialist guidance and use appropriate
protective equipment.
3.1.11 Metal Parts
When installing or servicing this stove, proper care should be taken to avoid the
possibility of personal injury.
4.0 Installation Information
4.1 Chimney
The chimney height and the position of the chimney terminal should conform to Building
Regulations. Minimum chimney height is 4.5m. Check that the chimney is in good
condition, dry, free from cracks and obstructions. The diameter of the flue should not be
less than 150mm and not more than 200mm. If any of these requirements are not met,
the chimney should be lined by a suitable method. The chimney must be swept before
connection to the stove.
Where the chimney is believed to have previously served an open fire installation, it is
possible that the higher flue gas temperature from the stove may loosen deposits that
were previously firmly adhered, with the consequent risk of flue blockage. It is therefore
recommended that the chimney be swept a second time within a month of regular use
after installation.
If you have any doubts about the suitability of your chimney, consult your local
dealer/stockist or chimney specialist. If there is no existing chimney then either a solid
4
Juno & Vulcan Issue 01 06/13
fuel compatible prefabricated block chimney or a twin-walled insulated stainless steel
flue to BS 4543 can be used. These chimneys must be fitted in accordance with the
manufacturer’s instructions and Building Regulations.
4.2 Ventilation
Purpose provided ventilation is not required in England and Wales unless the appliance
nominal rated output is greater than 5kW. Over 5kW 5.5 cm 2 of ventilation (550mm2) is
required for every kW output above 5. For example 6.5 kW requires 8.25 cm2 and 8 kW
needs 16.5cm2. In any case, if difficulty in starting the fire or any fuming is experienced,
ventilation must be put in place as required to eliminate these flue problems. If a flue
draught stabiliser is fitted then extra ventilation is required. See Document J of the
Building Regulations for detailed guidance especially in new build properties.
4.3 Flue Draught
A flue draught of minimum 1.2mm to a maximum 2.5mm water gauge (12 to 25 Pascals)
is required for satisfactory appliance performance. The flue draught should be checked
under fire at high output and, if it exceeds the recommended maximum, a draught
stabiliser must be fitted so that the rate of burning can be controlled to prevent overfiring.
4.4 Connection to the Chimney
This appliance is not suitable for use in a shared flue.
When using a liner a 5” flexible flue liner is permitted be used on these models ONLY
providing that they only burn smokeless fuel or seasoned wood logs with the air limiter
fitted in in full accordance with the wood burning instructions.
An existing fireplace opening can be bricked up or sealed with a register plate. A short
length of flue pipe of a minimum 125mm internal diameter (150mm min where the flue
spigot socket is 150mm diameter) may then be used to connect the stove to the
chimney. A maximum of 150mm horizontal flue pipe can be used. This flue pipe should
conform to Building Regulations. Ensure that the pipe end is no closer than 76mm to the
side or rear chimney walls.
Ideally, the old fireplace should be filled in so that there is a smooth streamlined entry
into the flue way. It is essential that all connections between the stove and chimney-flue
are sealed and made airtight with sealing rope, clamping rings and/or fire cement or
heat resisting cement where required.
Both the chimney and flue pipe must be accessible for cleaning and if ANY parts of the
chimney cannot be reached through the stove (with baffle removed), a soot door must
be fitted in a suitable position to enable this to be done.
5
Juno & Vulcan Issue 01 06/13
4.5 Material Clearances
Safety Distances from Combustible Surfaces:
Model
Side
Rear
Juno 5kW
600mm
800mm
Vulcan 8kW
750mm
850mm
In addition it is strongly recommended that any furniture or other combustible materials
are kept at least 900mm clear from the front of the stove.
Due to the fact that combustible shelves, timber fireplaces and beams have potentially
thousands of possible configurations in conjunction with stoves outset or inserted
partially or fully into chambers, it is not possible to give firm guidance on dimensions to
these features. As a guideline, materials that are in ‘line of sight’ to the stove are more
likely to overheat due to direct radiation from the stove body than materials that are not
in ‘line of sight’ (e.g. with stove fully inside a chamber). Materials above the stove are
more likely to overheat than materials alongside or below. A guideline limiting
temperature for solid timber (not surface finishes) is approximately 80-85 degrees C with
a normal ambient room temperature. Temperatures of combustible materials can be
substantially lowered with a simple heat shield constructed of a non-combustible
material and small air gap between the shield and combustible material.
Distances from NON-combustible materials:
The stove can be recessed in a suitable sized non-combustible fireplace but a
permanent free air gap of at least 50mm must be left around the sides and top and at
least 50mm at the back of the stove to obtain reasonable heat output and for access to
the stove for removal and maintenance. A clearance of 150mm will give a better heat
output
All non-combustible walls closer than 400mm to the stove should be at least 75mm
thick. For practical reasons the back wall of the fireplace recess and the hearth should
ideally be made of non-combustible material.
4.6 Hearths:
The Juno & Vulcan freestanding stoves do not require a constructional hearth beneath
them as they do not cause the floor temperature to exceed 100 degrees C. Note: the
optional solid fuel hearth heat shield MUST be fitted when using smokeless or any coal
fuels to ensure compliance with this requirement. Hearths must be level. In any case a
non-combustible superimposed hearth extending fully underneath the stove and forming
an apron of at least 225mm at the front of the stove and 150mm on either side must be
provided. The superimposed hearth must not be less than 12mm thick and must have a
clearly defined edge (change of level) to discourage placing of any combustible
materials on or partially over it.
The appliance shall be installed on a floor with adequate load-bearing capacity. If the
existing construction does not meet this requirement, suitable measures (e.g. load
distributing plate) should be provided to achieve it.
4.7 Commissioning and Handover
A CO detector must be fitted in the same room as the stove according to current
standards or codes of practice. Advise the customer of the importance of this device and
maintaining it.
6
Juno & Vulcan Issue 01 06/13
If the stove is to be used with smokeless fuel exclusively then the solid fuel fitting kit
(supplied separately) must be fitted to the stove according to the instructions supplied
with it.
Upon completion of the installation, allow a suitable period of time for any fire cement
and mortar to dry out. A small fire may then be lit and checked to ensure the smoke and
fumes are taken from the stove up the chimney and emitted safely to atmosphere.
Advise the customer not to run the stove at full output for at 3 – 4 days. Explain that the
stoves can provide much more or less than their rated heat outputs depending upon
how they are burnt and fuels and fuel loads used.
Warn the customer that using excessive air (having the air controls open too wide
for too long) can over-fire and irreparably damage the stove. Damage caused by
over firing is NOT covered by any warranty.
On completion of the installation and commissioning, check all parts of the appliance are
correctly fitted and ensure that the operating instructions and operating tools (including
gloves) for the stove are left with the customer. You must be sure to advise the
customer on the correct use of the appliance with the fuels likely to be used on the stove
and warn them to use only the recommended fuels for the stove.
Advise the user on what to do should smoke or fumes be emitted into the room from the
stove – see Safety Notes section. The user should be warned that they MUST use a
suitable fireguard in the presence of children, aged and/or infirm persons.
5.0 Technical Data
Model
Appliance gross weight
(packed) (Kg):
Efficiency on wood fuel: (%)
Declared nominal output:
(kW)
Tested wood re-fuelling
interval: (h)
Flue gas mass flow on wood
fuel: (g/s)
*Flue Temp on wood fuel:
(Deg C)
Max Log Length:
Efficiency on Ancit fuel: (%)
Declared nominal output on
Ancit Fuel: (kW)
Tested Ancit re-fuelling
interval: (h)
Flue gas mass flow on Ancit
fuel: (g/s)
*Flue Temp on Ancit fuel:
(Deg C)
Juno
5kW
Vulcan
8kW
74
81
79.0
78.6
5.0
7.6
0.75
1
5.1
5.8
229
375mm
14.5”
302
375mm
14.5”
75.4*
77.2*
5.0
8.0
1
2
4.5
5.9
276
329
7
*at nominal heat output
*With DEFRA air limiter fitted
– approx. 81% without.
*at nominal heat output
Juno & Vulcan Issue 01 06/13
6.0 Operating Instructions
This appliance is not designed for open operation and therefore should not be operated
with the doors open.
This stove is designed to burn wood and smokeless fuels cleanly with high efficiency.
However, for this product to work properly it must be used correctly. If used correctly this
stove will burn with the very useful feature of clean glass.
It is essential that the stove has an adequate air supply for combustion and ventilation.
DO NOT block any ventilators provided. The primary, secondary and tertiary air inlets
must be kept clear from obstruction.
Warning! This appliance will be very hot when in operation and due care should be
taken when operating the controls. A tool and pair of quality leather gloves are provided
to assist safe operation.
Do not use an aerosol spray on or near the stove when it is alight.
6.1 The Clean Air Act 1993 and Smoke Control Areas
Under the Clean Air Act local authorities may declare the whole or part of the district of
the authority to be a smoke control area. It is an offence to emit smoke from a chimney
of a building, from a furnace or from any fixed boiler if located in a designated smoke
control area. It is also an offence to acquire an "unauthorised fuel" for use within a
smoke control area unless it is used in an "exempt" appliance ("exempted" from the
controls which generally apply in the smoke control area).
The Secretary of State for Environment, Food and Rural Affairs has powers under the
Act to authorise smokeless fuels or exempt appliances for use in smoke control areas in
England. In Scotland and Wales this power rests with Ministers in the devolved
administrations for those countries. Separate legislation, the Clean Air (Northern Ireland)
Order 1981, applies in Northern Ireland. Therefore it is a requirement that fuels burnt or
obtained for use in smoke control areas have been "authorised" in Regulations and that
appliances used to burn solid fuel in those areas (other than "authorised" fuels) have
been exempted by an Order made and signed by the Secretary of State or Minister in
the devolved administrations.
The Cast Tec Arbeia Juno 5kW & Arbeia Vulcan 8kW have been recommended as
suitable for use in smoke control areas when burning wood logs. This is conditional
upon fitting the supplied secondary air control (air wash) limiters and following the wood
burning instructions precisely.
Further information on the requirements of the Clean Air Act can be found here:
http://smokecontrol.defra.gov.uk/. Your local authority is responsible for implementing
the Clean Air Act 1993 including designation and supervision of smoke control areas
and you can contact them for details of Clean Air Act requirements.
6.2 Air Controls
Keep air controls clean and free from ash or debris at all times.
Primary Air
Primary air is controlled via the rotary air controls on the bottom of the door.
8
Juno & Vulcan Issue 01 06/13
This provides a conventional air draught to the bed of the fire. The primary air intakes
need to be adjusted to give the best results when burning different fuels. It will usually
be closed when burning wood fuel and open when burning coal or smokeless type fuels.
Secondary Air (Air Wash)
Juno & Vulcan stoves are provided with a sophisticated patented “air wash” system.
This secondary air supply to the stove is controlled through a slider assembly located on
the centre of the stove above the door. If you want clean glass, always leave this control
open some way whilst burning unless the stove is being shut right down for a long
period. The only time this control should be fully closed is for maximum efficiency on
Ancit fuel or for very slow burning on wood. The DEFRA air restrictor will deliberately
prevent full closure of this control.
Tertiary Air
This appliance is also fitted with a draught controlled tertiary air system that burns
otherwise uncombusted gasses in the products of combustion thereby improving
efficiency, increasing heat output and decreasing unwanted atmospheric emissions. The
Tertiary air supply to the stove is controlled entirely by the draught in the flue and
firebox. At certain stages of burning you will notice “jets” of flame emerging near the air
holes to the rear of the firebox. For maximum efficiency on Ancit fuel the amount of
tertiary air is greatly reduced and so a seal is provided to be mounted inside the rear
airbox to restrict it for maximum efficiency. Remove the seal if the fuel is changed to
wood again.
Multifuel Grate
Your stove is fitted with a multifuel grate, which can be shaken from the right side of the
stove by inserting the pointed part of the multi tool into the knob and lifting up and down
or pulling and pushing the knob depending on the model. The grate is a strong set of
cast iron bars with suitable air slots that assist the burning of most fuels. When burning
coal type fuels it is important to use the shaker grate and a poker where required to deash regularly to ensure that the primary airflow is not impeded, as a build-up of ash
when burning coal can damage the cast iron grate. A build up of wood ash when
burning wood will not harm the grate and indeed wood burns better on a bed of ash.
Excessive wood ash build up is not to be recommended however.
Ashpan
It is essential that you empty the ash pan regularly when burning coal type fuels. Use
the forked end of tool to lift the ash pan out of the stove. DO NOT allow coal ash to build
up underneath the bed as this may cause damage to the grate.
6.3 Cleaning
Glass: Despite the advanced air wash system provided, the glass will still need cleaning
from time to time depending on the fuel quality and burning rates used. Never clean
glass when the stove is hot. Always use stove glass cleaner or ceramic hob cleaner,
which is available from your stove retailer. As an alternative, use a wet cloth with some
of the wood ash if burning wood but be very careful to use very clean ash so as not to
scratch the glass. DO NOT use coal ash to clean the glass.
Outer body: The outer body simply needs to be dusted from time to time. DO NOT use
any kind of furniture polish or cleaning agent other then your stove suppliers
recommended paint.
Inner firebox: Brush the inside of the firebox clean from time to time to check the
integrity of the plates and liners etc. It is not normally necessary to re-paint inside the
firebox due to the high temperatures that mean that the paint does not have much effect
before being burnt off. Steel and vermiculite board liners are resilient firebox materials
9
Juno & Vulcan Issue 01 06/13
and will give reliable service without major cleaning or work on the firebox. The liner
boards may require replacement fairly regularly depending upon fuels and the type of
usage experienced. Lining boards are not covered by warranty, as they are a wearing
consumable part.
Baffle: It is essential to check the top of the baffle for build up of soot and ash regularly
when in use and after a long period of no use. From time to time remove the baffle if
necessary to ensure that the flue way entrance is clear. A slot is provided in the front
edge of the baffle for lifting down with the multi tool for quick and easy checks without
getting dirty hands.
6.4 Fuels
The appliance is fitted with a versatile multifuel grate and the appliance has been tested
and approved burning dry, well-seasoned logs or Ancit smokeless fuel with the optional
solid fuel kit fitted. These are the recommended fuels. For other fuels please contact
the manufacturer for advice. Petroleum coke must never but burnt on this appliance.
6.5 Important Notes for Wood Burning
With a full load of wood, the stove will need to be refuelled approximately every 1.5
hours. Wood can be stacked higher in the stove than solid mineral fuel but care must be
taken that logs do not touch the baffle or the glass panel. Do not stack logs above the
level of the tertiary air inlets at the back of the stove.
Wood burns most efficiently with the primary air controls closed and the secondary (air
wash) controls a very small amount open. Carefully adjusting the fuel load and
secondary air controls will then control the burn rate of the stove. Always make sure that
flames are visible above the wood after re-fuelling for cleanest burning. After re-fuelling
open the air wash full for 3 to 5 minutes or until the logs are fully blackened to
achieve full flames above the fuel.
Wood burns best on a bed of ash and it is therefore only necessary to remove surplus
ash from the stove occasionally.
Burn only dry, well-seasoned wood, which should have been cut, split and stacked under protection from rain - for at least 12-24 months with free air movement around the
sides of the stack to enable it to dry out. Burning wet or unseasoned wood will create tar
deposits in the stove and chimney and will not produce a satisfactory heat output. Wood
that is not properly dry (‘dry’ is considered to be less than 20% internal moisture
content) uses up energy from the burn process to evaporate the water inside the
wood thus creating very poor conditions for combustion. The main cause of
burning problems with wood stoves is due to excessively damp wood. Wood can appear
perfectly dry on the outside but still contain 40-50% water on the inside. A moisture
meter can be purchased from some stove and equipment suppliers if you wish to check
your wood source is correct.
6.5.1 Refuelling on to a low fire bed
If there is insufficient burning material in the firebed to light a new fuel charge, excessive
smoke emission can occur. Refuelling must be carried out onto a sufficient quantity of
glowing embers and ash so that the new fuel charge will ignite in a reasonable period. If
there are too few embers in the fire bed, add suitable kindling to prevent excessive
smoke.
6.5.2 Fuel overloading
The maximum amount of fuel specified in this manual should not be exceeded,
overloading can cause excess smoke.
10
Juno & Vulcan Issue 01 06/13
6.5.3 Operation with door left open
Operation with the door open can cause excess smoke and spillage into the room. The
appliance must not be operated with the appliance door left open.
6.5.4 Primary Air left open
Operation with the primary air controls left open can cause excess smoke. The
appliance must not be operated with air controls or door left open.
6.6 Notes on Smokeless Fuel (Ancit) burning
Ancit, smokeless and coal type fuels require very different burning conditions to log
burning and to suit this a kit has been developed for the Juno & Vulcan to maximise
efficiency on smokeless fuels. The kit MUST be fitted to obtain the expected
performance characteristics from the stove when burning smokeless fuels. When the
stove is established and burning well, the air wash can be closed fully and the burning
rate controlled with the primary air control and refuelling to obtain maximum efficiency.
Ancit and other smokeless briquetted fuels can burn with very little primary air and stay
in for many hours.
6.7 Lighting the Stove
We recommend that you have two or three small fires before you operate your stove to
its maximum heat output. This is to allow the paint to cure in steadily and to give a long
service life of the paint finish. During this curing in process you may notice an
unpleasant smell whilst the finishes finally cure. It is non-toxic, but for your comfort we
would suggest that during this period you leave all doors and windows open.
First, open the secondary air wash control fully. Then load the firebox with plenty of
starting fuel, i.e. paper, dry kindling sticks and/or firelighters. If using Ancit, place a layer
of ancit into the firebox as well. Light the fire at the base leaving the secondary air
control fully open. Leave the door slightly ajar for 10 minutes to enhance initial starting
and reduce smoke emission – DO NOT leave the stove unattended if the door is left
ajar. Allow the fuel to reach a steady glow and build the fire up gradually by adding a
few small sticks, well split logs or Ancit briquettes at a time. Once you have a good fire
bed established across the grate, further fuel can be added step by step as required.
Don’t be tempted to overload the fire bed with fuel all at once or close down the air
controls too much until the fire is really well established for some time. Once the ignition
period is well under way, gradually reduce the air control opening to establish the
burning intensity you require.
6.8 Re-fuelling
When burning Ancit the fire will begin to die down with a significant amount of white ash
showing amongst the fuel. Shake the grate using the shaker bar and then gently run a
poker through the fire bed to remove most of the ash into the ashpan. Empty the ashpan
if it is nearly full and then re-fuel with a good load of briquettes. The fuel load should
initially be level with the top of the fuel retainer and not above the rear firebox liner
board. Whilst approval test cycles are 2 hours, a stove burning Ancit may be kept in
over night easily.
When burning wood, the fire will die down as the fuel is consumed. When the flames
disappear and the remainder is breaking down into glowing embers it is an appropriate
time to consider re-fuelling. NOTE: If the flames disappear and there are still lumps of
solid wood left this indicates excessive internal moisture in the wood or insufficient air
supply/flue draught.
11
Juno & Vulcan Issue 01 06/13
NOTE: To eliminate unwanted smoke emission, after loading new logs on to the fire,
open the air wash control up fully for 3-5 minutes or until the logs are blackened all over
to boost the fire and get flames issuing from the top of the fuel as soon as possible.
When flames are well established, reduce the air wash to the running setting required.
Burning without flames above the fuel will create unnecessary smoke. Do not load
fuel above the tertiary air inlet holes at the back of the firebox.
Loading 3 to 4 medium sized logs will produce a good output with reasonable burn time,
generally small logs will burn up quicker producing a high output for a short time and a
large log will take longer to burn and produce less output over a given time. These
appliances are approved for intermittent operation on wood (0.75 to 1.5 hour burn
cycles) although much longer burn times can be achieved by fully loading the firebox,
getting the fuel burning well and then shutting the air controls right down (see below).
The fire will then need reviving by first opening the air controls and then using small
pieces of wood and plenty of air to get flames issuing from the wood again.
6.9 Shutting Down
The stove will normally shut down by itself as the fuel is consumed. In order to shut
down the stove for other reasons, close the primary air controls (if open), then close the
secondary air control. If the controls are left in this position, the fire will eventually go
out. If you want to revive the fire it is recommended that the primary air controls are
open first, and then open the secondary air controls.
Warning! - The stove will remain very hot for a considerable time after the fire has died
down or been extinguished.
Notes: Warning!- Petroleum coke fuels or household waste must not be burnt on
this appliance.
Should any difficulties arise over fuel quality or suitability, consult your local approved
fuel merchant.
6.10 Shut down for prolonged periods
If the stove is to be left unused for a prolonged period of time then it should be given a
thorough clean to remove ash and unburned fuel residues. To enable a good flow of air
through the appliance to reduce condensation and subsequent damage, leave the air
controls fully open. It is important that the flue connection, any appliance baffles or
throat plates and the chimney are swept prior to lighting up after a prolonged shutdown
period.
6.11 Maintenance
Inspect the inside of the firebox and above the baffle plate every week during use.
Where the chimney is believed to have previously served an open fire installation, it is
possible that the higher flue gas temperature from the stove may loosen deposits that
were previously firmly adhered, with the consequent risk of flue blockage. It is therefore
recommended that the chimney be swept a second time within a month of regular use
after installation. See chimney cleaning section in section 3.1 Warnings and
Important Information. Inspect the inside of the stove and the flue ways and ensure
they are 100% clear after a period of disuse (e.g summer). Only use manufacturers
recommended replacement parts on the appliance.
7.0 Safety Notes for your guidance
FIRES CAN BE DANGEROUS – Always use a fireguard to BS 8423:2002 Fireguards
for use with solid fuel appliances in the presence of children, the elderly or the infirm.
12
Juno & Vulcan Issue 01 06/13
DO NOT perform modifications to the appliance as this could seriously
compromise safety in operation.
DO NOT OVERFIRE – it is possible to fire the stove beyond its design capacity, this
could damage the stove, so watch for signs of over firing – if any part of the stove starts
to glow red, including baffle plate or fuel retainer, the fire is in an over fire situation and
the controls should be adjusted accordingly. Never leave the stove unattended for long
periods without first adjusting the controls to a reduced and safe setting – careful air
supply control should be exercised at all times.
WARNING – FUME EMISSION
Properly installed and operated, this appliance will not emit fumes. Occasional fumes
from de-ashing and refuelling may occur which is not normally of serious concern.
However, persistent fume emission is potentially dangerous and must not be
tolerated.
If fume emission does persist, then the following immediate action should be taken: 1.
2.
3.
4.
Open doors and windows to ventilate room
Let the fire out, or remove and safely dispose of fuel from the appliance.
Check for flue chimney blockage and clean if required.
Do not attempt to re-light the fire until the cause has been identified and
corrected.
If necessary, seek professional advice from chimney or stove specialists.
Important! – Do not fit an extractor fan in the same room as this appliance.
IN THE EVENT OF A CHIMNEY FIRE
Raise the alarm to let others in the house know.
Call the Fire Service
Reduce the appliance burning rate by closing all air controls fully.
Move furniture and rugs away from the fireplace and remove any nearby
ornaments.
Place a fireguard or spark guard in front of the stove.
Feel the chimneybreast for sign of excessive heat.
Do not relight the fire until the chimney and flue ways have been examined by
a professional.
If the wall is becoming hot, move the furniture away. Ensure that the Fire Service can
gain access to your roof space in order to check this area for signs of fire spread.
CO ALARMS
Your installer should have fitted a CO alarm in the same room as the appliance. If the
alarm sounds unexpectedly, follow the instructions given under “Warning Note” below.
WARNING If the CO Alarm sounds unexpectedly:1. Open Doors and windows to ventilate the room and then leave the premises.
2. Let the fire go out
13
Juno & Vulcan Issue 01 06/13
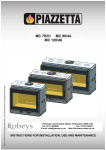
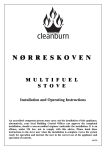
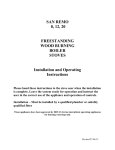
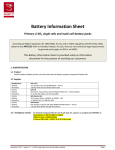
8.1
Arbeia Juno Stove
Dimensions
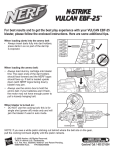
8.2
Arbeia Vulcan
Stove Dimensions
14
Juno & Vulcan Issue 01 06/13
9.0 Frequently Asked Questions
1 Do stoves require a chimney? All of our multi fuel and wood burning stoves require a
suitable chimney or professionally installed flue system.
2 How do I clean the chimney? You will require a chimney sweep to clean the chimney.
It is essential to provide a dedicated chimney cleaning access door when installing the flue
of the stove in some situations. In other situations the chimney can be swept through the
firebox.
3 Who should install my stove? Cast Tec want you to enjoy the maximum performance
from your appliance. To ensure this, it is essential that they are installed correctly. We
strongly recommend that your stove is installed by a suitably qualified installer e.g HETAS.
4 How do I regulate the heat output? Each stove has various air controls, which will
allow you to easily regulate the heat output and refuelling rate.
5 What warranty do I get? Cast Tec will replace, free of charge, any working part that
fails (under normal operating conditions) within 12 months of purchase. Consumables
such as glass, firebox lining boards or stove rope and adhesives are not guaranteed. A
call out charge will apply if our engineer attends any stove problem that is not
related to product failure.
6 Where can I get spare parts? Your local Cast Tec stove retailer will be pleased to
supply spare parts and to provide any other information you require. Alternatively contact
Cast Tec.
7 Can the doors be left open while burning? For safety and heat efficiency the doors
should remain closed.
8 Why is the stove smoking when lit? A flue with back draught problems is almost
certainly the cause of a smoking stove. Also check adequate ventilation is present. A
qualified fitter should complete both a smoke pressure and flow test prior to fitting the
stove to ascertain the integrity of the flue.
9 Why should I “Run in” my stove? To begin, light a series of small fires over a period
of a few days to allow the paint finish to cure. The stove is finished with a highly heat
resistant paint. The finish can be renovated with stove paint available from your local
stove retailer. If the stove is not “run in” correctly, this may cause the paint to discolour
and flake.
10 What is Over Firing? Your stove should never be used in a manner to cause over
firing. Over firing can be caused by over loading the stove with fuel, and with primary
controls open. If any part of stove glows "red" your stove is over firing and your draught
control should be adjusted to restrict airflow to stove. Over firing can cause permanent
damage to the appliance, which is not covered by warranty.
Cast Tec Ltd, East Side, Tyne Dock
South Shields, NE33 5SP
15
Juno & Vulcan Issue 01 06/13