1
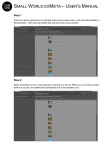
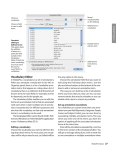
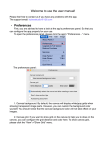
ImageFramer 3
User Manual
Copyright 2006, Apparent Software
Table of Contents
1. Welcome to ImageFramer!
3
2. Using ImageFramer!
4
3. Frame Editor!
10
4. Additional Topics!
13
Apparent Software - ImageFramer Manual - Page 2/13
1. Welcome to ImageFramer
Welcome to the ImageFramer Manual. Apparent Software ImageFramer is a unique
software for Mac OS X that allows simple and powerful framing of your visual art, be it
photographs or paintings. ImageFramer is used by professional artists, photographers,
bloggers and people who simply want their family photos to look better.
ImageFramer helps you to make your photos stand out with life-like frames for a
professional look and decide how to best frame your art by comparing multiple designs. It
allows you to apply photorealistic and artistic frames from a variety of preset designs, as
well as adding multiple mats and watermarks. ImageFramer operation is easy and visual, and
you can save the output in variety of formats and resolutions.
ImageFramer’s frame library includes hundreds of frames, with new frames are being added
constantly. ImageFramer Pro even includes a frame editor that allows you create and edit
your own frames. ImageFramer even supports vector frames in PDF format.
Some examples of what’s possible to do with ImageFramer:
Apparent Software - ImageFramer Manual - Page 3/13
2. Using ImageFramer
ImageFramer is very easy to use, but before you use it, you should understand the main
elements of ImageFramer screen. There are four key elements:
• Left sidebar, used to access frame library, templates and variations
• Right sidebar, used to change the properties of the frames and to add watermarks
• Layers filmstrip located at the bottom of the screen, used to manage the layers that
compose the framed image
• Preview pane in the center of the screen, showing the result of your work
Now, let us learn more about each element.
Apparent Software - ImageFramer Manual - Page 4/13
2.1 Left Sidebar
Left sidebar contains 3 tabs: variations, templates and library.
Note that you can also change the width of the sidebar, by dragging the
vertical splitter between it and the preview area, to the right or to the left.
2.1.1 Frame Library
Library tab shows the entire library of frames available in
ImageFramer. The frames are organized in hierarchy of
collections and sets. Therefore, each collection contains many
sets and each set contains many frames.
You can open a collection by double-clicking on it or pressing
“space” or “enter” key when the collection is selected. When the
collection is open, you can see the list of sets contained in this
collection. You will also see the navigation bar above change
from "Collections" to "Sets", meaning the you now see a list of
sets. You can always click on "Collections" to go back to the
frame collections list.
Double-clicking on a Set will show a list of frames contained in it. Double-clicking on any
frame from the list will add it to the design. The list of layers in film-strip below will show a
new layer with the icon of the selected frame, and image in preview will become framed.
If Alt key is pressed while double-clicking on a frame, the frame
will replace the current frame layer instead of being added as a
new layer. You can also right-click or ctrl-click on the frame for
additional actions on the frame, like adding it to a list of your
favorite frames.
Note the “All” and “Favorites” buttons above the library. When
“All” is selected , you see the entire library, but when “Favorites”
is selected, you see only the frames you selected as your
personal favorites. This allows you to have a fast access to your frequently-used frames
without having to look for them by searching collections and sets in the full frame library.
You can remove a frame from favorites by pressing “-” button at the bottom of the screen
or by using a frame context menu.
Apparent Software - ImageFramer Manual - Page 5/13
2.1.2 Templates
You can save your designs in order to apply them on many
images. These saved designs are called templates. Templates
include all the frames, watermarks and general settings, like
shadows. In order to apply a template on the current image,
just double-click on it. Note that your previous work on the
current image will disappear, being replaced by the loaded
template.
You can set a name for each template by clicking on it and
also add keywords (tags) to it. Later, you can find the
template you need by name or by tag by typing into the
template search box, located at the top of template sidebar.
You can create a template from your current design by
clicking "+" button located below the template sidebar when
the templates tab is open. You can remove an existing
template by pressing the "-" button or by selecting “Remove
template” from the template context menu.
You can view what keywords are associated with a selected template by looking at the list
at the bottom of the template sidebar. For example, all templates supplied with
ImageFramer have a “preset” keyword. You can add a keyword to a template simply by
typing it in the keyword list.
2.1.3 Variations
Variations allow you to temporarily save several designs you
work on in order to compare them and select the best one.
They are somewhat like templates, but unlike templates
variation icon shows the image as well, and they are not saved
when you quit ImageFramer.
In order to open a variation, double-click on it. Note that
your previous work on the current image will disappear, being
replaced by the loaded variation.
Apparent Software - ImageFramer Manual - Page 6/13
In order to add the current design to variations, click the "+" button located
below the left sidebar. To remove a variation, click "-".
Note that variations are not saved permanently and will be cleared when you exit
ImageFramer. Therefore, if you want to save the design for later, save it as a template or
export it as an image using File > Save Image or ⌘S.
2.2 Layers Filmstrip
Layers film-strip located at the bottom of the screen shows all layers used in the current
design. It is divided into 3 groups: image to the right, frames in the center and watermarks
to the left. The leftmost layer will be on top of the image, the rightmost layer (image) will
be the bottom layer. You can rearrange the order of the layers in each category by dragging
them, but as seen in the illustration above, the frames will always be on top of the image
and watermarks - on top of frames.
In addition, you can select the layer you're currently working on by clicking on it or by using
keyboard arrows. The selected layer gets a white frame around it. For example, in the
illustration above, the selected layer is watermark layer. The settings for the selected layer
will be shown on the layer controls tab in the right toolbar.
2.3 Right Sidebar
Right sidebar is used for settings management and it contains 3 tabs: design settings, layer
controls and watermarks.
Design settings allow you to define general settings for the
entire design, like shadows and light direction.
Apparent Software - ImageFramer Manual - Page 7/13
Layer settings allow you to edit settings of the current layer, which is selected in layers filmstrip. There are different settings for different layer types, so the contents of the layer
controls tab will change based on the type of the selected layer.
For example, let us review the settings for frame of type moulding shown in the illustration:
• Clicking on the Rotation icon will rotate the frame - good
for aligning the light direction of the frame with light
direction of the entire design.
• Saturation and Lightness sliders allow you to control the
color scheme of the frame
• Colorize checkbox allows you to change the overall color
of the frame into a color of your selection. In order to
select a desired color, click on the beige rectangle and
color selection panel will appear. You can also click on the
eyedropper and select any color appearing on the screen,
for example a color from the framed image. After selecting
a color, you can control its intensity using Lightness slider.
• Opacity slider lets you control the opacity level of the
frame. Default slider position is fully to the right - fully
opaque frame. Moving the slider left will add transparency
to the frame, and moving the slider fully to the left will make the frame fully transparent.
• Shadow control is used to manage shadow settings for the selected layer (note that if
“draw shadows” checkbox is disabled in Design Settings tab, there will be no shadows
drawn for every layer, regardless of the settings for that specific layer).
• Frame Width defines the size of the frame, as percentage of the image size below it.
• Frame over image defines how much of the image will be covered by the frame. In order
for the frame not to cover the image at all and be completely outside it, 0% should be
selected on the slider.
Apparent Software - ImageFramer Manual - Page 8/13
Watermarks tab allows you to add textual or image
watermark layers to the design.
First, select the type of watermark you would like to create:
Text or Image. The default is image watermark.
Then, press on "Add a new watermark" button - this will
create a new watermark layer that you will be able to find in
the leftmost part of the layers filmstrip.
Now click on “Open Image” to select the relevant content
for the watermark, and use mouse to move the watermark
on the preview pane or to change its size.
You can control watermark opacity and size using the
controls at the bottom of the watermark tab.
Selecting Text watermark will show relevant controls below.
In order to add a text watermark, you should press on "Add
a new watermark" button. Then, you will be able to enter
the text you would like to appear on the watermark.
You can click on button to select the font and font color, and
you use the black button below to change the background
color of the watermark text entry area to black (useful for
light color fonts) and back to white
ImageFramer Pro also allows to add automatic text to the
watermark, that will be based on file or EXIF or IPTC data,
like filename, the date a photo was taken etc. In order to
add the relevant data to the watermark, just select it from
the list:
If you have a regular ImageFramer license, you can always
upgrade to Pro license from ImageFramer3 menu.
Apparent Software - ImageFramer Manual - Page 9/13
3. Frame Editor
3.1 Using Frame Editor
ImageFramer Pro includes Frame Editor that allows you to
edit ImageFramer frames library: add, move, edit and delete
collections, sets and frames. You can enter the Frame Editor
by selecting it from File menu or by selecting “Show in Frame
Editor” from pop-up menu of a frame in the library.
Frame Editor window consists of 4 parts: Frame Library is shown on the left,
Object Properties and Preview are in the middle and Image Library is on the right:
Let’s learn more about each element of Frame Editor.
Apparent Software - ImageFramer Manual - Page 10/13
3.2 Frame Library, Properties and Frame Types
Frame Library allows you to browse the collections, sets and frames in ImageFramer
library. You can add new collections, sets and frames by pressing the
delete them with
button and
button. You can move sets and frames by dragging them to the
desired collection or set. You can also rename any object in the list by double-clicking on it.
You can search for a specific frame, set or collection by typing it’s name in the search box
on the top.
Note: all changes done to the frame in Frame Editor are saved immediately (there is no
“Save” button), so pay attention when modifying or deleting existing frames. If you made a
mistake, use Undo functionality to return to the previous state. Undo can be invoked by
⌘Z or selecting Undo from Edit menu.
When you create a new frame or edit an existing one, you
define the frame properties in the relevant area located in
center top of the screen. The list of the properties depends
on the frame type, which is displayed on the top of the
property list. Currently there are 4 frame types:
Color mat - a simple one-color mat. Click on Mat
color property to select the desired color and you’re done.
Full frame - this frame is composed of one image that is usually transparent in
the middle to allow the framed image to be seen inside the frame. This frame
type can also accept two images: one for landscape view and one for portrait.
Moulding - this frame requires 1 to 4 images, representing four sides of the
frame. You can set one image only and it will be used for all 4 sides of the frame,
but for best effect 4 different images should be used, as it allows to capture
effects of light & shadow on the frame. More detailed information on creating graphics for
moulding frames can be found in a tutorial “How to make perfectly seamless frames” by
Glen Dahlman - a professional designer and an enthusiastic ImageFramer user.
Moulding with corners - this frame is similar to regular moulding frame, but it
uses up to 8 images, representing 4 sides + 4 corners of the frame. It should be
used for frames with unique corners that are different from the pattern used in
the rest of the frame.
Apparent Software - ImageFramer Manual - Page 11/13
3.3 Image Library
The right sidebar in Frame Editor is used for managing the
images that are used by frames or as icons for collections
and sets. In order to use an image in a frame, just drag it to
relevant property in the frame properties section. Note that
you can use the same image in multiple frames or in
different properties of the same frame.
In order to add images to the list, click on the “+” button at
the bottom on the sidebar or just drag the relevant images
to the sidebar.
button.
To remove images from the list, use “-”
You can search for images by entering the name into the
search box above the image library sidebar.
Options button allows you to select if you would like to order the images by time added
or by filename, and if you would like images that are not used in any frame to be shown in
the separate category from images that are used.
The right slider lets you determine the size of the displayed icons.
3.4 Creating vector frames
Since version 3.1 ImageFramer supports vector frames in PDF format.
Vector frames have the advantage of drawing at high quality in any resolution.
ImageFramer will use the first page of a PDF file as the frame. The art box area of the PDF
defines the edges of the frame. Other than that, PDF files can be used in the same way that
raster images. All the effects that can be applied to regular frames, such as saturation,
lightness and colorization can also be applied to PDF friends.
Apparent Software - ImageFramer Manual - Page 12/13
4. Additional Topics
4.1 Preferences
ImageFramer allows you to export your designs fast with default settings by pressing ⌘
button and dragging the image from preview pane to the desired location (this action is
called drag-export). Export tab in Preferences dialog (available from ImageFramer3 >
Preferences menu) allows you to control the default settings used for this kind of export.
You can select the desired resolution and file name convention.
Updates tab allows you to enable and disable automatic updates of ImageFramer frame
library on ImageFramer startup.
4.2 Frame Updates
ImageFramer customer are entitled to free lifetime updates of ImageFramer frame library.
By default, ImageFramer will check if new frames are available on startup, but you can
disable that in Preferences dialog. In order to check manually if new frames are available,
use Check for library updates from ImageFramer3 menu.
Apparent Software - ImageFramer Manual - Page 13/13