1
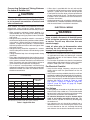
Thermostat Connections
• Thermostat connections should be made in accordance
with the instructions supplied with the thermostat and
the indoor equipment. Typical AC and thermostat
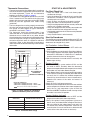
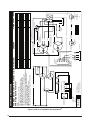
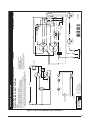
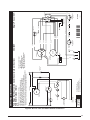
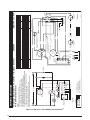
hookups are shown in Figure 3, (page 6).
• The outdoor unit is designed to operate from a 24 VAC
Class II control circuit. The control circuit wiring must
comply with the current provisions of the NEC (ANSI/
NFPA 70) and with applicable local codes having
jurisdiction.
• The low voltage wires must be properly connected to
the units low voltage terminal block. Recommended
wire gauge and wire lengths for typical thermostat
connections are listed in Table 2.
• The thermostat should be mounted about 5 feet
above the floor on an inside wall. DO NOT install the
thermostat on an outside wall or any other location
where its operation may be adversely affected by radiant
heat from fireplaces, sunlight, or lighting fixtures, and
convective heat from warm air registers or electrical
appliances. Refer to the thermostat manufacturer’s
instruction sheet for detailed mounting and installation
information.
Thermostat
R
C
C
Y/Y2
Y/Y2
Y1
Y1
Air Conditioner
OD Section
(Without CoreSense)
W2
W1
√Verify the indoor unit is level and allows proper
condensate drainage.
√ Verify the outdoor coil and top of the unit are free from
obstructions and debris, and all equipment access/
control panels are in place.
√ Verify air filters are cleaned and properly installed.
√ Verify duct work is sealed to prevent air leakage.
√ Verify line voltage power leads are securely connected
and the unit is properly grounded.
√ Verify low voltage wires are securely connected to the
correct leads on the low voltage terminal strip.
√ Verify power supply branch circuit overcurrent protection
is sized properly.
√ Verify the thermostat is wired correctly.
Start-Up Procedures
The thermostat's function mode should be set to OFF and
the fan mode should be set to AUTO. Close all electrical
disconnects to energize the sy stem.
Air Circulation - Indoor Blower
1.Set the thermostat system mode on OFF and the fan
mode to ON.
2.Verify the blower runs continuously. Check the air delivery
at the supply registers and adjust register openings for
balanced air distribution. If insufficient air is detected,
examine ductwork for leaks or obstructions.
3.Set the thermostat fan mode to AUTO and verify the
blower stops running.
O Y2 Y G RC RH C W2 W/E
G
START UP & ADJUSTMENTS
Pre-Start Check List
Furnace
NOTE: FOR THE MATCH
*S4BF-024KA + C6B(A,H)-X30(C,U)-C + *G7T-C
*S4BF-024KA + C6B(A,H)-X30(C,U)-C + *G7S-C+*SHE
Only connect Y2 from thermostat to OD Y2
Figure 3. Typical 2-Stage Air Conditioner
(without CoreSense) with Gas Furnace
System Cooling
1.Set the thermostat’s system mode to COOL and the
fan mode to AUTO. Gradually lower the thermostat
temperature setpoint below room temperature and verify
the outdoor unit and indoor blower energize.
2.Verify blower wheel is spinning in direction indicated by
arrow. Feel the air being circulated by the indoor blower
and verify that it is cooler than ambient temperature.
Listen for any unusual noises. If unusual sounds occur,
determine the source of the noise and correct as
necessary.
3.Verify HI and LO refrigerant pressures.
4.Allow the system to operate for several minutes and then
set the temperature selector above room temperature.
Verify the fan and compressor cycle off with the
thermostat. NOTE: The blower should also stop unless
fan mode is set to the ON position.
System Heating (optional)
THERMOSTAT
WIRE GAUGE
MAXIMUM RECOMMENDED
THERMOSTAT WIRE LENGTH (FT)
24
25
22
45
20
70
18
110
Table 2. Thermostat Wire Gauge
6
1.Set the thermostat's system mode to HEAT and the
temperature mode above room temperature.
2.
Verify the optional heating equipment (furnace or
electric heat) and indoor blower energize. Feel the air
being circulated by the indoor blower and verify that
it is warmer than ambient temperature. Listen for any
unusual noises. If unusual sounds occur, determine the
source of the noise and correct as necessary.