1
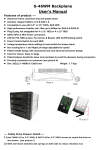
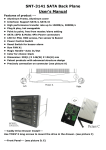
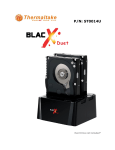
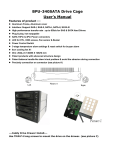
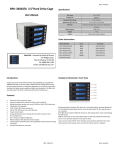
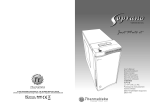
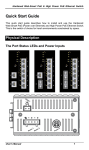
1
Hardware Installation
1. Front & Back Views
RESET
IJP3
POWER1
P/N: RC2300101A
HD1
MAX-2533
POWER2
IJP1
J4
HD3
LOW
HIGH
HD2
HD2
HD1
HD3
Mobile Rack / HDD Canister
with SAS & SATA Backplane
1
2
3
4 5
6
7 8
9
10
11 12
1 = HDD Tray Safety Lock & Eject Button
5 = IJP3: Extension Function Jumper
2 = Reset Switch for Buzzer Alarm &
6 = IJP1: Temperature Setting Jumper
7 = J4: Fan RPM Adjustment Switch
Overheating LED
8 = HDD Status LED On (O) & Off (X) Switch
3 = Individual HDD Power Button &
9 = 80mm Cooling Fan
Status LED
10 = SAS / SATA Data Connectors
4 = Fan Sensor LED
11 = Buzzer Alarm / Speaker
12 = SATA & Molex Power Connectors
2. Hard Drive Disk Installation
* Hard Drive not included
= 3.5” HDD Screw Holes
= 2.5” HDD Screw Holes
1. Insert 2.5” or 3.5” Hard Drive into the HDD Tray
2. Use the provided screws and fasten them into highlighted 2.5” or 3.5” holes from the
*Hard Drive(s) not included
*Require Hot-Swap SAS or SATA Controller Card/Motherboard
bottom of the Tray into the bottom of the 2.5” or 3.5” Hard Drive
3. After the screw installation, slide the HDD Tray back to the HDD Canister Base.
© 2010 Thermaltake Technology Co., Ltd. All Rights Reserved. 2010.08
All other registered trademarks belong to their respective companies.
4. Next, follow the Quick Installation in next page for the rest of the Setup.
www.thermaltake.com
3. LED Status & Switch Button Specifications
2
Note:
3
- All New / Raw hard drive(s) should follow hard drive / system manufacturer guideline or
Safety Lock Positions:
visit Thermaltake FAQ Site to partition, format and any necessary steps prior initial
OPEN Position
1. PUSH to Eject HDD Tray Handle
2. Pull the Tray Handle to Slide out HDD Tray
usage. Hard drive(s) not properly partitioned or formatted will not work. ( See below for
General Guideline to Partition & Format “NEW & RAW” hard drives)
- RAID Compatibility & Configuration bases on RAID Controller Card / On-Board RAID
Controller Chipset.
LOCKED Position
The Safety Lock Safeguards the Hard Drive(s) in proper
position & Prevent any Ejection while HDD in operate
** Push & Hold the HDD Tray Handle in Closed Position while Switching the Safety Lock.
- All New or Raw Hard Drive requires an initial Partition & Format after Hardware Setup.
Quick Installation
1. Fasten all screws necessary for any needed hard drive(s).
Jumper / Pin Assignments:
AJP1
AJP2
AJP3
65℃
60℃
55℃
FLEDR
FLED+
FLEDG
RESET
2. Slide any needed hard drive tray(s) back into the HDD canister base.
TLEDR
5V+
TLEDG
GND
Fan RPM :
3. Push the Red-Color handling bar into closed position.
HIGH = 3,000 RPM
4. To Lock the Safety Lock for each HDD Tray, Push & Hold HDD Tray Door Handle in
LOW = 2,300 RPM
closed position while switching the Safety Lock.
5. Connect all necessary data and power cable onto the rear end of HDD canister base.
6. Connect all necessary data and power cable from the rear end of HDD canister base
2 RESET LED & Switch Button
to either the SAS/SATA Controller Card or SAS/SATA Connectors on the
When Overheating occurs (Default Setting = 60℃), the Buzzer alarms,
motherboard.
and the RESET LED
7. Turn on the Power of your computer and wait until Operating System finish loading up.
blinks in Red color. To deactivate the alarm, press the RESET LED &
8. Turn on all necessary HD1~HD3 Power Button(s) for each Hard Drive.
Switch Button once, and the LED will go off at the same time.
9. Wait for your operating system to automatically search and recognize your newly
3 HD1 ~ HD3 LED & Switch Button
10. For optional RAID Configuration & Setup, please follow the user manual instructions
installed hard drive(s) before usage.
HD1, HD2 and HD3 Buttons serve as Individual Power Switch Button and
Hard Drive Status Indicators.
LED displays in Blue Color when Power On by pressing the button once.
LED displays and blinks in Red Color when Hard Drive is being access.
from your SAS/SATA Controller Card or Motherboard.
11. All New or Raw Hard Drive requires an initial Partition & Format. For instructions on
how to partition & format, please visit Thermaltake FAQ
Site: http://www.thermaltakeusa.com/support/FAQ
4 Fan Sensor LED
LED displays in Blue Color when the Fan functions properly.
Or, See below for
LED displays in Red Color when the Fan failed.
General Guideline to Partition & Format “NEW & RAW” hard drives
General Guideline to Partition & Format
“NEW & RAW” hard drives
4
5
For Windows Operating System:
1. After connecting all necessary cable(s) to PC, insert the Hard Drive into drive slot.
2. Power on the HDD Docking Station.
3. After OS recognizes the “New Hardware”, the driver will automatically be installed.
4. Next, “Right Click” on My Computer (Computer for Vista OS) icon on the desktop and
choose option: Manage.
7. Follow the onscreen New Partition Wizard to setup Partition and Format hard drive.
(Be Sure to Assign a Drive Letter).
5. Under Storage > Disk Management, initialize the newly installed hard drive. If the drive
has been initialized before, the initialize option will not be available.
6. Right Click on the newly added hard drive and choose New Partition.
For Mac OS:
8. Once Partition and Format is completed, hard drive is ready to use.
7
6
FCC and CE Radiation Norm
Mac OS 9.2 & earlier version does not support partition creation for external hard drive. In
order to create partition for external hard drive with Mac OS 9.2 & earlier, user will need to
FCC
purchase additional 3rd party software to create hard drive partition. For Mac OS X, simply
This equipment has been tested and found to comply with limits for Class B digital
use the Disk Utility to Partition and Format external hard drive as follows:
device pursuant to Part 15 of Federal Communications Commission (FCC) rules.
1. Select Disk Utilities in the utilities folder.
CE
2. Choose newly added external drive and format it.
This equipment has been tested and found to comply with the limits of the European
Council Directive on the approximation of the law of the member states relating to
electromagnetic compatibility (89/336/EEC) according to EN 55022 Class B.
!
Note:
If you want to operate Hard Drives on both Windows and Mac OS, it is
recommended to format the hard drive in Windows and choose FAT32 file format.
Do not change set partition or format hard drive. Otherwise, Windows OS will not
be able to recognize the hard drive.
FCC and CE Compliance Statement
These limits are designed to provide reasonable protection against frequency
interference in residential installation. This equipment generates, uses and can radiate
radio frequency energy, and if not installed or used in accordance with the instructions
may cause harmful interference to radio communication.
However, there is no guarantee that interference will not occur in television reception,
For technical support request, please visit
http://www.thermaltakeusa.com/contact/TechSupport/techreq-form.htm
Or, please call support Hot-Line @ 1-800-988-1088.
which can be determined by turning the equipment off and on. The user is encouraged
to try and correct the interference by one or more of the following measures:
- Reorient or relocate the receiving antenna
- Increase the separation between the equipment and the receiver
- Connect the equipment into an outlet on a circuit different from that to
Company Information
which the receiver is connected to
Thermaltake Technology, USA
Address: 525 Parriott Place, City of Industry, CA 91745
CAUTION!
TEL: +1-626-968-9189
The Federal Communications Commission warns the user that changes or
FAX: +1-626-968-7659
modifications to the unit not expressly approved by the party responsible for the
E-MAIL: [email protected]
compliance could void the user’s authority to operate the equipment.