1
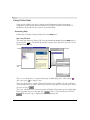
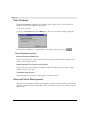
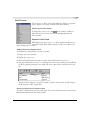
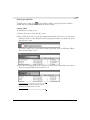
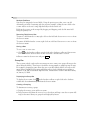
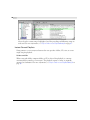
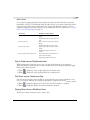
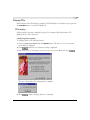
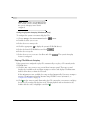
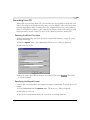
SIREN™
Jukebox
Product registration
To register on-line with Sonic Foundry, please follow the steps outlined in the registration
wizards upon installation of this product.
Registering your product will provide technical support, notification of product updates, and
special promotions exclusive only to Siren registered users.
Sonic Foundry product registration helps protect against software copyright infringement
and allows us to provide support exclusive to registered users.
If you do not have access to the Internet, registration assistance (in English) is available.
Please contact our Customer Service Department, 24 hours per day, seven days per week.
Telephone
• 1-800-577-6642 (toll-free) in the US, Canada, and the Virgin Islands.
• +800-000-76642 (toll-free) in Australia, Denmark, France, Germany, Italy, Sweden,
UK, Netherlands, and Japan.
• +608-256-3133, extension 2300 in all other countries.
E-mail
[email protected]
Fax
1-608-250-1745
SIREN™ JUKEBOX
Technical Support
1-608-256-5555 Monday through Friday between 7am and 10pm (CST).
Fax: 608-250-1745
E-mail: [email protected]
Sonic Foundry, Inc.
754 Williamson Street
Madison, WI 53703
Sonic Foundry Europe
PO Box 2903
2601 CX Delft
Netherlands
The information contained in this manual is subject to change without notice and does not
represent a commitment on the part of Sonic Foundry. The software described in this
manual is provided under the terms of a license agreement or non-disclosure agreement. The
software license agreement specifies the terms and conditions for its lawful use. No part of
this manual may be reproduced or transmitted in any form or by any means for any purpose
other than the purchaser’s personal use, without written permission from Sonic Foundry,
Inc.
Sonic Foundry and Siren are trademarks of Sonic Foundry, Inc. All other products
mentioned in this manual are trademarks or registered trademarks of their respective
holders.
© 2000 Sonic Foundry, Inc.
SIREN™ JUKEBOX
i
Table of Contents
SIREN™ Jukebox
Table of Contents . . . . . . . . . . . . . . . . . . . . . . . . . . . . . . . . . . i
Overview . . . . . . . . . . . . . . . . . . . . . . . . . . . . . . . . . . . . . . . . 1
Introduction. . . . . . . . . . . . . . . . . . . . . . . . . . . . . . . . . . . . . . . . . . . . . . . . . . . . 1
SIREN Jukebox Highlights. . . . . . . . . . . . . . . . . . . . . . . . . . . . . . . . . . . . . . . 1
System Requirements . . . . . . . . . . . . . . . . . . . . . . . . . . . . . . . . . . . . . . . . . . 2
Registration. . . . . . . . . . . . . . . . . . . . . . . . . . . . . . . . . . . . . . . . . . . . . . . . . . . . 2
Music Files. . . . . . . . . . . . . . . . . . . . . . . . . . . . . . . . . . . . . . . . . . . . . . . . . . . . . 5
Main Window. . . . . . . . . . . . . . . . . . . . . . . . . . . . . . . . . . . . . . . . . . . . . . . . . . 5
Using Online Help . . . . . . . . . . . . . . . . . . . . . . . . . . . . . . . . . . . . . . . . . . . . . . 6
Setting Up SIREN Jukebox . . . . . . . . . . . . . . . . . . . . . . . . 9
SIREN Jukebox Settings . . . . . . . . . . . . . . . . . . . . . . . . . . . . . . . . . . . . . . . . 9
Customizing the SIREN Jukebox Screen . . . . . . . . . . . . . . . . . . . . . . . . . . 9
Configuration Wizard . . . . . . . . . . . . . . . . . . . . . . . . . . . . . . . . . . . . . . . . . . 10
Searching for Music on a Hard Drive . . . . . . . . . . . . . . . . . . . . . . . . . . . . 13
Searching for Music in a Network, Removable Drive, or Folder. . . . . 13
TABLE OF CONTENTS
ii
SIREN Jukebox Panels . . . . . . . . . . . . . . . . . . . . . . . . . . . .15
Organizing Music. . . . . . . . . . . . . . . . . . . . . . . . . . . . . . . . 23
Organizing Music . . . . . . . . . . . . . . . . . . . . . . . . . . . . . . . . . . . . . . . . . . . . . 23
Clean Database . . . . . . . . . . . . . . . . . . . . . . . . . . . . . . . . . . . . . . . . . . . . . . . 32
Advanced Music Management . . . . . . . . . . . . . . . . . . . . . . . . . . . . . . . . . 32
Playing and Recording Music . . . . . . . . . . . . . . . . . . . . . 41
Playing Music Files with SIREN Jukebox. . . . . . . . . . . . . . . . . . . . . . . . . 41
The Current Playlist. . . . . . . . . . . . . . . . . . . . . . . . . . . . . . . . . . . . . . . . . . . . 41
Playing CDs. . . . . . . . . . . . . . . . . . . . . . . . . . . . . . . . . . . . . . . . . . . . . . . . . . . 47
Recording from CD. . . . . . . . . . . . . . . . . . . . . . . . . . . . . . . . . . . . . . . . . . . . 49
Custom CDs. . . . . . . . . . . . . . . . . . . . . . . . . . . . . . . . . . . . . .53
Creating CDs. . . . . . . . . . . . . . . . . . . . . . . . . . . . . . . . . . . . . . . . . . . . . . . . . . 53
Closing the CD Session . . . . . . . . . . . . . . . . . . . . . . . . . . . . . . . . . . . . . . . . 56
Downloading Music to a Portable Player . . . . . . . . . . . .57
Sending Music to a Portable Player . . . . . . . . . . . . . . . . . . . . . . . . . . . . . 57
Managing the Portable Player . . . . . . . . . . . . . . . . . . . . . . . . . . . . . . . . . . 61
Index . . . . . . . . . . . . . . . . . . . . . . . . . . . . . . . . . . . . . . . . . . . .63
TABLE OF CONTENTS
1
CHAPTER
Overview
1
Introduction
Sonic Foundry’s SIREN™ Jukebox allows you to play audio CDs and music files of various
formats from your computer. SIREN Jukebox will record music from your personal CD
collection to your computer for playback, as well as allow you to create custom CDs and
download music to portable players.
With SIREN Jukebox, you can organize create and organize a personal music library, making
it easy to locate a specific song, even in an extensive collection. SIREN Jukebox will also
sort, group, and filter your music library to create custom playlists for any occasions.
This manual describes the basic features of SIREN Jukebox, and provides the procedures
needed to take full advantage of the program.
SIREN Jukebox Highlights
Siren will help build and manage your music collection by:
•
•
•
•
•
•
•
CHP. 1
Playing CDs and music files.
Recording music from CDs to the computer for playback.
Organizing music into playlists.
Storing extensive database information for your music library.
Helping you download music from the Internet.
Creating custom CDs from your music library.
Downloading music to portable players.
OVERVIEW
2
System Requirements
The system’s components affect Siren’s performance. What follows is a list of the minimum, common, and recommended system requirements.
Minimum System Requirements
•
•
•
•
200 MHz processor
VGA display
32 MB RAM
DirectX Media 6.0 or later
Common System Requirements
•
•
•
•
•
•
•
•
Microsoft ® Windows™ 98, 2000, or NT 4.0
CD-ROM drive
Supported CD-Writer (for CD writing features)
Supported portable player (for portable player features; not available for Windows NT or
Windows 2000 systems)
20 MB hard-disk space for program installation
Windows-compatible sound card
Internet Explorer™ 4.0 or later to view the online help
1024x768 pixel screen area
Recommended System Requirements
• 4 GB of hard drive space (This allows for storage of over 100 CDs).
Note: When recording at CD quality, one
minute of recorded music uses 1 Mb of storage
space.
• 24-bit color display (for viewing spectrum and scope analysis)
• 64 MB RAM
Registration
Registering a SIREN Jukebox Download
Users who own a full version of Siren 1.0 and download Siren 1.5 from the Sonic Foundry
web site, need only to uninstall the previous version and install the updated application.
The Siren 1.0 serial number or product unlock key will unlock a full version of Siren 1.5.
OVERVIEW
CHP. 1
3
Once Siren is unlocked, choose Register Siren from the Help menu and follow the dialog
instructions to register the program. While registering is not mandatory, it allows Sonic
Foundry to provide you with technical support, application updates, and special promotions.
Registering a Sonic Foundry SIREN Jukebox CD
Sonic Foundry’s new browserless registration process allows owners to immediately begin
taking full advantage of Siren’s powerful array of features. The system will automatically
detect if Siren is being installed from an authentic Sonic Foundry CD, and if so, unlock all
of the program’s features without requiring any user input.
Once Siren is unlocked, choose Register Siren from the Help menu and follow the dialog
instructions to register the program. While registering is not mandatory, it allows Sonic
Foundry to provide you with technical support, application updates, and special promotions.
If the application was not purchased, users may elect to purchase a full version of Siren, or
use Siren XPress.
Purchasing a Full Version of SIREN Jukebox
If Siren was not purchased, a registration dialog is displayed the first time the program is
launched. From this dialog, users may elect to enter a serial number for a full version of
Siren, or use Siren XPress.
Purchasing SIREN Jukebox Online
To purchase Siren online:
1. Select the I would like to use Siren XPress radio button and click
. Siren XPress is
launched.
2. From the Help menu, choose Instant Upgrade. The Purchase Upgrade dialog is displayed.
3. Select the I want to purchase online radio button and click
. The system attempts to
launch its browser and connect to the Sonic Foundry Web site.
4. Follow the instructions to purchase the upgrade. When the transaction is completed a
Product Unlock Key
is e-mailed to the user.
5. Enter the Product Unlock Key and click
. The full version of Siren is unlocked.
Purchasing SIREN Jukebox Over the Phone
To purchase Siren over the phone:
1. Select the I would like to use Siren XPress radio button and click
. Siren XPress is
launched.
2. From the Help menu, choose Instant Upgrade. The Purchase Upgrade dialog is displayed.
CHP. 1
OVERVIEW
4
3. Select the I want to purchase over the phone radio button and click
Upgrade via Phone
. The Purchase
dialog is displayed.
4. Write down the provided Computer ID number and contact the Sonic Foundry Customer
Service Department at:
• 1-800-577-6642 in the U.S., Canada, and the Virgin Islands
• +800-000-76642 in Austria, Denmark, France, Germany, Italy, Sweden, UK,
Netherlands, and Japan
• +608-256-3133 extension 2300 in all other countries
5. When the transaction is complete, enter the Product Unlock Key and click
. The
full version of Siren is unlocked.
Note: Note: The Computer ID is a number
that serves to identify the computer for
licensing purposes only, and contains no
specific information about you, your
computer, or any files or other data on your
system. Sonic Foundry is aware of your
privacy concerns and strives to collect only as
much data as is required to make your Internet
and/or product use experience as efficient and
satisfying as possible.
Using SIREN Jukebox XPress
Users not wishing to purchase a full version of Siren may use Siren XPress, a limited version
of the application, free of charge. To avoid confusion, features included only in the full
version of Siren are identified with the following icon:
OVERVIEW
CHP. 1
5
Music Files
Music files are any audio file Siren will playback from the computer. Siren supports the
following audio file formats:
File Type
Wave (Microsoft)
MPEG Layer 3
Extension
*.wav
*.mp3
Windows Media
Audio
*.wma
Description
Standard audio format used on Windows-based computers.
Popular audio compression format. In addition to playing .mp3
files, Siren can create .mp3 files from music recorded off audio
CDs, and from .wav files. .Mp3 files are the only files that can be
downloaded to portable players.
Microsoft file compression format that provides security features
to prevent unauthorized duplication. In addition to playing .wma
files, Siren can also create .wma files from music recorded off
audio CDs, as well as from .wav and .mp3 files.
Main Window
Siren’s main window and panels are depicted below. Each of the labeled panels can be
toggled on/off by choosing the appropriate panel in the View menu. For more information, see
SIREN Jukebox Panels on page 15.
Note: For detailed information regarding the
main window, refer to online help.
CHP. 1
OVERVIEW
6
Using Online Help
Siren includes online help, which contains detailed information about all program
components and functions. Internet Explorer 4.0 or higher (included on the Siren CDROM) must be installed on the system to view online help.
Accessing Help
Online help is displayed using the keyboard or the Help menu.
Main Help Window
The main help window is displayed by choosing Contents and Index from the Help menu or
by pressing the F1 key. The main help window contains three tabs which are used to locate
the desired information.
Index Tab
Toolbar
Search Tab
Contents
Tab
Information
Pane
The Contents tab provides a categorized listing of available help topics. Click a book ( ),
and a topic page ( ) to display a topic.
The Index tab provides a complete listing of the help topics available. Use the scroll bar to
scroll through the list or enter a word in the text box to quickly locate related topics. Select
the topic and click
.
The Search tab allows users to enter a keyword and display all pertinent topics in online help.
Enter a keyword in the text box and click
. Select a topic from the list and click
. The selected topic is displayed in the information pane.
OVERVIEW
CHP. 1
7
Help on the Web
Additional help is available on the Sonic Foundry web site. To quickly connect to the Sonic
Foundry web site, choose Sonic Foundry on the Web followed by the appropriate help subject
from Help menu. Siren launches an internal browser and attempts to connect to the
appropriate page on the Sonic Foundry web site, via your Internet Service Provider (ISP).
CHP. 1
OVERVIEW
8
OVERVIEW
CHP. 1
9
CHAPTER
2
Setting Up
SIREN Jukebox
SIREN Jukebox Settings
Prior to using Siren, users must configure various operating settings to allow them to take
full advantage of Siren’s features.
Before using Siren for the first time, users should:
• Customize the Siren window; displaying, sizing, and arranging panels to make the screen
as comfortable and intuitive as possible. For more information, see Customizing the SIREN
Jukebox Screen on page 9.
• Specify the music library folders using the Configuration Wizard. For more information, see
Configuration Wizard on page 10.
• Verify that the computer is configured to play CDs automatically. For more information,
see CD Autoplay on page 47.
• Search the computer for music to begin building a music library.
Customizing the SIREN Jukebox Screen
Users can move and resize the majority of Siren’s panels. Panels can also be toggled on/off by
choosing the appropriate panel from the View menu. For more information, see SIREN
Jukebox Panels on page 15.
CHP. 2
SETTING UP SIREN JUKEBOX
10
Configuration Wizard
The Configuration Wizard is automatically launched the first time Siren is run, and allows users
to configure their Siren preferences.
Note: The Configuration Wizard can also be
launched by choosing Configuration Wizard
from the Options menu.
Completing the Configuration Wizard
To use the Configuration Wizard:
1. Choose Configuration Wizard from the Options menu. The Welcome to the Configuration
Wizard
2. Click
dialog is displayed.
. The Please Enter Your Email Address dialog is displayed.
SETTING UP SIREN JUKEBOX
CHP. 2
11
3. Enter an appropriate e-mail address in the field and click
Files Folder
. The Enter Your Music
dialog is displayed.
Note: Users not wishing to provide an e-mail
address can simply select the Anonymous
checkbox.
4. Accept the default folder location or click
and select the system folder in which
Siren will store music files.
5. Click
CHP. 2
. The Search Computer for Music dialog is displayed.
SETTING UP SIREN JUKEBOX
12
6. If necessary, specify a drive to search from the Look for music in drop-down list and click
. Siren searches the selected hard drive(s) and indicates the number of music files
found.
Note: Users not wishing to search for music
should select the No radio button.
For more information, see Searching for Music on a Hard Drive on page 13.
7. Click
. The Set Default Player dialog is displayed.
SETTING UP SIREN JUKEBOX
CHP. 2
13
8. Select the checkbox(es) corresponding to the file type(s) for which Siren will serve as the
default player.
9. Click
. Siren’s preferences are configured. Individual settings may be edited by
choosing Preferences from the Options menu.
Searching for Music on a Hard Drive
Siren will scan the specified drive(s) for .wav, .mp3, and .wma files, then either physically
move the files to the music files folder or simply add links to each song.
To search the computer for music:
1. Choose Search Computer for Music from the Options menu. The Search Computer for Music
dialog is displayed.
2. Specify the drive(s) to be searched in the Look for music in drop-down list.
3. Select the checkbox(es) corresponding to the file format(s) to be added.
4. To physically move files to the music library folder, select the Move located music files into
my music files folder
checkbox.
When this checkbox is cleared, music files remain in their system location, and Siren
simply creates links to the Manage My Music Library view.
5. Click
to begin searching. Once Siren has completed the search, it indicates the
number of music files found.
6. Click
. The music search is completed and Siren’s main window is displayed.
Searching for Music in a Network, Removable Drive, or Folder
To search a network, removable drive, or folder for music:
CHP. 2
SETTING UP SIREN JUKEBOX
14
1. Select the Navigator panel’s Explore My Files icon.
2. Use the tree view to select the drive or folder to be searched.
3. Right-click and choose Search For Music from the shortcut menu.
4. The Search Computer for Music dialog is displayed.
5. Select the checkbox(es) corresponding to the file format(s) to be added.
6. To physically move files to the music library, select the Move located music files into my
music files folder
checkbox.
When this checkbox is cleared, music files remain in their system location, and Siren
simply creates links to the Manage My Music Library view.
7. Click
to begin searching. Once Siren has completed the search, it indicates the
number of music files found.
8. Click
. The music search is completed and Siren’s main window is displayed.
Compact Mode
Siren allows users to place the application in compact mode and use skins to give the Siren a
new look. Though skins typically include only a portion of available Siren controls (often
only the Transport bar) they are convenient for placing on the desktop and providing limited
Siren control while working in another application.
Toggling Compact Mode On/Off
Users can toggle between Siren’s compact and normal modes by:
• Clicking
in the Transport toolbar
• Choosing Compact/Skin Mode from the View menu
• Pressing Ctrl + M on the keyboard
Selecting a Skin
Siren features a number of built-in skins. To use a skin, simply select it from the Skins menu.
Siren is automatically placed in compact mode and the new skin is displayed.
Getting More Skins
Users can download additional Siren skins, as well as the resources needed to create custom
skins. To download new skins, or the Sonic Foundry Skin Grafter’s Kit, choose Get Skins
from the Skins menu. Siren launches the internal browser and attempts to connects to the
page of the Sonic Foundry web site dedicated to Siren skin support.
SETTING UP SIREN JUKEBOX
CHP. 2
15
CHAPTER
SIREN Jukebox
Panels
3
SIREN Jukebox Panels
Siren features a number of panels designed to help manage music collections, customize
audio attributes, and enhance the jukebox experience.
Displaying Panels
To toggle a panel display on/off, select the appropriate panel from the View menu.
Navigator
The Navigator panel displays several icons designed to assist users in acquiring
and managing personal music libraries.
My Music
The Manage My Music Library icon displays the contents of a personal music
library, views and playlists, in the Explorer panel.
Audio CD
The Play or Record Music CDs icon lists the contents of the audio CD in the
system’s current CD drive.
Explore
The Explore My Files icon launches an Explorer within Siren, allowing users to
navigate the system without exiting the application.
Get Music
The Search for Music on the Internet icon launches Siren’s internal browser and
displays links to several Internet music resource sites.
CHP. 3
SIREN JUKEBOX PANELS
16
Create Music
The Create Music with ACID icon launches any Sonic Foundry ACID product installed on the
system. If an ACID product is not located on the system, Siren launches an internal browser
and attempts to connect to the area of the Sonic Foundry web site dedicated to ACID.
Transport
Eject
Play In Order/Random
Play Once
Next Song/Previous Song
Compact
Mode
Stop
Pause
Play
Record
The Transport panel contains buttons corresponding to Siren’s music playback control. For
more information regarding the Transport panel, refer to online help.
Spectrum
Spectrum is one of Siren’s two visual displays. The Spectrum panel is capable
of displaying real-time visualizations based on FFT (Fast Fourier Transform)
analysis of songs.
Selecting the Spectrum Display
To select the Spectrum panel display, right click on the panel and choose the
desired display from the shortcut menu.
Full Screen Mode
Selecting full screen mode expands the Spectrum display to fill the screen at a user-specified
resolution.
Graphic EQ
The Graphic EQ panel divides the audio spectrum in sixteen bands, and allows users to
customize their listening experience by boosting or cutting specific frequencies.
SIREN JUKEBOX PANELS
CHP. 3
17
Setting the Graphic EQ
To adjust a band, left-click on the fader thumb, and using
the mouse, drag it up or down. If Band Tension is disabled,
individual bands can be adjusted independent of the
surrounding faders. If Band Tension is enabled, adjusting a
fader affects all adjacent faders.
Enabling Graphic EQ
Selecting the Graphic EQ checkbox applies equalization to the current audio. Clearing the
checkbox bypasses the current EQ settings.
Graphic EQ Shortcut Menu
Clicking the title bar of the Graphic EQ panel displays the
Graphic EQ shortcut menu. Using this shortcut menu, users
can quickly:
•Select an EQ preset
•Reset all EQ bands
•Toggle Band Tension on/off
•Enable/disable the Graphic EQ
Reverb
simulates the acoustics of various venues and situations. It can also be used to create
interesting effects by placing sounds in spaces, real and otherwise, where they are normally
not heard.
Reverb
Configuring Reverb
Configuring Siren’s Reverb involves three individual parameters:
• Mix determines the amount of processed sound in the output. When Mix is set to 100%,
only the reverberated signal is heard. For more realistic reverb effects, reduce the mix
level.
• Size determines the time lapse between the initial audio and the onset of reverberation.
This, in turn, determines the illusion of the size of the acoustic space. Longer times are
associated with larger spaces, therefore, increasing the Size values simulates a larger room.
CHP. 3
SIREN JUKEBOX PANELS
18
• Brightness determines the reverb decay time. In a dampened room, walls absorb sound
quickly, whereas in a bright room, such as a gymnasium, walls reflect more sound.
Reverberation in a bright room lasts substantially longer than in a damp room, therefore,
increasing the Brightness level simulates a larger, brighter venue.
Like Graphic EQ, Reverb values are set by left-clicking on
the appropriate slider thumb and dragging it to the left
or right:
•Moving the thumb to the right increases the value.
•Moving the thumb to the left decreases the value.
Users are encouraged to experiment freely with the Reverb parameters to create custom
effects.
Enabling Reverb
Selecting the Reverb checkbox applies reverberation to the current audio. Clearing the
checkbox bypasses the current reverb settings.
Reverb Shortcut Menu
Clicking the title bar of the Reverb panel displays the
Reverb shortcut menu. Using this shortcut menu, users
can quickly:
•Select a Reverb preset
•Reset all Reverb parameters
•Enable/disable the Reverb
Time Stretch
Time Stretch alters
the length of a song without changing its
pitch. It is important to realize that this feature is most
effective for applying light to medium time compression or
expansion. Attempting to severely alter the length of a song
typically results in a distracting distortion of the audio
signal.
Setting Time Stretch
To set Time Stretch, left click on the slider thumb and drag it left or right:
• Moving the thumb to the right speeds the song up, thereby decreasing its length.
• Moving the thumb to the left slows the song down, thereby increasing its length.
SIREN JUKEBOX PANELS
CHP. 3
19
Notice that the Time Stretch value is depicted as a percentage of the song’s original speed.
Note: Double-clicking the Time Stretch slider
thumb returns the song to its original length
and tempo.
Enabling Time Stretch
Selecting the Time Stretch checkbox applies the current setting to the audio. Clearing the
checkbox bypasses the current time stretch settings.
Time Stretch Shortcut Menu
Clicking the title bar of the Time Stretch panel displays the
Time Stretch shortcut menu. Using this shortcut menu, users
can quickly:
•Double the length of a song
•Halve the length of a song
•Restore a song to its original length and tempo
•Enable/disable Time Stretch
Scope
Scope, Siren’s
other visual effect, displays real-time visualizations based on
waveform analysis of songs.
Selecting the Scope Display
To select the Scope display, right click on the panel and choose the desired
display from the shortcut menu.
Full Screen Mode
Choosing full screen mode expands the Scope display to fill the screen at a user-specified size
resolution.
CHP. 3
SIREN JUKEBOX PANELS
20
Song Info
The Song Info panel lists the artist, album, and genre of the current song.
Status Bar
The Status Bar is a scrolling display that provides playback information, based on whether
Siren is in Playback or Recording mode.
Playback Status Bar
During playback, the Status Bar displays:
• The current song’s title, artist, album, sample rate, bit-depth, channels, and bit rate
• The next song’s title, artist, and album
Recording Status Bar
During recording, the Status Bar displays:
•
•
•
•
The name of the song being recorded, its track number, and sample rate
Size of the song (in MB)
Drive location of the music library
Space remaining on drive
Volume
The Volume panel, which contains a volume fader and level meters, allows users to determine
and monitor Siren’s playback volume.
Setting Volume
To set Siren’s volume, left-click the fader thumb and drag it up or down:
• Moving the thumb up increases playback volume.
• Moving the thumb down decreases playback volume.
Volume Shortcut
Right-clicking the Volume panel displays the Volume shortcut menu. Using this menu, users
can:
• Reset volume level clips
SIREN JUKEBOX PANELS
CHP. 3
21
• Enable/disable volume meter labeling
• Determine labeling increments
• Enable/disable the hold peak and hold valley features
For additional information on any of Siren’s panels, refer to online help.
CHP. 3
SIREN JUKEBOX PANELS
22
SIREN JUKEBOX PANELS
CHP. 3
23
CHAPTER
4
Organizing
Music
Organizing Music
Music in the Manage My Music Library view can be categorized, sorted, and filtered. Siren
organizes songs based on information provided with the song, including artist, album, and
genre. If information is not available for a song, Siren places it in an Unknown folder in each
category.
In addition to predefined organization included in the Manage My Music Library view, Siren
can create custom playlists. For more information, see Custom Playlists on page 29.
CD Information
If Siren is able to retrieve information about a CD, either from the CD itself or a local
database, this information is displayed.
Configuring CD Information Preferences
Prior to using the Siren’s CD information features, users must configure the music database
preferences.
To set the music database preferences:
1. Choose Preferences from the Options menu. The Preferences dialog is displayed.
2. Select the CD Info tab.
CHP. 4
ORGANIZING MUSIC
24
3. Select the checkbox(es) corresponding to the desired CD information option(s) and click
. Siren is configured to retrieve CD information automatically when a CD is
inserted and the Play or Record Music CDs icon is clicked.
Compact Disc Database
In addition to the previously discussed option, Siren can retrieve CD information over the
Internet from the Compact Disc Database (CDDB).
Configuring CDDB
Users typically configure CDDB in the Configuration Wizard that is launched the first time
Siren is run. However, CDDB configuration can be edited at any time.
To edit the CDDB configuration:
1. Choose Preferences from the Options menu. The Preferences dialog is displayed.
2. Select the CD Info tab.
3. If desired, select the Automatically get CD Info from the Internet checkbox.
ORGANIZING MUSIC
CHP. 4
25
4. Enter a valid e-mail address in the Email address field and click
. CDDB is
configured.
Note: Users not wishing to sub an e-mail
address can simply select the Anonymous
checkbox.
Using CDDB
To access song information using CDDB:
1. Verify that the computer is connected to the Internet.
2. Place a CD in the CD drive and click the Play or Record Music CDs icon in the Explorer
panel. If Siren is configured to automatically retrieve CDDB information, it is accessed
and displayed. For more information, see Configuring CDDB on page 24.
CHP. 4
ORGANIZING MUSIC
26
If Siren is not configured to automatically retrieve CDDB information, click
choose CD Info, followed by Get from the File menu.
, or
Note: Once Siren retrieves information from
CDDB, it is saved to a local database.
Problems with CDDB Connections
Occasionally, users may experience problems connecting to CDDB. When experiencing
problems connecting to CDDB:
1. Choose Preferences from the Options menu. The Preferences dialog is displayed.
2. Select the CD Info tab.
3. Click
. A list of available CDDB sites is displayed.
4. Select a site and click
. Siren will connect to the new CDDB site when
prompted.
Submitting CDDB Information
Given the number of CDs released each year, it is inevitable that users will eventually
encounter a CD without CDDB information. When this happens, users can submit
information to CDDB, which is added to the database and made available for future users.
To submit CD information to CDDB:
1. Insert a CD for which CDDB has no information and click the Play or Record Music CDs
icon.
2. Manually enter the CD information. For more information, see Adding CD Information
Manually on page 27.
3. Click
, or choose CD Info, followed by Submit from the File menu. Siren attempts to
connect to CDDB, and if successful, submits the user-provided information.
If CDDB submission is unsuccessful, the user will receive an e-mail notification.
Anonymous users, however, will not receive notification of submission problems.
Adding/Editing Song Information
Typically, Siren retrieves song information from a CD or local database and displays the
information in Siren’s Explorer panel. When this information is unavailable, Siren displays
generic song information. For example, when an audio CD containing no song information
is inserted, or a CDDB connection cannot be made, Siren simply lists the tracks numerically.
ORGANIZING MUSIC
CHP. 4
27
Adding CD Information Manually
If Siren is unable to retrieve song information for a CD, information should be manually
entered before the song is recorded to the computer. Siren copies this information while
recording the audio.
To add CD information:
1. Place a CD in the CD drive. Siren alerts the user that CD information cannot be located
and lists the songs numerically.
2. Enter the appropriate information in the Album, Artist, and Genre fields.
3. Select a song.
4. Right-click on the selected song and choose Rename from the shortcut menu. An edit
field is displayed in place of the current song title.
5. Enter the new title and press
Enter . Siren stores the information in a local database, and
retrieves it whenever the CD is inserted. In addition, this information remains with the
songs after they are recorded to the computer.
6. Repeat steps 3 through 5 until all desired songs are named.
Editing Song Information in Views and Playlists
To manually add or edit song information, do one of the following:
• Select the song and edit the artist, album, or genre information in the Song Info panel.
• Select the song and click the area below the category column to be edited. Siren enters
edit mode. Enter the correct information followed by:
• Enter to move one cell down
• Shift + Enter to move one cell up
• Tab to move one cell to the right
• Shift + Tab to move one cell to the right
CHP. 4
ORGANIZING MUSIC
28
• Select the song and choose Properties from the File menu. When the Properties dialog is
displayed, select the Song Info tab. Edit the song information and click
.
Note: When artist, album, or genre
information is edited, the song is resorted in the
If the artist,
album, or genre information does not have an
existing category, Siren creates a new view
containing the song.
Manage My Music Library views.
ORGANIZING MUSIC
CHP. 4
29
Auto Rename Files Command
Users are able to rename linked music files based on the information retrieved from the local
music database. This feature changes a song’s filename to include available song
information, thereby making it more easily identifiable to users. When the Auto Rename
Files feature is used, Siren uses the following renaming format: artist-album-track-title.extension.
Using Auto Rename Files
To use the Auto Rename Files feature:
1. Select a song in the Manage My Music Library view.
2. Choose Auto Rename Files from the Edit menu. The file is renamed according to Siren’s
renaming format.
3. Click
or press F5 to refresh the Manage My Music Library view.
Note: The Auto Rename Files command can
be used on several files simultaneously.
MP3 Files and ID3 Tags
ID3 Tags allow additional information, musical and otherwise, to be saved as part of an .mp3
file.
Saving an ID3 Tag
To save an ID3 tag with an .mp3 file:
1. Add or edit song information as desired. For more information, see Editing Song Information
in Views and Playlists on page 27.
2. From the Edit menu, choose Update ID3 Tags. The appropriate ID3 Tags are added or
edited.
When the song’s properties are viewed, the updated ID3 Tags are included in the
Properties dialog.
Custom Playlists
Siren allows users to create custom playlists from the music library. Playlists enable users to
store links to music located in a number of different views. Using this simple idea, users can
create playlists for parties, work, reading, etc., and since playlists use links to songs rather
than copies, a song can be included in multiple playlists without depleting hard drive space.
CHP. 4
ORGANIZING MUSIC
30
Creating a Playlist
To create a playlist:
1. From the Manage My Music Library view, click the New Playlist button, or choose New
from the Edit menu. Siren creates a new playlist with a default name and displays
it beneath the My Playlists icon.
Playlist
2. Name the playlist and press
Enter
.
Note: Change a playlist name by right-
clicking on it and choosing Rename from the
shortcut menu.
3. Add songs to the playlist using any of the following methods:
• Drag and drop songs from the music library to a playlist
• Select a song and choose Add to Playlist from the Edit menu
• Select a song and click Add to Playlist at the bottom of the Explorer panel
Note: When Add to Playlist is selected, Siren
prompts the user to specify the playlist to which
the song will be added.
An Alternate Method of Creating a Playlist
To create a playlist:
ORGANIZING MUSIC
CHP. 4
31
1. Select the song(s) to be added to the new playlist.
2. Choose Add to Playlist from the Edit menu, or click Add to Playlist at the bottom of the
Explorer
panel.
3. Name the playlist.
Adding a Playlist
Once placed in a playlist, songs can be arranged using drag and drop.
Importing Playlists
To import a playlist:
1. Choose Search Computer for Music from the Options menu. The Search Computer for Music
dialog is displayed.
2. Select the Known Playlists checkbox and click
. Siren searches the computer for
previously created playlists (.m3u or .pls) and adds them to the music library.
Exporting Playlists
To export a playlist:
1. Click the Manage My Music Library icon, or choose Manage My Music Library from the
View
menu.
2. Select a playlist for export.
3. Right-click the mouse and choose Export Playlist from the menu. The Export Playlist dialog
is displayed.
4. Specify a location and name for the .m3u file and click
.
Locking Views and Playlists
Once a view or playlist is created and configured to the user’s satisfaction, it can be locked to
prevent accidental deletion. To lock a view or play, right-click on it in the Explorer panel and
select Locked from the shortcut menu. A checkmark is displayed adjacent to the Locked
command and subsequent right-clicking on the locked view or playlist displays an
unavailable Delete option. To unlock a view or playlist, thereby allowing it to be deleted,
right-click on it and reselect Locked from the shortcut menu.
Note: A locked view or playlist can be
renamed.
CHP. 4
ORGANIZING MUSIC
32
Clean Database
Siren’s Clean Database command, as one might expect, allows users to clear their music
database of deleted and duplicate file entries.
To clean the database:
1. Choose Clean Database from the Edit menu. The Clean Up Database dialog is displayed.
2. Select the checkbox(es) corresponding to the desired option(s) and click
.
Clean Database Functions
Remove Entries to Deleted Files
Siren searches the music database for files that have been deleted from the computer and
removes their database entries.
Delete Duplicate Files Found On Your System
Siren searches the music database for duplicate files and deletes them, retaining a single
database entry for each file.
Ask Before Deleting Items
Sirens prompts the user prior to deleting files or database entries.
Advanced Music Management
Siren features a number of database tools designed to allow users gain superior control over
their music libraries and listening habits. These include the Field Chooser, Sort Bar, Group Bar,
and Filter Bar.
ORGANIZING MUSIC
CHP. 4
33
Field Chooser
The Field Chooser allows users to determine the database categories
used to display, sort, group, and filter their music libraries.
Displaying the Field Chooser
To display the Field Chooser, click
in the database toolbar, or
right-click in the head row and choose Field Chooser from the
shortcut menu.
Explorer Panel Fields
All fields listed in the Field Chooser can be displayed in the Explorer
panel. By default, Siren displays only the name, artist, album, and
genre information for a song.
Adding Fields to the Explorer Panel
To demonstrate adding fields to the Explorer panel:
1. Display any view or playlist.
2. Display the Field Chooser.
3. Click and hold the left mouse button on the desired field in the Field Chooser.
4. Drag the field from the Field Chooser and drop it into the Explorer panel’s head row. When
the field is properly positioned, two small, red arrows appear above and below the head
row.
After the field is dropped, a new field column is added to the head row and all songs in
the list display a value, if applicable.
Removing Fields from the Explorer Panel
To remove a field from the Explorer panel, right-click on the field to be removed, and choose
Remove This Column from the shortcut menu.
CHP. 4
ORGANIZING MUSIC
34
Note: The fields displayed in the Explorer
panel have no effect on sorts, groupings, or
filters applied to the music library.
Editable and Non-Editable Fields
Select fields are populated with information retrieved directly from the music file, the CD,
or a local database, and this information may be permanent, or subject to editing. Other
fields rely on user input for their information. For more information, see Editing Song
Information in Views and Playlists on page 27.
The following table lists all available fields, and identifies each as either editable, or noneditable.
Field
Added
Album
Artist
Bitrate
Comment
File Path
File Size
File Type
Genre
Icon
Last Played
Length
Name
Play Command
Played
Track
Volume Name
Year
Status
Non-editable
Editable
Editable
Non-editable
Editable
Non-editable
Non-editable
Non-editable
Editable
Non-editable
Non-editable
Non-editable
Editable
Non-editable
Non-editable
Editable
Editable
Editable
Sort Bar
The Sort Bar, which can be used from any Manage My Music Library view, allows all songs in
the music library to be listed, or sorted, by field(s). This feature is useful for ordering and
displaying the music library alphabetically (by artist, album, or song name), chronologically,
by date added, number of times played, or by any other available field.
ORGANIZING MUSIC
CHP. 4
35
Displaying the Sort Bar
To display the Sort Bar, click
in the database toolbar, or right-click in the database
toolbar and choose Show Sort Bar from the shortcut menu.
Creating a Sort
To demonstrate creating a sort:
1. Display the All Music view and the Sort Bar.
2. Drag a field (Artist in the case of this demonstration) from the Field Chooser or head row
and drop it in the Sort Bar. When the field is properly positioned, two small, red arrows
appear in the Sort Bar.
The field is added to the Sort Bar with a small, up-pointing arrow, and all music library
artists are listed from A to Z.
3. Click the Artist field button in the Sort Bar. The arrow turns down and the sort reverses
directions; listing all library artists from Z to A.
Note: Clicking a field bar in the head row
automatically adds it to the Sort Bar.
CHP. 4
ORGANIZING MUSIC
36
Multiple Field Sorts
Sorts may be comprised of several fields. Using the previous procedure, users can add
additional sort fields. Continuing with the previous example, adding the Name field to the
Sort Bar will list each artist’s songs alphabetically with the initial sort.
Fields in the Sort Bar can be arranged by dragging and dropping, with the left-most field
being the primary sort.
Removing Fields from a Sort
To remove a field from the Sort Bar, right-click on the field and choose Remove This Sort from
the shortcut menu.
To remove all fields from the Sort Bar, right-click on a field and choose Remove All Sorts from
the shortcut menu.
Saving a Sort
To save a sort as a new view:
1. Click
New View
in the database toolbar, or right-click in the database toolbar and choose Make
from the shortcut menu. A new view with a default name is created.
2. Enter a name for the new view and press
Enter
.
Group Bar
The Group Bar, which can be used in any Manage My Music Library view, groups all songs in the
music library by field(s). This feature is useful for creating simple or complex groups of songs.
For example, grouping by genre allows the user to quickly identify all free jazz songs in the
music library. A multi-level grouping will allow users to easily identify song groupings as
elaborate as all 1997 death-metal .mp3 files with 128kbs bitrates added to the music library
on January 11, 2000.
Displaying the Group Bar
To display the Group Bar, click
in the database toolbar, or right-click in the database
toolbar and choose Show Group Bar from the shortcut menu.
Creating a Grouping
To demonstrate creating a group:
1. Display the All Music view and the Group Bar.
2. Drag the Bitrate field from the Field Chooser or head row and drop it into the Group Bar. All
songs in the music library are grouped and displayed by bitrate.
ORGANIZING MUSIC
CHP. 4
37
3. Drag the Genre field from the Field Chooser or head row and drop it in the Group Bar. All
songs are sorted by bitrate, and sub-sorted by genre.
Using this procedure, users can add additional fields. Fields in the Group Bar can be
arranged by dragging and dropping, with the left-most field being the primary grouping.
Removing Fields from a Grouping
To remove a field from the Group Bar, right-click on the field and choose Remove This Grouping
from the shortcut menu.
To remove all fields from the Group Bar, right-click on a field and choose Remove All Groupings
from the shortcut menu.
Saving a Grouping
To save a grouping as a new view, click
in the database toolbar, or right-click in the
database toolbar and choose Make New View from the shortcut menu. A new view, with a
name based on the grouping field order, is created and displayed.
CHP. 4
ORGANIZING MUSIC
38
Filter Bar
The Filter Bar, which can be used in any Manage My Music Library view, allows users to select,
or filter, songs fitting user-specified criteria. Whereas the Group Bar allows users to group
songs by field, the Filter Bar is more flexible, enabling users to apply comparative values or
ranges to determine which song meet their criteria, regardless of how specific. For example,
all songs between four and five minutes in length. Using Siren’s filter capabilities, users can
quickly isolate all library songs recorded between 1970 and 1980 that are longer than ten
minutes, have the word booty in the title, and have been played more than 25 times, but
haven’t been played since January 1, 2000.
Displaying the Filter Bar
To display the Filter Bar, click
in the database toolbar, or right-click in the database
toolbar and choose Show Filter Bar from the shortcut menu.
Creating a Filter
To demonstrate creating a filter:
1. Display the All Music view and the Filter Bar.
2. Drag the Played field from the Field Chooser or head row and drop it in the Filter Bar. The
Played
field is added to the Filter Bar with a corresponding drop-down list and edit field.
3. Specify less than in the drop-down list.
4. Enter 5 in the edit field.
5. Press
, click
in the database toolbar, or right-click in the Filter Bar and choose
from the shortcut menu. The filter is applied and only songs from the music
library that have been played 5 times or less are listed.
Enter
Apply Filter
Adding a Second Filter
To add a second filter:
ORGANIZING MUSIC
CHP. 4
39
1. Drag the Bitrate field from the Field Chooser or head row and drop it in the Filter Bar. The
Bitrate field
is added under the Played filter with a corresponding drop-down list and edit
field.
2. Specify equals from the drop-down list.
3. Enter 128 kbs in the edit field.
4. Press
, click
in the database toolbar, or right-click in the Filter Bar and choose
from the shortcut menu. The second filter is applied and only songs from the
music library that have been played less than 5 times or less, and have bitrates of 128kbs
are listed.
Enter
Apply Filter
Note: Fields in the Filter Bar cannot be re-
arranged.
Added and Last Played Field Values
Siren allows all views and playlists to be filtered using two different date fields, Added and
Last Played. Since there are countless ways to create a date value, Siren’s database features
have been designed with maximum flexibility. What follows is a partial list of valid date
values:
yesterday
last week
x weeks ago
x hours ago
day last week
month date year
today
next week
x months ago
month last year
day x weeks ago
month (abbr.) date year
tomorrow
x days ago
x years ago
month x years ago
month date
Removing Fields from a Filter
To remove a field from the Filter Bar, right-click on the field and choose Remove This Filter
from the shortcut menu.
CHP. 4
ORGANIZING MUSIC
40
To remove all fields from the Filter Bar, right-click on a field and choose Remove All Filters
from the shortcut menu.
Refreshing a View
After a filter is removed, the view can be updated, or refreshed, by clicking the Refresh
button, located between the Show Filter Bar and Apply Filter buttons.
Apply Filter
Refresh
Display Filter Bar
Saving a Filter
To save a filter as a new playlist:
1. Click
in the database toolbar, or right-click in the database toolbar and choose Make
from the shortcut menu. A new playlist, with a default name, is created and
displayed in the Manage My Music Library view.
New View
2. Enter a name for the new playlist and press
Enter
.
Combining Sorts, Groups, and Filters
As described previously, sorts, groups, and filters can be used independently of each other.
However, Siren’s music organization power can be further exploited by using these functions
in conjunction with each other. For example, users can quickly configure Siren to group
songs by bitrate and genre, sort by length and file type, and filter by date added and number
of times played. Combining these features allows users to find the perfect song for any
situation.
Note: When database features are combined,
they are always applied in Group-Sort-Filter
order.
ORGANIZING MUSIC
CHP. 4
41
CHAPTER
5
Playing and
Recording Music
Playing Music Files with SIREN Jukebox
Once music is added to the music library, it can be played-back from any My Music view or
custom playlist. In addition, Siren will play most .wav, .mp3, and .wma files from the
computer or a network drive.
The Current Playlist
Regardless of whether it is playing from a CD, a music view, a custom playlist, or a network
location, Siren always performs playback using the songs and sequence displayed in the
Current Playlist. Siren generates a Current Playlist each time the user selects a song for playback
from any of Siren’s available sources. To view a Current Playlist:
1. Click the Manage My Music Library icon in the Navigator panel.
2. Select the All Music icon.
3. Select any song in the All Music view and initiate playback.
4. Select the Current Playlist icon, which is located at the bottom on the Explorer tree.
CHP. 5
PLAYING AND RECORDING MUSIC
42
Notice that the current song is highlighted, and the preceding and following songs are
indicated. For more information, see Play in Order versus Play Randomized on page 43.
Instant Current Playlists
Siren generates a Current Playlist whenever the user specifies a folder, CD, view, or even a
single song for playback.
Folders and CDs
When a network folder, computer folder, or CD is selected for playback, its contents
automatically become the Current Playlist. The playback sequence can be as originally
arranged, or randomized. For more information, see Play in Order versus Play Randomized on
page 43.
PLAYING AND RECORDING MUSIC
CHP. 5
43
Music Library
Current Playlists generated from the music library are more involved than those generated
from folders and CDs. The following table describes Siren’s Current Playlist generation based
on user action and the source of the music files. Again, the playback sequence can be as
originally arranged in the music library view, or randomized. For more information, see Play in
Order versus Play Randomized on page 43.
User Action
Resulting Current Playlist
Select a view from the Explorer panel tree Entire content of view is placed in Current
Playlist.
Select a single song
Select a group of songs
Select song from multi-category view
Playback begins with the first song in the
view.
Entire content of view is placed in Current
Playlist.
Playback begins with the selected song.
Only selected songs are placed in Current
Playlist.
Playback begins with the first song
selected.
Only songs located in selected branch are
placed in Current Playlist.
Playback begins with selected song.
Play in Order versus Play Randomized
When playing music from any source, users can specify whether the Current Playlist is
generated using the original order, or with a random order, by clicking the playback toggle
button in the Transport panel.
• When
• When
is displayed, songs are played-back in the listed order
is displayed, song are played-back in a random order
Play Once versus Continuous Play
Like the previous feature, users are able to specify whether Current Playlist playback occurs
once, or is looped infinitely by clicking the appropriate toggle button in the Transport panel.
• When
• When
is displayed, playback is halted once the CD or playlist is complete
is displayed, playback continues infinitely (looped)
Playing Music from a My Music View
To play music from a Manage My Music Library view:
CHP. 5
PLAYING AND RECORDING MUSIC
44
1. Display the contents of the music library by clicking on the Manage My Music Library icon
in the Navigator panel, or by choosing Manage My Music Library from the View menu.
2. Click the All Music view. Siren lists all songs in the music library.
3. Click
on the Transport panel. Siren generates a Current Playlist, begins playing the first
song, and continues through the entire view. To begin playback with an alternate track,
double-click the track, or highlight it and click .
Playing Music from Other Views
To playback music from another of Siren’s views:
1. Display the contents of the music library by clicking on the Manage My Music Library icon
in the Navigator panel, or by choosing Manage My Music Library from the View menu.
2. Select the desired view. All music from the view is sorted and displayed in appropriate
branches.
3. Click the desired branch. Siren displays all songs in the branch.
Note: Depending upon the complexity of the
view, it may be necessary to click through
several layers of branches before locating song
PLAYING AND RECORDING MUSIC
CHP. 5
45
listings.
4. Select a song and click
on the Transport panel, or double-click it to begin playback.
Siren generates a Current Playlist and plays only the songs located in the specified branch.
Playing Music from a Custom Playlist
As discussed previously, Siren will instantly generate a Current Playlist to allow users to
immediately begin listening to music from the music library, a CD, or a network folder/drive.
In addition, Siren also allows users to create custom playlists to satisfy individual tastes or
requirements. To playback music from a playlist:
1. Display the music library by clicking the Manage My Music Library icon in the Navigator
panel or by choosing Manage My Music Library from the View menu.
2. Double-click the My Playlists icon in the Library Manager to display all playlists.
3. Select the desired playlist. The playlist’s songs are listed.
4. Click
on the Transport panel. Siren begins playing the first song in the list and
continues through the playlist. To begin playback with an alternate track, double-click
the track, or select it and click .
For more information, see Custom Playlists on page 29.
Using the Play Command Field
The Play Command field allows users to initiate playback from a view or playlist with a single
mouse click. To use the Play Command field:
1. Display any view or playlist.
2. Display the Field Chooser. For more information, see Field Chooser on page 33.
3. Drag the Play Command field from the Field Chooser, and drop it into the Explorer panel’s
head row. A Play Command column ( ) is added to the Explorer panel.
4. Left-click in the Play Command column. Playback begins with the adjacent song and
continues through the view or playlist.
Note: The Play Command field is displayed by
default in the Current Playlist.
CHP. 5
PLAYING AND RECORDING MUSIC
46
Playing Music from the Computer or a Drive Location
While music is typically played from the music library or a CD, Siren can also play music
from a folder on the computer, or from a network drive. In addition, links to these files can
be created in the Manage My Music Library view for easy accessibility.
Note: Secured .wma files cannot be played
from a network drive. However, .wav and
.mp3 files can be played or copied from a
network location.
To play music from the computer or a network drive:
1. Click the Explore My Files icon in the Navigator panel to view all drives and folders in the
Explorer
panel.
2. Navigate to the file containing the music to be played.
3. Click
. Siren creates a Current Playlist and begins playback with the first song in the list.
To begin playback with a different track, double-click the track, or highlight it and click
.
Adding Music From the Computer or Network to My Music
To add files to the Manage My Music Library view from folders on the computer or a network
drive, do one of the following:
• Choose Search Computer for Music from the Options menu.
• Click the Explore My Files icon, right-click on the desired folder, and choose Search for
Music from the shortcut menu.
If music located on a network drive is linked to a Manage My Music Library view, it is available
only when the computer is connected to that drive.
Identifying Network Music
As stated previously, music located on a network drive is only available when the computer
is connected to the network. Attempting to play music from a network when the computer
is disconnected produces an error message. To avoid error messages when the computer is
disconnected from the network, simply apply a filter using the File Path field, and specify only
songs located at the system’s hard drive address (typically C:). For more information, see Filter
Bar on page 38.
PLAYING AND RECORDING MUSIC
CHP. 5
47
Playing CDs
Siren will play audio CDs from the computer’s CD-ROM drive. Use Siren’s Transport panel or
the Transport menu to control CD playback.
CD Autoplay
If Siren and the system are configured to play CDs automatically, Siren initiates CD
playback when a CD is inserted.
Configuring Siren Autoplay
To configure Siren’s CD Autoplay feature:
1. Choose Configuration Wizard from the Options menu. The Welcome to the Configuration
Wizard
2. Click
dialog is displayed.
until the Set Default Player dialog is displayed.
3. Select the Set as the default player when audio CD is inserted checkbox and click
.
The user is alerted that the configuration is complete.
4. Click
CHP. 5
. Siren’s Autoplay feature is configured.
PLAYING AND RECORDING MUSIC
48
Note: If Siren still does not automatically play
CDs, and the system is running Windows 9x,
the system’s Autoplay feature must be
configured.
Configuring System Autoplay (Windows 9x only)
To configure the system to automatically play CDs:
1. Choose Settings, then Control Panel from the
menu.
2. Double-click the System icon.
3. Select the Device Manager tab.
4. Click the appropriate
to display the system’s CD-ROM drive(s).
5. Select the desired CD-ROM drive and click
.
6. Select the Settings tab.
7. Select the Auto insert notification checkbox and click
. The system’s Autoplay
feature is configured.
Playing CDs Without Autoplay
If the system is not configured to play CDs automatically, or to play a CD currently in the
CD-ROM drive:
1. Click the Play or Record Music CDs icon in Siren’s Navigator panel. The Explorer panel
displays the available tracks and Siren attempts to retrieve and display CD information
from local databases, or from the CD itself.
If this information is not available, the songs are listed numerically. Users may attempt to
retrieve CD information from the Internet using CDDB. For more information, see
Compact Disc Database on page 24.
2. Click
on the Transport panel. Siren makes the CDs content the Current Playlist, and plays
the entire CD, starting with the first track. To begin playback with an alternate track,
double-click the track, or highlight it and click .
PLAYING AND RECORDING MUSIC
CHP. 5
49
Recording from CD
Siren is able to record songs from a CD, place the files in a user-specified location, and create
links to those files in the Manage My Music Library view. In addition, users can listen to music
from the music library while recording CDs to the computer. However, it is not possible to
listen to a CD while recording it to the computer. In addition, while tracks can be recorded
from a previously created custom CD, these tracks cannot be written to another CD.
Selecting the Music Files View
As mentioned previously, users must specify the system folder for music storage. To specify
the music files folder:
1. From the Options menu, choose Preferences. The Preferences dialog is displayed.
2. Select the General tab.
3. Enter the path to the folder in the Music files folder field and click
. The folder
location is updated.
Specifying the Record Format
Users are able to record tracks to the computer in .mp3 or .wma format. To specify the record
format:
1. Choose Preferences from the Options menu. The Preferences dialog is displayed.
2. Select the Recording tab.
3. Specify the record format from the Record to Library format drop-down list.
CHP. 5
PLAYING AND RECORDING MUSIC
50
Siren displays the available recording bitrates.
4. Select the recording bitrate. For more information, see Recording Bitrates on page 50.
5. If encoding to .mp3, use the MP3 Quality slider to select the recording quality.
• Setting to Fastest Encode (far left) records files as quickly as possible.
• Setting to Highest Quality (far right) records files with the highest possible audio quality.
6. If desired, select the MP3VBR Quality checkbox and use the corresponding slider to set the
encoding sensitivity value. For more information, see MP3VBR Quality on page 51.
7. Click
. The configuration is saved.
Recording Bitrates
Available recording bitrates vary based on the recording format. The Windows Media Audio
(.wma) format offers 64, 96, 128, and 160kbps. Conversely, selecting the MPEG Layer 3
Audio (.mp3) format allows the user to specify from the following bitrates: 96, 128, 160,
192, 256 or 320kbps.
PLAYING AND RECORDING MUSIC
CHP. 5
51
Siren XPress users are limited to 64 and 96kbps bitrate in the .wma format, and twenty .mp3
encodes.
MP3VBR Quality
Variable bitrate (VBR) is an encoding method available only when recording to .mp3. The
bitrate is automatically adjusted during recording, resulting in higher quality audio and
smaller file sizes.
Recording from CD to the Computer
To record music from CD to the computer:
1. Place an audio CD in the system’s CD-ROM drive.
2. Click the Play or Record Music CDs icon in the Navigator panel. The CD’s tracks and
database information are displayed.
Note: If the system has multiple CD drives,
users must specify the appropriate drive to
display the track listing and database
information.
3. If the track information is not displayed, access CDDB or add this information manually.
For more information, see CD Information on page 23.
Note: If track information is not displayed or
added, Siren records all songs as unknown and
numbers them sequentially.
4. Select the track(s) to be recorded and click Record to Library from the Explorer menu
command bar, or choose Record to Library from the File menu.
CHP. 5
PLAYING AND RECORDING MUSIC
52
Siren records the song(s) to the music files folder and a progress meter is displayed in the
Status panel. To halt recording, click Cancel.
Monitoring the Recording Process
To monitor the recording progress, specify Recording List from the Explorer toolbar dropdown list.
PLAYING AND RECORDING MUSIC
CHP. 5
53
CHAPTER
Custom CDs
6
Creating CDs
Once music is in the music library, users can create custom CDs using a supported CD writer.
Custom CDs can be constructed using personal CD tracks along with .wav, .mp3, and .wma
files recorded or downloaded from the Internet.
Note: .Wma files may only be written to a
custom CD if the file includes a flag permitting
the file to be written to CD.
In accordance with copyright law, users may create a personal copy of copyrighted material.
This allows users to record music from personal CDs to the computer, and use that music to
create a custom CD of that music. However, users may not copy a custom CD or record its
music to another computer.
Configuring SIREN Jukebox to Write Custom CDs
To configure Siren to write custom CDs:
1. Choose Preferences from the Options menu. The Preferences dialog is displayed.
2. Select the CD Settings tab.
3. Specify the connected CD-R drive from the Write to CD drive drop-down list.
4. Set an appropriate Write to CD speed for the drive and click
.
Creating Custom CDs
To create a custom CD:
1. Verify that Siren is properly configured to create CDs. For more information, see
Configuring SIREN Jukebox to Write Custom CDs on page 53.
CHP. 6
CUSTOM CDS
54
2. Verify that the supported CD writer (CD-R or CD-RW) is connected to the computer.
3. In the Explorer panel, select the song(s) to be written to the CD.
4. Click Write to CD in the Explorer panel’s command bar or choose Write to CD from the File
menu. The Create CD dialog is displayed.
The Create CD dialog contains two very important values.
• The Time needed for audio value indicates the total time of the selected song(s).
• The Time available on disc value indicates the space remaining on the CD.
Note: The user will be alerted if the selected
song(s) require more space than the amount
remaining on the CD.
5. Click
. Siren begins writing the selected music to the CD and the Create CD
dialog displays the progress and time remaining.
Note: Sonic Foundry recommends allowing
Siren to complete this operation. Clicking
may render the CD unusable.
Cancel,
CUSTOM CDS
CHP. 6
55
6. When Siren finishes adding the selected song(s), it displays a message declaring that the
operation was successful. Click
.
If any error messages are displayed during CD writing, refer to Siren’s online help.
Use this method to write additional songs to the CD. The CD can be removed from the
drive and inserted in the future to continue adding songs, because the CD remains at the
current position and each song appends to it. When the custom CD is complete or full, it
must be closed. For more information, see Closing the CD Session on page 56.
CHP. 6
CUSTOM CDS
56
Closing the CD Session
Once all desired songs are written to a custom CD, the CD session must be closed. Closing a
CD allows it to be played in consumer CD players. Once a CD is closed, new songs can no
longer be added.
To close a CD session:
1. If it is not currently displayed, open the Create CD dialog by choosing Close CD Session
from the File menu.
2. Click
.Siren begins closing the CD and the Create CD dialog displays the progress
and time remaining.
3. When Siren completes the closing process, it displays a message declaring that the
operation was successful. Click
.
If any error messages are displayed during CD writing, refer to Siren’s online help.
CUSTOM CDS
CHP. 6
57
CHAPTER
7
Downloading
Music to a
Portable Player
Sending Music to a Portable Player
Siren is able to download .mp3 files to a portable player, as well as manage files once they are
placed in the player’s memory. However, Siren’s portable player features are available only
for Windows 95 and 98 operating systems.
Siren downloads music to portable players in one of two ways:
• Songs are selected from the Explorer panel, and downloaded using the Send to Portable
Player command. For more information, see Selecting Songs from the Explorer Window on page
57.
• Songs are selected and downloaded while managing the player. For more information, see
Downloading Music while Managing the Portable Player on page 59.
Note: Windows and dialogs pictured in this
chapter are examples only. Screens and options
vary based on the player.
Selecting Songs from the Explorer Window
To select songs for download from the Explorer panel:
1. Verify that the portable player is properly connected to the computer as described in the
player’s documentation.
2. In the Explorer panel, select the .mp3 file(s) to be downloaded to the portable player.
CHP. 7
DOWNLOADING MUSIC TO A PORTABLE PLAYER
58
3. Click Send to Portable Player in the Explorer panel’s command bar, or choose Send to
Portable Player
from the File menu. The Portable Player Manager dialog is displayed.
All connected portable players are displayed in the Portable Player Manager dialog,
however, if the player is turned off, its icon is inactive (crossed-out).
Note: If the player has a battery save feature,
and is idle for an extended period of time, it
may display as inactive even if properly
connected and previously on.
4. Click
appropriate to the desired portable player. The content of the player’s internal
memory, and any removable memory cards, is displayed.
DOWNLOADING MUSIC TO A PORTABLE PLAYER
CHP. 7
59
5. Select the memory, or folder, to which the selected music will be added. For more
information, see Folders on page 59.
6. Click
. The Portable Player Manager dialog displays the download progress of each
song.
Note: Sonic Foundry recommends allowing
Siren to complete this operation. Clicking
Cancel may leave the portable player in an
unknown state.
Once all selected songs are downloaded, the Portable Player Manager dialog closes and
Siren’s main screen is displayed. To manage songs in the player’s memory, choose Manage
Portable Player from the File menu. For more information, see Managing the Portable Player
on page 61.
Folders
Select portable player models support folders. If the connected player supports this feature,
the
button is active in the Portable Player Manager dialog. For more information
about folders, refer to online help.
Downloading Music while Managing the Portable Player
To download music while managing the portable player:
1. Choose Manage Portable Player from the File menu. The Portable Player Manager dialog is
displayed.
2. Click
CHP. 7
. The Open dialog is displayed.
DOWNLOADING MUSIC TO A PORTABLE PLAYER
60
3. Select the system folder containing the song(s) to be downloaded.
4. Select the song(s) to download.
Note: To select multiple songs, use
5. Click
Ctrl
-click.
. The Portable Player Manager dialog displays the download progress of each
song.
Note: Sonic Foundry recommends allowing
Siren to complete this operation. Clicking
leave the portable player in an
unknown state.
Cancel may
DOWNLOADING MUSIC TO A PORTABLE PLAYER
CHP. 7
61
After Siren downloads all selected songs, the Portable Player Manager dialog displays a list of
songs in the player.
Managing the Portable Player
In addition to downloading .mp3 files to portable players, Siren can also manage files.
However, management options vary based on the make and model of the player.
To manage music in a portable player:
1. Verify that the portable player is properly connected to the computer, as described in the
player’s documentation.
2. Choose Manage Portable Player from the File menu. The Portable Player Manager dialog is
displayed, listing songs in the player’s memory.
CHP. 7
DOWNLOADING MUSIC TO A PORTABLE PLAYER
62
From this dialog, users are able to download .mp3 files to the portable player, as well as
manage the .mp3 files stored in the player’s memory. Management options vary based on
the make and model of the portable player.
Note: For more information on portable
player management features, refer to Siren’s
online help.
DOWNLOADING MUSIC TO A PORTABLE PLAYER
CHP. 7
63
Index
Music, 5
A
Filter Bar, 38
Adding song information, 26
Full screen mode, 16
C
CD Information, 23, 24
G
Getting CD information, 24
CDs, 41
Creating, 53
Playing, 48
Recording, 49
Clean database, 32
Graphic EQ, 16
Group Bar, 36
H
Compact Disc Database (CDDB), 24, 48
Highlights, 1
Compact mode, 14
Configuration Wizard, 9, 10
M
Music
Organizing, 23
Playing, 41
Recording, 41, 49
Searching, 13
Copyright information, 53
Creating custom CDs, 53
Custom playlists, 29
D
Music files, 5
Downloading music to a portable player, 57
E
My Music library, 23
O
European contact information Title page
Online help
Accessing, 6
Via the web, 7
Field Chooser, 33
Organizing music, 23
Files
Overview, 1
F
INDEX
64
Transport controls, 47
P
Transport panel, 16
Panels, 9, 15
Playing CDs, 41
U
Playing music, 41
Using online help, 6
Playlist, 45
Playlists, 29
V
Volume, 20
Portable player
downloading music, 57
Preferences, 10
W
Web site
Help, using, 7
R
Random play, 43
Recording
music, 41, 49
Reverb, 17
S
Searching for music, 13
Sending music to a portable player, 57
Serial Number
Title page
Setting up Siren, 9
Siren
Highlights, 1
Overview, 1
Preferences, 10
Setting up, 9
Window, 5
Skins, 14
Song Info, 20, 26
Sort Bar, 34
Status bar, 20
System requirements, 2
T
Technical support Title page
INDEX