1
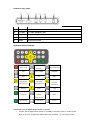
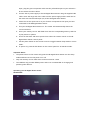
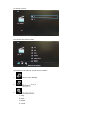
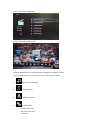
Thank you for purchasing the HD Digital Photo Viewer by Delkin Devices. The Digital Photo Viewer is an ideal companion to game cameras, compact digital cameras, camcorders and other imaging devices that lets you easily view and share photos and video on any television set in full 1080 HD quality. Be sure to read these instructions thoroughly before enjoying your HD Digital Photo Viewer. OVERVIEW: TOP PANEL Button Marking Function ESC / 1 PWR Escape / To power on press for 3 seconds, to power off press for 8 seconds 2 ▲ Move up / Fast forward 3 ▼ Move down / Rewind 4 Enter Enter / Play / Pause 5 V+ Volume up 6 V- Volume down 7 M Menu / Pressing for 3 seconds will return player to default settings OVERVIEW: FRONT PANEL 8 CF / MD Compact Flash, Micro Drive Reader 9 SD / MS /xD SD, SDHC, MS, xD Reader 10 USB USB Reader 11 IR IR Remote Receiver OVERVIEW: BACK PANEL 12 Mini USB Mini USB to connect to power supply or PC 13 HDMI HDMI connector 14 Y / CVBS Y / CVBS (PAL/NTSC) jack 15 Pb Pb jack 16 Pr Pr jack 17 Audio 3.5mm phone jack OVERVIEW: REMOTE CONTROL Power On/Off Change Resolution Access Main Page Mute Y, Pb, Pr Mode HDMI Mode Menu Up Back Left/Rewind/ Enter/Play/ Slide Show Off Pause/Zoom Out Sub Title Down Right/Fast Forward/ Slide Show On Stop Stereo/Left Volume Up Channel/ Rotate Right Channel Volume Down Change Track Zoom In Connecting your HD Digital Photo Viewer to your TV 1. Connect the HD Digital Photo Viewer to an HDMI, Component (Y,Pb,Pr /CVBS) or RCA input on your TV. (Component & RCA cables not included). * If connecting via RCA input, plug the green component cable into the yellow RCA input on your television – do not utilize the other cables. 2. Connect the AC power supply to the HD Digital Photo Viewer using the supplied USB cable. Insert the large end of the cable into the power supply and the small end of the cable into the Mini USB input (12) of the HD Digital Photo Viewer. 3. Select the correct input source on your TV that corresponds to the input you have connected to the HD Digital Photo Viewer. 4. Turn your HD Digital Photo Viewer on. The viewer will automatically detect the correct interface. 5. Insert your memory card or USB flash drive into the corresponding memory card slot to play movies or photos. 6. Access all functions and menu options from either the remote control or the HD Digital Photo Viewer control panel. 7. Use the power button on the remote control to toggle between sleep mode or active mode. 8. To power off, press the ESC button on the control panel for at least 8 seconds. Important Notes: The power button on the remote only puts the HD Digital Photo Viewer into the sleep mode and does not turn the power on or off Only one memory card or flash drive can be accessed at a time The USB host only provides 500mA power and is not recommended for charging and powering other devices Operating your HD Digital Photo Viewer MOVIE MODE To choose a movie: First choose the source folder: Press MENU in the play list to call the file toolbar: 1. Return to the desktop 2. ->Z,Z->A 3. 1. Copy 2. Paste 3. Delete 4. Cancel A list of files will be displayed: \ Choose the file you wish to view Press the MENU button in movie play mode to display the playback toolbar Use Left/Right button to choose the function. Press enter to confirm. 1. Return to File Manager 2. Track Selection 3. Subtitle Selection 4. Zoom Options A: Video full screen B: Screen full screen C: Default D: 4:3 F: 16:9 E: Fit view 5. Play Mode A: Only once B: Rotate one C: Rotate all D: Sequence F: Random 6. Channel Selection 1. Stereo 2. Left channel 3. Right channel 7. Subtitle Size 1. Subtitle size: small 2. Subtitle size: medium 3. Subtitle size: large 8. Subtitle Color 1. Default 2. Red 3. Blue PICTURE MODE Choose the picture mode: Choose the source folder: Choose the file you wish to view: Press the MENU button in picture play mode to display the picture toolbar. Use the Left/Right button to choose the option, then press enter to confirm. 1. Return to the File Manager 2. Auto play 3. Operation Zoom in Zoom out Rotate Counter Clockwise Rotate Clockwise Scroll Up Scroll Down Scroll Right Scroll Left 4. Browse 5. Music 6. Slide Show Transition mode Default Random Mosaic 7. Slide Show Time Interval 3s 5s 10s 20s 8. Slide Show Sequence Next photo Previous photo Random photos BROWSER Choose the browser: Choose the source folder: If there is an incompatible file, then the icon will be displayed Important Note: The HD Digital Photo Viewer firmware can be upgraded in the browser mode. SETTING MODE Choose Your Viewing Mode 1. Output Type 1. PAL 2. NTSC 3. 480P 4. 720P (50HZ) 5. 720P (60HZ) 6.1080P (50HZ) 7. 1080P (60HZ) 8. HDMI-480I 9. HDMI-480P 10. HDMI-576I 11. HDMI-576P 12. HDMI-720P (50HZ) 13. HDMI-720P (60HZ) 14. HDMI-1080I (50HZ) 15. HDMI-1080I (60HZ) 16. HDMI-1080P (24HZ) 17. HDMI-1080P (50HZ) 18. HDMI-1080P (60HZ) Choose Your Language 1. S-Chinese 2. T-Chinese 3. English 4. Japanese Choose Your Key Tone 1. On 2. Off System Information (firmware version) Restore Factory Defaults Trouble Shooting 1. No Signal to the TV 2. • Check the power and make sure the power supply indicator is lit • Make sure the cable(s) are connected correctly • Make sure the TV is set to the correct input source No Sound HDMI mode • Make sure the TV is set to HDMI audio • Make sure the speaker is working • Check to make sure the mute button is not pressed Y,Pb,Pr / CVBS mode • Make sure the audio cable is connected to the 3.5mm phone jack • Check that the TV audio in jack is connected • Make sure the speaker is working • Check to make sure the mute button is not pressed 3. Remote Control does not work • Check the battery and replace if necessary 4. Reset the unit to factory default settings • Press M button for 3 seconds, wait for the device to reboot 5. Unit will not power off • Sleep mode is only possible when using the remote control. If you want to power off the device, press the control panel ESC button for 8 seconds 6. Cannot see files on card • The unit supports one memory card at one time. Be sure that only one card is inserted 7. Cannot charge another device from the USB port • The USB Host only provides 500mA power SPECIFICATIONS Specification Model Number DDHDTV-VIEW I/O CF, (SD/SDHC, MS, XD) Slots USB 1.1 / 2.0 Mini USB (power) IR Receiver Language Interface Video Out English, T-Chinese, S-Chinese, Japanese CVBS Y P Br HDMI Resolution Playback Power Audio Out 3.5mm Phone jack HDMI 480P, 576P, 720P, 1080P Y P Br 480P, 576P, 720P, 1080P CVBS Video Format NTSC, PAL AVI, MPG, WMV, MOV, MTS Photo Format JPG, BMP Power Input AC to DC USB Type 5V/1A Power Consumption Working:650mA Standby:400mA Size Dimensions 26mm x 138mm x 95mm Weight 145g HDTV Viewer, power cord, HDMI cable, remote control, user manual 1 TB Included Memory Card CF SD / SDHC 2 TB XD 4 GB MS PRO 32 GB HDMI Version V 1.2 Firmware Upgrade By memory card 13350 Kirkham Way Poway, CA 92064. EU: +44(0)1922.636.250 All: 858.391.1234 Toll Free: 800.637.8087 © Delkin Devices, Inc. All Rights Reserved. Delkin Devices logos and trademarks are property of Delkin Devices, Inc. All other logos and brand names are trademarks of their respective owner. PAK MAN DDHDTV-VIEW 1 YEAR WARRANTY FROM DATE OF SALE, PROOF OF PURCHASE REQUIRED.