1
Getting The Most From
Your Batteries
This document is directed toward battery management for batteries / multi-chargers /
powered cradles used with LXE mobile devices with a Windows operating system.
A companion document Getting the Most From the Batteries Used in LXE Legacy and DOS
Devices is available for those with obsolete or discontinued LXE battery powered
terminals/computers. Battery management for obsolete LXE devices is not available in this
document.
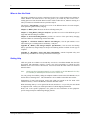
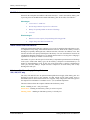
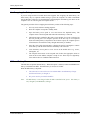
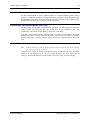
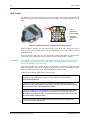
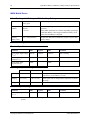
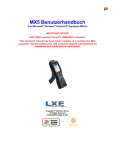
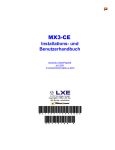
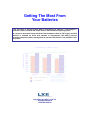
Available Capacity
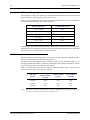
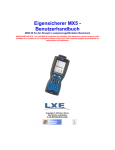
Self-Discharge : Battery Types
100%
90%
80%
70%
60%
50%
40%
30%
20%
10%
0%
2 weeks
4 weeks
NiCad and NiMH Batteries
Li-Ion Batteries
6 weeks
The rate at which the battery selfdischarges depends on the battery
construction, ambient temperature,
initial capacity of the battery, and
the amount of time that passes since
the battery was fully charged.
Copyright © Oct 2007 by LXE Inc.
All Rights Reserved
E-INF-BATTERY-G
Notices – Please Read
Note to the Reader -- This document is intended to be informational only and is offered as a
courtesy to purchasers of LXE battery powered products.
Most non-LXE battery charger/analyzer manufacturers include a product user manual with their battery charger/analyzer or
batteries. Use the information in this guide as an additional source of information to the manufacturer’s guide. LXE strongly
urges you to heed the cautions and warnings contained within the manufacturer’s user guide.
LXE Inc. reserves the right to make improvements or changes in the products described in this manual at any time without
notice. While reasonable efforts have been made in the preparation of this document to assure its accuracy, LXE assumes no
liability resulting from any errors or omissions in this document, or from the use of the information contained herein. Further,
LXE Incorporated, reserves the right to revise this publication and to make changes to it from time to time without any obligation
to notify any person or organization of such revision or changes.
Copyright:
This document is copyrighted. All rights are reserved. This document may not, in whole or in part, be copied, photocopied,
reproduced, translated or reduced to any electronic medium or machine-readable form without prior consent, in writing, from
LXE Inc.
Copyright © 2007 by LXE Inc. An EMS Technologies Company.
125 Technology Parkway, Norcross, GA 30092 U.S.A. (770) 447-4224
Trademarks:
LXE® is a registered trademark of LXE Inc.
Microsoft, Windows and the Windows logo are registered trademarks of Microsoft Corporation in the United States and/or other
countries.
All other brand or product names are trademarks or registered trademarks of their respective companies or organizations. When
this manual is in PDF format: “Acrobat ® Reader Copyright © 2007 Adobe Systems Incorporated. All rights reserved. Adobe,
the Adobe logo, Acrobat, and the Acrobat logo are trademarks of Adobe Systems Incorporated.” applies.
The user is strongly cautioned to read Appendix C, “Regulatory Notices and Safety Information”.
Important safety cautions, warnings and regulatory information is contained in Appendix C.
Important: This symbol is placed on the product to remind users to dispose of Waste Electrical and
Electronic Equipment (WEEE) appropriately, per Directive 2002-96-EC. In most areas, this product can
be recycled, reclaimed and re-used when properly discarded. Do not discard labeled units with trash.
For information about proper disposal, contact LXE through your local sales representative, or visit
www.lxe.com.
Revision Notice
Added HX3 and MX8 battery, charger and powered cradle related information.
Updated HX2 battery, charger and powered cradle related information
Entire Manual
Updated MX7 and MX8 powered cradle with spare battery charging capability
information.
Removed Legacy and DOS device information and placed it in a separate document titled
Getting the Most From the Batteries Used in LXE Legacy and DOS Devices.
Table of Contents
CHAPTER 1 INTRODUCTION
1
Overview ................................................................................................................................................. 1
When to Use this Guide ........................................................................................................................ 2
Getting Help............................................................................................................................................ 2
Obsolete Equipment............................................................................................................................................3
Related Manuals .................................................................................................................................................3
Battery Chargers and Analyzers .......................................................................................................... 4
New Batteries and Stand Loss ............................................................................................................. 4
Battery Maintenance.............................................................................................................................. 4
Battery Construction Types.................................................................................................................. 5
NiCad Batteries ...................................................................................................................................................5
NiMH Batteries ...................................................................................................................................................5
Li-Ion Batteries ...................................................................................................................................................6
About Lithium-Ion Batteries ..............................................................................................................................6
SLA Batteries ......................................................................................................................................................7
About Sealed Lead-Acid Batteries.....................................................................................................................7
Uninterruptible Power Supply Battery Pack – VX5, VX6, VX7 only...............................................................7
Battery Types used in LXE Equipment ............................................................................................................8
Quick Start.............................................................................................................................................. 9
The Volts and mAh Messages ..........................................................................................................................10
Extending Battery Life......................................................................................................................... 11
Battery Warning Messages on Computers ....................................................................................... 12
Battery Replacement ........................................................................................................................... 12
Hot Swapping the Battery ................................................................................................................................13
RX2 and Battery Power ...................................................................................................................................13
Set Up a Battery Maintenance Routine.............................................................................................. 14
Battery Identification........................................................................................................................................14
Analysis Scheduling ..........................................................................................................................................14
HX1 Only ...........................................................................................................................................................14
MX6 Only ..........................................................................................................................................................14
A Simple Battery Usage Routine .....................................................................................................................15
Sample Log Sheets for Battery Maintenance ...................................................................................................16
CHAPTER 2 BATTERY LIFE
17
Overview ............................................................................................................................................... 17
Factors Affecting Battery Life ............................................................................................................ 18
Memory Effect...................................................................................................................................................19
SLA Battery Lifespan and Power Drain.........................................................................................................19
Message Rate and Transmissions ....................................................................................................................19
Battery Storage .................................................................................................................................................19
SLA Batteries...................................................................................................................................................19
Temperature, Time, and Capacity ..................................................................................................................20
Self-Discharge..................................................................................................................................................20
Peripheral Devices ............................................................................................................................................21
Number of Devices and Time in Use ...............................................................................................................21
LXE Scanner Current Requirements................................................................................................................21
LXE Windows Computer Power Management Features..............................................................................22
E-INF-BATTERY-G
Getting The Most From Your Batteries
ii
Table of Contents
CHAPTER 3 USING BATTERY CHARGERS/ANALYZERS
23
Overview ............................................................................................................................................... 23
Types of Battery Charger/Analyzers.................................................................................................. 23
The Life Cycle Of A Battery................................................................................................................. 24
Charger/Analyzer Functions............................................................................................................... 24
Analyze Mode ....................................................................................................................................................24
Discharge Mode.................................................................................................................................................24
Charge Mode .....................................................................................................................................................24
Condition Mode.................................................................................................................................................25
Recalibration and Relearn Modes (HX1 Only)..............................................................................................25
Power Off...........................................................................................................................................................25
Single-Unit Chargers ........................................................................................................................... 26
How To: RX2 Battery Charger .......................................................................................................................26
How To: MX5 External Power Supply ...........................................................................................................27
Troubleshooting ...............................................................................................................................................27
How To: MX5 Belt Battery Charger...............................................................................................................28
Multi-Unit Charger/Analyzers ............................................................................................................. 29
How To: HX2 Multi-Charger ..........................................................................................................................29
How To: MX3 Multi-Charger Plus .................................................................................................................31
Interpreting the LEDs.......................................................................................................................................32
Important MX3 Battery Charger Version Information ....................................................................................33
How To: MX5 Multi-Charger..........................................................................................................................34
How To: MX6 Four Bay Charger / Analyzer.................................................................................................35
LEDs ................................................................................................................................................................36
How To: MX7 Four Bay Charger / Analyzer.................................................................................................37
Interpreting the LEDs.......................................................................................................................................39
How To: MX8 Four Bay Charger ...................................................................................................................40
Interpreting the LEDs.......................................................................................................................................40
How To: HX1 Four Bay Charger ....................................................................................................................41
Power LED.......................................................................................................................................................41
Status LED .......................................................................................................................................................41
Display .............................................................................................................................................................42
CHAPTER 4 POWERED DOCKING STATIONS / CRADLES
43
Overview ............................................................................................................................................... 43
Related Manuals ...............................................................................................................................................43
HX2 Desktop Cradle ............................................................................................................................ 44
MX3 Cradles ......................................................................................................................................... 45
MX5 Cradles ......................................................................................................................................... 46
MX6 Cradles ......................................................................................................................................... 47
MX6 Cradle Indicators and LEDs ..................................................................................................................47
Powered Desktop Cradle..................................................................................................................................47
Powered Vehicle Cradle...................................................................................................................................47
MX7 Desktop Cradle ............................................................................................................................ 48
MX8 Desktop Cradle ............................................................................................................................ 50
Troubleshooting Cradles and Docking Stations .............................................................................. 52
APPENDIX A LXE PART NUMBERS: BATTERIES, CRADLES AND CHARGERS
53
Battery Listing and Part Numbers...................................................................................................... 53
Battery Chargers and Docking Stations............................................................................................ 54
Getting The Most From Your Batteries
E-INF-BATTERY-G
Table of Contents
iii
APPENDIX B BATTERY AND BATTERY CHARGER/ANALYZER SPECIFICATIONS
57
HX1 Hands-Free Voice Device............................................................................................................ 57
HX1 Rechargeable Battery ..............................................................................................................................57
HX1 Multi-Charger ..........................................................................................................................................57
Electrical Specifications...................................................................................................................................57
Operating Temperature Ranges........................................................................................................................57
HX2/HX3 Wearable ............................................................................................................................... 58
HX2/HX3 Rechargeable Batteries...................................................................................................................58
HX2/HX3 Multi-Charger .................................................................................................................................58
Electrical Specifications...................................................................................................................................58
Operating Temperature Ranges........................................................................................................................58
MX3X and MX3-RFID Mobile Device................................................................................................... 59
Li-Ion Rechargeable Battery ...........................................................................................................................59
MX3 Multi-Charger Plus .................................................................................................................................59
Electrical Specifications...................................................................................................................................59
Operating Temperature Ranges........................................................................................................................59
MX5X Mobile Device ............................................................................................................................ 60
Li-Ion Rechargeable Battery and SLA Auxiliary Battery ............................................................................60
MX5 Multi-Charger .........................................................................................................................................60
Electrical Specifications...................................................................................................................................60
Operating Temperature Ranges........................................................................................................................60
MX5 Battery Belt Charger...............................................................................................................................60
MX6 with Windows Mobile OS............................................................................................................ 61
Li-Ion Rechargeable Battery ...........................................................................................................................61
MX6 Four Bay Charger/Analyzer...................................................................................................................61
MX7 Hand-Held..................................................................................................................................... 62
MX7 Rechargeable Battery..............................................................................................................................62
MX7 Multi-Charger .........................................................................................................................................62
Electrical Specifications...................................................................................................................................62
Operating Temperature Ranges........................................................................................................................62
MX8 Hand-Held..................................................................................................................................... 63
MX8 Rechargeable Battery..............................................................................................................................63
MX8 Battery Multi-Charger............................................................................................................................63
Electrical Specifications...................................................................................................................................63
Operating Temperature Ranges........................................................................................................................63
RX2 Vehicle Mounted RFID Tag Reader ............................................................................................ 64
In-Unit Rechargeable Battery..........................................................................................................................64
RX2 Battery Charger .......................................................................................................................................64
Electrical Specifications...................................................................................................................................64
Operating Temperature Ranges........................................................................................................................64
APPENDIX C REGULATORY NOTICES AND SAFETY WARNINGS
65
Revision History................................................................................................................................... 67
E-INF-BATTERY-G
Getting The Most From Your Batteries
iv
Table of Contents
Illustrations
Figure 1-1 Identify Components ..........................................................................................................................9
Figure 1-2 Determine Age of the Battery ..........................................................................................................11
Figure 3-1 RX2 Battery Charger and Cables .....................................................................................................26
Figure 3-2 MX5 Battery Charging LED ............................................................................................................27
Figure 3-3 HX2 Multi-Charger..........................................................................................................................29
Figure 3-4 MX3 Multi-Charger Plus .................................................................................................................31
Figure 3-5 LCD Display and Dome Switch.......................................................................................................32
Figure 3-6 MX5 Multi-Charger .........................................................................................................................34
Figure 3-7 MX6 Four Bay Charger / Analyzer..................................................................................................35
Figure 3-8 MX7 Five Bay Charger / Analyzer ..................................................................................................37
Figure 3-9 LCD Display and Dome Switch.......................................................................................................38
Figure 3-10 MX8 Four Bay Charger .................................................................................................................40
Figure 3-11 HX1 Four Bay Charger ..................................................................................................................41
Figure 4-1 MX3 Vehicle Mount and Desktop Docking Cradle LED ................................................................45
Figure 4-2 MX3 LED Indicators........................................................................................................................45
Figure 4-3 MX5 Cradle Power Supply and Charging Indicator ........................................................................46
Figure 4-4 MX7 Desktop Cradle .......................................................................................................................48
Figure 4-5 MX7 Desktop Cradle Front Label....................................................................................................48
Figure 4-6 MX8 Desktop Cradle .......................................................................................................................50
Figure 4-7 MX8 Desktop Cradle Front Label....................................................................................................50
Getting The Most From Your Batteries
E-INF-BATTERY-G
Chapter 1 Introduction
Overview
This guide discusses the rechargeable power supplies for LXE mobile devices with a Windows
operating system. The primary audience for this document is anyone who uses nickel-metalhydride (NiMH), lithium-ion (Li-Ion) and sealed lead-acid (SLA) batteries in LXE mobile
devices.
LXE computers may have one or more types of batteries installed:
•
The main battery is a removable battery (or battery pack) that can be charged in the
computer using a charging dock or removed from the computer and charged using a
battery charger/analyzer. The main battery powers the computer and provides normal
operation. The battery powered RX2 is an exception. The main battery cannot be
removed from the RX2 and is recharged in the unit.
•
The internal backup battery is not removable by the user. The backup battery recharges
using current from the main battery or recharges along with the main battery when the
computer is docked in a powered cradle. The backup battery is designed to save certain
information such as time and date in the event of a main battery power failure. Refer to
the computer’s reference guide for more details on the backup battery.
•
An auxiliary battery provides an additional source of power, either for the computer or
accessories. An MX5 uses an auxiliary battery worn on a belt to provide power for the
MX5 heater.
This document uses the term “backup battery” to refer to the internal backup battery. Extra main
batteries kept as backup for damaged or depleted main batteries are referred to as “spare
batteries”.
Note:
While the primary audience for this document is users of mobile devices with a Windows
operating system, users of vehicle mounted devices may find interest in reviewing the
power management sections, in order to conserve the life of the vehicle’s battery.
This document is directed toward battery management for batteries / multi-chargers /
powered cradles used with LXE mobile devices with a Windows operating system.
A companion document Getting the Most From the Batteries Used in LXE Legacy and DOS
Devices is available for those with obsolete or discontinued LXE battery powered
terminals/computers. Battery management for obsolete LXE devices is not available in this
document.
E-INF-BATTERY-G
Getting The Most From Your Batteries
2
When to Use this Guide
When to Use this Guide
This guide is intended to be used as a supplement for the User’s Guides and Reference Guides for
LXE’s Windows CE mobile devices. Use this guide as you would any other source book -reading portions to learn about the batteries used in LXE’s mobile devices, and then referring to it
when you need more information about a particular subject.
This chapter, “Introduction” provides an overview of the different batteries for each computer,
and a quick start guide to battery charging.
Chapter 2, “Battery Life” discusses the factors affecting battery life.
Chapter 3, “Using Battery Chargers/Analyzers” provides an overview of the different types of
single and multi-unit chargers available.
Chapter 4, “Powered Docking Stations” provides an overview of the spare battery charging
function available on some docking stations and cradles.
Appendix A, “LXE Part Numbers: Batteries and Chargers”, lists the part numbers to use
when ordering or re-ordering batteries and battery / analyzers.
Appendix B, “Battery and Charger/Analyzer Specifications”, lists the main and backup
battery specifications, charger/analyzers and powered docking stations available for each type of
computer.
Appendix C, “Regulatory Notice and Safety Information” contains important safety and
precautionary information for working with batteries and chargers.
Getting Help
LXE user guides are available on CD and they can also be viewed/downloaded from the LXE
ServicePass and PartnerPass websites. Contact your LXE representative to obtain the LXE
Manuals CD or access to these LXE websites. You can also check the LXE websites for the latest
manual releases.
Note:
Obsolete/archived equipment manuals are not available on the LXE Manuals CD. They
are available for download from the ServicePass website only.
You can get help from LXE by calling the telephone numbers listed on the LXE Manuals CD, in
the file titled “Contacting LXE”. This information is also available on the LXE main website.
Explanations of terms and acronyms used in this guide are located in the file titled “LXE
Technical Glossary” on the LXE Manuals CD and on the LXE website.
When the backup battery is to be replaced in the unit (most have a 2-5 year life), the unit should
be shipped to LXE. Contact your LXE representative to obtain shipping information.
Please refer to the specific equipment’s user guides for more information on the equipmentspecific charger/analyzers and docking/charging stations.
Getting The Most From Your Batteries
E-INF-BATTERY-G
Getting Help
3
Obsolete Equipment
The LXE Series 120, 200, 300, 1100, 1200, 2100, 2200 and 2300 Legacy units are obsolete. LXE
DOS computers are obsolete. The VX4 and MX3-CE Windows computers are obsolete. The
information contained in this document relating to obsolete/expired equipment has been made
available as a courtesy to LXE’s customers. Please contact your LXE customer support
representative for assistance with these units.
Getting the Most From the Batteries Used in LXE Legacy and DOS Devices is available for those
with obsolete or discontinued LXE battery powered terminals, computers, and docking stations.
Note:
Charger, multicharger and cradle manuals for obsolete LXE equipment are available on
the LXE ServicePass website (ServicePass / Documentation / Archives).
Related Manuals
Cradle Manuals
HX2 Cradle Reference Guide – HX2, HX3
MX3 Cradle Reference Guide – MX3, MX3-CE, MX3X
MX5 Cradle Reference Guide – MX5 PPC, MX5X
MX6 Cradle Reference Guide – MX6 PPC, MX6 WM
MX7 Cradle Reference Guide – MX7
MX8 Cradle Reference Guide – MX8
Charger Manuals
HX1 Multi-Charger User’s Guide – HX1
HX2 Multi-Charger User’s Guide – HX2, HX3
MX3 Multi-Charger Plus User’s Guide -- MX3, MX3-CE, MX3X
MX5 Multi-Charger User’s Guide – MX5 PPC, MX5X
MX7 Multi-Charger User’s Guide – MX7
MX8 Multi-Charger User’s Guide – MX8
Note:
E-INF-BATTERY-G
Information on the RX2 Battery Charger can be found in the RX2 Reference Guide.
Information on the MX6 Multi-Charger can be found in the MX6 Reference Guide.
Getting The Most From Your Batteries
4
Battery Chargers and Analyzers
Battery Chargers and Analyzers
LXE offers several configurations of chargers, charger/analyzers and powered docking stations
for NiCad, NiMH, Li-Ion and SLA batteries. Each battery station is pre-configured with the
specific software and battery adapter designed for:
1.
the type of battery to be maintained (NiMH, NiCad, Li-Ion or SLA) and
2.
the mAh rating of the battery.
Only. Do not attempt to insert an incorrect battery into the charging well of a multi-charger or
cradle designed for a different battery. Damage to the battery, the multi-charger or the cradle may
result.
New Batteries and Stand Loss
When you receive new Li-Ion or SLA batteries from LXE, you should charge the batteries prior to
use or storage.
SLA and Li-Ion batteries do not require conditioning. Conditioning shortens a Li-Ion battery’s
life. SLA batteries should only be stored with a full charge. However, please see the following
“Battery Maintenance” section for special information on HX1 and MX6 batteries.
Battery Maintenance
NiMH and NiCad batteries should periodically be conditioned to maintain full capacity. Some
LXE Windows CE mobile devices have a Battery Control Panel that enables
discharging/recharging of NiMH and NiCad backup batteries (also known as a coin or button
battery) in the mobile devices.
Some Li-Ion batteries (like those used in the HX1 and MX6) contain a “gas gauge” that monitors
battery capacity and reports this to the mobile device and the battery charger. Because the charge
routines may be conservative, over time the “calculated” capacity can differ from the actual
capacity of the battery. The “gas gauge” is reset by the recalibration cycle (HX1 charger) or the
analyze cycle (MX6 charger).
All batteries should be fully charged before storage. Periodically recharge batteries in long term
storage.
Getting The Most From Your Batteries
E-INF-BATTERY-G
Battery Construction Types
5
Battery Construction Types
LXE offers three types of main batteries or Main Battery packs:
•
Nickel-Cadmium (NiCad) batteries.
•
Nickel-Metal-Hydride (NiMH) batteries.
•
Lithium-Ion (Li-Ion) batteries.
The internal backup batteries are either Lithium, NiMH or NiCad, however, the backup battery
(also known as a coin or button battery) is not user replaceable. The unit should be returned to
LXE when the backup battery needs replacing.
Due to their size and weight, Sealed Lead-Acid (SLA) batteries are used as auxiliary batteries.
NiCad Batteries
Named for the Nickel-Cadmium construction.
Advantages:
•
Considerable power
•
Tolerance for wider range of operating temperatures
•
Lasts for more charge/discharge cycles
•
Shorter charge time
Disadvantages:
•
“Memory effect” necessitates periodic discharge
•
“Stand loss” can be significant
•
Environmentally unfriendly due to toxic metals
NiMH Batteries
Named for the Nickel-Metal hydride construction. When the DC powered option is not selected,
the RX2 is powered by an optional internal (non-user serviceable) NiMH battery pack.
Advantages:
•
More capacity than NiCad batteries
•
No poisonous metals
•
Less prone to “memory effect”
Disadvantages:
E-INF-BATTERY-G
•
Higher “stand loss” than NiCad batteries
•
Longer charge time than NiCad batteries
Getting The Most From Your Batteries
6
Battery Construction Types
Li-Ion Batteries
Named for the Lithium-Ion construction.
Advantages:
•
Higher energy density – less weight / more power
•
No “memory effect”
•
Less “stand loss”
•
No poisonous metals
Disadvantages:
•
Higher cost
•
Longer charging cycles
•
More sensitive to temperatures while charging
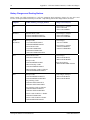
About Lithium-Ion Batteries
Li-Ion batteries (like all batteries) gradually lose their capacity over time (in a linear fashion) and
never just stop working. This is important to remember – most CE devices, like the HX2, MX3X,
MX8, etc., are always 'on' even when in the Suspend state and draw battery power at all times.
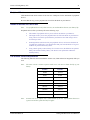
Use the following chart to determine when to replace the battery:
Battery Number
HX1A477BATTERY
HX2A301BATTSTD
HX2A302BATTEXT
MX3A378BATT
MX3A379BATT
MX3A380RFIDBATT
MX5A379BATT
MX6A380BATT
MX7A380BATT
MX8A380BATT
Fits these LXE
computers
HX1
HX2 / HX3
HX2 / HX3
100% capacity
(mAh)
1700
2000
4000
80% capacity
(mAh)
1360
1600
3200
MX3X
1800
1140
MX3-RFID
MX5X
MX6
MX7
MX8
1800
2800
2000
2200
3000
1140
2240
1600
1760
2400
Deciding when to replace the Main Battery pack in these Microsoft Windows CE powered
devices is difficult to quantify because it is very application specific. 1000 mAh may be the cutoff
for one customer who uses the computer frequently, while 300 mAh may be perfectly fine for a
customer who only occasionally uses the computer. You need to determine the point at which
battery life becomes unacceptable for your business practices and replace the Main Battery pack
with a fully charged pack before that point.
Getting The Most From Your Batteries
E-INF-BATTERY-G
Battery Construction Types
7
SLA Batteries
Named for the lead plates and sulfuric acid based electrolyte – used in the auxiliary battery pack
to provide power for the MX5 heater and the UPS battery pack for the VX5, VX6 and VX7.
Advantages:
•
Lower rates of “stand loss”
•
Provide large amounts of power for a short time
•
Battery life span dependent on amount of discharge
•
Low cost
Disadvantages:
•
Batteries can lose capacity if kept discharged for long periods
•
Longer charge time than NiCad batteries
About Sealed Lead-Acid Batteries
Although sealed lead-acid batteries experience a lower rate of stand loss than other battery types,
it is important to fully charge sealed lead-acid batteries after use. When an SLA battery is left in a
discharged (or partially discharged) state, chemical reactions, referred to as sulfation, occur. This
reaction can reduce the capacity and lifespan of the battery over time. SLA batteries stored for an
extended time should be recharged every six months when stored in a cool, dry place. Charging is
required more frequently in warmer or cooler storage.
The number of cycles in the life span of a SLA battery is dependent upon the amount of discharge
in the cycles. Unlike other battery types, the SLA battery’s lifespan is not determined by a set
number of charge/discharge cycles. If only 50% of the SLA battery’s capacity is discharged in
each cycle, the SLA battery’s lifespan increases compared to an SLA battery that is fully
discharged in each cycle.
Uninterruptible Power Supply Battery Pack –
VX5, VX6, VX7 only
The VX5, VX6 and VX7 have an optional Uninterruptible Power Supply (UPS) battery pack. It is
designed to provide power to the computer for short periods of time when vehicle power is
unavailable (such as when vehicle batteries are swapped). Fully charged, the UPS battery powers
the computer for a minimum of 15 minutes at 25º C (77º F) ambient temperature.
The Power Status LED on the computer indicates the UPS battery status:
Green – Running on 12V – 80V power input
Solid Yellow – Running on UPS battery, battery is not low on power
Flashing Yellow – Running on UPS battery, battery is critically low.
E-INF-BATTERY-G
Getting The Most From Your Batteries
8
Battery Construction Types
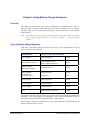
Battery Types used in LXE Equipment
These are the main battery types recommended for use with LXE hand-held terminals and
computers:
LXE Product
Battery Type
2000 mAh (Li-Ion)
4000 mAh (Li-Ion)
HX2 / HX3 Computer
1800 mAh (Li-Ion)
MX3X Computer
1800mAh (Li-Ion)
MX3-RFID Computer
2800 mAh (Li-Ion)
MX5X Computer
2000 mAh (Li-Ion)
MX6 Computer
2200 mAh (Li-Ion)
MX7 Computer
3000 mAh (Li-Ion)
MX8 Computer
1700 mAh (Li-Ion)
HX1 Computer
See Also
See Appendix A “LXE Part Numbers: Batteries and Chargers” for a listing of LXE approved
batteries and battery chargers for these LXE products.
Getting The Most From Your Batteries
E-INF-BATTERY-G
Quick Start
9
Quick Start
This section’s instructions are abbreviated and based on the assumption that your new battery
charger/analyzer is pre-configured for the appropriate battery type and requires only a power
source.
Note:
Your battery charger/analyzer may have different options or naming conventions than is
represented below. Please refer to the information in the following chapters for charger
specific information.
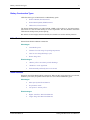
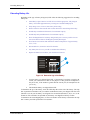
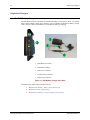
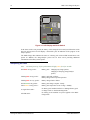
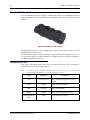
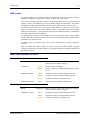
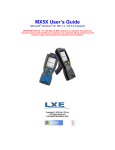
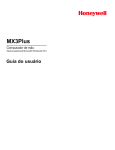
Figure 1-1 Identify Components
1
Battery Charging Well
2
Retaining Clip
3
Battery Charging Contacts in Charging Well
How To
1.
Insert the battery into the charging well with the charging contacts touching the battery
contacts.
2.
If you wish to simply charge the battery, install a battery in a charging station and touch
nothing.
3.
The charge process begins, and the Charge LED comes on with a steady glow. The charger
continuously charges a battery as long as the battery is connected.
4.
The Charge LED extinguishes and the Ready LED illuminates when the battery is fully
charged and ready for use.
Periodically check the battery mAh rating against the manufacturer’s optimum mAh rating to
determine the condition of the battery. Charger/Analyzers with LED screens display the last
measured capacity of the battery during several mode function operations.
E-INF-BATTERY-G
Getting The Most From Your Batteries
10
Quick Start
Use This Mode
Condition
When You …
Prepare a new battery for use or restore a deficient battery to maximum
available power.
Charge
Want to fast charge a battery and maintain its full charge capacity via
trickle charge until needed.
Analyze
Need to measure a battery’s capacity. This process first discharges then
charges the battery. The measured result can be compared against the
battery specifications.
Discharge
Want to verify the performance of another battery charger or check for
excessive “stand-loss”.
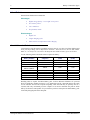
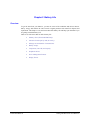
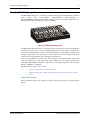
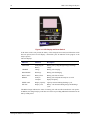
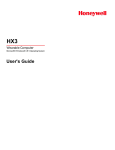
The Volts and mAh Messages
DISCHARGE
1
ANALYZE
Note:
2100mAh
7.2V
Visible on the LCD Information Center only.
The “V” or volts message continuously displays the measured battery voltage. This measurement
should increase through the charging cycles and decrease during the discharge cycles.
The mAh display will continuously track the depleted energy or capacity of the battery. The
message will display the capacity in increasing 11 mAh increments, during the discharge cycles.
Getting The Most From Your Batteries
E-INF-BATTERY-G
Extending Battery Life
11
Extending Battery Life
Regardless of the type of battery being used, LXE offers the following suggestions for extending
battery life:
•
Immediately replace batteries in LXE devices with the appropriate, fully charged
battery when LXE equipment battery warnings are issued/heard/displayed.
•
Fully charge a new Li-Ion or SLA battery before using.
•
Remove batteries from unused units or units that will be unused longer than a day.
•
Periodically recondition HX1 batteries for maximum capacity.
•
Periodically analyze MX6 batteries for maximum capacity.
•
Place discharged batteries in battery charger/analyzers as soon as possible. Do not
store SLA batteries that are discharged or partially discharged.
•
Store batteries in locations that maintain an ambient temperature of approximately
25°C (77°F).
•
Discard defective, shorted or end-of-life batteries.
•
Any battery that is over a year old is considered an old battery.
•
Replace all batteries more than a year old with new batteries.
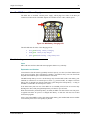
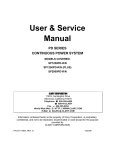
Figure 1-2 Determine Age of the Battery
1
Year the battery was shipped from LXE. If the number is less than or equal to the
current year (assumed to be 2006 for the purposes of this guide) the assumption is
the year is 200_. If the number is greater than the current year, the assumption is the
year is 199_.
2
The month the battery was shipped from LXE.
To determine the age of the battery, check the LXE ship date on the side of the battery. The ship
date is punched out and shows the year and the month that the battery was shipped. The first field
(labeled 1-0) is the year the battery was shipped. The second field (labeled J, F, M, A, etc.) is the
month. So if the 6 and the F are punched out, the battery was shipped in February of 2006.
To determine the actual shipping date, use the serial number on the battery to determine the ship
date. Contact your LXE representative for assistance.
E-INF-BATTERY-G
Getting The Most From Your Batteries
12
Battery Warning Messages on Computers
Battery Warning Messages on Computers
Many LXE battery operated units have been programmed to either display a warning message
and/or emit distinctive beeps when battery capacity has fallen to a pre-determined level.
The warning messages displayed on the screen may be similar to the following:
Low Battery Warning
Replace Battery Now
Critically Low
System Will Power Off In n Seconds
Do not ignore the warnings. The messages are displayed to warn you that the battery must be
replaced or data will be lost.
Follow the instructions displayed on the screen or listed in the respective equipment’s user guide.
The instructions are directed toward proper unit shutdown and battery replacement.
Battery Replacement
Battery replacement instructions for LXE computers are fully documented in the user and
reference guides delivered with the units. Please refer to the manuals for complete instruction. If
the computer supports “hot swapping” the main battery, the instructions follow.
In general, the battery replacement procedures consist of the following steps:
1.
If the unit is powered on, save any work, and close running programs.
2.
Place the unit in suspend (Windows CE equipped devices).
3.
Open the battery access panel or cover and remove the depleted battery.
4.
Insert an appropriate fully charged battery, aligning the positive and negative
contacts on the battery with the metal contacts in the unit.
5.
Close the battery access panel or cover.
6.
Turn the unit on or resume the unit from suspend mode.
Place the depleted battery in the appropriate battery charger/analyzer.
Getting The Most From Your Batteries
E-INF-BATTERY-G
Battery Replacement
13
Hot Swapping the Battery
If you are using an LXE CE mobile device that supports “hot swapping” the main battery, the
main battery may be replaced without having to power the computer off. LXE recommends
placing Windows CE devices in Suspend before hotswapping the main battery pack. Refer to the
computer’s user or reference guide for complete details.
The general procedure for hot swapping the main battery consists of the following steps:
1.
Save any work, and close running programs.
2.
Place the computer in suspend or standby mode.
3.
Open the battery access panel or cover and remove the depleted battery. The
computer enters critical suspend mode when the main battery is removed.
4.
The backup battery maintains data such as time and date for at least 5 minutes but
does not provide power for computer operation. If the hot swap is not completed
before the backup battery is depleted or the off timer expires, the computer powers
off and must be rebooted after a fully charged main battery is installed.
5.
Insert the correct fully charged battery, aligning the positive and negative contacts
on the battery with the metal contacts in the battery well in the unit.
6.
Close the battery access panel or cover. Secure to the mobile device e.g. screws,
locking tabs, etc.
7.
The computer then returns to the suspend state. Follow the appropriate action to
return to the on-state and the computer is ready for use. There may be a slight delay
if the radio needs to re-establish an RF connection.
RX2 and Battery Power
The RX2 has an optional internal battery. When this option is ordered, a 4000 mAh NiMH main
battery is installed in the RX2. The RX2 battery is not user serviceable.
When the RX2 battery is depleted:
Note:
E-INF-BATTERY-G
•
The unit must be removed from service and attached to an RX2 Battery Charger
until the main battery is charged, or
•
DC power must be provided for the RX2.
The RX2 battery is not charged when the RX2 is attached to DC power. The battery is
only charged by the RX2 Battery Charger.
Getting The Most From Your Batteries
14
Set Up a Battery Maintenance Routine
Set Up a Battery Maintenance Routine
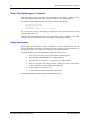
Put the information in this document to work for you by incorporating a battery usage routine.
Managing your batteries with a battery maintenance routine is intended to ensure:
Note:
•
You get as much battery life as you can.
•
You need fewer batteries per shift.
•
Every shift has fully charged batteries.
•
There is a battery slot on the charger for each battery at the end of every shift.
•
All unused batteries are placed in a charger at the end of every shift.
•
The computer’s backup battery (if equipped) has sufficient capacity to maintain the
computer if the main battery fails until a fresh main battery can be installed.
It is not necessary to place spare batteries in chargers; lay the battery pack contact-side
up in a protected environment.
Battery Identification
Label batteries with an identification number, symbol, or color. Base the identification scheme on
the type of equipment that uses the battery, the type of battery (NiCad, NiMH, Li-Ion or SLA)
and, if necessary, the specific charger/analyzer that accepts the battery type.
Note:
The outside of the battery charger/analyzer may look the same, but the internal
programming and algorithms, as well as the charger cup configuration, are the factors
that determine the type of battery that can be maintained in each particular battery
charger/analyzer.
Place a blank label, such as a mailing label, on the battery for recording the date and capacity
reading (spare batteries too). Do not cover the battery’s charging terminals with the label. Record
on the battery the date and capacity reading each time it is analyzed.
Note:
You may use a log sheet instead of a label for tracking capacity readings. However, the
labels ensure that the necessary information concerning each battery is always with that
battery.
Analysis Scheduling
Periodically check the battery mAh rating against the manufacturer’s optimum mAh rating to
determine the condition of the battery. Charger/Analyzers with LED screens display the last
measured capacity of the battery during several mode or function operations.
HX1 Only
The HX1 battery charger includes a recalibration routine. This routine should be performed on the
HX1 battery pack at least once per month to maintain maximum battery capacity.
MX6 Only
The MX6 battery charger includes an analyze routine. This routine should be performed on the
MX6 battery pack periodically to maintain maximum battery capacity.
Getting The Most From Your Batteries
E-INF-BATTERY-G
Set Up a Battery Maintenance Routine
15
A Simple Battery Usage Routine
A color coding routine used for a large or small operation that uses the same kind of battery in all
computers:
First
Color code all batteries by shift:
Shift 1
Shift 2
Shift 3
Blue
Red
Green
Second
Charge all batteries according to color. For example, all blue coded batteries
should be charged during shifts 2 and 3.
Third
Operators place all batteries into chargers at the end of every shift.
Fourth
As appropriate, condition (NiMH and NiCad), recalibrate (HX1) or analyze
(MX6) all batteries once a month according to the color code on the battery.
Designate a specific time to analyze each group of color coded batteries. See
the sample log sheets for battery maintenance that follow.
Fifth
Track battery capacity readings by recording the date and capacity reading for
each battery on the label (or log sheet).
Sixth
The computer’s internal backup battery (if equipped) may need to be
discharged and recharged once or twice a year for maximum life. LXE
computers with such an internal battery include a discharge utility for the
backup battery. Refer to the computer’s reference guide for details.
E-INF-BATTERY-G
Getting The Most From Your Batteries
16
Set Up a Battery Maintenance Routine
Sample Log Sheets for Battery Maintenance
MX3X Main Battery
Charger/Analyzer:
MX3 Charger Plus
Charger Identification:
(Serial Number)
Placed in Service:
(Date)
Battery Type:
Li-Ion 1800 mAh
Battery Serial Number /
Date Placed in Service
Date
Charged
Shift
Date
Analyzed
Final Capacity
Reading
Coin (Backup) Battery Maintenance
Equipment:
MX3X
Serial Number:
(on exterior label)
Placed in Service:
(Date)
Backup Battery Type:
50 mAh
Backup Battery
Getting The Most From Your Batteries
Shift
Date
Discharged
Date
Recharged
Final Capacity
Reading
E-INF-BATTERY-G
Chapter 2 Battery Life
Overview
To get the most from your batteries, you must be aware of the conditions and devices that use
battery energy and shorten the time between original purchase and end-of-life disposal and
replacement. This chapter covers the factors that affect battery life and helps you determine if you
are getting reasonable battery life.
There are several factors that can affect battery life:
E-INF-BATTERY-G
•
Memory effect (NiCad and NiMH only).
•
Amount of rated capacity used (SLA only).
•
Message rate and number of transmissions.
•
Battery storage.
•
Temperature, time idle, and capacity.
•
Peripheral devices.
•
Power Management Features .
•
Display Timers.
Getting The Most From Your Batteries
18
Factors Affecting Battery Life
Factors Affecting Battery Life
Refer to the following list of estimated battery life for the following batteries:
1
LXE Product
Battery Type
and Rating
Minimum Battery Life
(Before Replacement)
HX1
Li-Ion 1700 mAh
500 charge/discharge cycles
HX2 / HX3
Li-Ion 2000 or 4000 mAh
500 charge/discharge cycles
MX3X / MX3-RFID
Li-Ion 1400 mAh
Li-Ion 1800 mAh
500 charge/discharge cycles
MX5
Li-Ion 2800 mAh
500 charge/discharge cycles
MX5 Belt Battery
SLA 9Ah
200-300 charge/full discharge cycles
MX6
Li-Ion 2000 mAh
500 charge/discharge cycles
MX7
Li-Ion 2200 mAh
500 charge/discharge cycles
MX8
Li-Ion 3000 mAh
500 charge/discharge cycles
RX2
NiMH 4000 mAh
500 charge/discharge cycles
VX5/VX6/VX7 UPS
Battery Pack
SLA 2500 mAh
One year
1
The SLA battery lifespan greatly increases when the battery is not fully discharged in each
cycle.
Getting The Most From Your Batteries
E-INF-BATTERY-G
Factors Affecting Battery Life
19
Memory Effect
Memory effect occurs when batteries are recharged before they are fully discharged.
Over time, the portion of the NiCad battery that is not allowed to discharge becomes inactive,
resulting in shortened battery life. New NiCad and NiMH batteries must first be conditioned.
Li-Ion batteries will continue to recharge to full capacity without being affected by “memory
effect.” However, the HX1 and MX6 batteries contain an internal “gas gauge”. Over time, this
gauge may report less than actual battery capacity. This internal gauge can be reset via the
recalibration cycle (HX1 charger) or the analyze cycle (MX6).
SLA Battery Lifespan and Power Drain
The SLA battery is rated for 200 to 300 cycles when completely drained in each use before
recharging. If the battery is used for only 50% of its rated capacity, the life span is approximately
500 cycles. If the battery is used for only 30% of its rated capacity, the life span is approximately
1000 cycles.
Message Rate and Transmissions
Message rate is the number of messages transmitted per hour. For example, if you transmit 15
messages per hour, your message rate is 15. As the message rate increases battery life decreases.
Transmitting a message
•
requires energy from the battery.
•
can require the backlighting to come on in your mobile device.
Battery Storage
When a battery is not in use, lay the battery pack contact-side up in a protected environment. Do
not store charged batteries in an unpowered multi-charger or charging cradle.
Note:
Battery packs may leak up to 1 mA current through the battery contacts when left in an
unpowered battery well.
SLA Batteries
SLA batteries should always be fully charged before storing. If stored for extended periods, SLA
batteries should be periodically recharged. When stored in a cool, dry location SLA batteries
should be recharged after six months of storage. Significantly hotter or cooler locations may
require more frequent charging.
Storing an SLA battery in a discharged or partially discharged state can result in loss of battery
capacity and shorter battery life due to chemical reactions within the battery.
E-INF-BATTERY-G
Getting The Most From Your Batteries
20
Factors Affecting Battery Life
Temperature, Time, and Capacity
The temperature at which you operate your equipment affects how batteries perform. You should
charge all batteries, when possible, at or near 25°C (77°F).
Refer to the following table on how room temperature directly affects the life of a NiCad battery
in a 2280 terminal transmitting 360 messages each hour:
Room Temperature
Available Battery Life
-30°C (-22°F)
34%
-20°C (-4°F)
64%
-10°C (14°F)
80%
0°C (32°F)
88%
25°C (77°F)
100%
50°C (122°F)
90%
Ambient temperatures affect batteries differently. NIMH battery life decreases when stored in low
temperature areas, Li-Ion battery life decreases when stored in high temperature areas and NiCad
battery life decreases when stored in low temperature areas.
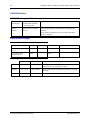
Self-Discharge
Batteries should be stored at temperatures close to 25°C (77°F) because higher temperatures cause
batteries to self discharge faster than lower temperatures.
All batteries begin self-discharging after receiving a charge. The rate at which the battery selfdischarges depends on the battery construction, temperature, initial capacity of the battery, and the
amount of time that passes since the battery was charged.
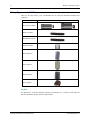
Refer to the following table on how the capacity of different battery types is affected by the
amount of time that passes after a battery is charged:
Note:
Time Since
Charge
NiCad and
NiMH Available
Capacity
Li-Ion Available
Capacity
SLA Available
Capacity
2 Weeks
80%
95%
98%
4 Weeks
70%
90%
96%
6 Weeks
65%
85%
94%
This table is based on ideal storage conditions. Temperatures significantly above 25ºC
(77ºF) increase the self-discharge rate of all batteries.
Getting The Most From Your Batteries
E-INF-BATTERY-G
Factors Affecting Battery Life
21
Peripheral Devices
LXE hand-held and vehicle mount CE devices have COM ports for the attachment of peripheral
devices.
Be aware that the way you use peripheral devices affects the drain on your batteries.
Number of Devices and Time in Use
Note:
Use peripheral devices only when necessary to avoid needless drain on your battery life.
Peripheral devices affect your battery life in the following ways:
•
The number of peripheral devices you use affects the drain on your batteries.
•
The length of time you use the peripheral devices affects the drain on your batteries.
Using a device for 6 hours per shift drains your batteries more than using a device
for 4 hours per shift.
•
Scanning bad barcode labels with your peripheral devices can increase the drain on
your batteries significantly. You should ensure that your barcode labels are in good
condition to prevent unnecessary drain.
•
Using a heater greatly reduces battery life. For this reason, the MX5 has an optional
battery belt with an auxiliary battery. The heater is not operational without the
auxiliary battery.
LXE Scanner Current Requirements
The following table lists the current that the scanner uses (either tethered or integrated) while you
scan:
Note:
Note:
E-INF-BATTERY-G
The more current a scanner requires while in use, the more it drains the life of your
battery.
Scanner
Current
SE824
137 mA
SE923
68 mA
SE955
86 mA
SE1200LR
65 mA
SE1524
210 mA
SE2223
230 mA
SE4400
200 mA
HHP5380
70 mA
EV-15
110 mA
Scanners not in use require only a small amount of current. Specifications shown are
typical current draw, peak draw may be higher.
Getting The Most From Your Batteries
22
Factors Affecting Battery Life
LXE Windows Computer Power Management Features
LXE computers running Microsoft Windows (such as Windows CE, XP. 98 or 2000) utilize
standard Windows power management options. Power Management features are generally
accessed via the Windows control panel. For handheld computers running Microsoft Windows
CE, options vary depending on hardware type. Not all options are present on all computers:
•
Power Off (or Suspend) – The user can configure the period of inactivity required
before the computer powers off (or enters the suspend state).
•
Display Backlight – The user can configure the amount of time that must elapse
before the display backlight is turned off.
•
Display Blanking – The user can configure the period of inactivity before the display
is turned off. Note that some vehicle mounted computers can be configured to blank
the display when the vehicle is moving. This is not configured via power
management, but does conserve vehicle battery power.
On many of these computers, unique time intervals can be specified when the computer is
operating on battery power or when operating on an external power source. Some computers also
allow the user to specify which primary events wake the computer, display or display backlight.
Please refer to the computer’s reference guide for more details on power management options and
settings.
It is important to remember – LXE handheld CE devices are always ‘on’ even when in the
Suspend state and draw battery power at all times.
For vehicle mounted computers with a Windows operating system, power management may be
desired to conserve the life of the vehicle’s battery. Standard power management features include
the ability to shut off the display and hard drives after a specified period if inactivity. Options may
also be provided for system standby and configuration. The keyboard backlight for some vehicle
mounted computers must be manually turned on and off. Please refer to the computer’s reference
guide for more details on power management options and settings.
Extended temperature VX6 and VX7 computers have a heated touchscreen. Some VX6 and VX7
allow the touchscreen heater to be turned off when not needed. Turning off the touchscreen heater
decreases the power consumption of the VX6 and VX7. For information on which units support
this feature and detailed instructions, please refer to the “VX6 Reference Guide” or the “VX7
Reference Guide.”
Getting The Most From Your Batteries
E-INF-BATTERY-G
Chapter 3 Using Battery Chargers/Analyzers
Overview
This chapter first discusses the types of battery charger/analyzers available, the life cycle of a
battery, and then explains the actions that make up a battery optimization cycle (i.e. analyze,
discharge, charge, etc.). The final section of this chapter contains instructions on using a battery
charger/analyzer.
Note:
This chapter covers only chargers and charger/analyzers. Powered docking stations that
also recharge computer batteries are covered in Chapter 4, “Powered Docking
Stations”.
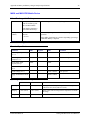
Types of Battery Charger/Analyzers
LXE offers several battery chargers and analyzers. The type you use depends upon the type of
battery required by LXE equipment.
LXE Equipment
Charger/Analyzer Type Specified By …
HX1 Computer
1700 mAh battery
Li-Ion
HX2 and HX3 Computer
2000 (standard) mAh or
4000 (extended) mAh battery
Li-Ion
MX3X Computer
MX3-RFID Computer
1800 mAh battery
Li-Ion
MX5 Computer
(Main Battery)
(Auxiliary Battery)
2800 mAh battery
Li-Ion
9 Ah battery
SLA
MX6 Computer
2000 mAh battery
Li-Ion
MX7 Computer
2200 mAh battery
Li-Ion
MX8 Computer
3000 mAh battery
Li-Ion
RX2
4000 mAh battery (internal)
NiMH
The outside of the battery charger/analyzer may look the same, but the internal programming and
algorithms, as well as the charger cup configuration, are the factors that determine the type of
battery that can be maintained in each particular battery charger/analyzer.
All LXE battery chargers are powered by AC power. Most LXE battery charger/analyzers can
hold more than one battery at a time.
E-INF-BATTERY-G
Getting The Most From Your Batteries
24
The Life Cycle Of A Battery
The Life Cycle Of A Battery
A new NiCad or NiMH battery should be conditioned before it is used for the first time.
Conditioning brings the battery up to its optimum energy capacity. All batteries experience stand
loss, a term used to describe how a battery self-discharges over time even when unused and stored
at satisfactory temperatures.
All new Li-Ion or SLA batteries should be fully charged before being used for the first time.
Note: Do not condition SLA or Li-Ion batteries. This shortens the battery’s life.
After conditioning or charging the new battery, the battery is then used by the appropriate mobile
computer until either a “battery low” warning is received or a pre-determined period of time has
elapsed (for example, some battery usage routines replace batteries after a specified number of
battery-intensive operations have been completed).
The battery then begins its life cycle countdown by being placed in a charger/analyzer, fully
discharged and then recharged to full capacity and placed back in service. Batteries usually have a
manufacturers rating of a minimum number of charge/discharge cycles before end-of-life is
reached.
Charger/Analyzer Functions
Most LXE battery chargers will at a minimum, discharge and charge the appropriate battery type.
Some of the following mode functions may not be included in your battery station. Please check
the user manual for your specific battery station for complete information.
Analyze Mode
When a battery is placed in the appropriate battery cup in the battery station, the analyzer first
“analyzes” the battery – measures the capacity, stated in mAh or Ah and registers the data.
The battery station will initially charge the battery to a fully-charged state. It then automatically
discharges the battery, tracking the energy it deducts during this process. When the battery has
been fully discharged the battery is again fully charged.
This final charge prepares the battery for use at the end of the analyze cycle.
Discharge Mode
The Discharge Mode discharges the battery (without a preliminary charge like that in the Analyze
Mode) and measures its capacity. This function discharges the battery to the manufacturer’s
recommended 1 volt per cell. The Discharge Mode can be used to check another
charger/analyzer’s performance.
Charge Mode
Use the Charge Mode to fast charge a battery. This function will continue to charge the battery
and measure the battery voltage until the battery reaches full charge. The station then maintains
the full charge state until the battery is removed from the charger cup.
Getting The Most From Your Batteries
E-INF-BATTERY-G
Charger/Analyzer Functions
25
Condition Mode
Use the Condition Mode to restore a deficient battery to its highest potential capacity. This is
known as “conditioning the battery”. During this process, the battery is fully charged and fully
discharged three times in succession. The final step is to charge the battery and maintain the fullycharged status until the battery is removed from the charger cup.
Recalibration and Relearn Modes (HX1 Only)
The HX1 battery pack should be recalibrated once per month. The HX1 charger can display the
number of times the battery pack has been charged since the last recalibration cycle. The
recalibration cycle consists of a full discharge followed by a full charge.
If the HX1 charger cannot read the “maximum capacity” register from the battery, the charger
automatically performs a relearn function on the battery. The relearn cycle consists of a complete
discharge followed by a complete recharge, however the process is repeated again for the relearn
cycle.
Power Off
Note:
Remove all batteries from the charger/analyzer before turning the unit off or removing
the power plug from the AC source.
Charger/analyzers sustain no damage when powered on for extended periods. Press the Power
Switch to the Off position (On “I”, Off “O”). Do not disconnect the power supply cord. In
emergency situations the fail-safe power disconnect is the power supply cord. Pull the plug!
E-INF-BATTERY-G
Getting The Most From Your Batteries
26
Single-Unit Chargers
Single-Unit Chargers
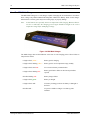
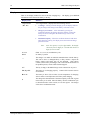
How To: RX2 Battery Charger
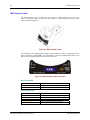
The RX2 Battery Charger can charge an internal RX2 battery in less than six hours. The battery
charger cable contains a break away connector to prevent damage to the RX2 or Battery Charger
in the event the vehicle with the RX2 is moved while the battery is charging.
1
RX2 (Battery Powered)
2
RX2 Battery Charger
3
RX2 Power Connector
4
To RX2 Power Connector
5
Break Away Connector
Figure 3-1 RX2 Battery Charger and Cables
The RX2 Charger LED indicates status as follows:
•
Red LED fast blinking – Battery deeply Discharged
•
Red LED on solid – Rapid Charge
•
Red LED slow blinking – Charge Complete, trickle charge
Getting The Most From Your Batteries
E-INF-BATTERY-G
Single-Unit Chargers
27
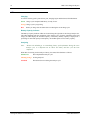
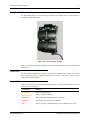
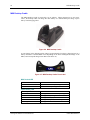
How To: MX5 External Power Supply
The MX5 has an available external power supply, which plugs into either of the D26 pin
connectors on the bottom of the MX5. Options are available for AC or DC (vehicle) power.
Figure 3-2 MX5 Battery Charging LED
The LED indicates the status of the charging process:
•
Slow green flashing – Battery is charging
•
Solid green – Battery is fully charged
•
Quick green double flashing – Charge/battery fault
Troubleshooting
Issue
MX5 cold resets and loses data and custom programs almost every other day.
Explanation and Solution
Li-Ion batteries (like all batteries) gradually lose their capacity over time (in a linear fashion) and
never just stop working. This is important to remember -- the MX5 is always 'on' even when in the
Suspend state and draws power from the batteries at all times.
The MX5 backup battery receives a trickle charge only when the MX5 (with a main battery pack
installed) is connected to an external power source e.g. powered cradle, AC adapter. The main
battery pack is charged first, then the main battery pack charges the backup battery – as long as
the MX5 is connected to an external power source.
If the main battery has been out of the MX5 for an extended period of time or becomes fully
discharged or dead, a fully charged backup battery will last for up to 24 hours.
When the main battery and backup battery are dead, the MX5 will cold reset the next time power
is applied from either AC power or a charged main battery. A cold reset will cause loss of data
and custom programs.
Always store unused MX5’s with a fully charged main battery pack installed and connect an MX5
to an external power source as frequently as possible.
E-INF-BATTERY-G
Getting The Most From Your Batteries
28
Single-Unit Chargers
How To: MX5 Belt Battery Charger
The MX5 Belt Battery requires an external charger operating on 110-120V AC.
How to Charge
1.
Disconnect the MX5 from the Belt Battery Cable!
2.
Place the battery charger on a flat, stable surface.
3.
Verify the temperature of the belt battery is between 0ºC and 40ºC (32ºF and 100ºF) before
charging. If the belt battery is outside this range, allow the temperature to stabilize in this
range before charging.
4.
Insert the two-prong plug on the Battery Charger AC plug into a 100V-120V US plugged,
stable AC outlet.
5.
Insert the cigarette lighter end of the Belt Charger AC cable into the Charging Bay on the Belt
Battery Assemble.
6.
A red LED on the Belt Battery Charger indicates the unit is charging the Belt Battery.
7.
When the battery reaches the predetermined voltage, the digital control circuit cuts the
charging circuit and the red LED goes off. When the voltage drops below the predetermined
voltage, the red LED illuminates.
8.
While the Belt Battery Charger and the Belt Battery are connected to an AC power source,
the Belt Battery voltage is continually maintained.
9.
A blinking red LED is expected at the end of the cycle. When the red LED is off for at least
ten seconds between blinks, the Belt Battery is fully charged. Disconnect the Belt Battery
Charger from the Belt Battery.
Getting The Most From Your Batteries
E-INF-BATTERY-G
Multi-Unit Charger/Analyzers
29
Multi-Unit Charger/Analyzers
LXE has several multi-unit charger/analyzers available. Each one is pre-programmed specifically
for the type of battery (NiCad, NiMH or Li-Ion) to be used in the battery station. The external
design of each battery station is different and is based on the type of charging the unit performs.
For complete information and instructions on using specific LXE
Charger/Analyzers, please refer to the documentation delivered with the unit.
How To: HX2 Multi-Charger
The LXE HX2 Multi-Charger is designed to simultaneously charge up to six standard HX2
Rechargeable Lithium Ion Battery Packs in less than four hours, depending upon battery pack
temperature and conditions. The Extended battery packs require less than eight hours to charge.
HX2 batteries are used by both the HX2 and the HX3.
Note:
Li-Ion batteries are especially sensitive to temperature while charging. Batteries that are
too hot or cold before the charging process begins should be brought to the correct
temperature range before attempting to charge.
Figure 3-3 HX2 Multi-Charger
The Multi-Charger has an LED indicator at the base of each charging pocket. These LEDs are
interpreted as follows:
Indication
Description
No Battery/power
Battery pack not plugged in or no power applied.
Green
Charged
Battery pack fully charged.
Red
Charging
Battery pack charging.
Yellow
Standby
Battery pack temperature out of range.
Flashing Red
on any station
Fault
Battery pack fault or failure.
Flashing Red
on any station
Timeout
Battery analyzer’s 4.5 hour timeout period
expired.
Flashing Red
on all stations.
Charger/Analyzer
Failure
Battery analyzer fault or failure.
LED
Off
E-INF-BATTERY-G
Getting The Most From Your Batteries
30
Multi-Unit Charger/Analyzers
Analyze/Charge Pocket
The analyze/charge pocket is the one closest to the HX2 Multi-charger label and the Analyze
dome switch. The analyze/charge pocket can be used to:
•
Charge a standard battery pack in less than 4 hours.
•
Charge an Extended battery pack in less than 8 hours.
•
Analyze a standard battery pack, ending with the battery pack fully charged, in less
than 12 hours.
•
Analyze an extended battery pack, ending with the battery pack fully charged, in less
than 32 hours.
Analyze Dome Switch
Press the Analyze dome switch within 15 seconds of inserting the battery to start the analysis
process. If the analyze dome switch is not pressed in time, the battery is charged, but not
analyzed.
The LEDs above the Analyze Dome Switch indicate the percentage of battery capacity.
Percentage of
Battery Capacity
Analyze
Progress
LED
Status
Between 90%
and 100%
Between 80%
and 90 %
Between 70%
and 80%
Between 50%
and 70%
On
Off
Off
Off
On
On
Off
Off
On
On
On
Off
On
On
On
On
When all LEDs are off, the battery capacity is less than 50%.
Getting The Most From Your Batteries
E-INF-BATTERY-G
Multi-Unit Charger/Analyzers
31
How To: MX3 Multi-Charger Plus
The MX3 Multi-Charger is a 5 unit charger, capable of charging the Li-Ion batteries in less than 4
hours.
Charge
only
2381A376BATT,
MX3A378BATT,
MX3A379BATT
or
MX3A380RFIDBATT Rechargeable Lithium Ion Battery Packs in this charger. Other batteries or
battery packs may burst causing injury or property damage.
Figure 3-4 MX3 Multi-Charger Plus
The MX3 Multi-Charger Plus has five charging pockets. Four pockets are used for charging only,
the pocket next to the label is used for charging and analyzing a battery. When a battery pack is
inserted into the charger/analyzer pocket, press the analyze dome switch within 15 seconds to start
the battery pack analysis. The analysis process ends with the battery fully charged. If the dome
switch is not pressed, the battery pack is charged, but not analyzed.
The LCD screen indicates the status of the charger/analyzer pocket. During battery analysis, the
LCD screen displays the word “ANALYZE” plus an indication of the progress of the analysis
(CHARGE, DISCHARGE or READY). If the battery is only being charged, the LCD screen only
displays “CHARGE” or “READY”.
The charge/analyze pocket can be used to:
•
Charge a battery pack in less than four hours.
•
Analyze a battery pack, ending with the battery pack fully charged, in less than ten
hours.
Analyze Dome Switch
Press the Analyze dome switch within 15 seconds of inserting the battery to start the analysis
process.
E-INF-BATTERY-G
Getting The Most From Your Batteries
32
Multi-Unit Charger/Analyzers
press
TO ANALYZE:
Insert BATTERY pack
into RIGHTHAND slot
Press dome switch
(within 15 seconds)
STATUS:
RED
FLASHING
GREEN
YELLOW
CHARGING
ANALYZING
(ALL SLOTS)
(RIGHT ONLY)
CHARGING
FAULT
READY
STANDBY
ANALYZING
FAULT
READY
STANDBY
Plus
MULTI-Charger
Figure 3-5 LCD Display and Dome Switch
If the dome switch is not pressed, the battery will be charged, but not analyzed. When the switch
has been pressed, the LCD will display “ANALYZE” plus an indication of the progress of the
analyze process.
The Multi-Charger Plus indicates the status of a battery pack with an LED located below each
pocket. In addition, the charge/analyze pocket has an LCD screen providing additional
information on the battery in that pocket.
Interpreting the LEDs
Note:
On initial power-up, all five pocket LEDs will light yellow for a few seconds.
Solid Red on any pocket -
Battery pack - Charging (any charge pocket).
Charging or analyzing (charge/analyze
pocket).
Flashing Red on any pocket -
Battery pack fault or failure.
Battery charger timeout period expiration.
Flashing Red on every pocket -
Battery charger fault or failure.
Solid Green on any pocket -
Battery pack charge complete - Ready.
Solid Yellow on any pocket -
Battery pack temperature is out of range - Standby.
A single LED is unlit -
No battery pack installed. Defective or damaged battery pack
or charger. Refer to Troubleshooting Guide.
No battery packs installed. No power applied to the MultiCharger Plus.
All LEDs unlit -
Getting The Most From Your Batteries
E-INF-BATTERY-G
Multi-Unit Charger/Analyzers
33
Important MX3 Battery Charger Version Information
Device
Main Battery
MX3X
MX3A378BATT
MX3A379BATT
MX3RFID
MX3A380RFIDBATT
MX3 Multi-Charger Plus
9000A377CHGR5
Use LXE V1.01 Upgrade Kit
Cradle
2381A002DESKCRADLE
MX3RA002DESKCRADLE
2381A003VMCRADLE
MX3RA003VMCRADLE
9000A005VMCRADLE19KB
9000A005VMCRADLE19KB-R
Charger
9000A377CHGR5
9000A377CHGR5
MX3 Multi-Charger
MX3A378CHGR6
(Obsolete July 2003)
Use LXE V1.20 Upgrade Kit
The MX3X main battery will
be incompatible with MX3
Battery Chargers that have
not been upgraded to V1.20
or V1.01. To successfully
charge the mobile device
Battery Pack, pre-existing
MX3 Battery Chargers must
be returned to LXE for a
software upgrade.
Using a Multi-Charger Plus Battery Charger with the Mobile Device’s Battery Pack
The mobile device is designed to use a 2.2Ahr main battery to achieve 8+ hours of continuous
operation.
If the battery pack is inserted into a MX3 Multi-Charger Plus (without the V1.01 upgrade) bay,
the battery may not become fully charged in the charger’s 4 hour time limit and a red LED
illuminates after 4 hours have elapsed indicating a Battery Problem.
Remove and reinsert the battery pack into the same charging bay. This will reset the timer and
allow the charger to complete the charge cycle for the mobile device’s main battery in
approximately 2 hours.
The mobile device battery pack has a silver label (as opposed to the white labels on LXE’s MX3
and MX3-CE battery packs).
125 Technology Parkway
Norcross, GA 30092 USA
!
Risk of fire, explosion, or burns. Do not short circuit, crush, heat above
100 C, incinerate or disassemble the battery.
E-INF-BATTERY-G
Getting The Most From Your Batteries
34
Multi-Unit Charger/Analyzers
How To: MX5 Multi-Charger
The MX5 Multi-Charger is a 6 unit charger, capable of charging the Li-Ion batteries in less than 4
hours. Charge only MX5A379BATT Rechargeable Lithium Ion Battery Packs in this charger.
Other batteries or battery packs may burst causing injury or property damage.
Note:
Li-Ion batteries are especially sensitive to temperature while charging. Batteries that are
too hot or cold before the charging process begins should be brought to the correct
temperature range before attempting to charge.
Figure 3-6 MX5 Multi-Charger
The Multi-Charger has an LED indicator at the base of each charging pocket. These LEDs are
interpreted as follows:
A single LED is yellow -
Battery pack is charging.
A single LED is flashing yellow -
Battery pack is out of temperature range, standby
A single LED is solid red -
No or incorrect battery communication.
A single LED is flashing red -
Battery pack fault or failure or the timeout period has
expired.
All LEDs flashing red -
Battery charger failure.
A single LED is green -
Battery is charged.
A single LED is unlit -
No battery in charge pocket or the battery is damaged or
defective.
All LEDs unlit -
No power available to charger or no battery packs
installed.
Getting The Most From Your Batteries
E-INF-BATTERY-G
Multi-Unit Charger/Analyzers
35
How To: MX6 Four Bay Charger / Analyzer
Note:
For best results, battery packs should be at room temperature before recharging them;
temperature has a marked effect on charging. The recommended temperature range is
50° to 95° F (10 ° to 35 ° C).
Figure 3-7 MX6 Four Bay Charger / Analyzer
The four bay Multicharger has four slots that fully charge a main battery in four hours. The
charging slots work independently to control the charging of individual battery packs.
The last slot on the right also functions as a battery analyzer/charger. It resets and re-calibrates a
battery, then displays its resulting capacity. The process monitors changes in temperature, current,
and voltage. The slot senses when a battery pack is fully charged and automatically switches to
maintain the battery at full capacity indefinitely.
How To Charge a Spare Battery Pack
1.
Insert the end of the battery without the locking tab into the charging slot.
2.
Snap the battery into place with a hinging motion.
3.
Once the battery is inserted, observe the Status LED to monitor the charging process.
How To Charge/Analyze a Spare Battery Pack
1.
Insert the end of the battery without the locking tab into the right hand charge/analyze slot.
2.
Snap the battery into place with a hinging motion.
3.
Once the battery is inserted, press the Analyze button. Observe the Indicator LEDs to monitor
the charge/analyze process.
E-INF-BATTERY-G
Getting The Most From Your Batteries
36
Multi-Unit Charger/Analyzers
LEDs
Charging
As soon as a battery pack is placed in any slot, charging begins and the Status LED illuminates.
Green Charge cycle completed and battery is ready for use.
Orange Charge cycle is progressing.
Red
Battery or charge slot encountered an error during the recent charge cycle.
Battery Capacity Indicator
The Battery Capacity Indicator LEDs are located along the right side of the Charge/Analyze slot.
The LEDs illuminate after the completion of the Analyze cycle. Upon the completion of the final
charge, the LEDs display the measured capacity of the battery. Battery capacity is displayed as a
percentage of measured capacity/rated capacity. Each LED equates to 10% battery capacity.
Analyzing
Note:
Because the multicharger is accumulating battery pack information during the entire
Analyze cycle, it is important not to remove the battery until the cycle has been
completed.
When this slot is being used to analyze a battery, the Status LED functions as follows:
Solid Green
Has completed the Analyze cycle.
Flashing Orange Is being analyzed.
Solid Red
Encountered an error during the Analyze cycle.
Getting The Most From Your Batteries
E-INF-BATTERY-G
Multi-Unit Charger/Analyzers
37
How To: MX7 Four Bay Charger / Analyzer
The LXE MX7 Multi-Charger is designed to simultaneously charge up to five MX7 Rechargeable
Lithium Ion Battery Packs in less than four hours, depending upon battery pack temperature and
conditions.
Figure 3-8 MX7 Five Bay Charger / Analyzer
The MX7 Multi-Charger has five charging pockets. Four pockets are used for charging only, the
pocket next to the label is used for charging and analyzing a battery. When a battery pack is
inserted into the charger/analyzer pocket, press the analyze dome switch within 15 seconds to start
the battery pack analysis. The analysis process ends with the battery fully charged. If the dome
switch is not pressed, the battery pack is charged, but not analyzed.
The LCD screen indicates the status of the charger/analyzer pocket. During battery analysis, the
LCD screen displays the word “ANALYZE” plus an indication of the progress of the analysis
(CHARGE, DISCHARGE or READY). If the battery is only being charged, the LCD screen only
displays “CHARGE” or “READY”.
The charge/analyze well can be used to:
•
Charge a battery pack in less than four hours.
•
Analyze a battery pack, ending with the battery pack fully charged, in less than
twelve hours.
Analyze Dome Switch
Press the Analyze dome switch within 15 seconds of inserting the battery to start the analysis
process.
E-INF-BATTERY-G
Getting The Most From Your Batteries
38
Multi-Unit Charger/Analyzers
Figure 3-9 LCD Display and Dome Switch
If the dome switch is not pressed, the battery will be charged, but not analyzed. When the switch
has been pressed, the LCD will display “ANALYZE” plus an indication of the progress of the
analyze process.
The LCD displays
Indicator
Function
Description
ANALYZE
Analyzing the
Battery
Battery pack cycling through Charge, Discharge,
Charge.
CHARGE
Charge
Battery pack charging.
DISCHARGE
Discharge
Battery pack discharging.
BAT. FAULT
Battery Fault
Battery pack fault or failure.
READY
Analysis
Complete
Battery pack analyzed and ready for use with
displayed capacity.
XXXX mAH
Display Capacity
Capacity measured during discharge cycle.
XX VDC
Display volts
Battery volts measured during charge and discharge
cycle.
The Multi-Charger indicates the status of a battery pack with an LED located below each pocket.
In addition, the charge/analyze pocket has an LCD screen providing additional information on the
battery in that pocket.
Getting The Most From Your Batteries
E-INF-BATTERY-G
Multi-Unit Charger/Analyzers
39
Interpreting the LEDs
Each pocket on the Multi-Charger has an LED. The LED located at the base of each pocket
communicates the status of the charge operation.
Note:
On initial power-up, all five pocket LEDs will light yellow for a few seconds.
RED - on any pocket
Battery pack charging (any charge pocket).
pocket).
Charging or analyzing (charge/analyze
RED FLASHING – on any pocket
Battery pack fault or failure. Battery charger timeout period expiration.
RED FLASHING - on every pocket
Battery charger fault or failure.
GREEN - on any pocket
Battery pack charge complete - Ready.
YELLOW - on any pocket
Battery pack temperature is out of range - Standby.
NO LIGHT - on a pocket
No battery pack installed.
Defective or damaged battery pack or charger. Refer to Troubleshooting.
NO LIGHT - on every pocket
No battery packs installed.
No power applied to the Multi-Charger.
E-INF-BATTERY-G
Getting The Most From Your Batteries
40
Multi-Unit Charger/Analyzers
How To: MX8 Four Bay Charger
The LXE MX8 Multi-Charger is designed to simultaneously charge up to four MX8 Rechargeable
Lithium Ion Battery Packs in less than five hours, depending upon battery pack temperature and
conditions.
Figure 3-10 MX8 Four Bay Charger
The MX8 Multi-Charger has four charging pockets. Battery packs do not need to be fully
discharged between charge cycles.
The external Power Supply for the multi-charger is shipped with the multi-charger. If there is no
AC cable, please contact your LXE representative. The multi-charger power supply is intended for
use with the MX8 Multi-Charger only.
Interpreting the LEDs
Each pocket on the Multi-Charger has an LED. The LED located at the base of each pocket
communicates the status of the charge operation.
Note:
On initial power-up, all LEDs will illuminate red, yellow, green for 1 second before
turning off. When the LEDs are off, the multi-charger is ready.
LED
Indication
Off
No Battery/power
Green
Charged
Battery pack fully charged.
Red
Charging
Battery pack charging.
Yellow
Standby
Battery pack temperature out of range.
Flashing Red on any
station
Fault
Getting The Most From Your Batteries
Description
Battery pack not plugged in or no power
applied.
Battery pack fault or failure.
E-INF-BATTERY-G
Multi-Unit Charger/Analyzers
41
How To: HX1 Four Bay Charger
The HX1 Multi-Charger is a 4 unit charger. Each bay of the charger can be used to charge or
recondition an HX1 battery pack.
Figure 3-11 HX1 Four Bay Charger
There are five LEDs on the Multi-Charger, one Power LED and a Status LED for each of the four
charging bays.
Power LED
The Power LED is illuminated solid green when power is supplied to the charger. If the LED
does not light when power is applied, check the power source. If the power source is good,
contact LXE Customer Support.
Status LED
There is one status LED for each of the four charging bays. The status LED indicates the activity
in the respective charging bay.
Status LED
Indicates…
Solid Yellow
Battery is being charged
Blinking Yellow
Battery is being recalibrated
Solid Green
Battery has stopped charging and is ready for use
Solid Red
The charger has detected a fault condition
Off
The bay is empty or the Multi-Charger is not connected to AC power
E-INF-BATTERY-G
Getting The Most From Your Batteries
42
Multi-Unit Charger/Analyzers
Display
There is one display window for each of the four charging bays.
information on the status of the battery in the bay.
The display gives additional
Display shows
Indicates…
2 digit number
( 00 – 99 )
A two digit number is displayed for the following reasons:
•
% Charge – During a normal charging cycle, the display indicates
the percentage of the charge in the battery from 00% to 99%.
•
Charge Cycle Counter – After momentarily pressing the
recalibration button, the display shows the number of times the
battery has been recharged in the Multi-Charger since its last
recalibration.
•
Maximum Capacity – When the recalibrate button is held down
while inserting a battery, the display shows the maximum charge
potential in mAh.
Note:
Since the capacity is a four digit number, the display
shows the first two digits for 2 seconds then the last 2
digits for two seconds.
1c or 2c
Either 1 (1c) or 2 (2c) recalibration cycles
Blank
No battery is present
__
The charger was unable to establish communications with the battery.
This can be due to a damaged battery or dirty contacts. Inspect the
battery contacts and ensure they are not damaged. Clean battery
contacts (on the battery and charger) with a cotton swab and alcohol. If
the problem persists, contact LXE Customer Support.
Off
The bay is empty or the Multi-Charger is not connected to AC power
FP, Fq or FL
The battery is not charging properly. Contact LXE Customer Service
for assistance.
Hi or Lo
The battery is above (Hi) or below (Lo) the temperature for charging.
After it reaches room temperature, the battery starts charging.
C
The charger has determined the “maximum capacity when full” register
in the battery is not valid. Place the battery into the recalibration cycle
(as described earlier in this section) to reset the register. The charger
selects the 2c recalibration mode.
Getting The Most From Your Batteries
E-INF-BATTERY-G
Chapter 4 Powered Docking Stations / Cradles
Overview
The HX2, HX3, MX3X, MX5, MX6, MX7 and MX8 have optional powered docking stations.
These docking stations offer two main functions:
•
They provide a communications link between the mobile device and another device
such as a personal computer or printer
•
They provide power to operate the mobile device while docked and to recharge the
battery in the mobile device if an external power supply is attached.
Only the functions and indicator lights pertaining to battery charging are discussed in this section.
For more information on the other functions of the docks, please refer to the reference guide for
the docking station.
Note:
Docks provide battery charging functions only. Additional battery functions such as
conditioning, analyzing or discharging are not included in the docks. See Chapter 3,
“Using Battery Chargers/Analyzers” for details on these functions and the equipment
that offers these functions.
Note:
Some docks may be passive; securing the mobile device in the dock without requiring a
power source connection.
Non-powered docking and non-charging docks or docking stations are not discussed here.
Related Manuals
HX2 Cradle Reference Guide – HX2, HX3
MX3 Cradle Reference Guide – MX3, MX3-CE, MX3X
MX5 Cradle Reference Guide – MX5 PPC, MX5X
MX6 Cradle Reference Guide – MX6 PPC, MX6 WM
MX7 Cradle Reference Guide – MX7
MX8 Cradle Reference Guide – MX8
E-INF-BATTERY-G
Getting The Most From Your Batteries
44
HX2 Desktop Cradle
HX2 Desktop Cradle
The HX2 Desktop Cradle is powered by an AC adapter. When connected to an AC power source,
the desktop cradle can power the HX2 while charging the tethered battery and a spare battery in
the dock’s battery charging wells. It also stores the tethered ring scanner while the HX2 is docked.
The HX3 mobile device is compatible with the HX2 cradle, tethered batteries, ring scanners
and accessories.
The cradle LEDs are on the front of the cradle.
B1 LED – Back left battery charging bay
Normal State is Off. With battery and AC power,
normal state may be any state listed in Cradle
LEDs.
PWR LED - HX2 Docked / On /
Receiving Power bay
Normal State is Off. With HX2 in, turned On and
AC power, normal state is On.
B2 LED – Back right battery charging bay
Normal State is Off. With battery and AC power,
normal state may be any state listed in Cradle
LEDs.
Cradle PWR LED
When PWR LED is …
It means ….
No AC/DC power supplied to the cradle
and/or
No HX2 in the charging bay
and/or
Off
HX2 is not properly seated in charging bay
and/or
if this is the first time the HX2 has been inserted, the HX2 is
properly seated and has not been powered On.
HX2 is On, is properly seated in the charging bay and is
receiving external power through the cradle.
Green
B1 and B2 LED
When B1 and/or B2 LED is …
It means ….
Off
No battery or no AC
power
No spare battery in the battery bay(s) or no
AC/DC power is being applied to the cradle.
Green
Charged
Spare battery pack fully charged.
Red
Charging
Spare battery pack charging.
Amber
Standby
Spare battery pack temperature out of range.
Flashing Red
Fault
Spare battery pack fault or failure.
Getting The Most From Your Batteries
E-INF-BATTERY-G
MX3 Cradles
45
MX3 Cradles
The MX3 has two single docking stations; one is a desk top mount, the other is a vehicle mount.
Unlike other docking stations, the MX3 docks only have a power LED. All the charging
indicators are on the MX3.
Figure 4-1 MX3 Vehicle Mount and Desktop Docking Cradle LED
Both docking stations have only one LED. The vehicle mount cradle is different in appearance,
but has the same status LED as the desktop docking cradle illustrated above. The LED is:
•
Orange when power is connected to the station.
•
Green when an MX3 is docked in a powered cradle.
•
Red when the IR port is in use.
Other indicators are on the MX3 computer:
MX3X
2nd
Esc
Ctrl
Alt
!
Q
Shft
Spc
CAPS
Break
|
W
A
Z
#
Bklt
\
E
S
X
F4
F3
F2
F1
@
$
:
R
D
C
%
;
T
F
V
F5
^
"
~
Y
G
B
F7
F6
&
`
'
U
H
N
*
,
I
J
_
M
F9
F8
(
.
O
K
)
?
P
L
ENTER
PgUp
/
7
-
8
PgDn
=
4
{
5
}
6
Home
[
1
]
2
>
3
End
<
0
F10
Ins
BkSp
Del
+
9
.
Figure 4-2 MX3 LED Indicators
E-INF-BATTERY-G
•
BATT B: Orange when the backup battery is charging and unlit when the backup
battery is charged.
•
BATT M: Red when the main battery is low on power, unlit otherwise.
•
CHGR: Red when the main battery is charging, green when the main battery is
charged. If orange, a problem has occurred (contact LXE customer support). If the
LED is not lit, the MX3 is not seated in a dock or the dock does not have a power
source connected.
Getting The Most From Your Batteries
46
MX5 Cradles
MX5 Cradles
The MX5 has a single docking station with a vehicle mount. Unlike other docking stations, the
MX5 dock only has a power LED built into the power supply. The charging indicator is on the
MX5.
1. Power
Indicator on
Power Supply
2. Charging
Indicator on
MX5
Figure 4-3 MX5 Cradle Power Supply and Charging Indicator
When the MX5 is charging, the LED slowly flashes green. When fully charged, the LED is
steady green. If a battery/charge fault occurs, the LED flashes green, but the flashing is quicker
and a double flash.
Allow a minimum of four hours for a new main battery to charge. Main batteries recharge in three
to four hours in the cradle. Allow up to seven hours for a new backup battery to charge.
Important:
The cradles are not designed to secure an MX5 with a protective padded case. The vehicle cradle
is not designed to secure an MX5 with a trigger handle. The desktop cradles will secure mobile
device’s with handstraps or trigger handles.
MX5 docking cradles give the MX5 the ability to communicate with a host computer and other
devices. In addition, using wall AC adapters or DC/DC converters, the cradle charges the main
battery. The MX5 can be either On or in Suspend mode while in the cradles.
LXE offers three desktop cradles and one vehicle cradle:
Standard Desktop Cradle requires AC power before main battery charging can
commence. This cradle does not have an active LED on the front housing.
MX5A002DESKCRADLE
Enhanced Desktop Cradle requires AC power before main battery charging can
commence. It will charge both the main battery in the MX5 and another MX5 Battery
Pack at the same time. MX5A003EDESKCRADLE
Enhanced Desktop Cradle with Ethernet Port requires AC power before main battery
charging and host/client communications can commence. It will charge both the
main battery in the MX5 CE. NET device and another main battery pack at the same
time. MX5A004ETHDESKCRADLE
Vehicle Mount Cradle requires AC/DC power before main battery charging can
commence. MX5A001VMCRADLE
Getting The Most From Your Batteries
E-INF-BATTERY-G
MX6 Cradles
47
MX6 Cradles
The docking cradles give the MX6 the ability to communicate with a host computer and other
equipment. The MX6 can be either On or in Suspend mode while in the cradles.
Using wall AC adapters or DC/DC converters, the docking cradle transfers power to the internal
charging circuitry of the MX6 and, in turn, the MX6 recharges the main battery. The desktop
docking cradle recharges both the MX6 main battery and an auxiliary battery at the same time.
The vehicle docking cradle uses a 12V cigarette lighter adapter or a bare wire 12-48V power
supply to transfer power to the internal charging circuitry of the MX6 and, in turn, the MX6
recharges the main battery. A powered docking cradle gives the MX6 the ability to communicate
with a host computer and other equipment.
A complete battery charge of the main battery pack and an extra battery pack using the desktop
docking cradle takes less than four hours. The vehicle cradle completely charges the main battery
in the MX6 is less than four hours.
The cradles require an external power source, before communications or battery charging is
available.
When the desktop and vehicle cradles are receiving external power and the MX6 is properly
seated in the charging bay, the DOCK LED is green. When the battery in the MX6 is charging the
DOCK LED is green.
MX6 Cradle Indicators and LEDs
Powered Desktop Cradle
DOCK
AUX Battery
COMM w/serial port
COMM w/USB port
Solid Green
MX6 is properly seated in the charging bay and the
main battery in the MX6 is charging.
Orange
The spare battery is charging.
Green
The spare battery has completed charging and is ready
for use.
Red
Serial data is being sent to the MX6 from the host.
Green
Serial data is being sent from the MX6 to the host.
Orange
Serial data is being sent at high data rates.
Green
USB connection is established with the host.
Powered Vehicle Cradle
DOCK
COMM w/serial port
E-INF-BATTERY-G
Solid Green
MX6 is properly seated in the charging bay and the
main battery in the MX6 is charging.
Red
Serial data is being sent to the MX6 from the host.
Green
Serial data is being sent from the MX6 to the host.
Orange
Serial data is being sent at high data rates.
Getting The Most From Your Batteries
48
MX7 Desktop Cradle
MX7 Desktop Cradle
The MX7 Desktop Cradle is powered by an AC adapter. When connected to an AC power
source, the desktop cradle can charge the main battery in a docked MX7 plus charge a spare
battery in the charging pocket.
Figure 4-4 MX7 Desktop Cradle
A spare battery in the charging pocket charges in approximately four hours. Charging time for a
battery installed in a docked MX7 varies depending on the Power Management settings of the
MX7 (a unit in suspend charges faster than a unit that is on).
Figure 4-5 MX7 Desktop Cradle Front Label
MX7 Docked LED
When Docked LED is …
Off
Red
It means ….
MX7 not inserted or no power applied
MX7 docked and power applied.
Spare Battery LED
When Spare LED is …
Off
Green
Red
Yellow / Amber
Flashing Red
Getting The Most From Your Batteries
It means ….
Battery pack not inserted or no power applied
Battery pack fully charged
Battery pack charging
Battery pack temperature out of range
Battery pack fault or failure
E-INF-BATTERY-G
MX7 Desktop Cradle
49
MX7 Mobile Device System Status LED
The MX7 System Status LED is located at the top left of the keypad, above the Scan button. Use
the System Status LED to determine the status of the MX7 while it is in the desktop cradle.
When the LED is . . .
The Status is . . .
Blinking Red
Power Fail
Steady Red
Main Battery Low
Blinking Green
No Color
Display Off
Good
Comment
Replace the main battery with a fully
charged main battery. Or Connect the MX7
to external AC power to allow the internal
charger to charge the main battery e.g.
dock in a powered cradle.
Low Battery Warning. Replace the main
battery with a fully charged main battery.
Or dock the MX7 in a powered cradle.
No user intervention required.
No user intervention required.
Important
The desktop cradle is shipped with the cradle adapter cup pre-installed.
•
To charge an MX7 with a rubber boot, the adapter cup must be removed.
•
To change an MX7 without a rubber boot, the adapter cup must be installed.
Please refer to the “MX7 Cradle Reference Guide” for details on installing or removing the cup.
E-INF-BATTERY-G
Getting The Most From Your Batteries
50
MX8 Desktop Cradle
MX8 Desktop Cradle
The MX8 Desktop Cradle is powered by an AC adapter. When connected to an AC power
source, the desktop cradle can charge the main battery in a docked MX8 plus charge a spare
battery in the charging pocket.
Figure 4-6 MX8 Desktop Cradle
A spare battery in the charging pocket charges in approximately four hours. Charging time for a
battery installed in a docked MX8 varies depending on the Power Management settings of the
MX8 (a unit in suspend charges faster than a unit that is on).
Figure 4-7 MX8 Desktop Cradle Front Label
MX8 Docked LED
When Docked LED is …
Off
Red
It means ….
MX8 not inserted or no power applied
MX8 docked and power applied.
Spare Battery LED
When Spare LED is …
Off
Green
Red
Yellow / Amber
Flashing Red
Getting The Most From Your Batteries
It means ….
Battery pack not inserted or no power applied
Battery pack fully charged
Battery pack charging
Battery pack temperature out of range
Battery pack fault or failure
E-INF-BATTERY-G
MX8 Desktop Cradle
51
MX8 Mobile Device System Status LED
The MX8 System Status LED is located at the top left of the keypad, above the Scan button. Use
the System Status LED to determine the status of the MX8 while it is in the desktop cradle.
When the LED is . . .
The Status is . . .
Blinking Red
Power Fail
Steady Red
Main Battery Low
Blinking Green
No Color
Display Off
Good
Comment
Replace the main battery with a fully charged
main battery. Or Connect the MX8 to
external AC power to allow the internal
charger to charge the main battery e.g. dock
in a powered cradle.
Low Battery Warning. Replace the main
battery with a fully charged main battery. Or
dock the MX8 in a powered cradle.
No user intervention required.
No user intervention required.
Important
The desktop cradle is shipped with the cradle adapter cup pre-installed.
•
To charge an MX8 with a rubber boot, the adapter cup must be removed.
•
To change an MX8 without a rubber boot, the adapter cup must be installed.
Please refer to the “MX8 Cradle Reference Guide” for details on installing or removing the cup.
E-INF-BATTERY-G
Getting The Most From Your Batteries
52
Troubleshooting Cradles and Docking Stations
Troubleshooting Cradles and Docking Stations
The Computer Does Not Fit Into the Station
Check to be sure the correct docking station is being used for the computer. Also, check the
computer or docking station reference guide to be sure the computer is placed in the docking
station correctly. As a general rule, the keypad and display face out or up when in the dock.
If the computer has a protective boot or is in a carrying case, remove the protective boot or
carrying case and try again.
The Power Indicator Is Not Lit
If the POWER or PWR light is not on, verify that the docking station is receiving power from the
appropriate source.
The Charging Indicator Is Not Lit
If the CHG, CHARGE, READY (MX2/2325) or BATTERY CHARGE light does not light or the
status light does not change from orange to green on the MX3 dock, be sure the computer or
spare battery being charged is inserted correctly in the dock. Also, be sure no foreign objects are
keeping the computer from fitting correctly in the dock.
The CHRG Light is Orange (MX3 Only)
This indicates a problem has occurred in the charging process. Contact LXE Customer Support for
assistance.
No Battery Pack in the Battery Well but the LED is On
Dirt or foreign objects may be in the battery well. Unplug the cradle from the AC outlet and
remove any dirt or foreign objects. If the LED continues to stay on, contact your LXE
representative.
The Docked LED Is Not Lit
Verify that the computer is correctly docked in the charging well and the docking station is
receiving power from the appropriate source.
Getting The Most From Your Batteries
E-INF-BATTERY-G
Appendix A LXE Part Numbers: Batteries, Cradles and Chargers
Battery Listing and Part Numbers
Please consult your LXE representative to verify the appropriate battery for your device and location. Some part
numbers listed may be obsolete.
Backup Battery 2
Computer
Main Battery
HX1
1700 mAh Li-Ion
HX1A477BATTERY
HX2/HX3
2000 mAh (standard) /
4000 mAh (extended)
Li-Ion
HX2A301BATTSTD
HX2A302BATTEXT
1400 mAh Li-Ion
2381A376BATT1600
1800 mAh Li-Ion
MX3A378BATT
MX3-RFID
1800 mAh Li-Ion
MX3A380RFIDBATT
50 mAh NiCad
MX5
2800 mAh Li-Ion
MX5A379BATT
450 mAh NiMH
MX6
2000 mAh Li-Ion
MX6A380BATT
NiMH
MX7
2200 mAh Li-Ion
MX7A380BATT
50 mAh NiCad
MX8
3000 mAh Li-Ion
MX8A380BATT
160 mAh NiMH
VX5, VX6, VX7
UPS Battery Pack
9000A378UPSBATTPACK
Li-Ion
50 mAh NiCad
50 mAh NiCad
MX3/MX3X
2
Not user replaceable. Replaced by LXE Repair Services (approximately 5 years until end of
life).
E-INF-BATTERY-G
Getting The Most From Your Batteries
54
Appendix A LXE Part Numbers: Batteries, Cradles and Chargers
Battery Chargers and Docking Stations
Please consult your LXE representative to verify the appropriate dock and battery charger for your device and
location. Some part numbers listed may be obsolete. Only docking stations that charge batteries are listed.
Computer
Cradles, Docking / Charging Stations
Chargers and Analyzers
HX1
--
4 Unit Charger / Analyzer
HX1A376CHGR
HX1A378CHGRWW
HX2/HX3
HX2/HX3 Desk Cradle
HX2A312DESKCRADLEUS
HX2A313DESKCRADLEWW
6 Unit Charger / Analyzer
HX2A310CHGR6US
HX2A311CHGR6WW
MX3X
MX3-RFID
Desktop Cradle
2381A001DESKCRADLE
MX3RA002DESKCRADLE
6 Unit Charger
2381A377CHGR6
Vehicle Mount Cradle
2381A003VMCRADLE
MX3RA003VMCRADLE
9000A005VMCRADLE19KB
MX5
Vehicle Mount Cradle
MX5A001VMCRADLE
Desktop Cradle
MX5A002DESKCRADLE
Enhanced Desktop Cradle
MX5A003EDESKCRADLE
5 Unit Charger / Analyzer
9000A377CHGR5US
9000A377CHGR5WW
6 Unit Charger
MX5A385CHGR6US
MX5A385CHGR6WW
Battery Belt Charger
MX5A383BATTBELTCHGR
Enhanced Desktop Cradle w/Ethernet
MX5A004ETHDESKCRADLE
MX6
Desktop Cradle
MX6A005DESKCRADLEUS
MX6A006DESKCRADLEWW
4-unit Charger /Analyzer
MX6A383CHGR4US
MX6A384CHGRWW
4-bay Docking Cradle
MX6A012MULTIDOCKUS
MX6A013MULTIDOCKWW
4-bay Docking Cradle w/ Ethernet
MX6A010NETCRADLEUS
MX6A011NETCRADLEWW
Vehicle Cradle for MX6 w/o Handle
MX6A007VMCRADLE
Vehicle Cradle for MX6 w/Handle
MX6A008WHVMCRADLE
Getting The Most From Your Batteries
E-INF-BATTERY-G
Appendix A LXE Part Numbers: Batteries, Cradles and Chargers
55
Computer
Cradles, Docking / Charging Stations
Chargers and Analyzers
MX7
Desktop Cradle w/spare battery bay
MX7A388DESKCRADLEWW
5 Unit Charger / Analyzer
MX7A385CHGR5US
MX7A386CHGRWW
Vehicle Mount Cradle
MX7A008ACTIVEVMCRADLE
MX8
Desktop Cradle w/spare battery bay
MX8A002DESKCRADLE
4-unit Charger
MX8A385CHGR4US
MX8A386CHGR4WW
RX2
--
Battery Charger
RX2A381CHGRUS
E-INF-BATTERY-G
Getting The Most From Your Batteries
56
Getting The Most From Your Batteries
Appendix A LXE Part Numbers: Batteries, Cradles and Chargers
E-INF-BATTERY-G
Appendix B Battery and Battery Charger/Analyzer Specifications
HX1 Hands-Free Voice Device
HX1 Rechargeable Battery
Main
16.8V, 4 cell, 1700 mAh
Li-Ion battery pack
Externally Chargeable
Backup
(CMOS)
Internal Nickel-Cadmium
(NiCad)
Automatically charges from Main Battery during normal
operation
Keeps MX7 operational for 5 minutes (depending upon usage)
when Main Battery is depleted
HX1 Multi-Charger
Electrical Specifications
Parameter
Min
Power Supply Input Voltage
(VAC-IN)
Power Supply Input
Frequency (freq)
Typical.
Max.
Comment
90VAC
264VAC
Auto-switching
47Hz
63Hz
Operating Temperature Ranges
Minimum
Maximum
Comment
Operating
0°C (32°F)
+45°C (113°F)
Battery packs shall only be charged when their temperature
is between 0°C (32°F) and 45°C (113°F).
Preferred
20°C (68°F)
25°C (77°F)
For best results, operate the charger at room temperature,
20°C (68°F) and 25°C (77°F).
Charging
0°C (32°F)
+45°C (113°F)
Battery packs will not charge if their temperature is outside
this range.
E-INF-BATTERY-G
Getting The Most From Your Batteries
58
Appendix B Battery and Battery Charger/Analyzer Specifications
HX2/HX3 Wearable
HX2/HX3 Rechargeable Batteries
Main, Standard
and Extended
7.2V, 2000 mAh (standard)
or 4000 mAh (extended)
Li-Ion battery pack
In-Unit Chargeable or Externally Chargeable
Backup
(CMOS)
Internal Nickel-Cadmium
(NiCad)
Automatically charges from Main Battery during normal
operation
Keeps memory operational for up to 24 hours when Main
Battery is depleted
HX2/HX3 Multi-Charger
Electrical Specifications
Parameter
Min
Power Supply Input Voltage
(VAC-IN)
Power Supply Input
Frequency (freq)
Typical.
Max.
Comment
100VAC
240VAC
Auto-switching
47Hz
63Hz
Operating Temperature Ranges
Minimum
Maximum
Comment
Operating
-20°C (-4°F)
+40°C (104°F)
Battery packs shall only be charged when their temperature
is between 10°C (50°F) and 40°C (104°F).
Charging
+10°C (50°F)
+40°C (104°F)
Battery packs will not charge if their temperature is outside
this range.
Storage
-20°C (-4°F)
+70°C (158°F)
Unit is off.
Getting The Most From Your Batteries
E-INF-BATTERY-G
Appendix B Battery and Battery Charger/Analyzer Specifications
59
MX3X and MX3-RFID Mobile Device
Li-Ion Rechargeable Battery
Main
10.8V, 3 cell, 1400 or 1800
mAh Li-Ion battery pack
(N/A on MX3-RFID)
In-Unit Chargeable or Externally Chargeable
1800 mAh Li-Ion battery
pack (MX3-RFID only)
Backup
(CMOS)
Internal Nickel-Cadmium
(NiCad)
5.7V max.
Automatically charges from Main Battery during normal
operation
Keeps MX3 operational for 5 minutes (depending upon usage)
when Main Battery is depleted
MX3 Multi-Charger Plus
Electrical Specifications
Parameter
Min
Typical.
Max.
Comment
Power Supply Input Voltage
(VAC-IN)
88VAC
110VAC
132VAC
Auto-switching
Power Supply Input
Voltage(VAC-IN)
176VAC
220VAC
264VAC
Auto-switching
Power Supply Input
Frequency (freq)
47Hz
63Hz
1A
Maximum Charge Current
(IMAX)
1.25A
Cutoff Voltage (VOUT)
12.3V ± 50mV
Charge Termination Current
(IT)
50mA ± 20mA
4.1V per cell
Operating Temperature Ranges
Minimum
Maximum
Comment
Operating
0°C (32°F)
+50°C (122°F)
Battery packs shall only be charged when their temperature
is between 10°C (50°F) and 35°C (95°F).
Charging
+10°C (50°F)
+35°C (95°F)
Battery packs will not charge if their temperature is outside
this range.
Storage
-20°C (-4°F)
+70°C (158°F)
Unit is off.
E-INF-BATTERY-G
Getting The Most From Your Batteries
60
Appendix B Battery and Battery Charger/Analyzer Specifications
MX5X Mobile Device
Li-Ion Rechargeable Battery and SLA Auxiliary Battery
Main
7.4V, 2800 mAh Li-Ion
battery pack
In-Unit Chargeable or Externally Chargeable
Backup
(CMOS)
Internal Nickel-Cadmium
(NiCad)
5.7V max.
Automatically charges from Main Battery during normal
operation
12V, 9 Ah SLA battery
Required for MX5 heater, Belt Battery requires a specific Belt
battery charger.
Auxiliary
(Battery Belt)
Keeps MX5 operational for 5 minutes (depending upon usage)
when Main Battery is hot swapped, maintains memory for 48
hours after Main Battery is depleted
MX5 Multi-Charger
Electrical Specifications
Parameter
Min
Typical.
Max.
Comment
Power Supply Input Voltage
(VAC-IN)
88VAC
110VAC
132VAC
Auto-switching
Power Supply Input
Voltage(VAC-IN)
176VAC
220VAC
264VAC
Auto-switching
Power Supply Input
Frequency (freq)
47Hz
63Hz
Operating Temperature Ranges
Minimum
Maximum
Comment
Operating
0°C (32°F)
+60°C (140°F)
Battery packs will only be charged when their temperature is
between 0°C (32°F) and 45°C (113°F).
Charging
0°C (32°F)
+45°C (113°F)
Battery packs will not charge if their temperature is outside
this range.
Storage
-20°C (-4°F)
+70°C (158°F)
Unit is off.
MX5 Battery Belt Charger
Parameter
Min
Power Supply Input Voltage
(VAC-IN)
110VAC
Typical.
Max.
Comment
120VAC
2 Amp, automatic shutoff
Belt Batteries should only be charged when their temperature is between 0°C (32°F) and 40°C
(100°F).
Getting The Most From Your Batteries
E-INF-BATTERY-G
Appendix B Battery and Battery Charger/Analyzer Specifications
61
MX6 with Windows Mobile OS
Li-Ion Rechargeable Battery
Main
Li-Ion battery pack
7.4V 14.8Ah
In-Unit Chargeable or Externally Chargeable
Backup
(CMOS)
Internal Nickel Metal
Hydride (NiMH)
5.7V max.
Automatically charges from main battery during normal
operation. MX6 must be connected to an external power
supply when backup battery charging is required.
Memory operational for 40 hours when main battery is
depleted
MX6 Four Bay Charger/Analyzer
Operating Temperature
14°F to 122°F (-10°C to 50°C)
Storage Temperature
-4°F to 158°F (-20°C to 70°C)
Charging Temperature
32°F to 113°F (0°C to 45°C)
Weight
18 oz (510 g)
Dimensions
Length 11.7 in x Width 5.2 in x Height 1.5 in
Length 29.7 cm x Width 13.2 cm x Height 3.8 cm
Capacity
1 to 4 battery packs
Power Supply Input
90-265V, 47-63Hz
Power Supply Output
12VDC, 3A
Input Connection
2 position IEC 320-C8
Charging Mode: Standard
100% charge in 4 hours
Charging Mode: Analysis
Charges/discharges/resets/calibrates battery in 14 hours
E-INF-BATTERY-G
Getting The Most From Your Batteries
62
Appendix B Battery and Battery Charger/Analyzer Specifications
MX7 Hand-Held
MX7 Rechargeable Battery
Main
7.2V, 2 cell, 2200 mAh
Li-Ion battery pack
In-Unit Chargeable or Externally Chargeable
Backup
(CMOS)
Internal Nickel-Cadmium
(NiCad)
Automatically charges from Main Battery during normal
operation
Keeps MX7 operational for 5 minutes (depending upon
usage) when Main Battery is depleted
MX7 Multi-Charger
Electrical Specifications
Parameter
Min
Power Supply Input Voltage
(VAC-IN)
Power Supply Input
Frequency (freq)
Typical.
Max.
Comment
100VAC
240VAC
Auto-switching
47Hz
63Hz
Operating Temperature Ranges
Minimum
Maximum
Comment
Operating
0°C (32°F)
+50°C (120°F)
Battery packs shall only be charged when their
temperature is between 0°C (32°F) and 45°C (113°F).
Charging
+10°C (50°F)
+40°C (100°F)
Battery packs will not charge if their temperature is
outside this range.
Storage
-20°C (-4°F)
+70°C (158°F)
Unit is off.
Getting The Most From Your Batteries
E-INF-BATTERY-G
Appendix B Battery and Battery Charger/Analyzer Specifications
63
MX8 Hand-Held
MX8 Rechargeable Battery
Main
3.7V, 3 cell, 3000 mAh
Li-Ion battery pack
In-Unit Chargeable or Externally Chargeable
Backup
(CMOS)
Internal Nickel Metal
Hydride (Ni-MH) 2.4V
max.
Automatically charges from Main Battery during normal
operation. Requires AC power for re-charging.
Minimum life expectancy is 2 years.
MX8 Battery Multi-Charger
Electrical Specifications
Parameter
Min
Max.
Comment
Power Supply Input
Voltage (VAC-IN)
100 VAC
240VAC
Auto-switching
Power Supply Input
Frequency (freq)
47Hz
63Hz
Note:
Battery packs may leak up to 1mA current through the battery contacts when left in an unpowered multicharger battery well.
Operating Temperature Ranges
Minimum
Maximum
Comment
Operating
0°C (32°F)
+50°C (120°F)
Battery packs will only be charged when their
temperature is between 10°C (50°F) and 40°C
(100°F).
Charging
10°C (50°F)
+40°C (100°F)
Battery packs will not charge if their temperature is
outside this range.
Storage
-20°C (-4°F)
+70°C (160°F)
Unit is off.
E-INF-BATTERY-G
Getting The Most From Your Batteries
64
Appendix B Battery and Battery Charger/Analyzer Specifications
RX2 Vehicle Mounted RFID Tag Reader
In-Unit Rechargeable Battery
Main
4000 mAh NiMH battery
Optional. Not user accessible. In-Unit Chargeable.
RX2 Battery Charger
Electrical Specifications
Parameter
Min
Power Supply Input Voltage
(VAC-IN)
100VAC
Typical.
Max.
Comment
240VAC
Auto-switching
Operating Temperature Ranges
Operating
Minimum
Maximum
0°C (32°F)
+40°C (104°F)
Getting The Most From Your Batteries
Comment
E-INF-BATTERY-G
Appendix C Regulatory Notices and Safety Warnings
Precautions When Using Charger/Analyzers and
Batteries
Before you plug in and operate any LXE Charger or Analyzer, please read and understand this section. The
following advice is given in the interest of safety and reliability. LXE strongly urges you to heed the
cautions and warnings contained within the manufacturer’s user guide.
Use For Correct Battery Type Only
Your LXE Charger or Analyzer must only be used to charge, analyze and condition NiCad, NiMH or LiIon batteries it was designed for. Any attempt to charge other types of batteries may cause an explosive
reaction, fire or chemical burns. Please do not assume that the physical form of another battery qualifies it
for use in the LXE Charger or Analyzer. Please read the battery label.
Hot or Cold Batteries
NiMH batteries cannot be repaired once they are damaged by over-temperature and under-temperature
charging. Therefore you should bring all NiMH batteries to room temperature before charging or
maintaining that battery. The System 90 Universal Charger temperature circuits will prevent the charge if
you install a battery that is too hot or cold. In this instance an error code will appear. (E01 or Battery Fault
LED).
Li-Ion batteries are also sensitive to temperature while charging. The Multi-Charger designed for the Liion batteries monitors the battery’s temperature during the charge process. Best results are obtained if the
battery is allowed to reach the proper room temperature before inserting it in the Multi-Charger. The
battery may take a much longer time to reach the proper temperature installed in the charger and can cause
the charger to discontinue the charging process if the battery temperature remains out of the safe range for
an extended period of time.
Sealed Lead Acid (SLA) batteries should only be charged when the battery is within the proper
temperature range described in this publication. If the battery is hotter or colder than the specified
temperature range, allow the battery to adjust to the proper temperature before charging.
E-INF-BATTERY-G
Getting The Most From Your Batteries
66
Appendix C Regulatory Notices and Safety Warnings
Battery Handling and Disposal
Never dispose of a battery in a fire. This may cause an explosion. Do not replace individual cells in a
battery pack. The imbalance in the battery pack will result in poor performance.
Old or damaged batteries should be disposed of promptly and properly. The best way to dispose of used
batteries is to recycle them. The battery recycling facilities recover the Nickel, Lithium or Lead from old
batteries to manufacture new batteries.
Important: This symbol is placed on the product to remind users to dispose of Waste
Electrical and Electronic Equipment (WEEE) appropriately, per Directive 2002-96-EC.
In most areas, this product can be recycled, reclaimed and re-used when properly
discarded. Do not discard labeled units with trash. For information about proper
disposal, contact LXE through your local sales representative, or visit www.lxe.com.
Electrolyte Burns
Be careful when handling NiCad, NiMH, Li-Ion or SLA batteries. If a battery is broken or shows signs of
leakage do not attempt to charge it. Dispose of it!
Lead and Nickel-based cells contain a chemical solution that burns skin, eyes, etc. Leakage from cells is
the only possible way for such exposure to occur. In this event, rinse the affected area thoroughly with
water. If the solution contacts the eyes, get immediate medical attention.
Electrical Burns
NiCad, NiMH, Li-Ion and SLA batteries are capable of delivering high currents when accidentally shorted.
Accidental shorting can occur when contact is made with jewelry, metal surfaces, conductive tools, etc.,
making the objects very hot. Never place a charged battery in a pocket or case with keys, coins, or other
metal objects.
Getting The Most From Your Batteries
E-INF-BATTERY-G
Appendix C Regulatory Notices and Safety Warnings
67
Revision History
Revision A: Initial Release, June 2002
Revision B: August 2003
Notices
Updated copyrights, notices and trademarks.
Entire Manual
Added Sealed Lead Acid to all sections discussing battery types. Added MX1IS and MX5 to all sections discussing equipment.
Revision C: January 2005
Entire Manual
Updated battery pack and battery charger/analyzer sections for new products
(MX3X, MX3-RFID, MX6, and VX5/VX6/VX7 UPS Battery Pack).
Revision D: March 2006
Inside cover
Removed all safety warnings to Appendix C, Regulatory Notices and Safety
Warnings.
Added reference to Appendix C.
Entire Manual
Added WEEE statement.
Updated battery pack and battery charger/analyzer sections for MX7.
Appendix C – Regulatory
Notices and Safety Warnings
Created new appendix with safety information removed from inside front
cover.
Revision E – November 2006
Entire Manual
Updated battery pack and battery charger/analyzer sections for HX1.
Updated all battery, docking cradle and charger part numbers to include
current offerings.
Chapter 2 – Battery Life
Revised “LXE Scanner Current Requirement”.
Appendix C – Regulatory
Notices and Safety Warnings
Added revision history.
Revision F – May 2007
Entire Manual
Updated battery pack and battery charger/analyzer sections for HX2 and RX2.
Updated sections to include the MX7 Desktop Cradles with spare battery
charging capability.
E-INF-BATTERY-G
Getting The Most From Your Batteries
68
Getting The Most From Your Batteries
Appendix C Regulatory Notices and Safety Warnings
E-INF-BATTERY-G