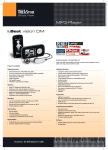
1
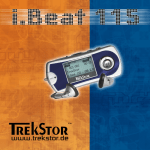
i.Beat rock User Manual ibrock-V1.1-EN-050801 Contents Contents 2 1 Introduction 5 1.1 Controls of the i.Beat rock . . . . . . . . . . . . . . . . . . . . . . . . . . . . . . . . 2 Using the i.Beat rock 5 6 2.1 General information . . . . . . . . . . . . . . . . . . . . . . . . . . . . . . . . . . . . 6 2.2 Basic functions . . . . . . . . . . . . . . . . . . . . . . . . . . . . . . . . . . . . . . 6 2.2.1 Turning the i.Beat rock on and off . . . . . . . . . . . . . . . . . . . . . . . . 6 2.2.2 Playback/pause . . . . . . . . . . . . . . . . . . . . . . . . . . . . . . . . . . 7 2.2.3 Volume regulation . . . . . . . . . . . . . . . . . . . . . . . . . . . . . . . . . 7 2.2.4 Fast forward/rewind . . . . . . . . . . . . . . . . . . . . . . . . . . . . . . . . 7 2.2.5 Change song . . . . . . . . . . . . . . . . . . . . . . . . . . . . . . . . . . . . 7 2.2.6 A-B repeat . . . . . . . . . . . . . . . . . . . . . . . . . . . . . . . . . . . . . 8 2.2.7 Button lock . . . . . . . . . . . . . . . . . . . . . . . . . . . . . . . . . . . . 8 2 CONTENTS 2.3 Main menu . . . . . . . . . . . . . . . . . . . . . . . . . . . . . . . . . . . . . . . . . 8 2.3.1 Music . . . . . . . . . . . . . . . . . . . . . . . . . . . . . . . . . . . . . . . 8 2.3.2 Voice recording . . . . . . . . . . . . . . . . . . . . . . . . . . . . . . . . . . 9 2.3.3 Directory . . . . . . . . . . . . . . . . . . . . . . . . . . . . . . . . . . . . . . 9 2.3.3.1 Navigation . . . . . . . . . . . . . . . . . . . . . . . . . . . . . . . 9 2.3.3.2 Delete . . . . . . . . . . . . . . . . . . . . . . . . . . . . . . . . . . 10 Settings . . . . . . . . . . . . . . . . . . . . . . . . . . . . . . . . . . . . . . 10 2.3.4.1 Illumination . . . . . . . . . . . . . . . . . . . . . . . . . . . . . . . 10 2.3.4.2 Contrast . . . . . . . . . . . . . . . . . . . . . . . . . . . . . . . . . 11 2.3.4.3 Shut down . . . . . . . . . . . . . . . . . . . . . . . . . . . . . . . 11 2.3.4.4 Automatic off . . . . . . . . . . . . . . . . . . . . . . . . . . . . . . 11 2.3.4.5 Memory . . . . . . . . . . . . . . . . . . . . . . . . . . . . . . . . . 11 2.3.4.6 Language . . . . . . . . . . . . . . . . . . . . . . . . . . . . . . . . 12 Additional functions . . . . . . . . . . . . . . . . . . . . . . . . . . . . . . . . . . . . 12 2.4.1 Equalizer . . . . . . . . . . . . . . . . . . . . . . . . . . . . . . . . . . . . . . 12 2.4.2 Preview song . . . . . . . . . . . . . . . . . . . . . . . . . . . . . . . . . . . 12 2.4.3 Play mode . . . . . . . . . . . . . . . . . . . . . . . . . . . . . . . . . . . . . 13 2.4.4 Delete song . . . . . . . . . . . . . . . . . . . . . . . . . . . . . . . . . . . . 13 2.3.4 2.4 TrekStor 3 i.Beat rock CONTENTS 3 Connecting to a PC 14 3.1 Minimum system requirements . . . . . . . . . . . . . . . . . . . . . . . . . . . . . . 14 3.2 Installation instructions . . . . . . . . . . . . . . . . . . . . . . . . . . . . . . . . . . 14 3.3 Logging off of the PC . . . . . . . . . . . . . . . . . . . . . . . . . . . . . . . . . . . 15 3.4 Exchanging data . . . . . . . . . . . . . . . . . . . . . . . . . . . . . . . . . . . . . . 15 3.5 Creating MP3 files . . . . . . . . . . . . . . . . . . . . . . . . . . . . . . . . . . . . . 16 4 Additional information on the i.Beat rock 4.1 18 Updating the i.Beat rock . . . . . . . . . . . . . . . . . . . . . . . . . . . . . . . . . A Instructions and Warranty 18 20 A.1 Support and contact . . . . . . . . . . . . . . . . . . . . . . . . . . . . . . . . . . . . 20 A.2 Liability . . . . . . . . . . . . . . . . . . . . . . . . . . . . . . . . . . . . . . . . . . 20 A.3 Safety information . . . . . . . . . . . . . . . . . . . . . . . . . . . . . . . . . . . . . 21 A.4 Instructions for use . . . . . . . . . . . . . . . . . . . . . . . . . . . . . . . . . . . . 21 A.5 Trademarks . . . . . . . . . . . . . . . . . . . . . . . . . . . . . . . . . . . . . . . . 22 A.6 Battery disposal . . . . . . . . . . . . . . . . . . . . . . . . . . . . . . . . . . . . . . 22 A.7 Copyright . . . . . . . . . . . . . . . . . . . . . . . . . . . . . . . . . . . . . . . . . 22 A.8 Warranty terms and conditions . . . . . . . . . . . . . . . . . . . . . . . . . . . . . . 22 TrekStor 4 i.Beat rock 1 Introduction Thank you for buying the i.Beat rock . We are confident that this product will be the source of much enjoyment. The i.Beat rock is a high-quality MP3 player with many functions for uninterrupted musical enjoyment on-the-go and at home. Before you first use the device, read the instructions in this manual. 1.1 Controls of the i.Beat rock A B C D E F Button Volume button Volume button Record button Button (Playback/Pause) USB port 5 G H I J K LCD switch (button lock) Headphone jack Microphone Battery compartment 2 Using the i.Beat rock 2.1 General information To make it easy to use, the i.Beat rock only has a few buttons. To enable numerous functions, different functions can be activated depending on how long you hold down the buttons. 2.2 Basic functions 2.2.1 Turning the i.Beat rock on and off To turn the i.Beat rock on, press the button for two seconds. To turn the i.Beat rock off, hold button again for two seconds. The i.Beat rock then automatically turns off. down the Note: Make sure that the switch is in the correct position, i.e., that the button lock is turned off. When the button lock is activated, the button lock symbol or a corresponding message appears. 6 2 Using the i.Beat rock 2.2.2 Playback/pause After turning it on, the i.Beat rock is in MP3/WMA play mode. To play a title, press the button. If the button is pressed during playback, playback is interrupted (pause). Press the button again to continue playing the selection. 2.2.3 Volume regulation You can easily adjust the volume using the buttons to lower the volume. and . Press to increase the volume. Press Briefly press the buttons to change the volume in short intervals. If you hold down the buttons, the volume changes gradually. 2.2.4 Fast forward/rewind button in one direction to navigate within a song. Press the Hold down the button to the left to rewind. right to fast-forward. Press the Note: The longer you hold the go forward or rewind. button to the button in one direction, the faster the device will 2.2.5 Change song Briefly press the button to the left or right to change the current song. Press the button to the right to select the next song. If you press the button to the left within 10 seconds after a song starts, you switch to the prior title. If you do this after 10 seconds of playback, the i.Beat rock returns to the beginning of the current song. TrekStor 7 i.Beat rock 2 Using the i.Beat rock 2.2.6 A-B repeat The i.Beat rock allows you to play a section of a title in a loop. During playback, press the button to set the starting point for the loop. Press the button again at the desired end point of the loop. The symbol ’A-B’ appears in the display, and the loops starts playing. To stop the loop, press the button again. 2.2.7 Button lock Slide the switch to the left to activate the button lock. The symbol ’Button lock’ appears on the bottom left next to the battery symbol in the display. 2.3 Main menu The i.Beat rock has different modes: ’Music’ , ’Voice recording’ , ’Directory’ , and ’Settings’ . To go to a mode, hold the button for approximately one second. Push the button button again. to the right or left to select the desired mode, and confirm by pressing the Note: If the button is not pressed after approximately 10 seconds, the i.Beat rock automatically interrupts the configuration and returns to play mode. 2.3.1 Music In the main menu, select the menu item ’Music’ , and confirm your selection by pressing the button. This mode is also called the MP3/WMA play mode. After turning on the i.Beat rock, it automatically goes to this mode. TrekStor 8 i.Beat rock 2 Using the i.Beat rock 2.3.2 Voice recording In the main menu, select the menu item ’Voice recording’ , and confirm your selection by pressing the button. You can record your voice using the integrated microphone. Hold the button for approximately 2 seconds to start recording. The display shows the message ’Rec’ , the length of current and potential voice recording. Stop recording by again pressing the button for approximately 2 seconds. The recorded file is saved in the VOICE directory. Use the recordings, and play them by pressing the button. buttons to navigate through your saved 2.3.3 Directory In the main menu, select the menu item ’Directory’ , and confirm your selection by pressing the button. This mode is also termed the folder navigation mode. 2.3.3.1 Navigation Press the button to the right or left to select the next or prior file, and confirm your selection by pressing the button. To go to a subdirectory (folder), again press the button. Continue navigation as usual. To return to the main directory, briefly press the button. Note: To make navigation easier, arrows are shown on the left side in the display. When you reach the first or last file of a directory, a line appears above or below the arrows. TrekStor 9 i.Beat rock 2 Using the i.Beat rock 2.3.3.2 Delete Press the button to the right or left to select the desired file (or folder), and delete it by pressing the button. A security prompt appears and asks if you really want to delete the file. Make your decision by pushing the button to the right or left, and confirm by pressing the button. (A way of deleting music files without the security prompt is described in the section 2.4.4.) Note: You can only delete a directory (folder) when it does not contain any files. Please note that the i.Beat rock can only display (and delete) music files (MP3/WMA/WAV) in the LC display. 2.3.4 Settings In the main menu, select the menu item ’Settings’ , and confirm your selection by pressing the button. To go to the respective settings, press the button to the right or left, and conbutton. This procedure also applies to most submenus (such as firm your selection with the ’Illumination’ , ’Contrast’ , . . . ). 2.3.4.1 Illumination Under ’Settings’ , select the menu item ’Illumination’ , and confirm your selection by pressing the button. You can now set how long the background illumination of the i.Beat rock should be active. TrekStor 10 i.Beat rock 2 Using the i.Beat rock 2.3.4.2 Contrast Under ’Settings’ , select the menu item ’Contrast’ , and confirm your selection by pressing the button. You can now change the display contrast. 2.3.4.3 Shut down Push the button to the right or left to select the menu item’Shut down’ , and confirm by pressing the button. Here you can set if and when the i.Beat rock will independently shut down. The time to shut down starts running when you are not pressing any buttons and the i.Beat rock is not playing anything. This function helps you save the battery of the i.Beat rock. 2.3.4.4 Automatic off Under ’Settings’ , select the menu item ’Automatic off’ , and confirm your selection by pressing button. Here you can set if and when the i.Beat rock will automatically shut off (sleep timer). the As soon as you select a time, the timer starts running. After this period is over, the i.Beat rock turns off even if you are pressing a button or are in playback mode. 2.3.4.5 Memory Under ’Settings’ , select the menu item ’Memory’ , and confirm your selection by pressing the button. This allows you to see the available and free memory of the i.Beat rock. TrekStor 11 i.Beat rock 2 Using the i.Beat rock 2.3.4.6 Language Under ’Settings’ , select the menu item ’Language’ , and confirm your selection by pressing the button. You can now select one of the available languages. 2.4 Additional functions The i.Beat rock has a range of settings and functions (’Equalizer’ , ’Preview song’ , ’Repeat’ and ’Delete’ ) that you can go to by briefly pressing the button. Push the button to the right or left to select the desired setting, and confirm by pressing the button. Note: If the button is not pressed after approximately 10 seconds, the i.Beat rock automatically interrupts the configuration and returns to play mode. 2.4.1 Equalizer Select the menu item ’Equalizer’ . This provides you with 6 different EQ modes that you can select button to the right or left. Confirm your selection by pressing button. by pressing the Note: If the i.Beat rock is in voice recording mode, no settings can be made in the equalizer. 2.4.2 Preview song Select the menu item ’Preview song’ , and confirm your selection by pressing the this mode, the first 10 seconds of each song are played. TrekStor 12 button. In i.Beat rock 2 Using the i.Beat rock 2.4.3 Play mode Select the menu item ’Repeat’ . This provides you with 5 different play modes that you can select by pressing the button to the right or left. Confirm your selection by pressing button. ’Normal’ : Plays every song once sequentially. ’Single title’ : Repeats the current song. ’All titles’ : Repeatedly plays every song once sequentially. ’Shuffle’ : Plays every song once in random order. ’Shuffle repeat’ : Repeatedly plays every song once in random order. Note: If the i.Beat rock is in voice recording mode, the play functions are limited. 2.4.4 Delete song Select ’Delete song’ . Press the prompt. TrekStor button to delete the currently displayed song without a security 13 i.Beat rock 3 Connecting to a PC 3.1 Minimum system requirements Microsoftr WindowsTM 98* (SE)/ME/2000/XP Pentium 400MHz RAM 64MB (Windows ME, 2000) - 128MB (Windows XP) USB port In Windows ME/2000/XP, a driver is not required to log the i.Beat rock onto the operating system. However, the i.Beat rock needs the current service pack versions to be installed (at present: Windows 2000: SP4, Windows XP: SP2). If problems arise, you should therefore attempt to install the current service pack from Microsoft for your respective operating system. One address where it can be obtained is: http://www.windowsupdate.com. 3.2 Installation instructions Since Microsoft Windows 98(SE) does not support the USB connection, a driver is required for this operating system that is automatically set up when the software is installed. 14 3 Connecting to a PC This software is required, however, for future updates or reformatting the i.Beat rock (the i.Beat rock may only be formatted with FAT file systems, but not with FAT32, NTFS etc.!). We therefore advise all users of other operating systems to go ahead and install the program. WARNING: Windows 98 users: First download the driver from our homepage at http://www.trekstor.de. Then install the driver before connecting the i.Beat rock to your PC. The PC may have to be restarted. Unpack the downloaded file, and start ’Setup.exe’ . Follow the installation instructions that appear. 3.3 Logging off of the PC Users of Windows 2000/ME/XP must right-click on the symbol ’Safely remove hardware’ in the bottom right of the screen in the system tray (next to the clock). Then select ’USB Mass Storage Device’ , and confirm by clicking the button ’Close’ . Windows 98 users must use the ’Device Manager’ to log off the i.Beat rock. Look for i.Beat rock under ’Device Manager’ (under’Drives’ ), and click the device with the left mouse button. Select the menu item ’Remove’ . You can now disconnect the i.Beat rock from the USB port. 3.4 Exchanging data Once your i.Beat rock is logged onto the PC, it functions like a normal hard disk. The device is automatically assigned its own drive letter. You can now copy, move or delete any kind of data by TrekStor 15 i.Beat rock 3 Connecting to a PC dragging and dropping in Windows Explorer. Note: The i.Beat rock only supports the FAT file system, but not FAT32 or NTFS. Warning: data. Never unplug the device while data is being transmitted. You will loose your 3.5 Creating MP3 files You can use the audiograbber to create legal MP3 files (for your own use) from your audio CDs (’rip’) if they are not copy-protected. To do this, you must first install the audiograbber1 on you PC. For your MP3 files to have the best playback quality, you might want to install the LAME MP3 encoder2 before first using the audiograbber. After you have saved the LAME encoder on your PC, unpack it (for example with Winzip), and copy "lame_enc.dll" to the audiograbber directory. Before you can start creating MP3 files, you need to make the following settings in the ’Options’ menu: In the menu item ’General settings: : :’ , indicate the target folder in which the MP3 files are to be saved. Under menu item ’MP3 options’ . . . – . . . ’grab’ the MP3 file through a temporary Wave file. – . . . select the encoder (such as LAME MP3 or OGG). 1 The audiograbber is available for downloading on the Internet under www.audiograbber.de. You will also find additional information there as well as detailed instructions for new users. 2 You can find details on this from the website www.audiograbber.de. Please observe the license conditions and current legal status! TrekStor 16 i.Beat rock 3 Connecting to a PC – . . . set the audio quality by adjusting the bit rate (recommended: = 128 kBit/s). Insert an audio CD. If Windows uses a program to start playing back the CD, close it. The audiograbber enters all music selections, and displays them as ’Tracks’ starting with ’Track 1’. Click the ’Penguin’ symbol (FreeDB) to read out information about you CD (performer, album, title, . . . ) from an online database (if connected to the Internet). Select the desired title. Click on the ’Grab’ symbol to start ripping the MP3 files. After this is done, the MP3 files on you PC can be played (for example with Windows Media Player). You can of course directly copy the MP3 files to your i.Beat rock and play them on it. TrekStor 17 i.Beat rock 4 Additional information on the i.Beat rock 4.1 Updating the i.Beat rock Visit the TrekStor homepage (http://www.trekstor.de). Here you can always find the current firmware version for your i.Beat rock. Download it and save it on your computer. WARNING: Please completely read the instructions to keep from damaging your i.Beat rock. Back up your data from your i.Beat rock before upgrading or formatting. Install the downloaded firmware version on your PC. Start the program update before connecting the i.Beat rock to your PC. After a few seconds, the PC will recognize the i.Beat rock and start the update and formatting tool. 18 4 Additional information on the i.Beat rock In addition to the current firmware version of the device (’Current Firmware Version’ ), the new firmware version (’Upgrade Firmware Version’ ) is shown. If the box ’Format Data Area’ is checked, the i.Beat rock is formatted before updating. If the box is not checked, the update runs directly. The data are saved and not deleted. TrekStor recommends that you always format the i.Beat rock at the same time. Click on Start to start the selected action. TrekStor 19 i.Beat rock A Instructions and Warranty A.1 Support and contact If you have any questions about our products or need assistance, send an e-mail to our free support service at [email protected]. You can also contact our support team by telephone. Our support team is available daily from 08:00-23:00 at the telephone number below. Phone: +49 (431) 24 89 45 711 www.trekstor.de [email protected] A.2 Liability The manufacturer only guarantees the suitability of the product for its intended use. TrekStor and its suppliers shall not be liable for loss of data that occurs during use or due to the use of the device or for consequences thereof. TrekStor shall under no circumstances be liable for direct, incidental special damages or consequential damages such as damage or loss of property or equipment, loss of earnings or sales, costs for spare parts, expenses or inconveniences due to interruption of service, or other damages. The user alone shall be liable for the loss, damage or destruction of data during operation of a TrekStor product. TrekStor shall under no circumstances be responsible for recovering lost data. Under no circumstances can claims that exceed the purchase price of the product be asserted. TrekStor reserves the right to continuously improve the product. All modifications may be made without describing them in this manual. The information contained in this manual must therefore not correspond to the current technical design. 1 Please check with your local telephone provider for connection costs. 20 A Instructions and Warranty A.3 Safety information Work on the product can only be performed by persons qualified for that purpose. Read this manual carefully and follow the instructions when installing the device. Do not open the product and attempt to modify it. Never insert metal objects into the product. This could result in an electrical shock, fire, short-circuit or hazardous emissions. Components cannot be serviced by the user. If the device is not functioning properly, carefully read the warranty terms in the A section. Never leave the device out in the rain, and keep it away from water and moisture. Never place containers filled with liquid on the device. Liquid could enter openings in the product creating a risk of electrical shock, short-circuits, fire and injuries. A.4 Instructions for use Never leave the device out in temperatures below 5 C (41 F) or above 40 C (104 F), as damage to the electrical components could result. Keep the device away from heat sources and direct sunlight (even through a window). Environments that are too cold or too humid can also damage the device. Unplug the device when there is a risk of lightning strikes or when the device is not in use for longer periods of time. Otherwise the risk of electrical shock, fire and short-circuits increases. Never place the device near other electrical devices or equipment such as televisions, radios and speakers since this could affect the operation of the other devices. Never place the device near sources of magnetic interference such as computer monitors, televisions and speakers. Magnetic interference can affect operation and stability of the device. Never place heavy objects on the device or exert extreme force on the device. Store the device in a clean, dust-free location. Dust can collect inside the device increasing the risk of damage and malfunction. Never use solvents, paint thinners, cleaning agents or other chemical products to clean the surface of the device. Use a soft, dry cloth or soft brush to clean the device. Attention!: TrekStor The warranty may become null and void if you do not follow the above instructions for use. 21 i.Beat rock A Instructions and Warranty A.5 Trademarks r Microsoft and Windows are registered trademarks of Microsoft Corporation. All other registered trademarks and the registered trademarks mentioned in this manual are the sole property of their respective owners and are confirmed as such. A.6 Battery disposal Do not dispose of batteries along with normal household waste. As a consumer, you are required by law to return used batteries. You can return old batteries to public community collection centers or anywhere where batteries of the same type are sold. Do not throw batteries, or dispose of them into an open fire or dispose of them in a wastebasket/dumpster or recycling container not intended for batteries or in any other manner that could be harmful to the environment. A.7 Copyright This manual may not be reproduced in whole or in part or copied, transferred or translated in any form or using any means, whether electronic or mechanical, including photocopying and recording, without the express written permission from TrekStor GmbH & Co. KG. The software described in this document is subject to a license agreement and can only be used or copied as indicated in the terms and conditions of the license agreement. Software cannot be copied to any other medium unless expressly permitted by the license agreement. The holder of the license is permitted to make a copy of the software for backup purposes, however. A.8 Warranty terms and conditions This product is subject to the legal warranty periods for manufacturing faults and defects. Warranty contents: TrekStor 22 i.Beat rock A Instructions and Warranty 1. If a malfunction due to faulty manufacturing should occur, TrekStor will repair or replace the faulty product at its discretion. 2. The following repairs are not included in the warranty and must be undertaken at the user’s expense: Malfunctions occurring after the legal warranty periods have expired Malfunctions resulting from incorrect operation by the user (if the device is not operated as described in the manual) Malfunctions due to other devices Changes or damage to the device not originating from the manufacturer. The warranty shall become null and void if the device is opened by retailers or repair shops not authorized by TrekStor GmbH & Co. KG. Damage due to natural disasters (force majeure) To assert a claim on the warranty, contact your local shop where you purchased the device. You must present your sales slip. The retailer will then perform services justified by the warranty after consultation with the TrekStor service team. Do not send any products directly to TrekStor, but contact your retailer at first. TrekStor 23 i.Beat rock


![Trekstor i.Beat organix [FM]](http://vs1.manualzilla.com/store/data/007153174_1-e7bb071958efeca9f95a86f972926437-150x150.png)