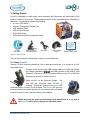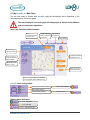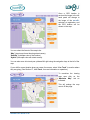
1
User Guide The world‟s first GPS locator that locates your child, not just the device nu•m8+ User Guide V1.06 © Table of Contents Preface .................................................................................................................................................. 2 Lok8u Ltd and its Subsidiaries ........................................................................................................... 4 1. Introduction ...................................................................................................................................... 5 2. Product Design and Functionality Summary ................................................................................ 5 3. Getting Started ................................................................................................................................. 6 3.1 Charge nu•m8+ ............................................................................................................................ 6 3.2 Create Account and Register nu•m8+.......................................................................................... 7 3.3 Activate nu•m8+ ......................................................................................................................... 12 3.4 nu•m8+ Battery ........................................................................................................................... 15 4. nu•m8+ Start-up ............................................................................................................................. 16 5. Time Configuration ........................................................................................................................ 17 5.1 Clock Display .............................................................................................................................. 17 5.2 Setting the correct Time Zone .................................................................................................... 17 6. Customer Portal Login .................................................................................................................. 18 6.1 My nu•m8+‟s – Main Page ......................................................................................................... 19 6.2 Help ............................................................................................................................................ 21 6.3 Forgotten Password ................................................................................................................... 22 7. Mobile Phone Text Commands .................................................................................................... 22 8. Where are you “wru” Request ...................................................................................................... 23 8.2 From your Mobile Phone ............................................................................................................ 23 8.2 From a Desk-top Computer (Customer Portal) .......................................................................... 24 9. Set, Apply and Edit a Safe Zone ................................................................................................... 28 9.1 From your Mobile Phone ............................................................................................................ 28 9.2 From a Desk-top Computer (Customer Portal) .......................................................................... 29 10. Removing nu•m8+ without triggering an Alert ......................................................................... 38 10.1 From your Mobile Phone .......................................................................................................... 38 10.2 From a Desk-top Computer (Customer Portal) ........................................................................ 39 11. Live Track ..................................................................................................................................... 41 12. Alerts ............................................................................................................................................. 44 12.1 Add New Recipient of Alerts..................................................................................................... 44 12.2 Change the Recipient of Alerts ................................................................................................ 45 12.3 Edit Recipient of Alerts ............................................................................................................. 46 13. Home Zone.................................................................................................................................... 47 13.1 Create New Home Zone........................................................................................................... 48 14. My Details ..................................................................................................................................... 49 15. Product Specification .................................................................................................................. 51 16. Waterproof Specification ............................................................................................................ 51 17. Certification .................................................................................................................................. 52 17.1 CE Certification......................................................................................................................... 52 17.2 WEE.......................................................................................................................................... 52 17.3 SAR .......................................................................................................................................... 53 17.4 Dermatological.......................................................................................................................... 53 17.5 FCC .......................................................................................................................................... 53 18. Product Information..................................................................................................................... 54 19. APPENDIX I ................................................................................................................................... 56 19.1 Useful Information .................................................................................................................... 56 20 APPENDIX II ................................................................................................................................... 57 20.1 Troubleshooting ........................................................................................................................ 57 21. APPENDIX III ................................................................................................................................. 58 21.1 nu•m8+ FAQ‟s .......................................................................................................................... 58 nu•m8+ User Guide V1.06 1 C o p y r i g h t E n v i s i o n S B S . 2 0 0 4 . A l l r i g h t s r e s e r v e d . P r o t e c t e d b y Preface Thank you for purchasing nu•m8+, the world‟s first location device specifically designed to be worn by children. It is my hope that nu•m8+ will make parents feel more comfortable in allowing their children to play un-supervised, so that “kids can be kids” and enjoy the benefits of being free to interact with their peers through unstructured play. I know, like you, that the social environment in which our children are growing up can, at times, be perilous and therefore we all want to make sure our children are safe and free from harm. nu•m8+ does not make the environment safer but will allow you to know where your children are, control the areas in which they play and be the first to know if they are at risk. Please read this simple user guide carefully to get the best out of your nu•m8+ and remember it is an aid to parental care and control; it must not be regarded as a substitute. As a parent myself, it was the urge to keep my children safe, whilst letting them enjoy the freedom of childhood that I enjoyed that spurred the development of nu•m8+. I know that it will live up to your expectations but if there are any suggestions that you think would be sensible to incorporate, I will give them my full attention. I can be contacted at [email protected]. Steven K Salmon Chief Executive © C o p y r i g h t E n v i s i o n S B S . nu•m8+ User Guide V1.06 2 2 0 0 4 . A User Guide This user guide is to introduce the nu•m8+ GPS child locator with the complete technical data and the instructions showing how to operate nu•m8+ easily and correctly. Please read this manual carefully before using this product. Most problems could be solved through the explanations and the troubleshooting tips. Once you finish reading it, keep it handy for necessary reference. Trademarks Lok8u, nu•m8+ and certain other trademarks and logos appearing in this document are filed or registered trademarks of Lok8u and / or in other countries. Copyright This manual is copyrighted by Lok8u with all rights reserved. No part of this manual may be reproduced, modified or disclosed to third parties in any form without the prior written permission of Lok8u. Lok8u hereby grants permission to download a copy of this user manual from the Lok8u website, www.lok8u.com, onto a hard disk or other electronic storage medium to be viewed and to print a copy of this manual or of any revision hereto, provided that such electronic or printed copy of this manual must contain the complete text of this copyright notice and provided further that any unauthorized commercial distribution of this manual or any revision hereto is strictly prohibited. Disclaimer and Limitation of Liability The content of this user guide is accurate and reliable and is provided “as is”. Lok8u makes no warranties of any kind, either express or implied, including, but not limited to, any implied warranties of merchantability, fitness for a particular purpose, are made in relation to the accuracy, reliability or contents of this document. The recipient of the documentation shall endorse all risks arising from its use. In no event shall Lok8u be liable for any incidental, direct, indirect, consequential, or punitive damages arising from the use or inadequacy of the documentation, even if Lok8u has been advised of the possibility of such damages and to the extent permitted by law. Information in this document is subject to change without notice. Lok8u reserves the right to change or improve its products and to make changes in the content without obligation to notify any person or organization of such changes or improvements. Visit the Lok8u website, www.lok8u.com, for current updates and supplemental information concerning the use and operation of this and other Lok8u products. General information about Lok8u and its range of products is available at the following internet address, www.lok8u.com. Important Notice Due to the nature of wireless communications, transmission and reception of data can never be guaranteed. Data may be delayed, corrupted (i.e., have errors) or be totally lost. Although significant delays or losses of data are rare when wireless devices such as the nu•m8+ device are used in a normal manner with a well-constructed network, Lok8u accepts no responsibility for damages of any kind resulting from delays or errors in data transmitted or received using its products, or for failure of its products to transmit or receive such data. nu•m8+ User Guide V1.06 3 Lok8u Ltd and its Subsidiaries United Kingdom (UK) Lok8u Ltd Unit 2 Colemeadow Road North Moons Moat Redditch, Birmingham B98 9PB United States (USA) Lok8u LLC 2500 Plaza Five, 25th Fl Jersey City, NJ 07311 South Africa (SA) Lok8u SA (Pty) Ltd PO Box 4459 Tygervalley Western Cape 7536 Tel: 08 452 099 099 email: [email protected] Tel: 1 888 423 1887 email: [email protected] Tel: +27 861 6 56588 email: [email protected] Europe Lok8u Ltd Unit 2 Colemeadow Road North Moons Moat Redditch, Birmingham B98 9PB Czeck Republic eLokator Povltavska 5 Prague 7 171 00 Turkey Turk Cell Turkcell Plaza Mesrutiyet Cad Tepebasi Istanbul 80050 Tel: 08 452 099 099 email: [email protected] nu•m8+ User Guide V1.06 Tel: 601601101 (CR) Tel: 601601701 (SK) email: [email protected] (CK) email: [email protected] (SK) Tel: 0532 444 0 532 email: musteri.hizmetleri @turkcell.com.tr 4 1. Introduction nu•m8+ is the world‟s first GPS locator device specifically designed to be worn by children. Launched by UK location service‟s company, Lok8u Ltd, this new GPS child locator is cleverly concealed within a child‟s digital watch. Its unique design features ensure that the parent locates their child, not the technology. nu•m8+ is innovative and fundamentally different to other products available in the market. It does not rely upon the child to be responsible enough to keep their locator with them in a bag or pocket. Instead, when nu•m8+ is securely fastened to a child‟s wrist it stays there unless deactivated by a parent. Parents can therefore be assured that wherever nu•m8+ is, their child is. Please note that nu•m8+ should not be regard as a substitute for parental care and supervision. 2. Product Design and Functionality Summary As far as the child is concerned, nu•m8+ is a digital watch. For parents it has been designed with simplicity and ease of use in mind. A Lok8u secure Customer Portal is also available on the internet and will be accessible worldwide from any PC. Each user will have a user name and password and will have the ability to request and display the child‟s location as an icon on Google maps with street address and postal code. The nu•m8+ technology is accessible at home, abroad or on holiday from any computer or mobile phone. To locate the child, simply text “wru” from a mobile phone to the nu•m8+ or click “Where ru” on the Lok8u secure Customer Portal. The child‟s location is then presented as an icon on Google maps and/or the street address and postal code is displayed. In addition, parents can set unique “Safe Zones“, in which their child can safely play. This function is activated simply by texting “safe”, followed by a number, which represents the metre radius for the child‟s safe area, to nu•m8+, or selecting a “Safe Zone” from the Lok8u secure portal. As long as the child remains in this area no alerts will be sent and the parent can still communicate with the device using the “wru” function. However, if they stray a priority alert will be sent to the parent‟s mobile phone and / or email address. When the nu•m8+ device is forcibly removed from the child‟s wrist an alert, “Strap Compromised”, is sent immediately to a designated mobile phone and / or email address with the child‟s location to give parents an early warning of potential danger. The device can only be removed from the wrist, without triggering an alarm, when de-activated by the authorised parent/guardian. A “Home Zone” can also be configured for easy and safe removal of the nu•m8+. nu•m8+ User Guide V1.06 5 © C o p y r i g h t E n v i s i o n S B S . 2 0 0 4 . A l l r i g h t s r e 3. Getting Started nu•m8+ is supplied in a high quality carton enclosure with information and functionality of the product, printed on the outside. The packaging contains all the equipment that is necessary for operation. The packaging includes the following: nu•m8+ GPS Watch Desk-top Charger with Release Tool USB Interface Cable USB AC Wall Charger Quick Start Guide Self adhesive 3M Derma Label (pre-fitted) QUICK START GUIDE nu•m8+ GPS Watch Desk-top Charger with Release Tool USB Cable *USB AC Wall Charger nu•m8+ QUICK START GUIDE *Optional in some Countries If any of the components are missing, contact your local Distributor. 3.1 Charge nu•m8+ Remove nu•m8+ and the accessories from its packaging and place it on charge for a full 8 hours before use. Connect the DC socket of the USB interface cable to the side of the Desktop Charger (indicated by ) and USB connector to the USB AC Wall Charger or USB port of a PC. (A standard USB port on a PC or USB Wall Charger can be used to charge nu•m8+.) Place nu•m8+ on the Desk-top Charger. The Red LED will illuminate whilst nu•m8+ is charging. This will be replaced by the Green LED illuminating when nu•m8+ is fully charged. The Green LED light may illuminate faster than quoted above but it is still advised that you charge it the full 8 hours to ensure that the battery is fully charged. Whilst there may be some residual charge from manufacture it is not safe to use nu•m8+ until it is fully charged, as described above. nu•m8+ User Guide V1.06 6 3.2 Create Account and Register nu•m8+ To create a new account and register nu•m8+, go to the Lok8u website, www.lok8u.com and select your country on the home page. On the home page of your country, click on the icon, Portal Login. In the Log In window, click on “Create Account” too follow the easy steps to create your account, to register your nu•m8+ and to request the activation of the incorporated SIM card. All the steps must be completed with all the required detail to continue to the next step. Once the registration has been successfully completed, you will receive an email confirming that your Portal Account has been successfully created. After verification, you will receive an email confirming that the SIM card has been activated, together with the phone number of your nu•m8+, within a maximum of 48 hours. nu•m8+ will then be ready for activation and use. To complete the registration process you will need: The serial number of your nu•m8+, (found on the base of the packaging) Valid debit or credit card registered at your address Telephone number of the mobile phone and email address that you want to receive alerts to as primary contact A digital photograph of your child, or other image, if you want to upload it to your part of the customer portal, maximum size 200kb Select the required subscription tariff (to select the subscription that is most appropriate for your planned use of nu•m8+, please refer to the Lok8u website, www.lok8u.com and select your country to view the available Tariff Options) Log In Click on “Create Account” to start with the registration process for the new nu•m8+. nu•m8+ User Guide V1.06 7 Terms & Conditions Please read through the Terms and Conditions and click on “Accept” to continue with the registration. You will not be able to create an account to register your device if you “Decline” the Terms and Conditions. Registration Enter your “Login Details”, “Personal Details” and “Address Details”. Click on “Cancel” to cancel the Registration of the new account. Click on “Finish” to complete the Registration of the new account. You will now be directed to your Customer Portal Main Page. Please note that details with “ * ” is mandatory. Details with “ † “ will be used as the Primary Contact for the registering nu•m8+. The “Address Details” provided should be the physical Street Address of your home. These details will be used to display the area of your home on Google Maps, every time when logged in to your Customer Portal account. Select a “User Name” and “Password” that is secure and only known to you. Ensure to keep your “Username” and “Password” safe and not recommended to share this information with others. nu•m8+ User Guide V1.06 8 My nu•m8+‟s - Main Page To register a nu•m8+, click on “My Details”. User Profile Click in “Register Device” to register a new nu•m8+. Click on “Back” to return to the Main Portal page. Click on “Logout” to log out of Portal. Click on “Save” to save any changes made. The following can be changed in your User Profile: You can select the Default Map View between Map, Satellite or Hybrid. You can enable or disable the Display Start-up Tips when Log In. You can select the mode in which nu•m8+ must go when the Strap is Compromised. It is recommended that nu•m8+ is configured to enter the “Standby” mode when the Strap is Compromised. You can select and configure your Time Zone. nu•m8+ User Guide V1.06 9 Terms & Conditions Please read through the Terms and Conditions and click on “Accept” to continue with the registration. You will not be able to register your device if you “Decline” the Terms and Conditions. Registration The registration consists of 2 easy steps: Step1: Add Devices Step2: Payment All the steps must be completed to continue to the next step. Click on “Add” to add the details of your nu•m8+. Click on “Cancel” to cancel adding a new device. nu•m8+ User Guide V1.06 10 Device Details Enter the details of the nu•m8+, select an Icon Colour and upload an image of your child. You can “Edit” the details of your device in the main Portal when logged in. All the fields marked with “*” are mandatory. Click on “Next” to continue to the next step. Continue with Step 2 “Payment” to complete the registration. Step 2 “Payment” – Provide details of payment method for monthly debit order. Once the registration has been successfully completed, it can take a maximum of 48 hours to activate the SIM card. Once this has been completed you will receive an email confirming that the SIM card has been activated together with the phone number of your nu•m8+. Once you have received the confirmation email you can then activate and use nu•m8+. Please note to ONLY activate nu•m8+ once the confirmation email with your mobile phone number was received. nu•m8+ User Guide V1.06 11 3.3 Activate nu•m8+ Before activating nu•m8+ ensure that the battery is fully charged. To activate nu•m8+ you MUST switch it On by inserting the strap into the housing whilst the watch is off the wrist and press the Reset button gently for 5 seconds with the release tool provided in the desk-top charger base. (The Reset button is found on the back plate next to the gold charging pins). Reset Inserting Strap Locking Mechanism Strap Secured Reset Button nu•m8+ will now go through its activation process and log on to the mobile phone network. This is shown by a message “Loading” and a black bar moving around the four sides of the LCD display, as indicated below. (Please note that it may be necessary to take nu•m8+ outside to enable this process to complete.) Monitor the status of the LCD display when nu•m8+ has been switched On. If the screen shows „Loading‟ but the black bar is not moving around the sides of the LCD display, then nu•m8+ is not acquiring a mobile phone signal. Take nu•m8+ to a know area that has good mobile phone signal / coverage or take nu•m8+ outside to acquire the mobile phone signal. Step 1 Step 2 Step 3 Step 4 Step 1 – Found and Connect to a mobile phone network Step 2 – Internal GPS check OK Step 3 – GPRS connection made Step 4 – Full Service Communication completed and successful. Once the activation is successful the time will display on the LCD display; leave for 10 minutes to synchronise your nu•m8+. For first time activation, nu•m8+ may defaults to GMT (Greenwich Mean Time), depending on configuration. When you turn nu•m8+ On, it may show a discrepancy of one hour or a couple of hours, depending on your location and time zone. To adjust the time, see Section 5, Time Configuration, for configuration. (See Section 4, nu•m8+ Start-up, for more detail.). You will only have to do this configuration once, nu•m8+ will remember the setting and will start-up with the correct time thereafter. nu•m8+ User Guide V1.06 12 IT IS CRITICAL THAT IN ORDER TO COMPLETE THE ACTIVATION PROCESS THE FOLLOWING 3 STEPS ARE FOLLOWED. STEP 1 When switching nu•m8+ ON for the first time, the GPS needs learn the satellite location in your area, in order to obtain a GPS location. To enable the GPS functionality of your nu•m8+, place nu•m8+ outside with good line of sight and clear view of the sky. Go to the portal and click “Live Track” and select an update rate of “2 minutes”. Leave the device in this mode until the portal map shows the GPS icon ( ). For the first time set up, it can take up to 45 minutes. Please note that GPS systems require good line of sight and clear view of the sky in order to achieve a GPS location. Please note the following information regarding the operation of the GPS receiver: When a GPS is new (from factory), has been turned Off for a long period of time, or has been transported for a long distance since it was turned On, it will take longer to get a "Time to First Fix" (TTFF), because the GPS must update its almanac and ephemeris data and store it in memory. Time to First Fix (TTFF) describes the time and process required for a GPS device to acquire enough usable satellite signals and data to provide accurate locations. A GPS must have three sets of data before it can provide accurate locations: GPS satellite signals, almanac data, and ephemeris data. The GPS almanac is a set of data that every GPS satellite transmits, and it includes information about the state (health) of the entire GPS satellite constellation, and coarse data on every satellite's orbit. When a GPS receiver has current almanac data in memory, it can acquire satellite signals and determine initial position more quickly. When the GPS comes from the factory, the receiver has no knowledge whatsoever of almanac data in turn to locate the satellites and retrieve ephemeris data. For a full almanac to be downloaded, it can take approximately 15 minutes, but can take up to 45 minutes. One thing to bear in mind is that the average time for First Time to Fix (TTFF) will vary. Depending on where you are can dramatically change the quickness of acquiring a satellite lock. To load the ephemeris data from the satellites, the GPS receiver requires a full 30 seconds of data reception. If this is interrupted from a tall building, or a branch from a tree, or if the signal you are receiving is being reflected off of a building then all of this can cause a problem in the data reception. If the data isn‟t received in full, the ephemeris data collection has to start again at the next cycle. A "cold" start refers to a situation in which the GPS must acquire all data in order to start navigation, and may take up to 15 minutes. nu•m8+ User Guide V1.06 13 A "warm" start means the GPS has most of the data it needs in memory, and will start quickly a minute or less. GPS receivers cannot receive a signal underground, underwater, under any conductive type material like metal, indoors or become inaccurate under thick glass as the signal travels slower through glass. The accuracy of a GPS location depends on the amount of satellites it can receive signals from. The minimum satellites required to provide a GPS location is four. STEP 2 Log in to the Customer Portal and click the “Switch Off” button to turn nu•m8+ “Off”. (See Section 6, Customer Portal Login, for more detail on the Customer Portal Log In, for your selected country.) When this action has completed the “Off” button on the Customer Portal will be filled and the LCD display on nu•m8+ will be blank. Disconnect the strap from the housing using the release tool provided. nu•m8+ is now ready for normal use. Please note that it is recommended to always “Switch Off” nu•m8+ before disconnecting the strap from the housing. Release Strap STEP 3 Adjust the strap to fit your child‟s wrist. Use the release tool located in the back of the desk-top charger base to un-do and re-do the locking screw in the strap. It is important that the strap is tight enough so that it cannot be slipped over the hand, but not so tight that it is uncomfortable. The strap is adjusted as follows: Tool Release Tool nu•m8+ User Guide V1.06 Un-do Locking Screw Adjust Strap and Re-do Locking Screw 14 Your nu•m8+ is now ready to be used. Simply place nu•m8+ around your child‟s wrist, insert and lock the open end of the strap into the housing of the nu•m8+, as indicated. The back plate of the nu•m8+ is manufactured from Stainless Steel. If you child has a know allergic reaction to Stainless Steel and or Nickel, the Self adhesive 3M medical label, supplied in the packaging, must be applied to the back plate of the nu•m8+, before placing nu•m8+ around your child‟s wrist. Stainless steel contains nickel, but it is bound in such a way that makes stainless steel safe for most nickel-sensitive individuals. 3.4 nu•m8+ Battery When charging nu•m8+ for the first time, it is advised that you charge nu•m8+ the full 8 hours to ensure that the battery is fully charged. approximately 2 hours. The charging time after the initial charge is Like any battery operated device, the more you use it the shorter the battery life is of the device. The expected battery life of the device in standby is between 24-30 hours. The following will have an effect on the battery life of your nu•m8+: Poor GSM coverage or handshaking between multiple base stations, i.e. during a car journey will also consume extra battery power. Powering up the GPS module consumes the most power. It is expected that 5-10 “wru” requests, when outdoors, will give you 14-18 hours of battery life. It is expected that 5-10 “wru” requests, when indoors, will give you 10-12 hours of battery life. It is expected that when configured for “Live Track” or “Safe Zone” with intervals of 10 minutes, the battery life will be 4-5 hours. Battery not fully charged. It is imperative to ensure that the battery is fully charged before using the device. nu•m8+ User Guide V1.06 15 4. nu•m8+ Start-up It is recommended to ensure that nu•m8+ is fully charged and that the correct time display on nu•m8+ before you let your child out to play. When the correct time display on nu•m8+, it is a visible indication that nu•m8+ is connected to the mobile phone (GSM) network. If you have poor network coverage at home, this process may not complete successfully. When you turn nu•m8+ On, it may show a discrepancy of one hour, depending on your location and time zone. To adjust the time, see Section 5, Time Configuration, for configuration. You will only have to do this configuration once, nu•m8+ will remember the setting and will start-up with the correct time thereafter. Place nu•m8+ around your child‟s wrist and push the strap to lock it in place. nu•m8+ will go through an automatic start-up process to check the status of the core functions of the product (GPS, GSM, battery, valid subscription) and update any status changes that you have recently made on the Customer Portal, such as alert information, Safe Zone etc. This is shown by a message “Loading” and a black bar moving around the four sides of the LCD display, as indicated in Section 3.3, Activate nu•m8+. When this process is completed the time will appear as a digital clock display. To adjust the clock settings, see Section 5, Time Configuration, for configuration. If the clock does not appear, nu•m8+ is not connected to the mobile phone (GSM) network. The most common reason for this is poor mobile phone coverage. If you take your child outside this will help it to acquire the necessary signal strength. Once coverage is established, nu•m8+ will hold the signal even in areas where it couldn‟t get signal at boot-up. If you have taken nu•m8+ off your child during the start-up sequence the watch will think it is in “Strap Compromise”. You will be notified by a “Strap Compromise” text alert (SMS) and the Customer Portal will show a strap alert. It will be necessary to turn nu•m8+ “Off”' using “Switch Off” from the portal or texting “Off” from the approved mobile phone and wait for the LCD display to go blank on nu•m8+. You should then initiate the start-up process again. If you have taken nu•m8+ off during the start-up process and don‟t get a “Strap Compromise” alert then re-insert the strap in to the housing and gently press the Reset button on the back plate. nu•m8+ will then go through the start-up process again. When the clock appears on the LCD display, nu•m8+ has logged on to the mobile phone (GSM) network and you must now go to the Customer Portal and send nu•m8+ the “Switch Off” command. nu•m8+ User Guide V1.06 16 When this has been processed and the Customer Portal has updated showing nu•m8+ is “Off” (“Off” checked in the right hand status panel), release the strap from the housing, using the release tool supplied. nu•m8+ is now ready to be placed on your child and the start-up sequence re-commenced. If nu•m8+ is out of subscription it will not operate and should be removed from your child. To update your subscription details contact the support service of your selected country. (See Lok8u Ltd and its Subsidiaries, Page 4, for contact details.) 5. Time Configuration nu•m8+ defaults to GMT (Greenwich Mean Time). When you turn nu•m8+ On it may show a discrepancy of one hour, depending on your location and time zone. The time of nu•m8+ can only be adjusted from the mobile phone set to receive alerts. This will be the primary contact details given at registration. (See Section 12, Alerts, for information on how to change and configure Alerts) 5.1 Clock Display The nu•m8+ display can be adjusted to show: Analogue watch or 12 hour digital or 24 hour digital. Clock display configuration text commands: To set analogue watch text “clock” To set 12 hour digital text “12” To set 24 hour digital text “24” 5.2 Setting the correct Time Zone To correct the time text “time+(hour)”, or “time-(hour)” to nu•m8+. Example: If the actual time is 9.00am and nu•m8+ shows 8.00am text “time+1” to nu•m8+. nu•m8+ User Guide V1.06 17 6. Customer Portal Login To log in to the Customer Portal, go to the Lok8u website, www.lok8u.com and select your country on the home page. On the home page of your country, click on the icon, Portal Login. Log In To use the Customer Portal, log in using the Username and Password that were chosen at registration and click on “Go”. My nu•m8+‟s - Information After successful log in, the information screen will display. Simply click the Red Cross to close the window and to continue. (To disable the pop-up screen to not appear again tick the box at the bottom, “Do not show message on next login”, before navigating away from the pop-up box). It is recommended to keep the Start-up pop-up screen enabled, to be informed about new tips and functionality. nu•m8+ User Guide V1.06 18 6.1 My nu•m8+‟s – Main Page You are now ready to interact with nu•m8+ using the functionality that is described in the following sections of this user guide. The map displayed in the main page will always open as default on the address that was entered at registration. Main Page Functions and Information: Click on where ru to request a location of your nu•m8+ Change / Edit User Profile and register new devices Help function for assistance Logout of Portal Maximise Map to view larger format Configuration details of selected nu•m8+ Icons of nu•m8+‟s configured with Alert status indication Click on the icon to select a nu•m8+ Switch nu•m8+ off before strap release Alerts in the past 7 days will be displayed in the information window below the map. nu•m8+ Alert Configuration: Strap compromise Alert indication Amber - Strap compromise Alert Battery status indication Safe Zone Alert indication Amber - Safe Zone Alert Battery Status Indication: Green Level - very good Amber Level - average Red Level – requires Charging nu•m8+ User Guide V1.06 19 Configuration Details of Selected nu•m8+: Icon / Name of nu•m8+ selected nu•m8+ Off indication Standby mode indication and configuration Live Track mode indication and configuration Safe Zone indication and configuration; Add New; Edit; Delete Safe Zones Configuration of Alert List and contact details Indication of current contact configured that can send / receive SMS and Alerts Configuration Home zone Home Zone indication and configuration; Add New; Edit; Delete Safe Zones Use of Map Functions: Select format of the Map “Map” (street map format showing street names), “Satellite” (helicopter view of the location) “Hybrid” (helicopter view with street names). Return to the last position on the Map Pan Up / Down / Left / Right Zoom In (+) Zoom In / Out Ruler Zoom Out (-) “Map” (street map format showing street names) nu•m8+ User Guide V1.06 20 6.2 Help If at any time you need assistance just click the “Help” button and the following screen will appear. Help Select the relevant article that deals with your query or just type your query in to the search box. If you require any further assistance, contact the Customer Services for your country. See Lok8u Ltd and its Subsidiaries for contact details for your country. If you are using a public computer please ensure that you do not click “Remember my Password” as your log in details will be visible to the next user. Ensure to always “Logout” after each session, to ensure that your session is closed and details are not visible to the next or other users. nu•m8+ User Guide V1.06 21 6.3 Forgotten Password If you have forgotten your password, simply click on “Forgotten Password” on the Log In page. To close the window, click on the 'X' in the top right corner. Enter the Username that were chosen at registration and click on “Send”. The password details will be e-mailed to the e-mail address that was entered at registration. Follow the process in the received email to change your password. 7. Mobile Phone Text Commands As mobile phones have a limited screen size and a less than perfect key pad, some of the functionality of the Customer Portal from mobile phones is available by text messaging (SMS) of instructions to nu•m8+: Function Description Where are you request Off (to release strap) Safe Zone on Safe Zone off Clock Analogue Clock 12 hour digital Clock 24 hour digital To correct the time + To correct the time - Text Command wru off safexx zone clock 12 24 time+(hour) time-(hour) Description Request location of your child Turn nu•m8+ off to release the strap Enable Safe Zone - (xx - radius in metres) Disable Safe Zone Configure nu•m8+ to display analogue clock Configure nu•m8+ to display 12 hour digital clock Configure nu•m8+ to display 24 hour digital clock Setting the correct time zone +(hour) Setting the correct time zone -(hour) Only your chosen authorised mobile phone can interact with your child‟s nu•m8+ by automatically verifying that the phone number of the sender matches the number held in your personal details section on the Customer Portal relevant to the Alert contact selected. (See Section 12, Alerts, for information on how to change and configure Alerts.) nu•m8+ User Guide V1.06 22 8. Where are you “wru” Request I want to know where my child is now! This can be done from either your Mobile Phone or Desk-top Computer (Customer Portal). 8.2 From your Mobile Phone To send text commands to nu•m8+ via your mobile phone, the “Alerts Send To” on the Customer Portal must be set to the mobile phone that you will be using to text nu•m8+. (See Section 7, Mobile Text Commands, for format and description of text commands.) Section 12, Alerts, for information on how to change and configure Alerts.) (See Now, text “wru” to the nu•m8+ phone number. The mobile phone number will then be validated to ensure that it is authorised and then the location of your child will be sent as a text message, providing the following information: 10/60 - Balance of SMS Alerts available My nu•m8+ - Name of your nu•m8+ as configured in the Portal wru acknowledgement SMS (SMS Type received) Approximate location (When Cell ID location is provided, GPS not achieved, when indoors) Location (When GPS location is achieved, when outdoors) House name/no; Street name; Town / City; Postal Code; Country Link (URL) to view your child‟s location on Google maps Please note that only internet enabled mobile phones with a valid network subscription will be able to view the URL link to Google maps. If nu•m8+ is unable to get a GPS lock the text message will give an approximate location, updating with subsequent Cell ID locations. Note: The mobile phone number of nu•m8+ may also be seen by hovering the mouse over the image of your child‟s nu•m8+ in the left hand panel of the portal, as shown in the image. nu•m8+ User Guide V1.06 23 8.2 From a Desk-top Computer (Customer Portal) Log in to the Customer Portal using the Username and Password that were chosen at registration. (See Section 6, Customer Portal Login, for more detail on the Customer Portal for your selected country.) Log In Log in using the Username and Password that were chosen at registration and click on “Go”. My nu•m8+‟s - Main Page Select the nu•m8+ icon in the left hand panel that corresponds to the nu•m8+ your child is wearing by clicking on the icon / picture. Your nu•m8+ will then appear in the right hand control panel. Click on the “where ru” button to request the location of your child. It is not possible to click the “Where ru” button again until it has completed its process of providing a location of your nu•m8+. nu•m8+ User Guide V1.06 24 The settings have been sent to your nu•m8+. Please wait. It is not possible to click the “Where ru” button again until the Portal has completed its process of locating your child. Once nu•m8+ has responded the location will be shown as a cross hair which if you place your mouse in the area will give the degree of accuracy and the time. The image on the Customer Portal will then change to the nu•m8+ standard icon and the radiating antennae image will pulse until a GPS location is received. If nu•m8+ is unable to get GPS the Cell ID cross hairs will appear with an approximate location and will be updated with subsequent Cell ID locations until nu•m8+ get a GPS fix. The previous Cell ID location will disappear and will display the GPS location when nu•m8+ get a GPS fix. nu•m8+ User Guide V1.06 25 Once a GPS location is received the image in the left hand panel will change to the image of the nu•m8+ selected at registration and the GPS location will be shown on the map. You can select the format of the map to be: “Map” (street map format showing street names), “Satellite” (helicopter view of the location) “Hybrid” (helicopter view with street names). You can also zoom in/out and pan up/down/left/ right using the navigation keys to the left of the map. If your child‟s current location gives you cause for concern, select “Live Track” to monitor where they are going. (See Section 11, Live Track, for more information on operation.) To maximise the viewing map area click on the “Maximise Map” tab as indicated. This will enlarge the map area to fill the page. nu•m8+ User Guide V1.06 26 You can now drag the map and pan in or out. Data updates will not refresh the map. This is particularly useful when you are reviewing a Live Track trip for example. If a position, or status change of a nu•m8+ is received whilst in drag mode, the orange “Drag Mode” icon will change to grey indicating that there is information pending. If you click on the grey bar the map will update with the latest information. To exit “Maximise Map”, click on the boxed Red Cross in the top right hand corner of the map. nu•m8+ User Guide V1.06 27 9. Set, Apply and Edit a Safe Zone A Safe Zone is an area on a map where you are happy and feel save for your child to play. If they move outside of this area you will receive an alert (this may be school, a playground, a shopping centre or even home). A Safe Zone should be used carefully as it is a battery intensive operation. 9.1 From your Mobile Phone It is only possible to set a defined radius circle (Geofence Zone), centred on your child‟s current location from your mobile phone. As was the case in a “Where ru” request, ensure that the “Alerts Send To” on the Customer Portal for the particular nu•m8+ is set to the mobile phone number from which you are sending the request. (See Section 7 for Mobile Text Commands, for format and description of text commands.) (See Section 12, Alerts, for information on how to change and configure Alerts.) It is recommended to first request a location by text “wru” to the nu•m8+ phone number to confirm the location of your child, before configuring a Safe Zone. Simply text “safexxx” where “xxx” is the radius in metres of the circle around your child‟s current location to your child‟s nu•m8+ e.g. “safe200” for a 200 metre radius circle around your child‟s current location. When this has been applied you will receive confirmation by text that the Safe Zone is set and nu•m8+ will then check every 5 minutes that your child is still within this area. The Customer Portal will update to show the status of nu•m8+ to Safe Zone-SMS set. If your child strays outside of this Safe Zone an alert will be sent via text message to your mobile phone and email to your desk-top computer with the current location of your child and a link to the Customer Portal and map showing their location. If your child‟s location gives you cause for concern, it is suggested that you contact the authorities, go to your child, or log in to the Customer Portal and then select “Live Track” to monitor where they are going for a period of time. If your child re-enters the Safe Zone a text message and email will be sent to you, informing you of this event. To disable the Safe Zone from your mobile phone text “zone” to nu•m8+ and it will return to Standby Mode. This updates nu•m8+‟s status to Standby on the Customer Portal. Please note that Safe Zone confirmation and Safe Zone breach each count as an alert from your monthly subscription allowance if sent as a text message (SMS) alert to a mobile phone. There is no monthly limit on email alerts. nu•m8+ User Guide V1.06 28 9.2 From a Desk-top Computer (Customer Portal) A Safe Zone can be set and applied immediately, saved for later, or you can select a previously saved Safe Zone by name and apply. A Safe Zone can be defined by multiple points on a map or a defined radius circle with its central point as a location on a map. 9.2.1 Create New Safe Zone Log in to the Customer Portal and select the nu•m8+ that you want to set the Safe Zone for. The selected nu•m8+ will be displayed in the top right corner of the Customer Portal. Click on “Safe Zone” in the right hand panel. Click on <New> to create a new Safe Zone. nu•m8+ User Guide V1.06 29 In the “Find” box, enter the name of a town or postal code to get the map to the general area of where you want to set the Safe Zone. Zoom in or out, pan right, left, up or down to get the exact location. You can select the Zone Type by selecting either “Radius” (circular zone) or “Point-to-Point” (multi point zone) Change the map view format to Hybrid” (helicopter view with street names) to view more detail of the area you want to select to create a new Safe Zone. 9.2.1.1 Create New “Point-to-Point” Safe Zone When selecting to create a “Point-to-Point” Safe Zone, hover the mouse over the map and click on the start location and then form the shaped area by setting markers on the perimeter of the area you want to set as a Safe Zone. You can clear the markers by clicking on “Clear” in the bottom left corner. Please note that you must end the zone where you start to form a bounded area. You cannot cross over lines and you have a maximum of 12 markers to set a shape. nu•m8+ User Guide V1.06 30 Give the Safe Zone area a Name and select the Live Update Rate. You can clear the zone by clicking on “Clear” in the bottom left corner. Click on “Save” to save the new Point-to-Point Safe Zone created. To cancel the operation, click on “Cancel”. Live Update Rate is the time delay between location updates to check that your child is in the Safe Zone when applied. Select if you want to set the Safe Zone on the device now or save it to the list only? You can choose to either “Set Now” or “Save to list” You can set the Safe Zone immediately, “Set Now”, in which case the settings will be sent to nu•m8+ or “Save to list”, which will save the Safe Zone to the list to be selected and applied later. nu•m8+ User Guide V1.06 31 When selecting “Set Now” the Safe Zone will be set immediately and the Zone settings will be sent to nu•m8+. The settings have been sent to your nu•m8+. Please wait. When a Safe Zone is set, the Customer Portal status will change to the name of the Safe Zone configured when nu•m8+ confirms that the instruction has been received and applied. 9.2.1.2 Create New “Radius” Safe Zone If you are not happy with this area and would prefer to try a radius circle area simply click on the “Radius” button and the shape will disappear ready for you to set a circular area as explained below. Click on the “Radius” button, hover your mouse over the map where you want the centre of the circle to be, click on the map and then adjust the radius by selecting the diameter in metres from the “Size” drop down menu. To move or change the Safe Zone, simply click on another area on the map. The Radius Safe Zone will be removed when selection Point-to-Point. Give the Safe Zone area a Name and select the Live Update Rate. Live Update Rate is the time delay between location updates to check that your child is in the Safe Zone when applied. nu•m8+ User Guide V1.06 32 Click on “Save” to save the new Radius Safe Zone created. You can choose to either “Set Now” or “Save to list” You can set the Safe Zone immediately, “Set Now”, in which case the settings will be sent to nu•m8+ or “Save to list”, which will save the Safe Zone to the list to be selected and applied later, as indicated with Point-toPoint Zones. Click on “Cancel” to cancel the operation. . The reason you may wish to select multipoint (Point-to-Point) rather than radius is, as can be seen in above map, the circle includes a main road as well as the park, a multipoint allows you to eliminate these risky areas from the Safe Zone, similarly a pond in a park could be removed from the Safe Zone. 9.2.2 Select a previously saved Safe Zone In the Customer Portal, select the nu•m8+ that you want to set the Safe Zone for. selected nu•m8+ will be displayed in the top right corner of the Customer Portal. The Click on “Safe Zone” in the right hand panel and select the saved “Safe Zone” that you wish to set. nu•m8+ User Guide V1.06 33 Confirm your choice of the Safe Zone selected and click on “Yes”. Click on “No” to cancel the operation. The settings have been sent to your nu•m8+. Please wait. When a Safe Zone is set, the Customer Portal status will change to the name of the Safe Zone configured when nu•m8+ confirms that the instruction has been received and applied. nu•m8+ User Guide V1.06 34 9.2.3 Edit a Safe Zone To Edit a “Safe Zone”, go to “Safe Zone” in the right hand panel and select the “Safe Zone” you wish to edit and click “Edit”. You will then be directed to the Edit Safe Zone window. Make the changes that you require to the area, the type of shape, “Radius” / “Pointto-Point”, or “Live Update Rate” and then click “Save”. The modifications will be saved, enabling the modified “Safe Zone” to be applied now or saved to the list for later. Click on “Cancel” to cancel the operation. nu•m8+ User Guide V1.06 35 9.2.4 Delete a Safe Zone To Delete a “Safe Zone”, go to “Safe Zone” in the right hand panel and select the “Safe Zone” you wish to delete and click “Delete”. Click on “Yes” to delete the selected Safe Zone. Click on “No” to cancel the operation. nu•m8+ User Guide V1.06 36 9.2.5 Disable a Safe Zone To disable a Safe Zone, select “Standby” on the main Customer Portal. Select “Yes” to switch the device mode to Standby and to disable the Safe Zone. Click on “No” to cancel the operation. The settings have been sent to your nu•m8+. Please wait. The portal status will be updated to “Standby” when nu•m8+ has received the instruction and confirmed to the Customer Portal that it has been applied. nu•m8+ User Guide V1.06 37 10. Removing nu•m8+ without triggering an Alert Your nu•m8+ strap is impregnated with a wound steel core which is very difficult to cut. If the release button in the watch housing is depressed releasing the strap before nu•m8+ is put in to “Off “mode a priority alert “Strap Compromised” will be sent to the designated alert recipients by email and / or text message. However, if a “Home Zone” (See Section 13, Home Zone, for more detail on operation) is set and your child is within that area and the release button is depressed before the unit is put in to “Off” mode, then alerts will not be sent. It is essential that the user sets the Home Zone responsibly as “Strap Compromised” is deactivated within this zone. 10.1 From your Mobile Phone To safely remove nu•m8+ from your child outside of a Home Zone, follow the easy steps: As was the case in a “Where ru” request, ensure that the “Alerts Send To” on the Customer Portal for the particular nu•m8+ is set to the mobile phone number from which you are sending the request. (See Section 12, Alerts, for information on how to change and configure Alerts). (See Section 7, Mobile Text Commands, for format and description of text commands.) Simply text “Off” to your nu•m8+. When the LCD display goes blank it is safe to remove the device from your child. The Customer Portal will then update the status to “Off”. To remove nu•m8+ depress the release button in the nu•m8+ strap with the release tool provided and the bracelet will release. Place the device on the desk-top charger to charge so that it will be ready for use next time. Release Strap Charge nu•m8+ Inserting Strap Please be aware that once nu•m8+ has been switched “Off” it can only be switched “On” again by inserting the strap into the housing. nu•m8+ User Guide V1.06 38 10.2 From a Desk-top Computer (Customer Portal) Log in to the Customer Portal and select the nu•m8+ that you want to “Switch Off”. The selected nu•m8+ will be displayed in the top right corner of the Customer Portal. Click on “Switch Off” to Switch Off nu•m8+. Select “Yes” nu•m8+ “Off”. to switch Click on “No” to cancel the operation. nu•m8+ User Guide V1.06 39 The settings have been sent to your nu•m8+. Please wait. When the LCD display goes blank it is safe to remove nu•m8+ from your child. The status on the Customer Portal will be updated to “Off”. To remove nu•m8+ depress the release button in the nu•m8+ strap with the release tool provided and the bracelet will release. Place the device on the desk-top charger to charge so that it will be ready for use, next time. Please be aware that once nu•m8+ has been switched „Off‟ it can only be switched On again by inserting the strap into the housing. If the nu•m8+ strap is removed before nu•m8+ has been “Switched Off” or outside of a Home Zone you will receive a “Strap Compromised” Alert message. nu•m8+ will go in either „Live Track‟ or „Standby‟ mode (depended on configuration) and a text message and email alert is sent to the parent with the child‟s current location. When your child is safely in your care put nu•m8+ to “Off” by following the “Switch Off” instructions above. nu•m8+ User Guide V1.06 40 11. Live Track Live Track can only be used from the Customer Portal and should be used carefully as it is a very battery intensive operation. To change the status of nu•m8+ to “Live Track”, log in to the Customer Portal and select the nu•m8+ that you want to set. The selected nu•m8+ will be displayed in the top right corner of the Customer Portal. Select “Live Track” change the status nu•m8+ to “Live Track”. to of . You can then select the time interval between location updates from the drop down menu. Once the desired update rate has been selected, click on “Yes” and the settings will be sent to nu•m8+. Click on “No” to cancel the operation. The settings have been sent to your nu•m8+. Please wait. nu•m8+ User Guide V1.06 41 nu•m8+ is in Live Track mode. Waiting for the first location. Please Wait. Once nu•m8+ has confirmed the Live Track settings the screen changes to the image above whilst you wait for the first location to be displayed on the map. The Start location of Live Track will be indicated with a Red icon on the map. If nu•m8+ is unable to get GPS the Cell ID cross hairs will appear with an approximate location and will be updated with subsequent Cell ID locations until nu•m8+ get a GPS fix. At this time all the previous Cell ID locations disappear and a snails trail starts, and continues with GPS locations. nu•m8+ User Guide V1.06 42 Each updated position will be linked to create a snail trail. The last updated position of the nu•m8+ will be indicated with a Blue icon on the map. To disable a Live Track, select “Standby” on the main Customer Portal. Select “Yes” to switch the device mode to Standby and to disable Live Track. Click on “No” to cancel the operation. If you log out of the Customer Portal whilst in “Live Track”, when you log back in, the history remains until you change the nu•m8+ mode to “Standby”, “Off”, or “Safe Zone”. nu•m8+ User Guide V1.06 43 12. Alerts When you first registered nu•m8+ you were asked to enter your contact details; mobile phone and email contact details, which were then saved and recorded as the primary contact. Alterations, “Change”, “Add New” and “Edit” can be made to your contact details entered at registration. 12.1 Add New Recipient of Alerts To configure a new contact click on “Alerts” and select <New>. Input a contact Name, email address and Mobile Phone number, with the country code. Click on Alerts. to enable SMS Click on Alerts. to disable SMS Click on “Save” to save the new contact added. Click on “Cancel” to cancel adding a new contact. Click on “Exit” to return to the main Portal. nu•m8+ User Guide V1.06 44 Each text alert (SMS) received uses up increments of your monthly text (SMS) allowance in the tariff that you have selected. It is possible, at anytime, to restrict alerts to email only, by disabling text alert. After the new contact was entered and saved, select if you want to set the Alert on the device now or save the Alert to the list only? You can choose to either “Set Now” or “Save to list” You can set the Alert immediately, “Set Now”, in which case the settings will be sent to nu•m8+ or “Save to list”, which will save the Alert to the list to be selected and applied later. 12.2 Change the Recipient of Alerts In the Customer Portal select the nu•m8+ that you want to set / change Alerts for. The selected nu•m8+ will be displayed in the top right corner of the Customer Portal. Select “Alerts” to set / change Alerts for nu•m8+. Now select the name of the contact that you wish to receive alerts by clicking on the name. nu•m8+ User Guide V1.06 45 Confirm by clicking on “Yes” and the Alert will be changed to that contact allowing the person to issue instructions from their mobile phone. Click on “No” to cancel the operation. 12.3 Edit Recipient of Alerts To “Edit” an existing contact, click on “Alerts” and select the individual you want to edit and click on <Edit> next to the person‟s name. nu•m8+ User Guide V1.06 46 Make the required changes and click on “Save” to save the alterations. Click on “Cancel” to cancel editing contact. Click on “Exit” to return to the main Portal. 13. Home Zone The purpose of Home Zone is to create an area in which it is safe to remove nu•m8+ from your child‟s wrist without first sending the “Switch Off” command to switch nu•m8+ Off. This is particularly useful when you get home and it is inconvenient to switch the unit “Off” before removing. Please note that nu•m8+ will stay in the mode that it was in before being removed from your child‟s wrist so it will still be consuming power and therefore will take longer to recharge on the desk-top charger. It is advisable to click the “Switch Off” icon from your computer, or text “Off” before nu•m8+ is put on to the desk-top charger to minimise charging time. It is essential that Home Zone is used carefully as when this zone is active nu•m8+ can be removed from your child without triggering an alarm, so, if it is someone other than you removing nu•m8+ in an active Home Zone you will not receive an Alert. nu•m8+ require good GPS position to confirm that it is within the Home Zone. This may not always be possible indoors where there is little access to a view of the sky. If nu•m8+ is removed in this scenario and has to be taken outside to get GPS, it will trigger a “Strap Compromised” alert which, if text alerts (SMS) are selected, will count as an alert from your monthly SMS bundle. nu•m8+ User Guide V1.06 47 13.1 Create New Home Zone Click on “Home Zone” in the right hand panel. Click on <New> to create a new Home Zone. Home Zone is set, edited and added in exactly the same way as Safe Zone with the exception that you select “Home” rather than “Safe”. To remove the Home Zone, click on “Clear” next to the selected Home Zone. Give the Safe Zone area a Name and select the “Live Update Rate”. You can select the Zone Type by selecting either “Radius” (circular zone) or “Point-to-Point” (multi point zone) Change the map view format to Hybrid” (helicopter view with street names) to view more detail of the area you want to select to create a new Safe Zone. Click on “Save” to save the new Home Zone created. Click on “Cancel” to cancel the operation. You can choose to either “Set Now” or “Save to list” You can set the Home Zone immediately, “Set Now”, in which case the settings will be sent to nu•m8+ or “Save to list”, which will save the Home Zone to the list to be selected and applied later, as indicated with Point-to- Point Zones. When a Home Zone is set, the Customer Portal status will change to the name of the Home Zone configured when nu•m8+ confirms that the instruction has been received and applied. nu•m8+ User Guide V1.06 48 14. My Details Click on “My Details” on the navigation bar of the Customer Portal to change the default settings of your User Profile. Click on “Back” to return to the Main Portal page. Click on “Logout” to log out of Portal. Click on “Save” to save any changes made. The following can be changed in your User Profile: You can select the Default Map View between Map, Satellite or Hybrid. You can enable or disable the Display Start-up Tips when Log In. You can select the mode in which nu•m8+ must go when the Strap is Compromised. It is recommended that nu•m8+ is configured to enter the “Standby” mode when the Strap is Compromised. nu•m8+ User Guide V1.06 49 You can select and configure your Time Zone. To change the icon, name and colour of your nu•m8+ click on “Edit” The configured details of the nu•m8+ will be displayed. The Device Name, Icon Colour and Image can be changed. Make the required changes and click on “Save” to save the alterations. Click on “Cancel” to cancel the operation Click on “Back” to return to User Profile configuration. nu•m8+ User Guide V1.06 50 15. Product Specification Watch dimensions, 35mm x 35mm x 13mm. Dot matrix LCD display for time. Clock display - 12 or 24 hour digital, analogue. Battery life of 24 hours, 5 hours in live track with intervals of 10 minutes LED indication on desk-top charger to display charging status. RED, charge busy; GREEN, charge complete. Low battery status indicator on internet portal, traffic light battery status. Battery low alert notification to parents on mobile phone and email. Water Resistant - Splash Proof GPRS communication with SMS default for location. Very low emissions as only GPRS data squirt upon location request. Metal reinforced rubber strap. Secured strap with special locking mechanism. Can only be released with a release tool Dermatologic tested to ensure safe wearing. Uses the same Pinpoint precise GPS technology used in SatNav systems and is accurate to 3 metres. Proprietary Cell ID location to 1000m (max) when no GPS signal is received, i.e. indoors All interaction with the device is from mobile phone (SMS) or computer through Lok8u‟s encrypted pinpoint services. Encrypted data sharing to ensure no un-authorised access of location, all requests for location pass through the Lok8u server infrastructure, with recorded history in the parent‟s portal location. Available in four colours, blue, green, pink and black. GENFLEC & CE/ FCC approved. 16. Waterproof Specification nu•m8+ is Water Resistant – Splash Proof. nu•m8+ is resistant to minor and Accidental Splashes. Greater water contact should be avoided. It is not recommended for nu•m8+ to be worn for swimming but it should be okay for playing around in water. Please note that sea water is corrosive and as such will over time affect the rating of nu•m8+. If nu•m8+ was in contact with sea water ensure that it is washed with fresh water and allowed to dry before charging. nu•m8+ User Guide V1.06 51 17. Certification 17.1 CE Certification By affixing the CE Marking, the manufacturer, its authorized representative, or person placing the product on the market or putting it into service asserts that the item meets all the essential requirements of the relevant European Directive(s). The E marking is a mandatory European marking for certain product groups to indicate conformity with the essential health and safety requirements set out in European Directives. To permit the use of a CE mark on a product, proof that the item meets the relevant requirements must be documented. Sometimes this is achieved using an external test house which evaluates the product and its documentation. Often it is achieved by a company-internal self-certification process. In any case the responsible organization (manufacturer, representative, importer) has to issue a C-Declaration of Conformity (EC-DoC) indicating his identity (location, etc.), the list of European Directives he declares compliance with, a list of standards the product complies with, and a legally binding signature on behalf of the organization. The EC-DoC underlines the sole responsibility of the manufacturer. Parts of the certification process for the CE marking could be performed by 3rd party test houses or certification bodies; in case that this is mandatory the CE symbol also includes a number that identifies the so called Notified Body. 17.2 WEE LOK8U Ltd is registered under the WEE imitative registration number, 158864. The WEEE directive (Waste Electrical and Electronic Equipment 2002/96/EC) has been put in to place to ensure that products are recycled using best available treatment, recovery and recycling techniques to ensure human health and high environmental protection. Your product is designed and manufactured with high quality materials and components, which can be recycled and reused. This product may also contain substances that can be hazardous to the environment. Do not dispose of your old product in your general household waste bin. Electrical and electronic equipment should never be disposed of with general household waste, but must be separately collected for their proper treatment and recovery. Please make yourself aware of the local separate collection system for electrical and electronic products marked with this symbol: The crossed-out bin symbol, placed on the product, reminds you of the need to dispose of the product correctly at the end of its life. Use of the following disposal options: Dispose of the complete product (including its cables, plugs and accessories) in the designated WEEE collection facilities. If you purchase a replacement product, hand your complete old product back to the retailer. They should accept it as required by the WEEE directive. Where possible recycle your packaging. With your help it is possible to reduce the amount of electrical and electronic waste ending up in landfill and to improve quality of life preventing the release of potentially hazardous substances into the environment. nu•m8+ User Guide V1.06 52 17.3 SAR The tests measure the Specific Absorption Rate (SAR) of mobile telephones. The SAR value shows how much heat energy is absorbed in the head area from the mobile phone. The test is designed to ensure that the maximum value of two watts per kilo as set in the Decree of the Ministry of Social Affairs and Health is not exceeded. The SAR value, specifically, is measured in the case of mobile phones because it is the best indicator of exposure of the user to radiation. When the SAR value is not more than two watts per kilo, tissues are not heated significantly. The manufacturer of a mobile telephone must ensure that the SAR value is below the permitted limit before the model is brought onto the market. Although there is no legal requirement for nu•m8+ to be SARS tested and rated as it is not in close proximity of the head we undertook the tests anyway. The SARS value of nu•m8+, as tested by RFI Global, is 0.038. 17.4 Dermatological nu•m8+ has undertaken rigorous dermatological testing to ensure that it is safe to be worn by children. This testing was undertaken by Forefront research. In addition, each nu•m8+ box has a self adhesive 3M medical label for placement on the stainless steel back plate if your child has a hypo-allergenic sensitivity to metal. 17.5 FCC This device complies with Part 15 of the FCC Rules: Operation is subject to the following two conditions: 1. This device may not cause harmful interference, and 2. This device must accept any interference received, including interference that may cause undesired operation. SARS - This equipment has been evaluated in accordance with FCC RF radiation exposure procedures for wrist worn operation. The equipment is designed to transmit worst case one GSM data burst every 2 minutes. Any change or modification to the product not expressly approved by Lok8U may violate FCC RF Exposure guidelines and void the user's authority to operate the device. nu•m8+ User Guide V1.06 53 18. Product Information Maintenance, repair and usage: It is advisable to keep nu•m8+ fully charged when not been used. nu•m8+ is Water Resistant – Splash Proof. It is not recommended for nu•m8+ to be worn for swimming but it should be okay for playing around in water. If nu•m8+ was in contact with sea water ensure that it is washed with fresh water and allowed to dry before charging. Users cannot repair or replace any part in the product, battery, or charger. It is strongly recommended that you should return the product to Lok8u for service or maintenance. For more information, consult with your local Lok8u distributor. Information about Periodic Maintenance, Frequency and the authorized persons/centers for it: nu•m8+ does not require periodic maintenance. Warranty Information: Lok8u warrants to the original purchaser that nu•m8+ shall be free from defects in material and workmanship for a period of 12 months from date of activation. If a defect covered by this warranty occurs during the warranty period, Lok8u will repair or replace your nu•m8+ or component free of charge. If your nu•m8+ is replaced for a defect covered under warranty, you may receive a refurbished nu•m8+ in exchange for your original nu•m8+. The replaced unit will carry the remaining warranty period from the original nu•m8+. Information about faulty usage of the device by the end-users (Out of warranty conditions): The manufacturer‟s warranty covers any faults in manufacture or normal use. It does not cover breakages from misuse by the customer or failure to keep the battery fully charged during nonuse. nu•m8+ may be repaired at the customer‟s request and cost if damaged out of warranty conditions or term. If it is uneconomic to repair, Lok8u may offer the customer a replacement nu•m8+ on terms to be agreed on a case by case basis. Human or environmental health warnings which may be hazardous/harmful during the use of the device: None Disposing of the Product: This electronic product is subject to the EU Directive 2002/96/EC for Waste Electrical and Electronic Equipment (WEEE). As such, this product must not be disposed off at a municipal waste collection point. Please refer to local regulations for directions on how to dispose of this product in an environmental friendly manner. nu•m8+ User Guide V1.06 54 Caring for your nu•m8+: nu•m8+ is constructed of high quality materials and does not require maintenance except cleaning. Cleaning the Case: Cleaning nu•m8+‟s outer casing (except for the screen) using a cloth damped with a mild detergent solution and then wipe dry. Avoid chemical cleaners and solvents that may damage the plastic components. Cleaning the Screen: Clean nu•m8+‟s screen using a soft clean, lint free cloth. Use water if needed. Storage: Do not store nu•m8+ where prolonged exposure to temperature extremes my occur (such as the trunk of a car) as permanent damage may result. Safety Precautions: The following safety precautions should be adhere to: Aircraft Safety: nu•m8+ can interfere with an aircraft‟s navigation system and its cellular network. Using a cellular device on board an aircraft is forbidden by law. Medical Devices: nu•m8+ can interfere with the functionality of pacemakers, hearing-aids and other sensitive medical equipment. Precautions during transportation: None Subscriptions: If nu•m8+ is out of subscription it will not operate and should be removed from your child. To update your subscription details contact the support service of your selected country. nu•m8+ User Guide V1.06 55 19. APPENDIX I 19.1 Useful Information GPS nu•m8+ will check that it can get a fix on the satellites to ensure that it can get the most accurate location when required. However, although nu•m8+ uses the latest technology, including assisted GPS, there will be times, particularly indoors, on a cold start, that this may take some time. If nu•m8+ cannot get a fix, as indicated on the screen “no GPS” ask your child to walk around the house, close to a window or briefly stand outside and the device will then acquire the satellites and be ready to use. There is a built in back-up within the nu•m8+ solution that can locate your child even where there is no location available from the satellites, it is not quite so accurate but will place your child to within acceptable proximity of their current location, however please note that you do need a current GPS location to use the “Safe Zone” and “Home Zone” functionality of nu•m8+. GSM Much like your mobile phone there are certain times and places where the network coverage is poor or nonexistent. The signal strength that we need to communicate with nu•m8+ is much lower than that required to make a voice call, however the quality of the signal needs to be good. Battery We constantly monitor the status of the battery within nu•m8+ and will alert at start-up or during use if the battery level is becoming low. There is a traffic light system on the portal indicating, Green (very good), Amber (average), or Red (requires charging). nu•m8+ User Guide V1.06 56 20 APPENDIX II 20.1 Troubleshooting nu•m8+ does not switch ON Clock shows the wrong time nu•m8+ does not respond to a WRU request Cannot set a safe zone No text message alerts are received Battery doesn‟t last very long My nu•m8+ does not work abroad nu•m8+ User Guide V1.06 Battery is flat. If the LCD display does not show the first vertical bar on the LCD display then there is no GSM coverage. If nu•m8+ does not proceed beyond the first bar then hit the reset button on the back, if this problem persists contact Lok8u customer service. Adjust the time by following the instructions in the time section of this manual. If sent by SMS check that the message has been sent from your mobile phone. nu•m8+ has no mobile phone coverage. You are not set up to receive alerts on the portal so nu•m8+ will reject your text. nu•m8+ cannot get a location from GPS You are not set up as the alerts recipient on the portal. nu•m8+ is out of GSM coverage. You have fully utilised the monthly allowance of your subscription. You are not set up to receive SMS alerts on the portal. You are not set up as the alerts recipient on the portal. nu•m8+ is off GSM network for a long period of time Check the mode and update rate if not in standby Has the battery been left discharged for a period of time? If so contact customer support. Did you purchase the holiday tariff before travelling abroad? nu•m8+ cannot be activated for roaming once outside your home country. 57 21. APPENDIX III 21.1 nu•m8+ FAQ‟s nu•m8+ doesn‟t start up when I have switched it On? Location info from nu•m8+ being inconsistent? What is the battery life of my nu•m8+? nu•m8+ is taking a long time to respond to my instructions? nu•m8+ clock shows the wrong time? How do I charge nu•m8+? The Red & Green lights both come on when I place nu•m8+ on the charger base? The Red light comes on when I place nu•m8+ on the charger base? The Green light comes on when I am charging nu•m8+? How do I turn nu•m8+ On? How do I turn nu•m8+ Off? I have removed nu•m8+ from my child without sending the “Off” command? I have forgotten the phone number of my nu•m8+? How do I set or change a Safe or Home Zone? How do I set Live Track? I want to change or add Contact details for Alerts? How do I alter the strap to fit my child‟s wrist? How do I know my child won‟t turn the service Off? Which phones are compatible with the service? I have forgotten my Portal Login password? nu•m8+ doesn‟t start up when I have switched it On? You may be in or live in an area that has poor mobile phone coverage. Go to a known area that has good mobile phone coverage or take nu•m8+ outside to acquire the mobile phone signal. Once nu•m8+ has acquire the mobile phone signal, it will go through its start up process and log on to the mobile phone network. This is shown by a message “Loading” and a black bar moving around the four sides of the LCD display. Once the start-up is successful the current time will display on the LCD display, indicating that nu•m8+ is ready for use. Monitor the status of the LCD display when nu•m8+ has been switched On. If the screen shows „Loading‟ but the black bar is not moving around the sides of the LCD display, then nu•m8+ is not acquiring a mobile phone signal. Take nu•m8+ to a know area that has good mobile phone signal / coverage or take nu•m8+ outside to acquire the mobile phone signal. Below the function description of the black bar that is moving around the four sides of the LCD display during start-up, when nu•m8+ has been switched On: Bar 1 – Found and Connect to a GSM Network Bar 2 – Internal GPS check OK Bar 3 – GPRS connection made nu•m8+ User Guide V1.06 58 Bar 4 – Full Service Communication completed and successful. The black bars is an indication that nu•m8+ acquired mobile phone signal and connected to the GSM network. If the time still does not appear, gently push and hold the Reset button on the back plate next to the charging pins for approximately 5 seconds, using the tool that is in the charger base unit. nu•m8+ should now Reset and start its initialization process. Please note that you may need to take nu•m8+ outside to enable it to log on to the mobile phone network. Check and confirmed that nu•m8+ is fully charged by placing it on the charger base. If the Red light comes on nu•m8+ is not charged. Leave nu•m8+ on the charger until the Green light comes on, indicating that nu•m8+ is ready for use. See 'Getting Started' in the Portal 'Help' section or Section 3, Getting Started in the User Guide. Location info from nu•m8+ being inconsistent? When switching nu•m8+ on for the first time, the GPS needs to learn the satellite location of the area, in order to obtain a GPS location. As specified in the Quick User Guide, to enable the GPS functionality of your nu•m8+, place your nu•m8+ outside with good line of sight and clear view of the sky. Go to the Portal and click “Live Track” and select an update rate of “2 minutes”. Leave the device in this mode until the Portal Screen shows the GPS icon. For the first time set up it can take up to 45 minutes but thereafter will be only a couple of minutes. Whilst nu•m8+ is waiting for a GPS location your computer screen will show cross hairs with GSM approximate location shown. This is perfectly normal. There are two ways that nu•m8+ provides locations, through GPS and through Cell ID triangulation. The device will always first return the Cell ID triangulation location information as it is faster to achieve and then continues to try to obtain a GPS location. If you are using it from the Portal you will see cross hairs giving you the approximate Cell ID location first and will update with the GPS location if/when achieved. Please note that GPS systems require good line of sight and clear view of the sky in order to achieve a GPS location. Please note the following information regarding the operation of the GPS receiver: When a GPS is new (from factory), has been turned Off for a long period of time, or has been transported for a long distance since it was turned On, it will take longer to get a "Time to First Fix" (TTFF), because the GPS must update its almanac and ephemeris data and store it in memory. nu•m8+ User Guide V1.06 59 Time to First Fix (TTFF) describes the time and process required for a GPS device to acquire enough usable satellite signals and data to provide accurate locations. A GPS must have three sets of data before it can provide accurate locations: GPS satellite signals, almanac data, and ephemeris data. The GPS almanac is a set of data that every GPS satellite transmits, and it includes information about the state (health) of the entire GPS satellite constellation, and coarse data on every satellite's orbit. When a GPS receiver has current almanac data in memory, it can acquire satellite signals and determine initial position more quickly. When the GPS comes from the factory, the receiver has no knowledge whatsoever of almanac data in turn to locate the satellites and retrieve ephemeris data. For a full almanac to be downloaded, it can take approximately 15 minutes, but can take up to 45 minutes. One thing to bear in mind is that the average time for First Time to Fix (TTFF) will vary. Depending on where you are can dramatically change the quickness of acquiring a satellite lock. To load the ephemeris data from the satellites, the GPS receiver requires a full 30 seconds of data reception. If this is interrupted from a tall building, or a branch from a tree, or if the signal you are receiving is being reflected off of a building then all of this can cause a problem in the data reception. If the data isn‟t received in full, the ephemeris data collection has to start again at the next cycle. A "cold" start refers to a situation in which the GPS must acquire all data in order to start navigation, and may take up to 15 minutes. A "warm" start means the GPS has most of the data it needs in memory, and will start quickly a minute or less. GPS receivers cannot receive a signal underground, underwater, under any conductive type material like metal, indoors or become inaccurate under thick glass as the signal travels slower through glass. The accuracy of a GPS location depends on the amount of satellites it can receive signals from. The minimum satellites required to provide a GPS location is four. See 'Getting Started' in the Portal 'Help' section or Section 3, Getting Started in the User Guide. What is the battery life of my nu•m8+? When charging nu•m8+ for the first time, it is advised that you charge nu•m8+ the full 8 hours to ensure that the battery is fully charged. The charging time after the initial charge is approximately 1-2 hours. Like any battery operated device, the more you use it the shorter the battery life is of the device. The expected battery life of the device in standby is between 24-30 hours. The following will have an effect on the battery life of your nu•m8+: nu•m8+ User Guide V1.06 60 Poor GSM coverage or handshaking between multiple base stations, i.e. during a car journey will also consume extra battery power. Powering up the GPS module consumes the most power. It is expected that 5-10 “wru” requests, when outdoors, will give you 14-18 hours of battery life. It is expected that 5-10 “wru” requests, when indoors, will give you 10-12 hours of battery life. It is expected that when configured for “Live Track” or “Safe Zone” with intervals of 10 minutes, the battery life will be 4-5 hours. Battery not fully charged. It is imperative to ensure that the battery is fully charged before using the device. nu•m8+ is taking a long time to respond to my instructions? The most common reason for a delay to occur is because nu•m8+ is being used in a poor mobile phone signal area. When the signal improves nu•m8+ will respond. The average response time of a “wru” request from your mobile phone can take between 1-2 minutes, depending on the mobile phone signal and if the device is indoors or outdoors. nu•m8+ clock shows the wrong time? The nu•m8+ clock can only be altered using the mobile phone listed in the contact details To change the time text „time+(hour)‟ or „time-(hour)‟ to nu•m8+. e.g. the current time is 9.00AM, nu•m8+ shows 7.00 then text „time+2′ to nu•m8+. See 'Setting the Time' in the Portal 'Help' section or Section 5, Time Configuration in the User Guide. How do I charge nu•m8+? Place nu•m8+ on the charger base with the strap un-locked so that the open end of the device fits in to the groove. The Red light should come on to show the charging cycle has started. If both lights are showing then nu•m8+ is not correctly seated on the charger base. Adjust the position until only the Red light is showing, indicating that nu•m8+ is charging. The Red & Green lights both come on when I place nu•m8+ on the charger base? Your nu•m8+ is not sitting correctly on the charger base. Ensure that the open end of the device fits in to the groove of the charger base. The Green light should then go out leaving the Red light on indicating the unit is charging. If the Green light stays on and the Red light goes out this indicates that nu•m8+ is fully charged. nu•m8+ User Guide V1.06 61 The Red light comes on when I place nu•m8+ on the charger base? This shows nu•m8+ is correctly positioned on the charger base and is charging the battery. nu•m8+ is fully charged and ready for use when the Red light goes Off and the Green light comes On. The Green light comes on when I am charging nu•m8+? This means that nu•m8+ is fully charged and ready for use. How do I turn nu•m8+ On? Remove nu•m8+ from the charger base, place it around your child‟s wrist and insert the metal tip end of the strap in to the watch housing. You will feel a click as the strap switches nu•m8+ on. nu•m8+ will now go through its activation process and log on to the mobile phone network. This is shown by a message “Loading” and a black bar moving around the four sides of the LCD display. (Please note that it may be necessary to take nu•m8+ outside to enable this process to complete.) Once the activation is successful the current time will display on the LCD display. See Section 3.3 „Activate nu•m8+ in the User Guide. How do I turn nu•m8+ Off? There are 2 ways of turning nu•m8+ Off. From the Portal click the „Switch Off‟ button and when the message asks you to confirm click „Yes‟. The command will be sent to nu•m8+ and when the screen clears the Portal should show „Off‟ in the right hand status panel. Using the registered Mobile Phone, text „Off‟ to your nu•m8+ phone number. Note: The mobile phone you are using must be set as the approved phone (see ‟Alert & Contact Settings‟ in the Portal „Help‟ section or Section 12, „Alerts‟ in the User Guide). nu•m8+ will not respond to an un-approved mobile phone. I have removed nu•m8+ from my child without sending the “Off” command? If you have inadvertently removed nu•m8+ from your child without sending the “Switch Off” command via the Portal or “Off” via text from your mobile phone, you must turn nu•m8+ „Off‟ correctly as soon as possible. To turn nu•m8+ Off from the Portal click the “Switch Off” button and confirm when prompted. nu•m8+ User Guide V1.06 62 To turn nu•m8+ Off using your mobile phone, text “Off” to the nu•m8+. Note: The mobile phone you are using must be set as the approved phone (see ‟Alert & Contact Settings‟ in the Portal „Help‟ section or Section 12, „Alerts‟ in the User Guide). nu•m8+ will not respond to an un-approved mobile phone. See 'Removing nu•m8+ without triggering an Alert' in the 'Help' section or Section 10, 'Removing nu•m8+ without triggering an Alert' in the User Guide. I have forgotten the phone number of my nu•m8+? Log on to the Portal and select the nu•m8+ you wish to find the number of and hover your mouse over that nu•m8+ icon to reveal the mobile number. How do I set or change a Safe or Home Zone? See „Safe Zones‟ and „Home Zones‟ in the Portal „Help‟ section or Section 9, „Safe Zones‟ and Section 13, „Home Zones‟ in the User Guide. How do I set Live Track? See „Live Track‟ in the Portal „Help‟ section or Section 11, „Live Track‟ in the User Guide. I want to change or add Contact details for Alerts? See „Alerts‟ in the Portal „Help‟ section or Section 12, „Alerts‟ in the User Guide. How do I alter the strap to fit my child‟s wrist? Remove the tool from the back of the charger base and use this to un-screw and remove the nut in the strap. Adjust the strap length to comfortably fit your child‟s wrist, re-insert the screw and tighten it. See Section 3.3 „Activate nu•m8+ Step 3 in the User Guide. How do I know my child won‟t turn the service Off? The service is automatically turned On as soon as the wrist strap on the device is fastened, and the LCD display shows the correct time, confirming that nu•m8+ is activated. The only way the service can be disabled is if you login to the Lok8u Portal and send a “Switch Off” command or text „Off‟ from your mobile phone. If the strap is opened before nu•m8+ is put in to “Off “mode a priority alert “Strap Compromised” will be sent to the designated alert recipients by email and / or text message. nu•m8+ User Guide V1.06 63 Which phones are compatible with the service? All mobile phones can receive text messages which is the standard way for nu•m8+ to communicate your child‟s position or give an alert. If you have a phone with internet connectivity (GPRS, 3G or Wifi) and the relevant tariff, you can also view the child‟s location on Google maps linked to the text message. Some mobiles can receive email alerts as well as text messages. If in doubt please contact your network provider. I have forgotten my Portal Login password? If you have forgotten your password, simply click on “Forgotten Password” on the Log In page. Enter the Username that were chosen at registration and click on “Send”. The password details will be e-mailed to the e-mail address that was entered at registration. Follow the process in the received email to change your password. nu•m8+ User Guide V1.06 64 Notes: nu•m8+ User Guide V1.06 65