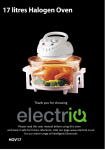
1
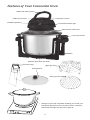
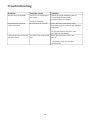
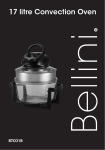
12 Litre Searing
Convection Oven
stainless steel bowl
BTSCO120
Important Safeguards
When using electrical appliances, in
order to reduce the risk of fire, electric
shock, and/or injury, these basic safety
precautions should always be followed:
For Your Safety
Read all instructions carefully, even if you are
familiar with the appliance.
•
NEVER INSERT A KNIFE OR ANY OTHER
UTENSIL INTO THE CONVECTION OVEN.
This may damage the mechanism and cause
a safety hazard. Contact with elements could
result in electrical shock.
•
Remove cardboard lids from food containers
and replace with aluminum foil before placing
in the appliance. When using aluminum foil,
keep it from touching the heating elements.
•
DO NOT MOVE appliance when switched on.
•
Ensure the power cord does not touch the
oven housing when in use.
•
Dispose of packaging properly keeping plastic
bags away from babies and young children.
•
Do not use outdoors.
•
Use only on heat resistant surfaces.
•
Do not attempt to repair or disassemble the
appliance. There are no user serviceable
parts.
•
The appliance should not be covered or
operated near or underneath flammable
material such as curtains or drapes or other
combustible materials when in operation.
•
Take care not to burn hands on upper
elements when removing items from the
Convection Oven.
•
Do not touch hot surfaces.
•
To protect against the risk of electric shock DO
NOT IMMERSE glass lid with control unit of
this appliance in water or any other liquid.
•
Any container placed in this appliance must
not be sealed and must have enough capacity
to let liquids expand.
•
CAUTION: The temperature of the door or the
outer surface may be high when the appliance
is in operation.
•
•
Switch off and remove the plug from the
power outlet before cleaning or when not in
use. To unplug, grasp plug and pull from the
power outlet. Never pull cord. Never carry the
appliance by the cord.
This appliance is not intended for use by
persons (including children) with reduced
physical, sensory and mental capabilities, or
lack of experience and knowledge, unless they
have been given supervision or instruction
concerning use of the appliance by a person
responsible for their safety.
•
Never leave the appliance unattended when in
use.
•
Children should be supervised to ensure that
they do not play with the appliance.
•
Do not operate in the presence of flammable
or explosive materials.
•
Do not use an extension cord with this
appliance.
•
Do not operate any appliance with a damaged
cord or plug; after the appliance malfunctions,
or is dropped or damaged in any manner.
•
Do not let the cord hang over edge off a table
or counter, or touch hot surfaces. Do not place
any part of this appliance on or near a hot gas
or electric burner or in a heated oven.
•
Allow the appliance to cool before cleaning.
•
Store the appliance indoors in a dry location.
•
Operate on a level surface. Operating on
sinks, drainboards or uneven surfaces should
be avoided.
•
Do not reach for an appliance that has fallen
in water. Switch off at the power outlet and
unplug immediately.
•
Do not use the appliance for anything other
than its intended use. This product is intended
for household use only.
•
Take care when opening the lid of the
appliance.
2
•
This appliance is not intended to be operated
by means of an external timer or separate
remote-control system.
•
Do not use the appliance for anything other
than its intended use. This product is intended
for household use only.
Compulsory Warning
If the supply cord is damaged, the cord must be
replaced by the manufacturer, its service agent
or similarly qualified persons in order to avoid a
hazard.
This product has not been designed for any uses
other than those specified in this booklet.
Save These Instructions
3
Features of Your Convection Oven
Handle with safety button
TIMER (clock timer)
Temperature Control
POWER (operation)
Thermostat indicator light
Glass lid with control unit
Cool touch handle
Base
Stainless steel stock pot /bowl
Grill rack tongs
Upper grill rack
Extra glass lid
Lower grill rack
•
Stockpot is stove top compatible enabling you to sear your
food before placing into the convection oven or used as a
stand alone stockpot with the bonus glass lid.
4
General Safety
Guidelines
•
Keep sufficient distance (15 cm) to highly
flammable objects such as furniture, curtains,
etc.!
Symbols in this user manual
•
Do not operate the device by an external timer
or separate remote control system.
Important notes for your safety are marked
distinctively. Pay absolute attention to them to
avoid accidents and damage to the device:
Note: A safety switch on the control unit
prevents the device from turning on if
the handle does not rest properly on the
device.
Warning:
•
Warns of dangers for your health and indicates
potential risks of injury.
Caution:
Location of controls
Indicates potential dangers for the device or
other objects.
1 Control lamp POWER (operation)
2 TIMER (clock timer)
3 Handle with safety button
4 Temperature Control
5 Thermostat indicator light
6 Glass lid with control unit
7 Cool touch handle
8 Base
9 Stainless steel stock pot /bowl
10 Extra glass lid
11 Grill rack tongs
12 Lower grill rack;
13 Upper grill rack
Note: Highlights tips and information for
you.
Special Safety
Precautions
Warning: Risk of burns!
•
During use, the temperature of the touchable
surface may become very high.
•
Hold at the handles and wear oven mitts.
•
Always put the lid on the bowl before
connecting the mains plug and turning on the
device.
Always turn off the device (e.g. by lifting up the
handle (3)) before disconnecting the mains plug
from the socket.
Intended use
This device is intended for roasting, steaming,
baking, toasting, defrosting and reheating.
It is exclusively intended for these purposes.
•
Let the device cool down before attaching or
removing accessory parts.
Only use the device as described in this instruction
manual.
•
Do not carry or lift the device during operation;
first turn off and then disconnect the mains
plug. Always use both hands to carry the
device!
Any other use is not recommended and may cause
physical damage or injuries.
Caution:
•
Do not place the device on or near other
electrical appliances (hotplates), heating gas
flames or in stoves.
•
Make sure the mains cable does not touch
any hot parts of the device.
•
Place the device on a heat resistant surface!
5
User note
Starting up
The convection oven is a new, inexpensive and
portable device with all advantages of bigger
convection ovens. It operates fast and saves
energy.
Mains power connection
•
If you are trying a recipe for the first time with
your convection oven, observe the cooking or
baking process whilst looking through the lid.
The cooking time of the convection oven is
shorter.
•
Make sure to evenly distribute the food in
the oven in order to allow for a steady and
maximum air circulation.
•
Place the ingredients in the center of the bowl
(9). Keep space of 2.5 cm to 3.5 cm to the
stainless steel wall.
•
•
Make sure the mains voltage in your household
corresponds to the one of the device. Check the
information on the rating plate.
First time use
F
Clean the device and accessories as described
under “Cleaning”.
Operation
1. Choose the appropriate accessories and place
them into the stainless steel bowl.
2. Preheating is not required.
Use the grill racks as dual stands for the
ingredients to be placed at different levels
(see table of cooking guide). Avoid piling
ingredients on one level, for cooking more
food, Allow the air to circulate around the
food, if not only the surface of the food will be
cooked.
3. Fill the bowl with ingredients.
4. Cover the bowl with the lid.
5. In order to rest the handle properly, first
release the safety button on the handle.
Note: The device features a safety switch.
If the handle does not rest properly, the
electric circuit will be interrupted.
Place the steam attachment on one of the grill
racks. You may steam vegetables along with
cooking the main dish by wrapping them in
aluminum foil.
6. Connect the mains cable to a properly installed
isolated ground receptacle of 240V, 50 Hz.
Caution:
7. Set the temperature control (4) and clock timer
(2) as desired. You will find suggestions for
cooking temperatures and times in the table of
the cooking guide.
The foil must be wrapped safely in order not
to fly away or being sucked into the fan.
•
•
If the cooking process finishes before the
preset time has elapsed, please turn the
temperature control (4) to OFF. Leave the fan
on in order to keep the food crispy.
Note: The thermostat keeps the desired
temperature until the pre-set time has
elapsed. The control lamp with its
halogen bulb (5) indicates the heating
process.
Use the included tongs (11) to easily remove
the different attachments from the bowl.
8. If it becomes necessary to open the bowl
during cooking, for example to turn the food
over, it is imperative to observe the following
instructions:
Unpacking the device
•
Remove the device from the packaging.
•
Remove any packaging material such as foils,
filling material and cardboard packaging.
Turn the device off by lifting the handle (3)
to the upright position.
Disconnect the plug from the mains. The
clock time continues automatically.
Lift the lid by the handle only.
6
Warning:
Instructions for baking
Please mind the escaping steam when
opening the lid. Risk of burns!
•
You may place any heat resistant baking pan
onto the lower grill rack. Because of the air
circulation the diameter should be of maximum
26 cm.
•
If you want to bake a very juicy cake without
a crust, attach aluminum foil over the baking
pan. Remove the foil shortly before the cake
is done, so the top of the cake may slightly dry
up.
•
Cakes and other cookies are baked a little bit
faster than in other common ovens.
•
Place frozen pizza directly on the upper grill
rack.
To continue cooking, first close the bowl and
connect the plug to the mains. The operation
continues as soon as the handle rests properly
on the device. Concerning the cooking time,
please keep in mind that the timer had been
running in the meantime.
Note: After the pre-set time has elapsed,
a beeping signal will sound indicating the
end of the cooking process. The fan and
the halogen lamp will automatically turn
off.
Ending the cooking process
Instructions for toasting
If you want to finish the cooking process, set the
temperature control and the clock timer to OFF
and disconnect the plug from the mains. The
control lamps will turn off.
•
You may toast bread and snacks without
preheating the oven.
•
Cooking guide for the
Convection Oven
Place the bakery products on one of the grill
racks.
•
Slightly moisten bread rolls that are from
the previous day. This way they will crisp up
nicely.
Instructions for roasting
•
You may also warm up older snacks such
as crackers, chips or cookies. Bake them at
maximum heat for a few minutes only, so they
will become crispy again.
•
Place the roast on the lower grill rack. Add
some water, but only covering the bottom of
the stainless steel bowl.
•
Turn the roast 1 or 2 times during cooking,
basting it with the gravy.
Instructions for defrosting
•
The convection oven provides for a more
evenly defrosting process than a microwave.
•
Set the temperature control to DEFROST.
Check the food every 5 to 10 minutes.
•
In order to cook frozen food, lower the specified temperature by 20°C. The cooking time in
the convection oven is also 30 - 50 % shorter
(e.g. 10 to 15 minutes instead of 20 minutes).
Instructions for baking
•
Use the grill racks as dual stands in order to
place the ingredients at different levels.
•
Turn thick meat pieces after half of the cooking
time has elapsed.
Instructions for steaming
Instructions for reheating
Fill the bottom of the bowl with some water and
tasty herbs and spices for steaming vegetables
or fish.
Use lower temperatures when reheating in order
not to burn your food. Check the food every 5 to
10 minutes.
7
Cooking Table
Meringue
Lower grill
rack
175
5-8
Note: These time specifications are for
reference only and may vary depending
on the circumstances.
Cookies
Lower grill
rack
190
12 - 15
Food
Cooking
time in
minutes
Loaf
Lower grill
rack
175
15 - 20
Bread rolls
Lower grill
rack
175
15 - 20
Yeast bread
Position
in the
bowl
Temperature
in °C
Chicken
(whole)
Lower grill
rack
200
35 - 40
Bread rolls,
crisped up
Lower grill
rack
100
5 - 10
Parts
Upper grill
rack
200
15 - 20
Corn bread
Lower grill
rack
175
10 - 20
Turkey
Lower grill
rack
200
60 - 90
Frozen pizza
Upper grill
rack
200
10
Duck
Lower grill
rack
200
50 - 60
Fish
Upper grill
rack
200
7 - 10
Sea shells,
steamed
Lower grill
rack
160
3-5
Poultry
Fish
Hint: Brush with oil after flavoring
Meat/ sausages
Roast beef(1.5 kg),
medium done
Lower grill
rack
175
45 - 50
Steaks, medium
done
Lower grill
rack
250
8 - 10
Sausages,
roasted
Lower grill
rack
200
10
Hint: When using both grill racks, change the food
after half of the cooking time has elapsed if the
upper food gets crispy faster.
Cakes
One layer
Lower grill
rack
175
15 - 20
Covered cake
with filling
Lower grill
rack
175
30 - 35
Loaf pan
Lower grill
rack
175
35 - 40
Pie (without
filling)
Upper grill
rack
200
10 - 12
Pie (with
filling)
Lower grill
rack
175
25 - 30
Muffins
Lower grill
rack
175
15 - 18
Pastry
8
Cleaning
Warning:
•
Always disconnect the mains plug before
cleaning.
•
Wait until the device has cooled down.
•
Do not immerse the lid into water for cleaning.
•
Protect the halogen lamp from water.
•
Water must not enter the control unit.
•
Do not use wire brushes or other abrasive
objects.
Lid
Use a wet cloth to remove splashes and remains
from the lid. Use a mild detergent in case of
heavy staining.
Steam attachment wash by hand in warm
water. Then dry thoroughly. it is not suitable for
dishwashers.
Stainless steel bowl, grill racks,
tongs and extra glass lid
•
Clean these parts by hand in warm dishwater
with a mild detergent.
•
Then rinse under clean water to remove soap
residue; dry thoroughly.
9
Troubleshooting
Problem
Possible cause
Solution
Device does not function.
Device is not connected to
the mains.
Check the proper position of the lid.
Check another wall socket.
Please contact your dealer.
Device is defective.
A whole piece of food is
cooked unevenly.
Air circulation is not even.
Place the food in the center of the
bowl leaving space between the stainless
steel bowl.
Do not pile food on one level. Use
the racks as dual stands.
The food is burnt on top but
not yet cooked.
The food is too close to the
grill.
Place the food on the lower grill
rack or.
Temporarily cover the food with
aluminum foil.
10
Notes
11
Warranty
5. Warranty will only be given where proof of
purchase is provided, e.g. original invoice.
The benefits conferred by this warranty are in
addition to all implied warranties, other rights and
remedies in respect of the product which the
consumer has under the Trade Practices Act and
similar State and Territory Laws.
6. Not designed or warranted for industrial or
commercial use.
DO NOT SEND IN THIS WARRANTY
Fill out the following details and file with your
purchase invoice.
The original purchaser of this Bellini product is
provided with the following warranty, subject to
the following conditions.
RETAIN & FILE WITH YOUR RECEIPT
This product is warranted for a period of 1 year
from the date of purchase for all parts defective in
workmanship or materials. Should an instance
occur where the product is deemed faulty, the
product will need to be returned to the retailer
where it was purchased to be replaced with the
same product or product of equivalent value and
type free of charge, or a refund issued. In order to
obtain an exchange or a refund, proof of purchase
must be presented to the retailer.
Your Purchase Receipt/Invoice is proof of date of
purchase. You must be able to present it at the
place of purchase to obtain a replacement or a
refund.
GSM International Ltd reserves the right to
discontinue items, modify designs and change
specifications without incurring obligation. Whilst
every effort is made to ensure that descriptions,
specifications and other information in this
publication is correct, no warranty is given in
respect thereof and the company shall not be
liable for any errors therein.
This warranty is in addition to all other rights and
remedies available under the Trades Practices
Act 1974 and other relevant State and Territory
laws and shall not be taken as applying to
exclude, restrict or modify such rights or remedies
in any other matter whatsoever.
Purchased from:
Co. Name:
WARRANTY CONDITIONS
Address:
1. This warranty is only valid for appliances used
according to the manufacturer’s instructions.
Date of Purchase:
2. This appliance must not be modified or
changed in any way.
NOTE: Consistent with our continuing
product development policy,
improvements may have been made
which render the contents of this
package slightly different to that shown.
3. Connection must be to the voltage
requirements as specified in the ratings label
located on the product.
4. The manufacturer does not accept liability for
any direct or consequential damage, loss or
other expense arising from misuse or incorrect
installation and operation of the appliance.
Cat. No. BTSCO120
December 2010
�������������������������������
����������������������
������������������������������������������������������������������������������������������
��������������������������������������������������������������������������������������������
����������������������������������������
12