1
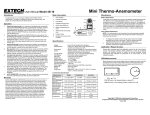
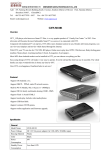
ANEMOMETER
TABLE OF CONTENTS
1. FEATURES................................................................ 1
2. SPECIFICATIONS...................................................... 1
3. FRONT PANEL DESCRIPTION.....................................
3-1 Power Button......................................................
3-2 Hold Button........................................................
3-3 Max. / Min. Button.............................................
3-4 Unit Button.........................................................
3-5 Air Flow Sensor..................................................
3-6 LCD display.........................................................
3-7 Battery Compartment / Cover...............................
3-8 Wristlet...............................................................
3
3
3
3
3
3
3
3
3
4. MEASURING PROCEDURES........................................ 4
5. OTHER FUNCTIONS.................................................. 4
6. BATTERY REPLACEMENT........................................... 5
1. FEATURES
* Tiny bone shape with lightweight and small size case design
are suitable for handling with one hand.
* Wristlet design provides extra protection to the instrument
especially for user one hand operation.
* Low-friction ball bearing mounted vane wheel design
provides high accuracy at high and low air velocity.
* Build in microprocessor circuit assures excellent
performance and accuracy.
* Concise and compact buttons arrangement, easy operation.
* Memorize the maximum and minimum value with recall.
* Air velocity measuring units selectable by pressing button on
the front panel for five kinds of units.
* Hold function to freeze the current reading value.
2. SPECIFICATIONS
2-1 General Specifications
Display
Measurement
Operating
Humidity
Operating
Temperature
Over Input
Display
Power Supply
8 mm LCD display
Air velocity.
Max. 80% RH.
0 to 50° C (32 to 122° F)
Indication of "- - - - "
006P DC 9V battery (Heavy duty type)
1
Power
Consumption
Weight
Dimension
Standard
Accessory
Optional
Accessories
Approx. DC 17 mA
160g (battery included)
HWD 156x60x33 mm (6.14x2.36x1.29 inch).
Instruction Manual
Carrying case.
2-2 Electrical Specification ( 23 ± 5℃ )
Unit
ft/min
m/s
km/h
MPH
knots
Range
Resolution
80 to 5910 ft/min
0.4 to 30.0 m/s
1.4 to 108.0 km/h
0.9 to 67.0 mile/h
0.8 to 58.3 knots
1 ft/min
0.1 m/s
0.1 km/h
0.1 MPH
0.1 knots
Remark :
ft/min : feet per minute
m/s : meters per second
km/h : kilometers per hour
MPH : miles per hour
knots : nautical miles per hour
2
Accureacy
≦ 20 m/s :
± 3% F.S.
> 20 m/s :
± 4% F.S.
3. FRONT PANEL DESCRIPTION
Fig. 1
3-1
3-2
3-3
3-4
3-5
3-6
3-7
3-8
Power Button
Hold Button
Max. / Min. Button
Unit Button
Air Flow Sensor
LCD display
Battery Compartment / Cover
Wristlet
3
4. MEASURING PROCEDURE
1) Power on the instrument by pressing the " Power Button "
( 3-1, Fig. 1 ).
2) Press the " Unit Button " ( 3-4, Fig. 1 ) to select
unit that you want and then face the " Air Flow Sensor "
( 3-5, Fig. 1 ) to the source of wind.
3) Allow time for reading to become stable and note the value
indicated. From a pratical point of view the velocity may
fluctuate.
5. OTHER FUNCTIONS
5-1 Hold Function
Pressing the "Hold Button" (3-1. fig. 1) will freeze the current
value with a "HOLD" symbol on the display. Press again to
release the hold function.
5-2 Data Record Function
1) The Data Record function records & displays the maximum
and minimum reading values. Start the Data Record
function by pressing the " Max./Min. Button " ( 3-3, Fig. 1 )
once. There will be a " REC " symbol on the display.
4
2) With the REC symbol on the display :
(a) Press the " Max./Min. Button " ( 3-3, Fig. 1 ) once and the
" Max " symbol along with the maximum value will appear on
the display.
(b) Press the " Max./Min. Button " again, the " Min " symbol
along with the minimum value will appear on the display.
(c) To exit the memory record function, press the " Max./Min.
Button " continuously for at least 2 seconds. The display will
revert to the current reading.
(d) Clear the Max./Min. value recorded by pressing the
" Hold Button " ( 3-2, Fig. 1 ) once. Previous recorded
Max./Min. value will be given up and then revert to the
REC. function keep on recording.
5-3 Auto Power Off Disable
In order to prolong the battery life, the instrument has "Auto
Power Off " function. The meter will switch off automatically if
no buttons are pressed for around 10 minutes.
6. BATTERY REPLACEMENT
1) When the LCD display shows "
" symbol, it's
necessary to replace a new battery. However measurement
may still be made for several hours after the low battery
indicator appears.
2) Open the " Battery Compartment / Cover " ( 3-7 Fig. 1) and
remove the battery.
3) Install a 9V battery (Alkaline or Heavy duty type) and then
reinstate the cover.
5
0306-LM-81AM