1
déclaRatiOn de cOnFORmité
DéClAlArAtAtIOn DE COnFOrmIté CE
POICON GmbH & Co. KG certifie que le produit POI Pilot 7000 est
conforme à la directive CEM in 2004/108/CE et à la directive RoHS
2011/65/UE.
116
Installation manual
Hambourg, le 24/02/2015
POICON GmbH & Co. KG
Stefan Quisdorf
Lilienstraße 11 (Lilienhof)
D-20095 Hambourg
ALLEMAGNE
Le formulaire de conformité détaillé est disponible sur
www.poicon.com/download/7000.pdf
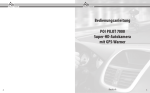
Français
POI PIlOt 7000
Super HD car camera
with GPS alerter
English
117
User Manual
Your new POI Pilot 7000 Super HD car camera with GPS alerter...............120
Scope of supply......................................................................................................120
Safety precautions................................................................................................121
Product details....................................................................................................................122
Installation............................................................................................................................ 132
Registration..........................................................................................................................140
Selecting and transferring speed camera POIs................................................... 145
Updating speed camera POIs...................................................................................... 155
Adding speed cameras and other POIs...................................................................160
Frequently asked questions and problems..........................................................166
APPENDIX
Support..................................................................................................................................168
1. Online.................................................................................................................... 168
2. E-Mail..................................................................................................................... 168
3. Phone.................................................................................................................... 168
Contents
Technical data......................................................................................................................131
Important information..................................................................................................170
Important information regarding disposal................................................171
Declaration of Conformity..........................................................................................172
118
English
English
119
Dear Customer,
Safety precautions
Thank you for purchasing this HD car camera, with which you can record
your routes and can store GPS data at the same time.
• This instruction manual is designed to familiarise you with the
functional capabilities of the product. Please make sure that this manual remains at hand, so that you can access it any time.
Please read this manual and follow the instructions and tips so that you can
use your new HD car camera to its maximum capabilities.
Scope of supply
• a full HD car camera
• suction pad holder
• vehicle adapter
• USB cable
• 3m USB charging cable with a GPS receiver
• 8 cable clamps
• instruction manual
Still required
1 micro SD card (up to 32GB, at least Class 6)
• Please only use the product for the purpose and manner for which it is intended. Any other use may result in damage to the product or to other items within the vicinity of the product.
• Remodelling or changing the product will impact on product safety. Caution! Risk of injury!
• Never open the product unattended. Never carry out any repairs on your own!
• Handle the product with care. It can be damaged by shock, impacts, or if it should fall from a low height.
• Keep the product away from any moisture or extreme temperatures.
• Never immerse the product in water or in other types of liquids.
Safety precautions
your new gps Locator
You can then view the route again at home using the software, which is
provided, and at the same time, you will receive the respective position
displayed on Google Maps.
• Make sure that the camera does restrict the view under any
circumstances when using it inside vehicles.
• Make sure that the cable which is connected to the power supply does not prevent you from having control over the vehicle.
• Please also ensure that the power cable cannot be walked over or be clipped, and make sure that it cannot come into contact with sources of heat or with sharp edges.
• Technical modifications and errors are reserved!
120
English
English
121
1
2
3
4
5
6
7
8
9
10
11
12
13
14
15
16
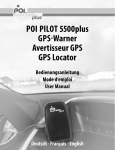
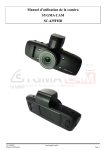
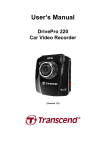
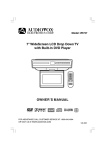
disPlay symBOls
Adapter for suction cup holder
USB port
HD output
Reset access (for paper clip etc.)
Loud speaker
Camera lens
Serial number
Microphone
On-/Off switch
microSD-Slot
LED
Display
Menu button
Up button
Down button
Confirm button
1 Resolution
2 Movement recognition
3 GPS signal (turns green when received)
4 Microphone (on/off )
5 microSD-card
6 Rechargeable battery charging status/connection with power
source (PC, tablet, power bank etc.)
7 Date
8 Remaining recording time
(dependant on the resolution which has been pre-set)
9 Time
10 Recording time
11 Vehicle number
1
2
3
4
6
23456
11
11
12
8
10
1
5
PrODUCt DEtAIlS
PrODUCt DEtAIlS
PROduct details
9
7
10
8
9
16
13
14 15
122
English
English
123
Function keys
Please observe the following steps in order to put your POI pilot into operation
with the POIbase:
„MENU“: opens the setting and selection menu/closes any setting and
selection processes and leads to the subsequent menu screen
1. Unpack the POI Pilot.
2. Insert a micro SD card (at least Class 6) which has been formatted in FAT 32 into the device.
3. Connect the POI pilot to the external GPS receiver inside the cable and connect this to the power supply inside the vehicle.
4. Switch the GPS on inside the POI pilot 7000 device menu, and wait until a GPS signal has been received in the POI pilot 7000 display (the GPS symbol will turn green). This process can take up to 30 minutes.
5. After the GPS has been received successfully, connect the POI pilot 7000 to the PC, and install the POIbase programme on the CD.
6. The POIbase will automatically recognise the POI pilot 7000 if the GPS signal has been successful.
7. Select and update the required POIs after you have completed the registration process.
8. The most up to date firmware shall be transferred initially, and must be confirmed on the POI pilot 700 after it has been disconnected from the PC.
9. The POI pilot must still revert to factory settings in the device menu before the PC can be re-connected.
10.Re-connect the POI pilot to the PC, and transfer the POIs by selecting “OK”.
11.Once the transfer has been completed successfully, the POI pilot can be attached to the vehicle windscreen and is ready for use
Up key: for navigating menus/switching the
microphone on or off
English
Down key: for navigating menus/opening the recording directory
„OK“: confirms menu selections and settings/starts and stops any recording
On/off switch: push briefly in order to display/hide the speed indicator
Main menu
Video recording settings
• Resolution: Video format – the higher the selection, the more
memory consumption
• Quality: the higher the selection, the more memory consumption
• HDR: A dynamic contrast amplifier for darker surroundings
• Time stamp: Displaying the date/time in the video
• LDWS recognition: Lane departure warning on/off.
product details
product details
124
POI pilot 7000 quick start
Photo settings
• Resolution: in mega pixels – the higher the selection, the more memory consumption
• Quality: the higher the selection, the more memory consumption
• Time stamp: displaying the date/time on the photos
• WB: white balance for adjusting the colour temperature
English
125
product details
Note: Some settings such as volume adjustment are only available
after the firmware has been updated.
126
• System: NTSC/Pal – please set/leave this on PAL
• Date/time: for setting the date and time
• Licence plate: can be found in the top right hand corner of the display and in the recordings • Formatting the SD card: for deleting all of the data on the SD card
• Factory settings: reverts to the original factory settings
• Movement recognition: starts recording after movement has been recognised in front of the camera
• LCD deactivation: turns the display off after a certain period of time
• Video length: can be set from 1-10 minutes
• GPS: switches the GPS on or off
• Time zone: for setting the time zone
• G sensor: for setting the sensitivity of the G-sensor to retain any evidence in the event of accidents, meaning that the recorded video is therefore saved on the SD card and is not overwritten
• Scene mode: various recording modes can be selected, however the default “from” mode suffices in most situations
• Balancing exposure to light: shortens or extends the exposure time
• Speed indicator: suppression of speed in the video after the set speed has been exceeded
• Volume: for setting the warning volume
• Excess fatigue alert: generates a signal at distances which have been set
• Car light: a signal will sound once the recording becomes too dark
• Speed camera alert: for switching the speed camera alert on/off
• Speed warning sound: warns you of an active speed camera when travelling in excess of the speed limit
English
• Alarm setting: Off = warnings when travelling at certain speed;
On = for alerts only when driving too fast
• Language: for selecting the language
• Most recent update: displays the date of the most recent POI
installation
• Firmware version: displays the firmware which has been installed
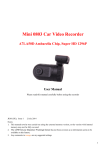
Installing the device inside a vehicle
Insert a microSD card into the microSD slot. Connect the camera and suction
cup holder (a sliding plug connection). Remove the protective film from the
suction cup the first time you use it.
Place the suction cup holder on your windshield or dashboard, so that the
view is not obscured. Now fix the suction cup by tilting the lever towards the
car window. The substrate must be free from dust and grease in order for it
to be secured properly.
You can adjust the camera after having opened the fixing wheel.
Connect the USB cable to the camera. Route the cable like you would for a
cigarette lighter socket so that it does not hinder you while driving. Use the
8 cable clamps for fixing the cable.
Connect the USB cable to the vehicle adapter and plug it into the cigarette
lighter input.
product details
Basic settings
Connecting the device to a computer
Connect the device (with an inserted microSD card) to the USB cable, which
has been provided (not the cable for the GPS receiver), and connect the
cable to an available USB port on your computer (which has been switched
on). Switch the device on. The computer will identify the device and will
English
127
You can also format the microSD card. However, all of the stored data will be
deleted should you do so!
product details
Connecting the device to a television
Used for playbacks, because the device (with an inserted microSD card) can
be connected to a television or to a monitor using an HD cable (this is not
supplied with the device).
Then connect the cable to the HD output of the device and connect the
cable to the input of the television.
Switch on the television and change the mode to video input.
Check the list of recordings of the device and select the appropriate recording program. Start playing by pressing on the “OK” button.
Use as a car camera
The device is ready for use as a car camera once it has been installed inside
the vehicle. The device will switch on once you have plugged the adapter
into the cigarette lighter.
Press the „OK“ button to start or finish recording.
128
English
Additional functions
Additional functions will become enabled depending on what you select in
the basic device settings:
• GPS tracking
• Speed indicator (can be customised in the video!)
• Speed alert
• Lane assistant
• Alerts for road conditions
• Distance
If required for legal reasons, you can also install speed camera data. The
regulations for this are not uniform within Europe.
Setting the speed camera and hazard warnings
The POI must be loaded initially via the POI base program in order for you to
be alerted to speed cameras and danger zones. The GPS must be enabled
when in operation.
The following elements can be set in terms of alerts.
Speed camera alert: for switching
The alarm settings on/off: Off = all warnings enabled, On = acoustic alerts
only if driving too fast
Volume: alert volume
Delete all data: stops recording by pressing both arrow buttons
simultaneously and holding them down for 5 seconds
English
product details
install the correct driver.
If the recognition process has been completed, then you can access the
microSD card from the camera as an ordinary USB stick and will be able to
play back, copy, and delete any recordings.
129
Traceroute via a PC
Technical details
The GPS software, which is provided, allows you to track any driven routes
on your PC via Google Maps.
160° wide angle lens
2” LCD display (5.08 cm)
Super HD resolution of up to 2688 x 1512 px (photo),
2304 x 1296 px (video set at 30 FPS)
H.264/MPEG4 video compression
G sensor
GPS integrated into an external USB cable
Integrated microphone/speaker headset
Simply launch it after the device has been connected to the PC correctly,
and this can be found under the „RegistratorViewer” program in the device
directory.
130
Technical details
Technical details
It is here where you can open the recording, which you wish to track.
English
English
131
Installation AND REGISTRATION
ATTENTION: Before connecting with your PC you have to put a
convenient microSD-card into your Poi Pilot!
The POI Pilot 7000 must have received a GPS signal before any POIs
can be transferred!
Please observe the following steps in order to put your POI pilot into
operation with the POIbase:
1. Insert a micro SD card (at least Class 6) which has been formatted in FAT 32 into the device.
2.Connect the POI pilot to the external GPS receiver inside the cable and connect this to the power supply inside the vehicle.
3.Switch the GPS on inside the POI pilot 7000 device menu, and wait until a GPS signal has been received in the POI pilot 7000 display (the GPS symbol will turn green). This process can take up to 30 minutes.
4.After the GPS has been received successfully, connect the POI pilot 7000 to the PC, and install the POIbase programme on the CD.
5.The POIbase will automatically recognise the POI pilot 7000 if the GPS signal has been successful.
Step-by-step guide to installing the software for your POI PILOT 7000 GPS
locator on your Windows PC:
1. Step
Insert the POI Pilot CD into the disc drive and click on „Run Setup.exe“.
Installation will start automatically. If it doesn‘t, you can start the installation
using the „Setup.exe“ file on the CD.
Windows XP/Vista/7
Windows 8
Installation AND REGISTRATION
Installing the POIbase software
NOTE: In some cases, your security software might block the
software installation from the CD. In this case, please download
the software from our website. You will find it at
http://www.poibase.com/en » Download.
132
English
English
133
Step 4
Click „Next“ in the POIbase setup assistant to confirm the installation.
Installation AND REGISTRATION
Installation AND REGISTRATION
Step 2
Click „Start download“ in the POIbase Web Downloader.
Step 3
Now select the desired language and confirm it with „OK“.
134
English
English
135
Step 6
Please leave the Start menu folder unchanged and confirm with „Next“.
will then start.
English
Installation AND REGISTRATION
Installation AND REGISTRATION
136
Step 5
The installation directory for the POIbase program can now be selected.
We recommend leaving it as it is, otherwise it may cause problems.
Confirm with „Next“.
English
137
Step 8
Under Windows 8, the installation is now complete and can be by by clicking
„Finish“. The next step is registration.
English
Installation AND REGISTRATION
Installation AND REGISTRATION
138
Step 7
The destination and Start menu folders will be shown again.
Click „Install“ to start the installation.
English
139
Installation AND REGISTRATION
Following the installation, a desktop icon will be visible on Windows XP/
Vista/7, and a tile with the POIbase logo on Windows 8.
Click this and the POIbase program will open. First, the program will {MQ}
search for updates, which can be installed with „OK“.
POIbase will then restart automatically. Registration will then proceed as
follows.
Step 2
The POI pilot will be recognised automatically and can be selected.
Installation AND REGISTRATION
Registration within the POIbase software
NOTE: If you reinstall or install the software on another PC, you will
not need to register again. Just log in as described in step 2 using the
existing account details you used when redeeming your activation
code.
Step 1
POIbase will automatically search for any devices, which have been
connected.
140
English
English
141
142
Step 4
The terms of use can now be read and must be accepted. They can also be
viewed later.
Installation AND REGISTRATION
Installation AND REGISTRATION
Step 3
If you have already registered, you only need to enter you email address and
password. If you haven‘t yet registered, leave all of the fields empty and click
„Register now“.
English
English
143
144
selecting and tRansFeRRing sPeed cameRa POis
Following registration, you can now select the desired speed cameras and
transfer them to your POI Pilot.
Step 1
Click „Download“.
InStAllAtIOn AnD rEGIStrAtIOn
InStAllAtIOn AnD rEGIStrAtIOn
Step 5
Now enter the corresponding data in the required fields, making sure
that you enter a valid email address. The activation code is printer on
the software CD, which can now be removed from your PC. Please enter
the dashes in the activation code. U and V are easily confused. Then click
„Register now“ and registration is complete.
The next step is selecting and transferring speed camera data.
English
English
145
Step 3
All of the data can be found under safety and speed cameras.
English
Installation AND REGISTRATION
Installation AND REGISTRATION
146
Step 2
Then „Download POIs“.
English
147
Step 5
Now the speed camera categories can be selected. You either do this
individually by clicking „Add“, or by clicking „Add all“ (in the black bar).
English
Installation AND REGISTRATION
Installation AND REGISTRATION
148
Step 4
The main categories are listed in the top row. Simply click the desired
category.
English
149
Step 7
Select the desired language and confirm with “OK”.
English
Installation AND REGISTRATION
Installation AND REGISTRATION
150
Step 6
After making your selection, you can either click „Back“ to select other
speed cameras (you current selection will remain) or start the transfer by
clicking „... Install POIs“.
English
151
Step 9
Firstly, the new firmware must be installed. Also, disconnect the POI pilot
from the PC, and confirm the update by pressing the OK button on the POI
pilot.
InStAllAtIOn AnD rEGIStrAtIOn
InStAllAtIOn AnD rEGIStrAtIOn
Step 8
Two measures are still required to be taken so that the POIs can be
transferred successfully.
152
English
English
153
Step 10
The POI pilot must still revert to factory settings in the device menu before
the PC can be re-connected. Re-connect the POI pilot to the PC, and
complete the transfer of the POIs by pressing “OK”.
Updating speed camera POIs
Updating the speed camera POIs on the POI Pilot. Our database is improved
and changed daily. This is done in a few steps.
Installation AND REGISTRATION
Installation AND REGISTRATION
Step 1
Connect the POI Pilot to your PC, start POIbase and click “Download“.
Step 11
After this, you will be able to disconnect the POI pilot from the PC. This now
highlights the fact that POI data can be read inside the display, and it will
begin to reboot automatically. It is now ready to use and can be attached to
the vehicle windscreen.
154
English
English
155
Step 3
You will find all previously transferred camera under „My selected POIs“.
English
Installation AND REGISTRATION
Installation AND REGISTRATION
156
Step 2
Click „Download POIs“.
English
157
Step 5
Select the desired language and confirm with “OK”. The selected speed
cameras and the most up to date firmware are then transmitted.
InStAllAtIOn AnD rEGIStrAtIOn
InStAllAtIOn AnD rEGIStrAtIOn
Step 4
No you can see the POIs again and, if necessary, remove categories.
When you are ready, click „... Update POIs“. The data will then be reloaded
and brought up to date.
158
English
English
159
Adding speed cameras and other POIs
New permanent and mobile speed cameras are adding to our roads every
day. You can also add these cameras to the POIbase database yourself.
The map is now shown.
Installation AND REGISTRATION
Installation AND REGISTRATION
Step 1
Connect the POI Pilot to your PC, start POIbase and click „Edit POIs“.
160
English
English
161
Step 3
Next, the POI categories is selected in the left column. In this case it is a 50
km/h fixed speed camera. Then click „Add POI“ in the right column.
English
Installation AND REGISTRATION
Installation AND REGISTRATION
162
Step 2
Use the mouse wheel to zoom in to the position where the speed camera is
located and mark it with a mouse click. A red X will appear at this point.
English
163
Example:
\[22087] Speed Camera F50; Mühlendamm 12; dir. city centre; \[Hamburg]
Once all required fields have been filled, continue with „Other steps“.
Installation AND REGISTRATION
Step 6
The details can be checked once again. If everything is right, click „OK“.
Your submission will then be sent, checked and added to the database.
164
Step 5
In this case it is a 50 km/h fixed speed camera. Then click „Add POI“ inthe
right column. The name of the speed camera is the name that will be shown
on the map later and should look like this:
\[Postcode] Speed Camera F50 (F stands for a fixed speed camera; choose M
for a mobile speed camera. The 50 stands for the speed limit.); street and
house number; direction and other details; \[Town] Please abbreviate Street
to St and direction to dir.
English
Installation AND REGISTRATION
Step 4
The selected category will be shown again. Click „Other steps“ for the POI
description.
English
165
Frequently asked questions and problems
Problem
Cause
Solution
My POI Pilot is not/ no longer recognised
by POIbase.
USB cable broken.
Try a new USB cable.
USB connection the PC
defective.
Try an another USB connection.
Entered code incorrectly.
Please enter the dashes too.
My activation code isn‘t accepted.
Why do I have to pay of
speed cameras?
Didn‘t enter activation code
during registration.
You can enter the code under Settings » Redeem activation code.
After reinstalling POIbase I can‘t register
again.
Already registered for the
program.
Cancel the registration and sign in using your email address and password.
How do I uninstall the program?
I shall not be warned of any speed
cameras.
FAQs
FAQs
U and V, 0 and D are easily confused.
POIbase can be uninstalled from the Control Panel under Programs and
Features.
No speed cameras have been
transferred.
Transfer the speed camera to the POI pilot.
Speed camera alert is switched
off.
Activate the speed camera alert in the POI pilot menu.
You will find further answers to known questions and problems at
www.poicon.com/en » Contact & Support » FAQs.
166
English
English
167
Support
1. Online
In our online support centre you can find:
•
free updates for many POICON products
•
many tips and important information about your product
www.poicon.com/en -> Contact & Support
2. E-mail
You can e-mail all of your questions and suggestions to our free e-mail
support at [email protected].
•
Orders:
Orders, product suggestions, questions about other products or content services
+49 (0)40 28 46 37 10
•
Customer technical support:
Here you can acquire help with the installation of and problems with your software
+49 (0)40 28 46 37 111
Support
Support
3. Telephone
Enjoy your new POI PILOT
Yours,
POICON Team
Hamburg
168
English
English
169
Important information
Important information regarding disposal
This electrical appliance cannot be disposed of alongside household waste.
Please contact local collection authorities in your district to ensure that it is
disposed of correctly.
Please refer to any information provided by your local authority regarding
details of the location of any such facilities, and in terms of existing daily/
monthly/annual quantity restrictions.
important information
DECLARATION OF CONFORMITY
ATTENTION: It is your responsibility to ensure that law within your
own country permits the use of this product.
170
English
English
171
important information regarding disposal
DECLALARATATION OF CONFORMITY
172
POICON GmbH & Co. KG hereby confirms that the product POI Pilot 7000
complies with the EMC Directive 2004/108/EG and with the RoHS directive
2011/65/EU (for restrictive hazardous substances).
Hamburg, 24/02/2015
POICON GmbH & Co. KG
Stefan Quisdorf
Lilienstraße 11 (Lilienhof)
20095 Hamburg
Germany
The full Declaration of Conformity can be found at
www.poicon.com/download/7000.pdf
English
English