1
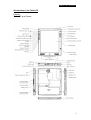
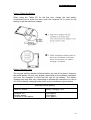
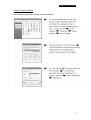
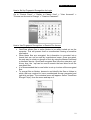
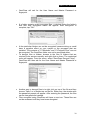
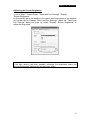
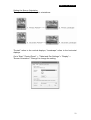
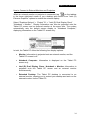
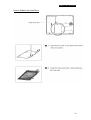
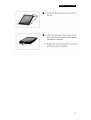
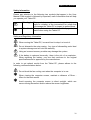
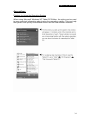
TTAB-B12D
USER MANUAL
TABLET PC RTAB912
Table of Contents
TTAB-B12D Highlights
03
Accessory Checklist
04
Introduction to the Tablet PC
05
05
06
Exterior
Indicators
Using Your Tablet PC
Specifications
Button Functions
Primary Functions
Secondary Functions
How to use Secondary Functions
How to Assign Secondary Functions to Buttons
Battery
How to Replace the Battery
How to Charge the Battery
Battery Charging Time
How to Conserve Power
How to Prolong the Battery Life
How to Hot Swap the Battery
Use and Setup of the Fingerprint Recognition Device
07
07
08
09
10
11
11
13
13
14
14
15
16
16
How to Register to Use the Fingerprint Recognition Device
How to Set Up Fingerprint Recognition for Login
How to Use Fingerprint Recognition to Restrict File Access
17
17
19
19
Calibrating the Screen
21
Adjusting the Screen Brightness
22
Setting the Screen Orientation
23
How to Connect to External Projectors and Monitors
24
1
TABLET PC RTAB912
Upgrading Your Tablet PC
Upgrading the Memory
How to Replace the Hard Drive
How to Recover Your Operating System
How to Use the Recovery CD
Safety Guidelines
Safety Information
Safety and Regulatory Information
Power Cord and Power Supply Usage Guidelines
Battery Safety Guidelines
Operating Specifications
Contacting Technical Support
25
25
26
28
28
29
29
29
30
31
31
Contacting the Manufacturer
Calling for Assistance
32
32
32
Declaration of Conformity (Safety Standards)
33
Appendices
34
34
35
36
36
36
37
38
39
Pointers for Using the Operating System
Help and Support Centre
Using Your Accessories
How to Use the Stylus Tether
How to Change the Stylus Tip
Eraser Setup
Using the Eraser
Maintaining Your LCD Display
2
TABLET PC RTAB912
TTAB-B12D Highlights
Even Lighter and Thinner:
At 1.4kg and 1.87cm thick, the ultra-thin design makes taking the Tablet with
you even easier.
Longer-lasting Battery:
The long-life battery lasts up to five hours.
Fingerprint Recognition:
The unique fingerprint recognition system makes the Tablet PC even more
secure.
Intelligent Light Sensor:
The light sensor automatically adjusts the screen brightness in response to
the environment, changing it to a comfortable viewing level.
Array Microphone:
The array microphone eliminates background noise, increasing the rate of
speech recognition.
Reduced Parallax:
Special measures to reduce the gap between the stylus tip and the on-screen
ink makes writing on the Tablet feel even more natural.
Comfort:
The Tablet PC's size is designed with the user's comfort in mind. While
writing, the user can conveniently rest their hand on top of the screen. Using
the stylus, the user can write directly on the screen, and handwritten
documents can even be converted into typed text.
Speech Recognition:
The Tablet PC's advanced speech recognition system also allows it to be
used as a dictation machine.
Wireless Connectivity:
The wireless network function lets users conduct business near compatible
wireless access points.
3
TABLET PC RTAB912
Accessory Checklist
Standard Accessories (dependent upon model and configuration)
•
•
•
•
•
•
•
Power Cord
AC Adapter
Stylus
Stylus Tether
Recovery CD
Wire Stand
Modem cable
4
TABLET PC RTAB912
Introduction to the Tablet PC
Exterior:
Tablet PC at a Glance
5
TABLET PC RTAB912
Indicators
Power Indicator
A steady green light indicates the computer is
turned on; when the computer is in Standby mode,
the light will shine orange. When the light is off, the
computer is either off or in Hibernate mode.
A slowly flashing green light indicates the computer
is accessing the hard drive.
Hard Drive Access
Indicator
Battery Indicator
A steady red light indicates the battery is charging.
A flashing red light indicates the battery is low. If
the AC adapter is not connected at this time, the
red light will continue to flash until it goes out. This
means that the battery has run too low and is
entering a protected state.
When the wireless card is enabled, the light will
shine green. When the wireless card is disabled,
the light will go out.
Wireless Network
Indicator
6
TABLET PC RTAB912
Using Your Tablet PC
Specifications
● Processor
Intel Pentium M Processor
● Memory
256MB (or 512MB, upgradeable to 768MB)
● Hard Drive
30G or 60GB
● Display
12.1" TFT LCD, resolution 1024x768
● External Interface
External Monitor Port
IEEE 1394 Port
MIC In
Headphone Out
IrDA Port
USB Port x2
RJ45 LAN Port
RJ11 Modem Port
PCMCIA Slot (1x Type II)
Docking Station Connection Port
● Light Sensor
Can automatically adjust the screen brightness in response to the
environment.
To enable the light sensor, please follow the steps below:
Go to "Control Panel" > "Light Sensor" Place a checkmark in the box next to
"Enable Light Sensor." The light sensor will now automatically adjust the
screen brightness.
Note:
Once the light sensor has been enabled, adjusting the brightness under
"Tablet and Pen Settings" > "Display" > "Screen Brightness" will not produce
any effect. The screen brightness will be regulated by the light sensor instead.
7
TABLET PC RTAB912
Button Functions
This product comes with fourteen different function buttons that can be used
after entering Windows. To enable the user to access applications quickly,
some of these fourteen function buttons offer additional functions. Four of the
functions can be defined by the user.
The four directions on the joystick or directional ball (four separate functions)
together with the Enter function count as five function buttons.
Each button has a built-in primary function. However, some buttons can also
have a second function at the same time. Of the fourteen buttons, four may
have a secondary function assigned to it.
1. Primary Functions
Pre-set system functions. There is no way for you to reset these. The icon to
the side of the actual button represents its primary function.
2. Secondary Functions
Additional functions accessed by pressing the [Fn] button. For some buttons,
these are user-programmable; for others, they have already been assigned.
The four user defined button operations can be set up by opening the Tablet
and Pen Settings icon in the bottom right of the desktop
and clicking on
the buttons tab. The different button press options are shown here.
8
TABLET PC RTAB912
Primary Functions
Each button has a basic primary function that has already been defined.
These basic functions are described as follows:
Icon
Function
Power On/Off
Function Description
Computer power switch
Rotate
Rotates the screen between two types of
pre-set orientations (user-programmable,
see page 20)
ESC
The same as a normal keyboard [ESC]
key, exits the current application
Function
Activates the secondary functions
Wireless Network
Activates the wireless card function
Up Arrow
The same as a normal keyboard cursor
[Up Arrow] key (directional ball function)
Down Arrow
The same as a normal keyboard Cursor
[Dn Arrow] key (directional ball function)
Right Arrow
The same as a normal keyboard cursor
[Right Arrow] key (directional ball
function)
The same as a normal keyboard cursor
[Left Arrow] key (directional ball function)
Left Arrow
Enter
The same as a normal keyboard [Enter]
key (directional ball function)
Tablet PC Input Panel
Turns the Tablet PC input panel on/off
Journal
Opens "Windows Journal" software
Start
Opens/closes Windows "Start Menu"
Windows Security
opens "Windows Task Manager," i.e.
[Ctrl] + [Alt] + [Del]
9
TABLET PC RTAB912
1. The power button can be set to make the computer enter Standby or
Hibernate mode. (Go to "Control Panel" > "Power Options" > "Advanced" >
"Power Buttons" and set as Standby or Hibernate.)
2. To activate or shut down the wireless network, hold down the Wireless
Network Button for two to five seconds. The time delay is so that the function
is not accidentally turned on/off.
3. The Direction Ball will automatically adjust the other functions along with
the four different screen rotations. For example, if the screen is rotated from a
primary setting to a secondary setting, the arrow orientation will also change.
Secondary Functions
Aside from the four function buttons listed immediately below, the other
buttons all either are or can be programmed with secondary functions.
1. Power Button
2. Fn Button
3. Windows Security
4. Wireless Network Button
Icon
Function
Rotate
ESC
Secondary Function Description (Fn +
Primary Button)
Default: Email Client (userprogrammable)
Up Arrow
moves the present work display to the
background
[Page Up] (directional ball function)
Down Arrow
[Page Down] (directional ball function)
Right Arrow
[Tab] (directional ball function)
Left Arrow
[Shift] + [Tab] (directional ball function)
Enter
[Alt] + [Tab]: you can switch between
open programs
Default: Volume Up (user-programmable)
Tablet PC Input Panel
Journal
Start
Default: Volume Down (userprogrammable)
Default: Internet Browser (userprogrammable)
10
TABLET PC RTAB912
How to Use the Secondary Functions
Press the [Fn] button to activate a secondary button function. When this is
pressed, the Windows icon taskbar in the lower right-hand corner of the
desktop will display the following message:
Note:
"User-programmable" means that a secondary function can be assigned
How to Assign Secondary Functions to Buttons
Button functions can only be assigned when the Windows "Start Menu"
taskbar is on-screen. In this section there is an explanation in how to assign
secondary functions to the four programmable buttons. These four buttons not
only have primary functions, but also may be assigned secondary functions.
Remember, to activate the secondary button functions, hold down the [Fn]
button and then press the specific secondary function button.
1. Go to "Start" "Control Panel" "Tablet and Pen Settings" "Tablet Buttons."
Alternatively, double-tap the "Change Tablet and Pen Settings" icon
the taskbar in the lower right-hand corner of the desktop.
on
11
TABLET PC RTAB912
2. From among the four available buttons, select an appropriate one to add a
secondary function. Below the "Tablet Buttons" heading, there are the
following four options:
Fn + Hot1 Button
Fn + Journal Button
Fn + Input Panel Button
Fn + Rotate Button
3. Tap on "Change."
4. Double-check the "Button Name" in the first row of the "Change Tablet
Button Action" dialog box to confirm the button selection.
5. Select a secondary function that is often used from among the fifty-four
different options in the "Action" scroll list.
6. Tap "OK" to confirm your selection.
12
TABLET PC RTAB912
Battery
How to Replace the Battery
The following diagrams explain how to replace the battery correctly:
13
TABLET PC RTAB912
Using Your Tablet PC
How to Charge the Battery
When using the Tablet PC for the first time, charge the new battery
continuously for at least four hours with the computer off in order for the
battery to get the maximum charge.
Battery Charging Time
The longest that the standard Lithium battery can last is five hours. However,
the actual battery life may vary slightly, depending on the software, hardware,
and how the computer is used and the age of the battery. The battery
charging time may also vary, depending on whether the computer is in use or
off. A list of battery charging times under various conditions is given below.
Standard Lithium Battery
Tablet PC Status
Battery Charging Time
Computer Off
Standby approx.
Computer In Use approx.
3 hrs approx.
2 hrs approx
4 hrs approx
14
TABLET PC RTAB912
How to Conserve Power
Here are three tips that can help conserve power:
15
TABLET PC RTAB912
How to Prolong the Battery Life
1. It is recommended that the battery is used until it is fully drained before
recharging it. This will prolong the useful lifetime of the battery.
2.New batteries must go through a few cycles of being completely charged
and drained before obtaining the maximum battery discharge time. This
should also be done if the battery is stored for a few months.
1. Touching either end of the battery contacts with anything metallic can result
in a short circuit and damage to the battery.
2. Do not get the battery wet, hit it, let it fall, or put it anywhere hot.
3. Charging the battery for too long can shorten its life. Do not charge it for
more than twenty-four hours at any one time.
How to Hot Swap the Battery
In order to ensure that none of system data is lost, the follow steps should be
used, when replacing the battery:
1. Disconnect the keyboard, mouse, and any other external devices.
2. Set the system on Standby.
3. Remove the battery.
4. Replace it with a fully charged battery.
5. Press the power button to restore your system to operating mode.
•
•
The above quick-change battery hot swap should be completed within
five minutes(otherwise, data may be lost).
Do not press the power button while in the middle of the battery hot
swap.
16
TABLET PC RTAB912
Use and Setup of the Fingerprint Recognition Device
How to Register to Use the Fingerprint Recognition Device
17
TABLET PC RTAB912
Green indicates successful fingerprint registration. Red indicates unsuccessful
registration.
18
TABLET PC RTAB912
How to Set Up Fingerprint Recognition for Login
Go to "Control Panel" > "Switch to Classic View" > "User Accounts" >
"Choose an Account to Change" > "Create a Password".
How to Use Fingerprint Recognition to Restrict File Access
•
•
•
•
OmniPass allows files or entire folders to be safely locked out on the
computer. This will prevent theft or unauthorized viewing of sensitive
information.
When these files are encrypted, the information is converted into a
format that can not be read by unauthorized users. Once encrypted,
the only way to unlock or decrypt a file is by using the Master Password
or biometric device. OmniPass encrypted files have the extension .opf.
At any time, the *.opf can be used to search the hard drive for all the
encrypted files.
It is recommended that a new folder is set up to store all the encrypted
files.
To encrypt files or folders, browse to and identify the files or folders to
which that are required to have unauthorized access prevented and
right click on them. The contextual menu will appear. Select "OmniPass
Encrypt File(s)" from the menu and tap on it.
19
TABLET PC RTAB912
•
OmniPass will ask for the User Name and Master Password or
fingerprint.
•
If a folder contains many encrypted files, a window listing the folder's
files and their encryption status will appear. After encryption is
complete, tap "OK."
•
A few particular folders can not be encrypted, because doing so could
have a negative effect on your system or the programs that are
installed. The contents of "C:\Windows" and "C:\Program Files" can not
be encrypted. The OmniPass folder can not be encrypted either.
To decrypt files or folders, browse to the files or folders that are
required to be access normally and right click on them. The contextual
menu will appear. From the menu, select "OmniPass Decrypt File(s)" .
OmniPass will then ask for the User Name and Master Password or
fingerprint.
•
•
•
Another way to decrypt files is to right click on top of the file and then
choose "Open" or to double-tap on the file. Either way, the window with
the password prompt will appear. After entering the password, the files
can be decrypted and opened.
Files encrypted using OmniPass will have a new icon. These files can
not be accessed until they have been decrypted.
20
TABLET PC RTAB912
Before Encryption
After Encryption
Calibrating the Screen
The following method will help the Tablet PC respond more effectively to the
stylus. First choose the screen orientation that needs to be calibrated:
Go to "Start" "Control Panel" "Tablet and Pen Settings" "Settings"
1. Choose an appropriate screen orientation to calibrate: Portrait or
landscape.
2. Now the screen is ready to be calibrated. Select "Calibrate."
3. Following the on-screen instructions, carry out calibration four times.
4. Calibration complete.
21
TABLET PC RTAB912
Adjusting the Screen Brightness
1. Go to "Start" "Control Panel" "Tablet and Pen Settings" "Display"
"Screen Brightness"
2. Alternatively go to the taskbar in the lower right-hand corner of the desktop
and double-tap on "Change Tablet and Pen Settings." When the "Tablet and
Pen Settings" dialog box pops up, select "Display" "Screen Brightness" to
adjust the brightness.
Note:
If the light sensor has been enabled, adjusting the brightness under the
"Screen Brightness" settings will not have any effect.
22
TABLET PC RTAB912
Setting the Screen Orientation
The screen has the following four orientations:
"Portrait" refers to the vertical displays; "Landscape" refers to the horizontal
displays.
Go to "Start" "Control Panel" > "Tablet and Pen Settings" > "Display" >
"Screen Orientation" "Change" to change the setting.
23
TABLET PC RTAB912
How to Connect to External Monitors and Projectors
When an external monitor or projector is connected, tap
on the taskbar
in the lower right-hand corner of your desktop and choose from "Intel (R)
Extreme Graphics" options to enable the external display:
Select "Graphics Options" > "Output To" > "Intel (R) Dual Display Clone"
"Notebook + Monitor." Display information can then be projected onto the
Tablet PC screen and an external monitor at the same time. The system
automatically sets the default screen display to "Notebook Computer,"
displaying information on the Tablet PC screen only.
In total, the Tablet PC offers the following four display options:
•
Monitor: Information is projected onto an external monitor, and the
Tablet PC screen is off.
•
Notebook Computer: Information is displayed on the Tablet PC
screen only.
•
Intel (R) Dual Display Clone.. Notebook + Monitor: Information is
projected onto the Tablet PC screen and an external monitor
simultaneously.
•
Extended Desktop: The Tablet PC desktop is connected to an
external monitor, allowing you to extend your desktop and work on the
external monitor via the Tablet PC.
24
TABLET PC RTAB912
Upgrading Your Tablet PC
Upgrading the Memory
25
TABLET PC RTAB912
How to Replace the Hard Drive
26
TABLET PC RTAB912
27
TABLET PC RTAB912
How to Recover the Operating System
1. Connect the Tablet PC to the USB keyboard.
2. When the computer is turned on, press [F10] before entering the operating
system to carry out system recovery. Or, after entering the operating system,
go to "Start" > "All Programs" > "System Recovery."
3. Follow the on-screen steps to recover the system.
How to Use the Recovery CD
(dependent upon configuration)
1. First connect the USB keyboard and the USB CD-ROM to the Tablet PC.
Insert Recovery CD 1.
2. Start up the computer and immediately press [F2]. Enter the BIOS/Boot and
change to the CD-ROM Drive, pressing [Shift] and [+] to drag the CD-ROM
Drive to the top of the list. Save and exit.
3. Recover the system as needed by following the on-screen instructions.
Note:
RM Tablet PCs can also use RMRESTOR to recover the Tablet PC operating
system software back to the original factory shipping state.
WARNING: This will result in any user data on the Primary partition being lost.
Connect a USB keyboard to the tablet. Turn the Tablet PC on and press both
“Shift” keys when “RMR” displays just before the operating system begins to
boot. The RMRESTOR will display with options to restore back the drive.
See the RMRESTOR.htm file on drive D:\RM for more information
To repair the existing operating system use the recovery CDs and a Firewire
or compatible USB CD-Rom drive.
28
TABLET PC RTAB912
Safety Information
Please pay attention to the following two symbols that appear in the User
Manual. Each symbol is followed by important, useful information that will help
you operate your Tablet PC.
This symbol warns of incorrect usage of equipment
and/or a violation of the instructions for usage that
will damage the Tablet PC or impair its performance.
Attention ! This symbol marks advice that will help get better
results when using the Tablet PC.
Warning !
Safety and Regulatory Information
When moving the Tablet PC, be careful not to drop it or knock it.
Do not dismantle the outer casing . Any type of dismantling could lead
to system damage and will void the warranty
Using an incorrect memory module may damage the system.
If the battery is replaced incorrectly, there is the risk of an explosion.
When replacing the battery, use one that conforms to the original
specifications and is approved by the manufacturer.
In order to get optimal results from the Tablet PC, please adhere to the
following recommendations below.
Do not block the fan cooling vent when the computer is in use.
When viewing the computer screen, maintain a distance of 38cm 45cm for the best results.
Avoid exposing the computer screen to direct sunlight, which can
cause viewing discomfort and/or reduce the screen brightness.
29
TABLET PC RTAB912
Power Cord and Power Supply Usage Guidelines:
Use together with the designated AC adapter.
Keep away from cold.
Keep away from high temperatures or fire hazards.
Do not short-circuit the power-out.
Do not use in water.
Do not use in humid areas.
Do not pull on the power cord.
High voltage inside; do not open.
Do not try to alter or repair.
Do exert pressure on or drop.
Use together with the designated power cord.
Store at a room temperature of -20oC - 85oC (-4oF - 185oF), relative
humidity 5% - 95%; operate at a room temperature of 5oC - 40oC (41oF
- 104oF), relative humidity 10% - 95%.
Do not use damaged power cords.
The Tablet is supplied with a universal power supply which can be
used with 110 -240V AC mains inputs.
In order to reduce the possibility of electric shock from a telephone
network, plug the computer power cord into the AC outlet before
connecting the computer to a telephone line. Also, you should
disconnect the telephone line first when unplugging the computer
power cord from the AC power outlet.
Do not repair or tamper with the power supply. Any dismantling or
adjustments aside from those that are listed in the User Manual
(Upgrading Your Tablet PC) may result in an electric shock. And will
also invalidate the system warranty.
30
TABLET PC RTAB912
Battery Safety Guidelines:
The battery is restricted to usage with this computer.
Do not dismantle the battery.
Do not expose the battery to fire or water.
Avoid fire, heat, and any sort of damage to the battery. Do not touch
either end of the battery with anything metallic.
Do not use a damaged or leaking battery.
If the ambient temperature exceeds 45oC (113oF), do not charge the
battery.
If the battery leaks and electrolytes come into contact with your eyes,
wash your eyes with water for fifteen minutes, and then immediately go
to a doctor.
To buy a replacement battery, contact RM.
Do not store the battery in a warehouse under high temperatures (over
60oC, 140oF).
To dispose of the battery, consult your local waste treatment centre
regarding disposal and recycling restrictions.
Operating Specifications
Electrical Rating: DC 12V, 3.5A
Operating Temperature: 25oC (77oF)
Storage Temperature: -20oC - 70oC (-4oF - 158oF)
Operating Humidity: under 26oC (78.8oF), 15% - 80% humidity
Storage Humidity: under 65oC (149oF), 90% humidity (no condensation)
Storage Altitude: 4500m (Max)
31
TABLET PC RTAB912
Contacting the Manufacturer
Before contacting the manufacturer's technical support, please carry out the
preliminary examination described below.
•
•
•
•
•
•
•
Disconnect all of the external accessories.
Check to see whether all of the power cords are correctly plugged into
the power supply and the computer.
Check the power indicator to see whether the machine is on.
If a malfunction has occurred with the USB CD-ROM, scanner, printer
or any other accessory, please contact the manufacturer of that
product.
If there is a software problem, please contact the software supplier.
When carrying out any kind of BIOS update, please load default BIOS
values first.
If there is a problem with wireless connection make sure the Tablet PC
wireless card has been switched on (see page “Introduction to the
Tablet PC” on page 5).
Calling for Assistance
If your computer's technical problem persists even after you have carried out
the above examination, please contact the manufacturer's technical support
as quickly as possible.
Before calling for assistance, prepare the following three pieces of
information:
•
•
•
•
Product model and serial number (This information is on the label on
the back of the computer.)
BIOS version (See below.)
EC version (See below.)
You may obtain the BIOS and EC versions from the Setup screen,
which can be entered as follows:
1. Turn on the Tablet PC.
2. When the logo appears on-screen, press [Esc].
3. Go to "Enter Setup," and you will find the BIOS and EC versions.
32
TABLET PC RTAB912
Declaration of Conformity (Safety Standards)
Product name: Tablet PC
Model: TTAB-B12D
Conforms to the following safety
standards:
Safety: TUV, CB, UL, CSA
Singapore
IDA-Telecom
IDA-RF
Standard
TUV EN 60950:2000
CB IEC 60950:1999
UL UL 60950 Third Edition
CSA C22.2 No.950-95
Japan
VCCI:VCCI/2002 (15th Edition)
TELEC
JATE
EMC:
CE (EU)
EMC:EN
55022:1998+A1:2000,Class B
EN 61000-32:1995+A1:1998+A2:1998
EN 61000-3-3:1995,
EN 55024:1998+A1:2001
RF: EN 301 489-17:2002
EN 300 328-2:2001
EN 301 893-2:2002
Telecom: TBR-21
Australia/New Zealand
AS/NZS CISPR 22:2002
FCC (USA)
EMC: FCC part 15 subpart B
RF: FCC part 15 subpart C
FCC Part 15 Subpart E
Telecom: FCC part 68
IC (Canada)
Telecom: IC CS03
EMC: ICES-003
RF: IC RSS210
Taiwan
DGT-RF: low power factor radio
frequency
electric technology specifications
BSMI:CNS 13438 class B
DGT-Telecom
33
TABLET PC RTAB912
Appendices
Pointers for Using the Operating System
When using Microsoft Windows XP Tablet PC Edition, the stylus can be used
to open practical information about using the operating system. This can help
the system user quickly understand how to use the new software features.
34
TABLET PC RTAB912
Help and Support
Under "Help and Support Centre," there is further information about the Tablet
PC operating system
35
TABLET PC RTAB912
Using Your Accessories
36
TABLET PC RTAB912
Eraser Setup
1. Go to "Start" "Control Panel" > Tablet and Pen Settings" > "Pen Options"
"Use Top of the Pen to Erase".
2. Alternatively go to the taskbar in the lower right-hand corner of the desktop
and double-tap on "Change Tablet and Pen Settings." When the "Tablet and
Pen Settings" dialog box pops up, go to "Pen Options" > "Use Top of the Pen
to Erase".
37
TABLET PC RTAB912
Using the Eraser
Flip the stylus over, and the head can be used as an eraser.
38
TABLET PC RTAB912
Maintaining the LCD Display
•
•
•
•
When cleaning the LCD display surface, use a fine, soft, cleaning cloth
to remove dust and fingerprints from the screen.
Avoid cleaning the computer while it is in use (hot).
When using a liquid cleaner, do not spray it directly onto the screen.
You should spray an appropriate amount of cleaning solution onto the
cloth and then wipe gently.
Select as neutral a cleaning solution as possible. Do not use a cleaning
solution that contains ammonia (most household cleaning agents
contain ammonia-type chemicals) or alcohols (most dry cleaners, such
as magnetic head cleaners, contain alcohol-type chemicals).
39