1
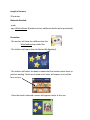
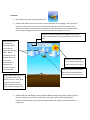
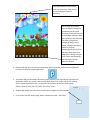
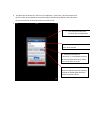
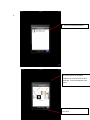
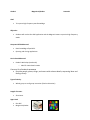
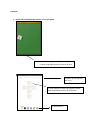
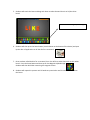
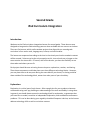
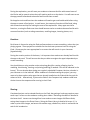
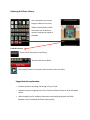
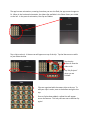
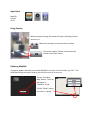
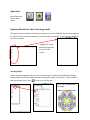
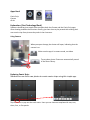
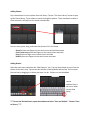
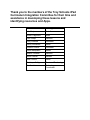
Elementary iPad Integrated Lessons 2011 Troy School District Kindergarten iPad Curriculum Integration Lessons Grade: KDG Apps: Lesson Name: Math Telling Time Lesson 1 Learn Time Level 1 - Hour Level 2 - ½ and 1/4 Hours Apples in Hour Hands Levels: Kindergarten - Hour 1st grade - Hour and ½ hour 2nd grade- Hour, ½ hour and ¼ hour Goal/Objective: Students use the following application(s) to improve their skills on telling time. The students will use Learning Time to practice matching the clock hands to the given time. Using the Apples in Hour Hands children will match the digital time to match the given analogue time. Curriculum Addressed: Telling time to the hour using analog and digital. TSD Report Card: Shows and tells time on a clock face to the hour. Michigan Content Expectations M.TE.00.02 Identify tools that measure time (clocks measure hours and minutes; calendars measure days, weeks, and months). M.UN.00.03 Identify daily landmark times to the nearest hour (lunchtime is 12 o’clock; bedtime is 8 o’clock). Computer Skills Needed: -Finding & opening the app icon. Type of Activity: -Whole group/small group. Students will practice reading/telling time. Length of Lessons: -20-30 minutes Materials Needed: -ipads -apps Learning Time and Apples in Hour Hands Procedure: Learn Time -Teacher will show the children the app icon looks like. -Students select Level 1. The children need to move the hands to match the given time. -The level will automatically change. Apples in Hour Hands -Teacher will show the children the app icon looks like. -Students select play. Children read the clock on the tree and then click on the apple that is the same time. Additional apps for math: -100 Board ($$) - children select the numbers and put them in the correct box on the hundred board. -Math Party ($$) - There are 4 different levels. 2 players can practice the following skills: sequence of numbers, addition, subtraction, multiply or division can be practiced using this app. -Ladybug Count (free app) - Children count the spots on the ladybugs and then put the correct number of their fingers on the screen. - Counting 123(free app) - Children learn to count from 1 to 10. There are 4 mini games in this app. -UnderSea Math (free app) - Practice addition problems -Dominos Kids-Calculation (free app) - children practice adding domino dots. -Mad Math ($$) - Children practice addition, subtraction or multiplication. -Toddler Teasers Shapes (free app) - Children are asked to look at a box with different shapes in it. They are then instructed to tap on a certain shape. -little matchups Count Money (free app) - The app allows the children to match the coins and values. Grade: KDG Apps: Lesson Name: Reading Lesson 1 WhoCanRead Goal/Objective: Students use WhoCanRead to practice reading books at their “just right” level. Curriculum: Reading books at their “just right” level. Computer Skills Needed: -Finding the app icon -Opening the app -Selecting the “just right” book from the book shelf Curriculum Addressed: Reading books at level. TSD: The books are leveled and at this time they have books leveled A to L. R.AT.00-02.01 be (K-become) enthusiastic about reading and learning how to read. R.WS.00.02 recognize that words are composed of sounds blended together and carry meaning. R.WS.00.07 follow familiar written text while pointing to matching words. Type of Activity: Small group/individual child Length of Lessons: 20 minutes Materials Needed: -ipads -app- WhoCanRead (8 books are free, additional books can be purchased). Procedure: -The teacher will show the children what the WhoCanRead icon looks like. -The children will tap on the star labeled My Bookshelf. -The children will select the book or books that the teacher wants them to practice reading. Books are leveled and a letter will appear in one of the four corners. -Once the book is selected a screen will appear similar to this one. -Read It To Me - the story is read to the children, but the children must tap the blue arrow to continue the story. -Audio Play - the story is read to the children and the pages turn automatically. -Read It To Myself - children read and turn the pages on their own. Additional apps for reading: -Grasshopper Apps (free apps) - There are many books that can be downloaded. -Read to me - The books can be read to the children with them turning the pages. -Read by myself – Children can read the stories themselves. If they get stuck on a word they can tap the word to be read to them. –Auto Play - The books are read to the children and the pages turn automatically. -Readsmart (free to $6.99 for 12 books in a reading level)- These are RAZ books that match the books found on the AtoZ web site: RAZ for kids. Children read these books on their own. -The Story Mouse (1 free, other books from .$99 to $1.99) - Children can select to have the book read to them or they can read the book themselves. -Dr. Seuss ($1.99 – $3.99) A varied of Dr. Seuss books. -Read To Me – Story is read to the children and they have to slide their finger on the screen to turn the pages. -Read It My Myself - Children read the story on their own. -Auto Play - Story is read to the children and words are highlighted when read. Pages turn automatically. -Story Chimes (free to .99) - There are many fairy tale books that can be downloaded. -Mercer Mayer – ($$) There are 9 books that can be downloaded. -Read To Me – Story is read to the children and they have to slide their finger on the screen to turn the pages. -Read It My Myself - Children read the story on their own. -Auto Play - Story is read to the children and words are highlighted when read. Pages turn automatically. Grade: KDG Apps: Lesson Name: Writing Practice Lesson 1 iWriteWords Goal/Objective: Students use the following application to improve their writing skills for lower case letters. Curriculum: Practice writing lower case letters. This app also allows practice on capital letters, numbers (up to 20) and words. Computer Skills Needed: -Finding the app -Opening the app Curriculum Addressed: Handwriting – correct letter formation. TSD: Practice writing lower and capital letters. Michigan Content Expectations: W.HW.00.01 form uppercase and lowercase manuscript letters. W.HW.01.01 legibly write uppercase and lowercase manuscript letters. Type of Activity: Whole group/small group Length of Lessons: 20-30 minutes Materials Needed: -ipads - iWriteWords app Procedure: -Teacher will show the children what the app icon looks like. -To practice writing lower case letters, students select the lower case letter button. Students can also practice writing capital letters, numbers or words by selecting the appropriate button. -Children can make the screen larger by sliding the button at the bottom of the page to the right. -Once the children trace the letter (following the numbers), the letter moves to the top left hand corner and becomes a block. -By tilting the ipad, the letter block needs to go in the hole found in the bottom right corner. Additional apps for practicing handwriting: Alphabet Tracing (free app) - Children trace with their finger following the train, truck or worm. They can practice capital, lower case or numbers 1 to 9. ABC Easy Writer ($$) - The children can watch as the letters are traced and then traced the letters themselves. ABC Tracer ($$) - There are 7 different parts to this app. -Part 1 and 2 - helps reinforce capital and lower case letter formations. -Part 3 - helps reinforce number formation. -Part 4 - (ABC Song) Children click on a letter to have the letter sing. -Part 5 - Pop & Learn – Children pop balloons in alphabetical order. -Part 6 - Quiz - Children are shown a letter at the bottom and given 4 different pictures. They select the picture that begins with the letter sound. If they select incorrectly it with say “oh, oh”. If they select correctly it claps for them. -Part 7 - Words – Children trace the given word. As they trace each letter says it name. Letter Trace (free app) - Children trace capital letters. Once they trace the letter correctly. When they are done tracing the letter name is said. ABC Tracing (free app) - Children select a letter tab at the bottom. The letter name is given; a picture that begins with the letter sound is shown along with dotted capital & lower case letters. ABC Writing ($$) - Children can practice writing capital & lower case letters along with a word that begins with the letter sound. Chalkboard (free app) - Children can practice on writing letters or numbers. Troy School District First Grade iPad Curriculum Integration Lessons Grade: 1 Science Plant Lesson Lesson #1 Goal: • To improve students’ understanding of plants Objective: • Students will use the Seed Cycle application and the Popplet application to learn about the life cycle of a plant through informative text and science vocabulary. Computer Skills Addressed: • • Basic knowledge of ipad skills Opening and closing applications Curriculum Addressed: • • Science (Plants) o Could be adapted to fit other science units/kits Common Core Standards for Speaking and Listening – Presentation of Knowledge and Ideas: 4. Describe people, places, things, and events with relevant details, expressing ideas and feelings clearly. S.CN.01.02 Type of activity: • Whole group, small group instruction or partnerships (Teacher discretion) Length of Lesson: • 20 minutes Apps Used: • • Seed Cycle Popplet Procedure: 1. Have children open the Seed Cycle application. 2. Students will need to click on the various components below to earn badges. Every time they click on one of the icons, they will learn about something new in relation to the plant cycle. Students can choose if they would like to read the text by themselves or have the text read to them. Below is a diagram that shows what different areas the students can click on. Students can decide whether they would like to have the caption read to them or if they would like to read it on their own. Students will need to click on the clouds to produce rain so that all plants have enough water. While controlling rain fall, students will need to pay close attention to the direction and location of where rain drops land. Students will need to plant all of the seeds in the soil by clicking on them. Once seeds are planted, they can be clicked on again to see how bugs influence the plant cycle. Students can click on the sun to ensure the plants get ample amounts of sunlight. Students can click on the bee to see how bees pollinate flowers and contribute to the seed cycle. 3. Students will then earn badges as they complete different stages of the plant growth cycle (see below). Students will read or have informative text read to them while learning science vocabulary and concepts as a busy bee pollinates flowers and protects the plant seed from a hungry bird. These white buttons can be clicked on to view a summary, keep playing or start a new game (teacher discretion). This is where the students earn the different badges for completing the seed cycle. Starting from the left, here are all the badges: opening a seed pod, planting a seed, watering the plant, giving a plant sunlight, growing a pansy flower, helping a bee collect pollen from a plant, completing the seed cycle for the pansy plant, protect the seeds from a bird, growing an aster flower and completing full seed cycles for both species of flowers. 4. Students will then end the Seed Cycle application and use what they have learned and gathered from here to open the Popplet application. 5. The teacher will give the student directions to take what they have learned from the Seed Cycle application and use it to create a web with the word plants in the center and the link relating facts or supporting details to this. For example, this could be: what plants need to grow, different kinds of plants, parts of a plant, life cycle of a plant 6. Students will double touch the center of the screen in Popplet to create a bubble. 7. In the center they will need to type, draw or handwrite the text – see below. Students use this X to close out of a Popplet. ADDITIONAL NOTE: Students can move boxes to make them closer to one another and farther away by holding down the box and dragging it to where they would like. Students can pick what color they would like their line or text to be here. This is where a picture could be uploaded from the photo album if a student is having a hard time with the drawing, handwriting or typing. Students can select the text option if they prefer to type the words. Students can select the draw or handwrite option if they prefer to draw the concept. Students can hold down this black shaded triangle and move it to make the Popplet bigger. 8. Students then click on one of the dots at the top, bottom, to the left or right of the first bubble to make another bubble (these are the supporting details). Students once again type, draw or handwrite the text to support the topic. 9. Repeat “Step 6” until each student has enough support thoughts about the presented topic of Plants. A finished piece of work might look like this: Grade 1 Exploring Your Family, Peers and Community Lesson #1 – 4 Goal: To familiarize students with his or her family, his or her peers’ families and families within the community while incorporating technology. Objective: Students will use the “Face Time” application to practice integrating technology into a Social Studies lesson. Computer Skills Addressed: • • Knowledge of basic iPad skills Opening and closing applications Curriculum Addressed: Common Core Standards for Speaking and Listening Skills – Comprehension and Collaboration: 1. Participate in collaborative conversations with diverse partners about grade 1 topics and texts with peers and adults in small and larger groups. a. Follow agreed-upon rules for discussions (e.g., listening to others with care, speaking one at a time about the topics and texts under discussion). b. Build on others’ talk in conversations by responding to the comments of others through multiple exchanges. c. Ask questions to clear up any confusion about the topics and texts under discussion. S.CN.01.02 S.DS.01.03 L.CN.01.03 L.RP.01.01 L.RP.01.03 Type of activity: Small group instruction: students will need to be broken up into groups of 4-5 so that they can share the ipad while conferencing with another Length of Lesson: At least 30 minutes per day across 4 days App Used: Face Time Procedure: Day 1 • Teacher models and/or goes step by step with students to conduct the Family Interview worksheet – see last page in this document. Day 2 • Teacher models how to share the Family Interview conducted on Day 1 with a partner. • Teacher arranges students into partnerships (these could be Making Meaning partners). • Students share with one another the Family Interview that was completed on Day 1. • Students, who would like to share, share out with the class the Family Interview. Day 3 • Teacher will demonstrate how to use Face Time by opening the application on two iPads 2. (At this point in the lesson planning process, the Face Time connection between iPads 2 is still being worked on within the district and steps will be coming out describing how to connect within the building and outside the building.) • Teacher will pair students up within the classroom to carry out a video call while using the Family Interview as the outline. Day 4 **This lesson is designed to have the first graders share with students outside the classroom. The teacher can decide how he or she would like to do this. Face Time can occur within the building or outside the building. Perhaps, one first grade class can connect with another first grade class in Troy. ** • Teacher will review how to use Face Time by opening the application on two iPads 2. • The teacher explains how this time the classroom will be video calling another classroom within the building or district to share the Family Interview. • Students conduct the Family Interview with another class in the district. Name ___________________________________ Directions: Write and draw about the listed family areas below. You can label and write sentences. Family Pets Home Foods Activities Grade: 1 Math Bingo Lesson #1 Goal: • To improve the accuracy of Math Facts Objective: • The object of Math Bingo is to get a pattern of five Bingo Bugs in a row by correctly answering math problems. Computer Skills Addressed: • Basic knowledge of ipad skills • Opening and closing applications Curriculum Addressed: • Common Core Standard for Mathematics, N.MR.01.10 (Model addition and subtraction for numbers through 30 for a given contextual situation using objects or pictures; record using numbers and symbols; solve Type of Activity: • Small group instruction by teacher or parent volunteer ( Teacher discretion) Length of Lesson: • 15 minutes Apps Used: • Math Bingo • White Board Procedure: 1. Have the students open the app titled Math Bingo NOTE: This app has not yet been purchased. Follow the steps of the program. • • • • • • Choose from 4 games, addition, subtraction, (multiplication/division) Choose from 3 different levels of difficulty: Easy, Medium and Hard Create up to 5 player profiles Choose from 8 different fun cartoon avatars Keep track of number of games played by player profile The scoreboard keeps track of scores for each game and level 2. Have the students open the Whiteboard app • Make sure to adjust the width bar over to the left, for thinner drawings. (1.) 3. Draw pictures for equation. 1. Make sure width bar is in correct position. 2. Tap on a color. • Tap on a color. (2.) • Have the children draw pictures for a number equation. ( 3.) • Re-tap on a color. (4.) 5. Write an equation to match the pictures. 4. Re-tap on a color. Upon completion of an equation, the children can share and read the problems to a partner. Grade: 1 Writer’s Workshop Lesson #1 Goal: • To use technology as another source of publishing student’s writing Objective: • Students will use Doodle Buddy App. as well as Sonic Pics. app. to create a published piece of writing. Computer Skills Addressed: • • • • Basic knowledge of ipad skills Opening and closing applications Basic knowledge of Doodle Buddy application Basic knowledge of Sonic Pics. application Curriculum Addressed: • Writer’s Workshop Type of Activity: • Whole group or small group instruction (Teacher discretion) Length of Lesson: • 30-45 minutes Apps Used: • • Doddle Buddy Sonic Pics Sonic Pics App icon Procedure: 1. Students will begin by writing about a small moment (this can be done a on a previous day or use a previous piece of writing.) 2. Once their small moment is written, students are then to illustrate their story using the Doddle Buddy App. Students can create three pictures on the application. They can illustrate the beginning, the middle, and the end of their small moment. a. Students are to touch the Doddle Buddy app. which will launch the application b. Doodle Buddy Application Press chalk button to change colors Once press the chalk button, students can pick their desired color. Once picture is completed, press the tool button. Then press the “save to photo album.” This needs to be done for each picture that is created. 3. Once all three pictures are created and saved to the photo album, then find Sonic Pics Application. 4. The above picture shows the “Sonic Pic Lite” application. At this time, I do not have access to the full version of this application to provide step-by-step directions. Below are the directions for the lite version that should be similar to the full version. 5. 1. This screen will show once the Sonic Pics Lite application 2. Have students type the title of their small moment 3. If students know what a “summary” is, have student write one sentence of what their story is about. This can be tricky for some. 4. Have students press the “add” button to add their pictures that they created on doodle buddy which are saved in the photo album. 6. 5. Click the Saved Photos button. 6. Select pictures to be added. Students can touch all three of their drawings. Then at the bottom press done. It should say 3 images in project, then press done. 7. Students can then press record to record the student reading his or her small moment piece of writing. This screen will then appear. Have students press the button in the lower left corner. This will change the picture for students to select their beginning picture. 8. This screen will then appear. Have students select the picture that they drew that represents the beginning of their story. 9. 1. This screen will then appear. Have students select the picture they drew that represents the beginning of their story. They can then talk and their voice will be recorded. 2. Students can then slide their finger to display the second picture and record their small moment, and then slide it again for the third picture. 3. When they are done recording their story, students can press this button to save their voice. 10. Press share and then create a video. This is as far as the lite version will allow. Students should be able to view other students videos to hear their stories. Grade: 1 Magnetic Alphabet Lesson #1 Goal: • To improve high frequency word knowledge Objective: • Students will use the Dice Roll application and the Magnetic Letters to practice high frequency words. Computer Skills Addressed: • • Basic knowledge of ipad skills Opening and closing applications Curriculum Addressed: • Reader’s Workshop (word work) o Ideal for a word work station Common Core Standards: S.CN.01.02 • Describe people, places, things, and events with relevant details, expressing ideas and feelings clearly. Type of activity: • Whole group or small group instruction (Teacher discretion) Length of Lesson: • 20 minutes Apps Used: • • Dice Roll Magnetic Alphabet Procedure: 1. Click the Dice Roll App button and this screen will appear: 1. Once Dice Roll app is opened, press the (+) button to add high frequency words to the dice. 2. Insert a title for the dice (ex: list 1) 3. Touch each box to input high frequency words, when completed press done on ipad screen. 4. Select color of di Screen shot of completed word list 5. Press save button then press back button to see dice with high frequency words 2. Students can then shake ipad to roll dice. 3. Write word from dice roll on that child’s white board 4. Then press the home button on the ipad (physical round button on device) and click Magnetic Alphabet app 5. Students will touch the letter and drag each letter to make the word that is on his/her white board. Touch letter with finger tip and drag 6. Students will then press the home button (circular button at the bottom of the device) and open up the dice roll application to roll the dice for a new word. 7. Once students rolled the dice for a new word, he or she will then write that word on their white board. Press the home button and then tap on the Magnetic Alphabet App. Students will then build their new using the magnetic letters. 8. Students will repeat this process until all words are practiced or until the teacher discontinues the lesson. Additional First Grade Apps for Ipads Reading: • Read Me Stories – FREE Help your child develop the habit of reading. Use this Library to give your child a fun and new educational and entertaining book EVERY day. • Who Can Read – First 8 are FREE Each book features audio so the child can have the book read to them, or volume can be turned off for the advanced reader • Smarty Pants School -$2.99 This app offers a carefully-structured series of games and activities designed to strengthen children’s early reading schools. Word Work: • Make Dice – $0.99 You can make customized dice for your classroom that work when the Ipad is shaken. You can pick the colors, type in words or upload photos. • Spell Blocks with Sight Words - $1.99 Spell Blocks is a fun game that helps children learn to spell sight words • Word Bingo - $0.99 Sight Word Bingo featuring the Dolch Word List • MagLetters – FREE MagLetters allows you to make words using appealing magnet letters, numbers and symbols • Magnetic letters - $0.99 Move letters of the alphabet around the screen with multi-touch Fluency: • Blue Fire – FREE This is a recorder that children can use to hear how they sound as they are reading a story. It is easy to use and a free download! • Timed Reading - $1.99 K-12 Timed Reading Practice lets readers in levels K-4 practice fluency by reading short, timed stories Handwriting: • Pocket Phonics – FREE Unique and innovative follow-me arrow dynamically guide the child how to write the letter Writing: • Story Buddy - $4.99 Students can create, read, and share stories. They can create a picture book page by page and create images to match their story. • Story Builder - $3.99 Story Builder is designed to help children 1.) Improve paragraph formation, 2.) Improve integration of ideas and 3.) Improve higher level abstractions by inference. • SonicPics -$2.99 Snap, Talk and Share! SonicPics is the easiest way to turn your images into custom slideshows. Science: • Popplet - $4.99 With Popplet you can capture your ideas, sort them visually, and collaborate with others. • Seed Cycle - $0.99 In this fun and educational app, children can grow their own beautiful flowers while learning about plant growth and pollination. Social Studies: • I get . . . People in my community - $0.99 I get . . . People in My Community is an app offering picture and text support to individuals learning about people in their community. • I get . . . People at School – $0.99 I get . . . People at School is an app offering picture and text support to individuals learning about people at their school. Math: • Count Money – FREE A fun simple matching game to learn to count and recognize coins. • Tell Time – FREE Interactive matching game that helps reinforce time concepts • Learning to tell time is fun - $1.99 Kids age 2 to 7 will now have fun learning to tell time. • AB Math Lite – FREE Putting numbers in order • MagLetters – FREE Can be used to build fact families • Math Shapes - $0.99 Help the submarine collect treasure from under the sea while learning about 2D shapes, 3D shapes and Geometry of everyday objects. • Cramberry - $3.99 Cramberry helps you study with flash cards. • SET Pro HD This is a math game that would take plenty of explanation and modeling for first graders; however, the payoff would be great! It helps students strengthen their problem solving and mathematical skills. They deal with probabilities, logical thinking and also thinking “outside the box”. • Shut the Box Classic - $0.99 A dice roll game where students can either add the dice combinations together or use the dice numbers separately to cover the corresponding tiles. Special Ed or ESL • My Choice Board - $9.99 The primary purpose for this app is to present a visual display of “choices” to those with limited communication skills. General or Other Resources: • First Grade Skills - $2.99 Multiple activities to build basic skills in reviewing time, money, word problems, vocabulary and reading skills. • Doodle Buddy – FREE Finger paint with thousands of colors and drop in playful stamps. • Whiteboard – FREE Collaborate with friends and family with this app, the easy to use collaborative drawing app. Troy School District Second Grade iPad Curriculum Integration Lessons Second Grade iPad Curriculum Integration Introduction: Welcome to the iPad curriculum integration lessons for second grade. These lessons were designed to integrate the iPad technology we now have available with our current curriculum. There are five lessons, which outline student projects that align with our second grade curriculum in four areas: math, language arts, science, and social studies. The lessons are sequenced according to the time in the school year that the academic content will be covered. Science may be the only exception to this, since schools are no longer on the same rotation for science kits. Of course, with all the lessons, you have the flexibility to use them when and where you see fit. Each project should be seen as having three main parts: exploration, creation, and sharing. These three components could take place over three different technology blocks. However, you may have time to do two parts during the same block if you choose, or sharing could be done outside of the technology block, woven into other parts of your school day. Exploration: Exploration is a critical part of each lesson. Allot enough time for your students to become comfortable using each app, building an understanding of the tools and fluidity in using them. In general, you should devote one entire technology block for exploration, to guarantee that you have time to model, transition to independent exploration, and troubleshoot unforeseen problems. This can be done during your regularly scheduled Computer Lab time, as the lessons address technology skills as well as curriculum content. During the exploration, you will want your students to become familiar with several areas of the iPad as well as several actions they will need to perform on the device. You will want to use the app yourself beforehand to become familiar with them as well. Each app has tools and functions that students will need to get comfortable with before using the apps to create a final project. In each lesson, the necessary functions will be listed, along with screenshots and tips for making the most of the exploration. Many apps use similar functions, so using the iPads over time should become easier as students become familiar with common functions (such as taking screenshots, emailing images, inserting photos, etc.). Creation: Each lesson is focused on using the iPad to allow students to create something, rather than just playing a game. These projects are suitable for the check-‐out system we have for using the iPads. Games may be more appropriate for a center that will remain in your classroom (hypothetically). During the creation portion of the lesson, it is important that students are already familiar with the apps to be used. This will ensure that they are able to navigate the apps independently to create something. You should plan on using another entire technology block for creating, allowing time for modeling, transitioning, creating, and printing/emailing (if needed – this will be indicated in the lesson). This can also be done during your regularly scheduled Computer Lab time, whether in you classroom or in the lab itself. When students are finished creating the project, you may want to let them explore other apps that are already installed on the iPads while they wait for others to finish. Alternatively, if you use the iPads in the Computer Lab, students could have choice time on the computers after turning in their iPads. Sharing: Completed projects can be viewed directly on the iPads, but getting a hard copy requires some extra steps. Lesson one has students creating short videos. Retrieving the videos is detailed in the lesson itself. Lessons two through four have students create images of different kinds, saving these images to the Photo Library. (Using the Photo Library is detailed in Lesson 1.) In order to print these images, we have to use another app, called ePrint, which is outlined at the end of this introduction. Basic iPad navigation tips: • To open an app, find the icon and tap it once. Apps that are required for each lesson are indicated with a small picture of the icon on the lesson plan. To find more apps, swipe a finger across the screen; a new page of app icons will appear. The small white dots at the bottom of the screen will tell you how many pages have apps. • After you are finished with an application, simply press the home button to get back to the iPad screen. The home button is on the front of the device on the bottom. • It is a good practice to have students delete all of their own photos/videos at the end of each session with the iPads, so that the Photo Library doesn’t fill up unnecessarily when other classes need it. (Using the Photo Library is detailed in Lesson One.) Using ePrint: Find and tap the ePrint icon to begin. Tap the “Album” icon to print images. If this pops up, tap “OK” to clear old images. Tap the + button to select photos to print. Tap the image to select. Then tap “Print Settings.” Tap the field to drop down the list of available printers. Tap to select a printer. ***Your Computer Parapro will need to install the network color printers on each iPad before printing will be functional.*** Slide the selectors to choose the paper and image size. Tap print when you are ready. Grade 2, Lesson 1 Retelling with Furry Friend Goal: Students will apply their understanding of a literary text to produce engaging retellings using simple iPad apps. Objectives: Students will retell a familiar text using correct sequence and important details. Students will effectively use the functions of a simple iPad app. Students will move between two or more apps in the creation of their retelling. Students will share retellings with their peers. Computer Skills Addressed: Opening and closing applications. Navigating menu options. Voice Recording. Saving and retrieving video files from the photo library. Optional – importing video files into iMovie, compiling and saving as one video file. Curriculum Addressed: Common Core State Standards for Reading Literature – Key Ideas and Details (2.RL.1, 2.RL.2, 2.RL.3). TSD Second Grade Reading Workshop (Unit 2, Lessons 1 – 5). Type of activity: Using a puppet-‐type voice recording app (Furry Friend), students will create an engaging retelling of a familiar literary text, save files to the Photo Library, and share them with peers by playing files directly from the Photo Library. Length of Lesson: Two – three Technology blocks (45 minutes each). Apps Used: Furry Friend (free version) Photo Library Optional: iMovie Exploring Furry Friend: (First Technology Block) Since we are working with the lite (free) version, the app is rather limited. However, it is very engaging for kids – they love talking into the iPad and seeing/hearing Furry Friend repeat what they said. Basic Functions: Tap to see a list of what Furry Friend will do. This screen will appear if a game button is tapped. Tap “no” to return to Furry Friend. (Upgrading requires a password.) Tap to play games – only available when you upgrade to the full version. Tap to begin recording. Furry Friend will begin recording right away. You have only about 10 seconds to record, and your remaining time is shown by the blue bar going across the bottom. After recording, Furry Friend will play back what was recorded. Save to Library when finished, or tap background to erase and start over. Exploring the Photo Library: Tap a thumbnail to view one image or video file at a time. Videos are denoted by a little camcorder icon as well as a number showing the length of the video. From this screen: Tap to see all the photos in the library. Tap the trash can to delete. Tap the play button in the center of the screen to view the video. Suggestions for exploration: • Students practice recording and saving in Furry Friend. • Students practice navigating from Furry Friend to Photos Library to view and delete videos. • Allow enough time for students to become comfortable going back and forth between Furry Friend and the Photo Library easily. Creation: Students will create a retelling of a familiar text with a partner. (Second Technology Block) • Students choose a book they have already read with a partner. Picture books will work better than chapter books. It should be a book they know well, so that they can do a complete retelling using all the key elements of the story. • Students take turns recording with the Furry Friend app. The first student records the name of the book and the names of the students (i.e. “This is a retelling of Goldilocks and the Three Bears, by Joe and Bob.”) Save the video in the Library, and switch partners. • Since they only have ten seconds to record, each partner will tell one event at a time before saving the video and switching partners. • To watch the videos in order at any time, go to the Photo Library. Choose the first video, and press the play button. When that video is done, simply swipe a finger across the screen, going from right to left, to view the next video in order. • If students need to delete any videos, they will want to do so right after creating it, so that the order does not get mixed up in the final retelling! Sharing: (Third Technology Block, or integrate into other parts of your literacy schedule) When all students are finished, you can share each retelling with the class by watching the videos in order directly from the Photo Library on each device. At this point, each seven-‐second video is separate, so you will not have a continuous retelling. If you want to be able to create one video from these files, you will need to use iMovie. (Optional) Using iMovie to compile retelling videos: This optional step will add time to the project, but it will allow you to share the completed retellings via Vimeo, YouTube, or DVD. Since we are only compiling videos (not editing), students can be taught do this on their own. If you would rather save your instructional time, you can collect the iPads and compile the videos yourself. You could also schedule a parent volunteer to do this step. This should be done and all videos erased before the iPads are returned, however. The app has two orientations, meaning that when you turn the iPad, the app screen changes to fit. When in the horizontal orientation, the video clips available in the Photo Library are visible on the left. In the portrait orientation, the clips are hidden. Tap a clip to select it. A blue arrow will appear on top of the clip. Tap the blue arrow to add it to your video timeline. Tap the play button to view the video so far. Tap “My Projects” when you are finished. 5 4 Clips are organized with the newest clips at the top. To add your clips in order, start at the bottom and go to the top. 3 2 1 Once a clip has been added, a yellow line will appear across the bottom. This lets you know not to add the clip again! Saving the video: Tap to add a title. Tap to go back to editing. Tap to add a new project. Tap to play. Tap to delete. **Tap to save.** If you have a YouTube or Vimeo account, you will be able to post videos directly from the app. If you would like to save the videos on your own computer, so that you can burn them to a DVD, choose “Save to Camera”. You will be able to get the videos onto your own computer by using the iPad’s USB cable. Retrieving the videos from the iPad: • After plugging the USB cable into your computer, double-‐click the “My Computer” icon and find the iPad device. Your computer will recognize the iPad as a camera. • You can open iPad folder to click and drag the video files to your computer. • The videos will play in Quicktime. Grade 2, Lesson 2 School Neighborhood Map Goal: Students will apply their knowledge of maps by creating personalized maps of their school neighborhood. Objectives: Students will effectively use the functions of a satellite mapping iPad app. Students will use map symbols to identify important landmarks in their community. Students will share maps with their peers. Computer Skills Addressed: Opening and closing applications. Navigating menu options. Taking photos with built-‐in camera. Conducting map searches using device gps, address search, zooming, and panning. Inserting images from the Photo Library into another app. Typing on the virtual keyboard. Curriculum Addressed: Michigan Dept. of Education Social Studies GLCEs for Second Grade (2 – G1.0.1) Social Studies Alive! My School and Family Chapter 3 Type of activity: Using a satellite mapping app, students will explore the neighborhood of their school, add photos to a create custom map, and send it to their teacher’s email for printing/sharing. Length of Lesson: One – two Technology blocks (45 minutes each) and one Social Studies block. Apps Used: MapEdit Camera ePrint Using Camera: When you open the app, the shutter will open, indicating that the camera is on. Make sure the app is in camera mode, not video. Tap to take a photo. Photos are automatically stored in the Photo Library. Exploring MapEdit: If a pop-‐up appears that asks you to allow MapEdit to use your current location, tap “OK”. This will allow the app to display a map of your school as soon as it starts up. Tap the “Start New Map” button. The map will appear in “Standard” mode. Tap the “Mode” button to switch to “Hybrid.” Exploring maps with the app: Tap the address bar to explore finding other places. A keyboard will pop up. To go between numbers and letters, tap the bottom left button. When you are finished, tap the “Go to the Address” button. Basic movements on the map: Zoom in: place two fingers on the touch screen and pull them apart OR double tap Pinch (zoom out): place two fingers on the touch screen and pinch Drag: place one finger on the touch screen and slide Rotate: place two fingers on the touch screen and twist Suggestions for exploring the map: • • • • • Type in “Michigan,” and have students use the iPads like slates to show you when they have found the correct map. Have the students the pinch screen until they have zoomed out to the entire United states. Have students use the address search again to find your school by typing in the address. Challenge the kids to find landmarks in your school neighborhood, Have students input their own address (if they know it) and try to identify their home on the map, or even find their route to school! Adding Photos: Tap the “Edit” button to begin. Once in edit mode, you cannot move the map. Tap the “Photo” button, and all the photo albums in your library will pop up. Tap the album, and all the photos in that album will be displayed. Tap a photo to choose it. To place the photo on the map, touch and drag one finger on the screen where you want the photo to appear. Make the photo larger by dragging further. When you lift your finger, the photo will be stuck in that place. There is no way to undo, unfortunately! Adding other symbols: To add more symbols, tap the “Tools” button and scroll with one finger until you see the names of the pictures (“car” is the first one). Place the icon on the map in the same way as you did the photos. Note: Give students time to practice placing images. It can be tricky to get the size/placement right. Every time they touch the screen, a new copy will be placed on the map! Tap the “Home” button when finished. Saving your map: From this screen, tap the map to view a menu with four options. Tap “Add to Photo Album” to save the map. You can also delete and start over from here if you make a mistake. Creation: Students will create a personalized map of their school neighborhood. • Students use the built-‐in iPad camera to take a picture of themselves. Each student will need a partner to take their picture. • Students use MapEdit to find your school neighborhood. They should include your school, and any other landmarks you would decide. • Students use street names to find the boundaries you would like them to include. (For example, for Schroeder, I would ask my students to be sure that Kristin drive is visible at the top of their map, and Golfview is visible near the bottom.) • Once the map is centered, students edit the map. • Students use the photo of themselves for their school, inserting it from the Photo Library. Choose two or three other landmarks near your school for students to denote using the MapEdit icons of their choice. • Students print maps in a full page format using the app ePrint. Directions for ePrint are included in the lesson introduction at the beginning of this document. Sharing: (During a Social Studies Block) In this lesson, sharing has two purposes: to give students a chance to share their own creations, and to deepen their understanding of map concepts. Download and print student maps from your email account for the students to work with. Suggestions for working with the maps: • Students glue their map to a large piece of construction paper and create a map key from the symbols they placed on their map. • Students add a compass rose to their map. • Students use a ruler to create a grid over their map. • Students write questions about their map for others to answer. (i.e. “What building is located in C3?” or “What landmark is south of our school?”) • Hang completed maps in the hallway to share with classmates and parents. Grade 2, Lesson 3 Line Symmetry Drawings Goal: Students will use simple iPad apps to develop understanding of one-‐ and two-‐line symmetry. Objectives: Students will effectively use the functions of a simple iPad app. Students will analyze and sort images based on how many lines of symmetry they have (one or two). Students will create images with one and two-‐line symmetry. Sharing will share drawings with their peers. Computer Skills Addressed: Opening and closing applications. Navigating menu options. Taking a screenshot. Using drawing tools on the touch screen. Curriculum Addressed: Everyday Mathematics Grade 2, Unit 5, Lesson 8 Type of activity: Using a symmetry drawing app, students will explore line symmetry, create drawings having one-‐ and two-‐line symmetry, save images using a screenshot, and send them to their teacher’s email for printing/sharing. Length of Lesson: One – two Technology blocks (45 minutes each) and one Math block. Apps Used: MirrorPaint Lite Photo Library ePrint Exploring MirrorPaint: (first Technology block) The app has two orientations, meaning that when you turn the iPad, the app screen changes to fit. When in the horizontal orientation, a menu is visible on the left. In the portrait orientation, the menu is hidden. Tapping the “script” button will pop that menu onto the screen. Running Scripts: Scripts are short programs that you can run on the app to (in this case) see different images being created. Tap the box with the arrow coming out to see a list of scripts. Tap one select it, and then tap the “play” icon ( ) to see it run on the app. The “5 Star” script creates this image: Drawing with Mirror Paint: Mirror Paint is also a free drawing app, with a twist – you can choose to have the app mirror your drawing movements across one or two lines of symmetry. Exploring the drawing function will help students develop a better understanding of line symmetry. Give them time to draw and explore all the tools in this simple app before creating images to print and share. Basic Drawing Tools: Tap to choose a color. Tap to choose the pen size (thickness of the line). Both will erase the image. The bomb will turn the page into whatever color is selected. The new page will give you a new white background. Tap to choose how many lines of symmetry you want your drawing to have. Creation: Students create symmetrical drawings to sort and share. (first or second Technology block, depending on your time and comfort level) • Students create a drawing that has one line of symmetry. • Students take a screenshot of the image – there is no way to save from the app. Take the screen shot while the iPad is in the portrait orientation, so the menu is hidden. Taking a Screenshot: A screenshot is a photo of everything that appears on the screen. To take a screenshot, press the power button and the home button on the iPad at the same time. The home button is on the bottom front of the device, and the power button is on the top edge, to the right. After pressing these two buttons at the same time, you should see a flash on the screen and hear a noise similar to a camera. This tells you that the screenshot worked. It will be stored as a photo in your Photo Library. • Students clear the screen and create a second drawing that has two lines of symmetry. • Students take a screenshot of their second drawing. • Students print images using the app ePrint. Directions for ePrint are included in the lesson introduction at the beginning of this document. Sharing: (During Math Block) In this lesson, sharing has two purposes: to give students a chance to share their own creations, and to deepen their understanding of the concept of symmetry with sorting exercises. These can be done in whole group or small group settings. Suggestions for sharing: • Print images in a 5x7 format. Be sure to write student names as you print! • As a whole-‐group activity, sort the images into two groups: one line of symmetry vs. two lines of symmetry. • After sorting, students can paste them side-‐by-‐side on a piece of construction paper and label with “One Line of Symmetry” and “Two Lines of Symmetry.” These can be hung up in the classroom or hallway to share. • Print images in 3x5 format and laminate. Place the cards in a math center for students to sort independently or with a parent volunteer. Grade 2, Lesson 3 Insect Diagram Goal: Students will apply knowledge of insect biology to create accurate diagrams of insect body parts using simple iPad apps. Objectives: Students will effectively use the functions of a simple iPad app. Students will identify basic body parts of an insect. Students will share diagrams with their peers. Computer Skills Addressed: Opening and closing applications. Navigating menu options. Taking a screenshot. Inserting images from the Photo Library into another app. Using drawing tools and zooming functions with the touch screen. Curriculum Addressed: Michigan Dept. of Education Science GLCEs for Second Grade (S.RS.02.11 and L.HE.E.1) FOSS Insects Module Type of activity: Students will select an image from the Insects HD app, import the image into the Doodle Pad app, create a diagram using the image, and send it to their teacher’s email for printing/sharing. Length of Lesson: One – two Technology blocks (45 minutes each) and one Science or Language Arts block. Apps Used: Insects HD Doodle Pad ePrint Exploration: (first Technology block) Students will need ample time to explore both apps used in the project before the creation portion of the lesson. Devote enough time for students to become comfortable with all the functions they will be expected to use. This will make the creation of their diagrams much easier for them (and you!). Exploring Insects HD: The app has two orientations, meaning that when you turn the iPad, the app screen changes to fit. When in the horizontal orientation, the menu of insect names is visible on the left. In the portrait orientation, the menu is hidden. Tap the “Show List” button to pop that menu onto the screen. Give students time to explore the photos in the app. They can use the menu or the gray arrows near the top to find new insects. To zoom in, place two fingers on the screen and pull them apart, giving an extreme close-‐up view of insect parts! Exploring Doodle Pad: Doodle Pad is a drawing app that also lets you insert images to draw on. It is fairly limited, which makes it simple to learn and use. Basic Drawing Tools: Slide the circle to change the pen size (thickness) Tap to undo or redo. Tap to delete and start over. If you tap the upgrade button, you will be prompted to enter a password. Don’t do this! ($$$) Select a different color by tapping the black rectangle. A color wheel will pop up. Tap on a color to select it. Go back to white by tapping the white rectangle. Insert a photo from the library into the background by tapping the “+” button. You won’t be able to move the image around, but you can draw on top of it. Suggestions for exploring Doodle Pad: • Give students time for free drawing with the app and trying out the different tools. • Students should practice writing with their fingers. • Encourage students to practice writing as small as they can. When they do their diagram, they will need to be able to fit all the words in, and this may be challenging for some. Creation: Making an insect diagram (second Technology block, or Science block) • Students select an insect to use in their diagram from the Insects HD app. • Students need to take a screenshot of the insect – there is no way to save from the app. Take the screen shot while the iPad is in the portrait orientation, so the menu is hidden. Taking a Screenshot: A screenshot is a photo of everything that appears on the screen. To take a screenshot, press the power button and the home button on the iPad at the same time. The home button is on the bottom front of the device, and the power button is on the top edge, to the right. After pressing these two buttons at the same time, you should see a flash on the screen and hear a noise similar to a camera. This tells you that the screenshot worked. It will be stored as a photo in your Photo Library. • Students will need to switch to the Doodle Pad app. To close the current app, always press the home button on the iPad. Then, find and tap the Doodle Pad icon. • Students insert the insect image from the photo library using the “+” tool. • Students label the parts of the insect using a different color for each part. They will need to write small to fit everything in! • When finished, students will have to take another screenshot in order to save the image in the Photo Library. (There is no “save” option on the app.) • Students print images using the app ePrint. Directions for ePrint are included in the lesson introduction at the beginning of this document. Sharing: (Science or Language Arts block) • Students can present their diagrams to the class or to a buddy. • As part of a research project, print the diagrams in a smaller format and use them in student-‐made nonfiction books. • Print the diagrams in a small format and sort the insects by distinguishing features. • Print in a full-‐page format and hang up to share with classmates and parents. Apps Used: Comic Strip Camera ePrint Exploration: (First Technology Block) Students should be given ample time to explore both the Camera and the Comic Strip apps. After showing students the functions of each, give them time to play around with making their own comic strips from pictures they take in the classroom. Using Camera: When you open the app, the shutter will open, indicating that the camera is on. Make sure the app is in camera mode, not video. Tap to take a photo. Photos are automatically stored in the Photo Library. Exploring Comic Strip: Students can use their own photos to create comic strips using this simple app. Tap this button to pop out the tools menu. Here you can choose a template with one, two, three, four, or five panels. Adding Photos: Tap a blue button to insert a photo from the library. Tap the “Pick from Library” button to pop up the Photo Library. Tap an album to search through the photos. Tap a thumbnail to select it. Once selected, it will pop into the frame automatically. You can zoom, pinch, drag, and rotate the photo to fit in the frame. Zoom in: place two fingers on the touch screen and pull them apart Pinch (zoom out): place two fingers on the touch screen and pinch Drag: place one finger on the touch screen and slide Rotate: place two fingers on the touch screen and twist Adding Words: Open the tools menu and select the “Add Captions” tab. Tap any white shape to pop it into the center of the comic strip. Tap the text box and the virtual keyboard will pop up. You can move the text box by dragging it to where you want it to be. Stickers can also be added. Tap the keyboard icon in the corner when you are done typing. ***To save the finished comic, open the toolbox and select “Save and Publish.” Choose “Save to Library.”*** Creation: Students create comics from nonfiction text. (second Technology block) • Students select a sequential nonfiction text (or you can assign one) that explains or describes a series of historical events, scientific concepts, or steps in a process. • Students use the iPad camera to take photos of key illustrations in the selected nonfiction text. Specify how many pictures you want them to use (3 – 5). • Students will use the Comic Strip app to import their photos in sequential order and add captions describing the events or steps in the sequence. • Students choose “Save and Publish” from the toolbox and select the “Save in Library” option. • Students print maps in a full-‐page format using the app ePrint. Directions for ePrint are included in the lesson introduction at the beginning of this document. Example: This example was created using Chapter 10 of Social Studies Alive! My Community. However, any nonfiction text that describes a sequence of historical events, a cycle, or steps in a process could be used as well. Sharing: (Science, Social Studies, or Language Arts block) Suggestions for Sharing: • Print comics in 8x10 format and use as assessment. • Have partners compare comics and reconcile any differences they may have. • Share comics with buddies. • Hang up in the classroom or hallway. Course: iPads in the Classroom Learn Ipad User Skills iPad Crash Course Video Apple - iPad Guided Tour Videos Apple iPad User Manual in Print 75 Really Useful iPad Tips and Tricks Butterscotch iPad Tutorial Series How to Use the iPad Interface Using iBooks as an e-book reader Using the iPad App Store iPad Web Browsing iPod and Video on the iPad Pages, Numbers, and Keynote Apps on the iPad Using iPhone or iPod Touch Apps on the iPad 4 Classroom Usage of iPads iPad in Schools - blog Princeton Schools iPad Project Making the Most of Your iPad iDeas for iPad in the Classroom Bloom's Revised Taxonomy Apps iPads in the Classroom - GREAT LINK 5 Other iPad Apps and Resources iPods and iPads in the Classroom iPads in Science iPads in Chicago Public Schools - app list Acalanes Schools iPad Apps List Top iPad Apps for Education. Troy Teacher iPad Apps http://moodle.oakland.k12.mi.us/troy/course/view.php?id=521[10/31/2011 8:25:17 AM] Thank you to the members of the Troy Schools iPad Curriculum Integration Committee for their time and assistance in developing these lessons and identifying resources and Apps. Name Building Julie Marjamaa Costello Lauren Fragomeni Wass Carol Dospil Hamilton Emily Freeman Schroeder Ashley Pellosmaa Bemis Shannon Kocher Schroeder Aaron Maliepaard Martell Jessica Thudium Hamilton Jason Fawcett Barnard Mike Cottone Bemis Merri Lynn Colligan Director of Technology Ron Keoleian Technology Coordinator