1
Wilo-Geniax Central Control
2 122 587-Ed.01 / 2011-04 Wilo
GB User manual
www.geniax.de
Contents
English
Contents
1 Introduction ........................................................................................................................
5
1.1 About these instructions ............................................................................................. 5
1.2 Where can you find which information? ............................................................... 7
2 For your safety ..................................................................................................................
8
2.1 General safety instructions ........................................................................................ 8
2.2 Application (intended use) .......................................................................................... 8
2.3 Who is allowed to do what? ........................................................................................ 9
3 Overview of the Central Control ......................................................................
10
3.1 Display .............................................................................................................................. 10
3.1.1 Room main display ................................................................................................ 10
3.1.2 Central main display (room group) ................................................................... 12
3.1.3 Menu display .......................................................................................................... 13
3.2 Operation and navigation .......................................................................................... 14
3.2.1
3.2.2
3.2.3
3.2.4
3.2.5
3.2.6
3.2.7
Navigation button ................................................................................................
Function buttons ..................................................................................................
Operational readiness ..........................................................................................
Changing main display .........................................................................................
Navigating in the selection menus ....................................................................
Setting the values in the input menus .............................................................
Calling up information in the display menus ...................................................
14
14
15
15
15
16
18
4 How does the temperature control work? ...............................................
19
4.1 Principle of operation .................................................................................................. 19
4.2 Temperature specifications ...................................................................................... 23
4.2.1
4.2.2
4.2.3
4.2.4
4.2.5
Comfort temperature ..........................................................................................
Energy saving temperature ................................................................................
Minimum temperature .........................................................................................
Maximum temperature ........................................................................................
Room frost protection temperature .................................................................
23
23
23
23
23
4.3 Central control ............................................................................................................... 24
5 Daily operation and quick settings .................................................................
25
5.1 Central week profile .................................................................................................... 27
5.1.1 Activating the central week profile for a room group .................................. 27
5.1.2 Ending the central week profile for a room group ........................................ 29
User manual Wilo-Geniax Central Control
1
English
Contents
5.2 Temporarily adjusting room temperature .......................................................... 30
5.2.1
5.2.2
5.2.3
5.2.4
5.2.5
5.2.6
Intervention for the room ...................................................................................
Editing intervention for the room .....................................................................
Ending intervention for the room .....................................................................
Intervention (warmer/colder) for a room group ............................................
Editing the intervention (warmer/colder) for a room group .......................
Ending intervention (warmer/colder) for a room group ...............................
30
32
33
34
36
37
5.3 Temporary presence .................................................................................................... 39
5.3.1
5.3.2
5.3.3
5.3.4
5.3.5
5.3.6
5.3.7
5.3.8
“Present today” for the room ............................................................................
“Present until ...” for the room ..........................................................................
Editing presence for the room ...........................................................................
Ending presence for the room ...........................................................................
“Present today” for a room group ....................................................................
“Present until ...” for a room group ..................................................................
Editing presence for a room group ...................................................................
Ending presence for a room group ....................................................................
39
40
43
44
45
46
50
51
5.4 Temporary absence ...................................................................................................... 53
5.4.1
5.4.2
5.4.3
5.4.4
5.4.5
5.4.6
5.4.7
5.4.8
“Briefly away” for the room ...............................................................................
“Absent until ...” for the room ...........................................................................
Editing absence for the room .............................................................................
Ending absence for the room .............................................................................
“Briefly away” for a room group .......................................................................
“Absent until ...” for a room group ...................................................................
Editing absence for a room group .....................................................................
Ending absence for a room group .....................................................................
53
54
57
58
59
61
65
66
5.5 Activating key lock ...................................................................................................... 68
6 Calling up information
.............................................................................................. 69
6.1 Display outdoor temperature .................................................................................. 69
6.2 Displaying energy saving tips .................................................................................. 70
6.3 Displaying temperature specifications ................................................................ 71
6.4 Displaying unit information ...................................................................................... 73
6.5 Displaying contact person ......................................................................................... 73
6.6 Displaying symbol explanations ............................................................................. 74
2
WILO SE 04/2011
Contents
English
7 Extended operation: setting up the Central Control ........................
76
7.1 Configuring central control functions .................................................................. 76
7.1.1 Configuring the Central Control for the central control .............................. 76
7.1.2 Configuring Geniax room user interfaces of a room group for central
control ..................................................................................................................... 77
7.2 Editing the week profile ............................................................................................. 78
7.2.1 Editing the week profile of the room ............................................................... 79
7.2.2 Editing the central week profile ........................................................................ 82
7.3 Setting temperature specifications ...................................................................... 86
7.3.1 Setting temperature specifications for the room .......................................... 86
7.3.2 Setting temperature specifications for a room group .................................. 88
7.4 Setting day and night period .................................................................................... 90
7.4.1 Setting day/night area for the room ............................................................... 90
7.4.2 Setting day/night area for a room group ....................................................... 91
7.5 Calling up factory configuration ............................................................................. 92
7.5.1
7.5.2
7.5.3
7.5.4
Viewing the presetting for the room ................................................................
Restoring the presetting for the room .............................................................
Viewing the presetting for a room group ........................................................
Restoring the presetting for a room group .....................................................
93
93
94
95
7.6 Adjusting the device .................................................................................................... 96
7.6.1 Selecting start screen .......................................................................................... 96
7.6.2 Setting the brightness ......................................................................................... 96
7.6.3 Setting the contrast ............................................................................................. 97
8 Maintenance
..................................................................................................................... 98
9 Disposal
................................................................................................................................ 98
10 Symbols
................................................................................................................................ 99
11 Energy saving tips ......................................................................................................
102
11.1 Setting the Central Control .................................................................................. 102
11.2 Setting the room temperature ............................................................................ 102
11.3 Lowering the room temperature ........................................................................ 103
11.4 Sensibly ventilate residential rooms ................................................................. 103
11.5 Heat evenly .................................................................................................................. 104
11.6 Do not cover or block radiators .......................................................................... 104
User manual Wilo-Geniax Central Control
3
English
Contents
11.7 Do not cover the Central Control ....................................................................... 105
11.8 Close roller blinds ..................................................................................................... 105
12 Menu structure .............................................................................................................
106
12.1 Room function ............................................................................................................ 106
12.2 Central functions ...................................................................................................... 107
13 Technical information .............................................................................................
108
13.1 Type key ..................................................................................................................... 108
13.3 Factory configuration .............................................................................................. 109
4
WILO SE 04/2011
Introduction
1
English
Introduction
1.1 About these instructions
General
The language of the original operating instructions is
German. All other languages of these instructions are
translations of the original instructions.
These instructions are an integral part of the product.
They must be kept readily available at the place where the
product is installed. Strict adherence to these instructions
is a precondition for the proper use and correct operation
of the product.
These instructions correspond to the relevant version of
the product and the underlying safety standards valid at
the time of going to print.
Save these operating instructions for future use.
Symbols used
The following symbols are used in these instructions to
designate notes:
Warning!
This note warns about dangers that could, in the event
the note is disregarded, lead to possible damage to
health or to death.
Caution!
This note warns about dangers that could, in the event
the note is disregarded, lead to property damage.
This note provides useful tips for easy use of the
Geniax Central Control. It also draws attention to
general information.
User manual Wilo-Geniax Central Control
5
English
Introduction
Use of highlighting
In these instructions, the following types of highlighting
are used to designate operating instructions, result
descriptions, lists, references, control elements, display
texts and other elements:
1. Numbered lists designate step-for-step operating
instructions.
➥ This symbol designates the result of an action which
has been carried out.
• When this symbol appears before operating instructions,
it designates preconditions for carrying out the sequence
of action. In paragraphs, this symbol designates lists without a fixed order.
[1 Introduction, page 5]: This highlighting designates references to other sections.
This symbol designates the menu items that have to be
selected in succession to reach a particular function.
»Menu«: This highlighting designates menu names.
[], [], [], [], [OK]: These symbols designate the
buttons of the navigation button [3.2.1 Navigation button, page 14].
[Function key]: This highlighting designates the correspondingly named function of a function key
[3.2.2 Function buttons, page 14].
6
WILO SE 04/2011
Introduction
English
1.2 Where can you find which information?
Operating concept
The basic operating concept of the Geniax Central Control
is described in the section 3.2 Operation and navigation
[page 14]. Here you can find out how to made settings and
have information displayed.
Daily operation/
quick settings
The basic functions of the Geniax Central Control are
described in the section 5 Daily operation and quick settings [page 25]. Here you can find out which actions are
necessary to adjust the room temperature temporarily for
one or more rooms to meet your needs. This section is
intended for any user who has to use the Central Control.
Extended functions
In section 6 Calling up information [page 69] and
7 Extended operation: setting up the Central Control
[page 76], complex functions of the Central Control are
described which concern the configuration of the device.
These sections are intended for experienced users and
qualified personnel.
Energy saving tips
In section 11 Energy saving tips [page 102], you can find
tips for dealing efficiently with the Central Control. You
can also have the energy saving tips shown on the display
of the Central Control [6.2 Displaying energy saving tips,
page 70].
Index
The index at the end of these instructions makes it easier
for you to find the information you are looking for.
Additional
information
You can find additional information about the Wilo Geniax
Decentralised Pump System in the Internet at
www.geniax.de.
User manual Wilo-Geniax Central Control
7
English
2
For your safety
For your safety
Carefully read the following sections to avoid dangers
which could arise due to improper handling of the Central
Control.
2.1 General safety instructions
Vulnerable persons
Warning!
This device is not intended for use by persons (including children) with reduced physical, sensory or mental
capabilities, or lack of experience and knowledge,
unless they have been given supervision or instruction
concerning use of the device by a person responsible
for their safety.
Children should be supervised to ensure that they do
not play with the device. There is a danger that persons can die as a result of overheating or undercooling
of the room.
• Children or people who are not able to understand
the dangers should not be left unattended.
• Activate the key lock to prevent unauthorised
access to the product [5.5 Activating key lock,
page 68].
2.2 Application (intended use)
The Wilo-Geniax Central Control is a central user interface. It is used for measuring, displaying and setting a
room temperature. It offers the possibility to define time
profiles during which one or more rooms can be heated to
defined temperatures. The Central Control may only be
used together with the Wilo-Geniax Decentralised Pump
System.
Any other utilisation or any utilisation that exceeds this is
not considered to be an intended use. Intended use also
includes adherence to these operating instructions.
8
WILO SE 04/2011
For your safety
English
2.3 Who is allowed to do what?
Wilo recommends that some functions only be changed
by an expert or in consultation with an expert. This is indicated in the respective places in these instructions.
User manual Wilo-Geniax Central Control
9
English
Overview of the Central Control
3
Overview of the Central Control
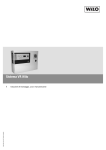
Fig. 1:
Central Control
Display [page 10]
Function buttons [page 14]
Navigation button [page 14]
3.1
Display
In normal operation, the display shows the room or central
main display.
3.1.1 Room main display
The room main display shows various items of status
information for the room in which the Central Control is
located.
10
WILO SE 04/2011
Overview of the Central Control
Fig. 2:
English
Room display elements (display)
Room mode [page 11]
Time specification [page 11]
Room target temperature [page 11]
Room temperature [page 11]
System status [page 11]
Navigating in the selection menus [page 15]
Changing main display [page 15]
Current time
Room mode
The currently active time profile for the room is shown by
the room mode. The room mode can also be an automatically triggered operating mode (e.g., summer operation)
[4 How does the temperature control work?, page 19].
Room target
temperature
The room target temperature is the temperature that a
room should have at the selected time in accordance with
the active time profile.
Room temperature
The room temperature is the temperature as is currently
measured in the room. If the room temperature is below
the room target temperature, then the room will be
heated.
Time specification
The time specification indicates until when the room target temperature is to be maintained in accordance with
the active time profile.
System status
This symbol displays the current operating status of the
Geniax system (e.g., heating mode, fault). See section
10 Symbols [page 99].
User manual Wilo-Geniax Central Control
11
English
Overview of the Central Control
3.1.2 Central main display (room group)
The central main display shows various items of status
information for the rooms of a room group connected to
the Central Control.
Fig. 3:
Central display elements (display)
Central room mode [page 12]
Room group status [page 12]
System status [page 12]
Navigating in the selection menus [page 15]
Changing main display [page 15]
Current time
12
Central room mode
The currently central active time profile for all the rooms
which are together in the room group of the Central
Control will be displayed by the central room mode
[4.1 Principle of operation, page 19]. The central room
mode can also be an automatically triggered operating
mode (e.g., summer operation).
System status
This symbol displays the current operating status of the
Geniax system (e.g., heating mode, fault). See section
10 Symbols [page 99]. The percentage of centrally controlled rooms can be read at the filling level bar. The three
markings correspond to 25%, 50% and 75%.
Room group status
The symbols inform you about the room mode of all the
rooms connected to the Central Control. The digits after
the time profile symbols indicate how many rooms are
currently active for the corresponding symboled room
mode. See sections 10 Symbols [page 99]. In this case,
it can concert and active room or a central time profile
[4.3 Central control, page 24].
WILO SE 04/2011
Overview of the Central Control
English
3.1.3 Menu display
The settings of values is done in the display via a menu
display. When doing this, there are three menu types.
Selection menus
Selection menus consist of a list of menu points. Every
menu point leads to a further menu.
Input menus
Values are shown in the input menus which can be
changed.
Display menus
In the display menus information is shown.
User manual Wilo-Geniax Central Control
13
English
Overview of the Central Control
3.2 Operation and navigation
The Central Control is operated with the help of a navigation button and two function buttons.
3.2.1 Navigation button
OK
The navigation button consists of a direction button with
four directions of movement [], [], [], [] and an
[OK] button.
• With the direction key, you move in the selection menus
from menu point to menu point or change the displayed
value in the input menus.
• Use the [OK] button to confirm the selection of a menu
point or an entered value.
3.2.2 Function buttons
The two function buttons have different functions,
depending on the menu display. The allocated functions
are shown in the display directly above the function buttons.
Assignment of the
function buttons
Assigned function
Meaning
[Menu]
[Room]
Calling up the main menu
Calling up the room main
display
Calling up the central main
display (room group)
Return to the main display or
the previous menu
Cancel entry and return to the
previous menu
Call up the help texts
Return to the higher level
(previous) menu
Save entries
Confirm dialogue
Activate quick heating up
[Central]
[Close]
[Cancel]
[Help]
[back]
[Save]
[Yes]
[Quick]
In the main display, the [Menu] and [Room]/[Central]
functions are allocated to the function buttons.
14
WILO SE 04/2011
Overview of the Central Control
English
3.2.3 Operational readiness
In order to make settings at the Central Control, the
device has to be put into operational readiness by pressing a button.
• In order to put the Central Control into operational readiness, press the navigation button or one of the two function buttons.
➥ The display lights up and settings can be make at the
Central Control.
If no entry occurs within 30 seconds, the device
automatically ends the operational readiness and
switches the display off.
3.2.4 Changing main display
The main display can be switched between the room view
and the room group view via the [Room]/[Central] function
button.
• In order to change from the room main display to the central main display, press the [Central] function button.
• In order to change from the central main display to the
room main display, press the [Room] function button.
3.2.5 Navigating in the selection menus
The main menu is called up via the [Menu] function button.
The selected menu item is highlighted with a black selection bar.
Sub-menu structures of various depths can be found
behind the menu items [12 Menu structure, page 106].
Select menu point?
• In order to select a menu point, press the [] and []
buttons until the selection bar is on the desired entry.
• In order to change to the selected menu, press the [OK] or
[] button.
User manual Wilo-Geniax Central Control
15
English
Overview of the Central Control
Return to the higher level
menu?
• In order to return to the higher level (previous) menu, use
the [] and [] buttons to select the »back« menu point
and then press [OK] button.
• Alternatively, you can always return the higher level menu
via the [] button.
Call up help?
• In order to call up a help text for the displayed selection
menu, press the [Help] function button.
• Alternatively you can use the [] and [] buttons to
select the menu point »Help« and then the [OK] button.
To leave »Help«, press the »back« function button.
Alternatively, you can also press the [] or [OK]
button.
Cancel selection?
• In order to cancel the selection, press the [Close] function
button.
3.2.6 Setting the values in the input menus
Values are changed in the input menus using the navigation button. Along with the displayed value, the corresponding direction buttons are shown on the display with
which the value can be changed.
If you lightly tap on a direction button, the displayed value will be adjusted in small steps. If you
press and hold down a direction button, the displayed value will be adjusted in larger steps.
16
WILO SE 04/2011
Overview of the Central Control
Change time?
English
• In order to change the displayed time, press the [] and
[] buttons of the navigation button.
Change date?
• In order to change the displayed date, press the [] and
[] buttons of the navigation button for the selection of
the day, month, or the year.
• Then press the [] and [] buttons to change the
selected entry.
Change temperature?
• In order to change the displayed temperature, press the
[] and [] buttons.
Apply values?
OK
• In order to apply changed values, press the [OK] button of
the navigation button.
Do not apply values?
In the »Intervention« menu, the set values are
automatically applied after a couple seconds without pressing the [OK] button.
• In order that changed values not be applied, press the
[back], [Close] or [Cancel] function key, depending on the
menu display.
User manual Wilo-Geniax Central Control
17
English
Overview of the Central Control
3.2.7 Calling up information in the display menus
Additional information is shown in the display menus. The
displayed values can not be changed.
Exit display menu?
• In order to exit a display menu, press the »back« function
button or press the [] or [OK] button.
18
WILO SE 04/2011
How does the temperature control work?
4
English
How does the temperature control work?
4.1 Principle of operation
Fundamentals
With the help of the Wilo-Geniax Central Control, you can
adjust the room temperature of an individual room or a
group of rooms to suit your personal needs. In contrast to
conventional thermostat regulators, with the Geniax
Central Control you can not only select a fixed temperature, but also several time areas per day during which the
heating can be different. The heating sequence defined in
this way will be saved in time profiles. A distinction is
made between room time profiles and central time profiles for the Central Control. See section Room and central time profiles [page 22].
The active time profile is shown in the display as room
mode.
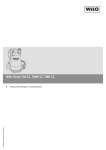
Week profile
The week profile is the standard time profile. It is always
active as soon as another time profile is completed. You
can create up to three time areas for every day of the week
here. Besides these time areas (e.g., at night or for
absence) a lower room temperature is maintained to save
energy [7.2 Editing the week profile, page 78]. The basic
idea is it that you are normally only at home at certain
times, so rooms can be switched to energy saving heating
during times of absence or at night. These periods are
designated as intermediate periods. Time and intermediate periods always include a start and an end time as well
as a selectable room target temperature.
During installation, the week profile is individually
adapted to your heating habits and the spatial situation. You only have to change the week profile if
your heating habits have changed significantly. For
brief changes, you can manually change the temperature or activate one of the time profiles
explained below.
User manual Wilo-Geniax Central Control
19
English
How does the temperature control work?
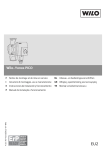
Week profile active
Room temperature
Period
Intermediate area
21°C
Fig. 4:
23:00
19:00
14:00
12:00
08:00
05:00
16°C
Time of day
Representation of a day in the week profile with three created time areas
Presence/absence
time profile
If your daily routine temporarily deviates from the heating
habits stored in the week profile, you can activate a presence/absence time profile for short periods, thereby
deactivating the week profile [5.3 Temporary presence,
page 39].
For absences (for example, holidays), the selected period
will be heated at an energy saving temperature around the
clock.
21°C
00:00
16°C
00:00
Room temperature
Absence time profile, active
Fig. 5:
Time of day
Representation of a day with active absence time profile
For longer all-day presences (due to illness, for example)
different temperatures can be selected for day and night
periods.
20
WILO SE 04/2011
How does the temperature control work?
English
Presence time profile, active
Room temperature
Night period
Night period
Day period
21°C
20:00
06:00
16°C
Time of day
Fig. 6:
Representation of a day with day and night periods with active presence time profile
Intervention
You can always deactivate an active time profile for a few
hours and manually set another temperature. A shortterm change of this sort is called an intervention
[5.2 Temporarily adjusting room temperature, page 30].
The current time profile is deactivated for the duration of
an intervention. After that, the previously active time profile is applied again.
Intervention
active
Room temperature
Week profile active
Week profile active
21°C
Fig. 7:
23:00
19:00
16:00
13:00
12:00
08:00
05:00
16°C
Time of day
Representation of a day in the week profile with three created time areas and a manual intervention from 13:00 hrs to 16:00 hrs
User manual Wilo-Geniax Central Control
21
English
How does the temperature control work?
Room and central
time profiles
Besides the room in which the Central Control is located,
it is also possible to centrally control Geniax room user
interfaces of the types Comfort Control or Basic Control in
other rooms with the Central Control [4.3 Central control,
page 24]. For this reason, a distinction is made between
two different time profile types:
• Room time profiles apply solely to the room in which the
Central Control is located.
• Central time profiles apply to a group of rooms that are
connected to the Central Control.
If a central time profile in the Central Control is activated,
then this time profile becomes active for all the room
user interfaces that are included in the central control
[7.1 Configuring central control functions, page 76]. If the
central week profile is activated, it is the standard time
profile for all the room user interfaces included in the central control.
Those room user interfaces excluded from the central
control will not apply an active central time profile. They
follow their own room time profile. For room user interfaces which have been excluded from the central control,
the local week profile is the standard time profile.
The room functions of the Central Control can also be
excluded by the central control [7.1.1 Configuring the
Central Control for the central control, page 76].
22
WILO SE 04/2011
How does the temperature control work?
English
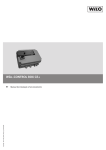
4.2 Temperature specifications
The working range of the temperature control is determined by various temperature specifications. These limit
the temperatures that can be set and are preselected in
the input menus.
Room temperature
Maximum temperature
e.g. 30°C
Comfort temperature
e.g. 21°C
Energy-saving temperature
e.g. 16°C
Minimum temperature
e.g. 10°C
Room frost protection temperature
e.g. 5°C
Time of day
Fig. 8:
Representation of the temperature specifications (factory configuration)
The temperature specifications are individually
preset during the installation. You only have to
change it if your heating habits have changed significantly [7.3 Setting temperature specifications,
page 86].
4.2.1 Comfort temperature
The comfort temperature is the preselected temperature
for presence and during the day period.
4.2.2 Energy saving temperature
The energy saving temperature is the preselected temperature for absence and in the night period.
4.2.3 Minimum temperature
The minimum temperature specifies the lowest temperature that can be set in the input menus.
4.2.4 Maximum temperature
The maximum temperature specifies the highest temperature that can be set in the input menus.
4.2.5 Room frost protection temperature
The room frost protection temperature is the temperature
specification for the “Room frost protection” room mode.
User manual Wilo-Geniax Central Control
23
English
How does the temperature control work?
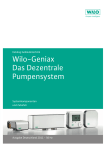
4.3 Central control
If one or more Geniax room user interfaces of the type
Comfort Control or Basic Control are used together with a
Central Control, the room user interfaces can be controlled from the Central Control. In this way, the temperature
for a group of similarly used rooms, e.g. a floor of a building, can be set centrally by one device. For this, the
respective Geniax room user interfaces have to be
included in the central control [7.1 Configuring central
control functions, page 76].
Local room time profiles can still be activated for a centrally controlled room. The activated central time profile
will become automatically active again should the locally
activated room time profile end.
If a room is to be completely excluded from the central
control, the corresponding Geniax room user interface has
to be excluded from the central control. The exclusion of
rooms from the central control is also possible for rooms
which are to be heated independently of living rooms; for
example, storage rooms, winter gardens
[7.1.2 Configuring Geniax room user interfaces of a room
group for central control, page 77].
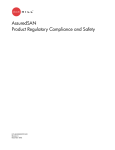
Room 1
ZBG Comfort
Room 2
RBG Premium
Room 4
RBG Premium
Fig. 9:
24
Room 3
RBG Premium
Room 5
RBG Premium
Installation with one central and four room user interfaces: Rooms 1-4 are centrally controlled.
The central control is indicated at the room user interface by the symbol
. Room 5 is excluded
from the central control.
WILO SE 04/2011
Daily operation and quick settings
5
English
Daily operation and quick settings
In this section, the basic functions of the Central Control
are described which you need for operating the device on
a daily basis. This section is intended for anyone who has
to use the Central Control.
Generally, the room temperature follows the day's heating
sequence as stored in the week profile; either the local
room week profile of a Geniax Comfort Control or Basic
Control room user interface, or the central week profile of
the Central Control.
If your daily routine should, however, deviate from this
heating sequence for a short time, you can temporarily
deactivate the week profile and instead manually adjust
the room temperature as follows:
Temporarily adjusting
room temperature
• Perform an intervention for the room in order to adjust the
Presence
• Activate the presence time profile to adjust the room
room temperature in one or more rooms for short periods;
for example, if you are too cold or too warm and you would
like to change the room temperature for just a couple
hours [5.2.1 Intervention for the room, page 30]/
[5.2.4 Intervention (warmer/colder) for a room group,
page 34].
temperature; for example, for a short-term presence of
a couple hours or one or more days [5.3.1 “Present today”
for the room, page 39]/[5.3.2 “Present until ...” for the
room, page 40]. The presence time profile can be activated for the room or a room group.
User manual Wilo-Geniax Central Control
25
English
Daily operation and quick settings
Absence
• Activate the absence time profile in order to lower the
room temperature; for example, for temporary absence of
a couple hours or a longer period [5.4.1 “Briefly away” for
the room, page 53]/[5.4.2 “Absent until ...” for the room,
page 54]. The absence time profile can be activated for
the room or a room group.
A manual adjustment of the room temperature
with one of the named procedures is a good idea if
the adjustment of the room temperature is to be
done as an exception. If your daily routine changes
permanently, then you should change the week
profile accordingly so that you do not have to keep
manually changing the heating sequence
[7.2 Editing the week profile, page 78].
26
WILO SE 04/2011
Daily operation and quick settings
English
5.1 Central week profile
You can activate a central week profile which is applied to
all the rooms of a room group included in the central control.
• As long as no central week profile is activated, the standard time profile is the room week profile locally stored in
every room user interface.
• If the central week profile is activated, it is the standard
time profile for all the rooms included in the central control.
5.1.1 Activating the central week profile for a room group
1. Press the [Central] function button in case the central
main display is still not displayed.
➥ The display shows the central main display.
2. Press the [Menu] function button.
➥ The display shows the »Menu« selection menu.
3. Use the [] and [] buttons to select the »Central control« menu point and press [OK] or [].
➥ The display shows the »Central control« selection
menu.
4. Use the [] and [] buttons to select the »Central interventions« menu point and press [OK] or [].
➥ The display shows the »Central interventions« selection menu.
User manual Wilo-Geniax Central Control
27
English
Daily operation and quick settings
5. Use the [] and [] buttons to select the »With home week
prof.« menu point and press [OK] or [].
If the central room group week profile is already
active, then the respective menu item is ticked off.
➥ The display shows the »Edit week profile« input menu.
You can change the week profile. See step 3,
section 7.2.2 Editing the central week profile
[page 82].
Week profile not activated?
6. In order not to activate the week profile, press the [Cancel]
function button.
➥ The display shows the »Central interventions« selection menu.
7. Cancel your selection with [Close] or wait until the display
shows the main display again.
➥ The display shows the central main display with the
overview of the active time profiles for all the room
user interfaces included in the central control. The preset time profile remains active.
Activate week profile?
8. In order to activate the week profile, press the [Activate]
function button.
➥ The display shows the »Save?« dialogue.
9. In order to save the week profile, press [Yes] or return to
the »Edit week profile« selection menu with [back] without saving.
➥ The display shows the central main display with the
overview of the active time profiles for all the room
user interfaces included in the central control. The
symbol
indicates the central active “Week profile”
room mode. The settings stored in the central week
profile are used.
28
WILO SE 04/2011
Daily operation and quick settings
English
5.1.2 Ending the central week profile for a room group
You can use this function to end the central active room
mode “Week profile” for a room group. You can only perform this function if the “Week profile” room mode is centrally active and the symbol
is shown in the central
main display.
1. Press the [Central] function button in case the central
main display is still not displayed.
➥ The display shows the main display. The central active
“Week profile” room mode is indicated by the symbol
.
2. Press the [Menu] function button.
➥ The display shows the »Menu« selection menu.
3. Use the [] and [] buttons to select the »Central control« menu point and press [OK] or [].
➥ The display shows the »Central control« selection
menu.
4. Use the [] and [] buttons to select the »Central active
interventions« menu point and press [OK] or [].
➥ The display shows the »Central active interventions«
selection menu.
5. Use the [] and [] buttons to select the »Week profile«
menu point and press [OK] or [].
➥ The display shows the »Week profile (central)« selection menu.
6. Use the [] and [] buttons to select the »End« menu
point and press [OK] or [].
User manual Wilo-Geniax Central Control
29
English
Daily operation and quick settings
➥ The display shows the central main display with the
overview of the active time profiles for all the room
user interfaces included in the central control. The
central “Week profile” room mode has been ended and
the preset time profile is active again.
5.2 Temporarily adjusting room temperature
You can use this quick setting to adjust the room temperature for a few hours to suit your needs.
5.2.1 Intervention for the room
If you are too warm or cold at the moment, you can adjust
the temperature in the room for a few hours. To do this,
select a desired room target temperature and a time up to
when the temperature in the room should be maintained.
At the selected time, the current time profile will automatically be activated again.
1. Press the [Room] function button in case the room main
display is still not displayed.
➥ The display shows the room main display.
If you have already performed an “Intervention”,
the symbol
will be shown in the room main display. You can, however, change the temperature
again at any time.
2. Press any of these buttons [] [] [] [] or [OK] on the
navigation button to go to the »Intervention« input
menu.
➥ The display shows the »Intervention« input menu.
What is shown are the room target temperature and
the time up to when the temperature should be maintained that are saved in the active time profile.
30
WILO SE 04/2011
Daily operation and quick settings
English
3. Select the desired room target temperature with the []
and [] buttons:
[] for a higher temperature, e.g. »17.5°C«,
[] for a lower temperature
If you lightly tap on the buttons, the temperature
will be adjusted in 0.5°C steps. If you press and hold
down the buttons, the temperature will be
adjusted in 1°C steps.
4. Use the [] and [] buttons to select the time up to when
the room target temperature should be maintained:
[] for a earlier time
[] for a later time, e.g. »16:00«.
If you lightly tap on the buttons, the time will be
adjusted in 1-minute steps. If you press and hold
down the buttons, the time will be adjusted in 15minute or hour steps.
Do not apply values?
Quick heating-up?
5. In case you want to retain the original values and do not
want to apply the changed values, press the [Close] function button.
➥ The display changes back to the room main display.
The active time profile remains active.
Start with Step 2. to input again.
6. In case you want a particularly quick heating up of the
room, press the [Quick] function button.
Pressing the function button again resets the function.
“Quick heating-up” increases energy use of the
heating system.
Apply values?
7. In order to apply the values, press [OK] on the navigation
button.
➥ The display shows the »Apply intervention« selection
menu.
8. Use the [] and [] buttons to select the »Apply« menu
point and press [OK] or [].
User manual Wilo-Geniax Central Control
31
English
Daily operation and quick settings
➥ The display shows the room main display with the
selected room target temperature and the time up
to when this temperature should be maintained.
The symbol
indicates the “Intervention” room
mode. At the end of the set period, the preset time
profile is activated again.
You can end the “Intervention” room mode sooner
again [5.2.3 Ending intervention for the room,
page 33].
The symbol
indicates the “heating up” of the
room. A “Quick heating-up” is indicated by the
symbol
.
Change entered values?
• In case you want to change the entered values again, start
again with step 1.
5.2.2 Editing intervention for the room
You can subsequently edit the intervention in the temperature sequence of the room with this function. You can
only carry out this change if the “Intervention” room mode
is active and the symbol
is shown in the room main display.
1. Press the [Room] function button in case the room main
display is still not displayed.
➥ The display shows the room main display. The “Intervention” room mode is indicated by the symbol .
2. Press the [Menu] function button.
➥ The display shows the »Menu« selection menu.
3. Use the [] and [] buttons to select the »Currently
active: Intervention« menu point and press [OK] or [].
32
WILO SE 04/2011
Daily operation and quick settings
English
➥ The display shows the »Intervention (room)« selection
menu.
If no room time profile but rather a central time
profile is active, the respective central room mode
is edited (room group).
4. Use the [] and [] buttons to select the »Edit« menu
point and press [OK] or [].
➥ The display shows the »Intervention« input menu.
5. Continue with step 3 in section 5.2.1 Intervention for the
room [page 30] .
5.2.3 Ending intervention for the room
You can use this function to end the “Intervention” room
mode for the room early. You can only carry out this function if the “Intervention” room mode is active and the
symbol
is shown in the room main display.
1. Press the [Room] function button in case the room main
display is still not displayed.
➥ The display shows the room main display. The “Intervention” room mode is indicated by the symbol .
2. Press the [Menu] function button.
➥ The display shows the »Menu« selection menu.
3. Use the [] and [] buttons to select the »Currently
active: Intervention« menu point and press [OK] or [].
User manual Wilo-Geniax Central Control
33
English
Daily operation and quick settings
➥ The display shows the »Intervention (room)« selection
menu.
If no room time profile but rather a central time
profile is active, the respective central room mode
is edited (room group).
4. Use the [] and [] buttons to select the »End« menu
point and press [OK] or [].
➥ The display shows the room main display with the
room target temperature and the time up to when this
temperature should be maintained. The “Intervention”
room mode has been ended and the preset time profile
is active again.
5.2.4 Intervention (warmer/colder) for a room group
You can adjust the room temperature in all rooms of a
room group by a few degrees. To do this, select the
desired temperature difference from the room temperature and a time up to when the temperature change
should be maintained.
At the selected time, the current time profile will be automatically activated again.
1. Press the [Central] function button in case the central
main display is still not displayed.
➥ The display shows the central main display.
If you have already performed an “Intervention”,
the symbol
will be shown in the central main
display. You can, however, change the temperature again at any time.
2. Press the [Menu] function button.
➥ The display shows the »Menu« selection menu.
3. Use the [] and [] buttons to select the »Central control« menu point and press [OK] or [].
34
WILO SE 04/2011
Daily operation and quick settings
English
➥ The display shows the »Central control« selection
menu.
4. Use the [] and [] buttons to select the »Central interventions« menu point and press [OK] or [].
➥ The display shows the »Central interventions« selection menu.
5. Use the [] and [] buttons to select the »Warmer/
colder« menu point and press [OK] or [].
If an intervention (warmer/colder) is already
active, then the respective menu item is ticked off.
In this case, the time profile can be edited
[5.2.5 Editing the intervention (warmer/colder) for
a room group, page 36], step 6.
➥ The display shows the »Rel. temperature change« input
menu.
6. Use the [] and [] buttons to select the time up to when
the intervention should be active:
[] for a earlier time
[] for a later time
If you lightly tap on the buttons, the time will be
adjusted in 1-minute steps. If you press and hold
down the buttons, the time will be adjusted in 15minute or hour steps.
7. Select the desired temperature change with the [] and
[] buttons:
[] to raise the temperature by the displayed value
[] to lower the temperature by the displayed value
Do not apply values?
User manual Wilo-Geniax Central Control
8. In case you want to retain the original values and do not
want to apply the changed values, press the [back] function button or wait until the display shows the main display again.
➥ The display changes back to the »Central interventions« selection menu or to the central main display.
The active time profile remains active.
Start with Step 2. to input again.
35
English
Daily operation and quick settings
Apply values?
9. In order to apply the values, press [OK] on the navigation
button.
➥ The display shows the »Apply intervention« selection
menu.
10. Use the [] and [] buttons to select the »Apply« menu
point and press [OK] or [].
➥ The display shows the central main display with the
overview of the active time profiles for all the room
user interfaces included in the central control. The
symbol
indicates the central active “Intervention”
room mode. At the end of the set period, the preset
time profile is activated again.
You can end the “Intervention” room mode sooner
again [5.2.6 Ending intervention (warmer/colder)
for a room group, page 37].
5.2.5 Editing the intervention (warmer/colder) for a room group
You can subsequently edit the intervention (warmer/
colder) in the temperature sequence of a room group with
this function. You can only make this change if the “Intervention” room mode is centrally active and the symbol
is shown in the central main display.
1. Press the [Central] function button in case the central
main display is still not displayed.
➥ The display shows the central main display. The central
active “Intervention” room mode is indicated by the
symbol .
2. Press the [Menu] function button.
➥ The display shows the »Menu« selection menu.
3. Use the [] and [] buttons to select the »Central control« menu point and press [OK] or [].
36
WILO SE 04/2011
Daily operation and quick settings
English
➥ The display shows the »Central control« selection
menu.
4. Use the [] and [] buttons to select the »Central active
interventions« menu point and press [OK] or [].
➥ The display shows the »Central active interventions«
selection menu.
5. Use the [] and [] buttons to select the »Warmer/
colder« menu point and press [OK] or [].
➥ The display shows the »Warmer/colder (central)«
selection menu.
6. Use the [] and [] buttons to select the »Edit« menu
point and press [OK] or [].
➥ The display shows the »Rel. temperature change« input
menu.
7. Continue with step 6 in section [5.2.4 Intervention
(warmer/colder) for a room group, page 34] .
5.2.6 Ending intervention (warmer/colder) for a room group
You can use this function to end the “Intervention” room
mode for a room group early. You can only perform this
function if the “Intervention” room mode is active and the
symbol
is shown in the central main display.
1. Press the [Central] function button in case the central
main display is still not displayed.
➥ The display shows the central main display. The central
active “Intervention” room mode is indicated by the
symbol .
2. Press the [Menu] function button.
User manual Wilo-Geniax Central Control
37
English
Daily operation and quick settings
➥ The display shows the »Menu« selection menu.
3. Use the [] and [] buttons to select the »Central control« menu point and press [OK] or [].
➥ The display shows the »Central control« selection
menu.
4. Use the [] and [] buttons to select the »Central active
interventions« menu point and press [OK] or [].
➥ The display shows the »Central active interventions«
selection menu.
5. Use the [] and [] buttons to select the »Warmer/
colder« menu point and press [OK] or [].
➥ The display shows the »Warmer/colder (central)«
selection menu.
6. Use the [] and [] buttons to select the »End« menu
point and press [OK] or [].
➥ The display shows the central main display with the
overview of the active time profiles for all the room
user interfaces included in the central control. The
“Intervention” room mode has been ended and the
preset time profile is active again.
38
WILO SE 04/2011
Daily operation and quick settings
English
5.3 Temporary presence
With this quick setting, you can adjust the room temperature for all-day presence or absence; for example, if you
come home early or leave your apartment unexpectedly
[4 How does the temperature control work?, page 19].
5.3.1 “Present today” for the room
In case you spontaneously stay at home for a day or return
home early during the day, you can use this time profile to
heat the room for the rest of the day period at the preset
comfort temperature.
At the end of the day, the preset time profile is activated
again.
1. Press the [Room] function button in case the room main
display is still not displayed.
➥ The display shows the room main display.
2. Press the [Menu] function button.
➥ The display shows the »Menu« selection menu.
3. Use the [] and [] buttons to select the »Time profiles«
menu point and press [OK] or [].
➥ The display shows the »Time profiles« selection menu.
4. Use the [] and [] buttons to select the »Present
today« menu point and press [OK] or [].
User manual Wilo-Geniax Central Control
39
English
Daily operation and quick settings
➥ The display shows the room main display with the
room target temperature and the time up to when this
temperature is to be maintained. The symbol
indicates the “Present” room mode. At the end of the displayed period, the preset time profile is activated
again.
For this time profile, the preset values of the day
period in the presence time profile are used. If no
change is made in the presence time profile, then
the preset comfort temperature will be maintained. You can change the preset values
[5.3.3 Editing presence for the room, page 43] or
end the “Present” room mode early again
[5.3.4 Ending presence for the room, page 44].
The symbol
room.
indicates the “heating up” of the
5.3.2 “Present until ...” for the room
In case you are going to remain at home for several days,
weeks or months (due to illness, for example), you can use
this time profile to define different room target temperatures for the room for day and night periods.
At the end of the select period, the preset time profile is
automatically activated again.
1. Press the [Room] function button in case the room main
display is still not displayed.
➥ The display shows the room main display.
2. Press the [Menu] function button.
40
WILO SE 04/2011
Daily operation and quick settings
English
➥ The display shows the »Menu« selection menu.
3. Use the [] and [] buttons to select the »Time profiles«
menu point and press [OK] or [].
➥ The display shows the »Time profiles« selection menu.
4. Use the [] and [] buttons to select the »Present until
...« menu point and press [OK] or [].
If an presence time profile is already active, then
the respective menu item is ticked off. In this case,
the time profile can be edited [5.3.3 Editing presence for the room, page 43], step 3.
➥ The display shows the »Present until ...« input menu.
5. Use the [] and [] buttons to select whether you want
to set the day, month or year of the final date of your
presence:
[] for selection to the left
[] for selection to the right
6. Select the desired final date of your presence with the []
and [] buttons:
[] for a later final date
[] for a earlier final date
7. Apply your input with [OK].
➥ The display shows the »Present« selection menu with
the daily temperature and time specifications up to the
end date.
Subsequently change the
final date?
8. In order to subsequently change the final date, use the
[] and [] buttons to select the »Until:« menu point
and press [OK] or [].
➥ The display shows the »Present until ...« input menu.
9. Follow the instructions in step 5 to step 7.
User manual Wilo-Geniax Central Control
41
English
Daily operation and quick settings
Subsequently change 10. In order to subsequently change the temperatures and
temperatures and times?
times, use the [] and [] buttons to select the »By
day:« or »At night:« menu point and press [OK] or [].
➥ Depending on the selection, the display shows the »By
day until« or »At night until« input menu.
11. Use the [] and [] buttons to select the desired room
target temperature for »By day until« or »At night until«.
12. Use the [] and [] buttons to select the time up to when
the room target temperature »By day until« or »At night
until« should be maintained.
13. Apply the displayed values with [OK].
➥ The display shows the »Present« selection menu with
the daily temperature and time specifications up to the
end date.
Apply all values? 14. In order to apply the values, use the [] and [] buttons
to select the »Apply« menu point and press [OK] or [].
42
WILO SE 04/2011
Daily operation and quick settings
English
➥ The display shows the room main display with the
room target temperature and the time up to when this
temperature is to be maintained. The symbol
indicates the “Present” room mode. At the end of the set
period, the preset time profile is activated again.
You can change the set values [5.3.3 Editing presence for the room, page 43] or end the “Present”
room mode early again [5.3.4 Ending presence for
the room, page 44].
The symbol
room.
indicates the “heating up” of the
5.3.3 Editing presence for the room
You can subsequently edit the settings for the presence
time profile of the room with this function. You can only
carry out this change if the “Present” room mode is active
and the symbol
is shown in the room main display.
1. Press the [Room] function button in case the room main
display is still not displayed.
➥ The display shows the room main display. The
“Present” room mode is indicated by the symbol
.
2. Press the [Menu] function button.
➥ The display shows the »Menu« selection menu.
3. Use the [] and [] buttons to select the »Currently
active: Present« menu point and press [OK] or [].
User manual Wilo-Geniax Central Control
43
English
Daily operation and quick settings
➥ The display shows the »Present (room)« selection
menu.
If no room time profile but rather a central time
profile is active, the respective central room mode
is edited (room group).
4. Use the [] and [] buttons to select the »Edit« menu
point and press [OK] or [].
➥ The display shows the »Present« selection menu with
the daily temperature and time specifications up to the
end date.
5. Continue with step 8 in section [5.3.2 “Present until ...” for
the room, page 40].
5.3.4 Ending presence for the room
You can use this function to end the “Present” room mode
for the room early. You can only carry out this function if
the “Present” room mode is active and the symbol
is
shown in the room main display.
1. Press the [Room] function button in case the room main
display is still not displayed.
➥ The display shows the room main display. The
“Present” room mode is indicated by the symbol
.
2. Press the [Menu] function button.
➥ The display shows the »Menu« selection menu.
3. Use the [] and [] buttons to select the »Currently
active: Present« menu point and press [OK] or [].
44
WILO SE 04/2011
Daily operation and quick settings
English
➥ The display shows the »Present (room)« selection
menu.
If no room time profile but rather a central time
profile is active, the respective central room mode
is edited (room group).
4. Use the [] and [] buttons to select the »End« menu
point and press [OK] or [].
➥ The display shows the main display with the room target temperature and the time up to when this temperature should be maintained. The “Present” room mode
has been ended and the preset time profile is active
again.
5.3.5 “Present today” for a room group
In case you spontaneously stay at home for a day or return
home early during the day, you can use this time profile to
heat a room group for the rest of the day period at the
preset comfort temperature.
At the end of the day, the preset time profile is activated
again.
1. Press the [Central] function button in case the room main
display is still not displayed.
➥ The display shows the central main display.
2. Press the [Menu] function button.
➥ The display shows the »Menu« selection menu.
3. Use the [] and [] buttons to select the »Central control« menu point and press [OK] or [].
User manual Wilo-Geniax Central Control
45
English
Daily operation and quick settings
➥ The display shows the »Central control« selection
menu.
4. Use the [] and [] buttons to select the »Central interventions« menu point and press [OK] or [].
➥ The display shows the »Central interventions« selection menu.
5. Use the [] and [] buttons to select the »Present
today« menu point and press [OK] or [].
➥ The display shows the central main display with the
overview of the active time profiles for all the room
user interfaces included in the central control. The
symbol
indicates the central active “Present” room
mode. At the end of the displayed period, the preset
time profile is activated again.
For this time profile, the preset values of the day
period in the presence time profile are used. If no
change is made in the presence time profile, then
the preset comfort temperature will be maintained. You can change the preset values
[5.3.7 Editing presence for a room group, page 50]
or end the “Present” room mode early again
[5.3.8 Ending presence for a room group, page 51].
5.3.6 “Present until ...” for a room group
In case you are going to remain at home for several days,
weeks or months (due to illness, for example), you can use
this time profile to define different room target temperatures for a room group for day and night periods.
At the end of the select period, the preset time profile is
automatically activated again.
46
WILO SE 04/2011
Daily operation and quick settings
English
1. Press the [Central] function button in case the central
main display is still not displayed.
➥ The display shows the central main display.
2. Press the [Menu] function button.
➥ The display shows the »Menu« selection menu.
3. Use the [] and [] buttons to select the »Central control« menu point and press [OK] or [].
➥ The display shows the »Central control« selection
menu.
4. Use the [] and [] buttons to select the »Central interventions« menu point and press [OK] or [].
➥ The display shows the »Central interventions« selection menu.
5. Use the [] and [] buttons to select the »Present until
...« menu point and press [OK] or [].
If an presence time profile is already active, then
the respective menu item is ticked off. In this case,
the time profile can be edited [5.3.7 Editing presence for a room group, page 50], step 3.
➥ The display shows the »Present until ...« input menu.
6. Use the [] and [] buttons to select whether you want
to set the day, month or year of the final date of you presence:
[] for selection to the left
[] for selection to the right
User manual Wilo-Geniax Central Control
47
English
Daily operation and quick settings
7. Select the desired final date of your presence with the []
and [] buttons:
[] for a later final date
[] for a earlier final date
8. Apply your input with [OK].
➥ The display shows the »Present« selection menu with
the final date of your presence. The »With room settings« menu item is ticked; the local room time profile
settings of the room user interfaces are used.
Subsequently change the
final date?
9. In order to subsequently change the final date, use the
[] and [] buttons to select the »Until:« menu point
and press [OK] or [].
➥ The display shows the »Present until ...« input menu.
10. Follow the instructions in step 6 to step 8.
Use the individual settings 11. Use the [] and [] buttons to select the »Apply« menu
point and press [OK] or [].
for every room?
➥ The display shows the central main display with the
overview of the active time profiles for all the room
user interfaces included in the central control. The
symbol
indicates the central active “Present” room
mode. The local room time profile settings of the room
user interfaces are used.
At the end of the set period, the preset time profile is
activated again.
You can change the set values [5.3.7 Editing presence for a room group, page 50] or end the
“Present” room mode early again [5.3.8 Ending
presence for a room group, page 51].
48
WILO SE 04/2011
Daily operation and quick settings
English
Use central settings for all 12. In order to set the same settings for temperatures and
rooms?
times in every room in a room group, use the [] and []
buttons to select the »With room settings« menu point
and press [OK] or [].
➥ The »With room settings« menu item is no longer
ticked. The »By day:« and »At night:« menu items
appear in the menu.
13. In order to change day or night time room settings, use the
[] and [] buttons to select the »By day:« or »At night:«
menu point and press [OK] or [].
➥ Depending on the selection, the display shows the »By
day until« or »At night until« input menu.
14. Use the [] and [] buttons to select the desired room
target temperature for »By day until« or »At night until«.
15. Use the [] and [] buttons to select the time up to when
the room target temperature »By day until« or »At night
until« should be maintained.
16. Apply the displayed values with [OK].
➥ The display shows the »Present« selection menu with
the daily temperature and time specifications up to the
end date.
User manual Wilo-Geniax Central Control
49
English
Daily operation and quick settings
17. In order to apply the values, use the [] and [] buttons
to select the »Apply« menu point and press [OK] or [].
➥ The display shows the central main display with the
overview of the active time profiles for all the room
user interfaces included in the central control. The
symbol
indicates the central active “Intervention”
room mode. The selected settings are applied to all
rooms.
At the end of the set period, the preset time profile is
activated again.
You can change the set values [5.3.7 Editing presence for a room group, page 50] or end the
“Present” room mode early again [5.3.8 Ending
presence for a room group, page 51].
5.3.7 Editing presence for a room group
You can subsequently edit the settings for the presence
time profile of a room group with this function. You can
only carry out this change if the “Present” room mode is
active and the symbol
is shown in the central main display.
1. Press the [Central] function button in case the central
main display is still not displayed.
➥ The display shows the central main display. The
“Present” room mode is indicated by the symbol
.
2. Press the [Menu] function button.
50
WILO SE 04/2011
Daily operation and quick settings
English
➥ The display shows the »Menu« selection menu.
3. Use the [] and [] buttons to select the »Central control« menu point and press [OK] or [].
➥ The display shows the »Central control« selection
menu.
4. Use the [] and [] buttons to select the »Central active
interventions« menu point and press [OK] or [].
➥ The display shows the »Central active interventions«
selection menu.
5. Use the [] and [] buttons to select the »Present«
menu point and press [OK] or [].
➥ The display shows the »Present (central)« selection
menu.
6. Use the [] and [] buttons to select the »Edit« menu
point and press [OK] or [].
➥ The display shows the »Present« selection menu with
the final date of your presence.
7. Continue with step 9 in section [5.3.6 “Present until ...” for
a room group, page 46].
5.3.8 Ending presence for a room group
You can use this function to end the “Present” room mode
for a room group early. You can only perform this function
if the “Present” room mode is centrally active and the
symbol
is shown in the central main display.
User manual Wilo-Geniax Central Control
51
English
Daily operation and quick settings
1. Press the [Central] function button in case the central
main display is still not displayed.
➥ The display shows the central main display. The central
active “Present” room mode is indicated by the symbol
.
2. Press the [Menu] function button.
➥ The display shows the »Menu« selection menu.
3. Use the [] and [] buttons to select the »Central control« menu point and press [OK] or [].
➥ The display shows the »Central control« selection
menu.
4. Use the [] and [] buttons to select the »Central active
interventions« menu point and press [OK] or [].
➥ The display shows the »Central active interventions«
selection menu.
5. Use the [] and [] buttons to select the »Present«
menu point and press [OK] or [].
➥ The display shows the »Present (central)« selection
menu.
6. Use the [] and [] buttons to select the »End« menu
point and press [OK] or [].
➥ The display shows the central main display with the
overview of the active time profiles for all the room
user interfaces included in the central control. The
“Present” room mode has been ended and the preset
time profile is active again.
52
WILO SE 04/2011
Daily operation and quick settings
English
5.4 Temporary absence
5.4.1 “Briefly away” for the room
In case you leave the house for short periods (for example,
to shop), you can lower the room temperature to the preset energy saving temperature with this time profile.
At the end of the select period, the preset time profile is
automatically activated again.
1. Press the [Room] function button in case the room main
display is still not displayed.
➥ The display shows the room main display.
2. Press the [Menu] function button.
➥ The display shows the »Menu« selection menu.
3. Use the [] and [] buttons to select the »Time profiles«
menu point and press [OK] or [].
➥ The display shows the »Time profiles« selection menu.
4. Use the [] and [] buttons to select the »Briefly away
for« menu point and press [OK] or [].
➥ The display shows the »Briefly away for ...« selection
menu.
Absent for 2, 4 or 8 hours?
User manual Wilo-Geniax Central Control
5. Use the [] and [] buttons to select the menu point
which corresponds to the duration of your absence.
53
English
Daily operation and quick settings
Absent up to a particular
time?
6. Use the [] and [] buttons to select the »Determine
duration« menu point and press [OK] or [].
➥ The display shows the »Determine duration« selection
menu.
7. Use the [] and [] buttons to select the time up to when
the lowered room target temperature should be maintained.
Apply settings?
8. Apply your input with [OK].
➥ The display shows the room main display with the
room target temperature and the time up to when this
temperature should be maintained. The symbol
indicates the “Absent” room mode. At the end of the
displayed period, the preset time profile is activated
again.
If no change is made in the absence time profile,
then the room temperature will be maintained at
the preset energy saving temperature. You can
subsequently change the set values [5.4.3 Editing
absence for the room, page 57] or end the
“Absent” room mode early again [5.4.4 Ending
absence for the room, page 58].
5.4.2 “Absent until ...” for the room
With this time profile, you can define an energy saving
room target temperature to be maintained during the
selected period in case you are going to be absent or on
holidays for several days, weeks or months.
At the end of the select period, the preset time profile is
automatically activated again.
1. Press the [Room] function button in case the room main
display is still not displayed.
54
WILO SE 04/2011
Daily operation and quick settings
English
➥ The display shows the room main display.
2. Press the [Menu] function button.
➥ The display shows the »Menu« selection menu.
3. Use the [] and [] buttons to select the »Time profiles«
menu point and press [OK] or [].
➥ The display shows the »Time profiles« selection menu.
If an absence time profile is already active, then the
respective menu item is ticked off. In this case, the
time profile can be edited [5.4.3 Editing absence
for the room, page 57], step 3.
4. Use the [] and [] buttons to select the »Absent until
...« menu point and press [OK] or [].
➥ The display shows the »Absent until ...« input menu.
5. Use the [] and [] buttons to select whether you want
to set the day, month or year of the final date of your
absence:
[] for selection to the left
[] for selection to the right
6. Select the desired final date of your absence with the []
and [] buttons:
[] for a later final date
[] for a earlier final date
7. Apply your input with [OK].
➥ The display shows the »Absent until ...« input menu.
8. Use the [] and [] buttons to select the desired time for
your return.
9. Apply your input with [OK].
User manual Wilo-Geniax Central Control
55
English
Daily operation and quick settings
➥ The display shows the »Absent« selection menu with
the date and the time of your return and the room target temperature which is set till then.
Subsequently change the 10. In order to subsequently change the final date, use the
final date?
[] and [] buttons to select the »Until:« menu point
and press [OK] or [].
➥ The display shows the »Absent until ...« selection
menu.
11. Follow the instructions from Step 5. to Step 7.
Subsequently change the 12. In order to change the return time, use the [] and []
return time?
buttons to select the »Return at:« menu point and press
[OK] or [].
➥ The display shows the »Absent until ...« selection
menu.
13. Follow the instructions from Step 8. to Step 9.
Change temperature? 14. In order to change the temperature, use the [] and []
buttons to select the »Reduce to:« menu point and press
[OK] or [].
➥ The display shows the »Absent until« input menu.
15. Select the desired room target temperature for the time of
your absence with the [] and [] buttons.
16. Apply the displayed values with [OK].
56
WILO SE 04/2011
Daily operation and quick settings
English
➥ The display shows the »Absent« selection menu with
the date and the time of your return and the room target temperature which is set till then.
Apply all values? 17. In order to apply the values, use the [] and [] buttons
to select the »Apply« menu point and press [OK] or [].
➥ The display shows the room main display with the
room target temperature and the time up to when this
temperature should be maintained. The symbol
indicates the “Absent” room mode. At the end of the
set period, the preset time profile is activated again.
You can subsequently change the set values
[5.4.3 Editing absence for the room, page 57] or
end the “Absent” room mode early again
[5.4.4 Ending absence for the room, page 58].
5.4.3 Editing absence for the room
You can subsequently edit the settings for the absence
time profile with this function. You can only carry out this
change if the “Absent” room mode is active and the symbol
is shown in the room main display.
1. Press the [Room] function button in case the room main
display is still not displayed.
➥ The display shows the room main display. The
“Absent” room mode is indicated by the symbol
.
2. Press the [Menu] function button.
User manual Wilo-Geniax Central Control
57
English
Daily operation and quick settings
➥ The display shows the »Menu« selection menu.
3. Use the [] and [] buttons to select the »Currently
active: Absent« menu point and press [OK] or [].
➥ The display shows the »Absent (room)« selection menu.
If no room time profile but rather a central time
profile is active, the respective central room mode
is edited (room group).
4. Use the [] and [] buttons to select the »Edit« menu
point and press [OK] or [].
➥ The display shows the »Absent« selection menu with
the date and the time of your return and the room target temperature which is set till then.
5. Continue with step 10 in section [5.4.2 “Absent until ...”
for the room, page 54].
5.4.4 Ending absence for the room
You can use this function to end the “Absent” room mode
for the room early. You can only use this function if the
“Absent” room mode is active and the symbol
is shown
in the room main display.
1. Press the [Room] function button in case the room main
display is still not displayed.
➥ The display shows the room main display. The
“Absent” room mode is indicated by the symbol
.
2. Press the [Menu] function button.
58
WILO SE 04/2011
Daily operation and quick settings
English
➥ The display shows the »Menu« selection menu.
3. Use the [] and [] buttons to select the »Currently
active: Absent« menu point and press [OK] or [].
➥ The display shows the »Absent (room)« selection menu.
If no room time profile but rather a central time
profile is active, the respective central room mode
is edited (room group).
4. Use the [] and [] buttons to select the »End« menu
point and press [OK] or [].
➥ The display shows the main display with the room target temperature and the time up to when this temperature should be maintained. The “Absent” room mode
has been ended and the preset time profile is active
again.
5.4.5 “Briefly away” for a room group
In case you leave the house for short periods (for example,
to shop), you can lower the room temperature of a room
group to the preset energy saving temperature with this
time profile.
At the end of the select period, the preset time profile is
automatically activated again.
1. Press the [Central] function button in case the central
main display is still not displayed.
➥ The display shows the central main display.
2. Press the [Menu] function button.
User manual Wilo-Geniax Central Control
59
English
Daily operation and quick settings
➥ The display shows the »Menu« selection menu.
3. Use the [] and [] buttons to select the »Central control« menu point and press [OK] or [].
➥ The display shows the »Central control« selection
menu.
4. Use the [] and [] buttons to select the »Central interventions« menu point and press [OK] or [].
➥ The display shows the »Central interventions« selection menu.
5. Use the [] and [] buttons to select the »Briefly away
for« menu point and press [OK] or [].
➥ The display shows the »Briefly away for ...« selection
menu.
Absent for 2, 4 or 8 hours?
Absent up to a particular
time?
6. Use the [] and [] buttons to select the menu point
which corresponds to the duration of your absence.
7. Use the [] and [] buttons to select the »Determine
duration« menu point and press [OK] or [].
➥ The display shows the »Determine duration« selection
menu.
8. Use the [] and [] buttons to select the time up to when
the lowered room target temperature should be maintained.
Apply settings?
60
9. Apply your input with [OK].
WILO SE 04/2011
Daily operation and quick settings
English
➥ The display shows the central main display with the
overview of the active time profiles for all the room
user interfaces included in the central control. The
symbol
indicates the central active “Absent” room
mode. At the end of the displayed period, the preset
time profile is activated again.
If no change is made in the absence time profile,
then the room temperature will be maintained at
the preset energy saving temperature. You can
subsequently change the set values [5.4.7 Editing
absence for a room group, page 65] or end the
“Absent” room mode early again [5.4.8 Ending
absence for a room group, page 66].
5.4.6 “Absent until ...” for a room group
With this time profile, you can define an energy saving
room target temperature to be maintained during the
selected period in case you are going to be absent or on
holidays for several days, weeks or months.
At the end of the select period, the preset time profile is
automatically activated again.
1. Press the [Central] function button in case the central
main display is still not displayed.
➥ The display shows the central main display.
2. Press the [Menu] function button.
➥ The display shows the »Menu« selection menu.
3. Use the [] and [] buttons to select the »Central control« menu point and press [OK] or [].
User manual Wilo-Geniax Central Control
61
English
Daily operation and quick settings
➥ The display shows the »Central control« selection
menu.
4. Use the [] and [] buttons to select the »Central interventions« menu point and press [OK] or [].
➥ The display shows the »Central interventions« selection menu.
5. Use the [] and [] buttons to select the »Absent until
...« menu point and press [OK] or [].
If an absence time profile is already active, then the
respective menu item is ticked off. In this case, the
time profile can be edited [5.4.7 Editing absence
for a room group, page 65], step 6.
➥ The display shows the »Absent until ...« input menu.
6. Use the [] and [] buttons to select whether you want
to set the day, month or year of the final date of you presence:
[] for selection to the left
[] for selection to the right
7. Select the desired final date of your absence with the []
and [] buttons:
[] for a later final date
[] for a earlier final date
8. Apply your input with [OK].
➥ The display shows the »Absent until ...« input menu.
9. Use the [] and [] buttons to select the desired time for
your return.
10. Apply your input with [OK].
➥ The display shows the »Absent« selection menu with
the date and time of your return. The »With room settings« menu item is ticked; the room time profile settings stored in the individual room user interfaces are
used.
62
WILO SE 04/2011
Daily operation and quick settings
English
Subsequently change the 11. In order to subsequently change the final date, use the
final date?
[] and [] buttons to select the »Until:« menu point
and press [OK] or [].
➥ The display shows the »Absent until ...« input menu.
12. Follow the instructions in step 6 to step 8.
Subsequently change the 13. In order to change the return time, use the [] and []
return time?
buttons to select the »Return at:« menu point and press
[OK] or [].
➥ The display shows the »Absent until ...« input menu.
14. Follow the instructions in step 9 to step 10.
Use the individual settings
for every room?
15. Use the [] and [] buttons to select the »Apply« menu
point and press [OK] or [].
➥ The display shows the central main display with the
overview of the active time profiles for all the room
user interfaces included in the central control. The
symbol
indicates the central active “Absent” room
mode. The local room time profile settings of the room
user interfaces are used.
At the end of the set period, the preset time profile is
activated again.
You can change the set values [5.4.7 Editing
absence for a room group, page 65] or end the
“Present” room mode early again [5.4.8 Ending
absence for a room group, page 66].
User manual Wilo-Geniax Central Control
63
English
Daily operation and quick settings
Use central settings for all
rooms?
16. In order to set each of the rooms to the same room temperature, use the [] and [] buttons to select the »With
room settings« menu point and press [OK] or [].
➥ The »With room settings« menu item is no longer
ticked. The »Reduce to:« menu item appears in the
menu.
17. In order to change the temperature, use the [] and []
buttons to select the »Reduce to:« menu point and press
[OK] or [].
➥ The display shows the »Absent until ...« input menu.
18. Select the desired room target temperature for the time of
your absence with the [] and [] buttons.
19. Apply the displayed values with [OK].
➥ The display shows the »Absent« selection menu with
the date and the time of your return and the room target temperature which is set till then.
20. In order to apply the values, use the [] and [] buttons
to select the »Apply« menu point and press [OK] or [].
64
WILO SE 04/2011
Daily operation and quick settings
English
➥ The display shows the central main display with the
overview of the active time profiles for all the room
user interfaces included in the central control. The
symbol
indicates the central active “Absent” room
mode. The selected settings are applied to all rooms.
At the end of the set period, the preset time profile is
activated again.
You can subsequently change the set values
[5.4.7 Editing absence for a room group, page 65]
or end the “Absent” room mode early again
[5.4.8 Ending absence for a room group, page 66].
5.4.7 Editing absence for a room group
You can subsequently edit the settings for the absence
time profile with this function. You can only carry out this
change if the “Absent” room mode is active and the symbol
is shown in the central main display.
1. Press the [Central] function button in case the central
main display is still not displayed.
➥ The display shows the central main display. The
“Absent” room mode is indicated by the symbol
.
2. Press the [Menu] function button.
➥ The display shows the »Menu« selection menu.
3. Use the [] and [] buttons to select the »Central control« menu point and press [OK] or [].
➥ The display shows the »Central control« selection
menu.
4. Use the [] and [] buttons to select the »Central active
interventions« menu point and press [OK] or [].
User manual Wilo-Geniax Central Control
65
English
Daily operation and quick settings
➥ The display shows the »Central active interventions«
selection menu.
5. Use the [] and [] buttons to select the »Absent« menu
point and press [OK] or [].
➥ The display shows the »Absent (central)« selection
menu.
6. Use the [] and [] buttons to select the »Edit« menu
point and press [OK] or [].
➥ The display shows the »Absent« selection menu with
the final date of your presence.
7. Continue with step 11 in section [5.4.6 “Absent until ...”
for a room group, page 61].
5.4.8 Ending absence for a room group
You can use this function to end the “Absent” room mode
for a room group early. You can only perform this function
if the “Absent” room mode is centrally active and the
symbol
is shown in the central main display.
1. Press the [Central] function button in case the central
main display is still not displayed.
66
WILO SE 04/2011
Daily operation and quick settings
English
➥ The display shows the central main display. The central
active “Absent” room mode is indicated by the symbol
.
2. Press the [Menu] function button.
➥ The display shows the »Menu« selection menu.
3. Use the [] and [] buttons to select the »Central control« menu point and press [OK] or [].
➥ The display shows the »Central control« selection
menu.
4. Use the [] and [] buttons to select the »Central active
interventions« menu point and press [OK] or [].
➥ The display shows the »Central active interventions«
selection menu.
5. Use the [] and [] buttons to select the »Absent« menu
point and press [OK] or [].
➥ The display shows the »Absent (central)« selection
menu.
6. Use the [] and [] buttons to select the »End« menu
point and press [OK] or [].
➥ The display shows the central main display with the
overview of the active time profiles for all the room
user interfaces included in the central control. The
“Absent” room mode has been ended and the preset
time profile is active again.
User manual Wilo-Geniax Central Control
67
English
Daily operation and quick settings
5.5 Activating key lock
You can disable the Central Control buttons to prevent
accidental input. In locked status, entries via the buttons
can no longer be made.
1. Press the [Room] function button in case the room main
display is still not displayed.
➥ The display shows the room main display.
2. Press the [Menu] function button.
➥ The display shows the »Menu« selection menu.
3. Use the [] and [] buttons to select the »Settings«
menu point and press [OK] or [].
➥ The display shows the »Settings« selection menu.
4. Select the »Key lock« menu point.
➥ The display shows the »Key lock« dialogue.
5. Activate the key lock with [OK] or return with [back] to the
»Settings« selection menu without activating the key
lock.
An active key lock is indicated by the symbol
in
the main display. In order to cancel the key lock
again, press the two function buttons at the Central Control simultaneously.
68
WILO SE 04/2011
Calling up information
6
English
Calling up information
Along with the information of the main display
[3.1 Display, page 10], you can call up further information
via a menu.
6.1 Display outdoor temperature
You can have the outdoor temperature displayed.
This function is only available for those Geniax
systems with an installed outdoor temperature
sensor.
1. Press the [Room] function button in case the room main
display is still not displayed.
➥ The display shows the room main display.
2. Press the [Menu] function button.
➥ The display shows the »Menu« selection menu.
3. Select the »Information« menu point and press [OK].
➥ The display shows the »Information« selection menu.
4. Select the »Outdoor temperature« menu point and press
[OK].
➥ The display shows the »Outdoor temperature« display
menu.
5. Return with [back] to the »Information« selection menu or
wait until the display automatically shows the main display again.
User manual Wilo-Geniax Central Control
69
English
Calling up information
6.2 Displaying energy saving tips
You can also display the energy saving tips for efficient
operation of the Central Control.
1. Press the [Room] function button in case the room main
display is still not displayed.
➥ The display shows the room main display.
2. Press the [Menu] function button.
➥ The display shows the »Menu« selection menu.
3. Select the »Information« menu point and press [OK].
➥ The display shows the »Information« selection menu.
4. Select the »Energy saving tips« menu point and press
[OK].
➥ The display shows the »Energy saving tips« display
menu with an energy saving tip.
5. Use [] and [] to select other energy saving tips.
6. Return with [back] to the »Information« selection menu or
wait until the display automatically shows the main display again.
70
WILO SE 04/2011
Calling up information
English
6.3 Displaying temperature specifications
You can display the temperature specifications, which are
defined in the working range of the temperature control.
The operation of the individual temperatures is explained
in the 4.2 Temperature specifications [page 23] section.
The temperature specifications are preset in the factory
but can be subsequently changed [7.3 Setting temperature specifications, page 86].
1. Press the [Room] function button in case the room main
display is still not displayed.
➥ The display shows the room main display.
2. Press the [Menu] function button.
➥ The display shows the »Menu« selection menu.
3. Select the »Information« menu point and press [OK].
➥ The display shows the »Information« selection menu.
4. Select the »Temperature specifications« menu point and
press [OK].
➥ The display shows the »Temperature specifications«
selection menu.
Display comfort
temperature?
5. In order to display the comfort temperature, select the
»Comfort« menu point and press [OK].
➥ The display shows the »Comfort« display menu.
6. Return with [back] or [] to the »Temperature specifications« selection menu in case you want to have other
temperature specifications shown, or wait until the display automatically shows the main display again.
User manual Wilo-Geniax Central Control
71
English
Calling up information
Show energy saving
temperature?
7. In order to display the energy saving temperature, select
the »Save« menu point and press [OK].
➥ The display shows the »Save« display menu.
8. Return with [back] or [] to the »Temperature specifications« selection menu in case you want to have other
temperature specifications shown, or wait until the display automatically shows the main display again.
Show room frost protection
temperature?
9. In order to the display the room frost protection temperature, select the »Room frost protection« menu point and
press [OK].
➥ The display shows the »Room frost protection« display
menu.
10. Return with [back] or [] to the »Temperature specifications« selection menu in case you want to have other
temperature specifications shown, or wait until the display automatically shows the main display again.
Display the maximum 11. In order to the display the maximum temperature, select
temperature?
the »Maximum« menu point and press [OK].
➥ The display shows the »Maximum« display menu.
12. Return with [back] or [] to the »Temperature specifications« selection menu in case you want to have other
temperature specifications shown, or wait until the display automatically shows the main display again.
Display minimum 13. In order to the display the minimum temperature, select
temperature?
the »Minimum« menu point and press [OK].
➥ The display shows the »Minimum« display menu.
14. Return with [back] or [] to the »Temperature specifications« selection menu in case you want to have other
temperature specifications shown, or wait until the display automatically shows the main display again.
72
WILO SE 04/2011
Calling up information
English
6.4 Displaying unit information
You can use this function to display the following unit
information:
• The name of the room where the Central Control is
installed
• The room group in to which the room has been assigned
• The serial number of your Central Control
1. Press the [Room] function button in case the room main
display is still not displayed.
➥ The display shows the room main display.
2. Press the [Menu] function button.
➥ The display shows the »Menu« selection menu.
3. Select the »Information« menu point and press [OK].
➥ The display shows the »Information« selection menu.
4. Select the »Unit« menu point and press [OK].
➥ The display shows the »Unit information« display
menu.
5. Return with [back] to the »Information« selection menu or
wait until the display automatically shows the main display again.
6.5 Displaying contact person
You can use this function to show the contact data of the
specialist who installed your heating system to receive
quick assistance in case there are problems.
User manual Wilo-Geniax Central Control
73
English
Calling up information
1. Press the [Room] function button in case the room main
display is still not displayed.
➥ The display shows the room main display.
2. Press the [Menu] function button.
➥ The display shows the »Menu« selection menu.
3. Select the »Information« menu point and press [OK].
➥ The display shows the »Information« selection menu.
4. Select the »Contact person« menu point and press [OK].
➥ The display shows the »Contact person« display menu.
5. Return with [back] to the »Information« selection menu or
wait until the display automatically shows the main display again.
6.6 Displaying symbol explanations
With this function, you can have all the symbols displayed
which can be shown on the display to find out their meaning.
1. Press the [Room] function button in case the room main
display is still not displayed.
➥ The display shows the room main display.
2. Press the [Menu] function button.
➥ The display shows the »Menu« selection menu.
3. Select the »Information« menu point and press [OK].
74
WILO SE 04/2011
Calling up information
English
➥ The display shows the »Information« selection menu.
4. Select the »Explanations of symbols« menu point and
press [OK].
➥ The display shows the »Explanations of symbols« display menu.
5. Use [] and [] to select the desired symbol.
➥ The display shows the brief designation of the displayed symbol in the header.
6. Return with [back] to the »Information« selection menu or
wait until the display automatically shows the main display again.
User manual Wilo-Geniax Central Control
75
English
7
Extended operation: setting up the Central Control
Extended operation: setting up the Central Control
Your Central Control has already been preset at the factory or, as the case may be, by a technician during the
installation to meet your individual needs and heating
habits.
Among the settings are:
• Configuration as independent or centrally controlled room
user interface
• Week profile specifications (time profiles for rooms and
room groups
• Standard values for temperature control
• Current date and time which control the time profiles
• Display contrast and brightness of the Central Control
7.1 Configuring central control functions
With the Central Control, several Geniax room user interfaces or, as the case may be, rooms which are included in
the central control can be controlled from one Central
Control.
If individual rooms are to be excluded from the central
control, the corresponding Geniax room user interface
(Comfort Control/Basic Control) has to be excluded from
the central control. Since the Central Control is also the
room user interface for the room where it is installed, it
can also exclude itself from the central control.
7.1.1 Configuring the Central Control for the central control
With this function, you can configure the room functions
of the Central Control for central control.
1. Press [Room] in case the room main display is still not displayed.
➥ The display shows the room main display.
2. Press [Menu].
76
WILO SE 04/2011
Extended operation: setting up the Central Control
English
➥ The display shows the »Menu« selection menu. The
third menu item from the top shows whether or not the
room is currently included in the central control.
3. If the room is centrally controlled by a Central Control, the
third menu point will be »Exclude room from centr.
contr.«. In order to remove the Central Control/room from
the central control, select the »Exclude room from centr.
contr.« menu point and press [OK].
➥ The display shows the »Menu« selection menu. The
third menu point in now »Include room for centr.
contr.«. The Central Control/room is removed from the
central control.
4. If the room is not centrally controlled, the third menu
point is »Include room for centr. contr.«. In order to
include the Central Control/room in the central control,
select the »Include room for centr. contr.« menu point
and press [OK].
➥ The display shows the »Menu« selection menu. The
third menu point in now »Exclude room from centr.
contr.«. The Central Control/room is centrally controlled.
When a Central Control or a room is controlled
centrally, local room time profiles can still be activated. However, the centrally activated room
group time profile will become automatically
active again after completion of the room time
profile.
If a central time profile is active, then the symbol
will be shown in addition in front of the symbol
of the corresponding time profile.
7.1.2 Configuring Geniax room user interfaces of a room group for central
control
With this function, you can configure the other rooms in a
room group functions for central control.
1. Press [Central] in case the central main display is still not
displayed.
➥ The display shows the central main display.
User manual Wilo-Geniax Central Control
77
English
Extended operation: setting up the Central Control
2. Press [Menu] and navigate in the »Central interventions«
selection menu via:
»Central control« »Central interventions«
➥ The display shows the »Central interventions« selection menu.
3. Use [] and [] to select the »Exclude rooms« menu item
and press [OK].
➥ The display shows the »Exclude rooms« selection menu
with the names of the rooms belonging to the room
group of the Central Control.
4. In order to include or exclude one or more rooms for the
central control, use [] and [] to select the respective
room and press [OK].
➥ The menu items of the rooms which are excluded from
the central control are ticked.
When a Central Control or a room is controlled
centrally, local room time profiles can still be activated. However, the centrally activated room
group time profile will become automatically
active again after completion of the room time
profile.
7.2 Editing the week profile
Up to three different time areas can be created for each
weekday in the week profile. You can adapt the week profile to suit your needs by changing existing time areas or
creating new time areas.
During installation, the week profile is individually
adapted to your heating habits and the spatial situation. It is only necessary to re-adapt it if the created weekly routine no longer corresponds to you
habits.
78
WILO SE 04/2011
Extended operation: setting up the Central Control
English
7.2.1 Editing the week profile of the room
You can edit the week profile of the room with this function.
1. Press [Room] in case the room main display is still not displayed.
➥ The display shows the room main display.
2. Press [Menu] and navigate to the »Week profile« selection
menu via:
»Settings« »Room« »Week profile«
➥ The display shows the »Edit week profile« selection
menu.
3. Use [] and [] to select the weekday whose time areas
you want to edit.
4. Use [] and [] to select the time area of the selected
weekday that you want to edit.
5. Use [OK] to open the selection menu for the selected time
area.
6. In order to set the starting time of the time area, select
»From:« and use [OK] to open the input menu.
7. Use [] and [] to enter the starting time.
8. Apply your input with [OK].
9. In order to set the end time of the time area, select »Up
to:« and use [OK] to open the input menu.
User manual Wilo-Geniax Central Control
79
English
Extended operation: setting up the Central Control
10. Use [] and [] to enter the end time.
11. Apply your input with [OK].
12. In order to set the room target temperature, select
»Temp.« and use [OK] to open the input menu.
13. Use [] and [] to enter the room target temperature.
14. Apply your input with [OK].
Set underfloor heating?
This function is only available for those heating
installations equipped with underfloor heating.
15. In order to set the temperature of the underfloor heating,
select »Floor tempering« and use [OK] to open the input
menu.
16. Use [] and [] to enter the tempering stage.
17. Apply your input with [OK].
80
WILO SE 04/2011
Extended operation: setting up the Central Control
Set towel dryer?
English
This function is only available for those heating
installations equipped with towel dryers.
18. In order to set the temperature of a towel dryer, select
»Towel dryer« and use [OK] to open the input menu.
19. Use [] and [] to enter the tempering stage.
20. Apply your input with [OK].
➥ The display shows the selection menu.
Do not apply values? 21. In order to exit the selection menu without applying the
input, press [back].
Delete time area? 22. In order to delete the time area, select »Deactivate time
area« and confirm with [OK].
Apply values? 23. In order to apply the values, select »Apply« and confirm
with [OK].
➥ The display shows the »Edit week profile« selection
menu of the last edited time area.
24. In order to enter or change other time areas, start again
with step 3.
Do not save week profile? 25. To not save the week profile, press [Cancel].
User manual Wilo-Geniax Central Control
81
English
Extended operation: setting up the Central Control
➥ The display shows the »Close« dialogue.
26. Cancel with [Yes] or return to the »Edit week profile«
selection menu with [back].
Save week profile? 27. To save the week profile, press [Save].
➥ The display shows the »Save?« dialogue.
28. In order to save the week profile, press [Yes] or return to
the »Edit week profile« selection menu with [back] without saving.
7.2.2 Editing the central week profile
You can edit the week profile of a room group with this
function.
1. Press [Central] in case the central main display is still not
displayed.
➥ The display shows the central main display.
2. Press [Menu] and navigate to the »Week profile« selection
menu via:
»Central control« »Central settings« »Name of the
room group« »Week profile«
In order to do the setting not for the entire room
group but rather for another Geniax room user
interface of the room group, select the respective
room in the »Central settings« menu instead of
the room group.
➥ The display shows the »Edit week profile« selection
menu.
3. Use [] and [] to select the weekday whose time areas
you want to edit.
4. Use [] and [] to select the time area of the selected
weekday that you want to edit.
5. Use [OK] to open the selection menu for the selected time
area.
82
WILO SE 04/2011
Extended operation: setting up the Central Control
English
6. In order to set the starting time of the time area, select
»From:« and use [OK] to open the input menu.
7. Use [] and [] to enter the starting time.
8. Apply your input with [OK].
9. In order to set the end time of the time area, select »Up
to:« and use [OK] to open the input menu.
10. Use [] and [] to enter the end time.
11. Apply your input with [OK].
12. In order to set the room target temperature, select
»Temp.« and use [OK] to open the input menu.
13. Use [] and [] to enter the room target temperature.
14. Apply your input with [OK].
User manual Wilo-Geniax Central Control
83
English
Extended operation: setting up the Central Control
Set underfloor heating?
This function is only available for those heating
installations equipped with underfloor heating.
15. In order to set the temperature of the underfloor heating,
select »Floor tempering« and use [OK] to open the input
menu.
16. Use [] and [] to enter the tempering stage.
17. Apply your input with [OK].
Set towel dryer?
This function is only available for those heating
installations equipped with towel dryers.
18. In order to set the temperature of a towel dryer, select
»Towel dryer« and use [OK] to open the input menu.
19. Use [] and [] to enter the tempering stage.
20. Apply your input with [OK].
➥ The display shows the selection menu.
Do not apply values? 21. In order to exit the selection menu without applying the
input, press [back].
Delete time area? 22. In order to delete the time area, select »Deactivate time
area« and confirm with [OK].
84
WILO SE 04/2011
Extended operation: setting up the Central Control
English
Apply values? 23. In order to apply the values, select »Apply« and confirm
with [OK].
➥ The display shows the »Edit week profile« selection
menu of the last edited time area.
24. In order to enter or change other time areas, start again
with step 3.
Do not save week profile? 25. To not save the week profile, press [Cancel].
➥ The display shows the »Close« dialogue.
26. Cancel with [Yes] or return to the »Edit week profile«
selection menu with [back].
Save week profile? 27. To save the week profile, press [Save].
➥ The display shows the »Save?« dialogue.
28. In order to save the week profile, press [Yes] or return to
the »Edit week profile« selection menu with [back] without saving.
User manual Wilo-Geniax Central Control
85
English
Extended operation: setting up the Central Control
7.3 Setting temperature specifications
The temperature specifications define the working range
of the temperature control. They are default values in the
time profiles and are stored at the factory [13.3 Factory
configuration, page 109]. You can change the default values for the temperature control in case your heating habits have significantly changed [4 How does the
temperature control work?, page 19].
Caution!
Changing the factory-set temperature specifications
can adversely affect the function of the heating systems.
• Only carry out changes on the temperature specifications in consultation with an expert.
7.3.1 Setting temperature specifications for the room
You can use this function to set the temperature specifications for the room.
1. Press [Room] in case the room main display is still not displayed.
➥ The display shows the room main display.
2. Press [Menu] and navigate to the »Temperature specifications« selection menu via:
»Settings« »Room« »Temperature specifications«
➥ The display shows the »Temperature specifications«
selection menu.
Change comfort
temperature?
86
3. In order to change the comfort temperature, select the
»Comfort« menu point and press [OK].
WILO SE 04/2011
Extended operation: setting up the Central Control
English
➥ The display shows the »Comfort« input menu.
4. Use [] and [] to enter the desired temperature.
5. Apply your input with [OK] or use [back] without applying
the input to return to the »Temperature specifications«
selection menu.
Change energy saving
temperature?
6. In order to change the energy saving temperature, select
the »Save« menu point and press [OK].
➥ The display shows the »Save« input menu.
Entering too high an energy saving temperature
can lead to unnecessary waste of energy.
7. Use [] and [] to enter the desired temperature.
8. Apply your input with [OK] or use [back] without applying
the input to return to the »Temperature specifications«
selection menu.
Change room frost
protection temperature?
9. In order to change the room frost protection temperature,
select the »Room frost protection« menu point and press
[OK].
➥ The display shows the »Room frost protection« input
menu.
10. Use [] and [] to enter the desired temperature.
11. Apply your input with [OK] or use [back] without applying
the input to return to the »Temperature specifications«
selection menu.
Change maximum 12. In order to change the maximum temperature, select the
temperature?
»Maximum« menu point and press [OK].
➥ The display shows the »Maximum« input menu.
The maximum temperature determines the maximum room target temperature that can be set. The
value entered here can not be exceeded.
13. Use [] and [] to enter the desired temperature.
User manual Wilo-Geniax Central Control
87
English
Extended operation: setting up the Central Control
14. Apply your input with [OK] or use [back] without applying
the input to return to the »Temperature specifications«
selection menu.
Change minimum 15. In order to change the minimum temperature, select the
temperature?
»Minimum« menu point and press [OK].
➥ The display shows the »Minimum« input menu.
The minimum temperature determines the minimum room target temperature that can be set. The
temperature cannot fall below the value entered
here.
16. Use [] and [] to enter the desired temperature.
17. Apply your input with [OK] or use [back] without applying
the input to return to the »Temperature specifications«
selection menu.
7.3.2 Setting temperature specifications for a room group
You can use this function to set the temperature specifications for a room group.
1. Press [Central] in case the central main display is still not
displayed.
➥ The display shows the central main display.
2. Press [Menu] and navigate to the »Temperature specifications« selection menu via:
»Central control« »Central settings« »Name of the
room group« »Temperature specifications«
In order to do the setting not for the entire room
group but rather for another Geniax room user
interface of the room group, select the respective
room name in the »Central settings« menu instead
of the room group name.
➥ The display shows the »Temperature specifications«
selection menu.
88
WILO SE 04/2011
Extended operation: setting up the Central Control
Change comfort
temperature?
English
3. In order to change the comfort temperature, select the
»Comfort« menu point and press [OK].
➥ The display shows the »Comfort« input menu.
4. Use [] and [] to enter the desired temperature.
5. Apply your input with [OK] or use [back] without applying
the input to return to the »Temperature specifications«
selection menu.
Change energy saving
temperature?
6. In order to change the energy saving temperature, select
the »Save« menu point and press [OK].
➥ The display shows the »Save« input menu.
Entering too high an energy saving temperature
can lead to unnecessary waste of energy.
7. Use [] and [] to enter the desired temperature.
8. Apply your input with [OK] or use [back] without applying
the input to return to the »Temperature specifications«
selection menu.
Change room frost
protection temperature?
9. In order to change the room frost protection temperature,
select the »Room frost protection« menu point and press
[OK].
➥ The display shows the »Room frost protection« input
menu.
10. Use [] and [] to enter the desired temperature.
11. Apply your input with [OK] or use [back] without applying
the input to return to the »Temperature specifications«
selection menu.
Change maximum 12. In order to change the maximum protection temperature,
temperature?
select the »Maximum« menu point and press [OK].
➥ The display shows the »Maximum« input menu.
The maximum temperature determines the maximum room target temperature that can be set. The
value entered here can not be exceeded.
13. Use [] and [] to enter the desired temperature.
User manual Wilo-Geniax Central Control
89
English
Extended operation: setting up the Central Control
14. Apply your input with [OK] or use [back] without applying
the input to return to the »Temperature specifications«
selection menu.
Change minimum 15. In order to change the minimum temperature, select the
temperature?
»Minimum« menu point and press [OK].
➥ The display shows the »Minimum« input menu.
The minimum temperature determines the minimum room target temperature that can be set. The
temperature cannot fall below the value entered
here.
16. Use [] and [] to enter the desired temperature.
17. Apply your input with [OK] or use [back] without applying
the input to return to the »Temperature specifications«
selection menu.
7.4 Setting day and night period
The day and night period are used as period specification
in the presence time profiles. The periods are stored in the
factory [13.3 Factory configuration, page 109]. You can
change the default values in case your heating habits have
significantly changed [4 How does the temperature control work?, page 19].
7.4.1
Setting day/night area for the room
You can use this function to define the day/night area for
the room.
1. Press [Room] in case the room main display is still not displayed.
➥ The display shows the room main display.
2. Press [Menu] and navigate to the »Day / night area« selection menu via:
»Settings« »Room« »Day / night area«
➥ The display shows the »Day / night area« selection
menu.
90
WILO SE 04/2011
Extended operation: setting up the Central Control
Change day period?
English
3. In order to change the day period, select »Day ends at«
menu point and press [OK].
➥ The display shows the »Day ends at ...« input menu.
4. Set the time at which the day ends with the [] and []
buttons.
5. Apply your input with [OK] or use [back] without applying
the input to return to the »Day / night area« selection
menu.
Change night period?
6. In order to change the night period, select »Night ends at«
menu point and press [OK].
➥ The display shows the »Night ends at ...« input menu.
7. Set the time at which the night ends with the [] and []
buttons.
8. Apply your input with [OK] or use [back] without applying
the input to return to the »Day / night area« selection
menu.
7.4.2
Setting day/night area for a room group
You can use this function to define the day/night area for
a room group.
1. Press [Central] in case the central main display is still not
displayed.
➥ The display shows the central main display.
2. Press [Menu] and navigate to the »Day / night area« selection menu via:
»Central control« »Central settings« »Name of the
room group« »Day / night area«
In order to do the setting not for the entire room
group but rather for another Geniax room user
interface of the room group, select the respective
room name in the »Central settings« menu instead
of the room group name.
User manual Wilo-Geniax Central Control
91
English
Extended operation: setting up the Central Control
➥ The display shows the »Day / night area« selection
menu.
Change day period?
3. In order to change the day period, select »Day ends at«
menu point and press [OK].
➥ The display shows the »Day ends at ...« input menu.
4. Set the time at which the day ends with the [] and []
buttons.
5. Apply your input with [OK] or use [back] without applying
the input to return to the »Day / night area« selection
menu.
Change night period?
6. In order to change the night period, select »Night ends at«
menu point and press [OK].
➥ The display shows the »Night ends at ...« input menu.
7. Set the time at which the night ends with the [] and []
buttons.
8. Apply your input with [OK] or use [back] without applying
the input to return to the »Day / night area« selection
menu.
7.5 Calling up factory configuration
You can reset the Central Control back to its saved factory
presettings. This will lead to the week profile stored in the
factory becoming active [13.3 Factory configuration,
page 109].
The restoration of the presettings will lead to all
individual adjustments of the week profile being
lost.
92
WILO SE 04/2011
Extended operation: setting up the Central Control
English
7.5.1 Viewing the presetting for the room
You can use this function to view the factory-saved week
profile for the room.
1. Press [Room] in case the room main display is still not displayed.
➥ The display shows the room main display.
2. Press [Menu] and navigate to the »Presetting« selection
menu via:
»Settings« »Room« »Presetting«.
➥ The display shows the »Presetting« selection menu.
3. Select the »View« menu point and press [OK].
➥ The display shows the »View presetting« dialogue.
4. Use [] and [] to select the weekday for which you want
to see the presettings.
5. Return to the »Presetting« selection menu with [back].
7.5.2 Restoring the presetting for the room
You can use this function to restore the factory-saved
week profile for the room.
1. Press [Room] in case the room main display is still not displayed.
➥ The display shows the room main display.
2. Press [Menu] and navigate to the »Presetting« selection
menu via:
»Settings« »Room« »Presetting«.
➥ The display shows the »Presetting« selection menu.
3. Select the »Restore« menu point and press [OK].
User manual Wilo-Geniax Central Control
93
English
Extended operation: setting up the Central Control
Restore presetting?
➥ The display shows the »Restore« dialogue.
4. In order to restore the presettings, confirm the dialogue
with [Yes], or return (without restoring the presettings) to
the »Presetting« selection menu with [back].
If no input is made, the device automatically jumps
back to the main display without restoring the presettings.
➥ The display shows the room main display with the
room target temperature and the time up to when this
temperature should be maintained. The “Week profile”
room mode is indicated by the symbol .
7.5.3 Viewing the presetting for a room group
You can use this function to view the factory-saved week
profile for a room group.
1. Press [Central] in case the central main display is still not
displayed.
➥ The display shows the room main display.
2. Press [Menu] and navigate to the »Presetting« selection
menu via:
»Central control« »Central settings« »Name of the
room group« »Presetting«.
In order to see the week profile not of the entire
room group but rather for another Geniax room
user interface of the room group (room week profile), select the respective room name in the »Central settings« menu instead of the room group
name.
➥ The display shows the »Presetting« selection menu.
3. Select the »View« menu point and press [OK].
94
WILO SE 04/2011
Extended operation: setting up the Central Control
English
➥ The display shows the »View presetting« dialogue.
4. Use [] and [] to select the weekday for which you want
to see the presettings.
5. Return to the »Presetting« selection menu with [back].
7.5.4 Restoring the presetting for a room group
You can use this function to restore the factory-saved
week profile for a room group.
1. Press [Central] in case the central main display is still not
displayed.
➥ The display shows the central main display.
2. Press [Menu] and navigate to the »Presetting« selection
menu via:
»Central control« »Central settings« »Name of the
room group« »Presetting«.
In order to restore the setting not for the entire
room group but rather for another Geniax room
user interface of the room group (room week profile), select the respective room name in the »Central settings« menu instead of the room group
name.
➥ The display shows the »Presetting« selection menu.
3. Select the »Restore« menu point and press [OK].
Restore presetting?
➥ The display shows the »Restore« dialogue.
4. In order to restore the presettings, confirm the dialogue
with [Yes], or return (without restoring the presettings) to
the »Presetting« selection menu with [back].
If no input is made, the device automatically jumps
back to the main display without restoring the presettings.
User manual Wilo-Geniax Central Control
95
English
Extended operation: setting up the Central Control
➥ The display shows the central main display with the
overview of the active time profiles for all the room
user interfaces included in the central control. The
central active “Week profile” room mode is indicated
by the symbol .
7.6 Adjusting the device
You can set the brightness and contrast of the Central
Control Display in order to improve the legibility of the
display. Besides this, you can select whether the main display should show the room or the room group as start
screen.
7.6.1 Selecting start screen
1. Press [Room] in case the room main display is still not displayed.
➥ The display shows the room main display.
2. Press [Menu] and navigate in the »Unit« selection menu via:
»Settings« »Unit«
➥ The display shows the »Unit« selection menu.
3. In order to select the start screen, select the »Start
screen« menu point and press [OK].
➥ The display shows the »Start screen« selection menu.
4. Use [] and [] to select the entry »This room« or »This
room group«, depending on whether you want the room
main display or the central main display as the start
screen.
5. Apply your selection with [OK] or use [Close] to return to
the main display without applying the entry.
7.6.2 Setting the brightness
1. Press [Room] in case the room main display is still not displayed.
➥ The display shows the room main display.
96
WILO SE 04/2011
Extended operation: setting up the Central Control
English
2. Press [Menu] and navigate in the »Unit« selection menu via:
»Settings« »Unit«
➥ The display shows the »Unit« selection menu.
3. In order to change the brightness, select the »Brightness«
menu point and press [OK].
➥ The display shows the »Brightness« input menu.
4. Use [] and [] to set the desired level of brightness.
5. Apply your input with [OK] or use [back] without applying
the input to return to the »Unit« selection menu.
7.6.3 Setting the contrast
1. Press [Room] in case the room main display is still not displayed.
➥ The display shows the room main display.
2. Press [Menu] and navigate in the »Unit« selection menu via:
»Settings« »Unit«
➥ The display shows the »Unit« selection menu.
3. In order to change the contrast, select the »Contrast«
menu point and press [OK].
➥ The display shows the »Contrast« input menu.
4. Use [] and [] to set the desired level of contrast.
5. Apply your input with [OK] or use [back] without applying
the input to return to the »Unit« selection menu.
User manual Wilo-Geniax Central Control
97
English
8
Maintenance
Maintenance
Only use a damp cloth to clean your Geniax Central
Control (as well as the electronics cover, unit casings,
design casings).
Do not use soap, dishwashing liquid, scouring powder or
caustic cleaning agent which could damage the housing
material.
9
Disposal
Proper disposal and recycling of this product prevents
damage to the environment and risks to personal health.
1. Use public or private disposal organisations when disposing of all or part of the product.
2. For more information on proper disposal, please contact your local council or waste disposal office or the
supplier from whom you obtained the product.
98
WILO SE 04/2011
Symbols
English
10 Symbols
In the following table, all symbols that can appear in the
display are listed and explained.
Symbol
Meaning
Brief explanation
Week profile
Normal operation: The room is heated in accordance with the week profile for the current week
as set by the customer.
The normal operation is currently being overridden by the user. Until the selected time, the room
will be heated up to the selected target temperature.
The normal operation is currently being overridden. The room will be heated up to the preset
temperature:
Room mode
Manual intervention
Present
• Until the end of the currently active time area
or
Absent
• Until a time which can be freely selectable
the user
The normal operation is currently being overridden. The room temperature will be lowered to
the preset temperature:
• Until the end of the currently active time area
or
Summer operation
Room frost protection
Central intervention
User manual Wilo-Geniax Central Control
• Until a time which can be freely selectable
the user
The heating of the room is switched off due to
high outdoor temperatures.
The room is heated up to frost protection
temperature.
The time profile of a Geniax Central Control is
active.
99
English
Symbol
Symbols
Meaning
Brief explanation
Heating
The Geniax System regulates the room temperature to maintain the room target temperature.
The Geniax System regulates the room temperature to the room target temperature with
increased feed temperature.
The Geniax System regulates the room temperature to maintain the room target temperature.
In addition, a floor tempering or a towel dryer is
activated.
The Geniax System regulates the room temperature the room target temperature with
increased feed temperature.
In addition, a floor tempering or a towel dryer is
activated.
An floor tempering or the operation of a towel
dryer is activated.
The heating up of the room to a room target
temperature will not be done.
The Geniax System provides heating to the room
in such a way that the room target temperature is
achieved within the selected time.
The Geniax System reduces the provision of
heating in such a way that the room target temperature is achieved within the selected time.
The heat generator provides no heating.
system status
Quick heating-up
Heating with additional
tempering
Quick heating up with
additional tempering
Additional tempering
without heating up
Heating-up optimisation
Heating optimisation
No provision of heating
Chimney sweep/technician
Intervention by the Geniax Server
Window open
System frost protection/
pump contact
Fault/warning
100
An external intervention at the Geniax Server by
a person (activation of the chimney sweeper
operation).
An external intervention is made in the control of
the room by the Geniax Server.
The Geniax System has detected an open window and temporarily switched off the heating of
the room.
Geniax system protection: The entire heating circuit which is attached to the room is heated to
frost protection temperature.
A fault in the Geniax System or in the Central
Control has occurred. The system/Central
Control has to be checked by a technician.
WILO SE 04/2011
Symbols
Symbol
English
Meaning
Brief explanation
Key lock
The key lock is activated. A deactivation is done
by simultaneously pressing the two function
buttons.
Current outdoor temperature is displayed.
Display menu
(information)
Outdoor temperature
Brightness
Contrast
User manual Wilo-Geniax Central Control
The device is ready for setting the display brightness.
The device is ready for setting the display contrast.
101
English
Energy saving tips
11 Energy saving tips
The Wilo-Geniax Decentralised Pump System is a newly
developed heating system which, due to its innovative,
purely demand-oriented concept, can achieve energy
savings of an average of 20% compared to conventional
heating systems.
Energy consumption is not only based on the technology
of the heating system but also shaped by the individual
heating behaviour of the users.
The following energy saving tips inform you how you can
save more energy through adaptations to suit your own,
personal heating habits.
11.1 Setting the Central Control
Use the settings options and comfort functions the
Central Control offers to you.
The Central Control offers you the possibility to adapt and
to a large extent automate the heating of your rooms,
your apartment or your building to suit your individual
needs and your normal daily routine. You can pre-program
up to three heating-up and cooling-off periods for each
weekday and assign the respective comfort and energy
saving temperatures. In this way, you can be sure that
your heating is always in the comfort range when you are
present, but automatically switches to saving operation as
soon as you, for example, leave your house or apartment.
It is only necessary to intervene or change the preset settings in the event you alter your normal daily routine (for
example, holidays, unforeseen presence or absence, etc.).
11.2 Setting the room temperature
Do not set the room temperature higher than is just
enough to ensure your well-being and comfort. Every
degree above this means an increase in heating costs of
up to 6%.
Also adapt the setting of the room temperature to the
corresponding use of the room. It is normally not necessary to continuously heat rooms that are seldom used or
only used at particular times, such as bedrooms, at 20°C or
more.
102
WILO SE 04/2011
Energy saving tips
English
11.3 Lowering the room temperature
Lower the room temperature to the energy saving temperature for your sleeping periods and for longer
absences. For regular, repeating absences, it is a good idea
to put these in a time profile and have the energy saving
temperature automatically activated for the desired
period. You can simply and quickly set these at the Geniax
Central Control.
We recommend lowering the room temperature by about
5°C for absences as is the case during full heating times.
Lowering by more than 5°C will generally not produce further significant energy savings, since then more energy is
required for heating-up during the next full heating time.
Only for longer absences (for example, going on holiday)
does it make sense to lower the room temperatures more.
In this case, the Wilo-Geniax Decentralised Pump System
automatically ensures sufficient frost protection in winter.
11.4 Sensibly ventilate residential rooms
Wilo recommends only opening the windows for brief
times for ventilation purposes during heating periods;
brief and intensive airing out periods are more effective
and save more energy than leaving bottom hung windows
open for long periods. Never leave windows open for temperature control.
It is true that the Geniax System control has a window
contact (to be provided onsite) that will detect an open
window and switch off the decentralised pump in this
room. Please keep in mind, however, that a greater
expenditure of heating energy will be needed subsequently to bring the room back up to the comfort temperature.
Another factor to consider is the resulting temperature
difference to neighbouring rooms will lead to heat losses
in those rooms via enclosing surfaces (that is, walls, doors,
ceilings, floors), meaning that heating is lost inadvertently
and in an uncontrolled fashion from the neighbouring
rooms.
User manual Wilo-Geniax Central Control
103
English
Energy saving tips
11.5 Heat evenly
When you are present, heat all the rooms in your home
evenly and in accordance to the respective use.
The frequently observed practice of not heating rooms at
all that are seldom used or only used at particular times to
try to save energy is actually the wrong way to do this and
not a sensible way to operate. Losses of comfort are generally the result:
Heating a particular room will result in uncontrolled
warmth transfer via enclosing surfaces (that is, walls,
doors, ceilings, floors) to unheated neighbouring rooms.
Heating energy is inadvertently lost. This can lead to the
performance of the radiator of this heated room to not
being sufficient to heat up the room up to the desired
comfort temperature. Although the heating is in operation, the room is no longer sufficiently heated; the room is
not comfortably warm.
This effect also often occurs if room doors between
heated and unheated or lesser heated rooms remain open.
By the way, the building structure can also suffer if parts
of the building are not (or only insufficiently) heated.
11.6 Do not cover or block radiators
Covers, shelves or seating areas that are placed directly in
front of the radiators prevent the even spreading of
warmth in the room. Such a heat build-up causes up to
5% higher heating costs.
Curtains that hang over radiators also shield the room
from the warm air and increase heating costs.
104
WILO SE 04/2011
Energy saving tips
English
11.7 Do not cover the Central Control
Your Central Control has to be able to freely measure circulating room air to ensure problem-free function. For
this reason, do not cover your Central Control with curtains, furniture or other objects. Besides this, it should
always remain accessible to you for operation.
11.8 Close roller blinds
At night, the lower outdoor temperatures result in greater
heating loss by glass and frames of windows and doors.
Additional savings can therefore be achieved by roller
blinds, folding shutters, and also by curtains and blinds.
The energy savings which can be attained by these measures are, however, quite small if heat shield insulating
glass is used. Roller blinds cases should be compact and
thermally well insulated.
User manual Wilo-Geniax Central Control
105
106
Menu
Help
Settings
Information
Time profiles
Intervene
Include room for centr. contr.
Exclude room from centr. contr.
Currently active: [current overlay]
back
back
back
Help
Contrast
Device
Help
Brightness
Key lock
Help
Central
This room
Start screen
Date / time
Help
back
Help
back
Restore
View
back
Help
Minimum
Maximum
Frost protection
Save
Comfort
Time (xx:xx)
Date (xx.xx.xx)
back
Help
Presettings:
Day / night area
Temperature specifications
Week profile
back
Help
Minimum
Maximum
Frost protection
Save
Comfort
Room
back
Help
Symbols
Contact person
Temperature specifications
Energy saving tip
Outdoor temperature
back
Help
Absent until ...
Present until...
Present today
back
Help
Terminate
Edit
back
back
Help
Night ends at
Day ends at
English
Menu structure
12 Menu structure
12.1 Room function
WILO SE 04/2011
Menu
User manual Wilo-Geniax Central Control
Help
Central settings
Intervene centrally
Active centr. interventions
back
Home
Room
back
back
Help
Presettings:
Help
Restore
View
back
Help
Night ends at
Day ends at
back
Help
Day / night area
Minimum
Temperature specifications
Maximum
Frost protection
Save
Comfort
Week profile
back
Exclude rooms
With home week profile
Absent until ...
Warmer/colder
Present today
Present until...
Briefly away
Menu structure
English
12.2 Central functions
107
English
Technical information
13 Technical information
13.1 Type key
Example: Wilo-Geniax Central Control black
Geniax
Central Control
black
Decentralised Pump System
Central user interface, housing colour:
Top part white, bottom part white
Optional housing colour:
Top part white, bottom part black
13.2 Technical data
General data
Temperature detection:
Measurement range / °C
Accuracy / K
Housing colour
Dimensions W x H x D / mm
Weight/ kg
Permitted field of application
Permitted ambient
temperature / °C
Storage temperature / °C
Relative humidity / %
Electrical connection/
power supply
Mains connection /V DC SELV
Max. current consumption/mA
Connection system
Stripping length /mm
Geniax BUS
BUS termination resistance/Ω
Connection system
Stripping length /mm
Connection, window contact
Connection system
Stripping length /mm
108
0 to +45
± 0.5 1)
RAL 9016
91 x 89 x 29
0.2
0 to +60
-20 to +65
0 to 95% (non-condensing)
24 (min. 15/max. 26.4)
< 302)
WAGO terminals type 243-211 red/dark grey
5 to 6
120 3)
WAGO terminals type 243-212 yellow/light grey
5 to 6
2-pole, digital input
WAGO terminals, type 250-1402
8 to 9
WILO SE 04/2011
Technical information
English
13.2 Technical data
Electronics
Electromagnetic compatibility
Emitted interference
Interference resistance
Protection class
Protection class
Materials
Housing
EN 55022
EN 61000-6-3
EN 61000-6-2
IP 20
II
Lower part of housing: Plastic PC-ABS
Housing, upper part: Plastic PMMA/PC
1) In the range of +15 to +25°C
2) Device active, display lighting switched on
3) can be activated/deactivated via the termination switch (DIP switch) at the Central Control
13.3 Factory configuration
The normally used factory-saved values are presented in
the following table.
Temperature pre-settings
Comfort temperature
Energy saving temperature
Minimum temperature
Maximum temperature
Room frost protection temperature
Temperature in the day period
End of the day period
Temperature in the night period
End of the night period
User manual Wilo-Geniax Central Control
21°C
The default value of the Geniax System which
is suggested when creating a new time area
in the week profile.
16°C
The default value of the Geniax System for
absence.
10°C
The lowest room temperature which can be
set for the building/rooms.
30°C
The highest room temperature which can be
set for the building/rooms.
8°C
The frost protection temperature set for all
rooms in the building by the Geniax System.
The value of the frost protection temperature
can be below the minimum temperature.
21°C
The temperature set by the Geniax System
for presence.
22:00 hrs The end of the day period set by the Geniax
System.
16°C
The temperature set by the Geniax System
for absence.
06:00 hrs The end of the night period set by the Geniax
System.
109
English
Technical information
Week time profiles
Time area 1
Start
End
Temperature
Towel dryer
Floor tempering
Time area 2
Start
End
Temperature
Towel dryer
Floor tempering
Time area 3
Start
End
Temperature
Towel dryer
Floor tempering
06:00 hrs Start time of time area 1
22:00 hrs End of time area 1
21°C
Room temperature for time area 1
(comfort temperature)
Stage 3 Tempering stage of a towel dryer for time
area 1 (available stages: 0 to 5)
Stage 3 Tempering stage of the floor for time area 1
(available stages: 0 to 5)
00:00 hrs Start time of time area 2
00:00 hrs End of time area 2
21°C
Room temperature for time area 2
(comfort temperature)
Stage 3 Tempering stage of a towel dryer for time
area 2 (available stages: 0 to 5)
Stage 3 Tempering stage of the floor for time area 2
(available stages: 0 to 5)
00:00 hrs Start time of time area 3
00:00 hrs End of time area 3
21°C
Room temperature for time area 3
(comfort temperature)
Stage 3 Tempering stage of a towel dryer for time
area 3 (available stages: 0 to 5)
Stage 3 Tempering stage of the floor for time area 3
(available stages: 0 to 5)
When delivered, time area 1 is set as default for
every weekday.
110
WILO SE 04/2011
Index
C
central control
-including and excluding rooms................. 76
-principle of operation.................................24
D
display............................................................. 10
-overview....................................................... 10
-setting ................................................... 96, 97
-switching on ................................................ 15
display menu........................................... 13, 18
E
energy saving tips................................ 70, 102
F
function key..................................................... 6
H
help ................................................................. 16
-explanations of symbols..................... 74, 99
-service .......................................................... 73
I
input menu.............................................. 13, 16
intermediate range ....................................... 19
K
key lock .......................................................... 68
M
main display
-central .......................................................... 12
-changing ............................................... 15, 96
-room ............................................................. 10
menu
-applying values ...........................................17
-changing date.............................................. 17
-changing temperature ............................... 17
-changing time ............................................. 17
-do not apply values..................................... 17
-exiting.................................................... 16, 18
-main menu ................................................... 14
-select ............................................................ 15
N
navigation button ........................................... 6
User manual Wilo-Geniax Central Control
English
O
operating concept
-fundamentals ..............................................14
operating elements ............................... 10, 14
-function key ................................................14
-navigation button.......................................14
Q
quick heating-up ..........................................31
quickstart ......................................................... 7
R
room mode........................................11, 12, 99
S
safety ................................................................ 8
-children........................................................... 8
-key lock ........................................................68
selection menu....................................... 13, 15
setting towel dryer ................................ 81, 84
setting underfloor heating ................... 80, 84
system status ................................ 11, 12, 100
T
temperature
-adjusting ......................................................25
-comfort ........................................................23
-maximum .....................................................23
-minimum ......................................................23
-outdoor.........................................................69
-room frost protection ................................23
-room target temperature...........................11
-room temperature ......................................11
-saving ...........................................................23
temperature specifications
-setting ..........................................................86
time area ........................................................19
time profile
-absent.................................................... 20, 26
-intervention .......................................... 21, 25
-present .................................................. 20, 25
-principle of operation.................................19
time specification .........................................11
W
week profile ...................................................19
111
EG - Konformitätserklärung
EC – Declaration of conformity
Déclaration de conformité CE
D
GB
F
(gemäß 2004/108/EG Anhang IV,2 und 2006/95/EG Anhang III,B,
according 2004/108/EC annex IV,2 and 2006/95/EC annex III,B,
conforme 2004/108/CE appendice IV,2 et 2006/95/CE appendice III B)
Hiermit erklären wir, dass die Bauarten der Baureihe :
Herewith, we declare that this product:
Par le présent, nous déclarons que cet agrégat :
Geniax Central Control
Geniax Central Control black
Geniax Comfort Control
Geniax Comfort Control black
Geniax Basic Control
Geniax Basic Control black
Geniax Ambient Sensor
in der gelieferten Ausführung folgenden einschlägigen Bestimmungen entspricht:
in its delivered state complies with the following relevant provisions:
est conforme aux dispositions suivants dont il relève:
Elektromagnetische Verträglichkeit - Richtlinie
Electromagnetic compatibility - directive
Compatibilité électromagnétique- directive
2004/108/EG
Niederspannungsrichtlinie
Low voltage directive
Directive basse-tension
2006/95/EG
und entsprechender nationaler Gesetzgebung.
and with the relevant national legislation.
et aux législations nationales les transposant.
Angewendete harmonisierte Normen, insbesondere:
Applied harmonized standards, in particular:
Normes harmonisées, notamment:
EN 60335-2-51
EN 55014-1
EN 61000-6-2
EN 61000-6-3
Bei einer mit uns nicht abgestimmten technischen Änderung der oben genannten Bauarten, verliert diese Erklärung ihre Gültigkeit.
If the above mentioned series are technically modified without our approval, this declaration shall no longer be applicable.
Si les gammes mentionnées ci-dessus sont modifiées sans notre approbation, cette déclaration perdra sa validité.
Dortmund, 06.04.2011
Erwin Prieß
Quality Manager
Document: 2109714.2
WILO SE
Nortkirchenstraße 100
44263 Dortmund
Germany
NL
I
EG-verklaring van overeenstemming
Dichiarazione di conformità CE
Declaración de conformidad CE
Hiermede verklaren wij dat dit aggregaat in de geleverde uitvoering
voldoet aan de volgende bepalingen:
Elektromagnetische compatibiliteit 2004/108/EG
Con la presente si dichiara che i presenti prodotti sono conformi alle
seguenti disposizioni e direttive rilevanti:
Compatibilità elettromagnetica 2004/108/EG
Por la presente declaramos la conformidad del producto en su
estado de suministro con las disposiciones pertinentes siguientes:
Directiva sobre compatibilidad electromagnética 2004/108/EG
EG-laagspanningsrichtlijn 2006/95/EG
en overeenkomstige nationale wetgeving
gebruikte geharmoniseerde normen, in het bijzonder:
zie vorige pagina
Direttiva bassa tensione 2006/95/EG
e le normative nazionali vigenti
norme armonizzate applicate, in particolare:
vedi pagina precedente
Directiva sobre equipos de baja tensión 2006/95/EG
y la legislación nacional vigente
normas armonizadas adoptadas, especialmente:
véase página anterior
P
Declaração de Conformidade CE
S
N
CE- försäkran
Härmed förklarar vi att denna maskin i levererat utförande
motsvarar följande tillämpliga bestämmelser:
EGElektromagnetisk kompatibilitet riktlinje 2004/108/EG
EU-Overensstemmelseserklæring
Vi erklærer hermed at denne enheten i utførelse som levert er i
overensstemmelse med følgende relevante bestemmelser:
EGEMVElektromagnetisk kompatibilitet 2004/108/EG
EGLågspänningsdirektiv 2006/95/EG
och gällande nationell lagstiftning
tillämpade harmoniserade normer, i synnerhet:
se föregående sida
EGLavspenningsdirektiv 2006/95/EG
og tilsvarende nasjonal lovgivning
anvendte harmoniserte standarder, særlig:
se forrige side
Pela presente, declaramos que esta unidade no seu estado original,
está conforme os seguintes requisitos:
Compatibilidade electromagnética 2004/108/EG
Directiva de baixa voltagem 2006/95/EG
e respectiva legislação nacional
normas harmonizadas aplicadas, especialmente:
ver página anterior
E
FIN
DK
H
CE-standardinmukaisuusseloste
Ilmoitamme täten, että tämä laite vastaa seuraavia asiaankuuluvia
määräyksiä:
Sähkömagneettinen soveltuvuus 2004/108/EG
EF-overensstemmelseserklæring
Vi erklærer hermed, at denne enhed ved levering overholder
følgende relevante bestemmelser:
Elektromagnetisk kompatibilitet: 2004/108/EG
EK-megfelelségi nyilatkozat
Ezennel kijelentjük, hogy az berendezés megfelel az alábbi
irányelveknek:
Elektromágneses összeférhetség irányelv: 2004/108/EK
Matalajännite direktiivit: 2006/95/EG
ja vastaavaa kansallista lainsäädäntöä
käytetyt yhteensovitetut standardit, erityisesti:
katso edellinen sivu.
Lavvolts-direktiv 2006/95/EG
og gældende national lovgivning
anvendte harmoniserede standarder, særligt:
se forrige side
Kisfeszültségü berendezések irányelv: 2006/95/EK
valamint a vonatkozó nemzeti törvényeknek és
alkalmazott harmonizált szabványoknak, különösen:
lásd az elz oldalt
CZ
PL
RUS
Prohláení o shod ES
Prohlaujeme tímto, e tento agregát vdodaném provedení
odpovídá následujícím písluným ustanovením:
Deklaracja Zgodnoci WE
Niniejszym deklarujemy z pen odpowiedzialnoci, e
dostarczony wyrób jest zgodny z nastpujcymi dokumentami:
Smrnice o elektromagnetické kompatibilit 2004/108/ES
dyrektyw dot. kompatybilnoci elektromagnetycznej
2004/108/WE
, !"! !
#$ % & "
:
2004/108/EG
Smrnice pro nízké naptí 2006/95/ES
a písluným národním pedpis'm
pouité harmoniza;ní normy, zejména:
dyrektyw niskonapiciow 2006/95/WE
oraz odpowiednimi przepisami ustawodawstwa krajowego
stosowanymi normami zharmonizowanymi, a w szczególnoci:
! "
#$ 2006/95/EG
*+ +
<%+ ! " ", :
viz pedchozí strana
patrz poprzednia strona
. %"& "*
GR
TR
RO
%&'()* )+,,37;()*< =*< >>
=>?@JUXY\ ^_` _U {|U}^J ~X_^ ~X_ _>J ~__~> {~|
U>
`~JU{U`\ _` ~^?UX\
`~_\` :
@'AJ=7Q,XY[*=\J& )+,]X=3=*=X E^-2004/108/E^
CE Uygunluk Teyid Belgesi
Bu cihazn teslim edildii ekliyle aadaki standartlara uygun
olduunu teyid ederiz:
Elektromanyetik Uyumluluk 2004/108/EG
EC-Declara?ie de conformitate
Prin prezenta declarm c acest produs aa cum este livrat,
corespunde cu urmtoarele prevederi aplicabile:
Compatibilitatea electromagnetic_ directiva 2004/108/EG
`{*Y|X }X,*'&< =~)*< E^2006/95/E^
~@ ~` _>J ~J__U`> |~_` JUYU\~
J~|YUJ`YJ~ |>`YU{U`UY\J~ {|^_X{~, `
`~_\|~:
?{\ {|U>UY\J> \?
~
Alçak gerilim yönetmelii 2006/95/EG
ve söz konusu ulusal yasalara.
ksmen kullanlan standartlar için:
bkz. bir önceki sayfa
Directiva privind tensiunea joas_ 2006/95/EG
i legislaia naional respectiv
standarde armonizate aplicate, îndeosebi:
vezi pagina precedent
EST
LV
LT
EÜ vastavusdeklaratsioon
Käesolevaga tõendame, et see toode vastab järgmistele
asjakohastele direktiividele:
Elektromagnetilise ühilduvuse direktiiv 2004/108/EÜ
EC - atbilstbas deklarcija
Ar o ms apliecinm, ka is izstrdjums atbilst sekojoiem
noteikumiem:
Elektromagntisks savietojambas direktva 2004/108/EK
EB atitikties deklaracija
iuo paymima, kad is gaminys atitinka ias normas ir direktyvas:
Elektromagnetinio suderinamumo direktyv 2004/108/EB
Madalpinge direktiiv 2006/95/EÜ
ja vastavalt asjaomastele siseriiklikele õigusaktidele
kohaldatud harmoneeritud standardid, eriti:
vt eelmist lk
Zemsprieguma direktva 2006/95/EK
un atbilstoai nacionlajai likumdoanai
piemroti harmonizti standarti, tai skait:
skat¤t iepriekjo lappusi
emos
tampos direktyv 2006/95/EB
bei atitinkamamiems alies ¢statymams
pritaikytus vieningus standartus, o b£tent:
r. ankstesniame puslapyje
SK
SLO
BG
ES vyhlásenie o zhode
ES izjava o skladnosti
Izjavljamo, da dobavljene vrste izvedbe te serije ustrezajo slede;im
zadevnim dolo;ilom:
E-
"
¥"", %"$ !" :
Direktiva o elektromagnetni zdruljivosti 2004/108/ES
E
2004/108/E
Direktiva o nizki napetosti 2006/95/ES
in ustrezno nacionalnim zakonom
uporabljeni harmonizirani standardi, predvsem:
glejte prejnjo stran
# 2006/95/E
$ * ¦"" ":
¨. %" "*
Týmto vyhlasujeme, e kontrukcie tejto kontruk;nej série v
dodanom vyhotovení vyhovujú nasledujúcim prísluným
ustanoveniam:
Elektromagnetická zhoda - smernica 2004/108/ES
Nízkonapäové zariadenia - smernica 2006/95/ES
a zodpovedajúca vnútrotátna legislatíva
pouívané harmonizované normy, najmä:
pozri predchádzajúcu stranu
M
Dikjarazzjoni ta konformità KE
B'dan il-mezz, niddikjaraw li l-prodotti tas-serje jissodisfaw iddispo
izzjonijiet relevanti li ªejjin:
Kompatibbiltà elettromanjetika - Direttiva 2004/108/KE
Vulta
baxx - Direttiva 2006/95/KE
kif ukoll standards armonizzati adottati fil-leªi
lazzjoni nazzjonali
b'mod partikolari:
ara l-paªna ta' qabel
WILO SE
Nortkirchenstraße 100
44263 Dortmund
Germany
Bedienungsanltg_comfort_control.book Seite 2 Donnerstag, 20. Oktober 2011 10:35 10
1-00_Wilo_Geniax_central_control_Cover_Back.fm Seite 117 Donnerstag, 20. Oktober 2011 9:32 09
WILO SE
Nortkirchenstraße 100
44263 Dortmund
Germany
T +49 231 4102-0
F +49 231 4102-7363
[email protected]
www.wilo.com
Wilo – International (Subsidiaries)
Argentina
WILO SALMSON
Argentina S.A.
C1295ABI Ciudad
Autónoma de Buenos
Aires
T+ 54 11 4361 5929
[email protected]
Austria
WILO Pumpen
Österreich GmbH
2351 Wiener Neudorf
T +43 507 507-0
[email protected]
Azerbaijan
WILO Caspian LLC
1014 Baku
T +994 12 5962372
[email protected]
Belarus
WILO Bel OOO
220035 Minsk
T +375 17 2535363
[email protected]
Belgium
WILO SA/NV
1083 Ganshoren
T +32 2 4823333
[email protected]
Bulgaria
WILO Bulgaria Ltd.
1125 Sofia
T +359 2 9701970
[email protected]
Canada
WILO Canada Inc.
Calgary, Alberta T2A 5L4
T +1 403 2769456
[email protected]
China
WILO China Ltd.
101300 Beijing
T +86 10 58041888
[email protected]
Croatia
WILO Hrvatska d.o.o.
10090 Zagreb
T +38 51 3430914
[email protected]
Czech Republic
WILO Praha s.r.o.
25101 Cestlice
T +420 234 098711
[email protected]
Denmark
WILO Danmark A/S
2690 Karlslunde
T +45 70 253312
[email protected]
Estonia
WILO Eesti OÜ
12618 Tallinn
T +372 6 509780
[email protected]
Finland
WILO Finland OY
02330 Espoo
T +358 207401540
[email protected]
France
WILO S.A.S.
78390 Bois d'Arcy
T +33 1 30050930
[email protected]
Great Britain
WILO (U.K.) Ltd.
DE14 2WJ BurtonUpon-Trent
T +44 1283 523000
[email protected]
Greece
WILO Hellas AG
14569 Anixi (Attika)
T +302 10 6248300
[email protected]
Hungary
WILO Magyarország Kft
2045 Törökbálint
(Budapest)
T +36 23 889500
[email protected]
India
WILO India Mather and
Platt Pumps Ltd.
Pune 411019
T +91 20 27442100
service@
pun.matherplatt.co.in
Indonesia
WILO Pumps Indonesia
Jakarta Selatan 12140
T +62 21 7247676
[email protected]
Ireland
WILO Engineering Ltd.
Limerick
T +353 61 227566
[email protected]
Italy
WILO Italia s.r.l.
20068 Peschiera
Borromeo (Milano)
T +39 25538351
[email protected]
Kazakhstan
WILO Central Asia
050002 Almaty
T +7 727 2785961
[email protected]
Korea
WILO Pumps Ltd.
621-807 Gimhae
Gyeongnam
T +82 55 3405890
[email protected]
Latvia
WILO Baltic SIA
1019 Riga
T +371 7 145229
[email protected]
Lebanon
WILO SALMSON
Lebanon
12022030 El Metn
T +961 4 722280
[email protected]
Saudi Arabia
WILO ME - Riyadh
Riyadh 11465
T +966 1 4624430
[email protected]
Lithuania
WILO Lietuva UAB
03202 Vilnius
T +370 5 2136495
[email protected]
Serbia and
Montenegro
WILO Beograd d.o.o.
11000 Beograd
T +381 11 2851278
[email protected]
The Netherlands
WILO Nederland b.v.
1551 NA Westzaan
T +31 88 9456 000
[email protected]
Slovakia
WILO Slovakia s.r.o.
83106 Bratislava
T +421 2 33014511
[email protected]
Norway
WILO Norge AS
0975 Oslo
T +47 22 804570
[email protected]
Slovenia
WILO Adriatic d.o.o.
1000 Ljubljana
T +386 1 5838130
[email protected]
Poland
WILO Polska Sp. z.o.o.
05-090 Raszyn
T +48 22 7026161
[email protected]
South Africa
Salmson South Africa
1610 Edenvale
T +27 11 6082780
errol.cornelius@
salmson.co.za
Portugal
Bombas Wilo-Salmson
Portugal Lda.
4050-040 Porto
T +351 22 2080350
[email protected]
Romania
WILO Romania s.r.l.
077040 Com. Chiajna
Jud. Ilfov
T +40 21 3170164
[email protected]
Spain
WILO Ibérica S.A.
28806 Alcalá de
Henares (Madrid)
T +34 91 8797100
[email protected]
Sweden
WILO Sverige AB
35246 Växjö
T +46 470 727600
[email protected]
Taiwan
WILO-EMU Taiwan Co.
Ltd.
110 Taipeh
T +886 227 391655
nelson.wu@
wiloemutaiwan.com.tw
Turkey
WILO Pompa Sistemleri
San. ve Tic. A.Ş.
34888 Istanbul
T +90 216 6610211
[email protected]
Ukraina
WILO Ukraina t.o.w.
01033 Kiew
T +38 044 2011870
[email protected]
United Arab Emirates
WILO Middle East FZE
Jebel Ali Free Zone South - Dubai
T +971 4 880 91 77
[email protected]
USA
WILO USA LLC
1290 N 25th Ave
Melrose Park, Illinois
60160
T +1 866 945 6872
[email protected]
Russia
WILO Rus ooo
123592 Moscow
T +7 495 7810690
[email protected]
Switzerland
EMB Pumpen AG
4310 Rheinfelden
T +41 61 83680-20
[email protected]
Vietnam
WILO Vietnam Co Ltd.
Ho Chi Minh City,
Vietnam
T +84 8 38109975
[email protected]
Moldova
2012 Chisinau
T +373 22 223501
Tajikistan
734025 Dushanbe
T +992 37 2312354
[email protected]
Uzbekistan
100015 Tashkent
T +998 71 1206774
[email protected]
Turkmenistan
744000 Ashgabad
T +993 12 345838
[email protected]
March 2011
Wilo – International (Representation offices)
Algeria
Bosnia and
Bad Ezzouar, Dar El Beida Herzegovina
71000 Sarajevo
T +213 21 247979
T +387 33 714510
chabane.hamdad@
salmson.fr
zeljko.cvjetkovic@
wilo.ba
Armenia
0001 Yerevan
T +374 10 544336
[email protected]
Georgia
0179 Tbilisi
T +995 32 306375
[email protected]
Macedonia
1000 Skopje
T +389 2 3122058
[email protected] sergiu.zagurean@
om.mk
wilo.md
Mexico
07300 Mexico
T +52 55 55863209
roberto.valenzuela@wi
lo.com.mx
Rep. Mongolia
Ulaanbaatar
T +976 11 314843
[email protected]
1-00_Wilo_Geniax_central_control_Cover_Back.fm Seite 118 Donnerstag, 20. Oktober 2011 9:32 09
WILO SE
Nortkirchenstraße 100
44263 Dortmund
Germany
T 0231 4102-0
F 0231 4102-7363
[email protected]
www.wilo.de
Wilo-Vertriebsbüros in Deutschland
Nord
WILO SE
Vertriebsbüro Hamburg
Beim Strohhause 27
20097 Hamburg
T 040 5559490
F 040 55594949
[email protected]
Ost
WILO SE
Vertriebsbüro Dresden
Frankenring 8
01723 Kesselsdorf
T 035204 7050
F 035204 70570
[email protected]
Süd-West
WILO SE
Vertriebsbüro Stuttgart
Hertichstraße 10
71229 Leonberg
T 07152 94710
F 07152 947141
[email protected]
Nord-Ost
WILO SE
Vertriebsbüro Berlin
Juliusstraße 52–53
12051 Berlin-Neukölln
T 030 6289370
F 030 62893770
[email protected]
Süd-Ost
WILO SE
Vertriebsbüro München
Adams-Lehmann-Straße 44
80797 München
T 089 4200090
F 089 42000944
[email protected]
Mitte
WILO SE
Vertriebsbüro Frankfurt
An den drei Hasen 31
61440 Oberursel/Ts.
T 06171 70460
F 06171 704665
[email protected]
Kompetenz-Team
Gebäudetechnik
WILO SE
Nortkirchenstraße 100
44263 Dortmund
T 0231 4102-7516
T 01805 R•U•F•W•I•L•O*
7•8•3•9•4•5•6
F 0231 4102-7666
Kompetenz-Team
Kommune
Bau + Bergbau
WILO SE, Werk Hof
Heimgartenstraße 1-3
95030 Hof
T 09281 974-550
F 09281 974-551
Erreichbar Mo–Fr von 7–18 Uhr.
– Antworten auf
– Produkt- und Anwendungsfragen
– Liefertermine und Lieferzeiten
– Informationen über Ansprechpartner vor Ort
– Versand von Informationsunterlagen
* 0,14 €/Min. aus dem Festnetz,
Mobilfunk max. 0,42 €/Min.
Werkskundendienst
Gebäudetechnik
Kommune
Bau + Bergbau
Industrie
WILO SE
Nortkirchenstraße 100
44263 Dortmund
T 0231 4102-7900
T 01805 W•I•L•O•K•D*
9•4•5•6•5•3
F 0231 4102-7126
[email protected]
Täglich 7-18 Uhr erreichbar
24 Stunden Technische
Notfallunterstützung
– KundendienstAnforderung
– Werksreparaturen
– Ersatzteilfragen
– Inbetriebnahme
– Inspektion
– Technische
Service-Beratung
– Qualitätsanalyse
West
WILO SE
Vertriebsbüro Düsseldorf
Westring 19
40721 Hilden
T 02103 90920
F 02103 909215
[email protected]
Wilo-International
Österreich
Zentrale Wiener
Neudorf:
WILO Pumpen Österreich
GmbH
Max Weishaupt Straße 1
A-2351 Wiener
Neudorf
T +43 507 507-0
F +43 507 507-15
Vertriebsbüro Salzburg:
Gnigler Straße 56
5020 Salzburg
T +43 507 507-13
F +43 507 507-15
Vertriebsbüro
Oberösterreich:
Trattnachtalstraße 7
4710 Grieskirchen
T +43 507 507-26
F +43 507 507-15
Schweiz
EMB Pumpen AG
Gerstenweg 7
4310 Rheinfelden
T +41 61 83680-20
F +41 61 83680-21
Standorte weiterer
Tochtergesellschaften
Argentinien,
Aserbaidschan, Belarus,
Belgien, Bulgarien, China,
Dänemark, Estland,
Finnland, Frankreich,
Griechenland,
Großbritannien, Indien,
Indonesien, Irland, Italien,
Kanada, Kasachstan, Korea,
Kroatien, Lettland, Libanon,
Litauen, Niederlande,
Norwegen, Polen, Portugal,
Rumänien, Russland,
Saudi-Arabien, Schweden,
Serbien und Montenegro,
Slowakei, Slowenien,
Spanien, Südafrika, Taiwan,
Tschechien, Türkei,
Ukraine, Ungarn, USA,
Vereinigte Arabische
Emirate, Vietnam
Die Adressen finden Sie
unter www.wilo.com.
Stand August 2010