1
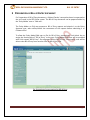
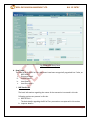
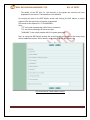
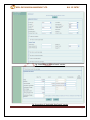
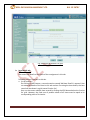
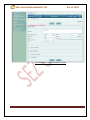
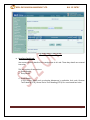
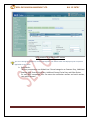
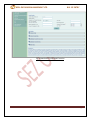
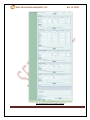
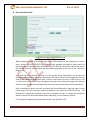
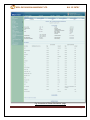
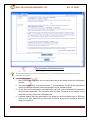
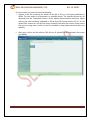
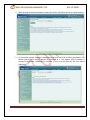
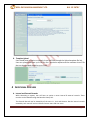
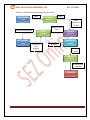
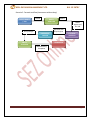
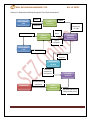
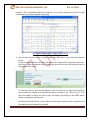
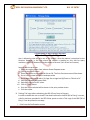
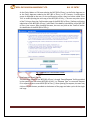
SEZ Online Manual Bill of Entry Version 2.0 NSDL DATABASE MANAGEMENT LTD. BILL OF ENTRY Note: This document is intended for use by existing SEZ units for the purpose of submitting Bill of Entry on behalf of SEZ units. The document describes the process of preparation & submission of Bill of Entry through SEZ online system. Table of Contents 1 Introduction ....................................................................................................................................................... 2 2 User Roles .......................................................................................................................................................... 2 3 Preparation of Bill of Entry document ............................................................................................................... 3 4 Additional Features .......................................................................................................................................... 24 5 Workflow of Bill of Entry /Deemed Export ...................................................................................................... 25 6 Payment of Transaction ................................................................................................................................... 31 7 Printing of Bill of ENTRY THROUGH SEZ Online System ................................................................................... 31 8 Amendment of Bill of Entry /Deemed Export .................................................................................................. 35 9 Cancellation of Bill of Entry /Deemed Export .................................................................................................. 35 SEZ Online Manual Page 1 NSDL DATABASE MANAGEMENT LTD. BILL OF ENTRY 1 INTRODUCTION A Unit may import goods and services from Abroad on Payment of Customs duties. The buyer unit shall file for Bill of Export transaction along with the required documents with the Customs officials of the SEZ. The following are the steps required for preparation and submission of Bill of Entry transactions to Customs office: Preparation of Bill of Entry by the Entity Maker or Customs House Agent (CHA) and its submission to the Entity Approver Implementing a Maker-Checker concept, the Bill of Entry document prepared by Entity Maker/CHA will be verified by Entity Approver, after which it is submitted to Customs office by using a digital signature certificate. After submission to Customs, obtain the print copies of the Bill of Entry document from the SEZ Online application and submit the same to the Customs office along with the necessary supporting documents (e.g. invoice, advance licenses etc) Depending upon the nature of the Bill of Entry transaction, the assessing officer will assess the request either with duty or without duty o If the Bill of Entry document is assessed with duty, then it is sent to the Unit side for entering the Challan/License details. On entering the required details, the document is then submitted to the Preventive Officer for verification of consignment and Challan/License details. o If the Bill of Entry document is assessed without duty, then it is sent to the Preventive Officer for verification of consignment. 2 USER ROLES Following user are involved in the processing of Bill of Entry transaction: From Unit o Entity Maker/CHA o Entity Approver From Customs o Customs Assessor o Authorized officer o Customs Approver o Authorizer (DC Approver) For detailed information and steps regarding user creation and role assignment, kindly refer the manual for ‘User Management’. SEZ Online Manual Page 2 NSDL DATABASE MANAGEMENT LTD. BILL OF ENTRY 3 PREPARATION OF BILL OF ENTRY DOCUMENT For Preparation of Bill of Entry document, a ‘Maker-Checker’ concept has been incorporated at the unit’s end, in the SEZ Online system. The Bill of Entry document can be prepared either by the ‘Entity Maker’ user or ‘CHA user’. The Entity Maker or CHA user prepares a Bill of Entry request and submits it to the Entity Approver user, who verifies/checks the correctness of the request before submitting it to Customs office. To allow the Entity Maker/CHA user to file for Bill of Entry transactions, Unit Admin has to assign the functionality of “Bill of Entry” to the user. Entity Maker/CHA user will be provided with a link named “Bill of Entry”. On assignment of the “Bill of Entry” functionality, user will be able to view Bill of Entry form once he clicks on Bill of Entry link. Fig: Screenshot of menu options for Bill of Entry SEZ Online Manual Page 3 NSDL DATABASE MANAGEMENT LTD. BILL OF ENTRY Fig: Blank Bill of Entry form A. Data fields: The data fields of the Bill of Entry document have been categorically organized into 5 tabs, as: i. BOE Details ii. Shipment Details iii. Invoice Details iv. Item Details v. Item Duty details i. BOE Details tab: The basic information regarding the nature of the transaction is entered in this tab. Following sections are present in this tab: a. BOE DETAILS – The basic details regarding the Bill of Entry transaction are captured in this section b. Importer details – SEZ Online Manual Page 4 NSDL DATABASE MANAGEMENT LTD. BILL OF ENTRY The details of the SEZ Unit (i.e. the importer of the goods and services) are auto populated in this section. These details are not editable. On entering the data in the BOE Details section and clicking on SAVE button, a unique request ID for that particular transaction is generated. The format of the request ID is “17YYXXXXXXXX”. Here, “17” is the code representing a Bill of Entry transaction “YY” are the last two digits of the current year “XXXXXXXX” is the unique number which is system generated. Also, on saving the BOE Details section, the remaining tabs are shown on the screen along with an additional section “Other details” at the bottom of the BOE Details tab. Fig: Screenshot of ‘Other Details’ section SEZ Online Manual Page 5 NSDL DATABASE MANAGEMENT LTD. BILL OF ENTRY ii. Shipment Details: The Shipment related details of the transaction are captured in this tab. This tab has the following section: a. Consignment Details – On saving the Consignment details section, a new section is displayed labeled as “Mode of Transportation Details” section. Fig: Screenshot of ‘Shipment Details’ tab b. Mode of Transportation Details – In “Mode of Transportation Details” section, we enter the information related to the physical attributes of the consignment. SEZ Online Manual Page 6 NSDL DATABASE MANAGEMENT LTD. BILL OF ENTRY Fig: Screenshot of ‘Mode of Transportation Details’ section iii. Invoice Details: The details related to the Invoice are captured in this tab. Following sections are present in this tab: a. Type of Applicable Charges b. Invoice Details a. Type of Applicable Charges – SEZ Online system provides flexibility to its users to specify the various applicable charges (e.g. Freight, Insurance, miscellaneous charges, agency commission etc.) either ‘BOE wise’ or ‘Invoice wise’. Thus, if ‘BOE wise’ is selected, then the applicable charges have to be entered only once before entering any invoice details. These applicable charges will later be distributed amongst all the invoices in the ratio of their Invoice value. If, ‘Invoice wise’ is selected, then the applicable charges have to be entered for each individual invoice. SEZ Online Manual Page 7 NSDL DATABASE MANAGEMENT LTD. BILL OF ENTRY Fig: Screenshot of ‘Invoice Details’ tab b. Invoice List – In this section, we have to enter the details pertaining to the invoice (e.g. Invoice value, Invoice currency, Invoice date, Supplier details etc.). User is also allowed to enter details of multiple invoices. User can do so by clicking the ADD button of the Invoice details grid, after which the ‘Add Invoice Details’ section will re-open, allowing user to enter the details of the new invoice. SEZ Online Manual Page 8 NSDL DATABASE MANAGEMENT LTD. BILL OF ENTRY Fig: Screenshot of ‘Invoice Details’ section Fig: Screenshot of ‘Applicable Rate Details’ section SEZ Online Manual Page 9 NSDL DATABASE MANAGEMENT LTD. BILL OF ENTRY Fig: Screenshot of ‘Invoice List’ grid iv. Item Details tab: User enters the details of the items of the consignment in this tab. Following section is present in this tab: a. List of Invoices – On clicking the ADD button, a new sub-section named ‘Add Item Details’ is opened. User can enter the details of the item in this sub-section. On saving the Item details, the item record will be shown in a grid named ‘Invoice List’. User can also enter multiple item records by clicking the ADD button below the ‘Invoice list’ grid. However, the total sum of product values of all items must be equal to its corresponding value of its invoice. SEZ Online Manual Page 10 NSDL DATABASE MANAGEMENT LTD. BILL OF ENTRY Fig: Screenshot of ‘Add Item Details’ section SEZ Online Manual Page 11 NSDL DATABASE MANAGEMENT LTD. BILL OF ENTRY Fig: Screenshot of ‘Item Details’ v. Item Duty Details tab: User enters the duty details of the consignment in this tab. These duty details are entered item-wise. This tab consists of two sections: a. Goods Details b. Duty Details a. Goods Details – In this section, details such as whether Abatement is applicable, Unit code, Customs Tariff Heading (CTH), Central Excise Tariff Heading (CETH) etc. are entered item-wise. SEZ Online Manual Page 12 NSDL DATABASE MANAGEMENT LTD. BILL OF ENTRY Fig: Screenshot of ‘Goods Details’ section Tips: For entering the CTH/CETH, use the search picker. The Search Picker will display only the CTH/CETH applicable in the system b. Duty Details The duty components are divided into 5 broad categories as Customs Duty, Additional Customs Duty, Central Excise Duty, Additional Central Excise Duty and Other Duties. For each duty component, user can enter the notification number and serial number, rate and/or amount. SEZ Online Manual Page 13 NSDL DATABASE MANAGEMENT LTD. BILL OF ENTRY Fig: Screenshot of ‘Duty Details’ section SEZ Online Manual Page 14 NSDL DATABASE MANAGEMENT LTD. BILL OF ENTRY Fig: Screenshot of ‘Duty Details’ section SEZ Online Manual Page 15 NSDL DATABASE MANAGEMENT LTD. BILL OF ENTRY B. Show Calculations link: Fig: Screenshot of ‘Show Calculations’ link While preparing the Bill of Entry, the user enters all the details of the Invoice(s) e.g. invoice value, invoice type (CIF/FOB/CI/CF) etc. The user also specifies the details of every item(s) of the invoice e.g. the product value of the item, the CTH & CETH classification code of the item u etc. Further, the user also furnishes the duty details applicable on the item in the ‘Item Duty Details’ tab. After entering all the details, the user can click on the ‘Show Calculations’ link to view the assessable value and duty calculation done by the SEZ online system. On this page, the user can view all the calculation details item wise. If there is more than one item in a Bill of Entry, a list of all the items of the Bill of Entry is displayed at the top most section of the page. The user can select any item to view the assessable value of the item and various duty amounts associated. After reviewing the details, the user may close the ‘Show Calculations’ page and return to the request page. The user can again make any changes in the contents of the Bill of Entry . This facility/link is specifically provided to the users to enable the users to review the calculation aspect of their Bill of Entry documents before submitting it to the Customs officials. For information regarding duty abatement, kindly refer the SEZ Act 49. SEZ Online Manual Page 16 NSDL DATABASE MANAGEMENT LTD. BILL OF ENTRY Fig: Screenshot of ‘Show Calculations’ page SEZ Online Manual Page 17 NSDL DATABASE MANAGEMENT LTD. BILL OF ENTRY Tip: After preparing the Bill of Entry document, visit the Show Calculations page to check the system calculated Assessable Value and Duty Amount of each of the items. C. Confirmation Screen: After preparation of the Bill of Entry document & after reviewing the calculations associated through the Show calculations link, as the user clicks on the ‘Submit’ button, a confirmation screen is displayed to the user. In the confirmation page, the contents of the Bill of Entry document are displayed. The user may either confirm or cancel the submission of the Bill of Entry using the buttons provided in this page. Further, please note that the user may also print a trial copy of the Bill of Entry document by clicking on “Print Trial” through this page. Fig: Screenshot of Confirmation Screen SEZ Online Manual Page 18 NSDL DATABASE MANAGEMENT LTD. BILL OF ENTRY Fig: Screenshot of Confirmation Screen Tip: Before submitting to Customs, check the Print Trial to see whether all the details are correctly entered in the request D. General Instructions: i. After entering details of each tab, the save button has to be clicked to save the information entered. ii. The fields marked with a red asterisk mark “*” are mandatory. The Bill of Entry document cannot be submitted without entering information in the mandatory fields. iii. On the basis of the information entered by the user, the system calculates the assessable value and duty applicable. The assessable value and duty calculated by the system can be viewed by clicking on the show calculations link. iv. A unique request id will be generated by the system as the Entity Maker user or CHA user clicks on the ‘Save’ button for the first time. The Bill of Entry can be tracked in future by using this request ID. SEZ Online Manual Page 19 NSDL DATABASE MANAGEMENT LTD. BILL OF ENTRY v. The Bill of Entry no. or Thoka no. is generated by the system as soon as the Entity Approver user submits the Bill of Entry to the Customs Assessor. This no. is called as the Import Dept Sr. No. in SEZ Online System. It can be viewed in the ‘Bill of Entry details’ tab of the BOE (Bill of Entry). vi. The unit will not be able to make any changes in the Bill of Entry once it is submitted to customs. vii. At any given point in time only one user can work on a BOE (Bill of Entry). The user in whose inbox the Bill of Entry is lying can only take action on that request. viii. The user has to enter the notification number and serial number which are present in the system. Only then the system will be able to fetch the duty values correctly. ix. While submitting the request, user has to ensure that the Invoice Value of an invoice is equal to the sum of product values of its corresponding items. However, system provides a facility called ‘0.5% flexibility’ where the maximum difference allowed between Invoice Value and its sum of product values is 0.5%. x. Whenever a request is submitted from Unit to Customs and vice versa, user will have to sign the Confirmation Screen using DSC. All Customs users, while submitting a request to an Entity or within Customs, will have to sign using a DSC. For further information regarding DSC, kindly refer the manual for “Digital Signature Certificate”. xi. For downloading reference manuals/formats, please visit the website https://www.sezonline-ndml.com/downloads.htm E. File Upload (Single & Batch) Preparing a Bill of Entry document manually by entering data in all the fields of the Bill of Entry form in SEZ Online application can be a time consuming process. Thus, a facility has been provided to import the Bill of Entry request prepared in a text file (using any in-house or vendor software) into SEZ Online System. If a user prepares a Bill of Entry in the form of a text file in a format published by NDML, the text file so created may be imported directly into SEZ Online system. This facility of importing a Bill of Entry has been provided so that if data is already available in electronic format, it can be re-used and typing the details again can be avoided. RES BOE File Upload functionality allows user to upload a text file, which contains details of a Bill of Entry transaction, to create a Bill of Entry request. Tip: For quick request creation, users can use RES BOE File Upload. SEZ Online Manual Page 20 NSDL DATABASE MANAGEMENT LTD. BILL OF ENTRY For this purpose, the user has to do the following: i. Prepare a text file containing the details of the Bill of Entry in the format published by NDML. The text needs to be prepared in a specified format. The specified format can be obtained from the ‘Downloads’ section of the website www.sezonline-ndml.com. Please refer to the excel workbook uploaded as ‘Bill-of-Entry-File-Format-Version-2.2.xls’ for file upload (The version No. will help the users to identify the latest file format. Please ensure that you are using latest version of the file provided on http://www.sezonline-ndml.com website.) ii. After login, click on the link called as “Bill of Entry Upload File’ (as indicated in the screen shot below). SEZ Online Manual Page 21 NSDL DATABASE MANAGEMENT LTD. BILL OF ENTRY iii. With the help of the browse button, select the text file (.be file) and click on Upload button. iv. On successful upload, message is displayed to the user and a Bill of Entry generated in SEZ Online system and a unique request id is allotted to it. The request may be viewed by clicking on the inbox. Modifications required (if any) may be done by the user before submission. SEZ Online Manual Page 22 NSDL DATABASE MANAGEMENT LTD. BILL OF ENTRY F. Item Upload If a Bill of Entry transaction has large number of items, then it would be a very tedious and time consuming activity to enter the details of each of the items manually. Therefore, SEZ Online application provides a provision to the user where the user can enter all the details regarding the items in an excel file, and then can create a text file from excel. This text file can be uploaded across a particular invoice to which these items shall belong. The file format for item upload can be found on the SEZ Online website, in the “Downloads” category, under the name ‘BOE-Item-Details-Upload-Template-Version-2.0.xls’. SEZ Online Manual Page 23 NSDL DATABASE MANAGEMENT LTD. BILL OF ENTRY G. Template Upload User should have an option to upload .xls and .pdf files through the Upload template file link. User can upload maximum up to 10 files for a particular request and the maximum size of file that can be uploaded should be up to 2 MB. 4 ADDITIONAL FEATURES A. Internal and External Remarks While submitting a request, user will have an option to enter internal & external remarks. These remarks can be viewed through the Remarks History link. The External Remarks can be viewed by all the users i.e., Unit and Customs. But the internal remarks entered by Unit users will not be visible to Customs users and vice-versa. SEZ Online Manual Page 24 NSDL DATABASE MANAGEMENT LTD. BILL OF ENTRY B. Quick Processing Screen When request is submitted to Customs users, then they can process that request from Quick Processing Screen. When a request is opened through quick processing screen, then user is not required to accept that request as it would be automatically accepted. Quick Processing screen is only available to Customs Users i.e.: Customs Assessor, Authorized Officer, Customs Approver and Customs Ops User. C. Item Details as per LOA A link called “Item Details As Per LOA” should be visible to Customs Assessor and Authorized Officer displaying the item details of the respective Entity as per mentioned its LOA. Also LOA Conditions, if any, should be visible to Customs Users through this link. 5 WORKFLOW OF BILL OF ENTRY /DEEMED EXPORT A. Preparation of Bill of Entry document from Entity Maker/CHA 1. Entity Maker prepares the Bill of Entry document and clicks on SUBMIT button 2. On clicking on SUBMIT, a Confirmation Screen will be shown to the user. On this Confirmation Screen, entire contents of the request will be shown to the user for verification. Confirmation Screen has 3 buttons, namely, SUBMIT, CANCEL and PRINT TRIAL a. CONFIRM -> The request gets submitted & it will go to the Entity Approver. The message “Request submitted successfully” is displayed to the user. b. CANCEL -> Confirmation is cancelled and request remains with the Entity Maker or CHA. The Entity Maker can make the necessary changes and submit it later. c. PRINT TRIAL -> A trail copy of the Bill of Entry can be printed for verification of details entered. B. ‘Submit’ Bill of Entry by Entity Approver to Customs side 1. As Entity Maker/CHA submits the request, it is sent to the inbox of Entity Approver. Entity Approver can open and view the entire details of the request by clicking on the request ID from Inbox. On submitting the request from Entity Maker/CHA, if this functionality is not assigned to any Entity Approver, then the request will be sent to Entity Admin’s Inbox. Entity Admin will then have to assign this module functionality to the user ID of Entity Approver and then reassign the request from the Inbox to this user ID. Entity Approver can perform the following actions: SEZ Online Manual Page 25 NSDL DATABASE MANAGEMENT LTD. BILL OF ENTRY a. Edit the contents of Bill of Entry – the user can edit the entire contents of the Bill of Entry document prepared by the Entity Maker/CHA b. After viewing the contents of the BOE (Bill of Entry), if the Entity Approver finds that the Bill of Entry is in order, the Entity Approver user may submit it to the Customs Assessor at DC’s Office. In this case, a confirmation screen appears in which the entire contents of the Bill of Entry are displayed to the user. The Confirmation screen contains ‘Confirm’, ’Cancel’ and ‘Print trial’ buttons. Following is the outcome on clicking on these buttons i. CONFIRM -> The system prompts the user for using his Digital Signature certificate. As the user selects his DSC and clicks on “OK”, system prompts Entity Approver for payment of transaction charge and once payment is made request gets submitted to the Customs Assessor at DC’s Office. The message “Request submitted successfully” is displayed to the user. Once the Bill of Entry is submitted to customs, the unit cannot make any changes in the Bill of Entry ii. CANCEL -> Confirmation is cancelled and request remains with the Entity Approver. The Entity Approver can make the necessary changes and submit it later. iii. PRINT TRIAL -> A trail copy of the Bill of Entry can be printed for verification of details entered. C. ‘Cancel’ request from Entity Approver The Entity Approver can ‘Cancel’ the Bill of Entry prepared by the Entity Maker/CHA user. In this case, the Bill of Entry will get cancelled permanently and will not be available for edit/submission to Customs. However, the users shall be able to view such Bill of Entry through the search facility SEZ Online Manual Page 26 NSDL DATABASE MANAGEMENT LTD. BILL OF ENTRY D. ‘Sentback’ request to Entity Maker/CHA The Entity Approver can send back the Bill of Entry to the Entity Maker/CHA user who has prepared it. In this case, the Bill of Entry shall reach the Inbox of the Entity Maker/CHA user who in turn can edit and resubmit the Bill of Entry to the Entity Approver again. E. Assessment of the request from Customs Assessor The requests which are submitted by Unit are received by the Customs Assessor. Customs Assessor has the following options Assess the request with/without duty Raise a query on the request (Customs Assessor -> Entity Approver) Raise a misuse-incident on the request (Customs Assessor -> Customs Approver) Send the request for First Check (Customs Assessor -> Preventive Officer) i. Assess the request with/without duty If Customs Assessor assesses the Bill of Entry document with duty, then the request is sent to Unit side for entering Challan/License details. After entering the Challan/License details by Unit, the request is then sent to Preventive Officer for ‘Out-Of-Charge’ of the goods. If Customs Assessor assesses the Bill of Entry document without duty, then the request is sent to Preventive Officer for ‘Out-Of-Charge’ of the goods. ii. Raise a query on the request If Customs Assessor finds some incorrectness or inconsistency in the details of the submitted Bill of Entry request, then Customs Assessor can send the request back to the Unit side for rectifying the errors. For this, Customs Assessor can submit the request with the status “Raise Query”, after which the request will be sent to the Entity Approver for query resolution. iii. Raise a misuse-incident on the request If Customs Assessor requires clearance regarding some aspect or details of the request, then Customs Assessor can submit the request with the status “Misuse Incident” and send it to Customs Approver iv. Send the request for First Check Customs Assessor can send the goods for First Check assessment if requested by the Unit. On submitting the request with the status “First Check Request”, the request is sent to the Preventive Officer for first check assessment along with ‘Examination Order’. After completing the first check assessment, Preventive Officer submits the request back to Customs Assessor along with the ‘Examination Report’. SEZ Online Manual Page 27 NSDL DATABASE MANAGEMENT LTD. BILL OF ENTRY Scenario 1: Forward workflow (Assessment with duty) ENTITY MAKER / CHA Forward to Entity Maker ENTITY MAKER / CHA Submit s ENTITY APPROVER ENTITY APPROVER Forward to Entity Approver Submit s Approved with Duty Duty Paid Makes payment of Rs. 200 CUSTOMS ASSESSOR PREVENTIVE OFFICER Out of Charge ENTITY APPROVER Rewarehousing completed TERMINATED SEZ Online Manual Page 28 NSDL DATABASE MANAGEMENT LTD. BILL OF ENTRY Scenario 2: Forward workflow (Assessment without duty) ENTITY MAKER / CHA Out of Charge ENTITY APPROVER SEZ Online Manual Submit s ENTITY APPROVER PREVENTIVE OFFICER Submit s Approved with Duty Forgone Makes payment of Rs. 200 CUSTOMS ASSESSOR TERMINATED Rewarehousing Completed Page 29 NSDL DATABASE MANAGEMENT LTD. BILL OF ENTRY Scenario 2: Backward workflow (along with First Check assessment) ENTITY MAKER / CHA Submit s Submit s ENTITY APPROVER Makes payment of Rs. 200 Sentback Forward Query Raise Query ENTITY APPROVER CUSTOMS ASSESSOR Query Response ENTITY MAKER / CHA Query Response First Check Request PREVENTIVE OFFICER First Check Completed / Discrepancy TERMINATED SEZ Online Manual Rewarehousing Completed ENTITY APPROVER CUSTOMS ASSESSOR Approved And Out Of Charge without Duty Page 30 NSDL DATABASE MANAGEMENT LTD. BILL OF ENTRY For complete set of statuses and workflow scenarios, kindly refer the embedded excel sheet. For more information regarding process flow for Bill of Entry transaction, kindly refer the SEZ Act 48. 6 PAYMENT OF TRANSACTION On signing the Digital Signature Certificate on the Confirmation Screen, Entity Approver will be asked to make a payment of transaction charge. The transaction charge for Bill of Entry document is Rs. 200. User has to avail Account deposit scheme for the purpose of payment of transaction charges. Payment has to be made to this account by Entity Approver user. Entity Approver user can topup any amount to this account. The payment to this account can be made either through Cheque or Demand draft or through online payment gateway. When Entity Approver selects a mode of payment and clicks on “Pay” and then on “Confirm” option, request gets submitted to the Customs Assessor. The message “Request submitted successfully” is displayed to the user. For more information regarding payment process/steps, kindly refer the manual for “SEZ Online - Payments”. 7 PRINTING OF BILL OF ENTRY THROUGH SEZ ONLINE SYSTEM After submitting the Bill of Entry document to Customs, the Unit/Customs user can take the print-out of the request even after the workflow of the request has ended. SEZ Online application provides the facility to user to take print-out of Original, Duplicate, Triplicate, Quadruplicate (Exchange Control) and Quintuplicate copies. On clicking the PRINT button in the User Interface, user is provided with a dialog which contains checkboxes for the above mentioned print copies. Depending upon the checkboxes selected, the print for those copies will be shown. User is also provided a facility to take printout in consolidated format. In this format, all the items with some matching data values will be logically grouped together in the main copy of the print-out. The details of these individual items will be attached at the end of each copy in the ‘Annexure’ document. To take the print-out in annexure format, the user has to select the SEZ Online Manual Page 31 NSDL DATABASE MANAGEMENT LTD. BILL OF ENTRY checkbox “Print consolidated BOE with Annexure” on the print dialog along with the ticked checkboxes of the copies required for printing. Fig: Screenshot of Annexure copy for Bill of Entry A. User can take the print-out of a request either from the Inbox or from the Search Request screen. To take the print-out from the Inbox, the request has to be present in the Inbox of the user. User has to open the request from his Inbox and then click on the PRINT button shown at the bottom of the screen. To take the print-out from Search Request screen, the user has to search the request by entering either its request ID of selecting the type of transaction (i.e. “Bill of Entry ”). Then after the request is found, user has to open the request by clicking on the PRINT button shown at the bottom of the screen. On clicking the PRINT button, User is asked to select which copies which are required. Only the copies that that ticked will be printed. SEZ Online Manual Page 32 NSDL DATABASE MANAGEMENT LTD. BILL OF ENTRY Fig: Dialog box for selecting the print copies User is allowed to take the print-out of the request, once the request is submitted to the Customs. However, in the case where the request is pending at Unit side for query resolution, the PRINT button will not be shown to the user (Unit as well as Customs). Steps to take the print-out: i. Open the request either from Inbox or Search Request screen ii. Click on the PRINT button iii. Select the copies as per need and click on OK. The Print Preview screen will be shown iv. Go to Print Preview and Select landscape mode v. Go to page settings and select: (a) Page Size as Legal and (b) Zoom as “Shrink to fit” vi. Keep page header and footer blank vii. Keep page margins as 0.2 inches viii. Click on PRINT button ix. Only the copies selected will be shown in the print preview screen x. Print the copies B. Printing Trial copy before submitting the Bill of Entry form to Customs In order to enable the user to check if the details entered in the BOE (Bill of Entry) is correct, a facility has been provided in the SEZ Online system to take a Trial copy of the BOE (Bill of Entry). It can be printed in two ways: i. Print from the Confirmation screen SEZ Online Manual Page 33 NSDL DATABASE MANAGEMENT LTD. BILL OF ENTRY As the Entity Maker or CHA user submits the BOE (Bill of Entry ) to the Entity Approver or as the Entity Approver submits the BOE (Bill of Entry ) to DC Customs, a confirmation screen is displayed to the user. On the confirmation screen, there is a button called ‘Print Trial’ to enable printing the trial copy of the BOE (Bill of Entry ). The user may take a print of the Trial copy from the Confirmation page of the BOE (Bill of Entry ) (before confirming submission of the BOE (Bill of Entry )) and check if the details/ calculations of the BOE (Bill of Entry ) are correct. After checking the same, the user may click on the ‘Confirm’ button for submission of the BOE (Bill of Entry ). Fig: Screenshot for Confirmation Screen ii. Print from the ‘Search’ facility The users may search for the BOE (Bill of Entry ) through ‘Search Request’ facility provided in the system. User can select BOE (Bill of Entry ) in “Request Type” or can enter Request ID in respective tab to search BOE (Bill of Entry ). After opening the request, the user may click on the print button provided at the bottom of the page and take a print of the single trial copy SEZ Online Manual Page 34 NSDL DATABASE MANAGEMENT LTD. BILL OF ENTRY 8 AMENDMENT OF BILL OF ENTRY /DEEMED EXPORT For information on amendment of Bill of Entry requests, kindly refer the manual for ‘Free Form – Amendment’ 9 CANCELLATION OF BILL OF ENTRY /DEEMED EXPORT For information on cancellation of Bill of Entry requests, kindly refer the manual for ‘Free Form – Cancellation’ SEZ Online Manual Page 35