1
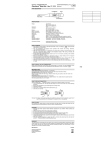
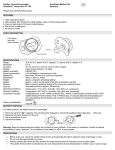
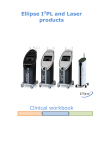
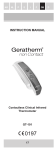
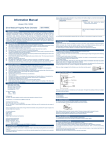
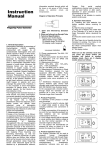
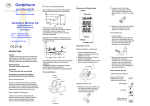
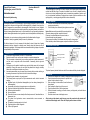
Fingertip Pulse Oximeter
Geratherm oxy control GT-300C203
Geratherm Medical AG
Germany
Instruction manual
Read carefully before using.
General Description
Haemoglobin saturation is the percentage of oxygen-bearing haemoglobin (HbO2) molecules
in proportion to the amount of oxygen that the haemoglobin (Hb) is capable of carrying in the
blood. It expresses the concentration of oxyhaemoglobin in the blood and is a very important
parameter of the respiratory and circulation system. Many respiratory diseases can result in a
decline in haemoglobin saturation levels. In clinical medicine it is very important to determine a
patient’s haemoglobin saturation level in good time so as to detect problems sufficiently early.
Pulsoximetry is a non-invasive monitoring procedure for the determination of oxygen
saturation in arterial (oxygenated) blood by means of a photosensor.
Scope of Product Operation
The Geratherm oxy control can be used to measure human haemoglobin saturation levels
and the heart rate via a finger. The product is suitable for use at home, in hospital (including
clinical use in internal medicine/surgical wards, in anaesthesia, paediatrics, intensive care
etc.), in social medical institutions or for physical care in sports (it can be used before or after
sporting activity - use during sporting activities is not recommended).
Battery Installation
Place the two AAA batteries inside the battery compartment
ensuring correct polarity.
2. Push the battery cover horizontally along the arrow as shown.
1.
Notes: Batteries must be inserted with the correct polarities.
Otherwise, damage might be caused to the device.
Please put or remove batteries in the correct order, or
the device bracket may be damaged.
Please remove the battery if the oximeter will not be used for a long period.
When the battery status indicator appears, replace the batteries in good time.
To obtain a diagnosis, it is only necessary for the patient to insert a finger into a fingertip
photoelectric sensor, whereupon a display screen directly shows the measured value of
haemoglobin saturation. Clinical experiments have demonstrated the high degree of precision
and repeatability of this procedure.
1
2
3
4
5
6
7
Precautions for Use
Do not use the pulse oximeter in an MRI or CT environment.
Explosion hazard: Do not use the pulse oximeter in an explosive atmosphere.
The pulse oximeter is intended only as an ancillary procedure in patient assessment. It
must be used in conjunction with other methods of assessing clinical signs and
symptoms.
Prolonged use or the patient’s condition may require that the sensor site be changed
periodically. Change the sensor site and check the patient’s skin integrity, circulatory
status, and correct alignment at least every 4 hours.
Inaccurate measurements may be caused by autoclaving, ethylene oxide sterilizing, or
immersing the sensors in liquid, which will result in inaccurate readings.
Preserve the pulse oximeter in a dry environment.
The following factors may impair the SpO2 measurements and/or lead to inaccurate
readings:
Significant levels of dysfunctional haemoglobins (such as carboxy-haemoglobin or
methaemoglobin)
Intravascular dyes such as indocyanine green or methylene blue
High levels of ambient light (shield the sensor area if necessary)
Excessive patient movement
Venous pulsations
Placement of a sensor on an extremity with a blood pressure cuff, arterial catheter, or
intravascular line
The patient has hypotension, severe vasoconstriction, severe anaemia, or
hypothermia
The patient is in cardiac arrest or is in shock
Fingernail polish or artificial fingernails
Cold or dirty fingernails
Description of Front Panel
Battery status indicator
SpO2/ Oxygen saturation
Power
button
(On/Off)
Pulse frequency indicator
Pulse rate
g
SpO2 wave form
The pulse frequency indicator flashes on and off in accordance with the pulse rate displayed.
1
2
3
4
5
6
7
How to Use
Insert two AAA batteries into the battery compartment before replacing the cover.
Press the device at the rear end so as to open the front
section for the insertion of a finger.
When your finger is in the oximeter, the nail surface must
face upwards.
After inserting the finger let go of the rear end.
Press the power button on the front panel once.
While the oximeter is working, you should not move your finger and you should behave
in a calm manner.
Read the values shown on the display screen.
After turning on the oximeter, each time you press the power button the oximeter will
switch to another display mode. There are 6 display modes shown as follows:
7.
1.
2.
3.
Quality Standards:
Certification according EN ISO 13485, Conformity according EN ISO 9919:2005
Medical electrical equipment – Particular requirements for the basic safety and
essential performance of pulse oximeter equipment for medical use, EN60601-1,
EN60601-1-2, standard Council Directives 93/42/ EEC
Possible Problems and Solutions
Problems
SpO2 or PR cannot
be shown normally.
4.
5.
6.
If you press the power button for a long time (longer than 1 second), the brightness level of the
oximeter will gradually change. There are 10 brightness levels. The default level is level four.
SpO2 or PR is shown
unstably
The oximeter cannot
be switched on
The PulseOximeter is supplied with a protective case to shield it from dirt and impacts.
Evaluation of pulse oximetry
In healthy patients, oxygen saturation levels lie between 96 and 98 %. Values below 95 % can
indicate a health disorder and make it necessary to supply the patient with additional oxygen.
If your oxygen saturation value is below 95 %, please consult your physician.
Normal pulse values depend on the age and fitness level of the individual.
Here are a few reference values indicating normal pulse rates:
Infants under 1 year: 100 - 160 bpm
Children between 1 and 10 years: 70 - 120 bpm
People over 10 years: 60 - 100 bpm
Highly trained individuals/athletes: 40 - 60 bpm
Specification
1. Display Type: 1-colour OLED display
2. SpO2:
Measurement range: 70-99%
Accuracy:±2% between 80% and 99%; ±3% between 70% and 80%
3. Pulse Rate:
Measurement range:30-235 bpm
Accuracy:±2 bpm or ±2%(larger)
Pulse intensity: Pulse frequency indicator
4. Power Requirements:
Two AAA alkaline batteries, type AAA 1.5 V, 600mAh
Power consumption: Less than 40mA
Low power indication:
5.
6.
Battery life: up to 30 hours in continual use
Dimensions:
Length: 58mm; Width: 32mm; Height: 34mm
Weight: 50g (including two AAA batteries)
Environmental Requirements:
Operating temperature: 5-40℃; Storage temperature: -10 – +40℃
Humidity: 15%-80% in operation; 10%-80% in storage
Possible reason
1. Finger is not inserted correctly.
2. Patient’s oxyhaemoglobin level is too
low to be measured.
1. Finger might not be inserted far
enough.
2. Finger is trembling or the patient’s
body is moving.
1. Battery power may be inadequate or
not be there at all.
2. Batteries may have been inserted
incorrectly.
3. The oximeter might be damaged.
Solution
1. Try inserting the finger again.
2. Try several more times if you are sure that there is no
problem with the device. Please go to a hospital in
good time to obtain a precise diagnosis.
1. Try inserting the finger again.
2. Try not to move.
1. Please replace batteries.
2. Please reinsert the batteries.
3. Have the device tested by the manufacturer
1. Normal
2. Replace the batteries.
“Error3” or
“Error4” displayed on
screen
1. The product is automatically switched
off if no signal is detected for longer
than 8 seconds.
2. Low power/ Batteries empty
1. Low power/ Batteries empty
2. Receiving sensor shielded or sensor
damaged.
“Error7” displayed on
screen
1. Low power/ Batteries empty
2. Infrared sensor damaged.
1 Change the batteries.
2 Have the device tested by the manufacturer.
Indication lamps
suddenly go off
1. Insert new batteries.
2. Have the device tested by the manufacturer.
Cleaning Instructions
Please use medical alcohol to clean the synthetic material touching the finger inside the
oximeter, and clean the test finger before and after using.
Please clean the surface of pulse oximeter for every use.
Limited Warranty
This pulse oximeter is guaranteed for 2 years from the date of purchase against
manufacturer’s defect under conditions of normal use.
Following the instructions precisely will ensure that the device functions reliably for many years.
If your pulse oximeter does not function properly due to defective parts or assembly we will
repair it free of charge. All parts are covered by this warranty. The warranty does not cover
damage to your unit due to improper handling.
The manufacturer recommends that the accuracy of the device be checked by an authorized
laboratory every 2 years.
Adhere to the applicable regulations when disposing of the device.
Manufacturer:
Geratherm Medical AG
Fahrenheitstraße 1
98716 Geschwenda
Germany
CE 0118