1
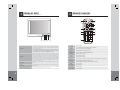
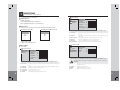
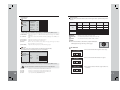
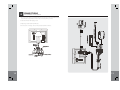
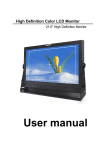
CM-800D
8” TFT LCD DIGITAL COLOR MONITOR
INSTRUCTION MANUAL
Thank you for purchasing this product.
For proper usages and application, Please read this instruction manual thoroughly.
INSTRUCTION MANUAL
PRINTED IN KOREA
ver. 1.0
CONTENTS
SAFETY RULES ................................................................... 3
SAFEGUARD INSTRUCTIONS
8” TFT LCD DIGITAL COLOR MONITOR
Please read the “Safety Rules” carefully before using this product. Following the safety rules
prevents users from damages related with the misuse of the product. It is very important to
follow these safety rules. We state “Caution” and “Warning” to clarify any potential risk for a
damage associated with the misuse of the product.
BEFORE USE ....................................................................... 5
CAUTION
This information is for preventing damage or shorten the life
time of the products.
SPECIAL FEATURES OF THE PRODUCT ........................ 5
WARNING
This information is for preventing bodily harm or even death
and use should follow this safety rules.
TERMS OF PART ................................................................. 6
REMOTE CONTROL ........................................................... 7
FUNCTIONS ........................................................................ 8
CONNECTIONS ................................................................ 12
CHANGING REMOTE CONTROL BATTERY ................ 14
CAUTION
Should install while power off. (After install products, connect DC jack)
- It may cause to electronic shock or malfunction.
While stop driving (parking), set the car in motion.
- It may cause battery discharge.
Do not use multi socket or extended adaptor.
- It may cause unexpected heating, fire and malfunction.
Unplug product when do not use for a long time.
- It may case fire by short circuit due to heating.
Do not place near magnet.
- It may cause malfunction and trouble.
SPECIFICATIONS ............................................................. 15
Do not push a LCD panel.
- It may cause LCD broken.
In case of inserting battery, attend to polarity and insert according to direction.
- When wrong inserting, it may cause fire, damage by explsion.
Before install the body, take enough place at least more than 15cm from the wall to
emit heat.
2
The battery for remote controller is not rechargeable and should replace same or similar model. Used battery may cause environmental pollution, so trash it carefully.
- This may cause a malfunction and problem.
3
1
WARNING
Do not put the product in place where sudden temperature increasing and should use
on optimum voltage, temperature and humidity.
- It may cause to electronic shock or malfunction.
Do not get product wet and operate with wet hands.
- It may cause to electronic shock or malfunction.
Do not place near of air bag effective range.
- It may cause malfunction of air bag or accident, injury due to hitting monitor by
air bag.
BEFORE USE
8” TFT LCD DIGITAL COLOR MONITOR
※ To safely use the product, please read the user’s manual carefully before use.
1) Connect all lines as directed in the product connection map in the manual.
2) Use the product at the temperature range of -10℃ ~ 60℃.
3) Screen may be a little dark when the product is operated in low temperature areas.
4) Screen will show normal luminosity after a few minutes.
5) When you install the product in a car, do not set a volume level too loud for others to hear
outside.
6) Quality of pictures on screen may vary depending on the radio field strength in different
locations.
7) You should use video equipment where you experience weak radio field strength.
8) Follow traffic laws when you use the Navigation Route System.
Keep clean dust on power socket.
- It may cause electronic shock and fire by bad connection.
Do not pull cord with a jerk, should catch a plug and pull. Do not use damaged cord.
- It may cause cord malfunction, electronic shock and fire.
When clean exterior, power off and wipe with dry cloth.
- Wet cloth may cause a electronic shock.
Do not clean exterior with volatility or oily solvent.
Neither keep touching rubber and plastic for long time.
- It may cause change of surface, fall of paint, malfunction and fire.
Do not place where vibration and shock.
- It may cause throw down and then malfunction and accident.
Do not put metals as like pin and needle into hole and chink of grill, speaker.
- In case of inserting them, stop to operate, it may cause electronic shock, fire and
malfunction.
Do not use in problem condition as like smoking, smell something burn.
- It may cause fire. Stop to use and make inquiries to agency.
Do not disassemble, repair and remodeling.
- It may cause malfunction and injury, can not get warranty.
- Make inquiries to agent for repair and checkup.
4
2
SPECIAL FEATURES OF THE PRODUCT
8” TFT LCD DIGITAL COLOR MONITOR
• Digital TFT Wide LCD with high resolution and low reflection
• All electronic control functions
• Convenient Graphic OSD
• All functions are displayed on screen (OSD function)
• Auto recognition function of TV signal system (PAL/ NTSC/ AUTO)
• PC auto adjustment
• 7 Languages on OSD menu (ENG-FRA-DEU-ESP-ITA-JPN-KOR)
• Auto mode selection (DSUB ANALOG, DVI DIGITAL, AV, S-VIDEO)
• One-touch Dimmer (Remote control)
• 0.5Watt speaker built-in
• STAND-BY function
• Low power consumption
5
3
TERMS OF PART
4
8” TFT LCD DIGITAL COLOR MONITOR
REMOTE CONTROL
8” TFT LCD DIGITAL COLOR MONITOR
①
④
②
③
⑤
⑥
⑦
⑧
⑩
⑨
⑪
⑫
⑭
⑬
① ②③④ ⑤
① MODE
② MENU
6
⑮
⑥
AV/S-VIDEO/PC(RGB) selection function. Press the mode button to be
appeared source select OSD box and press the DOWN, UP button or
mode button repeatedly th press the menu button or wait 3 second to
select highlighted source.
* If PC picture size does not match with full horizontal or vertical screen
size, press the mode button continuously(2~3 second) and wait for a
little while then you can see the most appropriate screen.
① POWER
Power On/Off
② TV/AV
Select DSUB ANALOG/ EXTERNAL VIDEO/ S-VIDEO
③ ▲▼CH
Selects channel and moves to MENU
④ MENU
Selects menu and changes function
⑤ ◀▶VOL
Controls Volume and changes MENU level
Button to Setup Screen and Function.Press the menu button to be appeared Menu OSD box and press the mode button repeatedly to select
the main menu(Picture menu, Setup menu, Audio menu), then press
the DOWN or UP button to enter to sub menu, press the mode button
repeatedly to highlight icon that user wants, press the DOWN, UP button to increase, decrease or change the function. Push the Menu button
once to return to the main menu to select another function or press
twice to exit from the OSD.
⑥ PICTURE
Picture selection button
⑦ SETUP
Setup selection button
⑧ SOUND
Sound selection button
⑨ MUTE
For muting sound. Returns to the previous sound level when you push again
⑩ RECALL
Displays present status and volume level
⑪ AUTOPIC
Selects DYNAMIC, NORMAL, MILD, USER for PICTURE
⑫ SLEEP
No use button
③ DOWN
Select the sub menu, decrease the selected function, hot key for volume
down.
④ UP
Select the sub menu, increase the selected function, hotkey for volume up.
⑤ POWER
⑬ CH.SET
No use button
Power On/Off
⑥ Remote Sensor Window
⑭ A.MEMO
No use button
Sensor for receiving signal from the remote control
⑮ 0~9 KEY
No use button
7
5
*(
FUNCTIONS
8” TFT LCD DIGITAL COLOR MONITOR
), it means a remote control button.
SETUP (SETUP)
1 POWER ON/OFF
• POWER ON/OFF KEY
1) Push POWER(POWER) button. POWER is on.
2) Push POWER(POWER) button again. POWER is OFF.
LANGUAGE
SETUP
OSD TIME
10 -
+
SOUND
TRANSLUCENT 14 -
+
OSD H POS.
50 -
+
OSD V POS.
50 -
+
2 MODE (TV/AV)
• It is function to change external video signals to DSUB ANALOG/ VIDEO/ S-VIDEO
DSUB ANALOG/ AV/ S-VIDEO
DSUB ANALOG/ DVI DIGITAL/ AV1/ AV2
SOURCE
DSUB ANALOG
SOURCE
DSUB ANALOG
AV
AV1
S-VIDEO
AV2
1) LANGUAGE
BRIGHTNESS
55 -
+
CONTRAST
40 -
+
SHARPNESS
14 -
+
COLOR TINT
50 -
+
COLOR TONE
60 -
+
SYSTEM
AUTO NTSC PAL
8
2) CONTRAST
3) SHARPNESS
4) COLOR TINT
5) COLOR TONE
6) SYSTEM
Adjust the brightness of VIDEO without affecting DSUB ANALOG’s brightness.
Adjust the contrast of VIDEO without affecting DSUB ANALOG’s contrast.
Adjust the sharpness of video image.
Change the richness of color.
Change the tone of color.
Change broadcast system NTSC, PAL, AUTO
▶ OFF
PICTURE
MUTE
SETUP
VOLUME
10 -
+
SOUND
TREBLE
50 -
+
BASS
50 -
+
* With VOL▶, go to SUB MENU. After adjusting in SUB MENU, press MENU to exit.
The audio input level should be met with the specification because of the audio
distorition.
* With VOL▶, go to SUB MENU. After adjusting in SUB MENU, press MENU to exit.
1) BRIGHTNESS
Change language English, French, German, Spanish, Italian, Japanese,
Korean.
The number of seconds that the OSD will remain visible before disappearing.
Change the opaqueness of the background of the OSD.
Move the OSD Window to the horizontal direction.
Move the OSD Window to the vertical direction.
A factory default reset will clear all of OSD information.
SOUND (SOUND)
• AV/ S-VIDEO
PICTURE(PICTURE)
SETUP
▶ OFF
* With VOL▶, go to SUB MENU. After adjusting in SUB MENU, press MENU to exit.
3) TRANSLUCENT
4) OSD H POS.
5) OSD V POS.
6) FACTORY RESET
3 MENU (MENU)
PICTURE
FACTORY RESET
2) OSD TIME
* Adjust it with CH ▲▼
* Adjust it with MODE (Key button)
▶ ENGLISH
PICTURE
1) MUTE
2) VOLUME
3) TREBLE
4) BASS
Mute the sound temporarily. Mute is released when you change channel
and adjust volume.
Adjust the sound volume.
Emphasize high frequency audio.
Emphasize low frequency audio.
9
• DSUB ANALOG
PICTURE
PICTURE
BRIGHTNESS
75 -
+
COLOR
CONTRAST
50 -
+
SETUP
H POSITION
50 -
+
SOUND
V POSITION
50 -
+
PHASE
14 -
+
100 -
+
PIXEL FREQ.
* With VOL▶, go to SUB MENU. After adjusting in SUB MENU, press MENU to exit.
1) BRIGHTNESS
2) CONTRAST
3) H POSITION
4) V POSITION
5) PHASE
6) PIXEL FREQ.
Adjust the brightness of DSUB ANALOG without affecting AV/ S-VIDEO’s
brightness.
Adjust the contrast of DSUB ANALOG without affecting AV/ S-VIDEO’s contrast.
Adjust the horizontal position of the image.
Adjust the vertical position of the image.
Remove the noises. When phase value is wrong, the image has vertical
lines especially in 1 dot on and off.
Adjust the sampling frequency of DSUB analog signal.
COLOR
The tone of color can be changed from red-dish white to bluish white.
The individual color components are also user customizable.
PICTURE
9300K
7300K
6500K
DISPLAY MODES
For the display modes listed below, the screen image has been optimized during manufacture.
MODE
VGA
Resolution
Horizontal
Frequency(KHz)
Vertical
Frequency(Hz)
Pixel Clock
Sync Polarity
Frequency(MHz)
(H/V)
720 x 400
31.469
70.087
28.322
-/+
640 x 480
31.469
59.940
25.175
-/-
640 x 480
37.500
75.000
31.500
-/-
800 x 600
37.880
60.300
40.000
+/+
800 x 600
46.875
75.000
49.500
+/+
SVGA
4 RECALL
5 AUTO PIC
6 TV/AV
Displays present status and volume level.
Select DYNAMIC, NORMAL, MILD, USER for PICTURE
Select DSUB ANALOG, EXTERNAL VIDEO, S-VIDEO
7 MUTE
• It is a function of Mute control. When you push MUTE button,
OSD display this image. This image can be toggle.
8 OSD MESSAGE
OUT OF RANGE
1) The screen shows this when signal is out of range.
USER
COLOR
SETUP
RED
50 -
+
GREEN
50 -
+
BLUE
50 -
+
NO SIGNAL
2) The screen shows this when there is no signal.
* With VOL▶, go to SUB MENU. After adjusting in SUB MENU, press MENU to exit.
The color temperature could be changed based on the lcd specification.
10
1) 9300K
2) 7300K
3) 6500K
4) USER
Change color temperature : Red 42 Green 52 Blue 50
Change color temperature : Red 51 Green 46 Blue 46
Change color temperature : Red 40 Green 54 Blue 54
User customizable. (RED, GREEN, BLUE)
CHECK CABLE
3) The screen shows this when the signal cable is not
connected.
11
6
CONNECTIONS
8” TFT LCD DIGITAL COLOR MONITOR
1. Choose a location where you install the Monitor. Clean the place for the Stand with cleanser
and remove the safeguard tape. And then attach it exactly where you want.
2. Fasten the Monitor with Tapping Screw.
3. Adjust angle of Stand and install Monitor.
4. Connect each connecting cable as in the product installation reference.
12
13
7
CHANGING REMOTE CONTROL BATTERY
8” TFT LCD DIGITAL COLOR MONITOR
8
SPECIFICATIONS
8” TFT LCD DIGITAL COLOR MONITOR
• CM-800D
1) Slide and open the battery cover.
SPECIFICATION
ITEM
2) Insert new battery and ensure that the polarities
are correct when inserting. (No. CR2025)
LCD PANEL
POWER
SUPPLY
SIZE
20.32 cm (8.0inch)
NUMBER OF PIXELS
800 x 600
DOT PITCH
0.2025(W) x 0.2025(H) mm
BRIGHTNESS
360 cd/m2
CONTRAST RATIO
500:1
VIEW ANGLE CR≥10
70/ 65/ 70 (H/U/D)
VOLTAGE
DC 12V
CONSUMPTION
10 Watt AT DC 12V
INPUT SYSTEM
NTSC/ PAL/ AUTO
OSD DISPLAY
7 Languages
3) Slide and close the battery cover.
INPUT SYNCHRONOUS
FREQUENCY
TTL Separate, Composite
HORIZONTAL
15.73 KHz
VERTICAL
60 Hz
ANALOG R.G.B 0.7Vp-p
INPUT
SIGNAL
VIDEO
Composite Video, S-VIDEO (75 ohm 1Vp-p)
AUDIO
MONO INPUT 400mVrms
SOUND SIGNAL
0.5 Watt max
USER CONTROLS
POWER ON/OFF, MENU, MODE, PRO UP/DOWN
DIMENSION (W x H x D)
223(W) x 178(H) x 34.5(D) mm
OPERATING TEMPERATURE
-10℃ ~ 60℃
STORAGE TEMPERATURE
-20℃ ~ 70℃
WEIGHT
1.2 kg (Exclude Monitor Bracket)
※ Design and specifications could be changed without notices.
14
15