1
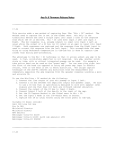
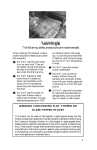
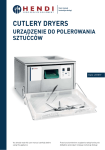
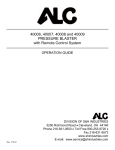
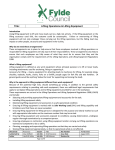
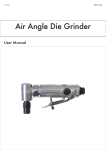
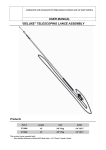
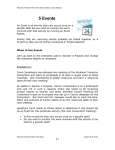
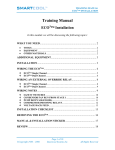
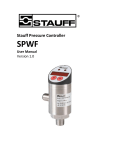
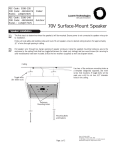
TM Blaster-Buddy User Manual 6/09 START UP Using the Blaster-Buddy is a quick and easy way to remove old finishes from wood surfaces but it is important to follow the following directions in order to assure your safety and proper operation of the equipment. First and foremost, the Blaster-Buddy is designed for using recycled crushed glass, walnut shells or corn-cob grit as blasting media. The use of other types of abrasive media may damage the equipment and if you break it, you'll have to pay to fix it! Before you start, a few notes about safety. The Blaster-Buddy puts out a high velocity stream of abrasive. Be careful where you point it and be sure that your working area is clear of children and pets. It's also important for your own protection that you wear the proper safety equipment. Starting with your clothes wear heavy duty long pants, a long sleeved shirt and work boots. Perma-Chink Systems includes a face shield, earplugs, gloves, and dust masks with the rental of each Blaster-Buddy. Be sure to use them whenever you operate the blaster. You will need to protect those areas of your home that you don’t want blasted like windows, doors, lighting fixtures, etc. The blasting media is very abrasive and will etch glass and remove paint and other coatings. Be sure to remove gutters and down spouts before you start and cover glass and painted surfaces with plastic film or cardboard. Small areas may be protected with duct tape applied over masking tape for easy release. In addition to the equipment supplied by Perma-Chink Systems you will need a source of compressed air. The required size is an air compressor capable of putting out between 125 and 185 cubic feet per minute (CFM). This is the same size required to run a jackhammer. Make sure to run the compressor without the automatic oiler. The oil will contaminate the blast media, and possibly leave an oily residue on the wood. If possible it should also have a regulator to regulate the air pressure. Most rental companies don't want customers fooling with the preset pressure on the compressor, so you may need to request an external regulator. Output pressure needs to be as low as possible and still do the job. 90 pounds per square inch (psi) works well in most situations. You should also request extra hose (100 feet should work for most jobs) and some extra gaskets for the hoses. However, try to place the compressor as close as possible to the blaster. 2 Air Compressor Types of abrasive suitable for use in the Blaster-Buddy include recycled crushed glass, corn-cob grit and walnut shells. Using other types of abrasives may damage the machine! For best performance use only grit supplied by Perma-Chink Systems. All blasting media MUST BE KEPT DRY for it to work. If it is wet or damp, it will clog the blaster. Do not try to reuse corncob grit or walnut shells that have already been through the blaster. In addition to the chance of picking up stones, dirt or moisture, once they have been used they lose the sharp edges that make them abrasive. Now it's time to do an inspection of the unit to make sure you have everything and the valves and levers are in the proper position. In addition to the blaster and safety equipment you should have: 1. Dual Line hose and remote control safety unit. 2. Blaster hose and nozzle. 1 2 Check to see that all gaskets and safety clips are in place. If any are missing, replace them before connecting the hoses. C B A See that the remote control safety switch is properly connected to the Dual Line hose and operates freely. Check the top opening to make sure the screen is free of debris. E D Check the following valves and levers to make sure that they are in the positions as shown. F G H Open Closed Open During operation. I J Open 4 Open Connect all of the hoses to the blaster making sure the gaskets are in place and the safety clips or wires are installed. These include the Dual Line hose (1), blast hose (A) and blast hose fitting (B), and the air supply line to the inlet valve fitting (C). If it's not already attached, screw the blaster nozzle onto the blaster hose nozzle coupling (2) making sure the nozzle washer is installed. Hand tighten until it seats and seals on the washer. Remove any debris or old, damp media from the top of the vessel. Make sure each leg of the bag breaker is securely fastened into place. Check the water drain valve to make sure it is in the open position (G). OPERATION 1. Close the main air valve (H) and media valve (J) by rotating the “T” handle clockwise. 2. Make sure the tank is not pressurized and fill the hopper with dry blasting media. Do not overfill. Add 100 psi one bag at a time. Keep the lid on the tank whenever the blaster is in use. 3. Warm up the air compressor until working pressure and temperature is attained. Never exceed 100 psi. Pressurize the air supply hose. Pressure Gauge 4. Make sure the area is clear and the operator has put on protective clothing and safety equipment before you start. Open the main air valve (I), the valve handle should be parallel to the pipe. Depress the safety lever on the remote control unit (D). Compressed air entering the vessel will pressurize the blaster. At this point only blast air, no media, should flow out of the blast nozzle. 5. To introduce the blasting media to the nozzle, keep the safety lever on the remote control unit depressed and begin turning the media control handle (J) counterclockwise until the desired air/media mixture is reached. 5 STOPPING THE BLASTER To avoid overnight condensation, empty the blaster of all media at the end of each day. Once empty, release the remote safety switch handle. That should relieve the pressure in the blaster pressure vessel and blast hose. Be sure that the blast hose is completely depressurized before releasing the hose and nozzle. SHUT-DOWN / STORAGE In order to receive your deposit in full, the Blaster-Buddy must be returned clean with no grit in it. Clean out the media remaining in the blaster by following these directions: Turn off the air supply valve at the compressor. Depressurize the blaster and hose by releasing the remote safety switch. Turn the media control valve (J) to the full open position, counterclockwise. Point the blast hose end in a safe direction. Open the compressor’s air supply valve to pressurize the air supply line to the blaster. Depress the handle on the remote safety switch (J). The grit will begin to expel. Once the blaster is empty, release the remote safety switch handle. Check to see that the blaster, air control hoses and blast hoses are completely depressurized before releasing the blast hose and nozzle. Shut off the source of compressed air and depressurize the air supply hose connected to the blaster. The blast hose, Dual Line hose and air supply hose should be loosely coiled and tied when not being used. TIPS ON OPERATION AND USE Using the Blaster-Buddy is a two-person job, one to manage the remote control safety switch and keep the tank filled with blasting media and the other to do the actual blasting. It takes both hands to maintain control of the blaster nozzle. It's the duty of the person holding the remote safety switch to constantly observe the individual doing the blasting and release the safety switch if any problem arises. 6 We recommend using fine media to avoid excessive pitting the surface. Start blasting by holding the nozzle at a 45 degree angle about two to three feet away from the surface of the wood. Work backwards away from the blast stream moving closer or further away to achieve the most effective removal of the old finish. If the wood is soft or rotted, be very careful since the blaster will remove soft wood very quickly. Some finishes or discolorations are not easily removed. Don't spend too much time blasting any one area since extreme wood removal will occur. Keep the blaster nozzle in constant motion sweeping back and forth across the surface of the wood. Once you have completed removing the old finish you want to make sure that the surface of the wood is clean and free of media and dust before you begin applying a new finish. The first step is to use the Blaster-Buddy to blow away any loose material. Clean out the grit remaining in the blaster by following the shut-down directions. Make sure the grit control handle (J) is in the off position by turning it clockwise. You will now be able to get clean air out of the blaster to blow off most of the dust, dirt and grit left on the surface. Once the surface has been blown clean, wash the walls with a Log Wash solution (2 cups per gallon of water) prior to staining. Be sure to completely rinse the Log Wash solution off of the wood with clean water and allow the surface to dry before applying Prelude. USING PreludeTM Clear Primer Media blasting significantly increases the porosity of the wood, thus allowing it to absorb much more stain than those wood surfaces that have been chemically stripped, sanded or pressure washed. This high absorption results in a darker final stain color than that typically reflected by a color chart. In addition, wood is not uniform and media blasting often emphasizes the differences in wood grain absorption, even on a single log. This results in streaks and blotches due to varying amount of stain absorbed by different areas of the wood. Prelude solves many of the potential problems created by media blasting. One coat fills the pores of the wood and provides a uniform surface film in preparation for the application of a pigmented stain. Contact any Perma-Chink Systems location for more information about Prelude Clear Water-Based Primer. Stained media blasted surface without Prelude. Stained media blasted surface first coated with Prelude. 7 TROUBLE SHOOTING GUIDE Although the Blaster-Buddy is designed to be basically trouble free, there are situations that may arise and prevent the blaster from functioning properly. CAUTION: Before attempting to troubleshoot any problem, always make sure to shut down the air compressor and allow air pressure to bleed off before removing any hoses, fittings, or valves. FAILURE TO DO SO MAY RESULT IN SERIOUS INJURY OR DEATH! PROBLEM The blaster will not pressurize. POSSIBLE CAUSE Remote control safety switch (D) defective. Insufficient air line pressure. Hoses connected improperly. Exhaust valve plugged or not operating correctly. No media comes out of blast hose. Blaster hose plugged. No media in vessel. Media feed plugged at vessel outlet (B). Too much media comes out of nozzle. Media control handle (J) is improperly set. There’s no pattern of media coming out of the hose. The blaster nozzle (2) is not in place. Improper nozzle technique. The air pressure is set too high. The wood is being excessively damaged. Improper or too coarse abrasive media is being used. The blast nozzle is too close to the wood surface. The blast nozzle is being moved too slowly. One last thing about using the Blaster-Buddy. If you are not sure about something or are having a problem, please give us a call. We have people available who can help you out. It’s much easier to avoid a problem than to try to fix it when you are not sure what to do. You should be all set to start using the Blaster-Buddy. Blast away, but blast safely! 8