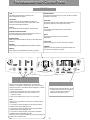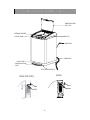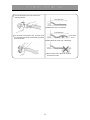
1
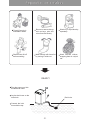
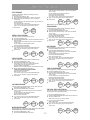
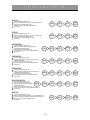
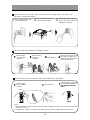
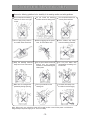
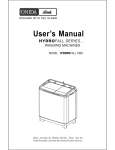
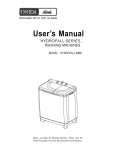
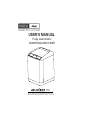
USER'S MANUAL Fully Automatic WASHING MACHINE 65X Before operating the Washing Machine, Please read this Guide thoroughly, and retain for future reference. SPARKLE 65X Dear Customer , Congratulations! You are now a proud owner of Onida SPARKLE 65X Fully automatic Washing Machine. We would particularly advise you to study the User's manual carefully to get the best out of your Onida Machine and please take the precautions mentioned on the following pages. Once again, Welcome to the happy ONIDA family. Contents : 1 SAFETY PRECAUTION FEATURES 2-3 FAMILIARISATION WITH CONTROL PANEL 4-5 PARTS LOCATION AND IDENTIFICATION 6 INSTALLATION & PREPARATION 7 CONNECTING THE DRAIN HOSE 8 PREPARATION BEFORE WASH 9 WASHING PROCEDURE 10-11 SELECTABLE WASHING METHODS 12 MAINTENANCE 13 TROUBLE SHOOTING 14 GUIDELINES FOR SAFETY AND DURABILITY 15 SPECIFICATIONS 16 ONIDA SERVICE CENTRES 17 WARRANTY CARD Proper use of Washing Machine Saves Electricity & Time Safety Precautions Please note that the following precautions for safety intend to prevent unpredictable danger and damage by helping the Proper use in safety. Make sure that the washing machine is plugged to a 5A electrical outlet and earth terminal is provided on the outlet. Unplug the power supply cord when you do not use it. To disconnect the washing machine from electrical mains completely, pull out the plug and never pull it from the mains cord. Don't allow your kids to look into the inside of the washing machine. This washing machine is meant for washing clothes with water as a medium. Do not use petrol or other chemicals. This can result in fire and damage. 0 Do not use water with temperature exceeding 50 C, as this deforms the plastic parts in the machine. If you desire to use warm water add hot water to cold water in the wash tub. Do not pour hot water in an empty tub. Keep the machine away from flames and inflammable material. Do not expose the washing machine to direct sunlight or rain. Also avoid placing it in humid locations. Take caution not to pierce the control panel membrane sheet. Never connect the earth wire to a phone wire, lightning rod. Do not press the button with an awl or pin. Never wash the washing machine or spread the water on machine top. Clean with just wet cloth or cloth soaked in soap water. -1- Features Moving Digital Display Keeps you updated with the various wash cycle timings and stages. Also easily allows you to program your machine with times and cycle repetitions according to your convenience and requirements. Brush With an actual Brush fitted on the inside of your drum, your clothes are treated gently with a cleaning system which is very much like a real person giving it a hand wash Water Saver Program In this Program the rinse function combines the spin and water spray features to help save energy and reduce water consumption by approximately 35%. Hexo Drum The Hexo Drum design creates a protective barrier of water between the drum and clothes. This ensures that your clothes get the best wash with minimum damage. Multiple Water Inlets With 2 water inlets provided, you can always be connected to cold & hot water sources. You can also choose the temperature of the water - hot, cold or a mix of both based on the requirement of your clothes to enhance the cleaning potential of the machine. Waterfall Just like a Waterfall dropping from great heights, this feature creates turbulence inside the wash tub which results in better dissolution of detergents within the water helping it to spread evenly throughout the clothes. It also produces greater movement of the wash load to give you enhanced cleaning action Fuzzy Logic Control Advanced technology features means that now your machine can do the thinking for you. With the Fuzzy Logic Control, the machine will indicate the required detergent level and will automatically decide the water level and wash time needed based on the load of the wash you put in and the temperature of the water you choose. Magic Filter The strategically placed box-type Magic Filter makes excess lint on your clothes history. It is positioned on the lower level of the tub which means that even in small wash loads the fluff will be captured in the Magic Filter and your clothes will remain lint-free. -2- Features Customized Wash Program Depending on your laundry, create personalized cycles with your own preference of wash, rinse and spin combinations as well as choose the desired water levels to be in total control of your machine! Active Soak The Active Soak function is there for those stubborn stains that cannot be removed with regular washing. It allows the clothes to be immersed in the detergent infused water and sends quivers through the wash from time to time so that it can attack the deepest dirt on your clothes and remove it. Eject Mechanism The Eject Mechanism allows you to open or close the door just at the press of a button. So now you can say goodbye to handles! Tempered Curved Glass Lid The Sparkle range comes with a Curved Transparent Window for a clear view of your clothes while they are being cared for. The Tempered Glass used is also stronger and adds to the durability of your washing machine. Memory Back-up The Memory Backup ability in your machine means that if you are going out or want to stop the cycle in the middle of a wash, you will be able to restart it from that particular point whenever you want. Water Level Selection With consumers desiring more water and energy saving washing machines, we have a Water Level Selection feature which allows you to choose from a variety of water levels depending on the wash load. This means there will be no more wastage! Delay Start The Delay Start option will allow you to set the machine to start at a later time or date so that your washing will be scheduled around your day and not your day around your washing! Child Lock This is an important feature if you have children in the house. The Child Lock option will disengage all the buttons on the machine so that your child is safe from harm and the wash cycle cannot be tampered with. -3- Familiarisation with Control Panel Start/Pause This button is used to start, pause the operation. To change the washing course during operation, press this button to pause and press the button to restart the operation after changing the course. Display Unit Programs Selector The unit will indicate the Remaining time to complete the selected program. Also indicates the error signals whenever they occur. As you press this button washing program changes as follows. Normal Heavy Gentle Quick wash Water Saver Jeans Sari Turbo Tub Clean Baby care Delay Selector To set the delay time Press this button. The delay time will change from 1 hr to 20 hrs with each press of the button with increment of 5 hr. Note : if you select Normal, Heavy, Gentle, Quick wash and water saver the LEDs will be continuously ON. For all other programmes LEDs will be Blinking. Mode Child Lock If any program is running or after starting any program the Water If any program/water level is selected then Level Button & Program the mode comes out of fuzzy and Custom LED Selection Button are will be ON and will execute the selected program. simultaneously pressed for 2 seconds, machine will If you press the mode button once then the go into Child lock mode. mode goes to custom where you can select the wash, rinse and spin course as per your This feature inactivates the requirement. Note: Once the course is completed, your selection control panel keypad. Press the same buttons for will be stored in the memory and the same can be 5 Seconds to de-activate displayed during your next selection of custom mode. the Child lock. When the machine is ON, the default mode is Fuzzy and Fuzzy LED will be ON. If you press the mode button twice then machine goes to “Today only” mode and both LED of mode button will be OFF where you can select the wash, rinse and spin as per your requirement. In this case, selection is not stored in memory. Water Level Selector Power Button In Fuzzy program according to the cloth load the Detergent level will be shown on the panel and Water level will automatically get selected Internally. In Custom mode you can select the water level from 22Litres to 60Litres. Power button is used to switch ON and switch OFF the machine. Note : If you select water levels 22, 30, 38, 46 and 54 the LEDs will be blinking. For all other water levels LEDs will continuously on. Note : This machine is equipped with memory backup function. This helps to retain same program in case of power failure. -4- Familiarisation with Control Panel MOVING DISPLAY TUB : Tub display will be ON When the Power is ON till the completion of programe. ERROR SIGNALS: Error signal s will be ON if any error occurs. (No Drain, No water, Imbalance and Lid open) PULSATOR : Pulsator display will be ON and Moving forward and reverse to show you the real motion of the Pulsator inside the machine during Wash and Rinse. FUNCTION: Soak, Wash, Rinse and Spin display will be ON as per the Programme selected to show the current process. CLOTH : Cloth display will be ON during Wash , Rinse and Spin. ARROWS and WATER DROPS : Arrows and water Drops will be ON during Spin to show you the real Spin happening inside the machine. WATER LEVEL: Water Level indicator will be ON as per the water level selected. WATER : Water display will be Blinking during intake of water. DRAIN : Drain display will be ON during draining of water. PAUSE: Pause display will be blinking when you pressed the pause button. DELAY: Delay display will be ON when you pressed the delay button. CHILD LOCK : Child lock display will be on when Child lock is activated TIME BAR: Display of 1 bar shows the start of Programe & display of all bars shows the completion of Program. Function Selector If you want to select individual wash, rinse and spin operation or combination of these three you can press these buttons. During this course Mode will be Changed to “Custom” from the default “Fuzzy”. 1. Wash can be selected from 6 min to 30 min in steps. 2. Rinse can be selected 1 time rinse to 2 times over flow rinse in steps. 3. Spin can be selected from 1 min to 11 min in steps. Temp With this button water inlet selection can be changed to Warm and Hot from the default Cold. For only baby care program the default water inlet selection is Hot. Note: Incase there is combination of functions in Custom mode by memory and, 1. If you want to select only Wash course then press Rinse and Spin button till their LED gets OFF. 2. If you want to select only Rinse course then press Wash and Spin button till their LED gets OFF. 3. If you want to select only Spin course then press Wash and Rinse button till their LED gets OFF. Same way you can get the combination of any two functions by pressing other functions OFF. -5- Parts Location And Identification TEMPERED CURVED GLASS LID. DETERGENT DRAWER EJECTOR CONTROL PANEL POWER PLUG DRAIN HOSE PLASTIC BASE SOUND ABSORPTION PLATE LEVEL ADJUSTMENT LEG BRUSH MAGIC LINT FILTER -6- Installation & Preparation Install the washing machine on a leveled and firm space. See if the level on the washing machine is correct. Adjust washing machine level by loosening or tightening the leg adjuster provided on the right hand side of the bottom of the washing machine. Keep the machine more than 20 cm away from the walls to prevent noise. Insert sound absorption plate into the slot at the Bottom of the machine. Connect the Inlet Hose Untighten the upper connector screw and the middle connector. Horizontal tap Rubber packing Connector Fixing screw Extension tap Middle Connector In case the diameter of the tap is large remove the guide plate Guide plate Square tap Connector Check to see if there is a rubber seal inside the connector. Check the water hose to the inlet valve of the washing machine, and then lock it by turning the hose connecting part. Push the upper connector up till the rubber packing is in tight contact with the Tap. Then tighten the 4 screws. Inside rubber packing Connector Middle connector Turn the middle connector to ensure no water leakage. Connect the water supply hose to the middle connector, pushing the plate up. Pusher Hose Connector Inside rubber packing Cold Water inlet (Blue) Hot Water inlet (Orange) -7- To separate the water supply hose from middle connector shut off the tap. Then pull the inlet hose down, pushing the plate down. Connecting the Drain Hose Connect the drain hose to the outlet of the washing machine. Less than 3m Additional hose is connected. Less than 2m Fix the drain hose with the clip, and then push the clip toward the body of the washing machine as shown below. Less than 6 cm. Place the drain hose over a threshold. Never let the end of the drain hose be immersed in water. -8- Preparation before Wash Check if laundry is washable in water. Be sure to remove things such as keys, pins and coins from the laundry. Wash oily or dyed laundry separately. Shake loose dirt off before washing. Wash laundry with loose lint by turning it inside out. Wash delicate clothes, wrapping them in a nylon net. READY? Plug the power cord into the electrical outlet. Lay the drain hose on the drain hole. Drain hole. Connect the inlet hose with the tap. -9- Washing Procedure 1 Connect the inlet hose to the tap. Plug in the power cord. Lower the drain hose. EJECT to release the 2 Press glass lid from the catch and 3 Put laundry in the tub. open it. Reverse the operation to close the lid. Note : If you pressed EJECT one time and Lid is not lifted sufficiently from the catch do not press it again instead lift it up. 4 Put proper amount of softener into the Softener inlet if required. The Softener will be automatically adds into the tub at the last rinsing cycle. Note : 1. Do not add detergent or bleach into the softener inlet. 2. Using too much softener may lead unsatisfactory result. 6 Select the programme as you desired and press the START/PAUSE button. From this moment enjoy your time. START/PAUSE -10- 5 Press the power switch. Washing Procedure Select the water level depending on the cloth load (default "60 Ltr” Level) Put the detergent in the "Detergent Drawer”. Press the START/PAUSE button. Soak, Wash, Rinse & Spin follow. If you want to pause, press the START/PAUSE button again. You can change the program when paused. Close the lid. FUZZY PROGRAM Controller automatically displays the Detergent Level & selects Water Level. Press the power button to "ON" Press the START/PAUSE button or wait for 10 seconds. Water level is selected & Detergent level is displayed automatically. Put the detergent in the "Detergent Drawer” as per Display on the Control Panel. Soak, Wash, Rinse & Spin follow. If you want to pause, press the START/PAUSE button again. You can change the program when paused. Close the lid. POWER POWER Note: Please do not use excess detergent. START/ PAUSE NORMAL / HEAVY PROGRAM PROGRAMS START/ PAUSE GENTLE PROGRAM Use this program for washing Woolen or Delicate laundry. Press the POWER button to "ON". Press the PROGRAMS button three Times. Fixed water level of "60 Ltr” is selected automatically. Put the detergent in the "Detergent Drawer”. Press the START/PAUSE button. Machine runs for 1 minute to dissolve the detergent and stops. Buzzer will beep and display will show "CL”. LOAD THE LAUNDRY INTO THE MACHINE Press the START/PAUSE button. Wash, Rinse & Spin follow. If you want to pause, press the START/PAUSE button again. You can change the program when paused. Close the lid. POWER PROGRAMS START/ PAUSE Use this program for washing heavily soiled heavy laundry. Press the POWER button to "ON". Press the PROGRAMS button Six Times. Select the water level depending on the cloth load (default "60 Ltr" Level) Put the detergent in the "Detergent Drawer”. Press the START/PAUSE button. Soak, Wash, Rinse & Spin follow. If you want to pause, press the START/PAUSE button again. You can change the program when paused. Close the lid. START/ PROGRAMS POWER PAUSE SARI PROGRAM Use this program for washing Sari and similar kind of laundry. Press the POWER button to "ON". Press the PROGRAMS button seven Times. Select the water level depending on the cloth load (default "60 Ltr” Level) Put the detergent in the "Detergent Drawer”. Press the START/PAUSE button. Wash, Rinse & Spin follow. If you want to pause, press the START/PAUSE button again. You can change the program when paused. Close the lid. POWER PROGRAMS START/ PAUSE Use this program for washing Baby laundry & under garments. Press the POWER button to "ON". Press the PROGRAMS button Eight Times. Select the water level depending on the cloth load (default "60 Ltr" Level) Put the detergent in the "Detergent Drawer”. Press the START/PAUSE button. Soak, Wash, Rinse & Spin follow. If you want to pause, press the START/PAUSE button again. You can change the program when paused. Close the lid. POWER Use this program for washing little dirty laundry within short time. Press the POWER button to "ON". Press the PROGRAMS button Four Times. Select the water level depending on the cloth load (default "60 Ltr" Level) Put the detergent in the "Detergent Drawer”. Press the START/PAUSE button. Wash, Rinse & Spin follow. If you want to pause, press the START/PAUSE button again. You can change the program when paused. Close the lid. PROGRAMS TURBO CLEAN PROGRAM QUICK WASH PROGRAM POWER START/ PAUSE JEANS PROGRAM Use heavy program for washing heavy laundry. Press the POWER to "ON". Press the PROGRAMS button one time for Normal & Twice for Heavy Program. Select the water level depending on the cloth load (default "60 Ltr" level). Put the detergent in the "Detergent Drawer”. Press the START/PAUSE button. Soak, Wash, Rinse & Spin follow. If you want to pause, press the START/PAUSE button again. You can change the program when paused. Close the lid. POWER PROGRAMS PROGRAMS START/ PAUSE TUB CLEAN / BABY CARE PROGRAM Use tub clean program for cleaning the machine and use Baby care programme for cleaning Baby laundry. Press the POWER button to "ON". Press the PROGRAMS button Nine Times for Tub clean and Ten times for Baby Care.. Water level will be "26 Ltr” Level by default. Press the START/PAUSE button. Wash & Spin follow. If you want to pause, press the START/PAUSE button again. You can change the program when paused. Close the lid. START/ PAUSE WATER SAVER PROGRAM Use this program to wash medium soiled clothes and to save water and detergent using shower rinse technology. Press the POWER button to "ON". Press the PROGRAMS button five Times. -11- POWER PROGRAMS START/ PAUSE Selectable Washing Methods WASH ONLY Press the POWER button to "ON". Select your desired washing time by pressing WASH button. Press the START/PAUSE button once. Washing goes on as per PROGRAMS selection. Close the lid. POWER CUSTOM WASH START/ PAUSE POWER CUSTOM SPIN START/ PAUSE POWER CUSTOM WASH RINSE START/ PAUSE POWER CUSTOM RINSE SPIN START/ PAUSE POWER CUSTOM WASH SPIN START/ PAUSE CUSTOM WASH RINSE SPIN START/ PAUSE POWER CUSTOM RINSE START/ PAUSE SPIN ONLY Press the POWER button to "ON". Select your desired spinning time by pressing SPIN button. Press the START/PAUSE button once. Spin goes on as per PROGRAMS selection. Close the lid. WASH AND RINSE Press the POWER button to "ON". Select your desired washing timing and rinse by pressing WASH & RINSE button. Press the START/PAUSE button once. Wash and rinse go on as per PROGRAMS selection. Close the lid. RINSE AND SPIN Press the POWER button to "ON". Select your desired rinse and spin timing by pressing RINSE & SPIN button. Press the START/PAUSE button once. Rinse and spin go on as per PROGRAMS selection. Close the lid. WASH AND SPIN Press the POWER button to "ON". Select your desired washing timing and spin timing by pressing WASH and SPIN button. Press the START/PAUSE button once. Wash and Spin go on as per PROGRAMS selection Close the lid. WASH, RINSE AND SPIN Press the POWER button to "ON". Select your desired washing timing, rinse and spin timing by pressing WASH, POWER RINSE & SPIN button. Press the START/PAUSE button once. Wash, Rinse, Spin go on as per PROGRAMS selection. Close the lid. RINSE ONLY Press the POWER button to "ON". Select your desired Rinsing program by pressing RINSE button. Press the START/PAUSE button to select the desired delay time. Rinse goes on as per PROGRAMS selection. Close the lid. -12- Maintenance Clean the filter in the inlet valve. Clean the filter when water supply into the tub is bad or the inlet valve is clogged with impurity. 1 Plug out the power cord from the outlet first. 2 Pull out the filter from the inlet valve with fingers. 3 Use a tooth brush to get rid of filth and then insert the filter back in position. Clean the waste thread collected in the Magic Lint filter. 1 Push the upper part of the filter and pull in. 2 Open the cover as shown in the figure. 3 Clean the filter. 4 Close the cover and insert the lower part of the filter in the basket first and then push the filter with “click” sound. Clean the brush to get rid off residues and lints accumulated over the bristles. 1 Push the upper part of the Brush and pull in. 2 Clean the Brush. 3 Insert lower part of the Brush in the basket first and then push the brush with “click” sound. BRUSH Note : 1. Bristle distortion might be there in the brush after completion of wash cycle. This will be resumed before next wash. 2. If bristles are coming out of brush call Onida service person & replace with the new brush. -13- Trouble-Shooting PROBLEMS CHECK-POINTS No water supply. E1 If the water is not supplied within 30 minutes, a buzzer will sound and remaining time indicator will show E1. Check if the tap is a open. Check for water supply. No drain. E2 Is the drain hose kept down? If the water does not drain within 5 minutes, a buzzer will sound and remaining time indicator will show E2. Is the drain hose twisted? or is not the threshold too high? No spining. E3 If the lid is opened during spin the buzzer will sound and the remaining time indication will show E3. E4 Is the lid closed properly. If the tub is unbalanced the buzzer will sound and the remaining time indication will show E4. E5 Contact nearest service centre for rectification. If there is any Pressure switch/Pressure switch hose connection problem the buzzer will sound and the remaining time indication will show E5. PROBLEMS Is the laundry unevenly balanced? CHECK-POINTS No power supply Is the power switch pressed? Is the power cord unplugged? Power failure? Fuse blown? START/PAUSE Machine not working. Is the water tap shut off? Is the water level normal? Has the START/PAUSE button been pressed? The high level of vibration and noise during spinning. Is the washing machine installed on a level place? -14- Is the noiseproof plate properly fit into the plastic base? Guidelines for Safety and Durability Observe the following guidelines for the durability of the washing machine and safety problems. Do not expose the washing machine to direct sun light or rain. Do not install the washing machine around a damp place. Do not sprinkle water over control panel switches. Do not plug many cords in one outlet at the same time. When plugging out the power cord, do not hold the wire. Have children stay away from the washing machine. Keep the washing machine away from fire or heat source. Do not pour caustic soda and bleach over the washing machine. It causes damage to rubber parts. Do not pour water with temperature exceeding 70°C into the tub. Make sure of closing the lid, particularly during spinning. Do not put hands into the rotating tub. Let water drain away from the drain hose thoroughly. Note : When not in use, switch the power off from wall socket or remove the power cord. Machine will give beeps till power supply is on. This is for safety. -15- Specifications DESCRIPTION SPARKLE 65X CAPACITY (Kg) 6.5 TYPE Fully Automatic Machine POWER SOURCE 230 V AC, 50 Hz WATER PRESSURE RANGE (Kg/cm 2) 0.3 to 8.0 WASHING SYSTEM Pulgitator BRUSH Yes WATER INLET 2 Nos. (Hot & Cold) INNER TUB Stainless Steel - Hexo Drum MOTOR RATING Wash - 130 rpm Spin - 740 rpm 400 W (Input) DRIER SYSTEM Spin Dry (Centrifugal Force) WATER LEVEL 10 (Ten) Levels. DIMENSION (WxHxD) (mm) 580x910x595 NET WEIGHT (Kg) 34.0 Kg ACCESSORIES Inlet Hose - 2 Nos. Drain Hose - 1No. Sound Absorption plate - 1 No. REVOLUTION SPEED (Design & Specification subject to change without notice) -16- nos. State Service Number Andhra Pradesh 040-39889000 Delhi 011-39889000 GOA 022-39889000 Gujarat 079-39889000 Haryana 0172-3988900 Karnataka 080-39889000 Kerala 0484-3988900 Madhya Pradesh 0731-3988900 Maharashtra 022-39889000 Punjab 0172-3988900 Rajesthan 0141-3988900 Tamilnadu 044-39889000 Uttar Pradesh 0522-3988900 W Bengal 033-39889000 Bihar 1800 30099000 Chattisgarh 1800 30099000 Himachal Pradesh 1800 30099000 Jharkhand 1800 30099000 Orrisa 1800 30099000 Uttaranchal 1800 30099000 Assam-Guwahati 0361-2413138 / 2413158 Assam-Jorhat 0376-2309008 Jammu & Kashmir- Jammu 0191-2562258 Overseas-Middle East Asia UNITED ARAB EMIRATES : M/s Al Futtaim Electronics,DUBAI .U.A.E.Tel : +971 4 6090760 Fax: +971 4 2832590, OMAN : M/s Mohsin Haider Darwish, P.O.Box : 880, PC 112-RUWI, OMAN Tel :+968 24 703411 Fax :+968 24 798662 QATAR: M/s Videohome & Electronics Centre, . PO Box : 4668,DOHA-QATAR,Tel : +974 4410060 Fax : +974 44373876 BAHRAIN: M/s Kewalram & Sons . .PO P Box : 84, Manama BAHRAIN Tel : +973 17 210617 Fax :+ 973 17 210627 KUWAIT: M/s Sefeena Gen Trading & Cont Est, P.O Box :5610, Safat: 13057 KUWAIT Tel :+9652456293 fax : +9652456297 KINGDOM OF SAUDI ARABIA:M/s Said Ahmed El-Ajou Trading Corp. LLC, Tel:+966 22830923, Fax :+966 2830924 -17- MANUFACTURED & MARKETED BY : MIRC ELECTRONICS LIMITED ONIDA HOUSE, G-1, MIDC, MAHAKALI CAVES ROAD, ANDHERI (EAST), MUMBAI 400 093 MADE IN INDIA www.onida.com