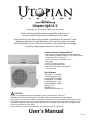
1
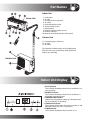
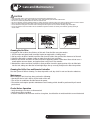
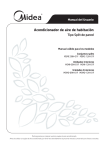
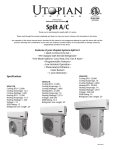
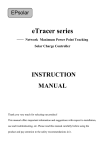
Utopian Split A/C
Thank you for purchasing this quality Split A/C system!
Please read through this manual completely, and keep it in
case you need to reference the information in the future.
Any operation of this device beyond what is described in this manual, or any
unapproved attempt to repair this device, will void the product’s warranty
and is undertaken at your own risk. Sunleaves is not responsible for damage
caused by inappropriate operation of this device.
Features of your Utopian Split A/C
• Quick-connect refrigerant pipes for easy installation
• Low-ambient operation continues to cool when outdoor temperatures are as low as 5°F
• Carbon filter helps to eliminate odors
• Heat pump
• Remote controller operation
• 24-hour programmable timer
• Auto-restart after power interruption
• 1-year warranty
Specifications
Cooling BTU: 11,000 BTU
Cooling Amperage: 10A
Cooling Wattage: 1090W
Heating BTU: 12,500 BTU
Heating Amperage: 10A
Heating Wattage: 1060W
Voltage: 115V
SEER Rating: 13
Refrigerant Line Length: 16’
CAUTION
• Contact a licensed professional for installation, repair or maintenance of this unit.
Installation work must be performed in accordance with local and national wiring standards.
•If the power cord needs to be replaced, replacement work must be performed by a licensed professional.
•This appliance should not be used by individuals who lack the experience, k
nowledge or ability to safely operate this appliance, unless they receive supervision or instruction c oncerning use of the appliance by a person responsible for their safety.
•Young children should be supervised when in the vicinity of the air conditioner.
User’s Manual
REV 032013
Safety Precautions
To prevent injury to the user or other people and property damage, the following instructions must be
followed. Incorrect operation that results from failure to follow the instructions can cause physical harm or
property damage. The danger level is indicated by the following:
WARNING: This symbol indicates the possibility of death or serious injury.
CAUTION: This symbol indicates the possibility of injury or damage to property.
WARNING
•Connect to the power source properly. Excessive heat generation caused by failure to do so may result in electric shock or fire.
•Do not operate or stop the unit by switching the power source on or off.
•Do not use a damaged or unspecified power cord. It may result in electric shock or fire.
•Modifying the power cord length or sharing the outlet with other appliances may result in electric shock
or fire.
•Operating the unit with wet hands or in a damp environment may result in electric shock.
•Always ground the unit properly. Improper grounding may result in electric shock.
•Allowing water to contact electric parts may cause failure of unit or electric shock.
•Always install a dedicated circuit and breaker. Improper wiring or installation may result in fire or
electric shock.
•Turn off the circuit breaker or disconnect the power source if strange sounds, smells or smoke come from
the unit.
•Do not drink water drained from the air conditioner.
•Opening the unit during operation may result in electric shock.
•Use the correctly rated circuit breaker.
•Do not place a heater or other appliances near the power cable.
•Do not disassemble or modify unit.
•If flammable gas leaks, turn off the gas and open a window to ventilate the room before turning on the unit.
•Do not store or use flammable gas or combustibles near the unit.
CAUTION
•Do not clean the air conditioner with water. Water may enter the unit and degrade the insulation, resulting in electric shock.
•Before cleaning the unit, turn off the unit and the circuit breaker. Cleaning the unit when the power is on may result in electric shock or injury.
•Do not place caged animals or house plants where they will be exposed to direct airflow.
•Do not use this unit for special purposes, such as preserving food or works of art. It is a consumer air
conditioner, not a precision refrigeration system.
•Placing obstacles around the air inlets or inside the air outlets may result in fire or failure of the appliance.
•If the appliance will be inactive for an extended period of time, disconnect the power source by turning off the circuit breaker.
•Use a soft cloth and do not use strong detergents or solvents to clean the unit.
•Ensure that the installation bracket of the outdoor appliance is not damaged by prolonged exposure to
the environment.
•Always insert air filters securely. Clean the filter every two weeks. Operating the unit without the filter will cause failure. (See page 6 for cleaning instructions.)
•Do not place heavy objects on or compress the power cord in any way.
•Use caution when unpacking and installing the unit. Sharp edges could cause injury.
•If water enters the unit, turn the unit off, disconnect the power and contact a licensed professional.
2
Part Names
Indoor Unit
Indoor Unit
1. Front panel
2. Air inlet
3. Air filter (under front panel)
4. Air outlet
5. Horizontal airflow louver
6. Vertical airflow louver
7. Display panel
8. Remote controller signal receiver
9. Remote controller
10. Manual control button (under front panel)
Outdoor Unit
11. Connecting pipe, drain hose
12. Air inlet
13. Air outlet
The operation indicator lights on the display panel
flash five times per second when safety protection
features are operating.
Outdoor Unit
Indoor Unit Display
1. AUTO indicator
This indicator illuminates when the air conditioner is in auto operation.
2. DEFROST indicator
This indicator illuminates when the air conditioner is defrosting or producing heat.
3. TEMPERATURE indicator
Displays the temperature settings in Fahrenheit when the air conditioner is operating.
4. OPERATION indicator
This indicator flashes when the power is turned on and illuminates when the unit is in operation.
5. TIMER indicator
This indicator illuminates when the timer is set.
DEFROST
3
Operating Instructions
Note: This manual does not cover remote controller operation. See the “Remote Controller Instructions”
packed with the unit for details.
Temperature/Mode
Cooling Operation
Heating Operation
Dehumidifying Operation
Room temperature
62ºF - 90ºF
(17ºC - 32ºC)
32ºF - 86ºF
(0ºC - 30ºC)
< 21,000 BTU models:
50ºF - 90ºF (10ºC - 32ºC)
≥2100 BTU models
62ºF - 90ºF (17ºC - 32ºC)
Outdoor temperature
5ºF - 122ºF
(-15ºC - 50ºC)
20ºF - 76ºF
(-7ºC - 24ºC)
< 21,000 BTU models:
52ºF - 109ºF (11ºC - 43ºC)
≥2100 BTU models
64ºF - 109ºF (18ºC - 43ºC)
Low Ambient Operation
This unit features low ambient operation, which means the unit will continue to cool indoors when outside
temperatures drop as low as 5°F/-15°C. This capability is ideal for locations that require cooling even during
winter.
Note:
1.The unit will perform optimally within the above conditions. If the unit is used outside the above conditions, safety features may begin to operate and the unit may function abnormally.
2.If the unit operates while the room’s relative humidity exceeds 80%, condensation may form on the surface of the unit. To prevent condensation, set the vertical airflow louver to the maximum opening and set fan mode to high.
Manual Operation
Note:
Manual operation should be used only if the remote controller has been disabled or if maintenance is necessary.
1. Lift the front panel until it remains fixed at an angle with a clicking sound.
2. Push the manual control button under the electrical box cover until the auto indicator illuminates. The unit will run in forced auto mode (the default
temperature setting is 76°F/24°C). Pressing the
manual control button again causes the operation mode to advance through the following sequence: AUTO COOL OFF.
3. Close the panel firmly.
4. To restore remote controller operation, use the
remote controller directly.
AUTO/COOL/OFF
4
Operating Instructions
Auto Operation
•When the air conditioner is in auto mode, it will automatically select between cooling, heating and fan-only operation to meet the set operating temperature.
•Select desired settings manually if the auto mode is uncomfortable.
Economy Operation
Press the economy button to begin economy mode. During cooling, heating or auto operation, the air conditioner will automatically increase (cooling) or decrease (heating) the set temperature by 2°F/1°C per hour for the
first two hours, maintain the new temperature for five hours, and then turn off.
Dehumidifying Operation
The unit regulates temperature while it is dehumidifying by turning cooling or fan-only operation on and off as
necessary. The fan speed is low.
Optimal Operation
To achieve optimal performance:
•Adjust the temperature to achieve the highest comfort level. Do not adjust the unit to excessive
temperature levels.
•Close doors and windows while operating on cool or heat mode.
•Use the timer-on button on the remote controller to select the time for the air conditioner to start.
•Do not put any object near air inlet or outlet because doing so may reduce the air conditioner’s efficiency and the air conditioner may stop operating.
•Clean the air filter every two weeks. (see page 6)
•Do not operate the unit with the horizontal louver in the closed position.
Turbo Function
The turbo function enables the unit to reach the preset temperature more quickly than under normal operation. On cooling or heating mode, the unit will blow air using a very high fan speed. Press the turbo button on
the remote controller to activate or deactivate the accelerated cooling or heating operation.
Adjust the airflow direction to avoid discomfort or uneven room temperatures.
To Set the Up/Down Airflow Direction (Vertical Airflow):
Use the remote controller to set the vertical airflow while the unit is operating.
Press the swing button to adjust the horizontal louver in increments of 6°, or
hold the button for more than two seconds to set the louver to swing up and
down automatically. Please refer to the “Remote Controller Instructions”
for details.
To Set the Left/Right Airflow Direction (Horizontal Airflow):
Move the vertical louver manually. (Refer to the illustration to the right.)
IMPORTANT: Disconnect the power supply before adjusting the vertical louver.
CAUTION
• Do not operate the air conditioner for long periods in cooling or dehumidifying mode with the airflow
direction set downward, or condensation may form on the surface of the horizontal louver and drop onto the floor or furniture.
• Do not move the horizontal louver manually unless it is necessary. Always use the remote controller.
• When the air conditioner is started immediately after being stopped, the horizontal louver might not move for approximately
10 seconds.
• Setting the horizontal louver so the open angle is too small may overly restrict the airflow and reduce performance.
• Do not operate the unit with the horizontal louver closed.
• When the unit is initially connected to a power source, the horizontal louver may generate a sound for 10 seconds.
This is normal operation.
5
Care and Maintenance
CAUTION
• Verify the power source and circuit breaker are turned off before cleaning the unit.
• If the indoor unit is very dirty, wipe it down with a cool, damp cloth. Dry the unit with another cloth.
• Do not use a chemically treated cloth or duster to clean the unit.
• Do not use benzene, thinner, polishing powder or similar solvents for cleaning. These may cause the plastic surface to crack or deform.
• Never use water hotter than 104°F/40°C to clean the front panel because it could deform or discolor the panel
• Do not touch the metal parts of the unit when removing the filter. Injuries can occur when handling sharp metal edges.
• Do not use water to clean the inside of the air conditioner. Exposure to water can destroy the insulation, possibly leading to
electric shock.
Cleaning the Air Filter
A clogged air filter reduces the efficiency of this unit. Clean the filter every two weeks.
1. Lift the indoor unit panel until it remains fixed at an angle with a clicking sound.
2. Pull up on the air filter’s handle to pull the filter from its holder, then pull the filter down out of the unit.
3. Clean the filter with a vacuum cleaner or water, then dry it in a cool place.
4. Remove the carbon and silver ion filters from their supporting frames. Clean these filters at least once a month with a vacuum cleaner, and replace them every four to five months.
5. Reinstall the carbon and silver ion filters in their positions. Insert the upper portion of the air filter back
into the u
nit, taking care that the left and right edges line up correctly, and place the filter into position.
Cleaning the Grille, Case and Remote Controller
Turn the system off before cleaning. To clean, wipe with a soft, dry cloth. Do not use bleach or abrasives.
Maintenance
Before idling the unit for a long time, perform the following:
• Operate the fan for half a day to dry the inside of the unit.
• Turn off the air conditioner and disconnect the power.
• The outdoor unit requires periodic maintenance and cleaning, which should be performed by a licensed professional.
Checks Before Operation
• Verify the wiring is not loose or disconnected.
• Verify the air filter is installed.
• If the air conditioner has not been used for a long time, check that the air outlet and inlet are not obstructed.
6
Operation Tips
The following events may occur during normal operation.
1. The compressor will not restart immediately after being stopped.
• To protect the compressor, it cannot restart for 3-4 minutes after it stops.
2. The indoor unit produces a white mist.
• The unit may generate white mist during cool mode if the room has a high relative humidity and there is a large temperature difference between the air inlet and air outlet.
• The unit may produce white mist during heat mode after defrosting because of the moisture generated.
3. The air conditioner produces a low noise.
• The air conditioner may produce a low hissing sound when the compressor is running or has just stopped running. The sound is caused by the refrigerant flowing or coming to a stop.
• The air conditioner may produce a low squeaking noise when the compressor is running or has just stopped running. The sound is caused by heat expansion and cold contraction of the plastic parts in the unit when the temperature changes.
• The louver may produce a noise as it returns to its original position when the air conditioner is turned on.
4. The indoor unit blows out dust.
• It is normal for the air conditioner to blow out dust when it has not been used for a long time or during first use of the unit.
5. The indoor unit produces an unusual smell.
• The indoor unit may give off smells absorbed from building material, furniture or smoke.
6. The air conditioner switches to fan-only mode from cool or heat mode.
• When the indoor temperature reaches the temperature setting on the air conditioner, the compressor will stop automatically, and the air conditioner will switch to fan-only mode. The compressor will start again when the indoor temperature rises or falls.
7. Condensation forms on the indoor unit.
• Condensation may form on the indoor unit during cool mode if relative humidity is higher than 80%. To reduce condensation, adjust the horizontal louver to the maximum air outlet position and select high fan speed.
8. A power failure during operation stops the unit completely.
• When the power is restored, the auto-restart function restarts the unit with all the previous settings
preserved by the memory function.
9. The unit malfunctions without apparent cause.
• Lightning or a signal from a wireless phone may cause the unit to malfunction. Disconnect the unit from the power source, then reconnect it. Push the on/off button on the remote controller to restart operation.
7
Troubleshooting Tips
If one of the following malfunctions occurs, stop the air conditioner immediately, disconnect the power and
then connect it again. If the problem persists, disconnect the power and contact a licensed professional.
OPERATION indicator or other indicators flash continuously.
Fuse blows frequently or circuit breaker trips frequently.
Malfunction
Water or an object falls into the air conditioner.
The remote controller doesn’t work or works abnormally.
One of the following codes appears on the display area: E0, E1, E2, E3 or P0, P1, P2
and P3.
Malfunctions
Unit does not start
Unit does not cool or heat
properly while running
Possible Cause
What to do
Power has been cut.
Wait for power to be restored.
Unit has become unplugged.
Plug unit securely into wall outlet.
Fuse has blown.
Replace the fuse.
Battery in remote controller has
been exhausted.
Replace the battery.
The timer is set to the incorrect time.
Cancel or reset timer setting.
Temperature setting is outside
recommended range.
Set temperature correctly. Refer to
“Remote Controller Instructions”
for details.
Air filter is blocked.
Clean the air filter.
Doors or windows are open.
Close the doors or windows.
Air inlet or outlet of indoor or
outdoor unit has been blocked.
Clear obstructions away and then
restart the unit.
Compressor protection has
been activated.
Wait 3 - 4 minutes for compressor to
restart.
NOTE: Do not attempt to repair the unit. Always consult a licensed professional.
User’s manual