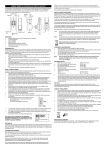
1
User manual
ENGLISH
4CH DMX MODUL
DIMMERPICK(DMP-408)
Version 2.0
CONTENTS
Warning
1
Caution
3
Important
3
Features
4
Section 1: Setting Up
5
Section 2: Operation
6
Functions (FRONT)
6
Functions (REAR)
9
Troubleshooting
11
Maintenance
11
Product Specifications
11
Appendix 1 DMP-408 Program Pattern Chart 12
If the supply cord is damaged, it must be
replaced by the manufacturer, its service
agent or similarly qualified persons in
order to avoid a hazard.
Read the manual
Indoor use only
This symbol indicating separate collection for electrical and
electronic equipment
Lamp Control Gear
Safety Class II appliance
Warning!
• To prevent fire or shock hazard, do not expose this appliance to rain or moisture.
• To avoid condensation to be formed inside, allow the unit to adapt to the surrounding temperatures when bringing it into a warm room after transport Condense sometimes prevents the unit from working at full performance or may even cause damages.
• This unit is for indoor use only.
• Don't place metal objects or spill liquid inside the unit. No objects filled with liquids, such as vases, shall be placed on this appliance. Electric shock or malfunction may result. If a foreign object enters the unit, immediately disconnect the mains power.
• No naked flame sources, such as lighted candles, should be placed on the appliance.
• Don't cover any ventilation openings as this may result in overheating.
• Prevent use in dusty environments and clean the unit regularly.
• Keep the unit away from children.
• Inexperienced persons should not operate this device.
• Maximum save ambient temperature is 40°C. Don’t use this unit at higher ambient temperatures.
• Always unplug the unit when it is not used for a longer time or before you start servicing.
1
• The electrical installation should be carried out by qualified personal only, according to the regulations for electrical and mechanical safety in your country.
• Check that the available voltage is not higher than the one stated on the rear panel of the unit.
• The socket inlet shall remain operable for disconnection from the mains.
• The power cored should always be in perfect condition. Switch the unit immediately off when the power cord is squashed or damaged. It must be replaced by the manufacturer, its service agent or similarly qualified persons in order to avoid a hazard.
• Never let the power-cord come into contact with other cables!
• This appliance must be earthed to in order comply with safety regulations.
• In order to prevent electric shock, do not open the cover. Apart from the mains fuse there are no user serviceable parts inside.
• In the event of serious operating problems, stop using the appliance and contact your dealer immediately.
• Please use the original packing when the device is to be transported.
• Due to safety reasons it is prohibited to make unauthorized modifications to the unit.
2
Caution!
To reduce the risk of electric shock, do not remove
the top cover. No user-serviceable parts inside. Refer
servicing to qualified service personnel only.
Important
The wires in this mains lead are colored in
accordance with the following code.
Green and Yellow – Earthed (E)
Blue – Neutral (N)
Brown – Live (L)
Warning: This appliance must be earthed.
3
Features:
• Built-in power: 4x1500W (Max. total: 3,6kW)
• 4 extra buttons to switch small effects on/off
• DMX output for extra power units:
1. 4 dimmer channels
2. 4 switch channels
• 4 user modes:
1. Manual dimmer mode
2. Light modulator (treble, mid, bass, anti-bass)
3. Built-in programs music triggered
4. Built-in programs at variable speed
• Internal micro or external music input
• Dimming on each channel
• Master dimming + background level
• Flash buttons on all channels
• 9 programs + random function
• Suitable for resistive and inductive charges
4
Section 1: Setting Up
Inspection
Every DMP-408 4CH DMX Modul Dimmerpack was thoroughly tested
and shipped in perfect condition. Carefully unpack your DMP-408
and remove the bag with components from the carton. Please notify
your dealer immediately if damage occurred during shipping.
Packing list:
• One DMP-408
• Instruction manual
Installation
1. Place DMP-408, 4CH DMX Modul Dimmerpack on a flat, dry surface or install on a suitable rack.
2. Refer wiring to a qualified technician. Plug par can power supply cords into the four channel outlets on the back of the unit. Do not exceed maximum load limits in Product Specifications.
3. Supply electric power. Press POWER switch to “on” position. LEDs will light. “O” will appear in the PROGRAM display.
5
Section 2: Operation
Functions (FRONT)
To operate DMP-408, follow instructions regarding the different
functions, MODE SELECT, PROGRAM SELECT, FUNCTION CONTROL,
and DIMMER CONTROL.
1. POWER SWITCH: used to switch the unit ON/OFF.
2. DIMMER CHANNELS: these are 4 sliders used to set the individual
dimming levels of the 4 channels. Below each slider there's a flash
button to set the output of the corresponding channel to 100%
(full) for as long as the button is pressed. The flash buttons all have
backlight so you can easily monitor the output of each channel.
3. MODE SELECT: simply press the MODE SELECT key to change
modes. The MODE SELECT LED display in the middle of the
controller will light to indicate the active mode.
• HOLD DIM: (top LED lit) makes the DMP-408 a dimming
board. Simply move the DIMMER CHANNELS sliders to adjust
light intensity of each of the four channels. This mode can be
used in conjunction with DIM MASTER and BACKGROUND
FUNCTION CONTROLS.
6
• HOLD SOUND: (second LED from top lit) equates DIMMER CONTROL output channels to musical ranges.
Channel 1 = Low (bass)
Channel 2 = Middle (tenor)
Channel 3 = High (soprano)
Channel 4 = Anti-base (Channel four lights are lit when the frequency besides low, middle and high).
* The intensity of par cans connected to these channels will reflect the intensity in these musical ranges.
• PROGRAM SOUND: (third LED from top lit) the chaser speed
is synchronized to the rhythm of the beat. For chase patterns, see Appendix 1.
• PROGRAM SPEED: (bottom LED lit) makes the FUNCTION CONTROL PROG SPEED slider trigger the chase. The higher the speed, the faster the chase Progresses.
4. MODE SELECT INDICATOR: show which of the 4 modes is currently active.
5. PROGRAM SELECT: to select a program, press PROGRAM SELECT. The PROGRAM display will show the number of the pattern being run. Please see Appendix 1 for pattern variation details.
6. PROGRAM DISPLAY: shows which chaser program is currently selected
7. FULL SWITCH: use this button to set the output of the 4 channels to 100% (full) for as long as the button is pressed.
8. STANDBY SWITCH: used to blackout the output of the 4 dimmer channels. The 4 switch channels are not affected.
9. SPEED x 10 BUTTON: increases or decreases chase speed by 10 times, when in the fourth mode.
10. SWITCH CHANNELS: these buttons are used to switch 4 individual light effects ON/OFF. To be able to use these buttons, you must to connect a separate switch pack to the DMX-output of the unit. (DMX address on the switch pack must be set to 005)
7
11. DIM MASTER: determines the maximum light intensity of par cans. If set to 100%, light intensity will reach 100% power -- full intensity. If set to 50%, light intensity will reach 50% brightness.
12. BACKGROUND: determines the minimum light intensity of par cans. If set to half, minimum light intensity will be 50% -- half strength. At 0, lights will be totally off, when at their lowest level.
13. PROG SPEED: controls the speed of chases in the fourth mode.
14. AUDIO SENSITIVITY: used to adjust the input sensitivity of the internal microphone or external audio inputs. Adjust the level until the sound activated functions work nicely to the rhythm of the music.
15. INTERNAL MICRO: the internal microphone is installed behind this opening
8
Functions (REAR)
16. SOUND SOURCE SELECT: used to select which audio input will
be used to synchronize the sound related functions:
• BUILT-IN MICRO: use this function when the music playback level
is over 75db, so the internal microphone can easily capture the
sound. This is the easiest way to use the sound functions.
• AUDIO INPUT: use this function when the sound level is rather
low. In this case don't forget to connect the audio input
connectors (17).
17. AUDIO INPUT: When the sound source selector (16) is set to
“AUDIO INPUT” you will have to connect these cinch/RCA
connectors to an analog audio signal ranging from 200mV to
1000mV. In most cases a record output or secondary master on
you mixer will do.
18. DMX OUTPUTS: used to connect the light modulator to DMX
power packs. You can use the 5 pin XLR or 3 pin XLR connectors.
Both connectors carry the same signal, they only have a different
pinning layout. In most cases however you will use standard XLR3 pin male/female cables. Both the dimmer and switch channels
are available on these outputs:
9
• DIMMER CHANNELS: are assigned to DMX addresses 001 to 004. Please set the starting address of the connected dimmer pack to 001.
• SWITCH CHANNELS: are assigned to DMX ADDRESSES 005 to 008. Please set the starting address of the connected switch pack to 005.
19. POWER INPUT: This input depends on the model number of the DMX Modul Dimmerpack :
• DMP408G & DMP408F: Mains input cable, make sure the local voltage is 230VAC or 240VAC and the projectors are properly connected to the channel output sockets (20) before you connect this cable to the mains wall socket. The maximum total
load is 16A or 3600 Watts.
20. INPUT NFB: This is an automatic circuit breaker. First locate and solve the problem that caused the NFB cutoff. When the problem is solved, simply push the button to reset the circuit breaker.
21. CHANNEL OUTPUTS: (only on DMP408G & DMP408A)
Each channel output has its own output socket to connects any resistive and/or inductive (PAR36) projector(s). Each channel is equipped with a fuse. Always replace a blown fuse with a fuse that has the same characteristic! (250V/8A fast)
VERY IMPORTANT NOTE!
It's very important to know that the maximum load for each channel is
rated at 8A or 1750 Watts. However the total load for all 4 channels
may not exceed 16A or 3600 Watts!
10
Troubleshooting
-Problem: 4CH DMX Modul Dimmerpack is not responding and no LEDs light.
-Solution: Check power supply, wiring, and power mains. Check connectors. Check POWER switch.
-Problem: 4CH DMX Modul Dimmerpack LEDs light, but par cans do not respond to music.
-Solution: Adjust the AUDIO SENSITIVITY knob until the functions work nicely to the rhythm of the music (over 75db). Or, if that doesn't work, refer servicing to a qualified technician.
Maintenance
Clean by wiping with a polished cloth slightly dipped with water.
Avoid getting water inside the unit. Do not use volatile liquids such as
benzene or thinner which will damage the unit.
Product Specifications
Model
DMP-408
Power Input
230Vac, 240Vac/16A maximum (3600W)
Power output
4x230Vac or 4x240Vac/max. 8A (1750W)
NFB
250V/15A
DMX outputs
3 pin XLR + 5 pin XLR
Audio input
Internal microphone External audio input on
cinch/RCA (200mV-->1000mV)
Dimensions (LxWxH)
483x132x105 mm
Weight
3.1 kg
Please Note: Specifications and improvements in the design of this
unit and this manual are subject to change without any prior written
notice.
11
Appendix 1 DMP-408 Program Pattern
Chart
Note: A vertical row represents a step. Each pattern completes
eight steps, then changes direction.
12
13
8
40
P-
DM