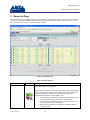
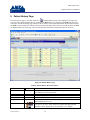
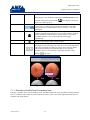
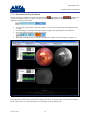
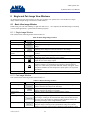
1
Anka Systems, Inc. EyeRoute Web User’s Manual EyeRoute Web User’s Manual for Version er65 Documentation Version 20081224a 2008 Anka Systems, Inc., all rights reserved. www.ankasystems.com Anka Systems, Inc. 7926 Jones Branch Drive, Suite 330, McLean, VA 22102 U.S.A. 1-888-714-ANKA Anka Systems, Inc. EyeRoute Web User’s Manual Anka Systems, Inc. ii Anka Systems, Inc. EyeRoute Web User’s Manual Table of Contents 1 Introduction ...........................................................................................................................................................1 2 How to Access EyeRoute from Your Computer ....................................................................................................2 2.1 IE Setting Hints and Troubleshooting for Login ...........................................................................................5 3 Link Menu .............................................................................................................................................................7 4 Login and Log Out ................................................................................................................................................8 5 Exam List Page .................................................................................................................................................... 10 5.1 Download Proview ...................................................................................................................................... 12 5.2 Search Features ............................................................................................................................................ 12 5.2.1 Search by Date ..................................................................................................................................... 12 5.2.2 Search by Category and its Value ........................................................................................................ 12 5.3 Sort Feature.................................................................................................................................................. 13 5.4 Hourglass Image Icon .................................................................................................................................. 13 5.5 Records Per Page Setting ............................................................................................................................. 13 6 Patient History Page ............................................................................................................................................ 15 6.1 Viewing the Images from Patient History Page ........................................................................................... 16 6.2 Import New Exam Feature ........................................................................................................................... 16 7 Proofsheet Window ............................................................................................................................................. 17 7.1.1 More about the Multi-Exam Comparison Page ................................................................................... 19 7.1.2 More about the AnyUp Feature ........................................................................................................... 21 7.2 Visual Field Proofsheet ................................................................................................................................ 22 7.3 How to Save Images from the Proofsheet .................................................................................................... 22 8 Single and Pair Image View Windows ................................................................................................................ 23 8.1 Basic View Image Window ......................................................................................................................... 23 8.1.1 Single Image Window ......................................................................................................................... 23 8.1.2 Pair Image Window ............................................................................................................................. 23 8.1.3 Saving Images from the Basic Image Window .................................................................................... 24 8.2 Proview Image Window .............................................................................................................................. 24 8.2.1 Single Image Window ......................................................................................................................... 24 8.2.2 Pair Image Window ............................................................................................................................. 27 8.3 Measurements .............................................................................................................................................. 30 8.4 Annotations .................................................................................................................................................. 30 9 Administrative Privileges .................................................................................................................................... 32 9.1 Marking the Exam Stale from Patient History Page .................................................................................... 32 10 Patient Page ..................................................................................................................................................... 34 10.1 Search Features ............................................................................................................................................ 35 10.1.1 Search by Date ..................................................................................................................................... 35 10.1.2 Search by Category and its Value ........................................................................................................ 35 10.2 Sort Feature.................................................................................................................................................. 35 10.3 Records Per Page Setting ............................................................................................................................. 35 10.4 Refer to section 5.4. Hourglass Image Icon ................................................................................................. 35 10.5 Import Functions .......................................................................................................................................... 35 10.5.1 Create and Import Record Feature ....................................................................................................... 35 10.5.2 Import Exam Feature: Fixed CS .......................................................................................................... 36 10.5.3 Import Exam Feature: Universal CS .................................................................................................... 36 10.6 Exam List ..................................................................................................................................................... 36 10.6.1 Create New Exam ................................................................................................................................ 37 11 Frequently Asked Questions (FAQs) ............................................................................................................... 38 11.1 System ......................................................................................................................................................... 38 11.2 Images.......................................................................................................................................................... 38 11.3 Annotation ................................................................................................................................................... 39 12 Keystrokes ....................................................................................................................................................... 40 13 Some Information about CSGs ........................................................................................................................ 41 13.1 EMR Links (Integration with EMR) ............................................................................................................ 41 Anka Systems, Inc. iii Anka Systems, Inc. EyeRoute Web User’s Manual 14 Technical Support ............................................................................................................................................ 42 Anka Systems, Inc. iv Anka Systems, Inc. EyeRoute Web User’s Manual List of Figures Figure 1: IE URL Address Location ..............................................................................................................................2 Figure 2: IE Security Alert ............................................................................................................................................3 Figure 3: System User Authentication, Option A ..........................................................................................................3 Figure 4: System User Authentication, Option B ..........................................................................................................4 Figure 5: EyeRoute Web Application User Authentication ...........................................................................................5 Figure 6: Menu Links ....................................................................................................................................................7 Figure 7: Login Page .....................................................................................................................................................8 Figure 8: Log Out Page .................................................................................................................................................9 Figure 9: Exam List Page ............................................................................................................................................ 10 Figure 10: Patient History Page ................................................................................................................................... 15 Figure 11: Proofsheet of One Exam ............................................................................................................................ 17 Figure 12: Study Comparison Proofsheet View .......................................................................................................... 17 Figure 13: Key Image Buttons ..................................................................................................................................... 19 Figure 14: Multiple Exam Comparison Page for VSF and OCT ................................................................................. 20 Figure 15: AnyUp Proofsheet ...................................................................................................................................... 21 Figure 16: Visual Field Proofsheet .............................................................................................................................. 22 Figure 17: Proview Single View Window ................................................................................................................... 24 Figure 18: Proview Pair Image View Window ............................................................................................................ 27 Figure 19: Stale Patient Button .................................................................................................................................... 33 Figure 20: Manual Import Page ................................................................................................................................... 34 Figure 21: Technical Support Contact Information ..................................................................................................... 42 Anka Systems, Inc. v Anka Systems, Inc. EyeRoute Web User’s Manual List of Tables Table 1: Menu Links......................................................................................................................................................7 Table 2: Exam Properties............................................................................................................................................. 10 Table 3: Search by Date Buttons ................................................................................................................................. 12 Table 4: Exam’s Search by Category .......................................................................................................................... 12 Table 5: Page Settings ................................................................................................................................................. 13 Table 6: Patient History Record Properties ................................................................................................................. 15 Table 7: Comparison View Settings ............................................................................................................................ 16 Table 8: Single Proofsheet Features ............................................................................................................................ 18 Table 9: Multiple Exam Comparison Page for VSF and OCT .................................................................................... 20 Table 10: Basic Single Image Features........................................................................................................................ 23 Table 11: Basic Pair Image Features ........................................................................................................................... 23 Table 12: Proview Single Image Features ................................................................................................................... 24 Table 13: Proview Pair Images Features ..................................................................................................................... 27 Table 14: Patient Properties ......................................................................................................................................... 34 Table 15: Exam List Properties ................................................................................................................................... 36 Table 16: New EMR Links .......................................................................................................................................... 41 Anka Systems, Inc. vi Anka Systems, Inc. EyeRoute Web User’s Manual Anka Systems, Inc. vii Anka Systems, Inc. EyeRoute Web User’s Manual 1 Introduction This document is to be used as a reference for the EyeRoute web-based application. In this document, the EyeRoute Web System is simply called ‘the system.’ The system runs on a web browser on Microsoft® Windows® platforms. EyeRoute enables the user to view and manipulate images and view/import patient information, all via a web browser. Microsoft Internet Explorer is recommended for your web browser, however other browsers will work in a basic mode. Interpretation is a separate module. Although you might see some of its features, they are not described in this document. This document contains a list of new features in the EyeRoute (ER) web-based application and is supplement to the User’s Manual. Exam Interpretation, Drawing Package, and Electronic Medical Records (EMR) Integration are separate modules. Although you might see some of their features, they might not be described in detail in this document. Here is the short list of changes and new features. Please refer to the rest of the document for details. Additional icons are available for image view. When performing manual import, the modality type and file location fields are automatically filled-in if the modality cookie is installed on the station/pc. Hospital Patient ID can be set as an optional field for manual import. The AnyUp feature has the capability to bring up images from multiple exams. User has the ability to mark and unmark key images. The History button will bring up key images from all exams of that type. If no key images have been registered, then the first four images of an exam will be displayed. The multi-exam page brings up all the exams for Zeiss Visualfield images or Zeiss OCT images for a patient. Single-page printouts are now available from the Proview and AnyUp windows. Images can now be copied to a clipboard for easy copy-and-paste to various applications (MS Word, Paint, etc.) A patient record can now be marked as stale for each modality type. Some new EMR links are available with different parameters. Anka Systems, Inc. 1 Anka Systems, Inc. EyeRoute Web User’s Manual 2 How to Access EyeRoute from Your Computer Here is specific information for your site: Eyeroute URL System User Authentication (Option A) System User Authentication (Option B) User Name Password User Name Password User Name Application User Authentication Password The Uniform Resource Locator (URL) for the EyeRoute Web site looks something like this: https://orglocNNwebMM.eyeroute.net/er. This is a unique address which identifies a resource on the Internet for routing purposes. Open Internet Explorer (IE) and type in your URL address in the “Address” field as shown in the Figure 1 below. The value that needs to be entered into the field can be obtained from the system administrator and can be noted in the EyeRoute URL field above for future reference. Once you have reached the proper site, please bookmark it for easy future reference. Figure 1: IE URL Address Location If you are accessing this URL remotely (outside of your hospital/clinic, e.g. home), a Security Alert window should pop-up (Figure 2) once you enter the URL Address. EyeRoute is set up with an https setting, which is a protocol Anka Systems, Inc. 2 Anka Systems, Inc. EyeRoute Web User’s Manual enabling the secured transmission of Web pages. Please check the “In the future, do not show this warning” and then click “OK” button to continue. If you are accessing from a computer that is on the same network as the EyeRoute server, you will not see this pop-up window. Figure 2: IE Security Alert If accessing from outside the network, a pop-up window requesting login information is for User Authentication to the EyeRoute System. Enter your system/computer user name and password (see Figure 1). If it does not allow you to login, try adding your system information as part of the user name as shown in Figure 4. Figure 3: System User Authentication, Option A Anka Systems, Inc. 3 Anka Systems, Inc. EyeRoute Web User’s Manual Figure 4: System User Authentication, Option B If you see the EyeRoute Web page as shown in Figure 5, you have successfully accessed the System. The second set of user authentication is to access the EyeRoute Web application. Enter your EyeRoute Web User ID and Password and click on the System Login button to access the patient exams. Anka Systems, Inc. 4 Anka Systems, Inc. EyeRoute Web User’s Manual Figure 5: EyeRoute Web Application User Authentication 2.1 IE Setting Hints and Troubleshooting for Login Here are few things to check: If you see “The page cannot be found” message for the web page, please check and make sure that the URL address is correct. Check the security setting for IE. Please consult your IT Department. To save a short cut to the desktop, on the viewing station’s system pop-up window, save the password, enter the site as local intranet site -> sites -> advanced -> add “*.eyeroute.net” and do NOT check off the “https” requirement. Anka Systems, Inc. 5 Anka Systems, Inc. EyeRoute Web User’s Manual Make sure the pop-up blocker is disabled for the EyeRoute web site. You might have multiple pop-up blockers. Please allow for *.eyerout.net address. Anka Systems, Inc. 6 Anka Systems, Inc. EyeRoute Web User’s Manual 3 Link Menu There are four items on the menu link: Login, Study, Participant, and Log Out. These are listed on the top of the page as shown in Figure 6, and the descriptions are in Table 1. Figure 6: Menu Links Table 1: Menu Links Links Login Study Patient Log Out Anka Systems, Inc. Descriptions A login page to log into the system. An exam list page that lists the study exams. A patient list page to create and import exam records. A log out page to exit out of the system. 7 Anka Systems, Inc. EyeRoute Web User’s Manual 4 Login and Log Out Use your User ID and password to log into the EyeRoute Web system (see Figure 7). Consult your EyeRoute administrator for your User ID and password. Figure 7: Login Page To completely log out, click on the Log Out link and then click on the Complete Logout button (see Figure 8). If this button is not clicked, then you will not be completely logged out. You can still access the system. There is a timeout feature, and after a certain period of time if the EyeRoute Web page is idle, the system will automatically Anka Systems, Inc. 8 Anka Systems, Inc. EyeRoute Web User’s Manual log you out completely. The default timeout is set to 30 minutes but this can be changed. Please consult your EyeRoute administrator for any modification. Figure 8: Log Out Page Anka Systems, Inc. 9 Anka Systems, Inc. EyeRoute Web User’s Manual 5 Exam List Page The ‘Exam List’ page is the default page (see Figure 9) and is displayed when you first login. You can also return to this page by clicking on the Study link on the top of the page. This page shows patient exams listed by the exam date. For each exam, the items are listed as shown in Table 2. Figure 9: Exam List Page Table 2: Exam Properties Name Select Button/icon Description To select a patient and see the Patient History page which lists all exams associated with the selected patient. This folder icon also shows the results of patient validation with the EMR system using the HL7 standard. If the EMR system is integrated with the Eyeroute system, patient validation is performed based on patient demographic information from the EMR system. Green folder icon indicates that all key parameters matched (first name, last name, DOB – date of birth - and patient ID). Yellow folder icon indicates partially matched. One or more of the non-key parameters is mismatched. Red folder icon indicates key parameters are mismatched and validation failed. Anka Systems, Inc. 10 Anka Systems, Inc. EyeRoute Web User’s Manual The result of the validation will appear if you move the cursor over the folder icon. Exam Interpretation (TBD). Exam Interpretation (EI) license is not available. Capture Station Patient ID generated by a specific Capture Station or any other non-Anka Systems record generator. Last name of a patient. First name of a patient. Gender of a patient. Date of birth of a patient. Exam date of a patient. Capture station type used for this exam (e.g. MRP, OCT, OIS, TOPCON, HEIDELBERG, I3 Ultrasound, IMPORT, etc). To view the exam proofsheet image. If images exist for this patient/exam, user can see the View? icons. More icons are available to distinguish between different capture station types. EI Record ID Last Name First Name Gen Birth Date Exam Date CS - View? … Cmp? V? Grayish-blue folder icon indicates no validation is performed. User can no longer recompress images via ER Web. To select and compare two exam proofsheets. When the second one is selected, two exam proofsheets will be displayed for study comparison. When next exam is selected, it will bring up the last selected exam and the current selected exam proofsheets. Click on the box again to deselect. To indicate if the exam is verified by the photographer. Red question mark ( ) indicates that the exam is not verified. Once the photographer views the images and verifies that the images and patient information are correct, click the icon to change from the red question mark to blue check mark ( ). If, for some reason the exam has changed after it was verified already, it will change from the blue check mark to the red check mark ( ). The change can be because additional images were published for this exam after it has been published at earlier time. R? After verification, the initial user who marked the exam as verified (blue check mark) can change the red check mark to a blue check mark. Similarly the initial user who has marked the exam as verified can change from verified to not verified status by clicking on the icon. To indicate if the exam is reviewed a doctor. Red question mark ( ) indicates that the exam is not reviewed. Once the doctor sees and reviews the images, click the icon to change it from a red question mark to a blue check mark ( ). If, for some reason the exam has changed after it was reviewed already, it will change from the blue check mark to the red check mark ( ). The change can be because additional images were published for this exam after it had already had been published initially. After the review, the initial user who has marked the exam as reviewed (blue check mark) can change it from a red check mark to a blue check mark. Similarly the initial user who has marked the exam as reviewed can change from the reviewed to not reviewed status by clicking on the icon.. Anka Systems, Inc. 11 Anka Systems, Inc. EyeRoute Web User’s Manual Doctor Proc - Diagnosis Tcase Imported 5.1 - Doctor’s name associated with this patient. Procedure type for this exam (e.g. Color, Fluorescein, Single Field Analysis, etc.). This is associated per exam. Diagnosis of a patient (e.g. Glaucoma, Choroidal Folds, Macular Pucker, etc.). This field can be modified under the Patient History page. This is associated per patient. Indication of testing case. This indicator can be set and unset under the Patient History page. The date of import. Download Proview The Download Proview button will add extra features in the image view pages. This setting includes much more than the basic view features. It allows adjustment for brightness and contrast, zooming, one-to-one image view, panning, auto intensity, annotations, measurement tools as well as other features for the images. In order to set to the Proview setting, you must download the proview images from this page; otherwise, only the basic view is available. Important note: Your computer login must be at least Power User – ability to read, write and install – in order to download the proview feature. Once the proview is installed, each EyeRoute Web user must click on the Proview button to create their own settings. This is cookied based per user, per computer. 5.2 Search Features You can search for specific exams by using (a) the search-by-date buttons or (b) the search-by-category and its value. 5.2.1 Search by Date There are three different buttons for search-by-date as shown in Table 3. Table 3: Search by Date Buttons Name Today Button/icon Description Lists all exams with today’s date. Last 7 day Lists all exams taken in last seven days. All Lists all exams in the system. Exam from Lists all exams taken from the particular date entered in the field. The calendar icon is available for the user to choose the date or the user can enter the date directly in the field in mm/dd/yyyy format. 5.2.2 Search by Category and its Value Search selections are as shown in Table 4. After selecting the category and its value, you can click on any of the three search-by-date buttons to search in combination with the category and the date. Table 4: Exam’s Search by Category Name All Patients Patient Name (First Last name) Button/icon - - Anka Systems, Inc. Description Lists all exams. Any field value entered will be ignored. Search by patient’s name using just first name, just last name, or both first and last names. The name does not have to be completely spelled out. The system will search for a patient’s name within the field value (a pattern match). It is not case sensitive. 12 Anka Systems, Inc. EyeRoute Web User’s Manual Doctor (First Last name) Exam Procedure - - Diagnosis CS Patient ID (Record ID) - System Patient ID (Integer) - CS Type Teaching Case Only My Patient - Search by doctor’s name using just first name, just last name or both first and last names. Name does not have to be completely spelled out. The system will search for doctor’s name within the field value (a pattern match). It is not case sensitive. Procedure type for this exam (e.g. Color, Fluorescein, etc.). The system will search for the procedure with a pattern match. It is not case sensitive. Diagnosis of a patient (e.g. Glaucoma, Choroidal Folds, Macular Pucker, etc.). The system will search for the pathology description within the field value (a pattern match). It is not case sensitive. Capture station Patient ID generated by a specific Capture Station or any other non-Anka Systems record generator. The system will search for ID that contains the field value (a pattern match). It is not case sensitive. Anka System’s generated record ID for this particular patient. The system will search for the ID with exact match. The ID number is displayed under the Patient History page and it is next to the teaching case indicator in blue color. In order to search using this method, the numbers must match exactly. Capture station type used for this exam (e.g. MRP, OCT, Topcon, Import, OIS, Heidelberg, ULI3, etc). The system will search for the capture station name within the field value (a pattern match). It is not case sensitive. Indication of teaching case. The system will search for exams that are set as the teaching case. This indicator can be set/unset under the Patient History page. Any field value entered will be ignored. The system will search for any patient that is associated with the login user. The Signed/Not Signed and its value of: category is for Interpretation Module and not covered in this document. 5.3 Sort Feature Once the exam list is displayed, you can sort by any item that has the sort button icon by clicking on the icon (EI, Record ID, Last Name, First Name, Gender, Birth Date, Exam Date, CS, Doctor, Proc, Diagnosis, Tcase, Imported). It will sort by descending/ascending order and when clicked again, it will reverse (ascending/descending order). 5.4 Hourglass Image Icon When the image is not compressed for some reason, an hourglass image icon is displayed. Only the administrator level user can attempt to recompress the images. If the exam is marked as stale, verified, or reviewed, and have the hourglass image icon, even the administrator level user cannot recompress. The exam must be unmarked as stale, verified, and reviewed before an administrator can attempt to recompress. If the attempt fails, please contact Anka technical support. 5.5 Records Per Page Setting Page-setting features are displayed as shown in Table 5. The default number of records displayed can be changed by the system administrator. Table 5: Page Settings Name Total Records Records per page Show previous page Description Number of total records or exams found. Setting for records per page to be displayed. If this setting is changed, click on any icon or button to take an effect. Advances to the previous page of the exam list. Show next page Advances to the next page of the exam list. Anka Systems, Inc. Button/icon - 13 Anka Systems, Inc. EyeRoute Web User’s Manual Show first page Advances to the first page of the exam list. Show last page Advances to the last page of the exam list. x of y Anka Systems, Inc. - Where x is the page number display and y is the number of pages available. 14 Anka Systems, Inc. EyeRoute Web User’s Manual 6 Patient History Page From the exam list page, if you click on this icon , the Patient History Page will be displayed (see Figure 10). You can return to the Exam Page either by clicking on the Back button or by clicking on the Study link on the top of the page. The Patient History page will list all the records for selected patients that match the first and last names and DOB. It is listed from top to bottom as the latest exam to the oldest exam. Patient’s first and last name and DOB are displayed on the top of the page. The rest of the patient’s information is listed in the table (see Table 6). Figure 10: Patient History Page Table 6: Patient History Record Properties Name Record ID Middle Name Gen Exam/Import CS Button/icon - View? … Anka Systems, Inc. Description Modality Patient ID generated by a specific Capture Station or any other non-Anka Systems record generator. Patient’s middle name if any. Gender of a patient. Exam date and the import date. Imported date is indicated by blue color. Capture station type used for this exam (e.g. MRP, OCT, Topcon, Import, OIS, Heidelberg, ULI3, etc). To view the exam proofsheet images. If images exist for this patient/exam, user can see the View? icons. If an icon is clicked, then that particular proofsheet will be displayed. Use the check box to see multiple 15 Anka Systems, Inc. EyeRoute Web User’s Manual Procedure - Diagnosis Tcase Note - 6.1 proofsheets (refer to section 6.1.). Procedure type for this exam (e.g. Color, Fluorescein, Visual Fields, Ultrasound, etc.). Diagnosis of a patient (e.g. Glaucoma, Choroidal Folds, Macular Pucker, etc.). Click on the update button to modify the information. When you’re finished, click on the save button to save and update. This will be updated for all exams for this patient. Indicates that this exam is a testing case. Click on the update button to turn on or off the teaching case indicator icon. The blue number next to it is the System ID, an Anka System generated ID for this particular exam. A place to put notes for the exam. Click on the update button to modify the information. When you’re finished, click on the save button to save and update. Viewing the Images from Patient History Page You can view the images by two ways: 1. Clicking on the icon under the View?. This will bring up one exam worth of images. 2. Clicking on the check boxes under the View?. This will bring up study comparison images. Depending on the setting, it can bring up two or more images to compare. When the next exam is checked, it will bring up the last exam(s) and the current selected exam images. Click on the box again to deselect. There are two settings for the View? checkbox and they are described in Table 7. Table 7: Comparison View Settings Name Call two studies comparison Call multiple studies comparison 6.2 Button/icon Description This icon is to compare two exam images. Only two check boxes can be selected. When this is set, the icon is in color; otherwise it is gray. This icon is to display multiple exam proofsheet images. Up to four checkboxes can be selected. To see less than four images, select this mode, check the boxes and then click on the call multiple studies comparison icon again. When this is set, the icon is in color; otherwise it is grayed. Import New Exam Feature For this specific patient and information, you can import new exams manually by clicking on the Import New Exam button. This will bring up the Create New Patient and Exam page. Existing patient information is already filled-in. Modify any necessary information and, from here, you can browse the location of the image file if not already set. Image file location can be set to a default directory for each capture station. Please consult your EyeRoute administrator to set the default location. Click on the Import New Exam button to complete the import. Refer for Section 10 for details of the manual exam imports. Anka Systems, Inc. 16 Anka Systems, Inc. EyeRoute Web User’s Manual 7 Proofsheet Window The images on the proofsheet are compressed thumbnail images. When a View? icon is clicked, an individual proofsheet window will pop-up (see Figure 11). When Cmp? checkboxes on the exam list page or View? checkboxes on the patient history page are selected, the proofsheet for study comparison window will pop-up (Figure 12). Both the individual proofsheet and the study comparison proofsheets have similar features. Figure 11: Proofsheet of One Exam Figure 12: Study Comparison Proofsheet View The patient’s information is displayed on the top of the page as follows: last name, first name, exam date, image filename and Anka Systems generated exam ID. There are two settings for viewing an image: 1. Basic view: This setting will bring up a basic view setting. This has minimal features. It will let you see the images by “scrolling” through and it has a one-to-one image viewing feature. You will see the images only in basic view if you do not download Proview from the exam list page. Anka Systems, Inc. 17 Anka Systems, Inc. EyeRoute Web User’s Manual From the basic view proofsheet and from the basic image view windows, you can click-and-drag (or rightclick and save as…) an image to your computer or to any other application (e.g. Microsoft PowerPoint program). 2. Proview: This setting will bring up Proview images. This setting includes more features than the basic view. It includes adjustment for brightness and contrasts, zooming, one-to-one image view, panning, auto intensity, annotations, measurement tools for single images, etc. In order to set the Proview setting, you must have already downloaded the Proview images from the exam list page. To bring up a single image window, click on the image itself. There are two ways to bring up a pair image window: 1. Image number checkboxes to select to compare two images. When the second one is selected, a new window with two images will be displayed for comparison. When next checkbox is selected, it will bring up the last selected image and the current selected image. Click on the checkbox again to deselect. brings up pair images window that contains two images that are next to each other. 2. Stereo image icon The following features only applies for a single proofsheet (see Table 8) Table 8: Single Proofsheet Features Name Save key image Button/icon Description User can mark and register key images of an exam to display under history proofsheet page for each capture station type per patient. History proofsheets are available for OD, OS, OD+OS, OU and Other categories. To save key image(s), Click on the gray icon to turn it green (see Figure 13). Click on the Save key image button to save. To Un-mark key image(s), Click on the green icon turn it gray. Click the Save key image button. Multi exam History of OD/OS/OD+OS/OU/ Other When you click on the Save key image button, a small pop-up window will appear to indicate that an update has been made. After a few seconds, the update notice window will close automatically. The multi-exam page brings up all the exams for Zeiss Visualfield images or Zeiss OCT images for a patient. A maximum of the three most recent exams is displayed with the most recent exam date starting at the top. Refer to Section 7.1.1 for more information. This feature shows the history of each eye or both eyes from all exams of the capture station type. The history window displays key image(s) of an exam (see the Save key image button above). If there are no key images registered, the first four images of the exam are displayed. User can access all the historic images of OD, OS, OD+OS, OU or Other. OD: History of right eye (single column) OS: History of left eye (single column) OD+OS: History of both eyes (dual columns of OD and OS) OU: History of both eyes (single column) Other: If the system cannot determine which eye, the system treats the exam as the Other type. Exams are listed from the most recent exam date to the oldest exam date starting from the top of the page. You can scroll to next row or previous Anka Systems, Inc. 18 Anka Systems, Inc. EyeRoute Web User’s Manual row by using < and > keystrokes. Image display can be changed by adjusting the Columns per line number AnyUp Print Annotation Timestamp and then clicking on the Refresh button . It will display with the new number of column specified. The AnyUP button has the capability to display images from multiple exams. Users can select images by clicking on an image or type in the image numbers in the input field box. Refer to Section 7.1.2 for more information. Prints the current proofsheet image. Click on the print button and Print window will appear along with preview page of the proofsheet. Select the printer and make sure that the printer’s layout option is set as portrait orientation. Printout is set to fit the width of the portrait page automatically. Annotation exists indicator. This icon will be displayed on single proofsheet and multiple studies comparison only. Displays under an image that is associated with timestamp if available. By clicking this button, this image time will be set to zero and the subsequent image time will display the difference. This is only a temporary display. The original timestamp can be displayed again if you reopen the proofsheet. If there is no timestamp, it will display either the image number or all zeros. Figure 13: Key Image Buttons 7.1.1 More about the Multi-Exam Comparison Page This page is available for OCT and Visualfield exams. The Multi-exam button on the proofsheet will bring up all the OCT or Visualfield (VSF) exams for a patient. Maximum of three recent exams will be displayed and the user can synchronize the image display. Anka Systems, Inc. 19 Anka Systems, Inc. EyeRoute Web User’s Manual Figure 14: Multiple Exam Comparison Page for VSF and OCT Table 9: Multiple Exam Comparison Page for VSF and OCT Name Exam date Single pan Select multiple exams or single exam Button/icon Description When an exam date is boxed in red color, this indicates that the exam is selected and displayed. When boxed in blue color, the exam is not selected and not displayed. Click the exam date to toggle to select and unselect. When toggled to red background, this synchronizes all the displayed images so that scrolling one image window will scroll all the image windows. User can select to display the exam images in a multiple exam window or in a single exam window. When the gray box button is selected, it will display a single exam. Select the exam to be displayed by clicking on an exam date at the top of the page. When the box button is in red, multiple exams can be displayed. Select up to three exam dates. Back to initial size Anka Systems, Inc. Exams selected are indicated by the exam date in a red box and exams not selected are in a blue box. Return back to the initial size and in multiple exam window. 20 Anka Systems, Inc. EyeRoute Web User’s Manual 7.1.2 More about the AnyUp Feature The AnyUp feature is available for single study, pair studies ( ) and multiple studies ( ) windows. For example, for multiple studies, you will see several boxes next to the AnyUp button coinciding with each exam displayed from the top to the bottom. To activate the AnyUp feature, click on the “Basic” or “Pro” button to turn the button’s background color to orange. Select the images by clicking on the images itself (or typing in the image numbers in the field box). The selected images will also be highleted in orange. When done selecting the images Click the orange button to display the selected images (see Figure 15). Figure 15: AnyUp Proofsheet Four patient names and associated exam dates are displayed at the top of the page. These exam dates have different colors, and the colors are used to differentiate the exam images on the proofsheet itself. Anka Systems, Inc. 21 Anka Systems, Inc. EyeRoute Web User’s Manual From the AnyUp proofsheet page, individual images can be displayed by clicking on the image itself. The user can select either Basic or Proview mode to view the images. The Print button on the upper right-hand side will resize the window to fit to one-page window before printing out the AnyUp page. 7.2 Visual Field Proofsheet The visual field proofsheet is organized by right and left eye image information as shown in Figure 16. Figure 16: Visual Field Proofsheet 7.3 How to Save Images from the Proofsheet If you need to save the images to be used in presentation, you can save all the thumbnail images from the proofsheet with just a few clicks by following the steps below: 1. 2. 3. 4. 5. 6. 7. 8. 9. Open the desired single proofsheet. Click on the print icon. A pop-up window will ask you to “Make sure that Print-Mode is portrait. Print now?” Click on the Cancel button to close the window. A print proofsheet window will pop-up. From this window, click on File menu, select Save as... Browse to the directory location you would like to save the files under, you can change the file name if you’d like and then click Save button. Close out the windows. Open your folder explorer and go to the directory where you have saved the file. There will be another folder with your saved filename. Under this folder, there will be JPG image files. Anka Systems, Inc. 22 Anka Systems, Inc. EyeRoute Web User’s Manual 8 Single and Pair Image View Windows As mentioned in previous sections, there are two types of image view options: basic view and Proview. Single image window and pair images window have similar features. 8.1 Basic View Image Window In this setting, user can click-and-drag (or right-click and save as… on a computer) an individual image to a desktop or to any other application (e.g. Microsoft PowerPoint program). 8.1.1 Single Image Window This window has the following features listed in Table 10. Table 10: Basic Single Image Features Name Close window Button/icon Previous image Next image Current image number View actual size - Print preview Print Click the image itself - Description Close the window Displays previous image and will rollover from the first image to the last image. Displays next image and will rollover from the last image to first image. Clicking on the image itself will also advance to next image. Indicates which current image of the proofsheet is displayed on the window. Enlarges the image to match up to one-to-one image, the actual size. The actual size image will be shown in a new window. Displays print preview of the image. Resize the Single Image window to adjust the size of the image to print. Prints the current image. Resize the window by click-and-dragging the window’s borders. Use the Print Preview button to check for desired image size. Click on the print button and Print window will appear. Select the printer and make sure that the printer’s layout option is set as portrait orientation. Displays next image and will rollover from the last image to first image. 8.1.2 Pair Image Window This window has the following features listed in Table 11. Table 11: Basic Pair Image Features Name Previous image Button/icon Next image Current image number Previous pair image Next pair image Anka Systems, Inc. - Description Displays previous image independently from the other pair image. It will rollover from the first image to the last image. Displays next image independently from the other pair image. It will rollover from the last image to first image. Indicates which current image is displayed on the window. Displays previous pair images and will rollover from first pair to the last pair images. Clicking on the left-hand side image, this will also retreat to previous pair. If the window is displaying image numbers 6 and 7, the previous pair images will be image numbers 4 and 5 Displays next pair images and will rollover from the last pair images to first pair images. Clicking on the right-hand side image, this will also advance to next pair. If the window is displaying image numbers 8 and 9, 23 Anka Systems, Inc. EyeRoute Web User’s Manual then the next pair images will be image numbers 10 and 11. Displays print preview of the image. Resize the Single Image window to adjust the size of the image to print. Prints the current image. Resize the window by click-and-dragging the window’s borders. Use the Print Preview button to check for desired image size. Click on the print button and Print window will appear. Select the printer and make sure that the printer’s layout option is set as landscape orientation. Displays previous image and will rollover from the first image to the last image. Displays next image and will rollover from the last image to first image. Print preview Print Click left image itself Click right image itself - 8.1.3 Saving Images from the Basic Image Window When your cache (temporary files) is filled, Internet Explorer will only let you save as bmp images from the BASIC mode from EyeRoute. This is a Microsoft issue. To clear the cache, follow the steps below and try again. Clearing Cache on Microsoft® Internet Explorer 6.0 1. Click Start, select Settings and Control Panel. 2. Double-click Internet Options to open Internet Properties. 3. Click the General tab. 4. Click Delete Files. 5. NOTE: Do not select Delete Cookies. Delete Files removes all the cookies stored on the computer. 6. Click OK on the Delete Files dialog box. 7. Click OK. If this does not work, you can directly click-and-drag the images right on to your desktop or folder directory. 8.2 Proview Image Window 8.2.1 Single Image Window This window has the following features listed in Table 12. Figure 17: Proview Single View Window Table 12: Proview Single Image Features Name Save image Anka Systems, Inc. Button/icon Description The first button in the first row is a save image button. Click the button to save the image to a clipboard for easy copy-and-paste to various applications (MS Word, Paint, etc.). Open up an application and the user can paste the image, for example, using Ctrl-V keystroke. 24 Anka Systems, Inc. EyeRoute Web User’s Manual Refresh image View actual size Fit to window size Rotate 180 degree View magnify glass Zoom in Zoom out In pair view window, left-hand side image is default to save to a clipboard. To select and save the right-hand side image, click R button and then click the Save image button. Click on the SEL button to go resume in default mode. Refresh image. Enlarges the image to match up to one-to-one image, the actual size. This will also bring up a small window. Click-and-drag the square in the small window (pan window) to move the 1:1 image to a particular location. Fit the image to current window size. Rotate the image 180 degrees. Click again and it will rotate 180 degrees again. Red lettering next to the icon indicates the degree of rotation in the relationship of the original image. Magnifies portion of the image under the magnification glass. Click on this button and move the mouse to the image. You will see a magnifying glass icon on the image and click-and-drag to see the portion of the image magnified. Click the button again to deselect. Zoom in to control the image view. This button will bring up a pan view window to guide you which portion of the image you’re looking (see the description of the pan control). Zoom out to control the image view. Auto intensity Pan view window will pop-up by when pan view button is clicked or whenever the image is too big for the window size. This will bring up a smaller version of the image to guide you which portion of the image you’re looking. You can move to a different location of the image when you click on a different place on the pan view window. You can also click-and-drag the square box to move the view location of the image. Automatically adjusts the intensity. Invert image Inverts the image from dark area to white area and vice versa. Gray image Gray image changes color image to black/gray/white image. Histo equalize image Histogram-based equalization to enhance the image. It computes a histogram of an image (within a user-configurable range) and redistributes pixel intensities equally across the intensity range. Brightness indicator bar is next to the brightness button. To change the brightness, click-and-drag the bar to left or right. The percentage will change accordingly. Click on the button to reset to zero percent. Once this is set, it will not change from image to image. Contrast indicator bar is next to the contrast button. To change the contrast, click-and-drag the bar to left or right. The percentage will change accordingly. Click on the button to reset to zero percent. Once this is set, it will not change from image to image. Brings up an annotation/drawing toolbar. Pan control Brightness control Contrast control Annotation toolbar MPS Ring (DA) FreeHand GLD/PDT Anka Systems, Inc. Draws MPS Rings. Select the desire MPS Ring setting from the dropdown list and then click the MPS Ring button. Using the mouse, move the ring to desire location and click to position the drawing. You may click on the ring to select and then move to different location if needed. Ring selections are from one to sixteen DA in increments of one and 1.5DA. Free hand drawing for Greatest Linear Dimension (GLD)/Photo Dynamic Therapy (PDT). Click and then drag the mouse to draw an area. It will show the PDT and the GLD measurements and init Area. 25 Anka Systems, Inc. EyeRoute Web User’s Manual FreeHand GLD Free hand drawing for GLD. Click and then drag the mouse to draw an area. It will show the GLD measurement and init Area. Draw a polygon. Click to indicate a start location of a side of the polygon and continue to click to represent the point of the sides. Double-click to end the polygon drawing (last end of the side). It will show the GLD measurement and init Area. Draw a circle/ellipse. Click-and-drag the mouse to draw a circle/ellipse. It will show the longest diameter measurement. Hold down the SHIFT key while drawing an ellipse to draw a circle. Draw a straight line. It will show the measurement in millimeter. Polygon GLD Ellipse Ruler Measurement Info - Temporary annotation file load Temporary annotation file save Annotation file #x Previous image Current image number Next image Slide show Print preview Print Show original image Print original image Anka Systems, Inc. - This field displays type of modality, degree field, and mm/pixel. The drop down list can hold up to five measurement information and if this is changed, the measure is changed accordingly. Any measurements done with previous measurement information remain as is and they are not recalculated to new measurement information. Usually the first measure is set to 0.1 pixel value such that it is grossly off and user must select the correct measurement. Also, PRELIM status is used to indicate that the measurement values are preliminary and would see need to be confirmed. Load annotation file that was temporarily saved. This is per user per image. Each login user can load his/her temporary saved annotation file per image. Temporarily save an annotated file. This is per user per image. Each login user can save a temporary annotation file per image. Where x is 1, 2, …5. The system can save up to five annotation files. Once saved, it cannot be deleted; thus the temporary annotation file save/load are provided. When an annotation file is saved, grayed out annotation button will turn blue to indicate it has an annotation file. To load the annotation, click on the blue-colored annotation button. Once an annotation file is loaded and displayed on the window, blue annotation button will display as red . Displays previous image and will rollover from the first image to the last image. Current image number. It indicates which current image of the proofsheet is displayed on the window. Displays next image and will rollover from the last image to first image. Advances one image every N seconds to display as slide show. Default setting for N is every three seconds. To change the N seconds, type in the value in the field left of the slide show icon. Displays print preview of the image. Resize the Single Image window to adjust the size of the image to print. Prints the current image. Resize the window by click-and-dragging the window’s borders. Use the Print Preview button to check for desired image size. Click on the print button and Print window will appear. Select the printer and make sure that the printer’s layout option is set as portrait orientation. Show original image that is not compressed. Provides single-page printouts. User can print original image from the proview window to provide high quality of image printing. The image will print out to the computer’s default print; thus default printer must be setup properly before printing. 26 Anka Systems, Inc. EyeRoute Web User’s Manual Since MRP’s original file (multi-tiff file) can not be loaded through internet, this feature is not available for MRP images. Close the window. Close window 8.2.2 Pair Image Window Pair image window is very similar to singles image window. This window has the following features listed in Table 13. Figure 18: Proview Pair Image View Window Table 13: Proview Pair Images Features Name Save image Button/icon Description The first button in the first row is a save image button. Click the button to save the image to a clipboard for easy copy-and-paste to different applications (MS Word, Paint, etc.). Open up an application and the user can paste the image, for example, using Ctrl-V keystroke. Save image In pair view window, left-hand side image is default to save to a clipboard. To select and save the right-hand side image, click R button and then click the Save image button. Click on the SEL button to go resume in default mode. Save image (TBD). Refresh image Refresh image Select left image To control left image. For example, when left image is selected and zoom in button is in use, it will only zoom on the left image. Select both images to control. The feature buttons will affect both images. Select both images Select right image View actual size Fit to window size Rotate 180 degree View magnify glass Anka Systems, Inc. To control right image. For example, when right image is selected and zoom in button is in use, it will only zoom on the right image. Enlarges the image to match up to one-to-one image, the actual size. This will also bring up a small window(s). Click-and-drag the square in the small window (pan window) to move the 1:1 image to a particular location. Fit the image to current window size Rotate the image 180 degrees. Click again and it will rotate 180 degrees again. Red letterings all the way to the right and left of the window indicate the degree of rotation in the relationship of the original image. Magnifies portion of the image under the magnification glass. Click on this button and move the mouse to the image. You will see a magnifying glass icon on the image and click-and-drag to see the portion of the image 27 Anka Systems, Inc. EyeRoute Web User’s Manual Zoom in Zoom out Duel Pan magnified. Click the button again to deselect. Zoom in to control the image views. This button will bring up a pan view window to guide you which portion of the image you’re looking (see the descriptions of the duel/single pan view window) Zoom out to control the image views. Duel pan view windows will pop-up either when pan view button is clicked or whenever the image is too big for the window size. This will bring up a smaller version of the image to show you which portion of the image you’re looking. You can move to a different location of the image when you click on a different place on the pan view window. You can also click-and-drag the square box to move the view location of the image. If Overlay or ), only one pan window will be left or right image is selected ( displayed. Single synchronized pan view window will pop-up either when pan view button is clicked or whenever the image is too big for the window size. Only left image will be displayed in the pan view window. It is synchronized to view two images at the same location. You can move to a different location of the image when you click on a different place on the pan view window. You can also click-and-drag the square box to move the view location of the image. Overlay the image. Right image will be overlay on top of the left image. Auto intensity Automatically adjusts the intensity. Invert image Inverts the image from dark area to white area and vice versa. Gray image Gray image changes color image to black/gray/white image. Histo equalize image Histogram-based equalization to enhance the image. It computes a histogram of an image (within a user-configurable range) and redistributes pixel intensities equally across the intensity range. Brightness indicator bar is next to the brightness button. To change the brightness, click-and-drag the bar to left or right. The percentage will change accordingly. Click on the button to reset to zero percent. Once this is set, it will not change from image to image. Contrast indicator bar is next to the contrast button. To change the contrast, click-and-drag the bar to left or right. The percentage will change accordingly. Click on the button to reset to zero percent. Once this is set, it will not change from image to image. Brings up an annotation/drawing toolbar. Single pan Brightness control Contrast control Annotation toolbar MPS Ring (DA) FreeHand GLD/PDT FreeHand GLD Polygon GLD Ellipse Anka Systems, Inc. Draws MPS Rings. Select the desire MPS Ring setting from the dropdown list and then click the MPS Ring button. Using the mouse, move the ring to desire location and click to position the drawing. You may click on the ring to select and then move to different location if needed. Ring selections are from one to sixteen DA in increments of one and 1.5DA. Free hand drawing for GLD/PDT. Click and then drag the mouse to draw an area. It will show the PDT and the GLD measurements and init Area. Free hand drawing for GLD. Click and then drag the mouse to draw an area. It will show the GLD measurement and init Area. Draw a polygon. Click to indicate a start location of a side of the polygon and continue to click to represent the point of the sides. Double-click to end the polygon drawing (last end of the side). It will show the GLD measurement and init Area. Draw a circle/ellipse. Click-and-drag the mouse to draw a circle/ellipse. It 28 Anka Systems, Inc. EyeRoute Web User’s Manual will show the longest diameter measurement. Hold down the SHIFT key while drawing an ellipse to draw a circle. Draw a straight line. It will show the measurement in millimeter. Ruler Measurement Info - Temporary annotation file load Temporary annotation file save Annotation file #x Previous image Current image number Next image Previous pair images Next pair images Slide show Print preview Swap pair image Print original image Print Anka Systems, Inc. - This field displays type of modality, degree field, and mm/pixel. The drop down list can hold up to five measurement information and if this is changed, the measure is changed accordingly. Any measurements done with previous measurement information remain as is and they are not recalculated to new measurement information. Usually the first measure is set to 0.1 pixel value such that it is grossly off and user must select the correct measurement. Also, PRELIM status is used to indicate that the measurement values are preliminary and would see need to be confirmed. Load annotation file that was temporarily saved. This is per user per image. Each login user can load his/her temporary saved annotation file per image. Temporarily save an annotated file. This is per user per image. Each login user can save a temporary annotation file per image. Where x is 1, 2, …5. The system can save up to five annotation files. Once saved, it cannot be deleted; thus the temporary annotation file save/load are provided. When an annotation file is saved, grayed out annotation button will turn blue to indicate it has an annotation file. To load the annotation, click on the blue-colored annotation button. Once an annotation file is loaded and displayed on the window, blue annotation button will display as red . Displays previous image and will rollover from the first image to the last image. Images can be scrolled independently from the other pair image. Current image number. It indicates which current image of the proosheet is displayed on the window. Displays next image and will rollover from the last image to first image. Images can be scrolled independently from the other pair image. Displays previous pair images and will rollover from first pair to the last pair images. If the window is displaying image numbers 6 and 7, the previous pair images will be image numbers 4 and 5. Displays next pair images and will rollover from the last pair images to first pair images. If the window is displaying image numbers 8 and 9, then the next pair images will be image numbers 10 and 11. Advances one image every N seconds to display as slide show. Default setting for N is every three seconds. To change the N seconds, type in the value in the field left of the slide show icon. Displays print preview of the image. Resize the Single Image window to adjust the size of the image to print. Swap two displayed images: left to right and right to left windows. Provides single-page printouts. User can print original image from the proview window to provide high quality of image printing. The image will print out to the computer’s default print; thus default printer must be setup properly before printing. Since MRP’s original file (multi-tiff file) can not be loaded through internet, this feature is not available for MRP images. Prints the current image. Resize the window by click-and-dragging the window’s borders. Use the Print Preview button to check for desired 29 Anka Systems, Inc. EyeRoute Web User’s Manual Show original image image size. Click on the print button and Print window will appear. Select the printer and make sure that the printer’s layout option is set as landscape orientation. Show original image that is not compressed. Close window Close the window. 8.3 Measurements From the single or pair proview page, follow the instructions below to do measurements. If you don't already have Proview, follow these steps: 1. After you have logged into Eyeroute, the Exam List page will display the list of patients' exams. 2. 3. On this page there is a Download Proview button next to the search buttons. Click on the Download Proview button and a smaller window will pop up. Make sure Proview is downloaded completely. If it's finished, you should see a color image on this window at which point you can close this Download Proview window. Now you should able to see Proview images and you can continue from here if you already have the Proview capability. 1. 2. 3. 4. Select a patient's exam and bring up the proofsheet. At the very top right-hand side on the proofsheet there are Basic and Proview radio buttons. Note that you won't see the Proview radio button if you don't have Proview downloaded. Make sure you have selected the Proview mode. Open an image that you want to perform the measurement on. There are four ways to draw and measure GLD: "FreeHand GLD/PDT", "FreeHand GLD", "Polygon GLD", and "Ellipse/Circle GLD". Once you have a Proview image, the measurement buttons are at the top of the page, starting from the second row, second button from the left. If you move your mouse cursor to the buttons, the description of each button will pop up. To draw, select the mode you want by clicking on the measurement button and then perform the following as desired: FreeHand GLD/PDT and FreeHand GLD: You can start drawing freehanded lines by click and dragging the mouse. Polygon GLD: Sequential clicks on the image define the start and end points of the polygon's side. You can end and complete the polygon by double-clicking the mouse. Ellipse/Circle GLD: Click and drag the mouse to the size of the ellipse/circle you desire. To draw a circle, hold down the "SHIFT" key during the click-and-drag operation of the mouse. Once these drawings are done, they can be resized and moved around the image. You can do this by clicking on a drawing itself and at which point you will see small squares. This indicates that the drawing can be modified. To move the drawing, place the cursor to the point on the drawing where you can see the double-arrows cross-like image. Click-and-drag the mouse to the desired location. To resize, place the cursor to the point where you can see an "X" and then click-and-drag to set the desired size. To change the color of the font, lines, etc. When the drawing or word is selected, right-click to bring up the menu. Select the Selected Properties and then Foreground Color. 8.4 Annotations NOTE: To save the annotation, the computer which the measurement is done MUST be mapped to EyeRoute Server’s Q-drive. Otherwise, the annotation can not be saved. If the computer is outside of the network, you can save the annotation via secured internet access. When you save the annotation, a pop-up window ask you to enter the Anka Systems, Inc. 30 Anka Systems, Inc. EyeRoute Web User’s Manual name of the annotation. Be sure to copy and paste the filename shown in the first field to the second field. The filename must be exact. Click okay to upload the file to the server. Anka Systems, Inc. 31 Anka Systems, Inc. EyeRoute Web User’s Manual 9 Administrative Privileges If you have EyeRoute administrator privileges, you can add patient admin page. From this page, you can mark a patient stale and an exam stale. If you do not have ER administrator privilites, please consult your EyeRoute administrator. and will log you out and you will see the ER login page. If you have this access then exams marked as stale will have a trash bin access then stale exams will not be displayed on your page. 9.1 icon next to them. If you don’t have this Marking the Exam Stale from Patient History Page You can mark exams as stale from this page but you must have EyeRoute administrator privileges. If you do not, please consult your EyeRoute administrator. If you have this access then exams marked as stale will have a trash bin icon next to them. If you don’t have this access then stale exams will not be displayed on your page. To access the stale marking page, change the address by adding the word “admin” prefix to patient. For example, you might see web address similar to: https://orgloc01web01.eyeroute.net/er60/patient.aspx?pid=800000 Do not modify anything else, but add the word “admin” as such that the web address now will read as: https://orgloc01web01.eyeroute.net/er60/adminpatient.aspx?pid=800000 You will see an additional column to the right, Stale Record. Click on the update icon and enter one “1” followed by semicolon “;” and then with your reason why this exam record is marked as stale. For example, entry should be “1;wrongImagesForThisPatient.” There should be no space in the entry. To change back to none stale record, delete the entry completely and leave it empty. This is only valid for exam records. Patient record can not be modified this way. Note: If the system logs you out (you see the login page), then you do not have stale marking privilege. Please consult your EyeRoute administrator. Anka Systems, Inc. 32 Anka Systems, Inc. EyeRoute Web User’s Manual Figure 19: Stale Patient Button A patient record can be marked as stale for each modality type ( ). To mark a patient stale, follow the steps below: 1. From the main page, Exam List, select the patient and capture station type to mark it stale and navigate to the Patient History Page by clicking on the select folder icon. In this example, MRP exam for George Washington was selected. Selecting the right capture station type is very important. Under Patient History, the systems patient ID is listed right next to the Tcase (teaching case) column in blue color. The number is in 800000’s. To be sure that that you have selected the right capture station type, take a look at the system patient ID for the desired capture station. In this example, 800004 for MRP type. Compare this number with system patient ID displayed next to the patient’s birth date. The number should match. The system patient ID is also the last number on the url address. The system patient ID number does not match then either start over or change the url pid number (and ENTER) to make the change. 2. In the Address bar, add “admin” in front of patientHistory.aspx…. and make sure not to modify any other information. From example, https://ankwdc01web01.eyeroute.net/er60/patientHistory.aspx?pid=800004 is changed to https://ankwdc01web01.eyeroute.net/er60/adminpatientHistory.aspx?pid=800004 3. Press Enter key to access the admin page. The user must have ER administrative privileges to see the admin page. 4. Click on the Stale patient trash can icon to mark all the exams and patient records associated with the capture station (in this example, MRP). 5. Once user marks a patient to stale, user can also unmark it by clicking this button again. Anka Systems, Inc. 33 Anka Systems, Inc. EyeRoute Web User’s Manual 10 Patient Page You can go to this page by clicking on the Patient link on the top of the page. Figure 20: Manual Import Page Some of the buttons previously provided has been removed and combined together to one button (Universal CS) to avoid complexity of user interface. Many different types of image files and movie files can be imported (PNG, JPG, TIFF, AVI, RTF). The user can now mark exams and patients stale for manually imported images. If cookie-based modality is not installed on a computer, then it will default to last selected capture station under Modality (CS) and Image location fields. If cookie-based modality is installed then the Modality (CS) and Image location fields are automatically filled-in. Be warned that if the user changes the modality field to a different modality type during a session and decided to go back to the manual import, it will default to the last selected modality, not a cookie-based modality. Although it is strongly recommended to use the Hospital Patient ID, ER Web can be configured such that Hospital Patient ID can be set as an optional field for manual import. Please contact Anka technical support. This page is used to import exams and is to display any imported patient exams. The feature in this page is very similar to Exam List page. This is listed by the imported date. For each imported exam, the following items are displayed: Table 14: Patient Properties Name Select Record ID Center ID Last Name First Name Anka Systems, Inc. Button/icon - Description To select a patient to edit the patient record and to map physician to the patient. Modality Patient ID generated by a specific Capture Station or any other non-Anka Systems record generator. Clinic Center ID where this exam was taken. Last name of a patient. First name of a patient. 34 Anka Systems, Inc. EyeRoute Web User’s Manual Gen Birth Date Imported CS-Import System ID Diagnosis - Exam Gender of a patient. Date of birth of a patient. Date of this exam imported. Modality type used for this exam (e.g. IMPORT-ULS, etc). Anka System generated System ID for this particular exam. Diagnosis of a patient (e.g. Glaucoma, Choroidal Folds, Macular Pucker, etc.). This field can be modified under Patient History page. To select the patient and see the exam list of this patient. You can import new exam record from here. 10.1 Search Features Search for exams is done either by using (a) the search-by-date buttons or (b) the search-by-category and its value. 10.1.1 Search by Date There are three different buttons for search-by-date (see Table 3). These date searches are associated with import date. 10.1.2 Search by Category and its Value Search selections are as shown in Table 4: Exam’s Search by Category. After selecting the category and its field, you can click on any of the three search-by-date buttons to search in combination with the category and the date. 10.2 Sort Feature Once the patient list is displayed, you can sort by any item that has the sort button icon by clicking on the icon (System ID, Center ID, Record ID, Last Name, First Name, Gen, Birth Date, Imported, Modality, Pathology). It will sort by descending/ascending order and when clicked again, it will sort by the opposite way (ascending/descending order). 10.3 Records Per Page Setting 10.4 Refer to section 5.4. Hourglass Image Icon When the image is not compressed for some reason, an hourglass image icon is displayed. Only the administrator level user can attempt to recompress the images. If the exam is marked as stale, verified, or reviewed, and have the hourglass image icon, even the administrator level user cannot recompress. The exam must be unmarked as stale, verified, and reviewed before an administrator can attempt to recompress. If the attempt fails, please contact Anka technical support. Records Per Page Setting. 10.5 Import Functions There are two different types of import functions. One is creating patient manually or using Anka Systems’ ClinicUtil program to import (New Patient button). This is for importing using the XML file which contains patient information. For non-XML file, there are two buttons next to Import exam: Fixed CS and Universal CS. Fixed CS button is used only if you have already configured your PC to import from one particular CS. Universal CS gives the user an option to import from any other configured import CS. 10.5.1 Create and Import Record Feature Click on the New Patient button to start the import feature. 1. If you’re using Anka Systems’ ClinicUtil program to import, use the Browse…. button to find appropriate XML file and then click on the Upload button to import the patient’s information. If you’re not using the Anka Systems, Inc. 35 Anka Systems, Inc. EyeRoute Web User’s Manual 2. 3. 4. 5. ClinicUtil program, enter the patient’s information. The fields with * indicates that these are required fields. Click on the Create/Import Record button. Edit Study & Mapping Physician page will appear. Check the record information and edit if needed. When finished, click on the Edit Record button. An import Study and Images page will appear. Click on the Browse…. button and find the images to import. Click on the Process Import button to complete the import the images. 10.5.2 Import Exam Feature: Fixed CS You must have already configured this feature via EyeRoute Webadmin in order for this feature to work properly. Click on the Fixed CS button to start the import feature for a particular CS. All the blue fieldnames with asterisks (*) are required fields. 1. Only one modality should be listed and the image location should be already filled-in. 2. Fill in the information. 3. Click on the Import New Exam to process. 10.5.3 Import Exam Feature: Universal CS Click on the Universal CS button to start the import feature any configured import CSs. All the blue fieldnames with asterisks (*) are required fields. 1. Select the Modality (CS) from the drop-down list. 2. Once the CS is selected, the Image location should change to appropriate directory that selected CS. 3. Fill in the information. 4. Click on the Import New Exam to process. Image location can be set to a default directory for each capture station. Please ask your Anka administrator. 10.6 Exam List From the patient list page, if you click on an exam icon , the Exam List page will be displayed. This page lists imported exams of the same date of the selected patient. It is listed from top to bottom as the latest exam date to the oldest exam date. Patient’s Record ID is displayed on the top of the page. The rest of the patient’s information is listed in the table (see Table 15). Table 15: Exam List Properties Name Edit Record ID CS ID Exam ID CS Exam ID Exam Date Import Date Procedure CS Type Notes Anka Systems, Inc. Button/icon - Description To select an exam and import/reimport the study and its images. This will bring up an Import Study and Images page. Modality Patient ID generated by a specific Capture Station or any other non-Anka Systems record generator. Modality ID that is created to reference which modality is used to create this study. Consult your EyeRouteAdmin person. Anka generated reference number for this exam. Modality generated reference number for this exam if any. Actual exam date of this study. When this exam is imported in this system. Procedure type for this exam (e.g. Color, Fluorescein, etc.) Modality description. A place to put notes for the exam. 36 Anka Systems, Inc. EyeRoute Web User’s Manual 10.6.1 Create New Exam For this specific patient with this specific modality ID and information, you can import new exams by clicking on the Create New Exam button. This will bring up the Import Study and Images page. From here you can browse the location of the image file and then click on the Process Import button to complete the import. Anka Systems, Inc. 37 Anka Systems, Inc. EyeRoute Web User’s Manual 11 Frequently Asked Questions (FAQs) 11.1 System Question: How can I make a shortcut on my desktop to open up IE with EyeRoute Web? Answer: System pop-up window, save the password, enter the site as trusted site 11.2 Images Question: When I click on the view icon, how com I do not see the proofsheet? Answer: Check if your computer is setup to block the pop-up. You can set the Internet Explorer to accept the popup from just this application. You computer might have been setup to block the pop-up from the various places, such as from IE settings, yahoo pop-up blockers, Norton Internet System’s pop-up blocker. Please consult your IT department and ask them to setup to accept the pop-up from the eyeroute url address. Question: Why does it take so long from when we publish to when the photos are able to be seen on the web page? Answer: Check the connection to our server from your capture station and then try the “PUSH” function again. If this does not work, please contact your Anka Administrator. Question: For the OCT images, I know I saved them using the snagit program but I do not see them on the EyeRoute web page. How come? Answer: Make sure the snagit program is set to save in PNG format. EyeRoute supports PNG, TIF, and JPG image formats. Other formats are not supported at this time and are ignored by the EyeRoute web page. Question: Why is the Internet Explorer will only let you save as bmp images from the BASIC mode from EyeRoute? Answer: This is Microsoft issue. This happens when your cache (temporary files) is filled. To clear the cache, follow the steps below and try again. Clearing Cache on Microsoft® Internet Explorer 6.0 1. Click Start, select Settings and Control Panel. 2. Double-click Internet Options to open Internet Properties. 3. Click the General tab. 4. Click the "Delete Files..." button. NOTE: Do not select Delete Cookies. Deleting cookie files removes all the cookies stored on the computer. 5. Click OK on the Delete Files dialog box. 6. Click OK. If this does not work, you can directly click-and-drag the images right on to your desktop or folder directory. Question: I like to see images in proview mode. When I try to download proview by clicking on the "Proview" icon, a pop-up window comes up but then nothing happens. Why do I not see color image on the pop-up window? Answer: Make sure you have administrative privileges (read and write accesses) to the computer. If you do not, please consult your IT department. If you do have the access, delete the LeadTool from the IE (see below steps) and re-download the proview. You will only need to download the proview only once. Deleting the LeadTool: 1. Click Start, select Settings and Control Panel. 2. Double-click Internet Options to open Internet Properties. 3. Click the General tab. 4. Click the "Settings..." button. 5. Click the "View Objects..." button. 6. Delete LEAD Main Control (13.0). 7. Close the windows. Anka Systems, Inc. 38 Anka Systems, Inc. EyeRoute Web User’s Manual Here is the proview activeX component that needs to be deployed to the viewing stations. Question: I need some images for my presentation, how can I get images files from EyeRoute? Answer: If you only need one or two images from a proofsheet, you can either use the save image icon in the proview window or right-click and then save as… method in the basic mode. You can also save all the images from one proofsheet by following the steps below: How to save all the images from one proofsheet: 1. Bring up a proofsheet for desire exam images. 2. Click on the print proofsheet (printer icon). 3. Click cancel if a pop-up window comes up for “Make sure that Print-Mode is portrait. Print now?” 4. Print proofsheet window contains all the compressed images. The window looks exactly like the proofsheet but the window title is “Print proofsheet” on the very top bar. 5. From print proofsheet window, click on File -> Save As…, select the location to save the images, enter the filename and save. 6. Using the folder explorer (my computer), go to the location where you have saved the images. 7. You should see one htm file and its folder. Under the folder, all the jpg images for the proofsheet should reside. 11.3 Annotation Question: When I use the temporary annotation save and load features from a viewing station, why isn’t the most recent temporary annotation uploaded? Answer: Your Internet Explorer is set to cache the annotation. To recache (to fix this problem), open your Internet Explorer, click on the Tools menu, select Internet Options…. This will bring up the Internet Options windows. Under the General tab and Temporary Internet files selection, click on the Settings... button. Make sure that “Check for newer versions for stored pages” is set to “Every visit to the page.” Click Oks to save the option change. Question: I have scanned a paper and it has white background. When I draw, I don’t see the line and the measurement value. Answer: Because the measurement lines and font colors have default setting for white color; thus white letters on white background will not show. You can change the color of the font, lines, etc. When the drawing or word is selected, right-click to bring up the menu. Select the Selected Properties and then Foreground Color. Anka Systems, Inc. 39 Anka Systems, Inc. EyeRoute Web User’s Manual 12 Keystrokes We support short keystrokes to control the image. Here are the summary. <in Basic mode> [ESC] Escape key: close browser [.] Period key: show next image [,] Comma key: show previous image [z] z key: popup 1:1 image window <in Proview mode> [ESC] Escape key: close browser [.] Period key: show next image [,] Comma key: show previous image [z] z key: 1:1 image window with pan [p] p key: show pan window [=] = key: zoom in [-] - key: zoom out [b] b key: control brightness to up [B] B key: control brightness to down [c] c key: control contrast to up [C] C key: control contrast to down [a] a key: auto intensity [i] i key: invert image [g] g key: gray scale from color [l] l key: focus next child window [k] k key: focus previous child window [s] s key: save annotation and open new popup window with saved image [S] S key: save annotation Anka Systems, Inc. 40 Anka Systems, Inc. EyeRoute Web User’s Manual 13 Some Information about CSGs Certain types of CSG (capture station gateway) can be setup to automatically adjust the brightness and the contrast when the images are imported. 13.1 EMR Links (Integration with EMR) Some new EMR links are now available with different parameters. Table 16: New EMR Links Name Exam type based Patient ID based without DOB Anka Systems, Inc. Button/icon Description New EMR web link provides to display proofsheet directly. User can send exam type to see only one proofsheet rather than patient history page. If there are more than one exam found for the same exam type, the system will default to show patient history page An EMR link must have patient ID but date of birth is not required. 41 Anka Systems, Inc. EyeRoute Web User’s Manual 14 Technical Support If you have any questions or comments, please email to Anka Systems, Inc. technical support department: [email protected]. The technical support email address and phone numbers are displayed on most ER Web pages (see Figure 21). Figure 21: Technical Support Contact Information Anka Systems, Inc. 42