1
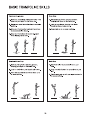
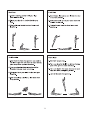
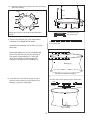
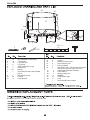
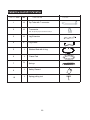
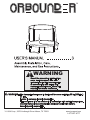
WARNING
YJ USA Corp., 3970 Lindbergh Drive Adison, TX 75001
www.jumppod.com
1-877-927-8777
2
1. The owner and supervisors of the trampoline
are responsible to make sure all the users are
aware of practices specified in this manual.
2. Trained Spotter supervision is recommended.
3. Place the trampoline and trampoline enclosure
on a level surface before use.
4. Must place the trampoline on lawn, bark wood
chip, sand or cushioning materials.
5. Adequate overhead clearance is essential. A
minimum of 7.3 m (24 ft) from ground level is
recommended. Provide clearance for wires,
tree limbs, and other possible hazards.
6. Maintain a free space of minimum 2500mm on
all sides of the trampoline. This area should not
included concrete, bitumen, brick, or other hard
surfaces as these can cause serious injuries.
7. Lateral clearance is essential. Place the trampoline and trampoline enclosure away from
walls, structures, fences, and other play areas.
Maintain a clear space on all sides of the
trampoline and trampoline enclosure.
8. Use the trampoline and trampoline enclosure in
a well-lighted area. Artificial illumination may
be required for indoor or shady areas.
9. Secure the trampoline and trampoline enclo
sure against unauthorized and unsupervised
use. If an access ladder is used, it should be
removed when the trampoline and trampoline
enclosure is not in use.
10. Inspect the trampoline and trampoline enclosure before each use, and replace any worn,
defective, or missing parts. Make sure the
frame padding, barier, enclosure tubes, and
foam sleeves are correctly positioned.
11. Remove any obstructions from beneath the
trampoline and trampoline enclosure.
12. The trampoline is designed for users weighing
90kg (200 lbs.) or less. Trampoline over 20 in.
(51cm) tall are not recommended for use by
children under 6 years of age.
13. Do not allow more than one person on the trampoline
and inside the trampoline enclosure. Use by more than
one person at the same time can result in serious
injuries.
14. Misuse and abuse of the trampoline is dangerous and
can cause serious injuries.
15. Use trampoline and trampoline enclosure only with
mature, knowledgeable supervision.
16. Climb on and off the trampoline. It is dangerous pratice
to jump from the trampoline to the floor or gound when
dismounting, or to jump onto the trampoline when
mounting. Do not use the trampoline as a springboard to
other objects.
17. Injury may result from encountering the frame or falling
through the springs while getting onto or off the trampo
line or while jumping. Stay in the center of the bed when
jumping. Do not use the trampoline without the frame
pad securely in place to cover the frame. The frame pad
is not designed or intended to support the weight of the
user. Do not step or jump directly onto the frame pad.
18. The trampoline is a rebounding device that propels the
user to unaccustomed heights and into a variety of body
movements. Rebounding off the trampoline, striking the
frame or springs, or improperly landing on the bed may
cause injury.
19. Do not attempt or allow somersaults on the trampoline.
This can result in a broken head, neck, back, or leg.
Landing on the head or neck can cause serious injury,
paralysis, or death, even when landing in the middle of
the bed.
20. Do not use the trampoline while under the influence of
alcohol or drugs. These substances impair reaction time,
judgement, and physical coordination.
21. Do not jump on the trampoline while holding an object,
particularly one that is sharp or breakable.
22. Bounce only when the surface of the bed is dry. Wind or
air movement should be calm to gentle. The trampoline
must not be used in gusty or severe winds.
23. The trampoline enclosure is only to be used as an
enclosure for a trampoline of a size for which the enclosure is designed.
24. Trampoline equipped enclosure for safety is
recommended.
25. Do not attach anything to the barrier that is not a
manufacturer approved accessory or part of the
enclosure system.
26. Wear clothing free of drawstrings, hooks, loops, or
anything that could get caught in the barrier.
27. Enter and exit the trampoline enclosure only at the
door designed for that purpose.
28. Do not attempt to crawl under the barrier.
35. While keeping the head erect, focus eyes on the trampoline
toward the perimeter. This will help control bounce.
36. Read all instructions before using the trampoline enclosure
and trampoline. Warnings and instructions for the care,
maintainance, and use of this trampoline enclosure and
trampoline are included to promote safe, enjoyable use of this
equipment.
37. Stop bounce by flexing knees as feet come in contact with the
trampoline bed. Learn this skill before attempting others.
29. Do not attempt to jump over the barrier.
38. Learn fundamental bounces and body positives thoroughly
before trying more advanced skills. A variety of trampoline
30. Do not intentionally rebound off the barrier.
activeties can be carried out by performing the basic fundamentals in various series and combinations, performing one
31. The trampoline frame and the enclosure are made of
fundamental after another, with or without feet bounces
metal. They are not grounded, and they will conduct
between them.
electricity. Therefore, an electrocution hazard exists.
32. Keep all frame and heat sources away from the
product.
33. Do not hang from, kick, cut or climb on the barrier.
34. Avoid bouncing when tired. Keep turns short.
39. Avoid bouncing too high. Stay low until bounce control and
repeated landing in the center of the trampoline can be
accomplished. Control is more important than height.
40. Bounce only when the surface of the bed is dry. Wind or air
movement should be calm to gentle. The trampoline must not
be used in gusty or serve winds.
Note: The
8
the
sharply
spot.
1. Make sure you understand the information in
the box at the top of this page before you
begin assembling the trampoline.
1
Lay two Top Tubes (1) on the ground as shown.
Make sure there is a T-Connector (2) on Top Tube (1).
Center
Insert the small end of one Top Tube(1) into
Top tube(1) with T-connector(2).
Insert a Center(4) into the leg, slide a second leg (3)
onto the center. Insert Leg(3) into the T-connector(2).
3
3
1
2
You have now assembled one leg section.
Repeat this step to assemble five more leg
sections.
1
2
2
2. Note: This step requires two persons. During
this step, you will connect the six leg sections.
Hold three leg sections in the positions shown.
Insert the small end of Top Tube (1) into the
T-connector (2) on another Top Tube (1).
Repeat this step until all four leg sections are
connected.
15
3. Lay the Bed (5) on the ground inside of the
assembled frame. Make sure that the two warn top of the Bed.
ing decals (not shown) are on
Note: There are V-rings around
the edge of the
5
Frame
V-rings
Bed (5) and holes around the top of the frame.
During this step, you will attach the Bed to the
frame using the included Springs (7) for holes
on top of frame and for holes on bottom of frame
(see the inset drawing). Hook a spring to the
Bed(5) and using the spring pulling tool(19), pull
the spring from the Bed to the hole slot in the
trampoline frame with even spring tension.
Be careful where you place your hands, the
Springs and frame joints can pinch.
7
7
Holes
To attach each Spring, you will first hook one end
of the Spring into a V-ring with black webbing
with yelow line location (see the inset drawing).
No yellow line
19
Black webbing with yellow line
Hook the first two Spring(7) into two the V-rings
(black webbing with yellow line) on the Bed(5) and
into the holes on the top tube. Attach two more
Springs (7) with black with yellow line location
directly across the Bed (with the webbing) from the
first two Spring. Attach two more Spring(7) with
black webbing with yellow line location halfway
between the first/second Spring(7), so eight
Springs(7) are attached as shown. Attach four
more Springs(7) (not shown) halfway between
the first eight Springs(7). Continue attaching
Springs(7) halfway between the previously attached
Springs,until all the Springs are attached.
Springs (7)
Hook the V-ring
During the installation of springs, wear
gloves and protective eye wear.
V-ring
7
7
5
Frame
16 4
4. Lay the Frame Pad (6) on the frame.
Double D-rings on the middle of pad should be fixed
exactly on the right of each T-connector of frame.
Do not use the trampoline without the
Frame Pad (6), which is designed to reduce the
likelihood of injury to the user from coming in contact with the trampoline frame. If you do not
have a Frame Pad, call our Customer Hot Line
toll-free at 1-877-927-8777, Monday-Friday,8 a.m.
-5 p.m. Central Time.(Excluding Holidays)
Properly install the Frame Pad before using the
trampoline.
Webbing
Safety pad(6)
D-ring
Webbing
T-connector
Double D-ring in the middle of pad should be
fixed exactly close to the right of T connector
on the top rail.
5
5. Look under the trampoline and locate the pairs
of straps near the edge of bed(5) and Double
D-ring and webbing near the frame.
B
A
C
Frame Pad
Frame Pad
Frame Pad
D-ring
Top tube
D-ring
D-ring
See the inset drawing. A, B and C. Repeat this
step with the remaining straps (not shown).
Top tube
Top tube
Webbing
Thread one end of Elastic Tie-Down, then tie a knot
on V-Ring.
Webbing
Webbing
Elastic Tie-Down
Elastic Tie-Down
Repeat this step with the remaining straps which at
middle position of each pad section (not shown).
V-Ring
V-Ring
Spring
17
Strap with Double D-ring on the pad edge
6
6. Using the included plastic tie, attach the Safety
Placard (8) to the frame near the point where
jumpers will climb onto and off the trampoline.
The trampoline is now fully assembled. Make
sure that all parts are securely attached.
Familiarize yourself and all users of the trampoline with the safety precautions, use and
instructional materials, and care and maintenance instructions in this manual before using
the trampoline.
Frame
7. Loosen the straps (not shown) on the underside of
the frame pad (for clarity, the frame pad is not shown
in the steps 8 and 11). Do not remove the frame pad
from the trampoline.
See the inset drawing.
10
T-connector
11
10
11
10
12
12
11
3
11
10
12
12
11
21
10
U-bolts
8. Lay a Bottom enclosure pole(13) and a
Top enclosure pole(14) with Plastic Cap on the
ground.
Make sure that the Bottom enclosure pole(13) is
oriented
so the small holes are in the position shown.
Slide a Foam Sleeve(18) onto each of the tubes;
note that the ends of the bottom enclosure pole(13)
should not be covered.
Small Hole
Plastic Cap
(16)
Insert the Bottom enclosure pole(13) into the Top
enclosure pole(14).
Tighten a Self-tapping Screw (9) into the small hole
in the Tube (13,14).
Assemble the remaining Bottom enclosure pole(13),
Top enclosure pole(14), and Foam sleeves(18) in the
same way.
Plastic Cap
(16)
Tighten Self-tapping Screw
Into Small Hole
14
9. Slide a ‘WEDGE’(20) onto the Bottom enclosure
pole(13), the top of the ‘Wedge’(20) should touch
the bottom of the T-Connector(2), and that the
bottom of the ‘Wedge’ (20) should be even with the
bottom of the Bottom enclosure pole.
Slide one of the U-bolts(12) up until it touches the
bottom of the T-connector(2), and tighten the two
Locknuts(10) on the U-bolt. Slide the other U-bolt
up until it is 2” above the lower end of the Straight
tube,and tighten the two Locknuts on the U-bolt.
Then, press two U-bolt Plastic Caps(21)
onto each U-bolt.
18
T-connector
21
10
21
10
20
12
12
3
10. Attach the other three Pole(13,14) in the same way.
See inset drawing.
10
Leg
Attach the Poles(13,14) as above arrow drawing
shown.
11. Lay out Top G3 Pole (15), joint each section
Connector to a straight line as shown.
6 Sections Per Line
Top G3 Pole (15)
Spread out G3 Pole and Joint each section
to one straight line.
Assemble the remaining Top G3 Pole (15) in the
same way.
D
Spread the Netting (17) on the trampoline bed,
insert a Top G3 Pole (15) into the opening of
Top Sleeve on the Netting (17). Insert the
other Top G3 Pole (15) into the opposite
opening of Top Sleeve on the Netting (17).
Opening
Netting(17)
Insert the pole into sleeve of the Netting(17)
12. Joint each end of Top G3 Pole (15) by the clip of
connector at each opening. The Top Sleeve of the
Netting (17) become a round shape.
Joint the end of each pole by Clip of Connector
Start:
Finish
Top Sleeve
Door of Netting
19
13. Note: During steps 14 and 15, you will “sew” the lower
edge of the Netting(17) to the V-rings on the bed using
the Cords(22).
13
Locate the V-ring closest to the door. Thread one end
of a Cord(22) through the lower edge of the Netting(17)
above the V-ring and then thread the Cord through the
V-ring. Tie the Netting to the V-ring, by making a double
knot in the Cord.
17
14. Thread the Cord(22)
through the lower edge of the
Netting(17) halfway between the first V-ring and the
V-ring to the left, and then thread the Cord through
the V-ring to the left. Repeat this procedure until
the entire Cord is threaded through the Netting and
the V-rings as shown. Keep the Cord taut. Tie the
end of the Cord to the last V-ring that it reaches.
14
22
17
Tie a second Cord(not shown)to the last V-ring
reached by the first Cord. Thread the second Cord
through the Netting(17) and the V-ring as described
above. Repeat this procedure with the remaining
Cords until the last Cord reaches the first Cord.
(Note: The last Cord may overlap the first Cord.)
Make sure that the Netting is sewn to every V-ring
on the trampoline bed; the Netting below the door
must also be sewn to the V-rings.
22
15
15. Using the included plastic tie,attach the Safety
Placard(8)to the Netting(17)near the door as
shown.
The trampoline/enclosure is now fully assembled.
Make sure that all parts are securely attached.
Familiarize yourself and all users of the trampoline/enclosure with the safety precautions, use
and instructional materials, and care and maintenance instructions in this manual before using.
Disassembly
To disassemble the trampoline/enclosure,follow assembly steps 1 through 14 in reverse order.
Do not attempt to disassemble any trampoline frame components before the springs and the bed
have been removed. Use gloves to protect your hands from pinch points during disassembly.
20
Stake
It is possible for the trampoline/enclosure
be blown about by high wind. If you anticipate
high winds, the trampoline/enclosure should be
moved to a sheltered location, disassembled,
or tied down to the ground with ropes and
stakes (not included). At least three ropes and three
stakes should be used. The tops of the stakes
should be at ground level so that they will not create a
tripping hazard. In addition, the tops of the stakes
should be covered, if necessary, so that users will not
be injured by falling onto the stakes. Make sure to
attach the ropes to the top of the frame; do not simply
secure the legs or the bases to the ground, as they
can separate from the frame sockets.
21
OR1413B6
15
17
14
9
16
13
6
5
21
8
10
2
3
20
8
1
12
11
4
15 %/$&.
7
1
2
3
4
5
6
7
8
12
12
12
6
1
1
60
1
9
10
11
4
16
8
8
19
18
Top Tube(With T-connector)
T-Connector
Leg Extension
Leg Center
Stitched Bed with V-ring
Frame Pad
Springs
User’s Manual and safety Placard
(2 pcs)
Self-tapping screw
Locknut
U-bolt Bracket
12
13
14
15
16
8
4
4
2
4
17
18
19
20
21
22*
*
1
8
1
4
16
8
1
U-bolts
Bottom Enclosure pole
Top Enclosure pole
G3 Pole (Black)
Hemisphere Cap ( This part has been attached to the top of the Top Tube (14).)
Netting with attached Hardware
Foam Sleeve
Spring Pulling Tool
WEDGE
U-bolt Plastic Cap
Cord
Set of ASTM Frame Labels
1
12
2
12
Top Tube with T-connector
T-connector
Note: This part may be pre-assembled onto key#1
3
12
4
6
Leg Center
5
1
Stitched Bed with V-ring
6
1
Frame Pad
7
72
8
1
Safety Placard
19
1
Spring pulling tool
Leg Extension
Springs
23
8
1
Safety placard
9
4
Self-tapping screw
10
16
Locknut
11
8
U-bolt Bracket
12
8
U-bolt
13
4
Bottom enclosure pole
14
4
Top enclosure pole
15
2
G3 pole
16
4
Hemisphere Cap
17
1
Netting with attached hardware
18
8
Foam sleeves
20
4
WEDGE
21
16
U-bolt plastic cap
22
8
Cord
(Pre-assembled to key#16)
24