1
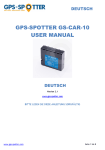
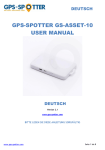
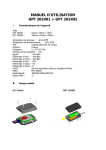
DEUTSCH GPS-SPOTTER GS-BIKE-10 USER MANUAL DEUTSCH Version 2.1 www.gps-spotter.com BITTE LESEN SIE DIESE ANLEITUNG SORGFÄLTIG www.gps-spotter.com Seite 1 bis 8 DEUTSCH 1 FUNKTIONSWEISE Das GS-Bike-10 ist ein Fahrrad-Rücklicht mit integriertem GPS-Modul inklusive SIM-Karte. Diese Anleitung beschreibt, wie Sie das Gerät in Betrieb nehmen, die aktuelle Position per SMS abfragen und nach der Startphase das Guthaben verlängern können. 2 PRODUKTBESCHREIBUNG 2 1 3 (1) AN-Knopf: 1x Knopf ca. 1 Sekunde drücken … Rücklicht blinkt während der Fahrt/Bewegung 2x Knopf ca. 1 Sekunde drücken … Rücklicht permanent AN während der Fahrt/Bewegung 3x Knopf ca. 1 Sekunde drücken … Rücklicht AUS während der Fahrt/Bewegung Nach ca. 60 Sekunden ohne Bewegung geht das Rücklicht aus und geht bei Bewegung wieder an. (2) Mini USB Buchse: Verwenden Sie die Mini-USB Buchse und das mitgelieferte USB-Kabel zum Nachladen des Geräts zusammen mit einem PC oder einem geeigneten Netzstecker (nicht im Lieferumfang enthalten). (3) SIM Schacht: den SIM-Schacht nicht öffnen. Die SIM-Karte des Anbieters ist vorkonfiguriert und aktiviert. Weiteres Zubehör: Halterung, Schraubenzieher, USB Kabel 3 INBETRIEBNAHME 3.1 AUFLADEN Vor dem ersten Einsatz und wenn das Rücklicht bei Bewegung nicht mehr leuchtet, ist in jedem Fall das Gerät zu laden. Die Ladezeit ist abhängig vom Ladezustand und der Verwendung der LED Lampe. Es kann bis zu 8 Stunden dauern, bis das Gerät komplett geladen ist. Während des Ladevorgangs ist eine kleine (4) Ladekontroll-Leuchte AN, die man nur erkennen kann, wenn das Rücklicht AUS ist und die nach Abschluss des Ladevorgangs erlischt. 4 www.gps-spotter.com Seite 2 bis 8 DEUTSCH 3.2 EINSCHALTEN Nach totaler Entladung müssen Sie das Gerät neu einschalten! Einschalten durch langes Drücken (ca. 3 Sekunden) des AN-Knopfs. Ein Ausschalten des Geräts ist nicht möglich, außer wenn die SIM-Karte entfernt wird. 3.3 EINMALIGE REGISTRIERUNG IHRES HANDY Nachdem Sie das GPS-Spotter Konto eingerichtet haben, senden Sie folgende SMS mit * am Anfang und * am Ende an die GSM-Nummer des Geräts, damit Ihr Handy zur Positionsabfrage verwendet werden kann. Die (5) GSM-Nummer finden Sie auf der Verpackung bzw. im GPSSpotter Konto. 5 SMS Kommando: Beispiel: Antwort: *master*123456*+436641234567* *master*123456*+436641234567* Notice Cell Phone # +436641234567 is set to master controller“ 4 WICHTIGE SMS KOMMANDOS 4.1 SMS POSITIONSABFRAGE MIT LANDKARTE SMS Kommando: Antwort: Beispiel: 4.2 SMS POSITIONSABFRAGE MIT GPS KOORDINATION SMS Kommando: Antwort: Beispiel: 4.3 *locatemap* Weblink zur Anzeige der Position mit Landkarte am Handy http://cell.miitown.com/map.aspx?lat=48.006424&lng=13.674745&rom= 2105671412310031 *locateaddress* Weblink zur Anzeige der Position mit Adresse am Handy Hauptstraße, Linz, Austria, Satellite: 12, Speed: 5.1km SMS ALARME AKTIVIEREN / DEAKTIVIEREN SMS Kommando: *sensitive*3* *smsalert* *alertoff* Bewegungssensor einstellen (Empfohlen 3, 1 sehr sensibel, 5 ungenau) SMS Alarme aktivieren (Alarm bei Beginn einer Bewegung) Alle Alarme deaktivieren 5 GPS-SPOTTER GUTHABEN 5.1 STARTGUTHABEN UND GUTHABEN-VERBRAUCH Sie können das GPS-Spotter Service inklusive SIM-Karte nach dem Kauf mit dem Startguthaben 3 Monate kostenlos nutzen. Wenn Sie KEIN Guthaben erwerben, wird die SIM-Karte nach 3 Monaten automatisch gesperrt. Der GPS-Spotter Dienst ist auf maximal 30 SMS Abfragen pro Monat limitiert. Während der Startphase können Sie online (z.B. bei Amazon) wie bei Wertkarten-Handys weiteres GPS-Spotter Guthaben kaufen (siehe www.gps-spotter.com). www.gps-spotter.com Seite 3 bis 8 DEUTSCH 5.2 GPS-SPOTTER KONTO ANLEGEN UND GUTHABEN ERWERBEN Gehen Sie auf www.gps-spotter.com und legen Sie, wie dort beschrieben, ein Online-Konto an. Registrieren Sie sich mit der (6) IMEI-Nummer auf der Verpackung Ihr Gerät. 6 In Ihrem Online-Konto können Sie das Guthaben zum Verlängern eingeben. Sie werden monatlich per Email informiert, wann das Guthaben verbraucht ist. 6 MONTAGE 7 Montieren Sie die (7) Halterung am Fahrradrahmen an einer geeigneten Stelle. 7 HÄUFIGE FRAGEN Problem LED beginnt nicht zu blinken / LED Licht lässt sich nicht einschalten Gerät antwortet nicht per SMS Ich kann mich nicht online beim GPS-Spotter anmelden Mögliche Ursache und Fehlerbehebung Bewegen Sie das Gerät Drücken Sie 1x den LED Knopf mind. 1 Sekunde Batterie ist leer: das Gerät aufladen Gerät ist aus, drücken Sie 3 Sekunden den LED Knopf Falsche GSM-Nummer: kontrollieren Sie die Nummer auf der Verpackung oder im GPS-Spotter Konto. Handynummer ist nicht als Master registriert Kein GPS-Spotter Guthaben mehr: Guthaben aufladen Monatliches SMS Limit von 30 SMS erreicht Schicken Sie eine Mail mit der Geräte-Nummer (IMEI) oder GSM-Nummer an unseren Support. Bei weiteren Problemen zur Verwendung kontaktieren Sie bitte unseren technischen Support. Die Kontaktdaten finden Sie auf www.gps-spotter.com www.gps-spotter.com Seite 4 bis 8 ENGLISH GPS-SPOTTER GS-BIKE-10 USER MANUAL ENGLISH Version 2.1 www.gps-spotter.com PLEASE READ THIS SHORT MANUAL CAREFULLY www.gps-spotter.com Page 5 to 8 ENGLISH 1 WORKING MODE The GPS-Spotter GS-Bike-10 is a working back light for bikes with integrated GPS tracking including a SIM card. This manual describes how you can install and use the device and add additional credit for the future operation. 2 PACKAGE CONTENT 2 1 3 (1) LED Power Button: 1x Press button for 1 second … LED light flashing during movement/ while driving 2x Press button for 1 second … LED light always ON during movement/ while driving 3x Press button for 1 second … LED light OFF during movement/ while driving If the device is not moving, the LED backlight turns off after approx. 60 seconds. (2) Mini USB Charging Slot: Connect the USB cable to the USB charging slot to recharge the device. Add the USB cable to a PC or a proper power plug (not included, e.g. from a mobile phone). The first charging will take up to 8 hours. (3) SIM Slot: don’t open the SIM slot. The SIM is already inserted and activated by the provider. If you remove the SIM, the device will be switched off. Additional Accessories: mounting collar, screw driver, mini usb cable. 3 OPERATING 3.1 CHARGING THE ACCU Prior to the first usage and when the back light is not working anymore, you should charge the accu. Use the USB cable and a computer or appropriate USB charger (not included). The first time could take for approx.. 8 hours. The charging duration depeonds on the battery level and how often the LED is used. During charging you will see a small red (4) charging LED that indicates that the charging is going on. After completion the red charging LED turns off. 4 www.gps-spotter.com Page 6 to 8 ENGLISH 3.2 SWITCHING ON If the device was fully dis-charged, you must switch on the device. Press the LED Power Button for approx. 3 seconds. The device cannot be switched off unless you remove the SIM card. 3.3 INITIAL REGRISTRATION OF YOUR MOBILE PHONE You need to register your mobile phone number with the device. Use your mobile phone to send a SMS text message with * as the first character and * as the last character of the message. You find the (5) GSM number of the device on the packaging or in the GPS-Spotter web-account. 5 SMS command: Example: Response: *master*123456*+436641234567* *master*123456*+436641234567* Notice Cell Phone # +436641234567 is set to master controller“ 4 IMPORTANT SMS COMMANDS 4.1 GET THE GPS LOCATION VIA SMS WITH MAP SMS command: Response: Example: 4.2 GET THE GPS LOCATION WITH MAP SMS command: Response: Example: 4.3 *locatemap* Receive the GPS location in a link that will be displayed as map on a smartphone http://cell.miitown.com/map.aspx?lat=48.006424&lng=13.674745&rom= 2105671412310031 *locateaddress* Receive the GPS location with a text message Main road, Linz, Austria, Satellite number:12, Speed 5.71km SMS ALARME AKTIVIEREN / DEAKTIVIEREN You can activate movement alerts to get a SMS notification in case of movement SMS command: *sensitive*3* *smsalert* *alertoff* Change the sensitivity of the motion sensor (default 3, 1 very sensitive … 5 insensitive) Active sms alerts Deactivate sms alerts (default) 5 GPS-SPOTTER CREDITS 5.1.1 STARTUP CREDITS AND CREDIT USAGE You can use the GPS-Spotter including the active SIM after the purchase for a 3 months startup period. After the startup period you need to purchase additional credit points online (e.g. Amazon), similar to prepaid SIM cards. www.gps-spotter.com Page 7 to 8 ENGLISH If you don’t add additional credits to your online GPS-Spotter account, the service and the SIM card will be blocked after 3 months and you cannot use the GPS-Spotter anymore. The GPS-spotter service is limited to 30 SMS per month. . 5.1.2 GPS-SPOTTER WEB ACCOUNT AND ADDING CREDITS Visit www.gps-spotter.com and create a new GPS-Spotter web-account. You can add your device in your web-account. Your (6) device IMEI number is needed that you find on the product packaging. 6 The GPS-Spotter account sends a monthly email with your current credit amount and when the credit will be over. You can add your purchased credit code in your web-account to add credit. 6 MOUNTING INSTRUCTIONS 7 Mount the back light to the seat tube with the (7) collar. Tighten the collar with the screw driver. 7 FEQUENTLY ASKED QUESTIONS Problem Back light cannot be switched on or is not blinking No SMS response I cannot login to my GPSSpotter account Reasons and hints LED function is switched off, press LED button 1 time The battery is empty: recharge it The device is switched off, press LED button for 3 seconds SIM card is NOT inserted Check the GSM number Register your mobile phone as master Monthly SMS limit reached (30) No GPS-Spotter credit anymore Contact our support on www.gps-spotter.com For any other technical assistance please contact our technical support on www.gpsspotter.com www.gps-spotter.com Page 8 to 8