1
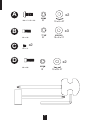
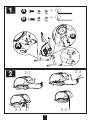
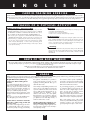
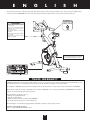
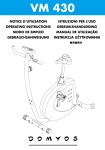
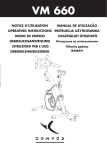
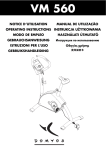
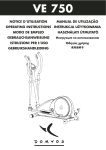
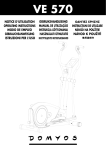
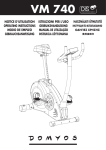
Réalisation : EVOLUTION + 32 / 69 250 500 VM 660 NOTICE D’UTILISATION MANUAL DE UTILIZAÇÃO OPERATING INSTRUCTIONS INSTRUKCJA UŻYTKOWANIA MODO DE EMPLEO HASZNÁLATI ÚTMUTATÓ GEBRAUCHSANWEISUNG Инструкция по использованию ISTRUZIONI PER L’USO Οδηγίες χρήσης GEBRUIKSHANDLEIDING VM 660 Réalisation : EVOLUTION + 32 / 69 250 500 Notice à conserver Keep these instructions Bitte bewahren Sie diese Hinweise auf Istruzioni da conservare Conservar instrucciones Bewaar deze handleiding Instruções a conservar Zachowaj instrukcję Őrizze meg a használati útmutatót Сохранить инструкцию DECATHLON - 4, Boulevard de Mons - 59665 Villeneuve d'Ascq - France Made in China - Hecho en China Réf. pack : 425.778 - CNPJ : 02.314.041/0001-88 - - MONTAGE • ASSEMBLY •MONTAJE • MONTAGE • MONTAGGIO • AFWERKING • MONTAGEM • MONTAŻ • SZERELÉS • Сборка • Συναρμολόγηση • 4 A x2 M8 x P1.25 x 20L 8 19 x 8 x 2T B x3 M8 x 16L C 8 19 x 8 x 2T x2 M5 x 5L D x2 M8 x 20L 8 19 x 8 x 2T 5 A x2 B x3 1-2 1-1 B A 2-2 2-1 2-4 2-3 6 C x2 2-1 2-2 2-3 L R 4 x2 D D 4-1 4-3 7 4-2 E N G L I S H You have chosen a piece of fitness equipment by DOMYOS. We thank you for your confidence in us. We have created the DOMYOS brand to provide a way for all athletes to train at home. Our products are created by athletes for athletes. We would be pleased to receive your comments and suggestions concerning DOMYOS products. The team at your store and the DOMYOS product design department are ready to listen. If you would like to write to us, please send us an email at the following address: www.decathlon.com We wish you successful training and hope that you will enjoy using this DOMYOS product. Console Handlebars Seat Handlebar post Seat post knob Seat post Pedal FRONT RIGHT SIDE LEFT SIDE VM 660 30,5 kg 67,4 lbs 130 x 63 x 110 cm 51 x 25 x 43 inch Model N° : Serial N° : REAR CAUTION ___________________ ___________________ Read all warnings affixed to the product. Write the serial number in the space above for future reference. Read precautions and instructions in this manual before using this equipment. Keep this manual for future reference. Serial number Decal 17 E N G L I S H P R E S E N TAT I O N The VM 660 is a new-generation fitness bicycle. Thanks to its special profile and adjustable seat and handlebars, this bike places you in an anatomical position adapted to your workout. The innovative shape of the handlebars enables you to find the ideal position for your hands and forearms easily. This product is equipped with a magnetic transmission system for optimal and smooth pedaling comfort. It is equipped with a modern electronic system that enables you to adjust the braking resistance and offers preset workout programs. SAFETY Warning: to reduce the risk of serious injury, please read the important precautions below before using the product. 1. Read all the instructions in this manual before using the product. Use this product only in the way described in this manual. Keep this manual during the product’s service life. 13. If you feel pain or dizziness while exercising, stop immediately, rest a while and consult your doctor. 14. Keep children and pets away from the product at all times. 2. This appliance is in compliance with European, American and Chinese standards related to fitness products for domestic and non-therapeutic use. (EN-957-1 and 5 classes HC / ASTM F1250 / GB17498) 15. Keep hands and feet away from moving parts. 3. An adult should do the assembly of the appliance. 16. Before starting an exercise program, you should consult a doctor to make sure that there are no counter-indications especially if you have not practiced any sport for several years. 4. It is up to the owner to make sure that all of the product’s users are properly informed on all the user precautions. 17. Do not let setting devices extend outward. 5. Domyos disclaims any responsibility in case of claim for injury or damages to any person or property resulting from improper utilization of this product by the purchaser or any other person. 18. Do not tinker with your VM660. 19. Keep your back straight when using the product. Do not arch your back. 6. The product is intended for domestic use only. Do not use the product in a commercial, rental or institutional context. 20. The pulse sensor is not a medical device. Various factors may affect the accuracy of rate readings. The pulse sensor is intended only as an exercise aid in determining heart-rate trends in general. 7. Use the product indoors, away from moisture and dust, on a level and solid surface and in a clear area. Be sure there is enough space for safe access to and passage around the product. Cover the floor beneath the product for protection. 21. Notice to persons with pacemakers, defibrillators or other implanted electronic devices. Persons who have a pacemaker use the pulse sensor at their own risk. Before starting use, an exercise test under a doctor’s supervision is advised. 8. It is the user’s responsibility to ensure efficient maintenance of the appliance. After assembling the product and before each use, check that the attachment elements are well tightened without extending. Check the state of wear and tear parts. 22. Pregnant women are not advised to use the product. Please consult your doctor before using it. 9. In the event of damage to your product, have all worn out or defective parts replaced immediately by the After-Sales Service of your nearest DECATHLON store and do not use the product before it is completely repaired. 23. Always hold the handlebar when getting on, getting down, or using the product. 10. Do not store the product in a humid place (edge of swimming pool, bathroom…) 25. When you stop exercising, allow the pedals to slowly come to a stop. 11. Always wear sports shoes to protect the feet while exercising. Wear appropriate clothing when exercising. DO NOT wear loose clothing that could get caught in moving parts. Remove jewellery. 26. Maximum user weight: 130 kg – 286 pounds. 24. Care should be taken mounting/dismounting the exercise bicycle. 27. There should only be one person on the product during the exercise 12. Tie long hair so that it does not get in the way when exercising. 28. Clean with a damp sponge. Rinse and dry thoroughly WA R N I N G Consult your doctor before starting an exercise program. This is particularly important for people over 35 or having had health problems before. Read all the instructions before use. 18 E N G L I S H ADJUSTMENTS Notice: you have to get off the bicycle to make any adjustments (seat, headrest). 1 1 HOW TO ADJUST THE POSITION OF THE SEAT AND THE HANDLEBARS For an effective workout, the seat and the handlebars must be adjusted properly. While you are pedaling, your knees should be slightly bent when the pedals are at the farthest position. In order to adjust the seat, unscrew and pull the knob on the seat post. Adjust the seat to the right height, as indicated in the reference table below, reinsert the knob in the seat post and tighten it all the way. Next, repeat the same operation for the handlebars. To find the position corresponding to your height, please refer to the table below titled: “Adjusting the Handlebars”: 3 2 Height in cm Seat adjustment 0 <155 0 155 à 160 1 161 à 164 2 165 à 169 3 170 à 173 4 174 à 177 5 178 à 181 6 182 à 186 7 187 à 195 8 >195 9 Height in cm Handlebars adjustment 155 à 160 1 161 à 166 2 167 à 172 3 173 à 178 4 179 à 184 5 185 à 190 6 191 à 195 7 IMPORTANT: Make sure to put the knob back into place in the seat/handlebars post and tighten it completely. Never exceed the maximum height of the seat. IMPORTANT: Never exceed the maximum handlebar height 2 4 HOW TO ADJUST THE PEDAL STRAP The new-generation foot wedges are easy to use and require no adjustment. START/STOP 3 + MODE _ LEVELING THE BICYCLE In case of instability of the bicycle during use, turn one of the plastic end knobs on the rear support leg or both, until the instability is eliminated. 4 RESET ADJUSTING THE RESISTANCE Braking and resistance are connected to pedaling speed. A modern electronic system enables you to adjust the braking resistance using “+” and “-” functions of the console (the resistance level is indicated on the screen). 19 E N G L I S H CONSOLE START/STOP + _ MODE START/STOP RESET + MODE _ RESET THE KEYS ON YOUR CONSOLE START/STOP Starts and stops your exercise. If you are in stop mode, a small crossed-out “P” flashes at the top left of the screen. To start your training session, press on START/STOP. RESET Resetting the console ENTER For selecting functions and data UP (+) / DOWN (-) Increases / decreases an item or selects last / next choice criterion, or the target values USING YOUR CONSOLE 1. STARTING Plug the bicycle into the power outlet via the adaptor provided (DC 6V, 500mA). The electric connection is on the rear foot of the bike. If the bicycle is already plugged in, press on any button or start pedaling. 2 . CHOOSING A USER PROFILE U1 - U4: After starting, the screen displays U1, meaning that the profile selected is user 1. The console thus offers the possibility of saving the data from individual workouts for 4 different users U1-U4. E.g. time, distance, calories. Choose your user profile with UP/DOWN and confirm your selection with ENTER. The console will now save the parameters you have selected, so you won’t have to reset the console when you start your next training session. After inputting your user profile, the 4 training mode icons begin to flash at the top of the screen, at which point you can select your training mode. 20 E N G L 3. SELECTING YOUR TRAINING MODE: I S H Once you have chosen PROGRAM mode, the first program, P1, is displayed on the screen. Use the UP/DOWN keys to select the program you want and confirm using MODE. You can choose from 4 training modes: MANUAL, PROGRAM USER, TARGET H.R. If you wish, you can adjust the resistance of the program, using UP/DOWN followed by MODE. Which you select with the UP/DOWN keys, and confirm your choice with ENTER. . MANUAL TRAINING: MODE MANUAL The MANUAL mode allows you to manually control the intensity of your workout by increasing or decreasing the resistance level. You can then set one or several objectives in the same way as in MANUAL mode described above. Braking resistance level: Start your workout by pressing on START/STOP This is represented by the flashing resistance bar. To choose the desired level of resistance, use the UP/DOWN keys. There are 16 levels of resistance between 1 and 16; 1 being the lowest and 16 the highest. If the program’s pre-selected resistance is too low or too high, you can increase it manually at any time, without interrupting the workout, by using UP/DOWN You can choose and set one or several training objectives using MODE to choose it and UP/DOWN to set its target value: Objectives: TIME : DISTANCE : CALORIES : CUSTOMIZED PROGRAM: USER Time in minutes of exercising Distance to be covered Number of calories to be burned It is a countdown, and the training session stops automatically when each of the objectives have been reached. The “P" icon indicating “Pause” starts flashing in the upper left-hand corner of the screen, and a beep sounds to indicate this stop. The USER function allows you to create a program on your own that will be added to the 6 pre-loaded programs. Select USER mode using UP/DOWN and confirm by pressing on MODE. If the values are set to 0, they will increment during the workout and there will be no automatic stop. After setting the desired resistance and your training objectives, start your training session by pressing on START/STOP. Next, choose the intensity of each of the segments of the programmed profile, using UP/DOWN, and proceed by pressing on UP/DOWN twice when setting the following segment. TRAINING BY PROGRAM: PROGRAM P1 – P6 Complete your program profile in this way and begin your workout by pressing on START/STOP. You can then set one or several objectives in the same way as MANUAL mode described above. Select this mode using UP/DOWN and confirm by pressing on MODE. This mode gives you access to the bicycle’s 6 automatic programs. The pictograms below the screen indicate the exertion profile of each program. 21 E N G L CARDIAC PROGRAM: ET HEART RATE I S H For a guideline for setting a heart rate goal, please refer to the chart below, which provides indicative values. Choose TARGET HR mode with UP/DOWN to do a workout controlled by your target heart rate, and confirm by pressing on MODE. Important: this is only an estimate, which in no case should be considered a medical certainty. Please note that before undertaking any sport it is necessary to consult a doctor! You can then choose an additional goal such as TIME , DISTANCE, etc. using MODE or start your program using START/STOP. Next, enter your age using UP/DOWN and MODE. The resistance decreases automatically by one level every 15 seconds if your heart rate is too high. If it is too low the resistance increases by one level every 30 seconds, until level 16 is reached. The console will then offer a target heart rate at 55% of the maximum heart rate for the age you entered. You can increase this percentage to 75% or even 90%, or “THR"using UP/DOWN. Please note: You have to keep both hands correctly positioned on the heartbeat sensors. You cannot adjust the resistance of the bicycle manually in THR mode. You can stop the workout immediately in any training mode, by pressing on START/STOP. The THR function enables you to enter an individual heart rate expressed in beats / minute instead of a pre-selected percentage. After you choose THR the console first offers a default frequency of 100 beats / minute in the lower right-hand corner of the screen. Use MODE and UP/DOWN to enter your desired value, between 30 and 240 beats per minute, then confirm the entry with MODE. CARDIO TRAINING : EXERCISE RANGE • Training at 80% to 90% of maximum heart rate and higher: Anaerobic and red zones reserved for competitive, specialized athletes. • Training at 70-80% of maximum heart rate: endurance training. • Training at 60-70% of maximum heart rate: Getting into shape/Burning off fat. • Training at 50 to 60% of maximum heart rate: Maintenance/Warm-up Beats per minute 100% 200 195 Beats per minute Men 100% 207 190 185 180 175 170 165 160 156 152 165 148 144 136 133 129 126 60% 120 117 114 111 108 50% 100 20 192 187 182 177 172 167 162 100% 80% 70% 140 197 155 100% 80% 160 202 Women 97 25 95 30 92 35 90 40 140 122 105 87 45 136 119 102 85 50 132 115 99 82 55 128 112 96 124 80% 108 144 77 60 65 157 153 141 149 137 134 130 60% 70% 124 121 118 115 112 50% 93 60% 80 161 70% 103 101 98 96 93 50% 20 Age 25 30 35 40 145 127 109 91 45 141 137 133 129 80% 123 120 116 113 106 103 100 97 60% 88 86 83 81 55 60 65 50 70% 50% Age NOTICE AND WARNINGS TO USERS Getting into shape must be done in a controlled manner. Before beginning physical activity, do not hesitate to CONSULT a PHYSICIAN, especially if you have not exercised in recent years, you are over 35 years old, you are not certain of your health, or you are receiving medical treatment. BEFORE UNDERTAKING ANY SPORT IT IS NECESSARY TO CONSULT A DOCTOR. 22 E N G L I S H EXPLANATION OF SCREEN INDICATIONS SCAN : During the workout, the console will regularly switch between speed, displayed in Km/h/miles “SPEED” and revolutions per minute “RPM”. CALORIES : Approximate indication of calories burned, between 0 and 999, or countdown of the pre-selected value. SPEED : Indicates your speed between 0.0 et 99.9 Km/h or miles/h. PULSE : Indicates your heart rate as soon as you grasp the heartbeat sensors of the handlebars “ HANDPULSES”. RPM : Indicates the number of rotations per minute of the pedals. Important: this is only an estimate, which in no case should be considered a medical certainty. TIME : Indicates the duration of your workout, or a countdown of the pre-selected valued between 01:00 and 99:00 minutes. The bike console will turn off automatically after 5 minutes of non-use. All the training objectives (time, distance, calories etc.) will be saved and will reappear when the console is turned back on. DISTANCE : Indicates the distance covered, from 0.1 Km or miles and 99.90 Km or miles. If a target distance is pre-selected, it will be counted down to 0.00. TROUBLESHOOTING - If the heart rate indicator is not flashing or is flashing erratically, check that your hands are positioned properly and that the sensors are not too moist - If the counter does not turn on: Check the condition and the connections of the cables on the back of the console, and where the stem meets the main frame of the bike - If the problem persists Bring the product back to the nearest DECATHLON store 23 E N G L I S H CARDIO-TRAINING EXERCISE Cardio-training exercise is a form of aerobics (conditioning the body in the presence of oxygen) and allows you to improve your cardio-vascular capacity. To be more precise, you will improve the tonicity of the heart and your blood vessels. Cardio-training exercise carries the oxygen breathed in from the air to your muscles. It is the heart that pumps this oxygen through the body and, in particular, to the muscles being exercised. PHASES OF A PHYSICAL ACTIVITY A Warm-up phase : progressive effort B Training TRAINING is the main phase of your physical activity. You can improve your physical condition by REGULAR training. • Anaerobie exercice to develop endurance. • Aerobic exercice to develop cardio-pulmonary resistance. Warming up is a preparatory phase before any activity. It puts the person INTO OPTIMUM CONDITIONS for carrying out his or her favorite sport. It is a METHOD OF PREVENTING ACCIDENTS TO TENDONS AND MUSCLES. There are two aspects : WAKING UP THE MUSCULAR SYSTEM, GENERAL WARMING UP. 1) The muscular system is prepared in a SPECIAL STRETCHING SESSION which PREPARES FOR EACH ACTIVITY : each group of muscles is used, joints are used. C Slowing down This is the continuation of an activity at low intensity, the gradual “return to rest” phase. SLOWING DOWN brings the cardiovascular and respiratory system, the blood flow and muscles back to “normal” (eliminating the counter effects of an exercice, such as lactic acids, the accumulation of which is one of the major causes of muscular pains such as cramps and stiff muscles). 2) Global warming up gradually brings the cardiovascular and respiratory system into action, improves irrigation of the muscles and prepares for making efforts. It must be sufficiently long : 10 min for a leisure sport activity, 20 min for a competition sport activity. Note that warming up must be longer : after 55 years old, in the morning. D Stretching STRETCHING must follow the slowing down phase while joints are still warm in order to reduce risks of injury. Stretching after an activity : minimizes MUSCULAR STIFFNESS due to an accumulation of LACTIC ACIDS, “stimulates” BLOOD CIRCULATION. PA R T S O F T H E B O D Y W O R K E D The exercise bike provides an excellent kind of cardio-training activity. Training on this equipment is designed to increase your cardio-vascular capacity. On this principle, you improve your physical condition, your endurance and you burn calories (an indispensable activity for weight loss in association with dieting). Finally, the exercise bike allows you to tone the muscles in the legs and buttocks. The muscles in the calves and the lower abdominals are also worked. USAGE When just starting out, begin by training over several days with a slight resistance and pedalling speed, without forcing, and taking rest breaks as needed. Then progressively increase the frequency or duration of your exercise sessions. Weight Maintenance/Warm-up: progressive effort starting at 10 minutes. For a workout designed either to keep you in shape or for re-education purposes, you may train every day for around ten minutes. This type of exercise is designed to stimulate your muscles and joints or may be used as a warm-up to additional physical activity. To increase the muscle tone of the legs, select a higher resistance and lengthen the exercise period. Of course, you may vary the pedalling resistance throughout your exercise session. Aerobic fitness workout: moderate effort for a fairly long period (35 min to 1 hour). If you wish to lose weight, this type of exercise, combined with a diet, is the only way to increase the quantity of energy consumed by the organism. Nevertheless, it is pointless to push yourself beyond your limits. It is the regularity of training that will allow you to obtain the best results. The resistance and/or speed of pedalling is increased so as to increase respiration during the exercise. The effort here is more sustained than for the maintenance workout. Select a fairly weak pedalling resistance and exercise at your own rhythm, but at least for a period of 30 minutes. This exercise should raise a slight sweat but should under no circumstances leave you breathless. It’s the duration of the exercise, at a slow rhythm, that will require your organism to draw its energy from your fat reserves provided that you pedal for more than thirty minutes, a minimum of three times a week. As your training progresses, you will be able to sustain the effort for longer periods, at a faster rate or with a higher degree of resistance. You may train a minimum of three times a week for this type of training. Training at a faster rate (anaerobic workout and workout in the red zone) is reserved for athletes and requires adequate preparation. Aerobic training for endurance: sustained effort for 20 to 40 minutes. This type of training targets significant reinforcement of the cardiac muscle and improved respiratory activity. 24 After each training session, take several minutes to pedal with diminishing speed and resistance in order to cool down and progressively bring the body to a state of rest. E N G L I S H The warning decals shown on this page have been placed on the product in the locations shown below. If a decal is missing or illegible, please contact your nearest DECATHLON store and order a free replacement decal. Place the decal on the product in the location shown. MAXIMUM PERMISSIBLE LOAD CAUTION 130 kg / 286 lbs • Misuse of this product may result in serious injury. • Read user’s manual and follow all warnings and operating instructions prior to use. • Do not allow children on or around machine. • Replace label if damaged, illegible, or removed. • Keep hands, feet and hairs away from moving parts. This product, which complies with the EN 957 class HC, GB17498, ASTM F1250 standards, is not designed for therapeutic purposes. T R A D E WA R R A N T Y DOMYOS guarantees this product under normal conditions of use for 5 years for the structure and, for wearing parts and workmanship, 2 years from the date of purchase, as indicated by the date on the receipt. This warranty only applies to the initial purchaser. The obligation of DOMYOS with regard to this warranty is limited to the replacement or repair of the product, at the discretion of DOMYOS. All products for which the warranty is applicable must be returned to DOMYOS at one of its approved facilities (a DECATHLON store) transport prepaid, accompanied by adequate proof of purchase. This warranty does not apply to cases of: • Damage caused during transport • Improper or abnormal use • Repairs made by technicians not approved by DOMYOS • Use of the product in question for commercial purposes This warranty does not exclude any legal guarantees applicable according to country and/or province DOMYOS, 4 BOULEVARD DE MONS – BP299 – 59665 VILLENEUVE D’ASCQ – France 25