1
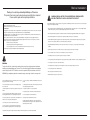
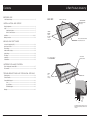
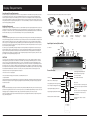
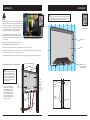
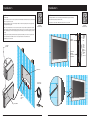
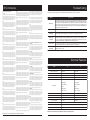
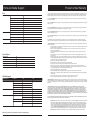
H Y- 1 9 . 5 & H Y- 2 7. 5
USER M ANUAL
Hydra
™
I N D O O R W AT E R P R O O F T E L E V I S I O N
w w w. s eur a .c o m
Before Installation
Thank you for selecting a Séura Hydra Waterproof Television.
This product has been inspected and packaged carefully before shipment.
Please read this guide before beginning installation.
WARNING: READ ALL INSTRUCTIONS AND REVIEW ALL DRAWING SHEETS
BEFORE ATTEMPTING TO INSTALL OR SERVICE THIS PRODUCT.
When installing and during use of this product, basic safety precautions should always be followed to reduce the risk of fire, electric shock and/or
injury to persons including the following:
Please keep this manual for future reference.
Information in this manual is subject to change without prior notice.
FCC Information
This equipment has been tested and found to comply with limits for a class B digital device, pursuant to Part 15 of the FCC Rules. These limits
are designed to provide reasonable protection against harmful interference in a residential installation.
This equipment generates, uses, and radiates radio frequency energy and, if not installed and used in accordance with the instructions, may
cause harmful interference to radio communications.
There is no guarantee that interference will not occur in a particular installation. If this equipment causes unacceptable interference to
radio and television reception, which can be determined by turning the equipment off and on, the user is encouraged to try to correct the
interference by one or more of the following measures.
• Reorient or relocate the receiving antenna.
• Increase the separation between the equipment and receiver.
• Connect the equipment into an outlet on a circuit different from that to which the receiver is connected.
Consult the dealer or an experienced Radio/TV technician for additional help.
• Inspect the desired location for installation and be aware of all electrical wiring pathways, water pipes, gas lines, or other potentially hazardous
conditions that may exist to protect from accidental damage during creation of on-site conditions.
• Ensure all required electrical specifications are adhered to and have been installed by the appropriate individuals and are code approved.
• Ensure all framing requirements, if needed, have been completed to building code and pose no structural issues.
• It is REQUIRED that this product is plugged into an electrical outlet protected by a Ground Fault Circuit Interrupter (GFCI) to protect against
electric shock, fire, and/or injury. Failure to do so will void any warranty for this product.
• Only qualified individuals should attempt to service the product. Removing covers can expose you to high voltage and other dangerous
conditions.
• To protect against electric shock, do not immerse the power cord, power plug, or product in water or other liquid.
• Do not overload AC outlets or extension cords. Overloading can cause fire or electric shock.
• Close adult supervision is necessary when any product is used by or near children.
• Do not operate any product with a damaged cord or plug or operate it after the appliance malfunctions or has been damaged in any manner.
• Do not let the power cord come in contact with hot surfaces.
WARNINGS
To reduce the risk of fire, electrical shock and other injuries, keep these safety precautions in mind when
installing, using, and maintaining your Television. The socket-outlet should be installed near the equipment
and be easily accessible. The TV should be connected to a grounded GFCI protected main socket outlet.
WARNING: If you manipulate against the recommended usage, serious injury or death to user may result.
To protect against electric shock, do not immerse the power cord, power
plug, or product in water or other liquid.
Do not use or place any combustible or flammable substances near the
product.
Do not overload AC outlets or extension cords. Overloading can cause
fire or electric shock.
To electrically disconnect the product, turn OFF the product, then remove
the electrical power plug from the outlet.
Close adult supervision is necessary when any product is used by or near
children.
Do not place heavy articles on or step on the product.
Do not operate any product with a damaged cord or plug or operate it
after the appliance malfunctions or has been damaged in any manner.
Do not use the product close to any heat sources such as radiators, heat
registers, stoves, or other products that produce heat.
Do not let the power cord come in contact with hot surfaces.
• To electrically disconnect the product, turn OFF the product, then remove the electrical power plug from the outlet.
• Do not use this product for other than intended use.
• This Séura product is only intended for use indoors.
• Retain this manual in a safe place for future reference.
Do not place the product on an unstable cart, stand, tripod or table.
Do not use this product for other than intended use.
This Séura product is only intended for use indoors.
For added safety during a lighting storm, or when this product is left
unattended and unused for long periods of time, unplug it from the wall
outlet and disconnect the antenna.
If you notice any smoke or scorched smell near the product, unplug
power cord and refer to qualified personnel for service and/or repair.
Specifications of this product are subject to unannounced changes; this manual may thus not reflect the current technical status.
2
3
Contents
BEFORE USE
2-Part Product Anatomy............................................................................................................... 5
2-Part Product Anatomy
BACK BOX
GRAVITY LOCK MOUNTS
FRAMING MEMBER
SCREW-MOUNTING
SLOTS (4)
INSTALLATION AND SETUP
Display Requirements................................................................................................................... 6
Setup............................................................................................................................................ 7
Input/Output Overview....................................................................................................... 7
Remote Control Functions.................................................................................................. 7
Installation................................................................................................................................8-11
Making Connections................................................................................................................... 12
FRAMING
MEMBER
SCREWMOUNTING
SLOTS (4,
2 PER SIDE)
INPUT/OUTPUT/LOW VOLTAGE
PASS-THROUGH PORT
MENUS AND SETTINGS
On Screen Display Menu (OSD).................................................................................................. 13
Input Source Selection................................................................................................................ 13
Video Settings............................................................................................................................. 13
Advanced Video Settings............................................................................................................ 14
Audio Settings............................................................................................................................. 14
TV Settings.................................................................................................................................. 15
Setup Menu................................................................................................................................. 15
Parental Menu............................................................................................................................. 16
LOW VOLTAGE
POWER LOCATION
TV ASSEMBLY
INTEGRATION AND CONTROL
RS-232 Settings and Command Table....................................................................................... 17
IR Commands............................................................................................................................. 18
TROUBLESHOOTING AND TECHNICAL DETAILS
Troubleshooting........................................................................................................................... 19
Technical Features...................................................................................................................... 19
Ports and Media Support............................................................................................................ 20
Ports................................................................................................................................. 20
Special Features............................................................................................................... 20
USB Media Support.......................................................................................................... 20
Warranty...................................................................................................................................... 21
GRAVITY
LOCK
GUIDE
SLOTS (4)
GLASS FACE
ON-UNIT CONTROL BUTTONS
INPUTS/OUTPUTS
Volume
Menu Channel
Up
Up Volume
Input
Channel
Down
Down
Power
Note: Buttons are labeled on product. 19" shown.
Buttons are located on the side of the unit on the
27" model.
4
5
Display Requirements
Operation and Storage Requirements
The ambient temperature for operating the device is between 41 to 122 degrees Fahrenheit. Do not install the device in the proximity of heat sources,
such as heating pipes, heaters, furnaces or other devices that radiate heat. Mount the device in such a way that it is protected against moisture.
Trouble free operation is ensured up to 75% air humidity. To prevent fire or electric shock, never allow liquids to enter the unit. The product must be
stored in dry and well-ventilated rooms, without extreme temperature fluctuations. Heat sources and aggressive active substances may not be stored
in the proximity of the device. The required storage temperature is 32° F - 140° F at an air humidity of 5 - 85% RH non-condensing. The device must be
stored in the complete packaging, as delivered.
Setup
Before using the device please check the following contents of the box for completeness:
2010 Remote Redesign
Final
www.seura.com
1.800.95.SEURA
PH. 920.857.9069
FAX 920.857.9490
cc
guide
Reseller
Have this product installed by qualified personnel only. Use the mounting systems which are specified or recommended by Séura. Install the product
in a way that it is fixed properly and take care that children are not exposed to danger. Please take extra care during installation, avoid impacts. Before
cabling your monitor, check that the power is off. To avoid any possibility of electric shock, always connect your equipment to properly grounded
outlets. Use of power cords or adapters other than those provided may cause fire or malfunction. Place this product as close to the power socket as
possible. Leave enough space to insert and remove the power plug on demand. Even if you switch off the product with your remote control, power is
not cut off unless the power cord is unplugged.
The device may only be operated with the provided power adapter. The rated voltage is indicated on the product label. The device is factory-set to
the optimal operating voltage (see Technical Specification). Use only power cords and plugs that are suitable for your local electrical outlets. Install
the power cords in such a way that it does not obstruct anyone. Ensure furthermore that the cable is not clamped and that it cannot be pulled out
accidentally from the power adapter. Do not install the power cords in the proximity of heating elements and never place heavy items on the cable or
power adapter. Do not modify or arbitrarily repair the power cords.
Revised Date
6 JAN 2012
BOTTOM VIEW
sleep
Back Box
Avoid direct light or sun exposure, direct proximity to heat sources, outdoor installation. The product is specifically designed for indoor use only. There
is the danger of fire and of electric shock and damage to the device if it is operated outdoors. Do not place any heat sources such as radiators and
heat registers, etc. near the monitor. To reduce eye strain, avoid installing the Séura Television against a bright background such as a window. Position
the monitor at the height of your eye level. Position the monitor directly in front of you at a comfortable viewing distance.
Installation
Date Created
15 MAR 2011
19" GLASS
DIMENSION
1314" GLASS
ok
DIMENSION
19" SCREEN
LOCATION
zoom
Installation Environment
Sales Order / Inv. Number
Item and Description
S-R-1913-19.5-HY.5
19"(W) x 13-1/4"(H) Standard Hydra Waterproof Television with a 19" LCD and Glass Color Choice
last
mute
978" SCREEN
3316" TOTAL
DIMENSION
UNIT DEPTH
(1)
CREATE ROUGH OPENING
50' Low-Voltage
Power Cable
Low-Voltage Power
Adapter and Cable
input
display
menu
A
3
16"
DIMENSION
exit
1314"
1278"
GLASS
DIMENSION
SIGNATURE:
MOUNT BACK BOX
TIGHT TO THE FINISHED
WALL SURFACE
(2)
INSTALL BACK BOX
INTO ROUGH OPENING
19"
GLASS
DIMENSION
151516" SCREEN
ROUGH
OPENING
DATE:
Hydra 19-inch
High-Definition
NOTE: PLEASE SIGN AND DATE THIS PAGE BEFORE RETURNING
TO SEURA.
ONLY THISLCD
PAGE NEEDS TO BE
DIMENSIONS ARE IN INCHES
PROPRIETARY AND CONFIDENTIAL
THE INFORMATION CONTAINED IN
ScreenTO
Size
(Diagonal):
19-inch
SHEET 1
RETURNED. BY RETURNING THIS SHEET, YOU ARE AGREEING
ALL
DIMENSIONS
SHOWN ON ALL DRAWING
TOLERANCES
THIS DOCUMENT IS THE SOLE
16:9 WITHOUT AN AUTHORIZED SIGNATURE.
SHEETS. FOR CUSTOM UNITS, WE WILL NOT START THEFormat:
BUILD PROCESS
FRACTIONAL 1/8 [3mm]
PROPERTY OF3THE MANUFACTURER. SIGNATURE
450
cd/m2ON THE ORIGINAL DRAWINGS.
ANGULAR: MACH 1.0
ANY REPRODUCTION
FOR DRAWINGS THAT REQUIRE REVISIONS: SEND THE Brightness:
REVISIONS TO
SEURA
16" IN PART, OR AS AND DATE
ANGULAR: BEND 1.0
A WHOLE, WITHOUT THE WRITTEN
170° Horizontal/Vertical
DO NOT SIGN UNTIL ALL REQUIRED DIMENSIONS ARE Viewing
VERIFIEDAngle:
AND ACCEPTED.
TWO PLACE DECIMAL .03 [.8mm] PERMISSION OF MANUFACTURER, IS REQUIRED
Contrast:
4000:1
1812"
THREE PLACE DECIMAL .015 [.4mm] PROHIBITED.
AFTER THE DRAWINGS ARE UPDATED, A REVISED DRAWING
PACKAGE
WILL BE RE-SENT FOR SIGNATURE.
1
1
BRING ALL A/V AND
Response Time: 6ms
MOUNTING LOCATION
Audio:
ROUGH
4"
4"
A
ELECTRICAL CONNECTIONS
SHOWING SUPPLIED HARDWARE
Native Resolution: 1920 x 1080
(No OPENING
Internal Speakers)
UP INTO THE BOTTOM OF
Backlight: LED
Amplified Output for External Speakers: 2 X 5W THE BACK BOX'S OPENING
FROM INSIDE THE WALL
Menu Languages: English, French, Spanish
Amplified Output: Terminal Block
CAVITY PRIOR TO
(4)
Tuner:
Constant Line Output: 3.5mm Jack X 2
INSTALLING LCD UNIT.
FINAL INSTALLATION
ATV: NTSC
Control:
Digital: ATSC/QAM
RS232 9-pin DB9
(3)Female X 1
Video:
WITH THE SEALANT AROUND THE GLASS,
IR IN:
3.5mm
Jack X 1
VERIFY
FUNCTIONALITY
INSERT THE LCD ASSEMBLY INTO THE
75 Ohm Coaxial Antenna X 1
IR OUT: 3.5mm&Jack X 4
BACK BOX MOUNTING THAT HAS BEEN
Composite Video, Audio L, Audio R (RCA plugs) X 1
Power:APPLY SEALANT
ALREADY INSTALLED. SLOWLY COMPRESS
DIMENSIONS ARE IN INCHES
PROPRIETARY AND CONFIDENTIAL
Component YPbPr (RCA plugs) X 1
Input: 110-240 VAC, 50-60Hz, 1.5A
THE ADHESIVE UNTIL THE BACK
OF THE GLASS
THE INFORMATION
CONTAINED IN
S-Video Mini 4-pin DIN X 1
IS TIGHT AGAINST THIS
THE DOCUMENT
WALL SURFACE.
NEMA
Plug
TOLERANCES
IS THE SOLE
AFTER VERIFYING THEType
A/V A
AND
ELECTRICAL
VERIFY THAT
SEALANT ISPROPERTY
SURROUNDING
THE
SHEET
FRACTIONAL
1/8 [3mm]
OF THE MANUFACTURER.
VGA 15-pin D-sub Male X 1 CONNECTIONS APPLY A LIBERAL
Requires
GFCIAMOUNT
Protected Outlet
ENOUGH
ENTIRE
OF
GLASS FACE.
ANGULAR:
MACHPERIMETER
1.0
ANYTHE
REPRODUCTION
IN PART, OR AS
HDMI Type A X 2
TO SURROUND THE OUTER LIP OF GLASS THAT
2
ANGULAR: BEND 1.0
A WHOLE, WITHOUT THE WRITTEN
Item METAL HOUSING NOTING
Sales Order / Inv. Number Date Created
Revised Date
SURROUNDS THE BLACK
USB Type A X 1
TWO PLACE DECIMAL .03 [.8mm] PERMISSION OF MANUFACTURER, IS
THE
MANUFACTURES DESIGNED USAGE.
S-R-1913-19.5-HY.5
15 MAR 2011 6 JAN 2012 THREE PLACE DECIMAL .015 [.4mm] PROHIBITED.
channel
SECTION A-A
volume
SEALANT BEFORE
UNIT IS ENGAGED
enter
SEALANT AFTER
UNIT IS ENGAGED
PULL OUT EXTRA LENGTH OF EACH OF THE A/V
AND POWER CABLES, ATTACH THEM AND TEST THE
UNIT FOR FULL FUNCTIONALITY PRIOR TO ADDING
SEALANT TO THE BACK OF THE GLASS
Item
S-R-1913-19.5-HY.5
Sales Order / Inv. Number
Date Created
15 MAR 2011
Revised Date
6 JAN 2012
DIMENSIONS ARE IN INCHES
PROPRIETARY AND CONFIDENTIAL
THE INFORMATION CONTAINED IN
TOLERANCES
THIS DOCUMENT IS THE SOLE
FRACTIONAL 1/8 [3mm]
PROPERTY OF THE MANUFACTURER.
ANGULAR: MACH 1.0
ANY REPRODUCTION IN PART, OR AS
ANGULAR: BEND 1.0
A WHOLE, WITHOUT THE WRITTEN
TWO PLACE DECIMAL .03 [.8mm] PERMISSION OF MANUFACTURER, IS
THREE PLACE DECIMAL .015 [.4mm] PROHIBITED.
SHEET
3
waterproof
TV Assembly
YPbPr
Adaper
Composite
Adapter
RS-232
Adapter
Waterproof
IR Remote
Control
Manual and Custom
Drawing Package
Mounting
Hardware
Input/Output Overview (Bottom View)
19" TV Shown
RF Coaxial
Antenna
Audio
Line
Out
RS232
Input
Speaker Out
S-Video
Composite
VGA
Input
HDMI 2
Input
PC
Audio In
YPbPr
IR Input
HDMI 1
Input
Audio Line
Out
USB
IR Output
Power Adapter
Input
CAUTION
Do not use any power cords or adapters other than those provided with this product! Use of power cords or adapters other than those provided
with this product may cause fire, electric shock or malfunction. If several kinds of power cords are provided with this product, use the one that fits
your power socket. Do not let the adapter hang down while using. Do not cover or wrap the adapter. Leave space around the adapter to prevent
overheating. The individual components can be destroyed, if the polarity is reversed or an incorrect connection is used. A goodwill replacement is not
possible in such cases, since each device is submitted to meticulous quality inspections prior to shipping. The connecting plugs must be attached in
such a way that the connector is held firmly. Have trained technical personnel install the electrical facilities necessary for mounting. The power adapter
must be installed in ventilated areas due to heat emission. Connect the power cord to a grounded outlet. Never cut or damage the power cord.
Please disconnect the device from the power adapter in the following cases:
TV Assembly
TV Back Box
2010 Remote Redesign
Final
Remote Functions
“Guide” displays available EPG (Electronic
Program Guide) when using tuner input
1. The device is out of use for a lengthy period.
2. The device malfunctions or displays other unusual features, necessitating maintenance work.
“CC” turns on/off subtitles
3. During a thunderstorm.
Power On / Off
Please plan the positioning of the power adapter and the source cables before proceeding with the structural measures and positioning of the Séura
Television. Observe the protection zones when placing the power adapter! Please bear in mind that the power adapter has to be placed beyond the
inset due to heat emission.
“Mute” turns on or off all audio output
mute
“Sleep” designates power off after a specified time
sleep
NOTE
“Zoom” configures ratio and appearance of picture
zoom
“Input” designates displaying content source
input
The power cable should be adequately secured to prevent it from becoming unstable and/or falling. Make sure the power source circuits are properly
grounded. Use the supplied power cord in order to connect it to the power source. If your installation requires a different power cord, be sure to use an
officially approved power cord displaying the mark of the safety agency that defines the regulations for power cords in your country.
Ensure that your installation complies with your national and local safety rules. Any servicing, adjustment, maintenance or repair must be performed
only by service-trained personnel.
Glass Face
BOTTOM VIEW
guide
cc
last
“Last” recalls last channel viewed
Menu Controls
ok
Press “Menu” to launch On Screen Display menu
display
menu
exit
Use arrows and “Ok” to navigate menu and make
selections
Press “exit” to close the On Screen Display menu
“Display” displays input and resolution information
channel
Numerical selection for channels and settings
volume
enter
Use Channel arrows to increase or decrease
channel selection
Use Volume arrows to increase or decrease
volume level
waterproof
6
7
Installation
Installation
Step 2
While keeping cord ends outside the back box pass-through port, finish the wall
tight to the edges of back box, removing any gap. Once complete, the final wall
surface should be flush with the front edge of the back box as shown.
NOTE:
All Séura drawing packages indicate generalized nominal residential wood
framing construction, and are not indicative of any particular building code.
It is the installers responsibility that all electrical, audio/visual, and framing
construction are code compliant to the municipality in which the product is
being installed. Modifications made to Séura recommendations are at the
sole discretion of the installer and release Séura of all liability.
Inspect the desired location for installation and be aware of all electrical
wiring pathways, water pipes, gas lines, or other potentially hazardous
conditions that may exist to protect from accidental damage during creation
of on-site conditions.
Scan to watch
the 2-minute
installation video
Scan to watch the 2-minute installation video
FINISHED WALL
Ensure all required electrical specifications are adhered to and have been
installed by the appropriate individuals and are code approved.
BACK BOX
Ensure all framing requirements, if needed have been completed to building code and pose no structural issues.
It is REQUIRED that this product is plugged into an electrical outlet protected by a Ground Fault Circuit Interrupter (GFCI) to protect against electric
shock, fire, and/or injury. Failure to do so will void any warranty for this product.
Only qualified individuals should attempt to service the product. Removing covers can expose you to high voltage and other dangerous conditions.
Read all installation instructions before beginning installation.
VERTICAL FRAMING MEMBERS
MAINTAIN CORDS IN
PASS-THROUGH PORT
DURING WALL FINISHING
BACK BOX
Step 1
Install back box to framing members using the
provided four screws and washers through
screw-mounting slots in back box. Ensure that
the front of the box is flush with finished wall
and mounting tabs will rest on finished wall
surface. Feed power and other desired cords
through pass-through port.
Note: Do not overtighten mounting
hardware. Back box should fit snuggly
between framing members. If the fit is
poor, and overtightening occurs, the
back box may deform, resulting in a
poorly sealed installation. If the back
box doesn’t fit well between framing
members, shim the framing members
for a square and stable fit.
SCREW
INTO
FRAMING
MEMBERS
USING
SCREWMOUNTING
SLOTS (4)
PASSTHROUGH
PORT
WALL BOARD
FRAMING
MEMBER
SCREW
MOUNTING
SLOTS
LOWVOLTAGE
POWER
FINISHED
WALL
BACK BOX
AUDIO
VIDEO
8
9
Installation
Installation
Step 3
Step 4
Install TV Assembly:
Allow waterproof sealant 24 hours to cure at 72 degrees Fahrenheit before exposing to moisture. (or
recommended time designated by sealant instructions)
A) Place TV assembly face down on a clean, dry surface near the installed back box. Make all necessary connections and
ensure LCD operation is successful.
B) Before applying adhesive, “dry fit” the TV assembly in back box. Notice that the gravity lock mounts engage. Ensure
functionality in installed position.
C) Remove TV assembly from back box. Do not disconnect any wires. Clean any residue from glass and remove debris.
Once fully cured, use a razor blade or utility knife to carefully remove excess sealant.
Scan to watch
the 2-minute
installation video
Scan to watch
the 2-minute
installation video
D) Generously apply 1/8" bead of supplied waterproof sealant to glass face as close to the edge as possible. Affix to wall
surface, ensuring gravity lock mounts are fully engaged. Sealant should seep out the front on all edges to provide the
best seal.
E) Immediately after TV assembly is installed and sealed, again verify functionality of LCD and remote. If operation has
been compromised by the installation, corrections can easily be made before the sealant has cured.
FINISHED WALL
F) Wipe dripping or excessive sealant.
FRAMING
MEMBER
1/8" BEAD
SEALANT
COMPLETELY
INSTALLED
BACK BOX AND
TV ASSEMBLY
SEALANT
CREATES
WATERTIGHT
SEAL
NOTE:
GLASS
FACEPLATE
SEALS
DIRECTLY
TO
FINISHED
WALL
SURFACE
2) BACK BOX
LOW VOLTAGE
POWER CABLE
PASSTHROUGH
PORT
1) TV ASSEMBLY
10
11
Making Connections
cc
guide
last
2010 Remote Redesign
Final
2010 Remote Redesign
Final
2010 Remote
2010Redesign
Remote Redesign
Final
Final
2010 Remote
2010Redesign
Remote Redesign
2010 Remote Redesign
Final
Final
Final
On Screen Display Menu (OSD)
2010 Remote Redesign
Final
mute
2010 Remote Redesign
cc
last
Final
guide
On Screen Display Menu (OSD)
sleep
ok
cc
guide
last
cc
cc
In the on screen display menu (OSD)
you
can adapt the characteristics of your display based on personal preferences.
OSD menus include Video,
Audio,
TV, Setup, and Parental.
cc
cc
guide
zoom
guide
cc
guide
last
1. Press
input
display
mute
guide
mute
mute
sleep
guide
sleep
sleep
3. Change settings with
ok
channel
sleep
ok
muteok
last
zoom
zoom
input
input
display
zoom
menu
menu
input guide display
input cc
volume
to exit the
exit
zoom
input
display
cc
guide
channel
sleep
channel
menu channel
exit
last
exit
channel
2010 Remote Redesign
channel
ok
channel
cc
guide
volume
volume
last
enter
In the ccInput Source menu, you may select from the available input sources.
guide
mute last
zoom
1. Press
mute
R+
guide
2. Press
sleep
ok
display
menu
exit
enter
volume
enter
enter sleep
volume
ok
until the desired Input Source is highlighted.
cc
volume
zoom
last
4. P
ress
to confirm selection of the chosen input and clear the Input Source
list from the screen or press
again to switch through the signal inputs.
sleep
ok
sleep
ok
input
channel
enter
display
menu
exit
mute
input
zoom
input
volume
enter
zoom
ok
enter
to display the Input Source list
guide
zoom
volume
last
sleep
volume
input
a t e r p r o o for
3. w
Press
mute
volume
channel
mute
last
enter
mute
Speaker
Wire Input
enter
to power the Television on
cc
cc
guide
5. Press
zoom
display
menu
ok
input
display
menu
exit
input
display
menu
exit
zoom
waterproof
channel
menu
exit
waterproof
wchannel
avolume
t e rw
p ar ot eo rf p r o o f
channel
w a t eenter
rw
p ar ot eo rf p r o o f
waterproof
channel
display
menu
channel
input
Connect an external USB media source to the USB socket to display photos, play
music or install a software update.
display
to close
w a t e rthe
p r oInput
o f Source list without selecting an alternative source.
exit
sleep
In order to have access to the USB port after installation we recommend installing a
USB extension cable.
exit
2010
RemoteexitRedesign
exit
menu
2010
Remote
Redesign
input
display
menu
channel
OSD
Finalmenu.
Final
Input Source SelectionFinal
R +
L+ -
2010 Remote Redesign
Final
ok
channel
Euroblock Connector
Connecting a USB Media Source
ok
display
menu
2010 Remote
Redesignexit
Final
input
menu
displaylast
enter
-
last
ok
input
menu
2010 display
Remote
Redesignexit
input
6. Press
exit
mute
L+ -
zoom
zoom
menu
display
5. Confirm selection with
Final
display
ok
sleep
mute
4. Go back one step with
sleep
Note: Hydra is not equipped with built-in
speakers.
ok
Final
ok
2. Navigate within the OSD with
cc
sleep
zoom
-
cc
guide
sleep
mute
exit
sleep
zoom
Two passive loudspeakers can be connected to the
speaker output socket with speaker cables. Observe
the polarity (+ and -) of the connections to avoid
phase errors (= incorrect stereo playback).
last
last
zoom
The Television features one Component, one Composite, one VGA, and two HDMI
inputs. We recommend using the HDMI inputs for best video and sound quality.
Connecting Audio
last
2010 Remote Redesign
on your remote control to
open the OSD menu.
menu
mute
Connecting Video
guide mute last
mute
exit
volume
waterproof
volume
enter
enter
volume
Video Settings
enter
channel
volume
volume
The Video Settings menu offers options to enhance and refine the image
characteristics
Television. These settings are based on ambient
w aoft eyour
r p r oSéura
of
conditions of illumination and personal preferences.
enter
enter
volume
Adjustment options include:
enter
waterproof
Picture Mode
Connecting a Home Automation System
With the RS-232 interface (9 pin d-subminiature connector female) you can connect
a serial cable for communication with a home automation system, PC, etc. The baud
rate is 115200.
waterproof
w aBrightness
terproof
Contrast
waterproof
waterproof
Saturation
Hue
waterproof
Sharpness
Back Light
Advanced Video
Reset Picture Mode
PICTURE MODE
Connecting an external IR-transmitter and Receiver
With the IR input interface, you can connect an external IR receiver to the Séura
Television. With the (4) IR output terminals, you can loop through the IR signal from
the remote control to an external device with a corresponding IR input or via an IR
emitter diode affixed in front of the IR receiver eye.
12
Within the Picture Mode menu you can customize the image display according to your preferences.
Your options: Home, Vivid, User, Cinema, Sport
The Home setting is recommended for most viewing environments. Select the User Mode to adjust your preferred settings manually.
13
OSD (cont.)
Advanced Video Settings
The Advanced Video Settings menu offers further options to refine the image
characteristics of your Séura Television.
Adjustment options include:
DNR
MPEG NR
Adaptive Luma Control
Flesh Tone
OSD (cont.)
TV Settings
The TV Settings menu offers options to set up and adjust preferences using the
built-in television tuner.
Adjustment options include:
Tuner Mode
Channel Scan
Channel Skip
DI Film Mode
Blue Stretch
Game Mode
Blue Mute
Gamma
TUNER MODE
Color Temperature
Select the option for obtaining television programming: Cable, Antenna
CHANNEL SCAN
COLOR TEMPERATURE
Within the Color Temperature menu you can customize the Color
Temperature of the picture according to your preferences.
Select Channel Scan to begin automatic scanning of channels. This process takes a few minutes and depends on program availability.
CHANNEL SKIP
Designate preferences for skipping channels.
Your options: Standard, Warm, User, Cool
Setup Menu
The Setup Menu offers options to determine fundamental settings of your
Séura Television based on personal preferences.
Adjustment options include:
OSD Language
Audio Settings
Caption
The Audio Settings menu offers options to enhance and refine the sound
characteristics of your Séura Television based on personal preferences.
Reset Default
Time Setup
Adjustment options include:
Balance
Bass
Treble
Sound Surround
Sound Mode
MTS
Audio Language
SPDIF Type
TIME SETUP
Options within the Time Setup selection include Time Zone, Time, and
Sleep Timer.
2010 Remote Redesign
Final
TIME ZONE
The local time zone may be selected using the graphical map of North
America
SLEEP TIMER
cc
Within the Sleep Timer menu you can determine a timespan after which
the Séura Television will turn off automatically.
guide
last
mute
Your options: Off, 10, 20, 30, 40, 50, 60, 90, 120 minutes
sleep
The Sleep Timer can also be activated and deactivated directly with
the remote control.
ok
zoom
input
14
display
menu
exit
channel
15
OSD (cont.)
Parental Menu
The Parental Menu offers options to restrict program viewing based on
various national rating systems.
To access the menu, enter the 4-digit Password using the keypad on the
remote. The factory default password is “0000”.
Adjustment options include:
Program Block
Change Password
Clean All (or reset settings)
RS-232 Control
Settings Table
Current Models: 19.5 Hydra, 27.5 Hydra, 10.5 TV Mirror, 19.5 TV Mirror, 27.5 TV Mirror
Legacy Model: 10.3 TV Mirror, 19.4 Hydra, 10.4 TV Mirror, 19.4 TV Mirror
Baud Rate
115200 bps
Data Length
8 bits
Parity Bit
None
Stop Bit
1 bit
Flow Control
None
Command Table
1
2
3
4
5
6
7
8
P
O
W
R
0
Power Off (sends TV into Standby)
P
O
W
R
1
Power On
R
S
P
W
0
obsolete
R
S
P
W
1
obsolete
I
T
G
D
X
toggle the input source
I
T
V
D
0
set the input source to TV, channel is set to the last channel tuned
I
A
V
D
1
sets the input source to AV (composite video)
I
A
V
D
2
sets the input source to S-Video
I
A
V
D
3
sets the input source to Component Video
I
A
V
D
4
sets the input source to VGA (PC Input)
I
A
V
D
5
sets the input source to HDMI 1
I
A
V
D
6
sets the input source to HDMI 2
I
A
V
D
7
sets the input source to USB
V
O
L
M
Power
Input
Volume
sets the volume level
*shaded characters may be any number from 0 to 99
Zoom
W
I
D
E
1
toggles the view mode
W
I
D
E
2
sets the view mode to side bar (AV input with 4:3 signal)
W
I
D
E
3
sets the view mode to zoom (AV input with 4:3 signal)
W
I
D
E
4
sets the view mode to stretch (AV input with 4:3 signal)
W
I
D
E
5
sets the view mode to normal (PC input)
W
I
D
E
6
sets the view mode to zoom (PC input)
W
I
D
E
7
sets the view mode to stretch (PC input)
W
I
D
E
8
sets the view mode to dot-by-dot
W
I
D
E
9
sets the view mode to full screen
M
U
T
E
1
mutes the audio
M
U
T
E
2
turns off mute
O
F
T
M
0
disables the sleep timer
O
F
T
M
1
TV turns off in 30 minutes
O
F
T
M
2
TV turns off in 60 minutes
O
F
T
M
3
TV turns off in 90 minutes
O
F
T
M
4
TV turns off in 120 minutes
D
A
2
P
D
C
2
U
C
H
U
P
X
channel up
C
H
D
W
X
channel down
Mute
Sleep Timer
Channel
16
sets ATSC tuner to a specific over the air channel, XX-YY or XX.YY is entered as XXYY
sets cable tuner to a channel
17
IR Commands
Remote Hexadecimal Codes
Power Toggle
0000 006B 0000 0020 000A 0047 000A 001F 000A 001F 000A 001F 000A 001F
000A 001F 000A 0047 000A 0047 000A 001F 000A 0047 000A 001F 000A 001F
000A 001F 000A 0047 000A 001F 000A 0718 000A 0047 000A 001F 000A 001F
000A 001F 000A 001F 000A 0047 000A 001F 000A 001F 000A 0047 000A 001F
000A 0047 000A 0047 000A 0047 000A 001F 000A 0047 000A 06A0
Menu
0000 006B 0000 0020 000A 0048 000A 001F 000A 001F 000A 001F 000A 001F
000A 001F 000A 001F 000A 001F 000A 001F 000A 001F 000A 0047 000A 001F
000A 001F 000A 0047 000A 001F 000A 0768 000A 0048 000A 001F 000A 001F
000A 001F 000A 001F 000A 0048 000A 0048 000A 0048 000A 0048 000A 0048
000A 001F 000A 0048 000A 0048 000A 001F 000A 0048 000A 0654
Source
0000 006B 0000 0020 000A 0047 000A 001F 000A 001F 000A 001F 000A 001F
000A 001F 000A 0047 000A 0047 000A 0047 000A 001F 000A 0047 000A 0047
000A 001F 000A 0047 000A 001F 000A 06C8 000A 0047 000A 001F 000A
001F 000A 001F 000A 001F 000A 0047 000A 001F 000A 001F 000A 001F
000A 0047 000A 001F 000A 001F 000A 0047 000A 001F 000A 0047 000A 06F2
Display
0000 006B 0000 0020 000A 0047 000A 001F 000A 001F 000A 001F 000A 001F
000A 0047 000A 0047 000A 001F 000A 0047 000A 0047 000A 001F 000A 001F
000A 001F 000A 0047 000A 001F 000A 06D4 000A 0047 000A 001F 000A
001F 000A 001F 000A 001F 000A 001F 000A 001F 000A 0047 000A 001F 000A
001F 000A 0047 000A 0047 000A 0047 000A 001F 000A 0047 000A 06C7
Exit
0000 006B 0000 0020 000A 0047 000A 001F 000A 001F 000A 001F 000A 001F
000A 0047 000A 0047 000A 001F 000A 001F 000A 0047 000A 0047 000A 0047
000A 0047 000A 0047 000A 001F 000A 0685 000A 0047 000A 001F 000A 001F
000A 001F 000A 001F 000A 001F 000A 001F 000A 0047 000A 0047 000A 001F
000A 001F 000A 001F 000A 001F 000A 001F 000A 0047 000A 071A
Up
0000 006B 0000 0020 000A 0047 000A 001F 000A 001F 000A 001F 000A 001F
000A 0047 000A 0047 000A 0047 000A 001F 000A 0047 000A 001F 000A 0047
000A 001F 000A 0047 000A 001F 000A 06C8 000A 0047 000A 001F 000A
001F 000A 001F 000A 001F 000A 001F 000A 001F 000A 001F 000A 0047
000A 001F 000A 0047 000A 001F 000A 0047 000A 001F 000A 0047 000A 06F6
Down
0000 006B 0000 0020 000A 0048 000A 001F 000A 001F 000A 001F 000A 001F
000A 001F 000A 001F 000A 001F 000A 0047 000A 0048 000A 001F 000A 0048
000A 001F 000A 0048 000A 001F 000A 0718 000A 0047 000A 001F 000A 001F
000A 001F 000A 001F 000A 0047 000A 0047 000A 0047 000A 001F 000A 001F
000A 0048 000A 001F 000A 0047 000A 001F 000A 0047 000A 06A4
Left
0000 006B 0000 0020 000A 0048 000A 001F 000A 001F 000A 001F 000A 001F
000A 001F 000A 001F 000A 001F 000A 0047 000A 0048 000A 001F 000A 0048
000A 001F 000A 0048 000A 001F 000A 0718 000A 0047 000A 001F 000A 001F
000A 001F 000A 001F 000A 0047 000A 0047 000A 0047 000A 001F 000A 001F
000A 0048 000A 001F 000A 0047 000A 001F 000A 0047 000A 06A4
Right
0000 006B 0000 0020 000A 0047 000A 001F 000A 001F 000A 001F 000A 001F
000A 001F 000A 0047 000A 0047 000A 001F 000A 0047 000A 0047 000A 0047
000A 0047 000A 0047 000A 001F 000A 06A0 000A 0047 000A 001F 000A
001F 000A 001F 000A 001F 000A 0047 000A 001F 000A 001F 000A 0047 000A
001F 000A 001F 000A 001F 000A 001F 000A 001F 000A 0047 000A 071B
Enter
0000 006B 0000 0020 000A 0047 000A 001F 000A 001F 000A 001F 000A 001F
000A 0047 000A 0048 000A 0047 000A 001F 000A 0048 000A 0048 000A 0047
000A 0048 000A 0048 000A 001F 000A 0678 000A 0048 000A 001F 000A 001F
000A 001F 000A 001F 000A 001F 000A 001F 000A 001F 000A 0048 000A 001F
000A 001F 000A 001F 000A 001F 000A 001F 000A 0047 000A 074E
Sleep
0000 006B 0000 0020 000A 0047 000A 001F 000A 001F 000A 001F 000A 001F
000A 001F 000A 0047 000A 001F 000A 0047 000A 0047 000A 001F 000A 001F
000A 001F 000A 0047 000A 001F 000A 06FC 000A 0047 000A 001F 000A
001F 000A 001F 000A 001F 000A 0047 000A 001F 000A 0047 000A 001F 000A
001F 000A 0047 000A 0047 000A 0047 000A 001F 000A 0047 000A 059B
Zoom
0000 006B 0000 0020 000A 0047 000A 001F 000A 001F 000A 001F 000A 001F
000A 001F 000A 001F 000A 001F 000A 001F 000A 001F 000A 0047 000A 001F
000A 0048 000A 0048 000A 001F 000A 0740 000A 0048 000A 001F 000A 001F
000A 001F 000A 001F 000A 0048 000A 0048 000A 0047 000A 0048 000A 0047
000A 001F 000A 0048 000A 001F 000A 001F 000A 0047 000A 068B
EPG
0000 006B 0000 0020 000A 0047 000A 001F 000A 001F 000A 001F 000A 001F
000A 0047 000A 0047 000A 0047 000A 0047 000A 001F 000A 0047 000A 001F
000A 001F 000A 0047 000A 001F 000A 06C8 000A 0047 000A 001F 000A
001F 000A 001F 000A 001F 000A 001F 000A 001F 000A 001F 000A 001F 000A
0047 000A 001F 000A 0047 000A 0047 000A 001F 000A 0047 000A 06EE
Troubleshooting
Mute
0000 006B 0000 0020 000A 0047 000A 001F 000A 001F 000A 001F 000A 001F
000A 0047 000A 0047 000A 0047 000A 001F 000A 0047 000A 001F 000A 001F
000A 001F 000A 0047 000A 001F 000A 06D4 000A 0047 000A 001F 000A
001F 000A 001F 000A 001F 000A 001F 000A 001F 000A 001F 000A 0047 000A
001F 000A 0047 000A 0047 000A 0047 000A 001F 000A 0047 000A 06C9
ch+
0000 006B 0000 0020 000A 0047 000A 001F 000A 001F 000A 001F 000A 001F
000A 0047 000A 001F 000A 001F 000A 001F 000A 0048 000A 001F 000A 001F
000A 001F 000A 0047 000A 001F 000A 0740 000A 0047 000A 001F 000A 001F
000A 001F 000A 001F 000A 001F 000A 0047 000A 0047 000A 0047 000A 001F
000A 0047 000A 0047 000A 0047 000A 001F 000A 0047 000A 067E
ch0000 006B 0000 0020 000A 0047 000A 001F 000A 001F 000A 001F 000A 001F
000A 001F 000A 0047 000A 001F 000A 001F 000A 0048 000A 001F 000A 001F
000A 001F 000A 0048 000A 001F 000A 0740 000A 0047 000A 001F 000A 001F
000A 001F 000A 001F 000A 0048 000A 001F 000A 0048 000A 0048 000A 001F
000A 0047 000A 0048 000A 0048 000A 001F 000A 0047 000A 0683
vol+
0000 006B 0000 0020 000A 0047 000A 001F 000A 001F 000A 001F 000A 001F
000A 001F 000A 001F 000A 0047 000A 001F 000A 0047 000A 001F 000A 001F
000A 001F 000A 0047 000A 001F 000A 0740 000A 0047 000A 001F 000A 001F
000A 001F 000A 001F 000A 0047 000A 0047 000A 001F 000A 0047 000A 001F
000A 0047 000A 0047 000A 0047 000A 001F 000A 0047 000A 067C
vol0000 006B 0000 0020 000A 0047 000A 001F 000A 001F 000A 001F 000A 001F
000A 0047 000A 001F 000A 0047 000A 001F 000A 0047 000A 001F 000A 001F
000A 001F 000A 0047 000A 001F 000A 0718 000A 0047 000A 001F 000A 001F
000A 001F 000A 001F 000A 001F 000A 0047 000A 001F 000A 0047 000A 001F
000A 0047 000A 0047 000A 0047 000A 001F 000A 0047 000A 06A8
1
0000 006C 0000 0020 000A 0047 000A 001F 000A 001F 000A 001F 000A 001F
000A 0047 000A 001F 000A 001F 000A 001F 000A 001F 000A 001F 000A 001F
000A 001F 000A 0047 000A 001F 000A 074A 000A 0047 000A 001F 000A
001F 000A 001F 000A 001F 000A 001F 000A 0047 000A 0047 000A 0047
000A 0047 000A 0047 000A 0047 000A 0047 000A 001F 000A 0047 000A 0652
2
0000 006B 0000 0020 000A 0047 000A 001F 000A 001F 000A 001F 000A 001F
000A 001F 000A 0047 000A 001F 000A 001F 000A 001F 000A 001F 000A 001F
000A 001F 000A 0047 000A 001F 000A 0768 000A 0047 000A 001F 000A 001F
000A 001F 000A 001F 000A 0047 000A 001F 000A 0047 000A 0047 000A 0047
000A 0047 000A 0047 000A 0047 000A 001F 000A 0047 000A 0651
3
0000 006B 0000 0020 000A 0047 000A 001F 000A 001F 000A 001F 000A 001F
000A 0047 000A 0047 000A 001F 000A 001F 000A 001F 000A 001F 000A 001F
000A 001F 000A 0047 000A 001F 000A 0723 000A 0047 000A 001F 000A 001F
000A 001F 000A 001F 000A 001F 000A 001F 000A 0047 000A 0047 000A 0047
000A 0047 000A 0047 000A 0047 000A 001F 000A 0047 000A 067D
4
0000 006B 0000 0020 000A 0047 000A 001F 000A 001F 000A 001F 000A 001F
000A 001F 000A 001F 000A 0047 000A 001F 000A 001F 000A 001F 000A 001F
000A 001F 000A 0047 000A 001F 000A 0768 000A 0047 000A 001F 000A 001F
000A 001F 000A 001F 000A 0047 000A 0047 000A 001F 000A 0047 000A 0047
000A 0047 000A 0047 000A 0047 000A 001F 000A 0047 000A 054F
5
0000 006B 0000 0020 000A 0047 000A 001F 000A 001F 000A 001F 000A 001F
000A 0047 000A 001F 000A 0047 000A 001F 000A 001F 000A 001F 000A 001F
000A 001F 000A 0047 000A 001F 000A 0740 000A 0047 000A 001F 000A 001F
000A 001F 000A 001F 000A 001F 000A 0047 000A 001F 000A 0047 000A 0047
000A 0047 000A 0047 000A 0047 000A 001F 000A 0047 000A 067E
6
0000 006B 0000 0020 000A 0047 000A 001F 000A 001F 000A 001F 000A 001F
000A 0047 000A 0047 000A 0047 000A 001F 000A 001F 000A 001F 000A 001F
000A 001F 000A 0047 000A 001F 000A 0718 000A 0047 000A 001F 000A 001F
000A 001F 000A 001F 000A 001F 000A 001F 000A 001F 000A 0047 000A 0047
000A 0047 000A 0047 000A 0047 000A 001F 000A 0047 000A 06A7
7
0000 006B 0000 0020 000A 0047 000A 001F 000A 001F 000A 001F 000A 001F
000A 0047 000A 0047 000A 0047 000A 001F 000A 001F 000A 001F 000A 001F
000A 001F 000A 0047 000A 001F 000A 0718 000A 0047 000A 001F 000A 001F
000A 001F 000A 001F 000A 001F 000A 001F 000A 001F 000A 0047 000A 0047
000A 0047 000A 0047 000A 0047 000A 001F 000A 0047 000A 06A6
8
0000 006B 0000 0020 000A 0047 000A 001F 000A 001F 000A 001F 000A 001F
000A 001F 000A 001F 000A 001F 000A 0047 000A 001F 000A 001F 000A 001F
000A 001F 000A 0047 000A 001F 000A 0768 000A 0047 000A 001F 000A 001F
000A 001F 000A 001F 000A 0047 000A 0048 000A 0047 000A 001F 000A 0047
000A 0047 000A 0048 000A 0047 000A 001F 000A 0048 000A 065B
9
0000 006B 0000 0020 000A 0047 000A 001F 000A 001F 000A 001F 000A 001F
Download these codes at http://www.seura.com/download-center
18
000A 0047 000A 001F 000A 001F 000A 0047 000A 001F 000A 001F 000A 001F
000A 001F 000A 0047 000A 001F 000A 0740 000A 0047 000A 001F 000A 001F
000A 001F 000A 001F 000A 001F 000A 0047 000A 0047 000A 001F 000A 0047
000A 0047 000A 0047 000A 0047 000A 001F 000A 0047 000A 067E
0
0000 006B 0000 0020 000A 0047 000A 001F 000A 001F 000A 001F 000A 001F
000A 001F 000A 0047 000A 001F 000A 0047 000A 001F 000A 001F 000A 001F
000A 001F 000A 0047 000A 001F 000A 0740 000A 0047 000A 001F 000A 001F
000A 001F 000A 001F 000A 0047 000A 001F 000A 0047 000A 001F 000A 0047
000A 0047 000A 0047 000A 0047 000A 001F 000A 0047 000A 0678
. (Dot)
0000 006C 0000
0047 000A 001E
000B 001E 000A
001E 000A 001E
000A 001F 000A
0045 000A 0696
0020 000A
000B 0046
001E 000B
000A 001E
001E 000A
0046 000A 001E 000B
000A 001E 000B 0046
0046 000B 001D 000B
000A 0046 000B 0046
001E 000A 0046 000A
001E 000A
000A 0046
06A5 000B
000A 001E
0046 000A
001E 000B
000A 0046
0046 000B
000B 0046
001E 000A
Enter
0000 006B 0000 0020 000A 0047 000A 001F 000A 001F 000A 001F 000A 001F
000A 0047 000A 0047 000A 001F 000A 0047 000A 001F 000A 001F 000A 001F
000A 001F 000A 0047 000A 001F 000A 06FC 000A 0047 000A 001F 000A
001F 000A 001F 000A 001F 000A 001F 000A 001F 000A 0047 000A 001F
000A 0047 000A 0047 000A 0047 000A 0047 000A 001F 000A 0047 000A 06A1
If the product is not working properly, please check the following troubleshooting hints before you contact customer service:
Symptoms
Possible Solution
Blank screen
Check the status LED. If the status LED is red, the Television is in standby and the monitor is black, this is normal. If the
status LED is green and the monitor is black, the Television might perform an input scan with no available signal. Please
check if an input source is available and that the port of the device has been connected correctly in the Service Settings/
Input Ports menu. Press “Menu” on your remote control: you should see the OSD menu. Check your settings for misconfigurations and adjust accordingly. Alternatively, perform a factory reset to restore the Television to its default settings. If
the problem still exists contact customer service.
Color defects
Check that the signal cable connector is properly connected and that the connection pins are not bent or damaged.
The image is
unsatisfactory
Adjust the picture characteristics as described in the above-mentioned section “Video Settings”. Image is not stable
Check that the display resolution and frequency from your media source is compatible with the Television.
Error message:
“No Signal”
Check that the connected media sources are switched on. Check that the signal cable connector is properly connected
and that the connection pins are not bent or damaged. Press “Menu” on your remote control: you should see the OSD
menu. Check your settings for misconfigurations and adjust accordingly. Alternatively, perform a factory reset to restore
the Television to its default settings. If the problem still exists contact customer service.
Low or no sound
Press “Volume Up” and/or “Volume Down” on your remote control and check the audio connection cable(s). Make sure
that the Volume Limit setting in the Service Settings menu has been set to an audible value.
Remote control
doesn’t work
Press a button on the remote control and check that the status LED of the Television flashes briefly. If it doesn´t, replace
the batteries of the remote control.
Discrete Remote Hexadecimal Codes
Power On(only)
0000 006d 0000 0020 000a 0047 000a 001e 000a 001e 000a 001e 000a 0047
000a 001e 000a 0047 000a 001e 000a 0047 000a 001e 000a 001e 000a 0047
000a 001e 000a 0047 000a 001e 000a 068b 000a 0047 000a 001e 000a 001e
000a 001e 000a 0047 000a 0047 000a 001e 000a 0047 000a 001e 000a 0047
000a 0047 000a 001e 000a 0047 000a 001e 000a 0047 000a 068b
Power Off(only)
0000 006d 0000 0020 000a 0047 000a 001e 000a 001e 000a 001e 000a 0047
000a 0047 000a 0047 000a 001e 000a 0047 000a 001e 000a 001e 000a 0047
000a 001e 000a 0047 000a 001e 000a 068b 000a 0047 000a 001e 000a 001e
000a 001e 000a 0047 000a 001e 000a 001e 000a 0047 000a 001e 000a 0047
000a 0047 000a 001e 000a 0047 000a 001e 000a 0047 000a 068b
NOTE: If the above troubleshooting hints do not help you to find a solution, please contact Séura.
Technical Features
AV (INPUT 1)
0000 006d 0000 0020 000a 0047 000a 001e 000a 001e 000a 001e 000a 001e
000a 001e 000a 0047 000a 001e 000a 001e 000a 0047 000a 0047 000a 001e
000a 001e 000a 0047 000a 001e 000a 068b 000a 0047 000a 001e 000a 001e
000a 001e 000a 001e 000a 0047 000a 001e 000a 0047 000a 0047 000a 001e
000a 001e 000a 0047 000a 0047 000a 001e 000a 0047 000a 068b
S-VIDEO (INPUT 2)
0000 006d 0000 0020 000a 0047 000a 001e 000a 001e 000a 001e 000a 001e
000a 0047 000a 0047 000a 001e 000a 001e 000a 0047 000a 0047 000a 001e
000a 001e 000a 0047 000a 001e 000a 068b 000a 0047 000a 001e 000a 001e
000a 001e 000a 001e 000a 001e 000a 001e 000a 0047 000a 0047 000a 001e
000a 001e 000a 0047 000a 0047 000a 001e 000a 0047 000a 068b
COMPONENT (INPUT 3)
0000 006d 0000 0020 000a 001e 000a 0047 000a 0047 000a 0047 000a 0047
000a 0047 000a 0047 000a 001e 000a 001e 000a 001e 000a 001e 000a 001e
000a 0047 000a 0047 000a 001e 000a 068b 000a 001e 000a 0047 000a 0047
000a 0047 000a 0047 000a 001e 000a 001e 000a 0047 000a 0047 000a 0047
000a 0047 000a 0047 000a 001e 000a 001e 000a 0047 000a 068b
VGA (INPUT 4)
0000 006d 0000 0020 000a 001e 000a 0047 000a 0047 000a 0047 000a 0047
000a 0047 000a 001e 000a 001e 000a 001e 000a 001e 000a 001e 000a 001e
000a 0047 000a 0047 000a 001e 000a 068b 000a 001e 000a 0047 000a 0047
000a 0047 000a 0047 000a 001e 000a 0047 000a 0047 000a 0047 000a 0047
000a 0047 000a 0047 000a 001e 000a 001e 000a 0047 000a 068b
HDMI (INPUT 5)
0000 006d 0000 0020 000a 0047 000a 001e 000a 001e 000a 001e 000a 001e
000a 0047 000a 0047 000a 001e 000a 001e 000a 0047 000a 001e 000a 0047
000a 0047 000a 0047 000a 001e 000a 068b 000a 0047 000a 001e 000a 001e
000a 001e 000a 001e 000a 001e 000a 001e 000a 0047 000a 0047 000a 001e
000a 0047 000a 001e 000a 001e 000a 001e 000a 0047 000a 068b
HDMI 2
0000 006d 0000 0020 000a 0047 000a 001e 000a 001e 000a 001e 000a 001e
000a 0047 000a 001e 000a 0047 000a 0047 000a 001e 000a 001e 000a 0047
000a 0047 000a 0047 000a 001e 000a 068b 000a 0047 000a 001e 000a 001e
000a 001e 000a 001e 000a 001e 000a 0047 000a 001e 000a 001e 000a 0047
000a 0047 000a 001e 000a 001e 000a 001e 000a 0047 000a 068b
ANT
0000 006d 0000 0020 000a 0047 000a 001e 000a 001e 000a 001e 000a 001e
000a 0047 000a 001e 000a 001e 000a 0047 000a 001e 000a 0047 000a 001e
000a 0047 000a 0047 000a 001e 000a 068b 000a 0047 000a 001e 000a 001e
000a 001e 000a 001e 000a 001e 000a 0047 000a 0047 000a 001e 000a 0047
000a 001e 000a 0047 000a 001e 000a 001e 000a 0047 000a 068b
Features
Display Backlight
Active Screen Area W x H
Diagonal
Picture Format
Physical Resolution
Viewing Angle
Brightness
Contrast
Response Time
Power Consumption
Operating Temperature
Humidity
Certification
19"
27"
TFT Thin Film Transistor | LED Backlight
21.54" x 18.23"
26.73" x 22.64"
19"
27.2"
16:10
16:9
1440 x 900
1920 x 1080
Horizontal
Horizontal
Typical (Total) 178°
Typical (Total) 176°
(Left: 89° / Right: 89°)
(Left: 88° / Right: 88°)
Vertical
Vertical
Typical (Total) 178°
Typical (Total) 176°
(Up: 89° / Down: 89°)
(Up: 88° / Down: 88°)
450 cd/m2
450 cd/m2
Typical 4000:1
Typical 5000:1
6.5ms
6ms
DC 19V
40W / .333A
DC 19V
50W / .417A
32° to 122° Fahrenheit
20 - 80% RH, Non-Condensing
CE, FCC
NOTE: Above specification may be changed without prior notification for quality improvement.
19
Ports and Media Support
Product Limited Warranty
Ports
Input Ports
Output Ports
Video
LINE Audio INPUT
1 x mini jack and adapter cable: RCA terminal, white, red, yellow
Component Input
1 x mini jack and adapter cable: RCA terminal, red, green, blue
HDMI™ Input
2 x HDMI™ terminal
USB
1 x USB terminal
RS232
1 x mini jack and adapter cable: D-SUB 9pin female
IR Input (Infrared)
1 x mini jack 3.5mm
S-Video
1 x 4-pin mini DIN
PC Audio In
1 x mini jack 3.5mm
Speaker Output
1 x Phoenix clip 4pin
IR Output
4 x mini jack 3.5mm
Audio Line Out
2 x mini jack 3.5mm
HDMI™
480i, 480p, 576i, 576p, 720p, 1080i, 1080p
Component (YPbPr / YCbCr)
480i, 480p, 576i, 576p, 720p, 1080i, 1080p
USB
Software Update
USB
Signal Scan
Yes
RS-232
Yes
Noise Reduction
3D
Séura warrants Storm Outdoor TVs with respect to Séura’s Labor for two (2) years; Glass, Structure, Frame, and Assembly for two (2) years; TV including remote and power
supply for one (1) year.
This Limited Warranty extends only to the original purchaser of a Product and only covers a Product purchased new. Séura reserves the right to require any warranty
claimant to produce the original purchase receipt or other original purchase date proof as may be reasonably required by Séura to verify the Product’s warranty eligibility.
1. Exceptions to Warranty: Séura does not warrant the Products against defects arising out of, related to, or caused by, whether totally or partially, and whether directly or
indirectly, any of the following:
A. Cleaning and maintenance of, or failing to properly clean and maintain, any Product, part or component of a Product, including, but not limited to, filters, front
bezel, and other Product areas or components;
B. A Product’s extended use, including particularly, commercial applications, where a Product is operating on average more than six (6) hours per day on a
permanent or extended periodic basis;
C. Circumstances, damage (including concealed damage) or other conditions occurring during shipment of a Product or at any time after a Product leaves
Séura’s facility;
D. Circumstances, damage or other conditions occurring during unpacking and/or removal of a Product from its original packaging, including the removal of
protective material;
E. Circumstances, damage or other conditions occurring during transport of the Product to or from Séura before or after authorized service. Products must be
packed properly using original packaging or Séura replacement or pre-authorized packaging. Customer assumes all risk, while in transit to or from Séura, and
shall be responsible for any costs incurred in transporting the Product.
F. Improper, incorrect, or insufficient AC supply voltage to a Product;
G. Alterations, modifications or changes to a Product without Séura’s prior written authorization;
H. The incorporation of a Product into or within a product of a third party, without Séura’s prior written authorization;
I. A Product’s misuse, neglect use, abuse, or improper operation, including the failure to follow a Product’s normal and ordinary operating instructions;
J. T
he effects of fire, flood, lightning, electrical surges, water and other liquid infiltration, smoke, and other substances not intended to come into contact with a
Product, including any such substances contact with a Product as the result of acts of God;
K. The improper or faulty installation, setup, or adjustment of a Product;
L. A Product’s repair, attempted repair, or total or partial disassembly by any party other than a Séura authorized service representative;
M. When the product occurs with pixel errors within the specified and permitted area. For more information about this, inquire directly with Seura regarding the
Seura Pixel Policy.
N. Corrosion that does not affect the performance of a Product or the reasonable cosmetic appearance of a Product; and
O. S
cratches or other paint or finish damage to a Product that lead to or are caused by, in part or in total, corrosion.
USB Media Support
File Extension
Video
Audio
Movie
.avi
DivX, XviD, MPEG-4
MP3, WMA, AAC
.mpg
MPEG-1, MPEG-2
.dat
MPEG-1
.mov / .mkv
H.264
.mp3
--
MP3
.wma
--
WMA
.m4a / .aac
--
AAC
.jpg / .jpeg
Progressive JPG
Photo
Séura warrants TV Mirrors with respect to Séura’s Labor for three (3) years; Mirror, Glass, Structure, Frame, and Assembly for three (3) years; TV including remote and power
supply for one (1) year.
Séura warrants Hydra Waterproof TVs with respect to Séura’s Labor for three (3) years; Mirror, Glass, Structure, Frame, and Assembly for three (3) years; TV including
remote and power supply for one (1) year.
USB Media Support
Music
Séura warrants Lighted Mirrors with respect to Séura’s Labor for three (3) years; Mirror, Glass, Structure, Frame, and Assembly for three (3) years; Electrical for three (3)
years. Lamps are not warranted.
Séura warrants Lighted Mirror TVs with respect to Séura’s Labor for three (3) years; Mirror, Glass, Structure, Frame, and Assembly for three (3) years; TV including remote
and power supply for one (1) year; Electrical excluding TV for three (3) years. Lamps are not warranted.
Special Features
Multimedia Player
If a Séura, Inc. (“Séura”) product (the “Product”) fails to work or operate properly because of a defect in materials or workmanship, Séura will, for the length of the period
indicated below (starting on the date of the Product’s purchase receipt for the Product), at its option, either (a) repair the Product with new or refurbished parts, including
Séura’s labor if applicable; or (b) replace the Product with a new or refurbished product. The decision to repair or replace the Product shall be in Séura’s sole discretion. Baseline JPEG
.bmp
BMP
.png
Non-Interlaced
Interlaced
2. Warranty Disqualifiers. This Limited Warranty does not apply, and Séura makes no warranties or representations, with respect to any Product being free from defects in
materials or workmanship if the Product was purchased from a seller who is not authorized, by Séura, to sell Séura products, is owned by or is in possession of an individual
or entity who is not the original purchaser of the Product, or if the Product’s original Séura serial number has been removed, defaced, replaced, or otherwise tampered with
in any manner.
3. Limitation of Liability. THE SPECIFIC TERMS OF THIS LIMITED WARRANTY ARE IN LIEU OF ALL OTHER WARRANTIES, ORAL, EXPRESSED OR IMPLIED,
INCLUDING, BUT NOT LIMITED TO, ANY IMPLIED WARRANTIES OF FITNESS FOR A PARTICULAR PURPOSE OR USE. SÉURA WILL NOT BE LIABLE FOR ANY LOSS,
DAMAGE OR LIABILITY OR ANY DIRECT, INCIDENTAL, OR CONSEQUENTIAL DAMAGES RESULTING FROM THE USE OR MISUSE OF A PRODUCT, OR ARISING
OUT OF ANY BREACH, BY THE PURCHASER OF A PRODUCT, OF THIS LIMITED WARRANTY. SOME STATES DO NOT ALLOW THE EXCLUSION OR LIMITATION OF
INCIDENTAL OR CONSEQUENTIAL DAMAGES, OR LIMITATIONS ON HOW LONG AN IMPLIED LIMITED WARRANTY LASTS, SO THE EXCLUSIONS MAY NOT APPLY TO
A PARTICULAR PURCHASER. NOTWITHSTANDING ANYTHING CONTAINED IN THIS LIMITED WARRANTY TO THE CONTRARY, SÉURA’S MAXIMUM LIABILITY TO A
PURCHASER RELATED TO ANY WARRANTY CLAIM OR ALLEGATION OF A DEFECT WITH RESPECT TO A PRODUCT SHALL NOT EXCEED THE THEN CURRENT SÉURA
WHOLESALE PRICE OF THE SPECIFIC PRODUCT FROM WHICH THE WARRANTY CLAIM DERIVES.
NOTICE OF ANY WARRANTY CLAIM MUST BE RECEIVED BY SÉURA, IN WRITING, PRIOR TO THE EXPIRATION OF THE APPLICABLE WARRANTY PERIOD SET FORTH
ABOVE. THE PRODUCT WARRANTY APPLIES ONLY FOR THE PERIODS SET FORTH ABOVE.
4. W
arranty Procedure. Prior to returning any Product to Séura, a warranty claimant must contact Séura at 920- 857-9069 to obtain a return goods authorization
(RGA) number and, if applicable, specific return and shipping instructions. A Product will only be accepted for warranty claims if returned and shipped to
Séura in the Product’s original packaging materials. If original packaging is not available, please contact Séura to receive authorized replacement packaging.
Packages not bearing the issued returned goods authorization (RGA) number will not be accepted by Séura and will be returned to sender. In addition to
the Product, the package must include the warranty claimant’s original sales receipt for the purchase of the Product. All Product returns shall be received
by Séura, at 1230 Ontario Road; Green Bay, WI 54311 with freight prepaid by the warranty claimant. Séura shall not be responsible for, and the warranty
claimant assumes and retains all such responsibility, any damage or loss to or of the Product during shipment to Séura as the result of a warranty claim.
5. Exclusive Remedy. This Limited Warranty sets forth the exclusive remedies of a warranty claimant with respect to allegations of a defective Product.
NOTE: Above specification may be changed without prior notification for quality improvement.
20
21
Notes
22
Notes
23
8 0 0 . 9 5 7. 3 8 7 2
w w w. seur a .com
Séura, Inc.
1230 Ontario Road
Green Bay, WI 54311
800.95.SEURA
t: 920.857.9069
f: 920.857.9490
© Séura 2013
All Rights Reserved
6-10-13