1
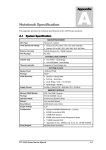
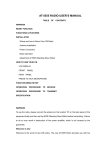
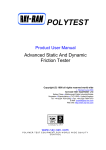
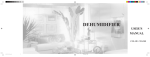
Instruction Manual of 8 HP
ART.: 12098
Contents
1. D e c l a r a t i o n … … … … … … … … … … … … … … 2
2. A s s e m b l y … … … … … … … … … … … … … … … 2
3. P r e p a r a t i o n … … … … … … … … … … … … … … … 3
4. O p e r a t i o n … … … … … … … … … … … … … … … … 4
5. Maintenance … … … … … … … … … … … … … … 5
6. O t h e r s … … … … … … … … … … … … … … … … 6
1. Declaration
Warning : Thank you for using our product; please read
through these instructions to use this product safely and
reliably.
1.1 Read through this manual and keep it handy for later referral or for
contacting the dealer.
1.2 Read through the information related to the snow thrower and its
components.
1.3 It is important to know how to properly use the snow thrower; you should
know how to turn it off before you begin using it.
1.4 Please follow the safety rules hereunder.
A. Persons under 16 years old are forbidden to use this machine; adults that
don’t know how to operate it correctly are also forbidden from using the
machine.
B. Please keep this machine away from other persons, especially children and
pets, when you use this unit.
C. Focus when operating the machine, especially when backing away to avoid
slipping.
1.5 This device is only used for sweeping snow; if you use it for another
purpose or change its structure, the producer is exempt from the responsibility
of replacing any parts or components for you.
1.6 We shall not be responsible for any human injury or property damage to any
third party caused by incorrect operation.
1.7 If you are cleaning snow on the road, you must obey the relevant laws and
rules of your locality.
1.8 When you use this snow thrower, you shall wear protective items such as
the warm clothes, anti-slip shoes, thermal gloves and blinkers.
2. Assembly
2.1 Please check that all components are included when you unpack this device; if
any component is missing, please contact the dealer to get it.
2.2 For mounting the skids, fix the skids onto the four holes on the large housing with
four M8×15 carriage bolts (see Fig. 1).
2.3 For mounting the handrail, mount the upper handrail components onto the
mounting holes on the lower handrail components with four M8×40 hexagonal
bolts, tight the bolts firmly (see Fig. 2).
2.4 For mounting the rocker, pull it through the rocker fixed seat (see Fig. 3) and
through the pinion shaft,fix it with spring pin (see Fig. 4).
2.5 For mounting the snow outlet, fix it onto the chassis along its edge with a plate
and bolt (see Fig. 5).
2.6 Connect the power lines on the handrail panel with the two power lines on the
main unit; the power for the lamp will be connected.
Note:
1. In case a 14.5 inch tire is equipped on the device and the handrail is a component,
two tires must be removed before performing process 2.3; otherwise the process 2.3
cannot be carried out.
2. In case the handrail consists of upper and lower components(the lower one is on
the main unit, and is free of installation), then process 2.3 is applicable for mounting
the upper handle.
2.7 For mounting the Stepped cable and Auger cable,please see Fig. 8.
3. Preparation
3.1 Inspect the area to be cleaned up and remove sleds, bricks or loose lines prior to
using this device.
3.2 Release the clutch that will be used to operate this device prior to starting the
engine.
3.3 You must wear anti-slip shoes to prevent sliding when you use the snow thrower.
3.4 Gasoline is flammable; take care when you fill it:
A. Use correct gasoline;
B. Don’t fill gasoline when the snow thrower is running or when the engine is hot;
C. Fill gasoline outdoors; filling up gasoline indoors is forbidden!
D. Open the oil filling inlet and wipe away spilled gasoline carefully.
3.5 Use correct anti-freeze engine-oil.
3.6 Adjust the chute to a proper height to avoid cleaning up sand or gravel on road.
3.7 Don’t adjust this device when running unless the manufacturer has given special
instructions for this.
3.8 Don’t sweep snow outdoors until the engine and the snow thrower have adjusted
to the temperature outside.
3.9 As the snow thrown by the snow thrower might be blown into your eyes, please
wear blinkers when you sweep snow.
3.10 Keep your body and clothes off the vent-pipe, heating components or rotating components of
the snow thrower.
3.11 Check the oil tank when you use this device and make sure there is sufficient
gasoline in the oil tank.
3.12
Adjust the clutch line and make sure it is flexible and reliable.
3.13
Operate this device carefully, especially when you walk across the road or in
reverse, to avoid any accident.
3.14
When the rotator of the snow thrower hits a block, turn off the engine
immediately and unplug the spark plug; then, clean up the snow and other things in
the device; please check if the device is damaged when you restart it.
3.15
If the snow thrower shakes abnormally during operation, turn off the engine
immediately and inspect it (this is very important!).
3.16
Don’t adjust or repair the snow thrower before turning off the engine.
3.17
Don’t clean, repair or check the snow thrower until you are sure that the
rotating components of the device have stopped.
3.18
Don’t use the snow thrower indoors; open your door first if you are going to
turn on the engine indoors to allow the smoke to exit the room.
3.19
Don’t use this product on an uneven road or place with steep slopes; take
special care when turning the device on a slope.
3.20
Don’t operate this device if there is no necessary protection.
3.21
Keep this snow thrower off glass, fences, vehicles, kids and pets when in use.
3.22
Don’t try to throw the snow beyond the maximum snow throwing distance of
this product.
3.23
Keep the device running at a proper speed when your use it on a slope, take
special care when you are in reverse.
3.24
Make sure there is no person in the path of
the snow thrower
when in operation and don’t throw snow onto any
person.
3.25
snow when working,
In case the snow thrower fails to throw
clean the impeller and the snow chute.
3.26
Only the manufacturer’s parts and spars are permitted to be installed with this
device.
3.27 If you use the snow thrower at night, first check that the illumination system
3.28
3.29
works properly.
Don’t carry anyone on the snow thrower.
Turn off the engine when you are going to stop this device.
3.30 Please use proper transmission and clutch so that it spins forward; if you are
going to change the gear, release the clutch first.
3.31 Note the direction of the snow outlet when operating this device; don’t point it
towards anyone.
3.32 The operator must make sure that the snow thrower does not flip over; don’t use
this product on slopes over 20 degrees.
3.33 Clean up the snow in the snow thrower when the snow cleaning session is
complete; it cannot work smoothly when the snow inside is frozen.
4. Operation
Warning! Please read through the security notices in the part 3 prior to using
this device.
4.1 How to start the engine:
A.Open the choke;
B.Turn the start switch (see Fig.6) to“ON”;
C.Pull the line to start the engine:
D.Close the choke when the engine starts;
4.2 How to turn off the engine: you can turn off the engine by turning the start switch
to“OFF”;
4.3 How to shift the snow outlet (see Fig.10); Move the lever forwards and the snow
cap will move down; Move the lever backwards and the snow cap will move up;
4.4 How to adjust the speed lever (see Fig.9);
A.When you move the lever left to the “R1” location, the device will move
backwardly; when you move it further,
B.When you move the lever right to the “1” location, the device will moves
4.5 How to operate the left and right handrail:
A.How to handle the left handrail: the left handrail is used for controlling the
snow mixing and throwing:
When it is released; the device won’t sweep or throw snow.
When you press it down, the device will sweep or throw snow.
B.How to handle the right handrail: the right handrail is used for controlling the
drive wheel of the device:
When it is released, the device stops.
When you press it down, the machine moves (forwards or backwards
according to your selection).
4.6 The interlock of the left and right handrail:
The left and right handrails might be interlocked; press down the right handrail first
and the then the left one; release your left hand might keep the left handrail pressed.
forwardly; when you move it further, it will run faster;
4.7 For lamp switch: the lamp is on when the switch points to “-”(this indicator is
on), when the switch points to “O”, the lamp is off.
5. Maintenance
5.1 Inspect the snow thrower regularly to use it safely.
5.2 Don’t put a snow thrower containing oil indoors; if you put it in indoors, keep it
away from fire.
5.3 If you are going to put this snow thrower in the garage, read through this manual
and store it according to the relevant requirements for storing the snow thrower.
5.4 Re-label security notices if necessary.
5.5 When the snow sweeping is finished, keep the agitating auger moving for a while
to prevent it from freezing.
6. Others
6.1 The importers of this company shall determine the quality warranty. Within the
quality warranty, free maintenance for your product due to any cause or reasons
arising from the materials and construction of the unit shall be available. If you desire
to have your unit repaired, please contact the distributor or local agency.
6.2 For any problems with your product, please consult the following troubleshooting
guide to solve the problem. For further enquiries, please contact the distributor.
6.3 This operation manual is prepared based on the latest model of this unit. The
manufacturer may modify it at any time without prior notice.
Troubleshooting:
Malfunctions
The engine cannot be
Possible causes
----------------------
Corrective actions
Consult engine manual
opened
The unstable running
---------------------The machine cannot Bolt damage
plow out snow
Disjunction
control system or
discharge
duct
damage
Incorrect
disjunction control
system adjustment
Chute’s jam
The machine cannot Incorrect
drive
disjunction control
system adjustment
Belt loose
Abnormal flutter
Gear shifting difficulty
Disjunction
control
system
icing
The
friction
rubber of the tyre
was punctured
parts slack or
damaged
Incorrect
disjunction control
system adjustment
Disjunction
control
system
icing
Consult engine manual
Replace a new bolt
Shut the engine off and exclude
the malfunction
Adjust terminal pad
Dredge the chute by crabstick
Adjust terminal pad
Tighten the belt or reinstall the
belt
Remove the accumulation
Replace the friction rubber of the
tyre
Shut off the engine immediately
and tighten the belt and nut
Adjust terminal pad
Remove the accumulation
The key technical parameters:
Cleaning area:1700m*2/h
Max working width: 620mm
Max working thickness: 545mm
Net weight: 85kg
Output power (HP/KW): 8 / 5.96
Max auger rotate speed:136RPM
Driving speed(KM/H)
:F5:3.6 -3.7 F4 :3.2-3.3
1.5-1.6 R1:1.7-1.8
Inner packing size:890*685*750
Oil Type: Unleaded Oil
F3 :2.7-2.4
F2:2.1-2.2
F1:
For the technical parameters of the gasoline engine, see the relevant user manual.