1
Parallels
Parallels Virtuozzo
Containers for Linux
User's Guide
Version 4.0
Copyright © 1999-2008 Parallels Software International Inc.
ISBN: N/A
Parallels Holdings Ltd.
13755 Sunrise Valley Drive
Suite 600
Herndon, VA 20171
USA
Tel: +1 (703) 815 5670
Fax: +1 (703) 815 5675
© 1999-2008 Parallels Holdings Ltd. All rights reserved.
Distribution of this work or derivative of this work in any form is prohibited unless prior written permission is
obtained from the copyright holder.
3
Contents
Preface
12 About This Guide ....................................................................................................................................... 13 Organization of This Guide ............................................................................................................. 14 Documentation Conventions ........................................................................................................... 15 Getting Help ............................................................................................................................................... 16 Feedback ..................................................................................................................................................... 17 Virtuozzo Containers Philosophy
18 About Virtuozzo Containers Software ........................................................................................................ 19 What is Parallels Virtuozzo ............................................................................................................. 19 Virtuozzo Applications .................................................................................................................... 20 Virtuozzo Containers 64-bit vs. Virtuozzo Containers 32-bit ......................................................... 21 Distinctive Features of Parallels Virtuozzo Containers 4.0 ........................................................................ 21 OS Virtualization ............................................................................................................................. 22 Virtuozzo File System (VZFS) ........................................................................................................ 22 Templates ........................................................................................................................................ 23 Resource Management .................................................................................................................... 23 Main Principles of Virtuozzo Operation ..................................................................................................... 24 Basics of Virtuozzo Technology ..................................................................................................... 24 Virtuozzo Configuration .................................................................................................................. 25 Understanding Licensing ................................................................................................................. 26 Parallels Management Console Overview ....................................................................................... 26 Parallels Infrastructure Management Overview .............................................................................. 31 Parallels Power Panel Overview...................................................................................................... 32 Hardware Node Availability Considerations .............................................................................................. 33 Operations on Containers
34 Creating New Container ............................................................................................................................. 34 Before You Begin ............................................................................................................................ 35 Choosing Container ID .................................................................................................................... 35 Choosing OS EZ Template .............................................................................................................. 37 Creating Container........................................................................................................................... 39 Creating Containers in Parallels Management Console................................................................... 41 Configuring Container ................................................................................................................................ 46 Setting Startup Parameters............................................................................................................... 46 Setting Network Parameters ............................................................................................................ 47 Setting root Password for Container ................................................................................................ 48 Starting, Stopping, Restarting, and Querying Status of Container.............................................................. 49 Listing Containers ....................................................................................................................................... 51 Setting Name for Container ........................................................................................................................ 54 Storing Extended Information on Container ............................................................................................... 56 Migrating Container.................................................................................................................................... 57 Standard Migration .......................................................................................................................... 58 Zero-Downtime Migration .............................................................................................................. 61 Enabling Container Migration from 3.x to 4.0 Hardware Nodes..................................................... 63 Contents
4
Moving Container Within Hardware Node................................................................................................. 64 Copying Container Within Hardware Node................................................................................................ 66 Backing Up and Restoring Containers ........................................................................................................ 68 Using vzabackup/vzarestore Utilities .............................................................................................. 69 Managing Backups in Parallels Management Console.................................................................... 71 Reinstalling Container .............................................................................................................................. 106 Customizing Container Reinstallation ........................................................................................... 107 Deleting Container .................................................................................................................................... 109 Disabling Container .................................................................................................................................. 111 Suspending Container ............................................................................................................................... 113 Running Commands in Container ............................................................................................................. 115 Managing Resources
116 What are Resource Control Parameters? .................................................................................................. 116 Managing Disk Quotas ............................................................................................................................. 117 What are Disk Quotas? .................................................................................................................. 118 Disk Quota Parameters .................................................................................................................. 118 Turning On and Off Per-Container Disk Quotas ........................................................................... 119 Setting Up Per-Container Disk Quota Parameters ......................................................................... 122 Turning On and Off Second-Level Quotas for Container.............................................................. 125 Setting Up Second-Level Disk Quota Parameters ......................................................................... 127 Checking Quota Status .................................................................................................................. 129 Configuring Container Disk I/O Priority Level ............................................................................. 131 Cleaning Up Containers................................................................................................................. 132 Managing Container CPU Resources ....................................................................................................... 135 Managing CPU Share .................................................................................................................... 136 Configuring Number of CPUs Inside Container............................................................................ 138 Controlling Container CPU Usage With VZASysD Plug-in ......................................................... 140 Managing Network Accounting and Bandwidth....................................................................................... 142 Network Traffic Parameters .......................................................................................................... 142 Configuring Network Classes ........................................................................................................ 143 Viewing Network Traffic Statistics ............................................................................................... 145 Turning On and Off Network Bandwidth Management ................................................................ 146 Configuring Network Bandwidth Management for Container ...................................................... 148 Managing System Parameters ................................................................................................................... 150 Overview ....................................................................................................................................... 150 Computing Memory Usage in SLM .............................................................................................. 151 Controlling Memory Usage by Container ..................................................................................... 151 SLM Modes ................................................................................................................................... 152 Managing Container Memory Usage............................................................................................. 154 Grouping Applications Inside Container ....................................................................................... 155 Managing Container Resources Configuration ......................................................................................... 158 Changes From Virtuozzo 3.0 ......................................................................................................... 159 Splitting Hardware Node Into Equal Pieces .................................................................................. 161 Scaling Container Configuration ................................................................................................... 163 Validating Container Configuration .............................................................................................. 165 Applying New Configuration Sample to Container....................................................................... 167 Real-Time Monitoring in Parallels Virtuozzo Containers
169 Monitoring Resources in Text Console .................................................................................................... 170 Monitoring Resources in Parallels Management Console ........................................................................ 173 Using Charts Representation ......................................................................................................... 174 Using Table Representation........................................................................................................... 182 Subscribing to Parallels Management Console Alerts .............................................................................. 183 Monitoring Virtuozzo Objects Using vzsnmp Plug-in.............................................................................. 185 Understanding vzsnmp Basics ....................................................................................................... 186 Contents
5
Using SNMP Management Tools to Monitor Parallels Virtuozzo Objects ................................... 186 Managing Services and Processes
191 What Are Services and Processes ............................................................................................................. 192 Main Operations on Services and Processes ............................................................................................. 193 Managing Processes and Services ............................................................................................................ 194 Viewing Active Processes and Services ........................................................................................ 195 Monitoring Processes in Real Time ............................................................................................... 198 Changing Services Mode ............................................................................................................... 201 Determining Container Identifier by Process ID ........................................................................... 202 Starting, Stopping, and Restarting Services................................................................................... 203 Managing Virtuozzo Network
205 Managing Network Adapters on Hardware Node..................................................................................... 205 Listing Adapters ............................................................................................................................ 206 Creating VLAN Adapter ............................................................................................................... 208 Connecting Adapter to Virtual Network........................................................................................ 210 Managing Virtual Networks ..................................................................................................................... 211 Creating Virtual Network .............................................................................................................. 212 Listing Virtual Networks ............................................................................................................... 213 Deleting Virtual Network .............................................................................................................. 215 Managing Virtual Network Adapters........................................................................................................ 215 Container Networking Modes ....................................................................................................... 215 Creating and Deleting veth Network Adapters .............................................................................. 220 Configuring veth Adapter Parameters ........................................................................................... 222 Connecting Containers to Virtual Networks.................................................................................. 224 Managing Hardware Nodes
227 Managing Virtuozzo Licenses .................................................................................................................. 227 Installing Virtuozzo Server License .............................................................................................. 227 Updating License ........................................................................................................................... 230 Transferring License to Another Node .......................................................................................... 230 Viewing Current License ............................................................................................................... 232 Managing Files ......................................................................................................................................... 235 Uploading Files to Node ................................................................................................................ 237 Downloading Files to Local Computer.......................................................................................... 240 Setting Permissions for Files on Node........................................................................................... 241 Managing IP Addresses Pool on Node ..................................................................................................... 242 Configuring Hardware Node IP Addresses Pool ........................................................................... 243 Viewing Allocated IP Addresses ................................................................................................... 244 Keeping Your Virtuozzo System Up-to-Date
246 Updating Host OS Software ..................................................................................................................... 246 Using up2date ................................................................................................................................ 247 Using yum ..................................................................................................................................... 247 Using yast ...................................................................................................................................... 247 Updating Virtuozzo Containers Software ................................................................................................. 248 Updating Parallels Virtuozzo Containers With vzup2date ............................................................ 248 Using Parallels Management Console to Update Virtuozzo Containers Software ........................ 260 Updating Containers ................................................................................................................................. 265 Updating EZ Template Packages Inside Container ....................................................................... 266 Updating OS EZ Template Caches ................................................................................................ 269 Contents
Compatibility With Previous Versions of Virtuozzo Containers
6
271 Running vzbackup/vzrestore Utilities ....................................................................................................... 274 Configuring Upgraded Nodes to Use VZFS v2 ........................................................................................ 276 New Directory Structure Restrictions ....................................................................................................... 277 Upgrading Legacy Containers to Support New Directory Layout ............................................................ 278 Migrating Legacy Container to Cluster Server .............................................................................. 279 Using New License Scheme on Virtuozzo 3.0 Nodes .............................................................................. 280 New Command Options for vznetcfg ....................................................................................................... 280 Using Old Configuration Files for Container Creation ............................................................................. 281 Setting Permissions for Roles in Parallels Infrastructure Manager........................................................... 282 Processing Previous Container Requests .................................................................................................. 282 Requesting Container in Parallels Infrastructure Manager ....................................................................... 283 Backing Up and Restoring Caches in Virtuozzo Containers 3.0 .............................................................. 283 Detaching Container From Hardware Node Cache Directory in Virtuozzo Containers 3.0 ..................... 284 Advanced Tasks
285 Migrating Physical Server to Container .................................................................................................... 285 Migration Overview ...................................................................................................................... 286 Migration Steps ............................................................................................................................. 286 Migration Requirements ................................................................................................................ 289 Migration Restrictions ................................................................................................................... 290 Migrating Physical Server to Container in Command Line........................................................... 291 Migrating Physical Server to Container in Parallels Management Console .................................. 297 Migrating Container to Physical Server .................................................................................................... 307 Migration Steps ............................................................................................................................. 307 Migration Requirements ................................................................................................................ 308 Migrating Container to Physical Server ........................................................................................ 308 Creating Customized Containers .............................................................................................................. 309 Using Customized OS EZ Template.............................................................................................. 309 Using EZ OS Template Set ........................................................................................................... 311 Using Customized Application Template ...................................................................................... 313 Changing System Time From Container .................................................................................................. 315 Setting Up iSCSI Environment in Virtuozzo-Based Systems ................................................................... 316 Obtaining Hardware Node ID From Inside Container .............................................................................. 317 Mounting /vz Partition via Virtuozzo Script ............................................................................................. 318 Managing Mount Points Inside Container ................................................................................................ 319 Preserving Application Data During Container Reinstallation ................................................................. 321 Accessing Devices From Inside Container ............................................................................................... 323 Moving Network Adapter to Container .................................................................................................... 325 Enabling VPN for Container..................................................................................................................... 326 Managing Hardware Node Resources Parameters .................................................................................... 327 Setting Immutable and Append Flags for Container Files and Directories............................................... 328 Recreating Service Container ................................................................................................................... 329 Customizing /proc/meminfo Output Inside Container .............................................................................. 330 Creating Local Repository Mirror for vzup2date...................................................................................... 332 Virtuozzo Repository Structure ..................................................................................................... 333 Creating Local Mirror.................................................................................................................... 334 Choosing Updates for Downloading ............................................................................................. 337 Configuring Updates Approval Policy .......................................................................................... 338 Loading iptables Modules ......................................................................................................................... 339 Loading iptables Modules to Hardware Node ............................................................................... 340 Loading iptables Modules to Particular Containers ....................................................................... 341 Contents
7
Sharing File System Among Containers ................................................................................................... 342 Creating Configuration File for New Linux Distribution ......................................................................... 343 Rebooting Container ................................................................................................................................. 344 Managing Graphical Applications Inside Container ................................................................................. 345 Running Graphical Applications in X Windows ........................................................................... 345 Running Graphical Applications via VNC .................................................................................... 350 VZFS v2 ................................................................................................................................................... 352 Advantages of VZFS v2 ................................................................................................................ 352 Inside VZFS v2.............................................................................................................................. 353 Upgrading VZFS ........................................................................................................................... 354 Restrictions .................................................................................................................................... 356 Mastering Parallels Management Console
357 Configuring Offline Management Parameters .......................................................................................... 358 Viewing Summary Pages .......................................................................................................................... 361 Managing Users and Groups Inside Container ......................................................................................... 363 Configuring Firewall................................................................................................................................. 365 Managing Mount Points............................................................................................................................ 367 Viewing System and Virtuozzo Logs ....................................................................................................... 368 Managing Files Inside Container .............................................................................................................. 370 Searching for Container ............................................................................................................................ 372 Managing Container Search Domains ...................................................................................................... 373 Troubleshooting
374 General Considerations ............................................................................................................................. 375 Kernel Troubleshooting ............................................................................................................................ 377 Using ALT+SYSRQ Keyboard Sequences ................................................................................... 377 Saving Kernel Fault (OOPS) ......................................................................................................... 378 Finding Kernel Function That Caused D Process State ................................................................. 379 Using Kexec and Kdump For System Troubleshooting ................................................................ 380 Problems With Container Management .................................................................................................... 382 Failure to Create Container............................................................................................................ 382 Failure to Start Container .............................................................................................................. 383 Failure to Access Container From Network .................................................................................. 384 Failure to Log In to Container ....................................................................................................... 384 Failure to Back Up Container in Parallels Management Console ................................................. 385 Failure to Display List of Container Backups ............................................................................... 385 Problems With Container Operation ......................................................................................................... 386 Timeout When Accessing Remote Hosts ...................................................................................... 386 Extraneous Backups Visible to Container in Parallels Power Panel.............................................. 386 Problems With Physical Server Migration................................................................................................ 387 Failure to Start iptables Modules After Physical Server Migration ............................................... 387 Miscellaneous Problems ........................................................................................................................... 387 Failure to Run vgscan Utility......................................................................................................... 387 Corrupted Pseudographics in Virtuozzo Utilities .......................................................................... 388 Getting Technical Support ........................................................................................................................ 388 Getting Assistance With Virtuozzo Containers installation .......................................................... 388 Preparing and Sending Questions to Technical Support................................................................ 389 Submitting Problem Report to Technical Support ......................................................................... 390 Establishing Secure Channel to Parallels Support ......................................................................... 392 Setting Up Monitor Node ......................................................................................................................... 393 Configuring Serial Console on Monitor Node ............................................................................... 394 Setting Up netconsole .................................................................................................................... 397 Preparing Monitor Node for Sending Alerts.................................................................................. 403 Using vzstatrep to Monitor Hardware Nodes ................................................................................ 405 Contents
8
Glossary
407 Index
410 9
Table of Figures
Figure 1: Virtuozzo Containers OS Virtualization .................................................................19 Figure 2: Virtuozzo Technology ...............................................................................................24 Figure 3: Management Console Network Architecture..........................................................28 Figure 4: Management Console Main Window.......................................................................29 Figure 5: Infrastructure Manager Interface Overview ..........................................................31 Figure 6: Management Console - Listing EZ OS Templates .................................................37 Figure 7: Management Console - Creating New Container ...................................................41 Figure 8: Management Console - Configuring Container Network Adapters .....................43 Figure 9: Management Console - Choosing OS Template .....................................................44 Figure 10: Management Console - Checking Newly-Created Container ..............................45 Figure 11: Management Console - Listing Containers ...........................................................52 Figure 12: Management Console - Migrating Containers ......................................................59 Figure 13: Management Console - Migrating Containers ......................................................63 Figure 14: Management Console - Moving Container Within Hardware Node ..................65 Figure 15: Management Console - Cloning Container ...........................................................67 Figure 16: Backup Overview ....................................................................................................71 Figure 17: Management Console - Setting Default Backup Storage .....................................72 Figure 18: Management Console - Setting Default Backup Location ...................................74 Figure 19: Management Console - Setting Default Backup Compression Level .................76 Figure 20: Management Console - Setting Default Backup Type..........................................77 Figure 21: Management Console - Choosing Backup Mode ..................................................78 Figure 22: Management Console - Choosing Files and Directories to Back Up...................80 Figure 23: Management Console - Specifying Main Backup Parameters ............................81 Figure 24: Management Console - Choosing Containers to Back Up ...................................83 Figure 25: Management Console - Choosing Files to Back Up ..............................................84 Figure 26: Management Console - Specifying Main Backup Parameters ............................85 Figure 27: Management Console - Browsing Backup Contents ............................................87 Figure 28: Management Console - Restoring Container Wizard ..........................................88 Figure 29: Management Console - Restoring Container Files Wizard .................................90 Figure 30: Management Console - Restoring Container Files Wizard .................................91 Figure 31: Management Console - Restoring Containers Wizard.........................................92 Figure 32: Management Console - Listing Backups ...............................................................94 Figure 33: Management Console - Launching Restore Individual Container Files Wizard95 Figure 34: Management Console - Choosing Files For Restoring .........................................96 Figure 35: Management Console - Searching for Backups ....................................................97 Figure 36: Scheduling Container Backups - Choosing Files to Back Up ..............................99 Figure 37: Scheduling Container Backups - Setting Main Backup Options ......................100 Figure 38: Management Console - Defining Backup Tasks Parameters ............................102 Figure 39: Management Console - Setting Number of Allowed Backups in Power Panel 104 Figure 40: Management Console - Deleting Container ........................................................110 Figure 41: Management Console - Disabling Container ......................................................112 Figure 42: Management Console - Enabling Per-Container Disk Quota ...........................120 Figure 43: Management Console - Container Disk Quota Parameters ..............................121 Figure 44: Management Console - Setting Up Container Disk Quota ................................124 Figure 45: Management Console - Turning Second-Level Disk Quota On and Off ..........126 Figure 46: Management Console - Setting Up Second-Level Disk Quota Parameters ......128 Figure 47: Management Console - Viewing Container Quota Statistics .............................130 Figure 48: Management Console - Configuring Container Disk I/O Priority Level .........131 Figure 49: Management Console - Configuring Number of CPUs Inside Container ........139 Table of Figures
10
Figure 50: Management Console - Configuring Network Classes .......................................144 Figure 51: Management Console - Setting Up Traffic Shaping Parameters ......................147 Figure 52: Management Console - Scaling Container Configuration .................................164 Figure 53: Management Console - Validating Container Sample .......................................166 Figure 54: Management Console - Applying New Configuration Sample to Container ...168 Figure 55: Management Console - Adding Monitoring Counters .......................................174 Figure 56: Management Console - Adjusting Charts Scale .................................................176 Figure 57: Management Console - Adjusting Charts View..................................................177 Figure 58: Management Console - Highlighting Counter ....................................................178 Figure 59: Management Console - Changing Logging Period .............................................180 Figure 60: Management Console - Replaying Logs ..............................................................181 Figure 61: Management Console - Monitoring Traffic Parameters ....................................182 Figure 62: Management Console - Setting E-mail Relay Server .........................................183 Figure 63: Management Console - Subscribing to Alert ......................................................184 Figure 64: Management Console - Viewing Services ............................................................197 Figure 65: Management Console - Monitoring Active Processes ........................................199 Figure 66: Management Console - Managing Processes and Services ................................203 Figure 67: Management Console - Listing Network Adapters ............................................207 Figure 68: Management Console - Creating VLAN Adapter ..............................................209 Figure 69: Management Console - Connecting Adapter to Virtual Network.....................211 Figure 70: Management Console - Creating Virtual Network ............................................213 Figure 71: Management Console - Listing Virtual Networks ..............................................214 Figure 72: Virtuozzo Networking - venet0 Mode ..................................................................216 Figure 73: Virtuozzo Networking - veth Mode......................................................................218 Figure 74: Management Console - Managing Container Adapters.....................................221 Figure 75: Management Console - Configuring Container Adapter Parameters ..............223 Figure 76: Mannagement Console - Connecting veth Adapter to Bridge ...........................226 Figure 77: Management Console - Installing License on Hardware Node .........................228 Figure 78: Management Console - Managing Files on Node ...............................................235 Figure 79: Management Console - Choosing Hardware Nodes for Uploading Files .........237 Figure 80: Management Console - Uploading Files to Hardware Node .............................238 Figure 81: Management Console - Uploading Files to Hardware Node .............................239 Figure 82: Management Console - Configuring Node IP Addresses Pool ..........................243 Figure 83: Management Console - Viewing Information on IP Addresses Pool ................244 Figure 84: Updating Virtuozzo Containers - Welcome Screen ............................................250 Figure 85: Updating Virtuozzo Containers - Specifying Repository ...................................251 Figure 86: Updating Virtuozzo Containers - Selecting Update Type ..................................252 Figure 87: Updating Virtuozzo Containers - Choosing System Reboot Options ...............253 Figure 88: Updating Virtuozzo Containers - List of Selected Updates ...............................254 Figure 89: Updating Virtuozzo Containers - Select Virtuozzo Core Updates ....................255 Figure 90: Updating Virtuozzo Containers - Selecting Linux Distribution ........................256 Figure 91: Updating Virtuozzo Containers - Selecting EZ Templates ................................257 Figure 92: Updating Virtuozzo Containers - Viewing EZ Templates to Install .................258 Figure 93: Updating Virtuozzo Containers - Selecting OS Standard Templates ...............259 Figure 94: Management Console - Configuring Virtuozzo Update Settings ......................261 Figure 95: Management Console - Choosing Virtuozzo Updates ........................................262 Figure 96: Management Console - Updating EZ Templates ................................................264 Figure 97: Management Console - Updating EZ Template Packages Inside Container ...267 Figure 98: Management Console - Caching OS Template ...................................................270 Figure 99: Management Console - Logging In to Physical Server ......................................297 Figure 100: Management Console - Reviewing Physical Server Configuration ................298 Figure 101: Management Console - Customizing Server Migration ...................................299 Figure 102: Management Console - Stopping Services........................................................301 Table of Figures
11
Figure 103: Management Console - Specifying Container Basic Parameters ...................302 Figure 104: Management Console - Defining Network Parameters ....................................303 Figure 105: Management Console - Specifying Additional Network Parameters .............304 Figure 106: Management Console - Specifying Resource Parameters ................................305 Figure 107: Management Console - Viewing Offline Services .............................................358 Figure 108: Management Console - Disabling Offline Management ..................................359 Figure 109: Management Console - Viewing Container Summary Page............................361 Figure 110: Management Console - Managing Users and Groups ...................................... 363 Figure 111: Management Console - Firewall Configuration Dialog ..................................365 Figure 112: Management Console - Managing Mount Points .............................................367 Figure 113: Management Console - Viewing Logs ................................................................369 Figure 114: Management Console - Managing Files.............................................................370 Figure 115: Management Console - Finding Container .......................................................372 Figure 116: Submitting Problem Report - Providing Necessary Information ...................390 Figure 117: Submitting Problem Report - Sending Report to Parallels .............................391 12
CHAPTER 1
Preface
In This Chapter
About This Guide .................................................................................................................. 13
Getting Help .......................................................................................................................... 16
Feedback ............................................................................................................................... 17
Preface
13
About This Guide
This guide is meant to provide comprehensive information on Parallels Virtuozzo Containers
4.0 – high-end server virtualization software for Linux-based servers. The issues discussed in
this guide cover the necessary theoretical conceptions as well as practical aspects of working
with Virtuozzo Containers. The guide will familiarize you with the way to create and administer
Containers (sometimes also called Virtual Environments, or VEs) on Virtuozzo-based Hardware
Nodes and to employ both graphical and command line interfaces for performing various tasks.
Note: The guide does not familiarize you with the process of installing, configuring, and
deploying your Virtuozzo system. Detailed information on all these operations is provided in the
Parallels Virtuozzo Containers Installation Guide shipped with Virtuozzo Containers 4.0.
According to the task-oriented approach, most topics of this guide are devoted to a particular
task and the ways to perform it. However, Virtuozzo Containers 4.0 is equipped with as many as
three different tools to perform many administrative tasks:
the command line interface
Parallels Management Console with the graphical user interface
Parallels Infrastructure Manager with web interface.
Besides, there is another tool for managing Containers - Parallels Power Panel. However, this
tool is mainly regarded as a means for individual Container customers to manage their personal
Containers and is therefore not described in this guide.
Parallels Management Console and the command line interface are considered the primary tools
for administering Virtuozzo Containers 4.0 and performing main administrative tasks on
Hardware Nodes and in the Container context. Therefore, when describing the ways to perform
this or that task, we have provided the corresponding algorithms only for Parallels Management
Console and the command line interface. As to Parallels Power Panel and Parallels
Infrastructure Manager, a web counterpart of Management Console, they are provided with a
comprehensive online help system.
Certain Linux administrator’s skills are desirable for a person reading the guide. If you foresee
any problems with setting up Linux on your server (for example, related to disk partitioning),
you may consult Parallels Support Team (see Getting Technical Support (p. 388) for contacts).
In addition, you can obtain some useful information regarding Red Hat OS installation issues
from http://www.redhat.com/docs/manuals/linux/.
Preface
14
Organization of This Guide
Chapter 2, Virtuozzo Philosophy, is a must-read chapter that helps you grasp the general
principles of Virtuozzo operation. It provides an outline of Virtuozzo architecture, of the way
Virtuozzo Containers 4.0 stores and uses configuration information, of the things you as
administrator are supposed to perform, and the common way to perform them. It also lets you
understand Virtuozzo licensing policy.
Chapter 3, Operations on Containers, covers those operations that you may perform on a
Container as on a single entity: creating and deleting Containers, starting and stopping them,
backing up and restoring, etc. You will also learn from this chapter how to migrate Containers
from one Hardware Node to another.
Chapter 4, Managing Resources, zeroes in on configuring and monitoring the resource control
parameters for different Containers. These parameters comprise disk quotas, network
accounting and shaping, CPU and system resources. Common ways of optimizing your
Containers configurations are suggested at the end of the chapter.
Chapter 5, Real-Time Monitoring in Parallels Virtuozzo Containers, explains the way to keep track
of the consumption of all kind of resources by running Containers and the Hardware Node itself
in real time. Configuring Parallels Management Console and the Monitor Node for sending
alerts is part and parcel of the monitoring process.
Chapter 6, Managing Services and Processes, familiarizes you with the operations you can
perform on processes and services in Parallels Virtuozzo Containers by using both the
command-line utilities and Parallels Management Console graphical interface.
Chapter 7, Managing Virtuozzo Network, familiarizes you with the Virtuozzo network structure,
enumerates Virtuozzo networking components, and explains how to manage these components
in Virtuozzo-based systems.
Chapter 8, Managing Hardware Nodes, centers on all those operations you as Hardware Nodes
administrator can perform on your Nodes.
Chapter 9, Keeping Your Virtuozzo System Up-to-Date, serves as a reference on the ways to keep
all the software components of a Hardware Node up-to-date.
Chapter 10, Compatibility With Previous Versions of Virtuozzo Containers, provides information
on compatibility issues between Parallels Virtuozzo Containers 4.0 and previous versions of
Virtuozzo Containers and the ways to solve them.
Chapter 11, Advanced Tasks, enumerates those tasks that are intended for advanced system
administrators who would like to obtain deeper knowledge about Virtuozzo capabilities.
Chapter 12, Mastering Parallels Management Console, focuses on those tasks that are most
comfortably accomplished using not the command-line utilities, but Parallels Management
Console graphical interface.
Chapter 13, Troubleshooting, suggests ways to resolve common inconveniences should they
occur during your work with the Parallels Virtuozzo Containers software.
Preface
15
Documentation Conventions
Before you start using this guide, it is important to understand the documentation conventions
used in it. For information on specialized terms used in the documentation, see the Glossary at
the end of this document.
The table below presents the existing formatting conventions.
Formatting convention
Type of Information
Example
Triangular Bullet(¾)
Step-by-step procedures. You
can follow the instructions
below to complete a specific
task.
To create a Container:
Items you must select, such as
menu
options,
command
buttons, or items in a list.
Go to the Resources tab.
Titles of chapters, sections, and
subsections.
Read the Basic Administration chapter.
Used to emphasize the
importance of a point, to
introduce a term or to designate
a command line placeholder,
which is to be replaced with a
real name or value.
These are the so-called EZ templates.
Special Bold
Italics
To destroy a Container, type vzctl
destroy ctid.
Monospace
The names of commands, files,
and directories.
Use vzctl
Container.
Preformatted
On-screen computer output in
your command-line sessions;
source code in XML, C++, or
other programming languages.
Saved parameters for Container
101
Monospace Bold
What you type, as contrasted
with
on-screen
computer
output.
# rpm –V virtuozzo-release
CAPITALS
Names of
keyboard.
SHIFT, CTRL, ALT
KEY+KEY
Key combinations for which
the user must press and hold
down one key and then press
another.
keys
on
the
start
to
start
a
CTRL+P, ALT+F4
Besides the formatting conventions, you should also know about the document organization
convention applied to Parallels documents: chapters in all guides are divided into sections,
which, in turn, are subdivided into subsections. For example, About This Guide is a section, and
Documentation Conventions is a subsection.
Preface
16
Getting Help
In addition to this guide, there are a number of other resources shipped with Virtuozzo
Containers 4.0 which can help you use the product more effectively. These resources include:
Manuals:
Parallels Virtuozzo Containers Evaluation Guide. This guide is destined to introduce you
to the main features of Virtuozzo Containers 4.0 and to its underlying technology, to
help you set up an environment for evaluating the Virtuozzo major features, and to
suggest the relevant procedures for this evaluation.
Getting Started With Parallels Virtuozzo Containers for Linux. This guide provides basic
information on how to install Parallels Virtuozzo Containers 4.0 on your server, create
new Containers, and perform main operations on them. As distinct from the given guide,
it does not contain detailed description of all the operations needed to install and set
Parallels Virtuozzo to work (e.g. planning the structure of your Virtuozzo network or
performing the Virtuozzo Containers unattended installation).
Parallels Virtuozzo Containers for Linux Installation Guide. This guide provides
exhaustive information on the process of installing, configuring, and deploying your
Virtuozzo system. As distinct from the Getting Started With Parallels Virtuozzo
Containers for Linux guide, it contains a more detailed description of all the operations
needed to install and set Virtuozzo Containers 4.0 to work including planning the
structure of your Virtuozzo network, performing the Virtuozzo Containers unattended
installation, etc. Besides, it does not include the description of any Container-related
operations.
Parallels Virtuozzo Containers for Linux Templates Management Guide. This guide is
meant to provide complete information on Virtuozzo templates - an exclusive Parallels
technology allowing you to efficiently deploy standard Linux applications inside your
Containers and to greatly save the Hardware Node resources (physical memory, disk
space, etc.).
Parallels Virtuozzo Containers for Linux Reference Guide. This guide is a complete
reference on all Parallels Virtuozzo configuration files and Hardware Node commandline utilities.
Help systems:
Parallels Management Console Help. This help system provides detailed information on
Parallels Management Console - a graphical user interface tool for managing Virtuozzo
Hardware Nodes and their Containers.
Parallels Infrastructure Manager Online Help. This help system shows you how to work
with Parallels Infrastructure Manager - a tool providing you with the ability to manage
Virtuozzo Hardware Nodes and their Containers with the help of a standard Web
browser on any platform.
Parallels Power Panel Online Help. This help system deals with Parallels Power Panel - a
means for administering individual Containers through a common Web browser on any
platform.
Preface
17
Feedback
If you spot a typo in this guide, or if you have thought of a way to make this guide better, we
would love to hear from you!
The ideal place for your comments and suggestions is the Parallels documentation feedback
page (http://www.parallels.com/en/support/usersdoc/).
18
CHAPTER 2
Virtuozzo Containers Philosophy
In This Chapter
About Virtuozzo Containers Software .................................................................................. 19
Distinctive Features of Parallels Virtuozzo Containers 4.0 .................................................. 21
Main Principles of Virtuozzo Operation ............................................................................... 24
Hardware Node Availability Considerations ........................................................................ 33
Virtuozzo Containers Philosophy
19
About Virtuozzo Containers
Software
What is Parallels Virtuozzo
Parallels Virtuozzo Containers is a patented OS virtualization solution. Virtuozzo Containers
4.0 creates isolated partitions or Containers on a single physical server and OS instance to
utilize hardware, software, data center and management effort with maximum efficiency. The
basic Virtuozzo capabilities are:
Intelligent Partitioning - Division of a server into as many as hundreds of Containers with
full server functionality.
Complete Isolation - Containers are secure and have full functional, fault and performance
isolation.
Dynamic Resource Allocation - CPU, memory, network, disk and I/O can be changed
without rebooting.
Mass Management - Suite of tools and templates for automated, multi-Container and
multi-server administration.
The diagram below represents a typical model of the Virtuozzo-based system structure:
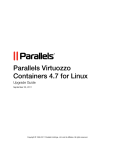
Figure 1: Virtuozzo Containers OS Virtualization
Virtuozzo Containers Philosophy
20
The Parallels Virtuozzo OS virtualization model is streamlined for the best performance,
management, and efficiency. At the base resides a standard Host operating system which can be
either Windows or Linux. Next is the virtualization layer with a proprietary file system and a
kernel service abstraction layer that ensure the isolation and security of resources between
different Containers. The virtualization layer makes each Container appear as a standalone
server. Finally, the Container itself houses the application or workload.
The Parallels Virtuozzo OS virtualization solution has the highest efficiency and manageability
making it the best solution for organizations concerned with containing the IT infrastructure and
maximizing the resource utilization. The Parallels Virtuozzo complete set of management tools
and unique architecture makes it the perfect solution for easily maintaining, monitoring, and
managing virtualized server resources for consolidation and business continuity configurations.
Virtuozzo Applications
Parallels Virtuozzo Containers is often bundled with HSPComplete, a comprehensive solution
for Hosting Service Providers, based on the Virtuozzo technology. Virtuozzo Containers 4.0
allows Hosting Service Providers to:
Have hundreds of customers with their individual full-featured virtual private servers
(Containers) sharing a single physical server;
Provide each customer with a guaranteed Quality of Service;
Transparently move customers and their environments between servers, without any manual
reconfiguration.
While Virtuozzo Containers 4.0 is effectively coupled with HSPComplete as well as with other
hosting automation solutions, the scope of its application is not limited to them.
If you administer a number of Linux dedicated servers within an enterprise, each of which runs
a specific service, you can use Virtuozzo Containers 4.0 to consolidate all these servers onto a
single sever without losing a bit of valuable information and without compromising
performance. Containers behave just like an isolated stand-alone server:
Each Container has its own processes, users, files and provides full root shell access;
Each Container has its own IP addresses, port numbers, filtering and routing rules;
Each Container can have its own configuration for the system and application software, as
well as its own versions of system libraries. It is possible to install or customize software
packages inside a Container independently from other Containers or the host system.
Multiple distributions of a package can be run on one and the same Linux box.
In fact, hundreds of servers may be grouped together in this way. Besides the evident
advantages of such consolidation (increased facility of administration and the like), there are
some you might not even have thought of, say, cutting down electricity bills by times!
Virtuozzo Containers 4.0 proves invaluable for IT educational institutions that can now provide
every student with a personal Linux server, which can be monitored and managed remotely.
Software development companies may use Containers for testing purposes and the like.
Thus, The Virtuozzo Containers software can be efficiently applied in a wide range of areas:
web hosting, enterprise server consolidation, software development and testing, user training,
and so on.
Virtuozzo Containers Philosophy
21
Virtuozzo Containers 64-bit vs. Virtuozzo Containers 32-bit
The Virtuozzo Containers 32-bit version has been ported to support the x86-64 and IA-64
processors, which allows you to use virtually any Virtuozzo Tool and utility under the
Virtuozzo Containers 64-bit versions in exactly the same way as you would use it on the servers
with standard 32-bit processors. However, while working with the 64-bit versions of Parallels
Virtuozzo Containers, you should keep in mind a number of peculiarities specific for the
corresponding Virtuozzo Containers 64-bit version and described in the table below:
Functionality
32-bit
64-bit for x86-64
64-bit for IA-64
Creating Containers on the basis of 32-bit OS
templates.
yes
yes
no
Adding 32-bit
Containers.
yes
no*
no
Migrating Containers based on 32-bit OS templates.
yes
yes
no
Migrating Containers based on 64-bit OS templates.
no
yes
yes
application
templates
to
your
*Note: You can add 32-bit application templates
to Containers created under the Virtuozzo
Containers 64-bit version for the x86-64
processors and based on 32-bit OS templates.
Note: You can move Containers created under
the corresponding Virtuozzo Containers 64-bit
version only to Hardware Nodes running the
same Virtuozzo Containers 64-bit version. So, a
Container created under the Virtuozzo
Containers version for the IA-64 processors can
be migrated only to a Hardware Node with the
same Virtuozzo Containers version installed.
Except for these points, using Virtuozzo Containers 4.0 for 64-bit processors does not differ
from working with its 32-bit counterpart. For example, you can use any Hardware Node as a
Backup Node irrespective of a Virtuozzo Containers version installed on this Node. So, you can
back up a Container from the Node running the Virtuozzo Containers 32-bit version and store it
on the Node running any Virtuozzo Containers 64-bit version and vice versa. More information
on Container backups is provided in the Backing Up and Restoring Containers section (p. 68).
Distinctive Features of Parallels
Virtuozzo Containers 4.0
The concept of Virtuozzo Containers is distinct from the concept of traditional virtual machines
in the respect that Containers always run the same OS kernel as the host system (Linux on
Linux, Windows on Windows, etc.). This single-kernel implementation technology allows to
run Containers with a near-zero overhead. Thus, Virtuozzo Containers offer an order of
magnitude higher efficiency and manageability than traditional virtualization technologies.
Virtuozzo Containers Philosophy
22
OS Virtualization
From the point of view of applications and Container users, each Container is an independent
system. This independency is provided by a virtualization layer in the kernel of the host OS.
Note that only a negligible part of the CPU resources is spent on virtualization (around 1-2%).
The main features of the virtualization layer implemented in Parallels Virtuozzo Containers are
the following:
Container looks like a normal Linux system. It has standard startup scripts, software from
vendors can run inside Container without Virtuozzo-specific modifications or adjustment;
A user can change any configuration file and install additional software;
Containers are fully isolated from each other (file system, processes, Inter Process
Communication (IPC), sysctl variables);
Containers share dynamic libraries, which greatly saves memory;
Processes belonging to a Container are scheduled for execution on all available CPUs.
Consequently, Containers are not bound to only one CPU and can use all available CPU
power.
Virtuozzo File System (VZFS)
VZFS is a file system that allows to share common files among multiple Containers without
sacrificing flexibility. It is possible for Container users to modify, update, replace, and delete
shared files. When a user modifies a shared file, VZFS creates a private copy of the file
transparently for the user. Thus, the modifications do not affect the other users of the file. Main
benefits of VZFS are the following:
It saves memory required for executables and libraries. A typical Container running a
simple web site might consume around 20–30 MBytes of RAM just for executable images.
Sharing this memory improves scalability and total system performance;
It saves disk space. A typical Linux server installation occupies several hundred MBytes of
disk space. Sharing the files allows you to save up to 90% of disk space;
VZFS does not require having different physical partitions for different Containers or
creating a special “file system in a file” setup for a Container. This significantly simplifies
disk administration;
Disk quota enables the administrator to limit disk resources available to a Container on-thefly, in the same manner as the standard disk quota system works on a per-user basis. Disk
quota for users and groups inside Containers is also supported.
Virtuozzo Containers Philosophy
23
Templates
A template (or a package set) in Parallels Virtuozzo Containers is a set of original application
files repackaged for mounting over Virtuozzo File System. Usually it is just a set of RPM
packages for Red Hat like systems. Virtuozzo Containers 4.0 provides tools for creating
templates, installing, upgrading, adding them to and removing them from a Container. Using
templates lets you:
Share the RAM among similar applications running in different Containers to save hundreds
of megabytes of memory;
Share the files comprising a template among different Containers to save gigabytes of disk
space;
Deploy applications simultaneously in many Containers;
Use different versions of an application on different Containers (for example, perform an
upgrade only in certain Containers).
There are two types of templates in Virtuozzo Containers 4.0. These are OS templates and
application templates. An OS template is an operating system and the standard set of
applications to be found right after the installation. Parallels Virtuozzo Containers uses OS
templates to create new Container with a preinstalled operating system. An application template
is a set of repackaged software packages optionally accompanied with configuration scripts. The
Virtuozzo Containers software uses application templates to add extra software to the existing
Container. For example, you can create a Container on the basis of the redhat OS template
and add the MySQL application to it with the help of the mysql template.
For detailed information on Parallels Virtuozzo templates, please see the Parallels Virtuozzo
Containers Templates Management Guide.
Resource Management
Virtuozzo Resource Management controls the amount of resources available to Containers. The
controlled resources include such parameters as CPU power, disk space, a set of memoryrelated parameters. Resource management allows Virtuozzo Containers 4.0 to:
Effectively share available Hardware Node resources among Containers;
Guarantee Quality-of-Service in accordance with a service level agreement (SLA);
Provide performance and resource isolation and protect from denial-of-service attacks;
Simultaneously assign and control resources for a number of Containers;
Manage a multitude of Hardware Nodes in a unified way by means of Parallels
Management Console and Parallels Infrastructure Manager;
Collect usage information for system health monitoring, etc.
Resource Management is much more important for Virtuozzo Containers 4.0 than for a
standalone server since server resource utilization in a Virtuozzo-based system is considerably
higher than that in a typical system.
Virtuozzo Containers Philosophy
24
Main Principles of Virtuozzo
Operation
Basics of Virtuozzo Technology
In this section we will try to let you form a more or less precise idea of the way the Virtuozzo
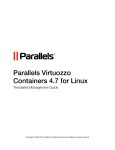
Containers software operates on your computer. Please see the figure below:
Figure 2: Virtuozzo Technology
This figure presumes that you have a number of physical servers united into a network. In fact,
you may have only one dedicated server to effectively use the Virtuozzo Containers software for
the needs of your network. If you have more than one Virtuozzo-based physical server, each one
of the servers will have a similar architecture. In Virtuozzo terminology, such servers are called
Hardware Nodes (or just Nodes), because they represent hardware units within a network.
Parallels Virtuozzo Containers 4.0 is installed on Red Hat Enterprise Linux 4 and 5, Fedora 7
and 8, CentOS 4 and 5, and Suse Linux Enterprise Server 10 configured in a certain way. For
example, such customized configuration shall include the creation of a /vz partition, which is
the basic partition for hosting Containers and which must be way larger than the root partition.
This and similar configuration issues are most easily resolved during the Linux installation on
the Hardware Node. Detailed instructions on installing Linux (called Host Operating System, or
Root Operating System in the picture above) on the Hardware Node are provided in Parallels
Virtuozzo Containers Installation Guide.
Virtuozzo Containers 4.0 is installed in such a way that you will be able to boot your computer
either with Virtuozzo support or without it. This support is presented as “linux virtuozzo” in
your boot loader and shown as Virtuozzo Layer in the figure above.
Virtuozzo Containers Philosophy
25
However, at this point you are not yet able to create Containers. A Container is functionally
identical to an isolated standalone server, having its own IP addresses, processes, files, users, its
own configuration files, its own applications, system libraries, and so on. Containers share the
same Hardware Node and the same OS kernel. However, they are isolated from each other. A
Container is a kind of ‘sandbox’ for processes and users.
Different Containers can run different versions of Linux (for example, SuSE 9.3 or Fedora 8 and
many others). Each Container can run its own version of Linux. In this case we say that a
Container is based on a certain OS template. OS templates are software packages shipped with
Virtuozzo Containers 4.0. Before you are able to create a Container, you should install the
corresponding OS template in Parallels Virtuozzo Containers. This is displayed as Virtuozzo
Templates in the scheme above.
After you have installed at least one OS template, you can create any number of Containers with
the help of standard Virtuozzo utilities, configure their network and/or other settings, and work
with these Containers as with fully functional Linux servers.
Virtuozzo Configuration
Virtuozzo Containers 4.0 allows you to flexibly configure various settings for the Virtuozzo
system in general as well as for each and every Container. Among these settings are disk and
user quota, network parameters, default file locations and configuration sample files, and others.
Parallels Virtuozzo Containers stores the configuration information in two types of files: the
global configuration file /etc/vz/vz.conf and Container configuration files
/etc/vz/conf/<CT_ID>.conf. The global configuration file defines global and default
parameters for Container operation, for example, logging settings, enabling and disabling disk
quota for Containers, the default configuration file and OS template on the basis of which a new
Container is created, and so on. On the other hand, a Container configuration file defines the
parameters for a given particular Container, such as disk quota and allocated resources limits, IP
address and host name, and so on. In case a parameter is configured both in the global Virtuozzo
configuration file, and in the Container configuration file, the Container configuration file takes
precedence. For a list of parameters constituting the global configuration file and the Container
configuration files, turn to the Parallels Virtuozzo Containers Reference Guide.
The configuration files are read when The Virtuozzo Containers software and/or Containers are
started. However, Virtuozzo standard utilities, for example, vzctl, allow you to change many
configuration settings “on-the-fly”, either without modifying the corresponding configuration
files or with their modification (if you want the changes to apply the next time The Virtuozzo
Containers software and/or Containers are started).
Some Virtuozzo utilities have their own configuration files. For example, vzbackup, which is
responsible for backing up Container private areas and configuration files, has its own global
configuration file /etc/vzbackup.conf and may have a number of per-Node configuration
files located in the backup directory. This directory is defined in the backup global
configuration file. Both the global backup configuration file and per-Node ones are located on a
central “backup” node. There are a number of other specific configuration files. All of them are
detailed in the Configuring Parallels Virtuozzo Containers chapter of the Parallels Virtuozzo
Containers Reference Guide.
Virtuozzo Containers Philosophy
26
Understanding Licensing
To start using the Virtuozzo Containers 4.0 software and Virtuozzo management tools (Parallels
Management Console, Infrastructure Manager, and Power Panel), you need a special license Virtuozzo Server license. You should install the Virtuozzo Server license on your server after
(or while) installing Virtuozzo Containers 4.0 on it. Every Hardware Node hosting one or more
Containers shall have its own license. Licenses are issued by Parallels and define a number of
parameters in respect of your Node. The main licensed parameters are listed below:
The number of CPUs which can be installed on the Hardware Node; please keep in mind
that each of the Dual Core and Hyperthreading processors is regarded as one CPU.
The number of users which can simultaneously use Parallels Management Console and
Parallels Infrastructure Manager to manage the Hardware Node and its Containers.
The license expiration date. Any license can be time-limited or permanent.
Virtuozzo licenses have a start date and, if they are time-limited, may also have an
expiration date specified in them. You shall have to set up your system clock correctly;
otherwise, the license validation may fail.
The number of Containers the Hardware Node will be able to host.
The platform and architecture with which the Virtuozzo Containers software is compatible.
Whether the Hardware Node can be managed by means of Parallels Infrastructure Manager.
Virtuozzo Server licenses can be shipped in one of the following ways:
as an activation code: in this case you are provided with a special alphanumeric code which
must be activated before starting to use Virtuozzo Containers 4.0 on your Hardware Node.
During the activation, the code is sent to the Parallels Key Authentication (KA) server
which, in its turn, verifies the code, generate a special license file, sends it back to the Node,
and installs it there.
as a product key: in this case you are provided with an alphanumeric key which is installed
on your Hardware Node directly without connecting to the Parallels KA server and
exchanging any information with it.
Parallels Management Console Overview
Parallels Management Console is a remote management tool for the Virtuozzo Containers
software with graphical user interface. Parallels Management Console is designed for Hardware
Node administrators having access to all the Containers on a particular Node. It allows the
administrator to control multiple Hardware Nodes, to manage all sorts of Containers, and to
monitor the system.
Virtuozzo Containers Philosophy
27
Parallels Management Console Specific Features
Parallels Management Console provides tools for managing any number of Hardware Nodes
and Host operating systems, including the following:
Groups of Hardware Nodes with unified space of Container IDs and IP addresses;
Global Virtuozzo configuration parameters;
Services of the Host OS;
Users and groups;
Disk usage;
Network bandwidth usage;
Network traffic accounting;
Mount points;
Firewall configuration.
Management Console facilitates major operations on all kinds of Containers such as their:
Creating and recovering;
Starting, stopping, and deleting;
Backing up and restoring;
Migrating.
Management Console also provides flexible means for managing various Container parameters,
among which there are:
Files;
Services;
Users and groups;
Network settings;
Action scripts;
Mount points;
Firewall configuration.
Management Console may monitor Containers as well as Hardware Nodes. It also provides
access to various system logs. Alerts notify you of lack of resources or system failures.
Management Console supports all the Virtuozzo template operations, facilitating:
Creating templates and/or template updates;
Uploading and installing templates and/or template updates on the Hardware Node;
Adding/removing templates and/or template updates to/from Containers.
Besides, Management Console can be used to create new VMware virtual machines and manage
the existing ones.
Virtuozzo Containers Philosophy
28
Parallels Management Console Network Architecture
Parallels Management Console uses a typical client/server architecture. The client Management
Console program runs on either Microsoft Windows 2000/XP/2003 or Linux (Fedora Core 4, 5,
6; Fedora 7 and 8; Red Hat Enterprise Linux 4 and 5; CentOS 4 and 5; SUSE Linux Enterprise
Desktop 10, Ubuntu 6) workstation with X Window System.
The client application with the graphical user interface connects to the Parallels Agent software,
which is running in the special Service Container on the Hardware Node. Parallels Agent
communicates with the client via the well-documented open Parallels Agent XML API and
controls the Hardware Node itself and Containers.
Figure 3: Management Console Network Architecture
The client may control multiple Hardware Nodes simultaneously by connecting to multiple
agents as is shown in the figure above. As the communications between the client and Parallels
Agents are secure, the Parallels Management Console workstation may be located virtually
anywhere on the net.
Virtuozzo Containers Philosophy
29
Hardware Node Main Window
You will feel most comfortable with Parallels Management Console with the screen resolution
of 1024x768 or higher. The main window of Management Console consists of two parts: the
tree pane on the left, and view pane on the right. There is a list of Hardware Nodes in the tree
pane. The Hardware Node subtree represents various aspects of its management, e.g. Services,
Logs, Templates, Backups, etc. The content of the view pane depends on the selected item in the
tree pane.
Figure 4: Management Console Main Window
Below the view pane on the right, there is also a small Actions/Messages/Operations pane. You
may switch between the Actions and Messages modes by clicking buttons to the right of this
pane. The Actions pane displays the progress of Management Console actions. The Messages
pane displays the detailed diagnostics of various Management Console errors. The Operations
pane shows the result of various asynchronous tasks performed with Containers.
You can view the summary page for every Hardware Node. Click on the name of the Hardware
Node you are interested in in the tree in the left pane of the Management Console main window
or double–click the name of the Hardware Node in the list of Nodes in the right pane.
Virtuozzo Containers Philosophy
30
The upper part of the view pane contains shortcuts to the most important tasks you are likely to
do. However, all the actions and operations are accessible via the Management Console toolbar,
Action menu, and context menus. The bottom part of the view pane includes three tabs: System,
Network, and Disks. The System tab describes the OS distribution and kernel version, CPU(s),
RAM, swap information, etc. The Network tab describes the Hardware Node network
configuration: interfaces, DNSs, IP addresses, etc. The Disks tab describes disks available on the
Hardware Node and their utilization.
Virtuozzo Containers Philosophy
31
Parallels Infrastructure Management Overview
Parallels Infrastructure Manager is designed for Hardware Node administrators and provides
them with the ability to manage multiple Hardware Nodes and all Containers residing on them
with the help of a standard Web browser on any platform. A list of supported browsers is given
below:
Internet Explorer 6.0 and above;
Mozilla 1.7 and above;
Firefox 1.0 and above;
Opera 8.0 and above.
Chances are that you will also be able to use other browsers, but Parallels Virtuozzo Containers
4.0 has not been extensively tested with them.
The Parallels Infrastructure Manager interface has been designed to let the Virtuozzo server
administrator quickly perform all possible tasks through an intuitive navigation system:
Figure 5: Infrastructure Manager Interface Overview
The main components the Parallels Infrastructure Manager interface consists of are:
The left menu frame listing and allowing to access all your Hardware Nodes and Containers
and the main types of operations to be performed on them with the help of Parallels
Infrastructure Manager;
The toolbar on top of the right frame allowing to perform on your Hardware Nodes and
Containers the actions most frequently called for in your routine management work and,
when necessary, a few more buttons allowing to perform additional actions on the objects
listed in the content part of the right frame (Container backups, packages updates, etc.);
Virtuozzo Containers Philosophy
32
The content part on the right frame displaying the currently accessed Hardware Nodes or
Containers, the key information (their statuses, configuration, etc.) and links to advanced
actions.
Note: Detailed information on Parallels Infrastructure Manager is given in its comprehensive
online help system and Parallels Infrastructure Manager Administrator's Guide shipped with
Infrastructure Manager.
Parallels Power Panel Overview
Wherever Parallels Virtuozzo Containers is applied, there are people that are supposed to be
administrators of particular Containers only, with no access rights to Hardware Nodes as such.
This is only but natural as it corresponds directly with the concept of a virtualization
technology. Such people can be subscribers to a hosting provider, university students, or
administrators of a particular server within an enterprise. Virtuozzo Containers 4.0 is equipped
with a web-based tool for managing personal Containers called Parallels Power Panel.
Parallels Power Panel is a means for administering personal Containers through a common
browser - Internet Explorer, Mozilla, and others. It is implemented by the vzcp package
installed inside the Service Container during the Virtuozzo Containers installation. The
vzcpcon process running in the Service Container handles the client browser requests and
passes them to the Parallels Agent software, which is responsible for managing all the
Containers of the given Hardware Node.
Parallels Power Panel allows Container administrators to:
Start, stop, or restart the Container;
Repair the Container;
Reinstall the Container;
Back up and restore the Container;
Change the Container root password;
Start, stop, or restart certain services inside the Container;
Access other control panels installed in the Container, for example the Plesk control panel.
View a list of Container processes and send them signals;
View the current resources consumption and resources overusage alerts;
View the Virtuozzo logs, etc.
Access rights to administer particular Containers by means of Parallels Power Panel are
determined by the Hardware Node administrator. Detailed instructions on how to control access
rights to particular Containers through Power Panel are provided in the Setting Virtuozzo Tools
to Work chapter of the Parallels Virtuozzo Containers Installation Guide.
Note: Parallels Power Panel can also be used by the Hardware Node administrator for managing
any Container on the given Node.
Virtuozzo Containers Philosophy
33
Hardware Node Availability
Considerations
Hardware Node availability is more critical than the availability of a typical PC server. Since it
runs multiple Containers providing a number of critical services, Hardware Node outage might
be very costly. Hardware Node outage can be as disastrous as the simultaneous outage of a
number of servers running critical services.
In order to increase Hardware Node availability, we suggest you follow the recommendations
below:
Use RAID storage for critical Container private areas. Do prefer hardware RAID, but
software mirroring RAID might suit too as a last resort.
Do not run software on the Hardware Node itself. Create special Containers where you can
host necessary services such as BIND, FTPD, HTTPD, and so on. On the Hardware Node
itself, you need only the SSH daemon. Preferably, it should accept connections from a predefined set of IP addresses only.
Do not create users on the Hardware Node itself. You can create as many users as you need
in any Container. Remember, compromising the Hardware Node means compromising all
Containers as well.
34
CHAPTER 3
Operations on Containers
This chapter describes how to perform day-to-day operations on separate Containers taken in
their wholeness.
Note: We assume that you have successfully installed, configured, and deployed your Parallels
Virtuozzo system. In case you have not, please turn to the Parallels Virtuozzo Containers
Installation Guide providing detailed information on all these operations.
In This Chapter
Creating New Container........................................................................................................ 34
Configuring Container .......................................................................................................... 46
Starting, Stopping, Restarting, and Querying Status of Container ........................................ 49
Listing Containers ................................................................................................................. 51
Setting Name for Container .................................................................................................. 54
Storing Extended Information on Container ......................................................................... 56
Migrating Container .............................................................................................................. 57
Moving Container Within Hardware Node ........................................................................... 64
Copying Container Within Hardware Node .......................................................................... 66
Backing Up and Restoring Containers .................................................................................. 68
Reinstalling Container........................................................................................................... 106
Deleting Container ................................................................................................................ 109
Disabling Container .............................................................................................................. 111
Suspending Container ........................................................................................................... 113
Running Commands in Container ......................................................................................... 115
Creating New Container
This section guides you through the process of creating a Container. We assume that you have
successfully installed Virtuozzo Containers 4.0 and prepared at least one OS EZ template. If
there are no OS EZ templates prepared for the Container creation, turn to the Parallels Virtuozzo
Containers Templates Management Guide first.
Operations on Containers
35
Before You Begin
Before you start creating a Container, you should:
Check that the Hardware Node is visible on your network. You should be able to connect
to/from other hosts. Otherwise, your Containers will not be accessible from other servers.
Check that you have at least one IP address per Container and the addresses belong to the
same network as the Hardware Node or routing to the Containers has been set up via the
Hardware Node.
To create a new Container, you have to:
choose the new Container ID;
choose the OS template to use for the Container;
create the Container itself.
Choosing Container ID
Every Container has a numeric ID, also known as Container ID, associated with it. The ID is a
32-bit integer number beginning with zero and unique for a given Hardware Node. When
choosing an ID for your Container, please follow the simple guidelines below:
ID 0 is used for the Hardware Node itself. You cannot and should not try to create a
Container with ID 0.
This version of Virtuozzo Containers uses ID 1 for the Service Container.
Note: The Service Container is a special Container running the Parallels Agent software
responsible for managing all the Containers of the given Hardware Node via Virtuozzo tools
(i.e. Parallels Management Console, Parallels Infrastructure Manager, and Parallels Power
Panel). In general, you are allowed to perform the same operations in the Service Container
context as you would perform in the context of a regular Container. However, you are not
recommended to change the default configuration of the Service Container (e.g. install your
own applications/templates into or store your private files inside this Container). Changing
the Service Container configuration may affect all the other Containers residing on the
Node.
Operations on Containers
36
The Virtuozzo Containers software reserves the IDs ranging from 0 to 100. Though
Parallels Virtuozzo Containers uses only IDs 0 and 1 from them, the next version might use
additional Containers IDs for internal needs. To facilitate upgrading, please do not create
Containers with IDs below 101.
The only strict requirement for a Container ID is to be unique for a particular Hardware Node.
However, if you are going to have several computers running Virtuozzo Containers 4.0, we
recommend assigning different Container ID ranges to them. For example, on Hardware Node 1
you create Containers within the range of IDs from 101 to 1000; on Hardware Node 2 you use
the range from 1001 to 2000, and so on. This approach makes it easier to remember on which
Hardware Node a Container has been created, and eliminates the possibility of Container ID
conflicts when a Container migrates from one Hardware Node to another.
Another approach to assigning Container IDs is to follow some pattern of Container IP
addresses. Thus, for example, if you have a subnet with the 10.0.x.x address range, you may
want to assign the 17015 ID to the Container with the 10.0.17.15 IP address, the 39108 ID to the
Container with the 10.0.39.108 IP address, and so on. This makes it much easier to run a
number of Virtuozzo utilities eliminating the necessity to check up the Container IP address by
its ID and similar tasks. You can also think of your own patterns for assigning Container IDs
depending on the configuration of your network and your specific needs.
Before you decide on a new Container ID, you may want to make sure that no Container with
this ID has yet been created on the Hardware Node. The easiest way to check whether the
Container with the given ID exists is to issue the following command:
# vzlist -a 101
Container not found
This output shows that Container 101 does not exist on the particular Hardware Node; otherwise
it would be present in the list.
If you use Parallels Management Console, click on the name of your Hardware Node in the left
pane and then on the Virtuozzo Containers item. The Management Console right pane will
display a list of existing Containers on the Node.
WARNING! When deciding on a Container ID, do not use the ID of any Container that was
ever present in the system unless you are sure that no data belonging to the old Container
remains on the Node. The fact is that the administrator of the newly-created Container might
have access to these data in this case, i.e. to the backups of the old Container, its logs, statistics,
etc.
Operations on Containers
37
Choosing OS EZ Template
Before starting to create a Container, you shall decide on which OS EZ template your Container
will be based. There might be several OS EZ templates installed on the Hardware Node and
prepared for the Container creation; use the vzpkg list command to find out what OS EZ
templates are available on your system:
# vzpkg list -O
redhat-el5-x86
fedora-core-8-x86
2007-05-21 23:59:44
2007-12-11 12:45:52
The -O option passed to the vzpkg list command allows you to list only OS EZ templates
installed on the Hardware Node. As you can see, the redhat-el5-x86 and fedoracore-8-x86 OS EZ templates are currently available on the Node. The time displayed
beyond OS EZ templates indicates when the corresponding EZ template was cached.
You can also use the --with-summary option to display brief information on the installed
OS EZ templates:
# vzpkg list -O --with-summary
redhat-el5-x86
:Red Hat Enterprise Linux v.5 Server EZ OS template
fedora-core-8-x86 :Fedora Core 8 EZ OS template
For complete information on the vzpkg list command, you can consult Parallels Virtuozzo
Containers Reference Guide.
In Parallels Management Console, you only have to click the Templates item under the
corresponding Hardware Node name and then the OS Templates tab to see a list of the installed
OS EZ templates:
Figure 6: Management Console - Listing EZ OS Templates
Operations on Containers
38
OS EZ templates can be easily identified by the 'EZ' inscription displayed in the Generation
column next to the corresponding template name.
Operations on Containers
39
Creating Container
After the Container ID and the installed OS EZ template have been chosen, you can create the
Container private area with the vzctl create command. The private area is the directory
containing the VZFS symlinks, copy-on-write area, and private files of the given Container. The
private area is mounted to the /vz/root/CT_ID directory on the Hardware Node and
provides Container users with a complete Linux file system tree.
The vzctl create command requires only the Container ID and the name of the OS
template as arguments; however, in order to avoid setting all the Container resource control
parameters after creating the private area, you can specify a sample configuration to be used for
your new Container. The sample configuration files are residing in the /etc/vz/conf
directory and have names with the following mask: ve-<configname>.conf-sample.
The most commonly used sample is the ve-basic.conf-sample file; this sample file has
resource control parameters suitable for most Containers.
Thus, for example, you can create a new Container by typing the following string:
# vzctl create 101 --ostemplate redhat-el5-x86 -–config basic
Creating Container private area (redhat-el5-x86)
Container is mounted
Postcreate action done
Container is unmounted
Container private area was created
Delete port redirection
Adding port redirection to Container(1): 4643 8443
In this case, the Virtuozzo Containers software will create a Container with ID 101, the private
area based on the redhat-el5-x86 OS EZ template, and configuration parameters taken
from the ve-basic.conf-sample sample configuration file.
If you specify neither an OS template nor a sample configuration, vzctl will try to take the
corresponding values from the global Virtuozzo configuration file (/etc/vz/vz.conf). So
you can set the default values in this file using your favorite text file editor, for example:
DEF_OSTEMPLATE=".redhat-el5-x86"
CONFIGFILE="basic"
and do without specifying these parameters each time you create a new Container. Please keep
in mind that the . symbol before the template name in the DEF_OSTEMPLATE parameter is
used to indicate that the Container being created is to be based on an OS EZ template;
otherwise, it will denote an OS standard template (detailed information on OS standard
templates and how to create Containers on the basis of these templates is provided in the
Parallels Virtuozzo Containers Templates Management Guide).
Now you can create a Container with ID 101 with the following command:
# vzctl create 101
Creating Container private area (redhat-el5-x86)
Container is mounted
Postcreate action done
Container is unmounted
Container private area was created
Delete port redirection
Adding port redirection to Container(1): 4643 8443
Operations on Containers
40
In principle, now you are ready to start your newly created Container. However, typically you
need to set its network IP address, hostname, DNS server address and root password before
starting the Container for the first time.
Operations on Containers
41
Creating Containers in Parallels Management Console
Parallels Management Console uses one wizard both to create a Container and to initially
configure it. You can launch this wizard by selecting the Virtuozzo Containers item in the left
pane and choosing the Create Container option on the Action menu:
Figure 7: Management Console - Creating New Container
The main Container parameters, including the templates and resource management parameters,
can be retrieved on the basis of the Container configuration sample indicated in the very first
option (detailed information on Container configuration samples is provided in the Managing
Container Resources Configurations section (p. 158)).
After you have decided on the Container configuration sample, you are supposed to define the
number of Containers you wish to create in the Number of Containers to create field. By default,
you are offered to create one Container. Besides, you can:
Operations on Containers
42
specify a name for your Container(s) in the Containers Name field; this name can then be
used, along with the Container ID, to refer to the Container while performing this or that
Container-related operation on the Hardware Node. In the case of creating several
Containers at once, you should use the $VEID placeholder which is automatically replaced
with the ID of the Container being created. For example, if you are creating Containers in
the range from 101 to 103 and enter MyCT$VEID into the Container Name(s) field, your
Containers will have the following names: MyCT101, MyCT102, MyCT103.
provide the description of the Container(s) in the Description field. You may enter any
Container-related information you consider reasonable.
Under the Container ID group, you can select the variant the Container ID assignment:
Select the Assign Container ID automatically radio button to automatically assign the first
unoccupied ID to the Container. For example, if you already have Containers with IDs from
101 through 105 and 107, the Container will be assigned the ID of 106.
Select the Assign Container IDs starting from radio button to manually specify the ID to be
assigned to the Container. If you are creating several Containers at once, the specified ID
will denote the starting ID for the first created Container. For example, if you are making 2
Containers and indicate 110 in the field provided, the first Container will be assigned the ID
of 110 and the second one - the ID of 111 (provided you do not already have Containers
with such IDs).
The Hostname group of options on the first page of the wizard shown above might help you
make use of your DNS server. If your DNS server has records for the IP addresses that will be
assigned to the newly-created Containers, select the Assign hostname automatically radio button.
The hostnames will be assigned on the basis of DNS records found. Selecting the Hostname
radio button allows you to manually set a hostname for the Container. As in the case of
assigning names to your Containers, you should use the $VEID placeholder if you are creating
several Containers at once. This placeholder is then automatically replaced with the ID of the
Container being created.
By default, the root account is disabled in a newly-created Container. To enable this account,
you may enter the root password on the first page of the wizard. If you leave the Password and
Confirm password fields blank, the root account will remain disabled.
Clicking the Next button displays the window where you can specify the settings for Container
virtual network adapters:
Operations on Containers
43
Figure 8: Management Console - Configuring Container Network Adapters
This window allows you to:
Assign one or more IP addresses to the venet0 virtual network adapter which is the
default adapter created for every Container on the Hardware Node. To this effect, select the
adapter name, click the Properties button, and, in the displayed window, enter the needed IP
addresses.
Create additional virtual network adapters for the Container by clicking the Add Interface
button and entering the necessary information in the displayed window. As distinct from the
default adapter operating in the host-routed mode, all additional network adapters are set to
work in the bridged mode. For detailed information on what host-routed and bridged modes
are and how to manage virtual network adapters operating in these modes, please turn to the
Managing Virtuozzo Network chapter (p. 205).
On the next step, you should choose the OS template to be used as the basis for the Container
creation:
Operations on Containers
44
Figure 9: Management Console - Choosing OS Template
All OS templates that are installed on the Hardware Node and can be used for the Container
creation are listed in the table on the Specify OS Template screen. To choose an OS template,
click its name in the Name column. Detailed information on OS templates is provided in the
Parallels Virtuozzo Containers Template Management Guide shipped with Virtuozzo Containers
4.0.
You can click on the Finish button on this step of the wizard and create the Container with the
configuration parameters specified in the configuration sample you chose on the first step of the
wizard. If you do not rely on any configuration sample, click the Next button instead of Finish.
In this case you will have to go through a number of steps of the wizard and set all the
parameters of the new Container separately. However, you can click Finish on every of the
following steps of the wizard to start creating the Container. All the pages of the wizard are selfexplanatory, so there is no need in dwelling upon them here in detail. You have the possibility
to:
Operations on Containers
45
Choose the OS template as the Container base and the application templates to be added to
the Containers. Detailed information on OS and application templates is provided in the
Parallels Virtuozzo Containers Templates Management Guide shipped with Virtuozzo
Containers 4.0.
Change the default Container private area and root paths or leave them intact.
Specify one or more search domains and DNS servers and decide on the default gateway to
be used by the venet0 default network adapter.
Configure Quality of Service parameters. The Quality of Service parameters are explained
in the Managing Resources chapter (p. 116); please consult it to gather more understanding
of this topic.
Enable the offline management for the Container for it to be directly managed by its root
from any browser at the Container IP address. For information on the offline management
feature, please see the Configuring Offline Management Parameters section.
Configure network shaping parameters. For detailed information on network shaping, please
turn to the Managing Network Accounting and Bandwidth section (p. 142).
Define what iptables modules are to be used inside the Container. Detailed information
on iptables is provided in the Loading iptables Modules section (p. 339).
Specify whether the Container is to be started on the Hardware Node boot.
Save all the defined parameters as a configuration sample file to be used in future for
creating new Containers on its basis. The information on Container samples is provided in
the Managing Container Resources Configuration section (p. 158). Please consult it to gather
more understanding of these topics.
Creating a new Container may take some time. You can see the progress in the Actions pane.
After you have created, for example, Containers 101, 102, and 103, you can see them in the
right pane of the Management Console window:
Figure 10: Management Console - Checking Newly-Created Container
Operations on Containers
46
Select any of the newly-created Container and choose the Properties item on the Action menu
(or use the context menu, if you like). You will have the possibility to review and/or change
most of the configuration options for this Container, as well as to set the root password using the
Advanced tab.
Configuring Container
Configuring a Container consists of several tasks:
Setting Container startup parameters;
Setting Container network parameters;
Setting Container user passwords;
Configuring Quality of Service (Service Level) parameters.
For all these tasks, the vzctl set command is used. Using this command for setting
Container startup parameters, network parameters, and user passwords is explained later in this
subsection. Service Level Management configuration topics are dwelled upon in the Managing
Resources chapter (p. 116).
Setting Startup Parameters
The vzctl set command allows you to define the onboot Container startup parameter.
Setting this parameter to yes makes your Container automatically boot at the Hardware Node
startup. For example, to enable Container 101 to automatically start on your Hardware Node
boot, you can execute the following command:
# vzctl set 101 --onboot yes --save
Saved parameters for Container 101
The onboot parameter will have effect only on the next Container startup.
Operations on Containers
47
Setting Network Parameters
In order to be accessible from the network, a Container shall be assigned a correct IP address
and hostname; DNS servers shall also be configured. In addition, the SSH or Telnet daemon
shall be running inside the Container. The session below illustrates setting the Container 101
network parameters:
# vzctl set 101 --hostname server101.parallels.com --save
Hostname for Container set: server101.parallels.com
Saved parameters for Container 101
# vzctl set 101 --ipadd 10.0.186.1 --save
Adding IP address(es): 10.0.186.1
Saved parameters for Container 101
# vzctl set 101 --nameserver 192.168.1.165 --save
File resolv.conf was modified
Saved parameters for Container 101
This command will assign Container 101 the IP address of 10.0.186.1, the hostname of
server101.parallels.com, and set the DNS server address to 192.168.1.165. The –save flag saves all the parameters to the Container configuration file.
You can issue the above commands when the Container is running. In this case, if you do not
want the applied values to persist, you can omit the –-save option and the applied values will
be valid only until the Container shutdown.
To check whether SSH is running inside the Container, use vzctl exec, which allows
executing any commands in the Container context. In Red Hat 9 and other new OS templates,
sshd is dependent on xinetd, so run:
# vzctl start 101
[This command starts Container 101, if it is not started yet]
# vzctl exec 101 service xinetd status
xinetd is stopped
# vzctl exec 101 service xinetd start
Starting xinetd: [ OK ]
# vzctl exec 101 service xinetd status
xinetd is started
The above example assumes that Container 101 is created on the Red Hat Linux template. For
other OS templates, please consult the corresponding OS documentation.
For more information on running commands inside a Container from the Hardware Node, see
the Running Commands in Container subsection (p. 115).
Operations on Containers
48
Setting root Password for Container
Setting the root user password is necessary for connecting to a Container via SSH or Parallels
Power Panel. By default, the root account is locked in a newly created Container, and you
cannot log in. In order to log in to the Container, it is necessary to create a user account inside
the Container and set a password for this account or unlock the root account. The easiest way
of doing it is to run:
# vzctl start 101
[This command starts Container 101, if it is not started yet]
# vzctl set 101 --userpasswd root:test
In this example, we set the root password for Container 101 to “test”, and you can log in to the
Container via SSH as root and administer it in the same way as you administer a standalone
Linux server: install additional software, add users, set up services, and so on. The password
will be set inside the Container in the /etc/shadow file in an encrypted form and will not be
stored in the Container configuration file. Therefore, if you forget the password, you have to
reset it. Note that --userpasswd does not requires the --save switch, the password is
anyway persistently set for the given Container.
While you can create users and set passwords for them using the vzctl exec or vzctl
set commands, it is suggested that you delegate user management to the Container
administrator advising him/her of the Container root account password.
Operations on Containers
49
Starting, Stopping, Restarting, and
Querying Status of Container
When a Container is created, it may be started up and shut down like an ordinary server. To start
Container 101, use the following command:
# vzctl start 101
Starting Container ...
Container is mounted
Adding port redirection to Container(1): 4643 8443
Adding IP address(es): 10.0.186.101
Hostname for Container 101 set: test.parallels.com
Container start in progress...
To check the status of a Container, use the vzctl status command:
# vzctl status 101
VEID 101 exist mounted running
Its output shows the following information:
Whether the Container private area exists;
Whether this private area is mounted;
Whether the Container is running.
In our case, vzctl reports that Container 101 exists, its private area is mounted, and the
Container is running. Alternatively, you can make use of the vzlist utility:
# vzlist 101
CTID
NPROC STATUS IP_ADDR
101
20 running 10.0.186.101
HOSTNAME
test.parallels.com
Still another way of getting the Container status is checking the /proc/vz/veinfo file. This
file lists all the Containers currently running on the Hardware Node. Each line presents a
running Container in the <CT_ID> <CT_class> <number_of_processes>
<IP_address> format:
# cat /proc/vz/veinfo
101
2
20
0
0
48
10.0.186.101
This output shows that Container 101 is running, its class ID is “2”, i.e. unlimited, there are 20
running processes inside the Container, and its IP address is 10.0.186.101. The second line
corresponds to the Container with ID 0, which is the Hardware Node itself.
The following command is used to stop a Container:
# vzctl stop 101
Stopping Container ...
Container was stopped
Container is unmounted
# vzctl status 101
VEID 101 exist unmounted down
vzctl has a two-minute timeout for the Container shutdown scripts to be executed. If the
Container is not stopped in two minutes, the system forcibly kills all the processes in the
Container. The Container will be stopped in any case, even if it is seriously damaged. To avoid
waiting for two minutes in case of a Container that is known to be corrupt, you may use the -fast switch:
Operations on Containers
50
# vzctl stop 101 --fast
Stopping Container ...
Container was stopped
Container is unmounted
Make sure that you do not use the --fast switch with healthy Containers, unless necessary, as
the forcible killing of Container processes may be potentially dangerous.
The vzctl start and vzctl stop commands initiate the normal Linux OS startup or
shutdown sequences inside the Container. In case of a Red Hat-like distribution, System V
initialization scripts will be executed just like on an ordinary server. You can customize startup
scripts inside the Container as needed.
To restart a Container, you may as well use the vzctl restart command:
# vzctl restart 101
Stopping Container ...
Container was stopped
Container is unmounted
Starting Container ...
Container is mounted
Adding IP address(es): 10.0.186.101
Container start in progress...
Note: You can also use Container names to start, stop, and restart the corresponding Containers.
For detailed information on Container names, please turn to the Setting Name for Container
section (p. 54).
Operations on Containers
51
Listing Containers
Very often you may want to get an overview of the Containers existing on the given Hardware
Node and to get additional information about them - their IP addresses, hostnames, current
resource consumption, etc. In the most general case, you may get a list of all Containers by
issuing the following command:
# vzlist -a
CTID
1
101
102
103
NPROC
135
8
7
-
STATUS
running
running
running
stopped
IP_ADDR
10.101.60.79
10.101.66.1
10.101.66.159
10.101.66.103
HOSTNAME
localhost
ct101.parallels.com
ct102.parallels.com
ct103.parallels.com
The -a switch tells the vzlist utility to output both running and stopped Containers. By
default, only running Containers are shown. The default columns inform you of the Container
IDs, the number of running processes inside Containers, their status, IP addresses, and
hostnames. This output may be customized as desired by using vzlist command line
switches. For example:
# vzlist -o veid,diskinodes.s -s diskinodes.s
CTID DQINODES.S
1
400000
101
200000
102
200000
This shows only running Containers with the information about their IDs and soft limit on disk
inodes (see the Managing UBC Resources in Parallels Virtuozzo Containers guide for more
information), with the list sorted by this soft limit. The full list of the vzlist command line
switches and output and sorting options is available in the Parallels Virtuozzo Containers
Reference Guide.
Very often you may want to get an overview of the Containers existing on the given Hardware
Node and to get additional information about them - their IP addresses, hostnames, status, etc.
In Parallels Management Console, you may display a list of all Containers by clicking the
Virtuozzo Containers item:
Operations on Containers
52
Figure 11: Management Console - Listing Containers
You can see that currently Containers 101, 102, and 103 exist on the Hardware Node. All the
Container vital information (its IP address(es), hostname, statuses, etc.) is presented in the table
having the following columns:
Column Name
Description
ID
The ID assigned to the Container.
Name
The name assigned to the Container. This name can be used, along with
the Container ID, to perform Container-related operations on the
Hardware Node.
Hostname
The hostname of the Container.
IP Address
The IP address assigned to the Container.
Status
The current status of the Container.
Operations on Containers
Resources
53
The circle opposite the corresponding Container reflects the current
state of the resource parameters consumed by the Container:
If the resource consumption lies within 90% of the limits defined
for the Container, the green circle with a white tick is displayed. It
means that the Container experiences no shortage in resources
required for the normal course of work.
If the Container consumes between 90% and 100% of the limits
defined for it, the orange circle with a white exclamation mark is
displayed.
If the Container is currently consuming 100% or more of the limits
defined for it, the red circle with a white exclamation mark is
displayed. A Container is allowed to consume more than 100% of
its quota only in extreme situations. If you do not solve the problem
in a reasonable time, applications running inside the Container may
be denied some of the resources, so application crashes and other
problems are most probable.
OS
The OS template the Container is based on.
Architecture
The system architecture of the Container.
Original Sample
The name of the configuration sample the Container is based on.
Description
The Container description.
To facilitate working with Containers, you can sort them by different parameters listed in the
table above: their ID, type, hostname, status, IP address, etc. Just click the column with the
appropriate name to put Containers in the desired order.
Operations on Containers
54
Setting Name for Container
You can assign an arbitrary name to your Container and use it, along with the Container ID, to
refer to the Container while performing this or that Container-related operation on the Hardware
Node. For example, you can start or stop a Container by specifying the Container name instead
of its ID.
You can assign names to your Containers using the --name option of the vzctl set
command. For example, to set the computer1 name for Container 101, you should execute
the following command:
# vzctl set 101 --name computer1 --save
Name computer1 assigned
Saved parameters for Container 101
You can also set a name for Container 101 by editing its configuration file. In this case you
should proceed as follows:
1 Open the configuration file of Container 101 (/etc/vz/conf/101.conf) for editing
and add the following string to the file:
NAME="computer1"
2 In the /etc/vz/names directory on the Hardware Node, create a symbolic link with the
name of computer1 pointing to the Container configuration file. For example:
# ln --symbolic /etc/vz/conf/101.conf /etc/vz/names/computer1
When specifying names for Containers, please keep in mind the following:
Names may contain the following symbols: a-z, A-Z, 0-9, underscores (_), dashes (-),
spaces, the symbols from the ASCII character table with their code in the 128 - 255 range,
and all the national alphabets included in the Unicode code space.
Container names cannot consist of digits only; otherwise, there would be no way to
distinguish them from Container IDs.
If it contains one or more spaces, the Container name should be put in single or double
quotes.
After the name has been successfully assigned to Container 101, you can start using it instead of
ID 101 to perform Container-related operations on the Node. For example:
You can stop Container 101 with the following command:
# vzctl stop computer1
Stopping Container ...
Container was stopped
Container is unmounted
You can start Container 101 anew by issuing the following command:
# vzctl start computer1
Starting Container ...
...
You can find out what name is assigned to Container 101 in one of the following ways:
Using the vzlist utility:
# vzlist -o name 101
NAME
computer1
Operations on Containers
Checking
the
NAME
parameter
in
(/etc/vz/conf/101.conf). For example:
the
Container
configuration
55
file
# grep NAME /etc/vz/conf/101.conf
NAME="computer1"
Checking the NAME parameter in the /etc/vz/names/computer1 file which is a
symlink to the Container configuration file. For example:
# grep NAME /etc/vz/names/computer1
NAME="computer1"
You can also use Parallels Management Console to set names for Containers. To this effect:
1
Choose the Virtuozzo Containers item under the corresponding Hardware Node, right-click
the Container to which you wish to assign a name, and select Properties on the context
menu.
2 On the General tab of the displayed window, enter an arbitrary name in the Name field.
3 Click OK.
Operations on Containers
56
Storing Extended Information on
Container
Sometimes, it may be difficult to remember the information on certain Containers. The
probability of this increases together with the number of Containers and with the time elapsed
since the Container creation. The Virtuozzo Containers software allows you to set the
description of any Container on the Hardware Node and view it later on, if required. The
description can be any text containing any Container-related information; for example, you can
include the following in the Container description:
the owner of the Container;
the purpose of the Container;
the summary description of the Container;
etc.
Let us assume that you are asked to create a Container for a Mr. Johnson who is going to use it
for hosting the MySQL server. So, you create Container 101 and, after that, execute the
following command on the Hardware Node:
# vzctl set 101 --description "Container 101
> owner - Mr. Johnson
> purpose - hosting the MySQL server" --save
Saved parameters for Container 101
This command saves the following information related to the Container: its ID, owner, and the
purpose of its creation. At any time, you can display this information by issuing the following
command:
# vzlist -o description 101
DESCRIPTION
Container 101
owner - Mr. Johnson
purpose - hosting the MySQL server
You can also view the Container description by checking the DESCRIPTION parameter of the
Container configuration file (/etc/vz/conf/101.conf). However, the data stored in this
file are more suitable for parsing by the vzlist command rather than for viewing by a human
since all symbols in the DESCRIPTION field except the alphanumerical ones ('a-z', 'A-Z', and
'0-9'), underscores ('_'), and dots ('.') are transformed to the corresponding hex character code.
While working with Container descriptions, please keep in mind the following:
You can use any symbols you like in the Container description (new lines, dashes,
underscores, spaces, etc.).
If the Container description contains one or more spaces or line breaks (as in the example
above), it should be put in single or double quotes.
As distinct from a Container name, a Container description cannot be used for performing
Container-related operations (e.g. for starting or stopping a Container) and is meant for
reference purposes only.
To provide a description for a Container in Management Console, you should perform the
following operations:
Operations on Containers
1
57
Choose the Virtuozzo Containers item under the corresponding Hardware Node, right-click
the Container for which you wish to set the description, and select Properties on the context
menu.
2 On the General tab of the displayed window, type the necessary information in the
Description field.
3 Click OK.
Migrating Container
The Virtuozzo Hardware Node is the system with higher availability requirements in
comparison with a typical Linux system. If you are running your company mail server, file
server, and web server in different Containers on one and the same Hardware Node, then
shutting it down for hardware upgrade will make all these services unavailable at once. To
facilitate hardware upgrades and load balancing between several Hardware Nodes, the
Virtuozzo Containers software provides you with the ability to migrate Containers from one
physical box to another.
Migrating Containers is possible if Parallels Virtuozzo Containers for Linux is installed on two
or more Hardware Nodes, so you are able to move a Container to another Node. Migration may
be necessary if a Hardware Node is undergoing a planned maintenance or in certain other cases.
In Virtuozzo Containers 4.0, you can choose one of the following ways to migrate a Container:
Migrating a Container using the standard migration technology. In this case there is a short
downtime needed to stop and start the Container during its migration from the Source Node
to the Destination Node.
Migrating a Container using the zero downtime migration technology. In this case the 'stop'
and 'start' operations are not performed and the migrated Container is restored on the
Destination Node in the same state as it was at the beginning of the migration. This greatly
reduces the migration time and puts it on the same footing as the delay caused by a short
interruption in the network connectivity.
Both ways are described in the following subsections in detail.
Note: Containers created under the Virtuozzo Containers 32-bit version can be migrated to
Hardware Nodes running the Virtuozzo Containers 64-bit version for the x86-64 processors and
cannot be moved to Hardware Nodes running the Virtuozzo Containers 64-bit version for the
IA-64 processors. Moreover, you can migrate Containers created under the corresponding
Virtuozzo Containers 64-bit version to Nodes running the same Virtuozzo Containers version
for 64-bit processors.
Operations on Containers
58
Standard Migration
The standard migration procedure allows you to move both stopped and running Containers.
Migrating a stopped Container includes copying all Container private files from one Node to
another and does not differ from copying a number of files from one server to another over the
network. In its turn, the migration procedure of a running Container is a bit more complicated
and may be described as follows:
1
After initiating the migration process, all Container private data are copied to the
Destination Node. During this time, the Container on the Source Node continues running.
2 The Container on the Source Node is stopped.
3 The Container private data copied to the Destination Node are compared with those on the
Source Node and, if any files were changed during the first migration step, they are copied
to the Destination Node again and rewrite the outdated versions.
4 The Container on the Destination Node is started.
There is a short downtime needed to stop the Container on the Source Node, copy the Container
private data changes to the Destination Node, and start the Container on the Destination Node.
However, this time is very short and does not usually exceed one minute.
Note: Before the migration, it might be necessary to detach the Container from its caches. For
more information on cached files, see the Cleaning Up Containers subsection (p. 132).
The following session moves Container 101 from the current Hardware Node to a new one
named ts7.parallels.com:
# vzmigrate ts7.parallels.com 101
[email protected]'s password:
vzmsrc: Connection to destination Hardware Node (ts7.parallels.com) \
is successfully established
vzmsrc: Moving/copying Container#101 -> Container#101, [], [] ...
vzmsrc: Container migrating mode : first stage sync, with tracking, \
second stage sync, with Container stopping
vzmsrc: Syncing private area of Container#101 [/vz/private/101] ...
/ 100% |*****************************|
vzmsrc: done
vzmsrc: Stopping Container#101 ...
vzmsrc: done
vzmsrc: Fast syncing private area of Container#101 [/vz/private/101] ...
/ 100% |*****************************|
vzmsrc: done
vzmsrc: DST: Starting Container#101 ...
vzmsrc: DST: done
vzmsrc: Successfully completed
You can specify more than one Container ID simultaneously; in this case, all specified
Containers will be moved to a new Hardware Node one by one.
Important! For the command to be successful, a direct SSH connection (on port 22) should be
allowed between the Source and Destination Nodes.
Operations on Containers
59
By default, after the migration process is completed, the Container private area and
configuration file are renamed on the Source Node by receiving the .migrated suffix.
However, if you wish the Container private area on the Source Node to be removed after the
successful Container migration, you can override the default vzmigrate behavior by
changing the value of the REMOVEMIGRATED variable in the Virtuozzo global configuration
file (/etc/vz/vz.conf) to “yes” or by using the –r yes switch of the vzmigrate
command.
To migrate one or more Containers to another Hardware Node with Parallels Virtuozzo
Containers for Linux using Parallels Management Console, select these Containers from the list
in the right pane after selecting the Virtuozzo Containers item in the left pane. Then right-click
the selection and point to Tasks --> Migrate to Another Hardware Node on the context menu.
Note that the target Hardware Node must be already registered in Management Console;
otherwise, the migration option will not be available. A migration dialog appears, for example:
Figure 12: Management Console - Migrating Containers
In this window, you should do the following:
select the Destination Node where you wish to move the Container;
make sure that the Offline migration... radio button is selected, which allows you to migrate
the Container using the standard migration technology.
You can also specify the following options for the Container to be migrated:
The Do not start the Container after migration check box, if selected, prevents the migrated
Container from starting on the Destination Node after its successful migration. This option
does not have any effect if the Container was not running on the Source Node.
Operations on Containers
60
The Force migration check box, if selected, forces the Container migration even if the
templates necessary for the Container correct operation are not installed on the Destination
Node. However, it will be impossible to start such a Container after the migration in case of
the absence of the needed templates.
Select the Remove the Container private area(s) ... check box to delete the Container private
area from the Source Node after the Container successful migration.
When you are ready, click the Migrate button.
Operations on Containers
61
Zero-Downtime Migration
Starting with Virtuozzo Containers 3.0, the vzmigrate utility allows you to migrate your
Containers from one Hardware Node to another with zero downtime. The zero downtime
migration technology has the following main advantages as compared with the standard one:
The process of migrating a Container to another Node is transparent for you and the
Container applications and network connections, i.e., on the Source and Destination Nodes,
no modifications of system characteristics and operational procedures inside the Container
are performed.
The Container migration time is greatly reduced. In fact, the migration eliminates the
service outage or interruption for Container end users.
The Container is restored on the Destination Node in the same state as it was at the
beginning of the migration.
You can move the Containers running a number of applications which you do not want to
be rebooted during the migration for some reason or another.
Note: Zero-downtime migration cannot be performed on Containers having one or several
opened sessions established with the vzctl enter CT_ID command.
Before performing zero-downtime migration, it is recommended to synchronize the system time
on the Source and Destination Nodes, e.g. by means of NTP (http://www.ntp.org). The reason
for this recommendation is that some processes running in the Container might rely on the
system time being monotonic and thus might behave unpredictably if they see an abrupt step
forward or backward in the time once they find themselves on the new Node with different
system clock parameters.
In the current version of Virtuozzo Containers, you can make use of the following types of zerodowntime migration:
Simple online migration. In this case a Container is 'dumped' at the beginning of the
migration, i.e. all Container private data including the state of all running processes are
saved to an image file. This image file is then transferred to the Destination Node where it is
'undumped'.
Lazy online migration. Using this type of online migration allows you to decrease the size
of the 'dumped' image file storing all Container private data and transferred to the
Destination Node by leaving the main amount of memory in a locked state on the Source
Node and swapping this memory from the Source Node on demand. Thus, the migrated
Container can be started before the whole memory is transferred to the Destination Node,
which drastically reduces the service delay of the corresponding Container. When a process
tries to access a page of memory that has not yet been migrated, the request is intercepted
and redirected to the Source Node where this page is stored.
Iterative online migration. In this case the main amount of Container memory is transferred
to the Destination Node before a Container is 'dumped' and saved to an image file. Using
this type of online migration allows you to attain the smallest service delay.
Iterative + lazy online migration. This type of online migration combines the techniques
used in both the lazy and iterative migration types, i.e. some part of Container memory is
transferred to the Destination Node before 'dumping' a Container and the rest is transported
after the Container has been successfully 'undumped' on the Node.
Operations on Containers
62
To migrate a Container by using the zero downtime migration technology, you should pass the
--online option to the vzmigrate utility. By default, the iterative online migration type is
used to move a Container from one Hardware Node to another. For example, you can migrate
Container 101 from the current Hardware Node to the Destination Node named my_node.com
by executing the following command:
Note: If the CPU capabilities on the Source Node exceed those on the Destination Node (e.g.
you migrate from a Source Node running the Pentium 4 processor to a Destination Node
running the Pentium 3 processor), the migration may fail and you will be presented with the
corresponding warning message. However, if you are sure that the CPU power on the
Destination Node is sufficient to start and run the Container(s) being migrated, you can use the
-f option to force the migration process.
# vzmigrate --online --require-realtime my_node.com 101
Enter password:
Connection to destination Hardware Node (192.168.1.57) \
is successfully established
Moving/copying Container#101 -> Container#101, [], [] ...
Syncing private area '/vz/private/101'
- 100% |***************************************
done
Suspending Container#101 ...
done
Dumping Container#101 ...
done
...
Migration completed
The --require--realtime option tells vzmigrate to move the Container by using the
iterative online migration type only. So, if this migration type cannot be carried out for some
reason or other, the command will fail and exit. If this option is omitted and in the case of
failure while performing the iterative migration, vzmigrate will try to move your Container
by means of the simple online migration type or the lazy online migration type (if the --lazy
option is given). You can specify more than one Container ID simultaneously; in this case, all
specified Containers will be moved to a new Hardware Node one by one.
If you wish to use another migration type for moving your Containers to another Node, you
should additionally pass certain options to vzmigrate:
Specify the --noiter option to migrate a Container by using the simple online migration
type;
Specify the --noiter and --lazy options to migrate a Container by using the lazy
online migration type;
Specify the --lazy option to migrate a Container by using the iterative + lazy online
migrate type.
To migrate one or more Containers in Parallels Management Console, select these Containers
from the list in the right pane after selecting the Containers item in the left pane. Then rightclick the selection and point to Tasks --> Migrate to Another Hardware Node on the context
menu. Note that the target Hardware Node must be already registered in Parallels Management
Console; otherwise, the migration option will not be available. A migration dialog appears, for
example:
Operations on Containers
63
Figure 13: Management Console - Migrating Containers
In this window you can do the following:
Select the target Hardware Node where you want to migrate the selected Container(s).
Select the Live migration... radio button allowing you to migrate the Container using the zero
downtime migration technology. In this case the Container will be migrated using the
'iterative online migration' type.
Select the Force migration check box to force the Container migration even if the templates
necessary for the Container correct operation are not installed on the Destination Node.
However, it will be impossible to start such a Container after the migration in case of the
absence of the needed templates.
Select the Remove the Container private area(s) ... check box to delete the Container private
area from the Source Node after the Container successful migration.
When you are ready, click the Migrate button.
Enabling Container Migration from 3.x to 4.0 Hardware Nodes
To enable the migration of Containers from Hardware Nodes running Virtuozzo Containers 3.0
or 3.0 SP1 to Virtuozzo Containers 4.0 Hardware Nodes, you should do the following:
1
Assign a public IP address to the Service Container and set the password of the vzagent0
user inside this Container using the vzctl set command:
# vzctl set 1 --ipdel all --ipadd public_IP_address
--userpasswd vzagent0:user_password
2 Restart the Parallels Agent software on the Hardware Node:
# vzagent_ctl restart
Operations on Containers
64
Moving Container Within Hardware
Node
The vzmlocal utility allows you to move Containers within your Hardware Node. Moving a
Container within one and the same Hardware Node consists in changing the Container ID and
its private area and root paths. So, you may use vzmlocal to change the ID of the
corresponding Container only or to additionally modify its private area and root path.
Let us assume that you wish to change the ID of your Container from 101 to 111 and modify its
private area and root paths from /vz/private/101 to /vz/private/my_dir and from
/vz/root/101 to /vz/root/ct111, respectively. To this effect, you should execute the
following command on the Hardware Node:
# vzmlocal 101:111:/vz/private/my_dir:/vz/root/ct111
Moving/copying Container#101 -> Container#111,
[/vz/private/my_dir], [/vz/root/ct111] ...
...
Successfully completed
To check if Container 101 has been successfully moved to Container 111, you can use the
following commands:
# vzlist -a
CTID
NPROC STATUS IP_ADDR
1
43 running 10.0.10.1
111
- stopped 10.0.10.101
# ls /vz/private
1 my_dir
# ls /vz/root
1 ct111
HOSTNAME
localhost
myContainer
As can be seen from the example above, the ID of Container 101 has been changed to 111, its
private area is now located in the /vz/private/my_dir directory on the Node, and the path
to its root directory is /vz/root/ct111.
Notes: 1. You may perform a number of moving operations by a single invocation of the
vzmlocal utility.
2. You may run the vzmlocal utility on both running and stopped Containers.
In Parallels Management Console, you can move Containers within your Hardware Node with
the help of the Move Container wizard. To invoke the wizard, select the Virtuozzo Containers
item under the corresponding Hardware Node name, right-click the Container you wish to
change the ID of, and select Tasks -> Move Container on the context menu. You will be asked
by the wizard to complete a number of tasks:
1
On the first step, you are to choose between two options:
The first option (Change Container ID) lets you specify a new ID for the corresponding
Container in addition to specifying its new root and private area paths. Note that if you
choose this option, you will not be able to preserve the old ID for this Container.
The second option (Change Container location on Hardware Node) allows you to specify
new root and private area paths without changing the Container ID.
Operations on Containers
65
2 If you choose the first option, you should specify a new ID for the corresponding Container
on the second step of the wizard. Please note that the old ID for this Container will be lost
and all Container private data will be transferred to the /vz/private/<new_CT_ID>
directory, where <new_CT_ID> denotes the new ID assigned to the Container (e.g.
/vz/private/111 for Container 111).
3 Next, you will presented with the Set New Container Root and Private Area Paths window:
Figure 14: Management Console - Moving Container Within Hardware Node
This window is displayed in one of the following cases:
You selected the Change Container ID check box on the first step of the wizard and then
specified a new ID for your Container and clicked Next in the Specify New Container ID
window. In this case the wizard will propose the default paths for you, but will leave
you the possibility to alter these paths. To do it, check the corresponding check box and
type the new private area or root path in the field thereunder. If have made some
changes to the default paths and now wish to revert to these paths, click the Set Default
button.
You selected the Change Container location on Hardware Node check box and clicked
Next on the first step of the wizard. In this case you can:
-manually enter the new private and root paths for the Container or
-click the Set Default button to display and use the paths proposed by the wizard.
4 On the last step of the Move Container wizard, you can review the settings made by you on
the previous steps. Click the Finish button to begin the moving process. This process may
take some time, so be sure to wait for it to complete.
Operations on Containers
66
Copying Container Within Hardware
Node
The Virtuozzo Containers software allows you to create a complete copy of a particular
Container (in respect of all the Container data and resources parameters), or a Container clone.
This saves your time because you do not have to think of setting up the Container configuration
parameters and the like. Moreover, you can create a number of Container clones at a sitting.
In Virtuozzo-based systems, you can use the vzmlocal utility to copy a Container within the
given Hardware Node. For example, you can issue the following command to create Container
111 and make it be a complete copy of Container 101:
Note: You can clone both running and stopped Containers.
# vzmlocal -C 101:111
Moving/copying Container#101 -> Container#111, [], [] ...
Syncing private area '/vz/private/101'->'/vz/private/111'
...
Successfully completed
# vzlist -a
CTID
NPROC STATUS IP_ADDR
HOSTNAME
1
42 running 10.0.10.1
localhost
101
10 running 10.0.10.101
Container115
111
- stopped 10.0.10.115
Container115
As you can see from the example above, a clone of Container 101 (i.e. Container 111) has been
successfully created. However, before starting to use Container 111, you should set another IP
address and another hostname for this Container which are currently identical to those of
Container 101. Please consult the Configuring Container section (p. 46) to learn how you can do
it.
The vzmlocal utility also enables you to override the default private area and root paths of the
destination Container which, by default, are set to /vz/private/<dest_CTID> and
/vz/root/<dest_CTID>, respectively (where <dest_CTID> denotes the ID of the
resulting Container). In the case of Container 111, these paths are /vz/private/111 and
/vz/root/111. To define custom private area and root paths for Container 111, you can
execute the following command:
# vzmlocal -C 101:111:/vz/private/dir_111/:/vz/root/ct111
Moving/copying Container#101 -> Container#111, [], [] ...
Syncing private area '/vz/private/101'->'/vz/private/dir_111'
...
Successfully completed
# ls /vz/private
1 101 dir_111
# ls /vz/root
1 101 ct111
To create a Container clone in Parallels Management Console, click Virtuozzo Containers under
the name of the corresponding Hardware Node, and as soon as a list of Containers appears,
right-click the Container you are going to clone. Select Tasks on the context menu and proceed
with the Clone Container(s) option. The Clone Container wizard will guide you through the
process of cloning the Container:
Operations on Containers
1
67
First, you will need to specify the number of Container clones to create and the starting
Container ID.
Figure 15: Management Console - Cloning Container
The number of clones depends on the capacity of the Hardware Node. This taken into
account, it is safe to create up to 100 Container clones at one time. The default is 1.
Similarly to creating new Containers, the Clone Container wizard allows the simultaneous
creation of several Container clones with IDs in a continuous series only. The default
starting Container ID, which is automatically offered, is the first unoccupied ID starting
from 101. For example, if you already have Containers with IDs from 101 through 105 and
107, the ID of 106 will be offered by default. And if you are creating only one Container
clone, you may safely accept this number. Or you can specify any other number, and the
system will check up if the ID is unoccupied. However, if you are going to create a number
of Container clones, it is recommended to decide on an unoccupied ID series in advance.
Operations on Containers
68
2 On the second step, you will be asked to define a new name and a new hostname for the
resulting Container. Type an arbitrary name you consider suitable for the Container in the
Name field and indicate its hostname, if necessary, in the Hostname field.
3 In the Assign Network Settings to Containers window, you can view and configure the
virtual network adapters that will be available inside the Container clone. Detailed
information on all network parameters and on the way to manage them is provided in the
Configuring Virtual Adapter Parameters subsection.
4 On the next step, you can change the path to the private area and root directory of the
Container clone by selecting the corresponding Override... check boxes and entering the
desired paths in the fields provided.
5 The last window lets you review the parameters provided by you on the previous steps. You
can also select the Start the cloned Container after its creation check box to immediately start
the Container after its successful cloning. Click Finish to start the copying process.
Parallels Management Console also allows you to create several copies of a Container at once.
To this effect, you should right-click the Containers you are going to clone in the Management
Console right pane, select Tasks --> Clone Container(s) on the context menu, and, in the
displayed window, provide the necessary information for the cloned Containers.
Backing Up and Restoring
Containers
A regular backing up of the existing Containers is essential for any Hardware Node reliability.
Any Container is defined by its private area, configuration files, action scripts, and quota
information. The Virtuozzo Containers software allows to back up all these components. Each
backup file may be of one of the following 3 types:
A full backup containing all Container data. This kind of backup is the most timeconsuming, space-intensive, and the least flexible one. However, full backups are the
quickest to restore.
An incremental backup containing only the files changed since the last full, differential, or
incremental backup. Incremental backups record only the changes since the last Container
backup (either full, differential, or incremental) and, therefore, are less in size and take less
time to complete than the full and differential backups.
A differential backup containing only the files changed since the last full backup. This kind
of backup does not take into account available incremental and differential backup archives
and always backs up all the files modified since the last full backup.
Operations on Containers
69
Using vzabackup/vzarestore Utilities
A regular backing up of the existing Containers is essential for any Hardware Node reliability.
Virtuozzo Containers 4.0 is shipped with the vzabackup and vzarestore utilities allowing
you to back up and restore your Hardware Nodes and their Containers. These utilities can be run
on virtually every Node in your network:
on the Source Node where the Container to be backed up is residing;
on the Backup Node - a special Node intended for storing Container backups (if you have
any), or
on any other Parallels Virtuozzo-based physical server in your network.
The only requirements all the Nodes should meet to successfully run vzabackup and
vzarestore on them is to have a server with the vzabackup package installed and to
provide the network connectivity for this server to be able to establish connections to the Source
and Backup Nodes, if necessary. The vzabackup package needs the Parallels Agent software
to be installed on the Node for its functioning; so, you may need to install this software first.
The created Hardware Node and Container backups are stored on the Backup Node which can
also be presented by any server in your network with the running Parallels Agent software.
Note: The vzabackup and vzarestore utilities can be used to back up and restore
Hardware Nodes running Virtuozzo Containers 4.0 and their Containers. For information on
how to create backups of Hardware Nodes with earlier versions of Parallels Virtuozzo
Containers installed and their Containers, please turn to the Running vzabackup/vzarestore
Utilities section (p. 274).
vzabackup can be used to back up both the Hardware Node itself and all its Containers. Let
us assume the following:
You wish to create a full backup of Container 101 residing on the Source Node with the IP
address of 192.168.0.15.
The credentials to access the Source Node are source_root and 1234qwer.
The backup will be created with the high level of compression.
The Backup Node where the resulting backup archive will be stored has the IP address of
192.168.200.200 and the credentials of backup_root and 1qaz2wsx.
You wish to exclude the /tmp directory inside Container 101 from the backup process.
You wish to provide the following description for the resulting backup archive: The
MySQL database - latest changes.
To create a backup with the aforementioned parameters, you can execute the following
command on any Hardware Node with vzabackup installed and having the network
connectivity to the Source and Backup Nodes:
# vzabackup -D "The MySQL database - latest changes." -C3 \
--storage backup_root:[email protected] \
source_root:[email protected] -e 101 \
--exclude-files /tmp
...
* Sending private backup data
* Backup storage: storing private backup data
* Backup storage: filling resultant backup info
* Removing obsolete backups
* Checking parameters
Operations on Containers
70
* Dumping quota
* Backup storage: preparing to backup
* Adjusting backup type (full)
* Backup storage: receiving backup file
* Backing up private area
100% ***************************************************
...
Upon the command completion, the created backup archive will be put to the backup directory
on the Source Node; by default, this directory is /vz/backups. Later on, the Container
backups may be restored from this directory.
You may specify any number of Hardware Nodes IP addresses in the command line. You can
also perform an incremental or a differential backup by additionally specifying the -I or -Tdiff option, respectively. If you indicate the –I or --Tdiff option, and the utility cannot
find the corresponding full backup, a full backup is performed. You can omit the indication of
the Backup Node if you wish to use your local Node to store the backup archive. Detailed
information on all options which can be passed to the vzabackup utility is provided in the
Parallels Virtuozzo Containers Reference Guide.
Before starting to restore any Hardware Nodes or separate Containers previously backed up, you
might want to view first the information about these Nodes or Containers. This can be done by
running the vzarestore utility on the Source Node (or on any other Node where
vzabackup is installed), e.g.:
# vzarestore --list --storage backup_root:[email protected]
...
Show existing backups...
Title
Creation date/time
Type Size
Container101
2007-02-11T111507+0004 full 8.79 Mb
localhost
2007-02-11T112810+0004 full 150.01 Mb
MyContainer
2007-02-11T113831+0004 full 8.81 Mb
comp1
2007-02-11T110447+0004 full 8.68 Mb
...
If you are running vzarestore on the Backup Node itself, you may omit the --storage
option.
To do the proper restoring of Container 101, issue the following command on the Source Node
(or on any other Node where vzabackup is installed):
# vzarestore 101 --storage backup_root:[email protected]
...
Restore environment: Container101 from 1361ac21-4cae-4981-...
...
This command will restore the latest backup of Container 101 stored on the Backup Node with
the IP address of 192.168.200.200 to the Node where you have run the command. If you
wish to restore a certain (not the latest) Container backup, you should use the -b option and
specify the ID of the created backup instead of the Container ID. You can find out what backup
ID is assigned to this or that Container backup using the -l and -f options of the
vzarestore command. You can also restore only certain files from the backup archive of
Container 101 using the --files option. For detailed information on all options which can be
used with the vzarestore utility, please turn to the Parallels Virtuozzo Containers Reference
Guide.
Operations on Containers
71
Managing Backups in Parallels Management Console
Parallels Management Console deals with three kinds of Nodes - the Source Nodes (the Nodes
where Containers are hosted during their backing up); the Backup Nodes (the Nodes where
Container backups are stored); and the Destination Nodes (the Nodes where Container backups
are restored).
Figure 16: Backup Overview
These Nodes are singled out by their functionality only. In reality, one and the same Hardware
Node may perform two or even three functions. Usually, the Source and Destination Node are
represented by one and the same Hardware Node, because you will likely want the Containers
you back up to be restored to their original Node. However, setting up a dedicated Backup Node
is recommended.
You should make sure that all the three Nodes are registered in Management Console before
starting to work with them.
Parallels Management Console lets you perform the following backup-related operations:
Assign the default Backup Node for the given Source Node;
Set the default backup location on the Backup Node;
Back up a single Container from the Source Node to the Backup Node;
Back up a number of Containers or the whole Hardware Node (i.e. all the Containers on the
given Node) to the Backup Node;
Restore a single Container from the Backup Node to the Destination Node;
Restore a number of Containers or the whole Hardware Node from the Backup Node;
Restore individual files from the Container backup on the Backup Node to the Destination
Node;
Directly manage the Backup Nodes;
Search the backup of a given Container from the Source Node across all the Backup Nodes;
Automate the task of backing up your Containers by setting Container backups to be run on
a schedule.
Operations on Containers
72
Setting Default Backup Parameters
The Virtuozzo Containers software allows you to specify a number of default backup
parameters which can then be used when creating Container backup archives. These parameters
include:
the default Backup Node where Container backups are to be stored;
the default backup location, i.e. the exact place on the Backup Node where Container
backups are to be stored;
the default backup compression level (p. 75);
the default backup type (p. 77).
All the aforementioned operations are described in the following subsections in detail.
Assigning Default Backup Node
When you are backing up Containers from a Source Node, you shall always specify on what
Node the resulting backups should be placed, i.e. the Backup Node. Parallels Management
Console allows you to set the default Backup Node for the given Source Node, i.e. for the Node
for which the window has been invoked, by performing the following operations:
1
Right-click the respective Source Node and choose Backup --> Set Default Backup Options
on the context menu.
2 In the displayed window, click the Change button opposite the Server field:
Figure 17: Management Console - Setting Default Backup Storage
3 In this window you can do the following:
If you do not wish to use a dedicated Node for storing Container backups, select the Use
local Hardware Node radio button and click OK to set the Source Node as the default
Backup Node.
Operations on Containers
73
If you are going to use a dedicated Node for storing Container backups, select the
Choose Hardware Node from the list below radio button. The table below this radio
button presents a list of Nodes registered in Management Console together with their IP
addresses. If the default Backup Node already exists for the given Source Node, it is
selected in the table. You should select the Node you wish to be the default Backup
Node for the given Source Node and click OK.
4 Click OK.
The assignment of the default Backup Node brings about the following effects:
When backing up Containers from the corresponding Source Node in Parallels Management
Console and Infrastructure Manager using the 'default' backup mode, the backups will be
automatically placed onto the default Backup Node.
When backing up Containers form the corresponding Source Node in Parallels Management
Console and Infrastructure Manager using the 'custom' backup mode, you will be
automatically suggested to place the backups onto the default Backup Node.
When a Container administrator backs up their Container by means of Parallels Power
Panel, the corresponding backup is automatically placed on the default Backup Node.
There are no restrictions as to what Hardware Node may be the default Backup Node. The only
requirements that this Node should meet are to be registered in Management Console
(otherwise, it will not be displayed in the table on the Backup Storage screen) and to have
sufficient disk space for housing multiple backups.
Notes: 1. You can use any Hardware Node as a Backup Node irrespective of a Virtuozzo
Containers version installed on this Node. So, you can back up a Container from the Node
running the Virtuozzo Containers 32-bit version and store it on the Node running the Virtuozzo
Containers 64-bit version and vice versa.
2. If you use Parallels Management Console 3.0 to set the default Backup Node for a Hardware
Node running Virtuozzo Containers 4.0, this setting will not be taken into account by Parallels
Management Console 4.0.
Operations on Containers
74
Setting Default Backup Location
Parallels Management Console allows you to change the location of the directory on the Backup
Node where all Container backups are to be stored. By default, the /vz/backup directory is
used. To set another backup directory to be used as the default one for storing Container
backups, you should right-click the corresponding Hardware Node in the left pane of the
Management Console main window and select Backup --> Set Default Backup Location on the
context menu. The following window is displayed:
Figure 18: Management Console - Setting Default Backup Location
In this window you can do one of the following:
Select the Back up to local Hardware Node radio button to specify a backup directory on one
of the Backup Node local disk drives. To set a new backup directory, you should type its
full path on the Node in the Path field or click the ... button and select the desired directory
in the displayed window.
Select the Back up to network share radio button to specify a backup directory on a network
share, i.e. on a Backup Node network drive. To this effect, you should enter the full path to
the directory on the network drive in the Path field. If the network drive where your backup
directory is to be located is password-protected, you should additionally specify the user
name and password to access this share in the User and Password fields, respectively.
After you have specified the path to a new directory for storing Container backups, click OK for
the changes to take effect.
Note: While defining the default backup directory, make sure that the disk drive where this
directory is to be located has sufficient disk space for housing multiple Container backups.
Operations on Containers
75
Defining Default Backup Compression Level
Parallels Virtuozzo Containers 4.0 allows you to configure the default backup compression level
by setting it to one of the following:
None: in this case the Container backup is created without any compression. Using this level
of compression, you may greatly reduce the backup creation time; however, the size of the
resulting backup file may significantly increase as compared to other compression levels.
Normal: in this case the Container backup is created with a normal level of compression.
This compression level is set by default and suitable for backing up most Container files and
folders.
High: in this case the Container backup is created with the high level of compression. The
size of the resulting backup file is smaller than that of the backup file compressed in the
'normal' and 'none' modes; however, it takes longer to create the backup file.
Maximum: in this case the Container backup is created with the maximal level of
compression. The size of the resulting backup file is the smallest and the time of the backup
creation - the longest.
In general the optimal data compression level depends on the type of files to be stored in the
backup archive. For example, it is advisable to use the 'normal' and 'none' compression types if
most of the files to be backed up are already compressed (e.g. the files with the .zip and .rar
extensions) or can be compressed with a low degree of efficiency (e.g. all executable files with
the .exe extension or image files with the .jpg, .jpeg., and .gif extensions).
To configure the default backup compression level, you should perform the following
operations in Parallels Management Console:
1
Right-click the respective Source Node and choose Backup --> Set Default Backup Options
on the context menu:
Operations on Containers
76
Figure 19: Management Console - Setting Default Backup Compression Level
2 Under the Compression Level group in the displayed window, move the slider to the left or
to the right to specify the desired compression level.
3 Click OK.
Operations on Containers
77
Specifying Default Backup Type
Another parameter that you may wish to configure and that will be applied to all Container
backups created using the default backup mode is the backup type. Each backup file may be of
one of the following 3 types:
A full backup containing the whole Container private area and its configuration file.
An incremental backup containing only the files changed since the full backup or the
previous incremental backup. An incremental backup may prove very useful because it
records only the changes since the last Container backup (either full or incremental) and
therefore is much less in size and takes much less time than the full backup. However, after
several consecutive incremental backups it is recommended to create a full backup de
nouveau and start the incremental backups chain from scratch.
A differential backup containing only the files changed since the last full backup. As a rule,
this kind of backup requires less space than a full backup, but more space than an
incremental backup.
You can configure the default backup type by perform the following operations in Parallels
Management Console:
1
Right-click the respective Source Node and choose Backup --> Default Backup Node
Configuration on the context menu:
Figure 20: Management Console - Setting Default Backup Type
2 Under the Backup Type group in the displayed window, choose one of the following options:
Operations on Containers
78
Select the Full radio button to always create full backup archives containing the whole
Container private area, all Container-related configuration files, action scripts, etc.
Select the Incremental or Differential radio button to always perform incremental or
differential backups, respectively. If an incremental or differential backup is performed,
and the corresponding full backup cannot be found, a full backup is automatically
performed.
3 Click OK.
Backing Up Single Container
To back up a single Container on the Source Node, do the following:
1
In Parallels Management Console, click the Virtuozzo Containers item under the
corresponding Source Node to open the Container manager window.
2 Right-click the Container you wish to back up and select Backup --> Back Up Container on
the context menu. The Back Up Containers wizard opens:
Figure 21: Management Console - Choosing Backup Mode
3 On the first step of the wizard, you should choose the Container backup mode:
Default: select this radio button to back up the Container using the default backup mode.
When run in this mode, the default backup parameters are used for creating the
Container backup. You can only set the backup description and configure the default
backup policy.
Operations on Containers
79
Note: Detailed information on what default backup parameters are and how to manage them
is given in the Setting Default Backup Parameters subsection (p. 72).
Custom: select this radio button to manually set the parameters to be applied to the
resulting backup archive. In this case you will have to go through a number of steps
(Steps 4 and 5) of the Back Up Containers wizard and set all the parameters of the
Container backup one by one.
Operations on Containers
80
4 On the second step of the wizard, you should specify the files and directories to be included
in the backup:
Figure 22: Management Console - Choosing Files and Directories to Back Up
By default, all the Container files and directories will be included in the backup archive. To
leave out a file or directory from the backup process, clear its check box in the Included files
table. You can also select the Matching the following criteria check box and use the
Add/Edit/Remove buttons to set the parameters to be met by the file/directory to exclude it
from the backup process. You can specify the full path to the corresponding file/directory,
enter its name, or define any filter compatible with standard Linux masking rules (i.e. with
standard globs). For example, you can indicate /usr/MyDirectory/MyFile.txt to
exclude the MyFile.txt file from the backup process or type *.bmp to leave out all files
with the bmp extension.
Operations on Containers
81
5 Next you should specify the main backup parameters:
Figure 23: Management Console - Specifying Main Backup Parameters
In this window you can configure the following backup parameters:
Choose the Backup Node where the Container backup is to be stored. You may leave the
Backup Node offered by Parallels Management Console by default or use the Change
button to specify the desired Backup Node. For detailed information on Backup Nodes,
please consult the Assigning Default Backup Node subsection (p. 72).
Decide on the backup compression level: 'None', 'Normal', 'High', or 'Maximum'.
Detailed information on all compression levels is provided in the Defining Default
Compression Level subsection (p. 75).
Specify the backup type. It may be full or incremental. Detailed information on backup
types is provided in the Specifying Default Backup Type subsection (p. 77). If you are
backing up a single Container, and no backup of this Container has been found on the
Backup Node, the Backup Type group is not shown, and a full backup is automatically
created.
Operations on Containers
82
6 On the next step of the wizard, you can set the following parameters for the Container
backup:
Provide the backup description in the Backup description field, if necessary. The
description can be any text containing any backup-related information (e.g. the backup
purpose).
Do not stop the Container backup even if any errors appear (the Do not stop on errors
check box is selected) or break the backup process should any malfunction occur (the
check box is cleared).
Do not stop the backup process if one or more of the Containers to be backed up is not
present on the Source Node (the Ignore non-existent Containers check box is selected) or
break the backup process if any Container is absent (the check box is cleared). This
option can be used when backing up several Containers at once.
7 The last screen allows you to review the information provided by you on the previous steps
of the wizard. Click Finish to start creating the Container backup; otherwise, click Back to
return to any step and correct the corresponding parameter.
Operations on Containers
83
Backing Up Group of Containers
To back up several or all Containers from a single Source Node, right-click the Virtuozzo
Containers item under the corresponding Source Node and select Backup --> Back up Containers
on the context menu. The Back Up Containers wizard is displayed. In this wizard you should:
1
Choose the Containers from the Source Node you wish to back up:
Figure 24: Management Console - Choosing Containers to Back Up
To schedule one or more Containers for backing up, click the Add button in the top left
corner and, in the displayed window, select the names of the appropriate Containers and
click OK. The selected Containers will be shown in the table on the Choose Containers to
Back Up screen. Click Next to proceed with the wizard.
2 Choose the Container backup mode:
Default: select this radio button to back up the Container using the default backup mode.
When run in this mode, the default backup parameters are used for creating the
Container backup. You can only set the backup description and configure the default
backup policy.
Note: Detailed information on what default backup parameters are and how to manage them
is given in the Setting Default Backup Parameters subsection (p. 72).
Custom: select this radio button to manually set the parameters to be applied to the
resulting backup archive. In this case you will have to go through a number of steps
(Steps 3 and 4) to of the Back Up Containers wizard and set all the parameters of the
Container backup one by one.
Operations on Containers
84
3 Specify the files and folders to be included in the backup:
Figure 25: Management Console - Choosing Files to Back Up
By default, all the Container files and directories are included in the backup archive.
However, you can select the Matching the following criteria check box and use the
Add/Edit/Remove buttons to set the parameters to be met by the file/directory to exclude it
from the backup process. You can specify the full path to the corresponding file/directory,
enter its name, or define any filter compatible with standard Linux masking rules (i.e. with
standard globs). For example, you can indicate /usr/MyDirectory/MyFile.txt to
exclude the MyFile.txt file from the backup process or type *.bmp to leave out all files
with the bmp extension.
Operations on Containers
85
4 Next you should specify the main backup parameters:
Figure 26: Management Console - Specifying Main Backup Parameters
In this window you can configure the following backup parameters:
Backup Node. This Node is the place where the Container backup will be stored. You
may leave the Backup Node offered by Parallels Management Console by default or use
the Change button to specify the desired Backup Node. For detailed information on
Backup Nodes, please consult the Assigning Default Backup Node subsection (p. 72).
Backup compression level: 'None', 'Normal', 'High', or 'Maximum'. Detailed information
on all compression levels is provided in the Defining Default Compression Level
subsection (p. 75).
Backup type. It may be full, incremental, or differential. Detailed information on backup
types is provided in the Specifying Default Backup Type subsection (p. 77). If you are
backing up a single Container, and no backup of this Container has been found on the
Backup Node, the Backup Type group is not shown, and a full backup is automatically
created.
Operations on Containers
86
5 On the next step of the wizard, you can set the following parameters for the Container
backup:
Provide the backup description in the Backup description field, if necessary. The
description can be any text containing any backup-related information (e.g. the backup
purpose).
Do not stop the Container backup even if any errors appear (the Do not stop on errors
check box is selected) or break the backup process should any malfunction occur (the
check box is cleared).
Do not stop the backup process if one or more of the Containers to be backed up is not
present on the Source Node (the Ignore non-existent Containers check box is selected) or
break the backup process if any Container is absent (the check box is cleared). This
option can be used when backing up several Containers at once.
6 Review the information provided by you on the previous steps of the wizard. Click Finish to
start creating the Container backup or click Back to return to any step and correct the
corresponding parameters.
Another way of backing up a number of Containers from the given Source Node is the
following:
1
Expand the Source Node item in the left pane of the Management Console main window
and click the Virtuozzo Containers item to open the Containers manager window.
2 Select the Containers you wish to back up. Use the CTRL and SHIFT keys for selecting a
number of Containers.
3 Click the right mouse button and select Back up Containers on the context menu.
The aforementioned Back Up Containers wizard is opened directly at the second page, because
the first page (Choose Containers to Back Up) becomes unnecessary.
Operations on Containers
87
Browsing Backup Contents
Parallels Management Console allows you to browse the directory structure of any Container
backup as if this backup had already been restored and restore only the needed files and
directories, if necessary. To view the backed up files and directories of a Container backup, you
should do the following:
1
Choose the Backups item in the Management Console right pane, right-click the Container
backup whose contents you wish to browse, and select Properties on the context menu.
2 In the displayed window, select the corresponding backup in the Available backups table and
click the Show Backup Contents button at the bottom of the window:
Figure 27: Management Console - Browsing Backup Contents
3 Double-click the directory to see its contents. The information on any file/directory inside
the backup is presented in the table having the following columns:
Column Name
Description
Title
The name of the file/directory.
Type
Denotes whether the object is a file, directory, or Virtuozzo file link (i.e. a link to
the corresponding file on the Node).
Size
The size of the file.
Modified
The date and time of the last modification of the file/directory.
Operations on Containers
88
If you wish to restore any files and/or directories from the backup to the actual Container,
select the check boxes near the corresponding files/directories and click the Restore Selected
Items button. Detailed information on how to restore individual files/directories is provided
in the Restoring Container Files subsection.
Restoring Single Container
To restore a Container from its backup, do the following:
1
Expand the Source Node item in the left pane of the Parallels Management Console main
window and click the Virtuozzo Containers item to open the Containers manager window.
2 Select the Container the backup of which you wish to restore from the Backup Node.
3 Click the right mouse button and select Backup --> Restore Container on the context menu.
The Restore Container wizard opens:
Figure 28: Management Console - Restoring Container Wizard
In this wizard you should do the following:
In the Choose Backup Node and Backup Archive window:
Select the Backup Node. This Node is the place where the Container backup is stored.
The Last Backup Date column in the list of Backup Nodes shows the date and time of the
last backup (if any) of the selected Container on the corresponding Node.
Operations on Containers
89
Select the backup from which the Container is to be restored. Any Container may have
any number of its backups made at different dates and of different types. As a rule, you
choose the most recent backup, unless you have reasons to restore an intermediary one.
In the Review Container Restoration Settings window:
Review the parameters provided by you on the previous step of the wizard.
Click the Finish button to start restoring the Container.
Notes: 1. During this operation, the Destination Node is supposed to be the same as the Source
Node. For instructions on how to restore a Container to a Destination Node other than the
Source Node, see Managing Backup Node.
2. If you wish to restore a Container residing on a Hardware Node running Virtuozzo Containers
4.0 from its backup stored on a 3.0 Hardware Node in Parallels Management Console, you
should invoke the Restore Container wizard for the Node where the Container backup is located,
i.e. for the 3.0 Node.
Operations on Containers
90
Restoring Container Files
Parallels Virtuozzo Containers allows you to browse the directory structure of any Container
backup as if this backup had already been restored and restore only the needed files and
folders/directories. To this effect, you should do the following:
1
Expand the Source Node item in the left pane of the Management Console main window
and click the Virtuozzo Containers item to open the Containers manager window.
2 Right-click the Container the files/folders of which you wish to restore and select Backup -> Restore Individual Container Files on the context menu. The Restore Individual Container
Files wizard opens:
Figure 29: Management Console - Restoring Container Files Wizard
In the first step of the wizard, you should:
Select the Backup Node. This Node is the place where the Container backup is stored. The
Last Backup Date column in the list of Backup Nodes shows the date and time of the last
backup (if any) of the selected Container on the corresponding Node.
Select the backup from which the Container files/folders/directories are to be restored. Any
Container may have any number of its backups made at different dates and of different
types.
The second step of the wizard allows you to review and explore the contents of all the
directories that were present inside your Container at the moment of the backup creation:
Operations on Containers
91
Figure 30: Management Console - Restoring Container Files Wizard
Double-click the directory to see its contents. The information on any file/directory inside the
backup archive is presented in the table having the following columns:
Column Name
Description
Title
The name of the file/directory.
Type
Denotes whether the object is a file, directory, or Virtuozzo file link (i.e. a link to
the corresponding file on the Node).
Size
The size of the file.
Modified
The date and time of the last modification of the file/directory.
To enqueue this or that file/directory for being restored, you should select its check box. You
can restore all the files and subdirectories included in a given directory by selecting the check
box next to this directory.
The last step of the wizard allows you to review the parameters provided by you on the previous
steps of the wizard. If you are satisfied with the specified parameters, click Finish to start
restoring the Container files/folders/directories; otherwise, click Back and change the
corresponding parameters.
Note: During this operation, the Destination Node is supposed to be the same as the Source
Node. For instructions on how to restore Container files/folders/directories to a Destination
Node other than the Source Node, see Managing Backup Node.
Operations on Containers
92
Restoring Group of Containers
To restore several Containers of a single Source Node from their backups on the Backup Node,
right-click the Virtuozzo Containers item under the corresponding Source Node, and select
Backup --> Restore Containers on the context menu. The Restore Containers wizard is
displayed. In this wizard you should:
1
Select the Backup Node on the Choose Backup Node screen. This Node is the place where
the backups of the Source Node Containers are stored. The Backup Availability column in the
list of Backup Nodes shows whether backups have been found on the corresponding Node.
2 On the Choose Containers to Restore screen, select the Containers you wish to restore from
the Backup Node:
Figure 31: Management Console - Restoring Containers Wizard
By default, all the backups of the Containers originally belonging to the Source Node are
selected, but you may exclude certain Containers from this list, as well as include in it any
other backups found on this Backup Node (i.e. the backups of those Containers not
belonging to the Source Node). To include these other backups, you should first make them
visible by selecting the Show all available backups check box.
Operations on Containers
93
3 If the Containers to be restored exist on the Destination Node, you will be presented with
the Resolve Conflicts With Existing Containers window listing these Containers. When
deciding on whether to restore this or that Container, please keep in mind that, during the
Container restoration, all its current data will be overridden with data from the
corresponding backup.
4 On the Review Containers Restoration Settings screen, click the Finish button to start
restoring the Containers.
Notes: 1. During this operation, all the Containers will be restored to the Source Node, i.e. to the
Node for which you have invoked the wizard, irrespective of whether the backed up Containers
originally belonged to this Source Node or to any other Node.
2. If you wish to restore a Container residing on a Hardware Node running Virtuozzo Containers
4.0 from its backup stored on a 3.0 Hardware Node in Parallels Management Console, you
should invoke the Restore Container wizard for the Node where the Container backup is located,
i.e. for the 3.0 Node.
Operations on Containers
94
Managing Backup Node
Any Hardware Node may perform the functions of the Backup Node, i.e. store the backups of
any Containers of any Hardware Nodes. To see a list of Container backups stored on a
Hardware Node, expand its name in the left pane of the Management Console main window and
select the Backups item:
Figure 32: Management Console - Listing Backups
The table in the right pane presents the following information about the Container backups
stored on the current Backup Node:
Column Name
Description
Name
The name of the backed up Container.
Source Node
The Node where the Container was hosted during its backing up.
Last Backup Date
The date and time when the last backing up of the Container took place.
Number of Backups The number of Container backups on the Node.
Description
The backup description.
Operations on Containers
95
The backup manager window allows you to perform the following operations:
Restore a single Container from its backup. You should right-click the needed Container
backup and select Restore Container on the context menu to start the Restore Container
wizard. In this wizard, you should select the Destination Node, i.e. the place whither the
Container will be restored. By default, the Container Source Node is selected. Only the
Nodes registered in Parallels Management Console are shown.
Restore one or several files and/or directories from a particular Container backup. You
should right-click the Container backup whose files/directories you wish to restore and
select Restore Individual Container Files on the context menu to start the Restore Individual
Container Files wizard. In this wizard you should:
Select the Destination Node, i.e. the place whither the Container files/directories will be
restored:
Figure 33: Management Console - Launching Restore Individual Container Files Wizard
By default, the Container Source Node is selected. Only the Nodes registered in
Parallels Management Console are shown. You can also restore the files to your local
computer, i.e. to the computer where Parallels Management Console is installed. To this
effect, select the Restore to local machine radio button and, in the Path field, specify the
path to the folder whither the files will be restored.
Operations on Containers
96
Select the Container files/directories that will be restored to the Destination Node:
Figure 34: Management Console - Choosing Files For Restoring
The Choose Files to Restore window provides you with a tree view of the files and
directories that you have backed up. To enqueue this or that file/directory for being
restored, you should select its check box. You can select the check box next to the
corresponding directory to restore all the files and subdirectories from this directory.
The Review Container Restoration Settings window enables you to review the parameters
entered by you on the previous steps of the wizard. If you are satisfied with the
parameters set, click Finish to start restoring the selected Container files/directories to
the Destination Node. Otherwise, click Back and change the corresponding parameters.
Right-clicking on a Container backup in this table and selecting Properties on the context menu
brings about the Container Backups dialog where you can view extensive information about the
current Container backup, including all its full and incremental backups, as well as delete any of
these backups, explore their contents (i.e. the Container files and directories), or restore the
Container or any of its files/directories by selecting their check boxes and clicking the Restore
Selected Items button.
Operations on Containers
97
Searching for Container Backups
If you do not remember the place where you are storing the backup of a particular Container
(identified by its ID or its IP address or its hostname or by the date of its creation), you can
search for the backup across all the Hardware Nodes (performing the function of Backup Nodes
in this case) registered in Parallels Management Console.
To search for a backup, do the following:
1
Right-click the Virtuozzo Containers item under the corresponding Backup Node name, and
select Backup --> Search for Backups on the context menu to open the Find Container
Backups dialog:
Figure 35: Management Console - Searching for Backups
2 On the upper left drop-down menu, choose the Container parameter by which you wish to
search for the corresponding Container backup.
3 Enter the value of the parameter in the text field on the right. All the Containers with the
corresponding parameter including the specified value as its part will be found. E.g., if you
enter "100" as the value for Container ID, the backups of Containers 100, 1000, 1001, 1002,
2100, 3100, and so on, will be searched for.
Operations on Containers
98
4 Check those Nodes where you want to search for the backups.
5 Click the Search button.
The Search results table presents the following information about the found backups:
Column Name
Description
Name
The name of the Container whose backup has been found.
Source Node
The Node where the Container was hosted during its backing up.
Creation date
The date and time when the backup was created.
Type
The backup type. Detailed information on all backup types is given in the
Defining Default Backup Type subsection (p. 77).
Backup Node
The Backup Node - the Node where the backup has been found.
Description
The backup description.
Double-clicking on a Container backup in this table brings about the Container Backups dialog
where you can view extensive information about the current Container backup, including all its
full and incremental backups, as well as delete any of these backups or restore them in the
manner depicted above.
Scheduling Container Backups
Parallels Management Console allows you to automate the task of backing up your Containers
by setting Container backups to be run on a schedule. So, you can specify certain time intervals
when the Container backup will be automatically performed. A schedule can be set for a
Container to be backed up at different intervals: daily, weekly, monthly. It is also possible to
specify a particular day of month for a Container backup to be executed.
Parallels Management Console provides you with a special wizard - Schedule Task for Backing
Up Containers - helping you schedule the time when for your Containers are to be backed up. To
invoke the wizard, right-click the Scheduled Tasks item under the corresponding Hardware
Node name and select Schedule New Task --> Back Up Containers on the context menu.
In this wizard you should:
1
Choose the Containers to be backed up on the schedule you will set on the following steps
of the wizard.To this effect, click the Add button in the top right corner of the Choose
Containers to Backup Up window, select the names of the corresponding Containers, and
click OK. When you are read, click Next to proceed with the wizard.
2 Choose the Container backup mode:
Default: select this radio button to back up the Container using the default backup mode.
When run in this mode, the default backup parameters are used for creating the
Container backup. You can only set the backup description and configure the default
backup policy.
Note: Detailed information on what default backup parameters are and how to manage them
is given in the Setting Default Backup Parameters subsection (p. 72).
Custom: select this radio button to manually set the parameters to be applied to the
resulting backup archive. In this case you will have to go through a number of additional
steps (Steps 3 and 4) of the Schedule Backup Task for Container(s) wizard and set the
necessary parameters of the Container backup one by one.
Operations on Containers
99
3 Specify the files and directories to be included in the backup:
Figure 36: Scheduling Container Backups - Choosing Files to Back Up
By default, all the Container files and folders are included in the backup archive. To leave
out a file or directory from the backup process, clear its check box in the Included files table.
You can also select the Matching the following criteria check box and use the
Add/Edit/Remove buttons to set the parameters to be met by the file/folder to exclude it from
the backup process. You can specify the full path to the corresponding file/folder, enter its
name, or define any filter compatible with standard Linux masking rules (i.e. with standard
globs). For example, you can indicate /usr/MyDirectory/MyFile.txt to exclude
the MyFile.txt file from the backup process or type *.bmp to leave out all files with the
bmp extension.
Note: The Included files table is not shown if you are creating a backup task for several
Containers.
Operations on Containers
100
4 Next you should specify the main backup parameters:
Figure 37: Scheduling Container Backups - Setting Main Backup Options
In this window you can configure the following backup parameters:
Backup Node. This Node is the place where the Container backup will be stored. You
may leave the Backup Node offered by Parallels Management Console by default or use
the Change button to specify the desired Backup Node. For detailed information on
Backup Nodes, please consult the Assigning Default Backup Node subsection (p. 72).
Backup compression level: 'None', 'Normal', 'High', or 'Maximum'. Detailed information
on all compression levels is provided in the Defining Default Compression Level
subsection (p. 75).
Operations on Containers
101
Backup type. It may be full, incremental, or differential. Detailed information on backup
types is provided in the Specifying Default Backup Type subsection (p. 77). If you are
backing up a single Container, and no backup of this Container has been found on the
Backup Node, the Backup Type group is not shown, and a full backup is automatically
created.
5 On the next step of the wizard, you can set the following parameters for the Container
backup:
Provide the backup description in the Backup description field, if necessary. The
description can be any text containing any backup-related information (e.g. the backup
purpose).
Do not stop the Container backup even if any errors appear (the Do not stop on errors
check box is selected) or break the backup process should any malfunction occur (the
check box is cleared).
Do not stop the backup process if one or more of the Containers to be backed up is not
present on the Source Node (the Ignore non-existent Containers check box is selected) or
break the backup process if any Container is absent (the check box is cleared). This
option can be used when backing up several Containers at once.
Operations on Containers
102
6 Next you should specify a number of parameters for the backup tasks being created:
Figure 38: Management Console - Defining Backup Tasks Parameters
In this window you are supposed to:
set the name for the backup task;
provide the task description, if necessary;
set the schedule for the Container backup (specify the task start time, set the time
interval when the Container backup is to be performed, etc.);
define the date when the backup task is to be removed from the schedule.
You can also clear the Enabled ... check box if you wish to run the scheduled task during a
certain period of time. You can always enable the task later on by right-clicking the task and
selecting Enable on the context menu.
Operations on Containers
103
7 On the last step of the wizard, review the parameters provided by you on the previous steps
of the wizard. If you are satisfied with all the parameters, click Finish to schedule the task.
Otherwise, click the Back button to return to the previous steps and change the
corresponding parameters. On this step you can also do the following:
Provide the backup description in the Backup description field. The description can be
any text containing any backup-related information (e.g. the backup purpose).
Select the Do not stop on errors check box to make the Container backup not stop even if
any errors appear during the backup execution. If you clear the check box, the backup
process will be broken should any malfunction occur.
Select the Force full backup check box to always perform a full backup for the selected
Containers. If you clear the check box, an incremental backup will be performed for
those Containers whose full backups are already present on the Backup Node.
At any time, you can configure any parameters of the scheduled backup task, disable the task, or
even delete it. To this effect, choose the Scheduled Tasks item under the corresponding
Hardware Node name, right-click the corresponding backup task in the Management Console
right pane, and select one of the following options on the context menu:
Disable to temporarily stop backing up your Containers on the set schedule
Delete to permanently remove the scheduled backup task
Properties to change the settings of the backup task.
Operations on Containers
104
Setting Maximal Backup Number for Parallels Power Panel
Management Console allows you to configure the number of Container backups Container
administrators are allowed to create on the given Hardware Node using Parallels Power Panel.
By default, any Container administrator is allowed to create only one Container backup in
Parallels Power Panel. However, you can increase the number of allowed backups by
performing the following operations:
1
Right-click the Hardware Node where the Container, for which you wish to increase the
number of allowed backups, is residing and choose Backup --> Set Default Backup Options:
Figure 39: Management Console - Setting Number of Allowed Backups in Power Panel
2 Specify the number of Container backups the Container administrator will be able to create
with Parallels Power Panel by typing the desired number in the Maximum number of allowed
Container backups field or using the spin button.
3 Click OK.
Operations on Containers
105
Please keep in mind that the limit set on the number of Container backups concerns only the
process of backing up Containers using the Parallels Power Panel tool. There are no restrictions
for any users creating Container backups by means of other Virtuozzo Tools (e.g. Parallels
Infrastructure Manager or Parallels Management Console); they are allowed to create as many
Container backups as they want to.
Operations on Containers
106
Reinstalling Container
Reinstalling a Container is used if a Container administrator has inadvertently modified,
replaced, or deleted any file that is part of an application or OS template, which has brought
about the Container malfunction. You can reinstall the Container in the two following ways:
1
The vzctl recover command restores the original VZFS symlinks of the Container
private area to the OS and/or application template(s) as they were at the time when the
Container was created and/or when the application template(s) were added to the Container.
This command does not deal with any user files on the Container:
# vzctl recover 101
Optimizing Container private area...
vzquota : (warning) Quota is running for id 101 already
Setting quota ...
Container is mounted
Setup slm memory limit
Setup slm subgroup (default)
Container is unmounted
Recover OS template: redhat-el5-x86
Creating Container private area (redhat-el5-x86)
...
Recovering Container completed successfully
2 The vzctl reinstall command creates a new private area for the problem Container
from scratch using its configuration files and its OS and application templates. Thus, a clean
working copy of the Container is created:
# vzctl reinstall 101
Optimizing Container private area...
Calculating Container disk usage...
Creating Container private area (redhat-el5-x86)
Starting Container ...
Initializing quota...
Container is mounted
Setup slm memory limit
Setup slm subgroup (default)
Container start in progress...
Calculating Container disk usage...
Copying Container credentials...
Stopping Container ...
Container was stopped
Container is unmounted
Old Container file system has been moved to /old
Initializing quota...
Container reinstallation completed successfully
Note: If any of the Container application templates cannot be added to the Container in a
normal way, the reinstallation process will fail. This may happen, for example, if an application
template was added to the Container using the --force option of the vzpkgadd or vzpkg
install command (for more information on these commands, please see the Virtuozzo
Command Line Interface chapter in the Parallels Virtuozzo Containers Reference Guide).
In order to retain the personal data inside the old Container, the utility also copies the contents
of the old private area to the /old directory of the new private area (unless the -skipbackup option is given). The personal data can then be copied to the corresponding
directories of the new private area and the /old directory eventually deleted:
# vzctl start 101
Starting Container ...
Operations on Containers
107
Container is mounted
Setup slm memory limit
Setup slm subgroup (default)
Setting devperms 20002 dev 0x7d00
Adding port redirection to Container(1): 4643 8443
Adding IP address(es) to pool:
Adding IP address(es): 10.14.14.101
Hostname for Container set: localhost.localdomain
Container start in progress...
# vzctl exec 101 ls /
bin
boot
dev
[...other directories...]
old
[...other directories...]
tmp
usr
var
Both the vzctl recover and vzctl reinstall commands retain the users' credentials
base, unless the --resetpwdb option is specified.
Note: In the current version of Parallels Virtuozzo Containers, Management Console does not
support recovering Containers; this functionality is accessible only through the command line
on the Hardware Node.
Customizing Container Reinstallation
The default reinstallation, as performed by the vzctl reinstall command, creates a new
private area for the broken Container as if it were created by the vzctl create command
and copies the private area of the broken Container to the /old directory in the new private
area so that no file is lost. There is also a possibility of deleting the old private area altogether
without copying or mounting it inside the new private area, which is done by means of the -skipbackup option. This way of reinstalling corrupted Containers might in certain cases not
correspond exactly to your particular needs. It happens when you are accustomed to creating
new Containers in some other way than just using the vzctl create command. For
example, you may install additional software licenses into new Containers, or anything else. In
this case you would naturally like to perform reinstallation in such a way so that the broken
Container is reverted to its original state as determined by you, and not by the default behavior
of the vzctl create command.
To customize reinstallation, you should write your own scripts determining what should be done
with the Container when it is being reinstalled, and what should be configured inside the
Container after it has been reinstalled. These scripts should be named vps.reinstall and
vps.configure, respectively, and should be located in the /etc/vz/conf directory on
the Hardware Node. To facilitate your task of creating customized scripts, the Virtuozzo
Containers software is shipped with sample scripts that you may use as the basis of your own
scripts.
When the vzctl reinstall <CT_ID> command is called, it searches for the
vps.reinstall and vps.configure scripts and launches them consecutively. When the
vps.reinstall script is launched, the following parameters are passed to it:
--veid
The ID of the Container.
Operations on Containers
108
--ve_private_tmp
The path to the Container temporary private area. This path designates
where a new private area is temporarily created for the Container. If the
script runs successfully, this private area is mounted to the path of the
original private area after the script has finished.
--ve_private
The path to the Container original private area.
You may use these parameters within your vps.reinstall script.
If the vps.reinstall script finishes successfully, the Container is started, and the
vps.configure script is called. At this moment the old private area is mounted to the /old
directory inside the new one irrespective of the --skipbackup option. This is done in order
to let you use the necessary files from the old private area in your script, which is to be run
inside the running Container. For example, you might want to copy some files from there to
regular Container directories.
After the vps.configure script finishes, the old private area is either dismounted and
deleted or remains mounted depending on whether the --skipbackup option was provided.
If you do not want to run these reinstallation scripts and want to stick to the default vzctl
reinstall behavior, you may do either of the following:
1
Remove the vps.reinstall and vps.configure scripts from the /etc/vz/conf
directory, or at least rename them;
2 Modify the last line of the vps.reinstall script so that it would read
exit 128
instead of
exit 0
The 128 exit code tells the utility not to run the scripts and to reinstall the Container with the
default behavior.
Operations on Containers
109
Deleting Container
You can delete a Container that is not needed anymore with the vzctl destroy <CT_ID>
command. This command removes the Container private area completely and renames the
Container configuration file and action scripts by appending the .destroyed suffix to them.
Note: You can also use the vzctl delete command introduced in Virtuozzo Containers 4.0
to remove Containers from your Hardware Node. This command has the syntax identical to
vzctl destroy and is meant to replace the latter in the future.
A running Container cannot be destroyed with the vzctl destroy command. The example
below illustrates destroying Container 101:
# vzctl destroy 101
Destroying Container private area: /vz/private/101
Container is currently mounted (unmount first)
# vzctl stop 101
Stopping Container ...
Container was stopped
Container is unmounted
# vzctl destroy 101
Destroying Container private area: /vz/private/101
Container private area was destroyed
# ls /etc/vz/conf/101.*
/etc/vz/conf/101.conf.destroyed
# vzctl status 101
VEID 101 deleted unmounted down
If you do not need the backup copy of the Container configuration files (with the .destroyed
suffix), you may delete them manually.
Containers can be deleted by using Parallels Management Console. Management Console
allows you to delete Containers that are not needed anymore. To delete one or more Containers,
select it (them) in the Containers table in the right pane of the Management Console main
window. You can use CTRL+Click to select or deselect an entry, SHIFT+Click to select a range
of Containers, CTRL+A to select all Containers. Then right-click the selected Containers and
choose Delete, for example:
Operations on Containers
110
Figure 40: Management Console - Deleting Container
You can also click the Delete button on the toolbar or select Delete on the Action menu. In the
displayed dialog, click Yes to confirm your decision.
Deleting a considerable number of Containers may take a rather long run. The progress is
displayed in the Actions pane.
Operations on Containers
111
Disabling Container
There may appear situations when you wish to forbid Container owners to use their Containers.
For example, it may happen in case the Container owner uses it for unallowed purposes:
intruding into computers of other users, participating in DoS attacks, etc.
In such cases, the Virtuozzo Containers software allows you to disable a Container, thus,
making it impossible to start the Container once it was stopped. For example, you can execute
the following command to disable Container 101 residing on your Hardware Node:
# vzctl set 101 --disabled yes
After the Container stopping, the Container user will not be able to start it again until you enable
this Container again by passing the --disabled no option to vzctl set. You can also
use the --force option to start any disabled Container. For example:
# vzctl start 101
Container start disabled
# vzctl start 101 --force
Starting Container...
Container is mounted
Adding port redirection to Container(1): 4643 8443
Adding IP address(es): 10.144.144.101
Hostname for Container set: Container_101
Container start in progress...
You can also disable/enable a Container by means of Parallels Management Console. To this
effect, you should select the Virtuozzo Containers item under the Hardware Node name on the
Management Console main menu, right-click the corresponding Container, and choose Tasks -> Disable/Enable on the context menu, respectively. For example:
Operations on Containers
112
Figure 41: Management Console - Disabling Container
You can use CTRL+Click to select or deselect an entry, SHIFT+Click to select a range of
Containers, CTRL+A to select all Containers.
Operations on Containers
113
Suspending Container
Parallels Virtuozzo Containers 4.0 allows you to suspend any running Container on the
Hardware Node by saving its current state to a special dump file. Later on, you can resume the
Container and get it in the same state the Container was at the time of its suspending.
In Virtuozzo-based systems, you can use the vzctl suspend command to save the current
state of a Container. For example, you can issue the following command to suspend Container
101:
# vzctl suspend 101
Setup checkpoint ...
Container is unmounted
Checkpointing completed successfully
During the command execution, the /vz/private/101/dump/Dump file containing the
entire state of Container 101 is created and the Container itself is stopped.
Note: You can set another directory to store dump files for your Containers by changing the
value of the DUMPDIR parameter in the Virtuozzo global file. Detailed information on the
Virtuozzo global file and the parameters you can specify in it is provided in the Parallels
Virtuozzo Containers Reference Guide.
In Parallels Management Console, you can suspend a running Container by doing the following:
1
Select the Containers item under the corresponding Hardware Node name in the
Management Console left pane.
2 In the Management Console right pane, right-click the Container you wish to suspend and
choose Suspend on the context menu.
3 Confirm the operation execution by clicking Yes in the displayed window.
At any time, you can resume Container 101 by executing the following command:
# vzctl resume 101
Starting Container ...
Container is mounted
Adding port redirection to Container(1): 4643 8443
Adding IP address(es): 10.0.10.101
Container start in progress...
The Container state is restored from the /vz/private/101/dump/Dump file on the Node.
Upon the restoration completion, any applications that were running inside Container 101 at the
time of its suspending will be running and the information content will be the same as it was
when the Container was suspended.
To restore a suspended Container in Management Console:
1
Select the Containers item under the corresponding Hardware Node name in the
Management Console left pane.
2 In the Management Console right pane, right-click the Container you wish to restore and
choose Resume on the context menu.
While working with dump files, please keep in mind the following:
Operations on Containers
114
You can restore the Container dump file on the Source Node, i.e. on the Node where this
Container was running before its dumping, or transfer the dump file to another Node and
restore it there.
Note: Before restoring a Container from its dump file, please make sure that the file system
on the Destination Node is identical to that at the moment of the Container dumping;
otherwise, the Container restoration may fail.
You can use the file manager to view the files and directories inside the suspended
Container. However, you cannot change any of the files and directories since it may cause
the Container to resume improperly.
You can reinstall the suspended Container.
You can back up the suspended Container.
You can restore the suspended Container from its backup. After restoring the Container, it is
brought to the 'suspended' state again.
You cannot clone the suspended Container.
You cannot change the ID of the suspended Container.
You cannot change network settings of the suspended Container.
You cannot perform operations on the users' accounts inside the suspended Container.
You cannot repair the suspended Container.
Operations on Containers
115
Running Commands in Container
Usually, a Container administrator logs in to the Container via network and executes any
commands in the Container as on any other Linux box. However, you might need to execute
commands inside Containers bypassing the normal login sequence. This can happen if:
You do not know the Container login information, and you need to run some diagnosis
commands inside the Container in order to verify that it is operational.
Network access is absent for a Container. For example, the Container administrator might
have accidentally applied incorrect firewalling rules or stopped the SSH daemon.
The Virtuozzo Containers software allows you to execute commands in a Container in these
cases. Use the vzctl exec <CT_ID> command for running a command inside the
Container with the given ID. The session below illustrates the situation when the SSH daemon
is not started:
# vzctl exec 101
sshd is stopped
# vzctl exec 101
Starting sshd:[
# vzctl exec 101
sshd (pid 26187)
/etc/init.d/sshd status
/etc/init.d/sshd start
OK ]
/etc/init.d/sshd status
is running...
Now Container users can log in to the Container via SSH.
When executing commands inside a Container from shell scripts, use the vzctl exec2
command. It has the same syntax as vzctl exec but returns the exit code of the command
being executed instead of the exit code of vzctl itself. You can check the exit code to find out
whether the command has completed successfully.
If you wish to execute a command in all running Containers, you can use the following script:
# for i in `cat /proc/vz/veinfo | awk '{print $1}'|egrep -v '^0$'`; \
do echo "Container $i"; vzctl exec $i <command>; done
where <command> is the command to be executed in all the running Containers. For example:
# for i in `cat /proc/vz/veinfo | awk '{print $1}'|egrep -v '^0$'`; \
do echo "Container $i"; vzctl exec $i uptime; done
Container 1
2:26pm up 6 days, 1:28, 0 users, load average: 0.00, 0.00, 0.00
Container 101
2:26pm up 6 days, 1:39, 0 users, load average: 0.00, 0.00, 0.00
[The rest of the output is skipped...]
116
CHAPTER 4
Managing Resources
The main goal of resource control in Virtuozzo Containers 4.0 is to provide Service Level
Management or Quality of Service for Containers. Correctly configured resource control
settings prevent serious impacts resulting from the resource over-usage (accidental or malicious)
of any Container on the other Containers. Using resource control parameters for resources
management also allows to enforce fairness of resource usage among Containers and better
service quality for preferred Containers, if necessary.
In This Chapter
What are Resource Control Parameters? ............................................................................... 116
Managing Disk Quotas.......................................................................................................... 117
Managing Container CPU Resources.................................................................................... 135
Managing Network Accounting and Bandwidth ................................................................... 142
Managing System Parameters ............................................................................................... 150
Managing Container Resources Configuration ..................................................................... 158
What are Resource Control
Parameters?
The system administrator controls the resources available to a Container through a set of
resource management parameters. All these parameters are defined either in the Virtuozzo
global configuration file (/etc/vz/vz.conf), or in the respective Container configuration
files (/etc/vz/conf/CT_ID), or in both. You can set them by manually editing the
corresponding configuration files, by using the Virtuozzo command-line utilities, or through
Parallels Management Console. These parameters can be divided into the disk, network, CPU,
and system categories. The table below summarizes these groups:
Group
Description
Parameter names
Explained in
Disk
This group of parameters determines DISK_QUOTA, DISKSPACE, Managing Disk
disk quota in Parallels Virtuozzo DISKINODES, QUOTATIME, Quotas
Containers. The Virtuozzo disk quota is QUOTAUGIDLIMIT, IOPRIO
realized on two levels: the per-Container
level and the per-user/group level. You
can turn on/off disk quota on any level
and configure its settings.
Managing Resources
Network This group of parameters determines TRAFFIC_SHAPING,
TOTALRATE,
Container the management of network BANDWIDTH,
bandwidth available to different RATE, RATEBOUND
Containers (network shaping). You can
turn on/off network shaping and
configure the settings for different
Containers.
117
Managing
Network
Accounting and
Bandwidth
CPU
This group of parameters defines the VE0CPUUNITS, CPUUNITS, Managing
BURST_CPULIMIT, Container CPU
CPU time different Containers are CPUS,
BURST_CPU_AVERAGE_USAGE Resources
guaranteed to receive.
System
This group of parameters allows you to slmmemorylimit
easily and effectively configure and
control all memory-related parameters
inside Containers.
Managing
System
Parameters
Managing Disk Quotas
This section explains what disk quotas are, defines disk quota parameters, and describes how to
perform disk quota related operations:
Turning on and off per-Container (first-level) disk quotas;
Setting up first-level disk quota parameters for a Container;
Turning on and off per-user and per-group (second-level) disk quotas inside a Container;
Setting up second-level quotas for a user or for a group;
Checking disk quota statistics;
Cleaning up Containers in certain cases.
Managing Resources
118
What are Disk Quotas?
Disk quotas enable system administrators to control the size of Linux file systems by limiting
the amount of disk space and the number of inodes a Container can use. These quotas are known
as per-Container quotas or first-level quotas in Parallels Virtuozzo Containers. In addition, the
Virtuozzo Containers software enables the Container administrator to limit disk space and the
number of inodes that individual users and groups in that Container can use. These quotas are
called per-user and per-group quotas or second-level quotas in Parallels Virtuozzo Containers.
By default, first-level quotas on your Node are enabled (which is defined in the Virtuozzo
global configuration file), whereas second-level quotas must be turned on for each Container
separately (in the corresponding Container configuration files). It is impossible to turn on
second-level disk quotas for a Container if first-level disk quotas are off for that Container.
The Virtuozzo Containers software keeps quota usage statistics and limits in
/var/vzquota/quota.<CT_ID> - a special quota file. The quota file has a special flag
indicating whether the file is “dirty”. The file becomes dirty when its contents become
inconsistent with the real Container usage. This means that when the disk space or inodes usage
changes during the Container operation, these statistics are not automatically synchronized with
the quota file, the file just gets the “dirty” flag. They are synchronized only when the Container
is stopped or when the Hardware Node is shut down. After synchronization, the “dirty” flag is
removed. If the Hardware Node has been incorrectly brought down (for example, the power
switch was hit), the file remains “dirty”, and the quota is re-initialized on the next Container
startup. This operation may noticeably increase the Node startup time. Thus, it is highly
recommended to shut down the Hardware Node properly.
Disk Quota Parameters
The table below summarizes the disk quota parameters that you can control. The File column
indicates whether the parameter is defined in the Virtuozzo global configuration file (G), in the
Container configuration files (V), or it is defined in the global configuration file but can be
overridden in a separate Container configuration file (GV).
Parameter
Description
disk_quota
File
Indicates whether first-level quotas are on or off for all Containers or GV
for a separate Container.
diskspace
Total size of disk space the Container may consume, in 1-Kb blocks.
diskinodes
Total number of disk inodes (files, directories, and symbolic links) the V
Container can allocate.
quotatime
The grace period for the disk quota overusage defined in seconds. The V
Container is allowed to temporarily exceed its quota soft limits for no
more than the QUOTATIME period.
quotaugidlimit
This parameter defines the maximum aggregate number of user IDs and V
group IDs for which disk quota inside the given Container will be
accounted. If set to 0, the UID and GID quota will be disabled.
ioprio
The Container priority for disk I/O operations. The greater the priority, V
the more time the Container has for writing to and reading from the
disk.
V
Managing Resources
119
Turning On and Off Per-Container Disk Quotas
The parameter that defines whether to use first-level disk quotas is DISK_QUOTA in the
Virtuozzo global configuration file (/etc/vz/vz.conf). By setting it to “no”, you will
disable Virtuozzo quotas completely.
This
parameter
can
be
specified
in
the
Container
configuration
file
(/etc/vz/conf/<CT_ID>.conf) as well. In this case its value will take precedence of the
one specified in the global configuration file. If you intend to have a mixture of Containers with
quotas turned on and off, it is recommended to set the DISK_QUOTA value to “yes” in the
global configuration file and to “no” in the configuration file of that Container which does not
need quotas.
The session below illustrates a scenario when first-level quotas are on by default and are turned
off for Container 101:
[checking that quota is on]
# grep DISK_QUOTA /etc/vz/vz.conf
DISK_QUOTA=yes
[checking available space on /vz partition]
# df /vz
Filesystem
1k-blocks
Used Available Use% Mounted on
/dev/sda2
8957295
1421982
7023242 17% /vz
[editing Container configuration file to add DISK_QUOTA=no]
# vi /etc/vz/conf/101.conf
[checking that quota is off for Container 101]
# grep DISK_QUOTA /etc/vz/conf/101.conf
DISK_QUOTA=no
# vzctl start 101
Starting Container ...
Container is mounted
Adding IP address(es): 10.0.16.101
Hostname for Container set: ve101
Container start in progress...
# vzctl exec 101 df
Filesystem
1k-blocks
Used Available Use% Mounted on
vzfs
8282373
747060
7023242 10% /
As the above example shows, the only disk space limit a Container with the quotas turned off
has is the available space and inodes on the partition where the Container private area resides.
To view and/or change the DISK_QUOTA parameter status in the Virtuozzo global file using
Parallels Management Console, do the following:
1
In the Management Console left pane, right-click the needed Node and select Tasks -->
Manage Virtuozzo Configuration on the context menu.
Managing Resources
120
Figure 42: Management Console - Enabling Per-Container Disk Quota
2 In the displayed window, you can view the current status of the disk_quota parameter
and modify it, if necessary.
3 Click the Apply button.
Parallels Management Console does not let you enable/disable disk quotas for separate
Containers, thus overriding the global setting. If the first-level quotas are on by default, there is
no way to rescind the calculation of quota data for a Container by means of Management
Console. However, you can allow this Container to have an almost unlimited disk space and the
number of inodes by doing the following:
1
Click Virtuozzo Containers in the Management Console left pane, right-click the needed
Container in the right pane, and choose Properties.
2 Click the Resources tab and select the Disk Quota item:
Managing Resources
121
Figure 43: Management Console - Container Disk Quota Parameters
3 Double-click the diskinodes parameter, and select the Not limited check box to remove
any limits on the number of disk inodes for the given Container.
4 Click OK twice.
5 If necessary, repeat Steps 3 and 4 for the diskspace parameter to allow the given
Container to have unlimited disk space.
Note: You must change the DISK_QUOTA parameter in the global Virtuozzo configuration file
only when all Containers are stopped, and in the Container configuration file – only when the
corresponding Container is stopped. Otherwise, the configuration may prove inconsistent with
the real quota usage, and this can interfere with the normal Hardware Node operation.
Managing Resources
122
Setting Up Per-Container Disk Quota Parameters
Three parameters determine how much disk space and inodes a Container can use. These
parameters are specified in the Container configuration file:
DISKSPACE
The total size of disk space that can be consumed by the Container in 1-Kb
blocks. When the space used by the Container hits the soft limit, the Container
can allocate additional disk space up to the hard limit during the grace period
specified by the QUOTATIME parameter.
DISKINODES
The total number of disk inodes (files, directories, and symbolic links) the
Container can allocate. When the number of inodes used by the Container hits
the soft limit, the Container can create additional file entries up to the hard limit
during the grace period specified by the QUOTATIME parameter.
QUOTATIME
The grace period of the disk quota specified in seconds. The Container is allowed
to temporarily exceed the soft limit values for the disk space and disk inodes
quotas for no more than the period specified by this parameter.
Managing Resources
123
The first two parameters have both soft and hard limits (or, simply, barriers and limits). The
hard limit is the limit that cannot be exceeded under any circumstances. The soft limit can be
exceeded up to the hard limit, but as soon as the grace period expires, the additional disk space
or inodes allocations will fail. Barriers and limits are separated by colons (“:”) in Container
configuration files and in the command line.
The following session sets the disk space available to Container 101 to approximately 1Gb and
allows the Container to allocate up to 90,000 inodes. The grace period for the quotas is set to ten
minutes:
# vzctl set 101 --diskspace 1000000:1100000 --save
Saved parameters for Container 101
# vzctl set 101 --diskinodes 90000:91000 --save
Saved parameters for Container 101
# vzctl set 101 --quotatime 600 --save
Saved parameters for Container 101
# vzctl exec 101 df
Filesystem
1k-blocks
Used Available Use% Mounted on
vzfs
1000000
747066
252934 75% /
# vzctl exec 101 stat -f /
File: "/"
ID: 0
0
Namelen: 255
Type: UNKNOWN (0x565a4653)
Blocks: Total: 1000000 Free: 252934
Available: 252934
Size: 1024
Inodes: Total: 90000
Free: 9594
It is possible to change the first-level disk quota parameters for a running Container. The
changes will take effect immediately. If you do not want your changes to persist till the next
Container startup, do not use the –-save switch.
To set up per-Container disk quota parameters using Parallels Management Console, do the
following:
1
Click Virtuozzo Containers in the Management Console left pane, right-click the needed
Container in the right pane, and choose Properties.
2 Click the Resources tab and select Disk Quota.
3 Double-click the diskinodes parameter in the right part of the displayed window, and
enter the soft limit and hard limit values for this parameter in the fields provided. For
example:
Managing Resources
124
Figure 44: Management Console - Setting Up Container Disk Quota
The hard limit is the limit that cannot be exceeded under any circumstances. The soft limit
can be exceeded up to the hard limit, but as soon as the grace period expires, the additional
disk space or inodes allocations will fail.
4 Click OK.
5 If necessary, repeat Steps 3 and 4 for the diskspace and quotatime parameters to
define the disk space quota and its grace period for the given Container.
Managing Resources
125
Turning On and Off Second-Level Quotas for Container
The parameter that controls the second-level disk quotas is QUOTAUGIDLIMIT in the
Container configuration file. By default, the value of this parameter is zero and this corresponds
to disabled per-user and per-group quotas.
If you assign a non-zero value to the QUOTAUGIDLIMIT parameter, this action brings about
the two following results:
1
Second-level (per-user and per-group) disk quotas are enabled for the given Container;
2 The value that you assign to this parameter will be the limit for the number of file owners
and groups of this Container, including Linux system users. Note that you will theoretically
be able to create extra users of this Container, but if the number of file owners inside the
Container has already reached the limit, these users will not be able to own files.
Enabling per-user and per-group quotas for a Container requires restarting the Container. The
value for it should be carefully chosen; the bigger value you set, the bigger kernel memory
overhead this Container creates. This value must be greater than or equal to the number of
entries in the Container /etc/passwd and /etc/group files. Taking into account that a
newly created Red Hat Linux-based Container has about 80 entries in total, the typical value
would be 100. However, for Containers with a large number of users this value may be
increased.
When managing the quotaugidlimit parameter, please keep in mind the following:
if you delete a registered user but some files with their ID continue residing inside your
Container, the current number of ugids (user and group identities) inside the Container will
not decrease.
if you copy an archive containing files with user and group IDs not registered inside your
Container, the number of ugids inside the Container will increase by the number of these
new IDs.
The session below turns on second-level quotas for Container 101:
# vzctl set 101 --quotaugidlimit 100 --save
Unable to apply new quota values: ugid quota not initialized
Saved parameters for Container 101
# vzctl stop 101; vzctl start 101
Stopping Container ...
Container was stopped
Container is unmounted
Starting Container ...
Container is mounted
Adding IP address(es): 192.168.1.101
Hostname for Container set: ct101
Container start in progress...
In Parallels Management Console, Virtuozzo second-level disk quotas are controlled in the
window that you may access by performing the following actions:
1
Click Virtuozzo Containers in the Management Console left pane, right-click the needed
Container in the right pane, and choose Properties.
2 Click the Resources tab and the Disk Quota item.
3 Double-click the quotaugidlimit parameter:
Managing Resources
126
Figure 45: Management Console - Turning Second-Level Disk Quota On and Off
4 Clear the Turn 2nd level quota off check box, enter the desired value in the Value field, and
click OK.
5 Restart the Container, if it running, for the changes to take effect.
Managing Resources
127
Setting Up Second-Level Disk Quota Parameters
The Virtuozzo Containers software provides the standard Linux quota package for working
inside Containers:
# vzctl exec 101 rpm -q quota
quota-4.03-1.1.parallels
This command shows that the quota package installed in the Container is built and shipped by
Parallels. Use the utilities from this package (as is prescribed in your Linux manual) to set
Virtuozzo second-level quotas for the given Container. For example:
# ssh ct101
root@ct101's password:
Last login: Sat Jul 5 00:37:07 2007 from 10.100.40.18
[root@ct101 root]# edquota root
Disk quotas for user root (uid 0):
Filesystem
blocks
soft
hard
inodes
soft
hard
/dev/vzfs
38216
50000
60000
45454
70000
70000
[root@ct101 root]# repquota -a
*** Report for user quotas on device /dev/vzfs
Block grace time: 00:00; Inode grace time: 00:00
Block limits
File limits
User
used
soft
hard grace
used soft hard grace
---------------------------------------------------------------------root
-38218
50000
60000
45453 70000 70000
[the rest of repquota output is skipped]
[root@ct101 root]# dd if=/dev/zero of=test
dd: writing to `test': Disk quota exceeded
23473+0 records in
23472+0 records out
[root@ct101 root]# repquota -a
*** Report for user quotas on device /dev/vzfs
Block grace time: 00:00; Inode grace time: 00:00
Block limits
File limits
User
used
soft
hard grace
used soft hard grace
---------------------------------------------------------------------root
+50001
50000
60000
none
45454 70000 70000
[the rest of repquota output is skipped]
The above example shows the session when the root user has the disk space quota set to the
hard limit of 60,000 1Kb blocks and to the soft limit of 50,000 1Kb blocks; both hard and soft
limits for the number of inodes are set to 70,000.
It is also possible to set the grace period separately for block limits and inodes limits with the
help of the /usr/sbin/setquota command. For more information on using the utilities
from the quota package, please consult the system administration guide shipped with your
Linux distribution or online manual pages included in the package.
Parallels Management Console also provides means for setting up second-level disk quotas in
Virtuozzo Containers 4.0. You should perform the following steps:
1
Open the needed Container manager window by double-clicking the corresponding
Container line in the right pane of the Parallels Management Console window.
2 Select the Users and Groups item in the left pane of the Container manager window.
3 In the right pane, select either the Groups or Users tab to see the list of Container registered
groups or users, respectively.
Managing Resources
128
4 Double-click the name of the group/user for whom you want to set up the quota parameters.
The group/user Properties window appears.
5 Click the Disk Quota tab in this window:
Figure 46: Management Console - Setting Up Second-Level Disk Quota Parameters
6 Select the needed quota parameter (either diskinodes or diskspace) and click the
Change Quota Limits button.
7 In the displayed window, enter the quota settings of your choice for the current group/user.
8 Click OK to close the Second Level Disk Quota window; then click OK to close the
group/user Properties window.
Managing Resources
129
Checking Quota Status
As the Hardware Node administrator, you can check the quota status for any Container with the
vzquota stat and vzquota show commands. The first command reports the status from
the kernel and shall be used for running Containers. The second command reports the status
from the quota file (located at /var/vzquota/quota.<CT_ID>) and shall be used for
stopped Containers. Both commands have the same output format.
The session below shows a partial output of Container 101 quota statistics:
# vzquota stat 101 –t
resource
usage
softlimit
1k-blocks
38281
1000000
inodes
45703
90000
User/group quota: on,active
Ugids: loaded 34, total 34, limit 100
Ugid limit was exceeded: no
hardlimit
1100000
91000
grace
User/group grace times and quotafile flags:
type block_exp_time inode_exp_time dqi_flags
user
0h
group
0h
User/group objects:
ID
type
resource
0
user 1k-blocks
0
user
inodes
[the rest is skipped]
usage
38220
45453
softlimit
50000
70000
hardlimit
60000
70000
grace status
loaded
loaded
The first three lines of the output show the status of first-level disk quotas for the Container. The
rest of the output displays statistics for user/group quotas and has separate lines for each user
and group ID existing in the system.
If you do not need the second-level quota statistics, you can omit the –t switch from the
vzquota command line.
To check the first-level quota status for a Container in Parallels Management Console, you
should:
1
Open the needed Container manager window by double-clicking on the corresponding
Container line in the right pane of the Management Console window;
2 Expand the Monitor item and select the Quotas and Usage folder.
You can see the first-level quota statistics for the current Container in the right pane of the
window:
Managing Resources
130
Figure 47: Management Console - Viewing Container Quota Statistics
To check the second-level disk quota parameters for any group or user of the given Container,
perform Steps 1 thru 5 as is indicated in the previous section.
Managing Resources
131
Configuring Container Disk I/O Priority Level
Virtuozzo Containers 4.0 provides you with the capability of configuring the Container disk I/O
(input/output) priority level. The higher the Container I/O priority level, the more time the
Container will get for its disk I/O activities as compared to the other Containers on the Node. By
default, any Container on the Hardware Node has the I/O priority level set to 4. However, you
can change the current Container I/O priority level in the range from 0 to 7 using the -ioprio option of the vzctl set command. For example, you can issue the following
command to set the I/O priority of Container 101 to 6:
# vzctl set 101 --ioprio 6 --save
Saved parameters for Container 101
To check the I/O priority level currently applied to Container 101, you can execute the
following command:
# grep IOPRIO /etc/vz/conf/101.conf
IOPRIO="6"
The command output shows that the current I/O priority level is set to 6.
To configure the I/O priority level of a particular Container in Parallels Management Console,
do the following:
1
Click Virtuozzo Containers in the Management Console left pane, right-click the needed
Container in the right pane, and choose Properties.
2 Click the Resources tab and then the Disk Quota item.
3 Double-click the ioprio parameter:
Figure 48: Management Console - Configuring Container Disk I/O Priority Level
Managing Resources
132
4 In the Resource Counter Properties window, you can view the disk I/O priority level
currently set for the Container and change it, if necessary, by entering the desired value
(from 0 to 7) in the field provided and clicking OK.
Cleaning Up Containers
The first-level quota assigned to this or that Container essentially shows how much space may
be occupied by the Container private files, i.e. not by the OS or common applications files. The
real OS and application files reside in the /vz/template directory on the Hardware Node
and practically do not add up to the Container quota (except for the symlinks to them located
inside the Container and occupying insignificant space).
However, there are situations when one and the same application or application update is
installed not as a template, but separately inside each and every Container. A good example of
this is the CPanel application with its robust auto-update features. If a certain version of CPanel
is installed in a number of Containers, and then an update is released, CPanel automatically
updates itself in all these Containers, thus creating a vast amount of identical files (not symlinks
already) throughout the Containers. These files tell dramatically on the Container quotas, which
may be avoided by putting all the identical files to the Hardware Node template area and
creating symlinks instead of real files inside the affected Containers.
The problem like the one described above can be solved in two ways:
1
A special subarea is created inside the Hardware Node template area /vz/template/vc - for housing the files identical among multiple Containers with the
help of the vzcache utility.
2 If the application or application update installed directly into one or more Containers has a
corresponding application template or template update installed on the Hardware Node, the
real files inside the Container(s) are replaced with symlinks to the template files on the
Node with the help of the vzpkglink and vzpkg link utilities. These utilities are used
to create symlinks to application standard and EZ templates, respectively.
Managing Resources
133
Moving Container Files to Cache Area on Hardware Node
We will illustrate the effect produced by vzcache by copying one and the same huge dummy
file into two Containers. First, let us learn the disk space occupied by the whole /vz partition
and by the two Containers - Container 101 and Container 102:
# df /vz
Filesystem
/dev/hda3
# vzctl exec 101 df
Filesystem
vzfs
# vzctl exec 102 df
Filesystem
vzfs
1K-blocks
13756796
Used Available Use% Mounted on
1348292 11622123 11% /vz
1K-blocks
1048576
Used Available Use% Mounted on
22311
1026265
3% /
1K-blocks
1048576
Used Available Use% Mounted on
22311
1026265
3% /
After that, we copy the dummy file, which is around 600 Mb in size, to the root of these
Containers:
# cp foo /vz/root/101
# cp foo /vz/root/102
Now check the disk space once again:
# df /vz
Filesystem
/dev/hda3
# vzctl exec 101 df
Filesystem
vzfs
# vzctl exec 102 df
Filesystem
vzfs
1K-blocks
13756796
Used Available Use% Mounted on
2569060 10401355 20% /vz
1K-blocks
1048576
Used Available Use% Mounted on
632430
416146 61% /
1K-blocks
1048576
Used Available Use% Mounted on
632430
416146 61% /
We see that around 600 Mb has been added to the space occupied by each Container and,
consequently, around 1.2 Gb has been added to the space used on the /vz partition. Now it's
time to resort to vzcache to get rid of identical files inside the Containers:
# vzcache -v 101 102
Processing VZFSv2 Container 101
VZFSv2 Container 101
78 regular files
Processing VZFSv2 Container 102
VZFSv2 Container 102
78 regular files
During the command execution, vzcache:
looks for identical files inside Container 101 and Container 102;
creates the CT_UUID subdirectory (where CT_UUID denotes the Container unique
identifier and can be determined by viewing the UUID parameters in the Container
configuration file) within the Hardware Node template area (/vz/template/vc by
default) for each Container;
moves the identical files to the created subdirectories in the Hardware Node template area.
Let us now take the final look at the disk space usage:
# df /vz
Filesystem
/dev/hda3
# vzctl exec 101 df
Filesystem
vzfs
# vzctl exec 102 df
Filesystem
vzfs
1K-blocks
13756796
Used Available Use% Mounted on
1953053 11017362 16% /vz
1K-blocks
1048576
Used Available Use% Mounted on
15105
1033471
2% /
1K-blocks
1048576
Used Available Use% Mounted on
15138
1033438
2% /
Managing Resources
134
As you can see, both the Hardware Node and the Containers have each gained more than 600
Mb of disk space. In real life, the disk space is gained by caching not one huge file in two
Containers but a number of identical files across many Containers.
The operation of the vzcache utility may be customized to a certain extent by using
vzcache command line switches (see the Parallels Virtuozzo Containers Reference Guide for
details).
Associating Container Files With Application Templates
It may often happen that a security update should immediately be applied to a package installed
as a template on the Node and added to a number of Containers hosted there. However, it takes
certain time to prepare a template update, so the Hardware Node and/or Container
administrators are not inclined to wait for it and they install the original security update directly
inside the Containers. As to the template update, it becomes available a few days afterwards. In
other cases, a Container administrator might not know that there is a certain template installed
on the Hardware Node, so they install the corresponding application directly inside their
Container.
To eliminate cluttering up the Container disk space with application files that are present as part
of an application template on the Hardware Node, the vzpkg link and vzpkglink utilities
are used.
The vzpkg link utility is used to link your Container to the application EZ templates
installed on the Hardware Node. For example, you can use the following command to
replace the openssl files inside Container 101 running Fedora 8 with symlinks to these
files in the /vz/template/fedora-core/8/x86/config/app/openssl
directory on the Node:
# vzpkg link 101
The vzpkglink utility is used to replace real files inside your Containers with symlinks to
application standard templates installed on the Hardware Node. The following session
illustrates how to perform this operation:
First, check if the Container files are compatible with the template version installed on
the Node. For example:
# vzpkglink -t -vv 101 openssl/20061118
If this test performs successfully, you can drop the -t switch and replace the openssl
files inside Container 101 with symlinks to these files in the
/vz/template/openssl directory on the Hardware Node:
# vzpkglink -vv 101 openssl/20061118
Issuing the vzpkgls 101 command now will let you ensure that the openssl template
has been added to the Container configuration file.
Managing Resources
135
Managing Container CPU
Resources
The current section explains the CPU resource parameters that you can configure and monitor
for each Container.
The table below provides the name and the description for the CPU parameters. The File column
indicates whether the parameter is defined in the Virtuozzo global configuration file (G) or in
the Container configuration files (V).
Parameter
Description
File
ve0cpuunits
This is a positive integer number that determines the minimal G
guaranteed share of the CPU time Container 0 (the Hardware
Node itself) will receive at its startup. It is recommended to
set the value of this parameter to be 5-10% of the power of the
Hardware Node. After the Node is up and running, you can
redefine the amount of the CPU time allocated to the Node by
using the --cpuunits parameter with the vzctl set
command.
cpuunits
This is a positive integer number that determines the minimal V
guaranteed share of the CPU time the corresponding
Container will receive.
Note: In the current version of Virtuozzo Containers,
you can also use this parameter to define the CPU time
share for the Hardware Node.
cpulimit
This is a positive number indicating the CPU time, in percent, V
the corresponding Container is not allowed to exceed.
burst_cpu_avg_usage
The CPU usage limit, in percent, used by the Parallels Agent G, V
software when controlling the CPU consumption of all
Containers currently running on the Hardware Node.
burst_cpulimit
The CPU power limit, in per cent, the Container cannot G, V
exceed. The limitations set in this parameter are applied to the
Container when it exceeds the limit specified in the
burst_cpu_avg_usage parameter.
cpus
The number of CPUs to be used to handle the processes V
running inside the corresponding Container.
Managing Resources
136
Managing CPU Share
The Virtuozzo Containers 4.0 CPU resource control utilities allow you to guarantee any
Container the amount of CPU time this Container receives. The Container can consume more
than the guaranteed value if there are no other Containers competing for the CPU and the
cpulimit parameter is not defined.
Note: The CPU time shares and limits are calculated on the basis of a one-second period. Thus,
for example, if a Container is not allowed to receive more than 50% of the CPU time, it will be
able to receive no more than half a second each second.
To get a view of the optimal share to be assigned to a Container, check the current Hardware
Node CPU utilization:
# vzcpucheck
Current CPU utilization: 11142
Power of the node: 125504
The output of this command displays the total number of the so-called CPU units consumed by
all running Containers and Hardware Node processes. This number is calculated by Virtuozzo
with the help of a special algorithm. The above example illustrates the situation when the
Hardware Node is underused. In other words, the running Containers receive more CPU time
than was guaranteed to them.
In the following example, Container 102 is guaranteed to receive about 4% of the CPU time
even if the Hardware Node is fully used, or in other words, if the current CPU utilization equals
the power of the Node. Besides, Container 102 will not receive more than 25% of the CPU time
even if the CPU is not fully loaded:
# vzctl set 102 --cpuunits 5000 --cpulimit 25 --save
Saved parameters for Container 102
# vzctl start 102
Starting Container ...
Container is mounted
Adding IP address(es): 192.168.1.102
Container start in progress...
# vzcpucheck
Current CPU utilization: 15154
Power of the Node: 125504
Container 102 will receive from 4% to 25% of the Hardware Node CPU time unless the
Hardware Node is overcommitted, i.e. the running Containers have been promised more CPU
units than the power of the Hardware Node. In this case the Container might get less than 4
percent.
Note: To set the --cpuunits parameter for the Hardware Node, you should indicate 0 as the
Container ID (e.g. vzctl set 0 --cpuunits 5000 --save).
To view and/or change the VE0CPUUNITS parameter using Parallels Management Console, do
the following:
1
Right-click the needed Node and select Tasks --> Manage Virtuozzo Configuration on the
context menu.
2 In the displayed window, select the ve0cpuunits parameter.
3 Enter the needed value and click OK.
Managing Resources
137
To view and/or change the CPUUNITS or CPULIMIT parameter for separate Containers, do the
following:
1
Click Virtuozzo Containers in the Management Console left pane, right-click the needed
Container in the right pane, and choose Properties.
2 Click the Resources tab and select CPU parameters.
3 Double-click the corresponding parameter in the right part of the displayed window, and, if
necessary, enter the right value for the given Container.
4 Click OK twice.
Managing Resources
138
Configuring Number of CPUs Inside Container
If your Hardware Node has more than one physical processor installed, you can control the
number of CPUs which will be used to handle the processes running inside separate Containers.
By default, a Container is allowed to consume the CPU time of all processors on the Hardware
Node, i.e. any process inside any Container can be executed on any processor on the Node.
However, you can modify the number of physical CPUs which will be simultaneously available
to a Container using the --cpus option of the vzctl set command. For example, if your
Hardware Node has 4 physical processors installed, i.e. any Container on the Node can make
use of these 4 processors, you can set the processes inside Container 101 to be run on 2 CPUs
only by issuing the following command:
# vzctl set 101 --cpus 2 --save
Note: The number of CPUs to be set for a Container must not exceed the number of physical
CPUs installed on the Hardware Node. In this case the 'physical CPUs' notation designates the
number of CPUs the Virtuozzo kernel is aware of (you can view this CPU number using the
/proc/cpuinfo command).
You can check if the number of CPUs has been successfully changed by running the cat
/proc/cpuinfo command inside your Container. Assuming that you have set two physical
processors to handle the processes inside Container 101, your command output may look as
follows:
# vzctl exec 101 cat /proc/cpuinfo
processor
: 0
vendor_id
: GenuineIntel
cpu family
: 15
model
: 4
model name
: Intel(R) Xeon(TM) CPU 2.80GHz
stepping
: 1
cpu MHz
: 2793.581
cache size
: 1024 KB
...
processor
vendor_id
cpu family
model
model name
stepping
cpu MHz
cache size
...
:
:
:
:
:
:
:
:
1
GenuineIntel
15
4
Intel(R) Xeon(TM) CPU 2.80GHz
1
2793.581
1024 KB
The output shows that Container 101 is currently bound to only two processors on the Hardware
Node instead of 4 available for the other Containers on this Node. It means that, from this point
on, the processes of Container 101 will be simultaneously executed on no more than 2 physical
CPUs while the other Containers on the Node will continue consuming the CPU time of all 4
Hardware Node processors, if needed. Please note also that the physical CPUs proper of
Container 101 might not remain the same during the Container operation; they might change for
load balancing reasons, the only thing that cannot be changed is their maximal number.
In Parallels Management Console you can configure the number of CPUs to be available to a
Container by doing the following:
1
Select the Virtuozzo Containers item under the corresponding Hardware Node name.
Managing Resources
139
2 Right-click the Container for which you wish to change the number of available CPUs and
select Properties on the context menu.
3 In the Parameters table on the Resources tab of the displayed window, double-click the
cpus item:
Figure 49: Management Console - Configuring Number of CPUs Inside Container
4 Clear the Not limited check box and specify the desired number of CPUs in the Value field.
5 Click OK twice.
Managing Resources
140
Controlling Container CPU Usage With VZASysD Plug-in
The Virtuozzo Containers software provides you with a special plug-in - VZASysD - allowing
to automatically control the CPU consumption of any Container on the Hardware Node. This
plug-in is automatically installed on your Node during the Virtuozzo Containers 4.0 installation
and gets started once the installation has successfully completed. When launched, the plug-in
runs in the background of your system, collects the information on the Container CPU usage
limits, compares the gathered information with the current CPU consumption by the
corresponding Containers, and limits the Container CPU usage, if necessary.
Note: VZASysD is an integral part of the Parallels Agent software and cannot be monitored or
configured using the Virtuozzo Containers software or standard Linux tools.
By default, the VZASysD functionality is disabled for all Containers on the Hardware Node. To
enable VZASysD to keep a check on the CPU consumption of a particular Container, you
should open the /etc/vz/conf/CT_ID.conf file for editing (e.g. using vi) and set the
following parameters in this file:
1
BURST_CPU_AVG_USAGE: the CPU usage limit, in percent, set for the Container. This
limit is calculated as the ratio of the current Container CPU usage to the CPU limit (i.e to
the value of the CPULIMIT parameter) set for the Container in its configuration file. If the
limit is not specified, the full CPU power of the Hardware Node is considered as the CPU
limit. Upon exceeding the BURST_CPU_AVG_USAGE limit, the VZASysD plug-in sets the
Container CPU usage to the value defined in the BURST_CPULIMIT parameter for the
given Container (see below).
2 BURST_CPULIMIT: the CPU power limit, in percent, the Container cannot exceed. The
plug-in imposes the limitations from this parameter on a Container when this Container
exceeds the limit set in the BURST_CPU_AVG_USAGE parameter.
Note: You can also set the BURST_CPU_AVG_USAGE and BURST_CPULIMIT parameters in
the Virtuozzo global file (/etc/vz/vz.conf); in this case the specified limits will apply to
all Containers on the Hardware Node (if not redefined in the corresponding Container
configuration file).
After setting the aforementioned parameters in the Container configuration file, the VZASysD
plug-in will carry out one of the following operations depending on the obtained results for the
given Container:
If the CPU usage consumption does not exceed the CPU limit set for the Container in the
BURST_CPU_AVG_USAGE parameter, no actions are taken on the VZASysD part.
If the processor time is currently overused by the Container, VZASysD places the
restrictions set in the BURST_CPULIMIT parameter on the Container CPU usage. On the
next check:
the set limit is removed if the CPU usage does not exceed the value calculated by the
following formula: (BURST_CPU_AVG_USAGE x BURST_CPULIMIT) / 100% (the
value of the BURST_CPU_AVG_USAGE parameter multiplied by the value of the
BURST_CPULIMIT parameter and divided by 100%);
the set limit is left intact if the Container CPU usage exceeds the aforementioned value.
Managing Resources
141
For example, you can make the VZASysD plug-in control the CPU usage of Container 101 by
editing the BURST_CPU_AVG_USAGE and BURST_CPULIMIT parameters in its
configuration file as follows:
...
BURST_CPU_AVG_USAGE="80"
BURST_CPULIMIT="60"
...
From this moment on, VZASysD will regularly check Container 101 and compare its CPU
usage with the value set in the BURST_CPU_AVG_USAGE parameter. If the CPU consumption
by Container 101 exceeds the value set in BURST_CPU_AVG_USAGE (i.e. 80%), the plug-in
will keep the Container CPU usage under the limit specified in BURST_CPULIMIT (i.e. under
60%). If during the next CPU usage check the CPU consumption by this Container:
becomes lower than the value calculated using the (BURST_CPU_AVG_USAGE x
BURST_CPULIMIT) / 100% formula (i.e. (80% x 60%) / 100% = 48% of the CPU time),
the BURST_CPULIMIT limit will be removed;
still exceeds 48% of the CPU time, the plug-in will continue keeping the Container CPU
usage under the value specified in BURST_CPULIMIT.
In Parallels Management Console you can perform the following operations to configure the
BURST_CPU_AVG_USAGE and BURST_CPULIMIT parameters for a:
1
Click Virtuozzo Containers in the Management Console left pane, right-click the needed
Container in the right pane, and choose Properties.
2 Click the Resources tab and select CPU parameters.
3 Double-click the corresponding parameter (either burst_cpu_avg_usage or
burst_cpulimit) in the right part of the displayed window, and, if necessary, enter the
right value.
4 Click OK twice.
By default, VZASysD checks the Container CPU usage every 5 minutes; however, you can
configure the check interval by editing the cpu_check_period parameter in the Parallels
Agent configuration file (/var/vzagent/etc/vzagent.conf). For example, you can do
it as follows:
1
Right-click the Hardware Node name in the Management Console left pane and select Tasks
--> Manage Parallels Agent Configuration on the context menu.
2 In the Parallels Agent Configuration window, expand the vzasysd key and select the
configuration subkey.
3 Double-click the cpu_check_period parameter in the right pane.
4 In the Edit Parameter window, enter the value you want in the Parameter value field.
5 Click the OK button and then the Apply button.
Managing Resources
142
Managing Network Accounting and
Bandwidth
This section explains how to perform the following tasks:
Setting up network classes;
Viewing network traffic statistics;
Turning on and off network bandwidth management;
Setting up the bandwidth limit for a Container.
Network Traffic Parameters
The table below summarizes the network traffic parameters that you can control. The File
column indicates whether the parameter is defined in the Virtuozzo global configuration file
(G), in the Container configuration files (V), or it is defined in the global configuration file but
can be overridden in a separate Container configuration file (GV).
Parameter
Description
File
traffic_shaping
If set to “yes”, traffic limitations for outgoing traffic are set G
for Containers. The default is “no”.
bandwidth
This parameter lists all the network adapters installed on the G
Hardware Node and their bandwidth.
totalrate
This parameter defines the bandwidth to be allocated for each G
and every network class. It is active if traffic shaping is turned
on.
rate
If traffic shaping is turned on, this parameter specifies the GV
bandwidth guarantee for any Container.
ratebound
If this parameter is set to “yes”, the bandwidth guarantee (the V
global rate parameter) is also the limit for the Container, and
the Container cannot borrow the bandwidth from the
TOTALRATE bandwidth pool.
Note: In old configuration files, there may remain the traffic_accounting parameter in
the global configuration file. It is outdated in the current Virtuozzo Containers version, as traffic
accounting is always enabled now.
Managing Resources
143
Configuring Network Classes
The Virtuozzo Containers software allows you to track the inbound and outbound network
traffic as well as to shape the outgoing traffic for a Container. In order to provide the ability to
distinguish between domestic and international traffic, a concept of network classes is
introduced. It is important to fully understand this notion, because network classes IDs are used
in the values of some network traffic parameters. A network class is a range of IP addresses for
which Parallels Virtuozzo counts and shapes the traffic.
Classes are specified in the /etc/vz/conf/networks_classes file. The file is in the
ASCII format, and all empty lines and lines starting with the ‘#’ sign are ignored. Other lines
have the following format:
<class_id> <ip_address>/<prefix_length>
where
<class_id>
defines
the
network
class
ID,
and
the
<ip_address>/<prefix_length> pair defines the range of IP addresses for this class.
There may be several lines for each class.
Classes 0 and 1 have special meanings. Class 0 defines the IP address range for which no
accounting is performed. Usually, it corresponds to the Hardware Node subnet (the Node itself
and its Containers). Setting up Class 0 is not required; however, its correct setup improves
performance.
Class 1 is defined by Parallels Virtuozzo Containers to match any IP address. It must be always
present in the network classes definition file. Therefore, it is suggested not to change the default
line
1 0.0.0.0/0
in the networks_classes file. Other Classes should be defined after Class 1. They
represent exceptions from the "matching-everything" rule of Class 1. The example below
illustrates a possible configuration of the network classes definition file:
# Hardware Node Containers networks
0 192.168.0.0/16
# any IP (all traffic)
1 0.0.0.0/0
# class 2 – addresses for the "foreign" traffic
2 10.0.0.0/8
2 11.0.0.0/8
# inside "foreign" network there
# is a hole belonging to "local" traffic
1 10.10.16.0/24
In this example the IP addresses in the range of 192.168.0.0 to 192.168.255.255 are treated as
Class 0 addresses and no accounting is done for the traffic from Containers destined to these
addresses.
Class 2 matches addresses in two ranges: from 10.0.0.0 to 10.255.255.255 and from 11.0.0.0 to
11.255.255.255 with the exception of addresses in the sub-range of 10.10.16.0 to 10.10.16.255,
which are treated as Class 1. All other IP addresses belong to Class 1. As far as the Class 2
addresses in this example are used for foreign routing, the Class 1 addresses are used for local
(domestic) routing, by the exclusion method.
Managing Resources
144
To set up network classes by means of Parallels Management Console, you should:
1
Right-click the needed Node and select Network Configuration --> Configure Traffic
Accounting and Shaping on the context menu.
2 On the Accounting tab of the displayed window, click the New IP addresses range button to
display the Add IP Range window.
3 Fill in the fields provided (the Class ID, Start IP address, and Subnet mask fields are
mandatory) and click OK. The example below illustrates how to create network class 2
matching all IP addresses in the range from 10.0.0.0 to 10.255.255.255:
Figure 50: Management Console - Configuring Network Classes
After you click OK in the Add IP Range window, network class 2 will be created and displayed
in the table on the Traffic Accounting and Shaping screen. To edit or delete the newly created
class or any other existing classes, use the corresponding buttons on the Accounting tab in the
Traffic Accounting and Shaping window.
Note: After editing the /etc/vz/conf/networks_classes file manually (i.e. without
the help of Parallels Management Console), you should execute either the /etc/init.d/vz
accrestart or service vz accrestart command for the changes made to the file to
take effect.
Managing Resources
145
Viewing Network Traffic Statistics
The Virtuozzo Containers software allows you to view the current network traffic statistics with
the help of the vznetstat command. The session below shows the traffic statistics for
Container 101:
# vznetstat -v 101
CTID Net.Class Input(bytes) Input(pkts)
101
1
2202448
19527
101
2
0
0
Output(bytes) Output(pkts)
9081832
19584
0
0
In this case, around 2 Mb of data were uploaded to the Container and about 9 Mb were
downloaded from it. All the traffic matches the definition of Class 1 and no data was exchanged
with any hosts from Class 2 networks.
Without specifying Container ID with the –v parameter, the command will display the statistics
for all running Containers.
In Parallels Management Console, you can view the current network traffic statistics for a
Container by performing the following operations:
1
Open the needed Container manager window by double-clicking the corresponding
Container line in the right pane of the Management Console window;
2 Expand the Monitor item and select the Network folder. You can now see the network traffic
statistics for the given Container in the right pane of the window.
Managing Resources
146
Turning On and Off Network Bandwidth Management
Traffic shaping also known as network bandwidth management allows you to control what
network bandwidth a Container receives for outgoing traffic. Traffic shaping is off by default in
Parallels Virtuozzo Containers and is controlled by the TRAFFIC_SHAPING variable in the
Virtuozzo global configuration file (/etc/vz/vz.conf).
Note: Container incoming traffic cannot be controlled in Virtuozzo Containers 4.0.
In order to turn traffic shaping on, you have to complete the following steps:
Set the value of TRAFFIC_SHAPING to “yes” in the Virtuozzo global configuration file;
Correctly set up the BANDWIDTH and TOTALRATE parameters values;
Start traffic shaping with the /etc/init.d/vz shaperon command.
The BANDWIDTH variable is used for specifying the network rate (in kilobits per second) of
available network adapters. By default, it is set to “eth0:102400”, which corresponds to a
100Mb/s Fast Ethernet card. If your Hardware Node has more network adapters installed, you
need to update this variable to list all the adapters participating in shaping. For example, in case
of two Fast Ethernet cards this variable shall be set to “eth0:102400 eth1:102400”.
The TOTALRATE variable specifies the size of the so-called bandwidth pool for each network
class being shaped. The bandwidth from the pool can be borrowed by Containers when they
need more bandwidth for communicating with hosts from the corresponding network class. It is
used to limit the total available outgoing traffic Containers can consume; the next section
explains
it
in
more
detail.
The
format
of
this
variable
is
“<NIC>:<network_class>:<bandwidth_in_Kbits_per_second>” and defines
the pool size per network class for a given network adapter. Multiple entries for different
network classes and adapters shall be separated by spaces. The default value for TOTALRATE is
“eth0:1:4096”, which corresponds to the pool size of 4Mb/s for Network Class 1 on the first
Ethernet adapter.
In the Virtuozzo global configuration file, you may also define the RATE variable whose value
amounts to the number of kilobits per second any Container is guaranteed to receive for
outgoing traffic with a network class on an Ethernet device. The default value of this parameter
is "eth0:1:8", which means that any Container is guaranteed to receive the bandwidth of at
least 8 Kbits/s for sending data to Class 1 hosts on the first Ethernet device. This bandwidth is
not the limit for a Container (unless the RATEBOUND parameter is set to “yes” in the Container
configuration file) – the Container is able to take the needed bandwidth from the TOTALRATE
bandwidth pool if it is not used by other Containers.
After setting up the above variables, start bandwidth management as is illustrated below:
# /etc/init.d/vz shaperon
Starting Virtuozzo shaping: Ok
Set shaping on running Container :
vz WARNING: Can't get tc class for Container(101).
vz WARNING: Can't access file /var/run/vz_tc_classes. \
Creating new one.
vz WARNING: Can't get tc class for Container(1).
Managing Resources
147
Now you have activated the network bandwidth limits. To turn traffic shaping off temporarily,
use the /etc/init.d/vz shaperoff command. If you want to disable bandwidth
management permanently, set the TRAFFIC_SHAPING variable to “no” in the Virtuozzo
global configuration file.
Parallels Management Console provides a convenient means for turning on/off network
bandwidth management on the Shaping tab of the Traffic Accounting and Shaping window,
which you can access by doing the following:
1
In the left pane of the Management Console window, right-click the needed Node and select
Network Configuration --> Configure Traffic Accounting and Shaping on the context menu.
2 Go to the Shaping tab of the displayed window:
Figure 51: Management Console - Setting Up Traffic Shaping Parameters
In this window you can:
enable/disable traffic shaping by selecting/deselecting the Enable traffic shaping check box
add/edit/delete a network class for traffic shaping
set up the BANDWIDTH parameter value for each Ethernet device
set up the TOTALRATE parameter value for each network class
set up the RATE parameter value which is the default network bandwidth guarantee for any
Container sending data to the given network class.
The traffic shaping settings will take effect immediately on your clicking the OK button in this
window.
Managing Resources
148
Configuring Network Bandwidth Management for Container
The network bandwidth for outgoing traffic a Container receives is controlled by two variables
in the Container configuration file (/etc/vz/conf/<CT_ID>.conf): RATE and
RATEBOUND.
Note: Container incoming traffic cannot be controlled in Virtuozzo 4.0.
The
RATE
variable
has
the
same
format
as
TOTALRATE:
“<NIC>:<network_class>:<bandwidth>”. This variable specifies the guaranteed
outgoing traffic rate that the corresponding Container receives. This rate can be specified
differently for different network classes and network adapters; use space to separate several rate
descriptions.
Bandwidth values are specified in Kbit/s. It is recommended to increase this value in 8Kbit/s
chunks and to set it no lower than 8Kbit/s.
The RATEBOUND variable specifies whether the network bandwidth available to the Container
for outgoing traffic is limited by the bandwidth specified in the RATE variable. The possible
values of the RATEBOUND variable are “yes” and “no”, the default is “no”. In this case the
Container is allowed to take free bandwidth from the TOTALRATE pool.
The actual network bandwidth available to the Containers depends on the number of Containers
and the total sum of the RATE values, and normally does not coincide with the bandwidth
specified in their own RATE variables. If the RATEBOUND variable is set to “yes”, then the
Container bandwidth is limited by the value of the RATE variable.
If the Container configuration file does not specify any of these parameters, the values from the
Virtuozzo global configuration file are taken. By default, Virtuozzo Containers does not set
RATEBOUND, which corresponds to “no”, and RATE is set to “eth0:1:8”.
Virtuozzo network bandwidth management works in the following way. The bandwidth pool for
a given network class (configurable through the TOTALRATE variable in the Virtuozzo global
configuration file) is divided among the Containers transmitting data proportionally to their
RATE settings. If the total value of the RATE variables of all Containers transmitting data does
not exceed the TOTALRATE value, each Container gets the bandwidth equal or greater than its
RATE value (unless this Container has the RATEBOUND variable set to “yes”). If the total value
of the RATE variables of all Containers transmitting data exceeds the TOTALRATE value, each
Container may get less than its RATE value.
The example below illustrates the scenario when there are two Containers, 101 and 102, which
have RATEBOUND set to “no”, and Container 103 has RATEBOUND set to “yes”:
# grep ^RATE /etc/vz/conf/101.conf /etc/vz/conf/102.conf
RATE="eth0:1:8"
RATEBOUND=”no”
RATE="eth0:1:8"
RATEBOUND=”no”
# grep ^RATE /etc/vz/conf/103.conf
RATE="eth0:1:64"
RATEBOUND=”yes”
Managing Resources
149
With the default TOTALRATE of 4096Kbit/s, bandwidth pool will be distributed according to
the following table:
Container 101
Container 102
Container 103
Bandwidth consumed by Containers
transmits
idle
idle
Container101: 4096Kbits/s
idle
idle
transmits
Container103: 64Kbits/s
transmits
transmits
idle
Container101: 2048Kbits/s
Container102: 2048Kbits/s
transmits
idle
transmits
Container101: 4032Kbits/s
Container103: 64Kbits/s
transmits
transmits
transmits
Container101: 2016Kbits/s
Container102: 2016Kbits/s
Container103: 64Kbits/s
After you have set up Container bandwidth settings, activate your changes as below:
# /etc/init.d/vz shaperrestart
Stopping Virtuozzo shaping: Ok
Starting Virtuozzo shaping: Ok
Set shaping on running Container: Ok
This command clears off all existing shaping settings and sets them again using the
configuration files of running Containers.
By means of Parallels Management Console, you can provide the network bandwidth settings
for a particular Container on the Resources tab of the Properties of Container window, which
you can access by doing the following:
1
Click Virtuozzo Containers in the Management Console left pane, right-click the needed
Container in the right pane, and choose Properties.
2 Go to the Network tab of the displayed window and select the Traffic Shaping item.
In the displayed window you can:
add/edit/delete a network class for traffic shaping
set up the RATE guarantee parameter value for the given Container for any network class
set the value for the RATEBOUND parameter for the given Container by selecting/clearing
the Rate guarantee is also a bound check box
scale the traffic shaping configuration.
The traffic shaping settings will take effect immediately on your clicking the OK button in this
window.
Managing Resources
150
Managing System Parameters
The given section provides information on how you can manage the system resource
parameters, which a Container may allocate, using the Virtuozzo Service Level Management
(SLM) system. This system allows you to easily and effectively configure and control all
memory-related parameters inside Containers.
Note: You can also set memory limits for and provide memory guarantees to Containers by
configuring multiple UBC (User Beancounter) parameters (numproc, numtcpsock,
vmguarpages, etc.). These parameters provide you with comprehensive facilities of
customizing the memory resources in respect of your Containers; however, this way of
managing system resources is more complex and requires more effort to be made on your part to
adopt it to your system. For detailed information on UBC parameters, please turn to Managing
UBC Resources in Parallels Virtuozzo Containers shipped with Virtuozzo Containers 4.0.
Overview
Virtuozzo Service Level Management (SLM) is a special system allowing you to configure and
control the service levels provided to Container users. SLM can be used to manage the
Container memory resources, i.e. to adjust the amount of memory that any Container on the
Hardware Node is allowed to consume. The SLM scheme introduced in Virtuozzo Containers
3.0 for the first time has been developed to replace the UBC scheme of managing system
resources parameters and, thus, to simplify the resources management inside Containers by
uniting all memory-related parameters into a single slmmemorylimit parameter.
Note: Detailed information on all UBC parameters is provided in the Managing UBC Resources
in Parallels Virtuozzo Containers guide shipped with Virtuozzo Containers 4.0.
SLM can be used to ensure that:
The memory consumption by every Container on the Hardware Node does not exceed its
instant memory limit.
The memory usage by every Container on the Hardware Node does not exceed its average
limit.
The total memory consumption by all Containers does not exceed the amount of memory
available on the Hardware Node and prevents the total memory from reaching the point
when the Node performance begins to significantly degrade.
The 'low memory' usage by all Containers on the Hardware Node does not leave the safe
range.
Managing Resources
151
Computing Memory Usage in SLM
As a Hardware Node administrator, you may often need to properly set the amount of memory
this or that Container will be allowed to consume and, therefore, should have a clear idea of the
memory computation mechanism used in the SLM scheme. On the whole, the memory usage
inside every particular Container for which the SLM functionality is enabled is calculated in the
same way as it would be done on a standalone server. It means that the same set of applications
running inside a Container will require approximately the same amount of RAM for their
functioning as it would require on any other standalone server. Consequently, the amount of
memory to be allocated to any Container largely depends on the number of applications you are
going to deploy inside the Container and their memory requirements. For example, if you are
going to use your Container as a web server only, there is no need to allocate much RAM to this
Container (e.g. no more than 50 Mb). At the same time, running such memory intensive
applications as MySQL, Perl, PHP requires the memory limit be set to no less than 300 Mb.
The situation above provides only the general description of memory usage inside Containers.
In fact, the process of memory computation used in the SLM scheme is more complicated. It
includes the calculation of the oomguarpages, kmemsize, lockedpages, and socket
buffer parameters and the unification of these parameters into a single slmmemorylimit
parameter. It also assumes a number of accounting rules to be taken into consideration while
deciding on the amount of memory to be allocated to a Container. The main rules are given
below:
The memory allocated to a Container includes both memory itself and the swap space.
The memory consumption inside a Container is calculated by taking into account the data
sharing among applications. So, if two Containers share one and the same memory page,
each Container is considered to consume half a page. As the number of Containers sharing
the same memory pages grows, the memory consumption inside each of these Containers
decreases. Thus, an application running inside a Container can consume much less memory
than the identical application launched in the Host OS or on a standalone server. Especially
much data can be shared when Containers use the same versions of applications and shared
libraries (e.g. in the case of using the same versions of the apache Web server with the
same set of modules and the same versions of system libraries). In such cases the difference
in memory usage may reach tens of megabytes.
The total amount of used memory and swap space in the system is computed on the basis of
the memory consumption inside all Containers plus memory usage in the Host OS.
Controlling Memory Usage by Container
SLM has a number of means at its disposal allowing it to effectively control and configure the
memory usage on the Hardware Node and inside all its Containers. These means include:
a Using the free command to check the memory limit set for a Container and the current
memory consumption inside this Container. If the SLM functionality is disabled,
running this command inside your Containers will display the total and used memory on
the Hardware Node.
b Restricting the rate of creating new processes and threads inside a Container.
c Denying memory allocation requests from a Container.
d Sending the SISTERM signal to applications intensively consuming the memory and
requesting them to terminate all their operations, save the data, and exit.
Managing Resources
152
e Killing a 'dangerous' application by sending the SIGKILL signal to it.
Various means of managing the Container memory consumption on the Node makes SLM more
application-friendly as compared to the management scheme by means of UBC parameters (the
latter has only the methods described in items c and e at its disposal). This allows SLM to
select the right means while deciding on the steps to be taken in respect of this or that
application. Among other things, SLM takes into account the following characteristics:
the severity of the memory limit excess;
the duration and frequency of the excesses.
SLM Modes
SLM is automatically enabled during the Virtuozzo Containers installation on the Hardware
Node, i.e. you do not have to perform any additional operations to start using this functionality
on your Node. However, the Virtuozzo Containers software allows you to manage SLM in one
of the following ways:
Disable SLM on a global basis. In this case no Container on the Hardware Node will be able
to make use of this functionality. To disable SLM, you should complete the following tasks:
Specify 'no' as the value of the SLM parameter in the Virtuozzo global configuration file
- /etc/vz/vz.conf.
Reboot the Hardware Node, e.g:
# shutdown -r now
Control the SLM mode for a particular Container on the Node. The current version of
Parallels Virtuozzo Containers allows you to set one of the following SLM modes for your
Container:
limited mode. In this mode the SLM functionality for the corresponding Container is
enabled and can be used to control the 'total' and 'low' memory consumption by all
Containers on the Hardware Node, which prevents the memory from being overused and
guarantees reliable performance of the Node. At the same time, you can use various
UBC parameters to manage particular resources of the Container. If the Container does
not have any UBC parameters set, SLM also undertakes the control over the
consumption of these resources by this Container. By default, any Container created on
the Hardware Node is functioning in the limited mode. If your Container is working in
another mode, you can return it to this mode by executing the vzctl set command
and passing the --slmmode all option to it.
full mode. In this mode the SLM functionality for the corresponding Container is
enabled and can be used to the full extent for managing the amount of memory which
can be allocated to and consumed by the Container. Enabling the full mode
automatically sets the values of all UBC parameters to 'unlimited'. When functioning in
this mode, SLM may significantly improve the resources allocation among individual
Containers. For example, it allows you to avoid situations when the memory allocation
for some application inside the Container fails although the system has a lot of free
resources. The full mode can be set by using the --slmmode slm option with the
vzctl set command.
Managing Resources
153
compatibility mode. In this mode the SLM functionality for the corresponding Container
is disabled and the system resources control management is performed by using UBC
parameters only: numproc, numtcpsock, numothersock, vmguarpages,
kmemsize, etc. Detailed information on all UBC parameters is provided in the
Managing UBC Parameters section. The compatibility mode can be set by using the -slmmode ubc option with the vzctl set command.
Note: You can also enable any of the aforementioned modes by editing the Container
configuration file and setting the corresponding value (all, slm, or ubc, respectively) of
the SLM parameter in this file.
Managing Resources
154
Managing Container Memory Usage
The SLM mechanism allows you to manage the amount of memory a Container can consume by
configuring a single parameter - slmmemorylimit. This significantly simplifies the process
of memory management on the Hardware Node and inside its Containers and represents the
main SLM advantage over the old memory management mechanism (implemented on the basis
of multiple UBC parameters). You can set or configure the Container memory usage limit by
means of the --slmmemorylimit parameter of the vzctl set command.
Let us assume that you wish to use SLM to manage the amount of memory which can be
consumed by Container 101 and set its memory limit to 100 Mb. This can be done by executing
the following command:
# vzctl set 101 --slmmemorylimit 102400000
Saved parameters for Container 101
By default, the memory limit to be allocated to your Container is set in bytes; however, you can
change the default units of measurement by adding the following symbols after the value:
K: specifying this symbol after the value allows you to set the Container memory limit in
kilobytes (e.g. 1000K).
P: specifying this symbol after the value allows you to set the Container memory limit in
pages (e.g. 200P).
M: specifying this symbol after the value allows you to set the Container memory limit in
megabytes (e.g. 100M).
G: specifying this symbol after the value allows you to set the Container memory limit in
gigabytes (e.g. 1G).
After the memory limit has been successfully set for Container 101, you can view it by running
the free command inside this Container:
# vzctl exec 101 free
total
used
Mem:
102400
46216
-/+ buffers/cache:
17936
Swap:
204800
0
free
56184
49748
204800
shared
0
buffers
10532
cached
27748
As can be seen from the example above, the specified memory limit is shown as the total
memory available to Container 101.
In Parallels Management Console, to view and/or change the amount of memory for a particular
Container, do the following:
1
Select the Virtuozzo Containers item in the Management Console left pane, right-click the
needed Container in the right pane, and choose Properties.
2 Click the Resources tab and select System parameters.
3 In the Parameters table, double-click the slmmemorylimit parameter, and, if necessary,
specify the right value for the given Container.
4 Click OK.
Managing Resources
155
Grouping Applications Inside Container
SLM provides a mechanism of classifying available applications (or processes representing
instances of these running applications) inside a Container, uniting them into certain groups, and
ensuring a sort of isolation among these groups. Such application grouping allows you to
separately control each application group and, if the Container exceeds its memory limit and
some application group inside this Container overuses the memory, to reduce the memory
consumption only by the corresponding application group rather than to impose memory
restrictions on the whole Container and all its applications. For example, this can help you keep
the remote SSH connection to your Container in the case of the apache Web server
misbehaviour or keep this Web service working if the 'dangerous' application is the sendmail
service.
In the current version of Parallels Virtuozzo Containers, all applications (processes) inside a
Container are by default included in one of the following groups:
'other' (also referred to as group 0): this group contains all the processes not included in
the 'daemons', 'httpd', and 'mysql' groups. The termination of any process belonging to
this group affects certain (usually uncritical) Container functionality only and does not lead
to the entire Container DoS (denial of service).
'daemons' (also referred to as group 1): this group includes init, rc, and all system
daemons (e.g. sshd). The 'daemons' group is the most important one and provides the
basis for the Container functioning.
'httpd' (also referred to as group 2): this group includes the apache Web server only.
The processes in this group and the 'mysql' one provide the main workload of any
Container.
'mysql' (also referred to as group 3): this group includes the MySQL database server only.
The processes in this group and the 'httpd' one provide the main workload of any
Container.
By default, any new process inherits the group from its parent process. For example, all children
of the httpd process are placed to the 'httpd' group whereas all children of the 'mysql'
process are included in the 'mysql' group. However, the group of a process can be changed
during its forking and/or execution on the basis of special SLM pattern rules. The default SLM
pattern rules are specified in the /etc/vzslm.d/default.conf file on the Hardware
Node in the table having the following four columns:
first_column: the name of the process to which the rule is to be applied.
second_column: a bitwise set of values defining the scheme on the basis of which the
process is to be moved to the corresponding group.
third_column: the group the process belongs to before the rule is applied. The -1 value,
if specified, means any group.
fourth_column: the group where the process will be moved after the rule is applied.
The flags field represents a number containing one or several of the following bitwise values:
Hexadecimal
Notation
Binary Notation
Description
Managing Resources
156
0x0001
|_0_|_0_|_0_|_0_|_0_|_0_|_0_|_1_ This bit, if set to 1,
|
indicates that the rule is to
be applied to the process if
it is a daemon.
0x0002
|_0_|_0_|_0_|_0_|_0_|_0_|_1_|_0_ This bit, if set to 1,
|
indicates that the rule is to
be applied to the process if
it is not a daemon.
0x0004
|_0_|_0_|_0_|_0_|_0_|_1_|_0_|_0_ This bit, if set to 1,
|
indicates that the rule is to
be applied to the process
during its forking (i.e. on
the fork() call).
0x0008
|_0_|_0_|_0_|_0_|_1_|_0_|_0_|_0_ This bit, if set to 1,
|
indicates that the rule is to
be applied to the process
during its execution (i.e.
on the exec() call).
0x0010
|_0_|_0_|_0_|_1_|_0_|_0_|_0_|_0_ This bit, if set to 1,
|
indicates that the name of
the process is to be
checked before applying
the rule.
Let us take as an example the following rule from the /etc/vzslm.d/default.conf file
"httpd"
0000001c
-1
2
and examine what processes are affected by this rule and in what way. The flags in this rule
(0000001c or |_0_|_0_|_0_|_1_|_1_|_1_|_0_|_0_| in the binary notation)
involve checking the name of the process (the fifth bit from the right equals 1) and, if this name
is httpd, moving the process to the 'httpd' group (destination_subgroup = 2)
regardless of the group it originally belongs to (source_subgroup = -1) during the process
forking and execution (the third and forth bits from the right equal 1).
The following table lists all the rules present in the /etc/vzslm.d/default.conf file
shipped with Virtuozzo Containers 4.0:
Rule Name
Explanation
#1 "init"
00000018 -1 9 If the process has the name of init, move it to
group 9 during the process execution
irrespective of the group it originally belongs to.
As there is no default group numbered 9, it will
be created when this rule is first applied.
#2 "httpd"
0000001c -1 2 If the process has the name of httpd, move it
to group 2 during the process forking and
execution irrespective of the group it originally
belongs to.
Managing Resources
#3 "httpsd"
157
0000001c -1 2 If the process has the name of httpsd, move it
to group 2 during the process forking and
execution irrespective of the group it originally
belongs to.
#4 "lighthttpd" 0000001c -1 2 If the process has the name of lighthttpd,
move it to group 2 during the process forking
and execution irrespective of the group it
originally belongs to.
#5 "mysqld"
0000001c -1 3 If the process has the name of mysqld, move it
to group 3 during the process forking and
execution irrespective of the group it originally
belongs to.
#6 "syslogd"
00000018
0 8 If the process has the name of syslogd and
originally belongs to group 0, move it to group 8
during the process execution.
#7 "sshd"
00000018
0 8 If the process has the name of sshd and
originally belongs to group 0, move it to group 8
during the process execution.
#8 "inetd"
00000018
0 8 If the process has the name of inetd and
originally belongs to group 0, move it to group 8
during the process execution.
#9 "xinetd"
00000018
0 8 If the process has the name of xinetd and
originally belongs to group 0, move it to group 8
during the process execution.
#10 "cron"
8
00000018
0 If the process has the name of cron and
originally belongs to group 0, move it to group 8
during the process execution.
#11 "crond"
8
00000018
0 If the process has the name of crond and
originally belongs to group 0, move it to group 8
during the process execution.
#12 ""
0
00000004
9 If the process originally belongs to group 9,
move it to group 0 during the process forking.
As there is only one process belonging to group
9 - init, this rule will be applied to the init
children only (see #1).
#13 ""
1
00000004
8 If the process originally belongs to group 8,
move it to group 1 during the process forking.
#14 ""
0
00000004
1 If the process originally belongs to group 1,
move it to group 0 during the process forking.
Note: As all processes (parents) in rules #6 - #11 belong to group 1, the instances these
rules can be applied to can only be children (see rule #14).
Managing Resources
158
During its life cycle, any process running inside the Container is checked against the available
rules in the /etc/vzslm.d/default.conf file from top to bottom and the first matching
rule is applied to it. So, if the following 2 rules are present in the default.conf file
"httpd"
"httpd"
0000001c
00000016
-1
-1
2
1
the first rule ("httpd" 0000001c
all Containers on the Hardware Node.
-1
2) will be applied to all httpd processes inside
You can create your own SLM pattern configuration files with your own rules and apply them
to particular Containers on the Node. For example, if you wish Container 101 to start using a
configuration file different from /etc/vzslm.d/default.conf, you can proceed as
follows:
1
Create a new file with an arbitrary name and the .conf extension (e.g. by means of vi)
and place it to the /etc/vzslm.d directory on the Hardware Node.
2 Make Container 101 use the newly created configuration file. Assuming that the
configuration file name is light.conf, you can do it by issuing the following command
on the Node:
# vzctl set 101 --slmpattern light --save
Saved parameters for Container 101
Note: If you wish to make all Containers on the Node use another SLM pattern
configuration file, you should specify the name of this file without the .conf extension
(e.g. light) as the value of the SLMPATTERN parameter in the global Virtuozzo
configuration file (/etc/vz/vz.conf).
Managing Container Resources
Configuration
Any Container is configured by means of its own configuration file. You can manage your
Container configurations in a number of ways:
1
Using configuration sample files shipped with Virtuozzo Containers 4.0. These files are
used when a new Container is being created (for details, see the Creating and Configuring
New Container section (p. 34)). Currently, the following configuration sample files are
provided:
basic – to be used for creating standard Containers;
confixx – to be used for creating Containers that are to use the Confixx control panel;
cpanel - to be used for creating Containers where the CPanel application is to be
installed;
oracle - to be used for creating Containers that are to run Oracle database servers;
slm.plesk - to be used for creating Containers with the Plesk control panel;
slm.256MB - to be used for creating Containers with 256 Mb of main memory;
slm.512Mb - to be used for creating Containers with 512 Mb of main memory;
slm.1024Mb - to be used for creating Containers with 1024 Mb of main memory;
Managing Resources
159
slm.2048Mb - to be used for creating Containers with 2048 Mb of main memory.
Note: Configuration sample files cannot contain spaces in their names.
Any sample configuration file may also be applied to a Container after it has been created.
You would do this if, for example, you want to upgrade or downgrade the overall resources
configuration of a particular Container:
# vzctl set 101 --applyconfig basic --save
This command applies all the parameters from the ve-basic.conf-sample file to the
given Container.
Important! When you install the Parallels Virtuozzo Containers software on your Hardware
Node, the default Container samples having the ve-<name>.conf-sample names are
put to the /etc/vz/conf directory. As you first start working in Virtuozzo Containers
4.0, these samples are automatically copied to the /var/vzagent/etc/samples
directory (leaving the original samples versions intact) where they are converted to a special
XML-based format that can be understood by Virtuozzo tools (Parallels Infrastructure
Manager and Parallels Management Console). In this connection you should keep in mind
the following when working with Container samples:
When you create a Container by means of Virtuozzo tools and base it on some
Container sample, this sample is taken from the /var/vzagent/etc/samples
directory.
When you create a Container using the vzctl create command utility and base it
on some Container sample, this sample is taken from the /etc/vz/conf directory.
If you modify an existing Container sample or create a new sample using Virtuozzo
tools, the changes are made to the corresponding sample located in the
/var/vzagent/etc/samples directory or the resulting Container sample is put to
this directory.
If you modify an existing Container sample or create a new sample using certain
Virtuozzo command line utilities (e.g. vzsplit, vzcfgscale), the changes are
made to the corresponding file in the /etc/vz/conf directory or the resulting
Container sample is put to this directory.
2 Using Virtuozzo specialized utilities for preparing configuration files in their entirety. The
tasks these utilities perform are described in the following subsections of this section.
3 The direct creating and editing of the corresponding Container configuration
(/etc/vz/conf/<CT_ID>.conf). This can be performed either with the help of
text editor or through Parallels Management Console. The instructions on how to
Container configuration files directly are provided in the four preceding sections. In
case you have to edit all the configuration parameters separately, one by one.
file
any
edit
this
Changes From Virtuozzo 3.0
The configuration sample files shipped with Virtuozzo 3.0 have undergone the following
changes in Virtuozzo Containers 4.0:
All the configurations samples have been renamed as follows:
Virtuozzo Containers 3.0
Virtuozzo Containers 4.0
vps.basic
basic
Managing Resources
vps.confixx
confixx
vps.cpanel
cpanel
db.oracle
oracle
vps.plesk7.rh9
slm.plesk
vps.256MB
slm.256MB
vps.512MB
slm.512MB
vps.1024MB
slm.1024MB
vps.2048MB
slm.2048MB
160
The vps.basic default configuration sample set in the Virtuozzo global configuration
file and used in Virtuozzo 3.0 for creating Containers is replaced with the basic
configuration sample.
The unlimited.db2 configuration sample is not shipped any more.
The resources values of the following configuration samples have been changed in
Virtuozzo Containers 4.0:
ve-vps.1024MB.conf-sample;
ve-vps.2048MB.conf-sample;
ve-vps.256MB.conf-sample;
ve-vps.512MB.conf-sample;
ve-vps.plesk7.rh9.conf-sample.
As
a
result,
these
configuration
sample
files
are
moved
to
the
/etc/vz/conf/old_configs directory on the Hardware Node when upgrading to
Virtuozzo Containers 4.0. So, you cannot use them in Virtuozzo Containers 4.0 as the basis
for the Container creation. If you, however, wish to continue using any of these templates,
you can proceed as follows:
a
Create a new configuration sample file and base it on the corresponding old
configuration sample.
b
Copy the needed configuration sample from the /etc/vz/conf/old_configs
directory to the /etc/vz/conf directory on the Hardware Node. For example:
# cp /etc/vz/conf/old_configs/ve.vps.plesk7.rh9.conf-sample
/etc/vz/conf
After executing these commands, you will be able to use vps.plesk7.rh9
configuration sample in the same way you would use it in Virtuozzo 3.0.
Managing Resources
161
Splitting Hardware Node Into Equal Pieces
It is possible to create a Container configuration roughly representing a given fraction of the
Hardware Node. If you want to create such a configuration that up to 20 fully loaded Containers
would be able to be simultaneously running on the given Hardware Node, you can do it as is
illustrated below:
# cd /etc/vz/conf
# vzsplit -n 20 -f mytest
Config /etc/vz/conf/ve-mytest.conf-sample was created
Note that the configuration produced depends on the given Hardware Node resources.
Therefore, it is important to validate the resulted configuration file before trying to use it, which
is done with the help of the vzcfgvalidate utility. For example:
# vzcfgvalidate ve-mytest.conf-sample
Recommendation: kmemsize.lim-kmemsize.bar should be > 253952 \
(currently, 126391)
Recommendation: dgramrcvbuf.bar should be > 132096 (currently, 93622)
The number of Containers you can run on the Hardware Node is actually several times greater
than the value specified in the command line because Containers normally do not consume all
the resources that are guaranteed to them. To illustrate this idea, let us look at the Container
created from the configuration produced above:
# vzctl create 101 --ostemplate redhat-el5-x86 --config mytest
Creating Container private area (redhat-el5-x86)
Container is mounted
Postcreate action done
Container is unmounted
Container private area created
Container registered successfully
# vzctl set 101 --ipadd 192.168.1.101 --save
Saved parameters for Container 101
# vzctl start 101
Starting Container ...
Container is mounted
...
# vzcalc 101
Resource
Current(%) Promised(%) Max(%)
Memory
0.53
1.90
6.44
As is seen, if Containers use all the resources guaranteed to them, then around 20 Containers
can be simultaneously running. However, taking into account the Promised column output, it is
safe to run 40-50 such Containers on this Hardware Node.
There is a possibility to create a suchlike configuration sample file using Parallels Management
Console:
1
Right-click the Container Samples item in the Hardware Node main tree and select "Slice"
Hardware Node on the context menu.
2 Follow the instructions of the wizard.
When creating a new Container configuration sample by splitting Hardware Node resources,
please keep in mind the following:
If you generate a Container configuration sample using the vzsplit command line utility,
the resulting Container sample is put to the /etc/vz/conf directory. This sample can
then be used by vzctl create when creating a new Container on its basis.
Managing Resources
162
If you generate a Container sample by splitting Hardware Node resources via Virtuozzo
tools, the resulting Container sample is put to the /var/vzagent/etc/samples
directory. This sample can then be used by Virtuozzo tools when creating a new Container
on its basis.
Managing Resources
163
Scaling Container Configuration
Any configuration or configuration sample file can prove insufficient for your needs. You might
have an application, which does not fit into existing configurations. The easiest way of
producing a Container configuration is to scale an existing one.
Scaling produces a “heavier” or “lighter” configuration in comparison with an existing one. All
the parameters of the existing configuration are multiplied by a given number. A heavier
configuration is produced with a factor greater than 1, and a lighter one – with a factor between
0 and 1.
Note: If you create a new sample on the basis of an existing sample using the vzcfgscale
command line utility, the resulting Container sample is put to the /etc/vz/conf directory.
This sample can then be used by vzctl create when creating a new Container on its basis.
The session below shows how to produce a configuration sample 50% heavier than the basic
configuration shipped with Parallels Virtuozzo Containers:
# cd /etc/vz/conf
# vzcfgscale -a 1.5 -o ve-improved.conf-sample ve-basic.conf-sample
# vzcfgvalidate ve-improved.conf-sample
Recommendation: kmemsize.lim-kmemsize.bar should be > 245760 \
(currently, 221184)
Recommendation: dgramrcvbuf.bar should be > 132096 (currently, 98304)
Validation completed: success
Now improved can be used in the vzctl create command for creating new Containers.
It is possible to use the same technique for scaling configurations of the existing Containers.
Please note that the output file cannot be the same as the file being scaled. You have to save the
scaling results into an intermediate file.
In Parallels Management Console, on the contrary, the scaling results are not written into a new
file. If you scale the configuration of a Container, its configuration file is changed without
saving the original file. If you scale a configuration sample file, it is correspondingly modified.
That is why, it is recommended to create a copy of the configuration sample file you are going
to scale before scaling it.
To scale an existing configuration using Parallels Management Console, do the following:
1
Select the Container Configuration Samples or Virtuozzo Containers option in the Hardware
Node main tree.
2 Right-click the sample configuration file or the Container configuration file of which you
are going to scale and select Properties.
3 Go to the Resources tab and click the Scale button:
Managing Resources
164
Figure 52: Management Console - Scaling Container Configuration
4 Determine whether you want to enhance or attenuate the current configuration and specify
the factor.
5 You may choose what groups of parameters will be scaled under the Apply scaling to group.
6 You are strongly encouraged to validate the resulting configuration with the help of the
Validate button before clicking OK.
7 Click OK to save the changes.
Note: If you modify an existing Container sample using Virtuozzo tools (e.g. Parallels
Management Console or Parallels Infrastructure Manager), the changes are made to the
corresponding sample located in the /var/vzagent/etc/samples directory. This sample
can then be used by Virtuozzo tools when creating a new Container on its basis.
Managing Resources
165
Validating Container Configuration
The system resource control parameters have complex interdependencies. Violation of these
interdependencies can be catastrophic for the Container. In order to ensure that a Container does
not break them, it is important to validate the Container configuration file before creating
Containers on its basis.
The typical validation scenario is shown below:
# vzcfgvalidate /etc/vz/conf/101.conf
Error: kmemsize.bar should be > 1835008 (currently, 25000)
Recommendation: dgramrcvbuf.bar should be > 132096 (currently, 65536)
Recommendation: othersockbuf.bar should be > 132096 \
(currently, 122880)
# vzctl set 101 --kmemsize 2211840:2359296 --save
Saved parameters for Container 101
# vzcfgvalidate /etc/vz/conf/101.conf
Recommendation: kmemsize.lim-kmemsize.bar should be > 163840 \
(currently, 147456)
Recommendation: dgramrcvbuf.bar should be > 132096 (currently, 65536)
Recommendation: othersockbuf.bar should be > 132096 \
(currently, 122880)
Validation completed: success
The utility checks constraints on the resource management parameters and displays all the
constraint violations found. There can be three levels of violation severity:
Recommendation
This is a suggestion, which is not critical for Container or Hardware Node
operations. The configuration is valid in general; however, if the system has
enough memory, it is better to increase the settings as advised.
Warning
A constraint is not satisfied, and the configuration is invalid. The Container
applications may not have optimal performance or may fail in an
ungraceful way.
Error
An important constraint is not satisfied, and the configuration is invalid.
The Container applications have increased chances to fail unexpectedly, to
be terminated, or to hang.
In the scenario above, the first run of the vzcfgvalidate utility found a critical error for the
kmemsize parameter value. After setting reasonable values for kmemsize, the resulting
configuration produced only recommendations, and the Container can be safely run with this
configuration.
You can also validate any configuration sample file the given Hardware Node has by means of
Parallels Management Console. To this effect, do the following:
1
Click the Container Sample item in the Hardware Node name, right-click the needed sample
configuration file in the right pane, and select Properties.
2 Select the Resources tab and click the Validate button. A window appears informing you of
the results. For example:
Managing Resources
Figure 53: Management Console - Validating Container Sample
In this example the configuration sample verification has passed successfully.
166
Managing Resources
167
Applying New Configuration Sample to Container
The Virtuozzo Containers software enables you to change the configuration sample file a
Container is based on and, thus, to modify all the resources the Container may consume and/or
allocate at once. For example, if Container 101 is currently based on the basic configuration
sample and you are planning to run the Plesk application inside the Container, you may wish to
apply the slm.plesk sample to it instead of basic, which will automatically adjust the
necessary Container resource parameters for running the Plesk application inside Container 101.
To this effect, you can execute the following command on the Node:
# vzctl set 101 --applyconfig slm.plesk --save
Saved parameters for Container 101
This command reads the resource parameters from the ve-slm.plesk.conf-sample file
located in the /etc/vz/conf directory and applies them one by one to Container 101.
When applying new configuration samples to Containers, please keep in mind the following:
All Container sample files are located in the /etc/vz/conf directory on the Hardware
Node and are named according to the following pattern: ve-<name>.conf-sample.
You should specify only the <name> part of the corresponding sample name after the -applyconfig option (slm.plesk in the example above).
The --applyconfig option applies all the parameters from the specified sample file to
the given Container, except for the OSTEMPLATE, TEMPLATES, CT_ROOT,
CT_PRIVATE, HOSTNAME, IP_ADDRESS, TEMPLATE, NETIF parameters (if they exist
in the sample file).
You may need to restart your Container depending on the fact whether the changes for the
selected parameters can be set on the fly or not. If some parameters could not be configured
on the fly, you will be presented with the corresponding message informing you of this fact.
To apply a new Container configuration sample to a Container in Parallels Management
Console, you should perform the following operations:
1
Select the Virtuozzo Containers item in the Hardware Node main tree.
2 Right-click the corresponding Container and choose Tasks --> Apply Container Sample on
the context menu to display the Apply Container Configuration Sample window:
Managing Resources
168
Figure 54: Management Console - Applying New Configuration Sample to Container
3 In this window you should select a new sample file the Container will be based on and the
parameters to be changed in accordance with this configuration sample. If you wish to
change all the parameters for the Container, select the check box near the Applicable
parameters item or click the Select All button to the right of the table. Otherwise, expand the
Applicable parameters item and select the check boxes near the parameters to be configured.
4 Click OK.
After you have selected a new configuration sample and clicked OK, you may need to restart
your Container depending on the fact whether the changes for the selected parameters can be set
on the fly or not.
Note: Before applying a new Container sample to your Container, make sure you are aware of
the resource values defined in this Container template and to be set for the Container. Detailed
information on Container samples is provided in the Managing Container Resources
Configurations section (p. 158).
169
CHAPTER 5
Real-Time Monitoring in Parallels
Virtuozzo Containers
In This Chapter
Monitoring Resources in Text Console................................................................................. 170
Monitoring Resources in Parallels Management Console .................................................... 173
Subscribing to Parallels Management Console Alerts .......................................................... 183
Monitoring Virtuozzo Objects Using vzsnmp Plug-in .......................................................... 185
Real-Time Monitoring in Parallels Virtuozzo Containers
170
Monitoring Resources in Text
Console
Virtuozzo Containers 4.0 includes quite a number of means to monitor the Hardware Node and
Containers resources. One of Virtuozzo’s most powerful features is the ability to monitor
resources in real time. To this effect, you may run the vzstat utility on the Hardware Node,
for example, with the following options:
# vzstat -d 5 –v
12:34pm, up 14 days, 18:31, 1 user, load average: 1.00, 1.00, 1.00
CTNum 1, procs 245: R
3, S 228, D
0, Z
0, T 14, X
0
CPU [ OK ]: CTs
0%, CT0 50%, user 31%, sys 19%, idle 50%, lat(ms) 10/0
Mem [CRIT]: total 3940MB, free 962MB/0MB (low/high), lat(ms) 1/0
ZONE0 (DMA): size 10MB, act 0MB, inact 0MB, free 2MB (0/0/0)
fragm 5*1 7*2 5*4 4*8 5*16 5*32 4*64 3*128 1*256 1*512 1*1024
ZONE1 (DMA32): size 2992MB, act 1631MB, inact 179MB, free 957MB (5/7/8)
fragm 1*1 1*2 5*4 2*8 0*16 0*32 2*64 15*128 11*256 3*512 233*1024
ZONE2 (Normal): size 1008MB, act 603MB, inact 258MB, free 2MB (1/2/2)
fragm 1*1 9*2 3*4 3*8 2*16 1*32 2*64 1*128 1*256 2*512 1*1024
Mem lat (ms): A0 0, K0 0, U0 0, K1 1, U1 0
Slab pages: 243MB/243MB (ino 84MB, de 53MB, bh 49MB, pb 8MB)
Swap [ OK ]: tot 1992MB, free 1992MB, in 0.000MB/s, out 0.000MB/s
Swap lat: si 0, 0/0 ms, so 0, 0/0 ms, 0/0 cpu ms
Swap cache: add 0, del 0, find 0/0
Net [ OK ]: tot: in 0.002MB/s
22pkt/s, out 0.000MB/s
1pkt/s
lo: in 0.000MB/s
0pkt/s, out 0.000MB/s
0pkt/s
eth0: in 0.002MB/s
22pkt/s, out 0.000MB/s
1pkt/s
eth1: in 0.000MB/s
0pkt/s, out 0.000MB/s
0pkt/s
sit0: in 0.000MB/s
0pkt/s, out 0.000MB/s
0pkt/s
Disks [ OK ]: in 0.000MB/s, out 0.012MB/s
root(/) free: 1964MB(50%), 972837ino(94%)
vz(/vz) free: 174234MB(97%), 47117046ino(99%)
sda1(/boot) free: 146MB(76%), 50155ino(99%)
CTID ST
%VM
1 OK 3.0/-
%KM
0.2/-
PROC
CPU
SOCK FCNT MLAT IP
0/78/256 0.0/100 42/1256
0
1 192.168.118.207
This screen will be updated with the time interval equal to the value specified after the –d
(delay) option measured in seconds. In the session above, the statistics displayed will be
renewed every five seconds. If the –d option is not specified, the default interval equals 1
second.
As you can see, the utility provides real-time information on the number of Containers and
processes (in each and every state) on the Hardware Node, as well as on all the main resources
subsystems pertaining both to the Hardware Node and to its Containers – the disk, network,
CPU, and memory subsystems. You may want to shrink the output of the utility by specifying
the –b (brief) option instead of the –v (verbose) one, or to do without any options to use the
“normal” mode of displaying.
The following information is displayed per each Container:
Column Name
Description
CTID
Container ID.
Real-Time Monitoring in Parallels Virtuozzo Containers
171
ST
Container status. If there are no failed counters and the latency values are normal,
the status is “OK”. Otherwise, it is displayed in red as “!!”. You can sort
Containers by their status to see the problem Containers first.
%VM
Virtual memory usage (in per cent to the total memory), corresponding to the
privvmpages parameter set in the Container configuration file. The first number
is how much privvmpages are being held, and the second one is the
privvmpages barrier.
%KM
Kernel memory usage (in per cent to the normal zone size), corresponding to the
kmemsize parameter set in the Container configuration file. The first number is
how much kmemsize is being used, and the second one is the kmemsize
barrier.
PROC
Running/total/maximal processes number. The maximal number of processes
represents the Container barrier. You can sort the Containers by the number of
running or total processes.
CPU
CPU usage in per cent to all available CPUs. The first number is how much of the
CPU power is being used by the Container, and the second one is its guaranteed
share judging by the cpuunits parameter. Note that the actual CPU usage may
be higher than the guaranteed one.
SOCK
Sockets usage, corresponding to the sum of the numtcpsock and
numothersock parameters set in the Container configuration file. The first
number is how many sockets are opened, the second one is the sockets barrier.
FCNT
The number of Container failed counters for all the resource parameters. In the
standard mode of displaying, this number represents the increase of failed counters
since the previous screen update, whereas in the average mode of displaying, it
represents an absolute failed counters sum for the given Container.
MLAT
Maximal scheduling latency for the Container, in ms. This parameter shows the
maximal scheduling latency inside the given Container, i.e. for how long (at the
utmost) a process inside the Container awaits for the CPU.
IP/HOSTNAME
The IP address or the hostname of the given Container. You may switch between
them by pressing the e key on the keyboard while vzstat is running.
Real-Time Monitoring in Parallels Virtuozzo Containers
172
The %VM, %KM, CPU, and SOCK columns provide two values per column separated by a slash
for each Container. The first value indicates the real usage of the corresponding parameter by
the Container, and the second one – the maximal value allowed for the Container. The PROC
column shows the number of processes in the corresponding Container in the following format:
running/total/maximal number of processes.
The great thing about the vzstat utility is its interactivity. You can set the time interval,
manage the mode of displaying, sort the Containers by a number of parameters, and all this onthe-fly. For example:
1
While vzstat is running, press t on the keyboard, enter the new timeout (say, 180), and
press ENTER;
2 Press b to switch to the brief details level;
3 Press w to toggle the display of the swap information on the screen;
4 Press o, and then r to sort the displayed Containers by the number of running processes.
Now your screen must look something like the following:
1:20pm, up 14 days, 19:17, 1 user, load average: 1.00, 1.00, 1.00
CTNum 1, procs 249: R
2, S 229, D
0, Z
0, T 18, X
0
CPU [ OK ]: CTs
0%, CT0 50%, user 30%, sys 20%, idle 50%, lat(ms)
Mem [CRIT]: total 3940MB, free 958MB/0MB (low/high), lat(ms) 1/0
Net [ OK ]: tot: in 0.001MB/s
16pkt/s, out 0.000MB/s
1pkt/s
Disks [ OK ]: in 0.000MB/s, out 0.000MB/s
CTID ST
%VM
1 OK 3.0/-
%KM
0.2/-
3/0
PROC
CPU
SOCK FCNT MLAT IP
0/78/256 0.0/100 42/1256
0
1 192.168.118.207
The vzstat utility has a configuration file where you can set the values of different
parameters indicating the warning and/or the error levels for them. If a parameter hits the
warning level, it will be displayed in yellow by the utility, if it hits the error level – in red.
Moreover, if a parameter has hit the error level, the CRIT warning is displayed instead of OK
after the name of the corresponding subsystem (CPU, Memory, Swap, Net, or Disks). Thus, for
example, if you see Swap [ CRIT ] on the screen, it means that one or more of the
Hardware Node swap-related parameters (the total size of swap memory used, the swap in/out
activity, etc.) has hit the error level. The offending parameter(s) will be displayed in red.
Please consult Parallels Virtuozzo Containers Reference Guide for a complete list of command
line options, interactive keys, and configuration file parameters of the vzstat utility.
Real-Time Monitoring in Parallels Virtuozzo Containers
173
Monitoring Resources in Parallels
Management Console
You can exploit the Monitor feature of Parallels Management Console for monitoring resources.
This feature provides either the whole Hardware Node resources monitoring or the monitoring
of resources consumption by a single Container, depending on whether you use the
Management Console main window or a particular Container manager window. To open the
latter, it is enough to double-click the necessary Container in the Container table in the right
pane of the Management Console main window. The principles of working with these two kinds
of monitors are essentially the same (only the set of the parameters that can be displayed is
slightly different); therefore, they can be described together. You can access the Management
Console Monitor feature by selecting the Monitor item in the left pane of the window you are
working with.
Real-Time Monitoring in Parallels Virtuozzo Containers
174
Using Charts Representation
The charts section of Parallels Management Console lets you display quite a number of charts
for monitoring various kinds of resources on a single grid. It offers means for better
visualization of charts, like assigning colors and line styles to all the elements of the grid and
charts or choosing a peculiar representation scale for each chart. You can save and load a set of
counters you would usually monitor thus avoiding the necessity of adding the counters one by
one each time you start Management Console. And, last but not least, there is a possibility to
replay the charts for any specified period of time by using logs.
The sequence of your actions may be the following:
1
To display the chart, expand the Monitor item in the window you are working with (either
the Management Console main window or a Container manager window) and click Charts
to see the monitor grid in the right pane.
2 Click the Add Counters button on the Charts toolbar.
3 In the Add Monitoring Counters dialog window, select the set of counters from which you
want to add one(s) by selecting the desired group on the Counter type drop-down menu.
4 Select the needed counters and click Add. You may use the Ctrl and Shift keys to add a
number of counters from a group. When you select a certain counter with your mouse, the
counter description is provided in the lower part of the Add Monitoring Counters dialog
window. For example:
Figure 55: Management Console - Adding Monitoring Counters
5 Click Close after you have added all the desired counters.
Real-Time Monitoring in Parallels Virtuozzo Containers
175
Now that you have a number of counters on the grid, you can see a red line indicating the
current moment of time moving from left to right as time passes and new values of monitored
parameters appear on the grid. Now it’s time to customize your view and learn the other
opportunities. You may want to perform the following tasks:
Adjust the periodicity of refreshing the information on the grid;
Adjust the representation scale for each counter;
Adjust colors and line styles for the visual elements;
Highlight a certain counter;
Save the current configuration of counters to be able to open it at any moment of time;
Use the grid to replay some past real-time information about a set of parameters.
Adjusting Periodicity of Refreshing Information
To set the time interval at which the information is refreshed for all the charts, right-click the
Charts item in the Hardware Node or Container main tree and choose one of the following
options on the context menu:
Update Speed --> High: choose this option to set the time interval to 1 second.
Update Speed --> Normal: choose this option to set the time interval to 5 seconds.
Update Speed --> Low: choose this option to set the time interval to 15 seconds.
Update Speed --> Pause: choose this option to stop refreshing the information for the charts.
Real-Time Monitoring in Parallels Virtuozzo Containers
176
Adjusting Representation Scale
The value of any counter on the grid may vary from 0 to 100. These numbers are marked on the
left of the grid. But the “weight” of these numbers is different for each counter. It is difficult to
use one and the same scale, for example, for memory usage which may amount to hundreds of
thousands of KBs and for CPU usage in percent. You can adjust the scale for each parameter
separately for their better visualization on the grid:
1
Right-click the name of the corresponding counter in the table of displayed counters below
the grid and select Properties on the context menu. For example:
Figure 56: Management Console - Adjusting Charts Scale
2 Select the necessary scale on the Scale drop-down menu on top of the grid and click Apply.
Real-Time Monitoring in Parallels Virtuozzo Containers
177
Adjusting Colors and Styles
You can define the way this or that counter is displayed on the grid:
1
Right-click the name of the corresponding counter in the table of displayed counters below
the grid and choose Properties:
Figure 57: Management Console - Adjusting Charts View
2 In the corresponding boxes, adjust the color of the counter line, its width and style as
desired.
3 Click the General tab and adjust the view of the grid elements. The options on that tab are
self-explaining.
4 Click OK.
Real-Time Monitoring in Parallels Virtuozzo Containers
178
Highlighting Counter
In case there are many counters being simultaneously displayed on the grid, it might be difficult
to quickly single out the needed one. Parallels Management Console provides a means for
highlighting any one of the counters at a time:
1
Click the name of the corresponding counter in the table of displayed counters below the
grid.
2 Click the Highlight Counter button on the toolbar.
The selected counter will be highlighted on the grid with a broad white line. For example:
Figure 58: Management Console - Highlighting Counter
Real-Time Monitoring in Parallels Virtuozzo Containers
179
Saving Counters Configuration
You can save the information about the current set of counters in the Management Console
configuration file to call this information the next time it is needed sparing the labor of adding
the counters one by one again. Only one set of counters can thus be saved. Just right-click the
counter you wist to save and select Save Counters on the context menu. When you alter the
counters configuration (for example, when you restart Parallels Management Console, all the
counters are erased) and wish to restore the saved configuration, click the Load Counters button.
The saved set of counters will be loaded from the configuration file.
Real-Time Monitoring in Parallels Virtuozzo Containers
180
Replaying Information From Logs
The function of replaying the resources consumption information over a specified time span in
the past is ensured by the background logging of all the parameters in Parallels Virtuozzo
Containers 4.0. The default periodicity of refreshing the resources consumption information in
the logs is set to be 1 (one) hour. You may have the logs collect the resources consumption
information more frequently by "accelerating" the necessary logs with the help of the Log Setup
folder under the Monitor item. For example:
1
Click Logging Period Setup under the Monitor item.
2 In the right of the Management Console window, double-click the necessary log group in
the Parameters table, or right-click it and select Properties on the context menu.
Figure 59: Management Console - Changing Logging Period
3 In the Change Logging Period window, set the update period for the given group of logs.
4 Click OK for the changes to take effect.
Note: Virtuozzo Management Console 3.x does not allow you to configure the periodicity of
refreshing the resources consumption information in the logs for Hardware Nodes running
Virtuozzo Containers 4.0.
The replaying proper of logs is performed using the same grid of the Charts function as for realtime monitoring. The counters are also displayed and configured in the same way as for realtime monitoring. The principal difference is that when replaying the counters, the information
for the charts is taken from the logs (both the default logs and the logs accelerated in the
Logging Period Setup section are used), and not from real-time monitoring.
To switch to the charts replaying mode:
1
Click Charts under the Monitor item.
2 On the Logged Counters tab, click the Add Counters button on the toolbar to display the Add
Logged Counters window.
3 On the Data tab of the Add Logged Counters window, click the Add button to add any of the
available counters in the same way as they are added for real-time monitoring.
Real-Time Monitoring in Parallels Virtuozzo Containers
181
4 After adding the desired counters, adjust the style of their visualization with the help of the
corresponding options on the Data tab.
5 Go to the Time tab of the Add Logged Counters window, define the update period, and the
time span for which you wish to view the logs for the specified counters. For example:
Figure 60: Management Console - Replaying Logs
Real-Time Monitoring in Parallels Virtuozzo Containers
182
Using Table Representation
Besides charts, it is possible to monitor many of the Hardware Node or Container parameters in
real time as a list of lines each of which reflects the name and the value of a parameter, as well
as the attributes specific for this or that kind of parameters. In such a way, you can view the
Network and Processes groups for a particular Hardware Node, and the Network, Processes,
Resources, and Quotas and Usage groups for a particular Container. Choose any of these groups
either in the Management Console main window or in a Container manager window to see the
real-time information about the selected parameters in the form of a table. For example, if you
choose Network under a Hardware Node tree, you may see the following window:
Figure 61: Management Console - Monitoring Traffic Parameters
The graphic chart in the Management Console right pane shows the values for the incoming and
outcoming traffic rate in bytes per second and packets per second for all the network interfaces
present on the Hardware Node.
Real-Time Monitoring in Parallels Virtuozzo Containers
183
Subscribing to Parallels
Management Console Alerts
Parallels Management Console allows you to subscribe to e-mail notifications about resourceoverusage system alerts. The subscription to this kind of alerts consists in specifying the e-mail
address to send notification to. However, prior to subscribing to alerts, you should provide your
e-mail relay server IP address to send e-mail notifications through. To this effect, do the
following:
1
In Parallels Management Console, click the Manage E-mail Alert Subscription link on the
Hardware Node dashboard.
2 In the Manage E-mail Alert Subscription window, click the Configure button:
Figure 62: Management Console - Setting E-mail Relay Server
3 In the displayed window, enter the IP address of the mail relay server in the E-mail relay IP
address field:
4 Click OK.
Now that you have set the e-mail relay server IP address, you can subscribe to an alert:
1
Click the Manage E-mail Alert Subscription link on the Hardware Node dashboard:
Real-Time Monitoring in Parallels Virtuozzo Containers
184
Figure 63: Management Console - Subscribing to Alert
2 Type the e-mail address where the alert notification is to be sent in the To field.
3 Click the Subscribe button.
Parallels Management Console uses a pre-configured notification template. This template
includes special placeholders representing special symbols that will be substituted for in the
actual message by the actual Container name, parameter name, etc. A list of the main
placeholders is given below:
$TITLE: the name assigned to the Container. If there is no name set for the Container, its
hostname is used;
$ID: the name of the resource parameter (in the actual message, it will be “diskspace”,
etc.);
$CURTYPE: the alert type (at the alert generation moment). The “yellow” alert means that
the barrier value lies in the range from 90% to 100% and the “red” alert indicates that the
limit value has been hit;
$TOTALMAXTYPE: the maximal alert type ("yellow" or "red") registered during the time
when alerts were collected;
$COUNT: the number of registered alerts from the time when the last e-mail notification
was sent;
$TYPERANGE: the range of alert types registered during the time when alerts were
collected (e.g. if all types of alerts were registered, the value of this parameter in the e-mail
notification will be set to "yellow" or "red");
$TIMERANGE: the alert time (the server time);
$CURVALUE: the current value of the parameter (at the alert generation moment);
$MAXVALUE: the maximal value of the parameter during the time when alerts were
collected;
Real-Time Monitoring in Parallels Virtuozzo Containers
$SOFT: the parameter value barrier;
$HARD: the parameter value limit.
185
By default, only one alert is sent per subscription and you have to resubscribe to an alert each
time after its receiving. However, you can configure the default alert policy by doing the
following:
1
Click the Manage E-mail Alert Subscription link on the Hardware Node dashboard.
2 In the Manage E-mail Alert Subscription window, click the Configure button.
3 In the displayed window, you can choose one of the following options:
Stop sending alerts. In this case after having received an alert, you have to resubscribe to
it again. This option is selected by default.
Keep sending alerts. In this case you will get alerts on a permanent basis without having
to resubscribe to them each time after their receiving.
Collect alerts before sending for... In this case alerts will be permanently collected by the
Parallels Agent software to a special database. This database will be periodically, i.e.
with the period specified in the field opposite the option name, checked and if there
were any alerts gathered during the set time, the corresponding notification will be sent
to your e-mail address. The alert checking time is measured in seconds and can be set
either by using the spin button or entering the needed period by hand.
4 After you have chosen the right option, click OK to save the settings.
Monitoring Virtuozzo Objects Using
vzsnmp Plug-in
This section provides information on how you can monitor Parallels Virtuozzo objects using the
vzsnmp plug-in.
Real-Time Monitoring in Parallels Virtuozzo Containers
186
Understanding vzsnmp Basics
Starting with version 4.0, Parallels Virtuozzo Containers is provided with the vzsnmp
application allowing you to monitor network and system resources on the Hardware Node and
inside its Containers by means of the SNMP (Simple Network Management Protocol) protocol.
The vzsnmp application includes two components - vzsnmp and vzsnmp-proxy - which
are automatically installed on the Hardware Node (vzsnmp-proxy) and inside the Service
Container (vzsnmp) during the Virtuozzo Containers 4.0 installation.
The vzsnmp plug-in conforms to the same SMI (Structure of Management Information) rules
as the data represented within the standard context of SNMP, for example:
all Virtuozzo objects are organized into a tree-like hierarchy
any object is made up of a series of integers corresponding to the nodes in the tree and
separated by dots.
The root subtree containing all Virtuozzo-related objects has the object ID of
1.3.6.1.4.1.26171.1.1
and
is
described
in
the
/usr/share/snmp/mibs/SWSOFT-SMI.txt file inside the Service Container.
The vzsnmp plug-in enables you to monitor a number of objects and their states in respect of
the Hardware Node and its Containers (e.g. the version of Parallels Virtuozzo currently installed
on your Node or the IP addresses assigned to your Containers). All the data that can be reported
by the vzsnmp application is described in detail in the following subsection.
Using SNMP Management Tools to Monitor Parallels Virtuozzo
Objects
When working with SNMP in Parallels Virtuozzo-based systems, please keep in mind that
Parallels Virtuozzo 4.0 does not maintain control over the SNMP service. You can use standard
SNMP management tools to administer this service and gather the information on Parallels
Virtuozzo-related objects.
The following example demonstrates how you can use the snmpwalk Linux utility to get the
status of Parallels Virtuozzo objects. For the sake of simplicity, we assume in our example that
your Hardware Node hosts only the Service Container which is treated by the vzsnmp plug-in
as any other regular Container. To obtain the information on Virtuozzo-related objects, you
should do the following:
1
Install the net-snmp and net-snmp-utils packages on the Node.
Note: By default, the SNMP service is not installed on the Hardware Node during the
Virtuozzo Containers 4.0 installation. So, you should install the net-snmp and netsnmp-utils packages on your Node manually.
Real-Time Monitoring in Parallels Virtuozzo Containers
187
2 Make sure that the snmpd daemon is running on the Hardware Node. If it is not, start the
service:
# service snmpd start
Starting snmpd:
[OK]
3 Ascertain that the snmpd daemon is running inside the Service Container. If it is not, start
the service by executing the following commands on the Node:
# vzctl enter 1
entered into Container 1
-bash-2.05b# service snmpd start
Starting snmpd:
[OK]
4 On the computer that is to server as the Monitor Node, run the snmpwalk utility to collect
the information on Parallels Virtuozzo-related objects available on your Hardware Node.
For example, you can do this by running the following command:
# snmpwalk -m SWSOFT-VIRTUOZZO-MIB -v 1 -c public 10.30.20.207
\.1.3.6.1.4.1.26171.1.1
where
-m specifies which MIB module should be loaded by the command. The Parallels
Virtuozzo MIB module has the name of SWSOFT-VIRTUOZZO-MIB; so, we indicated
this name after the -m option.
-v 1 specifies which version of SNMP to use.
-c specifies the community string for the command. The default community string to
access the Parallels Virtuozzo MIB is public.
10.30.20.207 denotes in our example the IP address of the Hardware Node where
you want to monitor Parallels Virtuozzo objects.
.1.3.6.1.4.1.26171.1.1 is the path to the root subtree containing the Parallels
Virtuozzo-related objects.
Real-Time Monitoring in Parallels Virtuozzo Containers
188
When executed, snmpwalk walks the entire Parallels Virtuozzo subtree and displays the
information on all Parallels Virtuozzo-related objects (the Container IP addresses, the OS
template the Container is based on, etc.) which can be monitored. A typical snmpwalk
command output is given below:
SWSOFT-VIRTUOZZO-MIB::vzHWID.0 = STRING: "a87f51dd-4e1e-4c44-a2828a7843ca183f"
SWSOFT-VIRTUOZZO-MIB::vzVersion.0 = STRING: 4.0.0
SWSOFT-VIRTUOZZO-MIB::vzLicenseStatus.0 = STRING: ACTIVE
SWSOFT-VIRTUOZZO-MIB::vzEnvID.1 = Gauge32: 1
SWSOFT-VIRTUOZZO-MIB::vzEnvEid.1 = STRING: "0ad47247-3b48-d847-877e9613584f4b8c"
SWSOFT-VIRTUOZZO-MIB::vzEnvType.1 = STRING: Virtuozzo
SWSOFT-VIRTUOZZO-MIB::vzEnvName.1 = STRING: ServiceCT
SWSOFT-VIRTUOZZO-MIB::vzEnvDescription.1 = STRING:
SWSOFT-VIRTUOZZO-MIB::vzEnvOS.1 = STRING: redhat-as3-minimal/20061020
SWSOFT-VIRTUOZZO-MIB::vzEnvOrigSample.1 = STRING: "00000000-0000-0000-0000000000000000"
SWSOFT-VIRTUOZZO-MIB::vzEnvState.1 = INTEGER: running(6)
SWSOFT-VIRTUOZZO-MIB::vzEnvTransition.1 = INTEGER: none(0)
SWSOFT-VIRTUOZZO-MIB::ipAddrEntAddress.1.10.224.182.173 = IpAddress:
10.224.182.173
SWSOFT-VIRTUOZZO-MIB::ipAddrEntNetMask.1.10.224.182.173 = IpAddress:
255.255.255.255
SWSOFT-VIRTUOZZO-MIB::envQuotaDiskSpace.1 = Gauge32: 517340
SWSOFT-VIRTUOZZO-MIB::envQuotaDiskSpaceSoft.1 = Gauge32: 11141120
SWSOFT-VIRTUOZZO-MIB::envQuotaDiskSpaceHard.1 = Gauge32: 10485760
SWSOFT-VIRTUOZZO-MIB::envQuotaDiskInodes.1 = Gauge32: 26728
SWSOFT-VIRTUOZZO-MIB::envQuotaDiskInodesSoft.1 = Gauge32: 400000
SWSOFT-VIRTUOZZO-MIB::envQuotaDiskInodesHard.1 = Gauge32: 440000
SWSOFT-VIRTUOZZO-MIB::envQuotaUgid.1 = Gauge32: 0
SWSOFT-VIRTUOZZO-MIB::envQuotaUgidHard.1 = Gauge32: 0
SWSOFT-VIRTUOZZO-MIB::envNetworkClass.1.0 = Gauge32: 0
SWSOFT-VIRTUOZZO-MIB::envNetworkClass.1.1 = Gauge32: 1
SWSOFT-VIRTUOZZO-MIB::envNetstatIncomingBytes.1.0 = Gauge32: 0
SWSOFT-VIRTUOZZO-MIB::envNetstatIncomingBytes.1.1 = Gauge32: 0
SWSOFT-VIRTUOZZO-MIB::envNetstatIncomingPackets.1.0 = Gauge32: 0
SWSOFT-VIRTUOZZO-MIB::envNetstatIncomingPackets.1.1 = Gauge32: 0
SWSOFT-VIRTUOZZO-MIB::envNetstatOutgoingBytes.1.0 = Gauge32: 0
SWSOFT-VIRTUOZZO-MIB::envNetstatOutgoingBytes.1.1 = Gauge32: 0
SWSOFT-VIRTUOZZO-MIB::envNetstatOutgoingPackets.1.0 = Gauge32: 0
SWSOFT-VIRTUOZZO-MIB::envNetstatOutgoingPackets.1.1 = Gauge32: 0
End of MIB
The information provided by the snmpwalk utility is explained in the table below:
Line
Description
SWSOFT-VIRTUOZZO-MIB::vzHWID.0
"a87f51dd-4e1e-4c44-a282-8a7843ca183f"
=
STRING: The Hardware Node unique identifier
used by Virtuozzo tools (Parallels
Infrastructure Manager and Parallels
Management Console) to identify the
Hardware Node.
SWSOFT-VIRTUOZZO-MIB::vzVersion.0
4.0.0
=
STRING: The version of Parallels Virtuozzo
Containers currently installed on the
Hardware Node.
SWSOFT-VIRTUOZZO-MIB::vzLicenseStatus.0
STRING: ACTIVE
SWSOFT-VIRTUOZZO-MIB::vzEnvID.1 = Gauge32: 1
= The status of the Parallels Virtuozzo
Containers license.
The ID of the Container. (The Service
Container is always marked as Container
1.)
Real-Time Monitoring in Parallels Virtuozzo Containers
SWSOFT-VIRTUOZZO-MIB::vzEnvEid.1 =
"0ad47247-3b48-d847-877e-9613584f4b8c"
189
STRING: The Container unique identifier used by
Virtuozzo tools to identify the Container.
SWSOFT-VIRTUOZZO-MIB::vzEnvType.1 = STRING: The virtualization technology of the
Virtuozzo
Container.
SWSOFT-VIRTUOZZO-MIB::vzEnvName.1 = STRING: The hostname of the Container.
ServiceCT
SWSOFT-VIRTUOZZO-MIB::vzEnvDescription.1
STRING:
SWSOFT-VIRTUOZZO-MIB::vzEnvOS.1
redhat-as3-minimal/20061020
=
= The description of the Container, if set.
STRING: The name of the OS template the
Container is based on.
SWSOFT-VIRTUOZZO-MIB::vzEnvOrigSample.1
STRING: "00000000-0000-0000-0000-000000000000"
= The Container original sample unique
identifier used by Virtuozzo tools to
identify the Container sample.
SWSOFT-VIRTUOZZO-MIB::vzEnvState.1 = INTEGER: The current state of the Container.
running(6)
SWSOFT-VIRTUOZZO-MIB::vzEnvTransition.1
INTEGER: none(0)
= The transitional state of the Container.
SWSOFT-VIRTUOZZOThe IP address
MIB::ipAddrEntAddress.1.10.224.182.173 = IpAddress: Container.
10.224.182.173
assigned
to
the
SWSOFT-VIRTUOZZOThe network mask assigned to the
MIB::ipAddrEntNetMask.1.10.224.182.173 = IpAddress: Container.
255.255.255.255
SWSOFT-VIRTUOZZO-MIB::envQuotaDiskSpace.1
Gauge32: 517340
= The disk space currently consumed by
the Container.
SWSOFT-VIRTUOZZO-MIB::envQuotaDiskSpaceSoft.1
= Gauge32: 10485760
The disk space soft limit set for the
Container.
SWSOFT-VIRTUOZZO-MIB::envQuotaDiskSpaceHard.1
= Gauge32: 11141120
The disk space hard limit set for the
Container.
SWSOFT-VIRTUOZZO-MIB::envQuotaDiskInodes.1
Gauge32: 26728
= The number of disk inodes (files,
directories, symbolic links) currently
used by the Container.
SWSOFT-VIRTUOZZO-MIB::envQuotaDiskInodesSoft.1
= Gauge32: 400000
The disk inodes soft limit set for the
Container.
SWSOFT-VIRTUOZZO-MIB::envQuotaDiskInodesHard.1 The disk inodes hard limit set for the
= Gauge32: 440000
Container.
SWSOFT-VIRTUOZZO-MIB::envQuotaUgid.1
Gauge32: 0
SWSOFT-VIRTUOZZO-MIB::envQuotaUgidHard.1
Gauge32: 0
= The number of user/group IDs allowed
for the Container internal disk quota.
(This parameter is disabled for the
=
Service Container.)
SWSOFT-VIRTUOZZO-MIB::envNetworkClass.1.0
Gauge32: 0
= The network classes currently existing
on the Hardware Node.
SWSOFT-VIRTUOZZO-MIB::envNetworkClass.1.1
Gauge32: 1
=
SWSOFT-VIRTUOZZOMIB::envNetstatIncomingBytes.1.0 = Gauge32: 0
SWSOFT-VIRTUOZZOMIB::envNetstatIncomingBytes.1.1 = Gauge32: 0
The amount of incoming traffic, in bytes,
consumed by the Container.
Real-Time Monitoring in Parallels Virtuozzo Containers
SWSOFT-VIRTUOZZOMIB::envNetstatIncomingPackets.1.0 = Gauge32: 0
190
The amount of incoming traffic, in
packets, consumed by the Container.
SWSOFT-VIRTUOZZOMIB::envNetstatIncomingPackets.1.1 = Gauge32: 0
SWSOFT-VIRTUOZZOMIB::envNetstatOutgoingBytes.1.0 = Gauge32: 0
The amount of outcoming traffic, in
bytes, consumed by the Container.
SWSOFT-VIRTUOZZOMIB::envNetstatOutgoingBytes.1.1 = Gauge32: 0
SWSOFT-VIRTUOZZOMIB::envNetstatOutgoingPackets.1.0 = Gauge32: 0
The amount of outcoming traffic, in
packets, consumed by the Container.
SWSOFT-VIRTUOZZOMIB::envNetstatOutgoingPackets.1.1 = Gauge32: 0
The snmp plug-in also reports the information about the names and versions of the application
templates applied to your Containers. However, this information is not shown for the Service
Container; so, it is absent from the snmpwalk command output above.
To discover the full power of the vzsnmp plug-in and to have a total network view of your
Parallels Virtuozzo Hardware Nodes, you can make use of NMS (Network Management
Stations) suites uniting multiple applications into one convenient product. Examples of such
suites are HP OpenView NNM, Tivoli Netview, Castle Rock SNMPc, etc.
191
CHAPTER 6
Managing Services and Processes
This chapter provides information on what services and processes are, the influence they have
on the operation and performance of your system, and the tasks they perform in the system.
You will learn how to use the command line utilities and Parallels Management Console in
order to manage services and processes in Virtuozzo Containers 4.0. In particular, you will get
to know how you can monitor active processes in your system, change the mode of the
xinetd-dependent services, identify the Container ID where a process is running by the
process ID, start, stop, or restart services and processes, and edit the service run levels.
In This Chapter
What Are Services and Processes ......................................................................................... 192
Main Operations on Services and Processes ......................................................................... 193
Managing Processes and Services ......................................................................................... 194
Managing Services and Processes
192
What Are Services and Processes
Instances of any programs currently running in the system are referred to as processes. A
process can be regarded as the virtual address space and the control information necessary for
the execution of a program. A typical example of a process is the vi program (on a Linux Node)
running on your Hardware Node or inside your Container(s). Along with common processes,
there are a great number of processes that provide an interface for other processes to call. They
are called services. In many cases, services act as the brains behind many crucial system
processes; they typically spend most of their time waiting for an event to occur or for a period
when they are scheduled to perform some task. Many services provide the possibility for other
servers on the network to connect to the given one via various network protocols.For example,
the nfs service provides the NFS server functionality allowing file sharing in TCP/IP networks.
You may also come across the term "daemon" that is widely used in connection with processes
and services. This term refers to a software program used for performing a specific function on
the server system and is usually used as a synonym for "service". It can be easily identified by
"d" at the end of its name. For example, httpd (short for HTTP daemon) represents a software
program that runs in the background of your system and waits for incoming requests to a web
server. The daemon answers the requests automatically and serves the hypertext and multimedia
documents over the Internet using HTTP.
When working with services, you should keep in mind the following. During the lifetime of a
service, it uses many system resources. It uses the CPUs in the system to run its instructions and
the system's physical memory to hold itself and its data. It opens and uses files within the
filesystems and may directly or indirectly use certain physical devices in the system. Therefore,
in order not to damage your system performance you should run only those services on the
Hardware Node that are really needed at the moment.
Besides, you should always remember that running services in the Host OS is much more
dangerous than running them in Containers. In case violators get access to one of the Containers
through any running service, they will be able to damage only the Container where this service
is running, but not the other Containers on your Hardware Node. The Hardware Node itself will
also remain unhurt. And if the service were running on the Hardware Node it would damage
both the Hardware Node and all the Containers residing on it. Thus, you should make sure that
you run only those services on the Hardware Node that are really necessary for its proper
functioning. Please launch all additional services you need at the moment inside separate
Containers. It will significantly improve your system safety.
Notes: 1. In Parallels Management Console, you can view all available services by clicking on
the Services folder item in the tree below the Hardware Node name or the Container name or
clicking on the Manage Unix Services link on the corresponding summary page.
2. When working with the command line, you can use the vzps or vztop utilities to display
all the processes that are currently running in your system.
Managing Services and Processes
193
Main Operations on Services and
Processes
The ability to monitor and control processes and services in your Virtuozzo system is essential
because of the profound influence they have on the operation and performance of your whole
system. The more you know about what each process or service is up to, the easier it will be to
pinpoint and solve problems when they creep in.
The most common tasks associated with managing services in the Host Operating System of the
Hardware Node or inside a Container are starting, stopping, enabling, and disabling a service.
For example, you might need to start a service in order to use certain server-based applications,
or you might need to stop or pause a service in order to perform testing or to troubleshoot a
problem.
For xinetd-dependent services, you do not start and stop but enable and disable services. The
services enabled in this way are started and stopped on the basis of the corresponding state of
the xinetd daemon. Disabled services are not started whatever the xinetd state.
The services management is mostly disabled for the Hardware Node. Practically all the services
are read-only, you are able to view the information but you cannot perform any operation on
them. The reason is that many Red Hat packages determine a successful stop by looking up all
the processes with a specified name. If such processes exist elsewhere, they are killed with the
terminate signal. Thus, all the like services in all the Hardware Node Containers might be
accidentally shut down because of this.
However, there are some services that can be managed by a number of administrative tools
offered in Parallels Virtuozzo Containers. These tools allow a service to be managed and
configured either by means of special Linux command-line utilities or via Parallels Management
Console. You can do it either locally or from any server connected on the network. Besides, you
can manage all the processes and services through Parallels Power Panel. All the necessary
information on managing services and operations in Parallels Power Panel is provided in the
comprehensive online help system and the user's manual Parallels Power Panel is supplied with.
As for processes, such utilities as vzps, vztop, vzpid enable you to see what a process is
doing and to control it. Sometimes, your system may experience problems such as slowness or
instability, and using these utilities should help you improve your ability to track down the
causes. It goes without saying that in Parallels Virtuozzo Containers you can perform all those
operations on processes you can do in the common Linux system, for example, kill a process by
sending a terminate signal to it.
In Virtuozzo Containers 4.0, you can manage services and processes using both the command
line and Parallels Management Console. Further in this chapter, both methods are described.
Managing Services and Processes
194
Managing Processes and Services
In Virtuozzo Containers 4.0, services and processes can be managed by using both the
command line and Parallels Management Console. In the command line, you can manage the
corresponding processes and services by using the following utilities:
vzps,
vzpid,
vztop, and
vzsetxinetd.
With their help you can perform the following tasks:
Print information about active processes on your Hardware Node;
Display the processes activity in real time;
Change the mode of the services that can be either xinetd-dependent or standalone;
Identify the Container ID where a process is running by the process ID.
Parallels Management Console allows you to manage the services present in the Host Operating
System of the Hardware Node or in a Container. It allows you to monitor (and partially
configure) the services of the Host operating system at the Hardware Node. By using
Management Console, you can start, stop, restart a service, or edit its run levels.Below in this
chapter detailed information on all those tasks that can be performed by means of the command
line utilities and Parallels Management Console is given.
Managing Services and Processes
195
Viewing Active Processes and Services
The vzps utility can be run on the Hardware Node just as the standard Linux ps utility. It
provides certain additional functionality related to monitoring separate Containers running on
the Node, namely, you can use the -E switch with the vzps utility to:
display the Container IDs where the processes are running;
view the processes running inside a particular Container.
vzps prints information about active processes on your Hardware Node. When run without any
options, vzps lists only those processes that are running on the current terminal. Below is an
example output of the vzps run:
$ vzps
PID TTY
4684 pts/1
27107 pts/1
TIME CMD
00:00:00 bash
00:00:00 vzps
Currently, the only processes assigned to the user/terminal are the bash shell and the vzps
command itself. In the output, the PID (Process ID), TTY, TIME, and CMD fields are
contained. TTY denotes which terminal the process is running on, TIME shows how much CPU
time the process has used, and CMD is the name of the command that started the process.
Note: Starting with Virtuozzo Containers 3.0, the IDs of the processes running inside
Containers and displayed by running the vzps command on the Hardware Node does not
coincide with the IDs of the same processes shown by running the ps command inside these
Containers.
As you can see, the standard vzps command just lists the basics. To get more details about the
processes running on your Hardware Node, you will need to pass some command line
arguments to vzps. For example, using the aux arguments with this command displays
processes started by other users (a), processes with no terminal or one different from yours (x),
the user who started the process and when it began (u). Besides, you can pass vzps the -E
switch, which is specific for Parallels Virtuozzo Containers, to sort the processes by the
Container IDs where they are running.
# vzps aux -E
USER PID %CPU %MEM
root
1 0.0 0.0
root
5 0.0 0.0
root
6 0.0 0.0
#27
7 0.0 0.0
root
9 0.0 0.0
root 1574 0.0 0.1
VSZ
1516
0
0
0
0
218
RSS
128
0
0
0
0
140
TTY
?
?
?
?
?
pts/4
STAT START
S
Jul14
S
Jul14
S
Jul14
S
Jul14
S
Jul14
S
09:30
TIME
0:37
0:03
3:20
0:00
0:00
0:00
COMMAND
init
[ubstatd]
[kswapd]
[bdflush]
[kinoded]
-bash
There is a lot more information now. The fields USER, %CPU, %MEM, VSZ, RSS, STAT, and
START have been added. Let us take a quick look at what they tell us.
The USER field shows you which user initiated the command. Many processes begin at system
start time and often list root or some system account as the USER. Other processes are, of
course, run by individuals.
Managing Services and Processes
196
The %CPU, %MEM, VSZ, and RSS fields all deal with system resources. First, you can see
what percentage of the CPU the process is currently utilizing. Along with CPU utilization, you
can see the current memory utilization and its VSZ (virtual memory size) and RSS (resident set
size). VSZ is the amount of memory the program would take up if it were all in memory; RSS is
the actual amount currently in memory. Knowing how much a process is currently eating will
help determine if it is acting normally or has spun out of control.
You will notice a question mark in most of the TTY fields in the vzps aux output. This is
because most of these programs were started at boot time and/or by initialization scripts. The
controlling terminal does not exist for these processes; thus, the question mark. On the other
hand, the bash command has a TTY value of pts/4. This is a command being run from a
remote connection and has a terminal associated with it. This information is helpful for you
when you have more than one connection open to the machine and want to determine which
window a command is running in.
STAT shows the current status of a process. In our example, many are sleeping, indicated by an
S in the STAT field. This simply means that they are waiting for something. It could be user
input or the availability of system resources. The other most common status is R, meaning that it
is currently running.
Note: For detailed information on all vzps parameters, output fields, states of processes, etc.,
please consult the vzps manual pages.
In the current version of Parallels Virtuozzo Containers, you can also use the vzps command to
view the processes currently running inside any Containers on the Hardware Node. The example
below shows you how to display all active processes inside Container 101:
# vzps -E 101
CTID
PID TTY
101 27173 ?
101 27545 ?
101 27555 ?
101 27565 ?
101 27576 ?
101 27583 ?
101 27584 ?
101 27587 ?
101 27596 ?
TIME CMD
00:00:01 init
00:00:00 syslogd
00:00:00 sshd
00:00:00 xinetd
00:00:03 httpd
00:00:00 httpd
00:00:00 httpd
00:00:00 crond
00:00:00 saslauthd
In its turn, Parallels Management Console allows you to monitor the services present in the Host
Operating System of the Hardware Node or inside a Container. Click on the Services item in the
tree below the Hardware Node name. A list of the Host OS or Container OS services should
appear in the right pane:
Managing Services and Processes
197
Figure 64: Management Console - Viewing Services
The way the services are colored reflects the importance of a service for Parallels Virtuozzo
Containers: pink icons are for services that are critical for Parallels Virtuozzo Containers and
yellow icons are for services that are not that critical.
Running services are indicated with bright icons. Stopped services have shaded icons. The
Status column of the table duplicates this information in the text form. The default run levels of
services are ticked off in the corresponding table columns.
To facilitate working with services, you can sort them by different parameters: their name,
status, etc. Just click the column with the appropriate name to put services in the desired order.
Managing Services and Processes
198
Monitoring Processes in Real Time
The vztop utility is rather similar to vzps but is usually started full-screen and updates
continuously with process information. This can help with programs that may infrequently
cause problems and can be hard to see with vzps. Overall system information is also presented,
which makes a nice place to start looking for problems.
The vztop utility can be run on the Hardware Node just as the standard Linux top utility. The
only features that distinguish the vztop utility from top are the following:
vztop allows you to use the -E option that monitors only the processes belonging to the
Container whose processes you wish to display;
you can use the e interactive command to temporarily view/hide the CTIDs where the
processes are running;
you can use the E interactive command to set the filter on the CTID field that helps you
display only the processes belonging to the given Container.
The vztop utility usually has an output like the following:
# vztop -E 101
17:54:03 up 20 days, 23:37, 4 users, load average: 2.13, 1.89, 1.75
305 processes: 299 sleeping, 3 running, 3 zombie, 0 stopped
CPU0 states: 20.1% user 51.2% system 0.0% nice 0.0% iowait 28.1% idle
CPU1 states: 21.2% user 50.0% system 0.0% nice 0.0% iowait 28.1% idle
Mem: 1031088k av, 969340k used, 61748k free, 0k shrd, 256516k buff
509264k active,
330948k inactive
Swap: 4056360k av,
17156k used, 4039204k free
192292k cached
CTID
PID USER PR NI VIRT RES SHR S %CPU %MEM TIME+ COMMAND
101 27173 root 16 0
1616 604 1420 S 0.0 0.1 0:01.86 init
101 27545 root 16 0
1520 624 1356 S 0.0 0.1 0:00.34 syslogd
101 27555 root 25 0
4008 1700 3632 S 0.0 0.4 0:00.04 sshd
101 27565 root 25 0
2068 860 1740 S 0.0 0.2 0:00.05 xinetd
101 27576 root 16 0
7560 3180 6332 S 0.0 0.7 0:03.78 httpd
101 27587 root 16 0
2452 1036 1528 S 0.0 0.2 0:00.34 crond
101 27596 root 25 0
4048 1184 3704 S 0.0 0.2 0:00.01 saslauthd
As you can see, vztop provides an ongoing look at the processor activity in real time (the
display is updated every 5 seconds by default, but you can change that with the d command-line
option or the s interactive command). It displays a list of the most CPU-intensive tasks on the
system and can provide an interactive interface for manipulating processes. It can sort the tasks
by CPU usage, memory usage, and runtime. Specifying 101 after the -E option allows you to
display only those processes that are running inside Container 101 only. Besides, most features
can be selected by an interactive command, for example, the e and E commands described
above.
Note: For more information on all vztop parameters, please consult its man pages. Besides,
you can find information on some fields in the Viewing Active Processes subsection (p. 195).
In Parallels Management Console, you can view those processes that are currently running on
your Hardware Node and/or inside your Container(s). To display the processes, click the
Hardware Node name where you wish to monitor processes and then select Monitor -->
Processes. A list of the Host OS or Container OS processes should appear in the right pane:
Managing Services and Processes
Figure 65: Management Console - Monitoring Active Processes
The column names and their description is presented in the table below:
Column name
Description
pid
The identifier of the process.
%cpu
The CPU time, in percent, used by the process.
%mem
The memory used by the process.
ni
The 'nice' parameter; weights the overall scheduling priority for the
process.
pri
The kernel scheduling priority for the process.
rss
Number of resident pages for the swap-out guarantee (the resident set
size).
stat
The process current status. Can be 'R' (running), 'S' (sleeping, waiting
for 'wake-up call)', 'D' (uninterruptable sleep), 'Z' (zombie, waiting for
parent process), 'T' (stopped or traced). Sometimes the second symbol
may appear: 'W' (process swapping), 'N' ('niced' process), 'L' (process has
pages locked into memory). If the < sign is displayed after the status, it
means that this information was returned by the Parallels Agent
software which, in turn, got this information from the ps tool.
time
The total CPU time the process has used.
user
The user who has launched the process.
veid
The ID of the Container where the process is running.
199
Managing Services and Processes
command
200
The command that invoked the process.
To view the processes inside a Container, double-click on its name and select Monitor -->
Processes.
Note: Starting with Virtuozzo Containers 3.0, the IDs of the processes running inside your
Containers displayed by selecting Monitor --> Processes on the Hardware Node does not
coincide with the IDs of the same processes shown when opening the Container Manager
window and selecting Monitor --> Processes.
You can send different signals to process by right-clicking a process and selecting the
corresponding signal on the pop-up menu.
Managing Services and Processes
201
Changing Services Mode
xinetd is a service used to start and stop a variety of data communication services. xinetd
starts on the Hardware Node startup and waits for a connection request from a remote client that
wants to connect to the server. There can be a number of remote clients in the network, and each
of them can use different network protocols to establish connection to the server. In order not to
run all network services responsible for this or that protocol, which will negatively influence the
system performance, the system starts only the xinetd service. This service controls all other
network services and, at the connection time, it starts the corresponding service to process this
connection. In such a way, xinetd saves system resources allowing you to run only those
network services in the system that are really needed at the moment.
The vzsetxinetd utility allows you to switch Container services between the standalone and
xinetd mode. The services that can be either standalone or dependent on xinetd in the current
release of Parallels Virtuozzo Containers are sendmail, sshd, proftpd, and courierimap. Whereas they are xinetd-dependent by default in order to consume less resources, you
may want to make them standalone due to the following reasons:
The CPanel application does not recognize sshd if it is dependent on xinetd;
sendmail does not process some rules correctly if it is dependent on xinetd;
A number of control panel applications and some others are not able to manage xinetdbased services at all.
The courier-imapd, courier-imapds, courier-pop3d, and courier-pop3ds
services are provided by the courier-imap service, thus vzsetxinetd can manage these
services via the courier-imap service.
Let us assume that you wish to check the mode of the sendmail service and set it to
standalone if it is in the xinetd mode. First, you should check the current status of the
sendmail service. To this effect, type the following command in the command line:
# vzsetxinetd -s 222 sendmail
where 222 is the Container ID, sendmail denotes the name of the corresponding service, and
the -s option gets the status of the sendmail service of the Container with ID 222. The
output will tell you if this service has the standalone or xinetd mode:
sendmail is xinetd service
In our case it is in the xinetd mode. Now you can change the mode of the sendmail service
to standalone. To make it standalone, type the following line:
# vzsetxinetd 222 sendmail off
sendmail is standalone service
where off specifies that the sendmail service should be set to the standalone mode. The
output confirms that the sendmail service is now standalone.
For more information on the vzsetxinetd utility, please consult the corresponding man
pages or turn to the Parallels Virtuozzo Containers Reference Guide.
Note: You cannot use the vzsetxinetd utility to change the mode of the xinetddependent services in Containers where the Debian 3.0 OS template is installed.
Managing Services and Processes
202
Determining Container Identifier by Process ID
Each process is identified by a unique PID (process identifier), which is the entry of that process
in the kernel's process table. For example, when you start Apache, it is assigned a process ID.
This PID is then used to monitor and control this program.The PID is always a positive integer.
In Parallels Virtuozzo Containers you can use the vzpid (retrieve process ID) utility to print
the Container ID the process with the given id belongs to. Multiple process IDs can be specified
as arguments. In this case the utility will print the Container number for each of the processes.
The typical output of the vzpid utility is shown below:
# vzpid 12
Pid
VEID
12
4
Name
init
In our example the process with the identifier 12 has the name 'init' and is running in the
Container with ID = 4.
Note: You can also display the Container ID where the corresponding process is running by
using the vzps utility.
Managing Services and Processes
203
Starting, Stopping, and Restarting Services
Parallels Management Console allows you to manage the services present in the Host Operating
System of the Hardware Node or in a Container. Click the Services item in the tree below the
Hardware Node nameor the Container name. A list of the Host OS or Container OS services
should appear in the right pane:
Figure 66: Management Console - Managing Processes and Services
To start, stop, or restart a service, select its line in the table and either use the pop-up menu or
the buttons on the toolbar. For xinetd-dependent services (the services having xinetd in
parentheses beside their name), you do not start and stop but enable and disable services. The
services enabled in this way are started and stopped on the basis of the corresponding state of
the xinetd daemon. Disabled services are not started whatever the xinetd state.
To edit the default run levels for the service, use the Properties item on the context menu or just
double–click on the service name within the list. When the Properties dialog is open, select the
check boxes of the run levels on which the service will start automatically. Click the OK button
to apply your settings. If the service is dependent on xinetd, you cannot choose its run levels,
as the latter are determined by the xinetd daemon. Besides, you cannot change run levels for
certain services, which means that they are critical and you are not allowed to change their run
levels.
You can also manage (i.e. start, stop, and restart) services by using the command line. For
example, you wish to start the httpd service. To this effect, you should type the following
command:
[root@ct222 /]# service httpd start
Managing Services and Processes
204
where service is the standard Linux command, httpd denotes the name of the
corresponding service, and start is the command that will launch this service. In order to
check that the httpd service was successfully launched, you can either type the following
Linux command:
[root@ct222 /]# service httpd status
or use the vzps utility when working on your Hardware Node or the ps utility when working
inside your Container(s) and passing them the x argument. The output will tell you if the
httpd service is running in your system or not.
205
CHAPTER 7
Managing Virtuozzo Network
The given chapter familiarizes you with the Virtuozzo network structure, enumerates Virtuozzo
networking components, and explains how to manage these components in Virtuozzo-based
systems. In particular, it provides information on:
How you can manage physical and VLAN adapters on the Hardware Node;
What Virtual Networks are and how you can manage them on the Hardware Node;
What the venet0 networking mode is and how to make your Containers operate in this
mode;
What the veth networking mode is and how to make your Containers operate in this mode;
How to create veth virtual network adapters inside your Containers and configure their
parameters;
How to connect Containers to LANs (Local Area Networks) and VLANs (Virtual Local
Area Networks).
In This Chapter
Managing Network Adapters on Hardware Node................................................................. 205
Managing Virtual Networks ................................................................................................. 211
Managing Virtual Network Adapters .................................................................................... 215
Managing Network Adapters on
Hardware Node
Physical and VLAN (Virtual Local Area Network) adapters installed on the Hardware Node are
used to provide Containers with access to each other and to external networks. During the
Parallels Virtuozzo Containers installation, all physical and VLAN network adapters on the
Node are registered with Virtuozzo Containers 4.0, which allows you to perform the following
operations on these adapters:
list the adapters currently installed on the Hardware Node;
create new VLAN adapters on the Hardware Node;
connect adapters to Virtual Networks on the Hardware Node.
Both operations are described in the following subsections in detail.
Managing Virtuozzo Network
206
Listing Adapters
You can view the physical and VLAN network adapters currently installed on your Hardware
Node using the vznetcfg Virtuozzo utility. For example, you can execute the following
command to find out what network adapters are available on your Node:
# vznetcfg if list
Name
Type
Network ID
eth0
nic
Addresses
192.168.0.170/22,dhcp
As can be seen from the command output, only one physical adapter - eth0 - is currently
installed on the Hardware Node. The information on adapters produced by vznetcfg is
presented in the table having the following columns:
Column Name
Description
Name
The adapter name.
Type
The type of the network adapter which can be one of the following:
nic denotes a physical adapter;
vlan stands for a VLAN adapter.
Network ID
The ID of the Virtual Network where the network adapter is connected.
Detailed information on Virtual Networks is provided in the Managing
Virtual Networks section (p. 211).
Addresses
The IP address(es) and subnet mask(s) assigned to the network adapter.
Managing Virtuozzo Network
207
In Parallels Management Console, you can list all available adapters on the Node by rightclicking the needed Hardware Node and selecting Network Configuration --> Configure Network
Adapters on the context menu:
Figure 67: Management Console - Listing Network Adapters
The Adapters table in the displayed window lists all the network adapters currently available on
the Node. To view detailed information on the corresponding adapter, select its name in the
Adapters table. All adapter-related data (its name, type, the MAC and IP address assigned to the
adapter, etc.) will be shown in the Details table at the bottom of the Hardware Node Network
Configuration window.
Managing Virtuozzo Network
208
Creating VLAN Adapter
Parallels Virtuozzo Containers allows you to create new VLAN adapters on the Hardware Node.
You can use these adapters later on to connect your Containers to any of the available Virtuozzo
Virtual Networks (for more information on Virtual Networks, please turn to the Managing
Virtual Networks section (p. 211)). VLAN adapters can be made using the vznetcfg vlan
add command. To create a new VLAN adapter, you should specify the VLAN ID - an arbitrary
integer number which will uniquely identify the virtual LAN among other VLANs on the
Hardware Node - and the physical network adapter on the Node to which the VLAN is to be
bound. For example, you can execute the following command to make a new VLAN adapter on
the Node, associate it with a VLAN having the ID of 5 (i.e. with VLAN 5), and attach the
VLAN adapter to the eth0 physical adapter on the Hardware Node:
# vznetcfg vlan add eth0 5
To check that the VLAN adapter has been successfully created on the Hardware Node, you can
execute the following command:
# vznetcfg
Name
eth0
eth0.5
if list
Type
Network ID
nic
vlan
Addresses
192.168.0.150/22,dhcp
VLAN adapters can be easily identified by the vlan designation shown in the Type column of
the command output. As you can see, there is only one VLAN adapter currently existing on the
Hardware Node. It is assigned the name of eth0.5 which is automatically generated on the
basis of the specified VLAN ID and the name of the physical adapter to which the VLAN
adapter is tied.
At any time you can delete the eth0.5 VLAN adapter and thus destroy VLAN 5 by issuing
the following command on the Node:
# vznetcfg
# vznetcfg
Name
eth0
vlan del eth0.5
if list
Type
Network ID
nic
Addresses
192.168.0.150/22,dhcp
To create a new VLAN adapter in Parallels Management Console, you should complete the
following tasks:
1
Right-click the needed Hardware Node and select Network Configuration --> Configure
Network Adapters on the context menu.
2 In the Hardware Node Network Configuration window, click the Create VLAN button:
Managing Virtuozzo Network
209
Figure 68: Management Console - Creating VLAN Adapter
3 The VLAN Properties window allows you to set the following parameters for the VLAN
adapter:
Base device: choose the physical network adapter on the Hardware Node where the
VLAN adapter is to be bound.
VLAN ID: specify the VLAN ID - an arbitrary integer number which will uniquely
identify the virtual LAN among other VLANs on the Hardware Node.
4 Click OK.
At any time, you can remove any of the VLAN adapters existing on the Hardware Node by
selecting its name in the Adapters table and clicking the Remove button at the bottom of the
table.
Note: By default, all VLANs created on the Hardware Node by means of Parallels
Infrastructure Manager, Parallels Management Console, or the vznetcfg utility are in the
'down' state. To enable a newly created VLAN, assign a valid IP address to it and then bring the
VLAN to the running state using the Linux ip utility.
Managing Virtuozzo Network
210
Connecting Adapter to Virtual Network
Connecting a physical or VLAN adapter to a Virtual Network allows you to join all Containers
included in the Virtual Network to the network (either LAN or VLAN) where the corresponding
adapter is connected.
Let us assume the following:
The eth0 physical adapter and the vznetwork1 Virtual Network exist on the Hardware
Node. For information on how to create Virtual Networks, please turn to the Creating Virtual
Network subsection (p. 212).
The eth0 physical adapter is connected to the local network.
Container 101 and Container 102 are connected to the vznetwork1 Virtual Network.
Detailed information on how to join Containers to Virtual Networks is given in the
Connecting Containers to Virtual Networks subsection (p. 224).
To connect the eth0 adapter to the vznetwork1 Virtual Network and thus to join Container
101 and 102 to the local network, you should issue the following command on the Node:
# vznetcfg net addif vznetwork1 eth0
To check that the eth0 physical adapter has been successfully added to the vznetwork1
Virtual Network, you can execute the following command:
# vznetcfg if list
Name
Type
Network ID
eth0
nic
vznetwork1
...
Addresses
192.168.0.170/22,dhcp
As you can see, the eth0 adapter is now joined to the vznetwork1 Virtual Network, which
means that Container 101 and 102 whose virtual network adapters are connected to
vznetwork1 can access the local network behind eth0.
At any time you can disconnect the eth0 physical adapter from the vznetwork1 Virtual
Network (and thus detach Container 101 and 102 from the local network) by running the
following command:
# vznetcfg net delif eth0
To check that the physical adapter has been successfully disconnected from vznetwork1,
issue the following command:
# vznetcfg if list
Name
Type
Network ID
eth0
nic
...
Addresses
192.168.0.170/22,dhcp
To join a physical or VLAN adapter to a Virtual Network in Parallels Management Console, do
the following:
1
Right-click the needed Hardware Node and select Network Configuration --> Configure
Network Adapters on the context menu.
2 In the Hardware Node Network Configuration window, select the name of the network adapter
(either physical or VLAN) to be joined to a Virtual Network and click Edit button.
3 Under Virtual Network, choose on the drop-down menu the Virtual Network where you wish
to join the network adapter:
Managing Virtuozzo Network
211
Figure 69: Management Console - Connecting Adapter to Virtual Network
4 Click OK.
To disconnect an adapter from the corresponding Virtual Network, perform Steps 1 and 2 above
and, in the Properties window, choose Not connected on the drop-down menu.
Managing Virtual Networks
A Virtuozzo Virtual Network acts as a binding interface between a Container virtual network
adapter and the corresponding physical or VLAN adapter on the Hardware Node allowing you
to include your Containers in different networks (local or VLAN). Parallels Virtuozzo
Containers 4.0 enables you to manage Virtual Networks as follows:
create a new Virtual Network on the Hardware Node and remove an existing one;
list the Virtual Networks currently existing on the Hardware Node and configure their
properties;
delete a Virtual Network that you do need any more from the Hardware Node.
Both operations are described in the following subsections in detail.
Managing Virtuozzo Network
212
Creating Virtual Network
Virtual Networks serve as binding interfaces between the veth virtual network adapters inside
Containers and the physical/VLAN adapters on the Hardware Node allowing you to connect the
corresponding Containers to different LANs and VLANs. New Virtual Networks can be created
using the vznetcfg utility. For example, to make a new Virtual Network with the name of
vznetwork1, you can issue the following command:
# vznetcfg net new vznetwork1
To check that vznetwork1 has been successfully created on the Hardware Node, you can
execute the following command:
# vznetcfg net list
Network ID
Status
vznetwork1
active
Master Interface Slave Interfaces
You can see that the vznetwork1 Virtual Network is now available on the Node.
Each Virtual Network is associated with some bridge which is automatically made on the
Hardware Node during the Virtual Network creation and serves as the basis for the Virtual
Network functioning. To find out what bridge is associated with what Virtual Network, you can:
issue the following command:
# vznetcfg if list
Name
Type
eth0
nic
br0
bridge
...
Network ID
vznetwork1
vznetwork1
Addresses
192.168.0.150/22,dhcp
The command output that the vznetwork1 Virtual Network is bound to the br0 bridge
on the Node.
check the /etc/vz/vznet.conf file on the Node:
# cat /etc/vz/vznet.conf
VNID_br0="vznetwork1"
...
In the output above, the name of the bridge - br0 - is a component of the VNID_br0
parameter defining the Virtual Network name.
Managing Virtuozzo Network
213
Note: Detailed information on the vznetcfg utility and the /etc/vz/vznet.conf file is
provided in Parallels Virtuozzo Containers Reference Guide.
To create a new Virtual Network in Parallels Management Console, you should perform the
following operations:
1
Right-click the needed Hardware Node and select Network Configuration --> Configure
Virtual Networks on the context menu.
2 In the Virtual Networks window, click the Add button:
Figure 70: Management Console - Creating Virtual Network
3 Specify an arbitrary name for the Virtual Network in the Name field and provide its
description, if necessary, in the Description field.
4 Click OK.
Listing Virtual Networks
Sometimes, you may wish to list all Virtual Networks currently existing on the Hardware Node.
To this effect, you should execute the following command on the Hardware Node:
# vznetcfg net list
Network ID
Status
vznetwork1
active
vznetwork2
active
Master Interface
eth0
Slave Interfaces
In the example above, two Virtual Networks - vznetwork1 and vznetwork2 - exist on the
Hardware Node. The information on these Virtual Networks is presented in the table having the
following columns:
Network ID
The name assigned to the Virtual Network.
Managing Virtuozzo Network
Status
214
Indicates the status of the Virtual Network. It can be one of the
following:
active: the Virtual Network is up and running.
configured: the information on the Virtual Network is present
in the /etc/vz/vznet.conf file on the Hardware Node;
however, the bridge to which the Virtual Network is bound is
down or absent from the Node.
Note: Detailed information on the vznet.conf file is given in
the Parallels Virtuozzo Containers Reference Guide.
Master Interface
The name of the physical/VLAN adapter on the Hardware Node
connected to the Virtual Network, if any.
Slave Interfaces
The name of the veth virtual network adapters joined to the Virtual
Network, if any.
To list the Virtual Network on the Node in Parallels Management Console, you can do the
following:
1
Right-click the needed Hardware Node and select Network Configuration --> Configure
Virtual Networks on the context menu:
Figure 71: Management Console - Listing Virtual Networks
2 The Virtual Networks window lists all the Virtual Networks currently existing on the
Hardware Node.
Managing Virtuozzo Network
215
Deleting Virtual Network
At any time, you can remove a Virtual Network that you do not need any more from the
Hardware Node. For example, you can delete the vznetwork1 Virtual Network by running
the following command:
# vznetcfg net del vznetwork1
To check that vznetwork1 has been successfully remove from the Node, issue the following
command:
# vznetcfg net list
Network ID
Status
vznetwork2
active
Master Interface Slave Interfaces
Note: Detailed information on the vznetcfg utility and all its options is provided in the
Parallels Virtuozzo Containers Reference Guide and the vznetcfg manual pages.
To remove an existing Virtual Network from the Hardware Node in Parallels Management
Console, do the following:
1
Right-click the needed Hardware Node and select Network Configuration --> Configure
Virtual Networks on the context menu.
2 In the Virtual Networks window, select the name of the Virtual Network you wish to delete
and click the Remove button.
Managing Virtual Network Adapters
Parallels Virtuozzo Containers 4.0 provides you with ample opportunities of configuring virtual
network adapters inside Containers and including them in different network environments. The
given section starts with the explanation of the two network modes - venet0 and veth - in
which any Container can operate and then shows you the way to:
create new virtual network adapters inside your Containers and delete existing ones;
configure the parameters of an existing virtual network adapter (e.g. assign an IP address to
it);
join Container virtual network adapters to Virtual Networks on the Hardware Node, thus,
connecting them to external networks (either LANs or VLANs).
All these operations are described in the following subsections in detail.
Container Networking Modes
In Parallels Virtuozzo Containers 4.0, any Container can operate in one of the two operating
modes:
venet0 mode;
veth mode.
Detailed information on these operating modes is provided in the following subsections.
Managing Virtuozzo Network
216
venet0 Mode
By default, all the Containers on the Hardware Node are operating in the venet0 mode, which
means that they are connected among themselves and with the Node using a virtual network
adapter called venet0. The picture below provides an example of the Virtuozzo network
structure when all Containers (Container #1, Container #2, Container #3) on the
Node are functioning in the venet0 mode:
Figure 72: Virtuozzo Networking - venet0 Mode
All Containers on the Hardware Node use the venet0 virtual adapter as the default gateway to
send and receive data to/from other networks (shown as the PUBLIC NETWORK in the picture
above). The procedure of handling incoming and outgoing IP packets may be described as
follows:
All IP packets from Containers operating in the venet0 mode come to this adapter and are
redirected through a public IP address of the Hardware Node to the corresponding server on
the public network.
All IP packets coming from external networks and destined for Container IP addresses reach
the public IP address of the Hardware Node first and, afterwards, are sent through venet0
to the IP addresses of the corresponding Containers.
Managing Virtuozzo Network
217
The venet0 adapter is also used to exchange the traffic among all the Containers hosted on the
given Hardware Node. All the network traffic of a Container is isolated from that of the other
Containers, i.e. all Containers are protected from each other in the way that makes traffic
snooping impossible.
Managing Virtuozzo Network
218
veth Mode
Starting with Parallels Virtuozzo Containers 3.0 SP1, you can also create special veth virtual
adapters inside your Containers and make the Containers operate in the veth mode. The
following figure represents an example of the Virtuozzo network structure where all Containers
(Container#1 and Container#2) are operating in the veth mode:
Figure 73: Virtuozzo Networking - veth Mode
In the veth mode, a separate veth virtual adapter is created for each Container on the
Hardware Node. You are allowed to create several veth adapters for a Container. Any veth
virtual adapter consists of two interfaces:
An Ethernet interface inside the Container. This interface represents a counterpart of a
physical network adapter installed on a standalone server. As any other physical adapter, it
has a MAC address (e.g., 00-0A-CC-32-F1-FF and 00-0A-CC-32-F1-BB), can be
assigned one or more IP addresses (e.g., 192.168.200.101 and 192.168.200.102)
and included in different network environments, etc. Please turn to the Managing veth Virtual
Network Adapters section (p. 215) for detailed information on all the parameters which can
be configured for Ethernet interfaces inside Containers.
Managing Virtuozzo Network
219
An Ethernet interface on the Hardware Node. This interface is responsible for the adapter
operation in the Hardware Node context and mostly used to maintain the interaction and
communication between the Node and the Ethernet interface inside the Container. Each
Ethernet interface on the Hardware Node should be assigned a MAC address (e.g., AA-000B-CC-11-BB and AA-00-0B-CC-11-CC). Detailed information on how to manage
Ethernet interfaces on the Hardware Node is provided in the Managing veth Virtual Network
Adapters section (p. 215).
Both interfaces are closely linked to each other, which means that an IP packet entering one
interface will always come out from the other one.
Differences Between venet0 and veth Modes
The veth mode demonstrates the following differences as compared to the venet0 mode:
Each of the Ethernet interfaces constituting a veth virtual adapter has a MAC address
assigned to it while venet0 does not have any. Thanks to this fact:
Any Container can see all broadcast and multicast packets received from or sent to the
selected network adapter on the Hardware Node.
Using a veth virtual adapter inside a Container allows you to host a DHCP or Samba
server inside this Container, etc.
There is no more need to assign all network settings (IP addresses, subnet mask, gateway,
etc.) to a Container from the Host OS. All network parameters can be set from inside the
Container.
veth adapters can be bridged among themselves and with other devices. If several veth
adapters are united into a bridge, this bridge can be used to handle network traffic for the
Containers whose veth adapters are included in the bridge.
Due to the fact that veth adapters act as full members of the Virtuozzo network (rather
than 'hidden' beyond venet0), they are more prone to security vulnerabilities: traffic
sniffing, IP address collisions, etc. Therefore, veth adapters are recommended to be used
in trusted network environments only.
The veth mode has poorer scalability than the venet0 mode. This is caused by the fact
that any broadcast packet meant for any veth virtual network adapter is duplicated and
transmitted to all available veth network adapters, which requires the CPU(s) on the
Hardware Node to process all the resulting broadcast packets and may noticeably degrade
the system performance. So, we highly recommend that you create no more than 100 veth
network adapters for every CPU on the Node.
Managing Virtuozzo Network
220
Creating and Deleting veth Network Adapters
By default, any Container on the Hardware Node starts functioning in the venet0 mode right
after its creation. However, at any time you can create additional virtual adapters for your
Container and set them to work in the veth mode. This can be done by using the -netif_add option of the vzctl set command.
Let us assume that you wish to create a new virtual adapter with the name of eth1 inside
Container 101 and make it function in the veth mode. To this effect, you can execute the
following command on the Hardware Node:
# vzctl set 101 --netif_add eth1 --save
Saved parameters for Container 101
The settings of the newly created virtual adapter are saved as the value of the NETIF parameter
in the configuration file of Container 101 (/etc/vz/conf/101.conf). So, you can use the
following command to display the parameters assigned to the veth network adapter inside
Container 101:
# grep NETIF /etc/vz/conf/101.conf
NETIF="ifname=eth1,mac=00:10:41:F0:AA:B6,host_mac=00:18:51:A0:8A:D7"
As you can see, the parameters set for the veth virtual network adapter during its creation are
the following:
ifname: the name set for the veth Ethernet interface inside Container 101. You specified
this name when creating the Container virtual network adapter. Usually, names of Ethernet
interfaces inside Containers are set in the form of ethAd_N where Ad_N denotes the index
number of the created adapter (e.g. eth0 or eth1); however, you can choose any other
name you like and specify it during the virtual adapter creation.
mac: the MAC address assigned to the veth Ethernet interface inside Container 101.
host_mac: the MAC address assigned to the veth Ethernet interface on the Hardware
Node.
ifname is the only mandatory parameter that should be indicated when creating a Container
virtual network adapter. All the other parameters are optional and generated by Parallels
Virtuozzo Containers automatically, if not specified.
At any time, you can remove the veth virtual network adapter inside Container 101 by
executing the following command:
# vzctl set 101 --netif_del eth1 --save
Saved parameters for Container 101
# grep NETIF /etc/vz/conf/101.conf
NETIF=""
In Parallels Management Console, you can create a new virtual network adapter or delete an
existing one by performing the following operations:
1
Select the Virtuozzo Containers item under the corresponding Hardware Node name.
2 Right-click the Container for which you wish to make the adapter and select Properties on
the context menu.
3 Go to the Network tab of the displayed window and select the Network Adapters item in the
left part of the window:
Managing Virtuozzo Network
221
Figure 74: Management Console - Managing Container Adapters
4 In the right part of the window, use either the Add Interface or Remove button to create or
delete the virtual network adapter.
5 Click OK.
Managing Virtuozzo Network
222
Configuring veth Adapter Parameters
While functioning in the veth mode, each Container virtual network adapter appears as a full
participant on the network to which it is connected and needs to have its own identity on this
network.
Fist of all, to start functioning on a TCP/IP network, a veth virtual adapter should be assigned
one or several IP addresses. This can be done as follows:
Note: For detailed information on all parameters that can be configured for each default
Container network adapter (i.e. for the adapter operating in the venet0 mode), please turn to
the Configuring Container section (p. 46).
# vzctl set 101 --ifname eth1 --ipadd 192.168.144.123 --save
Saved parameters for Container 101
This command will set an IP address of 192.168.144.123 for the eth1 adapter inside
Container 101. If you wish to use the Dynamic Host Configuration Protocol (DHCP) to make
the eth1 adapter of Container 101 automatically receive TCP/IP configuration settings, you
can issue the following command instead:
# vzctl set 101 --ifname eth1 --dhcp yes --save
Saved parameters for Container 101
Any static IP address assigned to the Container virtual network adapter can be removed by
executing the following command:
# vzctl set 101 --ifname eth1 --ipdel 192.168.144.123 --save
Saved parameters for Container 101
You can also delete all IP addresses set for Container 101 at once:
# vzctl set 101 --ifname eth1 --ipdel all --save
Saved parameters for Container 101
You may also wish to set the following parameters for a Container network adapter:
one or more DNS servers that the Container virtual adapter is supposed to use:
# vzctl set 101 --ifname eth1 --nameserver 192.168.100.111 --save
Saved parameters for Container 101
and a gateway to be used for routing the traffic of the Container virtual adapter:
# vzctl set 101 --ifname eth1 --gateway 192.168.111.1 --save
Saved parameters for Container 101
Detailed information on all options which can be used with the vzctl set command to
manage Container adapter parameters is given in Parallels Virtuozzo Containers Reference Guide
and the vzctl manual pages.
To configure the aforementioned adapter settings in Management Console, do the following:
1
Select the Virtuozzo Containers item under the corresponding Hardware Node name.
2 Right-click the Container whose network adapter settings you wish to configure and select
Properties on the context menu.
3 In the displayed window, go to the Network tab and select the Network Adapters item in the
left part of the window. A list of network adapters currently existing inside the Container
will be shown in the Interfaces table in the right part of the window.
Managing Virtuozzo Network
223
4 Select the network adapter the network settings of which you wish to configure and click the
Properties button at the bottom of the Interfaces table:
Figure 75: Management Console - Configuring Container Adapter Parameters
5 In this window you can configure the following adapter parameters:
On the General tab of the Virtual Network Interface Properties window:
Change the MAC address assigned to the veth Ethernet interface inside the Container
by entering the needed MAC address in the Enter manually field.
Connect the Container virtual network adapter to a Virtual Network by clicking the
down arrow in the Connection to field and selecting the desired Virtual Network on the
context menu. Detailed information on how to connect Containers to Virtual Networks
is provided in the Connecting Containers to Virtual Networks (p. 224) subsection.
On the IP Settings tab of the Virtual Network Interface Properties window:
configure the network adapter IP addresses:
a
Select the Obtain IP address via DHCP radio button to make the adapter automatically
receive its IP address and the information on the default gateway through the Dynamic
Host Configuration Protocol (DHCP).
b
Select the Get IP address from pool radio button to make the adapter automatically
receive its IP address from the IP addresses pool configured on the Hardware Node.
Detailed information on IP addresses pools is provided in the Configuring IP Addresses
Pool subsection.
c
Select the Enter IP addresses manually radio button and use the Add button to manually
set one or more IP addresses for the adapter.
Managing Virtuozzo Network
224
specify the IP address of the default gateway to be used by the network adapter in the
Default gateway address field (this option is inaccessible if you select the Obtain IP
address via DHCP radio button).
6 Click OK twice.
Connecting Containers to Virtual Networks
With the implementation of veth virtual adapters allowing Containers to function as full
participants on the network, it has become possible to include Containers in a wide range of
network configurations the most common of which are Ethernet networks and VLANs (virtual
local area networks). The process of connecting veth virtual network adapters to an Ethernet
network or to a VLAN is carried out using certain physical and VLAN adapters, respectively,
available on the Hardware Node and involves completing the following tasks:
creating a Virtual Network on the Node to be an intermediary between the veth adapters
and the physical/VLAN adapter on the Node;
connecting the veth virtual adapters you wish to include in an Ethernet network/VLAN to
the Virtual Network;
joining the Virtual Network where the veth virtual adapters are included to the
corresponding physical/VLAN adapter on the Node.
After completing these tasks, the Container virtual network adapters will be able to
communicate with any computer on the network (either Ethernet or VLAN) where they are
included and have no direct access to the computers joined to other networks.
The process of creating new Virtual Networks and joining physical and VLAN adapters to these
Virtual Network is described in the Creating Virtual Network (p. 212) and Connecting Adapter to
Virtual Network (p. 210) subsections, respectively. So, in the example below we assume the
following:
The eth0 physical adapter and the vznetwork1 Virtual Network exist on the Hardware
Node.
The eth0 physical adapter is connected to the local Ethernet network and to the
vznetwork1 Virtual Network.
You wish to connect Container 101 and Container 102 to the local Ethernet network.
To join Container 101 and 102 to the local Ethernet network behind the eth0 adapter, you
should connect these Containers to the vznetwork1 Virtual Network. This can be done as
follows:
1
Find out the name of the veth Ethernet interfaces inside Container 101 and 102:
# vzlist -a -o ctid,ifname
CTID IFNAME
1 101 eth1
102 eth0
103 -
The command output shows that the veth Ethernet interfaces inside Container 101 and 102
have the names of eth1 and eth0, respectively.
Note: To add a veth adapter to a Virtual Network, you should always use the name of its
Ethernet interface inside the Container.
Managing Virtuozzo Network
225
2 Join the veth adapters to the vznetwork1 Virtual Network:
Add the veth adapter of Container 101 to the Virtual Network:
# vzctl set 101 --ifname eth1 --network vznetwork1 --save
Saved parameters for Container 101
Add the veth adapter of Container 102 to the Virtual Network:
# vzctl set 102 --ifname eth0 --network vznetwork1 --save
Saved parameters for Container 102
After completing these tasks, Container 101 and Container 102 will be able to access any of the
servers in the network where the eth0 physical adapter is connected.
At any time, you can disconnect the veth virtual network adapters of Container 101 and 102
from the vznetwork1 Virtual Network by executing the following commands on the Node:
To disconnect the veth adapter of Container 101 from the Virtual Network:
# vzctl set 101 --ifname eth1 --network "" --save
Saved parameters for Container 101
To disconnect the veth adapter of Container 102 from the Virtual Network:
# vzctl set 102 --ifname eth1 --network "" --save
Saved parameters for Container 102
In Parallels Management Console, you can join a Container to any Virtual Network on the
Hardware Node by performing the following operations:
1
Choose the Virtuozzo Containers item under the corresponding Hardware Node name, rightclick the Container you wish to join to the Virtual Network, and select Properties on the
context menu.
2 On the Network tab of the displayed window, select the Network Adapters item.
3 Double-click the Container virtual network adapter to be connected to the Virtual Network.
4 In the Virtual Network Interface Properties window, under Virtual Network, select the Connect
to radio button and, on the drop-down menu, choose the needed Virtual Network:
Managing Virtuozzo Network
226
Figure 76: Mannagement Console - Connecting veth Adapter to Bridge
5 Click OK twice.
To remove a Container virtual network adapter from the Virtual Network where it is currently
included, perform Steps 1-3 described above and, in the Virtual Network Interface Properties
window, select Not Connected on the drop-down menu.
Note: If you are deploying Virtuozzo Containers 4.0 in a VMware ESX Server environment,
you should perform the following operations to make your Containers operating in the veth
mode accessible from external servers:
- Make sure that the value of the Promiscuous Mode field on the Security tab of the vSwitch
Properties window is set to Accept.
- Ensure that the ESX Server adapter always has one and the same MAC address assigned.
227
CHAPTER 8
Managing Hardware Nodes
The current chapter centers on all those operations you can perform on your Hardware Nodes.
You will learn how to manage your Virtuozzo licenses, to unite your Nodes into a group, to
view and configure a number of Virtuozzo-related parameters.
In This Chapter
Managing Virtuozzo Licenses............................................................................................... 227
Managing Files ...................................................................................................................... 235
Managing IP Addresses Pool on Node.................................................................................. 242
Managing Virtuozzo Licenses
The given section provides information on managing Virtuozzo licenses. In particular, you will
know how to view the current license status, to install a new license on your Hardware Node or
to update an existing one, to transfer the license from one Node to another, etc.
Installing Virtuozzo Server License
Depending on the way you have obtained your Virtuozzo Server license, it can be installed on
the Hardware Node as follows:
If you have obtained the Virtuozzo Server license in the form of a product key, you can
install it on the Node using the -p option of the vzlicload command. For example, you
can execute the following command to install the 5BVMF2-560MM0-D28DQA-B59NTE10H4HG product key on your Hardware Node:
# vzlicload -p 5BVMF2-560MM0-D28DQA-B59NTE-10H4HG
Processing product key "5BVMF2-560MM0-D28DQA-B59NTE-10H4HG"...
License VZSRV was loaded successfuly
--1 of 1 licenses was loaded
If you have obtained the Virtuozzo Server license in the form of an activation code, you can
install it on the Node using the -a option of the vzlicupdate command. For example:
# vzlicupdate -a 5K4N96-05WRT4-P28A4R-M65W3T-VB4A7C
where 5K4N96-05WRT4-P28A4R-M65W3T-VB4A7C is the Virtuozzo activation code.
When executed, vzlicupdate connects to the Parallels Key Authentication (KA)
licensing server and transmits the specified activation code there. In its turn, the licensing
server generates a license file, sends it back to the Hardware Node from where the activation
code has been dispatched, and installs it on this Node. So, before executing the
aforementioned command, it is necessary to make sure that the Hardware Node is connected
to the Internet.
Managing Hardware Nodes
228
In Parallels Management Console, you can install a Virtuozzo Server license (using both a
product key and an activation code) by doing the following:
1
Follow the Manage License link at the Hardware Node dashboard.
2 In the Manage Licenses window, click the Install License button.
3 In the Choose License Installation Method window, select the Enter a new Virtuozzo license
key radio button and click Next:
Figure 77: Management Console - Installing License on Hardware Node
4 Enter the Virtuozzo Server product key number or the activation code in the field provided
and click Next.
5 In the Review License Details window, you can view detailed information on the license that
will be installed on your Node. Click the Install button to initiate the installation process.
If you are activating your Virtuozzo Containers installation by means of an activation key, you
should have an active Internet connection to successfully complete the Virtuozzo license
installation. Otherwise, you will be presented with the corresponding warning message
informing you of the steps you have to take to activate your license. As a rule, these steps
include the following:
1
Visiting the http://www.swsoft.com/en/support/virtuozzo/activate web page and activating
the Virtuozzo license manually.
2 Providing the following information on this web page:
In the Product Code field, specify your license activation code (e.g. A6C400-WT1321PFHB48-VIPG61-PDRT56).
In the HWID field, provide the ID of your Hardware Node. You can find this ID in the
Parallels Management Console warning message displayed after clicking the Install
button in the Review License Details window.
Managing Hardware Nodes
229
3 Clicking the Activate License button.
If you have entered the correct information on the Virtuozzo License Activation page, you will be
provided with a link to a Virtuozzo license file that you should download to and install on the
Hardware Node to start using Virtuozzo Containers 4.0. To install the obtained Virtuozzo
license file on the Node, do the following:
Running the vzlicload utility with the -f option on the Hardware Node where the
license file is to be loaded. For example:
# vzlicload -f /etc/vzlicense
This command will install the license file with the name of vzlicense on your Node.
Using Parallels Management Console:
1
Follow the Manage License link at the Hardware Node dashboard.
2 In the Manage Licenses window, click the Install License button.
3 Select the Upload the Virtuozzo license file radio button in the Choose License Installation
Method window and click Next:
4 In the Specify Virtuozzo License File window, you can do one of the following:
enter the path to the license file in the field provided or use the Browse button to specify
the location of the license file or
select the Paste the license text in the area below radio button and copy the contents of
the license file in the field at the bottom of the window.
When you are ready, click Next.
5 In the Review License Details window, you can view detailed information on the license that
will be installed on your Node. Click the Install button to upload the license to the Hardware
Node and install it there.
Managing Hardware Nodes
230
Updating License
The vzlicupdate utility shipped with Virtuozzo Containers 4.0 allows you to update the
Virtuozzo Server license currently installed on the Hardware Node. When executed, the utility
tries to connect to the Parallels Key Authentication (KA) server and to retrieve a new license in
order to install it on the Node. So, before starting to use this utility, you should make sure that
the Hardware Node where you wish to update the Virtuozzo license is connected to the Internet.
After that, you can issue the following command to update your Virtuozzo license:
# vzlicupdate
Start updating license [6E62.3D01.6BEC.E8D7.CE42.4517.68CB.E102]
...
By default, vzlicupdate tries to access the KA server having the hostname of
ka.swsoft.com. However, you can explicitly specify what KA server is to be used by
passing the --server option to the utility:
# vzlicupdate --server ka.server.com
In this case the vzlicupdate utility will try to connect to the KA server with the hostname of
ka.server.com, to get a new license from this server, and to install it on the Hardware Node
where vzlicupdate has been executed.
Note: In the current version of Virtuozzo Containers, you can update Virtuozzo licenses
installed on the Hardware Node with the help of activation code only. If you wish to update a
Virtuozzo Server product key installed on your Node, please contact a Parallels sales
representative to learn how you can do it.
To update a Virtuozzo Server license in Parallels Management Console, do the following:
1
Make sure that the workstation where Management Console is installed and the Hardware
Node where you are planning to update the license are connected to the Internet.
2 Follow the Manage License link at the Hardware Node dashboard.
3 In the Manage Licenses window, click the Update License button. Management Console will
try to connect to the Parallels Key Authentication (KA) server, retrieve a new license, and
install it on the Node.
Transferring License to Another Node
Sometimes you may wish to transfer Virtuozzo licenses from one Hardware Node (Source
Node) to another (Destination Node). For example, this may be the case if the Node where the
Virtuozzo Server license is installed starts experiencing problems for some reason or other or
requires the hardware upgrade.
The procedure of transferring a Virtuozzo license from one Hardware Node to another depends
on the license type and can be one of the following:
If you have activated your Virtuozzo Containers installation by means of a Virtuozzo Server
product key, you can transfer the installed license from the Source to the Destination Node
as follows:
Remove the installed license from the Source Node (e.g. using the vzlicload -r
product_key command);
Managing Hardware Nodes
231
Log in to the Destination Node;
Install the Virtuozzo Server product key on the Destination Node. Detailed information
on how to install Virtuozzo licenses is provided in the Installing License on Hardware
Node subsection (p. 227).
If you have activated your Virtuozzo Containers installation by means of a Virtuozzo
activation code, you should use the vzlicupdate utility to move Virtuozzo Server
licenses between Hardware Nodes. For example, to transfer a Virtuozzo license that has
been installed on Node 1 using the 9BVMF2-560MN0-F28DQA-O59NTE-12H6HG
activation code to Node 2, you should do the following:
1. Ascertain that Node 1 is shut down or the license is removed from this Node.
2. Make sure that Node 2 is up and connected to the Internet.
3. Log in to Node 2 (e.g. via ssh).
4. Execute the following command on Node 2:
# vzlicupdate -t -a 9BVMF2-560MN0-F28DQA-O59NTE-12H6HG
When executed, vzlicupdate sends the 9BVMF2-560MN0-F28DQA-O59NTE12H6HG license key to the Parallels KA server, thus informing the server of its intention to
transfer the license to a new Hardware Node. The KA server verifies the received license
key, generates a new license file, sends it back to Node 2, and installs it there.
To transfer a Virtuozzo license from the Source Node to the Destination Node in
Management Console, perform the following operations:
Ascertain that the Source Node is shut down or the license is removed from this Node.
Make sure that the Destination Node and the computer where Management Console is
installed are connected to the Internet.
In Management Console, click the Destination Node name and follow the Manage
License link at the Hardware Node dashboard.
In the Manage Licenses window, click the Install License button.
Select the Transfer a license from another Hardware Node radio button in the Choose
License Installation Method window and click Next.
In the Enter Product Activation Code window, enter the activation code and click the
Install button. Management Console will connect to the Parallels KA server, inform the
server of its intention to transfer the license to a new Hardware Node, get a new license
file from the KA server, and install it on the Destination Node.
Managing Hardware Nodes
232
You can check that the license transferal has completed successfully by means of the
vzlicview utility. For example, to check that the U8IK3F-P6QJ8A-O59NTE-42H6HLD5R07H product key is now installed on Node 2 (see the example above), issue the following
command:
# vzlicview
Show installed licenses...
VZSRV
status="ACTIVE"
version=4.0
serial="9BVMF2-560MN0-F28DQA-O59NTE-12H6HG"
expiration="05/01/2007 23:59:59"
...
The command output shows that the 9BVMF2-560MN0-F28DQA-O59NTE-12H6HG license
key has been successfully installed on Node 2 and you can start using the Virtuozzo Containers
software on this Node. Detailed information on the vzlicview utility and its output is
provided in the Viewing Current License subsection (p. 232).
Viewing Current License
The given subsection familiarizes you with the way to view the information on the Virtuozzo
licenses currently installed on your Hardware Node.
Managing Hardware Nodes
233
Viewing Virtuozzo Server License
In order to view the information on the Virtuozzo Server license and find out its current status,
Parallels ships a special vzlicview utility. When executed, this utility checks the Virtuozzo
Server license currently installed on the Hardware Node and prints the license contents along
with its status obtained from the kernel. A sample output of vzlicview is given below:
# vzlicview
Show installed licenses
VZSRV
status="ACTIVE"
version=4.0
serial="6BWMF2-560MM0-D28DQA-C59NTE-10H6HG"
expiration="12/01/2006 23:59:59"
graceperiod=86400 (86400)
key_number="VZ.00000001.0000"
cpu_total=64 (1)
ct_total=8200 (1)
max_vzmcpmc_users=128
max_pim_users=260
platform="Any"
product="Virtuozzo Containers"
vzpp_allowed=1
backup_mgmt_allowed=1
workflow_mgmt_allowed=1
vzagent_allowed=1
architecture="Any"
The command output shows the full information about the Hardware Node license. The main
Virtuozzo Server license parameters which may be of interest to you are listed in the following
table:
Column Name
Description
status
The status of the license currently installed on the Hardware
Node. The information on all license statuses is provided in the
Virtuozzo License Statuses subsection (p. 234).
version
The Virtuozzo Containers version with which the license is
compatible.
serial
The Virtuozzo Server license serial number.
expiration date
The license expiration date, if it is time-limited.
grace_period
The period during which Parallels Virtuozzo Containers continues
functioning after your license has expired, in minutes.
key_number
The number under which the Virtuozzo Server license is
registered on the Parallels Key Authentication server.
cpu_total
The total number of central processor units (CPUs) which can be
installed on the Hardware Node.
ct_total
The total number of Containers which can simultaneously run on
the Hardware Node.
max_vzmc_users
The number of users able to simultaneously connect to the Node
through Parallels Management Console.
max_vzcc_users
The number of users able to simultaneously connect to the Node
through Parallels Infrastructure Manager.
platform
The operating system with which the license is compatible.
product
The product name for which the license has been issued.
Managing Hardware Nodes
234
Indicates whether you can manage Containers residing on the
given Hardware Node by means of Parallels Power Panel:
vzpp_allowed
1: the 'Parallels Power Panel' functionality is enabled;
0: the 'Parallels Power Panel' functionality is disabled.
Indicates whether the 'backup' functionality is enabled for the
given Hardware Node:
backup_mgmt_allowed
1: the 'backup' functionality is enabled;
0: the 'backup' functionality is disabled.
Indicates whether the 'Container requesting' functionality is
enabled for the given Hardware Node:
workflow_mgmt_allowed
1: the 'Container requesting' functionality is enabled;
0: the 'Container requesting' functionality is disabled.
Indicates whether you are allowed to use the Parallels Agent
functionality on the given Hardware Node:
vzagent_allowed
architecture
1: the Parallels Agent functionality is enabled;
0: the Parallels Agent functionality is disabled.
The system architecture with which the license is compatible.
In Parallels Management Console, you can check the current status of the Virtuozzo Server
license installed on the Hardware Node by doing the following:
1
Follow the Manage License link at the Hardware Node dashboard.
2 Choose Virtuozzo Server license in the top part of the Manage Licenses window. The full
information about the installed Virtuozzo Server license will be displayed in the License
details table in the bottom part of the window.
Virtuozzo License Statuses
When viewing information on your license, please pay special attention to the license status that
can be one of the following:
ACTIVE
The license installed on the Hardware Node is valid and active.
VALID
The license the utility parses is valid and can be installed on the Hardware Node.
EXPIRED
The license has expired and, therefore, could not be installed on the Hardware Node.
GRACED
The license has been successfully installed on the Hardware Node; however, it has
expired and is currently on the grace period (i.e. it is active till the end of the grace
period).
INVALID
The license is invalid (for example, because of the Hardware Node architecture
mismatch) or corrupted.
Managing Hardware Nodes
235
Managing Files
Parallels Management Console provides you with a special file manager allowing you to
perform various operations on files and folders located on the Hardware Node. You can access
the file manager by clicking the File Manager item under the corresponding Hardware Node
name. After expanding the File Manager item, you will see a list of directories available on the
Hardware Node:
Figure 78: Management Console - Managing Files on Node
The principles of working with the Hardware Node file manager are standard. You can move
through the hierarchy of directories by double-clicking their names or selecting the necessary
directories in the left pane. Use the menu items, toolbar buttons, table view, and context menus
to perform the following tasks:
View the contents of simple text files;
View the principal information about a file/directory available on the Hardware Node;
Upload any number of files or whole directories from your local computer (the computer
where Management Console is installed) to any directory on the Hardware Node;
Download any number of files from the Hardware Node to your local computer;
Create new directories on the Hardware Node;
Copy files to another directory on the Hardware Node;
Move files to another directory on the Hardware Node;
Delete files/directories from the Hardware Node;
Rename files/directories on the Hardware Node;
Managing Hardware Nodes
236
Set permissions for Container files.
Parallels Management Console provides a user-intuitive interface for performing all these tasks.
Managing Hardware Nodes
237
Uploading Files to Node
In Parallels Management Console, you can upload any number of files or whole directories from
the local computer (the computer where Management Console is installed) to any directory on
the Hardware Node. Under the corresponding Hardware Node name, right-click the File
Manager item and select Tasks --> Upload Local File(s) on the context menu. The Upload Files
Wizard opens:
Figure 79: Management Console - Choosing Hardware Nodes for Uploading Files
It is a four-step wizard. On the first step of the wizard, you should define the Hardware Node(s)
and the path on this Node (these Nodes) where the files will be uploaded. Click the Add button
to open the Select Hardware Node(s) window and select the Hardware Node you wish to add to
the upload list. Repeat this sequence for every Hardware Node where you wish to upload files
and then click OK. After that, you should enter the path where the files are to be uploaded or
browse for this path on the remote Node. Click Next when you are finished.
On the second step of the wizard, you should specify the local files you wish to upload to the
Hardware Node(s) that you specified on the previous step.
Managing Hardware Nodes
238
Figure 80: Management Console - Uploading Files to Hardware Node
On the first step of the wizard, you should specify the local files you wish to upload to the
Hardware Node. Click the Add button and select a file or a group of files from a single directory
for uploading. You can also upload the whole directory by clicking the Add Directory button. If
you need to upload files from various local directories, click the Add button the required number
of times. After you have added all the files and directories to be uploaded, click Next.
The second step of the wizard allows you to specify file access permissions, i.e. to set up certain
attributes of the files to be uploaded:
Managing Hardware Nodes
239
Figure 81: Management Console - Uploading Files to Hardware Node
Each file in any Unix system must have a user owner and a user group. The default values are
root in both cases. You may specify your own values in the fields provided. A file has also
special flags marking if the file is executable or not, and if it is read-only. Depending on your
choice, the files may be uploaded with any values of these attributes. Review the settings, make
the necessary corrections, and click Next.
The next window lets you review all the information provided by you on the previous steps of
the wizard. Make sure the settings are correct. To change the settings, click the Back button and
make the necessary corrections. After you click Next, the uploading process begins. The
operation progress is graphically displayed in the window of the Upload Files Wizard. You can
see how each of the selected files is being consecutively uploaded to the Hardware Node. Please
wait for the operation to finish.
After the uploading process has finished, you will get informed of the results of the operation.
The table in the displayed window lets you view the results regarding every file uploaded to the
Node. Click Finish to exit the wizard.
Managing Hardware Nodes
240
Downloading Files to Local Computer
Parallels Management Console allows you to download any file or directory located on the
Hardware Node to the computer where Management Console is installed. To this effect, do the
following:
1
Expand the File Manager item under the corresponding Hardware Node name.
2 Select the file/directory you wish to download to your local computer (you can use
CTRL+Click to select or deselect the file/directory, SHIFT+Click to select a range of
files/directories, CTRL+A to select all files/directories).
3 Right-click it and choose Tasks --> Copy To Local Computer on the context menu.
4 In the displayed window, specify the directory where you wish to download the selected
file/directory.
5 Click OK.
Managing Hardware Nodes
241
Setting Permissions for Files on Node
Parallels Management Console allows you to view and/or change the properties of the
corresponding file or directory on the Hardware Node. Under the corresponding Hardware Node
name, expand the File Manager item, select the file/directory whose properties you wish to
display, right-click it, and choose Properties. The file/directory Properties window opens:
The information is presented on two tabs:
General: This tab contains only one editable field (Name) where you can rename the current
file or directory. You can also view the type, location, size, and the last modification date of
the file or directory.
Permissions: This tab allows you to set the owner and the group for the corresponding
file/directory and its standard Unix properties.
If you are working with a directory, there are two other options on the tab. They are
described in the table below:
Option
Only owners
delete files
Description
can This option is used to override the Write permission when it is given to
Group or Other. If this is the case, selecting this check box will allow the
Group and Other members only to write the files in the corresponding
directory, but not to delete them.
Apply changes for If you select this check box, the changes in ownership and permissions
files and folders that you have made for the current directory, will be recursively applied
recursively
to all its subdirectories and files.
Managing Hardware Nodes
242
Managing IP Addresses Pool on
Node
The given section provides information on how you can manage IP addresses pools for your
Hardware Nodes.
Managing Hardware Nodes
243
Configuring Hardware Node IP Addresses Pool
After you have registered a Hardware Node in Parallels Management Console, you can create
and configure the IP addresses pool for Containers which will be hosted on this Node. This
helps you ensure a unified space of Container IP addresses within your Hardware Node.
To create a new IP addresses pool or configure an existing one, do the following:
1
Right-click the corresponding Hardware Node name and select Network Configuration --> IP
Addresses Pool on the context menu:
Figure 82: Management Console - Configuring Node IP Addresses Pool
2 On the Pool Configuration tab of the IP Addresses Pool Configuration window, use the
provided buttons to make a new pool or configure an existing one. Pools are comprised of
continuous ranges of IP addresses. Every range may be characterized by the starting IP
address, the ending IP address, and the number of IP addresses within the range. Obviously,
it is enough to know any two of these three parameters to deduce the third one. The
information on the operations you can perform using the buttons to the right of the IP
address ranges in pool table is presented below:
Button
Description
Add Range
Displays a window where you can define a new range for the IP addresses pool of the
given Hardware Node.
Delete
Deletes the IP addresses range selected in the table.
Edit
Displays a window where you can edit the parameters of the range selected in the
table.
Managing Hardware Nodes
Exclude Range
244
Displays a window where you can exclude a certain continuous subrange of IP
addresses from the range selected in the table. As a rule, this brings about the
appearance of two new ranges instead of the selected one.
Viewing Allocated IP Addresses
Parallels Management Console allows you to view the IP addresses from the pool that were
already assigned to the Containers on your Hardware Node (either during the Container creation
or while configuring these Containers afterwards). To this effect, you should right-click the
corresponding Hardware Node name, select Configure IP Addresses Pool on the context menu,
and go to the Allocated tab of the displayed window:
Figure 83: Management Console - Viewing Information on IP Addresses Pool
In this window you can view the following information about your IP addresses pool:
Under the Usage Statistics group, you can learn:
the number of IP addresses from the pool already assigned to the Containers on the
Node;
the total number of IP addresses in the pool;
the ratio of used IP addresses to the total number of IP addresses in the pool, in percent;
the graphical representation of this ratio is also provided at the top of the IP Addresses
Pool Configuration window.
Managing Hardware Nodes
245
The Allocated IP addresses table provides detailed information on the IP addresses already
allocated to the Containers on the Hardware Node:
Column Name
Description
IP Address
The IP address from the pool already allocated to some Container on the Node.
Environment
The hostname of the Container to which the IP address was allocated.
Hosted on
The name of the Hardware Node where the database of IP addresses (the IP
addresses pool) is stored.
246
CHAPTER 9
Keeping Your Virtuozzo System Up-toDate
Being a virtualization solution, the Virtuozzo Containers software modifies the host operating
system on a rather low level, even including kernel modification. With this in mind, the
Virtuozzo Hardware Node administrator is supposed to understand what are the ways to keep
the Virtuozzo system up-to-date by applying all the latest security fixes and other updates.
The components to be kept up-to-date are the following:
the Host OS software;
the Virtuozzo Containers software, and
the Containers created on the Hardware Node.
In This Chapter
Updating Host OS Software.................................................................................................. 246
Updating Virtuozzo Containers Software ............................................................................. 248
Updating Containers ............................................................................................................. 265
Updating Host OS Software
Beginning with Virtuozzo Containers 3.0, it is safe to use the native Linux distributions updaters
(up2date, yum, or yast) in the same way as you would use them on common non-Virtuozzo
systems. This is due to the fact that the Virtuozzo Containers installation program modifies the
settings of these updaters in such a way that the kernel and other packages vital for Virtuozzo
Containers 4.0 functioning do not get updated, unlike all the other operating system packages.
The Hardware Node administrator should regularly use these updaters without overriding their
default behavior, which ensures that the non-Virtuozzo-specific part of the operating system has
all the latest fixes (including security patches) installed and that Virtuozzo-specific packages are
not erroneously updated by native updaters. If a security patch or other fix is issued for the
mainstream Linux kernel or any other package that has been modified for Virtuozzo needs, the
kernel/package is instantly rebuilt by Parallels with this security patch and becomes accessible
on the Virtuozzo Containers update site (see the Updating Virtuozzo Containers Software section
below).
There follows a description of peculiarities of various native updaters and their integration with
Parallels Virtuozzo Containers.
Keeping Your Virtuozzo System Up-to-Date
247
Using up2date
The up2date updater can be used on such host operating systems as Red Hat 9, Red Hat
Enterprise Linux 4 and 5, CentOS 4 and 5, Fedora 7 and 8.
If
Parallels
Virtuozzo
Containers
is
installed
on
the
server,
the
/etc/sysconfig/rhn/up2date configuration file is modified in such a way so as to let
all the packages necessary for Virtuozzo Containers 4.0 functioning remain intact on the Node
during the work of up2date.
So, here are the pitfalls you should avoid while using the up2date updater:
Do
not
modify
the
value
of
the
following
/etc/sysconfig/rhn/up2date configuration file:
pkgSkipList;
removeSkipList;
forceInstall (the right value is 0);
parameters
in
the
Do not pass the -f or --force option to up2date.
Using yum
The yum updater can be used on such host operating systems as CentOS 4 and 5, Fedora Core 5,
6, Fedora 7 and 8.
If Virtuozzo Containers 4.0 is installed on the server, the /etc/yum.conf configuration file
is modified in such a way so as to exclude all the packages necessary for Virtuozzo Containers
4.0 functioning from the update list. The parameter the value of which you should avoid
modifying in this configuration file is exclude, which is located in the [main] section. You
should not use other configuration files than the default one, either.
Using yast
The yast updater can be used on the SUSE Linux Enterprise Server 9 host operating system.
The default behavior of this updater does not update any packages that are not signed by SUSE.
All the packages on a SLES 9 distribution that have been replaced with analogous ones by
Parallels (including the kernel) do not have the SUSE signature and thus are excluded from the
default update list. However, it is very easy to inadvertently override this default behavior (a
casual mouse-click opposite an Parallels-rebuilt package could be enough), so you should be
extra careful with yast.
Keeping Your Virtuozzo System Up-to-Date
248
Updating Virtuozzo Containers
Software
Parallels Virtuozzo Containers for Linux is constantly developing: there appear new versions of
the Virtuozzo core and of existing Virtuozzo utilities, OS and application templates are
perfected, new templates and utilities are also added from time to time. Thus, Parallels
Virtuozzo Containers as a single product may often be repackaged to include the latest changes
in any of its parts. As these changes grow in number, new Virtuozzo Containers versions with
incremented major and/or minor numbers are released.
Parallels Virtuozzo Containers allows you to use one of the following tools to update your
Virtuozzo Containers software:
the vzup2date utility;
Parallels Management Console.
You can use both tools to connect to the Virtuozzo update server and update the following
components on the Hardware Node:
the kernel;
the Linux packages copyrighted by third parties (by the OS vendor, for example) but built
by Parallels for compatibility with Virtuozzo Containers 4.0; such packages are usually
rebuilt by Parallels and put on the Virtuozzo update server after a security or other important
hotfix is issued by the third party;
the Virtuozzo packages copyrighted and built by Parallels, Inc.;
the Virtuozzo templates (both standard and EZ) installed on the Hardware Node.
Updating Parallels Virtuozzo Containers With vzup2date
The vzup2date utility, introduced in Virtuozzo Containers 2.6.1, is intended to relieve
Virtuozzo administrators of the necessity to manually update existing Virtuozzo Containers
installations. It provides a single information channel for learning if updated Virtuozzo
Containers versions are available. In other words, a regular launching of this utility helps ensure
that you always have the latest Parallels Virtuozzo Containers software available.
The vzup2date utility can be launched in two modes:
Graphical mode representing the Virtuozzo Update wizard allowing you to update either the
Virtuozzo system files or the Virtuozzo templates depending on the options passed to
vzup2date.
Command line mode containing two submodes:
the batch submode and
the messages submode.
In comparison to the graphical mode, the command line mode provides more inclusive
possibilities for the Virtuozzo Containers updates management (e.g. the ability to use special
filters while selecting updates for your system).
Keeping Your Virtuozzo System Up-to-Date
Both modes are described in the following subsections in detail.
249
Keeping Your Virtuozzo System Up-to-Date
250
Updating in Graphical Mode
In the graphical mode, the vzup2date utility can be launched in three submodes. If invoked
without any parameters or with the -s switch, it is supposed to check and, if necessary,
download and install Virtuozzo system files, i.e newest versions of the Virtuozzo core and
utilities. On the other hand, the -t and -z switches provided when invoking the utility tells it to
perform the same operations for Virtuozzo OS and application standard and EZ templates,
respectively. There is no single interface for checking Virtuozzo system files and templates at
once, as these operations are different in nature, so you should consecutively call the
vzup2date utility with and without the -t and -z switches, if you wish to check for all
available system and template updates.
Note: You can explicitly specify that the vzup2date utility is to be run in the graphical mode
by passing the -m interactive switch to it.
The vzup2date utility is implemented as a wizard, the first few steps of which are common
for all three modes. After you launch the utility from the command line, you will be presented
with a greeting screen:
Figure 84: Updating Virtuozzo Containers - Welcome Screen
In this window you can do one of the following:
Click the Next button to connect to the Parallels default repository
Click the Configure button to display the current settings used to connect to the repository
housing Virtuozzo updated packages and templates and to configure it, if necessary:
Keeping Your Virtuozzo System Up-to-Date
251
Figure 85: Updating Virtuozzo Containers - Specifying Repository
The
information
on
this
screen
is
taken
from
the
/etc/sysconfig/vzup2date/vzup2date.conf file on the Hardware Node. If
you wish to change this information and save the changes to the configuration file, enter the
correct settings into the fields provided and press OK. For example, this may be the case if
you have created your own local mirror of the Virtuozzo official repository with the
vzup2date-mirror utility. For detailed information on vzup2date-mirror, please
turn to the Creating Local Repositories for vzup2date section (p. 332).
As soon as you press Next in the Welcome... window, the utility will try to connect to the
specified repository (either the Parallels default repository or your own one) and, if the
connection is successful, display the next screen, which will vary depending on the mode of the
vzup2date invocation. First, we will describe the mode of updating Virtuozzo system files
and then proceed with updating Virtuozzo standard and EZ templates.
Keeping Your Virtuozzo System Up-to-Date
252
Updating Virtuozzo System Files
After the repository is checked for updates availability, it may happen that no updates are
available for your system, in which case the utility will duly inform you thereof. If there are any
updates, please distinguish between major and minor Virtuozzo Containers updates. A major
Virtuozzo Containers update is indicated by a higher version of the available Virtuozzo
Containers release. For example, with the current Virtuozzo Containers version of 4.0, this will
be a major update for Virtuozzo Containers 3.0. Minor updates happen within the same
Virtuozzo Containers release. Minor updates may be available not only for the latest Virtuozzo
Containers release but for previous releases as well. So, in case there is a major update available
for your current Virtuozzo Containers installation, you will be presented with a screen like the
following:
Figure 86: Updating Virtuozzo Containers - Selecting Update Type
Bear in mind that the latest Virtuozzo Containers release you are upgrading to might also
already have available minor updates. However, they will not be applied during this invocation
of the vzup2date utility. So, in order to install the latest Virtuozzo Containers version and
then to apply minor updates to it, you will need to launch the utility twice.
Note: The vzup2date utility might see that the selected Virtuozzo Containers update includes
an updated version of the vzup2date utility itself. In this case you will first have to perform
an update of this utility and then to re-launch it and select the desired Virtuozzo system update
once again.
Depending on the kind of update you choose on this screen, the further steps will differ. Mind
also that if there is only a major update or there are only minor updates available, the above
screen will be skipped and you will be taken to the corresponding branch of the wizard directly.
Keeping Your Virtuozzo System Up-to-Date
253
Upgrading Parallels Virtuozzo Containers to Latest Release
After you have chosen to upgrade your current Virtuozzo Containers installation to the latest
release, you will go through the following steps of the wizard:
Read the Release Notes for the new Virtuozzo Containers release.
Confirm the downloading of the new release, the size of which will be indicated.
After the updated packages have been downloaded, you will be notified if rebooting the
server is needed after the upgrading and will need to decide on the system reboot options. If
you wish your system to be automatically rebooted upon the updates installation
completion, select the Automatically reboot after update check box; otherwise, select the
Reboot later manually check box.
Figure 87: Updating Virtuozzo Containers - Choosing System Reboot Options
After deciding on the system reboot options, press Install to begin installing the latest
release. Mind that the Virtuozzo service will be stopped during the upgrading and the
Hardware Node rebooting, so all the Containers will not be functional all this time.
Keeping Your Virtuozzo System Up-to-Date
254
Updating Current Virtuozzo Containers Release
Updating the current Virtuozzo Containers release happens when there are no new Virtuozzo
Containers releases or if you are not willing to update to the latest release. The utility will first
present you with a default list of updates to be applied to your Node. This default list comprises
the latest Virtuozzo Containers updates for the given release:
Figure 88: Updating Virtuozzo Containers - List of Selected Updates
If you wish to update to the latest Virtuozzo core and utilities versions, just press Next on this
screen and the vzup2date utility will download and install them asking your confirmation
before each action.
On the other hand, if you have a reason not to install the latest updates for both the Virtuozzo
core and Virtuozzo utilities, press Customize. Then you will be able to choose whether to
perform customization on the Virtuozzo core or on the Virtuozzo utilities. This step will be
skipped if updates are currently available either only for the Virtuozzo core or only for the
Virtuozzo utilities. On the next step, you will be asked to choose the needed Virtuozzo core or
utilities updates, in case there are many. For example, the available Virtuozzo utilities updates
might be presented like this:
Keeping Your Virtuozzo System Up-to-Date
255
Figure 89: Updating Virtuozzo Containers - Select Virtuozzo Core Updates
The bottommost update includes the functionality of all the other updates. You may select any
of the intermediary updates and press Select to go back to the List of Selected Updates screen
and read the information on this update. You will be able to perform customization more than
once until you finally decide on the set of updates to be applied and press Next.
Downloading and installing the necessary updates is straightforward.
Keeping Your Virtuozzo System Up-to-Date
256
Updating Virtuozzo EZ Templates
Updating Virtuozzo EZ templates consists in updating one or more EZ templates configuration
files located in the /vz/template/<os_name>/<os_version>/<arch>/config
directory on the Node and takes place if you have launched the vzup2date utility with the -z
option. The first few steps of the wizard were described in the Updating in Graphical Mode
subsection (p. 250). As soon as you press Next in the Welcome... window, the utility will try to
connect to the EZ templates repository (either the Parallels default repository or your own one)
and, if the connection is successful, display the EZ Templates Selection window listing all EZ
templates that have one or more updates available or that are not installed on your Node at all.
For example:
Figure 90: Updating Virtuozzo Containers - Selecting Linux Distribution
In this window you can do one of the following:
If you wish to download and install all available EZ templates/template updates for a certain
Linux distribution, select this distribution by placing the cursor beside it and pressing the
space bar on your keyboard; then click Next.
If you wish only certain EZ templates of the corresponding Linux distribution to be
installed/updated on the Hardware Node, place the cursor beside this distribution and press
F2 on your keyboard. You will be presented with the Templates selection window where
you can select the corresponding EZ templates:
Keeping Your Virtuozzo System Up-to-Date
257
Figure 91: Updating Virtuozzo Containers - Selecting EZ Templates
After choosing the right EZ templates, click the Select button to close the displayed window
and then click Next to proceed with the wizard.
Note: New application EZ templates for a Linux distribution can be installed on the
Hardware Node only if the corresponding OS EZ template is already installed on this Node.
Keeping Your Virtuozzo System Up-to-Date
258
On the next step, you can review the EZ templates/template updates you selected on the
previous step and scheduled for downloading and installing on your Hardware Node. If you are
not satisfied with the chosen templates/template updates, click the Back button to return to the
previous step and modify the set of templates; otherwise, click Next to start downloading the
templates/template updates on the Node.
After the EZ templates/templates have been successfully downloaded to the Hardware Node, the
Installing EZ template window is displayed:
Figure 92: Updating Virtuozzo Containers - Viewing EZ Templates to Install
In this window you can view the templates/template updates ready to be installed on your Node.
If you are installing a new OS EZ template/OS EZ template update, you can make use of the
Run vzpkg cache after installation check box to specify whether to cache the corresponding OS
EZ template/template update right after its installation on the Node or to do it at a later time. By
default, all OS EZ templates are just installed on the Hardware Node without being cached;
however, you can select the provided check box and schedule your OS EZ template/template
update for caching. Clicking Next starts installing the EZ templates on the Hardware Node. By
the time the wizard finishes you should have updated OS and application templates on your
system.
Keeping Your Virtuozzo System Up-to-Date
259
Updating Virtuozzo Standard Templates
Updating Virtuozzo standard templates takes place if you have launched the vzup2date
utility with the -t option and, in contrast to EZ templates, includes updating one or more
software packages of the corresponding template. The first few steps of the wizard were
described in the Updating Virtuozzo Containers Software section. After the repository has been
checked for the availability of updated templates, the utility will present you with a list of OS
templates that you may install and/or update on your server. For example:
Figure 93: Updating Virtuozzo Containers - Selecting OS Standard Templates
There are two kinds of templates on this list:
1
Templates that are not present on your system. These might be templates that you did not
wish to install from the very beginning, so by default they are not selected to be installed
this time also. Anyway, you may just as well select them and thus add to your system.
2 Updates to those templates that are already installed with you. By default, these templates
are already selected on this screen. It may happen that an update involves the downloading
and installing of some intermediary updates, in which case you will see several templates
downloaded and installed at the final stages of the wizard. Anyhow, you need to select only
the latest update, and all the rest is done automatically.
Review the templates that you wish to install and/or update and click Next to go to the
application templates selection screens. You will also have the possibility to select not only
those application templates that can update your existing applications but install new templates
compatible with a set of OS templates installed on your system. Those application templates
that are incompatible with the OS templates you chose to install or update on the previous step
will not be offered for selection. To schedule this or that application template for being
installed/updated, you should click on the Customize button and, in the displayed window, select
the corresponding templates.
Keeping Your Virtuozzo System Up-to-Date
260
The steps of downloading and installing the selected templates are self-evident. By the time the
wizard finishes you should have updated OS and application templates on your system.
Updating in Command Line Mode
Another way of updating your Virtuozzo system files and templates is to run the vzup2date
utility in the command line mode, which can be done by passing the corresponding commands,
switches, and options to vzup2date. While executing vzup2date in the command line
mode, you can choose between the batch and messages submodes. Both submodes can be used
to update either the Virtuozzo system files or the Virtuozzo templates and have the identical
syntax. However, the output produced by these commands is different. The messages submode
output is less user friendly than the batch submode one and is mostly suitable for machine
processing.
To run the vzup2date utility in the command line mode, you should use either the -m
batch switch or the -m messages switch intended for executing vzup2date in the batch
and messages submodes, respectively.
Let us assume that you wish to update your Virtuozzo system files by installing the latest
Virtuozzo core in the batch submode. To this effect, you can issue the following command on
the Hardware Node:
# vzup2date -m batch install --core
This will check the Virtuozzo repository for the latest Virtuozzo core updates and, in the case of
finding any, download and install them on the Hardware Node. However, to be able to update
your
Virtuozzo
Containers
installation,
you
may
need
to
edit
the
/etc/sysconfig/vzup2date/vzup2date.conf file to specify the repository from
where the Virtuozzo Containers updates are to be downloaded or configure a number of other
parameters. Detailed information on the vzup2date.conf file is provided in the Configuring
Parallels Virtuozzo Containers chapter of Parallels Virtuozzo Containers Reference Guide.
You can also execute the vzup2date utility in the batch mode to update Virtuozzo templates
installed on the Hardware Node. For example, you can issue the following command
# vzup2date -t -m batch install --all-os
to update all OS templates installed on your Node. Detailed information on all options that can
be passed to the vzup2date utility is given in the Virtuozzo Command Line Interface chapter of
the Parallels Virtuozzo Containers Reference Guide.
Note: To perform the aforementioned operations in the messages submode, you should pass the
-m messages option to the vzup2date utility instead of -m batch.
Using Parallels Management Console to Update Virtuozzo Containers
Software
You can also use Parallels Management Console to keep your Virtuozzo Containers software at
the most recent version.
Keeping Your Virtuozzo System Up-to-Date
261
Configuring Virtuozzo Containers Update Server Settings
Before starting the update procedure in Parallels Management Console, you may wish to check
and configure, if necessary, the parameters to be used by the Virtuozzo Containers Update wizard
while connecting to the update server storing Virtuozzo system and template updates. To view
the current settings of the update server, you should right-click the name of the Hardware Node
you are going to update in the Parallels Management Console tree pane and select Virtuozzo
Containers Update --> Set Up Update Repository on the context menu. You will be presented
with the following window:
Figure 94: Management Console - Configuring Virtuozzo Update Settings
In this window you can view and modify, if necessary, the following settings:
Under the Repository group, you can change a number of parameters related to the update
server:
the URL (Uniform Resource Locator) to be used to connect to the update server (e.g.
http://vzup2date.swsoft.com)
the user name for accessing the update server
the password of the user specified in the Login group and used for accessing the update
server.
If you use a proxy server to connect to the Internet, you may also need to specify/configure
the following settings for your proxy server:
the proxy server address in the URL field (e.g. http://192.168.1.20)
the user name used by the proxy server for your authentication in the Login field
the password of the user specified in the Login field and used for your authentication by
the proxy server.
Keeping Your Virtuozzo System Up-to-Date
262
Updating Virtuozzo System Files
Parallels Management Console provides you with a special wizard helping you update your
current Virtuozzo Containers software. The Virtuozzo System Update wizard is supposed to
check and, if necessary, download and install Virtuozzo system files, i.e newest versions of the
Virtuozzo core and utilities. To invoke the wizard, you should right-click the name of the
Hardware Node you wish to update and select Virtuozzo Update --> Check for System Updates
on the context menu (alternatively, you can follow the Check for System Updates link on the
Hardware Node dashboard). The wizard will try to connect to the repository housing updated
packages for the Virtuozzo software and, if the connection is successful, you will be presented
with a screen containing a list of available updates for your Virtuozzo Containers installation:
Note: If the connection to the update server has failed, the Update Repository Settings window
is displayed allowing you to check and configure the settings to be used for connecting to the
repository. Detailed information on how to change the parameters in this window is given in the
Checking Virtuozzo Update Center Settings subsection.
Figure 95: Management Console - Choosing Virtuozzo Updates
All updates that can be currently applied to your system are listed in the Virtuozzo Core Updates
(storing the latest patches to the Virtuozzo kernel) and Virtuozzo Tools Updates (storing the
latest versions of Virtuozzo command-line utilities) tables on the Select Updates screen. In this
window you can do the following:
If you wish to update to the latest Virtuozzo core and utilities versions, just click Finish on
this screen.
Keeping Your Virtuozzo System Up-to-Date
263
If you wish to install updates of certain Virtuozzo core or utilities only, select the radio
buttons next to these updates and click Finish. Please keep in mind that the uppermost
update includes the functionality of all the other updates (e.g. update 4.0.0-271 includes
all the functionality of update 4.0.0-270).
If you wish to view detailed information on an update, expand the plus sign next to this
update in the corresponding table.
If you do not wish to install any updates, select the Do not install any updates button.
If you are going to install a Virtuozzo core update, you can additionally specify what operations
are to be performed after the update installation on the Hardware Node:
If you wish your system to be automatically rebooted upon the update installation
completion, leave the Disable automatic reboot check box cleared. Rebooting the Node is
usually required for the changes made to the Virtuozzo kernel to take effect.
If you wish the Virtuozzo System Update wizard to automatically reconfigure your system
boot loader (either Lilo or Grub) on applying the update, leave the Disable automatic
bootloader configuration check box cleared; otherwise, select this check box.
When you are ready, click Finish to start downloading the selected updates and installing them
on the Node.
Keeping Your Virtuozzo System Up-to-Date
264
Updating Templates in Parallels Management Console
Parallels Management Console provides you with the Virtuozzo Templates Update wizard
allowing you to update any of EZ and standard templates installed on your Hardware Node. You
can also use this wizard to download new templates to the Hardware Node and install them
there. To invoke the Virtuozzo Templates Update wizard, right-click the Templates item under
the corresponding Hardware Node name and select Check for Template Updates on the context
menu. When launched, the wizard tries to connect to the templates repository (either the
Parallels default repository or your own one) and, if the connection is successful, display the
Select Updates window listing those templates that have one or more updates available or that
are not installed on your Node at all. For example:
Note: If the connection to the Virtuozzo Containers update server cannot be established, you
will be presented with the Repository Update Settings window where you will be asked to
provide the correct information to connect to the update server. Detailed information on how to
change the parameters in this window is given in the Checking Virtuozzo Containers Update
Server Settings subsection.
Figure 96: Management Console - Updating EZ Templates
In this window, you can do one of the following:
If you wish to download and install all available templates/template updates for a certain
Linux distribution, click the Next button to go to the next step of the wizard.
Keeping Your Virtuozzo System Up-to-Date
265
If you wish only certain templates of a Linux distribution to be installed/updated on the
Hardware Node, click on the plus sign beside the corresponding Linux distribution to
display a list of application templates available for this distribution. You can then get
detailed information about a particular template by selecting the corresponding template and
viewing its data in the right part of the displayed window. By default, all new
templates/template updates are set for downloading to and installing on the Hardware Node.
To prevent this or that template from being downloaded/installed, just clear its check box.
When you are ready, click Next.
Click Finish to start installing the selected templates/template updates on the Hardware Node.
Updating Containers
Virtuozzo Containers 4.0 provides you with two facilities allowing to always keep your
Containers up-to-date. These facilities include:
Updating EZ templates software packages inside a particular Container by means of
Parallels Management Console or the vzpkg utility. Using this facility, you can keep any of
the Containers existing on your Hardware Node up-to-date.
Updating caches of the OS EZ templates installed on the Hardware Node. This facility
allows you to create new Containers already having the latest software packages installed.
Keeping Your Virtuozzo System Up-to-Date
266
Updating EZ Template Packages Inside Container
Virtuozzo Containers 4.0 allows you to update packages of the OS EZ template a Container is
based on and of any application EZ templates applied to the Container. You can do it by using
the vzpkg update utility. Assuming that Container 101 is based on the redhat-el5-x86
OS EZ template, you can issue the following command to update all packages included in this
template:
# vzpkg update 101 redhat-el5-x86
...
Updating: httpd
#######################
Updating: vzdev
#######################
Cleanup : vzdev
#######################
Cleanup : httpd
#######################
[1/4]
[2/4]
[3/4]
[4/4]
Updated: httpd.i386 0:2.0.54-10.2 vzdev.noarch 0:1.0-4.swsoft
Complete!
Updated:
httpd
i386
0:2.0.54-10.2
vzdev
noarch
0:1.0-4.swsoft
Notes: 1. A Container has to be running in order to update EZ templates inside this Container.
2. If you are going to update the cache of a commercial OS EZ template (e.g. Red Hat
Enterprise Server 5 or SLES 10), you should first update software packages in the remote
repository used to handle this OS EZ template and then proceed with updating the EZ template
cache. Detailed information on how to manage repositories for commercial Linux distributions
is provided in the Setting Up Repositories and Proxy Servers for EZ Templates section of the
Parallels Virtuozzo Containers Templates Management Guide.
As you can see from the example above, the httpd and vzdev applications have been updated
for the redhat-el5-x86 OS EZ template. If you wish to update all EZ templates (including
the OS EZ template) inside Container 101 at once, you should execute the following command:
# vzpkg update 101
...
Running Transaction
Updating : hwdata
Cleanup
: hwdata
###################### [1/2]
###################### [2/2]
Updated: hwdata.noarch 0:1.0-3.swsoft
Complete!
Updated:
hwdata
noarch
0:0.158.1-1
In the example above, only the hwdata package inside Container 101 was out of date and
updated to the latest version.
This window displays all packages which are included in the EZ templates applied to your
Container.
Keeping Your Virtuozzo System Up-to-Date
267
Select the check boxes of the packages you wish to update and click on the Update button. You
can use the Select All and Deselect All buttons to select/deselect all packages included in your
EZ templates. On this screen, you can also select the Force template(s) installation check box to
force the EZ template installation inside the Container. In this case no dependencies and no
available versions of the application EZ template will be checked during its installation, which
may cause the application EZ template to malfunction.
In Parallels Management Console, you should perform the following operations to update the
OS EZ template a Container is based on and/or any of its application EZ templates:
1
Open a list of Containers in the Management Console main window by selecting the
Virtuozzo Containers item in the Hardware Node tree.
2 Double-click the name of the Container where you wish to add an EZ template to open the
Container Manager.
3 Click the Templates item in the main tree of the opened Container Manager.
4 In the Management Console right pane, click either the OS Templates or Application
Templates tab depending on what EZ template you wish to update.
5 Right-click the corresponding EZ template and select the Update Installed Packages option
on the context menu. For example:
Figure 97: Management Console - Updating EZ Template Packages Inside Container
This window displays all the packages that are included in the EZ templates (both OS and
application) applied to your Container.
Keeping Your Virtuozzo System Up-to-Date
6
268
Select the check boxes of the packages you wish to update and click on the Update button.
You can use the Select All and Deselect All buttons to select/deselect all packages included in
your EZ templates. On this screen, you can also select the Force template(s) installation
check box to force the EZ template installation inside the Container. In this case no
dependencies and no available versions of the application EZ template will be checked
during its installation, which may cause the application EZ template to malfunction.
Keeping Your Virtuozzo System Up-to-Date
269
Updating OS EZ Template Caches
With the release of new updates for the corresponding Linux distribution, the created OS EZ
template cache can become obsolete. So, Virtuozzo Containers 4.0 provides the vzpkg
update cache command allowing you to quickly update any of the OS EZ template caches
available on the Hardware Node.
Note: If you are going to update the cache of a commercial OS EZ template (e.g. Red Hat
Enterprise Server 5 or SLES 10), you should first update software packages in the remote
repository used to handle this OS EZ template and then proceed with updating the EZ template
cache. Detailed information on how to manage repositories for commercial Linux distributions
is provided in the Setting Up Repositories and Proxy Servers for EZ Templates section.
When executed, vzpkg update cache checks the cache directory in the template area
(by default, the template area is located in /vz/template) on the Hardware Node and
updates all existing tarballs in this directory. However, you can explicitly indicate the tarball for
what OS EZ template should be updated by specifying the OS EZ template name. For example,
to update the tarball for the fedora-core-8-x86 OS EZ template, you should issue the
following command:
# vzpkg
Loading
Setting
Setting
base0
base1
base2
base3
...
update cache fedora-core-8-x86
"rpm2vzrpm" plugin
up Update Process
up repositories
100% |=========================|
100% |=========================|
100% |=========================|
100% |=========================|
951
951
951
951
B
B
B
B
00:00
00:00
00:00
00:00
Upon the vzpkg update cache execution, the old tarball is renamed by receiving the old suffix (e.g. fedora-core-8-x86.tar.gz-old):
# ls /vz/template/cache
fedora-core-8-x86.tar.gz
fedora-core-8-x86.tar.gz-old
You can also pass the -f option to vzpkg update cache to remove an existing tar archive
and create a new one instead of it.
If the vzpkg update cache command does not find a tarball for one or several OS EZ
templates installed on the Node, it creates tar archives of the corresponding OS EZ templates
and puts them to the /vz/template/cache directory.
To update an OS EZ template cache in Parallels Management Console, you should:
1
Select the Templates item under the corresponding Hardware Node name in the
Management Console left tree.
2 In the Management Console right pane, click the OS Templates tab to display a list of OS
templates installed on the Node.
3 Right-click the template you wish to cache in the right pane and select Cache OS Template
on the context menu. For example:
Keeping Your Virtuozzo System Up-to-Date
Figure 98: Management Console - Caching OS Template
270
271
CHAPTER 10
Compatibility With Previous Versions of
Virtuozzo Containers
Parallels Virtuozzo Containers has done its best to provide backward and upward compatibility
between the functionality available in Virtuozzo Containers 4.0 and that of earlier versions of
Parallels Virtuozzo Containers (e.g. in Virtuozzo Containers 3.0 or 2.6.2). However, a great
number of new features and improvements, which have required significant changes in the
Virtuozzo kernel and its other structural components, do present some challenges for
interoperability between Virtuozzo Containers 4.0 and its predecessors. The main compatibility
issues are summarized in the following table:
Issue
Description
Solution
New backup utilities
New vzabackup and vzarestore Using the vzbackup and
utilities are used by Virtuozzo Containers vzrestore
utilities
to
4.0 to manage Container backups.
manage Container backups on
Hardware
Nodes
running
previous versions of Virtuozzo
Containers.
VZFS v2
Virtuozzo Containers 4.0 comes with a new
version of Virtuozzo File System - Version
2 (VZFS v2) having no backward
compatibility with the previous version of
VZFS - VZFS v1. For example, this may
result in the impossibility of starting a
Container migrated from a 4.0 Virtuozzo
Hardware Node on a Virtuozzo 3.0 Node.
Configuring the Virtuozzo
global configuration file on a
4.0 Hardware Node to prevent
the automatic applying of the
VZFS v2 technology to all
newly-created Containers on
this Node.
VZFS v1 on upgraded Virtuozzo 3.0 Hardware Nodes upgraded to Upgrading legacy Containers
Nodes
version 4.0 continue using VZFS v1 for all and configuring the system to
legacy and newly created Containers.
make
new
Containers
automatically use VZFS v2.
New layout of the Virtuozzo Containers 4.0 comes with a
Container
directory newly designed Container directory
structure
structure imposing a number of restrictions
on managing Containers with different
directory structures, e.g. the impossibility
of:
Old Container directory
layout
for
legacy
Containers on upgraded
Nodes
The full support of the old
Container directory structure on
Virtuozzo 4.0 Hardware Nodes.
The restriction of performing
unsupported operations on
Containers with the new
restoring a Container with the new directory structure.
directory structure on a Node running
Parallels Virtuozzo Containers 3.0;
migrating a Container with the new
directory structure to a Node running
Parallels Virtuozzo Containers 3.0.
All legacy Containers on the Hardware Converting legacy Containers
Nodes upgraded to Virtuozzo Containers to
the
new
Virtuozzo
4.0 continue using the old Container Containers 4.0 directory layout.
directory layout.
Compatibility With Previous Versions of Virtuozzo Containers
New license scheme
A new Virtuozzo licensing scheme has been
implemented in Virtuozzo Containers 4.0,
which makes it impossible to continue using
old licenses on Hardware Nodes after
upgrading them to Virtuozzo Containers
4.0.
272
The automatical upgrade of the
Virtuozzo license during the
Hardware Node upgrade to
Virtuozzo Containers 4.0.
New
configuration New configuration sample files are shipped The possibility of using old
sample files
with Virtuozzo Containers 4.0 and used for configuration sample files for
creating Containers.
creating
Containers
on
Virtuozzo 4.0 Hardware Nodes.
New security scheme All permissions of the roles created on 3.0 Assigning the lost permissions
implementation
Hardware
Nodes
using
Parallels to the roles anew.
Infrastructure Manager are lost after
upgrading to Virtuozzo Containers 4.0.
New command options New vznetcfg command options are The possibility of using old
for vznetcfg
used in Virtuozzo Containers 4.0 for vznetcfg commands for
managing the Virtuozzo network.
managing Virtuozzo network
components.
Container
requests If you have not processed any requests for Processing all the Container
made
by
Parallels new Containers submitted by Infrastructure requests before the upgrade.
Infrastructure Manager Manager users, these requests will not be
users not kept
retained after the upgrade to Virtuozzo
Containers 4.0.
The self-registration of
new users in Parallels
Infrastructure Manager
not supported
The "Infrastructure Manager Users SelfRegistration" feature present in previous
versions of Virtuozzo Containers and used
by new users to self-register in
Infrastructure Manager and
request
Containers is not supported any more in
Virtuozzo Containers 4.0.
Registering external databases
in Infrastructure Manager and
allowing any users from the
registered databases to request
Containers by assigning the
"Workflow User" role to these
users.
vzuncache
and The vzuncache and vzlscache utilities
vzlscache dropped are not supported any more in Virtuozzo
Containers 4.0 and can be used for
managing Container caches on Virtuozzo
3.0 Hardware Nodes only.
The new vzcache utility does
not
any
more
require
Containers to be detached from
their caches before performing
Container-related
operations
(e.g. migrating a Container
from one Hardware Node to
another).
Compatibility With Previous Versions of Virtuozzo Containers
273
Detailed information on all these features is provided in the following sections.
In This Chapter
Running vzbackup/vzrestore Utilities ................................................................................... 274
Configuring Upgraded Nodes to Use VZFS v2 .................................................................... 276
New Directory Structure Restrictions ................................................................................... 277
Upgrading Legacy Containers to Support New Directory Layout ........................................ 278
Using New License Scheme on Virtuozzo 3.0 Nodes .......................................................... 280
New Command Options for vznetcfg ................................................................................... 280
Using Old Configuration Files for Container Creation ......................................................... 281
Setting Permissions for Roles in Parallels Infrastructure Manager ....................................... 282
Processing Previous Container Requests .............................................................................. 282
Requesting Container in Parallels Infrastructure Manager ................................................... 283
Backing Up and Restoring Caches in Virtuozzo Containers 3.0 .......................................... 283
Detaching Container From Hardware Node Cache Directory in Virtuozzo Containers 3.0 . 284
Compatibility With Previous Versions of Virtuozzo Containers
274
Running vzbackup/vzrestore
Utilities
If you have one or more Hardware Nodes running a Virtuozzo Containers version other than 4.0
(e.g. Virtuozzo Containers 3.0), you can use:
the vzbackup utility to create backups of Containers residing on these Nodes;
the vzrestore utility to manage the existing Container backups on the Backup Node (e.g.
view detailed information on backups or restore Containers from their backups).
The vzbackup utility is run on the Backup Node connecting via SSH to the Hardware Node(s)
where some or all Containers are to be backed up and puts the tarballs (either compressed or
not) into the directory defined in the /etc/vzbackup.conf global backup configuration file
(by default, this directory is /vz/backups). Later on, the Container backups may be restored
from this directory. Assuming that you are going to back up all the Containers on the Node
running Virtuozzo Containers 3.0 and having the IP address of 192.168.1.165, you may run
the following session on the Backup Node (i.e. on any Hardware Node running Virtuozzo
Containers 4.0):
# vzbackup -i -Cg -s 192.168.1.165
[email protected]'s password:
vzbackup(16013): Starting backup. Nodes - dhcp-165.asplinux.ru
vzbackup(16013): Starting node dhcp-165.asplinux.ru backup...
vzbackup(16013): Node dhcp-165.asplinux.ru archived \
Containers: 101([email protected]) \
1([email protected])
vzbackup(16013): Cleaning up
The –s option in the session above forces the Containers to be stopped for the time necessary
for their backing up. In this case, if a client tries to access the Containers during their downtime,
a temporary "busy" page is shown. You may use the –n option to back up the Containers while
they are running, which is better, on the one hand, but does not guarantee the Containers
consistency, on the other. If neither –n nor –s is specified, the backup configuration file is
consulted for the default value (the BACKUP_CTSTOP parameter).
The -Cg switch compresses the resulting Container backups with the gzip archiver. You can
also use the bzip2 algorithm or do without any compression. Whether to use compression or
not and the compression method itself are defined in the global backup configuration file and
can be overridden by the command line switches. For the full list of configuration file
parameters and command line options, turn to the Parallels Virtuozzo Containers Reference
Guide.
Note: You may as well compress the Container tarballs manually later. Provided the archives
will be situated in the same directory and will have an identical name (before the extension),
this will not hinder the Containers from being restored when time comes. A Container may be
restored from files with any of the following extensions: .tar, .tar.gz, .tgz, tar.bz2.
The type of the backup to be performed is specified by one of the following 3 options:
-F a plain full backup;
-I a full backup;
Compatibility With Previous Versions of Virtuozzo Containers
275
-i an incremental backup containing only the files changed since the previous “I” or “i”
backup.
If you specify the –i option, and the utility cannot find the corresponding full backup, a full
backup is performed.
You may specify any number of Hardware Nodes names or IP addresses in the command line.
You may also enter these names as the value of the BACKUP_NODES parameter in the global
backup configuration file to avoid the necessity to specify them in the command line. In this
case, you shall specify the –a option instead.
If you wish to back up not all, but select Containers from the specified Node, use the –e or –x
switches (include or exclude the specified Containers, respectively). For example:
# vzbackup -i -s 192.168.1.165 -e 101
[email protected]'s password:
vzbackup(17344): Starting backup. Nodes - dhcp-165.asplinux.ru.
vzbackup(17344): Starting node dhcp-165.asplinux.ru backup...
vzbackup(17344): Node dhcp-165.asplinux.ru archived Containers: \
101([email protected])
vzbackup(17344): Cleaning up...
In this session, only Container 101 will be included in the backup.
Note: A number of default parameters in the global backup configuration file may be adjusted
for a particular Hardware Node to be backed up. To this effect, you should create a new
configuration file named <node>.conf and put it to the backup directory (defined by the
BACKUP_DIR parameter in the global backup configuration file). This file should contain those
parameters that you want to re-write for a particular Node. Still, a number of other parameters
may further be adjusted for a particular Container to be backed up. In this case these parameters
should
be
inserted
into
the
corresponding
Container
configuration
file
(/etc/vz/conf/CT_ID.conf). For a complete list of those backup parameters that are
allowed to be used in per-Node and per-Container configuration files, see the Backup
Configuration File section in the Parallels Virtuozzo Containers Reference Guide.
To restore any Hardware Nodes previously backed up or separate Containers, you might want to
view first the information about these Containers:
# vzrestore -l
Container 101 dir /vz/backups/dhcp-165.asplinux.ru
[email protected] type I
To do the restoring proper, issue the following command:
# vzrestore dhcp-165.asplinux.ru -e 101
vzrestore(23558): Starting restore Container \
101([email protected]) \
on node dhcp-165.asplinux.ru...
vzrestore1 (101): Container is mounted. Exiting...
vzrestore(23558): Failed to restore dhcp-165.asplinux.ru Container 101 tag .
vzrestore(23558): Done.
# vzctl stop 101
Removing stale lock file /vz/lock/101.lck
Stopping Container ...
Container was stopped
Container is unmounted
# vzrestore dhcp-165.asplinux.ru -e 101
vzrestore(23960): Starting restore Container \
101([email protected]) \
on node dhcp-165.asplinux.ru...
vzrestore1 (101): Created /vz/backup/101/tmpfyPsqw
Compatibility With Previous Versions of Virtuozzo Containers
276
vzrestore1 (101): Restoring Container...
vzrestore1 (101): \
/vz/backups/dhcp-165.asplinux.ru/101/101-2006-06-27T122705+ \
[email protected]...
vzrestore1 (101): Replacing /etc/vz/conf/101.conf...
vzrestore1 (101): Moving /vz/private/101 to \
vz/backup/101/tmpfyPsqw/101.tmp...
Saved parameters for Container 101
vzrestore1 (101): Cleaning up...
vzrestore1 (101): Done.
vzrestore(23960): Done.
Use the –e or –x switches in the same way as for the vzbackup utility. You may also use the
–d option to specify the Destination Node where the Containers are to be restored instead of the
default behaviour of restoring the Containers to their Source Node.
Note: The vzrestore utility does not restore Containers by the Hardware Nodes IP
addresses, but only by their hostnames, even if the backing up was performed by means of IP
addresses.
Configuring Upgraded Nodes to Use
VZFS v2
Parallels Virtuozzo Containers 3.0 Hardware Nodes upgraded to version 4.0 continue using
VZFS v1, i.e. all legacy Containers on these Nodes continue operating on VZFS v1 and all new
Containers are also created on the basis of this VZFS version. If you wish to use VZFS v2,
which is the default VZFS version on Hardware Nodes with fresh installations of Parallels
Virtuozzo Containers 4.0, on the upgraded Nodes, you can proceed as follows:
Upgrade all legacy Containers to use VZFS v2. To this effect:
Run the following command for each OS template installed on the Node:
# vzpkg upgrade area OS_Template_Name
Issue the following command for each legacy Container residing on the Node:
# vzfsutil --upgrade --ctid=CT_ID -t /vz/template /vz/private/CT_ID
Make all newly created Containers automatically use VZFS v2. To this effect:
Ascertain that the value of the VEFORMAT parameter in the Virtuozzo global
configuration file (/etc/vz/vz.conf) is set to vz4:
# grep VEFORMAT /etc/vz/vz.conf
VEFORMAT="vz4"
Recreate the caches of all OS templates installed on the Node by running the following
commands:
# vzpkg remove cache OS_Template_Name
# vzpkg create cache OS_Template_Name
Compatibility With Previous Versions of Virtuozzo Containers
277
New Directory Structure
Restrictions
The Container directory structure layout (/vz/private/CT_ID) has been modified in
Virtuozzo Containers 4.0 to make the Container file structure more understandable and userfriendly. However, the implementation of the new directory structure imposes a number of
restrictions on managing Containers created on Virtuozzo 4.0 Hardware Nodes. These are the
following restrictions:
You cannot restore a Container supporting the new directory structure on a Hardware Node
running a Virtuozzo Containers version older than 4.0.
You cannot migrate a Container supporting the new directory structure to a Hardware Node
running a Virtuozzo Containers version older than 4.0.
Once a Container is converted to support the new directory structure, you cannot convert it
back to the old directory layout.
Compatibility With Previous Versions of Virtuozzo Containers
278
Upgrading Legacy Containers to
Support New Directory Layout
All legacy Containers on the Hardware Nodes upgraded from Virtuozzo Containers 3.0 or 3.0
SP1 to 4.0 continue using the old Container directory layout. The old and new layouts have the
following differencies:
In the old layout, the Container-related files are dispersed over the whole Hardware Node
file system.
In the Virtuozzo Containers 4.0 layout, the Container-related files are stored in the
/vz/private/CTID directory.
You can convert any Container using the old layout to support the new Virtuozzo Containers 4.0
layout. This conversion is performed via the vzctl convert command. The following
example demonstrates how you can convert Container 101 to support the new directory layout:
# vzctl convert 101
Container registered succesfully
Container converted succesfully
Note: Keep in mind that the vzctl convert command requires the Container to be stopped.
After Container 101 has been converted, keep in mind that:
it is not possible to convert it back into the Virtuozzo 3.0 or 3.0 SP1 layout
it is not possible to migrate it to the Hardware Node running Virtuozzo Containers 3.0 or
3.0 SP1
it is not possible to restore its backup on the Hardware Node running Virtuozzo Containers
3.0 or 3.0 SP1.
If you are not sure which layout the Container is using, log in to the Hardware Node hosting this
Container and list the files and subdirectories in the /vz/private/CTID directory:
In the new Container layout, the Container file system is stored in the
/vz/private/CT_ID/fs directory. The presence of this directory indicates that the
given Container supports the new layout. For example:
# ls /vz/private/101
dump fs quota.fs scripts
templates
ve.conf
The absence of the /fs directory denotes that the Container uses the old directory layout.
For example:
# ls /vz/private/101
cow root templates
VERSION
You should pay special attention to the cases when you have to migrate a legacy Container to
the Hardware Node where the /vz directory is created on a shared partition (e.g. in the
Virtuozzo failover cluster). This kind of migration is directly relevant to the layout conversion.
The way of migrating a legacy Container to a cluster server running Virtuozzo Containers 4.0 is
described in detail in the following subsection.
Compatibility With Previous Versions of Virtuozzo Containers
279
Migrating Legacy Container to Cluster Server
In a Virtuozzo cluster, the /vz directory is created on a shared partition and Containers using
the old layout cannot be migrated to this directory in the usual way. The current subsection
explains how you can migrate a legacy Container to a Hardware Node which is used as a cluster
server. Let us assume that we have to migrate Container 101 using the old layout to the cluster
server. The cluster server IP address is 10.28.252.69. To perform the migration, follow these
guidelines:
1
Log in to the Hardware Node hosting Container 101 and migrate the Container to the cluster
server private area. In our example, we migrate Container 101 to /tmp/private/101:
# vzmigrate [email protected] 101:101:/tmp/private/101
[email protected]'s password:
Connection to destination node ([email protected]) is successfully established
Moving/copying CT#101 -> CT#101, [/tmp/private/101], [] ...
Checking external bind mounts
Check cluster ID
Checking keep dir for private area copy
Checking SLM-only mode
Checking technologies
Checking disk usage space
Checking templates for CT
copy ez template area directories
Checking caches
Checking IP addresses on destination node
Checking RATE parameters in config
Copy private area '/vz/private/101'
done
OfflineManagement CT#101 ...
done
Successfully completed
2 Log in to the cluster server and convert Container 101 to support the new Virtuozzo
Containers 4.0 layout:
# vzctl convert 101
file lock /vz/lock/101.lck
Running command: cp -f /etc/vz/conf/101.conf /tmp/private/101/ve.conf
Running command: cp -f /var/vzquota/quota.101 /tmp/private/101/quota.fs
Moving /tmp/private/101/root -> /tmp/private/101/fs/root
Moving /tmp/private/101/cow -> /tmp/private/101/fs/cow
Moving /tmp/private/101/.vzpkgset -> /tmp/private/101/fs/.vzpkgset
Moving /tmp/private/101/.vzpkgver -> /tmp/private/101/fs/.vzpkgver
Moving /tmp/private/101/VERSION -> /tmp/private/101/fs/VERSION
Container registered succesfully
flock lock /var/tmp/cluster_service.lck
Container converted succesfully
3 Migrate Container 101 to the /vz directory residing on the shared partition. On the cluster
server, execute the following command:
# vzmlocal 101:101:/vz/private/101
Moving/copying CT#101 -> CT#101, [/vz/private/101], [] ...
Check disk space
Syncing private area '/tmp/private/101'->'/vz/private/101'
done
Copying/modifying config scripts of CT#101 ...
OfflineManagement CT#101 ...
done
OfflineManagement CT#101 ...
done
Successfully completed
Compatibility With Previous Versions of Virtuozzo Containers
280
As you can see, Container 101 has been successfully migrated to the cluster server. You can use
this method to migrate a legacy Container not only to a cluster server but also to any Hardware
Node with the /vz directory installed on a shared partition.
Using New License Scheme on
Virtuozzo 3.0 Nodes
The new licensing scheme implemented in Virtuozzo Containers 4.0 deals with one license only
- a Virtuozzo Server license. This license is needed to start using the Parallels Virtuozzo
Containers software and all Virtuozzo management tools (Parallels Management Console,
Parallels Infrastructure Manager, and Parallels Power Panel).
Parallels Virtuozzo Containers 4.0 allows for an easy upgrade of all licenses installed on your
Hardware Node. It means that all valid licenses on the Node (e.g. the Parallels Infrastructure
Manager and Virtuozzo licenses) are automatically upgraded to support Virtuozzo Containers
4.0 when upgrading the corresponding Hardware Node to version 4.0. However, please keep in
mind that this process is not backward-compatible, i.e. once your license is upgraded, you will
not be able to auto-return to the old licensing format.
New Command Options for vznetcfg
The following changes have been made to the vznetcfg utility in Virtuozzo Containers 4.0:
The following vznetcfg command options have been replaced with new ones:
Old Option
New Option
br new
net new
br del
net del
br change
net change
br attach
net addif
br detach
net delif
br list
net list
Virtuozzo Containers 4.0 supports both old and new vznetcfg command options.
However, you are highly recommended to make use of new options when managing the
Virtuozzo network since the support of old options will be dropped in the future versions of
Virtuozzo Containers.
The support of the following options for vznetcfg has been dropped:
br show;
addr set;
addr show;
route add default via;
route del default;
Compatibility With Previous Versions of Virtuozzo Containers
route show;
route list.
281
The vznetcfg utility does not deal with bridge IDs any more; the emphasis is put on
Virtual Networks instead.
For detailed information on vznetcfg and all its options, please turn to the Managing
Virtuozzo Network chapter (p. 205) and the Parallels Virtuozzo Containers Reference Guide.
Using Old Configuration Files for
Container Creation
The configuration sample files shipped with Virtuozzo Containers 3.0 have undergone the
following changes in Virtuozzo Containers 4.0:
All the configurations samples have been renamed as follows:
Virtuozzo Containers 3.0
Virtuozzo Containers 4.0
vps.basic
basic
vps.confixx
confixx
vps.cpanel
cpanel
db.oracle
oracle
vps.plesk7.rh9
slm.plesk
vps.256MB
slm.256MB
vps.512MB
slm.512MB
vps.1024MB
slm.1024MB
vps.2048MB
slm.2048MB
The vps.basic default configuration sample set in the Virtuozzo global configuration
file and used in Virtuozzo Containers 3.0 for creating Containers is replaced with the
basic configuration sample.
The unlimited.db2 configuration sample has been dropped from the Virtuozzo
Containers 4.0 distribution set.
The resources values of the following configuration samples have been changed in
Virtuozzo Containers 4.0:
ve-vps.1024MB.conf-sample;
ve-vps.2048MB.conf-sample;
ve-vps.256MB.conf-sample;
ve-vps.512MB.conf-sample;
ve-vps.plesk7.rh9.conf-sample.
Compatibility With Previous Versions of Virtuozzo Containers
282
As
a
result,
these
configuration
sample
files
are
moved
to
the
/etc/vz/conf/old_configs directory on the Hardware Node when upgrading to
Virtuozzo Containers 4.0. So, you cannot use them in Virtuozzo Containers 4.0 as the basis
for the Container creation. If you, however, wish to continue using any of these templates,
you can proceed as follows:
a
Create a new configuration sample file (e.g. in Parallels Management Console) and base
it on the corresponding old configuration sample.
b
Copy the needed configuration sample from the /etc/vz/conf/old_configs
directory to the /etc/vz/conf directory on the Hardware Node. For example:
# cp /etc/vz/conf/old_configs/ve.vps.plesk7.rh9.conf-sample
/etc/vz/conf
After executing these commands, you will be able to use vps.plesk7.rh9
configuration sample in the same way you would use it in Virtuozzo Containers 3.0.
Setting Permissions for Roles in
Parallels Infrastructure Manager
A newuser authentication and authorization strategy has been implemented in Virtuozzo
Containers 4.0. As a result of this, the roles created on 3.0 Hardware Nodes using Parallels
Infrastructure Manager do not include any permissions after upgrading to Virtuozzo Containers
4.0. So, to continue using these roles on Virtuozzo Containers 4.0 Hardware Nodes, you need to
edit all roles one by one and set the needed permissions anew. Detailed information on how you
can do it is provided in the Managing Virtuozzo Security chapter of the Parallels Infrastructure
Manager Administrator's Guide.
Processing Previous Container
Requests
In the previous version of Parallels Virtuozzo Containers, Parallels Infrastructure Manager users
were able to submit requests for new Containers for themselves. The Hardware Node
administrator then could either approve or reject these requests. This functionality has been
extended in Virtuozzo Containers 4.0 because Parallels Infrastructure Manager now supports the
simultaneous management of a number of Hardware Nodes and users from other domains can
now also request Containers for themselves. The by-effect of these enhancements is that if you
had not processed (approved or rejected) any Container requests before you upgraded the Node
to Virtuozzo Containers 4.0, these requests will not be retained in Infrastructure Manager. So
please try to process all such requests before the upgrade.
Compatibility With Previous Versions of Virtuozzo Containers
283
Requesting Container in Parallels
Infrastructure Manager
In previous versions of Parallels Virtuozzo Containers (e.g. in Virtuozzo Containers 3.0 SP1), Container
requests are processed as follows:
1
A new user registers in Infrastructure Manager following the Register link on the
Infrastructure Manager login screen.
2 After the registration, the user places a Container request.
3 The Hardware Node administrator accepts or denies the Container request.
In Virtuozzo Containers 4.0, the functionality of users self-registering in Infrastructure Manager
is not supported any more. Instead of this, the Hardware Node administrator can allow users to
request new Containers by completing the following tasks:
1
Register an external database the corresponding user belongs to in Infrastructure Manager.
2 Assign the 'Workflow User' role built-in in Infrastructure Manager to the user.
Detailed information on how to perform both operations is provided in the Managing Virtuozzo
Security chapter of the Parallels Infrastructure Manager Administrator' Guide.
Backing Up and Restoring Caches
in Virtuozzo Containers 3.0
If you are backing up and restoring Containers with the help of the vzbackup utility, it does
not back up and restore Container caches by default. However, Container caches do contain
Container private files, therefore you may want to back them up as well. This is done with the
help of a special switch of the vzbackup utility, for example:
# vzbackup --vzcache 192.168.20.20 -e 101
This command will back up all the cache areas Container 101 is appended to, but not Container
101 itself. In order to back up both the Containers and their caches, you will have to back up the
whole Node:
# vzbackup 192.168.20.20
The restoring of Container caches is performed in much the same way: the --vzcache option
should be used with the vzrestore utility. However, the restoring of the whole Node will not
restore the Container caches by default, and you should explicitly provide the --vzcache
option in all cases.
Compatibility With Previous Versions of Virtuozzo Containers
284
Detaching Container From
Hardware Node Cache Directory in
Virtuozzo Containers 3.0
Whereas the vzcache utility helps effectively gain disk space both on the Hardware Node and
within Containers, there may be situations when it is necessary to detach a Container from its
cache and copy the cached files back to the Container private area. A typical example of this is
migrating a Container to another Hardware Node. The migration is not possible if there are links
in the Container private area pointing to the /vz/template/vzcaches directory on the
Hardware Node.
To copy the cached files back to the Container private area, the vzuncache utility is used:
[root@dhcp0-84 root]# vzuncache 101 -a
[Optimization messages skipped...]
Container 101
53 magic symlinks to convert
Container 101 will be detached from the following caches:
Cache name
Size
dhcp0-84.sw.ru-2005030316237
607972K
Now, Container 101 can safely be migrated to another Hardware Node. Note that unlike
vzcache, the vzuncache utility shall be called for only one Container at a time. The -a
switch tells the utility to detach the Container from all the cache directories specified in its
configuration file as the value of the VZCACHE parameter.
285
CHAPTER 11
Advanced Tasks
In This Chapter
Migrating Physical Server to Container ................................................................................ 285
Migrating Container to Physical Server ................................................................................ 307
Creating Customized Containers........................................................................................... 309
Changing System Time From Container............................................................................... 315
Setting Up iSCSI Environment in Virtuozzo-Based Systems ............................................... 316
Obtaining Hardware Node ID From Inside Container .......................................................... 317
Mounting /vz Partition via Virtuozzo Script ......................................................................... 318
Managing Mount Points Inside Container ............................................................................ 319
Preserving Application Data During Container Reinstallation ............................................. 321
Accessing Devices From Inside Container ........................................................................... 323
Moving Network Adapter to Container ................................................................................ 325
Enabling VPN for Container ................................................................................................. 326
Managing Hardware Node Resources Parameters ................................................................ 327
Setting Immutable and Append Flags for Container Files and Directories .......................... 328
Recreating Service Container ................................................................................................ 329
Customizing /proc/meminfo Output Inside Container .......................................................... 330
Creating Local Repository Mirror for vzup2date .................................................................. 332
Loading iptables Modules ..................................................................................................... 339
Sharing File System Among Containers ............................................................................... 342
Creating Configuration File for New Linux Distribution ..................................................... 343
Rebooting Container ............................................................................................................. 344
Managing Graphical Applications Inside Container ............................................................. 345
VZFS v2 ................................................................................................................................ 352
Migrating Physical Server to
Container
This section provides information on how you can migrate an external physical server to a
Container on your Hardware Node.
Advanced Tasks
286
Migration Overview
Along with migrating Containers between your Hardware Nodes, you may wish to move a
stand-alone physical server running a Linux operating system (Fedora Core, Debian, etc.) to a
Container on your Node. The migration process includes copying the whole contents of the
physical server (i.e. all its files, directories, quota limits, configuration settings, and so on) to a
Container on the Hardware Node. After the server migration, you will have its exact copy in a
Container including the operating system running inside the Container, the IP address(es)
assigned to the Container, the amount of available disk space and memory, etc.
Migration Steps
Before you start migrating a physical server to a Container on the Node, you should have a clear
idea of the steps to be performed during the migration. The main steps of the migration
procedure may be described as follows:
1
Creating the configuration file containing information on the main resources consumption
on the physical server. This file is meant to be used for creating a Container on its basis. The
data in the configuration file should be provided in the format readable by Virtuozzo
Containers 4.0 (i.e. in the form of "PARAMETER"=”value”). Among other things, the
file should include information on the Linux distribution your physical server is running and
the number of user/group IDs allowed for Container internal disk quota. Detailed
information on quota limits and Linux distributions is provided in the Managing Resources
chapter (p. 116) and in the Linux Distribution Configuration Files subsection of the Parallels
Virtuozzo Containers Reference Guide, respectively.
2 Copying the configuration file made on the previous step from the physical server to the
Hardware Node. You may copy the configuration file to any directory on the Node; the full
path to this file should be specified during the physical server migration.
This step is automatically performed by migrating a physical server to a Container using
Virtuozzo Tools (Parallels Management Console and Parallels Infrastructure Manager).
3 Creating a Container on the basis of the configuration file copied to the Node. On this step,
you can also specify an OS template to be used for creating the Container. Using an OS
template for the Container creation enables you to save RAM and disk space used by this
Container on the Hardware Node. In case an OS template is not specified, the mkvzfs
command is executed during the Container creation which makes an empty private area with
the name of /vz/private/CT_ID on the Node. On the next step, all the physical server
files including its system and application files will be copied to the
/vz/private/CT_ID directory. Detailed information on OS templates is given in
Virtuozzo Templates Management Guide.
4 Migrating the physical server to the created Container. During the server migration, the
following operations are consecutively performed:
All the files, directories, etc. are copied from the server to the Container on the Node by
means of rsync - a utility providing the fast incremental data transfer. For more
information on rsync, please see the man pages for this utility.
All the services on the physical server except for the critical ones (e.g. the sshd service
needed to provide communication between the physical server and the Node) are
stopped. This prevents the running services from modifying any files being moved.
However, it depends entirely on you what services to stop.
Advanced Tasks
287
The files, directories, etc. transferred to the Container during the first rsync run are
compared with those on the physical server and, if any changes to the files have been
made during the files migration, they are copied to the Container once more by means of
rsync allowing to transfer just the differences between the two sets of files. This step
is performed only if you chose the OS template for the Container creation on Step 3.
Note: If the migration process fails on this step, the /vz/private/CT_ID directory on
the Hardware Node will contain all the copied files and directories and may occupy a great
amount of disk space. You can keep the directory, which will greatly speed up the repeated
migration procedure, or manually remove the directory by using the rm utility.
Advanced Tasks
288
5 Migrating the disk quota limits imposed on the selected partition from the physical server to
the created Container. You may specify only one partition on the physical server which will
be migrated to the Container on the Node together with all quotas imposed on it. All the
other partitions of the server will be copied without keeping their quota limits. Moreover,
the quota limits of the migrated partition will be applied to the entire Container after the
server migration. Detailed information on the quota limits is provided in the vzquota
subsection of the Parallels Virtuozzo Containers Reference Guide and in the Managing
Resources chapter (p. 116).
6 Executing the post-migration scripts depending on the Linux distribution the physical server
was running. The names of the scripts to be run are read from the corresponding distribution
configuration file in the /etc/vz/conf/dists directory on the Hardware Node. The
scripts themselves and located in the /etc/vz/conf/dists/scripts directory on the
Node. They are needed to tune the Container to be able to start it. Any script can be
launched by executing the vzctl runscript CT_ID script_path command on
the Node where CT_ID denotes the ID of the Container where the physical server has been
migrated and script_path is the full path to the script on the Node.
7 Stopping the physical server and starting the Container on the Node.
Parallels Virtuozzo Containers allows you to complete all these steps in the following ways:
1
By using the vzp2v command line utility;
2 By using Parallels Management Console;
3 By using Parallels Infrastructure Manager.
The aforementioned steps can be automatically performed while running the Management
Console and Infrastructure Manager migration wizards. However, if you wish to use the vzp2v
utility to migrate a physical server to a Container, you should manually create the configuration
file by means of the vzhwcalc utility and copy it to the Hardware Node before starting the
migration process itself. You may also use this utility previous to migrating a physical server in
Management Console and/or Infrastructure Manager to find out the resources consumption on
the server during its maximal loading and set the right resources parameters on the
corresponding steps of Management Console/Infrastructure Manager wizards. Detailed
information on the vzhwcalc utility and on how to create and modify the configuration file for
the Container where your physical server is to be migrated is provided in the Preparing
Container Configuration File subsection (p. 291).
Besides, while using vzp2v, you have to manually stop the physical server and start the
Container on the Node after the server migration whereas Management Console and
Infrastructure Manager allow you to select the corresponding options on the last step of their
wizards.
The migration procedure by means of Management Console and the vzp2v utility is described
in the following subsections; detailed information on how to migrate a physical server to a
Container by using Infrastructure Manager is provided in the Parallels Infrastructure Manager
Administrator's Guide.
Advanced Tasks
289
Migration Requirements
To avoid delays and problems while migrating your physical server to a Container on the Node,
please make sure that the following requirements are fulfilled in respect of the server and the
Hardware Node:
The physical server is running a Linux distribution (Fedora Core, Red Hat, Debian, SUSE,
etc.).
Note: None of the BSD operating systems is supported.
The Linux distribution installed on the physical server is supported by Parallels Virtuozzo
Containers. To find out if your Linux distribution can be recognized by Virtuozzo
Containers 4.0, you can check the /etc/vz/conf/dists directory on the Node and
look for the configuration file of your Linux distribution. It should have the name of
Linux_Distribution_Name-version.conf
where
Linux_Distribution_Name and version denote the name of the Linux distribution
running on your physical server and its version, respectively (e.g. redhat-5.conf). In
case there is no corresponding distribution in the directory, you can proceed in one of the
following ways:
Create a new distribution configuration file and place it to the
/etc/vz/conf/dists directory on the Node. Detailed information on how to create
new configuration files is provided in the Creating Configuration File for New Linux
Distribution section (p. 343).
Start the migration process without having the right configuration file for your Linux
distribution. In this case the unknown.conf distribution configuration file from the
/etc/vz/conf/dists directory on the Node will be used for tuning the Container
after the physical server migration. However, using the unknown.conf configuration
file means that you will not be able to use standard Virtuozzo utilities (e.g. vzctl) for
performing the main operations on the created Container (such as setting the Container
IP address or configuring the DNS parameters) and have to manually complete these
tasks from inside the Container.
A network connection can be established among the physical server to be migrated and the
Hardware Node.
ssh is installed on both the physical server and the Hardware Node. ssh is used to provide
secure encrypted and authenticated communication between the server and the Hardware
Node. You can check if the ssh package is already installed on the server by executing the
ssh -V command.
rsync is installed on the physical server. rsync is used to copy the physical server
contents to the Container. If the physical server rsync happens to be incompatible with the
Hardware
Node,
use
the
statically
linked
rsync
from
the
usr/local/share/vzlinmigrate directory on the physical server as well.
The Parallels Agent application is started. You can learn if Parallels Agent is running by
executing the following command on the Hardware Node:
# vzagent_ctl status
vzagent (pid 31556 31555...) is running...
If Parallels Agent is stopped, start it:
Advanced Tasks
290
# vzagent_ctl start
The vzhwcalc, vzlinmigrate, and vzlinmigrate-lib packages are installed on
the Hardware Node. During the Virtuozzo 4.0 installation or while upgrading your earlier
Virtuozzo Containers version to 4.0, these packages are automatically installed on the Node.
Migration Restrictions
Although Parallels Virtuozzo Containers allows you to migrate virtually any physical server
running a Linux distribution to a Container, there is a number of limitations which should be
taken into account before deciding on the migration process:
During the migration, all the filesystems available on your physical server are joined to one
filesystem inside the Container - VZFS (Virtuozzo File System). Detailed information on
VZFS is provided in the Virtuozzo File System subsection (p. 22).
If there are several IP addresses assigned to the physical server, all these IP addresses will
be reassigned to one and the same device on the Node - venet0 - a virtual network adapter
used to connect all the Containers on the given Hardware Node among themselves and with
the Node. After the migration, you can create additional virtual network adapters inside the
Container and decide what IP address to be assigned to what network adapter. For detailed
information on how to create and manage Container virtual network adapters, please turn to
the Managing Virtual Network Adapters section (p. 215).
During the migration process, you may specify only one partition on the physical server
which will be migrated to the Container on the Node together with all quotas imposed on it.
All the other partitions of the server will be copied without keeping their quota limits.
Moreover, the quota limits imposed on the selected partition will be applied to the entire
Container after the server migration.
While migrating your physical server running a Linux operating system with the securityenhanced (SE) Linux kernel, please keep in mind that the SE Linux kernel is currently not
supported by Parallels Virtuozzo Containers. Therefore, the Container where the server
running the SE Linux distribution has been migrated will not support the SE security
features.
If any of your files and/or directories on the physical server have extended attributes
associated with them, these attributes will be lost after the server migration.
Raw devices on the physical server cannot and will not be migrated to the Container on the
Hardware Node.
If you are running an application which is bound to the physical server MAC address, you
will not be able to run this application inside the Container after the server migration. In this
case, you can do one of the following:
If you are running a licensed application, you should obtain a new license and install the
application inside the Container anew.
If you are running a non-licensed application, you can try to reconfigure the application
and to make it work without being bound to any MAC address.
If the migration process fails on the step of transferring files and directories from the
physical server to the Container by means of rsync, the /vz/private/CT_ID
directory on the Hardware Node will contain all the copied files and directories and may
occupy a great amount of disk space. You can keep the directory, which will greatly speed
up the repeated migration procedure, or manually remove the directory by using the rm
utility.
Advanced Tasks
291
Migrating Physical Server to Container in Command Line
Preparing Container Configuration File
If you wish to migrate a physical server to a Container in the command line, i.e. by using the
vzp2v utility, you should manually create the server configuration file and place it to the
Hardware Node before starting the migration process itself. The configuration file contains
information on the main server settings: its resource management parameters (e.g. disk space
and the number of inodes consumed by the server, the server CPU power), network-related
parameters (e.g. the server IP address and hostname), etc. During the physical server migration,
information on the resources parameters from the configuration file is used to create a Container
on their basis.
To prepare a configuration file for the physical server migration, you should perform the
following operations:
Copy the vzhwcalc utility from the Hardware Node to the server; you will need
vzhwcalc to create the server configuration file.
Copy the distdetect-common.sh script from the Hardware Node to the server; this
script is used to determine the Linux version your server is running.
Create the configuration file by running the vzhwcalc utility on the server.
Edit the configuration file, if needed, and copy it to the Hardware Node.
As a result of the aforementioned operations, a valid configuration file should be created in the
format readable by Parallels Virtuozzo Containers and copied to the Hardware Node. This file
will be used to create a Container on its basis and the path to the file should be specified as the
value of the -c option while running the vzp2v utility.
Advanced Tasks
292
Creating Container Configuration File
To create a configuration file of your physical server, you should first copy the vzhwcalc
utility and the distdetect-common.sh script from the Hardware Node to the physical
server. By default, vzhwcalc and distdetect-common.sh are stored in the
/usr/local/bin and /usr/local/share/vzlinmigrate directories on the Node,
respectively. The vzhwcalc utility is used to create a configuration file containing information
on the server main resource parameters and used to create a Container on its basis. In its turn,
the distdetect-common.sh script is intended to determine what Linux distribution the
server is running and to set the value of the DISTRIBUTION variable in the generated
configuration file in accordance with the detected distribution. You may copy the vzhwcalc
and distdetect-common.sh file to any directory on the physical server.
When launched, the vzhwcalc utility scans the main resources on your physical server, makes
a snapshot of their consumption, and writes down this information to the server configuration
file. Besides, the utility initiates the execution of the distdetect-common.sh script used
to determine the Linux version installed on your server and to put this information to the
generated configuration file.
So, after you have copied the vzhwcalc and distdetect-common.sh files to the
physical server, you should run the vzhwcalc utility on it to create a configuration file for
your server:
# vzhwcalc --scan-time time -p time -d script_path
where --scan-time is the time during which the vzhwcalc utility will be periodically
making snapshots of the main server resources, -p denotes the interval with which the resources
snapshots will be made by the vzhwcalc utility, and -d is the full path to the distdetectcommon.sh script on the server. The time and interval should be given in the dhms format
(e.g. --scan-time 1d2h30m40s means that the vzhwcalc utility will run on the server
for 1 day, 2 hours, 30 minutes, and 40 seconds).
While running the vzhwcalc utility, please keep in mind the following:
The consumption of the resources may significantly vary depending on the server loading.
Therefore, we recommend that you set the scan time of the vzhwcalc utility to 1 day or
more. During this time, the utility will periodically (i.e. with the interval specified) check
the resources consumption on the server. As a result, the configuration file will be created
on the basis of the peak values reached by the resources during the time specified. By
default, all the resource parameters are calculated by vzhwcalc with a 150% allowance as
compared to their maximal values (except for memory which is calculated with a 120%
allowance compared to its maximal value). However, you can use the --mem-scale and
--disk-scale options to set your own enlargement factor by which the calculated
memory and disk space resources parameters will be increased in the configuration file.
After executing vzhwcalc, you will be presented with a list of directories on the physical
server which are highly recommended to be excluded from the migration process. The
names of these directories should be given as the value of the --exclude option while
running the vzp2v utility.
During the vzhwcalc execution, the following warning messages may be displayed:
Advanced Tasks
293
A message informing you that the distdetect-common.sh script has failed to
determine the Linux distribution your physical server is running. In this case you should
manually specify your distribution name as the value of the DISTRIBUTION variable
in the created configuration file. Detailed information on how to work with the
DISTRIBUTION variable is provided in the next subsection.
A message informing you that your physical server has two or more network interface
cards installed. In this case all IP addresses assigned to several network interfaces on the
server will be reassigned to one virtual network adapter on the Node - venet0. This
virtual adapter will be used by the created Container to communicate with the other
Containers on the Node and with the outer world.
A message containing a list of peer-to-peer IP addresses that cannot and will not be
migrated to the Container to be created.
A message informing you that the Linux OS installed on your physical server supports
Native POSIX Thread Library (NPTL). For more information on NPTL, please see the
Migration Restrictions subsection (p. 290).
The configuration file created by the vzhwcalc utility is placed to the same directory on the
physical server from where you have run this utility and has the default name of ve.conf.
However, you can pass the -o option to vzhwcalc and set a name of your choice for the
resulting configuration file.
Editing Container Configuration File
After you have created the Container configuration file with the default name of ve.conf, you
should check this file for the resources values listed in it. As has been mentioned above, the
resource parameters in the configuration file are calculated on the basis of the physical server
maximum load. However, you may wish to increase the resources available (e.g. in case you
wish to exploit the Container to be created more intensively than the physical server). You can
do it by opening the ve.conf file for editing (for example, by means of vi) and entering new
values for the corresponding parameters.
Along with editing the resource parameters, you should also look for the DISTRIBUTION
variable in the configuration file used to define what post-migration scripts are to be executed
depending on the Linux distribution set in this file:
If the DISTRIBUTION variable is present in the file:
Make sure that the distribution configuration file whose name is indicated as the value
of the DISTRIBUTION variable is present in the /etc/vz/conf/dists directory
on the Node. All distribution configuration files have .conf as their extension added to
the corresponding distribution name (e.g. redhat.conf).
In case there is no corresponding distribution configuration file in the
/etc/vz/conf/dists directory, create a new distribution configuration file with
the name specified as the value of the DISTRIBUTION value in the ve.conf file and
place it to this directory. More information on the distribution file creation see below.
If the DISTRIBUTION variable is absent in the file meaning that the Linux version running
on the physical server could not be detected, you should do the following:
Create a new distribution configuration file for the Linux version running on the server
and place it to the /etc/vz/conf/dists directory on the Node.
Specify the name of the newly created distribution configuration file as the value of the
DISTRIBUTION variable in the ve.conf configuration file.
Advanced Tasks
294
Detailed information on how to create new configuration files and set the DISTRIBUTION
variable is provided in the Creating Configuration File for New Linux Distribution section (p.
343).
You can also start the migration process without having the right configuration file for your
Linux distribution. In this case the unknown.conf distribution configuration file from the
/etc/vz/conf/dists directory on the Node will be used for tuning the Container after the
physical server migration. However, using the unknown.conf configuration file means that
you will not be able to use standard Virtuozzo utilities (e.g. vzctl) for performing the main
operations on the created Container (such as setting the Container IP address or configuring the
DNS parameters) and have to manually complete these tasks from inside the Container.
Finally, you should copy the resulting configuration file to the Hardware Node. You will have
to specify the full path to the configuration file while running the vzp2v utility.
Linux distribution installed on the physical server is supported by Parallels Virtuozzo
Containers. To find out if your Linux distribution can be recognized by Virtuozzo Containers
4.0, you can check the /etc/vz/conf/dists directory on the Node and look for the
configuration file of your Linux distribution. It should have the name of
Linux_Distribution_Name-version.conf where Linux_Distribution_Name
and version denote the name of the Linux distribution running on your physical server and its
version, respectively (e.g. redhat-5.conf).
Migrating Physical Server to Container
Now that you have created the configuration file and copied it to the Hardware Node, you can
start the migration procedure itself. To migrate a physical server to a Container, the vzp2v
utility is used.
Let us assume that you wish to migrate a physical server running the Red Hat Enterprise Linux
Server 5 (RHEL 5) operating system and having the IP address of 199.199.109.109 to
Container 101 on your Hardware Node; moreover, you are supposed to use the root user name
and the 3e5rrt4 password to log in to the server. To this effect, you should issue the
following command on the Node:
# vzp2v [email protected] --ctid 101 -c /etc/ve.conf \
-q /private_data -t -d rhel-5 redhat-el5-x86 \
--exclude=/proc/* --exclude=/usr/games -S iptables,crond
The options passed to the vzp2v utility in the example above are explained in the following
table:
Option Name
Description
--ctid
Mandatory. The ID of the Container that will be created on the Node
and where the physical server will be migrated. You can specify any
unoccupied ID on the Node.
-c
Mandatory. The full path to the configuration file on the Node that was
created on the physical sever by means of the vzhwcalc utility. You
may specify only the name of the configuration file if you run the
vzp2v utility from the directory where this file is located.
Advanced Tasks
295
-q, --quota
Optional. The partition on your physical server which has any user
and/or user groups quotas imposed on it. This partition will be
migrated to the Container together with all quotas imposed on it.
Moreover, these quotas will be applied to the entire Container after the
server migration.
-d, --dist
Optional. The Linux version your physical server is running. The name
of the version specified should coincide with the name of the
corresponding distribution configuration file located in the
/etc/vz/conf/dists directory on the Node. For example, if you
specify rhel-5 as the value of this option, the rhel-5.conf file
should be present in the /etc/vz/conf/dists directory on the
Node. You should obligatorily set this option, if there is no
DISTRIBUTION variable specified in the server configuration file. In
case the DISTRIBUTION variable is set in the configuration file and
you have specified the -d option, the latter takes precedence.
-t, --ostmpl
Optional. The OS template to be used to create the Container. You may
list all OS templates installed on the Node together with their updates
by executing the vzpkgls command. The names of OS templates
usually correspond to those of Linux distributions (e.g. redhatel5-x86 as in the example above); so you can easily guess what OS
template to use for your Linux distribution. In case an OS template is
not specified, the mkvzfs command is executed during the Container
creation which makes an empty private area with the name of
/vz/private/CT_ID on the Node. This private area is then used to
copy all the physical server files to it.
--exclude
Optional. The path to the directories and files which will be excluded
from copying to the Container. This option allows you to avoid
migrating the data you do not need. To gain more understanding on
this option, please consult the man pages for the rsync utility.
Note: We strongly recommend that you exclude the files and
directories you were informed of while running the vzhwcalc
utility on the physical server.
-S, --srvstop
Optional. The services to be stopped for the time of the physical server
migration. We recommend that you stop all the services on the
physical server except for the critical ones (e.g. the sshd service that
is needed to provide communication between the physical server and
the Node) before the migration. This will prevent the running services
from modifying any files being moved.
Advanced Tasks
296
In the example above, the following operations are performed during the physical server
migration:
1
The vzp2v utility connects to the physical server with the IP address of
199.199.109.109 by using the root user name. While establishing a network
connection, you will be asked for the password of root to log in to the server and have to
enter 3e5rrt4 (which is, in our case, the password of the root user).
2 The /etc/ve.conf file is read and the 101.conf file is created on its basis in the
/etc/vz/conf directory on the Node.
3 Container 101 is created on the basis of the 101.conf file and the redhat-el-x86 OS
template.
4 All the data except for the /usr/games directory and the contents of the /proc directory
is copied from the physical server to Container 101.
5 The iptables and crond services are stopped on the physical server.
6 The files copied to Container 101 are compared with those on the physical server and, if any
changes to the files were made during the 4th migration step, these changes are copied to
Container 101.
7 The quota limits that were imposed on the /private_data partition on the physical
server are copied to the Container. These quota limits are applied to the entire Container.
8 The post-migration script specific for the RHEL 5 OS is executed. The name of the script to
be run is read from the rhel-5.conf distribution configuration file located in the
/etc/vz/conf/dists directory on the Node and is needed to tune the Container before
its starting.
Advanced Tasks
297
Migrating Physical Server to Container in Parallels Management
Console
Parallels Management Console provides a special wizard allowing you to quickly and reliably
migrate a stand-alone physical server to a Container on your Node. You can launch the Migrate
Physical Server to Container wizard by right-clicking the Virtuozzo Containers item under the
Hardware Node where you wish to migrate the physical server and choosing Tasks --> Migrate
Physical Server to Container on the context menu. You will be presented with the following
window:
Figure 99: Management Console - Logging In to Physical Server
The information you should enter in the fields provided is presented below:
Server IP Address or Hostname: the IP address or hostname of the physical server you wish
to migrate.
Advanced Tasks
298
User Name: The user name used to log in to the physical server. You can specify the root
user in this field, which is offered by default, or may use any other account to log in to the
server. However, in the latter case you should make sure that the specified user has all the
rights and privileges of the root user.
User Password: The password used to log in to the physical server by the user specified in
the User Name field.
Clicking Next in the Log in Physical Server window starts the process of connecting to the
physical server and collecting information on the server configuration. The process is displayed
in the progress bar of the Collecting Server Configuration window. After the wizard has
successfully connected to the physical server and finished collecting information on its
configuration, the following window is displayed:
Figure 100: Management Console - Reviewing Physical Server Configuration
The Review Server Configuration window allows you to check the configuration of the server
you are going to migrate into a Container. The information on the server is divided into three
groups for your convenience:
Advanced Tasks
299
The System Configuration group including information on the operating system the server is
running, the number and power of the processor(s) installed on the server, etc.
The Network Configuration group containing information on the server hostname, the IP
address(es) of the default gateway used by the server to access other networks, and so on.
The Disk Configuration group holding data on the partitions that the physical server has:
their name, type, disk space, etc.
After you have reviewed the information on the physical server configuration and clicked Next,
the Customize Server Migration window is displayed:
Figure 101: Management Console - Customizing Server Migration
In this window, you can perform the following operations:
Advanced Tasks
300
In the Distribution field, indicate the Linux distribution your physical server is running by
selecting the right Linux version on the drop-down menu. The wizard tries to automatically
determine the Linux distribution installed on your server and to offer the most suitable
variant. If the wizard cannot specify what Linux distribution your server is running, the
value of this field is set to "unknown". In this case you should manually select the
corresponding Linux distribution on the drop-down menu; otherwise, you may get your
Container in an non-operational state after the physical server migration. In case you cannot
find the right distribution on the drop-down menu, you can proceed in one of the following
ways:
Select the most suitable distribution available on the Node. For example, if your
physical server is running Fedora 8, you can choose fedora-core-8 (the distribution
configuration file for Fedora 8) or, if the latter is also lacking, fedora-core (the
generic configuration file for all Fedora Core distributions). However, there is a slight
chance that your Container may not work properly due to some differences, which might
be present in one and absent in another Linux version.
Create a new distribution configuration file and place it to the
/etc/vz/conf/dists directory on the Hardware Node. However, to be able to
select this configuration file on the drop-down menu in the Distribution field, you should
log off and log in to the physical server anew. You can do it either by closing the wizard
and starting it again or by clicking on the Back button until you return to the Login to the
Server being Migrated window and then proceeding with the wizard in the way described
above. Detailed information on how you can create new distribution configuration files
is provided in the Creating Configuration File for New Linux Distribution section (p. 343).
In the Partition field, specify a partition on your physical server which has any user and/or
user groups quotas imposed on it by selecting the right partition on the drop-down menu.
The selected partition will be then migrated to the Container together with all quotas
imposed on this partition. Moreover, the quota limits that were imposed on the selected
partition on the physical server will be applied to the entire Container after the server
migration. For example, you might have created a number of user accounts having access to
a certain partition on your physical server and set the maximal amount of disk space these
users are allowed to consume within this partition. Specifying the name of this partition in
the Partition field allows you to move the partition to the Container and to keep all users
disk space quotas imposed on it.
Note: 1. If your physical server has several partitions with quota parameters imposed on
them, the quota parameters for all the partitions other than the one indicated in the Partition
field will not be migrated. In this case you will need to manually set the corresponding
quotas by means of Parallels Management Console or special Virtuozzo command line
utilities after the physical server migration. Detailed information on how to manage the
Container quota parameters is provided in the Managing Disk Quotas section (p. 117).
2. Although the partition migration with quotas proceeds smoothly in most cases, we
recommend that you check all the partition quotas after the physical server migration and
adjust them, if needed.
Advanced Tasks
301
When you are ready with specifying the right Linux distribution and partition, click Next.
The next screen allows you to exclude certain files and directories on the physical server from
being migrated to the Container and, thus, to avoid copying the data you do not need. You may
be already presented with a list of files and directories that are to be excluded from the
migration process and that were automatically generated by the wizard. You can also use the
Browse button in the right part of the Select Files and Folders to Exclude from Migration window
to additionally specify the files and directories you wish to exclude from being moved to the
Container. Click Next.
Figure 102: Management Console - Stopping Services
The next screen allows you to specify the Container main parameters:
Advanced Tasks
302
Figure 103: Management Console - Specifying Container Basic Parameters
In this window you can do the following:should provide information in the following fields:
Select the Use precalculated configuration check box to create the Container by using the
configuration file that was automatically generated by the wizard on the basis of the
resources consumption on your physical server.
Select the Use following Container sample configuration check box to create the Container on
the basis of one of the Container configuration sample files available on your Node. All the
Container sample files you can choose from are listed in the table in the centre of the
displayed window. Detailed information on Container configuration sample files is provided
in the Managing Container Resources Configuration section.
Container ID: enter the ID of the Container which will be created on the Node and where the
physical server will be migrated. Make sure that there is no Container on the Node with the
ID specified in this field.
Hostname: enter the hostname of the Container which will be used to identify the Container
on a network.
Advanced Tasks
303
After you have selected the corresponding check box and specified the Container ID and
hostname, click Next.
The Specify OS Template window allows you to choose an OS template and its version the
Container will be based on. By default, Parallels Management Console automatically searches
for the most compatible OS template. However, you can select any OS template listed in the
table on this screen and create the Container on its basis.
Clicking Next on the Specify OS Template screen displays the window where you are asked to
specify the Container network parameters:
Figure 104: Management Console - Defining Network Parameters
In this window you can do the following:
Advanced Tasks
304
View and configure the settings of the venet0 virtual network adapter that will be created
inside the Container. venet0 is the default network adapter created inside each Container
on the Node. You can change the IP address to be assigned to the venet0 adapter (by
default, the IP address of the physical server is set) by selecting the adapter name in the
Interfaces table, clicking the Properties button, and, in the displayed window, entering the
needed IP address(es).
Create additional virtual network adapters for the Container by clicking the Add Interface
button and entering the necessary information in the displayed window. For example, if the
physical server has obtained its TCP/IP-settings through the DHCP protocol, you may need
to create a new virtual network adapter, set it to work in the bridged mode, and attach the
adapter to the corresponding physical network adapter on the Node to provide network
connectivity for the resulting Container. For detailed information on how to create and
manage Container virtual network adapters, please turn to the Managing Virtuozzo Network
chapter (p. 205).
On the next step, you can specify a number of additional network settings for the Container:
Figure 105: Management Console - Specifying Additional Network Parameters
Advanced Tasks
305
In this window you can use the provided Add, Remove, and Edit buttons for the corresponding
operations on Container DNS servers and search domains.
After you have set the Container network parameters, click Next to open the window allowing
you to adjust the resources parameters for the Container:
Figure 106: Management Console - Specifying Resource Parameters
All the resources are grouped by their relations to several subsystems for you to easier find
information on the resource that interests you: CPU parameters, Disk Quota parameters, Primary
UBC parameters, Secondary UBC parameters, Auxilary UBC parameters, and New SLM
parameters. The information on the Container parameters is presented in the table having the
following columns:
Column Name
Description
Name
The name of the resource parameter.
Advanced Tasks
306
Soft Limit
The quota on the consumption of the given resource by the Container. In some
situations, the system may allow the Container to exceed this quota up to the
limit.
Hard Limit
The quota on the consumption of the given resource by the current Container that
cannot be exceeded in any circumstances.
Description
The concise description of the given resource.
When setting Container system management parameters, you can choose one of the following
options:
Select the Memory-related parameters button to use UBC parameters to manage Container
system resources. Detailed information on all UBC parameters is provided in Managing UBC
Resources in Parallels Virtuozzo Containers shipped with Virtuozzo Containers 4.0.
Select the New Service Level Management parameters to use SLM parameters to manage
Container system resources. Detailed information on these parameters is given in the
Managing System Parameters section (p. 150).
Select the All parameters radio button to manage Container system resource using both UBC
and SLM parameters.
All the resource parameters shown in the table are calculated with a 150% allowance as
compared to their original values (except for memory which is calculated with a 120%
allowance to its original value), i.e. to those values that were collected by the wizard while
scanning your physical server. However, you should keep in mind that the resources
consumption on the physical server may significantly differ depending on its loading. So, you
may need to increase the Container resources parameters by double-clicking them and entering
new values in the appropriate fields.
Note: While defining the right resources parameters, you can resort to the help of the
vzhwcalc utility allowing you to scan the main resources on the physical server for a long
period of time and to find out their consumption during its maximal loading. Detailed
information on this utility is given in the Creating Container Configuration File subsection (p.
291).
In the Modify Resources Configuration for Destination Container window, you can also use the
Scale Configuration and Verify Configuration buttons at the foot of the page to scale and verify
the configuration of the Container, respectively. For information on how to scale and validate
your existing configuration see the Managing Container Resources Configuration section (p.
158). After you have made the necessary changes, click Next.
The last screen of the wizard allows you to review the migration settings made on the previous
steps. You can also compare the configuration of the physical server to be migrated with that of
the Container to be created. Besides, you can select the Shut down server and start Container
after migration check box at the bottom of the screen to automatically stop the physical server
and start the Container after migration. This may be necessary to avoid the conflict of the
physical and virtual servers due to the identical network settings. If you are satisfied with the
parameters set, click Finish to start migrating the physical server to the Container.
Note: If you click Cancel on certain steps, and the migration wizard exits, there may remain a
temporary directory on the physical server that you should remove manually. The name of the
directory is /var/vzagent.tmp.
Advanced Tasks
307
Migrating Container to Physical
Server
You may also wish to migrate an existing Container on your Node to a physical server on a
network. For example, this may be useful in case you migrated your physical server to a
Container on the Node, performed some operations on/inside this Container (i.e. changed the
content of some folders and directories), and now wish to move all the data (intact and changed)
back from the Container to the server.
Note: User quotas inside the Container are not migrated to the physical server in the current
Virtuozzo Containers version.
Migration Steps
The main steps performed while migrating a Container to a physical server are the following:
1
A network connection is established between the Hardware Node and the physical server.
2 The Container to be migrated is set in the "stopped" and "mounted" states, in case it is
running or stopped and unmounted.
3 A list of files and directories to be automatically excluded from the migration process is
generated. The script used to create such a list depends on the Linux distribution the
Container is running. The name of the script is read from the distribution configuration file
in the /etc/vz/conf/dists directory and the script itself is located in the
/etc/vz/conf/dists/scripts directory on the Node. You can also specify
additional files and directories that you do not wish to move to the physical server.
4 The files, directories, libraries, etc. are copied from the Container to the physical server by
using rsync. This utility allows you to transfer only the differences between the two sets of
files, which significantly speeds up the process of copying data between the Container and
the server in case they differ only slightly from each other.
5 The ldconfig command is executed on the physical server. This command examines the
copied shared libraries, if any, in the /usr/local/lib, /usr/lib, and /lib
directories on the server and in the directories specified in the /etc/ld.so.conf file
and updates the links and cache to these libraries. For more information on ldconfig,
please see the man pages for this command.
The vzv2p utility used to migrate a Container to a physical server allows you to automatically
complete all the aforementioned tasks except for the last one, i.e. you have to manually run the
ldconfig command on the server after the Container migration.
Advanced Tasks
308
Migration Requirements
Before starting the migration process, please make sure that your physical server and Container
meet the following requirements:
A Linux distribution (Fedora Core, SUSE, Debian, etc.) is installed on your physical server.
This distribution should correspond to that running inside the Container you are going to
migrate.
A network connection can be established among your physical server and the Hardware
Node.
ssh is installed on both the physical server and the Hardware Node. ssh is used to provide
secure encrypted and authenticated communication between the server and the Hardware
Node. You can check if the ssh package is already installed on the server by executing the
ssh -V command.
rsync is installed on the physical server. rsync is used to copy the Container contents to
the physical server. If the physical server rsync happens to be incompatible with the
Hardware
Node,
use
the
statically
linked
rsync
from
the
usr/local/share/vzlinmigrate directory on the physical server as well.
The distribution configuration file for the Linux distribution running inside the Container to
be migrated is present in the /etc/vz/conf/dists directory on the Node. The
DISTRIBUTION variable in this file specifies what script is to be used to generate a list of
files and directories, which will not be moved from the Container to the physical server.
Migrating Container to Physical Server
To migrate a Container to your physical server, the vzv2p utility is used. Let us assume that
you migrated your physical server to Container 101 three months ago, the Container was on the
go during all this time (i.e. some of the old files and directories were changed, certain
configuration settings modified, etc.), and now you wish to move Container 101 back to your
physical server. To this effect, you should issue the following command:
# vzv2p [email protected] --ctid 101 \
--exclude /home/private
The options passed to the vzv2p utility in the example above are explained in the following
table:
Option Name
Description
--ctid
The ID of the Container on the Node to be migrated to the physical
server.
--exclude
The directories to be excluded from being copied to the Container.
This option allows you to avoid migrating the data you do not need.
Advanced Tasks
309
In our example, the vzv2p utility connects to the physical server with the IP address of
199.199.109.109 by using the root user name. While establishing a network connection,
you will be asked for the password of root to log in to the server and have to enter 3e5rrt4
(which is, in our case, the password of the root user). After that, Container 101 is brought to
the "stopped" and "mounted" state and all the data except for the /home/private directory
and directories that were automatically generated by the script defined on the basis of the
DISTRIBUTION variable in the Container configuration file is copied from Container 101 to
the physical server.
After the Container has been successfully migrated to the physical server, you should execute
the ldconfig command to update the links and cache to the shared libraries on the server.
Creating Customized Containers
If you wish to run one or several customized applications inside your Containers and the
number of such Containers is relatively large, you may think of a way to automate the process
of creating Containers that already have a number of applications installed and tuned to meet
your demands. So, you do not need to manually install and customize your applications every
time you create a new Container.
Parallels Virtuozzo Containers allows you to create customized Containers having a certain set
of customized applications installed inside them right after their creation in one of the following
ways:
By making a customized base OS EZ template and using it as the basis for your Containers.
By making a non-base OS EZ template and using it as the basis for your Containers.
By making a customized application EZ template, adding it to a new configuration sample
file, and using this sample file as the basis for your Containers.
All these operations are described in the following subsections in detail.
Using Customized OS EZ Template
Let us first start with making a customized base OS EZ template which can then be used to
create Containers with a set of application already tuned to meet your demands. To make such a
template, you should perform the following operations:
1
Create a metafile that will serve as the basis for your customized base OS EZ template.
Notes: 1. Detailed information on how to create metafiles is given in the Creating Metafile
for EZ Template subsection of the Parallels Virtuozzo Containers Templates Management
Guide.
2. While creating a metafile for your new OS EZ template, you should make sure that the
value of either the %osname parameter or the %version parameter in the metafile differs
from the names or versions of all base OS EZ templates installed on the Hardware Node. So,
if the base RHEL4 OS EZ template is already installed on your Node, these values cannot
be simultaneously set to redhat and as4.
Advanced Tasks
310
2 Create one or more scripts that will be executed on different stages of the OS EZ template
lifecycle and customize your application(s) to meet your needs. For example, you can create
a postinstall script with the name of post_install.bash and make it perform a number
of customization operations on some application included in the OS EZ template after
installing this application inside your Container.
3 Create a customized OS EZ template by running the vzmktmpl utility and passing the
corresponding options to it. So, you can use the --post-install option and specify the
path to the post_install.bash script from the example above to make an OS EZ
template that will customize your application after installing it inside your Container.
Note: The full list of options allowing you to specify what scripts are to be executed on
what stage of the EZ template lifecycle is provided in the vzmktmpl subsection of the
Parallels Virtuozzo Containers Reference Guide.
4 Install the customized OS EZ template on the Hardware Node by using the rpm -i
command.
5 Cache the created OS EZ template by running the vzpkg create cache command.
Detailed information on how you can do it is provided in the Preparing OS EZ Template for
Container Creation section.
6 Create a Container based on the OS EZ template.
For example, to create a Container which will run Red Hat Enterprise Linux 4 (RHEL 4) and
have the customized mysql and apache applications installed inside it right after its creation,
you should do the following:
1
Create a metafile for the RHEL 4 OS EZ template, name it, for example,
rhel_4_customized.metafile, and save in the /root/rhel4 directory on the
Hardware Node.
2 Make a script that will perform a number of custom operations after applying the mysql
and apache application EZ templates to the Container and name it
post_install.bash.
3 Copy the script to the /root/rhel4 directory on the Hardware Node.
4 Execute the following command on the Node to create the RHEL 4 OS EZ template:
# vzmktmpl /root/rhel4/rhel_4_customized.metafile \
--post-install /root/rhel4/post_install.bash
This command will create an OS EZ template for RHEL 4 and put it to the /root directory
on the Hardware Node (e.g. /root/redhat_customized-as4-x86-ez-4.0.01.swsoft.noarch.rpm).
Advanced Tasks
311
5 Install the resulting OS EZ template on the Hardware Node:
# rpm -i /root/redhat_customized-as4-x86-ez-4.0.0-1.swsoft.noarch.rpm
6 Cache the installed OS EZ template:
# vzpkg create cache redhat_customized-as-x86
...
Complete!
Packing cache file redhat_customized-as4-x86.tar.gz ...
Cache file redhat_customized-as4-x86.tar.gz [14M] created.
7 Create Container 101 on the basis of the new OS EZ template:
# vzctl create 101 --ostemplate redhat_customized-as4-x86
-–config basic
Creating Container private area (redhat_customized-as4-x86)
Container is mounted
Postcreate action done
Container is unmounted
Container private area was created
Delete port redirection
Adding port redirection to Container(1): 4643 8443
So, you have just created Container 101 having the customized mysql and apache
applications installed inside it.
Using EZ OS Template Set
Another way of creating customized Containers is to make a non-base OS EZ template (also
known as an OS EZ template set) differing from the corresponding base OS EZ template in the
number of packages included in this template. For example, if you wish your Container to run
Red Hat Enterprise Linux 4 and to function as a Linux-based server only, you can create the
redhat-as4-x86-server OS EZ template set and include only those packages in it that
are needed for performing main server tasks. So, you can specify packages to be used for setting
up file and print sharing and exclude all the packages for graphical interfaces (GNOME and
KDE).
To create a non-base OS EZ template, you should complete the following tasks:
1
Create a metafile that will serve as the basis for your non-base OS EZ template. Any
metafile for this kind of EZ template should contain the following information:
%osname: the name of the Linux distribution for which you are creating the OS EZ
template set. This name should correspond to that specified in the base OS EZ template.
For example, if you are creating an OS template set of the base OS EZ template for
RHEL 4, you should set the value of this parameter to redhat.
%osver: the version of the Linux distribution specified as the value of the %osname
parameter. This name should correspond to that specified in the base OS EZ template.
For example, if you are creating an OS template set of the base OS EZ template for
RHEL 4, you should set the value of this parameter to as4.
%osarch: The microprocessor architecture where the EZ template is to be run. This
name should correspond to that specified in the base OS EZ template. For example, if
you are creating an OS template set of the base OS EZ template for RHEL 4, you should
set the value of this parameter to x86.
%setname: the name to be assigned to your non-base OS EZ template. You can specify
any name you like for your OS template set:
Advanced Tasks
312
a
This name will be added to the name of the base OS EZ template after the indication of
the architecture where the OS EZ template is to be run. For example, if you are creating
an OS template set of the base OS EZ template for RHEL 4 which is supposed to run on
x86 platforms, the name of your non-base OS EZ template may look like the following redhat-as4-x86-Template_Name-ez-1.0-1.noarch.rpm
where
Template_Name is the name you specify as the value of the %setname parameter.
b
This name will also be assigned to the directory which will store the meta data of your
non-base OS EZ template after the template installation on the Hardware Node. For
example,
it
will
have
the
name
of
/vz/template/redhat/as4/x86/config/os/my_non_base_template/
after you set the value of this parameter to my_non_base_template, created a nonbase OS EZ template for RHEL 4, and installed it on the Node.
%packages: a list of RPM packages to be included in the non-base OS EZ template.
This parameter allows you to specify what applications will be present inside your
Containers based on this OS EZ template set right after their installation. The names of
the packages listed as the value of this parameter should correspond to the names of real
RPM packages (without indicating the package version, release, architecture, and the
.rpm extension) that are stored in the repository used for managing your EZ templates.
Note: You can also specify a number of additional parameters in your metafile. For
example, you may wish to add one or several extra packages to your OS EZ template set
which are not available in the repository used to handle the packages for the corresponding
base OS EZ template. For this purpose, you will have to specify the %mirrorlist
parameter providing information on the repository where these extra packages are kept.
Detailed information on all parameters you can set in metafiles is given in the Parallels
Virtuozzo Containers Reference Guide.
2 You can also (although you do not have to) create a number of scripts that will be executed
on different stages of the non-base OS EZ template lifecycle and customize your
application(s) to meet your demands. The path to these scripts should then be specified after
the corresponding options while creating your OS template set. For example, you can create
a preinstall script with the name of pre_install.bash and make it perform a number
of customization operations on some application included in the non-base OS EZ template
before installing this application in your Container.
Note: If there are no scripts for the non-base OS EZ template, the corresponding scripts
available for the base OS EZ template will be executed.
3 Create the non-base OS EZ template by running the vzmktmpl utility and passing the
corresponding options to it, if needed. So, if you created one or several scripts on the
previous step, you can use special options and specify the path to these scripts during the
command execution. For example, you can use the --pre-install option and specify
the path to the pre_install.bash script to make an OS EZ template that will
customize your application before installing it inside your Container.
Note: The full list of options allowing you to specify what scripts are to be executed on
what stage of the EZ template lifecycle is provided in the vzmktmpl subsection of the
Parallels Virtuozzo Containers Reference Guide.
Advanced Tasks
313
4 Install the non-base OS EZ template on the Hardware Node by using the rpm -i
command.
5 Cache the created OS EZ template by running the vzpkg create cache command.
Detailed information on how you can do it is provided in the Preparing OS EZ Template for
Container Creation section of the Parallels Virtuozzo Containers Templates Management
Guide.
6 Create a Container based on the OS EZ template.
Using Customized Application Template
If the number of customized applications inside your Containers is relatively small, you can also
use the following way of creating customized Containers:
1
Create a metafile that will serve as the basis for your customized application EZ template.
Note: Detailed information on how to create metafile is given in the Creating Metafile for EZ
Template subsection of the Parallels Virtuozzo Containers Templates Management Guide.
2 Create one or more scripts that will be executed on different stages of the application EZ
template lifecycle and customize your application(s) to meet your demands. For example,
you can create a postinstall script with the name of post_install.bash and make it
perform a number of customization operations on your application after installing this
application in your Container.
3 Create a customized application EZ template by running the vzmktmpl utility and passing
the corresponding options to it. So, you can use the --post-install option and specify
the path to the post_install.bash script from the example above to customize your
application in accordance with your needs after installing it in your Container.
Note: The full list of options allowing you to specify what scripts are to be executed on
what stage of the EZ template lifecycle is provided in the vzmktmpl subsection of Parallels
Virtuozzo Containers Reference Guide.
Advanced Tasks
314
4 Install the customized EZ template on the Hardware Node by using the rpm -i command.
5 Create a new Container configuration sample file and include the customized EZ template in
this file. Detailed information on Container configuration sample files is provided in the
Managing Container Resources Configuration section (p. 158).
6 Create a customized Container on the basis of the configuration sample.
The following example demonstrates how to create Container 101 which will run Red Hat
Enterprise Linux 4 and have the customized mysql application installed inside it right after its
creation:
1
Create a metafile for the mysql application, name it mysql.metafile, and save in the
/usr/mysql directory on the Hardware Node.
2 Make a script that will perform a number of custom operations after applying the mysql
EZ template to the Container and name it post_install.bash.
3 Copy the script to the /usr/mysql directory on the Hardware Node.
4 Execute the following command on the Node to create the mysql EZ template:
# vzmktmpl /usr/mysql/mysql.metafile \
--post-install /usr/mysql/post_install.bash
This command will create an EZ template for the mysql application and put it to the
/root directory on the Hardware Node (e.g. /root/mysql-redhat-as4-x86-ez4.0.0-1.swsoft.noarch.rpm).
5 Install the mysql EZ template on the Hardware Node:
# rpm -ihv /root/mysql-redhat-as4-x86-ez-4.0.0-1.swsoft.noarch.rpm
6 Create a new Container configuration sample file and add the mysql EZ template to a list
of templates that will be installed in Containers created on the basis of this configuration
sample file. For example, you can create a new configuration sample with the mysql name
by running the Create Configuration Sample Wizard in Parallels Management Console and
add the mysql EZ template to a list of templates on the Select Application Templates step of
this wizard.
7 Create Container 101 by using the vzctl create command and the mysql sample file:
# vzctl create 101 --ostemplate redhat-as4-x86 -–config mysql
Creating Container private area (redhat-as4-x86)
Container is mounted
Postcreate action done
Container is unmounted
Container private area was created
Delete port redirection
Adding port redirection to Container(1): 4643 8443
So, you have just created Container 101 having the customized mysql application installed
inside it.
Advanced Tasks
315
Changing System Time From
Container
Normally it is impossible to change the system time from a Container. Otherwise, different
Containers could interfere with each other and could even break applications depending on the
system time accuracy.
Normally only the Hardware Node system administrator can change the system time. However,
if you want to synchronize the time via Network Time Protocol (NTP), you have to run NTP
software, which will connect to external NTP servers and update the system time. It is not
advisable to run application software on the Hardware Node itself, since flaws in the software
can lead to compromising all Containers on the Hardware Node. Thus, if you plan to use NTP,
you shall create a special Container for it and configure it to have the sys_time capability.
The example below illustrates configuring such a Container:
# vzctl set 101 --capability sys_time:on --save
Unable to set capability on running Container
Saved parameters for Container 101
The output of the above command warns you that vzctl cannot apply changes in the
capabilities to a running Container. The Container has to be restarted before changes take effect:
# vzctl stop 101; vzctl start 101
Stopping Container ...
Container was stopped
Container is unmounted
Starting Container ...
Container is mounted
Adding IP address(es): 192.168.1.101
Hostname for Container set: Container101
Container start in progress...
# ssh root@ct101
root@ct101's password:
Last login: Mon Feb 28 23:25:58 2007 from 10.100.40.18
[root@ct101 root]# date
Mon Feb 28 23:31:57 EST 2007
[root@ct101 root]# date 10291300
Tue Feb 29 13:00:00 EST 2007
[root@ct101 root]# date
Tue Feb 29 13:00:02 EST 2007
[root@ct101 root]# logout
Connection to Container101 closed.
# date
Tue Feb 29 13:01:31 EST 2007
The command session above shows the way to change the system time from Container 101. The
changes will affect all the Containers and the Hardware Node itself. It is not advisable to have
more than one Container with the sys_time capability set on.
NTP is described in Internet Standard RFC 1305; more information including client software
can be obtained from the NTP web server (http://www.ntp.org).
Advanced Tasks
316
Setting Up iSCSI Environment in
Virtuozzo-Based Systems
iSCSI (Internet Small Computer System Interface) is a TCP/IP-based protocol meant for
transmitting data over local area networks (LANs), wide area networks (WANs), or the Internet
and providing location-independent data storage and retrieval. The iSCSI protocol is mainly
used to interconnect hosts (e.g. database servers) with shared storage systems on SANs (Storage
Area Networks). In this connection it aims at achieving the following goals:
Storage Consolidation. Various storage resources from many servers around the network
can be moved to one or more central locations (e.g. data centers) on the SAN, which allows
you to allocate storage resources more efficiently. For example, any server on the SAN can
be allocated a new disk volume without making changes to the server resources. Similarly,
any server upgrades or expansions can be performed without impacting the storage
resources on the SAN.
Disaster Recovery and Business Continuity. The iSCSI protocol can be used to allow for
remote data replication and near real time data backup across vast distances providing a cost
effective solution to disaster recover and business continuity.
The implementation of an iSCSI storage system in a Virtuozzo Containers environment does not
differ from that in standard environments and is based on the three main components: a TCP/IP
network, an initiator, and a target. The interaction among the components in a Virtuozzo-based
system may roughly be described as follows:
A Hardware Node acting as an initiator sends a SCSI command (request) over the TCP/IP
network to the target represented by a SCSI data storage system (i.e. one or more SCSI
storage devices).
The target processes the received request and takes the appropriate action.
To configure a Hardware Node to communicate with a target (e.g. some SCSI storage device)
via the iSCSI protocol, you should perform the following operations on the Node:
1
Install the iscsi-initiator-utils RPM package providing the server daemon for
the iSCSI protocol and the necessary utilities for its managing:
# rpm -ihv iscsi-initiator-utils-6.2.0.742-0.5.el5.i386.rpm
2 Discover your iSCSI target using the iscsiadm utility:
# iscsiadm --mode discovery --type sendtargets --portal <target_IP_address>
where <target_IP_address> denotes the IP address used to access the target.
3 Log in to the target using the iscsiadm utility:
# iscsiadm --mode node --login automatic
This command saves the information about the target to the /var/lib/iscsi/nodes
directory on the Hardware Node, which allows your Node to automatically detect the iSCSI
target on its boot.
Advanced Tasks
317
After completing the operations above, a new iSCSI device should appear under the /dev
directory on your Node. You can find out the device name using the fdisk -l or tail -f
/var/log/messages command.
Now you can mount the iSCSI device to your Hardware Node using the mount utility.
Assuming that your iSCSI device has the name of /dev/sdb1 and you wish to mount it to the
/vz directory on your Node, this can be done as follows:
# mount /dev/sdb1 /vz
Note: If you have not yet partitioned your target, you should partition it and create a filesystem
on it (using the fdisk and mkfs utilities) prior to mounting the iSCSI device to your Node.
You can also automate the procedure of mounting your iSCSI partition on the Hardware Node
boot by editing the /etc/fstab file. For example, if you wish to have the /dev/sdb1
partition automatically mounted on the Node boot and this partition is formatted to ext3, you
can add the following string to the /etc/fstab file:
/dev/sdb1 /vz ext3 defaults 0 0
Important! If your iSCSI partition is formatted to ext3, make sure that you have this partition
mounted to only one Hardware Node at a time; otherwise, the SCSI storage may become
corrupted.
Obtaining Hardware Node ID From
Inside Container
The default Virtuozzo Containers installation does not allow users inside a Container to obtain
any information specific to the Hardware Node the Container is running on. The reason is that
no Container shall have knowledge about the corresponding Hardware Node. A Container can
be transparently migrated to another Hardware Node, and if this Container runs any applications
depending on the particular Node, these applications might fail after the migration.
There are however situations when you have to provide some unique Hardware Node ID to
some applications. For example, you might want to license your application per Hardware
Node. In this case, after the migration your customer will need to re-apply the license for your
application.
Parallels Virtuozzo Containers provides access to the unique Hardware Node ID via the
/proc/vz/hwid file. The default Virtuozzo Containers installation makes this file accessible
to Containers from 1 to 100 (i.e. Containers with Virtuozzo-reserved IDs). It is possible to
change this range in the Virtuozzo global configuration file. For example, this is the way to
make the file visible in Containers from 1 to 1000:
# vi /etc/vz/vz.conf
VZPRIVRANGE=”1 1000”
# vzctl exec 101 cat /proc/vz/hwid
0C3A.14CB.391B.6B69.02C9.4022.3E2F.CAF6
The above example illustrates accessing the Hardware Node ID from Container 101.
Advanced Tasks
318
Mounting /vz Partition via Virtuozzo
Script
If you experience problems with mounting or accessing the /vz partition (e.g. due to some data
corruption) and this interferes with the Hardware Node boot-up procedure, you can prevent the
/vz partition from being mounted at the Hardware Node startup and have it mounted by a
special /etc/init.d/vz script only after the Node is up and running.
To start using the vz script for mounting the /vz partition after the Hardware Node boot, you
should complete the following tasks:
1
Open the /etc/fstab file on the Hardware Node for editing and set the noauto flag for
the /vz partition. After editing, your fstab file may look as follows:
LABEL=/
/
LABEL=/vz
/vz
LABEL=SWAP-sda3 swap
...
ext3 defaults 1 1
ext3 defaults,noauto 1 2
swap defaults 0 0
2 Make sure that the value of the VZMOUNTS parameter in the /etc/sysconfig/vz file
on the Hardware Node is set to vz, as shown below:
VZMOUNTS="vz"
From this point on, the vz script will be used to automatically mount the /vz partition after the
Hardware Node boot. During its execution, the script will:
Search the /etc/fstab file on the Node for partitions having the noauto flag set.
Note: As the /etc/init.d/vz script checks the /etc/fstab file for all partitions
with the noauto flag set, you can also have any other partition automatically mounted by
this script after the Hardware Node boot rather than at the boot time by setting noauto for
the corresponding partition in the /etc/fstab file and indicating the partition name as
the value of the VZMOUNTS parameter in the /etc/vz/vz.conf file.
Check if these partitions are mounted. If they are not, it will:
run the fsck utility to examine the partitions and repair them if there are any errors or
data loss (please keep in mind that it may take a rather long run to check and fix a
damaged file system);
mount the partitions.
If the /vz partition has errors that cannot be corrected automatically by the script, you can
remotely log in to the Hardware Node and troubleshoot the problem.
Advanced Tasks
319
Managing Mount Points Inside
Container
The previous versions of Virtuozzo Containers (3.0 and earlier) provide you with the ability to
remount any part of the Hardware Node file hierarchy and to have it automatically mounted
to/unmounted from a particular Container on its startup/shutdown using special system-wide or
per-Container mount/umount action scripts. In Virtuozzo Containers 4.0, this can also be done
with the help of the vzctl utility. Along with defining what part of the Hardware Node file
hierarchy is to be automatically mounted inside a Container on its booting, you can also use
vzctl to configure certain options (or flags) to be applied to the mounted directories.
Currently, you can set the following options for mounted Container directories:
noexec. This option does not allow the execution of any binaries in the mounted directory.
nodev. This option does not allow to interpret character or block special devices in the
mounted directory.
nosuid. This option does not allow set-user-identifier or set-group-identifier bits to take
effect.
You can manage the mounted directories inside Containers (and, as a consequence, the
aforementioned directory options) using the --bindmount_add option of the vzctl set
command. For example, you can execute the following command to set the noexec flag for the
/tmp directory inside Container 101, thus forbidding the execution of any binaries in this
directory:
Note: You can set mount points for and remove them from stopped Containers only; the mount
points will become active/inactive on the Container startup.
# vzlist -a
CTID
NPROC STATUS
IP_ADDR
HOSTNAME
1
32 running
127.0.1.2
localhost
101
- stopped
10.12.12.101
# vzctl set 101 --bindmount_add /tmp,noexec --save
Saved parameters for Container 101
# vzctl start 101
Starting Container ...
Container is mounted
Set up bind mount(s): /tmp
...
To check that the directory has been successfully mounted with the specified option, you can
run the following command:
# vzctl exec 101 mount
vzfs on / type vzfs (rw)
simfs on /tmp type simfs (rw,noexec)
proc on /proc type proc (rw,nodiratime)
The directories mounted inside Containers using the --bindmount_add option are displayed
as the ones of the simfs type. So, the command output above shows that the /tmp mount
point is currently available inside Container 101 and that this mount point has the following
flags set for it: rw and noexec.
Advanced Tasks
320
If a directory to be remounted does not exist inside a Container, this directory is created under
/vz/private/CT_ID/mnt/Dir_Name on the Hardware Node (where Dir_Name is the
name of the directory you wish to mount) and becomes visible from inside the Container under
the / directory. For example, assuming that there is no /root/MyTempDir directory inside
Container 101, you can issue the following command to create such a directory inside the
Container and mount it with the noexec flag:
# vzctl set 101 --bindmount_add /root/MyTempDir,noexec --save
Saved parameters for Container 101
# ls -R /vz/private/101/mnt
/vz/private/101/mnt:
media root
/vz/private/101/mnt/root:
MyTempDir
...
# vzctl exec 101 ls /root
MyTempDir
While working with mounted directories, please keep in mind the following:
There are no restrictions on migrating a Container with one or several mount points inside.
Having been moved to the Destination Node, the Container will have the same mount points
with the same flags (noexec, nodev, nosuid) as it had on the Source Node before the
migration.
The permissions set for the mounted directories are taken from the corresponding upperlevel directories (e.g. the permissions for the MyTempDir directory inside Container 101 in
the example above are derived from the /root directory inside the Container).
If there is no upper-level directory, the directory permissions are set to 0777 meaning that
owners, groups, and others have read, write, and search permissions in respect of this
directory.
For mount points quota accounting, standard per-Container quota calculation rules are used
since all bind mounts are located in the /vz/private/CT_ID/mnt directory on the
Hardware Node.
At any time you can remove a mount point from a Container. For example, you can delete the
/tmp mount point from Container 101 by executing the following command:
# vzlist -a
CTID
NPROC STATUS
IP_ADDR
1
32 running
127.0.1.2
101
- stopped
10.12.12.101
# vzctl set 101 --bindmount_del /tmp --save
Saved parameters for Container 101
HOSTNAME
localhost
-
Advanced Tasks
321
Preserving Application Data During
Container Reinstallation
A typical Container reinstallation creates a new Container instead of the broken one using the
corresponding OS and application templates and mounting the filesystem of the broken
Container to the /tmp directory inside the new one, which does not let the necessary data from
the old Container get lost. However, a manual copying of the broken Container contents to the
new Container may prove a tedious and time-consuming task. Beginning with version 3.0.0
SP1, The Virtuozzo Containers software allows to automate this process by performing special
scripts that would copy the relevant data to the appropriate places of the new Container after the
reinstallation. Naturally, these scripts deal with the data of particular applications only; in fact,
this functionality should be supported by application templates that should carry the reinstall
scripts specific to them and install them to the /etc/vz/reinstall.d directory inside the
Container. Only then will Parallels Virtuozzo Containers be able to make use of them, should
the Container be reinstalled one day.
Let us consider a typical scenario of such an automation by the example of the Plesk
application:
1
The Plesk application template is repackaged to include the necessary reinstall scripts.
Note: Usually it is up to the application vendor or the template maker to provide this kind of
scripts. However, if you have a certain experience with making application templates
yourself, you may do it on your own. The reinstall script(s) should be first packaged into an
RPM, which should in its turn be added to the template.
2 A new Container is created and the Plesk application template is added to it. Part of this
addition consists in copying the reinstall scripts to the /etc/vz/reinstall.d directory
inside the Container.
3 A Plesk license is manually copied to the appropriate place inside the Container and
installed.
4 The Container administrator performs typical day-to-day tasks with the help of the Plesk
control panel. The local Plesk database gets filled up with all kinds of objects (servers,
domains, hostnames, IP addresses, logs, etc.).
5 Some day the Container gets broken and wouldn't start. The Container administrator clicks
the Reinstall button in Parallels Power Panel. At this point Parallels Virtuozzo Containers:
a
Creates a brand-new Container with the necessary templates added to it. This means that
Plesk is also added and the /etc/vz/reinstall.d directory with the Plesk scripts
is created.
b
Mounts the filesystem of the broken Container to the /mnt directory inside the new
Container.
c
NB: Launches scripts from the /etc/vz/reinstall.d directory. These scripts are
executed one by one in the alphabetical order. They take care of copying both the Plesk
license and the Plesk database to the new Container and installing the license.
d
Dismounts the old filesystem from the /mnt directory.
Advanced Tasks
322
6 The Container administrator gets their working Container again with the Plesk application
having retained both its license and database, so no manual copying is involved in the
process.
When launching the vzctl reinstall command from the command line, you have the
option to drop certain scripts from the reinstallation procedure. This can be done with the help
of the --scripts option:
# vzctl reinstall 101 --scripts 'script1 script2'
In this example only the scripts named script1 and script2 will be launched at the end of
the reinstallation, and all the other scripts from the Container /etc/vz/reinstall.d
directory will be discarded.
Advanced Tasks
323
Accessing Devices From Inside
Container
It is possible to grant a Container read, write, or read/write access to a character or block device.
This might be necessary, for example, for Oracle database software if you want to employ its
ability to work with raw disk partitions.
In most cases, providing access to the file system hierarchy for a Container is achieved by using
bind mounts. However, bind mounts do not allow you to create new partitions, format them with
a file system, or mount them inside a Container. If you intend to delegate disk management to a
Container administrator, you shall use either the –-devices or the --devnodes option of
the vzctl set command.
The example session below illustrates the following situation: you want to allow the root user of
Container 101 to take responsibility for administering the /dev/sdb, /dev/sdb1 and
/dev/sdb2 devices. In other words, you allow the Container 101 system administrator to
repartition the /dev/sdb device and create file systems on the first two partitions (or use them
with any software capable of working with raw block devices, such as Oracle database
software).
First, we are going to grant the Container the permissions to work with the needed block
devices:
# vzctl set 101 --devices b:8:16:rw --devices b:8:17:rw --devices
b:8:18:rw --save
Setting devperms
Saved parameters for Container 101
This command sets the read/write permissions for block devices with major number 8 and minor
numbers 16, 17 and 18 (corresponding to /dev/sdb, /dev/sdb1, and /dev/sdb2). If you
are not sure which major and minor numbers correspond to the necessary block devices, you
may issue the following command:
# ls -l /dev/sdb{,1,2}
brw-rw---1 root
brw-rw---1 root
brw-rw---1 root
disk
disk
disk
8,
8,
8,
16 Jan 30 13:24 /dev/sdb
17 Jan 30 13:24 /dev/sdb1
18 Jan 30 13:24 /dev/sdb2
Now let us create a 100-Mb Linux partition in addition to an already existing 2 GB partition on
/dev/sdb1 from Container 101.
[root@ct101 root]# fdisk /dev/sdb
Command (m for help): p
Disk /dev/sdb: 255 heads, 63 sectors, 2231 cylinders
Units = cylinders of 16065 * 512 bytes
Device Boot
/dev/sdb1
*
Start
1
End
255
Command (m for help): n
Command action
e
extended
p
primary partition (1-4)
p
Partition number (1-4): 2
Blocks
2048256
Id
83
System
Linux
Advanced Tasks
324
First cylinder (256-2231, default 256):
Using default value 256
Last cylinder or +size or +sizeM or +sizeK \
(256-2231, default 2231): +100M
Command (m for help): p
Disk /dev/sdb: 255 heads, 63 sectors, 2231 cylinders
Units = cylinders of 16065 * 512 bytes
Device Boot
/dev/sdb1
*
/dev/sdb2
Start
1
256
End
255
268
Blocks
2048256
104422+
Id
83
83
System
Linux
Linux
Command (m for help): w
After the new partition table has been written, you can format it and mount inside the Container:
[root@ct101 root]# mke2fs /dev/sdb2
[Output of mke2fs is skipped…]
[root@ct101 root]# mount /dev/sdb2 /mnt
[root@ct101 root]# df
Filesystem
1k-blocks
Used Available Use% Mounted on
vzfs
1048576
149916
898660 15% /
ext2
101107
13
95873
1% /mnt
Remember that you have to specify all minors for the devices you want to delegate authority
for; allowing to access /dev/sdb grants the permission to create, modify and delete partitions
on it, but explicit permissions shall be given for partitions you allow the Container to work with.
Advanced Tasks
325
Moving Network Adapter to
Container
By default, all the Containers on a Node are connected among themselves and with the Node by
means of a virtual network adapter called venet0. Starting with Virtuozzo Containers 2.6.1,
there is a possibility for a Container to directly access a physical network adapter (for example,
eth1). In this case the adapter becomes inaccessible to the Hardware Node itself. This is done
with the help of the vzctl command:
# vzctl set 101 --netdev_add eth1 --save
Add network device: eth1
Saved parameters for Container 101
Mind that the network device added to a Container in such a way has the following limitations:
This network device will be accessible only to the Container whereto it has been moved, but
not to the Hardware Node (Container 0) and not to all the other Containers on the Node.
The port redirection mechanism is not supported for this network device.
The Virtuozzo class-based traffic shaping, if set for the given Container, does not limit the
bandwidth for this network device.
If such a device is removed from the Container (by means of the vzctl set -netdev_del command) and added to another Container instead, all the network settings
of this device are purged. To work around this problem, you should store all the device
settings in the ifcfg-dev file and have this file available in the
/etc/sysconfig/network-scripts directory inside all the Containers that may
have access to this device (including Container 0). After the device has been added to a
Container, it will be enough to issue the ifup dev command inside the Container to read
the settings from the file mentioned above. Mind though that this will still not restore
advanced network configuration settings, such as traffic shaping or packet filtering rules.
The physical device inside a Container has no security restrictions typical for the venet
virtual device. Inside the Container it will be possible to assign any IP address to this device
and use it, to sniff network traffic in the promiscuous mode, and so on.
Advanced Tasks
326
Enabling VPN for Container
Virtual Private Network (VPN) is a technology which allows you to establish a secure network
connection even over an insecure public network. Setting up a VPN for a separate Container is
possible via the TUN/TAP device. To allow a particular Container to use this device, the
following steps are required:
Make sure the tun.o module is already loaded before Parallels Virtuozzo Containers is
started:
# lsmod
Allow the Container to use the TUN/TAP device:
# vzctl set 101 --devices c:10:200:rw --save
Create the corresponding device inside the Container and set the proper permissions:
# vzctl exec 101 mkdir -p /dev/net
# vzctl exec 101 mknod /dev/net/tun c 10 200
# vzctl exec 101 chmod 600 /dev/net/tun
Configuring the VPN proper is carried out as a common Linux administration task, which is out
of the scope of this guide. Some popular Linux software for setting up a VPN over the
TUN/TAP driver includes Virtual TUNnel <http://vtun.sourceforge.net/> and
OpenVPN <http://openvpn.sourceforge.net/>.
Advanced Tasks
327
Managing Hardware Node
Resources Parameters
Virtuozzo Containers 4.0 allows you to configure a number of resource management parameters
defining the amount of resources to be allocated to the Hardware Node (also known as
Container 0). These parameters include all standard UBC parameters (VMGUARPAGES,
KMEMSIZE, OOMGUARPAGES, etc.) as well as the ONBOOT parameter.
You can edit any of these parameters in the /etc/vz/conf/0.conf file on the Hardware
Node by means of your favorite text editor (for example, vi or emacs) or by using the vzctl
set command and specifying 0 as the Container ID. For example:
# vzctl set 0 --kmemsize 12211840:14359296 --save
Saved parameters for Container 0
This command sets both the barrier and limit values of unswappable kernel memory (in bytes)
which can be allocated to internal kernel structures of the processes on the Node. The specified
parameter values will be in force until the Hardware Node restart. If you wish these values to be
applied to the Node on its next booting, you should additionally set the ONBOOT parameter in
the /etc/vz/conf/0.conf file to yes. This can be done in one of the following ways:
Passing the --onboot option to the vzctl set command:
# vzctl set 0 --onboot yes
Saved parameters for Container 0
Editing the /etc/vz/conf/0.conf file with your favorite text editor (e.g. vi) and
setting the value of the ONBOOT parameter in this file to yes.
Note: Detailed information on all resource parameters that can be changed in respect of your
Hardware Node is provided in the Parallels Virtuozzo Containers Reference Guide.
If you have made a number of changes to Hardware Node resource management parameters and
wish to reset them to the values specified in the /etc/vz/conf/0.conf file, you can
proceed as follows:
# vzctl set 0 --reset_ub
UBC limits were set successfully
Advanced Tasks
328
Setting Immutable and Append
Flags for Container Files and
Directories
Starting with Virtuozzo Containers 3.0 SP 1, you can use standard Linux utilities - chattr and
lsattr - to set extra flags for files and directories inside your Containers and to query their
status, respectively. Currently, two of these extra flags - 'append' and 'immutable' - are
supported. For example, you can execute the following command to set the 'immutable' flag for
the /root/MyFile file inside Container 101:
[root@ct101 root] chattr +i /root/MyFile
To check that the 'immutable' flag has been successfully set, use the following command:
[root@ct101 root] lsattr /root/MyFile
----i-------- /root/MyFile
Note: For detailed information on the chattr and lsattr utilities, please see their manual
pages.
Advanced Tasks
329
Recreating Service Container
The Service Container should be created on every Node you are going to manage with the help
of Parallels Management Console, Infrastructure Manager, or Power Panel.
Note: In general, you are allowed to perform the same operations in the Service Container
context as you would perform in the context of a regular Container. However, you are not
recommended to change the default configuration of the Service Container (e.g. install your
own applications/templates into or store your private files inside this Container). Changing the
Service Container configuration may affect all the other Containers residing on the given
Hardware Node.
In case your Service Container starts experiencing problems for some reason or other and
cannot be used to further manage the Hardware Node(s) and its(their) Containers, you can
recreate it using a special utility shipped with Virtuozzo Containers 4.0 - vzsveinstall.
The vzsveinstall utility takes the Service Container IP address and the path to RPM
packages from your Virtuozzo Containers distribution as parameters and does all the necessary
installation tasks. By default, vzsveinstall uses the redhat-as3-minimal OS
template to create the Service Container; so, you should have this OS template installed on the
Hardware Node and cached.
Let us assume that you wish to create the Service Container with the IP address of
10.100.105.1 and the Virtuozzo Containers distribution is located in the
/root/vz_download directory on your Hardware Node. To make the Service Container,
you should execute the following commands:
# cd /root/vz_download
# vzsveinstall -f -d virtuozzo/RPMS -c client -s 10.100.105.1
Creating Container private area
[skipping most of the vzsveinstall output…]
Advanced Tasks
330
Customizing /proc/meminfo Output
Inside Container
The /proc/meminfo virtual file allows you to view the information about memory usage
(both physical and swap) on the system. In the current version of Virtuozzo Containers, you can
customize the output of this file inside a particular Container and set it to one of the following
modes:
Non-virtualized. In this case running the cat /proc/meminfo command inside a
Container will display the information about the physical memory on the Hardware Node
(total, used, free, shared, etc.), in kilobytes.
Virtualized in pages. Setting the /proc/meminfo output to this mode allows you to
specify what amount of total memory (in kilobytes) will be displayed while running the cat
/proc/meminfo command inside this or that Container.
Virtualized in privvmpages. Setting the /proc/meminfo output to this mode also allows
you to arbitrarily specify the amount of total memory (in kilobytes) to be displayed while
running the cat /proc/meminfo command inside this or that Container. As distinct
from the previous mode, the amount of memory to be shown in this mode is calculated on
the basis of the value of the PRIVVMPAGES parameter set in the Container configuration
file.
Notes: 1. Enabling this or that mode for a Container does not exert any influence on the real
resources allocation to the Container; it is only used to modify the way the /proc/meminfo
output will look inside this Container.
2. The output of the /proc/meminfo file cannot be customized if the new SLM functionality
is enabled on the Hardware Node. In this case the cat /proc/meminfo command executed
inside a Container always displays the amount of memory set for this Container using the -slmmemorylimit option of the vzctl set command.
During the Virtuozzo Containers installation, the output of the /proc/meminfo virtual file is
set to the 'non-virtualized' mode, i.e. running the cat /proc/meminfo command inside any
Container on the Hardware Node will show information about the memory usage on this Node.
You can use the --meminfo option with the vzctl set command to switch between
different modes:
To set the output of /proc/meminfo inside Container 101 to the 'virtualized in pages'
mode, issue the following command on the Node:
# vzctl set 101 --meminfo pages:2000 --save
The amount of memory that will be displayed by running the cat /proc/meminfo
command inside Container 101 is defined by the data specified after the --meminfo
option:
pages tells the vzctl set command that you wish to enable the 'virtualized in
pages' mode for the /proc/meminfo output and simultaneously denotes the units of
measurement to be used for setting the amount of memory (e.g. 4-Kb pages for
Containers running 32-bit operating systems);
200 denotes the number of pages to be shown in the /proc/meminfo output.
Advanced Tasks
331
In our case the /proc/meminfo output inside Container 101 may look like the following:
# vzctl exec 101 cat /proc/meminfo
MemTotal:
8000 kB
MemFree:
5140 kB
LowTotal:
8000 kB
LowFree:
5140 kB
Buffers:
0 kB
Cached:
0 kB
SwapCached:
0 kB
HighTotal:
0 kB
HighFree:
0 kB
...
While working in this mode, please keep in mind the following:
The specified amount of memory (in our case it is 8000 Kb) is always shown in the
MemTotal and LowTotal fields of the cat /proc/meminfo output.
The values in the MemFree and LowFree fields are calculated automatically by the
system.
All the other fields in the command output have the values set to 0.
To set the output of /proc/meminfo inside Container 101 to the 'virtualized in
privvmpages' mode, execute the following command on the Node:
# vzctl set 101 --meminfo privvmpages:3 --save
The amount of memory that will be displayed by running the cat /proc/meminfo
command inside Container 101 is calculated using the following formulas:
Privvmpages_Value * 3 * 4Kb if Container 101 is running a 32-bit operating
system (OS) or an OS for x86-64 processors and
Privvmpages_Value * 3 * 16Kb if Container 101 is running an OS for IA-64
processors
where Privvmpages_Value denotes the value of the PRIVVMPAGES parameter set in
the Container configuration file and 3 is an arbitrary integer coefficient which you can
modify to increase/decrease the amount of memory in the /proc/meminfo output.
Assuming that the privvmpages parameter for Container 101 is set to 10000, your output
may look as follows:
# vzctl exec 101 cat /proc/meminfo
MemTotal:
120000 kB
MemFree:
78248 kB
LowTotal:
120000 kB
LowFree:
78248 kB
Buffers:
0 kB
Cached:
0 kB
SwapCached:
0 kB
HighTotal:
0 kB
HighFree:
0 kB
...
As can be seen from the example above, the displayed records comply with the same rules
as the records in the 'virtualized in pages' mode.
Advanced Tasks
332
To revert the output of /proc/meminfo to the default mode, execute the following
command on the Node:
# vzctl set 101 --meminfo none --save
Note: If the value specified after the --meminfo option exceeds the total amount of memory
available on the Hardware Node, the cat /proc/meminfo command executed inside a
Container will display the information about the total physical memory on the Node.
The --save flag in the commands above saves all the parameters to the Container
configuration file. If you do not want the applied changes to persist, you can omit the --save
option and the applied changes will be valid only till the Container shutdown.
Creating Local Repository Mirror for
vzup2date
The vzup2date-mirror utility allows you to create local mirrors of the Parallels Virtuozzo
official repository storing the latest versions of the Virtuozzo Containers software (i.e. newest
versions of the Virtuozzo core and utilities) and used by vzup2date to keep your current
Parallels Virtuozzo Containers installation up-to-date. You can also use this utility to make local
mirrors of updated standard and EZ OS and application templates.
When executed, vzup2date-mirror completes a number of tasks (connects to the
Virtuozzo official repository, downloads the specified Virtuozzo Containers software updates or
updated templates to the server where your mirror is located, etc.) resulting in building a local
mirror of the Virtuozzo official repository. The created mirror can then be used to update all
your Hardware Nodes from one and the same location on your local network. Building your
own local repository mirrors results in less Internet bandwidth consumption and more rapid
software updates deployments to your Nodes.
The following subsections provide information on how you can create your own local mirrors of
the Parallels Virtuozzo official repository using the vzup2date-mirror utility.
Advanced Tasks
333
Virtuozzo Repository Structure
Before starting to create your own local mirror, it is important to you to have a clear idea of the
structure of the Parallels Virtuozzo official repository. This knowledge will be of service to you
later on while running vzup2date-mirror and specifying the part of the Virtuozzo
repository for which you wish to create a mirror (i.e. while deciding on what Virtuozzo
Containers update release or what Virtuozzo templates are to be downloaded).
The official Virtuozzo repository is organized as a directory tree at the top of which the
/virtuozzo directory (the root of the tree) is located. The further repository structure may be
described as follows:
Beneath the root is the directory containing the information about the operating system the
packages of which are stored in the Parallels Virtuozzo repository. In our case, it is Linux;
so, the full name of the directory is /virtuozzo/linux. Please note that you are not
allowed to access the root of this directory.
The next underlying directory represents the microprocessor architecture for which the
packages stored in the Parallels Virtuozzo repository are meant. Currently, you can make
use of the following directories:
i386: this directory is meant for Virtuozzo RPM packages and templates to be used on
32-bit platforms;
x86_64: this directory is meant for Virtuozzo RPM packages and templates to be used
on x86-64-bit platforms (e.g. on servers with the AMD Opteron and Intel Pentium D
processors installed);
ia64: this directory is meant for Virtuozzo RPM packages and templates to be used on
IA-64-bit platforms (i.e. on servers with the Itanium 2 processor installed).
Each of the aforementioned directories contains a number of files holding the information
on all update releases for the corresponding architecture (e.g. index.xml) and on
particular update releases (e.g. index_4.0.0.xml or update_ids.4.0.0).
The next underlying directories are the following:
The eztemplates directory containing a set of OS and application EZ templates for
the corresponding microprocessor architecture. This directory contains two files index.xml and update_ids - holding the information on all available EZ template
updates.
The templates subdirectory containing a set of OS and application standard
templates for the corresponding microprocessor architecture. This directory contains two
files - index.xml and update_ids - holding the information on all available
standard template updates.
A directory representing the major Virtuozzo Containers release version for the
corresponding
microprocessor
architecture
(e.g.
/virtuozzo/linux/i386/4.0.0 for the Virtuozzo Containers 4.0 release). This
directory contains the index.xml and update_ids files holding the information on
all available updates for the given release, a number of additional xml files and
subdirectories described below.
A number of subdirectories containing updated packages for particular Parallels Virtuozzo
components (e.g. /virtuozzo/linux/i386/4.0.0/TU-4.0.0-3 keeping updates
for your current Virtuozzo utilities).
Advanced Tasks
334
Creating Local Mirror
The process of creating your local repository mirror which will be locally available to your
Hardware Nodes includes the following main stages:
1
Installing the apache application on the server where your local mirror will be kept, if it is
not yet installed. Currently, you can create HTTP-based mirrors only; so, apache is needed
to make your server function as a web server.
Note: We recommend that you always store your mirrors inside individual Containers or on
dedicated servers not to compromise the Hardware Node security.
2 Installing the vzup2date-mirror RPM package shipped with the Virtuozzo Containers
4.0 distribution using the rpm -i command.
3 Configuring the vzup2date-mirror configuration file that will be used by this utility on
the step of connecting to the Parallels Virtuozzo official repository and deciding what
updates to download to your local mirror.
4 Running the vzup2date-mirror utility on the server where you are going to set up the
mirror. This will create a special directory on this server and download all the required
packages from the Parallels Virtuozzo official repository to this directory.
5 Telling the vzup2date utility to use the local mirror for updating your Virtuozzo
Containers software instead of connecting to the Parallels Virtuozzo official repository. To
this effect, you should replace the value of the Server parameter in the
/etc/sysconfig/vzup2date/vzup2date.conf file on each Hardware Node
where the vzup2date utility is to be run with the path to your local mirror.
Let us clear up the aforementioned statements by following the example below. In this example
we presume the following:
You wish to create a local repository mirror that will store system files for the 32-bit version
of the Virtuozzo Containers 4.0 release and use it to update all Hardware Nodes in your
local network.
Your mirror will be located in the /var/www/html directory inside Container 101.
Container 101 is started and has the IP address of 192.168.0.101 assigned to it (i.e. it
can be accessed from your local network using this IP address).
Note: You can also assign a public IP address to the Container and make it accessible from
your Hardware Nodes on other networks.
Advanced Tasks
335
The apache web server is running inside Container 101 and the default document root for
apache is /var/www/html.
To create a local mirror and make it available to your Hardware Nodes, you should perform the
following operations:
1
Log in to Container 101 (e.g. via SSH) and install the vzup2date-mirror package
there. For example:
# rpm -ihv vzup2date-mirror-4.0.0-17.swsoft.noarch.rpm
Note: You may need to additionally install a number of Perl packagesto satisfy the
vzup2date-mirror dependencies. For example, if you are creating a local mirror in a
Container based on the sles-9-x86_64 or sles-10-x86_64 EZ OS template, you
have to install the perl-Crypt-SSLeay package before installing the vzup2datemirror package inside this Container.
2 Edit the vzup2date-mirror.conf file. It is located in the /etc/vzup2datemirror directory inside Container 101. This file is used by the vzup2date-mirror
utility to:
retrieve the path and the credentials to access the Parallels Virtuozzo official repository
define what packages are to be downloaded to your local mirror
define the place where the mirror is to be located.
You can edit this file according to your needs or leave the default settings. For example,
your vzup2date-mirror.conf file may look like the following:
Server=http://vzup2date.swsoft.com
User=user1
Password=sample
HTTP_PROXY=http://192.168.1.20
HTTP_PROXY_PASSWORD=wer26sd2
HTTP_PROXY_USER=Peter
LocalRepositoryRoot=/var/www/html
Releases=i386/4.0.0
MirrorName=MyMirror
HTTPD_CONFIG_FILE=/etc/httpd/conf/httpd.conf
The aforementioned parameters define the behaviour of the vzup2date-mirror utility
during the local mirror creation as follows:
The Server, User and Password parameters are used by the utility when
connecting to the Parallels Virtuozzo official repository. As a rule, these parameters are
set automatically and do not need to be modified.
The HTTP_PROXY group of parameters should be used if you are connecting to the
Internet via a proxy server.
The LocalRepositoryRoot and MirrorName parameters define the mirror
location and name, respectively.
The Releases parameter determines the list of updates to be downloaded to the local
mirror from the Parallels Virtuozzo repository. For more information on how to
configure this parameter, please see the Choosing Updates for Downloading section (p.
337).
The HTTPD_CONFIG_FILE parameter defines the functioning of your local mirror as
an HTTP-based server providing the path to the httpd configuration file. By default,
this parameter is set to /etc/httpd/conf/httpd.conf. If you have not changed
the default httpd.conf file location, you do not need to modify this parameter.
Advanced Tasks
336
Note: Detailed information on all the parameters that can be set in the vzup2datemirror configuration file is provided in the Parallels Virtuozzo Containers Reference Guide.
3 Create a local mirror inside Container 101:
# vzup2date-mirror
During the command execution, vzup2date-mirror will perform the following
operations in accordance with the parameters set in the vzup2date-mirror.conf file:
Connect to the Parallels Virtuozzo official repository using the specified URL,
credentials, and proxy server settings.
Create the /var/www/html/virtuozzo/linux/i386/4.0.0 directory inside
Container 101 according to the values of the LocalRepositoryRoot and
Releases parameters and copy all the packages contained in the subdirectories of the
/virtuozzo/linux/i386/4.0.0 directory of the Parallels Virtuozzo official
repository to the /var/www/html/virtuozzo/linux/i386/4.0.0 directory
inside Container 101.
Create a number of files in the /var/www/html/virtuozzo/linux/i386
directory (e.g. index.xml and index_4.0.0.xml) containing the information on
all major system update releases available for the i386 architecture and on all minor
update releases included in the Virtuozzo Containers 4.0 release.
Note: To create a local mirror storing the latest versions of Virtuozzo standard and EZ
templates, you should configure the vzup2date-mirror.conf file and specify the -t
or -z option when running the vzup2date-mirror utility, respectively. Please see the
Choosing Updates for Downloading section (p. 337) and the Parallels Virtuozzo Containers
Reference Guide for details.
4 Set
the
value
of
the
Server
parameter
in
the
/etc/sysconfig/vzup2date/vzup2date.conf file on each Hardware Node
where the vzup2date utility is to be run to http://192.168.0.101.
From now on, the vzup2date utility will use the created local repository mirror to update all
Hardware Nodes in your local network.
At any time, you can run vzup2date-mirror to check if there are any updates available to
your local mirror. The second and all subsequent times you run the utility, it will download only
those packages that are currently absent from your mirrored releases or the MD5SUM check
sum of which differs from that of the packages in the mirrored releases and will put them to the
corresponding directories. As for the aforementioned example, all changed packages for the 4.0
major
release
will
be
downloaded
to
the
/var/www/html/virtuozzo/linux/i386/4.0.0 directory inside Container 101.
Advanced Tasks
337
Choosing Updates for Downloading
When executed without any options, the vzup2date-mirror utility downloads all the
available system updates for all architectures and releases to your local mirror. If you wish to
download all available EZ or standard templates updates, you should additionally pass the -z or
-t option to vzup2date-mirror, respectively. You can also make the utility download
particular system and templates updates only. This can be done by editing the Releases
parameter in the vzup2date-mirror.conf file. Let us assume that you wish to get the
following updates from the Parallels Virtuozzo official repository:
all system updates for the 32-bit version of Virtuozzo Containers 4.0;
all updates for the centos-4 and fedora-core-8 EZ templates intended for use on the
64-bit version of Virtuozzo Containers for x86-64-bit processors;
all updates for the centos4 standard template intended for use on the 32-bit version of
Virtuozzo Containers.
To make the vzup2date-mirror utility download only the aforementioned updates to your
local mirror, you should first create three separate configuration files for vzup2datemirror - one file per each update type (system, EZ template, and standard template). The
necessity of creating three separate files is caused by the fact that the format of the Releases
parameter for system, EZ templates, and standard templates updates is different:
For system updates, the Releases parameter should be set in the
arch/Virtuozzo_release format where arch and Virtuozzo_release denote
the microprocessor architecture and the major Virtuozzo Containers release version,
respectively, for which the updates are to be downloaded (e.g. x86_64/4.0.0).
For EZ templates updates, the Releases parameter should be set in the
arch/EZ_template_name format where arch and EZ_template_name denote the
microprocessor architecture and the name of the EZ template, respectively, for which the
updates are to be downloaded (e.g. x86_64/fedora-core-8).
For standard template updates, the Releases parameter should be set in the
arch/standard_template_name
format
where
arch
and
standard_template_name denote the microprocessor architecture and the name of the
standard template, respectively, for which the updates are to be downloaded (e.g.
i386/centos4).
The easiest way to make three configuration files is to use the default /etc/vzup2datemirror/vzup2date-mirror.conf file for system updates and create two copies of this
file for EZ and standard templates updates. Let us name these files vzup2date-mirrorz.conf (this file will be responsible for handling EZ templates updates) and vzup2datemirror-t.conf (this file will be responsible for handling standard templates updates) and
put them to the /etc/vzup2date-mirror directory.
After creating three separate configuration files, you should configure the Releases
parameter in each file to tell the vzup2date-mirror utility to download certain system and
templates updates only:
Configure the Releases parameter in the vzup2date-mirror.conf file by setting
its value to i386/4.0.0:
# vi /etc/vzup2date-mirror/vzup2date-mirror.conf
Releases=i386/4.0.0
Advanced Tasks
338
Configure the Releases parameter in the vzup2date-mirror-z.conf file by
setting its value to x86_64/centos-4, x86_64/fedora-core-8:
# vi /etc/vzup2date-mirror/vzup2date-mirror-z.conf
Releases=x86_64/centos-4, x86_64/fedora-core-8
Configure the Releases parameter in the vzup2date-mirror-z.conf file by
setting its value to i386/centos4:
# vi /etc/vzup2date-mirror/vzup2date-mirror-t.conf
Releases=i386/centos4
Now you can start downloading the specified updates. To this effect, run the following
commands on the server where your local mirror resides:
To download all system updates for the 32-bit version of Parallels Virtuozzo 4.0:
# vzup2date-mirror
To download all updates for the centos-4 and fedora-core-8 EZ templates intended
for use on the 64-bit version of Parallels Virtuozzo for x86-64-bit processors:
# vzup2date-mirror -z -c /etc/vzup2date-mirror/vzup2date-mirror-z.conf
To download all updates for the centos4 standard template intended for use on the 32-bit
version of Parallels Virtuozzo 4.0:
# vzup2date-mirror -t -c /etc/vzup2date-mirror/vzup2date-mirror-t.conf
The -c option in the last two commands tells the vzup2date-mirror utility to use the
necessary parameters from the specified configuration files instead of the default one.
Configuring Updates Approval Policy
The vzup2date-mirror updates approval mechanism enables you to define the updates
approval policy for deploying Virtuozzo Containers system updates to the Hardware Nodes in
your local network. By default, all updates downloaded to your local mirror are automatically
approved for installation on your Nodes. However, you can change the default policy and
postpone the updates distribution to your Nodes until these updates are thoroughly tested by
your IT department against the compatibility with your working environments. Let us assume
the following:
All Hardware Nodes in your local network are running the x86-64-bit version of Windows
Server 2003 and have the following software installed:
the 4.0 version of Parallels Virtuozzo Containers;
the 2.6.9-023stab041.3 version of the Virtuozzo kernel;
the 4.0.0-200 version of the Virtuozzo tools and command-line utilities.
Advanced Tasks
339
All Hardware Nodes are configured to get system and templates updates from a mirror in
your local network.
You wish to forbid your Hardware Nodes to obtain Virtuozzo kernel, tools, and commandline utilities updates higher than the versions currently installed on them from your local
mirror (e.g. until they are checked on your test server).
To make major versions of the Virtuozzo Containers software higher than 4.0, Virtuozzo
kernel updates higher than version 2.6.9-023stab041.3, and Virtuozzo tools and utilities
updates higher than version 4.0.0-200 invisible for the vzup2date utility that you will
launch on the Hardware Nodes configured to get updates from your local mirror, you should add
the following section to the vzup2date-mirror configuration file:
<ApproveSystemUpdate x86_64/4.0.0>
MU=no
CU=2.6.9-023stab041.3
TU=4.0.0-200
</ApproveSystemUpdate>
This section is opened with the <ApproveSystemUpdate x86_64/4.0.0> tag denoting
the system architecture (x86_64) and the Virtuozzo Containers release (4.0.0) the specified
policy will be applied to. If you wish to set the updates approval policy for all architectures at
once, you should specify all instead of x86_64. The value of the MU parameter set to no
signifies that no major updates are allowed for downloading to your Nodes. The CU and TU
parameters denote the maximal versions of the Virtuozzo kernel and Virtuozzo tools and
utilities that can be downloaded by the vzup2date utility to your Hardware Nodes.
Note: Detailed information on all parameters that can be specified in the vzup2datemirrow configuration file, including ApproveSystemUpdate, is provided in the
vzup2date-mirror Configuration File section of the Parallels Virtuozzo Containers Reference Guide.
Now let us assume that you have downloaded the 2.6.9-023stab041.4 version of the
Virtuozzo kernel and the 4.0.0-201 version of the Virtuozzo tools and utilities to your local
mirror, have tested them on your test server, and wish to make these updates available to the
Hardware Nodes in your network. To this effect, you should configure the
ApproveSystemUpdate section in the vzup2date-mirror configuration file as
follows:
<ApproveSystemUpdate x86_64/4.0.0>
MU=no
CU=2.6.9-023stab041.4
TU=4.0.0-201
</ApproveSystemUpdate>
Loading iptables Modules
The given section provides information on how you can manage iptables modules on the
Hardware Node and inside particular Containers.
Advanced Tasks
340
Loading iptables Modules to Hardware Node
You can configure a list of iptables modules that will be loaded on the Hardware Node after
its startup as follows:
By using standard means of your Host operating system:
On RHEL-based Nodes, by editing the /etc/sysconfig/iptables-config file
with your favorite text editor (e.g. vi) and configuring the value of the
IPTABLES_MODULES parameter in this file.
On SUSE-based Nodes, by editing the /etc/sysconfig/SuSEfirewall2 file
(e.g. by means of the YaST2 configuration tool).
For example, if your Hardware Node is running Red Hat Linux Enterprise 5, you can make
the ip_conntrack_netbios_ns, ip_conntrack, and ip_conntrack_ftp
modules load on the Node startup by modifying the IPTABLES_MODULES parameter in
the /etc/sysconfig/iptables-config file as follows:
IPTABLES_MODULES="ip_conntrack_netbios_ns ip_conntrack ip_conntrack_ftp"
By editing the /etc/vz/vz.conf file on the Hardware Node. The IPTABLES
parameter in this file determines the iptables modules that will additionally be loaded to
the Node during the Virtuozzo service startup. For example, you can indicate the following
iptables modules as the value of this parameter to have them automatically loaded to
your Hardware Node after the Virtuozzo service startup:
IPTABLES="ipt_REJECT ipt_tos ipt_limit ipt_multiport iptable_filter
iptable_mangle ipt_TCPMSS
ipt_tcpmss ipt_ttl ipt_length"
All the specified modules will be loaded on the Node startup after you reboot the Hardware
Node.
Advanced Tasks
341
Loading iptables Modules to Particular Containers
The list of iptables modules that are loaded to a Container by default is determined by the
iptables modules loaded on the Hardware Node at the moment of the Container startup. For
example, if your Hardware Node has the ipt_REJECT, ipt_tos, ipt_limit,
ipt_multiport, and iptable_filter modules loaded, any Containers on this Node will
also have these iptables modules loaded after their startup.
However, Parallels Virtuozzo Containers allows you to prevent certain modules from being
loaded inside a Container on its startup, even if they are loaded on the Node itself. The full list
of such iptables modules is listed below:
ip_table;
ip6_table;
iptable_filter;
ip6table_filter;
iptable_mangle;
ip6table_mangle;
ip_conntrack;
ip_conntrack_ftp;
ip_conntrack_irc;
iptable_nat;
ip_nat_ftp;
ip_nat_irc.
To forbid the usage of any of the aforementioned iptables modules inside a Container, you
should explicitly indicate the names of the modules you wish to be loaded to the Container as
the value of the IPTABLES parameter in the Container configuration file
(/etc/vz/conf/<CT_ID>.conf) or by using the vzctl command. For example:
# vzctl set 101 --iptables ip_table --iptables iptable_filter --iptables
ip_conntrack --iptables iptable_nat --iptables iptable_mangle --save
This command will tell Virtuozzo Containers 4.0 to:
load the ip_table, iptable_filter, ip_conntrack, iptable_nat, and
iptable_mangle modules to Container 101 if they are loaded on the Hardware Node
during the Container startup;
forbid the usage of all the other iptables modules listed above (i.e. ip6_table,
ip6table_filter,
ip6table_mangle,
ip_conntrack_ftp,
ip_conntrack_irc, ip_nat_ftp, ip_nat_irc) inside Container 101 even if they
are loaded on the Hardware Node during the Container startup.
This information will also be saved in the Container configuration file thanks to the --save
option.
Loading a new set of iptables modules does not happen on the fly. You should restart the
Container for the changes to take effect.
Advanced Tasks
342
Sharing File System Among
Containers
This section provides a simple example of what can be done with the help of Container action
scripts. You need a basic BASH shell language knowledge to understand the examples.
Remember that when you source configuration files in your action script, you have two
environment variables that show the path to Container file areas: $VE_ROOT and
$VE_PRIVATE. You need to use $VE_ROOT since the VZFS file system does not follow
mount points in the Container private area. In other words, if you mount a directory to the
Container private area, the users inside the Container will not see this mount and you should use
$VE_ROOT in your scripts.
This example shows how to create a configuration when two environments can share files and
the necessary setup is automatically created at Containers startup. Let us assume that both
environments want to have their user home directories in sync. For the sake of simplicity, let
Container 102 (called test2) hold actual user directories and Container 101 (called test1)
use them as well.
In this case, Container 102 does not need any action scripts. All the necessary setup is done by
the mount script of Container 101. It can look like the following:
#!/bin/bash
#
# 101.mount - script to mount home dir of Container 102
# if one of these files does not exist then something is
# really broken
[ -f /etc/sysconfig/vz ] || exit 1
[ -f $VE_CONFFILE ] || exit 1
[ -f /etc/sysconfig/vz-scripts/$veid.conf ] || exit 1
# source these files. Note the order, it is important
. /etc/sysconfig/vz
. $VE_CONFFILE
# If home dirs are not mounted we exit with error
mount --bind /vz/root/102/home $VE_ROOT/home
exit $?
This script is intentionally simplified to focus on the main idea of mounting one Container
directories inside another. However, it can be developed further by adding checkups for the
Container 102 mount status (it is possible to call vzctl from the mount script, but do not call
vzctl with the same Container ID as the Container the mount script is being executed for). It
can source the Container 102 configuration file to determine correctly the VE_ROOT directory
of Container 102.
In order to be able to stop Container 101, you have to create the umount script dismounting
$VE_ROOT/home:
#!/bin/bash
#
# 101.umount – a script to umount home directory of Container 102
Advanced Tasks
#
#
[
[
343
If one of these files does not exist then something is
really broken
-f /etc/sysconfig/vz ] || exit 1
-f $VE_CONFFILE ] || exit 1
# Source configuration files to access $VE_ROOT
. /etc/sysconfig/vz
. $VE_CONFFILE
# Dismount shared directory
umount $VE_ROOT/home
After starting Container 102 and 101, Containers will have a common /home directory.
It is possible to use the same technique for mounting the Hardware Node file system sub tree
into a Container, to mount a block device into a Container (for example, a hard drive partition or
a CD-ROM), and so on.
Creating Configuration File for New
Linux Distribution
Distribution configuration files are used to distinguish among Containers running different
Linux versions and to determine what scripts should be executed when performing the relevant
Container-related operations (e.g. assigning a new IP address to the Container). Detailed
information on distributions configurations files is provided in the Linux Distribution
Configuration Files subsection of the Parallels Virtuozzo Containers Reference Guide.
All Linux distributions shipped with Parallels Virtuozzo Containers have their own
configuration files located in the /etc/vz/conf/dists directory on the Hardware Node.
However, you may wish to create your own distribution configuration files to support new
Linux versions released. Let us assume that you wish your Container(s) to run the CentOS 5
Linux distribution and, therefore, have to make the centos-5.conf distribution
configuration file to define what scripts are to be executed while performing major tasks with
Containers running this Linux version. To this effect, you should do the following:
1
In the Container configuration file (with the name of /etc/vz/conf/CT_ID.conf),
specify centos-5 as the value of the DISTRIBUTION variable (for example,
DISTRIBUTION="centos-5").
2 Create the centos-5.conf configuration file in the /etc/vz/conf/dists directory.
The easiest way to do it is copy one of the existing configuration files by executing the
following command in the /etc/vz/conf/dists directory:
# cp fedora.conf centos-5.config
In the example above, we assume that the fedora.conf file is present in the
/etc/vz/conf/dists directory on the Hardware Node. In case it is not, you may use
any other distribution configuration file available on your Node.
Advanced Tasks
344
3 Open the centos.conf file for editing with the help of any text editor:
# vi centos-5.conf
4 In the centos-5.conf file, go to the first entry and, in the right part of the entry, specify
the name of the script you wish to be run on issuing the vzctl command with the
parameter specified in the left part of the entry. For example, if you wish the script to be
executed while assigning a new IP address to your Container and the script has the
my_centos_script name, your entry should look as follows:
ADD_IP=my_centos_script-add_ip.sh
Note: The information on all acceptable parameters and their description are provided in the
Linux Distribution Configuration Files subsection of the Parallels Virtuozzo Containers
Reference Guide.
5 Repeat Step 4 for all entries in the file.
6 Place
the
scripts
for
the
new
Linux
distribution
to
the
/etc/vz/conf/dists/scripts directory on the Node. Make sure the names of these
scripts coincide with those specified in the centos-5.conf file.
Rebooting Container
When you issue the reboot command at your Linux box console, the command makes the
reboot system call with argument ‘restart’, which is passed to the server BIOS. The Linux
kernel then reboots the server. For obvious reasons this system call is blocked inside Containers:
no Container can access BIOS directly; otherwise, a reboot inside a Container would reboot the
whole Hardware Node. That is why the reboot command inside a Container actually works in
a different way. On executing the reboot command inside a Container, the Container is
stopped and then started by Parallels Agent, which handles this situation.
If you want a Container to be unable to initiate reboot itself, add the ALLOWREBOOT=”no”
line to the Container configuration file (/etc/vz/conf/CT_ID.conf). If you want to have
Container reboot disabled by default and want to specify explicitly which Containers are
allowed to reboot, add the ALLOWREBOOT=”no” line to the Virtuozzo global configuration
file (/etc/vz/vz.conf) and explicitly specify ALLOWREBOOT=”yes” in the
corresponding Container configuration files.
If the Parallels Agent software is not running on your Hardware Node for this or that reason, an
auxiliary way to allow Containers to reboot themselves is to uncomment the following line in
the /etc/cron.d/vereboot file:
# vi /etc/cron.d/vereboot
[beginning of file]
#* * * * * root /etc/vz/conf/vereboot
You can use any editor of your choice instead of the vi command. Remove the hash mark on
the last line to read:
* * * * * root /etc/vz/conf/vereboot
Now you can issue the reboot command in a Container, and the latter will be started on the
next vereboot run.
Advanced Tasks
345
Managing Graphical Applications
Inside Container
The given section provides information on how you can run X applications inside your
Containers located somewhere on a TCP/IP network and display them on your local server,
exploit window managers to customize the appearance of running X applications, and use the
vnc desktop software to remotely launch graphical applications.
Running Graphical Applications in X Windows
Overview
You may wish to run X applications (X clients) such as xclock, xmms, etc. inside your
Containers on a TCP/IP network and display the resulting output on your local server. This can
be done with the help of the X Window System. The X Window System is based on the
client/server model where an X server is the program responsible for controlling the display of
the server on which you are working and an X client denotes an application program that
communicates with the server, sending it various requests, such as "draw a line" or "pay
attention to keyboard input".
To run X applications inside your Container located on a TCP/IP network and to display them
on your local server, you should take care of the following:
Install and configure a special software called an X server on the server where you wish X
clients to be displayed.
Note: In the following subsections, we assume that you have successfully installed and
configured an X server on your local server. In case you have not, please download the X
server software packages (e.g. from http://www.xfree86.org) and install them by following
the instructions shipped with this software.
Advanced Tasks
346
Configure X clients (X applications) to direct their output to your local server where the X
server is running.
You may also wish to specify a window manager of your choice to be used for displaying
your X clients.
A central concept of the X Window System is the display, an abstraction for the screen managed
by an X server. When an X client is invoked, it needs to know which display to use. Displays
are named by strings in the form of hostname:displaynumber.screennumber and
should be set as the DISPLAY environment variable on the server where X clients are to be run
(in our case inside the corresponding Container):
hostname specifies the hostname or the IP address of the machine to which the display is
physically connected, i.e. the server where the X server is running (e.g.
198.112.45.11:0.0). An omitted hostname (e.g. DISPLAY=:0.0) would mean the
local host.
displaynumber is usually used to refer to a collection of monitors that share a common
keyboard and pointer (mouse, tablet, etc.). Most workstations tend to have only one
keyboard and pointer, and therefore, only one display. In case a workstation has several
displays (i.e. several keyboards or pointer sets), each display on this server is assigned a
display number (beginning at 0) when the X server for that display is started. The display
number must always be given in a display name.
screennumber. Some displays share a single keyboard and pointer among two or more
monitors. Since each monitor has its own set of windows, it is assigned a screen number
(beginning at 0) when the X server for that display is started. If the screen number is not
given, screen 0 will be used.
For example, if your local server is known to the outside world as my_local_computer and
located in the my-domain.org domain and you are running a normal X server on this server,
the value of the DISPLAY variable in the Container environment where you wish to remotely
run X clients should be set to my_local_computer.my-domain.org:0.0.
Advanced Tasks
347
Using X Windows to Run Graphical Applications
The X Window System lets you start any X application inside any Container on a TCP/IP
network and have it show up on your local server where an X server is installed. To run remote
X applications, you should first of all tell the X applications running inside your Container to
direct their output to the display of your local server. You can do it by specifying the DISPLAY
environment variable inside the Container. For example, to run the xfig drawing program
inside your Container and display its output on your local server with the IP address of
199.199.199.199, you should issue the following commands inside the Container:
# DISPLAY=199.199.199.199:0
# export DISPLAY
# xfig &
Along with setting the DISPLAY environment variable inside your Container, you should also
open permissions to your X server so that X applications are allowed to use your local display.
You can do it in one of the following ways:
By using the host list mechanism (xhost). In this case the X server maintains a list of hosts
which are allowed to connect to it.
By using the magic cookie mechanism (xauth). In this case the X server allows access
from any host having an authorization record (a magic cookie) stored inside the server.
By forwarding X connections via ssh.
You can choose any of these ways to remotely run your X applications. However, by using the
xhost and xauth mechanisms, authority records needed to establish a connection between an
X server and X application are transmitted over the network with no encryption, whereas using
ssh enables you to run X applications over encrypted connections. So, if you are worried that
someone might snoop on your connections, you can use the X forwarding mechanism, as is
shown in the example below.
Let us assume that you wish to run the xclock application inside Container 101 and display its
output on your local server with the name of my_local_computer.my-domain.org. To
this effect, you should perform the following operations:
Note: Before running X applications inside a Container on a public network, check that this
Container is accessible from your local server where the X server is to be run.
1
On the local server, execute the startx command:
# /usr/X11R6/bin/startx
This starts an X server with a basic terminal window (the default xterm application) on
your server.
Advanced Tasks
348
2 Once xterm is open, you should establish an ssh connection to a Container where you
wish to run the xclock application:
# ssh CT_IP_Address
where CT_IP_Address denotes the IP address or hostname of the Container where your
X client is to be run. As has been mentioned above, an ssh connection is used to provide
security and stronger authentication for an X protocol connection between the X server and
the X client by tunneling the X protocol, which is called X forwarding. Moreover, X
forwarding automatically sets the DISPLAY variable inside the Container to point to your
local server and directs the output of X clients running inside the Container to the X server
on the local server. X forwarding is enabled in ssh1 and ssh2 by default; however, you
may additionally use the -X option to enable X forwarding in case you are not sure that it is
on.
3 After executing the command, you will be prompted for the password to log in to the
Container. Provide the root user name and their password to log in to the Container and
press Enter.
4 Now that you have successfully logged in to the Container, execute the echo $DISPLAY
command to check the value of the DISPLAY variable in your Container environment. It
should read: my_remote_computer.swsoft.com:10.0. As distinct from the
xhost and xauth mechanisms where the display number in the DISPLAY variable
reflects a real number of displays connected to a server (beginning at 0), ssh always uses
the 10th display number - a special X display created by ssh itself - to pass X protocol
information to your local server.
If you do not see any value when typing this command or the value is incorrect, set the
DISPLAY variable in your Container environment as follows:
# DISPLAY=my_remote_computer.swsoft.com:10.0
# export DISPLAY
5 Launch the xclock application displaying the current time in an analog form by issuing
the following command:
# xclock
If a clock is shown on the screen of your remote server, you have successfully run the
xclock application.
Note: While running the commands in our example, we assume that you work in the bash
shell. While working in other Linux shells, you may need to use different commands to start
your X server or to set the DISPLAY variable on your local server.
Advanced Tasks
349
Defining Window Manager to Run X Applications
The layout of windows on the screen in the X Window system is controlled by special programs
called window managers. Window managers (like twm, wmaker, fvwm2, etc.) are programs
that sit between an X server and normal X clients and control the way the running X clients are
positioned, resized, or moved on your screen. Although a window manager decides to a great
extent how X clients look and feel, it does not affect what client applications do within the
window defined by this window manager.
The main operations that can be performed by means of window managers are the following:
Start and terminate X clients;
Move, resize, and rearrange the "vertical" stacking of windows;
Refresh the screen(s);
Determine which window is to receive input from your keyboard or mouse;
Create and customize pop-up menus to complete any of the aforementioned tasks, etc.
You can change the default window manager used to control the appearance of your X clients
by
editing
the
Xclients
and
xinitrc
scripts
located
in
the
/usr/X11R6/lib/X11/xinit/ directory either inside your Container or on your local
server. However, you can launch only one window manager at any time. So, if you are already
running a local window manager, you cannot start the remote one (i.e. it will complain and exit).
Let us assume that you wish to run several X applications (xterm, oclock, emacs) inside
your Container and to use the remote fvwm2 window manager to manage their output on the
screen. To this effect, you can edit the /usr/X11R6/lib/X11/xinit/Xclients script
inside your Container in the following way:
Note: We assume that you have successfully installed the fvwm2 window manager inside your
Container. In case you have not, please download the needed software packages (e.g. from
http://www.fvwm.org) and install them by following the instructions shipped with this software.
1
Log in to your Container and open the /usr/X11R6/lib/X11/xinit/Xclients file
for editing:
vi /usr/X11R6/lib/X11/xinit/Xclients
This file is just a shell script containing commands that you wish to run when your X
session starts (e.g. xterm, xclock).
2 Remove the existing text in the file and add the following strings to it:
Note: We recommend that you make a copy of the Xclients file in case something goes
wrong.
#!/bin/sh
oclock -geometry 75x75-1-1 &
xterm -C -geometry 80x12+0+0 &
emacs &
fvwm2
The clients will be launched in the order in which they are listed in the file; the last line
should specify the window manager where the started X clients will run.
Advanced Tasks
350
3 Save the file.
In our example, the Xclients file starts three applications - xterm, oclock, and emacs and the fvwm2 window manager where these application are to be run. The -geometry
options used in the example specify the size and shape of the window. 80x12+0+0 means a
window that is 80 characters wide and 12 lines high, positioned at the upper left. The + and numbers give the location of the window. The first number gives the X coordinate and the
second one gives the Y coordinate. The + numbers start from the upper left of the screen; the numbers start from the lower right of the screen. So, +0+0 means to put the xterm application
at the upper left corner. Numbers greater than 0 are used to put things in the middle of the
screen as in case with the oclock window (a round clock) in our example.
Running Graphical Applications via VNC
You may also wish to use VNC (Virtual Network Computing) to remotely run graphical
applications inside your Container and display them on your local server. The main features of
VNC are the following:
The server and the client may be on different computer and on different types of computers.
The protocol which connects the server and the viewer is simple, open, and platform
independent.
No state is stored at the viewer. Breaking the viewer's connection to the server and then
reconnecting will not result in any loss of data. Because the connection can be remade from
somewhere else, you have easy mobility.
The VNC protocol is designed to adapt to the amount of bandwidth available which makes
it ideal for thin client deployments.
To start using VNC, you should perform the following operations:
Install a virtual X server - vnc - inside your Container. The vnc servers are not associated
with a physical display, but provide a "fake" one X clients (xterm, mozilla, etc.) can
attach to.
Install a vnc client - vncviewer - on your local server to connect to the vnc server from
anywhere on the network.
Connect to the vnc server with the vnc viewer.
Let us run the xclock application inside Container 101 with the hostname of
Container101.com located on a TCP/IP network and display it on your local server by
using VNC.To this effect, you should do the following:
Note: We assume that you have successfully installed a vnc server inside your Container and a
vnc client on your local server. If you have not, please download the needed software packages
(e.g. from http://www.realvnc.com) and install them by following the instructions shipped with
this software or available on the web site.
1
Log in to Container 101 and start your vnc server by issuing the following command:
# vncserver
If you have never run a vnc server before, you will be prompted for a password, which you
will need to use when connecting to this server. All the vnc servers on your remote server
will use the same password; you can change it at a later time by using the vncpasswd
command. Type the password you consider suitable and press Enter.
Advanced Tasks
351
2 Execute the echo $DISPLAY command to check what display number will be used by the
vnc server to run graphical applications. As you have learnt in the previous subsections, the
main X display of a workstation is usually indicated as 0 (in our case it will read :0; the
hostname is omitted because the vnc server is running inside the Container itself). When
you run a vnc server inside your Container, it will appear as :1, as if it were just an
additional display. Normally, the vnc servers will choose the first available display number
and tell you what it is. However, you can specify your own display number (for example, 2)
by typing the following:
# vncserver :2
You can also cause graphical applications to use a vnc server rather than the normal X
display by setting the DISPLAY variable in the Container environment to the vnc server
you want (in the examples below, we assume that the display number for the vnc server is
set to 2):
# export DISPLAY=CT101:2
or by starting a graphical application with the -display option:
# xterm -display CT101:2 &
3 Now you should connect the vnc viewer running on your local server to the vnc server.
You can do it by executing the following command on your local server:
# vncviewer CT101.com:2
where CT101.com is the hostname of Container 101 where the vnc server is running and
1 denotes the number of the display used by the vnc server to run graphical applications.
Note: While using hostnames for connecting to a Container, make sure that your Container
has a valid DNS entry. Otherwise, you should replace its hostname with the corresponding
IP address.
You can control the way graphical applications are positioned, resized, or moved on the screen
of your local server by specifying different options for the vncserver command, as you do it
by using window managers while running X applications. For example, you can pass the geometry option to vncserver to set the size of the desktop to be created (by default, it is
1024x768). You can get a list of all options for the vncserver command by giving -h as its
option.
Advanced Tasks
352
VZFS v2
VZFS is an integral part of the virtualization technology developed by Parallels, Inc. It
translates to Virtuozzo file system and comprises such product as Parallels Virtuozzo Containers
for Linux. VZFS allows to share common files among multiple Containers (Containers) without
sacrificing flexibility. This sharing saves up to tens of megabytes of RAM and hundreds of
megabytes of disk space for each Container. On the other hand, it remains possible for
Container users to modify, update, replace, and delete shared files. When a user modifies a
shared file, VZFS creates a private copy of the file transparently for the user. Thus, the
modifications do not affect the other users of the file. As an additional advantage, VZFS does
not require having different physical partitions for different Containers or creating a special “file
system in a file” setup for a Container, which significantly simplifies disk administration.
Virtuozzo Containers 4.0 for Linux comes with a new version of VZFS - Version 2. This paper
is destined for Virtuozzo administrators who would like to know more of VZFS v2 and to
understand the upgrade path for existing Virtuozzo Containers installations.
Advantages of VZFS v2
Main benefits of VZFS v2 in relation to previous VZFS versions are the following:
The process of creating a Container takes much less time with VZFS v2.
A Container created from scratch on the basis of an OS EZ template has much fewer files if
VZFS v2 is used, because it is not necessary any more to provide each and every file from
the template area with a corresponding 'magic' link in the Container private area.
The disk space occupied by any Container based on EZ templates is greatly reduced.
Full compatibility with third-party backup tools is provided. For example, an Parallelsspecific modification of the common tar utility in order to be able to back up a Container
is no more necessary.
The process of backing up and restoring Containers has speeded up significantly.
Container backups occupy much less disk space than was the case with VZFS v2.
The migration of Containers using VZFS v2 is performed much quicker.
Advanced Tasks
353
Inside VZFS v2
By its nature, VZFS is closely related to two other Virtuozzo notions, namely, templates and
Container private areas. Templates make use of VZFS to offer themselves for sharing among
Containers, and Container private areas obtain the possibility to create links to templates instead
of regular files to save RAM and disk space. In this respect VZFS v2 has the following
specifics:
The nature of private area links to templates is altogether different in VZFS v2. These were
called 'magic' links in the previous version of VZFS and lacked many characteristics of
regular files from the point of view of the Hardware Node filesystem (though they were
seen as regular files from inside the corresponding Container). In VZFS v2 these links are
regular files even when seen from the Hardware Node context. To indicate that these files in
fact point to template files, they are named shortcuts in Virtuozzo Containers 4.0 as distinct
from 'magic' links in VZFS v1 and Virtuozzo Containers 3.0.
Whereas in the previous version of VZFS each and every file from a template had to be
represented by its own 'magic' link in a Container private area, in VZFS v2 a single shortcut
suffices for a whole directory inside a template together with all its subdirectories, files, and
symlinks. This shortcut contains all the information on the structure of a directory from the
template area. If a Container user modifies a shared file inside their Container, VZFS v2 just
creates a private copy of this file inside the Container private area. On the other hand, if a
Container user modifies the structure of a shared directory by adding, deleting, or renaming
some file(s) in it, VZFS v2 replaces the shortcut representing this directory with a number of
shortcuts each representing a single subdirectory, file, or symlink from the template area. A
single shortcut is no more sufficient because the structure of the directory inside the
Container private area has come to be different from that inside the template area.
In VZFS v2, symlinks are included in a template in the same way as regular files and
directories. In the previous version of VZFS, only regular files and directories were installed
in a template area and thus represented by their 'magic' links in Container private areas,
whereas symlinks were simply copied to the private areas. VZFS v2 extends the copy-onwrite (COW) mechanism on symlinks, as well.
EZ templates based on VZFS v2 are backwardly compatible with private areas based on
VZFS v1, though in this case VZFS v2 advantages are not available before the conversion
of the private areas to VZFS v2 is performed.
VZFS v2 is not applicable to standard Virtuozzo templates; it can be applied only to EZ
templates and to the private areas of those Containers that are based on an OS EZ template
or have application EZ templates added to them. This has been done to further promote the
usage of EZ templates in Parallels Virtuozzo Containers at the expense of outdated standard
templates. This does not mean that Virtuozzo Containers 4.0 installations are not able to
work with standard templates, as the Virtuozzo kernel provides backward compatibility with
the previous version of VZFS.
Advanced Tasks
354
Upgrading VZFS
It goes without saying that all new Virtuozzo Containers installations enjoy all the benefits of
VZFS v2 without having to worry about compatibility with the previous VZFS version. On
newly-installed systems both EZ templates and Container private areas are installed and created
on the basis of VZFS v2.
And even if you are upgrading your existing Virtuozzo system to version 4.0 (and thus, to VZFS
v2), this process remains almost wholly transparent for the administrator. Even if you do not
know anything about VZFS and its versions, the legacy Containers will continue operating as
usual on VZFS v1. For newly-created Containers to use VZFS v2 and all its advantages, it is
sufficient to issue a single vzpkg update cache command to recreate the caches of the
installed OS EZ templates. So what exactly happens to VZFS when a Virtuozzo Containers 3.0
or 3.0 SP1 system is upgraded to version 4.0?
Upgrading templates
The first thing to note is that the upgrade does not affect standard Virtuozzo templates in any
way. Both these templates and Container private areas based on these templates will continue to
operate on the previous version of VZFS, and there is nothing the Hardware Node administrator
can or should do in this respect.
As to EZ templates, they are upgraded automatically to VZFS v2, and no additional actions are
required for application templates. However, the OS EZ template caches on the basis of which
new Containers are created will still use VZFS v1. So, you need to complete the following tasks
to make all newly created Containers on the Hardware Node automatically use VZFS v2:
Make sure that the value of the VEFORMAT parameter in the Virtuozzo global configuration
file (/etc/vz/vz.conf) is set to vz4:
# grep /etc/vz/vz.conf
VEFORMAT="vz4"
Recreate the OS EZ template caches on the basis of which new Containers will be created
using the vzpkg remove cache and vzpkg create cache commands. For
example, to upgrade the cache of the fedora-core-8-x86 OS EZ template, you can run
the following commands on the Hardware Node:
# vzpkg remove cache fedora-core-8-x86
# vzpkg create cache fedora-core-8-x86
From this moment on, when a Container is created on the basis of the fedora-core-8-x86
OS EZ template, its private area will use VZFS v2. At any time you can revert to VZFS v1 by
changing the value of the VEFORMAT parameter in the Virtuozzo configuration file
(/etc/vz/vz.conf) from vz4 to vz3.
Upgrading Container private areas
Upgrading templates is almost transparent, and the only thing where a manual intervention is
possible is upgrading existing Containers to VZFS v2. Please keep in mind that this upgrading is
not at all necessary to maintain the proper of operation of these Containers. Even though the
corresponding EZ template has already been upgraded to VZFS v2, the Container can still use
VZFS v1 and be perfectly compatible with the template. The process of upgrading such
Containers can be regarded as an optimization only and as such can be planned for whatever
convenient time after the upgrade of Virtuozzo proper.
Advanced Tasks
355
When upgrading a Container to VZFS v2, first make sure that it is based on an OS EZ template.
If this is not the case, the optimization is senseless. After you have decided on the Container you
want to upgrade, you should unmount it and use the vzpkg upgrade area and vzfsutil
commands to upgrade this Container to VZFS v2. For example, to upgrade Container 101 based
on the fedora-core-8-x86 OS EZ template to VZFS v2, you should:
Make sure Container 101 is unmounted:
# vzctl status 101
VEID 101 exist unmounted down
Upgrade the fedora-core-8-x86 template area on the Hardware Node:
# vzpkg upgrade area fedora-core-8-x86
Check that the fedora-core-8-x86 template area has been successfully upgraded and
upgrade the private area of Container 101:
# vzfsutil --upgrade --ctid=101 -t /vz/template /vz/private/101
To ascertain that Container 101 now uses VZFS v2, you can use one of the following ways:
Execute the following command on the Hardware Node:
# ls -l /vz/private/CT_ID/fs/VERSION
lrwxrwxrwx ... /vz/private/122/fs/VERSION -> 005.004
The number "005.004" in the command output indicates that the Container uses VZFS v2.
VZFS v1 would be indicated by 005.003 instead.
By checking the VEFORMAT parameter in the Container configuration file:
# cat /etc/vz/conf/101.conf | grep VEFORMAT
VEFORMAT="vz4"
vz4 specified as the value of this parameter indicates that Container 101 uses VZFS v2;
otherwise, vz3 would be specified.
Advanced Tasks
356
Restrictions
When EZ templates are upgraded to VZFS v2, they remain perfectly compatible with those
Containers that are based on the previous version of VZFS. As such, upgrading EZ templates
cannot cause any trouble as regards the Hardware Node or Containers functioning.
On the other hand, the Containers based on VZFS v2 are not compatible any more with VZFS
v1. So, if you, for example, have forcibly (as Parallels Virtuozzo Containers will not allow you
to do otherwise) migrated such a Container to a Virtuozzo Containers 3.0 Hardware Node, it is
not expected to start.
Virtuozzo Containers 4.0 checks the Container configuration file to determine the VZFS version
to be present on the Hardware Node for the given Container to operate correctly. The VZFS
version is specified as the value of the VEFORMAT parameter in the Container configuration
file. If the Container private area is based on VZFS v2 (the VEFORMAT parameter is set to
vz4), it should not be migrated or cloned to a Hardware Node where Virtuozzo Containers 4.0
has not been installed. There is no way to downgrade such a Container to VZFS v1. If you
continue to have legacy Virtuozzo Nodes in your Virtuozzo Group, and you wish to maintain
the ability to migrate your Containers to such Nodes, you should not upgrade these Containers
to VZFS v2. Moreover, you can prevent the automatical applying of the VZFS v2 technology to
all newly-created Containers on Virtuozzo 4.0 Nodes. To do this, alter the value of the
VEFORMAT parameter in the Virtuozzo configuration file (/etc/vz/vz.conf) from vz4 to
vz3.
Another thing to bear in mind is the possibility of a Container private area growing in size even
a Container user has not added anything to their Container, but rather deleted a file or just
renamed it. The explanation is simple: as the structure of a shared directory has changed inside
the Container, VZFS v2 creates separate shortcuts for each file from the template area instead of
having just one file for the whole directory. Thus, deleting a file from inside a Container might
cause the Container to occupy more space on the Hardware Node. This behavior is conditioned
by the nature of VZFS v2 and is perfectly normal. However, it should be taken into account
when deciding on Container disk quotas, because the Container private area makes part of the
disk space included in the quota.
357
CHAPTER 12
Mastering Parallels Management Console
To leverage the full power of Parallels Management Console, it is important to be aware of
those tasks that are much more convenient to perform through the Management Console
interface than through the command line. The current chapter centers on the advanced
Management Console features you can make use of while administering your Virtuozzo system.
In This Chapter
Configuring Offline Management Parameters ...................................................................... 358
Viewing Summary Pages ...................................................................................................... 361
Managing Users and Groups Inside Container ..................................................................... 363
Configuring Firewall ............................................................................................................. 365
Managing Mount Points ........................................................................................................ 367
Viewing System and Virtuozzo Logs ................................................................................... 368
Managing Files Inside Container .......................................................................................... 370
Searching for Container ........................................................................................................ 372
Managing Container Search Domains .................................................................................. 373
Mastering Parallels Management Console
358
Configuring Offline Management
Parameters
The offline management functionality ensures the Container manageability by means of one or
more offline services from any browser at its own IP address. When offline management is
enabled for a Container, this Container is said to be subscribed to one or more offline services,
which means that one or more ports of its IP address are permanently active whatever the
Container state. This is needed to ensure the Container manageability in its down state.
The currently supported services are vzpp (for managing Containers by means of Parallels
Power Panel) and vzpp-plesk (for managing Containers by means of the Plesk control panel
integrated with Parallels Power Panel). You can view the names of accessible services on your
Hardware Node in Parallels Management Console by right-clicking the needed Hardware Node
name and selecting Tasks --> Manage Offline Services on the context menu:
Figure 107: Management Console - Viewing Offline Services
All offline services currently available on your Hardware Node are listed in the Offline services
configuration table in the displayed window. By default, offline management is enabled for all
Containers residing on the Node.
To disable the offline management for a Container, do the following:
1
In the left pane of the Management Console window, select the Virtuozzo Containers item
under the corresponding Hardware Node name.
Mastering Parallels Management Console
359
2 In the right pane, right-click the Container on the Container list and select Properties on the
context menu.
3 On the Network tab of the displayed window, select the Offline Management item and clear
the Enable offline management check box:
Figure 108: Management Console - Disabling Offline Management
On this screen you can also manage the offline services which will be available to the
Container. To this effect:
leave the Enable offline management check box selected;
click the name of the corresponding offline service and use the the Enable/Disable
buttons to subscribe the Container to or unsubscribe it from this service.
If you have made some changes to any of the offline services and wish to restore the system
default values, click the Apply System Defaults button at the bottom of the Properties
window.
Mastering Parallels Management Console
360
4 Click OK.
You can disable the offline management for all Containers residing on the Node at once:
1
Right-click the Hardware Node name and select Tasks --> Manage Offline Services.
2 On the Parallels Power Panel tab of the Offline Services Configuration window, clear the
Enable Parallels Power Panel and Parallels Infrastructure Manager services check box.
On the Offline Services tab, you can also manage the offline services which will be available
to all Containers on the Hardware Node:
select the corresponding offline service from the list of available services and use the
Enable/Disable buttons to enable/disable this offline service to the Containers on the
Node;
use the Add/Delete/Edit buttons to add a new offline service, to remove an existing
offline service, or to configure the properties of any offline service in the Offline services
configuration table, respectively.
If you have made some changes to any of the offline services and wish to restore the system
default values, click the Restore Defaults button.
3 Click OK.
Mastering Parallels Management Console
361
Viewing Summary Pages
You can view the summary page for every Hardware Node. Click on the name of the Hardware
Node you are interested in in the tree in the left pane of the Parallels Management Console main
window or double–click the name of the Hardware Node in the list of Nodes in the right pane.
The upper part of the information pane contains shortcuts to the most important tasks you are
likely to do. However, all the actions and operations are accessible via the Management Console
toolbar, Action menu and context menus. The bottom part of the Hardware Node summary page
includes three tabs: System, Network, and Disks. The System tab describes the OS distribution
and kernel version, CPU(s), RAM, and swap information. The Network tab describes the
Hardware Node network configuration: interfaces and IP addresses. The Disks tab describes
available disks and their utilization.
You can also view summary pages for each and every Container. To open the summary page in
the Container Manager, click on the name of the Container in the tree pane. The summary page
is similar to that in the main Management Console window:
Figure 109: Management Console - Viewing Container Summary Page
Mastering Parallels Management Console
362
It contains information about the Container ID, type of the Container, OS template, status (e. g.
'mounted', 'running'), Container class, and hostname. There is also a Network section describing
the network configuration of the Container.
The shortcuts to the most common operations are located at the bottom of the summary page, in
the Actions section.
Mastering Parallels Management Console
363
Managing Users and Groups Inside
Container
Parallels Management Console does not allow you to manage users or groups of the Host OS
not to compromise the security of the Hardware Node. However, you can manage users and
groups inside regular Containers with the help of Container Manager. All users and groups are
adjustable. You can also add new users and groups.
To manage groups or users inside a Container, open the main tree for this Container, select the
Users and Groups item, and click either the Groups or Users tab, respectively:
Figure 110: Management Console - Managing Users and Groups
To open the group properties dialog, double-click on the group name in the table of groups or
select Properties on the context menu. To add a new user to the group, click the Add button. To
remove a user from the group, select the user name and click the Remove button.
To add a new group, click the New group button on the toolbar (note that this button appears
only if you are currently working with Container groups). Then enter the group name and press
OK.
To delete a group, select its name in the table of groups and click the Delete button on the
toolbar or select the Delete item from the context menu.
To add a new user, open the list of users and click the New user button at the top toolbar. Enter
the user login (user name). This is the only mandatory parameter. You may also specify the
home directory, the login shell, set the user description and password, add the user to one or
more groups (see the Member Of tab). Then click OK.
Mastering Parallels Management Console
364
To edit an existing user, double-click on the user name in the table of users or use the Properties
item from the context menu. The user properties dialog is analogous to the New User dialog.
To delete a user, select its name in the table of users and click the Delete button at the top
toolbar or select the Delete option in the context menu.
Mastering Parallels Management Console
365
Configuring Firewall
You can limit access of Internet users to your Hardware Node. To enable the Hardware Node
firewall, right-click the needed Node and select Tasks --> Manage Firewall Settings on the
context menu.
Figure 111: Management Console - Firewall Configuration Dialog
Several default rules are set for the Hardware Node, which are read-only. These rules are used
to allow the Hardware Node to receive/send IP packets from/to different networks via TCP and
UDP protocols and to enable Management Console connections to the Node.
In the Hardware Node Firewall Properties window, you can:
Add your own rules with the Add button, for example, to provide access to certain services
like SSH, Telnet, POP3, SMTP, HTTP, and FTP. You can also define rules that are more
specific. Refer to your Linux documentation for more details on firewall configuration.
Mastering Parallels Management Console
366
Remove any rules (except for the default ones) form the existing list with the Delete button.
To disable the rule temporary, unmark the check box opposite the rule name.
Change any of the existing rules (except for the default ones) using the Edit button.
Save any of the existing rules on your local computer with the Store Rules button or load
new rules from a local file with the Load Rules button.
Managing the firewall configuration for a Container is identical to managing the firewall
configuration for the Hardware Node in respect of adding or removing rules. To manage the
firewall configuration for a Container, click the Manage Firewall link on the summary page of
the Container Manager.
Each IP packet coming to a particular Container passes 2 firewalls: the iptables rules of the
Host OS and the firewall rules of the given Container. An administrator of the Hardware Node
sets up the Host OS iptables rules, and the end-users have no access to these rules.
Mastering Parallels Management Console
367
Managing Mount Points
You can manage mount points through Parallels Management Console both for the Hardware
Node and for each and every Container. To view the current list of mount points, click the
Manage Mounts link on the summary page of either the Hardware Node or the necessary
Container. Then use the Add button to add a new mount point, the Remove From List button to
delete an existing mount point, or the Edit button to change an existing mount point. For
example, after clicking the Add button, you will be presented with the following window:
Figure 112: Management Console - Managing Mount Points
In this window you should:
specify the directory where your file system is to be mounted the Mount point field (if the
directory does not exist, it will be automatically created after clicking the OK button);
choose the physical device where your file system resides in the Device list box.
If you mark a mount point permanent (the Permanent check box is selected), it means that this
mount point will be automatically mounted on the system boot. If you mark a mount point
active (the Active check box is selected), it will be mounted after you click the OK button in the
Mount Point window.
Mastering Parallels Management Console
368
Viewing System and Virtuozzo Logs
Parallels Management Console allows to view the logs which are maintained on the
corresponding Hardware Node both for the Hardware Node itself and for a particular Container.
The following log types are available for a particular Hardware Node in the Management
Console main window:
Log type
Description
Alerts
Resource management system messages generated in case a Container exceeds its
resources limits or disk quotas.
Events
All Container-related events (start, stop, migrate, mount, unmount, etc.).
Operations
Asynchronous tasks performed with any Container of the Hardware Node.
Virtuozzo
Full Virtuozzo chronicles, i.e. system messages.
Actions
All actions performed with the main Virtuozzo Container management utility vzctl:
creating a new Container destroying an existing Container, starting and stopping a
Container, running commands in a Container and adjusting the configuration parameters
and limits for a Container.
Mastering Parallels Management Console
369
For Containers, only the Events and Alerts and Tasks Log logs are available in the corresponding
Container manager window.
In order to view the logs, do the following:
1
Expand the Logs folder in the main tree under either the Hardware Node name or the
Container name and click the needed log type.
2 Specify the time period for which you would like to view the logs.
3 Click Search to display the list of log entries in the right pane of the window:
Figure 113: Management Console - Viewing Logs
Note: You can adjust the level of logging verbosity by defining the log_level parameter (from 0
to 2) in the Virtuozzo global configuration file (adjustable by selecting the Configuration item in
the Hardware Node main tree).
Mastering Parallels Management Console
370
Managing Files Inside Container
You cannot manage files directly on the Hardware Node by means of Parallels Management
Console, but you can do it inside each and every Container by means of the Container manager
window. After you click on the File Manager item in the Container main tree, you will see the
list of folders and files of the Container root directory. Thus, this item corresponds to the /
directory of the selected Container:
Figure 114: Management Console - Managing Files
The principles of working with the Container file manager are standard. You can move through
the hierarchy of Container folders by double-clicking the folders names or selecting the
necessary folders in the left pane. Use the menu items, toolbar buttons, table view, and context
menus to perform the following tasks:
View the contents of simple text files;
View the principal information about a file/folder/symlink located in every directory and
subdirectory of any depth in the given Container;
Upload any number of files or whole directories from the local computer (the computer
where Parallels Management Console is installed) to any folder of the given Container;
Download any number of files from the given Container to the local computer;
Create new folders in the Container;
Copy files to another directory in the given Container;
Move files to another directory in the given Container;
Delete Container files;
Rename Container files;
Mastering Parallels Management Console
371
Set permissions for Container files.
Parallels Management Console provides a user-intuitive interface for performing all these tasks.
Mastering Parallels Management Console
372
Searching for Container
Usually there are a great number of Containers on your Hardware Node(s). To quickly find the
necessary Container, go to the Virtuozzo Containers item, right-click it, and choose Task -->
Search for Containers. The Find Containers window opens:
Figure 115: Management Console - Finding Container
This dialog window provides you with a list of Containers across one or several Hardware
Nodes united by a common parameter value. This can be the Container ID, name, type, status,
or IP address assigned to the Container.
Mastering Parallels Management Console
373
You should indicate the parameter by which you wish to search for Containers on the upper left
drop-down menu, and then the value of the parameter. If you choose to search for Containers by
their state (status) or ID you will be presented with a list of predefined values of these
parameters. It is connected with the fact that there is a fixed number of Container statuses, and
Container IDs can be only of the integer type. By searching for Containers by their name or IP
address, you can enter any string in the corresponding field. In this case the search results will
display all the Containers whose name/IP address contain the specified string, even if only as a
part.
You should also select the Hardware Node(s) where you wish to search for Containers with the
specified characteristics. Containers from different Nodes matching the search criterion will be
displayed in one and the same search result table. After you have selected the Hardware
Node(s), click the Search button. The table will be populated at the bottom of the window.
The Containers in the Search Results table corresponding to the specified search criterion may
also be sorted by a number of parameters, among which are their ID, name, the Hardware Node
they belong to, their IP address, etc. To sort the Containers by a parameter, click the
corresponding column name. Another click will reverse the sorting order.
From the Search Results table, you may also open the Container manager window by doubleclicking the corresponding Container.
Managing Container Search
Domains
Search domains is the list for hostname lookup. The search list is normally determined by the
local domain name; by default, it contains only the local domain name. You can add other host
names for a particular Container. A search query is performed by attempting to use each item in
the list in turn until a match is found. Note that this process may be slow and may generate a lot
of network traffic if the servers for the listed domains are not local, and that the query might
time out if no server is available for one of the domains. The search list is currently limited to
six domains with a total of 256 characters.
To view and/or edit the list of search domains for a particular Container, do the following:
1
Click on the Virtuozzo Containers item in the Parallels Management Console main tree.
2 As soon as the list of the Containers on this particular Hardware Node is displayed, rightclick on the necessary Container name and select Properties on the context menu. (In case
you are working with the Container Manager, click on the Manage Container Configuration
link at the Container dashboard).
3 Click the Network tab in the Properties of Containers window.
4 Under the Search domains group in the right part of the window, use the Add, Remove, and
Properties buttons to add, delete, or edit search domains, respectively.
374
CHAPTER 13
Troubleshooting
This chapter provides the information about those problems that may occur during your work
with Parallels Virtuozzo Containers and suggests the ways to solve them, including getting
technical support from Parallels.
In This Chapter
General Considerations ......................................................................................................... 375
Kernel Troubleshooting ........................................................................................................ 377
Problems With Container Management ................................................................................ 382
Problems With Container Operation ..................................................................................... 386
Problems With Physical Server Migration ............................................................................ 387
Miscellaneous Problems ....................................................................................................... 387
Getting Technical Support .................................................................................................... 388
Setting Up Monitor Node ...................................................................................................... 393
Troubleshooting
375
General Considerations
The general issues to take into consideration when troubleshooting your Virtuozzo system are
listed below. You should read them carefully before trying to solve more specific problems.
Make sure a valid license is always loaded on the Hardware Node. If your license has
expired and the grace period is over, all the Containers on your Node will be stopped!
You should always remember where you are located now in your terminal. Check it
periodically using the pwd, hostname, ifconfig, cat /proc/vz/veinfo
commands. One and the same command executed inside a Container and at the Hardware
Node can lead to very different results! You can also set up the PS1 environment variable to
show the full path in the bash prompt. To do that, add these lines to
/root/.bash_profile:
PS1="[\u@\h \w]$ "
export PS1
If the Hardware Node slows down, use vmstat, ps (ps axfw), dmesg, top (vztop) to
find out what is happening, never reboot the machine without investigation. If no thinking
helps restore the normal operation, use the Alt+SysRq sequences to dump the memory
(showMem) and processes (showPc).
If the Hardware Node was incorrectly brought down, on its next startup all the partitions
will be checked and quota recalculated for each Container, which dramatically increases the
startup time.
Do not run any binary or script that belongs to a Container directly from the Hardware
Node, for example, do not ever do that:
cd /vz/root/99/etc/init.d
./httpd status
Any script inside a Container could have been changed to whatever the Container owner
chooses: it could have been trojaned, replaced to something like rm -rf, etc. You can use only
vzctl exec/vzctl enter to execute programs inside a Container.
Do not use init scripts at the Hardware Node. An init script may use killall to stop a
service, which means that all similar processes will be killed in all Containers! You can
check /var/run/Service.pid and kill the correspondent process explicitly.
You must be able to detect any rootkit inside a Container. It is recommended to use the
chkrootkit package for detection (you can download the latest version from
www.chkrootkit.org), or at least run
rpm -Va|grep "S.5"
to check up if the MD5 sum has changed for any RPM file.
You can also run nmap, for example:
# nmap -p 1-65535 192.168.0.1
Starting nmap V. 2.54BETA22 ( www.insecure.org/nmap/ )
Interesting ports on (192.168.0.1):
(The 65531 ports scanned but not shown below are in
state: closed)
Port
State
Service
21/tcp
open
ftp
22/tcp
open
ssh
80/tcp
open
http
Troubleshooting
111/tcp
open
376
sunrpc
Nmap run completed -- 1 IP address (1 host up) scanned
in 169 seconds
to check if any ports are open that should normally be closed.
That could however be a problem to remove a rootkit from a Container and make sure it is
100% removed. If you're not sure, create a new Container for that customer and migrate his/her
sites and mail there.
Check the /var/log/ directory on the Hardware Node to find out what is happening on
the system. There are a number of log files that are maintained by the system and Parallels
Virtuozzo Containers (the boot.log, messages, vzagent.log log files, etc.), but
other services and programs may also put their own log files here depending on your
distribution of Linux and the services and applications that you are running. For example,
there may be logs associated with running a mail server (the maillog file), automatic tasks
(the cron file), and others. However, the first place to look into when you are
troubleshooting is the /var/log/messages log file. It contains the boot messages when
the system came up as well as other status messages as the system runs. Errors with I/O,
networking, and other general system errors are reported in this file. So, we recommend that
you turn to the messages log file first and then proceed with the other files from the
/var/log/ directory.
Subscribe to bug tracking lists, at least for Red Hat. You should keep track of new public
DoS tools or remote exploits for the software and install them into Containers or at
Hardware Nodes.
When using iptables, there is a simple rule for Chains usage to help protect both the
Hardware Node and its Containers:
use INPUT, OUTPUT to filter packets that come in/out the Hardware Node;
use FORWARD to filter packets that are designated for Containers.
Troubleshooting
377
Kernel Troubleshooting
Using ALT+SYSRQ Keyboard Sequences
Press ALT+SYSRQ+H (3 keys simultaneously) and check what is printed at the Hardware
Node console, for example:
SysRq: unRaw Boot Sync Unmount showPc showTasks showMem loglevel0-8 tErm kIll
killalL Calls Oops
This output shows you what ALT+SYSRQ sequences you may use for performing this or that
command. The capital letters in the command names identify the sequence. Thus, if there are
any troubles with the machine and you're about to reboot it, please press the following
sequences before pressing the Power button:
ALT+SYSRQ+M to dump memory info;
ALT+SYSRQ+P to dump processes states;
ALT+SYSRQ+S to sync disks;
ALT+SYSRQ+U to unmount filesystems;
ALT+SYSRQ+L to kill all processes;
ALT+SYSRQ+U try to unmount once again;
ALT+SYSRQ+B to reboot.
If the server is not rebooted after that, you can press the Power button.
Troubleshooting
378
Saving Kernel Fault (OOPS)
You can use the following command to check for the kernel messages that should be reported to
Parallels Virtuozzo Containers developers:
grep -E "Call Trace|Code" /var/log/messages*
Then you should find kernel-related lines in the corresponding log file and figure out what
kernel was booted when the oops occurred. Search backward for the "Linux" string, look for
strings like that:
Sep 26 11:41:12 kernel: Linux version 2.6.18-8.1.1.el5.028stab043.1
(root@rhel5-32-build) (gcc version 4.1.1 20061011 (Red Hat 4.1.1-30)) #1 SMP
Wed Aug 29 11:51:58 MSK 2007
An oops usually starts with some description of what happened and ends with the Code string.
Here is an example:
Aug 25 08:27:46 boar BUG: unable to handle kernel NULL pointer dereference at
virtual address 00000038
Aug 25 08:27:46 boar printing eip:
Aug 25 08:27:46 boar f0ce6507
Aug 25 08:27:46 boar *pde = 00003001
Aug 25 08:27:46 boar Oops: 0000 [#1]
Aug 25 08:27:46 boar SMP
Aug 25 08:27:46 boar last sysfs file:
Aug 25 08:27:46 boar Modules linked in: snapapi26(U) bridge(U) slm_dmprst(U)
ip_vzredir(U) vzredir(U) vzcompat(U) vzrst(U) i
p_nat(U) vzcpt(U) ip_conntrack(U) nfnetlink(U) vzfs(U) vzlinkdev(U)
vzethdev(U) vzevent(U) vzlist(U) vznet(U) vzstat(U) vzmo
n(U) xt_tcpudp(U) ip_vznetstat(U) vznetstat(U) iptable_mangle(U)
iptable_filter(U) ip_tables(U) slm_kill(U) slm_nofork(U) slm_core(U)
slm_skill(U) slm_if(U) vztable(U) vzdquota(U) vzdev(U) autofs4(U) hidp(U)
rfcomm(U) l2cap(U) bluetooth(U) sunrpc(U) ipv6(U) xt_length(U) ipt_ttl(U)
xt_tcpmss(U) ipt_TCPMSS(U) xt_multiport(U) xt_limit(U) ipt_tos(U)
ipt_REJECT(U) x_tables(U) video(U) sbs(U) i2c_ec(U) button(U) battery(U)
asus_acpi(U) ac(U) lp(U) floppy(U) sg(U) pcspkr(U) i2c_piix4(U) e100(U)
parport_pc(U) i2c_core(U) parport(U) cpqphp(U) eepro100(U) mii(U) serio_raw(U)
ide_cd(U) cdrom(U) ahci(U) libata(U) dm_snapshot
(U) dm_zero(U) dm_mirror(U) dm_mod(U) megaraid(U) sym53c8xx(U)
scsi_transport_spi(U) sd_mod(U) scsi_mod(U) ext3(U) jbd(U) ehci_hcd(U)
ohci_hcd(U) uhci_hcd(U)
Aug 25 08:27:46 boar CPU: 1, VCPU: -1.1
Aug 25 08:27:46 boar EIP: 0060:[<f0ce6507>] Tainted: P VLI
Aug 25 08:27:46 boar EFLAGS: 00010246 (2.6.18-028stab043.1-ent #1)
Aug 25 08:27:46 boar EIP is at clone_endio+0x29/0xc6 [dm_mod]
Aug 25 08:27:46 boar eax: 00000010
ebx: 00000001
ecx: 00000000
edx:
00000000
Aug 25 08:27:46 boar esi: 00000000
edi: b6f52920
ebp: c1a8dbc0
esp:
0b483e38
Aug 25 08:27:46 boar ds: 007b
es: 007b
ss: 0068
Aug 25 08:27:46 boar Process swapper (pid: 0, veid: 0, ti=0b482000
task=05e3f2b0 task.ti=0b482000)
Aug 25 08:27:46 boar Stack: 0b52caa0 00000001 00000000 b6f52920
00000000f0ce64de 00000000 02478825
Aug 25 08:27:46 boar 00000000 c18a8620 b6f52920 271e1a8c 024ca03800000000
00000000 00000000
Aug 25 08:27:46 boar 00000000 00000000 c18a3c00 00000202 c189e89400000006
00000000 05cb7200
Aug 25 08:27:46 boar Call Trace:
Aug 25 08:27:46 boar [<f0ce64de>] clone_endio+0x0/0xc6 [dm_mod]
Aug 25 08:27:46 boar [<02478825>] bio_endio+0x50/0x55
Aug 25 08:27:46 boar [<024ca038>] __end_that_request_first+0x185/0x47c
Aug 25 08:27:46 boar [<f0c711eb>] scsi_end_request+0x1a/0xa9 [scsi_mod]
Aug 25 08:27:46 boar [<02458f04>] mempool_free+0x5f/0x63
Troubleshooting
379
Aug 25 08:27:46 boar
Aug 25 08:27:46 boar [<f0c713c3>] scsi_io_completion+0x149/0x2f3 [scsi_mod]
Aug 25 08:27:46 boar [<f0c333b9>] sd_rw_intr+0x1f1/0x21b [sd_mod]
Aug 25 08:27:46 boar [<f0c6d3b9>] scsi_finish_command+0x73/0x77 [scsi_mod]
Aug 25 08:27:46 boar [<024cbfa2>] blk_done_softirq+0x4d/0x58
Aug 25 08:27:46 boar [<02426452>] __do_softirq+0x84/0x109
Aug 25 08:27:46 boar [<0242650d>] do_softirq+0x36/0x3a
Aug 25 08:27:46 boar [<024050b7>] do_IRQ+0xad/0xb6
Aug 25 08:27:46 boar [<024023fa>] default_idle+0x0/0x59
Aug 25 08:27:46 boar [<0240242b>] default_idle+0x31/0x59
Aug 25 08:27:46 boar [<024024b1>] cpu_idle+0x5e/0x74
Aug 25 08:27:46 boar =======================
Aug 25 08:27:46 boar Code: 5d c3 55 57 89 c7 56 89 ce 53 bb 01 00 00 00 83 ec
0c 8b 68 3c 83 7f 20 00 8b 45 00 8b 00 89 44 24 04 8b 45 04 89 04 24 8b 40 04
<8b> 40 28 89 44 24 08 0f 85 86 00 00 00 f6 47 10 01 75 0a 85 c9
Aug 25 08:27:46 boar EIP: [<f0ce6507>] clone_endio+0x29/0xc6 [dm_mod]
SS:ESP0068:0b483e38
Aug 25 08:27:46 boar Kernel panic - not syncing: Fatal exception in interrupt
All you need is to put the oops into a file and then send this file as part of your problem report to
the Parallels support team.
Finding Kernel Function That Caused D Process State
If there are too many processes in the D state and you can't find out what is happening, issue the
following command:
# objdump -Dr /boot/vmlinux-`uname -r` >/tmp/kernel.dump
and then get the process list:
# ps axfwln
F UID
PID PPID PRI NI VSZ RSS WCHAN STAT
100
0 20418 20417 17 0 2588 684
- R
100
0
1
0
8 0 1388 524 145186 S
040
0 8670
1
9 0 1448 960 145186 S
040
0 8713
1 10 0 1616 1140 11ea02 S
TTY
?
?
?
?
TIME
0:00
0:00
0:00
0:00
COMMAND
ps axfwln
init
syslogd -m 0
crond
Look for a number under the WCHAN column for the process in question. Then you should open
/tmp/kernel.dump in an editor, find that number in the first column and then scroll
backward to the first function name, which can look like this:
"c011e910 <sys_nanosleep>:"
Then you can tell if the process “lives” or is blocked into the found function.
Troubleshooting
380
Using Kexec and Kdump For System Troubleshooting
Virtuozzo Containers 4.0 comes with the support of a new crash dumping mechanism based on
the following kernel components:
Kexec: this component, if installed on the Hardware Node, allows you to directly reboot to
a new kernel (also known as capture kernel) from the context of an already running one
without going through the bootloader stage of the system boot process, which drastically
reduces reboot-related system downtime. When used for troubleshooting purposes, Kexec
can be configured to boot into a new kernel on the system crash while preserving the
crashed kernel memory contents and passing the control over this contents to the capture
kernel.
Kdump: this component provides a highly reliable dump generation and capturing
mechanism. It uses Kexec to fast boot into the capture kernel in a system crash event and,
after the kernel is loaded, captures the kernel crash dump.
Currently, you can use Kexec and Kdump to troubleshoot Hardware Nodes running Linux
distributions with 'RHEL 5'-based kernels installed (e.g. RHEL 5). To start using these
components on your Hardware Node, you should perform the following operations:
1
Install the kexec-tools package on the Node. For example:
# rpm -ihv kexec-tools-1.8-1.i386.rpm
2 Open the bootloader configuration file for editing (/etc/grub.conf) and append the
following string to the end of the kernel line:
If you are running the 32-bit or x86-64-bit version of Virtuozzo Containers:
"crashkernel=128M@16M"
If you are running the IA64-bit version of Virtuozzo Containers:
"crashkernel=256M@256M"
128M and 256M in the examples above denote the amount of memory to be reserved for the
capture kernel (please keep in mind that this memory is taken from RAM and cannot be
used by the system) and 16M and 256M indicate at what physical address the reserved
memory section is to be started.
Troubleshooting
381
3 Reboot the Hardware Node:
# shutdown -r now
4 Enable the Kdump service on the Node:
# chkconfig kdump on
5 Start the Kdump service:
# service kdump start
Now in the case of a system crash, Kexec will boot to the capture kernel without clearing the
crashed kernel memory and then pass the control to this kernel. Kdump, in its turn, will capture
the dump and put it to the /var/crash directory on the Hardware Node. This directory is
used by Kdump by default for storing system crash dumps. You can leave the default location or
redefine it by editing the Kdump configuration file (/etc/kdump.conf). Anyway, you
should make sure that the corresponding directory has enough free space to store system dumps.
In addition to storing kernel dumps on the local filesystem, Kdump can be configured to place
crash dumps to the following locations:
RAW disk partitions;
dedicated filesystems (i.e. formatted partitions that are not used by the system);
NFS mounted filesystems;
remote systems (using ssh and scp).
For example, the following session demonstrates what tasks should be completed to start using a
remote server for storing crash dumps. Setting a remote location for keeping dumps may prove
useful when the local filesystem is corrupted and saving a crash dump to your local system may
only worsen the situation:
1
Create a user on the remote server. This user should have the following rights and
permissions in respect of the server:
S/he should be able to log in to the remote server from the Hardware Node via
passwordless SSH keys.
As Kdump will move the created crash dumps to the default /var/crash directory on
the remote server using the scp utility, the user should have the permissions to wright
to this directory.
2 Add the following string to the Kdump configuration file (/etc/kdump.conf) on the
Hardware Node:
"net <username>@<server>"
where <username> is the name of the user created on the remote server on Step 1 and
<server> denotes the IP address or hostname of the remote server.
3 You can also change the default path on the remote server (/var/crash) where all kernel
crash dumps will be collected by adding the following string to the Kdump configuration
file:
"path <dump_path>"
where <dump_path> is the path to be used for storing crash dumps. In this case you
should make sure that the user has the permissions to wright to the specified directory.
4 Set up the passwordless SSH host keys and distribute them to the remote server:
# service kdump propagate
5 Save the changes made to Kdump:
# service kdump restart
Troubleshooting
382
Problems With Container
Management
This section includes recommendations on how to settle some problems with your Containers.
Failure to Create Container
An attempt to create a new Container fails. There is a message on the system console: Cached
package set XXX version YYY not found.
Solution 1
The necessary OS template might be absent from the Hardware Node. Copy the template to the
Hardware Node, install it, cache it, and try to create a Container once again.
Solution 2
The Container private area might not be pre-cached. In this case the vzpkgcache utility shall
be used. Issue the command:
vzpkgcache
The utility looks for the OS templates installed on the Hardware Node and caches those that are
not cached. After this, try to create a Container once again.
Troubleshooting
383
Failure to Start Container
An attempt to start a Container fails.
Solution 1
If there is a message on the system console: parameters missing, and the list of missed
parameters follows the message, set these parameters using the vzctl set --save
command (see Configuring Container (p. 46) for instructions). Try to start the Container once
again.
Solution 2
If there is a message on the system console: IP address is already used, issue the
cat /proc/vz/veinfo command. The information about the Container numeric identifier,
Container class, number of Container’s processes and Container IP address shall be displayed
for each running Container. This shall also demonstrate that your Container is up, i.e. it must be
running without any IP address assigned. Set its IP address using the command:
vzctl set CT_ID --ipadd IP_addr --save
where ct_id represents the Container numeric identifier and IP_addr represents an actual IP
address.
Solution 3
Poor UBC parameters might prevent the Container from starting. Try to validate the Container
configuration (see Validating Container Configuration (p. 165)). See what configuration
parameters have caused the error and set appropriate values using the vzctl set --save
command.
Solution 4
The Container might have used all its disk quota (either disk space or disk inodes). Check the
Container disk quota (see the Managing Disk Quotas section and Chapter 7 for details) and
increase the quota parameters if needed (see Setting Up Per-Container Disk Quota Parameters (p.
122)).
Solution 5
Run the vzfsutil utility to make sure that the VZFS symlinks inside the Container work
correctly. For example:
vzfsutil --call –t /vz/template /vz/private/<CT_ID>
The complete reference on the vzfsutil utility is provided in the Parallels Virtuozzo
Containers Reference Guide.
Solution 6
The Container administrator might have inadvertently modified, replaced, or deleted any file
that is part of an application or OS template, which has brought about the Container
malfunction. In this case, restore the file(s) with the vzctl recover command (see the
Recovering Container section for details).
Troubleshooting
384
Solution 7
Restore the latest operable copy of the Container by means of the vzarestore utility (see the
Backing Up and Restoring Container section for details).
Failure to Access Container From Network
Solution 1
The IP address assigned to this Container might be already in use in your network. Make sure it
is not. The problem Container address can be checked by issuing the following command:
# grep IP_ADDRESS /etc/vz/conf/<CT_ID>.conf
IP_ADDRESS="10.0.186.101"
The IP addresses of other Containers, which are running, can be checked by running
cat /proc/vz/veinfo
Solution 2
Make sure the routing to the Container is properly configured. Containers can use the default
router for your network, or you may configure the Hardware Node as rooter for its Containers.
Failure to Log In to Container
The Container starts successfully, but you cannot log in.
Solution 1
You are trying to connect via SSH, but access is denied. Probably you have not set the password
of the root user yet or there is no such user. In this case, use the vzctl set -userpasswd command. For example, for Container 101 you might issue the following
command:
# vzctl set 101 --userpasswd root:secret
Solution 2
Check forwarding settings by issuing the following command:
# cat /proc/sys/ipv4/conf/venet0/forwarding
If it is 0 then change it to 1 by issuing the following command:
# echo 1 > /proc/sys/ipv4/conf/venet0/forwarding
Troubleshooting
385
Failure to Back Up Container in Parallels Management Console
An attempt to back up a Container with a large amount of disk space (e.g. 6 Gb) by means of
Parallels Management Console finishes with the following error message: The request
was timed out. However, the backup process continues running and the Container backup
is successfully created on the Backup Node after a while, which can be checked by exploring
the /vz/backup directory on this Node, where all Container backups are stored by default.
Solution
The problem is caused by the fact that the timeout limit set by Parallels Agent for the Container
backup process in Management Console has been reached. This limit is equal to 3600 seconds
by default. You can increase the maximal backup timeout value by performing the following
operations:
1
In Management Console, right-click on the Hardware Node name and select Tasks -->
Manage Parallels Agent Configuration on the context menu.
2 In the left part of the displayed window, choose backm --> configuration --> timeouts.
3 Double-click the backup parameter in the right part of the Parallels Agent Configuration
window and specify the needed time (in seconds) in the Parameter value field.
4 Click OK.
Failure to Display List of Container Backups
You created a number of Container backups on the Backup Node and now wish to view them.
However, the process of displaying your Container backups takes a very long time or even goes
into infinity.
Solution
By default, the timeout limit for the Container backup search process is set to a very high value
- 3600 seconds, which makes the search process to run for 60 minutes before showing a list of
available backups on the Backup Node. To reduce the time needed to display your Container
backup list, you should decrease the backup search value. You can do it in the following way:
1
In Parallels Management Console, right-click on the Hardware Node name and select Tasks
--> Manage Parallels Agent Configuration on the context menu.
2 In the left part of the displayed window, choose backm --> configuration --> timeouts.
3 Double-click the search parameter in the right part of the Parallels Agent Configuration
window and specify the desired time (in seconds) in the Parameter value field.
Note: You are recommended to set the value of the search parameter to 300 seconds.
4 Click OK.
Troubleshooting
386
Problems With Container Operation
Timeout When Accessing Remote Hosts
A host is unreachable by the Virtuozzo Hardware Node or its Containers, though it can be
reached from other computers.
Solution
Often these timeouts occur due to the fact that the Explicit Congestion Notification (ECN)
mechanism of the TCP/IP protocol is on by default in Parallels Virtuozzo Containers and off in
some other systems, which leads to their incompatibility. ECN is used to avoid unnecessary
packet drops and for some other enhancements. If Virtuozzo Containers cannot connect to a
host, turn off this mechanism:
# sysctl –w net.ipv4.tcp_ecn=0
net.ipv4.tcp_ecn = 0
Extraneous Backups Visible to Container in Parallels Power Panel
Sometimes the Back Up/Restore Container page in Parallels Power Panel shows backups not
belonging to the given Container.
Solution
This happens when two or more Hardware Nodes have Containers with identical IDs hosted on
them. If such Containers are backed up onto one and the same Backup Node, they will be able
to see the backups of each other by means of Parallels Power Panel. To avoid this situation, you
are recommended to have unique Container IDs throughout all your Hardware Nodes.
Troubleshooting
387
Problems With Physical Server
Migration
Failure to Start iptables Modules After Physical Server Migration
iptables is broken in the Container after a physical server has been migrated.
Solution
The iptables service can work properly inside the Container that has resulted from a
physical server migration only if the ipt_state module is loaded both on the Hardware Node
and in the Container in question. The simplest way to do it is the following:
1
Stop Virtuozzo on the Node:
# service vz stop
2 Add ipt_state as another module name to the IPTABLES_MODULES parameter in the
/etc/sysconfig/iptables-config file on the Node.
3 Restart iptables on the Node:
service iptables restart
4 Start Virtuozzo:
# service vz start
5 Add ipt_state as another module name to the IPTABLES parameter in the
/etc/vz/vz.conf file on the Node.
6 Restart the Container:
#
vzctl restart CT_ID
To learn more on loading iptables modules, please turn to the Loading iptables Modules
section (p. 339).
Miscellaneous Problems
Failure to Run vgscan Utility
The vgscan utility may not work on some Host operating systems using lvm2-compatible
tools (for example, Fedora Core 2), if Virtuozzo is installed on such systems. To avoid the
utility malfunction, make sure you have the lvm1-compatible tools installed on your Node.
Troubleshooting
388
Corrupted Pseudographics in Virtuozzo Utilities
Some Virtuozzo utilities (e.g. install, vzup2date, and others) employ pseudographical
instead of simple character output during their operation. Certain terminal clients fail to display
the pseudographics the way it was intended to be displayed. This has nothing to do with
Virtuozzo, but with locale settings either on the Hardware Node or in the terminal client. You
may try to solve this problem in one of the following ways:
Solution 1
Set the correct locale for your terminal.
Solution 2
Try to run the utility as
# LC_ALL=C utility_name
Solution 3
If you are connecting to the Node via a remote shell, please make sure the locale set in the
remote terminal is the same as in the local one.
Getting Technical Support
Getting Assistance With Virtuozzo Containers installation
Parallels provides installation assistance for the Virtuozzo Containers software. Assistance with
installation can be offered via e-mail or by using the Virtuozzo Support Tunnel tool:
While communicating via e-mail, the Parallels support will attempt to answer any relevant
questions you may have before the installation process is initiated. This includes the
following:
Pre-requisites list;
Hardware compatibility;
Software compatibility.
You can also install the Virtuozzo Support Tunnel tool on your physical server and use it for
getting installation assistance from the Parallels support. Detailed information on the
Virtuozzo Support Tunnel tool is provided in the Establishing Secure Channel to Parallels
Support subsection (p. 392).
Troubleshooting
389
Preparing and Sending Questions to Technical Support
In most cases, the support team must rely on the customer's observations and communications
with the customer in order to diagnose and solve the problem. Therefore, the detailed problem
report is extremely important. You can submit a Virtuozzo-related support report by visiting the
http://www.swsoft.com/en/support/virtuozzo/request/ web page and filling in the Online
Support Form. When describing the problem, please do mention the following:
Symptoms of the problem;
When the problem began including the circumstances of the failure;
Any changes you made to your system;
Other information that may be relevant to your situation, such as the installation method;
Specific hardware devices that may be relevant to your problem.
You can also make use of the Parallels Helpdesk support tool. To this effect:
1
Follow the https://helpdesk.swsoft.com/ link.
2 Register with the Parallels Helpdesk (if you have not done so before) by clicking the Get
Access to Parallels Helpdesk link on the Helpdesk login page and following the instructions
provided on the Activate Your Support Account screen.
3 Log in to the Helpdesk using the received credentials.
4 At the top of the RT At Glance screen, select the Virtuozzo component your problem relates
to on the drop-down menu and click the New Ticket in button:
5 On the Create New Ticket screen, fill in the appropriate fields, describe your problem, and
click the Create button to make a new support ticket.
Another way of getting help is to directly call us or visit one of our offices. The information
about phone numbers, contact people and office addresses is available on the contact pages at
http://www.swsoft.com/en/contact and http://www.swsoft.com/en/support/phone/.
Troubleshooting
390
Submitting Problem Report to Technical Support
Virtuozzo Containers 4.0 is shipped with a special utility - vzreport - allowing you to
compile a detailed report if you have any Virtuozzo-related problems and to automatically send
it to the Parallels support team. After receiving your report, the support team will closely
examine your problem and make its best to solve the problem as quickly as possible.
vzreport has two modes of execution — full screen and command line. By default, the utility
starts in the full screen mode. However, you can force the utility to run in the command line
mode by specifying any option containing your contact information (e.g. -n denoting your
name) or the problem report description (e.g. -m used to provide additional information on your
problem). Detailed information on all the options that can be passed to vzreport in the
command line is provided in the Parallels Virtuozzo Containers Reference Guide.
After running the vzreport utility in the full screen mode, the Problem Report Wizard is
opened, which will guide you through a number of steps asking you to provide the necessary
information to generate a problem report. On the Welcome to ... screen, just click Next to
proceed with the wizard. You will be presented with the following window:
Figure 116: Submitting Problem Report - Providing Necessary Information
In this window you should enter your name, e-mail, and the name of your company into the
corresponding fields. Make sure that you type a valid e-mail address; otherwise, the Parallels
support team will not be able to contact you. In the Subject field, you should also specify what
Virtuozzo problem you encountered and may provide additional information in the Problem
description field which, in your opinion, can help solve the problem.
Troubleshooting
391
Clicking Next in the Your contact information and issue description window starts collecting
Virtuozzo logs and information on your system and network settings into a special file. This file
will be sent to the Parallels support team upon the completion of the wizard. The file does not
contain any private information!
After the utility has gathered all the necessary information on your Node, the Submit report
window is displayed:
Figure 117: Submitting Problem Report - Sending Report to Parallels
In this window you can do one of the following:
Click the Submit button to send your problem report to the Parallels technical support team.
The report is dispatched directly to Parallels by using the HTTP protocol and port 80.
However, if you use an HTTP proxy server for handling all your HTTP requests and wish
your problem report to be sent via this server, you should specify the hostname or IP address
of the server in the /etc/vz/vz.conf configuration file on the Hardware Node as the
value of the HTTP_PROXY parameter. After the problem report has been successfully sent
to the Parallels support, the Congratulations window is displayed informing you:
of the ID assigned to your report; you should use this ID every time you communicate
with the Parallels support via e-mail or the Parallels Helpdesk support tool;
that an e-mail message providing you with detailed information on your problem report
has been sent to the e-mail address you specified in the E-mail field of the Your contact
information and issue description window.
Click the Cancel button if you do not wish to dispatch the problem report to the support
team at the moment for some reason or other. You can do it later on by manually sending
the generated zip file to the Parallels support team. The full path to this file is indicated in
the Submit report window.
Troubleshooting
392
Establishing Secure Channel to Parallels Support
Parallels Virtuozzo Containers provides you with a special tool - Virtuozzo Support Tunnel which allows you to establish a private secure channel to the Parallels support team server. After
establishing such a channel, the support team will be able to quickly and securely connect to
your Node and diagnose and solve your problem. The secure connection to your server is
achieved through a Virtual Private Network (VPN) created between the Parallels support team
server and your Hardware Node.
To start using the Virtuozzo Support Tunnel tool, you should:
Make sure the openvpn (version 2.0 and above) and vzvpn packages are installed on
your Node. These packages are automatically installed on the Node during the installation of
Virtuozzo Containers version 2.6.2 to 4.0. However, if you are running a Virtuozzo
Containers version older than 2.6.2, you may need to manually copy these packages and
install them on your Node.
Make sure that port 80 is opened on the Hardware Node.
Edit the /etc/vzvpn/vzvpn.conf file to specify the correct parameters for your proxy
server, if you use any. Detailed information on these parameters is given in the vzvpn
Configuration File subsection of the Parallels Virtuozzo Containers Reference Guide.
After you have completed the tasks above and in case you encountered a Virtuozzo-related
problem, you can do the following to get assistance from the Parallels support:
1
Obtain a special certificate from Parallels which will uniquely identify you as a Virtuozzo
user. Certificates are issued by Parallels in the form of files and should be installed on your
Node by issuing the vzvpn.sh key-install certificate command where
certificate denotes the name of the certificate file obtained from Parallels. You can get
a certificate in one of the following ways:
Visit the http://www.swsoft.com/en/support/virtuozzo/certificates web site, fill up the
Request Virtuozzo Support Certificate form, and click the Submit button. After a while, a
certificate will be generated and sent to the email address you provided in the Request
Virtuozzo Support Certificate form.
Contact the Parallels support team via email or by telephone and ask for a valid
certificate.
Troubleshooting
393
2 After you are ready with the certificate installation, make sure your Hardware Node is
connected to the Internet.
3 On the Node, execute the /etc/init.d/vzvpn.sh start command to establish a
VPN between your Node and the Parallels support server.
4 Contact the Parallels support team (by telephone or via e-mail) and inform them of the
problem you encountered. You should also mention that you have launched the Virtuozzo
Support Tunnel tool and established a VPN to the Parallels support server.
5 After that, the Parallels support team will connect to your Node by using the secure VPN
established, closely examine your problem, and make its best to solve the problem as
quickly as possible.
Notes: 1. Virtuozzo Support Tunnel is implemented as a standard Linux service
running in the background of your system. Therefore, to have this service running after your
Hardware Node reboot, you should set it to the autoboot mode or start it manually again by
executing the /etc/init.d/vzvpn start command.
2. To close the VPN session with the Parallels support server, you should issue the
/etc/init.d/vzvpn stop command on the Node.
Setting Up Monitor Node
A regular monitoring of Hardware Nodes is an important part of their maintaining,
administering, and troubleshooting. Parallels Virtuozzo Containers enables you to check the
state of your Nodes in one of the following ways:
By using the Monitor Node as a serial console to log the kernel state of the Hardware Node.
This way of logging kernel messages is the most preferable one since it allows you to start
monitoring the system and collecting messages right after the kernel boot process is started.
By running the vzrmond daemon on the Monitor Node. This daemon provides the remote
monitoring of the Hardware Node by constantly checking up the current state of the Node,
verifying that the main Hardware Node parameters do not exceed their specified limits, and
sending instant alerts via e-mail, ICQ, or SMS if anything goes wrong on the Node.
By running the vzstatrep utility on the Monitor Node. This utility periodically analyzes
the main resources consumption of one or several Hardware Nodes, generates statistic
reports and graphics based on the analyzed information, and sends these reports and
graphics at your e-mail address. You can then examine the received e-mail message to find
out whether the Hardware Node is functioning trouble-free or a number of corrective actions
should be performed in relation to some of its components.
By using the netconsole module. This module can be configured to send console
messages from the Virtuozzo kernel on the Hardware Node to the Monitor Node. However,
in this case the process of monitoring the system and collecting kernel messages is started
only after the kernel has been successfully loaded on the Hardware Node.
The following subsections describe each of these ways in detail.
Troubleshooting
394
Configuring Serial Console on Monitor Node
To set up a serial console on the Monitor Node, you have to complete the following tasks:
Install Linux on a dedicated server that is to be served as the Monitor Node. This server
shall meet one requirement: you must be able to install a Linux distribution on it. Logging
messages even from several Hardware Nodes requires neither a powerful CPU nor a large
amount of RAM. However, if you plan to be connected to more than two Hardware Nodes,
you may need a special multi-port serial card. Among the popular makes of multi-port serial
cards are Cyclades-Z, Digiboard, Specialix, and Stallion. Consult your Linux distribution
vendor on multi-port serial card compatibility issues.
Connect the Hardware Nodes to the Monitor Node via a null-modem cable.
Configure serial parameters on the Monitor Node and the Hardware Node.
Configure the Hardware Node to send kernel messages to the Monitor Node.
Start the message collector on the Monitor Node.
Reboot the Hardware Node.
Configuring Serial Parameters on Monitor Node and Hardware Node
First, find out the serial port number used on the Monitor Node. The first serial port (COM1 in
DOS) is represented by /dev/ttyS0, the second one (COM2 in DOS) – by /dev/ttyS1,
and so on. If you are not sure about which serial port the cable is connected to, you may try on
your own risk different ports in the commands given in this and next subsections. It may not be
completely safe if you have some other hardware attached to a different serial port.
If you have the null-modem cable connected to the /dev/ttyS1 port, issue the following
command on the Monitor Node:
# stty 115200 cs8 -hupcl -cstopb cread clocal -crtscts -icrnl ixon \
ixoff -opost -isig -icanon -iexten -echo \
</dev/ttyS1 >/dev/ttyS1
This command will correctly configure the second serial port (/dev/ttyS1). Use the
appropriate serial terminal name instead of /dev/ttyS1 if the actual configuration differs.
Start the following command on the Monitor Node:
# cat /dev/ttyS1
Now find out which serial port is connected on the Hardware Node side. Issue the following
commands to configure the serial line parameters on the Hardware Node and to send a message
to the Monitor Node:
# stty 115200 cs8 -hupcl -cstopb cread clocal -crtscts ixon ixoff \
-opost </dev/ttyS0 >/dev/ttyS0
# echo 123 > /dev/ttyS0
The commands above assume that /dev/ttyS1 is used on the Monitor Node and
/dev/ttyS0 is used on the Hardware Node. Change the commands appropriately if the
actual configuration differs.
If you did everything right, you shall see “123” on the Monitor Node now.
Troubleshooting
395
Preparing Hardware Node for Sending Messages
Now you should pass the console=ttyS0,115200 console=tty parameters to the
kernel on each start of the Hardware Node. In case you are using the LILO boot loader, add the
following line into the Virtuozzo section of the /etc/lilo.conf configuration file:
append="console=ttyS0,115200 console=tty"
and run /sbin/lilo to activate the changes.
With the GRUB loader, it is enough to modify the /boot/grub/grub.conf configuration
file by adding the needed parameters to the line beginning with kernel inside the Virtuozzo
section of the file. For example:
kernel /vmlinuz-2.4.0-stab1.2.777 ro console=ttyS0,115200 console=tty
Note: You must not remove any of the existing parameters in the kernel line of the
grub.conf configuration file.
Parallels Virtuozzo Containers 4.0 includes a special Virtuozzo watchdog module, which is off
by default. However, if you set up a Monitor Node, it is very important to have this module
running since it logs the kernel state every minute. In order to make Virtuozzo Containers 4.0
load this module automatically, edit the /etc/vz/vz.conf file and change the value of the
VZWDOG parameter from no to yes. The corresponding line should look like the following:
# grep ^VZWDOG /etc/vz/vz.conf
VZWDOG=yes
Troubleshooting
396
Starting Messages Collection on Monitor Node
The kernel messages from the Hardware Node may be collected by reading from the serial
terminal on the Monitor Node. The simplest way to collect and to store them is by executing the
following command:
# cat /dev/ttyS1 > /var/log/vzmessages.hn1 &
on the Monitor Node.
This
/var/log/vzmessages.hn1 file.
way
the
messages
will
be
stored
in
the
However, it is recommended to use the ttylogd serial console daemon to maintain serial log
files. This daemon is launched by the /etc/init.d/ttylogd script on the system startup
and uses the /etc/ttylogd.conf file for the correct parameters. Thus, all you need to do
to automate the messages collection on the Monitor Node is to install ttylogd and edit
appropriately its configuration file.
First, install the daemon on the Monitor Node. The corresponding package can be found on your
Virtuozzo Containers 4.0 4.0 CD, DVD, or in your local distribution directory in the
/virtuozzo/RPMS subdirectory:
# rpm -ihv ttylogd-3.0.0-2.swsoft.i386.rpm
Preparing...
####################################### [100%]
1:ttylogd
####################################### [100%]
Now, take a look at the /etc/ttylog.conf file. It must comprise a number of string
sections of the following type:
#
#
#
#
Settings for ttyS0
PORT1=/dev/ttyS0
HOST1=ts2
LOG1="/var/log/console-${HOST1}.log"
The value of the PORTX parameter is the serial console device on the Monitor Node;
The value of the HOSTX parameter is the name of the Hardware Node to be monitored.
This parameter is optional, it is used for convenience.
The value of the LOGX parameter is the path to the file that will accumulate messages
coming to the specified serial console from the Hardware Node. You may use the
${HOSTX} variable to synchronize the name of the file with the name of the Hardware
Node.
You must have as many such sections as the number of Nodes you wish to monitor. Copy and
paste the needed number of these sections in the ttylogd.conf configuration file. Apply one
and the same number after "PORT", "HOST", and "LOG" throughout each section, and increment
this number with each new section. Edit the values of the "PORT", "HOST", and "LOG"
parameters appropriately for each and every Hardware Node to be monitored and remove the
hash marks before them. Then modify the DAEMONS="1 2" line to include all the numbers
(separated by spaces) you used in your sections after the "PORT", "HOST", and "LOG"
parameters. Save the file.
You may also consult the ttylogd(8) and ttylog.conf(5) manual pages.
Troubleshooting
397
Checking That Logging Works
Now reboot the Hardware Node. After the Hardware Node is up, check the file on the Monitor
Node where the messages are stored (for example, /var/log/vzmessages.hn1). The file
should contain the messages printed by the kernel during the boot-up.
Upon loading, the Virtuozzo watchdog module should produce to the log file the output similar
to the one below:
MODULES="$PRELOAD_MODULES vzfs vzmon vzdquota vzdev vzwdog"
*** VZWDOG: time 1034715427.628385 uptime 994993 \
CPU 0 $Revision: 1.1.2.1 $ ***
CPU0
0:
994995
IO-APIC-edge timer
1:
2
IO-APIC-edge keyboard
8:
1
IO-APIC-edge rtc
14:
2
IO-APIC-edge ide0
21:
1999
IO-APIC-level eth0
26:
11037
IO-APIC-level aic7xxx
27:
16
IO-APIC-level aic7xxx
[a lot of lines suppressed]
Setting Up netconsole
The netconsole module allows you to send the console messages from the Virtuozzo kernel
installed on the Hardware Node to the Monitor Node. To prepare this module for use in your
network environments, you should perform the following operations:
set up the netconsole module on the Hardware Node to be monitored;
configure the Monitor Node to collect messages from the netconsole module on the
Hardware Node.
Both operations are described in the following subsections in detail.
Notes: 1. The netconsole module uses the UDP (User Datagram Protocol) transport
protocol to send kernel messages from the Hardware Node to the Monitor Node. As this
protocol provides simple but unreliable message services, you are highly recommended to have
both Nodes located as close to each other as possible (best of all - in one and the same network
segment) to ensure that all kernel messages can reach the Monitor Node.
2. Since the netconsole module allows you to monitor the system and collect kernel
messages only after the kernel is successfully loaded and the corresponding NIC card is
initialized, we recommend that you set up a serial console and use it as the primary tool for
monitoring your system. Configuring the Monitor Node as a serial console enables you to start
collecting the Node kernel logs right after the kernel boot process is started.
Troubleshooting
398
Preparing Hardware Node for Sending Kernel Messages
First, you should set up the netconsole module on the Hardware Node you wish to monitor.
Depending on the Linux distribution installed on your Node, the operations you have to perform
to configure this module may slightly differ. Listed below are examples of how to set up the
netconsole module for the major Linux distributions:
To configure the netconsole module on a Hardware Node running Red Hat Enterprise Linux
3 or 4:
1
Specify the IP address of the Monitor Node as the value of the SYSLOGADDR parameter in
the /etc/sysconfig/netdump file. Assuming that your Monitor Node has the
192.168.0.100 IP address assigned, you can do it as follows:
SYSLOGADDR=192.168.0.100
2 Execute the following command on the Hardware Node:
# service netdump restart
To configure the netconsole module on a Hardware Node running Red Hat Enterprise Linux
5.1 and Fedora 8:
Note: For instructions on how to load the netconsole module on Hardware Nodes running
Red Hat Enterprise 5.0, please see the information below.
1
Specify the IP address of the Monitor Node as the value of the SYSLOGADDR parameter in
the /etc/sysconfig/netconsole file. Assuming that your Monitor Node has the
192.168.0.100 IP address assigned, you can do it as follows:
SYSLOGADDR=192.168.0.100
2 Execute the following command on the Hardware Node:
# service netconsole restart
To configure the netconsole module on a Hardware Node running SUSE Linux Enterprise
Server 10:
1
Make sure that the netconsole-tools RPM package is installed on the Hardware
Node.
2 Run the netconsole-server utility on the Hardware Node and specify the Monitor
Node IP address as its parameter. For example:
# netconsole-server 192.168.0.100
To configure the netconsole module on Hardware Nodes running other Linux distributions,
please see the documentation shipped with these distributions.
Another way of loading and configuring the netconsole module on your Hardware Node is
to use the modprobe utility. The procedure of setting up netconsole using this utility is
identical for all Linux distributions and can be used for the netconsole configuration
irrespective of a Linux distribution installed on the Node. However, to configure the
netconsole module with modprobe, you have to manually specify a number of parameters
when running this utility (e.g. the Node IP address and the name of the network card installed
on this Node). For example, you can issue the following command to prepare the netconsole
module on your Node for sending kernel logs to the Monitor Node:
# /sbin/modprobe netconsole \
[email protected]/eth0,[email protected]/00:17:31:D9:D7:C8
Troubleshooting
399
The parameters used in this command are explained below:
6666: the port on the Hardware Node used for sending UDP messages.
192.168.0.50: the IP address assigned to the Hardware Node.
eth0: the name of the network interface card installed on the Hardware Node.
514: the port on the Monitor Node used to listen to incoming UDP messages from the
Hardware Node.
192.168.0.100: the IP address assigned to the Monitor Node.
00:17:31:D9:D7:C8: the MAC address of the Monitor Node (if you do not know how
to find out the Monitor Node MAC address, please turn to the next subsection).
If you wish the netconsole module to automatically load on the Hardware Node boot up,
you need to add the following string to the /etc/rc.d/rc.local script on the Node:
/sbin/modprobe netconsole \
[email protected]/eth0,[email protected]/00:17:31:D9:D7:C8
Determining Monitor Node MAC Address
You can execute the following command on your Hardware Node to learn the MAC address
assigned to the Monitor Node (we assume that the Monitor Node has the 192.168.0.100 IP
address assigned):
# /sbin/arp -n 192.168.0.100
Address
HWtype
HWaddress
192.168.0.100
ether
00:17:31:D9:D7:C8
Flags Mask
C
Iface
eth0
In the example above, the Monitor Node has the MAC address of 00:17:31:D9:D7:C8
assigned.
Troubleshooting
400
Starting Messages Collection on Monitor Node
The kernel messages sent by the netconsole module on the Hardware Node may be
collected by dumping the data received on a UDP port on the Monitor Node. The simplest way
to collect this data is by executing the following command on the Monitor Node:
# nc -l -u 514 > /var/log/netconsole_logs
This way the messages will be collected on the 514 UDP port (this is the same port you
specified when setting up netconsole on the Hardware Node) and stored in the
/var/log/netconsole_logs file on the Monitor Node. However, the collected messages
will have no time stamps and the redirection to the file will become broken in the case of a
Monitor Node reboot. So, we recommend that you use the ttylogd serial console daemon to
maintain kernel messages on the Monitor Node.
Note: Some Linux distributions (e.g. SLES 10 SP1) include the netcat utility in their
distributions instead of nc. If this is your case, use netcat to collect kernel messages coming
from netconsole in the same way you would use the nc utility.
The ttylogd serial console daemon is used to effectively process kernel messages received
from netconsole on the Monitor Node. This daemon is launched by the
/etc/init.d/ttylogd script on the system startup and uses the /etc/ttylogd.conf
file for the correct control parameters. Thus, all you need to do to automate the kernel messages
collection on the Monitor Node is to install ttylogd and to edit appropriately its configuration
file.
First, you should install the daemon on the Monitor Node if you have not done so before. The
corresponding package can be found in the /virtuozzo/RPMS subdirectory on your
Virtuozzo Containers 4.0 CD, DVD, or in your local distribution directory:
# rpm -ihv ttylogd-3.0.0-2.swsoft.i386.rpm
Preparing...
##################################### [100%]
1:ttylogd
##################################### [100%]
Now take a look at the /etc/ttylog.conf file. It must comprise a number of string
sections of the following type:
#
#
#
#
Settings for netconsole
PORT3=514
HOST3=ts4
LOG3="/var/log/console-${HOST3}.log"
The value of the PORTX parameter is the UDP port number on the Monitor Node used to
listen to incoming kernel messages from your Hardware Node.
The value of the HOSTX parameter is the name of the Hardware Node to be monitored.
This parameter is optional, it is used for convenience.
The value of the LOGX parameter is the path to the file that will accumulate messages
coming to the specified serial console from the Hardware Node. You may use the
${HOSTX} variable to synchronize the name of the file with the name of the Hardware
Node.
Troubleshooting
401
You must have as many such sections as the number of Nodes you wish to monitor. Copy and
paste the needed number of these sections in the ttylogd.conf configuration file. Apply one
and the same number after "PORT", "HOST", and "LOG" throughout each section, and increment
this number with each new section. Edit the values of the "PORT", "HOST", and "LOG"
parameters appropriately for each and every Hardware Node to be monitored and remove the
hash marks before them. Then modify the DAEMONS="1 2" line in this file to include only
those numbers (separated by spaces) that are used in your sections after the "PORT", "HOST",
and "LOG" parameters. Save the file.
After you have configured the /etc/ttylog.conf file, you should restart the ttylogd
daemon for the changes made to this files to come into effect:
# service ttylogd restart
Shutting down ttylogd:
Starting ttylogd 514:
[OK]
[OK]
You may also consult the ttylogd(8) and ttylog.conf(5) manual pages.
Increasing Kernel Log Level
To increase the kernel verbosity on the Hardware Node to get more informative kernel messages
on the Monitor Node, you can proceed as follows:
1
Check the current kernel log level:
# cat /proc/sys/kernel/printk
6
4
1
7
2 Set the log level to the maximum possible value:
# echo 8 4 1 8 >/proc/sys/kernel/printk
3 On Hardware Nodes running RHEL-based distributions, additionally edit
KLOGD_OPTIONS parameter in the /etc/sysconfig/syslog file as follows:
the
KLOGD_OPTIONS="-x -c 8"
4 If your Hardware Node has an SMP kernel installed, additionally execute the following
command on the Node:
# echo 8 >/proc/sys/kernel/silence-level
You can permanently save the changes made to the kernel log level configuration by doing the
following:
1
Adding the following string to the /etc/sysctl.conf file on the Hardware Node:
kernel.printk = 8 4 1 8
2 Specifying the debug parameter in the boot loader configuration file (/etc/grub.conf
or /etc/lilo.conf) on the Hardware Node.
On Hardware Nodes with SMP kernels, you should also add the silencelevel=8 string to
the boot loader configuration file on the Node.
Checking That netconsole Logging Works
You can check that you have successfully set up netconsole by loading and unloading a
certain kernel module on the Hardware Node and viewing the file on the Monitor Node where
the messages are stored. The file should contain the messages printed by the kernel during the
module loading/unloading. Assuming that all messages coming from netconsole are to be
stored in the /var/log/netconsole_logs file For example, netconsole will send
messages like the following during the loop module loading on the Hardware Node:
Troubleshooting
Jan 22 17:49:57 ts4 ttylogd v.2.1.0-5 started
Jan 22 06:14:58 ts4 loop: loaded (max 8 devices)
402
Troubleshooting
403
Preparing Monitor Node for Sending Alerts
The Monitor Node can also be configured to remotely check up the state of the Hardware Nodes
– if they are running or down, as well as a number of vital parameters – and to send instant
alerts via e-mail if anything goes wrong.
To this effect, it is necessary to install the vzrmon package on the Monitor Node, which are
located on your Virtuozzo Containers 4.0 4.0 CD, DVD, or in your local distribution directory
in the /virtuozzo/RPMS subdirectory. For example:
# rpm -ihv vzrmon-4.0.0-9.swsoft.i386.rpm
Preparing...
###################################### [100%]
1:vzrmon
###################################### [100%]
Note: You might also need to install the gnuplot and mutt packages, if they are not already
installed. If this is the case, you will receive the corresponding notification. These packages are
not included with Parallels Virtuozzo Containers, as they are part of a standard Red Hat Linux
distribution.
After the vzrmon package is installed, the vzrmond daemon is started on the Monitor Node.
You should manually edit the vzrmond configuration file (see the next subsection for details)
to define the list of Nodes to monitor and the way the alerts are sent. However, vzrmond needs
to be able to remotely log in to the specified Node(s) without having to provide a root password.
Therefore, you should provide each Node to be monitored with your authorized public SSH
RSA key. It can be done in the following way. First, you should generate a pair of SSH keys –
public and private:
# ssh-keygen -t rsa
Generating public/private rsa key pair.
Enter file in which to save the key (/root/.ssh/id_rsa):
/root/.ssh/id_rsa already exists.
Overwrite (y/n)? y
Enter passphrase (empty for no passphrase):
Enter same passphrase again:
Your identification has been saved in /root/.ssh/id_rsa.
Your public key has been saved in /root/.ssh/id_rsa.pub.
The key fingerprint is:
c6:19:a8:2c:67:31:15:e6:30:23:2b:8a:b0:63:77:8f \
[email protected]
Note that you should leave an empty passphrase in the above procedure.
Next, transfer your public key to each Hardware Node you are going to monitor to the
/root/.ssh directory (use some intermediary name for the file not to overwrite the
corresponding file on the Hardware Node):
# scp /root/.ssh/id_rsa.pub \
[email protected]:/root/.ssh/temp_name
The authenticity of host 'dhcp-129.asplinux.ru (192.168.1.129)' \
can't be established.
RSA key fingerprint is 01:fc:b6:e9:26:40:1f:1a:41:5f:7a:fb:cf:14:51.
Are you sure you want to continue connecting (yes/no)? yes
Warning: Permanently added 'dhcp-129.asplinux.ru,192.168.1.129' \
(RSA) to the list \
of known hosts.
[email protected]'s password:
id_rsa.pub
100% |*****************************|
235
00:00
Troubleshooting
404
Finally, you should add the contents of the transferred file to the authorized_keys file in
this very directory of the Hardware Node. Log in to the Hardware Node, go to the
/root/.ssh directory and issue the following command in it:
# cat temp_name >> authorized_keys
Now the Monitor Node should be able to log in to this Hardware Node as root without having to
provide the root password. You should copy the public RSA file of the Monitor Node to every
Hardware Node to be monitored and add its contents to the authorized_keys file in the
/root/.ssh directory.
Using External Applications for Sending Alerts
Along with sending e-mail messages, vzrmond allows you to use external instant messaging
applications for sending alerts via other means of communication (e.g. via ICQ or SMS). Let us
assume that you wish to configure the Centericq application to send notifications about the
Hardware Node state to your ICQ. To this effect, you should perform the following operations
on the Monitor Node:
Install the centericq package, for example:
# rpm -ihv centericq-4.21.0-1.i386.rpm
Preparing...
#################################### [100%]
1:centericq
#################################### [100%]
Configure the CUSTOM_ACTION and CUSTOM_LIST parameters in the
/etc/vzrmond.conf configuration file to inform vzrmond that it should use the
Centericq application for sending messages. For example:
...
CUSTOM_ACTION="centericq -s msg -p icq"
CUSTOM_LIST="-t 24359283"
...
The parameters specified above mean the following:
the -s option is used to denote the type of event to be sent (in our case it is a message 'msg');
the -p option is used to specify the destination instant messaging network (icq);
the -t option is used to indicate the ICQ UIN (Unified Identification Number) where
the message is to be sent (24359283).
Note: Detailed information on all parameters that can be specified in the vzrmond.conf file
is provided in the Parallels Virtuozzo Containers Reference Guide.
Troubleshooting
405
Using vzstatrep to Monitor Hardware Nodes
The vzstatrep utility allows you to analyze the main resources consumption of one or
several Hardware Nodes and to receive information on this consumption in the form of statistic
reports and graphics at your e-mail address(es). vzstatrep is included in the vzrmon
package and automatically installed on the Monitor Node during the vzrmon package
installation. For more information on how to install vzrmon, please see the previous
subsection.
To start using vzstatrep, you should manually edit the vzstatrep.conf configuration
file located in the /etc directory on the Monitor Node to define a list of Hardware Nodes
whose resources consumption is to be analyzed and specify one or several e-mail addresses
where the Hardware Node statistic reports and graphics are to be sent. In this file, you can also
set a number of other parameters (e.g. the resources the usage of which will be presented in the
graphical form with the help of the gnuplot utility or the path to the directory on the
Hardware Node where vzstatrep will search for the logs to be analyzed). Detailed
information on the vzstatrep.conf file and all its options is provided in the Configuring
Parallels Virtuozzo Containers chapter of the Parallels Virtuozzo Containers Reference Guide.
By default, the vzstatrep utility is scheduled as a cron job to automatically run once a day.
When launched, the vzstatrep utility performs the following operations:
Connects to the Hardware Node(s) to be monitored;
Downloads the logs collected by the vzlmond utility
/var/log/vzstat directory on the Hardware Node by default;
Analyzes the downloaded logs and generates the statistic report and graphics on the basis of
these logs;
Sends the generated statistic report and graphics at the specified e-mail address(es).
and
stored
in
the
Let us assume that you wish to analyze the resources statistics from the Hardware Node having
the hostname of my_hardware_node.com and to periodically (i.e. once a day) receive this
statistics report at the peter@my_domain.com e-mail address. To this effect, you should do
the following:
1
On the Monitor Node, open the /etc/vzstatrep.conf file for editing:
# vi /etc/vzstatrep.conf
2 In the file, set the STATS_EMAIL and NODES parameters as follows:
NODES="my_hardware_node.com"
STATS_EMAIL="peter@my_domain.com"
3 Save the /etc/vzstatrep.conf file.
From now on, an e-mail message containing information on the Hardware Node resources
consumption will be sent every day at the peter@my_domain.com e-mail address.
However, if you wish to get the Hardware Node statistic report at the current moment, you can
manually run the vzstatrep command on the Monitor Node:
# vzstatrep --plot --sendmail
Troubleshooting
406
As a result of this command, an e-mail message will be instantly sent to the
peter@my_domain.com address containing the text information on the Hardware Node
resources consumption (on the memory and CPU consumption on the Node, network statistics,
etc.). Besides, you will get a number of attached files where the resources usage is presented in
the form of graphics generated by the gnuplot utility. Detailed information on all
vzstatrep options (including the --plot and --sendmail options used in the example
above) is provided in the Virtuozzo Command Line Interface chapter of the Parallels Virtuozzo
Containers Reference Guide.
407
Glossary
Application template is a template used to install a set of applications in Containers. See also
Template.
Container (or regular Container) is a virtual private server, which is functionally identical to an
isolated standalone server, with its own IP addresses, processes, files, its own users database, its
own configuration files, its own applications, system libraries, and so on. Containers share one
Hardware Node and one OS kernel. However, they are isolated from each other. A Container is
a kind of ‘sandbox’ for processes and users. Container 0 and Container 1 are used to designate
the Hardware Node and the Service Container, respectively.
Container 0 is used to designate a Hardware Node where the Virtuozzo Containers software is
installed.
Container 1 is used to designate the Service Container.
EZ template is a template file that points to a repository with the packages that comprise the
template. Unlike standard templates, EZ templates cannot be updated because the repository
stays the same. However, the packages in the repository can be updated.
Hardware Node (or Node) is a server where the Virtuozzo Containers software is installed for
hosting Containers. Sometimes, it is marked as Container 0.
Host Operating System (or Host OS) is an operating system installed on the Hardware Node.
MAC address stands for Media Access Control address, a hardware address that uniquely
identifies each Node in a network. The MAC layer interfaces directly with the network media.
Consequently, each different type of network media requires a different MAC layer.
OS template (or Operating System template) is used to create new Containers with a preinstalled
operating system. See also Template.
Package set is a synonym for Template.
Parallels Infrastructure Manager (or Infrastructure Manager) is a tool designed for managing
Hardware Nodes and all Containers residing on them with the help of a standard Web browser
on any platform.
Parallels Management Console (or Management Console) is a Virtuozzo Containers
management and monitoring tool with graphical user interface. It is used to control individual
Hardware Nodes and their Containers. Management Console is cross-platform and runs on both
Microsoft Windows and Linux workstations.
Parallels Power Panel is a means for administering personal Containers with the help of a
standard Web browser (Internet Explorer, Mozilla, etc.) on any platform.
Glossary
408
Parallels Virtuozzo Containers (or Virtuozzo Containers) is a complete server automation and
virtualization solution allowing you to create multiple isolated Containers on a single physical
server to share hardware, licenses, and management effort with maximum efficiency.
Private area is a part of the file system where Container files that are not shared with other
Containers are stored.
SSH stands for Secure Shell. It is a protocol for logging on to a remote machine and executing
commands on that machine. It provides secure encrypted communications between two
untrusted hosts over an insecure network.
Service Container is a special Container automatically created on the Hardware Node during
the Virtuozzo Containers installation and needed to manage your regular Containers by means
of Parallels Infrastructure Manager, Parallels Power Panel, and Parallels Management
Console. Sometimes, the Service Container is marked as Container 1.
Standard template is a template file that has inside itself all the re-usable files of all the
packages comprising the template. If newer versions of any of these packages appear, a standard
template can be correspondingly updated. Compare EZ template.
TCP (TCP/IP) stands for Transmission Control Protocol/Internet Protocol. This suite of
communications protocols is used to connect hosts on the Internet.
Template (or package set) is a set of original application files (packages) repackaged for
mounting over Virtuozzo File System. There are two types of templates. OS Templates are used
to create new Containers with a preinstalled operating system. Application templates are used to
install an application or a set of applications in Containers. See also Standard template and EZ
template.
UBC is an abbreviation of User Beancounter.
User Beancounter is the subsystem of the Virtuozzo Containers software for managing
Container memory and some system-related resources.
VENET device is a virtual networking device, a gateway from a Container to the external
network.
Virtual Environment (or VE) is an obsolete designation of a Container.
Virtuozzo Control Center (or VZCC) is an obsolete designation of Parallels Infrastructure
Manager.
Virtuozzo File System (VZFS) is a virtual file system for mounting to Container private areas.
VZFS symlinks are seen as real files inside Containers.
Virtuozzo Server license is a special license that you should load to the Hardware Node to be
able to start using the Virtuozzo Containers software. Every Hardware Node shall have its own
Virtuozzo Server license.
Virtuozzo Power Panels (or VZPP) is an obsolete designation of Parallels Power Panel.
Virtual Private Server (or VPS) is an obsolete designation of a Container.
Glossary
409
Parallels Agent (or Parallels Agent Protocol) is an XML-based protocol used to monitor and
manage a Hardware Node. The Parallels Agent software implements this protocol and is a
backend for the Parallels Management Console.
410
Index
A C About This Guide • 13
About Virtuozzo Containers Software • 19
Accessing Devices From Inside Container •
323
Action Scripts • 27, 68, 77, 109, 319, 342
Adjusting Colors and Styles • 177
Adjusting Periodicity of Refreshing
Information • 175
Adjusting Representation Scale • 176
Administrator
Container • 115
Hardware Node • 26, 31, 129
system • 116
Advanced Tasks • 285
Advantages of VZFS v2 • 352
Alerts • 183, 403
Applications • 23, 24, 28, 132, 134, 290, 345,
347, 349
Applying New Configuration Sample to
Container • 167
Assigning Default Backup Node • 72
Associating Container Files With Application
Templates • 134
Changes From Virtuozzo 3.0 • 159
Changing Services Mode • 201
Changing System Time From Container • 315
Checking Quota Status • 129
Checking That Logging Works • 397
Choosing Container ID • 35
Choosing OS EZ Template • 37
Choosing Updates for Downloading • 337
Cleaning Up Containers • 132
Compatibility With Previous Versions of
Virtuozzo Containers • 271
Computing Memory Usage in SLM • 151
Configuration Files
backup • 25
Container • 25, 57, 109, 116, 118, 119, 136,
148, 158, 286, 291, 294, 343
creating • 292, 343
editing • 293
global • 25, 57, 116, 118, 119, 136, 148,
390
GRUB • 395
LILO • 395
Linux distribution • 286, 294, 307, 343
managing • 158
ttylogd • 396
vzrmond • 403
Configuring Container • 46
Configuring Container Disk I/O Priority Level
• 131
Configuring Firewall • 365
Configuring Hardware Node IP Addresses
Pool • 243
Configuring Network Bandwidth Management
for Container • 148
Configuring Network Classes • 143
Configuring Number of CPUs Inside Container
• 138
Configuring Offline Management Parameters •
358
Configuring Serial Console on Monitor Node •
394
Configuring Serial Parameters on Monitor
Node and Hardware Node • 394
Configuring Updates Approval Policy • 338
B Backing Up and Restoring Caches in
Virtuozzo Containers 3.0 • 283
Backing Up and Restoring Containers • 68
Backing Up Group of Containers • 83
Backing Up Single Container • 78
Backup
configuration file • 25
Container • 31, 68, 385, 387
copy • 109
directory • 25
full • 68
incremental • 68
Node • 68, 385, 386
searching • 97
timeout • 385
Basics of Virtuozzo Technology • 24
Before You Begin • 35
Browsing Backup Contents • 87
Index
Configuring Upgraded Nodes to Use VZFS v2
• 276
Configuring veth Adapter Parameters • 222
Configuring Virtuozzo Containers Update
Server Settings • 261
Connecting Adapter to Virtual Network • 210
Connecting Containers to Virtual Networks •
224
Container
accessing • 115
administrator • 32
backing up • 68
checking status • 49
cleaning up • 132
configuration file • 25, 136, 158, 163, 165,
291, 293, 308, 343
configuring • 46, 47, 48
CPU share • 136
creating • 34, 35, 41
destroying • 109
disk quota • 118, 119, 127, 129, 132
files • 132, 133, 134, 370
hostname • 41, 47
IP address • 41, 47
listing • 51
migrating • 57, 285, 294, 297, 307, 308
mount point • 367
network parameters • 142, 143, 145, 146,
148
rebooting • 344
reinstalling • 106, 107
restarting • 49
restoring • 68
starting/stopping • 49
understanding concepts • 20, 22
user • 115, 363
Container Networking Modes • 215
Controlling Container CPU Usage With
VZASysD Plug-in • 140
Controlling Memory Usage by Container • 151
Copying Container Within Hardware Node •
66
Corrupted Pseudographics in Virtuozzo
Utilities • 388
Creating and Deleting veth Network Adapters
• 220
Creating Configuration File for New Linux
Distribution • 343
Creating Container • 39
Creating Container Configuration File • 292
Creating Containers in Parallels Management
Console • 41
Creating Customized Containers • 309
Creating Local Mirror • 334
411
Creating Local Repository Mirror for
vzup2date • 332
Creating New Container • 34
Creating Virtual Network • 212
Creating VLAN Adapter • 208
Customizing /proc/meminfo Output Inside
Container • 330
Customizing Container Reinstallation • 107
D Defining Default Backup Compression Level •
75
Defining Window Manager to Run X
Applications • 349
Deleting Container • 109
Deleting Virtual Network • 215
Detaching Container From Hardware Node
Cache Directory in Virtuozzo Containers 3.0
• 284
Determining Container Identifier by Process
ID • 202
Determining Monitor Node MAC Address •
399
Differences Between venet0 and veth Modes •
219
Disabling Container • 111
Disk Quota Parameters • 118
Distinctive Features of Parallels Virtuozzo
Containers 4.0 • 21
DNS server • 297
Documentation Conventions • 15
Downloading Files to Local Computer • 240
E Editing Container Configuration File • 293
Enabling Container Migration from 3.x to 4.0
Hardware Nodes • 63
Enabling VPN for Container • 326
Establishing Secure Channel to Parallels
Support • 392
Extraneous Backups Visible to Container in
Parallels Power Panel • 386
EZ Template
application • 266
OS • 34, 37, 41
updating • 265, 266
F Failure to Access Container From Network •
384
Failure to Back Up Container in Parallels
Management Console • 385
Failure to Create Container • 382
Index
Failure to Display List of Container Backups •
385
Failure to Log In to Container • 384
Failure to Run vgscan Utility • 387
Failure to Start Container • 383
Failure to Start iptables Modules After
Physical Server Migration • 387
Feedback • 17
Files • 370
Finding Kernel Function That Caused D
Process State • 379
Firewall • 115, 365
G General Considerations • 375
Getting Assistance With Virtuozzo Containers
installation • 388
Getting Help • 16
Getting Technical Support • 388
Glossary • 407
Grouping Applications Inside Container • 155
H Hardware Node Availability Considerations •
33
Hardware Node Main Window • 29
Highlighting Counter • 178
HN • See Hardware
Host OS • 22, 195, 291, 363, 407
Hostname
Container • 31, 41, 97, 170, 291, 297, 347
Hardware Node • 297, 405
proxy server • 390
HSPcomplete • 20
HTTP • See Hyper Text Transfer Protocol
Hyper Text Transfer Protocol • 390
I Inside VZFS v2 • 353
Installing Virtuozzo Server License • 227
Internet Explorer • 31
IP Address
Container • 24, 35, 51, 170, 286, 343, 347
Hardware Node • 29
mail relay server • 183
physical server • 294, 323
proxy server • 390
Service Container • 329
iptables • 339, 340, 341
K Keeping Your Virtuozzo System Up-to-Date •
246
Kernel
412
2.4 • 253, 289
2.6 • 61, 253
Kernel Troubleshooting • 377
L License
Virtuozzo • 26, 375
Listing Adapters • 206
Listing Containers • 51
Listing Virtual Networks • 213
Loading iptables Modules • 339
Loading iptables Modules to Hardware Node •
340
Loading iptables Modules to Particular
Containers • 341
Logs • 29, 174, 368, 390, 405
M MAC Address • 290, 407
Main Operations on Services and Processes •
193
Main Principles of Virtuozzo Operation • 24
Managing Backup Node • 94
Managing Backups in Parallels Management
Console • 71
Managing Container CPU Resources • 135
Managing Container Memory Usage • 154
Managing Container Resources Configuration
• 158
Managing Container Search Domains • 373
Managing CPU Share • 136
Managing Disk Quotas • 117
Managing Files • 235
Managing Files Inside Container • 370
Managing Graphical Applications Inside
Container • 345
Managing Hardware Node Resources
Parameters • 327
Managing Hardware Nodes • 227
Managing IP Addresses Pool on Node • 242
Managing Mount Points • 367
Managing Mount Points Inside Container • 319
Managing Network Accounting and
Bandwidth • 142
Managing Network Adapters on Hardware
Node • 205
Managing Processes and Services • 194
Managing Resources • 116
Managing Services and Processes • 191
Managing System Parameters • 150
Managing Users and Groups Inside Container •
363
Managing Virtual Network Adapters • 215
Managing Virtual Networks • 211
Index
Managing Virtuozzo Licenses • 227
Managing Virtuozzo Network • 205
Mastering Parallels Management Console •
357
Migrating Container • 57
Migrating Container to Physical Server • 307,
308
Migrating Legacy Container to Cluster Server
• 279
Migrating Physical Server to Container • 285,
294
Migrating Physical Server to Container in
Command Line • 291
Migrating Physical Server to Container in
Parallels Management Console • 297
Migration
Container to Container • 57
Container to physical server • 307, 308, 323
physical server to Container • 285, 286,
291, 294, 297, 387
zero downtime • 57, 61
Migration Overview • 286
Migration Requirements • 289, 308
Migration Restrictions • 290
Migration Steps • 286, 307
Miscellaneous Problems • 387
Monitoring Processes in Real Time • 198
Monitoring Resources in Parallels
Management Console • 173
Monitoring Resources in Text Console • 170
Monitoring Virtuozzo Objects Using vzsnmp
Plug-in • 185
Mounting /vz Partition via Virtuozzo Script •
318
Moving Container Files to Cache Area on
Hardware Node • 133
Moving Container Within Hardware Node • 64
Moving Network Adapter to Container • 325
Mozilla • 31, 350
N Network
adapter • 146, 148, 290, 292, 325, 339
bandwidth • 146, 148
classes • 143, 146, 148
configuration • 361
connection • 290, 308, 317
interface • 293
parameters • 47, 116, 142, 297, 390
public • 347
traffic • 142, 145, 148
Network Traffic Parameters • 142
New Command Options for vznetcfg • 280
New Directory Structure Restrictions • 277
413
Node
Backup • 68, 92, 97
Destination • 57
Hardware • 23, 28, 29, 31, 33, 35, 49, 57,
118, 136, 143, 158, 195, 286, 293, 307,
317, 340, 361, 394, 395, 405
Monitor • 393, 394, 395, 403, 405
Source • 97, 106
Target • 57
O Obtaining Hardware Node ID From Inside
Container • 317
Operations on Containers • 34
Organization of This Guide • 14
OS Virtualization • 22
Overview • 150, 345
P Parallels Agent • 28, 289, 329, 385, 407
Parallels Infrastructure Management Overview
• 31
Parallels Infrastructure Manager • 13, 31, 286
Parallels Management Console • 13, 26, 27,
28, 29
Parallels Management Console Network
Architecture • 28
Parallels Management Console Overview • 26
Parallels Management Console Specific
Features • 27
Parallels Power Panel • 13, 32, 193
Parallels Power Panel Overview • 32
Password
Container user • 33
root • 48, 294, 308, 347, 403
setting • 48
Plesk • 32, 158, 363
Pool • 146
Preface • 12
Preparing and Sending Questions to Technical
Support • 389
Preparing Container Configuration File • 291
Preparing Hardware Node for Sending Kernel
Messages • 398
Preparing Hardware Node for Sending
Messages • 395
Preparing Monitor Node for Sending Alerts •
403
Preserving Application Data During Container
Reinstallation • 321
Problems With Container Management • 382
Problems With Container Operation • 386
Problems With Physical Server Migration •
387
Index
Processes
monitoring in real time • 198
overview • 191, 192, 193
PID • 202
viewing • 195
Processing Previous Container Requests • 282
Processor
64-bit • 57, 68
p • 57, 68
R RAID • See Redundant Array of Inexpensive
Drives
RAM • See memory
Real-Time Monitoring in Parallels Virtuozzo
Containers • 169
Rebooting Container • 344
Recreating Service Container • 329
Red Hat Package Manager • 22, 23, 329, 396,
403
Redundant Array of Inexpensive Drives • 33
Reinstalling Container • 106
Replaying Information From Logs • 180
Requesting Container in Parallels
Infrastructure Manager • 283
Resource Management • 23
Resources • 23, 116, 183, 297
configuration • 158, 161, 163, 165
CPU • 22, 23, 116, 136, 297
disk space • 23, 116, 117, 118, 122, 125,
127, 129, 297
memory • 23, 116, 297
monitoring • 170, 173, 174, 175, 176, 177,
178, 179, 180, 182, 183
network • 116, 142, 143, 145, 146, 148
overview • 116
system • 116, 195, 297
Restoring Container Files • 90
Restoring Group of Containers • 92
Restoring Single Container • 88
Restrictions • 356
root
operating system • 24
partition • 24
password • 32, 48, 403
user • 294, 308, 403
Routing
rules • 20
table • 365
RPM • See Red Hat Package Manager
Running Commands in Container • 115
Running Graphical Applications in X
Windows • 345
414
Running Graphical Applications via VNC •
350
Running vzbackup/vzrestore Utilities • 274
S Saving Counters Configuration • 179
Saving Kernel Fault (OOPS) • 378
Scaling Container Configuration • 163
Scheduling Container Backups • 98
Scripts • 22, 23, 49, 68, 109, 286, 293, 343,
349, 375, 396
Search Domain • 373
Searching for Container • 372
Searching for Container Backups • 97
Secure Shell • 33, 115, 286, 294, 308, 347,
403, 407
Service Level Agreement • 23
Service Resources • 28, 32, 49, 195, 289, 329
Services
changing mode • 201
overview • 192, 193
restarting • 203
starting/stopping • 203
viewing • 195
xinetd-dependent • 191, 193, 194, 201, 203
Setting Default Backup Location • 74
Setting Default Backup Parameters • 72
Setting Immutable and Append Flags for
Container Files and Directories • 328
Setting Maximal Backup Number for Parallels
Power Panel • 104
Setting Name for Container • 54
Setting Network Parameters • 47
Setting Permissions for Files on Node • 241
Setting Permissions for Roles in Parallels
Infrastructure Manager • 282
Setting root Password for Container • 48
Setting Startup Parameters • 46
Setting Up iSCSI Environment in VirtuozzoBased Systems • 316
Setting Up Monitor Node • 393
Setting Up netconsole • 397
Setting Up Per-Container Disk Quota
Parameters • 122
Setting Up Second-Level Disk Quota
Parameters • 127
Sharing File System Among Containers • 342
SLA • See Service Level Agreement
SLM Modes • 152
Specifying Default Backup Type • 77
Splitting Hardware Node Into Equal Pieces •
161
SSH • See Secure Shell
Standard Migration • 58
Index
Starting Messages Collection on Monitor Node
• 396, 400
Starting, Stopping, and Restarting Services •
203
Starting, Stopping, Restarting, and Querying
Status of Container • 49
Storing Extended Information on Container •
56
Submitting Problem Report to Technical
Support • 390
Subscribing to Parallels Management Console
Alerts • 183
Support • 388, 389, 390, 392
Suspending Container • 113
Swap • 29, 170, 361
T TCP • 116, 345, 407
Telnet • 47, 365
Template
alert • 183
application • 23, 133, 134
area • 132
directory • 132
files • 132
OS (operating system) • 23, 25, 286, 294
overview • 23
updates • 134
updating • 259
Templates • 23
Timeout When Accessing Remote Hosts • 386
Transferring License to Another Node • 230
Troubleshooting • 374
Turning On and Off Network Bandwidth
Management • 146
Turning On and Off Per-Container Disk
Quotas • 119
Turning On and Off Second-Level Quotas for
Container • 125
U UBC • See User Beancounters
UDP • See User Data Protocol
Understanding Licensing • 26
Understanding vzsnmp Basics • 186
Update
template • 132
utility • 252, 253, 254, 259
Virtuozzo • 252, 253, 254, 259, 260
Updating Containers • 265
Updating Current Virtuozzo Containers
Release • 254
Updating EZ Template Packages Inside
Container • 266
415
Updating Host OS Software • 246
Updating in Command Line Mode • 260
Updating in Graphical Mode • 250
Updating License • 230
Updating OS EZ Template Caches • 269
Updating Parallels Virtuozzo Containers With
vzup2date • 248
Updating Templates in Parallels Management
Console • 264
Updating Virtuozzo Containers Software • 248
Updating Virtuozzo EZ Templates • 256
Updating Virtuozzo Standard Templates • 259
Updating Virtuozzo System Files • 252, 262
Upgrading Legacy Containers to Support New
Directory Layout • 277
Upgrading Parallels Virtuozzo Containers to
Latest Release • 253
Upgrading VZFS • 354
Uploading Files to Node • 237
User
Container • 22, 33, 115
level • 116
managing • 363
quota • 118, 122, 129, 286, 294, 307
root • 294, 308, 347
Virtuozzo • 392
User Beancounters • 297, 407
User Data Protocol • 365
Using ALT+SYSRQ Keyboard Sequences •
377
Using Charts Representation • 174
Using Customized Application Template • 313
Using Customized OS EZ Template • 309
Using External Applications for Sending
Alerts • 404
Using EZ OS Template Set • 311
Using Kexec and Kdump For System
Troubleshooting • 380
Using New License Scheme on Virtuozzo 3.0
Nodes • 280
Using Old Configuration Files for Container
Creation • 281
Using Parallels Management Console to
Update Virtuozzo Containers Software • 260
Using SNMP Management Tools to Monitor
Parallels Virtuozzo Objects • 186
Using Table Representation • 182
Using up2date • 247
Using vzabackup/vzarestore Utilities • 69
Using vzstatrep to Monitor Hardware Nodes •
405
Using X Windows to Run Graphical
Applications • 347
Using yast • 247
Index
Using yum • 247
Utilities
backup management • 25
Container management • 46, 47, 48, 49, 51,
106, 109, 115
license management • 26
migration management utilities • 57, 286,
291, 294, 307, 308
Node monitor • 405
resources management utilities • 119, 122,
125, 127, 129, 133, 134, 136, 145, 146,
148, 284
Service Container creation • 329
Virtuozzo update • 252, 253, 254, 259
Virtuozzo License Statuses • 234
Virtuozzo Repository Structure • 333
VNC • See Virtual Network Computing
VPN • See Virtual Private Network
VZFS • See Virtuozzo File System
VZFS v2 • 352
V X Window System • 28, 345, 347, 349
XML • 28
Validating Container Configuration • 165
venet • 290, 292, 407
venet0 Mode • 216
veth Mode • 218
Viewing Active Processes and Services • 195
Viewing Allocated IP Addresses • 244
Viewing Current License • 232
Viewing Network Traffic Statistics • 145
Viewing Summary Pages • 361
Viewing System and Virtuozzo Logs • 368
Viewing Virtuozzo Server License • 233
Virtual Network Computing • 345, 350
Virtual Private Network • 326, 392
Virtualization
operating system • 22
Virtuozzo Applications • 20
Virtuozzo Configuration • 25
Virtuozzo Containers
32-bit version • 57
64-bit version • 57
applications • 20
configuration file • 25, 57, 368
file system • 23
installing • 34, 388
layer • 24
license • 26
logs • 368
resources • 116
support tunnel • 392
technology • 20, 21, 22, 23, 24
templates • 23
updating • 252, 253, 254
utilities • 25
Virtuozzo Containers 64-bit vs. Virtuozzo
Containers 32-bit • 21
Virtuozzo Containers Philosophy • 18
Virtuozzo File System • 22, 290, 407
Virtuozzo File System (VZFS) • 22
416
W What are Disk Quotas? • 118
What are Resource Control Parameters? • 116
What Are Services and Processes • 192
What is Parallels Virtuozzo • 19
X Z Zero-Downtime Migration • 61