1
Parallels Virtuozzo
Containers 4.7 for Linux
Templates Management Guide
Copyright © 1999-2012 Parallels IP Holdings GmbH and its affiliates. All rights reserved.
Parallels IP Holdings GmbH.
Vordergasse 59
CH8200 Schaffhausen
Switzerland
Tel: + 41 526320 411
Fax: + 41 52672 2010
www.parallels.com
Copyright © 1999-2012 Parallels IP Holdings GmbH and its affiliates. All rights reserved.
This product is protected by United States and international copyright laws. The product’s underlying technology,
patents, and trademarks are listed at http://www.parallels.com/trademarks.
Microsoft, Windows, Windows Server, Windows NT, Windows Vista, and MS-DOS are registered trademarks of Microsoft
Corporation.
Apple, Mac, the Mac logo, Mac OS, iPad, iPhone, iPod touch, FaceTime HD camera and iSight are trademarks of Apple
Inc., registered in the US and other countries.
Linux is a registered trademark of Linus Torvalds.
All other marks and names mentioned herein may be trademarks of their respective owners.
Contents
Introduction ............................................................................................................... 5
About Parallels Virtuozzo Containers 4.7 .......................................................................... 6
About This Guide ............................................................................................................ 7
Organization of This Guide .......................................................................................................7
Documentation Conventions ....................................................................................................8
Getting Help....................................................................................................................9
Feedback........................................................................................................................9
Templates Overview ................................................................................................ 10
Parallels Virtuozzo Containers Templates Overview ........................................................ 11
EZ Templates Overview ................................................................................................. 12
EZ Templates Basics ..................................................................................................... 13
EZ Template Directory Structure .................................................................................... 15
Differences Between OS and Application EZ Templates ................................................. 18
EZ Template Lifecycle ................................................................................................... 19
Managing EZ Templates ......................................................................................... 20
Creating an EZ Template ............................................................................................... 20
Creating a Template from Official Templates ......................................................................... 21
Creating a Template from Scratch ......................................................................................... 21
Setting Up Repositories and Proxy Servers for EZ Templates ......................................... 27
Managing Default Repositories .............................................................................................. 28
Creating a Local Repository .................................................................................................. 30
Managing Repositories for Commercial Linux Distributions.................................................... 34
Creating Proxy Servers for EZ Templates .............................................................................. 36
Contents
Preparing OS EZ Templates for Creating Containers ...................................................... 43
Installing Application EZ Templates ................................................................................ 44
Downloading and Installing EZ Templates with vzup2date .............................................. 44
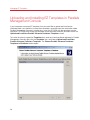
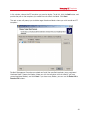
Uploading and Installing EZ Templates in Parallels Management Console ....................... 48
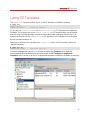
Listing EZ Templates ..................................................................................................... 51
Adding Application EZ Templates to Containers ............................................................. 53
Keeping EZ Templates Up To Date ................................................................................ 55
Updating EZ Templates on Hardware Node .......................................................................... 55
Updating OS EZ Template Caches ........................................................................................ 63
Updating EZ Templates Packages In Containers ................................................................... 65
Creating Historical Mirrors for Backed Up Containers ..................................................... 68
Copying EZ Templates to Another Hardware Node ........................................................ 70
Removing Application EZ Templates From Containers.................................................... 72
Removing EZ Templates From the Hardware Node ........................................................ 73
Converting Containers Based on Standard Templates ................................................... 75
Index ........................................................................................................................ 77
CHAPTER 1
Introduction
This chapter provides basic information about Parallels Virtuozzo Containers 4.7 and this guide.
In This Chapter
About Parallels Virtuozzo Containers 4.7 ................................................................. 6
About This Guide ................................................................................................... 7
Getting Help ........................................................................................................... 9
Feedback ............................................................................................................... 9
Introduction
About Parallels Virtuozzo Containers 4.7
Parallels Virtuozzo Containers 4.7 is a patented OS virtualization solution. It creates isolated
partitions or Containers on a single physical server and OS instance to utilize hardware, software,
data center and management effort with maximum efficiency. The basic Parallels Virtuozzo
Containers capabilities are:
•
Intelligent Partitioning—Division of a server into as many as hundreds of Containers with
full server functionality.
•
Complete Isolation—Containers are secure and have full functional, fault and performance
isolation.
•
Dynamic Resource Allocation—CPU, memory, network, disk and I/O can be changed
without rebooting.
•
Mass Management—Suite of tools and templates for automated, multi-Container and multiserver administration.
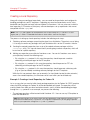
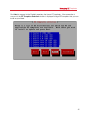
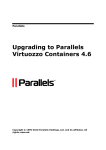
The diagram below represents a typical model of the Parallels Virtuozzo Containers system
structure:
6
Introduction
The Parallels Virtuozzo Containers OS virtualization model is streamlined for the best performance,
management, and efficiency. At the base resides a standard Host operating system which can be
either Windows or Linux. Next is the virtualization layer with a proprietary file system and a kernel
service abstraction layer that ensure the isolation and security of resources between different
Containers. The virtualization layer makes each Container appear as a standalone server. Finally,
the Container itself houses the application or workload.
The Parallels Virtuozzo Containers OS virtualization solution has the highest efficiency and
manageability making it the best solution for organizations concerned with containing the IT
infrastructure and maximizing the resource utilization. The Parallels Virtuozzo Containers complete
set of management tools and unique architecture makes it the perfect solution for easily
maintaining, monitoring, and managing virtualized server resources for consolidation and business
continuity configurations.
About This Guide
This guide provides information on Parallels templates, an exclusive technology that allows you to
deploy Linux applications in Containers, greatly saving Hardware Node resources (physical
memory, disk space, and so on).
The primary audience for this guide is anyone who is intended to deploy one or several applications
in their Containers and looking for ways to do it with the maximal level of efficiency. To complete all
the operations described in this guide, no more than basic Linux administration habits is required.
Organization of This Guide
Chapter 1, Introduction, provides general information on Parallels Virtuozzo Containers 4.7 and
this guide.
Chapter 2, Templates Overview, outlines the basics of EZ templates.
Chapter 3, Managing EZ Templates, provides instructions on managing OS and application EZ
templates. You will know how to create and install EZ templates on the Hardware Node, add them
to and remove them from Containers, make OS template caches and update them, and so on.
7
Introduction
Documentation Conventions
Before you start using this guide, it is important to understand the documentation conventions used
in it.
The table below presents the existing formatting conventions.
Formatting convention
Special Bold
Type of Information
Example
Items you must select, such as
Go to the Resources tab.
menu options, command buttons,
or items in a list.
Titles of chapters, sections, and
subsections.
Read the Basic Administration chapter.
Italics
Used to emphasize the
These are the so-called OS templates.
importance of a point, to
introduce a term or to designate a To remove a Container, type vzctl
command-line placeholder, which delete ctid.
is to be replaced with a real name
or value.
Monospace
The names of commands, files,
and directories.
Preformatted
Monospace Bold
Key+Key
On-screen computer output in
your command-line sessions;
source code in XML, C++, or
other programming languages.
Use vzctl start to start a Container.
Saved parameters for Container
101
What you type, as contrasted with C:\vzlist -a
on-screen computer output.
Key combinations for which the
user must press and hold down
one key and then press another.
Ctrl+P, Alt+F4
Besides the formatting conventions, you should also know about the document organization
convention applied to Parallels documents: chapters in all guides are divided into sections, which,
in their turn, are subdivided into subsections. For example, About This Guide is a section, and
Documentation Conventions is a subsection.
8
Introduction
Getting Help
In addition to this guide, there are a number of other resources available for Parallels Virtuozzo
Containers which can help you use the product more effectively. These resources include:
•
Parallels Virtuozzo Containers 4.7 Installation Guide. This guide provides detailed information on
installing Parallels Virtuozzo Containers on your server, including the pre-requisites and the
stages you shall pass.
•
Getting Started With Parallels Virtuozzo Containers 4.7. This guide provides basic information
on how to install Parallels Virtuozzo Containers on your server, create new Containers and
virtual machines, and perform main operations on them. Unlike the Parallels Virtuozzo
Containers 4.7 Installation Guide, it does not contain detailed description of all the operations
needed to install and set Parallels Virtuozzo Containers to work (for example, installing Parallels
Virtuozzo Containers in unattended mode).
•
Parallels Virtuozzo Containers 4.7 User's Guide. This guide provides comprehensive information
on Parallels Virtuozzo Containers covering the necessary theoretical conceptions as well as all
practical aspects of working with the product. However, it does not deal with the process of
installing and configuring your system.
•
Parallels Virtuozzo Containers 4.7 Command Line Reference Guide. This guide is a complete
reference on all Parallels Virtuozzo Containers configuration files and command-line utilities.
•
Deploying Clusters in Parallels-Based Systems. This guide describes the process of creating
Parallels failover and GFS clusters using the Red Hat Cluster Suite (RHCS) software.
Feedback
If you spot a typo in this guide, or if you have an opinion about how to make this guide more
helpful, you can share your comments and suggestions with us by completing the Documentation
Feedback form on our website (http://www.parallels.com/en/support/usersdoc/).
9
CHAPTER 2
Templates Overview
This chapter outlines the basics of EZ templates.
In This Chapter
Parallels Virtuozzo Containers Templates Overview ................................................. 11
EZ Templates Overview .......................................................................................... 12
EZ Templates Basics .............................................................................................. 13
EZ Template Directory Structure ............................................................................. 15
Differences Between OS and Application EZ Templates .......................................... 18
EZ Template Lifecycle............................................................................................. 19
Templates Overview
Parallels Virtuozzo Containers Templates
Overview
A template in Parallels Virtuozzo Containers is a set of application files and registry settings installed
on the Host operating system in such a way as to be usable by any Container by mounting over
Virtuozzo File System. The Parallels Virtuozzo Containers software provides tools for creating
templates, installing and removing them on/from the Hardware Node, adding them to a Container,
and so on. Using templates lets you
•
Securely share the RAM among similar applications running in different Containers to save
hundreds of megabytes of memory.
•
Securely share the files comprising a template among different Containers to save gigabytes of
disk space.
•
Install applications and patches simultaneously in many Containers.
•
Use different versions of an application on different Containers (for example, perform an
upgrade only in certain Containers).
There are two types of templates in Parallels Virtuozzo Containers. These are OS templates and
application templates. An OS template is an operating system and the standard set of applications
to be found right after the installation. Parallels Virtuozzo Containers uses OS templates to create
new Containers with a preinstalled operating system. An application template is a set of
repackaged software packages optionally accompanied with configuration scripts. Parallels
Virtuozzo Containers uses application templates to add extra software to the existing Containers.
For example, you can create a Container on the basis of the redhat OS template and add the
MySQL application to it with the help of the mysql template.
Some of the operations you can perform on templates are listed below:
•
creating your own application templates
•
uploading new templates to the Hardware Node
•
listing the templates currently installed on the Hardware Node
•
installing templates on and removing them from the Hardware Node
•
adding templates to any number of Containers
•
removing templates from the Hardware Node
•
removing templates that are not needed any more from Containers
•
migrating templates from the Source Node to the Destination Node
All these operations are described in the following chapters in detail.
11
Templates Overview
EZ Templates Overview
EZ templates are part and parcel of the Parallels Virtuozzo Containers philosophy because they
provide a way of sharing resources among lots of Containers, thus enabling huge savings in terms
of disk space and memory. For example, when you install and cache an OS template on the
Hardware Node, Parallels Virtuozzo Containers creates the
/vz/template/<name_of_the_OS> directory containing all the OS files that can be shared
among Containers. When a Container based on this template is created, it contains only symlinks
to the OS template files. These symlinks occupy very little space on the hard disk. They are situated
in the so-called private area of the Container. The corresponding directory is
/vz/private/<CT_ID>. The private area of a Container contains not only symlinks to the
necessary template files, but also the copy-on-write area of the Container (the area for storing the
information about those changes that the Container makes to the template files; this information
pertains only to the given directory) and all the private Container files. When the Container is
started, this private area is mounted as Virtuozzo File System (VZFS) to the /vz/root/<CT_ID>
directory. This directory is seen as the root directory from within the Container. And, which is the
pivot of it all, thanks to the VZFS, the symlinks of the Container private area are seen as real files
there!
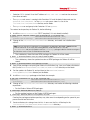
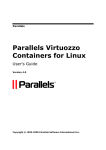
Thus, the most important directories in the /vz partition are the following:
/vz/template
- contains OS and application files shared among Containers;
/vz/private
- contains VZFS symlinks to template files;
/vz/root
- contains Container mounted symlinks and all other Container files.
The relation of these directories may be represented as below:
/vz/template (real files) /vz/private (symlinks) /vz/root (symlinks seen as real files
in / for the Container)
While you are able to perform all kinds of tasks within a Container including building RPM packages
and installing them, Parallels Virtuozzo Containers provides an easy and far more efficient way of
installing the applications you need inside Containers. In the same way as you install an OS
template on the Parallels Virtuozzo Containers system in order to create any number of Containers
on its basis and share its resources, you can install application templates in Parallels Virtuozzo
Containers in order to share application files among any number of Containers. You can then add
these applications to any number of Containers with a single command.
12
Templates Overview
EZ Templates Basics
All OS and application EZ templates are defined by the following features:
•
EZ templates do not carry any package files. They contain only information about what
packages to install on the Hardware Node to make the templates fully operational and from
what network repository to download these packages.
Note: For the sake of brevity, we will be saying throughout this guide that packages are included in EZ
templates, which actually means that EZ templates contain the information on the corresponding
packages without carrying the packages themselves.
•
The dependencies of software packages included in an EZ template are automatically resolved
during the packages installation on the Hardware Node. So, if the specified packages require
other packages to be installed, these packages are also downloaded from the repository and
installed on the Node. In case a package has requirements that conflict with existing software
on the Node or any dependencies for the package being installed cannot be satisfied, the
package installation process fails without making any changes to the system.
•
The EZ templates technology allows you to use the original OS and application vendor's
packages and to receive the updated packages from a central repository right after their
release.
One of the basic concepts in the EZ template technology is the concept of 'repository' where
software packages for the given EZ template are stored. A repository is a prepared directory or
web site containing the packages and index files for Linux operating systems and/or any of their
applications. An example of such a repository is the repository located at the
http://mirrors.usc.edu/pub/linux/distributions/fedora/ web site and storing software packages for
the Fedora Core releases. Using repositories gives you the following advantages:
•
Software packages included in the given EZ template do not contain versions, but only names
(for example, bash, crontabs). So, you always update any package included in the EZ
template to its latest version available in the repository.
•
As a result of the fact that a list of packages does not provide their versions, EZ templates do
not have versions either (for example, centos-5-x86). Thus, you install any EZ template on
the Hardware Node only once and, after that, use the installed template to update the
packages inside any Container where it is applied.
•
You can create several OS EZ template sets for one and the same Linux operating system. Any
OS EZ template you are provided with has the default packages set included in it and is called
the base OS EZ template. However, you can make your own OS EZ template sets (the socalled non-base OS EZ template sets) which can differ from the corresponding base template:
• in the number of packages included in these EZ template sets
• in the number and location of repositories to be used for these EZ template sets
• in the number and kind of scripts to be executed on different EZ template sets lifecycle
stages, etc.
13
Templates Overview
Non-base OS EZ template sets should have their own names and are created by appending a
random identifier to the base OS EZ template name. For example, if you wish your Container to
run Red Hat Enterprise Linux 5 and to function as a Linux-based server only, you can create the
redhat-el5-x86-server OS EZ template set and include only those packages in it that are
needed for performing main server tasks. So, you can specify packages to be used for setting
up file and print sharing and exclude all the packages for graphical interfaces (GNOME and
KDE).
Parallels Virtuozzo Containers provides you with a vzpkg tool allowing you to automatically locate
and obtain the correct packages for your EZ templates from package repositories. The packages
are downloaded from the repository and installed on the Hardware Node in one of the following
cases:
•
when creating a cache for an OS EZ template
•
when updating an existing OS EZ template cache (if there are new packages available in the
repository)
•
when adding an application EZ template or package to the first Container
•
when updating EZ templates or software packages inside a destination Container
Note: Detailed information on how to manage software package repositories is provided in the Setting
Up Repositories for EZ Templates section (p. 27).
14
Templates Overview
EZ Template Directory Structure
All EZ templates and the software packages included in them and installed on the Hardware Node
are located in the so-called template area the path to which is set as the value of the TEMPLATE
variable in the /etc/vz/vz.conf file. By default, the /vz/template directory is used. The
template area includes two main subdirectories:
•
The cache subdirectory where the tar archive of the potential private area of a Container based
on the corresponding OS EZ template is stored. The tar archive is created during the OS EZ
template caching. Please keep in mind that the OS EZ template should be obligatorily cached
before you can start creating Containers on its basis.
•
The template directory having the name of <os_name>/<os_version>/<arch> where:
• <os_name> denotes the name of the Linux distribution for which the OS EZ template is
created (redhat, centos, fedora-core, and so on);
• <os_version> is the version of the Linux distribution specified as <os_name> (for
example, 12 or 13), and
• <arch> denotes the microprocessor architecture where the OS EZ template is to be run
(x86 or x86-64).
For example, after installing the 32-bit version of the Fedora 13 EZ template, the
/vz/template/fedora-core/13/x86 directory on the Hardware Node is created.
The <arch> directory contains the following subdirectories and areas:
•
The template configuration subdirectory including:
• The config/os/default directory where the appropriate configuration files for the base
OS EZ template are stored.
• The config/os/<setname> directory where the appropriate configuration files for nonbase OS EZ templates, if any, are stored.
• The config/app/<app_name>/default directory where the appropriate configuration
files for the base application EZ template are stored. This directory is created if at least one
application EZ template for the given OS EZ template is installed on the Hardware Node.
• The config/app/<app_name>/<setname> directory where the appropriate
configuration files for non-base application EZ templates, if any, are stored.
•
The packages area containing a number of software packages downloaded from the repository
and installed on the Hardware Node. The installed files can be shared among Containers, i.e.
when a Container based on the given OS EZ template is created or application EZ templates
are added to any Container, it contains only symlinks to the template files in the packages area.
The installed package has the following structure:
<name>-<epoch>:<version>-<release>.<arch>
where
15
Templates Overview
• <name> is the package name
• <epoch> denotes the package epoch
• <version> indicates the package version
• <release> is the package release
• <arch> denotes the microprocessor architecture where the package is to be used
Examples of the installed software packages are the zlib-1.2.3-14.fc138.i386.rpm or
glib-1.2.10-28.fc13.i386.rpm packages that can be found in the packages area on the
Hardware Node after installing and caching the Fedora 13 OS EZ template.
•
One or several subdirectories containing the packages comprizing the corresponding OS EZ
template. The directories have the following names:
• baseN for the base OS template
• <setname>N for the non-base OS template with the name of <setname>, if any
• <appname>N for the base application template
• <appname>-<setname>N for the application template with the name of <setname>, if
any
N denotes the index number of the URL specified in the repositories/mirrorlist file
(see information on the repositories/mirrorlist file below).
As has been mentioned above, the configuration directory (that is,
/<template_area>/<template_directory>/config) contains a number of subdirectories
storing 'EZ templates'-related configuration files. The contents of these subdirectories can vary
depending on whether it is a base OS EZ template or a non-base one and on the EZ template type
(OS or application template). The most important configuration files are listed below:
•
Data files:
• packages: contains a list of software packages names included in the corresponding EZ
template.
• package_manager: specifies the packaging system used to handle the EZ template.
• repositories: a list of repositories where the packages comprising the EZ template are
stored.
• mirrorlist: one or several URLs to the file containing a list of repositories from where the
packages comprising the EZ template are to be downloaded.
• distribution: the name of the Linux distribution for which the EZ template is created.
This file should be absent for application EZ templates.
• summary: brief information on the EZ template.
• description: detailed information on the EZ template. As distinct from the summary file,
it can contain additional data relevant for the EZ template.
16
• environment: a list of environment variables set in the form of key=value.
Templates Overview
•
Scripts:
• pre-cache: this script is executed before installing the packages included in the EZ
template on the Hardware Node.
• post-cache: this script is executed after installing the packages included in the EZ
template on the Hardware Node.
• pre-install: this script is executed before adding the EZ template to or installing the
package inside the Container.
• post-install: this script is executed after adding the EZ template to or installing the
package inside the Container.
• pre-upgrade: this script is executed before updating the packages inside the Container.
• post-upgrade: this script is executed updating the packages inside the Container.
• pre-remove: this script is executed before removing the application EZ template/package
from the Container.
• post-remove: this script is executed after removing the application EZ template/package
from the Container.
•
Document files: one or several files with arbitrary names containing the information on the EZ
template (e.g. README).
Note: Detailed information on the files contained in the OS template configuration directory is provided in
the Parallels Virtuozzo Containers 4.7 Reference Guide.
When working with EZ template configuration files, pay attention to the following:
•
The packages file should be specified for all EZ templates.
•
The packages, package_manager, and repositories/mirrorlist files should be
specified for all base OS EZ templates.
•
The package_manager and distribution files should be specified for all base OS EZ
templates and absent for non-base OS EZ templates and all application EZ templates.
•
The information from the repositories/mirrorlist file(s) created for non-base OS and all
application EZ templates is added to that in the repositories/mirrorlist file(s) for the
base OS EZ template.
17
Templates Overview
Differences Between OS and Application EZ
Templates
Actually, there are four major differences between OS EZ templates and application templates:
•
OS templates are used to create new Containers, whereas application templates provide
additional software for already created Containers.
•
OS templates may and usually do use action scripts, whereas application templates cannot use
action scripts in the current version of Parallels Virtuozzo Containers.
•
You may define a list of compatible templates and a list of required templates for application
templates.
•
OS templates and their updates are cacheable, whereas application templates and their
updates are not.
The last point needs further explanation. The fact is that creating a huge number of symlinks to the
OS template when creating a Container (i.e. its private area) may take a very considerable amount
of time. To reduce the time needed for creating a new Container, you should use the vzpkg
create cache command allowing you to make a tarball of the potential private area of a
Container based on the corresponding template. This tarball is also located in the
/vz/template/cache directory. When a Container is being created, the tarball is simply
deployed into the Container private area.
18
Templates Overview
EZ Template Lifecycle
An EZ template has the following development stages:
1
Any EZ template should be first installed on the Hardware Node. The vzpkg install
template command enables you to install OS and application EZ templates on the Node.
2
The EZ template should be cached by using the vzpkg create cache command. This step
is required for OS EZ templates only. As a result of the vzpkg create cache execution, the
necessary packages included in the OS EZ template are downloaded from the network
repository, installed in the /vz/template/<os_name>/<os_version> directory on the
Hardware Node, and a gzipped tarball for the OS EZ template is created and put to the
/vz/template/cache directory.
3
Either a new Container is created on the basis of the cached OS EZ template with the vzctl
create command or an application EZ template is added to any number of Containers by
using the vzpkg install command. In the latter case, the necessary application files are first
downloaded from the network repository and installed on the Hardware Node and then the
VZFS links to the installed files are created and added to the Container private area.
4
An obsolete EZ template applied to the corresponding Container can be updated by using the
vzpkg update command.
5
Any EZ template excluding OS EZ templates can be removed from the Container with the
vzpkg remove command.
6
An EZ template that is not used by any Container may be completely removed from the
Hardware Node with the vzpkg remove template command.
All these steps can be performed either through the Parallels Virtuozzo Containers command-line
utilities indicated above, with the help of Parallels Virtual Automation, or using Parallels
Management Console.
19
CHAPTER 3
Managing EZ Templates
This chapter describes how to create and manage EZ OS and application templates in Parallels
Virtuozzo Containers.
In This Chapter
Creating an EZ Template ........................................................................................ 20
Setting Up Repositories and Proxy Servers for EZ Templates .................................. 27
Preparing OS EZ Templates for Creating Containers ............................................... 43
Installing Application EZ Templates ......................................................................... 44
Downloading and Installing EZ Templates with vzup2date ....................................... 44
Uploading and Installing EZ Templates in Parallels Management Console ................ 48
Listing EZ Templates .............................................................................................. 51
Adding Application EZ Templates to Containers ...................................................... 53
Keeping EZ Templates Up To Date ......................................................................... 55
Creating Historical Mirrors for Backed Up Containers .............................................. 68
Copying EZ Templates to Another Hardware Node ................................................. 70
Removing Application EZ Templates From Containers ............................................. 72
Removing EZ Templates From the Hardware Node ................................................. 73
Converting Containers Based on Standard Templates ............................................. 75
Creating an EZ Template
Parallels Virtuozzo Containers is shipped with a certain number of OS (e.g., centos-5-x86_64)
and application (e.g., mysql-centos-5-x86_64) EZ templates. This is usually sufficient to
deploy the main Linux distributions and their applications in Containers. You can, however, create
your own OS and application EZ templates and use them to base Containers on or run different
applications in Containers.
You can use one of the following ways to create EZ templates:
•
Make a template on the basis of an existing template (p. 21). In this case, you configure the
parameters of one of the templates installed on your Node to meet your needs.
•
Make a template from scratch (p. 21). In this case, you first create a new template configuration
and then create the template on its basis.
The following subsections describe both ways of creating templates in detail.
Managing EZ Templates
Creating a Template from Official Templates
The easiest way to create a template is to base it on one of the official templates shipped by
Parallels and adjust its configuration to meet your demands:
1
Install the template you want to use as the basis for your new template (e.g., using the
vzup2date -z command).
2
Create a copy of the directory containing the template configuration files. Depending on
whether you want to create a non-base template or a self-contained template, your steps
slightly differ:
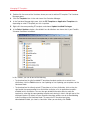
• To create a non-base template, create a subdirectory in the
/vz/template/os_name/os_version/arch/config/os directory and copy to this
directory the contents of the
/vz/template/os_name/os_version/arch/config/os/default subdirectory.
For example, to make a non-base template for the official centos-5-x86_64 template
and put its configuration files to the /customized directory, you can run this command:
# cp -a /vz/template/centos/5/x86_64/config/os/{default,customized}
This command creates a new non-based template with the name of centos-5-x86_64customized.
• To create a self-contained template, create a subdirectory in the /vz/template directory
and copy to this directory the contents of the subdirectory for the original template
(/vz/template/os_name). For example, to make a self-contained template on the basis
of the official centos-5-x86_64 template and put it to the /vz/template/centoscustomized directory, you can run these commands:
# mkdir -p /vz/template/centos-customized/5/x86_64/config
# cp -a /vz/template/centos{,-customized}/5/x86_64/config/os
The last command creates a new self-contained template with the name of centoscustomized-5-x86_64.
3
Change to the directory containing the configuration files for the new template and adjust them
to meet your demands. For example, you can change the list of packages to include in the
template by editing the packages file or configure the list of mirrors by editing the
mirrorlist file.
Creating a Template from Scratch
The process of creating a template from scratch includes completing the following tasks:
1
Installing the vztt-build package on the Node.
2
Making a metafile that will be used as the basis for creating the template.
3
Using the vzmktmpl utility to create the template from the metafile.
The following subsections describe these operations in detail.
21
Managing EZ Templates
Installing vztt-build
The first step in creating a template from scratch is to install the vztt-build package on your
Node. This package contains
•
template metafile samples. You use metafile samples as the basis for creating a metafile for
your own template.
•
the vzmktmpl utility. You use the vzmktmpl utility to create the template on the basis of your
metafile.
The vztt-build package is located in the /virtuozzo/RPMS/optional directory of your
Parallels Virtuozzo Containers distribution and is not installed by default during the installation. To
install the vztt-build package, use the rpm -i command, for example:
# rpm -i /virtuozzo/RPMS/optional/vztt-build-4.7.0-11.x86_64.rpm
Creating Metafiles
In the second step, you make a metafile, a plain text file having the .metafile extension and
containing a list of parameters for your template. The vzmktmpl utility uses this file when creating
the template.
The following example demonstrates the process of creating a metafile for the x64 version of
CentOS 5. To create the metafile:
1
Create a new text file with an arbitrary name and the.metafile extension (e.g., centos-5custom.metafile).
The easiest way to create a new metafile is to copy one of the metafile samples from the
/usr/share/vztt/samples directory and configure it to meet your demands. For example,
you can use the /usr/share/vztt/samples/centos-5-x86_64/metafile file as the
basis for creating your new metafile for CentOS 5.
# cp /usr/share/vztt/samples/centos-5-x86_64/metafile /home/user1
2
Configure the metafile to meet your demands:
a
%osname. Specify the name of the Linux distribution for which you are creating the OS EZ
template:
%osname
centos-custom
The specified name will be assigned to the template directory where you will install the
template (e.g., in our case, it will be /vz/template/centos-custom).
b
%osver
5
22
%osver. Specify the version of the Linux distribution for which you are creating the
template:
The specified name will be assigned to the subdirectory that will denote the version of your
Linux distribution (e.g., /vz/template/centos-custom/5).
Managing EZ Templates
c
%osarch. Provide the information about the microprocessor architecture where the OS EZ
template is to be run:
%osarch
x86_64
You can set the value of the %osarch parameter to one of the following:
* x86: specify if you plan to run the template on x86 platforms.
* x86_64: specify if you plan to use the template on x86-64 platforms.
As the template being created is intended for use on x86-64-bit platforms, the %osarch
parameter is set to x86_64.
d
%packages. Indicate the packages to include in the template.
The names of the packages must correspond to the names of real packages (with or
without package versions, for example, wget or wget=1.9.1) that are stored in the
repository used for the OS template (in our case, for CentOS 5). The specified packages will
be downloaded from the package repository and installed on the Node when you will cache
the OS template.
Note: If you are creating a template for Debian-based distributions (e.g., Debian, Ubuntu), you
need to specify in this step three parameters: %packages_0, %packages_1, and %packages.
This is explained by the fact that the installation of such distributions is carried out in three stages.
If you do not know which packages to include, consult the documentation for the respective
distribution.
e
%package_manager. Specify the package manager to use for handling the template.
%package_manager
rpm44x64
For the full list of package managers, see Available Package Managers below.
f
%repositories. Define the list of repositories storing packages for the template:
%repositories
$CE_SERVER/centos/5/os/x86_64
$CE_SERVER/centos/5/updates/x86_64
All the listed parameters are mandatory and must be specified in any metafile. You can also
set a number of supplementary parameters in your metafile (e.g., version and release).
For detailed information on all available parameters, see the vzpkg.metafile manual
pages. For metafile samples, go to the /usr/share/vztt/samples directory and look
for the metafile file in the subdirectory corresponding to specific Linux distributions (e.g.,
/usr/share/vztt/samples/centos-5-x86_64/metafile).
3
Save the file.
Metafiles for Application Templates
The example above explains in detail how to create a metafile for an OS template. The process of
creating a metafile for an application template is similar to that described above, except for the
following:
23
Managing EZ Templates
•
Add the %appname parameter to the file to specify a name for the application template, for
example:
%appname
php-customized
•
Do not include the %package_manager, %upgradable_versions, and %distribution
parameters in the file. These parameters are allowed for OS templates only.
•
Make sure that the value of the %osname parameter corresponds to the name of the directory
of the Linux distribution under which the application template is to be run. For example, if you
are creating an application template for CentOS 5 installed in the /vz/template/centos
directory, set this value to centos:
%osname
centos
•
Ensure that the value of the %osver parameter corresponds to the version of the respective
Linux distribution. For example, for CentOS 5 installed in the /vz/template/centos/5
directory, set this value to 5:
%osver
5
Available Package Managers
Depending on the Linux distribution for which you are creating the template, set the following
values for the package_manager parameter:
x86 Linux distributions
•
rpm49db5x86: Fedora 17
•
rpm49x86: Fedora 15 and 16
•
rpm47x86: Red Hat Enterprise Linux 6 and CentOS 6
•
rpm44x86: Red Hat Enterprise Linux 5 and CentOS 5
•
rpm43x86: Red Hat Enterprise Linux 3 and 4, CentOS 3 and 4
•
rpmzypp44x86: SUSE Linux Enterprise Server 11 with Service Pack 2
•
rpm41x86: SUSE Linux Enterprise Server 10 and SUSE Linux 10.x
•
rpm41s9x86: SUSE Linux Enterprise Server 9
•
rpmzypp49x86: openSUSE 12.1
•
dpkg: Debian and Ubuntu
x86-64 Linux distributions
•
rpm49db5x64: Fedora 17
•
rpm49x64: Fedora 15 and 16
•
rpm47x64: Red Hat Enterprise Linux 6 and CentOS 6
24
Managing EZ Templates
•
rpm44x64: Red Hat Enterprise Linux 5 and CentOS 5
•
rpm43x64: Red Hat Enterprise Linux 3 and 4, CentOS 3 and 4
•
rpmzypp44x64: SUSE Linux Enterprise Server 11 with Service Pack 2
•
rpm41x64: SUSE Linux Enterprise Server 10 and SUSE Linux 10.x
•
rpm41s9x64: SUSE Linux Enterprise Server 9
•
rpmzypp49x64: openSUSE 12.1
•
dpkgx64: Debian and Ubuntu
Creating the Template with vzmktmpl
In the last step, you use the vzmktmpl utility to create the template. To make a template with this
utility, you need to specify the path to
•
Metafile that defines all parameters for the template; see Creating Metafiles from Scratch (p.
22) for details on metafiles.
•
Scripts that are to be executed at different stages of the template life cycle (e.g., when caching
an OS template or adding an application template to a Container). Each template should have
its own set of scripts optimized for use with the Linux distribution for which the template is
created. To learn what scripts to specify for your template:
1. Install an official template provided by Parallels for the same Linux distribution for which you
are creating the template. For example, if you are making a template for CentOS 5, install
the CenOS 5 OS template (use the vzupdate -z command, if necessary).
2. Go to the configuration directory
(/vz/template/os_name/os_version/arch/config/os/default) of the installed
template.
3. Look for the files starting with "pre-" and "post-" (e.g, pre-cache or post-install):
25
Managing EZ Templates
# ls -l /vz/template/centos/5/x86_64/config/os/default
...
-rwxr-xr-x 1 root root 453 Aug 13 22:12 post-cache
-rwxr-xr-x 1 root root 3399 Aug 13 22:12 post-install
-rwxr-xr-x 1 root root 610 Aug 13 22:12 pre-cache
-rwxr-xr-x 1 root root 943 Aug 13 22:12 pre-upgrade
...
For the full list of scripts, see the vzmktmpl section in the Parallels Virtuozzo Containers 4.7
Command Line Reference Guide.
Once you have a metafile and the required scripts at hand, copy them to your current working
directory and execute the vzmktmpl utility. For example, to create a template for CentOS 5, base
it on the centos-5-custom.metafile file, and include the scripts post-cache, postinstall, pre-cache, and pre-upgrade in the template, you can run this command:
# vzmktmpl --pre-cache pre-cache --pre-upgrade pre-upgrade --post-cache post-cache -post-install post-install centos-5-custom.metafile
Upon the command completion, the created template is put to your current working directory:
# ls
centos-custom-5-x86_64-ez-1.0-1.noarch.rpm
...
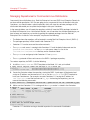
To start using the new OS template, install it on the Node using the vzpkg install template
command and cache it with the vzpkg create cache command.
26
Managing EZ Templates
Setting Up Repositories and Proxy Servers for EZ
Templates
If you are going to use OS and application EZ templates in Containers, you first need to have one
or more repositories with software packages prepared for these EZ templates. Package
repositories are required for the EZ templates functioning due to the fact that these templates do
not carry all the necessary package files inside themselves. They contain only information about
what packages are included in the corresponding EZ template and from what repository they
should be downloaded. In Parallels Virtuozzo Containers, you can make use of the following
package repositories:
•
Default repositories. When you install an EZ template on the Node, it is pre-configured to use
official vendor's file sources (e.g., RPMs from the Fedora website) and a number of packages
provided by Parallels and needed for the correct EZ template functioning. So, you can start
using the default repositories right after the EZ template installation on the Node. Please note
that the default repositories are provided for non-commercial versions of Linux distributions
only.
•
Local repositories. You can build your own local repositories, which allows you:
• To greatly save on network bandwidth when deploying package updates to several Nodes
in your network.
• To organize your own package repository if public repositories provided by Linux OS and
application vendors are not compatible with a vzpkg tool used to manage EZ templates.
Note: The vzpkg tool supports all the repositories that can be used by the yum utility (version 2.4.0
and higher) and the apt utility.
•
Repositories for storing software packages and updates for Red Hat Enterprise Linux
distributions.
Along with setting up the aforementioned package repositories, you can also create special
caching proxy servers and use them to efficiently manage your OS and application EZ templates.
27
Managing EZ Templates
Managing Default Repositories
When you install an OS EZ template on the Node, it is preconfigured to use one or several package
repositories storing Linux OS vendor's file sources. The path to the repositories for most OS EZ
templates and their application EZ templates is automatically set during the EZ template installation
in the mirrorlist or repositories files located in the
/vz/template/<os_name>/<os_version>/<arch>/config/os/default directory.
Thus, you do not have to perform any additional operations to start using an installed OS EZ
template (i.e. cache it and create Containers on its basis). The only requirement your system must
meet is to have an active Internet connection to access the servers where the preconfigured
repositories are located.
Let us assume that you want to use the 32-bit version of Fedora 16 to base your Containers on. To
do this, you install the fedora-core-16-x86-tmpl-4.7.0-3.noarch.rpm EZ template on
the Node:
# vzpkg install template fedora-core-16-x86-tmpl-4.7.0-3.noarch.rpm
Preparing...
############################## [100%]
1:fedora-core-16-x86-tmpl
############################## [100%]
After the OS EZ template has been successfully installed, you can explore the default repositories
for Fedora 16 in the /vz/template/fedora/16/x86/config/os/default/mirrorlist
file. For example:
# cat /vz/template/fedora/16/x86/config/os/default/mirrorlist
$SW_SERVER/download/mirrors/fedora-core-16
$SW_SERVER/download/mirrors/updates-released-fc16
http://mirrors.fedoraproject.org/mirrorlist?repo=fedora-16&arch=i386
http://mirrors.fedoraproject.org/mirrorlist?repo=updates-released-f16&arch=i386
This file lists the repositories set to handle the Fedora 16 OS EZ template:
•
Repositories on the Parallels web server are defined in the first two lines. $SW_SERVER denotes
the string whose value is specified in the /vz/template/conf/vztt/url.map file. In our
case, this string is the URL of the Parallels web server. The repositories on the Parallels web
server keep a number of software packages needed for the correct operation of the fedoracore-16-x86 template. Along with $SW_SERVER, the url.map file contains the list of URLs
for all Linux distributions supported by Parallels Virtuozzo Containers and having official
repositories.
•
Repositories on the Fedora web server are defined in the third and fourth lines. These
repositories store all RPM packages for the Fedora 16 distribution.
The priority according to which software packages are downloaded from the specified servers is
determined by the repositories order in the mirrorlist file. So in the example above, RPM
packages from the Parallels web server are downloaded first and, after that, all the packages from
the Fedora server.
28
Managing EZ Templates
Notes:
1. You can use the vzpkg info OS_template_name mirrorlist repositories command to
view the mirrors and repositories for specific OS templates.
2. Commercial Linux distributions (e.g., Red Hat Enterprise Linux) do not have official repositories. You
need to manually set up software repositories for such distributions before you can start using them. For
more information, see to Setting Up Repositories with vzcreaterepo.
Software packages are downloaded and installed on the Node from package repositories when
you:
•
Cache an OS EZ template.
•
Update an existing OS EZ template cache (provided that new packages are available in the
repository).
•
Add an application EZ template or package to a Container for the first time.
•
Update an EZ template or software package in a Container.
You can set up your own repositories (e.g., storing unofficial software packages) for EZ templates.
To do this, create the repositories file in the
/vz/template/<os_name>/<os_version>/<arch>/config/os/default directory on
the Node, if it is not present, and specify the path to the desired repository. For example, to add
the extra repository at http://mirrors.dotsrc.org/jpackage/ and keeping Java packages for Fedora
16:
1
Create the /vz/template/fedora/16/x86/config/os/default/repositories file
on the Node.
2
Add the following string to the file:
http://mirrors.dotsrc.org/jpackage
3
Save the file.
29
Managing EZ Templates
Creating a Local Repository
Along with using pre-configured repositories, you can create local repositories and configure for
handling packages for your EZ templates. Organizing your own local repositories results in less
bandwidth consumption and rapid software updates to Containers. You may also want to build a
local repository if OS vendors or third-party software developers set up repositories that are not
compatible with the vzpkg tool.
Note: The vzpkg tool supports all the repositories that can be used by the yum (version 2.4.0 and
higher) and apt utilities. For detailed information on these utilities, see their man pages.
The process of setting up a local repository includes the following main steps:
1
Obtaining software packages comprising the given Linux distribution. The easiest way of doing
it is to copy the necessary packages from your distribution disks or the OS vendor's website.
2
Creating the metadata repository from a set of the copied software packages with the
createrepo utility. This step can be omitted if you are going to create a repository which will
be a mirror of a public repository.
3
Making your repository accessible for Containers users. You can let Container users access
your repository in one of the following ways:
• By using the http protocol. In this case the repository should represent a website
containing software packages for the EZ template.
• By using the ftp protocol. In this case the repository should represent an FTP site
containing software packages for the EZ template.
• By using the file protocol. In this case the repository should represent a directory path
(e.g. on your local Node) containing software packages for the EZ template.
While the first two protocols allow you to remotely (i.e. from Nodes located in other networks)
access the created repository, the third one can be used within your local Node only.
Example 1: Creating a Local Repository for Fedora 16
Let us assume that you want to build a local package repository for the Fedora 16 OS EZ template
where the RPM packages for Fedora 16 will be downloaded and stored. The repository will be
used by Nodes from both your local and other networks, and it will allow downloading packages
through the http protocol. In our example, we presume the following:
•
The package repository will be located inside Container 101. You can use any OS template to
base the Container on.
Note: We recommend that you always place your local repositories inside separate Containers not to
compromise the Node security. In particular, it is of significant importance if you are going to provide
access to your repositories through the http and ftp protocols.
30
Managing EZ Templates
•
Container 101 is started. It has the IP address of 123.145.145.123 and can be accessed
from other networks.
•
The apache web server is running inside Container 101 and the default document root for
apache is /var/www/html, i.e. the apache web server stores its sites in the
/vz/root/101/var/www/html directory on the Node.
•
The apache user and group inside Container 101 are apache.
To create a local repository for Fedora 16, do the following:
1
Install the fedora-core-16-x86 OS EZ template (if it is not already installed):
# vzpkg install template fedora-core-16-x86-tmpl-4.7.0-3.noarch.rpm
Preparing...
################################ [100%]
1:fedora-core-16-x86-tmpl
################################ [100%]
2
Change to the /vz/root/101/var/www/html directory, and create two subdirectories
within it:
Note: You can also log in to Container 101 and perform the operations described in Steps 2-8 from
inside the Container. In this case your working directory inside Container 101 must be
/var/www/html, and you will need to install the createrepo package inside the Container and grant
the Container access to the CD-ROM drive on the Node.
• The subdirectory where the base RPM packages for Fedora 16 will be stored:
# mkdir -p download/fedora-core/16/i386/os/Fedora/RPMS
• The subdirectory where the updated versions of RPM packages for Fedora 16 will be
stored:
# mkdir -p download/fedora-core/updates/16/i386
3
Copy all the packages comprising the Fedora 16 distribution (e.g., from your Fedora distribution
disks) to the download/fedora/16/i386/os/Fedora/RPMS directory on the Node.
4
Get the updates for Fedora 16, and put them to the download/fedoracore/updates/16/i386 directory on the Node.
5
Install the createrepo package on the Node, for example:
# rpm -Uhv createrepo-0.4.3-1.2.el4.rf.noarch.rpm
Preparing...
#################################### [100%]
1:createrepo
#################################### [100%]
6
Change to the /vz/root/101/var/www/html directory and create the following metadata
repositories:
• For the Fedora 16 base RPM packages:
# createrepo download/fedora/16/i386/os
• For the updated versions of the Fedora 16 RPM packages:
# createrepo download/fedora-core/updates/16/i386
Creating the package metadata repository may take some time depending on the speed of your
processor and hard disk drive.
7
Create a directory for storing mirror site lists. In our case, the lists will be kept in the
/vz/root/101/var/www/html/download/mirrors directory:
# mkdir -p download/mirrors
31
Managing EZ Templates
8
Create the mirror list files and set the path to your local repository. For example, you can do this
as follows:
• For the Fedora 16 base RPM packages:
# echo 'http://123.145.145.123/download/fedora/16/i386/os/' >> download/mirrors/fedoracore-16
• For the updated versions of the Fedora 16 RPM packages:
# echo 'http://123.145.145.123/download/fedora/updates/16/i386' >>
download/mirrors/updates-released-fc16
The aforementioned commands create the fedora-core-16 and updates-releasedfc16 files in the /vz/root/101/var/www/html/download/mirrors directory on the
Node and add the
http://123.145.145.123/download/fedora/16/i386/os/Fedora/RPMS and
http://123.145.145.123/download/fedora/updates/16/i386 strings to them,
respectively.
9
Open the /vz/template/conf/vztt/url.map file on the Node for editing (e.g., by using
vi), and change the value of the $FC_SERVER variable as follows:
$FC_SERVER
http://123.145.145.123
10 Grant the apache user and the apache group access to the created repositories inside
Container 101 by executing the following command on the Node:
# vzctl exec 101 chown -R apache.apache /var/www/html/download
Example 2: Accessing the Repository via the file protocol
Once you set up a local repository by following the instructions in the example above, you can start
using the vzpkg tool to obtain RPM packages for the Fedora 16 EZ template from this repository.
You can connect to these repositories via the http protocol from both remote and local Nodes.
You can further speed up the process of distributing RPM packages across your repository for
those Containers that reside on your local Node (that is, on the Node where the repositories are
stored). To do this, configure your system to use the file protocol instead of http to connect to
your repositories:
1
Open the /vz/template/fedora/16/x86/config/os/default/mirrorlist file on
the Node and comment the strings containing $FC_SERVER:
#$FC_SERVER/download/mirrors/fedora-core-16
#$FC_SERVER/download/mirrors/updates-released-fc16
2
Execute the following commands to create the repository files:
• To create the
/vz/template/fedora/16/x86/config/os/default/repositories file on the
Node and to make it point to the Fedora 16 base RPM packages from your local repository:
# echo 'file:///vz/root/101/var/www/html/download/fedora/16/i386/os/Fedora/RPMS' >>
/vz/template/fedora/16/x86/config/os/default/repositories
32
Managing EZ Templates
• To create the
/vz/template/fedora/16/x86/config/os/default/repositories file on the
Node and to make it point to the updated versions of the Fedora 16 RPM packages from
your local repository:
# echo 'file:///vz/root/101/var/www/html/download/fedora/updates/16/i386' >>
/vz/template/fedora/16/x86/config/os/default/repositories
33
Managing EZ Templates
Managing Repositories for Commercial Linux Distributions
Commercial Linux distributions (e.g., Red Hat Enterprise Linux and SUS Linux Enterprise Server) do
not have official repositories. So if you are going to run a commercial Linux distribution inside your
Containers, you should create a special repository which will store the software packages of this
distribution and enable you to update the packages inside your Containers.
In the example below, we will create the repository which will store the RPM packages included in
the Red Hat Enterprise Linux 4 distribution. Besides, we will consider the situation explaining to you
how to keep your repository up-to-date by getting the updated packages from the Red Hat
Enterprise Linux 4 website. In our example, we presume the following:
•
The Node where the repository will be located is running Red Hat Enterprise Linux 4 (RHEL 4).
•
The package repository will be stored inside Container 111.
•
Container 111 can be accessed from other networks.
•
The apache web server is running inside Container 111 and the default document root for
apache is /var/www/html, i.e. the apache web server stores its sites in the
/vz/root/111/var/www/html directory on the Hardware Node.
•
The apache user and group inside Container 111 are apache.
•
The http protocol will be used to access the RHEL 4 packages repository.
To create a repository for RHEL 4, do the following:
1
Install the redhat-as4-x86 OS EZ template on the Node, if it is not yet installed:
# vzpkg install template redhat-as4-x86-tmpl-4.7.0-3.noarch.rpm
Preparing...
################################## [100%]
1:redhat-as4-x86-tmpl
################################## [100%]
2
Create the Container where the repository storing the RHEL 4 packages will be located and
assign an IP address and hostname to it. Let us use the centos-6-x86 OS EZ template to
base your Container on. For example, to create Container 111 having the IP address of
144.134.134.144 and the hostname of my_repo for housing the repository, you can
execute the following commands:
# vzctl create 111 --ostemplate centos-6-x86 --ipadd 144.134.134.144 --hostname my_repo
3
Make sure that Container 111 is running and the httpd service is started in the Container:
# vzlist -a
CTID
NPROC STATUS IP_ADDR
HOSTNAME
1
42 running 10.163.163.1
localhost
111
- stopped 144.134.134.144 my_repo
...
# vzctl start 111
Starting Container ...
Container is mounted
...
Container start in progress...
# vzctl exec 111 service httpd status
httpd is running...
Container 111 should be running to be able to perform the commands listed below.
34
Managing EZ Templates
4
Inside Container 111, create a directory where the RPM packages for Red Hat Enterprise Linux
4 will be stored:
# mkdir -p /vz/root/111/var/www/html/download/redhat/as4/i386/os/ \
RedHat/RPMS
5
Copy the RPM packages from the RHEL 4 distribution disks to the
/vz/root/111/var/www/html/download/redhat/as4/i386/os/RedHat/RPMS
directory by executing the following command for each of the RHEL 4 CDs:
# cp /media/cdrom/RedHat/RPMS*.rpm /vz/root/111/var/www/html/ \
download/redhat/as4/i386/os/RedHat/RPMS
6
Install the createrepo package on the Hardware Node, for example:
# rpm -Uhv createrepo-0.4.3-1.2.el4.rf.noarch.rpm
Preparing...
#################################### [100%]
1:createrepo
#################################### [100%]
7
Create the metadata repository for the RHEL 4 packages with the createrepo utility:
# createrepo /vz/root/111/var/www/html/download/redhat/as4/ \
i386/os/RedHat/RPMS
Creating the RPM metadata repository may take some time depending on the speed of your
processors and hard disk drive.
8
Create a directory for keeping mirror site lists. In our case, mirror site lists will be stored in the
/vz/root/111/var/www/html/download/mirrors directory on the Node:
# mkdir -p /vz/root/111/var/www/html/download/mirrors
9
Create the /vz/root/111/var/www/html/download/mirrors/redhat-as4 mirror list
file and make it point to the repository inside Container 111 where RPM packages for RHEL 4
are stored:
# echo "http://144.134.134.144/download/redhat/as4/i386/os/RedHat/ \
RPMS/" > /vz/root/111/var/www/html/download/mirrors/redhat-as4
This command makes the
/vz/root/111/var/www/html/download/mirrors/redhat-as4 file on the Node and
adds the
http://144.134.134.144/download/redhat/as4/i386/os/RedHat/RPMS string to
the file.
So, we have just created a repository for your RHEL 4 OS EZ template. Now you can cache the
redhat-as4-x86 EZ template and start creating Containers on its basis. However, if you wish to
receive package updates from the RHEL 4 website, you should additionally perform the following
steps:
1
On the Node, run the up2date utility and register your up2date account with RHEL 4. Please
consult the up2date documentation to complete this task.
Note: If your Node has another Linux OS installed on it (e.g., Fedora 16), you need to create a special
Container which is to run Red Hat Enterprise Linux 4 and register the up2date account from inside this
Container.
2
Inside Container 111, create a directory where the updated versions of the RHEL 4 packages
will be stored:
# mkdir -p /vz/root/111/var/www/html/download/redhat/updates/as4/i386
35
Managing EZ Templates
3
Create the /vz/root/111/var/www/html/download/mirrors/updates-releasedas4 mirror list file and make it point to the repository inside Container 111 where the updated
versions of the RHEL 4 packages are stored:
# echo "http://144.134.134.144/download/redhat/updates/as4/i386/" > \
/vz/root/111/var/www/html/download/mirrors/updates-released-as4
This command makes the
/vz/root/111/var/www/html/download/mirrors/updates-released-as4 file on
the Node and adds the
http://144.134.134.144/download/redhat/updates/as4/i386 string to the file.
4
On the Node, create an empty RPM database. For example:
5
Install the RPMs from the official RHEL 4 disks in the created database:
# mkdir -p /var/repo/redhat-as4
# rpm --initdb --dbpath /var/repo/redhat-as4
# rpm --dbpath /var/repo/redhat-as4 --import /usr/share/ \
rhn/RPM-GPG-KEY
# find /vz/root/111/var/www/html/download/redhat/as4/i386/os/ \
RedHat/RPMS -name '*.rpm' | xargs rpm -ihv --justdb\
--dbpath /var/repo/redhat-as4 --ignoresize --force --nodeps
Installing all RPM packages for the RHEL 4 distribution may take a rather long run; please wait
until the installation process completes. After that, you can start using the up2date utility to
update the created repository.
For example, the following session updates the RPM packages in your local repository inside
Container 111:
•
Obtain a list of RPM packages
# up2date -l --tmpdir=/tmp/up2date --dbpath /var/repo/redhat-as4/ | \
awk 'BEGIN { stage = 0; } \
stage == 0 && /^--*$/ {stage = 1; next; } \
stage == 1 && /^$/ { stage = 2; next } \
stage == 1 { print $1; }' \
> /tmp/pkgs-list
• Download them:
# cat /tmp/pkgs-list | xargs up2date -d --tmpdir=/tmp/up2date \
--dbpath /var/repo/redhat-as4/
# rpm -ivh --justdb --dbpath /var/repo/redhat-as4/ --ignoresize \
--force --nodeps /tmp/up2date/*.rpm
# mv /tmp/up2date/*.rpm /vz/root/111/var/www/html/download/redhat/ \
updates/as4/i386/
# createrepo /vz/root/111/var/www/html/download/redhat/updates \
/as4/i386
You can also make a script to automatically perform the aforementioned operations and set this
script to be run as a cron job.
Creating Proxy Servers for EZ Templates
This section describes the process of creating caching proxy servers to efficiently manage OS and
application EZ templates in your network.
36
Managing EZ Templates
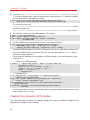
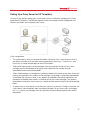
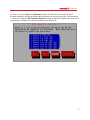
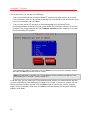
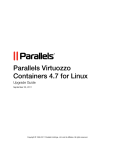
Setting Up a Proxy Server for EZ Templates
You can set up special caching proxy servers and use them to efficiently manage your OS and
application EZ templates. The following figure illustrates an example network configuration that
contains two Nodes and a separate proxy server:
In this configuration:
•
The caching proxy server sits between the Nodes (Hardware Node 1 and Hardware Node 2)
and keeps a number of EZ templates and the repositories (Repository 1, Repository 2, and
Repository 3) storing the packages for these EZ templates.
•
When either Node requests certain packages from any repository for the first time, these
packages are first downloaded to the proxy server where they are cached and then
downloaded to the corresponding Node.
•
When a Node requests a package that is already available in the cache on the proxy server and
none of the repositories has updates for the package, this package is immediately downloaded
to the Node from the proxy server. If any updates are available in the official repositories, the
procedure of handling these updates is identical to that of the main packages: The update is
downloaded to the proxy server where it is cached and then retransmitted to the corresponding
Node.
•
A special script is automatically run on the proxy server at set intervals. During its execution, the
script creates a local repository from the cached packages. All you have to do is to configure
the vzpkg tool to use packages from this repository instead of obtaining them from remote
repositories.
37
Managing EZ Templates
Setting up a proxy server for managing EZ templates has the following advantages:
1
Your Internet bandwidth consumption is greatly reduced because all packages are downloaded
to the proxy server only once and can then be used by any Node on your network.
2
You can more rapidly apply software updates to Containers since the proxy server where the
downloaded packages are stored resides in the local network.
3
You can always have the software packages included in OS EZ templates at hand and do not
have to worry whether they have been changed in or removed from their original repositories.
The Parallels script running on the proxy sever does not remove any cached packages; so it is
up to you when to delete a specific package, if at all.
Setting Up a Proxy Server
To make a server act as a caching proxy server for EZ templates, you need to install the
vzpkgproxy package on this server. vzpkgproxy is located in the /virtuozzo/RPMS
directory of your Parallels Virtuozzo Containers distribution and can be installed with the rpm -i
command on servers (including Containers) meeting the following requirements:
•
The Apache httpd server, version 2.0.53 and higher, is installed on the server.
•
The createrepo package, version 0.4.2 and higher, is installed on the server.
Keep in mind that you may also need to install a number of additional packages to satisfy the
vzpkgproxy dependencies.
By default, the caching proxy server does not allow connections from external hosts. To allow
external connections, you need to edit the /etc/httpd/conf.d/vzproxy.conf file as
described below:
1
Locate the following section in the vzproxy.conf file.
<Proxy *>
Order deny,allow
Deny from all
# Enter all clients here
Allow from localhost.localdomain
</Proxy>
2
Replace localhost.localdomain with the hostnames of external servers you want to be
able to connect to the proxy server. For example, to allow connections from the
myserver1.com and myserver2.com servers, you can edit the section as follows:
<Proxy *>
Order deny,allow
Deny from all
# Enter all clients here
Allow from myserver1.com myserver2.com
</Proxy>
You can also remove the string Deny from all and change the string Allow from
localhost.localdomain to Allow from all to allow all external hosts to connect to the
proxy server.
38
Managing EZ Templates
Once you edit the /etc/httpd/conf.d/vzproxy.conf file, you need to tell the vzpkg tool to
use the packages from the local repository on the proxy server while handling EZ templates. To do
this, edit the /etc/vztt/vztt.conf file on the Node and specify the following parameters:
•
The URL of the proxy server, the port number where the httpd daemon is listening, and the
path to the directory where the EZ templates local repository is located as the value of the
VZTT_PROXY parameter. For example, if your proxy server has the 127.123.123.127 IP
address assigned, the httpd daemon running on the proxy server is listening on port 8080,
and the local repository is stored in /var/www/html/download, you should set the
VZTT_PROXY parameter to http://127.123.123.127:8080/download.
•
The URL of the proxy server and the port number where the httpd daemon is listening as the
value of the HTTP_PROXY parameter. For example, you should set this value for the
aforementioned proxy server to http://127.123.123.127:8080. Keep in mind that you
also need to set the HTTP_PROXY_PASSWORD and HTTP_PROXY_USER parameters in the
/etc/vztt/vztt.conf file if the access to your proxy server is password-protected.
Configuring Proxy Server Parameters
You can configure a number of proxy server parameters to meet your demands:
•
Configure the CACHE_DISABLE parameter in the /etc/vzpkgpoxy/vzpkgproxy.conf file
on the proxy server to specify the hosts to be excluded from the caching process. By default,
the proxy server caches the packages from all external hosts that are allowed to connect to the
proxy server.
•
Configure the port number on which the httpd daemon running on the proxy server is
listening. To do this, specify the desired port number in the
/etc/httpd/conf.d/vzproxy.conf file on the proxy server. The default port number is
8080.
•
Configure the REPO_DIR parameter in the vzpkgproxy.conf file to change the path to the
directory where the local repository created on the basis of the cached packages will be stored.
By default, this directory is /var/www/html/download.
39
Managing EZ Templates
Setting Up an RHN Proxy Server for RHEL OS EZ Templates
If you plan to run Red Hat Enterprise Linux 4 (RHEL 4) or 5 (RHEL 5) in Containers, you can create
a special caching proxy server—RHN (Red Hat Network) Proxy Server. Using the RHN proxy
server, you can greatly reduce your Internet bandwidth consumption and more rapidly apply
software updates to Containers. RHN Proxy Servers can be created using the vzrhnproxy utility
shipped with Parallels Virtuozzo Containers. This utility can be installed on any computer (including
Containers) running the RHEL 4 and RHEL 5 Linux distributions with the rpm -i command.
Notes:
1. You may need to install a number of additional packages to satisfy the vzrhnproxy dependencies.
2. You can also try to deploy an RHN Proxy Server on systems running other RHEL-based distributions
(e.g., CentOS 6), but vzrhnproxy has not been extensively tested with them.
Let us assume that you wish to create an RHN Proxy Server on the server with the IP address of
192.168.10.10 that will serve all Containers running the 32-bit version of RHEL 5 and residing
on the Node with the hostname of mycomputer1 and the IP address of 192.168.0.125. To do
this, perform the following operations:
1
Log in to the server where you are planning to create the RHN Proxy Server (further referred to
as Proxy Server) and make sure the vzrhnproxy utility is installed on this server.
2
Specify a valid user name and password you use to log in to Red Hat Network (RHN) as the
values of the REDHAT_LOGIN and REDHAT_PASSWORD parameters, respectively, in the
/etc/vz/pkgproxy/rhn.conf file on the Proxy Server. These credentials will be used by
vzrhnproxy in the next step to register your system profile with RHN. For example:
# vi /etc/vz/pkgproxy/rhn.conf
REDHAT_LOGIN="user1"
REDHAT_PASSWORD="2WSX0OKM"
...
3
Execute the following command on the Proxy Server:
# vzrhnproxy register i386 5Server mycomputer1 192.168.0.125
registering for i386-5Server-mycomputer1
...
where i386 and 5Server denote the system architecture and the operating system you wish
to register with RHN (in our case, we are registering the 32-bit version of the Red Hat Enterprise
Linux 5 server).
During the command execution, vzrhnproxy will do the following:
• Connect to Red Hat Network (available at http://rhn.redhat.com) with the credentials
specified in the rhn.conf file in the previous step.
• Create a profile and register it with RHN for the system running the 32-bit version of RHEL
5.
• Download the headers of the packages comprising the 32-bit RHEL 5 distribution to the
Proxy Server.
40
Managing EZ Templates
• Create a pseudo-repository containing the repodata generated on the basis of the
downloaded headers.
• Grant the server with the IP address of 192.168.0.125 (i.e. our Node) access to the
Proxy Server.
4
On the Node:
• Open the /vz/template/conf/vztt/url.map file for editing (e.g. using vi) and
change the value of the $RH_SERVER parameter as follows:
$RH_SERVER
http://192.168.10.10/rhn
• Save the file.
From this moment on:
•
If the Node with the IP address of 192.168.0.125 requests certain packages included in the
RHEL 5 distribution for the first time (e.g. while caching the RHEL 5 OS EZ template), this
request will be sent to the Proxy Server which, in its turn, will connect to Red Hat Network and
retrieve the requested packages. These packages will then be downloaded to the Proxy Server
where they are cached and finally returned to the Node.
•
If the Node requests a package already available in the cache on the Proxy Server, the package
will be immediately downloaded from the cache to the Node.
You can make the Proxy Server serve the requests for RHEL 5 packages from more than one
Node. To do this, you should specify the IP addresses of the corresponding Nodes during the
vzrhnproxy register command execution and properly edit the
/vz/template/conf/vztt/url.map file on each of these Nodes (see Step 3 and 4 above).
Keep in mind that, while executing the vzrhnproxy register command, you should specify
the hostname of one Node only; this can be the hostname of any Node to be handled by the Proxy
Server.
You can also create and register several system profiles with Red Hat Network. For example, if you
have one or more Nodes hosting Containers with the x86-64-bit version of RHEL 5, you may wish
to use the Proxy Server for handling the packages included in this RHEL 5 version as well. To do
this, you should perform once more Steps 1-4 described above and use the following command
on Step 3 to register a new system profile with RHN:
# vzrhnproxy register x86_64 5Server mycomputer2 192.168.22.22
registering for x86_64-5Server-mycomputer2
...
where 192.168.22.22 is the IP address of the Node hosting 64-bit Containers.
To list all system profiles registered with RHN, you can execute the following command on the
Proxy Server:
# vzrhnproxy list
i386-5Server-mycomputer1
x86_64-5Server-mycomputer2
x86_64-5Server-mycomputer3
41
Managing EZ Templates
As you can see, three system profiles are currently registered with RHN: two for servers running the
x86-64-bit version of RHEL 5 and one for the server running the 32-bit version of RHEL 5. For each
of these profiles, the corresponding pseudo-repository containing the RHEL 5 package repodata
exists on the Proxy Server.
After some time, the repodata (and, consequently, the cache on the Proxy Server) may become
obsolete. In this case you can use the vzrhnproxy update command to update the repodata in
pseudo-repositories on the Proxy Server. For example, the following command will update the
repodata in the pseudo-repository corresponding to the i386-5Server-mycomputer1 profile:
# vzrhnproxy update i386-5Server-mycomputer2
42
Managing EZ Templates
Preparing OS EZ Templates for Creating
Containers
OS EZ templates are used to create Containers on their basis. However, before you can use an OS
EZ template for creating a Container, you need to do the following:
1
Install the OS EZ template on the Node.
2
Cache the installed OS EZ template.
To install a new OS EZ template on the Node, you can use the vzpkg install template
command. For example, to install the CentOS 5 OS EZ template, you can run this command:
# vzpkg install template centos-5-x86-ez-4.7.0-3.noarch.rpm
Preparing...
################################# [100%]
1:centos-5-x86
################################# [100%]
# vzpkg list
centos-5-x86
As you see, the centos-5-x86 EZ template is now installed on the Node. The corresponding
path is /vz/template/centos/5. However, before you can start using the centos-5-x86 EZ
template as a basis for creating Containers, you need to cache it. This can be done wiht the vzpkg
create cache command:
Note: To cache an OS EZ template, you may need first to set up a package repository for the template.
For example, you have to build a special repository for all commercial versions of the Linux distributions
(e.g., Red Hat Linux Enterprise 4 or 5). Detailed information on managing package repositories is
provided in the Setting Up Repositories and Proxy Servers for EZ Templates section (p. 27).
# vzpkg create cache centos-5-x86
...
Complete!
Packing cache file centos-5-x86.tar.gz ...
Cache file centos-5-x86.tar.gz [14M] created.
The created tar archive is put to the /vz/template/cache directory on the Node:
# ls /vz/template/cache
centos-5-x86.tar.gz
Now you can use the centos-5-x86 EZ template for creating Containers. Detailed information on
how to create Containers on the basis of OS EZ templates is provided in the Parallels Virtuozzo
Containers 4.7 User's Guide.
43
Managing EZ Templates
Installing Application EZ Templates
The same way as you use an OS EZ template in a Parallels Virtuozzo Containers system to create
any number of Containers on its basis and share its resources, you can use application EZ
templates to share application files among any number of Containers.
To install a new application EZ template on the Node, you can use the vzpkg install
template command. For example, to install the mysql EZ template intended for use on the
CentOS 5 distribution, you can execute the following command:
# vzpkg install template mysql-centos-5-x86
Preparing...
################################## [100%]
1:mysql-centos-5-x86
################################## [100%]
The mysql EZ template is installed into the
/vz/template/centos/5/x86/config/app/mysql directory on the Node. To check that
the installation was successful, you can use the vzpkg list command:
# vzpkg list
centos-5-x86
centos-5-x86
mysql
2010-04-21 02:22:45
As you see, the mysql EZ template is now available on the Node and can be added to Containers.
Downloading and Installing EZ Templates with
vzup2date
You can use the vzup2date utility to download new OS and application EZ templates to your
server and install them there. To do this, execute the utility with the -z option. Once you run the
utility, the Welcome window appears.
44
Managing EZ Templates
Click Next to connect to the Parallels repository that stores EZ templates. If the connection is
successful, the EZ Templates Selection window is displayed listing all EZ templates that you can
install on your Node.
45
Managing EZ Templates
In this window, do one of the following:
•
To download and install all available EZ templates for a certain Linux distribution, select this
distribution by placing the cursor beside it and pressing the space bar on your keyboard; then
click Next.
•
To download and install only certain EZ templates of the corresponding Linux distribution, place
the cursor beside this distribution and press F2 on your keyboard. You will be presented with
the Templates selection window where you can select the corresponding EZ templates.
After choosing the necessary EZ templates, click the Select button to close the displayed
window, and then click Next to proceed with the wizard.
Note: New application EZ templates for a Linux distribution can be installed on the Hardware Node only
if the corresponding OS EZ template is already installed on this Node.
In the next step, you can review the EZ templates you selected in the previous step and scheduled
for downloading and installing on your Hardware Node. If you are not satisfied with the chosen
templates, click the Back button to return to the previous step and modify the set of templates.
Otherwise, click Next to start downloading the templates.
46
Managing EZ Templates
Once the EZ templates have been successfully downloaded to the Hardware Node, the Installing
EZ templates window is displayed.
In this window, you can view the templates ready to be installed on your Node. If you are installing
a new OS EZ template, you can select the Run 'vzpkg cache' after installation check box to
cache the OS EZ template right after its installation on the Node. Clicking Next starts installing the
EZ templates on the Hardware Node.
47
Managing EZ Templates
Uploading and Installing EZ Templates in Parallels
Management Console
If you have one or more new EZ templates that you would like to upload and install on the
Hardware Node, you should first to have these templates accessible from the workstation where
Parallels Management Console is installed (e.g., insert the CD-ROM with the templates into the
computer's CD-ROM drive or copy the templates to the computer hard disk) and then launch the
Upload and Install New Parallels Virtuozzo Containers Templates wizard.
To invoke the wizard, expand the Templates item under any Hardware Node registered in Parallels
Management Console, right-click the Templates item, and choose Upload and Install New
Parallels Virtuozzo Containers Templates. The Choose Parallels Virtuozzo Containers
Templates to Distribute window opens.
48
Managing EZ Templates
In this window, choose the EZ templates you want to deploy. To do this, click the Add button, and
provide the path to the templates you would like to install on the Node. Click Next.
The next screen will prompt you to define target Hardware Nodes where you wish to add new EZ
templates.
Parallels Management Console can upload and install the specified templates to any registered
Hardware Node. Choose the Nodes where you wish the templates to be installed (if you have
several registered Nodes), and click Next. If you have many Nodes, you can use the Select All or
Deselect All buttons.
49
Managing EZ Templates
The last page of the wizard allows you to review the settings made in the previous steps of the
wizard.
It summarizes the information provided by you in the previous steps, namely, which templates to
install and where to install them. If you are satisfied with the settings, click the Finish button. This
will launch the upload and installation process. Otherwise, click Back to make the necessary
changes to the information entered.
50
Managing EZ Templates
Listing EZ Templates
The vzpkg list command allows you to list the EZ templates installed on the Node:
# vzpkg list
redhat-el5-x86
fedora-core-13-x86
2010-07-24 15:45:15
As you see, the redhat-el5-x86 and fedora-core-13-x86 EZ templates are available on
the Node. The numerals next to the fedora-core-13-x86 EZ template inform you of the date
and time when software packages included in the template were updated for the last time. The
absence of numerals for the redhat-el5-x86 EZ template, in turn, indicates that the template
has not yet been cached at all.
Specifying a Container ID as the parameter, vzpkg list prints the EZ templates used by the
specified Container:
# vzpkg list 101
fedora-core-13-x86
2010-07-24 14:27:19
In Parallels Management Console, it is sufficient to choose the Templates item under the
corresponding Hardware Node name and select either the OS Templates or Application
Templates tab to see the list of the OS or application templates installed on the Node, respectively.
51
Managing EZ Templates
The information on templates is presented in the table having the following columns:
Column Name
Descriptions
Name
The name of the EZ template.
Version
The template version. EZ templates do not have versions; so this
column always displays n/a.
Generation
The type of the template: 'standard' or 'EZ'. All EZ templates have
the EZ legend in this column.
Description
The description of the EZ template.
Platform
The platform where the EZ template can be used.
Architecture The system architecture where the EZ template can be used.
Cached
Denotes whether the EZ OS template has been cached or not. For
EZ OS templates only.
OS
The name of the Linux distribution under which the EZ application
template can be run. For EZ application templates only.
To see the EZ templates used by a particular Container, double-click the needed Container in the
Container list in the right pane to open this Container management window, and then again choose
the Templates item and click the OS Templates or Application Templates tab in the left pane of
the new window.
52
Managing EZ Templates
Adding Application EZ Templates to Containers
To add an application EZ template to an existing Container, you can use the vzpkg install
command. To successfully add an application EZ template to a Container, this Container must be
running.
In the example below, the mysql application EZ template meant for the usage with Red Hat
Enterprise Linux 5 and already installed on the Hardware Node is added to Container 101:
# vzctl status 101
CTID 101 exists mounted running
#vzpkg list
redhat-el5-x86
2010-05-21 02:21:56
redhat-el5-x86
mysql
...
# vzpkg install 101 mysql
...
Installed:
mysql
i386
0:4.1.12-3.RHEL5.1
mysql-bench
i386
0:4.1.12-3.RHEL5.1
mysql-devel
i386
0:4.1.12-3.RHEL5.1
...
You can also add an application EZ template in Parallels Management Console by doing the
following:
1
In the Parallels Management Console left pane, select the Templates item under the
corresponding Hardware Node name, and then click the Application Templates.
53
Managing EZ Templates
2
In the Parallels Management Console right pane, right-click the application EZ template to add
to the Container, and choose Install Into Containers.
3
Select the check boxes of the Containers where the application EZ template is to be added,
and click Next. You can use the Select All/Deselect All buttons to select/deselect all
Containers listed in the Choose Target Containers window.
Note: To facilitate working with your application EZ templates, you can select the check box at the
bottom of the window to display only the Containers running the Linux distributions that are compatible
with the given application EZ template.
4
On the next screen, you can select the Force template installation check box to force the
template installation inside the Container. In this case no dependencies and no available
versions of the application template will be checked during its installation, which may cause the
installed application template to malfunction.
5
The last window allows you to review the information entered on the previous steps. If you are
satisfied with the data entered, click Finish to start adding the application EZ template to the
Container; otherwise, click Back and change the necessary parameters.
54
Managing EZ Templates
If you are adding an EZ template to only one Container, you can as well do the following:
1
Open the list of Containers in the Parallels Management Console main window by selecting the
Parallels Virtuozzo Containers item in the Hardware Node tree.
2
Double-click the name of the Container where you want to add the EZ template.
3
Select the Templates item in the main tree of the opened Container Manager, click the
Application Templates tab, right-click somewhere in the top part of the Management Console
right pane, and choose Add Application Template.
4
Follow the instructions of the wizard.
Alternatively, you can:
1
Open the list of Containers in the Parallels Management Console main window.
2
Right-click the Container where you want to add the template, and choose Templates >
Add/Update Templates.
3
Follow the instructions of the wizard.
Keeping EZ Templates Up To Date
Parallels Virtuozzo Containers allows you to update OS and application EZ templates as follows:
•
Update any of the EZ templates installed on the Node.
•
Update the caches of OS EZ templates installed on the Node.
•
Update the packages that are included in the EZ templates (OS and application) applied to
specific Containers.
All the aforementioned operations are described in the following subsections in detail.
Updating EZ Templates on Hardware Node
Sometimes, you may need to update one or more EZ templates (either OS or application) installed
on your Node. The process of updating EZ templates consists in updating one or more EZ template
configuration files located in the
/vz/template/<os_name>/<os_version>/<arch>/config directory on the Node.
Parallels Virtuozzo Containers allows you to use one of the following tools to update the EZ
templates installed on the Node:
•
the vzup2date utility
•
the vzpkg update template utility
•
Parallels Management Console
55
Managing EZ Templates
Updating Templates with vzup2date
The vzup2date utility allows you to update any of the EZ templates installed on the Node. This
utility can also be used to download new EZ templates to the Node and install them there.
vzup2date can be launched in two modes:
•
graphical mode
•
command line mode
Updating EZ templates in the graphical mode takes place if you have executed the vzup2date
utility with the -z option. After launching the utility, you will be presented with a greeting screen:
In this window, do one of the following:
•
Click the Next button to connect to the repository storing the latest EZ templates (either the
Parallels default repository or your own one).
•
Click the Configure button to configure the parameters used to connect to the EZ templates
repository.
56
Managing EZ Templates
As soon as you press Next in the Welcome window, the utility will try to connect to the EZ
templates repository (either the Parallels default repository or your own one) and, if the connection
is successful, display the EZ Templates Selection window listing all EZ templates that have one or
more updates available or that are not installed on your Node at all.
57
Managing EZ Templates
This window allows you do one of the following:
•
If you wish to download and install all available EZ templates/template updates for a certain
Linux distribution, select this distribution by placing the cursor beside it and pressing the space
bar on your keyboard; then click Next.
•
If you wish only certain EZ templates of the corresponding Linux distribution to be
installed/updated on the Node, place the cursor beside this distribution and press F2 on your
keyboard. You will be presented with the Templates selection window where you can select
the corresponding EZ templates:
After choosing the right EZ templates, click the Select button to close the displayed window,
and then click Next to proceed with the wizard.
Note: New application EZ templates for a Linux distribution can be installed on the Node only if the
corresponding OS EZ template is already available on it.
In the next step, you can review the EZ templates/template updates you selected on the previous
step and scheduled for downloading and installing on your Node. If you are not satisfied with the
chosen templates/template updates, click the Back button to return to the previous step and
modify the set of templates; otherwise, click Next to start downloading the templates/template
updates to the Node.
58
Managing EZ Templates
After the EZ templates/template updates have been successfully downloaded to the Node, the
Installing EZ template window is displayed.
In this window you can view the templates/template updates ready to be installed on your Node. If
you are installing a new OS EZ template/template update, you can make use of the Run vzpkg
cache after installation check box to cache the corresponding OS EZ template/template update
right after its installation on the Node. By default, all OS EZ templates are just installed on the Node
without being cached; however, you can select the provided check box and schedule your OS EZ
template/template update for caching. Clicking Next starts installing the selected EZ
templates/template updates on the Node. By the time the wizard finishes you should have updated
OS and application EZ templates on your system.
Another way of updating your EZ templates is to run the vzup2date utility in the command line
mode, which can be done by passing the corresponding commands, switches, and options to
vzup2date. For example, the following command will update the fedora-core-13-x86 OS EZ
template to the latest version:
# vzup2date -z -m batch install fedora-core-13-x86
Detailed information on all options that can be passed to the vzup2date utility is given in the
Parallels Command Line Reference Guide.
59
Managing EZ Templates
Updating Templates With vzpkg update template
Another way of updating your EZ templates installed on the Node is to use the vzpkg update
template utility. This utility allows you to update OS or application EZ templates from the
corresponding local RPM packages. For example, you can execute the following command to
update the CentOS 5 OS EZ template installed on the Node from the centos-5-x86-ez4.7.0-3.noarch.rpm package located in the /root directory:
# vzpkg update template /root/centos-5-x86-ez-4.7.0-3.noarch.rpm
You can update a number of EZ templates at once by specifying the corresponding packages and
separating them by spaces. For example, the following command
# vzpkg update template /root/centos-5-x86-ez-4.7.0-3.noarch.rpm /root/redhat-el5-x86ez-4.7.0-3.noarch.rpm
simultaneously updates the CentOS 5 and Red Hat 5 OS EZ templates installed on the Node.
60
Managing EZ Templates
Updating Templates in Parallels Management Console
Parallels Management Console provides you with the Templates Update wizard allowing you to
update any of EZ templates installed on your Hardware Node. You can also use this wizard to
download new EZ templates to the Hardware Node and install them there. To invoke the
Templates Update wizard, right-click the Templates item under the corresponding Hardware
Node name, and choose Check for Template Updates. When launched, the wizard tries to
connect to the EZ templates repository (either the Parallels default repository or your own one) and,
if the connection is successful, display the Select Updates window. This window list all EZ
templates that have one or more updates available or that are not installed on your Node at all. For
example:
Note: If the connection to the Parallels Virtuozzo Containers update server cannot be established, you
will be presented with the Repository Update Settings window where you will be asked to provide the
correct information to connect to the update server. Detailed information on how to change the
parameters in this window is given in the Checking Parallels Virtuozzo Containers Update Server
Settings subsection of the Parallels Virtuozzo Containers 4.7 User's Guide.
61
Managing EZ Templates
In this window, you can do one of the following:
•
To download and install all available EZ templates/template updates for a certain Linux
distribution, click the Next button to go to the next step of the wizard.
•
To download and install only certain EZ templates of a Linux distribution, click on the plus sign
next to the corresponding Linux distribution to display the list of application templates available
for this distribution. You can then get detailed information about a particular template by
selecting the corresponding template and viewing its data in the right part of the displayed
window. By default, all new templates/template updates are set for downloading to and
installing on the Hardware Node. To prevent this or that EZ template from being
downloaded/installed, just clear its check box. When you are ready, click Next.
Click Finish to start installing the selected EZ templates/EZ template updates on the Hardware
Node.
62
Managing EZ Templates
Updating OS EZ Template Caches
With the release of new updates for the corresponding Linux distribution, the created OS EZ
template cache can become obsolete. So, Parallels Virtuozzo Containers provides the vzpkg
update cache command allowing you to quickly update any of the OS EZ template caches
available on the Hardware Node.
Note: If you are going to update the cache of a commercial OS EZ template (e.g. Red Hat Enterprise
Server 5 or SLES 10), you should first update software packages in the remote repository used to handle
this OS EZ template and then proceed with updating the EZ template cache. Detailed information on how
to manage repositories for commercial Linux distributions is provided in the Setting Up Repositories
and Proxy Servers for EZ Templates section (p. 27).
When executed, vzpkg update cache checks the cache directory in the template area (by
default, the template area is located in /vz/template) on the Hardware Node and updates all
existing tarballs in this directory. However, you can explicitly indicate the tarball for what OS EZ
template should be updated by specifying the OS EZ template name. For example, to update the
tarball for the fedora-core-13-x86 OS EZ template, you can execute the following command:
# vzpkg
Loading
Setting
Setting
base0
base1
base2
base3
...
update cache fedora-core-13-x86
"rpm2vzrpm" plugin
up Update Process
up repositories
100% |=========================|
100% |=========================|
100% |=========================|
100% |=========================|
951
951
951
951
B
B
B
B
00:00
00:00
00:00
00:00
Upon the vzpkg update cache execution, the old tarball is renamed by receiving the -old
suffix (for example, fedora-core-13-x86.tar.gz-old):
# ls /vz/template/cache
fedora-core-13-x86.tar.gz
fedora-core-13-x86.tar.gz-old
You can also pass the -f option to vzpkg update cache to remove an existing tar archive and
create a new one instead of it.
If the vzpkg update cache command does not find a tarball for one or several OS EZ templates
installed on the Node, it creates tar archives of the corresponding OS EZ templates and puts them
to the /vz/template/cache directory.
To update an OS EZ template cache in Parallels Management Console, do the following:
1
Select the Templates item under the corresponding Hardware Node name in the Management
Console left tree.
2
In the Parallels Management Console right pane, click the OS Templates tab to display the list
of OS templates installed on the Node.
3
Right-click the template to cache in the right pane, and choose Cache OS Template.
63
Managing EZ Templates
64
Managing EZ Templates
Updating EZ Templates Packages In Containers
Parallels Virtuozzo Containers allows you to update software packages of the OS EZ template a
Container is based on and of any application EZ templates applied to the Container. You can do
this by using the vzpkg update utility. Assuming that Container 101 is based on the redhatel5-x86 OS EZ template, you can run the following command to update all packages included in
this template:
# vzpkg update 101 redhat-el5-x86
...
Updating: httpd
####################### [1/4]
Updating: vzdev
####################### [2/4]
Cleanup : vzdev
####################### [3/4]
Cleanup : httpd
####################### [4/4]
Updated: httpd.i386 0:2.0.54-10.2 vzdev.noarch 0:1.0-4
Complete!
Updated:
httpd
i386
0:2.0.54-10.2
vzdev
noarch
0:1.0-4
Notes:
1. You can update templates in running Containers only.
2. If you are going to update the cache of a commercial OS EZ template (e.g., Red Hat Enterprise Server
5 or SLES 10), first update software packages in the remote repository used to handle this OS EZ
template and then proceed with updating the EZ template cache. Detailed information on how to manage
repositories for commercial Linux distributions is provided in the Setting Up Repositories and Proxy
Servers for EZ Templates section (p. 27).
As you can see from the example above, the httpd and vzdev applications have been updated
for the redhat-el5-x86 OS EZ template. To update all EZ templates (including the OS EZ
template) inside Container 101 at once, execute the following command:
# vzpkg update 101
...
Running Transaction
Updating : hwdata
Cleanup
: hwdata
Updated: hwdata.noarch 0:1.0-3
Complete!
Updated:
hwdata
noarch
###################### [1/2]
###################### [2/2]
0:0.158.1-1
In the example above, only the hwdata package inside Container 101 was out of date and
updated to the latest version.
In Parallels Management Console, do the following to update the OS EZ template a Container is
based on and/or any of its application EZ templates:
1
Open the list of Containers by selecting the Parallels Virtuozzo Containers item in the
Hardware Node tree.
65
Managing EZ Templates
2
Double-click the name of the Container where you want to add an EZ template. The Container
Manager opens.
3
Click the Templates item in the main tree of the Container Manager.
4
In the Container Manager right pane, click the OS Templates or Application Templates tab
depending on what EZ template you wish to update.
5
Right-click the corresponding EZ template, and choose Update Installed Packages.
6
In the Select Updates window, all available Linux distributions are shown that fit your Parallels
Virtuozzo Containers installation.
In this window, you can do one of the following:
• To download and install all available EZ templates/template updates for a certain Linux
distribution, click the Finish button to start updating to start updating your templates on the
Hardware Node.
• To download and install only certain EZ templates of a Linux distribution, click on the plus
sign beside the corresponding Linux distribution to display a list of application templates
available for this distribution. You can then get detailed information about a particular
template by selecting the corresponding template and viewing its data in the right part of the
displayed window. By default, all new templates/template updates are set for downloading
to and installing on the Hardware Node. To prevent an EZ template from being
downloaded/installed, just clear its check box. When you are ready, click Finish.
66
Managing EZ Templates
On this screen, you can also select the Force templates installation check box to force the EZ
template installation inside the Container. In this case no dependencies and no available
versions of the application EZ template will be checked during its installation, which may cause
the application EZ template to malfunction.
67
Managing EZ Templates
Creating Historical Mirrors for Backed Up
Containers
If you have one or several Containers that are based on OS EZ templates and that were backed up
long time ago, you may come across problems when trying to restore them on a destination server
other than the source server (i.e. the Node where the Containers were hosted during their backing
up). This may happen when the following conditions are simultaneously met:
•
The destination server does not have one or several software packages included in the OS EZ
template the Container being restored is based on.
•
The missing packages are not available in the public repositories set to handle the OS EZ
template; so, they cannot be downloaded and installed on the destination server. The absence
of certain software packages in the public repositories may come out of the fact that some
packages that were installed in the Container at the moment of its backing up have become
obsolete in the course of time and been replaced with newer versions.
To avoid the aforementioned problems in the future, you can create the so-called 'historical' mirrors
which will store an archive of all software packages present in the public repositories and
containing the packages installed in the Container during its backing up.
Let us assume that you backed up a number of Containers based on the Fedora 13 OS EZ
template. Now to be sure that you always have a repository containing all the necessary RPM
packages for your backed up Containers, you wish to create a historical mirror of an official Fedora
13 repository. In our example below, we presume the following:
•
The historical mirror will be located inside Container 101. You can use any OS template to base
the Container on.
Note: We recommend that you always place your local repositories inside separate Containers to not
compromise the Node security. In particular, it is of significant importance if you are going to provide
access to your repositories through the http and ftp protocols.
•
Container 101 is started and has the IP address of 123.145.145.123 assigned to it.
•
The mirror will be created on a web server, i.e. it can be accessed from other networks through
the http protocol.
•
The apache web server is installed and running inside Container 101; the default document
root for apache is /var/www/html, i.e. the apache web server stores its sites in the
/vz/root/101/var/www/html directory on the Node.
•
The apache user and group inside Container 101 are apache.
To create a historical mirror for Fedora 13, you should perform the following operations:
1
Change to the /vz/root/101/var/www/html directory and create the fed8mirror
subdirectory within it:
# cd /vz/root/101/var/www/html
68
Managing EZ Templates
# mkdir fed13mirror
The fed13mirror subdirectory will store an archive of the Fedora 10 repository.
2
Change to the fed10mirror subdirectory
# cd fed13mirror
and execute the following command:
# rsync -av http://ftp.rhd.ru/pub/fedora/linux/releases/13/Everything/i386/os
This command will make a copy of the entire Fedora 13 repository located at
http://ftp.rhd.ru/pub/fedora/linux/releases/13/Everything/i386/os. Keep in mind that it may take
a rather long run to copy all RPM packages to Container 101 depending on your bandwidth
and the load on the Fedora mirror server.
Note: You can use any alternative Web or FTP site containing the Fedora 10 repository instead of the
one indicated above.
3
Add your historical mirror to the list of repositories to be checked while performing operations
on EZ templates related to Fedora 13 (in particular, while restoring Fedora-based Container
backups). You can do it as follows:
• Create the /vz/template/fedoracore/13/x86/config/os/default/repositories file on the Node, if it is not yet
present.
• Add the following string to the file:
http://123.145.145.123/var/www/html/fed13mirror
• Save the file.
69
Managing EZ Templates
Copying EZ Templates to Another Hardware
Node
Parallels Virtuozzo Containers allows you to copy the installed OS and application EZ templates
from one Hardware Node to another using the vzmtemplate utility. For example, you can copy
the fedora-core-13-x86 OS template installed on the Source Node to the Destination Node
with the IP address of 192.168.0.9 by executing the following command:
# vzmtemplate -z [email protected] fedora-core-13-x86
[email protected]'s password:
Connection to Destination Node (192.168.0.9) is successfully established
Copying Template ".fedora-core-13-x86"
...
During the command execution, vzmtemplate will do the following:
1
Ask you for the password of the root user on the Destination Node.
2
Check whether the fedora-core-13-x86 OS EZ template already exists on the Destination
Node. If this templates is installed on the Destination Node, the command will exit.
3
Copy the fedora-core-13-x86 configuration files from the Source Node to the Destination
Node. Keep in mind that the fedora-core-13-x86 OS EZ template is not removed from the
Source Node.
4
Run the vzpkg create cache command on the Destination Node to cache the OS EZ
template and prepare it for the Container creation. Detailed information on this command is
provided in the Preparing OS EZ Templates for Creating Containers section (p. 43).
Note: If you are going to copy an application EZ template, you should make sure that the corresponding
OS EZ template (i.e. the OS template with which the application EZ template can be used) is installed on
the Destination Node; otherwise, the operation will fail.
To check that the fedora-core-13-x86 OS template has been successfully copied to the
Destination Node, you can run the following command on this Node:
# vzpkg list
fedora-core-13-x86
2010-08-09 07:05:39
In Parallels Management Console, you can copy the installed OS and application EZ templates
from the Source Node to any other Node registered in Parallels Management Console by doing the
following:
1
Select the Templates item under the Hardware Node name where the template to be copied is
installed, and click either the OS Templates or Application Templates tab depending on
whether you wish to copy an OS or application template, respectively.
2
In the Management Console right pane, right-click the template, and choose Tasks > Copy to
Another Hardware Node.
70
Managing EZ Templates
In the displayed window, you can view the list of Hardware Nodes currently registered in
Parallels Management Console. You can copy the template to any of the listed Nodes provided
it is compatible with the Host OS installed on this Node. To do this, select the check box next
to the template name, and click the Copy button to the right of the table.
71
Managing EZ Templates
Removing Application EZ Templates From
Containers
The vzpkg remove command allows you to remove one or several application EZ templates from
a Container. A session below shows you an example how to remove the mysql EZ template from
Container 101:
# vzpkg list 101
redhat-el5-x86
redhat-el5-x86
mysql
# vzpkg remove 101 mysql -w
vzpkg remove 101 mysql
Removed:
mysql
mysql-server
mysql-devel
mysql-bench
perl-DBD-MySQL
# vzpkg list 101
redhat-el5-x86
2010-05-21 02:21:56
2010-05-21 05:36:42
2010-05-21 02:21:56
You can see that the mysql EZ template has been successfully removed from Container 101. The
-w option tells the vzpkg remove command to also delete from the Container all packages
having interdependencies with mysql.
To remove an application EZ template from a Container in Parallels Management Console, do the
following:
1
Open the list of Containers by selecting the Parallels Virtuozzo Containers item in the
Hardware Node tree.
2
Double-click the name of the Container where from you want to delete a template to open the
Container Manager.
3
Select the Templates item in the main tree of the Container Manager, and click the
Application Templates tab to see the list of application templates currently applied to the
Container.
4
Right-click the application template you wish to delete, and choose Delete.
5
Confirm your decision by clicking the Remove button in the displayed dialog window. In this
window you can also do the following:
• Select the Forced removal check box to force the template deletion from the Container.
• Select the Remove dependent packages check box to also remove the packages having
dependencies with the template.
72
Managing EZ Templates
Removing EZ Templates From the Hardware
Node
The vzpkg remove template command allows you to remove from the Hardware Node those
EZ OS and application templates that you do need any more. The process of removing an EZ
template includes deleting all the RPM packages comprizing this template and all the caches
available for this template (for EZ OS templates only). Keep in mind that the template to be removed
must not be used by any Container; otherwise, the template deletion will fail. A session below
demonstrates how to remove the redhat-el5-x86 EZ OS template from the Hardware Node:
# vzpkg list
redhat-el5-x86
2010-07-16 12:50:17
fedora-core-13-x86
2010-07-18 14:23:12
# vzpkg remove template redhat-el5-x86
redhat-el5-x86 template was removed
# vzpkg list
fedora-core-13-x86
20010-07-18 14:23:12
To remove an EZ application template from the Node, additionally specify the -F option after the
vzpkg remove template command. This option denotes the EZ OS template with which the
EZ application template is compatible. For example, the following command can be used to
remove the mailman EZ application template that is intended for running under RHEL 5 from your
Node:
# vzpkg remove template -F redhat-el5-x86 mailman
redhat-el5-x86 mailman template was removed
You can also remove several EZ templates at once by specifying their names after vzpkg remove
template and separating them by spaces. However, when handling application templates, keep
in mind that you can delete only those application templates that relate to one and the same EZ OS
template. For example:
# vzpkg remove template -F redhat-el5-x86 sitebuilder4 mailman
redhat-el5-x86 sitebuilder4 template was removed
redhat-el5-x86 mailman template was removed
In this example the sitebuilder4 and mailman EZ application templates intended to run under
RHEL 5 have been successfully removed from the Hardware Node.
To remove one or more EZ templates in Parallels Management Console, do the following:
1
In the left pane of the Parallels Management Console main window, expand the Hardware
Node where the template to be deleted is installed, and select the Templates.
73
Managing EZ Templates
2
In the right pane of the Parallels Management Console main window, do one of the following:
• If you want to remove an EZ OS template from the Hardware Node, go to the OS
Templates tab, right-click the EZ OS you wish to remove, and choose Delete.
• If you want to remove an EZ application template from the Hardware Node, go to the
Application Templates tab, right-click the EZ application template you wish to remove, and
choose Delete.
3
Confirm your decision by clicking the Remove button in the displayed dialog window. In this
window you can also do the following:
• Select the Forced removal check box to force the template deletion from the Hardware
Node.
• Select the Remove dependent packages check box to also remove the packages having
dependencies with the template.
74
Managing EZ Templates
Converting Containers Based on Standard
Templates
You can use the vzveconvert utility to convert your existing Containers based on standard OS
templates (and possibly having a number of standard application templates applied to them) to the
EZ template-based ones. Let us assume that you wish to transform Container 101 based on the
fedora-core-3 standard OS template and having the psa-fc3 standard application template
applied to it and make it use the corresponding EZ templates: the fedora-core-4-x86 OS and
the plesk8 application EZ templates. To this effect, you can issue the following command on the
Hardware Node:
Note: You are highly recommended to back up a Container before starting to convert it.
# vzveconvert 101
During the command execution, the following main operations are performed:
1
The vzveconvert utility checks if the fedora-core-4-x86 EZ OS template and the
plesk8 EZ application templates are installed on the Hardware Node. If any of these EZ
templates cannot be found on the Node, the command will fail.
2
The pre-fedora-core-4 script located in the /usr/share/vztt/convert/scripts
directory on the Hardware Node is executed. This script is meant to perform a number of preupgrade operations in the Container context.
3
The packages comprising the fedora-core-3 standard OS template and the psa-fc3
standard application template are compared with those available in the repositories for the
fedora-core-4-x86 EZ OS template and the plesk8 EZ application template and if any
updates are available, they are downloaded to the Hardware Node and installed there. You can
also pass the -C option to the command to make vzveconvert look for the packages
updates in the vzpkg cache only.
4
The packages that are included in the fedora-core-3 and the psa-fc3 standard templates
and that cannot be found in the repositories for the fedora-core-4-x86 and plesk8 EZ
templates, if any, are copied to the /vz/template/vc/<UUID>/<rpm_name> directory on
the Node where <UUID> denotes the unique identifier of the Container (you can find out what
unique ID is assigned to the Container by viewing the value of the UUID parameter in the
Container configuration file after the vzveconvert execution) and <rpm_name> is the name
of the package (together with its version, release, and architecture) absent from the EZ template
repositories.
75
Managing EZ Templates
5
The packages installed in the /vz/template/fedora-core/4/x86 directory on the
Hardware Node (i.e. in the template area of the fedora-core-4-x86 and plesk8 EZ
templates) are compared with those specified in the /vz/template/fedoracore/4/x86/os/default/packages and /vz/template/fedoracore/4/x86/app/plesk8/default/packages meta files and if some packages listed in
these files are not present in this directory, they are also downloaded from the repository to the
Node and installed there.
6
The symlinks to the package files in the /vz/template/fedora-core-3/ and
/vz/template/psa directories on the Node are replaced with symlinks to the files in the
/vz/template/fedora-core/4/x86 EZ template directory.
7
The following parameters in the /etc/sysconfig/vz-scripts/101.conf file are updated
or set anew in accordance with the changes made: OSTEMPLATE, TEMPLATES, UUID,
TECHNOLOGIES. Detailed information on these parameters is provided in the Configuring
Parallels Virtuozzo Containers 4.7 chapter of the Parallels Virtuozzo Containers 4.7 Reference
Guide.
8
The post-fedora-core-4 script from the /usr/share/vztt/convert/scripts
directory on the Node is executed. This script is meant to perform a number of post-upgrade
operations in the Container context.
The full list of "standard OS template --> EZ OS template" and "standard application template -->
EZ application template" transformations which can be performed in the current version of Parallels
Virtuozzo Containers is provided in the /usr/share/vztt/convert/os_table and
/usr/share/vztt/convert/app_table files on the Hardware Node, respectively. For
example, you can issue the following command to learn what standard OS templates can be
converted to their EZ counterparts:
# cat /usr/share/vztt/covert/os_table
...
fedora-core-1
fedora-core-4-x86
fedora-core-2
fedora-core-4-x86
fedora-core-3
fedora-core-4-x86
fedora-core-4
fedora-core-4-x86
fedora-core-5
fedora-core-5-x86
fedora-core-4-x86_64
fedora-core-4-x86_64
...
The left column provides information on standard OS templates whereas the right one informs you
of the corresponding OS EZ templates.
Note: The /usr/share/vztt/convert/app_table file contains only the names of the EZ
application templates having its own repositories for handling the packages included in these templates
(e.g., all plesk EZ templates).
76
Index
Index
A
About Parallels Virtuozzo Containers 4.7 - 6
About This Guide - 7
Adding Application EZ Templates to
Containers - 53
C
Container
creating - 18
private area - 18
symlinks - 18
updating - 65
Converting Containers Based on Standard
Templates - 75
Copying EZ Templates to Another Hardware
Node - 70
Creating a Local Repository - 30
Creating a Template from Official Templates 21
Creating a Template from Scratch - 21
Creating an EZ Template - 20
Creating Historical Mirrors for Backed Up
Containers - 68
Creating Metafiles - 22
Creating Proxy Servers for EZ Templates - 36
Creating the Template with vzmktmpl - 25
D
Differences Between OS and Application EZ
Templates - 18
Documentation Conventions - 8
Downloading and Installing EZ Templates
with vzup2date - 44
E
EZ Template
adding to Container - 13, 19, 53
application - 15, 19, 44, 53, 65
area - 15
caching - 13, 19, 43
concepts - 13
directory structure - 15
installing - 19, 43, 44
lifecycle - 19
listing - 44, 51
OS - 13, 19, 28, 30, 34, 43, 51, 63, 65
removing - 19, 72
repository - 13, 27, 43
scripts - 15
sets - 13, 15
updating - 13, 19, 65
EZ Template Directory Structure - 15
EZ Template Lifecycle - 19
EZ Templates Basics - 13
EZ Templates Overview - 12
F
Feedback - 9
G
Getting Help - 9
I
Installing Application EZ Templates - 44
Installing vztt-build - 22
Introduction - 5
K
Keeping EZ Templates Up To Date - 55
Kernel
2.4 - 27
L
Listing EZ Templates - 51
M
Managing Default Repositories - 28
Index
Managing EZ Templates - 20
Managing Repositories for Commercial Linux
Distributions - 34
O
Organization of This Guide - 7
P
Parallels Virtuozzo Containers Templates
Overview - 11
Pool - 18
Preparing OS EZ Templates for Creating
Containers - 43
R
Removing Application EZ Templates From
Containers - 72
Removing EZ Templates From the Hardware
Node - 73
Repository
default - 27, 28
for commercial Linux distributions - 27, 28,
34
local - 27, 30
S
Scripts - 18
Setting Up a Proxy Server for EZ Templates 37
Setting Up an RHN Proxy Server for RHEL
OS EZ Templates - 40
Setting Up Repositories and Proxy Servers for
EZ Templates - 27
T
Tarball - 18
Template
application - 18
caching - 18
directory - 18
OS (operating system) - 18
overview - 18
Templates Overview - 10
U
Updating EZ Templates on Hardware Node 55
Updating EZ Templates Packages In
Containers - 65
Updating OS EZ Template Caches - 63
Updating Templates in Parallels Management
Console - 61
Updating Templates With vzpkg update
template - 60
Updating Templates with vzup2date - 56
Uploading and Installing EZ Templates in
Parallels Management Console - 48
Utilities
EZ template management utilities - 43, 44,
51, 53, 65, 72