1
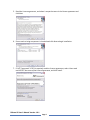
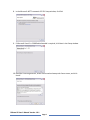
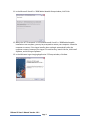
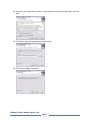
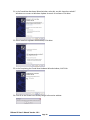
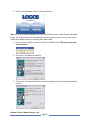
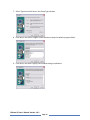
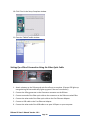
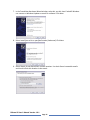
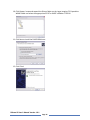
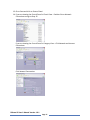
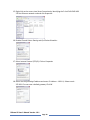
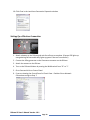
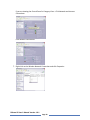
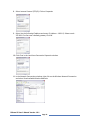
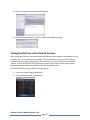
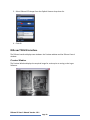
Table of Contents Introduction .................................................................................................................................... 2 Features ...................................................................................................................................... 2 Description ...................................................................................................................................... 2 Kit Contents ................................................................................................................................. 2 Carrying Case .............................................................................................................................. 2 USB 2.0 Fiber Fast Ethernet Adapter .......................................................................................... 2 DiXcam X‐ray Camera ................................................................................................................. 3 Setup ............................................................................................................................................... 3 Installing the Logos Imaging Application .................................................................................... 3 Installing the DiXcam Drivers .................................................................................................... 11 Setting Up a Wired Connection Using the Fiber Optic Cable ................................................... 14 Setting Up a Wireless Connection ............................................................................................ 19 Setting the DiXcam as the Default Scanner .................................................................................. 22 DiXcam TWAIN Interface .............................................................................................................. 23 Preview Window ....................................................................................................................... 23 DiXcam Control Window ........................................................................................................... 24 Generator Control ................................................................................................................. 24 Noise Suppression ................................................................................................................. 24 Gain ....................................................................................................................................... 24 Status .................................................................................................................................... 24 Test ........................................................................................................................................ 24 Execute .................................................................................................................................. 25 Transfer ................................................................................................................................. 25 Capturing an Image ....................................................................................................................... 25 DiXcam XP User’s Manual Version 1.0.1 Page 1 Introduction The DiXcam is a high‐performance black and white CCD camera. Its sensitivity and ability to irradiate an object with up to 300 pulses allows for examination of a wide range of objects not previously achievable with CCD‐based systems. Features • • • • • Operates on the Logos Imaging software platform High image dynamics provided by the 14‐bit CCD camera (12‐bit effective depth). Up to six hours battery life using the same DeWalt batteries used by Golden x‐ray machines Lightweight fiber optic cable Standard wireless data transfer capability Description Kit Contents • • • • • • • • • DiXcam x‐ray camera Cable spool with 100 meter fiber optic cable 3 meter camera‐to‐generator cable for 5‐pin Golden x‐ray machines USB 2.0 Fast Ethernet Adapter with USB cable Wireless antenna DeWalt battery charger 2 each 14.4 V DeWalt batteries Logos Imaging Application CD Carrying Case Carrying Case The carrying case is divided into two levels. The upper level contains the USB 2.0 Fiber Fast Ethernet Adapter and a pocket to hold the software, generator cable, and wireless antenna. The lower level contains the DiXcam camera, fiber optic cable spool, two batteries, and the battery charger. USB 2.0 Fiber Fast Ethernet Adapter Connections • • Type B USB port Fiber optic cable socket with protective cap Displays • Link LED (green) – Lights when the camera connection is established DiXcam XP User’s Manual Version 1.0.1 Page 2 • TX/RX LED (yellow) – Lights when the camera connection is established, blinks during data transfer A USB 2.0 capable Y cable must be used to connect the USB 2.0 Fiber Fast Ethernet Adapter. DiXcam Xray Camera Connections • • • • Fiber optic cable socket with protective cap Generator cable socket Antenna connector Battery socket Displays • • Battery LED – Lights green when the battery is fully charged, lights orange during the camera self test, lights red when the battery is discharged Camera LED – Lights green after a successful self test, lights orange during the camera self test, lights red in the event of a camera malfunction The LEDs illuminate for only five seconds following power up. WLAN Switch – Setting the switch to “O” places the camera in cable mode, setting the switch to “I” places the camera in wireless mode. Setup If you have previously installed Logos Imaging Application version 5.0 or higher, proceed to Installing DiXcam Drivers. If you have not installed the Logos Imaging Application on your computer, or if you have version 4.3 or earlier, begin by Installing the Logos Imaging Application. Installing the Logos Imaging Application Note: Installing the Logos Imaging Application requires the hardware key (dongle) included with the software package. DO NOT connect the hardware key until prompted by the software. Note: If you are reinstalling the Logos Imaging Software Application, please uninstall your old version prior to installing the updated software. 1. Insert the Logos Imaging Application CD into your CD drive. DiXcam XP User’s Manual Version 1.0.1 Page 3 2. On the Logos Imaging Application menu, click Install Software. 3. On the Install Software menu, click Logos Software. 4. There may be a considerable delay as the installer checks your system for the required prerequisites. If .NET Framework 3.5 SP1 or Microsoft Visual C++ 2008 Redistributable are missing, the installer will open the Welcome to the Prerequisites Wizard. If there are no missing components, the installer will move to step 13. DiXcam XP User’s Manual Version 1.0.1 Page 4 5. Read the License agreement, and select I accept the terms in the license agreement and click Next. 6. Ensure each missing component is checked and click Next to begin installation. 7. If .NET Framework 3.5 SP1 is required, read the License agreement, select I have read and ACCEPT the terms of the License Agreement, and click Install. DiXcam XP User’s Manual Version 1.0.1 Page 5 8. In the Microsoft .NET Framework 3.5 SP1 Setup window, click Exit. 9. If Microsoft Visual C++ 2008 Redistributable is required, click Next in the Setup window. 10. Read the License agreement, select I have read and accept the license terms, and click Install. DiXcam XP User’s Manual Version 1.0.1 Page 6 11. In the Microsoft Visual C++ 2008 Redistributable Setup window, click Finish. 12. When the .NET Framework 3.5 SP1 and Microsoft Visual C++ 2008 Redistributable installations are complete, you may be prompted to restart your computer. Allow the computer to restart. If the Logos Installer does not begin automatically after the computer restarts, browse to the Logos CD root directory, launch LIA.exe, click Install Software, and click Logos Software. 13. In the Welcome Logos Imaging Application 5.2 Setup window, click Next. DiXcam XP User’s Manual Version 1.0.1 Page 7 14. Read the License agreement, select I accept the terms in the license agreement, and click Next. 15. Click Next to keep the default destination location. 16. Click Install to begin installation. DiXcam XP User’s Manual Version 1.0.1 Page 8 17. Click Next in the Device Driver Installation Wizard window. 18. Click Finish in the Device Driver Installation Wizard window. 19. DO NOT click OK until you have completed steps 20‐23 and the hardware key driver installation is complete. 20. Attach the Dinkey Dongle hardware key when prompted. (If you have previously installed the Logos software using the hardware key, a green light on the end of the hardware key will indicate that the drivers are already installed, and you can skip to step 12.) DiXcam XP User’s Manual Version 1.0.1 Page 9 21. In the Found New Hardware Wizard window, select No, not this time when asked if Windows can connect to Windows Update to search for software. Click Next. 22. Select Install the software automatically. Click Next. 23. In the Completing the Found New Hardware Wizard window, click Finish. 24. Click OK in the Please insert Dinkey Dongle information window. DiXcam XP User’s Manual Version 1.0.1 Page 10 25. The software will display a message indicating a successful installation and the options installed. Click OK. 26. Click Finish in the Completing the Logos Imaging Application 5.2 Setup window. Installing the DiXcam Drivers IMPORTANT: Do not connect the DiXcam CCD Imager until you have completed steps 1 – 11. 1. Insert the Logos Imaging CD into your CD drive. 2. On the Logos Imaging Application menu, click Install Software. DiXcam XP User’s Manual Version 1.0.1 Page 11 3. On the Install Software menu, click DiXcam Drivers. Note: If you have installed previous versions of the DiXcam drivers, a DOS window will appear briefly. The DiXcam drivers are installed when the DOS window closes. You may then skip to Setting Up a Wired Connection Using the Fiber Optic Cable. 4. Click Yes when asked if you want to install the TWAIN Toolkit. This process may take several minutes. 5. Click Next in the Welcome window. 6. Click Next in the Choose Destination Location window to keep the default destination location. DiXcam XP User’s Manual Version 1.0.1 Page 12 7. Select Typical and click Next in the Setup Type window. 8. Click Next in the Select Program Folder window to keep the default program folder. 9. Click Next in the Start Copying Files window to begin installation. DiXcam XP User’s Manual Version 1.0.1 Page 13 10. Click Finish in the Setup Complete window. 11. Close the TWAIN Toolkit window. Setting Up a Wired Connection Using the Fiber Optic Cable 1. Attach a battery to the DiXcam and wait for self test to complete. (Camera LED lights up orange during self test and briefly lights up green if the test is successful.) 2. Connect the X‐Ray generator to the Generator connector on the DiXcam. 3. Connect one end of the fiber optic cable to the connector on the DiXcam marked Fibre. 4. Connect the other end of the fiber optic cable to the Fast Ethernet Adapter. 5. Connect a USB cable to the Fast Ethernet Adapter. 6. Connect the other end of the USB cable to an open USB port on your computer. DiXcam XP User’s Manual Version 1.0.1 Page 14 7. In the Found New Hardware Wizard window, select No, not this time if asked if Windows can connect to Windows Update to search for software. Click Next. 8. Select Install from a list or specified location (Advanced). Click Next. 9. Select Search for the best drivers in these locations. Un‐check Search removable media and check Include this location in the search. DiXcam XP User’s Manual Version 1.0.1 Page 15 10. Click Browse, locate and expand the Drivers folder on the Logos Imaging CD. Expand the WINXP folder and select the appropriate 32 BIT or 64 BIT subfolder. Click OK. 11. Click Next to install the DUB‐E100 drivers. 12. Click Finish. DiXcam XP User’s Manual Version 1.0.1 Page 16 13. Go to Start and click on Control Panel. 14. If you are viewing the Control Panel in Classic View – Double click on Network Connections and go to Step 15. If you are viewing the Control Panel in Category View – Click Network and Internet Connections Click Network Connections DiXcam XP User’s Manual Version 1.0.1 Page 17 15. Right click on the correct Local Area Connection by identifying the D‐Link DUB‐E100 USB 2.0 Fast Ethernet network card and click Properties. 16. Disable File and Printer Sharing and QoS Packet Scheduler. 17. Select Internet Protocol (TCP/IP). Click on Properties. 18. Select Use the following IP address and enter: IP Address – 10.0.0.1, Subnet mask – 255.0.0.0. Do not enter a default gateway. Click OK. DiXcam XP User’s Manual Version 1.0.1 Page 18 19. Click Close in the Local Area Connection Properties window. Setting Up a Wireless Connection 1. Attach a battery to the DiXcam and wait for self test to complete. (Camera LED lights up orange during self test and briefly lights up green if the test is successful.) 2. Connect the X‐Ray generator to the Generator connector on the DiXcam. 3. Attach the antenna to the DiXcam. 4. Turn on the DiXcam Wireless by moving the WLAN switch from “O” to “I”. 5. Go to Start and click on Control Panel. 6. If you are viewing the Control Panel in Classic View – Double click on Network Connections and go to Step 7. DiXcam XP User’s Manual Version 1.0.1 Page 19 If you are viewing the Control Panel in Category View – Click Network and Internet Connections Click Network Connections 7. Right click on the Wireless Network Connection and click Properties. DiXcam XP User’s Manual Version 1.0.1 Page 20 8. Select Internet Protocol (TCP/IP). Click on Properties. 9. Select Use the following IP address and enter: IP Address – 10.0.0.2, Subnet mask – 255.0.0.0. Do not enter a default gateway. Click OK. 10. Click Close in the Local Area Connection Properties window. 11. In the Network Connections window, right click on the Wireless Network Connection and select View Available Wireless Networks. DiXcam XP User’s Manual Version 1.0.1 Page 21 12. Select the DiXcam network and click Connect. 13. Click Continue Anyway if you see an unsecured network message. Setting the DiXcam as the Default Scanner After installing the drivers, you should select the DiXcam as your default scanning device if you intend to use it as your primary x‐ray imager. This will allow you to connect to the DiXcam interface using the Logos Image button. If you choose not to set the DiXcam as the default scanner, you can still connect to the DiXcam using the Import button in the Logos Incident Manager pane and selecting the DiXcam from the drop down menu. To select the DiXcam as your default scanning device: 1. Launch the Logos Imaging Application. 2. On the Edit Menu, select Preferences. DiXcam XP User’s Manual Version 1.0.1 Page 22 3. Select DiXcam CCD Imager from the Default Scanner drop‐down list. 4. Click OK. DiXcam TWAIN Interface The DiXcam interface displays two windows: the Preview window and the DiXcam Control window. Preview Window The Preview Window displays the acquired image for review prior to saving to the Logos Software. DiXcam XP User’s Manual Version 1.0.1 Page 23 DiXcam Control Window The DiXcam Control Window displays the DiXcam settings and controls. Generator Control Set the number of pulses to be fired by the Golden x‐ray machine using the slider or up and down arrows. The maximum number of pulses is 99. Noise Suppression This setting fires the generator multiple times to reduce noise and improve penetration. Low fires one sequence of pulses using the pulse count set using the generator control. Medium fires two sequences of pulses using the pulse count set using the generator control. High fires three sequences of pulses using the pulse count set using the generator control. If the generator is set to 20 pulses and the noise suppression is set to medium, the DiXcam will fire 20 pulses on the Golden x‐ray machine, wait several seconds, fire 20 more pulses, combine the images, and display the resulting image in the preview window. Gain Adjust the camera gain by using the slider, up and down arrows, or the presets. The higher the gain setting, the more sensitive the CCD chip will become. Higher sensitivity provides greater penetration with fewer pulses, but results in an image with more noise. Status The colored box in the bottom left corner shows the camera status. Red indicates that the DiXcam is not connected, Green indicates an active connection to the DiXcam, Yellow indicates a test image is being acquired, and a radiation symbol indicates the x‐ray generator is firing. Test Activates an LED in the camera housing and triggers the camera. The test image will appear in the Preview Window. DiXcam XP User’s Manual Version 1.0.1 Page 24 Execute Fires the Golden x‐ray using the current settings in the DiXcam Control window. The image will appear in the Preview Window. Transfer Moves the image in the Preview Window into the Logos database for further processing. Capturing an Image 1. Start the computer. 2. Attach a battery to the DiXcam and wait for self test to complete. (Camera LED lights up orange during self test and briefly lights up green if the test is successful.) 3. Connect the X‐Ray generator to the Generator connector on the DiXcam. 4. For wireless connections – Connect the antenna to the DiXcam. Turn on the DiXcam Wireless by moving the WLAN switch from “O” to “I”. For wired connection – Connect one end of the fiber optic cable to the connector on the DiXcam marked Fibre. Connect the other end of the fiber optic cable to the Fast Ethernet Adapter. Connect a USB cable to the Fast Ethernet Adapter. Connect the other end of the USB cable to an open USB port on your computer. 5. Launch the Logos Imaging Application. 6. Select the appropriate incident database from the Incident File Location drop‐down list on the right side of the top menu bar or select All Incident Locations. 7. In the Incident Manager pane, create an Incident, or select the name of the incident you want to open from the Incident Manager drop‐down list. 8. Click Logos Image to open the DiXcam interface. 9. Select the number of pulses, noise suppression, and gain settings. 10. Click Execute. The image thumbnail will appear in the current incident list. 11. If the image in the Preview Window is acceptable, click Transfer, or change the settings in the DiXcam Control window and retake the image by clicking Execute. 12. The image is now ready for editing. Refer to the Logos Software Manual for imaging editing instructions. DiXcam XP User’s Manual Version 1.0.1 Page 25