1
www.microscopenet.com
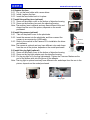
2.6 Replace the fuse
2.6.1 Pry out the fuse holder with a screw driver.
2.6.2 Install / replace the fuse.
2.6.3 Insert the fuse holder back to its place.
Fuse Holder
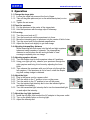
2.7 Install the auxiliary lens (optional)
2.7.1 Screw off the plastic cover on the bottom of objective housing.
2.7.2 Screw on the auxiliary lens onto the objective housing.
Note: The auxiliary lens is optional and may have different color and
shape from the one in the picture, depends on the model
purchased.
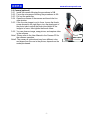
2.8 Install the camera (optional)
2.8.1 Take off the plastic cover on the phototube.
2.8.2 Insert the camera into the phototube, and then connect the
camera to a computer by a USB cable.
2.8.3 Refer to the manual in the Camera CD to installation the driver
and software.
Note: The camera is optional and may have different color and shape
from the one in the picture, depends on the model purchased.
Auxiliary Lens
Camera
Photo Tube
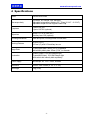
2.9 Install the ring light (optional)
2.9.1 Screw off the plastic cover on the bottom of objective housing.
2.9.2 Screw on the ring light adapter onto the objective housing.
2.9.3 Put the ring light on to the ring light adapter. Tighten the 3 screws. Make sure the
end of the screws stick into the groove of the adapter.
Note: The ring light is optional and may have different color and shape from the one in the
picture, depends on the model purchased.
Ring Light
Ring Light Adapter
-5-