1
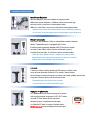
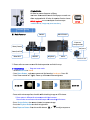
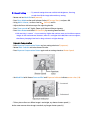
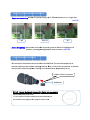
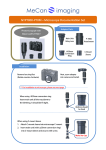
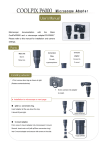
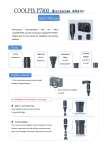
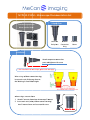
NYP330-P33M – Miccroscope
e Docum
mentatio
on Set
Adapte
er Parts
Photomiicrograph with
w
Nikon CoolPix
C
P330
0!
Main Un
nit
Relay Le
ens
Φ300mm
Conveersion
Rin
ng
C-M
Mount
Sleeve
Installation
n
Attach ad
dapter to ca
amera lens
parts and
d tighten with screw
** For insta
allation to microscope,
m
p
please see ne
ext page
When using Φ30mm con
nversion ring
g
Insert main un
nit all the way
w down to
th
he 30Φring. It should be
e fit tight.
W
When using C-mount
C
slee
eve
1. Attach C-m
mount sleev
ve into micrroscope C-m
mount.
2. Insert main unit (with
h φ30mm cconversion ring)
r
into C-mo
ount sleeve and secure
e with screw.
Make No Ga
ap
Installation to Microscope
Installing to Eyepiece
Remove eyepiece and insert adapter to eyepiece tube.
When tube inside diameter is Φ30mm, attach conversion ring
to main unit first, and insert it into eyepiece tube.
When it is Φ23.2mm, insert main unit directly into eyepiece tube.
* Adapter may start to rotate when diopter ring is attached to eyepiece.
In such case, insert the adapter after turning diopter ring to either end.
Nikon F phototube
Insert main unit to Nikon F-tube. In recent Nikon models, the ones
With V-T phototube part is equipped with F-tube.
In older models, Optiphot, Biophot, SMZ-2T trinocular models
are with F-tube. When 35mm camera or Polaroid system is
installed to microscope, it is likely be same as the old models.
*SMZ-10 require optional sleeve. * Adapter may start to rotate
when diopter ring is attached to eyepiece. In such case, insert the
adapter after turning diopter ring to either end.
C-mount
C-mounts is often used for attaching CCD cameras, and has male
screw of outer diameter 25.4mm. First, attach C-mount sleeve
to microscope C-mount. Second, insert main unit (with φ30mm conversion
ring) into C-mount sleeve and secure with screw.
*Compatible only with direct (1.0x) C-mount.
C-mount with lens inside should not be used.
Olympus PT phototube
A PT phototube has an outer diameter of φ38mm
with curving threads at the top. U-SPT, SZ-PT tubes
are with PT-tube. When 35mm camera or
Polaroid system is installed to microscope,
it is likely be PT tube. It requires fixation sleeve
NY-BH (option) to secure adapter to microscope.
NY-BH
JIS phototube
e
JIS tube has ou
uter diameter φ25mm,,
and
d inner diam
meterΦ23.2
2mm. Old Olympus mod
dels are
oftten equippe
ed with JIS tube. It requ
uires fixation
n sleeve
NY
Y-JIS (option
n) to secure
e adapter to microscopee
NY-JIS
*without NY-JISS, image ma
ay come out blurry.
Camera Setting
S
■ Ma
ain Feature
es
Sh
hutter
Movie Buttton
Exposure
Compensatio
C
on
Zoom
m Control
OK
K button
Comm
mand Dial
Mod
de Dial
ON/OFF
Playback
P
Menu
u
Multi--Selector
** Plea
ase refer to camera man
nual for bassic operation
n and initial set up.
〇 Eassy Setting ・・・ Easy
y semi-auto mode
・Set tthe Mode Dial
D to Scene
e.
・Presss Menu Buttton , and ro
otate comm and dial to select
s
Landsscape. Presss OK.
・Presss Zoom con
ntrol to T (rig
ght). Zoom up till there
e will be no vignette.
v
Zo
oom (W)
Zoom (T)
・Focu
us with micrroscope focus handle w
while checking image on
n LCD vieweer.
*** Focus pointt is different for microsco
ope and digiital cameras.
Please make
e sure to foccus with micrroscopes wh
hile watching
g LCD viewerr.
・Presss Shutter Re
elease (or re
emote shuttter) to captu
ure image.
・Presss the Playba
ack Button to
t check im age taken.
・Presss Exposure Button. Pre
ess the multii selector
or
to
t adjust exp
posure.
〇 Manual Setting ・・・Try manual setting when not satisfied with brightness, focusing,
T
or color level of the image taken with easy setting.
・Rotate and set Mode Dial to M (manual).
・Press Focus Mode on the multi-selector. Select MF (manual focus) and press OK.
・Using Multi- Selector , set focus level to∞ (Infinite) and fix.
・Adjust the focus with microscope fine adjusting handle.
・Press Zoom control to T (right). Zoom up till there will be no vignette.
・Press Menu Button and select ISO Sensitivity by rotating Command dial.
*ISO sensitivity is camera’s base sensitivity. Higher the number, more you be able to capture
images in dark environment. However, when it is set higher than 800, noise starts to appear,
therefore try keeping it low level as long as there is no light shortage.
Exposure Compensation
・Press Exposure Compensation Button and set setting criteria to F (exposure).
・Rotate Multi- Selector and select lowest F# value.
・Press Exposure Compensation Button again and set setting criteria to Shutter Speed.
・Set Mode Dial to M. Rotate Command Dial until Exposure Indicator indicate center value (±0)
・Take a picture for a test. When image is too bright, try shorter shutter speed(-).
In the same manner when image is too dark, try longer shutter speed (+)
Brightness of image depends on following 3 criteria.
Please refer when using manual setting.
BRIGHT
High・・・
ISO
・・・Low
Low・・・
Exposure (F/#)
・・・High
Long・・・
Shutter Speed
・・・Short
DARK
・When setting is finished, take a picture for test by pressing shutter release.
Pressing Playback button after taking shot enables you to see and check image.
〇 Other Setting ・・
Please also refer to CoolPix P330 user manual for detail
・White Balance ・・
Please adjust white balance manually when it is hard to produce
desired image due to the sample color or tone of light. (P65 & Ref P32)
・Image Size
・・
Small data size enables you to capture more images with single
memory card and easy to handle whereas large data size is more
suitable for printing and enlargement. (P71)
・Auto Off
・・
When no operation is performed for the selected time length, the monitor
would shut off and camera enter standby mode. When the AC adapter
is connected, it is set for 30 minutes automatically. (P19 & Ref P78)
・Date Imprint
・・
Date and time of recording can be imprinted on pictures. (Ref P74)
・Stabilizer
・・
Use self-timer 2S (two second) to stabilize the camera. (P55)
Othe
er thing you
u can do witth CoolPix P
P330
Expossure Bracke
eting enable
es to capture
e image witth 3 differen
nt exposuress in a single shot.
(R
Ref P42)
+ 0.3
Base Pic
-0.3
Active
e D-Lighting
g reduces ov
ver and und
der exposure
e, preserve details in hiighlights and
shadows,, creating ph
hotograph with
w natural contrast. (R
Ref P50)
Ocular Microme
eter Installa
ation
Φ21m
mm ocular micrometer
m
can
c be installled into NY
Y-P330. First turn the ad
dapter tip to
o
counte
er-clockwise
e and remov
ve installing
g bracket. Next,
N
insert ocular micrrometer to bracket
with printed surfa
ace facing do
own. Finallyy, reinstall bracket to ad
dapter bodyy to set.
Printted surface ffacing down
Micrrometer
S11- CF - Speciall design miccrometer forr digital cam
mera adapte
er
(10m
mm/100split pitch 0.1mm
m)
S11-C
CF removes numbers wrritten on the
e micrometerr and
also shifted scale
e slightly to the
t edge for clearer view
w.