1
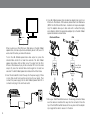
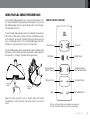
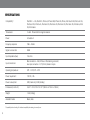
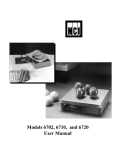
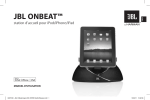
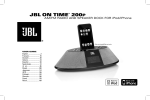
JBL OnBeat™ speaker dock for iPod/iPhone/iPad Owner’s Manual Important Safety Instructions Regulations FCC Statement and Warning Please read thefollowing precautions before use: 1. Read these instructions. 12. Use only with the cart, stand, tripod, bracket or table specified by the manufacturer or sold with the apparatus. When a cart is used, use caution when moving the cart/apparatus combination to avoid injury from tip-over. 2. Keep these instructions. 3. Heed all warnings. 4. Follow all instructions. 5. Do not use this apparatus near water. 13. Unplug this apparatus during lightning storms or when unused for long periods of time. 6. Statement and W Clean only with a dry cloth. 7. Do not block any ventilation openings. Install in accordance with the manufacturer’s instructions. 8. Do not install near any heat sources such as radiators, heat registers, stoves or other apparatus (including amplifiers) that produce heat. 9. Do not defeat the safety purpose of the polarized or grounding-type plug. A polarized plug has two blades with one wider than the other. A grounding-type plug has two blades and a third grounding prong. The wide blade or the third prong is provided for your safety. If the provided plug does not fit into your outlet, consult an electrician for replacement of the obsolete outlet. 10. Protect the power cord from being walked on or pinched, particularly at plugs, convenience receptacles and the point where they exit from the apparatus. 11. Only use attachments/accessories specified by the manufacturer. 14. Refer all servicing to qualified service personnel. Servicing is required when the apparatus has been damaged in any way, such as power supply cord or plug is damaged, liquid has been spilled or objects have fallen into the apparatus, the apparatus has been exposed to rain or moisture, does not operate normally, or has been dropped. 15. Do not expose this apparatus to dripping or splashing and ensure that no objects filled with liquids, such as vases, are placed on the apparatus. – Increase the separation between the equipment and receiver – Connect the equipment into an outlet on a circuit different from that to which the receiver is connected. 17. The mains plug of the power supply cord shall remain readily operable. – Consult the dealer or an experienced radio/TV technician for help. 18. Do not expose batteries to excessive heat such as sunshine, fire or the like. WARNING: TO REDUCE THE RISK OF FIRE OR ELECTRIC SHOCK, DO NOT EXPOSE THIS APPARATUS TO RAIN OR MOISTURE. . SEE MARKING ON BACK OF PRODUCT. MODIFICATIONS NOT EXPRESSLY APPROVED BY THE MANUFACTURER COULD VOID THE USER AUTHORITY TO OPERATE THE EQUIPMENT UNDER FCC RULES. IC Statement and Warning CAUTION 2 – Reorient or relocate the receiving antenna. 16. To completely disconnect this apparatus from the AC Mains, disconnect the power supply cord plug from the AC receptacle. RISK OF ELECTRIC SHOCK DO NOT OPEN THE LIGHTNING FLASH WITH AN ARROWHEAD SYMBOL, WITHIN AN EQUILATERAL TRIANGLE, IS INTENDED TO ALERT THE USER TO THE PRESENCE OF UNINSULATED “DANGEROUS VOLTAGE” WITHIN THE PRODUCT’S ENCLOSURE THAT MAYBE OF SUFFICIENT MAGNITUDE TO CONSTITUTEA RISK OF ELECTRIC SHOCK TO PERSONS. This equipment has been tested and found to comply with the limits for aClass B digital device, pursuant to part 15 of the FCC Rules. These limits are designed to provide reasonable protection against harmful interference in a residential installation. This equipment generates, uses and can radiateradio frequency energy and, if not installed and used in accordance with the instructions, may cause harmful interference to radio communications. However, there is no guarantee that interference will not occur in a particular installation. If this equipment does cause harmful interference to radio or television reception, which can be determined by turning the equipment off and on, the user is encouraged to try to correct the interference by one or more of the following measures: THE EXCLAMATION POINT WITHIN AN EQUILATERAL TRIANGLE IS INTENDED TO ALERT THE USERTO THE PRESENCE OF IMPORTANT OPERATING AND MAINTENANCE SERVICING INSTRUCTIONS IN THE LITERATURE ACCOMPANYING THE PRODUCT. This Class B digital apparatus complies with Canadian ICES-003. Cet appareil numérique de la classe B est conforme à la norme NMB-003 du Canada English connecting and setting up your jbl OnBeat™ SPEAKER DOCK 1. C arefully unpack your speaker dock, and confirm that all the items shown here are included: JBL® OnBeat speaker dock, power supply, AC cord*, remote control, iPod®/iPhone® adapter clip and iPad™ adapter clip. 3. If you are going to use your JBL OnBeat speaker dock with another audio source, plug one end of a 3.5mm (1/8") stereo cable (not included) into the JBL OnBeat speaker dock Audio In connector, and plug the other end into the audio source’s audio out or headphone DC IN POWER AUDIO IN USB VIDEO OUT 3.5mm (1/8") cable * AC cord varies by region. 2. C onnect a USB Type Mini B cable (not included) to the JBL OnBeat speaker dock USB port and to a USB port on the computer on which your iTunes library is located. This allows you to sync a docked iPod/ iPhone/iPad device with iTunes® (see Synchronizing with your iTunes Library, on page 6). DC IN POWER AUDIO IN USB VIDEO OUT USB Type B IMPORTANT: If you play audio through a docked iPod, iPhone or iPad device and an audio source connected to the Audio In connector at the same time, you will hear both of their outputs mixed through the JBL OnBeat speaker dock. To hear only one source, you will need to turn off the other source (the one you do not want to hear) manually. Important Note for All Electronic Products: Before inserting or unplugging audio cables from the device’s Audio In jack, it is good practice to turn off the device first. This will prolong the life of your unit, help protect it from static electricity and prevent 4. If you want to view videos or photos from your iPod, iPhone or iPad device on a TV, plug one end of a composite video cable (not included) into the JBL OnBeat speaker dock Video Out connector, and plug the other end into your TV’s composite video input connector. www.jbl.com 3 DC IN POWER AUDIO IN USB 6. Y our JBL OnBeat speaker dock includes two adapter clips: one for an iPod touch®/iPod classic®/iPhone device, and another for an iPad device (NOTE: the iPod 5G and iPod nano® models do not require an adapter clip.) The adapters allow you to dock units with or without third-party skins attached. Attach the appropriate adapter clip to the JBL OnBeat speaker dockdock as shown below. VIDEO OUT Composite Video iPod touch/iPhone iPad Locking Hole hen you dock your iPod, iPhone or iPad device on the JBL OnBeat W speaker dock, its video output will automatically be set to Off, even if it was turned On before you docked the device. To turn the JBL OnBeat speaker dock video output on, press the remote’s Menu button for at least two seconds. The JBL OnBeat speaker dock status LED will flash once. The video from the iPod, iPhone or iPad device will play on the connected TV. To turn the video output off, press the remote’s Menu button again for at least two seconds. The JBL OnBeat speaker dock status LED will flash twice. 5. Insert the included AC cord all the way into the power supply (if there is more than one AC cord, use the correct one for your region). Then connect the power supply into the JBL OnBeat speaker dock DC In connector and plug it into an AC wall outlet. DC 12V AUDIO IN USB Insert Pin Into Locking Hole Bend Clip Slightly Bend Clip Slightly VIDEO OUT 7. P lace your iPod/iPhone/iPad device on the docking connector. Make sure the device is inserted all the way onto the connector. Press the top of the iPod/iPhone/iPad device all the way back into the adapter clip or against the dock to secure it in the dock. 4 English Using your jbl OnBeat SPEAKER DOCK To turn the JBL OnBeat speaker dock on, press the Power button on the unit. The unit’s status LED will glow white when the system is on. To turn the JBL OnBeat speaker dock off, press the Power button on the unit again. The status LED will turn off. remote control functions To place the JBL OnBeat speaker dock into the Standby mode while an iPod, iPhone or iPad device is docked, hold down the Play/Pause button on the remote for two seconds. The status LED will glow amber when the unit is in the Standby mode. To turn the JBL OnBeat speaker dock from Standby to on, press any button on the unit or remote control. Volume Down The JBL OnBeat speaker dock will automatically enter the Standby mode whenever no control buttons have been pressed and no audio signal has been present for 10 minutes. The status LED will glow amber. Play/Pause* Previous/Rewind (Hold for rewind) Power Button Volume Up Mute/Unmute Next/Fast Forward (Hold for fast forward) Menu Scroll Up Menu Scroll Down Menu Menu Select/Enter Volume Buttons Adjust the volume using the (+) and (–) buttons. Press both buttons simultaneously to mute the sound; press either button to unmute the sound. * iPod touch, iPhone and iPad menu navigation may require you to put the iPod/iPhone/iPad device in music mode manually. www.jbl.com 5 rotating the dock When an iPod or iPhone device is docked in the JBL OnBeat speaker dock, you can rotate the dock to the landscape mode. IMPORTANT: You cannot rotate the dock when an iPad device is docked. Synchronizing with YOUR iTunes LIBRARY To rotate the dock to the landscape mode, turn it 90 degrees counterclockwise. To rotate it back to the portrait mode, turn it 90 degrees clockwise. The dock will hold in place at the portrait and the landscape positions. Before attempting to synchronize, be sure that the JBL OnBeat speaker dock USB port is connected to the computer on which your iTunes library is located. Portrait Mode Landscape Mode NOTE: Before attempting to synchronize your iPod/iPhone/iPad device with your iTunes library, be sure that both your iPod/iPhone/iPad device and your iTunes library are updated to the latest software version. 1. P lace your iPod/iPhone/iPad device on the JBL OnBeat speaker dock docking connector. Make sure the iPod/iPhone/iPad device is inserted all the way onto the connector. 2. U se your computer’s iTunes software to synchronize the iPod/ iPhone/iPad device with the iTunes library. 3. W hen you’re finished synchronizing, eject the iPod/iPhone/iPad device from the iTunes library. Status LED Your JBL OnBeat speaker dock LED will display different colors to indicate the unit’s status: Charging a docked iPod/iPhone/iPad DEVICE Status LED Color State The JBL OnBeat speaker dock will charge your iPod or iPhone device whenever it is docked. White – Constant JBL OnBeat speaker dock is on White – Flashing JBL OnBeat speaker dock is muted Amber – Constant JBL OnBeat speaker dock is in Standby mode No LED JBL OnBeat speaker dock is off NOTE: The JBL OnBeat speaker dock may not charge a docked iPad device via the USB connection to a PC. If the iPad device charges when it is connected directly to the PC via USB, it will charge while docked on the JBL OnBeat speaker dock. If the iPad device does not charge when it is connected directly to the PC via USB, it will not charge while docked on the JBL OnBeat speaker dock. 6 English Troubleshooting Your JBL OnBeat SPEAKER DOCK Problem Solution No sound (amber LED is not illuminated): •M ake sure that the power supply is properly connected to the JBL OnBeat speaker dock and to a working AC outlet. No sound (white LED is illuminated): • Touch the Volume Up (+) button to increase the system volume. • If you’re using a docked iPod/iPhone/iPad device, make sure that it is properly docked in the JBL OnBeat speaker dock. • If you’re using an auxiliary source, make sure that the audio cable is properly connected to the JBL OnBeat speaker dock Audio In connector and to the source component’s audio output. •M ake sure that the iPod/iPhone/iPad device or other source component is not in the Pause mode and that its volume control is not turned all the way down. Sound crackles, hisses or is distorted: • Turn the iPod/iPhone/iPad device or other source component’s volume down. • Make sure that the iPod/iPhone/iPad EQ setting is set to “Off.” Loud hum or buzzing: •M ake sure that the audio cable is plugged all the way into the JBL OnBeat speaker dock Audio In jack. • Replace the audio cable. • Unplug the power supply and connect it to a different AC outlet. Sound comes from only one speaker: •M ake sure that the iPod/iPhone/iPad device is properly seated all the way into the docking connector. •M ake sure that the audio cable is plugged all the way into the JBL OnBeat speaker dock Audio In jack. • Make sure that the audio cable is a stereo cable. www.jbl.com 7 Specifications Compatibility*: iPad Wi-Fi® + 3G, iPad Wi-Fi, iPhone 4, iPhone 3GS, iPhone 3G, iPhone, iPod touch 4G, iPod touch 3G, iPod touch 2G, iPod touch, iPod nano 5G, iPod nano 4G, iPod nano 3G, iPod nano 2G, iPod nano, iPod 5G, iPod classic Transducers: 2 x JBL® Phoenix SE full-range transducers Power: 6.5 watts x 2 Frequency response: 70Hz – 20kHz Signal-to-noise ratio: 80dB Input impedance (Aux): 10k ohms Input connections: Main connection – iPod, iPhone or iPad docking connector; Aux input connection – 1/8" (3.5mm) stereo mini-jack Operating temperature: 32˚F – 104˚F; 0˚C – 40˚C Power requirement: 13V DC, 2.5A Power consumption: 30W (maximum); 0.5W (standby) Dimensions (H x W x D): 5-3/4" x 10-13/16" x 5-5/16" (146mm x 275mm x 135mm) Weight: 1.9 lb (0.88kg) Available finishes: Black; white * Compatibility at time of writing. For the latest compatibility information, go to www.jbl.com. 8 English HARMAN Consumer, Inc. 8500 Balboa Boulevard, Northridge, CA 91329 USA © 2011 HARMAN International Industries, Incorporated. All rights reserved. JBL is a trademark of HARMAN International Industries, Incorporated, registered in the United States and/or other countries. JBL OnBeat is a trademark of HARMAN International Industries, Incorporated. iPhone, iPod, iPod classic, iPod nano, iTunes and iPod touch are trademarks of Apple Inc., registered in the U.S. and other countries. iPad is a trademark of Apple Inc. “Made for iPod,” “Made for iPhone” and “Made for iPad” mean that an electronic accessory has been designed to connect specifically to iPod, iPhone and iPad, respectively, and has been certified by the developer to meet Apple performance standards. Apple is not responsible for the operation of this device or its compliance with safety and regulatory standards. iPod/iPhone/iPad not included. Wi-Fi is a registered trademark of the Wi-Fi Alliance. Features, specifications and appearance are subject to change without notice. www.jbl.com 9