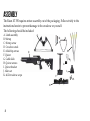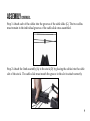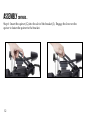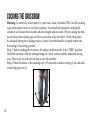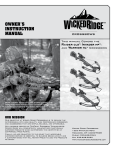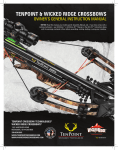
1
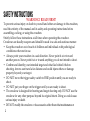
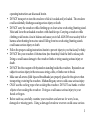
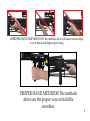
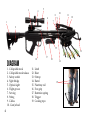
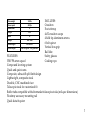
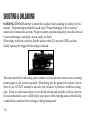
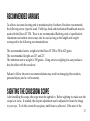
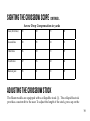
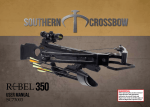
user manual
SC73001
WARNING:
WHO WE ARE
Southern Crossbow is built on the idea of integrating age-old
American resourcefulness and perseverance with modern
equipment. These one-of-a-kind, tactical crossbows are
Engineered in texas
different than the typical genre of the traditional crossbow
market. With a matte black finish instead of a camouflage
print, Southern Crossbows incorporate the style and customizable traits of a tactical
weapon’s platform with an innovative crossbow structure.
Southern Crossbows are equipped with a state-of-the-art, customizable AR platform,
allowing users to mount flashlights, lasers, night vision riflescopes or any other
tactical accessory that can be applied to an AR platform. Along with collapsible
stocks, swinging stocks, and ergonomic grips, Southern Crossbow offers a modular
crossbow system users can customize to their needs. The crossbows include arrows,
a scope and a detachable quiver, everything needed for an ultimate crossbow
experience.
made for all
www.southerncrossbow.com
Table of contents
Safety Instructions and Proper Handling……............................2-5
Specification and Features………………………………………..6-7
Assembly…………………………………………………………...8-11
Accessory mounting………………………………………………11-12
Installing the scope………………………………………………..12-13
Cocking and Loading……………………………………………..14-15
Shooting and Unloading…….……………………………………16
Recommended Arrows…..………………………………………..17
Sighting..............................................................................................17-19
Adusting the stock….……………………………………………..19-20
String specification………………………………………………...21
Maintenance………………………………………………………..21-22
Troubleshooting……………………………………………………23-24
Warranty……………………………………………………………24-26
1
Southern Crossbow was created to integrate the features of a tactical weapons
platform with the modern compound crossbow. The Southern Crossbow Risen
XT’s compound levering system and quiet cams make the 180lb draw weight
and 350 fps arrow speed sure to turn heads on the range or in the field. The
composite, ultra-stiff, split limb design offers exceptional power and durability.
The Risen XT has an adjustable vertical grip, allowing the shooter better stability
and accuracy. The Risen XT’s stock is modeled similar to that of a tactical
weapon’s system helping shooters easily transition from gun to bow without a
substantial adjustment period; it is a composite stock with a rubber grip finish.
The Risen XT comes packaged with: a 4x32 crossbow scope, a foot stirrup, four
field tip arrows, a six arrow quiver, rail lube and safety glasses. It has everything
the shooter needs, right out of the box, to pick up and start shooting in minutes.
Targets and prey not included.
WARNING! READ FIRST!
To prevent injury to yourself and others or damage to the crossbow, read
the entirety of the manual and its safety and operating instructions before
assembling, cocking or using the crossbow.
Safety instructions
WARNING! READ FIRST!
To prevent serious injury or death to yourself and others or damage to the crossbow,
read the entirety of the manual and its safety and operating instructions before
assembling, cocking, or using the crossbow.
Strictly follow these instructions at all times when operating the crossbow.
Crossbows are deadly weapons and should be used in a safe and cautious manner.
• Keep the crossbow out of reach of children and individuals with pathological
conditions when not in use.
• Always point your crossbow in a safe direction. Never point it at or toward
another person. Never point it at or toward anything you do not intend to shoot.
• Confirm and identify your intended target and what lies behind it before
shooting. Arrows can travel a far distance and could injure others or damage
property beyond your target.
• DO NOT move the trigger safety switch to FIRE position until you are ready to
shoot.
• DO NOT put your finger on the trigger until you are ready to shoot.
• The crossbow is designed for hunting and target shooting only. DO NOT use the
crossbow for any other purpose beyond its original intent. Doing so could cause
serious injury or death.
• DO NOT modify the crossbow or its accessories other than what maintenance or
2
operating instructions are discussed herein.
• DO NOT transport or store the crossbow while is it cocked and/or loaded. The crossbow
could accidentally discharge causing serious injury or death.
• DO NOT carry the crossbow while climbing up or down a tree or shooting/hunting stand.
Hoist and lower the unloaded crossbow with durable rope. Carrying a crossbow while
climbing could create a loss in balance and cause you to fall. ALWAYS wear a safety belt or
harness when hunting from a tree stand. Falling from tree or shooting/hunting stands
could cause serious injury or death.
• Follow the proper cocking instructions herein to prevent injury to your back and/or body.
• DO NOT fire your crossbow if obstructions (tree branches) block the limb’s release path.
Doing so could cause damage to the crossbow limbs or string causing serious injury or
death.
• DO NOT fire the weapon with bystanders standing beside the crossbow. Bystanders are
subject to serious injury in the rare case a string, cable, or limbs were to break.
• Make sure all arrows (field tips and broadheads) are properly placed in the quiver when
transporting or storing the crossbow. Mishandling any arrow could cause serious injury.
• ONLY use the cocking rope when cocking the crossbow. DO NOT use hands or other
objects when cocking the crossbow. Doing so could cause serious injury to your
hands or fingers.
• Before each use, carefully examine your crossbow and arrows for worn, loose,
damaged or missing parts. Using a damaged crossbow or arrow could cause serious
3
injury or death to yourself or others.
• DO NOT attempt to adjust the crossbow’s draw weight, change its cable, limbs, or
string without proper tools and instruction. Have a qualified archery/crossbow
pro-shop perform these tasks. Improper adjustments and installation could cause
serious injury or death, and void the crossbow’s warranty.
• DO NOT use arrows that do not meet the required specifications of recommended
arrows. Using incorrect lightweight arrows can have the same effect as dry-firing,
thus causing damage to the crossbow, injury to yourself or others.
proper
hand grip of the crossbow
NEVER allow your fore-grip hand or fore-grip hand’s fingers or thumb to move above
the flight groove or into the path of the bowstring or cable. All hands and fingers should
remain below the flight groove and string/cable path to prevent serious injury. Not
following this safety instruction will cause serious injury to your hand and fingers when
the crossbow is fired. Hands must remain below this area at all times. Prior to shooting,
hands should be properly kept on the crossbow’s foregrip.
4
IMPROPER HAND GRIP METHODS! The methods above will cause serious injury
to your hands and fingers upon firing.
PROPER HAND METHODS! The methods
above are the proper ways to hold the
crossbow.
5
3
4
5
8
6
7
1
10
9
11
12
2
15
DIAGRAM
1. Collapsible stock
2. Collapsible stock release
3. Safety switch
4. Sight bridge
5. Optical sight
6. Flight groove
7. Serving
8. String
9. Cables
10. Cam/wheel
6
18
11.
12.
13.
14.
15.
16.
17.
18.
19.
17
Limb
Riser
Stirrup
Barrel
Picatinny rail
Fore grip
Retention spring
Trigger
Cocking rope
16
13
14
19
Draw weight
180 lbs
Arrow speed
350 fps
Power stroke
Length
13”
35.5”
Width
16”
Weight
8lbs 12oz
Arrow length
20” and 22”
Arrow weight
400-425 grain / 350 grain min.
INCLUDES:
Crossbow
Foot strirrup
4x32 crossbow scope
4 field tip aluminum arrows
6 bolt quiver
Vertical fore-grip
Rail lube
Safety glasses
Cocking rope
FEATURES:
350 FPS arrow speed
Compound levering system
Quick and quiet cams
Composite, ultra-stiff split limb design
Lightweight, composite stock
Durable, CNC machined riser
Telescopic stock for customized fit
Buffer tube compatible with aftermarket telescopic stocks (mil-spec dimensions)
Picatinny accessory mounting rail
Quick detach quiver
7
ASSEMBLY
The Risen XT 350 requires minor assembly out of the packaging. Follow strictly to the
instructions herein to prevent damage to the crossbow or yourself.
The following should be included:
A. Limb assembly
B. Stirrup
C. Stirrup screw
D. Crossbow stock
E. 4 field tip arrows
F. Quiver
G. Cable slide
H. Quiver screws
I. Quiver bracket
J. Allen set
K. 4x32 crossbow scope
A.
B.
C.
E.
D.
J.
G.
I.
F.
K.
8
H.
ASSEMBLY continued...
Step 1: Attach each of the cables into the grooves of the cable slide (G). The two cables
must remain in the individual grooves of the cable slide once assembled.
Step 2: Attach the limb assembly (A) to the stock (D) by placing the cables into the cable
slot of the stock. The cable slide must match the groove in the slot to attach correctly.
9
ASSEMBLY continued...
Step 3: Insert the barrel of the stock into the limb assembly and connect together.
Step 4: Attach the stirrup (B). Make sure the concave surface of the stirrup faces up and
meets flush with the edge of the limbs. Fix the stirrup into place with the 2 stirrup
screws (C). Do not over tighten.
10
ASSEMBLY continued...
The main components of the crossbow are now assembled. Make sure the cables in the
cable slide are separated in their grooves and not stacked together. If so, repeat steps 1
through 4.
Step 5: Install the quiver bracket onto the bottom of the crossbow body and fasten the
two quiver screws (J).
11
ASSEMBLY continued...
Step 6: Insert the quiver (G) into the slot of the bracket (I). Engage the lever on the
quiver to fasten the quiver to the bracket.
12
ASSEMBLY
COntinued...
Installing the Scope
The scope rings are pre-installed onto the crossbow scope. Follow the instructions below
to properly mount the crossbow scope.
Step 1: Loosen the mounting screws on the scope rings.
Step 2: Align the rings with the grooves on the crossbow’s mount. If the rings are not
aligning properly with the grooves on the crossbow mount, the rings placement on the
scope should be adjusted. To do so, loosen the two screws on the scope ring. Move the
ring forward or backward to match the placement needed to mount to the crossbow
mount. Retighten the screws on the scope ring.
Step 3: Tighten the mounting screws on the scope ring.
Step 4: At this time check for correct eye relief by holding the crossbow in the shooting
position. If adjustment is needed to obtain a full field of view through the scope, loosen
the scope’s two screws and reset the scope to the correct position.
Step 5: Once eye relief is established, check the crosshair alignment is level by pointing
the scope at an object that is level. If alignment is needed, loosen the rings then rotate the
scope to align the crosshair.
13
Cocking the crossbow
Warning: In order to prevent injury to your back, arms, or hands ONLY use the cocking
rope instructions below to cock the crossbow. Accurately and properly cocking the
crossbow will ensure the crossbow shoots straight and accurate. When cocking the bow,
never release the cocking rope as this can result in a dry fire effect. If the string must
be released during the cocking process, slowly lower the handles to gently return the
bowstring to its resting position.
Step 1: Before cocking the crossbow, the safety switch must be in the “FIRE” position.
Hold the crossbow with the stirrup sitting on a level surface and the underside facing
you. Place your foot into the stirrup to provide stability.
Step 2: Place the hooks of the cocking rope (19) onto the crossbow string (8) on each side
of the flight groove (6).
14
Cocking the crossbow continued...
Step 3: Then place the middle of the rope in the groove in the stock located behind the
mount and safety switch.
Step 4: Grasp the molded handle and pull the string back until it latches in the trigger.
Step 5: Place a recommended crossbow arrow in the flight groove. Make sure a fletching
or vane is slipped into the flight groove and slide the arrow back under the arrow
retention spring until it rests against the serving. The arrow is now loaded and ready to
fire.
WARNING! Even with the safety engaged, proper crossbow and shooting safety must be
followed to prevent damage to property, serious injury or death.
15
Shooting & Unloading
WARNING! DO NOT attempt to shoot the crossbow before reading the entirety of this
manual. Proper handgrip should be used (read “Proper Handgrip of the Crossbow”
under safety instructions section). Proper crossbow and shooting safety must be followed
to prevent damage to property, serious injury or death.
When ready to fire the crossbow, flip the safety switch (3) forward to FIRE position.
Gently squeeze the trigger till the string is released.
The safest method for unloading your crossbow is to fire an arrow into an arrow training
(foam) target or soft, rock-free ground. When firing into the ground, fire at least 3 feet in
front of you. DO NOT attempt to un-cock your crossbow by hand nor with the cocking
rope. Doing so could cause injury to your hands or back and possibly result in a dry fire.
It is recommended to carry a field trip in your quiver while hunting and use the field tip
to unload the crossbow before storage or being transported.
16
RECOMMENDED ARROWS
To achieve accurate shooting and to maintain safety, Southern Crossbow recommends
the following arrow types be used. Field tips, fixed and mechanical broadheads may be
used with the Risen XT 350. There is no recommended fletching style of specification.
Aluminum and carbon arrows may also be used as long as the length and weight
correspond to the following recommendations:
The recommended arrow weights for the Risen XT 350 is 390 to 425 grain.
The recommended lengths are 20” and 22”.
The minimum arrow weight is 350 grains. Using arrows weighing less can produce a
dry-fire effect with the crossbow.
Failure to follow the arrow recommendations may result in damaging the crossbow,
personal injury, and a void warranty.
SIGHTING THE CROSSBOW SCOPE
After installing the scope, the scope must be sighted in. Before sighting in, make sure the
scope is in focus. If needed, the diopter adjustment can be adjusted to focus the image
to your eye. To do this, rotate the eyepiece, until focus is achieved. If the user of the
17
crossbow changes, the focus may need to be re-adjusted.
To sight in:
It is recommended to place the crossbow in a shooting vice that does not interfere with
the operation of the string and limbs. Having the crossbow stable in a shooting vice will
eliminate human error making it easier to line the sight’s crosshair with the impact point
of the arrow. Sight in the crossbow scope at 20 yards using the top line. If the impact of
the arrow is offset from the aiming point, make adjustments to the elevation or windage
adjustments. Adjust the top crosshair to align with the impact point of the arrow.
Continue to shoot the crossbow and adjust the scope until the impact and aiming point
coincide.
For the Risen XT 350 (350fps), once zeroed at 20 yards the lower three lines correspond
to approximately 25, 30 and 36 yards. Note: arrow quality, wind, and environmental
conditions create considerable variables in crossbow ballistics. The arrow drop
compensation feature does not guarantee an exact hit every time at long distances. For
calculated specific yardages refer to the following table:
18
Sighting the Crossbow Scope
continued...
Arrow Drop Compensation in yards
Zero (first line)
15
20
25
30
Second line
20
25
30
35
Third line
26
30
35
39
Fourth line
32
36
40
44
Bottom post
38
41
45
49
ADJUSTING the Crossbow Stock
The Risen models are equipped with a collapsible stock (1). The collapsible stock
provides a custom fit to the user. To adjust the length of the stock, press up on the
19
collapsible stock lever (2) and pull or push the stock. Release the collapsible stock lever
while continuing to push or pull the stock. The lever will click and fix the stock into
position.
Replacing the Crossbow Stock
The Risen XT 350 buffer tube was designed to Mil-Spec dimensions, so most aftermarket
stocks designed to mil-spec dimension can be attached to the Risen models.
To remove the Risen stock, press up on the stock lever (2). With your fingers or needle nose
pliers pull down on the nut located under the stock lever. Next, release the stock lever
while still pulling on the nut. Next, slide the stock all the way off the tube. To reinstall the
stock again follow the same procedures when sliding the stock onto the tube.
To install a standard AR15 collapsible stock, simply pull up on the position lever and slide
the stock onto the stock tube. For aftermarket AR15 stocks follow the manufacturer’s
procedures.
Note: the tube that comes with the Risen crossbow is not a substitute for an AR15 buffer
tube. DO NOT USE ON FIREARMS.
20
STRING SPECIFICATION
The Risen XT 350 requires a 32 strand 34” length string (does not include loops) and 17.5”
length cable with 12” yoke.
MAINTENANCE AND CARE
WARNING! Each time before you shoot the crossbow inspect the crossbow for worn,
loose, damaged or missing parts.
Replace worn, damaged, or frayed strings and cables immediately. Keep strings and cables
moist with string wax. DO NOT apply string wax to the serving, barrel or trigger. Doing
so will collect wax in the latching/trigger mechanism and possibly prevent the string from
cocking properly. Under normal shooting conditions, it is recommended to have your
string replaced every other year by a professional at an archery/crossbow pro shop.
Regularly clean the crossbow to maintain top performance.
Keep the trigger/latching assembly dry. After use in wet conditions, dry the crossbow with
a small cloth or blow dryer on the no heat setting. Occasionally apply lube to the latching
assembly to prevent rust.
21
Occasionally apply lube to the safety switch, with the switch is located in the SAFE
position and then in the FIRE position.
Barrel/rail lubrication can be used on the flight rail to reduce friction between the string
and rail. This will prolong the life of the serving and maintain proper arrow speed.
Apply a small amount of lubrication to the rail every 100 shots. Too much lubrication can
soak into the string and serving, causing the material to break down.
Regularly apply a small amount of lubrication to the axles and cams/wheels to maintain
proper mechanics.
DO NOT use heavy oils, greases, or petroleum based jelly as lubricant. These substances
will attract dust and dirt that will collect in the mechanical parts of the crossbow.
DO NOT store your crossbow in hot environmental conditions. Crossbow must be stored
in a cool, dry place to prevent degradation of strings and cables.
DO NOT loosen bolts on the riser or limbs when the crossbow is not in use.
Southern Crossbow is only authorized to repair or replace mechanical parts, triggers,
mounts and limbs. If repairs are needed, contact the Quality Assurance Department at
1-817-225-0310 or email request through the website www.southerncrossbow.com
22
troubleshooting
Crossbow will not cock
• The safety switch is not set in the “FIRE” position. Set the safety switch from the
“SAFE” position to “FIRE” position.
• The latching mechanism has not been properly maintained. Add small drops of oil to
the latching mechanism and safety switch (in “fire” and “safe” position).
• Heavy grease or jelly was used during maintenance and has caused collection of debris
to prevent proper latching. Attempt to clean the device with proper oils. The crossbow
may need to be sent to the factory in order to be properly cleaned.
Trigger safety tension is too tight or loose
• Add small drops of oil to the latching mechanism and safety switch (in “fire” and
“safe” position).
• The crossbow may need to be sent to the factory in order to be properly cleaned.
Arrow groupings are inaccurate
• The string was improperly cocked. Review section “cocking and loading” for proper
technique to load the crossbow.
• Check that all assembly screws for the crossbow are tight (stirrup, limbs, sight bridge,
scope rings, etc.)
• The scope rings may be loose and not holding zero. Retighten the rings and re-zero
the scope
23
• The scope may have parallax and be defective.
• The arrow shaft may be out of tune. Rotate the arrow on its tip to see if the arrow
bows or wobbles on its axis. If so, have your arrows re-tuned at a pro shop.
The string and cables are fraying
• Apply wax to the string and cables and rub the wax into the strings with your fingers.
• DO NOT use the crossbow if the cables are cut. Have the string/cable replaced before use.
The serving has degraded or come apart
• Applying too much oil to the rail of the crossbow will saturate the serving and cause
the serving to come apart. Replace the string before use.
limited lifetime warranty
Your Southern Crossbow product is warranted free of defects in materials and workmanship
that affect the proper operation of the crossbow for the lifetime of the original owner except
for bow limbs, cams/wheels/axles, protective glasses, strings, and cables. Bow limbs and
cams/wheels/axles are warranted for five (5) years from the date of purchase. Strings, cables,
and protective glasses are not covered under warranty. This warranty is non-transferable is
only deemed effective if purchaser registers product within 30 days after purchase through
completing the online warranty registration at www.southerncrossbow.com. Southern
Crossbow reserves the right at its discretion to accept valid proof of purchase upon request for
Return Authorization (RA) number.
24
In the event of a defect under this warranty, Southern Crossbow will, at our option, repair or
replace the product. This warranty does not cover damages caused by misuse or improper
handling. Also, this warranty is null and void if modification or maintenance is provided
by someone other than Southern Crossbow, excluding string/cable replacement in which
consumer should consult a archery/crossbow pro shop or Southern Crossbow for service.
Warranty will be void for the following reasons:
1. Owner did not follow proper procedure of operation or proper maintenance provided
in owner’s manual.
2. The crossbow was altered from its original state or used outside of its intended use.
3. Damage caused by misuse, abuse, or neglect.
4. Damage caused by dry-firing or by using a non-recommended or underweight arrow
as specified in the owner’s manual.
5. The safety was disabled or altered from its original state.
To receive a RA number for warranty service or out-of-warranty repair, you will need to:
1. Fill out the online document labeled Warranty RA Form, or call 1-877-431-3579. If you
are outside the US, call 1-817-225-0310.
2. Once the request has been received you will either receive a reply email that contains
all necessary return information, or a customer service representative will contact you
and give you an RA number over the phone.
If you are sending in a product for a warranty repair, you will be required to fill out a RA
25
request form. Once the form has been received and processed, you will receive a
confirmation email containing your RA number and a PDF Return Form. The Return
Form must be filled out completely and mailed in with your product. In order for
your repair to be successfully fulfilled, be sure to closely follow all instructions
outlined by the Return Form. If any of the aforementioned instructions are not
properly followed, your request cannot be processed and the product will be held
until you are contacted, and proper documentation is received.
To send in the product, you will be required to include the following items:
1. The filled out Repair Form.
2. The defective product.
3. If product was not registered online, a copy of the original receipt showing when
and where the product was purchased must be included.
4. The RA number printed on the box, with a return address.
To view this manual in other languages or for more
information, visit www.southerncrossbow.com
26
user manual