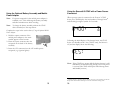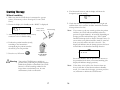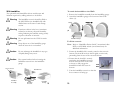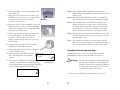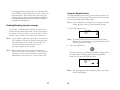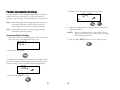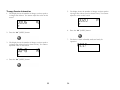
1
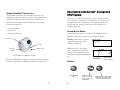
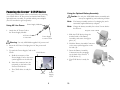
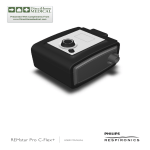
Manufacturer
AEIOMed, Inc.
1313 5th Street SE, Suite 205
Minneapolis, MN 55414 USA
www.aeiomed.com
Integrated
CPAP System
Phone:
Toll Free:
Fax:
612.455.0550
866.722.2507
612.455.0551
Revision Record
Everest® 3 Integrated CPAP System
Patient Manual 101213 Rev A
E3PM
Revised: 12-2008
Patient Manual
© 2008 AEIOMed, Inc., Minneapolis, MN USA
All rights reserved.
AEIOMed®, Everest®, HeadRest® and DataRest® are registered
trademarks of AEIOMed, Inc.
NOTICE: The information contained in this document is
subject to change without notice.
Contents
Precautions for Use ................................................................................1
Inspecting the CPAP Components .........................................................6
Description of the Everest 3 Integrated CPAP System...........................8
Standard User Modes ........................................................................8
Buttons...............................................................................................8
Powering the Everest 3 CPAP Device....................................................9
Using AC Line Power.........................................................................9
Using the Optional Battery Assembly ..............................................10
Using the Optional Battery Assembly and AC Line Power ..............11
Checking the Capacity of the Battery Cell Pack ..............................12
Changing the Battery Cell Pack.......................................................13
Using the Optional Mobile Power Adapter .......................................14
Using the Optional Battery Assembly and Mobile Adapter ..............15
Using the Everest CPAP with a Power Source Connected..............16
Starting Therapy ...................................................................................17
Without Humidifier ...........................................................................17
With Humidifier ................................................................................19
Humidifier Preheat (Optional Step)..................................................22
Using the CPAP with Heated Humidifier and Optional Battery ........23
Turning on the Blower......................................................................25
Interface Interupt Feature (if enabled) .............................................26
Enabling/Disabling Interface Interrupt..............................................27
Using the Ramp Function ................................................................28
Stopping Therapy ............................................................................30
Patient Information Settings .................................................................31
Accessing Patient Settings ..............................................................31
Therapy Session Information...........................................................33
Cleaning Instructions ............................................................................35
Specifications .......................................................................................37
Manufacturer’s Declaration...................................................................39
Limited Warranty ..................................................................................42
Troubleshooting....................................................................................44
Appendix 1: Reorder Numbers .............................................................48
Precautions for Use
This section describes the indications for use, warnings, cautions,
and contraindications associated with use of the Everest® 3
Integrated CPAP System. The following guidelines apply to this
document:
WARNING
CAUTION
NOTE
Indicates the possibility of serious injury or
death to yourself or others.
•
•
•
•
Indicates the possibility of minor injury or
damage to the equipment.
Indicates a tip, explanation or feature to aid
in understanding or efficient operation of
the device.
•
•
Indications for Use
The Everest 3 Integrated CPAP System is intended for the
therapy of adults over 66 pounds (30 kg) with Obstructive Sleep
Apnea (OSA). The device delivers continuous positive airway
pressure (CPAP), which prevents the collapse of the upper
airway, thereby preventing obstructions that can interfere with
spontaneous breathing.
•
•
•
•
•
•
1
2
Warning
Caution: Federal law (United States) restricts this device to sale
by or on the order of a physician.
This device is not intended for life support.
The Everest® 3 Integrated CPAP System must be set up and
adjusted by a trained CPAP provider before it can be used for
therapy.
When operating properly, the CPAP system flushes out
exhaled air through the vent in the patient interface. Exhaled
air could be re-breathed if the CPAP blower is off, not
operating properly, or the vent is blocked. Re-breathing
exhaled air for longer than several minutes can, in some
circumstances, lead to suffocation.
The air temperature produced by this device can be as much
as 10ºF higher than the temperature of the room. Exercise
caution if the room temperature is warmer than 90ºF (32ºC).
Do not block or otherwise obstruct the exhalation ports of
the patient interface. Follow the Patient Interface
Instructions for your interface.
Oxygen can only be used in accordance with the Oxygen Use
Warnings on the following page.
Emptying and cleaning the humidifier reservoir daily will
help to prevent mold and bacteria growth.
Use of accessories or a humidifier other than defined in this
manual is potentially unsafe.
The CPAP system is only to be used with the supplied and
recommended accessories. Use of accessories not
recommended may result in increased electromagnetic
emissions or decreased electromagnetic immunity of the
CPAP system.
The CPAP system should not be used adjacent to or stacked
with other equipment.
The CPAP System is not defibrillation proof.
•
•
•
•
•
•
•
•
•
•
•
•
•
•
Oxygen Use Warnings
If oxygen is used with this device, the oxygen flow must be
turned off when the device is not in operation.
Turn the device on before turning oxygen on. This will
prevent oxygen from accumulating in the device.
Do not inject oxygen through the air inlet of the device.
At a fixed flow rate of supplemental oxygen, inhaled oxygen
concentration will vary depending on the pressure settings,
patient breathing patterns, mask selection, and leak rate.
Oxygen use must be accommodated as far down stream as
possible from the air outlet side of the CPAP and only as
prescribed and set-up by your physician or equipment dealer.
Caution
Do not sterilize the CPAP system.
Power the CPAP system only from the AEIOMed® supplied
power supply, optional battery assembly, or mobile power
adapter. Reference Appendix 1 for Reorder Numbers.
Reference the Everest® 3 Integrated CPAP Patient Manual
only after receiving appropriate training in the use of the
CPAP system.
Use patient interface devices with a leak flow rate of at least
12 L/min at 4 cm H2O.
Discontinue use of the CPAP device or humidifier if
respiratory irritation occurs.
Do not introduce liquids or objects into the CPAP device’s
air inlet/outlet connector.
Inspect the power cord for signs of wear or damage before
each use. Replace the power cord if necessary.
Reduce the humidifier heat setting if you observe excessive
moisture in the flexible tubing.
For safe operation, place the humidifier lower than the user.
3
• For proper operation, the humidifier must be level.
• Use the humidifier only for its intended purpose as described
in this manual.
• Do not operate the humidifier if any of the parts are
damaged, if it is not working properly, or if the humidifier
has been dropped or mishandled.
• Do not use the humidifier if the water reservoir is leaking or
is damaged in any way. Replace damaged parts before
continuing use.
• Do not submerge the humidifier in any fluids; damage may
occur.
• The humidifier reservoir must be filled with distilled water to
the MAX fill line (see humidifier lid) at the beginning of each
therapy session.
• Dry external surfaces before inserting the humidifier
reservoir into the humidifier garage.
• AEIOMed, Inc. recommends replacing the 22 mm 6’ Output
Hose after 6 months use.
• To protect the environment, some parts and accessories of
the CPAP system must be disposed of in accordance with
local regulations.
• Use only those accessories provided or recommended by
AEIOMed, Inc.
4
Inspecting the CPAP Components
Contraindications
The Everest® 3 Integrated CPAP System is contraindicated in
patients with the following conditions:
•
•
•
•
When you receive the Everest® 3 CPAP System package,
unpack all items from the travel bag, including the manual, and
inspect them to ensure they were not damaged during shipment.
Bullous lung disease
Pathologically low blood pressure
Pneumothorax or pneumomediastinum.
Pneumocephalus has been reported in some users using
nasal CPAP. Caution should be used when prescribing
CPAP for susceptible users such as those with cerebral
spinal fluid (CSF) leaks; abnormalities of the cribriform
plate; and a prior history of head trauma; and/or
pneumocephalus.
Report any missing or damaged items to your home healthcare
provider.
The Everest 3 Integrated CPAP System includes the following
items and an accessory pouch (not pictured):
CPAP Device
Power Supply
Air Inlet Filters
Power
Cord
.
Patient Manual
22mm 6’ Output Hose
Optional Integrated Components
Heated
Humidifier
Mobile Power
Adapter
Battery Assembly
Refer to Appendix 1 for reorder numbers.
5
6
Description of the Everest® 3 Integrated
CPAP System
Optional DataRest® Accessories
The DataRest Compliance System makes it easy for your
healthcare provider to collect, save, print, and e-mail valuable
information collected from the Everest® 3 CPAP device.
The Everest 3 CPAP System delivers positive pressure from 4
to 20 cm H2O to the patient, as prescribed by the clinician. The
therapeutic pressure is continuous. The display panel presents
therapy pressure, settings of the device, and the duration of
therapy completed.
The DataRest Compliance System Patient Kit contains the
following components:
• Docking Station
• Data Card
• Instruction Manual
Standard User Modes
Normal operation consists of 3 states: Off, Standby, and On.
Off: Not connected to a power source. Display is blank.
(CPAP Device)
Standby: Connected to a power
source, but the blower is off.
“REST” is displayed.
Card Slot
Docking
Station
Data Card
On: Blower is on. The display
shows the therapeutic pressure
setting. This example shows the
setting for the optional humidifier is
at 3.
The DataRest Compliance System
Refer to the DataRest Compliance System instruction manual or
contact your provider for additional information if necessary.
Therapy Pressure
Buttons
Turns the blower
off or on
7
Optional Humidifier
operating at Setting 3
8
Manual ramp when the
blower is on; in Standby
mode it is used to review
Patient Settings
Adjusts the optional humidifier’s heater
settings when connected; in standby
mode it is used to preheat water
Powering the Everest® 3 CPAP Device
Using the Optional Battery Assembly
The Everest CPAP System offers several choices for powering
your CPAP device: AC line power (an electrical wall outlet),
optional battery assembly, or optional mobile power adapter
(for 12V automotive type receptacles).
Using AC Line Power
Caution Use only the AEIOMed® battery assembly such
as may be supplied by your homecare provider.
Note: The battery assembly consists of a charging bay and a
removable/replaceable battery cell pack.
Power Supply Module
Note: Charge the battery assembly for at least 5 hours before
the first use.
1. Attach the AC Power Cord to
the Power Supply Module.
AC Power Cord
to wall outlet
Receptacle on back of CPAP
Power Supply
Cord to CPAP
Warning Use only AEIOMed® supplied AC power cord.
(A)
2. Hold the Battery Assembly Connector
so the arrow symbol appears on the
left side. (B)
2. Insert the AC Power Cord plug into AC line power wall
outlet.
3. To attach the Power Supply Cord to the
CPAP:
CPAP Device
a. Hold the connector of the
Power Supply Cord so the arrow
symbol appears on the left side.
1. Slide the CPAP device along the
notched track of the Battery
Assembly, and secure it snugly in
place. (A)
Connector
b. Insert the connector into the
receptacle on the back of the
Everest CPAP device.
3. Insert the Battery Assembly
Connector into the receptacle
on the back of the Everest® 3
CPAP device. (C)
4. The CPAP device is ready for
use.
(B)
(C)
c. The CPAP device is ready for
use.
Power
Supply
Cord
Arrows
9
10
Checking the Capacity of the Battery Cell Pack
Using the Optional Battery Assembly and AC Line
Power
1. Locate the Key on the bottom
of the battery assembly.
Note: If an electrical outlet is available, use it. This will charge
the battery assembly and allow maximum use when AC
line power is not available, such as during a power
outage. The CPAP device switches automatically to
battery power in such events without interrupting your
CPAP therapy.
2. Press and hold the Key.
3. Observe the number of
illuminated lights, which
provide an approximate
indication of the capacity.
Note: To charge the battery assembly without the CPAP
device attached, connect the power supply to the battery
assembly.
•
Complete the steps in the section above, Using the Optional Battery
Assembly.
•
1. Hold the connector of the power
supply so the arrow symbol
appears on the bottom. (D)
(F)
2. Insert the power supply
connector into the receptacle on
the back of the battery assembly.
(E)
(D)
3. Insert the battery assembly connector into the back
of the CPAP. (F)
(E)
4. Insert the power cord plug into AC line power wall outlet.
0 – 1 lights – Little or no
charge remaining.
KEY
4 lights – Full or near full
charge.
Note: For peak performance, AEIOMed® recommends
keeping the power supply or mobile adapter connected
to the battery assembly even after all 4 lights are
illuminated.
Note: Battery life varies depending on the pressure and
humidifier settings. Monitoring charge time vs. usage
time will help you understand how to optimize battery
operation for your system.
Note: Lithium Ion (Li-Ion) batteries such as this one and
those used in laptop computers can be charged and
discharged either fully or partially repeatedly without
noticeable performance loss. However, to get the
utmost in runtime throughout the life of your battery,
occasionally (e.g. once per month) allow the battery to
discharge completely followed by fully charging it for at
least 5 hours. Individual results may vary.
Note: Verify proper disposal requirements of the Li-Ion
battery according to local, state, or national laws.
11
12
Changing the Battery Cell Pack
Using the Optional Mobile Power Adapter
Note: See Appendix 1 to order additional battery assemblies
or battery cell packs.
Note: Your battery cell was designed for convenient removal
and replacement much like a laptop computer battery.
Fully charged spare battery cell packs may be kept on
hand and replaced in a matter of minutes.
1. Disconnect any power sources.
2. Detach the Battery Assembly from the
CPAP device and humidifier.
3. Locate the battery cell pack screw located
on the bottom of the battery assembly.
Loosen the screw with a flat blade (or Phillips) screwdriver.
The captivated screw is made to remain in place as you
loosen it for your convenience.
4. Remove the battery cell pack from the battery
assembly.
Caution
(A)
Use only the AEIOMed®
mobile power adapter and
cables such as may be supplied
your homecare provider.
Your mobile power adapter is supplied with
two cables: one to connect to your CPAP, and
the other to connect to a mobile power
receptacle (e.g. 12V automotive/cigarette
lighter).
(B)
1. Connect both of the cables to the base of the
mobile power adapter.
2. Insert the square connector to the back of the
CPAP device, making sure to line up the
arrows on the left side (similar to connecting
Power Supply described previously). (A)
3. Insert the 12V connector into the 12V mobile
power receptacle (e.g. cigarette lighter). (B)
4. Ensure the CPAP display turns on indicating
that power is being supplied to the CPAP.
5. Insert the new battery cell into the battery assembly.
6. Tighten the screw.
Note: Make certain that the cables are securely connected to
the power adapter and to the power receptacle. It may
be necessary to unplug the cables and reconnect to
ensure a good connection.
7. Reattach the CPAP components.
8. Reconnect the power connections.
9. Charge for at least 5 hours.
13
14
Using the Optional Battery Assembly and Mobile
Power Adapter
Note:
If a power receptacle for the mobile power adapter is
available, use it. This will charge the battery assembly
and allow maximum use while traveling.
Note:
To charge the battery assembly without the CPAP
device attached, use the steps below.
Using the Everest® 3 CPAP with a Power Source
Connected
When a power source is connected to the Everest 3 CPAP
device, the CPAP displays the total number of therapy hours♠
and a flashing hourglass symbol for 3 seconds.
Complete the steps in the section above, Using the Optional Mobile
Power Adapter.
1. Hold the square connector of the
mobile power adapter so the arrow
symbol appears on the bottom.
Following the initial display of the therapy hours, the CPAP
device is in Standby mode—the CPAP is ready, the blower is
off, and the display shows the following:
2. Insert the square connector into the
receptacle on the back of the battery
assembly.
3. Insert the 12V connector into the 12V mobile power
receptacle (e.g. cigarette lighter).
Note: If the CPAP loses power while delivering therapy, it will
immediately resume delivering therapy as soon as power
is restored (the CPAP will skip the initial therapy hours
and Standby screens)
♠
Therapy hours = operating time at therapy pressure, as monitored by the device.
Ramp time and Interface Interrupt time are not included in therapy time.
15
16
6. The blower will turn on, and the display will show the
therapeutic pressure setting.
Starting Therapy
Without humidifier:
1. Make sure that the CPAP device is connected to a power
source. (If necessary, refer to Powering the Everest® CPAP
Device.)
2. Ensure the display is in Standby mode. “REST” is displayed.
Interface 22mm
airway connector
6’ flexible tubing
7. Check that the hose and patient interface have a tight seal
and that there is no excessive air leaks around the interface
when positioned on face.
Note:
3. Attach the patient interface 22 mm airway
connector to the 6’ flexible tubing.
4. Position the patient interface (mask),
according to the instructions
accompanying the patient interface
selected by your care provider.
5. Press the on/off button.
If you remove or do not securely position the patient
interface, the CPAP will automatically reduce the
pressure in approximately 1-60 seconds (depending on
therapy pressure and interface type). This is called
Interface Interrupt (refer to Interface Interrupt Feature). It
occurs when your patient interface (mask) is removed
from your face and the air leak is excessive. The
display will indicate that the therapy pressure has been
reduced due to the Interface Interrupt function.
Example of the
HeadRest® with
Nasal Seal
Warning Turn on the CPAP blower as quickly as
possible after positioning the patient interface.
Exhaled air could be re-breathed if the CPAP
blower is off. Re-breathing exhaled air for
longer than several minutes can, in some
circumstances, lead to suffocation.
17
Secure the interface and the pressure will increase to
the prescribed level when you resume breathing (the
display will indicate therapy pressure).
Note:
18
If the device is left off the face for more than one
hour, it will shut off the blower and enter Standby
mode. To resume device therapy, you must press the
on/off button to initiate the CPAP blower.
To attach the humidifier to the CPAP:
With humidifier:
The optional heated humidifier relieves nasal dryness and
irritation in patients by adding moisture to the airflow.
1. Remove the humidifier assembly from the humidifier garage.
2. Attach the humidifier garage to the bottom of the CPAP
device (A).
Warning The humidifier reservoir should be filled to
the MAX fill line (see humidifier lid) with
distilled water at the start of each therapy
session.
CPAP
Warning If moisture collects in the hose (sometimes
referred to as rainout), adjust the humidity
setting. Reducing the humidity setting usually
stops the collection of moisture.
(A)
Humidifier Garage
Warning Do not spill water into the CPAP air outlet
port.
To fill the reservoir:
Warning Keep objects out of the humidifier garage
when the reservoir is not installed.
Note: Refer to “Humidifier Patient Guide”, instructional video
DVD, or AEIOMed website (ww.aeiomed.com) for
additional information.
Caution
Do not submerge the humidifier in any type
of liquid; damage may occur.
3. Ensure the humidifier lid is securely seated on the reservoir
bottom. The clear lid has slots that fit tightly over the tabs,
protruding from the rear of the reservoir bottom.
Caution
Dry external surfaces before inserting the
humidifier reservoir into the humidifier
garage.
4. Ensure that the clear lid is securely
attached to the humidifier reservoir
bottom. Push the front of the latch
as shown, to fully engage the
humidifier lid with the reservoir
bottom.
Hose Connector
Humidifier Lid
Humidifier
Assembly
Humidifier
Reservoir
PUSH
HERE
5. Turn the humidifier reservoir so that the
hose connector is facing up.
Humidifier
Garage
19
20
6. Fill the humidifier reservoir with distilled water
to the MAX line.
7. Wipe off excess water from the outside of the
humidifier reservoir. Take care to wipe off any
moisture that may be on the electrical
contacts of the reservoir.
Note: The humidifier symbol without a number above it
indicates that the humidifier is connected, but the heat
setting is off.
Note: Pressing the humidifier button when the humidifier is
not connected does not change the humidifier setting.
MAX Line
Note: The humidifier can be used with the mobile power
adapter or the battery. If the battery is used to power
the CPAP and the humidifier, without AC line power
or mobile power sources, the humidifier heat setting
will be automatically reduced to prolong battery life.
8. Place the reservoir in the humidifier garage, and
slide it firmly into position. Ensure humidifier
is fully seated in garage (reservoir should ‘click’
into place when fully seated).
Note: During battery operation, the humidifier heat may turnoff when approaching low battery condition to extend
overall therapy usage.
9. Ensure that the silicone adapter is connected to
the clear lid tightly at the humidifier hose
connector. The flat edge of the silicon
adapter should be aligned with the top side of
the humidifier.
Note: The humidifier contains an overheat sensor that will
shut off the heating element of the humidifier if there is
an over temperature condition (e.g. reservoir is empty).
10. Connect one end of the 6’ 22 mm flexible
tubing to the humidifier connector.
11. Attach the patient interface airway connector
to the 6’ flexible tubing.
Humidifier Preheat (Optional Step)
12. Check the lower right-hand corner of
the CPAP display for the humidifier
symbol:
13. Pressing the humidifier button adjusts the heat
settings for the humidifier. Humidifier settings
range from minimum heat temperature/humidity
(1) to maximum temperature/humidity (5).
Preheating the water in the reservoir provides immediate
humidification of the air when the blower is turned on.
Warning Do not wear the patient interface while using
preheat, since the blower is off. Exhaled air
could be re-breathed. Re-breathing exhaled air
for longer than several minutes can, in some
circumstances, lead to suffocation.
Humidifier Symbol
1. Ensure that the CPAP has power and the blower is off.
21
22
2. Check the display for the humidifier icon in the lower righthand corner.
•
The CPAP will not offer preheat. If the unit changes
from AC power to battery power during preheat, the
function is suspended until out of battery mode. When
returning to AC power, the unit will resume at previous
setting.
•
The CPAP will offer only one humidification setting,
noted with an asterisk (*) above the humidifier symbol.
•
When humidifier shuts off, asterisk symbol will
disappear and CPAP will continue therapy without
humidification.
•
Pressing the humidifier button will toggle between
humidification ‘on’ and ‘off.’
•
The humidifier will automatically shut off after 5 hours
of therapy.
3. Repeatedly press the humidifier button for the number
display. Settings range from minimum
temperature/humidity (1) to maximum
temperature/humidity (5).
The display shows the humidifier setting.
4. Allow the humidifier to preheat for 15-20 minutes. The heat
will remain on until the blower is turned off after therapy.
Using the Everest 2 CPAP with the Heated
Humidifier and Optional Battery
Everest®
When the
3 CPAP and Heated Humidifier are
connected to AC line power, the CPAP and Humidifier will
function normally as described in the patient manual. When
powered by the optional battery assembly however, the device
recognizes the loss of AC line power and will enter Enhanced
Energy Management mode (EEM). EEM extends the life of the
optional integrated battery.
Enhanced Energy Management humidification will have the
following characteristics that deviate from general AC power
usage:
23
Note: After the Everest 3 CPAP device is disconnected from
AC line power it will take 20-40 seconds for recognition
of battery use. Following device recognition of battery
mode power, the device enters Enhanced Energy
Management mode and will run the humidifier for a
maximum 5-hour period. After this period the
humidifier will shut-off, but the CPAP will continue to
run on battery power for an estimated 3 hours at 20 cm
H20 prior to battery depletion.
24
1. Ensure that the CPAP device has power, the blower is off,
and the preheated humidifier is active.
occurs when your patient interface (mask) is removed
from your face and the air leak is excessive. The display
will indicate that the therapy pressure has been reduced
due to the Interface Interrupt function.
2. Position the patient interface (mask), according to
the instructions accompanying the patient interface
selected by your care provider.
Secure the interface and the pressure will increase to
the prescribed level when you resume breathing (the
display will indicate therapy pressure).
Turning on the Blower
3. Press the on/off button.
Warning Turn on the blower as quickly as possible
after positioning the patient interface.
Exhaled air could be re-breathed if the CPAP
blower is off. Re-breathing exhaled air for
longer than several minutes can, in some
circumstances, lead to suffocation.
When the blower is on, the display shows the therapeutic
pressure setting. Check that the hose and patient interface have
a tight seal and that there is no excessive air leak.
Note:
If you remove or do not securely position the patient
interface, the CPAP will automatically reduce the
pressure in approximately 1-60 seconds (depending on
therapy pressure and interface type). This is called
Interface Interrupt (refer to Interface Interrupt Feature). It
25
Note:
If the device is left off the face for more than one
hour, it will shut off the blower and enter Standby
mode. To resume device therapy, you must press the
on/off button to initiate the CPAP blower.
Note:
The CPAP device recalls the humidity setting during
therapy. The next time you begin therapy or turn on
preheat, the CPAP will use the same humidifier setting.
Interface Interrupt Feature (if enabled)
The Everest® 3 CPAP will automatically reduce therapy
pressure when it detects that the interface has been removed or
has an excessive interface leak (within 1-60 seconds, depending
on therapy pressure setting and interface type). This feature is
intended to minimize disruption to the user or bed partner (e.g.
reduce noise when taking a bathroom break). The Interface
Interrupt feature also detects when the interface is returned to
position on the face and breathing is restored (shortly after the
interface is repositioned) and will restore CPAP to previous
therapy pressure.
Note: If the Interface Interrupt occurs during normal therapy
(indicated by the display showing four dashes instead of
26
the therapy pressure), please make sure all connections
to the CPAP are secure and that no excessive leaks have
been introduced. If this feature does not seems to be
working properly, please contact Clinician or DME for
possible adjustment (reference Troubleshooting table
for additional information).
Enabling/Disabling Interface Interrupt
For Everest® 3 CPAP models, the default setting will have
Interface Interrupt disabled, and this can only be changed by
the clinician. Once the setting is selected, the value is saved
within the device and does not change when powered off.
Note:
Note:
If your CPAP is updated by a prescription created by the
PC Compliance software, the Interface Interrupt setting
will automatically reset to disable. If this needs to be
enabled, the clinician must manually set this or
prescription updates cannot be used.
Using the Ramp Function
The ramp gradually increases the pressure setting, allowing you
to become accustomed to the positive pressure, so that you may
ease into the therapy while falling asleep.
Note: If your clinician has instructed you to adjust your ramp
starting pressure, refer to Patient Information Settings.
1. The CPAP’s blower is on:
Note: You must start the blower before selecting the ramp
function. You should adjust your patient interface at the
full therapy pressure setting.
2. Press the ramp button.
When the Interface Interrupt Feature is disabled, the
device will not offer ‘true compliance,’ as therapy session
information will record when the device is powered up
independent of when the device is actively being used.
The pressure drops to a reduced level and the display shows
the ramp symbol. During ramp, the pressure gradually
increases to the prescribed pressure level.
Note: The actual pressure delivered during ramp is not shown
on the CPAP display.
27
28
Once therapy pressure is reached, the ramp icon will disappear
from the display screen.
Note: Pressing the ramp button during ramped pressure
delivery will not affect the pressure delivered. If you
wish to stop the gradual pressure increase of the ramp
function you must turn off the device. The next time
the blower is turned on it will deliver the prescribed
therapy pressure.
Stopping Therapy
The blower is on and the display shows the prescribed pressure
setting:
1. Remove the patient interface (mask).
2. Press the on/off button.
Note: Interface Interrupt is not active during ramp.
Note: In the event of power loss during ramp, the CPAP will
resume at the full prescribed pressure as soon as power
is restored.
3. The blower is off, and the device is in Standby mode
(“REST” is displayed).
4. Remove the humidifier reservoir from the humidifier garage.
5. Empty any remaining water from the humidifier reservoir,
rinse thoroughly, and allow it to air dry.
Note: The humidifier shuts off when the blower is stopped.
However, the CPAP remembers your humidity setting
and will use that value the next time you start therapy.
29
30
The display shows the starting pressure for the ramp
Patient Information Settings
You will typically use the settings configured by your clinician,
and will not need to adjust them. You may access patient
settings to report therapy session information to your clinician.
Note: When adjusting patient settings, ignore the symbols on
the buttons. Instead, the symbol above the button
reflects what will occur when you push the button.
Note: Patient Settings consist of viewing therapy session
information and ramp settings.
4. Adjust the starting pressure using the buttons under the up
and down symbols.
NOTE:
Accessing Patient Settings
1. Make sure the device is in Standby mode. The CPAP device
must have power, and the blower must be off.
5. Press the “>>” (NEXT) button to access therapy session.
2. Press the middle button.
The display shows the approximate duration in minutes for the
pressure to ramp from the starting pressure to the prescribed
pressure setting (a value of 00 min means ramp is disabled).
3. Press the “>>” (NEXT) button.
31
If the up and down arrows are not visible on the
display, your clinician has not allowed you to change
the starting ramp pressure.
32
Therapy Session Information
1. The display shows the number of therapy sessions equal to
or longer than 8 hours. You cannot adjust the value on this
screen.
5. The display shows the number of therapy sessions equal to
or longer than 4 hours (but less than 6 hours). You cannot
adjust the value on this screen.
6. Press the “>>” (NEXT) button.
2. Press the “>>” (NEXT) button.
3. The display shows the number of therapy sessions equal to
or longer than 6 hours (but less than 8 hours). You cannot
adjust the value on this screen.
7. The device is back in Standby mode and ready for
operation.
4. Press the “>>” (NEXT) button.
33
34
To clean the humidifier reservoir lid:
Cleaning Instructions
1. Hold the reservoir with the bottom of
it facing you.
If the case becomes dirty:
(1) Disconnect power from the unit.
2. Use both hands and position thumbs
under the lip.
(2) Use a soft cloth dampened with warm water and mild
liquid dish washing soap to clean it.
3. Push upward on the lip to separate the plastic lid
from the reservoir bottom.
(3) Dry the device thoroughly before reconnecting the
power source.
•
•
•
•
•
•
Lip
4. Rinse the plastic lid with warm water and mild liquid
dishwashing soap.
Warning
Unplug the CPAP device before cleaning it.
Do not submerge the CPAP device, heated humidifier
assembly, battery assembly, battery charger or power supply
in liquid.
Prevent water from entering any of the device’s openings.
Do not use harsh or abrasive cleaning agents to clean any
CPAP components.
Do not sterilize the CPAP device.
Do not place cleaning materials, such as a cloth or liquid,
into the CPAP air inlet or air outlet connector.
5. Clean the humidifier garage by using a soft cloth
dampened with warm water and mild liquid dishwashing
soap.
6. Dry with a cloth, or allow to air dry.
CAUTION Do not clean the humidifier components in the
dishwasher otherwise damage to humidifier may occur.
CAUTION Do not submerge the heated humidifier garage
assembly in liquid or damage may occur.
Replace the foam air inlet filter periodically. To remove filter,
gently tug filter at the center. To replace, insert the new filter
and push along its edges to seat in place.
CAUTION Do not immerse the reservoir bottom in
liquid. Clean daily.
Clean the flexible tubing weekly by washing it in warm water
with mild liquid dishwashing soap. Allow the tubing to air dry
thoroughly before use.
CAUTION Dry external surfaces before inserting the
humidifier reservoir into the humidifier base.
CAUTION There are no user serviceable parts. Any
service or repair must be done by authorized personal only.
35
36
Specifications
CPAP Performance
CPAP Physical Characteristics
CPAP Device Weight:
CPAP Device Dimensions:
Air Outlet Connector Port
Dimensions:
2.2 lbs (1.00 kg)
5.0 in X 6.0 in X 5.0 in (12.7 cm X 15.2
cm X 12.7 cm)
22-mm diameter
Humidifier Physical Characteristics
Humidifier Weight:
Humidifier Dimensions:
Humidifier Operating
Volume:
Humidifier Output:
At H5 setting, 4 - 20 cmH2O
Charging Requirement:
Battery Dimensions:
4 to 20 cmH2O
Accuracy of Pressure Setting:
+1 cmH2O or +10%, whichever is
greater
Accuracy of Time Display:
+ 1 second
Maximum system shutdown
pressure:
30 cmH2O
Ramp Time Duration:
+ 25% time variance
Operating Temperature Range:
40 to 104°F (5 to 40°C)
Storage Temperature Range:
-30 to 150ºF (-34 to 66ºC)
Operating Humidity Range:
10% to 95% relative humidity, noncondensing
Storage Humidity Range:
10% to 95% relative humidity, noncondensing
Sound Pressure Level:
≤ 28 dbA with Heated Humidifier
≤ 22 dbA without Heated Humidifier
0.97 lb (0.44 kg)
6.14 in X 3.45 in X 5.25 in (15.6 cm X 8.8
cm X 13.3 cm)
0 to 240 ml
> 10 mg/L
(Applies to AC or Mobile Power usage)
Battery Physical Characteristics
Battery Weight:
Battery Life
(from fully charged):
Working pressure range:
1.58 lbs (0.72 kg)
11 hours @ 10 cm H2O without humidifier
(Result will vary depending on ambient
conditions)
Use only AEIOMed-supplied charger,
reference Appendix 1
7.9 in X 2.0 in X 5.44 in (20.1 cm X 5.08
cm X 13.8 cm)
Sound pressure measured in
compliance with Clause 26 of EN
17510-1:2007.
Altitude Range:
Mobile Power Adapter Characteristics
Mobile Power Adapter Input:
13.5 Vdc nominal.
12 to 15.5 Vdc
Power Supply Characteristics
AC Supply Input:
AC Supply Output:
100-240 VAC, 50-60Hz
19Vdc, 2.6 Amp
37
38
0-8000 feet
EN 60601-1 Compliance
Table 202: Electromagnetic Immunity
Protection against electric shock:
Class II
Type BF
The CPAP System is intended for use in the electromagnetic environment specified below. The
customer or the user of the CPAP System should ensure that it is used in such an environment.
Degree of Protection against
ingress of water:
IPX1
Use of Flammable Gasses:
Equipment not suitable for
use in the presence of a
flammable anesthetic mixture
or with nitrous oxide. Oxygen
can be used only as
prescribed in the Oxygen Use
Warning section of this
manual.
Manufacturer’s Declaration
Table 201: Electromagnetic Emissions
Immunity Test
IEC 60601
Test Level
Compliance
Level
Electromagnetic
Environment—Guidance
Electrostatic
Discharge (ESD)
±2, 4, 6 kV
contact
N/A. The CPAP
System does not
have conductive
surfaces.
±8 kV air
±2, 4, 6, 8 kV air
Floors should be wood,
concrete, or ceramic tile. If
floors are covered with
synthetic material, the relative
humidity should be at least
30%.
Electrical Fast
Transient/Burst
±2 kV for power
supply lines
±2 kV for power
supply lines
IEC 61000-4-4
±1 kV for
input/output
lines
±1 kV for
input/output lines
Surge
±1 kV differential
mode
±0.5*, 1 kV
differential mode
IEC 61000-4-5
±2 kV common
mode
IEC 61000-4-2
The CPAP System is intended for use in the electromagnetic environment specified below. The
customer or the user of the CPAP System should ensure that it is used in such an environment.
Emissions Test
Compliance
Electromagnetic Environment—
Guidance
RF Radiated
Emissions
CISPR 11
Group 1
The CPAP System uses RF energy only for
its internal function. Therefore, its RF
emissions are very low and are not likely to
cause any interference in nearby electronic
equipment.
RF Conducted
Emissions
CISPR 11
Class B
Harmonic
Emissions
IEC 61000-3-2
Class A
Voltage
Fluctuations/
Flicker Emissions
IEC 61000-3-3
Complies
The CPAP System is suitable for use in all
establishments, including domestic
establishments and those directly connected to
the public low-voltage power supply network
that supplies buildings used for domestic
purposes.
Voltage dips, short
interruptions, and
voltage variations
on power supply
input lines
IEC 61000-4-11
Power Frequency
(50/60 Hz)
Magnetic Field
Mains power quality should be
that of a typical commercial or
hospital environment.
Mains power quality should be
that of a typical commercial or
hospital environment.
±2 kV common
mode
<5% UT
(>95% dip in UT)
for 0.5 cycle
<5% UT
(>95% dip in UT)
for 0.5 cycle
40% UT
(60% dip in UT)
for 5 cycles
40% UT
(60% dip in UT)
for 5 cycles
70% UT
(30% dip in UT)
for 25 cycles
70% UT
(30% dip in UT)
for 25 cycles
<5% UT
(>95% dip in UT
for 5 sec)
<5% UT
(>95% dip in UT
for 5 sec)
3 A/m
3 A/m
Mains power quality should be
that of a typical commercial or
hospital environment. If the
user of the CPAP System
requires continued operation
during power mains
interruptions, it is
recommended that the CPAP
System be powered from the
battery.
Power frequency magnetic
fields should be at levels
characteristic of a typical
commercial or hospital
environment.
IEC 61000-4-8
NOTE: UT is the A.C. mains voltage before application of the test level.
* Compliance level adjusted to meet FDA limits.
39
40
Table 204: Electromagnetic Immunity
The CPAP System is intended for use in the electromagnetic environment specified below. The
customer or the user of the CPAP System should ensure that it is used in such an environment.
Limited Warranty
Immunity
Test
AEIOMed, Inc. warrants the Everest®3 Integrated CPAP
units to be free of defects in materials and workmanship and
will perform in accordance with the product specifications for
a period of 2 years from the date of sales by AEIOMed, Inc.
to the dealer. The battery assembly is similarly warranted for
a period of 1 year, and the mobile power adapter is warranted
for 3 years from the date of sales by AEIOMed, Inc. to the
dealer.
IEC 60601 Test
Level
Compliance
Level
Electromagnetic
Environment—Guidance
Portable and mobile RF communications equipment should be used no closer to any part of the CPAP
System, including cables, than the recommended separation distance calculated from the equation
applicable to the frequency of the transmitter.
Recommended Separation
Distance
Conducted RF
3 Vrms
3 Vrms
IEC 61000-4-6
150 kHz to 80 MHz
10 KHz to 100 MHz*
Radiated RF
3 V/m
10 V/m*
d = 0.35 P 80 MHz to 800MHz
IEC 61000-4-3
80 MHz to 2.5 GHz
26 MHz to 2.5 GHz*
d = 0.70 P 800MHz to 2.5 GHz
d = 1.17
P
where P is the maximum output
power rating of the transmitter in
watts (W) according to the
transmitter manufacturer and d is
the recommended separation
distance in meters (m).
Field strengths from fixed RF
transmitters, as determined by an
electromagnetic site survey,1 should
be less than the compliance level in
each frequency range.2
* Compliance level
adjusted to meet FDA
limits.
Interference may occur in the
vicinity of equipment marked with
the following symbol:
NOTE 1: At 80 MHz and 800 MHz, the higher frequency range applies.
NOTE 2: These guidelines may not apply in all situations. Electromagnetic propagation is
affected by absorption and reflection from structures, objects, and people.
1 Field strengths from fixed transmitters, such as base stations for radio (cellular/cordless) telephones
and land mobile radios, amateur radio, AM and FM radio broadcast and TV broadcast cannot be
predicted theoretically with accuracy. To assess the electromagnetic environment due to fixed RF
transmitters, an electromagnetic site survey should be considered. If the measured field strength in
the location in which the CPAP System is used exceeds the applicable RF compliance level above,
the CPAP System should be observed to verify normal operation. If abnormal performance is
observed, additional measures may be necessary, such as reorienting or relocating the CPAP System.
2 Over the frequency range 150 kHz to 80 MHz, field strengths should be less than 3 V/m.
41
If the product fails to perform in accordance with the
product specifications, AEIOMed, Inc. will repair or replace,
at its option, any materials or parts of the Everest 3
Integrated CPAP system, which, upon AEIOMed’s
examination appear defective. This does not cover damages
caused by accident, misuse, abuse, alteration, and other
defects not related to material or workmanship. AEIOMed,
Inc. will pay customary freight charges from AEIOMed, Inc.
to dealer location only.
AEIOMED, INC. DISCLAIMS ALL LIABILITY FOR
ECONOMIC LOSS, LOSS OF PROFITS, OVERHEAD,
OR CONSEQUENTIAL DAMAGES WHICH MAY BE
CLAIMED TO ARISE FROM ANY SALE OR USE OF
THIS PRODUCT. SOME STATES DO NOT ALLOW
THE EXCLUSION OR LIMITATION OF INCIDENTAL
OR CONSEQUENTIAL DAMAGES, SO THE ABOVE
LIMITATION OR EXCLUSION MAY NOT APPLY TO
YOU.
42
THIS WARRANTY IS GIVEN IN LIEU OF ALL OTHER
EXPRESS WARRANTIES. IN ADDITION, ANY
IMPLIED WARRANTIES, INCLUDING WARRANTY
OF MERCHANTABILITY OR FITNESS FOR THE
PARTICULAR PURPOSE ARE LIMITED TO TWO
YEARS. SOME STATES DO NOT ALLOW THE
EXCLUSION OR LIMITATION OF INCIDENTAL OR
CONSEQUENTIAL DAMAGES, SO THE ABOVE
LIMITATION OR EXCLUSION MAY NOT APPLY TO
YOU. THIS WARRANTY GIVES YOU SPECIFIC
LEGAL RIGHTS, AND YOU MAY ALSO HAVE
RIGHTS WHICH VARY FROM STATE TO STATE.
To qualify for repair, replacement, or refund, the defective
device must be returned to AEIOMed, Inc. within 30 days
after the discovery of the defect. Any repair, replacement, or
refund obligation would not apply if the device has been
repaired or otherwise altered in a facility not authorized in
writing by AEIOMed, Inc. To exercise your rights under this
warranty, contact your local, authorized AEIOMed, Inc.
dealer or AEIOMed, Inc. at 1313 5th Street SE, Minneapolis,
MN 55414, 1-866-722-2507 or 1-612-455-0550.
Troubleshooting
Problem
Probable Cause
Discomfort due to a
feeling of high
pressure.
CPAP device pressure
may be set too high.
Solution
1. Breathe slowly through
your nose with your
mouth closed.
2. Use the ramp pressure,
if available.
3. If the pressure remains
problematic, contact
your homecare provider.
Nose or throat
irritation.
CPAP device
display is blank
when connected to
power.
Dry air.
Connect a humidifier to the
CPAP device, or add
humidity to the room.
Contact your provider.
Dirty air filter.
Change and/or clean the air
inlet filter.
Power source is not
properly connected.
Check all power
connections.
AC power may not be
active.
• Use another power
outlet.
• Confirm outlet is not
controlled by a wall
switch.
Test another device with
this outlet.
Battery is depleted.
CPAP shuts off.
• Hose disconnected
Check the battery
assembly’s capacity.
Charge if necessary.
• Reconnect the hose.
from the device.
• The interface was
off or dislodged and
a high leak was
experienced for an
extended period of
time, enabling the
Interface Interrupt
feature and shutting
off unit.
43
44
• Ensure interface
adjustments allow
proper sealing of the
interface to minimize
leaks.
• Press on the On/Off
button to resume at
therapeutic pressure.
Problem
Probable Cause
Solution
Low Battery Symbol
appears on the
display.
Battery is depleted.
Charge the battery.
No airflow from the
CPAP system.
Device motor failure;
or, electronics failure.
Contact the provider’s
technical service
department.
Fault Symbol
appears on the
display.
Device detects an
operating error.
Note code on display.
Unplug and reconnect the
power source. If error
message continues,
contact provider’s technical
service department.
Heat setting cannot
be adjusted/shows
asterisk symbol
(Battery Operation).
When using
humidification on
battery power, the
CPAP will offer only
one humidification
setting, noted with an
asterisk (*) above the
humidifier symbol.
N/A
Humidifier heat
shuts off (Battery
Operation).
During battery
operation, the
humidifier heat may
turn-off when
approaching low
battery condition to
extend overall therapy
usage.
• Check and/or charge
Heated Humidifier
shuts off or is
erratic.
Moisture on electrical
connector.
Remove and dry
connectors – allow to air
dry prior to use.
Pressure too low
The Interface Interrupt
feature is enabled and
a high leak was
experienced for an
extended period; the
pressure is reduced
until the leak is
corrected.
• Ensure interface
Pressure increases
rapidly when
interface is
removed and then
reduces pressure.
This is normal, the
device detects within
1-60 seconds that the
interface is off and
lowers the pressure.
Ensure interface
adjustments allow proper
sealing to minimize leaks.
Pressure increases
rapidly when
interface is
removed, then
replaced.
This is normal, the
device senses that the
interface is being put
on and goes from a
low pressure to
prescribed pressure.
N/A
Pneumatic Functional Diagram
Input
Air
Blower
Pressure Sensor
Controller
battery prior to nightly
usage
adjustments allows
proper sealing to
minimize leaks
45
46
CPAP
Output Port
Appendix 1: Reorder Numbers
Symbols
Item
CPAP Output Port
Attention: Consult Accompanying Documents
Type BF Applied Part
IPX1
Ingress of Water. Protection provided against
vertical dripping.
CAUTION: Federal Law (USA) restricts this
device to sale by or on the order of a physician.
Everest® 3 CPAP
Power Supply Assembly
Everest 3 Heated Humidifier
Humidifier Lid Replacement
Everest Battery Assembly
Battery Cell Replacement
22mm 6’ Output Hose
Mobile Power Adapter
Filter Media 2 Pack Assembly
Patient Manual
Headrest® with Nasal Seal
Medium Nasal Seal
Large Nasal Seal
Extra-Large Nasal Seal
Manufacturer Catalog (Model) Number
CE Mark For Europe
47
48
EVE3
PSA3
HH3
LID3
BAT1
CELL1
6FH
MPA
FP3
E3PM
HRML
MNS
LNS
XLNS
AEIOMed Everest® 3 Integrated CPAP
System
Patient Manual
Part Number 101213 Rev A
E3PM
Revised: 12-2008
AEIOMed, Inc.
1313 5th Street SE, Suite 205
Minneapolis, MN 55414 USA
Web Site:
Phone:
Toll Free:
Fax:
www.aeiomed.com
612.455.0550
866.722.2507
612.455.0551