1
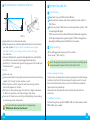
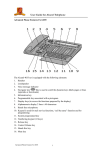
GSM-120 120 Defense Zones Smart Voice GSM ALARM System User Manual Please read before use 2014 .04V1.0 General Description Table of Content The system is a multi-functional smart voice GSM alarm system, adopted advanced GSM digital signal process technology, integrated with digital voice,support SMS, self-learning wireless coding, remote appliance control and SMS recognition technologies. Auto-voice prompt and SMS 1.Features 2.System construction and usage Know the panel 2 3 3 alert available when alarm triggered. Color digital screen can show you How to use remote controller 6 the exact alarm direction clearly. System is stable, reliable, secure, and Door Sensor Installation and Test 7 user friendly. Infrared detector installation and test 8 3.System Use and Set It has been widely used in homes, factories, schools, shops, convenience 12 Host panel quer y function 17 SMS enquir y and SMS control host functions 21 stores, financial and banking workplace, community centre and residential area to provide protection to valuable assets. 9 Command sheet 1 4.Alarm reception & Remote Control 23 5 .Defense zone type and the panel parameter 24 6 .FQA 27 1 1 System feature 2 System construction and usage Know the panel: Adopt quad-band GSM/GPRS industrial graded module, stable and reliable,with voice prompt. Directly check the phone bills and make phone call on panel. Allow up to 120 wireless and 2 wired defense zones. 12 9 10 11 8 14 7 13 Each zone can be defined as one of the 8 zone types including NORMAL, STAY, INTELLIGENT, EMERGENCY, CLOSED, CHIME HELP SENIOR, 3 WELCOME and HELP SENIOR. 4 Four groups timely arm/disarm,choose different week and defense zone. 5 8 6 MIC 2 Panel Face (PIC 1) With clock display, two groups ring bell function, adjustable ring time . 6 groups voice alarm phone number, 3 groups help number, 6 groups SMS number, can allocate different zones with different preset number groups. 1 anti-tamper switch Embedded in a variety of intelligent voice prompts,indicate alarm (97 zones system default) SIM 关 Z51 GND Z52 12V COM NO SIREN- location and defense zone accurately when alarm. SIREN+ 开 System settings via keypad or make remote control phone call/send SMS Remote control realize arm/disarm,listen-in,talk function. DC power socket 1 group relay linkage output to realize home appliances remote control. Panel backside (PIC 2) Wireless learn code.Maximum support 150 remote controllers and 150 sensors can be controlled in separate zones. built-in standby battery SIM card seat ( pls mind the slip direction) Wired interface connection diagram Check 72 arm/disarm and 102 recent alarm events record.Indicate alarm SIREN- SIREN+ NO COM 12V Z52 GND Z51 time and defense zone. Built-in Ni-Hi rechargeable battery and automatically switch to back-up battery while power failure, and with SMS alert. V+ V- C NC AC 220V 5A 2 Wired infrared detector Wired door magnetic gap sensor (PIC 3) 3 SIM card installation NO First step: Open back cover case, SIM card with gap side towards left. Second step: Slide SIM card into the card seat from right to left. SIM SIM Supplements NO Function Indications short "beep" once 1 Built-in speaker “beep", "beep" twice "beep, beep, beep" three times Voice prompt Light up 2 3 4 Light up Enable the clock function 8 Timely arm/ disarm LED Light up Enable timely arm/disarm function 9 KEYLOCK LED Light up Enable Keyboard password protection function 10 Recording LED Light up Enter recording status 11 Light up SIM Card loaded correctly SIM card indicator Flash Unloaded SIM card or loaded wrong All light up GSM signal strong Some light up GSM Signal weak,still can alarm Light up Enable intercom function Light off Save mode,standby for 1 minute auto shut off LCD display Light up Show current time or alarm state 12 GSM signal indicator 13 Speaker indicator operation voice prompt External power off, using back-up battery Battery low voltage LED Backup battery is low voltage 14 Four digital tube LED Show 98 alarm Press panel SOS alarm button Show 97 alarm Tamper alarm “BF”Light up,LCD display OUT ARM “BF”for 1 Second ARM LED 5 Stay arm LED 6 Alarm LED 4 Error indication Description Clock LED Exit or learn succeed External UPS normally supply Flashing every 1 second Delay arm Off 5 Please enter Indications 7 Description Battery Power LED Light off and time clock right Light up Function Disarm “LB”Light up,LCD display Stay arm "LB" for 1 second Light up Alarm Flash Delay arm Note: Installation way of desktop and wall mounted for your choice. Main panel should be placed in the middle of all wireless detectors to ensure best reception, but away from large metal objects or appliances with high-frequency interference and reinforced concrete walls and fire doors and other barriers. 5 How to use remote controller LED Indicator OUT ARM Disarm Emergency help Stay/Home ARM A 1 .OUT ARM Put it ARM when Nobody at home. Press the arm key all the detectors start to work. Once detector(motion infrared, door magnet, smoke and gas, etc) triggered, panel will alarm immediately. ] LED will Light up and LCD show "BF" for 1 Second. After armed, arm [ ] in the remote control once. Remote operation: Press Key [ ] in main panel once. Keyboard operation: Press Key [ 2 .STAY/HOME ARM Press HOME ARM to enable some detectors working, some not when at home. In home alarm status, [ ] LED will Light up,and LCD show "BF"for 1 Second. Remote operation: Press Key [ Keyboard operation: Press Key [ ] in the remote control once. ] in main panel once. 3 .Disarm 4 .Emergency call When emergency comes,press [ B 10mm (PIC 4) Open the case, install the battery properly by tear down insulation material. Clean the installation place. Put it on the door/window that can close/open. Install the transmitter (A)on door frame and the magnet(B )on door. Transmitter and magnet should at the same level, distance between them should be within 10 mm. Double-sided tape or screws can be used for a firmly attachment. Make sure panel can receive wireless signal sent by detector. A large quantity of metal and antenna should be avoided in the area of detector. Testing and Coding Press DISARM to stop alarm, all the detectors won’t trigger alarm( except 24-hour emergency zone). In disarm status, [ ] LED is off and LCD show "CF" for 1 Second. Remote operation: Press Key [ ] in the remote control once. Keyboard operation: Press Key [ ] in main panel once. 6 Door Sensor Installation and Test ] and it will alarm regardless of working patter The newly-bought door sensors should be coded to the control panel before use.(For specified operation ,please refer to the manual of alarm system. ) Installation finished, To confirm it works properly by open your door or window with a red indicator light flashing. For more information, please refer to corresponding Wireless Door/Windows Gap Detector user manual 7 Infrared detector installation and test 3 System Use and Set a .First time use PIR Sensor 1 Open back cover, put SIM card into SIM seat. 2 Insert adapter into power hole, back-up battery button switch to 2.2-2.4 M 0 meter 2m 4m 6m 8m Fresnel Lens Walk Way (PIC 5) Open detector case, choose work mode. When the power is on, indicator light will be blue for 2 seconds and pair with panel( blue light: send out wireless alarm signal. Red light: battery low- voltage, battery need a change ). Put case back. Choose install position, adjust install angle/direction, walk test the protection area, make sure alarm triggered in three steps. Install at 2.2-2.4 meters from ground, using screws to fix bracket, put the detector on it. (see PIC 5) [ON] status. 3 After voice prompt "Welcome to use voice gsm alarm system", start to searching GSM signal. "SIM" character in screen shows SIM card installed well, signal bar on left place displays the signal strength. If "SIM" and signal bars keep bright, GSM signal and the SIM card are normal. b . General setting All the settings,please insure input [#] to confirm. To exit, press [*] first, then [#]. Note: If keyboard password protection function enabled, please enter password to operate. The initial code is 1234. Notice Indoor use only. Avoid sunshine,direct strong light,heat,stoves,air condition and moving objects.Don't straight at door/window or vents. Detect direction must be tangential with body moving direction (vertical 90 degrees) is the best. With pets at home,please adjust the detector to higher view,above 0-30cm from ground,in case little pet trigger false alarm. Take care of fresnel lens,avoid dirty,scratching,falling down,crashing. In case damage inside components. For more information, please refer to corresponding “ PIR Montion Detector User Manual” 8 1.Alarm message recording In alarm status, dial preset phone number and play preset recorded message. In setting status, Press 19# and voice prompt to remind you start to record. Record contents should be concise, such as this is XXX home, residential I llegal invasion here, please help.” 10 seconds later, the system will exit automatically.Press any button to stop record. 2.Add Remote Control In the setting status, press 07+(000~120)+# to add remote control. 000~120 is zone number. 9 Example 1: Press 07 and then 001 # to add the 1st remote control. Take one sensor and let it transmit a signal to the host, adding successful when voice prompt "coding right ".If come out sound "di" once indicates repetition of code, please change other sensors. If you want to add more remote controls, input other three-digit code numbers. Follow the same route. Voice prompt in all operation. Learning well,press [#] to exit learn mode;press [*] [#] exit setting. c .For other function settings please refer to Command Sheet below. Following command valid for : a. keyboard settings b. remote phone call settings c. SMS remote settings these three ways. Example 3: If user want to set the first alarm number 13899998888, Note:Panel maximum support 150 different code remote controls. Three setting methods: Method 1: Press # to enter setting, then press 3113899998888#, 3.Delete remote control In setting mode, press 08+(000~120)+# to delete corresponding remote control. Press 08+ * * * + # to delete all remote controls. E.g. 2:Press 08 then 001 # to delete NO.1 remote control.At this time directly input 008 if you want to delete NO. 8 remote control; input 010 to delete NO.10 remote control. Press # to exit delete remote control mode. and * # to exit. Method 2: Make remote phone call, voice prompt "Enter Password". Enter 1234,host voice prompt "“correct password”, then press # with a voice prompt “set” indicate remote setting entered. Press 3113899998888# with corresponding voice prompts, then press * # to exit. Method three: Texting 12343113899998888 # to host number. Host will reply with "NO.1 Phone number: 13899998888" set is 4.Add wireless detector In setting mode, press 09+(000~120)+# enter detector adding mode. Note: Specific operation, please refer to (Example 1), the host can add up to 150 detector. 5.Delete wireless detectors successful. Example 4: If user want to delete the NO.1 alarm number. Method 1: Input 31 # in remote phone setting status and then press * # to exit. Method 2: Press 31# to enter into remote phone call setting status. Method 2: Texting 123431# to host number. Host will reply with “NO.1 Phone number: " delete successfully. In setting mode, press 10+(000~120)+# to delete corresponding detector. Press 10+***+# to delete all detectors Note: Enter setting status,input command in the following to set. Note: Specific operation, please refer to (Example 2). 10 11 Command sheet 1 (all the below command valid for the two methods) Preset voice alarm phone number Command :[3]+[1-9]+ [Phone number]+[#] Delete voice alarm phone number Preset 1-9 group voice alarm phone numbers. [1-9 ] indicates the 1st group to the 9th group alarm numbers. Please refer to Example 3 for the specific instruction. Remark: 1. Power cut off or power on again, it will dial the 6th special number automatically and send SMS alert. 2.Only when the SOS emergency alarm will dial 7th,8th, 9 th Group number. Auto dial three times at most. Delete 1-9 group voice alarm phone number Specific instruction refer to Example 4. Command :[3]+[1-9]+ [#] Set SMS alarm number Preset 1st-6th group SMS alarm phone numbers. When alarm, host will send message to these six numbers. Command:[4]+[1-6]+ Specific instruction refer to Example 3. [Phone number]+[#] Set alarm panel and remote control operate zones area Set alarm panel and Factor y default all remote control and panel can control remote control operate all 000-120 zones. zones Remark: The 1 st remote control represented by number 001, *** represents the alarm panel keyboard. Example 5: If you want main panel to control 00-50 Command: [54]+[remote defense zone. control number 000~120] Method one: +[Starting defense zone Enter the configuration mode, press 54* * * 000050# and press *#to exit configuration mode. 000~120 ]+[ End of Method two: defense zone 000~120 ] Enter the remote configuration mode,then press 54* * * 000050#. +[#] Method three: Send SMS message 123454***0050# Arm/Disarm siren sound on/off Use remote control and panel to Arm/Disarm siren on/off. 1 means on and 0 means closed, the default is on. Delete SMS alarm numbe Delete 1-9 group SMS alarm numbers, refer to example Example: 001 represent 1 st remote control, *** represent Command:[55]+[Remote controlnumber 000~120]+ main panel keyboard. Specific instruction refer to Example 5. [0/1]+[#] Command:[4]+[1-6]+[#] 4 for specific instruction Set system time and date Password modification Command:[56]+[four digital year]+[01-12 Set the system date include year,month,day,time, Month]+[01-31 day]+ minute and seconds. [00-23 clock]+[00-59 miniute]+[00-59 second] +[#] Command :[50]+ [4 digits newpassword]+ [#] Delay arm time Command : [51] + [00-99 S]+[#] To modify the user password, the default user password is 1234.Change it before using. Set the delay time for out arm. 0-99 seconds can be set, system default 00 seconds. Set delay alarm time panel ready to alarm time, 0-99 seconds can be set, Command : [52] + [00-99 S]+[#] Set Siren alarm time Command :[ 53 ]+ [00-20 Minutes]+[#] 12 system default 00 seconds. Set siren alarm time, 0-20 mins can be set, system default 1 min. To set the time for scheduled arm and disarm from 1 st to 4 th group and choose week. Timely Arm/ Example 6: set up the first group scheduled time to arm disarm time set at 22 : 00 pm and disarm at 07 : 00 am, this is valid fo r Monday, to Friday. Steps:[ 57 ]+ Group number Method one: Press # enter configuration mode, and then [01~04 ]+[ AAAA time of arm ] press 57012200070012345#,and then press * # to exit. Method two: enter the remote configuration mode, and +[BBBB disarm time ]+ then press 57012200070012345 #. [ Number of week ]+[#] Method three: Send SMS message 123457012200070012345 #. 13 Delete timely arm/ To delete the scheduled arm and disarm time from disarm time Command:[57]+Group 1 st to 4 th group. number[01~04]+[0]+[#] Scheduled clock time setting To set two groups clock ring time and choose week,when ringing press any button to cance l or pess remote control Command:[57 ] + Group Disarm button. number [05~06 ]+ Suggestion: you'd better to put the remote control at [ AAAA start ]+[BBBB end] your bedside easier for you to operate. +[ Number of week]+[# ] Specific instruction refer to Example 6. Delete the clock time Syntax:[57]+Group To delete the 1st to 2nd groups scheduled clock time . number[05~06]+[0]+[#] Timely arm/disarm defense zone settings Syntax:[58 ]+[Group Set four groups timely arm/ disarm zones. number 01~04 ]+ [000-120 begin zone number]+[000-120 end zone number ]+[#] Set 120 defense zone type, 000-120 represents 0-120 zone number, 1-8 represents one of the 8 zone type: Set defense zone type 1.NORMAL 2.STAY ARM 3.INTELLIGENT 4.EMERGENCY Command:[60]+ 5.CLOSED [000-120 zone numbe] 6.CHIME +[1-8 type]+[0/1]+[#] 7.WELCOME 8.HELP SENIOR [0/ 1]0 represents siren no sound when the zone alarm, 1 siren with sound. Set two wired defense zone attribute. 051-052 are wired Wired defense zone defense zones. System default: 51-52 zone shor t-circuit attribute setting alarm NO mode. Syntax:[61 ]+[zone number [0/ 1],0 means NO and 1 means NC NO means shor t-circuit to alarm 051-052 ]+[0/1 ]+[#] NC means open-circuit to alarm 14 Remote setting function Except remote control/detectors coding and record function,all the other funtions can be set remotely. on/off Syntax:[62]+[0/1]+[#] System default 1-on. Assign specific phone To set specific phone numbers to certain zones. number to certain zone System default: 000-120 defense zones will dial from the Syntax:[ 63 ]+[000-120 first to sixth group phone number. begin zone]+[000-120 Remarks: if user want a appointed phone number to dial end zone]+[Phone alarm the zone, he can put phone number of the begin zone the same with the end zone. number 123456 ]+[#] Clock display save mode on or off ,0 means off ,1 means on. System default:1 When alarm host in standby state: If ON, clock display auto off 1 minute later. Syntax:[84]+[0/1]+[#] If OFF, clock display will stay on. Set audible voice on/off Remote control or system operation voice prompt on/off. 1 ON,0 OFF. Syntax:[11]+[0/1]+[#] System default 1,ON. 1 is on and 0 is off. Enable/disable SMS on/off System Default is 1,on. Remarks : If you disable SMS function,host won’t send Syntax:[12]+[0/1]+[#] out any alarm SMS or reply. Siren volume adjustment 00 stand for minimum voice, 99 for maximum voice system defalut Please note: Extremely low voice may leads to abnormal Syntax:[14]+[00-99]+[#] siren voice. please should be used with caution Clock display save mode ON /OFF Anti-cracking Syntax:[15]+[0/1]+[#] Interference Alert on/off Syntax:[16]+[0/1]+[#] Keyboard password protection Syntax:[17]+[0/1]+[#] In the ARM state,Any remote control can’t disarm the host,but the host keypad can disarm. 1 means ON, 0 means OFF System default is 0,off. In arm state, when receive same wireless interference over 15 seconds,host siren ring 5 seconds.Panel display Tp. When Keyboard password protection is on, enter password before operation. Factor y default password is 1234. System default is 0 means off. 15 Enable/disable alarm linkage function. Alarm linkage function 1 is enabled and 0 is disabled, system default is 1. Remark: If enabled, the relay(NO and COM) will turn to on /off close state. Closing time same as siren ring time. If disabled, the relay(NO and COM)can control home Syntax:[20]+[0/1]+[#] appliance remotely. Via remote setting to control on/off. Factory reset Syntax:[9898]+[#] System factor y reset Remark: Delete all phone numbers,password back to 1234, but remote control and detector code won’t lose. Disconnect power, turned off batter y switch, then press and hold ARM button on keypad, respond with “beep, beep,beep,..”sound, for 5 seconds,release ARM button. Panel back to factor y settings,password 1234,delete all Syntax:Press and hold the remote control and detector coding message. ARM button until power on Remarks:If the user open password protection function but forget.Please reset mandator y back to factor y setting. Reset Mandatory Host panel query function Press panel”Enquiry” ( ) key,and then enter the following command to check various parameters of the host settings; press * then press # to exit. If open password protection,please enter the password to unlock, then press the”Enquiry” ( ) button to check the following instruction. Query voice alarm phone number Syntax:3+[ 1-9 ]+[#] Query SMS phone number Quer y 1-6 group SMS phone numbers. Press Enquir y key on keyboard, and then press 41#, Syntax:4+[1-6]+[#] display screen will show 1 st SMS number. Query password Syntax:50+[#] Query delay arm time Function of call up The panel can be used as a phone,to make phone call. Syntax :Enter[#+0 0+phone number+# ] ,directly make phone call Press DISARM key to hang up. e.g. If you want to call 13712345678,input 1 # 0013712345678# when panel in standby status and then can be get through. At the end of your call, press DISARM key, press *, and then press # to exit. Power cut off/come back alert When AC power is off/on,host will dial the 6 th number and send SMS message “AC power off/on” to this number . And AC power is on ,the panel will do the same with “AC power is on”. Remark : If you disable the SMS message function or didn’t set the SMS alarm number ,this function will auto off . 16 Quer y 1-9 group voice alarm phone numbers. Press Enquir y key on keyboard, and then press 31#, display screen will show 1 st group phone number. Syntax:51+[#] Quer y current four digits password, Press Enquir y key and then press 50#, LCD display 1234 is current password. Press # to clear, press * then press # to exit. Quer y delay arm time (00-99) Seconds Press Enquir y key, and then press 51#, LCD display 00 means delay time is 0 second. Query delay alarm time Quer y delay alarm time (00-99) Seconds Press Enquir y key, and then press 52#,LCD display 00 Syntax:52+[#] means delay time is 0 second. Query siren ring time Quer y siren alarm ring time (00-20) minutes. Press Enquir y key, and then press 53#, LCD display 01 Syntax:53+[#] means ring time is 1 minute. Quer y of specific remote control and keyboard assignments Query remote control and keyboard assignments to which zone 000-120. Press Enquir y key, and then press 54001#, LCD display 000-120, to zone means 1 st remote controller controling zone 000-120, press # nd Syntax: 54+[000-120]+[#] to clear screen.Press 5402 # to quer y 2 remote control’s condition. Query remote control Quer y NO. 000-120 remote control or keyboard’s voice prompt on/off. or keypad voice prompt ON means sound .OFF means no sound. *** present keyboard. e.g. Press Enquir y key, and then press 5501#,LCD display ON, Syntax:55+[000-120]+[#] means 1 st remote control with voice prompt while arm/disarm. 17 Query system date and time Quer y the system date and time. After DI sound,Press Enquir y key, and then press 56#, LCD display 2012, after DI sound display 0601, then DI sound again display 1830, DI sound display 5.So the current time Syntax:56+[#] is 18:30pm, 1 st June , 2012 ----Friday . Quer y 1st to 4th group scheduled time and week for arm/ Query timely arm/ disarm , two group clock bell time and week. disarm time and week e.g. Press Enquir y key, and then press 5701# to quer y the first group scheduled arm and disarm, LCD display 22-00, after DI sound display 07-00,DI sound again display 12345, Syntax:57+[01-06]+[#] means schedule time is from Monday to Friday,22:00 pm Arm,07:00 Disarm. Query the zone number Quer y the 1 st to 4 th group scheduled arm/disarm’s zone number. with scheduled arm/ disarm Press Enquir y key, and then press 5801# to check the 1 st arm/ disarm group controlled which zones,display “000-120” means Syntax:58+[01-04]+[#] it controls 000-120 zones. Quer y the zone types of 000-120 and siren sound. e.g. Press Enquir y key, and then 600001# to check the st Query type of wireless condition of 1 zone. 1 on panel means NORMAL , defense zone. 2 means STAY ARM, 3 means INTELLIGENT, 4 means EMERGENCY, 5 means CLOSED, Syntax:60+[000-120]+[#] 6 means CHIME, 7 means WELCOME 8 means HELP SENIOR. The word “ON” mean siren with sound, “OFF” no sound. For quer y the zone type of 51~52 Query the type of Example: Press Enquriy key, and then press 61051# to quer y wired zones 51 zone alarm type, show NO means short-circuit to alarm , Syntax:61+[051-052]+[#] while show NC means open circuit to alarm. Query remote To quer y if the remote operation is allowed, it should show operation on/off either ON or OFF. Syntax:62+[#] Query phone number To quer y the phone number assigned to zone 000-120 for alert. e.g. Press quer y key, and then press 63001# to see which number for specific zone is allocated for 1 st zone, if display 123456,means these 6 group of phone numbers are assigned to 01 zone. If display 34 , 3 rd and 4 th Syntax:63+[000-120]+[#] group number is allocated to 1 st zone. 18 Query clock display save mode on/off To quer y clock digital tube display save mode on/off Syntax:84+[#] ON-open,OFF-close Query audible voice prompt on/off Quer y whether the system audible voice prompt on/off Syntax:11+[#] ON-open,OFF-close Query SMS messaging function on /off Syntax:12+[#] Query siren volume Syntax:14+[#] For quer y the SMS messaging function . ON-open,OFF-close Quer y for the volume level of siren(00-99), e.g. Press enquir y key,and then press 14# to see the voice volume. 00 as lowest and 99 as highest volume. Query anti-cracking function To quer y anti-cracking function on/off. ON is open,OFF is close. Syntax:15+[#] Query same frequency To quer y interference alert is on/off. interference alert ON is open,OFF is close. Syntax:16+[#] Query keyboard To quer y if the password protection function is on. password protection ON is open ,OFF is close. Syntax:17+[#] Query alarm linkage on/off To quer y alarm linkage function. ON means is needs alarm linkage while OFF means don’t. Syntax:20+[#] Query alarm panel arm/disarm records Syntax:9901+[#] The system can save up to the most recent 72 disarmed records. Press enquir y key, and then press 9901#, press 8 to scroll up and 0 to scroll down for records. The first display is the record serial number, like, 01. It shows the 1 st record. Other indications as: After DI sound,0801 means 1st August DI sound again, 1210 means time is 12:10 DI sound once again shows the following features. YC = arm/disarm from remote JP = arm/disarm from keyboard DS = Scheduled arm/disarm YK= arm/disarm from remote control CF= disarm 19 Query alarm panel arm/disarm records Syntax:9901+[#] Query alarm records Syntax:9900+[#] BF=arm LSBF=stay arm 01 = remote control number 1 . 120= remote control number 120. Remark: if first display DS, and then show 01,02,03,04, it means 4 groups of scheduled arm/disarm. System can save up to the most recent 102 alarm records. Press Enquir y key, and then press 9900#, press 8 to scroll up and press 0 to scroll down for records. The first display is the record serial number, like, 01. It shows the 1 st record. After DI sound display date. E.g. 0801 is 1 st August DI sound again display time. E.g. 1210 is 12:10 am DI sound once again display 01 mean zone 1 alarm,120 mean zone 120 alarm. Query current ARM zones For quer y the arm district Press Enquir y key,LED light flashing,and then press 00#. LCD show 000-120 means zone 000-120 in ARM state. Syntax:00+[#] SMS enquiry and SMS control host functions The following instructions is only work for SMS remote operation,setting and inquiries: Function Syntax Remote SMS Disarm 0# Remote SMS Arm Description Send SMS message 12340# to host Note: 1234 is initial password, use new password when it is changed. 1# Send SMS messages 12341# to host for ARM Remote SMS Stay Arm 2# Send SMS message 12342# to host for STAY ARM. Remote SMS turn on relay 3# Send SMS message 12343# to host Remote SMS turn off relay 4# Send SMS message 12344# to host. Query the AC power status 6# Query the alarm panel general settings 11# Send SMS messages 12346# to host,if host reply AC power ON or AC power OFF. ON shows the power is normal and OFF shows outside power supply is abnormal or power off. Example: Send SMS message 123411# to the alarm panel, the alarm panel replies with a list of related setting: arming,Relay out off ,Green ,Alarm out on , Send SMS on ,Remote set on ,Password:1234, Alarm delay:00s,Arm delay:00s,Siren on 1 min, Siren VOL:99,Crack off ,Disturb off ,Key lock off , Voice on Return a list of 1st to 9th phone number group Query voice alarm phone number Query SMS number 20 for voice alarm. 30+ [ 01- 09] Example: Send 12343001# to the alarm panel, the alarm panel replies " Group 1 phone number : +[#] 13712345678” means the first voice alarm phone number is 13712345678 Quer y 1st to 6th SMS numbers 40+ E.g. Send SMS messages 12346# to host, panel [ 01- 06] reply with 13888889999 which is the 1st SMS +[#] alarm number. 21 Quer y the assignment of remote control and keyboard to specific defense zone Example: Send 123454001# to host,host replies: “001 remote control zone range:000-120,Keyboard zone range:000-120” ,it means 01 remote control is assigned 54+[000-120]+[#] to control zone 000-120. and keyboard is assigned to control zone 000-120. Quer y the system time by SMS. Query the system time Example: Send 123456# to host, host replies “System clock :2012-07-01 12:00”. Means the system is now 56+[#] July 1 st , 2012 12 : 00 am. Query assignment of remote control to defense zone. Query scheduled arm/disarm status 57+[01-04]+[#] Quer y the four groups scheduled arm/disarm about the time, week and zones. Example: send 12345701# to the host, the alarm panel replies: 1 st group scheduled timing arm and disarm settings: Arm time:12:00 Disarm time:13:00 Arm/Disarm week:1234567 Zone range:000-120 Means: the first group scheduled time to arm at 12:00 and disarm at 13:00, this is valid each day. scheduled arm/disarm in 000-120 zone Query wireless defense Query the type and siren setting of certain wireless defense zone zone type and siren on/off Example: Send message 123460001# to host,host will reply: “zone 60+[000-120]+[#] 001 is wireless normal zone, siren ON.” Check the host’s zone 51-52 alarm type and siren status Query wired defense Example: send text message 123461051# to host, the zone type and siren on/off host replies: “051 zone is wired zone, zone type:normal; siren ON; alarm type: NO”. 61+[051-052]+[#] It means zone 51 is a normal zone, siren in it is on and alarm type is NO (Z51 and GND in Short circuit alarm). Query phone number assignment to zone 63+[00-120]+[#] 22 Quer y by SMS to know the phone number assigned to zone 000-120. Example: send message 123463001# to host,host replies: “zone 01 dial group number “123456”. It means zone 1 will dial 123456 these six group numbers. Used to customize the SMS message to 1-6 group numbers Customize the SMS message for certain zone for zone 000-120. Example: Send message “123480001 Front Door Open#” to the host, it will send message “zone 001 Front Door Open” 80+[000-120]+ to 1-6 group numbers upon zone 01 being triggered. [SMS message]+[#] Note: Maximum length of message is 25 characters. System will add zone number in the message automatically. Query customized SMS Quer y customized SMS message contents of zone 000-120 message contents when alarm triggered. Example: Send 123481001# to the alarm panel to quer 81+[000-120]+[#] Note: "1234" shown in above table all represents the initial password. User can change password and use new password to operate. 4 .Alarm reception&remote control 1.What to do when get alarm call When alarm,dial the preset telephone numbers from 1st to 6th group,send SMS to 1st to 6th groups,siren on/off accord to your setting.If one line is busy or can’t get through,auto dial next number,every number call 3 times. Get alarm call auto play 10 seconds recording without input password,press cell phone/telephone digital number can control following functions: [1] key: arm [2] key: disarm [3] key: listen-in [4] key: stop listening [5] key: talk [6] key: stop talking [7] key: siren on [8] key: siren off [9] key: turn on relay [0] key: turn off relay [*] key: hang up and exit, won’t dial the next number on list. Remark: If you don’t press “*” or “2”,sytem continue to dial next number. 23 2.Remote control: Use your phone to dial the host,ring for a while system is connected automatically.Voice prompt please enter password,enter your password (1234 factory default,input wrong remind you input again,wrong for three times,hang up automatically). Input right,voice prompt correct password,press cell phone/telephone digital number can control following functions: [1] key: arm [2] key: disarm [3] key: listen-in [4] key: stop listening [5] key: talk [6] key: stop talking [7] key: siren on [8] key: siren off [9] key: turn on relay [0] key: turn off relay [*] key: hang up and exit. [#] key:Enter remote configuration mode,make general settings refer to Sheet 1 Commands. Without any operation after 20 seconds auto hang up and exit. Note: 1.Listen-in time is 20 seconds, press key [3] in 20 seconds to keep listening. 2.When monitoring press key [5] for two-way intercom. 3.When talk, press key [5] in 20 seconds to keep talking 3.INTELLIGENT Defense zone: If the detectors in the zone triggered only once,won’t alarm.But if triggered again within 30 seconds it will alarm immediately. 4.EMERGENCY Defense zone: No matter arm/disarm,it will alarm immediately once detector triggered. Usually pair with smoke detector,gas detector and emergency button,etc. 5.CLOSED Defense zone: No matter arm/disarm, it won’t alarm even detectors triggered. 6.CHIME Zone: No matter arm/disarm,detectors in the zone is triggered with door bell voice prompt. 7.WELCOME Zone: When Disarm,detectors in the zone triggered with welcome voice prompt.When Arm/Stay arm status, it will alarm once detector in the zone triggered. 8.HELP SENIOR Defense Zone: No matter arm/disarm,it will alarm with voice prompt “ help senior ”and dial 7,8,9 group numbers once detector in this zone is triggered. Zone types(system default): zone Stay 5 .Defense zone type and parameters No.60-79 zone Emergency No.80-89 zone Help Senior No.90 zone Chime No.91 zone Welcome No.92 zone Normal No.01-59,100~120 Intelligent No.93-99 zone Anti-tamper No.97 zone There are 120 defense zones.Every zone with eight different types. 1.NORMAL Defense Zone: Panel only works on ARM status.No response while Disarm. 2.STAY Defense zone(HOME Defense zone): While stay Arm,detectors in stay zone won’t alarm even triggered. 24 25 System default 6 .FQA Operation password Troubleshooting 1234 Remote Control setting Enable Clock display save mode Enable Siren ring time 1 minute Remote control operation Enable voice prompt Delay ARM 0s Delay alarming 0 second Siren volume 99 0-120 zone alarm Siren sound on Alarm linkage Enable 51-52 wired zone alarm type NO SMS message Enable 1-120 zone SMS message Certain zone alarm Panel parameters Input voltage: DC9V-12V Load SIM card Cancel PIN code Take to strong signal place GSM signal weak SIM card not read by panel, or add GSM antenna Forget to preset alarm number Set voice alarm number or GSM can't call and SMS Forget to preset SMS number Set the SMS number Insufficient of SIM card or Pay phone bills validity passed Enable SMS messages function Close SMS text function Input correct password or Input Password wrongly change new password or Can't remote control Reset Mandator y No record indication Re-record according to Didn’t record manual book when alarm Coding unmatched with Re-coding the host Change batter y Insufficient power Remote controller not work batter y pieces poor Polish elastic plate of batter y contact or corroded Contact local dealer find a Unmatched with host matching one change batter y Infrared detector not work Low-power Siren no sound Wireless frequency: 315/433/868/915MHZ , 2262/1.5-4.7M , EV1527/300K GSM Format: Support GSM850/900/1800/1900MHz (option) Backup battery: NI-HI AAA*6 DC7.24V Siren plug/jack in short circuit or broken-line Plug line cut off Siren closed A nearby emitter is panel receive infrared transmiting sensor,door sensor, remote control distance Panel receiver failure Standby batter y of the shortened host insufficient Alarm loudness: 110dB Press Key Button failure Without voice prompt 26 Methods SIM card unloaded SIM need PIN code Standby currents: < 25 mA Alarm current: < 450 mA Reasons Repair or change plug/socket Change plug line Set siren ringing time find the interfering source and move it Deliver y back to manufacturer for repairs Check host power. Password keyboard Close password keyboard protection function is on protection function Voice prompt function is off Open voice prompt function 27