1
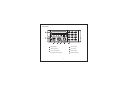
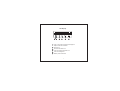
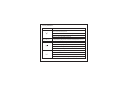
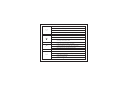
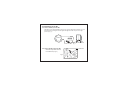
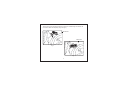
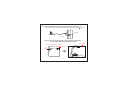
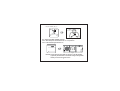
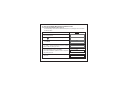
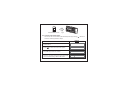
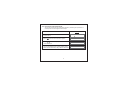
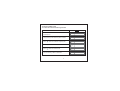
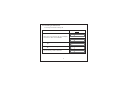
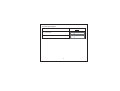
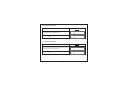
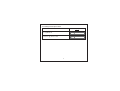
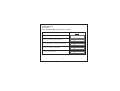
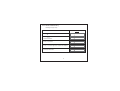
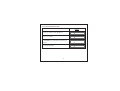
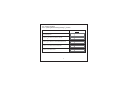
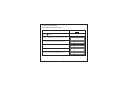
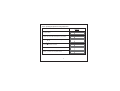
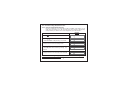
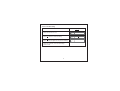
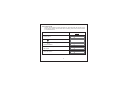
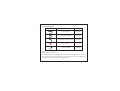
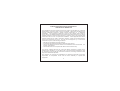
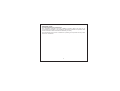
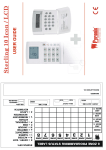
®
Bluetooth Dialing Car Kit
BT 78X
User Manual
Environmental
friendly
Thank you for buying BT78X Dialing Car
Kit which features p ortability, 2-way
voice recording, large LCD display, Caller
ID, Call waiting, and many more advanced
functions. Enjoy happy and safe driving.
2
Table of Contents
1
1.1
1.2
1.3
2
2.1
2.2
2.3
2.4
2.4.1
2.4.2
3
3.1
3.2
3.3
4
4.1
4.2
4.3
4.4
4.5
4.6
4.7
Profile and its Function ...........................................................5
Feature List ... ....... .......................................................................5
Profile .........................................................................................6
Key Functions................... ..........................................................8
Installation of Car Kit ............................................................. ...10
How to install your Car Kit . ......... ...............................................10
How to position your Car Kit... . ...... ........ . ..................................10
How to position the external microphone .............. . ................... 12
Turn on power switch ............................................ . ................... 1 3
Slide the power switch from off to on position ............................ 1 3
LCD and back light will turn on....................... ........................... 1 3
How to establish Bluetooth Link with Car Kit ..............................14
Pairing with mobile phone ........................................................14
Connect with mobile phone... ..... ... ............................................ 15
Disconnect with mobile Phone ...................................................16
How to make a call........... ........ .. .... . .......................................... 1 7
Make an external call through Car Kit .. .. .. .. .... ............. ............... 1 7
Answering an external call ........................................................18
Muting microphone ...................................................................19
Call waiting function ... ........... ...................................................20
Dialing from Dial list... ..............................................................21
Dialing from Call list .................................................................21
Dialing from the phone book ........ .. ............. ... .......................... . . 22
3
5
Main Features.... .. . ........................... ........................................ 23
5.1
Dial list............ ........................................................................23
5.1.1 Opening the Dial list by pressing up button ... ... ........................23
5.1.2 Opening the Dial list through main menu .................................. 24
5.1.3 Delete a Dial list entry..... . . .................................................. ....25
5.1.4 Delete all Dial list entry . . ............ ................................... .........26
5.2
Call list operation............................... ......... .. .......................... 27
5.2.1 Opening the Call list by pressing down button . ...... ....................27
5.2.2 Opening the Call list through main menu ................................... 28
5.2.3 Delete a Call list entry .... ... .......................................................29
5.2.4 Delete all Call list entries .........................................................30
5.2.5 Copy the Call list entries to the phone book ..............................31
5.3
Phone book operation ..............................................................32
5.3.1 How to enter a phone book .......................................................32
5.3.2 Opening the phone book by [OK] button ...................................33
5.3.3 Delete a phone book entry ........................................................34
5.4
Voice Recording/Playback function..........................................35
5.4.1 Voice recording mode selection ................................................35
5.4.2 Voice recording........... ............................................................36
5.4.3 Playback voice message.. .........................................................37
5.5
System reset................... ........................................................38
6
Package Contents........... .........................................................39
FCC Interference statement ..............................................................40
4
1 Profile and its Function
1.1 Feature List
! Caller ID Display
! Two-way recording and playback, 60 minutes (30 records max.)
! Dial list - up to 10 logs
! Call list - up to 10 logs
! Phone book - up to 255 entries
! LED backlight to enhance viewing comfort
! 7-level Volume control
! Call duration timer
! Microphone muting
! Handsfree speaker phone operation
! Echo cancellation
! Noise reduction
! Dialing key pad to make the call directly
! Powered by car charger / Built - in Ni - MH battery
! Flexible windshield stand with vacuum suction
! Built - in microphone
! Portable conferencing unit
! Call waiting
5
1.2 Profile
1
2
3
4
5
6
7
1
LCD Display
4
2
“Menu” button
5
“C” button
3
“Voice recording”
6
“Call” button
and “Play back” button
7
6
“OK” button
Dialing keypad
LCD Display
1
1
2
3
4
5
6
2
3
4
5
6
Line 12 dot-matrix characters display for
alpha-numerical character
Phone icon
BT link connected icon
Voice recording play back icon
Voice recording icon
Battery level indication
7
1.3 Key Functions
Buttons
Functions
Make a connection to mobile phone when the Car Kit is not
connected with mobile phone
[
]
Answer a call when there is an incoming call
Terminate a call during conversation
Start a outgoing call from the Car Kit
[1] .. [9], [ * ],
[0], and [ # ]
12 digits dialing keypad for numerical and alphabetical entry
Start Voice recording during a conversation
Playback recording log when the Car Kit is idle
[
]
Pause play back during voice recording playing
Restart play back during Pause
Menu scrolling up direction
[
]
Volume up during a conversation
Dial list access when the Car Kit is idle
Volume up when voice recording item is playing back
8
Menu scrolling down direction
Volume down during a conversation
[
]
Call list access when the Car Kit is idle
Volume down during voice recording item play back
Menu access when the Car Kit is idle
[
]
Exit menu during menu is scrolling
Voice recording item operation when Voice
recording item is playing back
Enter menu item when menu is scrolling
[
OK
]
Confirm operations (i.e. delete item, copy items...)
Switch between on hold call and active call
Exit menu when menu is scrolling
[
C
]
Exit operations (i.e. Voice recording item play back…)
Delete digits / characters
Reject an incoming call
9
2 Installation of Car Kit
2.1 How to install your Car Kit
Whenever you use the Dialing Car Kit, turn on the electrical system of your car
and plug the car charger into the cigarette lighter socket in your car to get
power ( Fig. 1)
DC
Socket
Fig. 1
2.2 How to position your Car Kit
– attach the adjustable stand to
the windshield ( Fig. 2)
Windshield
Fig. 2
10
- fit the Car Kit onto the stand & adjust to the most suitable angle to achieve the
most favourable sound quality (Fig. 3 & Fig. 4)
Windshield
Windshield
Fig. 3
Fig. 4
11
2.3 How to position the external microphone (Fig. 5 , Fig. 6 & Fig. 7)
- Insert the external microphone jack into the microphone socket ( ) (Fig. 5)
Socket
Fig. 5
Remark: In order to get the best voice perception, please plug
in the external microphone as shown in “Fig.5” .
Windshield
- Suck to the windshield (Fig. 6)
Windshield
Air
suckers
Fig. 6
12
- Clip to clothes (Fig. 7)
Fig. 7
2.4 Turn on power switch ( Fig.8)
2.4.1 Slide the power switch from “ off ” to “ on ” position.
2.4.2 LCD and back light will turn on.
OFF
OFF
ON
ON
Fig. 8
Remark: please plug the provided car charger or AC/DC adaptor
(optional) to DC Socket of Car Kit to charge rechargeable
battery for 6 hours in the first use.
13
3 How to establish Bluetooth Link with Car Kit
3.1 Pairing with mobile phone (Fig.9)
Before making connection with the mobile phone, a pairing process should be
done as follow:
Display
When the Car Kit is idle and is not connected
with mobile phone
WE LCOME
Press [
P H O N E
] button to access menu system
[ ]
Press [ ] /
button and [OK] button to select
<PAIRING>
Enter 4 digit PIN with any number buttons
(eg.1234). Same PIN must be entered to mobile
phone while in pairing process.
Press [OK] button to confirm after a confirm tone is
issued and display showns “PAIRING” .
Then follows mobile’s operation menu to complete
the pairing process.
If the pairing is successful, the LCD will display
“PAIR OK”
14
B O O K
P A I R I N G
S Y S
P I N ? * * * *
P A I R I N G
P A I R
O K
Bluetooth Mobile Phone
Fig. 9
3.2 Connect with mobile phone
The Car Kit can connect with a paired mobile phone by pressing [
search or following the below steps:
] button to
Display
When the Car Kit is idle and is disconnect with
mobile phone
WE LCOME
Press [
P H O N E
] button to access menu system
[ ]
B O O K
Press [ ] /
button to select <CONNECT> item
and press [OK] button to confirm
C O N N E C T
The Car Kit will search for mobile phone.
After the successful connection, the Car Kit will
show connected and go back to idle state.
C O N N E C T E D
15
3.3 Disconnect with mobile Phone
The Car Kit can disconnect with mobile phone by following the operation of
mobile phone or following the below steps:
Display
When the Car Kit is idle and is connected with
mobile phone
C O N N E C T E D
Press [
P H O N E
] button to access menu system
[ ]
Press [ ] /
button and [OK] button to select
B O O K
D I S C O N N E C T
<DISCONNECT>
The Car Kit will disconnect with the mobile phone.
When it’s disconnected, it will go back to idle state.
16
WE LCOME
4 How to make a call
4.1 Make an external call through Car Kit
Display
When the Car Kit is idle and connected with the
mobile phone
C O N N E C T E D
Using the key pad to dial the phone number
8 5 2 2 1 9 1 8 8 9 9
Press [
8 5 2 2 1 9 1 8 8 9 9
] button to make an outgoing call
LCD display shows call timer
0 0 : 0 0 : 0 1
Press [
0 0 : 1 0 : 0 1
] button to end the call
C O N N E C T E D
The Car Kit will go back to idle state
17
4.2 Answering an external call
Answering an external incoming call
Display
1 2 3 4 5 6
When there is an incoming call, the LCD display
will show the caller ID or “RINGING”
OR
R I N G I N G
Press [
] phone button to accept the call
Press [
] phone button again to end the call
T A L K I N G
0 0 : 0 5 : 0 1
C O N N E C T E D
The Car Kit will go back to idle state
18
4.3 Muting microphone
Display
Press [C] button to mute the microphone while
in conversation
Press [C] button again to unmute the microphone
19
S E C R E C Y
ON
0 0 : 0 0 : 0 1
4.4 Call waiting function
Display
0 0 : 0 0 : 0 1
When the Car Kit is in use and there is another
call coming, the LCD display will show the
caller ID
1 2 3 4 5 6 7 8 9 0
Press [OK] to accept the incoming call and hold
the current call
SW I T C H
C A L L
Press [OK] to switch between held call and
active call
SW I T C H
C A L L
After all calls are ended, the Car Kit will go back
to idle mode
C O N N E C T E D
20
4.5 Dialing from Dial list
Display
[ ]
Press [ ] button , then press [ ] /
to select the
desired number from dial list
Press the [
2 3 8 9 0
0 0 : 0 0 : 0 1
] button to dial
4.6 Dialing from Call list
Display
[ ]
[ ]
Press
button , then press [ ] /
to select the
desired number from call list
Press the [
2 3 8 9 0
0 0 : 0 0 : 0 1
] button to dial
21
4.7 Dialing from the phone book
Display
[ ]
Press [ ] /
button to select the desired name
from phone book
Press the [
J o h n
0 0 : 0 0 : 0 1
] button to dial
22
5 Main Features
5.1 Dial list
5.1.1 Opening the Dial list by pressing [ ] button
Display
CONNE CTED
When the Car Kit is idle
1 2 3 4 5
Press [ ] button to open the Dial list
[ ]
Press [ ] /
button to scroll through the list
1 2 3 4 5 6
D I A L
Press [C] button to exit Dial list
L I S T
CONNE CTED
Press [C] button to exit
23
5.1.2 Opening the Dial list through main menu
Display
Press [
CONNE CTED
] button to open the menu
[ ]
Press [ ] /
button to select item <DIAL LIST>
and confirm by pressing [OK] button
D I A L
[ ]
Press [ ] /
button to scroll through the list
1 8 6 0
24
L I S T
5.1.3 Delete a Dial list entry
Deleting a single entry
Display
1 8 6 0
Press [ ] button to open the Dial list
[ ]
Press [ ] /
button to select the desired number
from the Dial list
8 3 5 5 2 7 6 1
Press [OK] button
D E L E T E
E N T R Y
Press [OK] button again to confirm the deletion
D E L E T E
E N T R Y
The entry is deleted with confirmed
message “DELETED”
D E L E T E D
25
5.1.4 Delete all Dial list entry
Display
Press [ ] button to open the Dial list
1 2 3 4 5
Press [OK] button
D E L E T E
E N T R Y
D E L E T E
A L L
[ ]
Press [ ] /
button to select the menu item
<DELETED ALL> and confirm by pressing [OK]
button
The entry is deleted with confirmed
message “DELETED”
D E L E T E D
26
5.2 Call list operation
[ ]
5.2.1 Opening the Call list by pressing
button
Display
When the Car Kit is idle and is connected with
a mobile phone
Press
[ ]
CONNE CTED
1 2 3 4 5
button to open the Call list
[ ]
Press [ ] /
button to scroll through the list
2 3 4 5 6 7
D I A L
Press [C] button to exit the Call list
L I S T
CONNE CTED
Press [C] button to exit
27
5.2.2 Opening the Call list through main menu
Display
Press [
CONNE CTED
] button to open the menu
[ ]
Press [ ] /
button to select item <CALL LIST>
and confirm by pressing [OK] button
C A L L
[ ]
Press [ ] /
button to scroll through the list
1 2 3 4 5 6
28
L I S T
5.2.3 Delete a Call list entry
Deleting a single entry
Display
Press
[ ]
1 2 3 4 5
button to open the Call list
[ ]
Press [ ] /
button to select the desired number
from the Call list
6 7 8 9 0
Press [OK] button
D E L E T E
E N T R Y
Press [ ] /
button to select the menu item
<DELETE ENTRY> and confirm by pressing
[OK] button
D E L E T E
E N T R Y
The entry is deleted with confirmed
message “DELETED”
D E L E T E D
[ ]
29
5.2.4 Delete all Call list entries
Display
Press
[ ]
1 2 3 4 5
button to open the Call list
D E L E T E
E N T R Y
Press [ ] /
button to select the menu item
<DELETE ALL> and confirm by pressing [OK]
button
D E L E T E
A L L
The entry is deleted with confirmed
message “DELETED”
D E L E T E D
Press [OK] button
[ ]
30
5.2.5 Copy the Call list entries to the phone book
Display
Press
[ ]
1 2 3 4 5
button to open the Call list
[ ]
Press [ ] /
button to select the desired number
from the Call list
6 7 8 9 0
Press [OK] button
D E L E T E
E N T R Y
[ ]
Press [ ] /
button to select the menu item
<COPY TO DIR> and confirm by pressing [OK]
button
Enter the name and confirm by pressing [OK] button
Modify the phone number and confirm by
C O P Y
T O
D I R
A B C
1 2 3 4 5
pressing [OK] button
The entry is saved with confirmed
message “ENTRY SAVED”
E N T R Y
31
S A V E D
5.3 Phone book operation
5.3.1 How to enter a phone book
Display
Press [
] button
Select “ PHONE BOOK ” and press [OK] button
Press [OK] button and select “ NEW ENTRY ”
P H O N E
NEW
B O O K
E N T R Y
Press [OK] button and enter the name
D a v i d
Press [OK] button and enter the number
8 5 2 2 1 9 1 8 8 9 9
Press [OK] button to confirm the entry
D a v i d
32
5.3.2 Opening the phone book by [OK] button
Display
When the unit is idle and is connected with
mobile phone
CONNE CTED
Open the phone book and press [OK] button
D a v i d
[ ]
Press [ ] /
button to scroll through the list
J o h n
Press [ ] button to switch between the name
and the telephone number
1 2 3 4 5 6
Press [OK] button to Add/Edit/Delete entry
NEW
PHONE
Press [C] button to exit phone book
33
E N T R Y
BOOK
5.3.3 Delete a phone book entry
Deleting a single entry
Display
Open the phone book and press [OK] button
D a v i d
[ ]
Press [ ] /
button to select the desired name
from the phone book
J o h n
NEW
Press [OK] button
E N T R Y
[ ]
Press [ ] /
button to select menu item
<DELETE ENTRY> and confirm by pressing [OK]
button
The entry is deleted with confirmed
message “DELETED”
D E L E T E
D E L E T E D
Warning: “DELETE ALL” will delete all phone book entries.
34
E N T R Y
5.4 Voice Recording/Playback function
5.4.1 Voice recording mode selection
Car kit provides two voice recording modes. Standard mode allows you to
make voice recording up to 60 min with good voice quality. High Quality
mode provides you a better voice recording quality up to 30 minutes.
Display
Press [
CONNE CTED
] button to open the menu
[ ]
Press [ ] /
button to select item
<RECORD MODE> and pressing [OK] button
Display shows current recording mode
[ ]
Press [ ] /
button to select the desired
recording mode and confirm by pressing [OK]
button
Display will show the recording mode selected
R E C O R D
MODE
S T A N DA R D
H I
Q U A L I T Y
HQ
S E L E C T E D
Remark: If user changes high quality mode to standard recording mode,
LCD will show “ STD SELECTED ” .
35
5.4.2 Voice Recording
Display
0 0 : 0 0 : 0 1
When the Car Kit is in use
0 0 : 0 0 : 0 1
Press [
] button to start recording
Press [
] button again to stop voice recording
When the call ends, the record message
will be saved
36
0 0 : 0 2 : 0 1
5.4.3 Playback voice message
Display
When the Car Kit is idle and is connected with
mobile phone
CONNE CTED
Press [
M E S S A G E :
1
Press “3” button for next message or “1” button
for previous message
M E S S A G E :
2
Press [ ] button and [OK] button to delete the
message
M E S S A G E :
2
Press [C] button to stop the playback
CONNE CTED
] button to start playback
37
5.5 System reset
The Car Kit provides a system reset feature, which will clear all contacts in the
phone book, call list, dial list and voice recording, and reset all volume levels
to the default level.
Display
When the Car Kit is idle and connected with
mobile phone
CONNE CTED
Press [
P H O N E
] button to access menu system
[ ]
B O O K
Press [ ] /
button and [OK] button to select
<SYSTEM RESET>
S Y S T E M
The Car Kit will ask you to confirm reset
the system
R E S E T
?
Press [OK] button to confirm and the Car Kit will
reset the system
R E S E T
OK
38
R E S E T
6 Package Contents
Accessories
Status
1 x Car charger
Provided
1 x External microphone
Provided
1 x Adjustable windshield stand
Provided
3 x Air suckers
Provided
1 x AC/DC Adaptor
Optional
Note:
BQB, CE and FCC approve d
The Bluetooth word mark and logos are owned by the Bluetooth SIG, Inc. and any
use of such marks by In-Tech Electronics Ltd. is under license. Other trademarks
and trade names are those of their respective owners.
39
Federal Communication Commission
Interference Statement
This equipment has been tested and found to comply with the limits for a Class B
digital device, pursuant to Part 15 of the FCC Rules. These limits are designed to
provide reasonable protection against harmful interference in a residential
installation. This equipment generates, uses and can radiate radio frequency
energy and, if not installed and used in accordance with the instructions, may cause
harmful interference to radio communications. However, there is no guarantee that
interference will not occur in a particular installation. If this equipment does cause
harmful interference to radio or television reception, which can be determined by
turning the equipment off and on, the user is encouraged to try to correct the
interference by one of the following measures:
- Reorient or relocate the receiving antenna.
- Increase the separation between the equipment and receiver.
- Connect the equipment into an outlet on a circuit different from that to which
receiver is connected.
- Consult the dealer or an experienced radio/TV technician for help.
the
This device complies with Part 15 of the FCC Rules. Operation is subject to the
following two conditions: (1) This device may not cause harmful interference, and
(2) this device must accept any interference received, including interference that
may cause undesired operation.
FCC Caution: Any changes or modifications not expressly approved by the party
responsible for compliance could void the user's authority to operate this
equipment.
40
IMPORTANT NOTE:
FCC Radiation Exposure Statement:
This equipment complies with FCC radiation exposure limits set forth for an
uncontrolled environment. This equipment should be installed and operated with
minimum distance 20cm between the radiator & your body.
This transmitter must not be co-located or operating in conjunction with any other
antenna or transmitter.
41