1
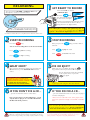
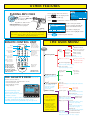
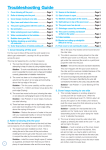
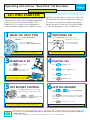
Operating Instructions: “Real Time” CD Recorders
All “Real Time” CD Recorder Models
GETTING STARTED!
We have found from experience that even though
we provide instructions for Coomber equipment,
they are rarely at hand when needed. This is
especially true in schools where equipment is
used by different people and in different rooms.
1
I
r
WHAT CDs CAN I PLAY
The 6100 series plays audio CDs CD-Rs and
CD-RW discs.
A Reference Manual for this model is available for download from our website at
www.coomber.co.uk (see Product Support and Operating Instructions). Software
upgrades, if developed, will be available free from our site under Product Support.
With this consideration in mind, our “Real Time”
CD Recorders have been designed for simplicity.
This quick start guide will help you get going,
though we feel that the best way to learn how
to use the equipment is to just fiddle with it!
2
D
pr
A
CD-R
le
re
e o rd a
or able
ec
C - W
r
Plug the CD Recorder into a wall socket
and switch the socket on.
It will also play MP3 files
stored on a CD or USB flash drive.
The CD Recorder will
start up automatically.
A CD-R is a recordable CD.
A CD-RW is a recordable and erasable CD.
3
INSERTING A CD
Press
on the keypad
to open the CD tray.
On startup, the CD recorder will detect
whether a CD has been left in the drive or not.
4
Press
again or push the
tray lightly to make it close.
You can also use the CD drive button
to open or close the tray. Neither
button works in play or record mode!
5
SWITCHING ON
THE ROTARY CONTROL
The rotary control adjusts the volume.
Volume settings show up in the display.
Press
or
buttons and
adjust them with the rotary control.
6
PLAYING CDs
Press
to play the CD.
Press
again to pause the CD.
Press
to stop the CD.
Press
to eject the CD.
GETTING AROUND
Press
or
keys to go back-wards
or forwards through the tracks.
Press
key and twist rotary control to scan
back or forth across a track -allowing you to cue up
any section.
Press
TIP: press the key a second time or leave the rotary control
for a few seconds to re-enable volume adjustment.
to cancel the cue mode.
TIP: Use CUE in PAUSE mode for greater playback control.
You can switch the unit into standby mode (where it powers down and consumes minimal electricity) by pressing the green
ON/STANDBY switch. Remember though, that it is still connected to the mains power supply and the red LED gives
an indication of this.
For safety always unplug the unit from the wall overnight or if not in use for long periods!
RECORDING
You can record to CD-R/RW or USB flash drive from
microphone, cassette or external sources*
1
GET READY TO RECORD
Insert a blank CD or connect
a USB flash drive.
Press the
until
the desired media appears
on the screen (shown right).
-R,
W
C
D
Connect a microphone into either mic socket
- or record from a Hi-fi, mixer or PA etc,
using the line in or digital sockets.
CD-R
You can record on a CD-R once only.
You can record and erase a CD-RW many times.
Phantom power may be enabled via the menu:- Record
options>Microphone settings>Turn phantom power on.
To record from a digital source, you must first select Record
options > Record from digital input from the menu.
* 90 minute recordable CDs are not compatible with our ‘Real Time’ CD Recorders.
2
START RECORDING
Press the
key.
3
You are now recording direct to the chosen media!
4
Press
to pause recording.
Press
to stop recording.
WHAT NEXT?
Once you have finished recording you can remove the
CD from the tray or the USB flash drive from the
socket.
5
STOP RECORDING
Once you press the
CD track.
key, you have made a
Press
to play the track.
Press
to record a new track.
FIX OR EJECT?
When you eject a recordable CD using the
key you’ll be asked if you want to fix or eject it.
Use the appropriate menu key (arrowed)
to select your choice or press the
key again.
IMPORTANT WARNING:
NEVER REMOVE A USB FLASH DRIVE WHILE
RECORDING OR ERASING. IT WILL CAUSE LOSS OF
INFORMATION AND MAY DAMAGE THE DRIVE!
ALSO: ENSURE THAT THE FLASH DRIVE IS
NOT “WRITE PROTECTED” WHEN RECORDING!
6
IF YOU DON’T FIX A CD...
...you can record more tracks at a later date...
but you can’t play it on other CD players - you’ll
only be able to play it on a Coomber ‘Real Time’
CD Recorder until you fix it.
Note: You will not be offered this choice
if you eject a CD using the drive door button!
7
IF YOU DO FIX A CD...
...you can’t add further tracks to it, but you can play it
on most* CD players!
*Note: CDs are read with a laser. Some players don’t
have lasers powerful enough to read CD-R or CD-RW
discs.
CD-RW discs can be erased. If you do fix a CD-RW you can
erase it at a later date. We have included an erase feature in
the menu should you wish to use it. Erasing a CD-RW will
mean that all information on the disc will be lost.
Important Note Always use good quality media for recording purposes (such
as TDK, Sony or Verbatim). Cheap media have a high failure rate and may
lead to users losing (or failing to successfully complete) valuable recordings.
This equipment was developed and tested using high quality media. We do
not accept any liability for recording failure caused by the use of poor
quality, scratched or dirty CDs or low quality USB flash drives.
OTHER FEATURES
PLAYING MP3 FILES
MP3 CD
Play, select tracks,
stop and eject MP3 CDs
like an ordinary CD.
Selects between
CD and USB
flash drives
GOTO
allows you to select
track numbers
greater than 9
LEVEL
1
2
3
4
5
6
7
8
9
GOTO
0
CUE
Recordable
Remaining 96:39
files
Press
Off (Stand-by)
unit can only be
switched on using
the keypad ON/OFF
key or at the mains
Manual Record Level
(when manual
record level has
been selected)
Up / Down
(as rotary control)
input
Use the soft keys below the
screen to navigate through the
folders and individual tracks.
folder
Press folder to display the
contents of the highlighted item.
to listen to your selection.
THE USER MENU
Record level mode
Automatic record level
Microphone
settings
Two microphone setup
2 mics are a stereo pair
Microphone
sensitivity
High sensitivity
Manual record level
MENU
Record options
2 mics are dual mono
Low sensitivity
Turn phantom power on
Select to turn phantom power on or off
Record to one disc only
Dual disc record mode
Track 21 would be
reached by pressing
GOTO, 2 and 1
Features found
on the remote
are the same as
on the keypad or
the menu, except
for those differences
indicated here.
files
to show the contents of the drive.
back
REMOTE CONTROL UNIT
A/B
Press
until the display shows
“Pen 1” and the USB logo.
COOMBER
DANCE CLUB
HISTORY FOLK SONGS
WAKE AND SHAKE
Audio/MP3 files and folders play in order of placement on
a flash drive. A selected track (file) will play, followed by
the next in the list. When all files have been played the
next folder is opened and played.
Record
Pen 1
Select
Play MP3 or audio from a
USB flash drive by locating and
selecting the file to be played.
Open / Close
Insert the flash drive into the slot.
Record to both discs
INTRO
SPEED
TREB
RAND
PROG
BASS
REP
MUTE
BAL
Continuous record
Record from digital input
Option not visible during recording.
Mute / Unmute
speakers and
headphones
Fade out recording
Option visible during recording.
Replacement
Part No. 1920
Repeat options
no repeat
Programme
repeat track
repeat disc
Playback options
THE CASSETTE DECK
6121 & 6131 only
Use the cassette deck to:• Record from CD, external source or mic
• Record cassette to CD
• Record CD to cassette
• Play cassettes
To prevent damage to the
cassette heads and door,
please ensure that the cassette
is loaded as shown.
The software recognises when a cassette is playing or
recording. Information will appear on the screen
indicating activities being undertaken by the tape deck.
options appear when a CD
with audio tracks has been
inserted.
Random
Intro
Erase†
& copy functions
Erase disc
Erase last track Option only available with LiteOn drives
erase functions are only
visible when a CD-RW
with audio tracks has
been inserted.
Copy disc
Other settings
Speaker options
Options in red are only
available on 6130/6131
models only.
Turn PA mode on
Select for public address via mic.
Disable keypad
Keypad & remote options
Disable keypad can only be
Disable remote
deselected by restarting the unit.
† Option appears when
a CD-RW is inserted.
Tick indicates default
selection at startup.
All options can be
cancelled via the menu
and default settings are
resumed on startup.
Copy or splice tracks
Copy tracks
Splice tracks
Display options
Mute speakers
Select to mute/unmute speakers.
Contrast
Select to adjust display contrast
using rotary control knob.
Invert
Select to invert the LCD image
from positive to negative.
Backlight Off
Select to switch off the backlight.
Show build information
Service Info
Shows information
Show drive information
about your Real Time
CD Recorder - useful info for advice or support.
RECORD OPTIONS
PLAYBACK OPTIONS
Record level mode
Repeat options
Automatic record level: Sound is monitored and record level
adjusted automatically for a reasonable result. (Default setting.)
Manual record level: User sets record level for optimum result.
No repeat: play a CD once only (default).
Repeat track: select and continually play one track.
Repeat disc: play entire CD continuously.
1. Select “Manual record level” from the menu.
Programme
2. Connect external mic(s) if required. Press RECORD.
Choose the order of tracks playing from CD.
! Manual Level
Setup
L&R level
meters
level
38
Adjust level with knob...
press "RECORD" when ready
L
R
programme mode
Level box
appears
when the
rotary control
is adjusted
X
X
Recent Record level
track
number
tens
Recording overload
warning indicators
Maximum Record level
3. The record levels can be adjusted using the rotary control.
Note: speakers are switched off while a mic recording is in
progress, but on when line inputs are being used. The volume
level adjusts with the record level.
4. Once set, press RECORD again and recording begins.
plays at
position
units
next
01
done
On selection the
programme screen
appears. Use the
“tens” or “units”
keys to select the
number of your
first track.
Press NEXT to add the next track and so on. When ready, press
DONE. Press PLAY to hear the selected programme.
Random mode
Plays all tracks on CD in a random fashion.
Intro mode
Plays five seconds of each CD track.
Note: Levels can be adjusted during recording by selecting
the LEVEL menu soft key and using the rotary controller.
Microphone Settings
Two microphone setup
2 mics are dual mono: Recording will be in mono regardless
of whether one or two mics are being used.
Note: All options can be cancelled via the menu.
Default settings are resumed on startup.
2 mics are a stereo pair: One mic records to the left channel,
the the other records to the right channel. (Default setting.)
Microphone Sensitivity
High sensitivity: Ideal for most conditions
including quiet recordings. (Default setting.)
Low sensitivity: Select if recordings
are overloaded or distorted.
Turn phantom power on
Some microphones require an external 48V power source
known as “phantom power”. This can be supplied via the XLR
microphone sockets. The default setting is OFF.
SAFETY
AND GENERAL
INFORMATION
Class 1 laser product: Warning - This equipment
is fitted with a LASER diode which can harm the
eyes. Do not attempt to disassemble the casing or use
any part of the contents for any purpose other than its
intended use. This equipment is a CLASS 1 Laser
Product - which means that it presents no danger if
used as intended (i.e. to play or record CDs).
Once selected, phantom power remains on until deselected or
the unit is switched off.
Headphones: For personal safety and listener
comfort turn volume down and connect headphones
into the equipment before placing them over ears. For
safety use only 600 ohm headphones (i.e Coomber
type 1929).
Record from digital input
Environments: The equipment should not be
Allows recording via the coaxial or optical digital connectors.
Option not visible in record mode.
exposed to dust, moisture, water, chlorine and other
corrosive substances in normal use or during storage.
It will cause damage to this equipment.
Swimming pool atmospheres: are very hostile to
Fade out recording
Recording ends with 5 second fade out when STOP is pressed.
Option only visible during recording.
Coomber Electronic Equipment Ltd.
Brindley Road, Warndon, Worcester, WR4 9FB, U.K.
Tel: 0044 (0)1905 342070
web: www.coomber.co.uk
Fax: 0044 (0)1905 759170
e-mail: [email protected]
All Coomber equipment is covered by a 12 months warranty against
defective components or faulty manufacture from date of dispatch.
Any modifications to or misuse of the equipment renders this warranty void.
Equipment that is security marked or damaged cannot
under any circumstances be exchanged.
Coomber reserve the right to change products and specifications without notice.
GH INSTR 6100 v1.3 06/07/2009
© Coomber Electronic Equipment Ltd. 2009
v1.0 first published 2007
all electro-mechanical equipment (e.g. steel rusts and
rubber perishes). Equipment returned for repairs
showing evidence of use in adverse environments may,
at our discretion, be charged for (even during the 12
month warranty period).
• Do not cover the ventilation openings with any
items (e.g. newspaper, fabrics etc.)
• Naked flames, such as lighted candles, should not
be placed on or near the apparatus.
• The apparatus should not be exposed to dripping or
splashing. No objects filled with liquids, such as
vases, should be placed on or near the apparatus.
European Safety Standard: All Coomber
equipment complies with EN60065. Any local
requirements for use of this equipment should be taken
into account.
Copyright and recordings: Recordings protected
by copyright have copying restrictions placed upon
them. If in doubt about your right to copy such material,
contact the copyright holder for permission.
Class I construction:
This equipment must be EARTHED.
Mains Voltage UK & EEC: nominal 230V 50Hz
USA:110-120V 60Hz
UK & EEC Mains Cord: Line=Brown, Neutral=Blue,
Earth=Yellow & Green. Fitted with either 13A UK or
Semko moulded plug.
USA Mains Cord: Line=Black, Neutral=White,
Earth=Green. Fitted with moulded USA plug.
Isolate from mains supply when not in use by
removing the plug from the wall socket.
Mains Plug: The mains cable fitted to this equipment
is already provided with a moulded plug. If another plug
type is required, follow instructions from the plug
manufacturer, or seek advice from a qualified person.
DISPOSE OF ORIGINAL PLUG SAFELY, REMOVING ANY
FUSES, where fitted. DO NOT RE-USE.
Mains Plug fuse rating: 3Amp to BS1362 (applicable
in UK)
Connecting to the mains supply:
The unit must be connected to a socket outlet with a
protective earthing connection.
The mains plug must be accessible at all times.
Model type and rating information is located
on a label on the base of the product.
Additional Technical Information: If you require
any further help or information, or if any point is not
clear, then please telephone 01905 25168 quoting your
model number and serial number (located on a label on
the base of the product). Our Technical Department will
be pleased to help you.
Note: This equipment contains no user serviceable
parts and should only be disassembled and
reassembled by competent qualified personnel.
Dismantling will render the warranty void.
Electrical Safety Testing:
• Safety testing and servicing should only be carried
out by competent qualified personnel.
• When undertaking an earth bond safety test, only
use the externally exposed metalwork. Do not test
against internal metal components found inside
tape mechanisms or CD trays - THIS WILL LEAD
TO IRREPARABLE INTERNAL DAMAGE.
• The supply cable is part of a special assembly. If
damaged the equipment should be returned to
Coomber Electronic Equipment Limited or their
agent for cable replacement.