1
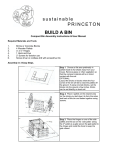
Table of Contents Parts 2 Assembling your WormBox 3 Getting Started Preparing the Bedding Adding the Worms 4 5 Managing the WormBox 6 Harvesting 8 Additional Helpful Information 8 Feeding the Worms 10 What it…. 11 Conclusion 11 Thank you for buying a Soilsouls WormBox! Vermicomposting contributes to a healthier environment for all living organisms. Using worm castings in gardening has been shown to boost the immune system of plants by helping them to become stronger and more disease resistant. We in turn benefit by eating food grown in soil enriched with worm castings; our immune systems are strengthened and our ability to fight disease increases. 1 WormBox Parts (Built from the bottom up) a. Pedestal Base (tray with 4 legs) b. Base Tray (with one hole in one side wall) c. Liquid Collection Tray (with one hole on one side) d. e. Two 60 cm X 60 cm white “weed barrier” cloths Worm Trays (3-5 depending on model purchased.) f. Roof (with small vent holes on two sides) g. Faucet and Bolts Packet (may be included as part of Faucet Package) i. j. 2 bags of Coconut Coir for initial bedding Instruction Manual 2 Assembling your WormBox 1. Put Pedestal Base down on floor, on its’ legs (un-cut side towards the back). 2. Align Base Tray on top of Pedestal Base. The faucet hole should face forward. The grids should align. 3. Attach Base Tray to Pedestal Base - Insert two bolts (one in each of two opposite corners) from the top down through the Base Tray into Pedestal Base through aligning holes (preferably a few squares from the corner) of the mesh bottom. Check that the Base trays are perfectly aligned. 4. Attach wing nuts onto bottom of bolts under the Pedestal Base and tighten until secure but not too tight. 5. Lay Liquid Collection Tray inside Base Tray, aligning the faucet holes. 6. Insert a white rubber washer onto the faucet and then insert the faucet into the hole of the Base Tray. Once inserted, put the second washer on the faucet on the inside of the Liquid Collection Tray. 7. Now screw the plastic nut onto end of the faucet end on the inside of the Liquid Collection Tray. 3 8. Place some water into the Liquid Collection Tray in order to check that it is not leaking. If it leaks, check the placement of the faucet and nut. If it does not leak, empty the Liquid Collection Tray again. 9. OPTIONAL: Lay a 60 cm X 60 cm “weed barrier” cloth or any drainable cloth on top of the Liquid Collection Tray. This will prevent worms and the worm bedding from falling into and clogging the Liquid Collection Tray. Keep the “weed barrier” fabric between the Liquid Collection Tray and the first tray. The other weed barrier cloth can be placed between the Roof and the top tray to prevent worms from climbing onto the lid if it bothers you. Worms do travel a bit - especially in pitch darkness. This is not a problem as they do travel back. The only problem is that worms cannot swim - if the Liquid Collection Tray is not emptied often. 10. Now stack all the trays on top of the Liquid Collection Tray. Keep the empty trays on top of the filled trays or put them aside for later use. 11. The Roof goes on top. The tallest part of the Roof could face the wind in either of four directions. The wind will flow over the roof and increase the ventilation through the holes of the Roof. Getting Started Preparing the bedding A. Presoak the coconut coir – use at least one and a half of the bags (the rest can be kept for future use as drying agent or extra bedding). Scoop the coconut fiber out of the bucket in handfuls, squeezing out 4 excess moisture so that the coir / worm bedding is damp, not dripping wet. B. Mix a handful of any type of organic compost with the coconut coir to seed the bedding with the microorganisms that breaks down the organic material. Usually your worms will already be packed in some compost so this is optional. You can even take decayed leaf litter from your garden. Then mix in some food scraps (see page for food types). Your WormBox is now ready for the worms to arrive. You can even wait a few days for the food to start breaking down. Adding the worms C. Usually worms are sold separately. It is important that you buy the red wiggler (Eisenia Foetida). D. Add the worms by digging a hole in the centre of the bottom tray’s bedding. Bedding MUST be damp enough. Gently add the worms with the bedding they arrived in. E. You can now add the lid with or without the other trays. All the initial matter in your WormBox is a food source for the worms including coconut coir! Allow time for the worms to consume and process the bedding. You can jump start your worm bin by buying a larger quantity of worms. A good start will be 500 worms (about 125g) but if you add 1,000 worms your WormBox will get a good jumpstart. A WormBox can accommodate up to 4.5 kg of worms. The worms will take a few weeks to settle in. Initially place the WormBox in an area with a light on during night-time (2 nights or so). This will encourage them to settle in. They might be disorientated after travelling and this will prevent them from crawling out in dark, wet conditions. Worms do not like to be disturbed. You can lift the trays to look and monitor the rate of composting but try not to disturb them too much – they are trying to eat and socialize! Managing the WormBox 5 After a few days please check if the worms are happy! If they crawl around and are happy you may add some more food. Whenever your first tray is filled up, you may add the second tray. Scrape a handful of the compost/bedding from the lower tray and place it into the second tray making sure that the top of the bedding in the lower tray comes in complete contact with the bottom of the second tray - we will call this second tray the new Active Tray. Only add new trays to the top of the stack of trays. Only add food to the Active Tray (the top tray). It is ideal to mix the new food with some of the bedding/compost and add it to your tray (bury the food). It is recommended that you place the food waste under moist paper or newspaper or composted materials. This will prevent the “attack of the fruit-flies”! You may now add the lid with or without the remaining trays. The worms will migrate upward into the next tray in search of food after they have composted the bedding they are in. They can re-eat their bedding and previous food sources for a while but red wigglers will die if there is no more food to compost. Worms consume their weight in food each day however it is difficult to say the worms will eat their weight each day of freshly added food. When the second tray is full you may start adding food to another tray. Again, the bedding in the lower tray must come in contact with the bottom of the next tray. You can see the transmutation of food as the worms consume the food. DO NOT be tempted to add food waste into the shrinking bottom trays again. As the bottom trays decompose it shrinks but you will disrupt the layered process if you add food into the bottom trays again. We suggest cleaning out the Liquid Collection Tray occasionally. Spray off with a hose or rinse. 6 Worm Tea and the collection tray: it usually takes a month or 2 for the nutrient-rich fluid, also called leachate, to accumulate in the bottom collection tray. The tempo depends on the surrounding humidity, climate and the type & form of food. The liquid can be drained at any time but preferably as soon as possible. The vital microorganisms die if they are not fed or get oxygen. If, for some reason, your WormBox was not in a healthy condition it would be better to pour the leachate down the drain – this is an ideal drain cleaner and you are not exposing your plants to extreme conditions. Alternatively, if you want “worm tea” simply fill up a cup of well processed castings from a lower tray and steep in a 3 ½ liters of water overnight and use the worm tea within 12 hours to water plants. Before applying worm tea to your plants, add some oxygen by pouring it into another bucket. Adding oxygen in this manner also takes away possible foul smells. You can use it in full strength but dilution can take you further and is recommended. There really is no recipe but we use 1:50. The worm tea can also be recycled into the WormBox if it requires some moisture. The bedding must be moist, not soaking wet. Condensation produced from decomposition provides enough moisture for your system. The roof was also designed to create an eco friendly habitat. Excess moisture usually drains into the Liquid Collection tray. Do not leave your WormBox in direct rain. If your WormBox is too dry: do not pour water over your bedding. If it is really very dry you may add wet shredded corrugated cardboard/newspaper or use a fine water-sprayer. If your bedding is too wet, simply add more coconut coir or dry shredded newspaper/corrugated cardboard. The roof can be completely removed and set aside to reduce moisture if needed – it is ideal to use the weed cloth over the top tray if the roof is removed. The liquid can be used as long as you don't leave it in the container too long. If the worm tea has an offensive odor, don't use it until you have poured it from one container to another several times to promote aerobic bacteria growth or you can use an aquarium air pump to aerate it. When going on holiday you may leave the faucet open continuously and keep a small container under it. 7 The bottom weed cloth /collection tray will become full of fine black vermin-castings. You can add it to some water and use. Or you can add it to the bottom tray for later use. Worm should not fall into the collection tray because of the weed cloth. But if it happens you may gather them with a piece of paper or grass and add them back into any tray. They can climb back themselves but they cannot swim! Harvesting The food material in the trays will naturally settle and condense as the worms compost it. The bottom tray will become dark (nearly black), rich and fine. The ph will be 6.5. It will be filled with broken down organic matter, worms, worm eggs, worm castings and other organisms. Then it is ready to use. There is no specific stage in which you must empty the bottom tray. From here-on we will call this bottom tray the new Ready tray. There will always be some worms left in the Ready Tray. Take the Ready Tray out of the system and put it on top of the Active tray. Let it dry out for a while (put it in a direct light or sunlight for faster action!). Stir it carefully several times a day. The worms will crawl into the cool and moist conditions of the Active Tray. You can also add some cow manure to the Active Tray to entice them to move out of your Ready Tray. Tip the compost out and use it! Wash the Ready Tray and it will become your next Active Tray when the current one becomes full. Or you could just scrape off and use the top compost until you come across worms. Let it stand and settle again while the worms flee even further down. Follow this process until this Ready tray is empty. Additional Helpful Information A. Worms must never dry out – they need moisture. B. Do not over-feed the worms initially. They start up in only food! Be patient and only add food when the worms actively start to work on the food you recently added. This takes time as the worms multiply. C. The red wigglers are topsoil worms – compost makers not tunnel diggers. Their chance of survival is much lower than other 8 earthworms (although they multiply faster too!). They thrive in temperatures between 15’C and 27’C. Outside this range they will slow down or move back to the lower trays. They may even die in freezing conditions. During temperature extremes, add more coconut coir/ newspaper/cardboard to dry out the worm bedding. The dry bedding will act as insulation to protect the worms and they use it for bedding when they are not eating. It is recommended to find a cool shady spot in summer and bring them indoors in winter or put an insulated carpet over them. D. Good ventilation is very important. Our lid is specifically designed to aid with this. But it is important to keep your WormBox in a well ventilated area. E. Plastic perishes quicker in the sun, especially recycled plastic like our product. The container must never stand in direct sunlight. Avoid direct sunlight and direct rain. F. Regular checks are important, maybe once a week. If water runs out of the bedding when you squeeze it, it is too wet. Add dry leaves or bedding. It is too dry if parts are not moist – this might happen in windy conditions. G. Do not stack your WormBox too high as you might compact the bottom tray too much. H. BEWARE of poisons and ANTS – especially during spring and summer!! Your bin is especially prone to ant attacks if the moisture level drops. In order to prevent an ant take-over: - put the WormBox’s feet in bowls of water (some people use oil although this is no longer fun) - put a ring of Vaseline around your WormBox - use some type of ant trap that will attract them first. But if mother queen moves in you may start over…she is the new boss in town! I. There are other creatures in your WormBox. They include spring tails, mites, white pot worms and mould. But that is perfectly normal as long as none of their numbers become too excessive. They all help the worms! J. If you are into growing worms for fishing, fill up all of your trays so you can easily harvest worms by simply lifting each tray. When you lift a tray, you see the worms in transit and they will hang from the bottom of the tray. 9 Feeding the Worms Please remember you (and your worm buddies) are creating a product that will become a nutrient for your own plants and garden. Consider what you put into the WormBox because it may end up on your dinner table in the form of vegetables and fruit from your garden. Even though worms can transmute chemicals into safe useable garden soil amendments (which plants cannot absorb), chemicals like ink take longer to breakdown. They basically eat all organic materials but they hate “the COPs” – Citrus, Onion, Pineapple! Also not use fresh grass clippings as it can heat up your WormBox too much. Decompose it first. Acceptable foods are: fruit rinds, cores and peels, grains, vegetative matter and egg shells. They like materials high in cellulose such as sawdust, leaves, paper and cardboard. Coffee grinds and teabags are excellent food. Try not to change their diet too often as it reduces their productivity. Food will be eaten faster if it is softer and smaller, i.e. chop it up. But keep in mind that something must SUIT YOUR LIFESTYLE in order to change your lifestyle. Root plant like potatoes take longer to break down and might even grow in your bin. The process can be aided by freezing it or putting it in the microwave or freezer for a few seconds. Or chop it up. Unacceptable foods are: cooking oils, meat, cheese, butter, animal products, cat and dog pooh, fish, and paper with colored inks. Color ink contains heavy metals. Also avoid flavorings or spices. Avoid food with yeast like bread and pasta. You can use a plastic container with a tight lid in your refrigerator to accumulate scraps for your worms. This refrigerated container keeps the scraps from drying out, smelling up your kitchen or rotting too fast before you use them for worm food. Worms should be fed about once a week. It is better to give them small amounts of food on a weekly basis. The amount of food depends on the amount of worms, how active they are, what stage in their lifecycle they are, outside temperature, type of food, if food was cut up, etc. The worms will show you when they are ready for more food. The best way to judge the amount of food to add is to see how much un-eaten food is left (if there is) at the end of the week. 10 What if… It starts smelling: overfeeding or too wet. Try stirring now and again to bring oxygen in. Stop feeding and add dry bedding. Worms start crawling out – even over day: They are definitely unhappy, stressed or unfamiliar with the circumstances. Check all the conditions, eg. temperature, oxygen and moisture levels. MONITOR CAREFULLY. Too many pot worms: your WormBox is too acidic - add two tablespoons of garden lime into the top layer of the bedding and scraps of the top tray for pH balance. Garden lime is safe. Do not use hydrated lime or slaked lime. The wrong kind of lime will kill worms! Crushed eggshells, rock dust or crushed see-shells are great! You go on holiday: add a large amount of shredded newspaper / cardboard or straw to the top tray. This will maintain moisture, ph, temperature and provide feeding. You can also cut a butternut in half and put the two halves face-down in the Active Tray. The worms will do fine without food for up to a month, even 6 weeks if the worms are not too many. Leave the faucet open with a bucket underneath to prevent an overflow of worm-tea and drowning of worms. And put your WormBox somewhere where ants will not be a hazard. Fruit flies: add shredded leaves or other bedding to block their way to the fruit wastes. Put a layer of shredded newspaper on top of the bedding and fruit waste. Bury the fruit when adding it. All the worms died: If, for some natural reason, all the worms died try restoring the conditions for worm breeding. The eggs might hatch again. This will not apply if there are poisons in the compost. Conclusion Your well-managed WormBox should only smell like fresh garden soil! Worms are our friends. Be patient and the reward will be beneficial to your own body as well as to the planet we live on. 11