1
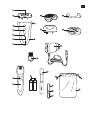
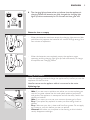
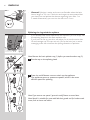
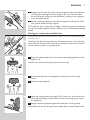
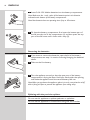
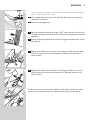
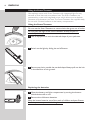
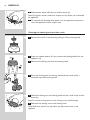
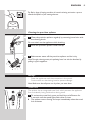
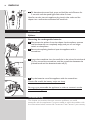
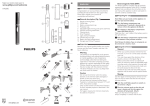
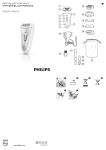
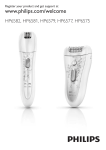
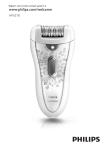
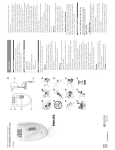
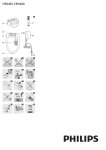
HP6581
User manual
1
4
English
Introduction
Congratulations on your purchase and welcome to Philips!
To fully benefit from the support that Philips offers, register
your product at www.philips.com/welcome.
General description (Fig. 1)
1 Epilating discs
2 Epilating head
3Opti-Light
4 On/off button
-- Press once for speed II
-- Press twice for speed I
5 Light for speed I
6 Light for speed II
7 Charging light
8Epilator
9 Release button
10 Trimming comb
11 Shaving head
12 Basic epilation cap
13 Active hair-lift and massage cap
14Adapter
15 Cleaning brush
16 On/off slide
17 Precision epilator
18 Disposable non-rechargeable batteries
19 Storage case of Smart Tweezers
20 Smart Tweezers
21 Light of Smart Tweezers
22 On/off slide for light
23Pouch
Preparing for use
Charging
-- Charging the epilator takes approx. 1 hour. When the epilator is fully
charged, it has a cordless operating time of up to 40 minutes.
1Connect the small plug to the appliance (1) and the mains plug to the
wall socket (2).
English
,, The charging light pulsates white to indicate that the appliance is
charging. When the batteries are fully charged, the charging light
lights up white continuously for 20 minutes and then goes out.
Batteries low or empty
-- When the batteries are almost empty, the charging light starts to flash
red. When this happens, the batteries still contain enough energy for a
few minutes of operation.
-- When the batteries are completely empty, the appliance stops
operating and the charging light lights up red continuously. To charge
the epilator, see ‘Charging’ above.
Using the epilator
Clean the epilating head and charge the appliance fully before you use the
appliance for the first time.
Note:You cannot use the appliance while it is connected to the mains.
Epilating tips
-- Wet: If you are new to epilation, we advise you to start epilating on
wet skin, as water relaxes the skin and makes epilation less painful
and gentler. The appliance is waterproof and can be safely used in the
shower or bathtub.
-- Wet: If you want, you can use your common shower gel or foam.
-- Dry: If you epilate dry, epilation is easier just after taking a bath or
shower.
-- Dry: Make sure your skin is clean and free from grease. Do not apply
any cream to your skin before you start to epilate.
-- General: We advise you to epilate in the evening, as skin irritation
usually disappears overnight.
5
6
English
-- General: Epilation is easier and more comfortable when the hairs
have a length of 3-4 mm. If the hairs are longer, we recommend that
you shave first and epilate the shorter regrowing hairs after 1 or
2 weeks. Alternatively, you can trim the hairs to 3-4 mm.
Epilating the legs with the epilator
-- If you already have some experience with epilation, you can simply use
the epilating head with the basic epilation cap.
-- If your hairs lie flat on your skin, we advise you to use the active hairlift and massage cap. This cap not only lifts up the hairs but its active
massaging roller also minimises the pulling sensation of epilation.
Note: Remove the basic epilation cap (1) before you attach another cap (2).
1Put the cap on the epilating head.
2Press the on/off button once to switch on the appliance.
,, The appliance starts to operate at speed II, which is the most
efficient speed for epilating.
Note: If you want to use speed I, press the on/off button a second time.
Note: Speed I is suitable for areas with little hair growth and for hard-to-reach
areas, such as knees and ankles.
English
7
3Stretch the skin with your free hand to make the hairs stand upright
(1). Place the epilating head at an angle of 90° onto the skin with
the on/off button pointing in the direction in which you are going to
move the appliance (2).
4Slowly move the appliance over the skin against the direction of the
hair growth while pressing it lightly.
Tip:To relax the skin, we advise you to apply a moisturising cream immediately
or a few hours after epilation. For the underarms, use a mild deodorant without
alcohol.
Shaving the underarms and bikini line
Use the shaving head to shave sensitive areas, such as the underarms and
the bikini line.
Note:To get the best shaving results, use the shaving head on a dry skin. If you
want to use the shaving head in the bath or shower, we advise you to use your
common shower gel for a more gentle shave.
1Press the release button (1) and remove the epilating head from the
epilator (2).
Note:You can remove the shaving head in the same way.
2Put the shaving head on the appliance and press it until it snaps
home.
3Switch on the appliance.
4Place the shaving head at an angle of 90° onto your skin with the on/
off button pointing in the direction in which you are going to move
the appliance.
5Slowly move the appliance against the direction of hair growth.
Note: Make sure that the shaving head is always fully in contact with the skin.
8
English
6Shave your bikini line as shown in the figure. Stretch the skin with
your free hand and move the appliance in different directions.
7Shave your underarms as shown in the figure. Move the appliance in
different directions and raise your arm to stretch the skin.
Note:When you use shaving foam or gel, clean the shaving head during and
after each use with water to ensure optimum performance.
8When you have finished shaving, switch off the appliance and clean
the shaving head according to the instructions in chapter ‘Cleaning
and maintenance’.
9Put the trimming comb on the shaving head when you store the
appliance.
Trimming with the comb
Use the shaving head with the comb attached to trim your hairs in the
bikini line to a length of 3 mm. You can also use the comb to pretrim long
hairs (longer than 10 mm) on the underarms or legs.
1Press the release button (1) and remove the epilating head from the
epilator (2).
2Put the shaving head on the appliance and press it until it snaps
home.
English
9
3Put the comb on the shaving head.
4Follow steps 3 to 8 in section ‘Shaving the underarms and bikini line’.
Overheat protection
This function helps to prevent overheating of the appliance.
Note:To avoid overheating of the appliance, do not press it too hard onto
your skin.The appliance works best when you move it over your skin without
excessive pressure.
If the overheat protection is activated, the appliance switches off
automatically and the charging light and the speed lights flash red for
30 seconds.
You can deactivate the overheat protection by letting the appliance cool
down and then switch it on again.
Note: If the charging light flashes red again, the appliance has not yet cooled
down completely.
Overload protection
If you press the epilating head onto your skin too hard or when the
epilating discs of the epilating head get blocked (e.g. by clothes), the
appliance switches off automatically and the speed lights flash red for
5 seconds.
1Turn the epilating discs with your thumb until you can remove
whatever blocks the epilating discs.
Using the precision epilator
Inserting/changing the batteries
1Remove the lid of the battery compartment by pressing the snap
hooks.
10
English
2Insert 2 AA 1.5V alkaline batteries into the battery compartment.
Note: Make sure the + and - poles of the batteries point in the direction
indicated at the bottom of the battery compartment.
Note: New batteries have an operating time of up to 40 minutes.
3To close the battery compartment, first insert the bottom part of
the lid into the rim of the compartment (1) and then press the top
part of the lid home until it locks with a snap (2).
Removing the batteries
1If you want to remove the batteries, open the lid of the battery
compartment, see step 1 in section ‘Inserting/changing the batteries’
above.
2Take out the first battery.
3Turn the appliance around, so that the open part of the battery
compartment is facing the floor. Hold your hand under the opening
and shake the appliance until the second battery falls out.
Note:When you put down the appliance, place it in such a way that the on/off
slide is facing the floor to prevent the appliance from rolling away.
Epilating with the precision epilator
Do not use this appliance to epilate eyebrows or eyelashes.
Do not use this appliance to remove hairs that grow out of moles.
English
11
-- Use the precision epilator to epilate the underarms, the bikini line and
hard-to-reach areas, wet or dry.
1Thoroughly clean the area to be epilated. Remove any residues of
deodorant, cream etc.
2Switch on the appliance.
3Place the epilating head at an angle of 90° onto the skin with the on/
off slide pointing in the direction in which you are going to move the
appliance.
4Slowly move the appliance over the skin, against the direction of the
hair growth.
5Epilate your bikini line as shown in the figure. Stretch the skin with
your free hand and move the appliance in different directions to
catch all hairs.
6Epilate your underarms as shown in the figure. Raise your arms to
stretch the skin and move the appliance in different directions to
catch all hairs.
Tip: If you want to use the precision epilator in the bath or shower, we advise
you to use a small amount of your common shower gel for better gliding.
12
English
Using the Smart Tweezers
Your epilator comes with Smart Tweezers with integrated light for easy
removal of facial hair, such as eyebrow hairs. The Smart Tweezers are
protected by a case with integrated mirror which allows you to depilate
wherever and whenever you want. The Smart Tweezers are supplied ready
for use with 3 button batteries in the battery compartment.
Using the Smart Tweezers
Do not use the Smart Tweezers to remove hairs that grow out of moles.
Do not point the light of the Smart Tweezers directly at your or
somebody else’s eyes.
1Use an eye pencil to mark the desired shape of your eyebrows.
2Switch on the light by sliding the on/off button.
3Remove any hairs outside the marked shape. Always pull out the hair
in the direction of hair growth.
Replacing the batteries
1Open the battery and light compartment by turning the bottom
anticlockwise with a coin.
2Remove the old button batteries.
Keep the button batteries out of the reach of children and pets. Button
batteries present a potential choking hazard.
English
13
3Insert the new button batteries with the negative side pointing
forward into the battery and light compartment.
Note:The Smart Tweezers work on three alkaline button batteries, type L736H
or AG3 (dia. 7.8 x 3.4 mm).
4Screw the bottom back onto the battery and light compartment by
turning it clockwise with a coin.
Cleaning and maintenance
Never use scouring pads, abrasive cleaning agents or aggressive liquids
such as petrol or acetone to clean the appliance.
Always keep the adapter dry. Never rinse it under the tap or immerse it
in water. If necessary, clean the adapter with the cleaning brush or a dry
cloth.
Cleaning the epilator and attachments
Clean the epilating head after each wet use to ensure optimum
performance.
Always switch off the appliance before you clean it.
1Switch off the appliance.
2Remove the cap from the epilating head.
3Press the release button (1) and remove the epilating head from the
appliance (2).
Note: Never try to detach the epilating discs from the epilating head.
4Remove loose hairs with the cleaning brush.
5Rinse all parts (epilator, epilating head and caps) under a lukewarm
tap while turning them.
14
English
6Shake excess water off the parts and let them dry.
Note: For hygienic reasons, make sure all parts are dry before you reassemble
the appliance.
7To reattach the epilating head, place it on the appliance and press it
onto the appliance until it snaps home.
Cleaning the shaving head and the comb
1Remove the comb, if attached, by pulling it off the shaving head.
2Press the release button (1) and remove the shaving head from the
appliance (2).
3Remove the shaving unit from the shaving head.
4Rinse the shaving unit, the shaving head and the comb under a
lukewarm tap while turning them.
5Shake the shaving unit, the shaving head and the comb firmly and let
them dry.
Note: Do not exert any pressure on the shaving unit to avoid damage.
6Reattach the shaving unit to the shaving head.
Note: Make sure all parts are dry before you place them back on the
appliance.
English
Tip: Rub a drop of sewing machine oil onto the shaving unit twice a year to
extend the lifetime of the cutting element.
Cleaning the precision epilator
1Clean the precision epilator regularly by removing loose hairs with
the cleaning brush.
Do not switch on the appliance while brushing.
2Rinse the precision epilator under the tap.
3Shake excess water off the precision epilator and let it dry.
Note:To make cleaning easier, the epilating head can also be detached by
pulling it off the appliance.
Storage
-- Store the appliances and the accessories in the pouch.
-- Put the comb on the shaving head to prevent damage.
Note: Make sure that all parts are dry when you store them.
Travel lock
The epilator has an integrated travel lock which prevents the appliance
from accidentally being switched on during travel.
1To activate the travel lock, press and hold the on/off button for
3 seconds until the speed lights flash white 2 times.
,, The epilator starts running and stops immediately when the travel
lock activates.
15
16
English
2To deactivate the travel lock, press and hold the on/off button for
3 seconds until the speed lights flash white 2 times.
Note:You can also insert the appliance plug into the inlet socket and the
adapter into a wall socket to deactivate the travel lock.
Environment
Epilator
Removing the rechargeable batteries
1Disconnect the epilator from the adapter. Let the epilator operate
until the batteries are completely empty and you can no longer
switch on the epilator.
2Remove the epilating head and open the appliance with a
screwdriver.
3Insert the screwdriver into the small slot in the printed circuit board
(1). Turn around the screwdriver until the connection between the
printed board and the batteries breaks off (2).
4Pry the batteries out of the appliance with the screwdriver.
Caution: Be careful, the battery strips are sharp.
Do not try to reassemble the appliance in order to connect it to the
mains. This is dangerous.
Troubleshooting
This chapter summarises the most common problems you could
encounter with the appliances. If you are unable to solve the problem with
the information below, contact the Consumer Care Centre in your country.
English
17
Problem
Possible cause
Solution
The epilator does
not work.
The socket used
to charge the
epilator does not
work.
Make sure the socket you use to charge the epilator is live.
The charging light goes on to indicate that the epilator
is charging. If you connect the epilator to a socket in a
bathroom cabinet, you may need to switch on the light in the
bathroom to make sure the socket is live.
The rechargeable
batteries are
empty.
When the charging light lights up red continuously, the
batteries are empty and you need to charge the epilator for
approx. 1 hour. Note: You have to charge the epilator fully
before first use.
The travel lock is
active.
To deactivate the travel lock, press and hold the on/off button
for 3 seconds until the speed lights flash white 2 times. You
can also connect the epilator to the mains with the adapter
to deactivate the travel lock.
The overheat
During use, the
protection has
epilator becomes
been activated.
hot and suddenly
stops operating.
Then the speed
lights and the
charging light flash
red for 30 seconds.
The epilator is equipped with integrated overhead protection,
which prevents the epilator from becoming too hot. If the
overheat protection is activated, the appliance switches off
automatically. Then the speed lights and the charging light
flash red for 30 seconds. To reset the overheat protection, let
the epilator cool down and then switch it on again. To avoid
overheating of the epilator, do not press the epilator too hard
onto your skin.
During use, the
epilator suddenly
stops operating.
Then the speed
lights flash red for
5 seconds.
The overload
protection has
been activated.
If you press the epilating head too hard onto your skin or
when the rotating discs of the epilating head get blocked (for
instance because a piece of clothing has got stuck between
the epilating discs), the epilator switches off automatically.
Then the speed lights flash red for 5 seconds. Turn the
epilating discs with your thumb until you can remove
whatever is blocking the epilating discs. Then switch on the
epilator again.
My skin is irritated
after shaving or
trimming.
You move the
shaver (with or
without trimming
comb) in the
wrong direction
or you press too
hard.
Slight skin irritation like red skin may occur. This is normal.
To avoid irritated skin, make sure the shaving head (with or
without trimming comb) is always in full contact with the skin
and that you gently move the appliance against the direction
of hair growth.
Do not apply too much pressure during shaving and
trimming, as this may cause skin irritation.
Check if the shaving head or the trimming comb is broken.
Always replace damaged or broken parts with original Philips
parts.
18
English
Problem
Possible cause
Solution
The precision
epilator does not
work.
The disposable
batteries are
empty or have
been inserted
incorrectly.
Replace the batteries or insert them correctly (see chapter
‘Using the precision epilator’).
The precision
epilator is
operating, but its
performance is
poor.
After 40 minutes,
the disposable
batteries are
almost empty and
no longer have
enough power to
guarantee good
performance.
Insert new batteries (see chapter ‘Using the precision
epilator’). Only use disposable non-rechargeable AA 1.5V
alkaline batteries.