1
Knit Visualizer 2.1 Manual
Page 1 of 75
User Manual
Presented by
The Knit Foundry: building better tools for knitters
http://www.knitfoundry.com
Copyright 2005 -2009 © The Knit Foundry
http://www.knitfoundry.com
Knit Visualizer 2.1 Manual
Page 2 of 75
WHAT IS KNIT VISUALIZER?...............................................................................................................................5
HOW TO READ THIS MANUAL.............................................................................................................................5
IMPORTANT NOTE ON READING-THE-MANUAL-EVEN-IF-YOU-DON'T-WANT-TO ....................................................5
INSTALLATION.........................................................................................................................................................6
WINDOWS VISTA: DOWNLOAD AND CD.....................................................................................................................6
WINDOWS XP: DOWNLOAD AND CD..........................................................................................................................6
Important Installation Steps ..................................................................................................................................7
MAC OS X
...........................................................................................................................................................9
Install Knit Visualizer on Macintosh: Download ..................................................................................................9
Install Knit Visualizer on Macintosh: CD .............................................................................................................9
Creating a file association for .kvc files ..............................................................................................................10
RUNNING THE PROGRAM...................................................................................................................................10
WINDOWS XP...........................................................................................................................................................10
MAC OS X................................................................................................................................................................10
UNINSTALLING KNIT VISUALIZER .................................................................................................................10
CHANGE HISTORY ................................................................................................................................................11
CONVERTING FROM VERSION 1.X TO VERSION 2.X ..................................................................................13
LEARNING THE MAIN WINDOW .......................................................................................................................15
MENUS & TOOLBAR BUTTONS..........................................................................................................................16
KNIT VISUALIZER MENU – ABOUT KNIT VISUALIZER ........................................................................................16
KNIT VISUALIZER MENU – PREFERENCES...........................................................................................................16
KNIT VISUALIZER MENU – QUIT KNIT VISUALIZER ............................................................................................16
FILE MENU –
NEW CHART ..................................................................................................................................16
FILE MENU –
OPEN… ........................................................................................................................................17
FILE MENU – OPEN RECENT .....................................................................................................................................17
FILE MENU – IMPORT ...............................................................................................................................................17
FILE MENU –
SAVE AND
SAVE AS… ...........................................................................................................18
FILE MENU –
PAGE SETUP .................................................................................................................................19
FILE MENU –
PRINT… &
EXPORT AS PNG ..................................................................................................19
Layouts ................................................................................................................................................................21
Export ..................................................................................................................................................................23
Copy to Clipboard ...............................................................................................................................................24
Print Preview.......................................................................................................................................................24
Print.....................................................................................................................................................................25
FILE MENU – EXIT ....................................................................................................................................................25
EDIT MENU CONCEPTS .............................................................................................................................................25
EDIT MENU –
UNDO ...........................................................................................................................................25
EDIT MENU –
REDO ............................................................................................................................................26
EDIT MENU –
CUT,
COPY &
PASTE ........................................................................................................26
EDIT MENU – DUPLICATE .........................................................................................................................................26
EDIT MENU –
DELETE .........................................................................................................................................26
EDIT MENU – CLEAR CHART ....................................................................................................................................26
EDIT MENU – MIRROR SELECTION ( HORIZONTAL & VERTICAL) ....................................................................26
INSERT MENU OVERVIEW ........................................................................................................................................27
Copyright 2005 -2009 © The Knit Foundry
http://www.knitfoundry.com
Knit Visualizer 2.1 Manual
Page 3 of 75
INSERT MENU – INSERT COPIED ROWS/COLUMNS ...................................................................................................27
INSERT MENU – NEW COLUMNS TO THE
RIGHT/
LEFT ..................................................................................27
INSERT MENU – NEW ROWS
ABOVE/
BELOW ................................................................................................28
FORMAT MENU –
INCREASE &
DECREASE FONT ...........................................................................................28
FORMAT MENU – REPLACE STITCH ..........................................................................................................................28
FORMAT MENU – JUSTIFY ........................................................................................................................................29
The No Stitch Concept .........................................................................................................................................29
FORMAT MENU – BORDERS ......................................................................................................................................30
FORMAT MENU – COLOR..........................................................................................................................................31
Select Foreground Color .....................................................................................................................................31
Select Background Color.....................................................................................................................................33
Select Border Color .............................................................................................................................................34
Force all Black and White ...................................................................................................................................34
Force Selection to Black and White.....................................................................................................................34
Force all to Stitch Defaults..................................................................................................................................34
Force selection to Stitch Defaults........................................................................................................................34
VIEW MENU – CHART PROPERTIES ......................................................................................................................35
Row Numbering Options......................................................................................................................................35
Show All Row Numbers as Right Side (Circular) ............................................................................................................. 35
First Row is a Right Side Row (in v1.x it was Odd # Rows on Right Side of Chart) ........................................................ 35
Hide Wrong Side Rows ..................................................................................................................................................... 35
Starting Row Number ........................................................................................................................................................ 36
Chart Options ......................................................................................................................................................36
Grid Color.......................................................................................................................................................................... 36
Show Symbol for Empty Stitches ...................................................................................................................................... 36
Aspect Ratio ...................................................................................................................................................................... 36
Title ................................................................................................................................................................................... 37
Source................................................................................................................................................................................ 37
Notes.................................................................................................................................................................................. 37
VIEW MENU – STITCH LIBRARY MANAGER .........................................................................................................37
VIEW MENU – APPLICATION PREFERENCES .............................................................................................................37
Stitch used when deleting cells ............................................................................................................................38
Stitch used when adding new Columns/Rows ......................................................................................................38
Colors to use in Draw mode ................................................................................................................................38
Strings to build chart and legend.........................................................................................................................38
VIEW MENU – HIDE PATTERN ENTRY FIELDS ..........................................................................................................39
VIEW MENU – THEMES.............................................................................................................................................39
HELP MENU – ABOUT KNIT VISUALIZER..................................................................................................................41
TOOLBAR BUTTONS .............................................................................................................................................42
STATUS BAR INFORMATION..............................................................................................................................43
KNIT VISUALIZER MODES..................................................................................................................................44
SELECT MODE ........................................................................................................................................................45
DRAWING MODE....................................................................................................................................................46
DRAWING A STITCH USING COLOR............................................................................................................................46
NAVIGATING THE STITCH PALETTE ..........................................................................................................................46
COLORING MODE..................................................................................................................................................47
COLOR FOREGROUND ...............................................................................................................................................47
COLOR BACKGROUND...............................................................................................................................................47
COLOR FOREGROUND MANY TIMES ..........................................................................................................................47
COLOR BACKGROUND MANY TIMES ..........................................................................................................................48
COLOR BOTH FOREGROUND AND BACKGROUND MANY TIMES ..................................................................................48
Copyright 2005 -2009 © The Knit Foundry
http://www.knitfoundry.com
Knit Visualizer 2.1 Manual
Page 4 of 75
EYEDROPPER MODE ............................................................................................................................................48
PATTERN ENTRY MODE: PARSING KNITTING INSTRUCTIONS .............................................................48
WHAT CAN BE PARSED ............................................................................................................................................49
PATTERN ENTRY AREA ............................................................................................................................................49
SIMPLE PARSER EXAMPLE ........................................................................................................................................50
ENTERING REPEATS..................................................................................................................................................51
A FEW CAVEATS ......................................................................................................................................................53
QUANTIFIED REPEATS ..............................................................................................................................................53
CHANGING THE WAY THE LAST REPEAT OF THE ROW ENDS .......................................................................................54
Basic Stitches.......................................................................................................................................................54
Increase & Decreases..........................................................................................................................................55
CABLES ....................................................................................................................................................................55
HOW TO HANDLE NON-PATTERN INSTRUCTIONS .....................................................................................................56
HOW MANY REPEATS TO ENTER..............................................................................................................................56
KEEPING TRACK OF WHICH ROW COMES NEXT .......................................................................................................56
PARSER LIMITATIONS ...............................................................................................................................................56
WHAT TO DO WHEN THINGS LOOK REALLY WRONG ..............................................................................................56
PARSING VS THE STITCH PALETTE ...........................................................................................................................57
STITCH LIBRARY MANAGER.............................................................................................................................58
A NOTE ABOUT FONTS ..............................................................................................................................................58
CREATE A CUSTOM STITCH ......................................................................................................................................59
Custom Stitch Fields ............................................................................................................................................59
WRITE THE LIBRARY TO FILE ...................................................................................................................................61
WHAT'S THAT TOOLBAR FOR? ..................................................................................................................................61
DELETE A CUSTOM STITCH ......................................................................................................................................62
A few Caveats about Deleting Custom Stitches ...................................................................................................62
CUSTOM STITCHES AND CHART FILES ......................................................................................................................62
COMPARING TWO CUSTOM STITCHES ......................................................................................................................64
CREATING A CUSTOM STITCH AND KEEPING IT IN YOUR CHART ONLY .....................................................................64
IMPORTING ANOTHER LIBRARY ...............................................................................................................................65
SHARE YOUR STITCH LIBRARY .................................................................................................................................65
TIPS AND TRICKS ..................................................................................................................................................66
QUICK REFERENCE: KEYBOARD SHORTCUTS ...........................................................................................67
QUICK REFERENCE: STITCHES & DEFINITIONS ........................................................................................68
WHERE TO GO FOR SUPPORT ...........................................................................................................................73
OTHER RESOURCES .............................................................................................................................................73
ONLINE RESOURCES .................................................................................................................................................73
INDEX ........................................................................................................................................................................74
Copyright 2005 -2009 © The Knit Foundry
http://www.knitfoundry.com
Knit Visualizer 2.1 Manual
Page 5 of 75
What is Knit Visualizer?
Knit Visualizer was created to make it easy for you, the knitter/designer, to create charts from a stitch
pattern and modify those charts easily. Why charts? Charts give you a chance to understand how a
stitch pattern looks, what two repeats side by side look like before you ever sit down with needles and
yarn. Want to change where you start knitting the pattern? That is much easier to do when you can see
which stitches line up on top of each other in a chart and how the repeats interact with each other.
Knit Visualizer contains an extensive palette of knitting stitches that you can easily paint onto your chart.
From lace, complex cables and color work, you can do it all easily. The symbols are clear and easy to
read. You can easily zoom in/out to determine the best viewing size for your particular chart. High
resolution export makes including Knit Visualizer charts in your pattern easy and with no necessary
manipulation in a secondary graphics editor.
The Knit Visualizer parser will interpret a stitch pattern and build the chart for you. This gives you an
excellent starting point for combining different patterns, changing the edge stitch/pattern or whatever
you need to do to make the pattern work for your project.
Printing is a snap with multiple layout options for the chart, auto-generated legend, notes and more. A
Print Preview screen shows exactly how your chart will look on paper. Printouts can be scaled down to fit
more on a page, or scaled up to make the chart easier to read. A large notes area for each chart will let
you put special instructions, even a full pattern with your chart. Chart, title, author, notes, and Chart
Properties (including font size, row number preferences) are saved in your save file.
For the creative person - Knit Visualizer can also be used to chart out weaving treadle sequences, cross
stitch charts, any type of pattern that requires a grid to organize the symbols.
If you are new to knitting using charts, be sure to check out the tutorial available from The Knit Foundry
website http://www.knitfoundry.com/freestuff.html
How to Read this Manual
The manual covers installation, use of the software and a lot of tips and tricks. Throughout the
document you might see these items:
This will be in front of a tip that will help you navigate a
window or dialog using keyboard shortcuts.
Information about the application
k2p2
Text displayed like this is meant to be typed into the Pattern
Entry text field.
This icon means a difference in the application for Mac users
Important Note On Reading-The-Manual-Even-If-You-Don'tWant-To
I know most people don’t want to read the manual. I hardly blame you. However, there are a lot of
scenarios related to custom stitches that are covered in that section that you should know and
Copyright 2005 -2009 © The Knit Foundry
http://www.knitfoundry.com
Knit Visualizer 2.1 Manual
Page 6 of 75
understand. Things like where the custom stitch information is saved. Or maybe - What happens if you
delete a custom stitch from your library and then open a chart that used that custom stitch? If you are
suddenly interested, please read on.
For Frequently Asked Questions (FAQs) and other related items (like the latest version of this manual),
please see http://www.knitfoundry.com/software.html
Installation
Knit Visualizer is available for the following platforms: Windows XP, Windows Vista & Mac OS X 10.4+
(including Leopard, 10.5.x). Instructions for installation on your specific platform can be found here.
The instructions for installing the Demo and the full application are the same.
It is recommended that you uninstall (Windows) or
delete (Mac) the Demo or any previous versions of Knit
Visualizer before installing the full version.
Windows Vista: Download and CD
System Requirements:
Disk Space
approx 65MB
Memory
512MB or more recommended
Screen Resolution
1024x768
The Vista installation is very similar to that of Windows XP, with a few exceptions:
•
•
To install into the default C:\Program Files\Knit Visualizer location you need to have
administrative rights on your computer. If you are not an administrator, right click the
installation .exe file and select “Run as Administrator”. You will need to know the username and
password of an administrative user to continue. If you don’t have administrative rights you can
install it anywhere else that you have permissions.
There is no charts directory under C:\Program Files\Knit Visualizer
Vista doesn’t let mere mortals write into this area of the file system, so your file save dialog
should default to opening into your Documents directory.
When you first run the installer, Vista will show you a dialog that says “An unidentified program wants
access to your computer” and say it’s from an Unknown Publisher. This is normal. Click “Ok” to continue
with the installation as shown in the Windows XP section.
Windows XP: Download and CD
System Requirements:
Disk Space
approx 65MB
Memory
512MB or more recommended
Screen Resolution
1024x768*
*
All versions of Knit Visualizer will startup at 1024x768 resolution, unless it detects a lower resolution value. Prior to version 2.0 to
force it into 800x600 follow these steps:
•
Run Knit Visualizer
•
Right click on the task bar and select Task Manager OR you can use Control-Alt-Delete to get to it
Copyright 2005 -2009 © The Knit Foundry
http://www.knitfoundry.com
Knit Visualizer 2.1 Manual
Page 7 of 75
Older processors (more than a few years old) might have difficulty running Knit Visualizer due to the
graphics-intensive nature of the application. More memory is always recommended and will improve the
performance of Knit Visualizer accordingly. A dedicated video card isn't required; but even one that has
64MB of memory will improve your system's performance while running Knit Visualizer.
Once you have the installation exe file (either via download, or on a CD), browse to the file and double
click it to begin the installation. Below you will find the important screens in the installation process,
with an explanation of their purpose. If you received Knit Visualizer on CD, the CD should auto-play the
installation program for you when you insert it into your CD drive on your computer. If not, open the CD
in Windows Explorer, and open the Windows directory. Double click the exe file to begin the installation.
Important Installation Steps
License agreement
You must agree to the license
in order to install Knit
Visualizer. Selecting "I accept
the agreement" will enable the
Next button.
Destination Directory
Select where you would like to
install Knit Visualizer. The
default is C:\Program
Files
Select Components
You are required to install the
Program & Libraries. Installing
the Sample Charts is optional.
It is recommended to install
the Sample Charts so you will
be able to view some preexisting charts to get an idea
of what you can create in Knit
Visualizer.
•
•
Make sure the Applications tab is selected
Find the Knit Visualizer entry, and right click on it. Select “Maximize”.
Copyright 2005 -2009 © The Knit Foundry
http://www.knitfoundry.com
Knit Visualizer 2.1 Manual
Page 8 of 75
Select Start Menu Folder
In Windows, you access
programs from the Start
button, All Programs Menu.
The default name of the folder
placed there is Knit Visualizer.
Select File Associations
You can choose to associate
the extension .kvc with Knit
Visualizer. This will allow you
to open the application by
double clicking on a saved
chart file.
Select Additional Icons
You can create a desktop icon,
and/or a quick launch icon. If
you unselect both of these,
you will still be able to access
Knit Visualizer from the Start
button, All programs menu.
Finish
After a progress dialog
displays the files being copied,
you will be shown this last
screen. You can run Knit
Visualizer immediately from
this screen.
Copyright 2005 -2009 © The Knit Foundry
http://www.knitfoundry.com
Knit Visualizer 2.1 Manual
Page 9 of 75
Mac OS X
System Requirements:
Mac OS X 10.4.x or 10.5.x
Administrator privileges are recommended
Disk Space
approx 10MB
Memory
512MB or higher recommended
Screen Resolution 1024x768
In order to use Knit Visualizer on your Macintosh, you must first verify the proper system files are
available. Using the Finder, find the path: "Applications Utilities Java"
You should see J2SE 5.0 listed. If not, follow these directions to install the proper files
You can download the JDK from the apple site at
http://www.apple.com/support/downloads/java2se50release3.html
(There might be a later version available, Check http://developer.apple.com/java/download/ for info)
When the Java download completes, you'll be prompted if you want to continue installing or not. Select
"Continue" several times, Agree to the license agreement, Continue until prompted for the Administrator
password (enter it). You should finish with a message "The software was successfully installed"
You can also use the Software Update mechanism to find and install the new version of Java. Refer to
the documentation included with your computer for how to use the Software Update tool.
Install Knit Visualizer on Macintosh: Download
You will download a file named* KnitVisualizer2.0.dmg . After the download is complete, your
system should automatically mount the file as a drive for you. As the file is mounted, you will be
prompted to agree to the license to use Knit Visualizer (unless you're installing the Demo). Agree to the
license, and once the file is mounted, open the Finder application and open the mounted drive, to find
the Knit Visualizer, Save File Converter apps and the Sample Charts directory. Simply drag the Knit
Visualizer application to your desired location. If you use /Applications, then you will need to
authenticate as an administrator on your computer. If you use your user ~/Applications directory, you
won't need admin privs.
If you have previously used an older version of Knit Visualizer you should also copy the Save File
Converter program.
You may copy the Sample Charts directory to anywhere on your system.
Install Knit Visualizer on Macintosh: CD
Put the CD into your CD drive. Open the Knit Visualizer CD icon. You'll see a Mac OS X directory. Browse
to that directory, then simply drag the Knit Visualizer & Save File Converter application to the desired
location. If you use /Applications, then you will need to authenticate as an administrator on your
computer. If you use your user ~/Applications directory, you won't need admin privs. The Sample
Charts directory at the root of the mounted disk is valid for both Windows and Mac systems - You may
copy the Sample Charts directory to anywhere on your system.
Once the installation is complete, you can Eject the temporarily mounted drive in the Finder.
*
Version number or name might be slightly different
Copyright 2005 -2009 © The Knit Foundry
http://www.knitfoundry.com
Knit Visualizer 2.1 Manual
Page 10 of 75
Creating a file association for .kvc files
To create a file association for .kvc files follow these steps:
1. Find a chart file that ends in .kvc (you can use the Sample Charts provided for this)
2. Right Click and select "Get Info"
3. Find the section labeled "Open with:"
4. Select "Other…" from the drop down in that section
5. Choose to enable "All Applications" from the drop down
6. Select "Always Open With" checkbox
7. Browse to where you dragged Knit Visualizer to install it
8. Highlight Knit Visualizer
9. Click Open
10. Back in the Info dialog; click the "Change All…" button.
11. Accept the change in the dialog
Running the program
Windows XP
Double click the Knit Visualizer.exe file from the Windows File Explorer, or click on the desktop or quick
launch icon created during installation. The splash screen will appear while the application is being
loaded. Once the main window is visible, you may begin editing and creating charts.
Mac OS X
Browse to where you installed the application and double click the icon. The splash screen will appear
while the application is being loaded. Once the main screen appears, you may begin editing and creating
charts.
A note on keyboard shortcuts: Throughout the manual, keyboard shortcuts will be listed for most
operations. They will be listed as "Control-<key>". On the mac substitute "Command" for the word
"Control" and the shortcuts will work as described.
UnInstalling Knit Visualizer
To uninstall Knit Visualizer, simply find the Knit Visualizer Uninstaller (on Windows). Double click the
item, and follow the prompts. Any charts you have created or altered in your Knit Visualizer program
directory will remain after uninstallation. Please note you will not be able to read .kvc files once the
program is uninstalled.
For Mac OS X, you simply drag the application(s) to the trash can.
Copyright 2005 -2009 © The Knit Foundry
http://www.knitfoundry.com
Knit Visualizer 2.1 Manual
Page 11 of 75
Change History
This section details out changes made to Knit Visualizer since the original release. More recent changes
are listed first.
Version 2.1, December 2008
This release includes some bug fixes as well as a few new features.
• Import Chart feature
• Change the text that is associated with Legend, Notes, Pattern, etc in Application Preferences
• Bug Fixes
o Pattern Parsing fields are hidden by default on the main window (use View -> Hide
pattern Entry and unselect to see them)
o Notes allow all characters now
o Legend shows symbols in correct size
o Certain Legend fields are editable on the Print Preview window (be warned: nothing is
saved if you change it here)
o Background of chart on Windows is truly white now; no longer using the theme color
which caused grey printouts/exports
o Added option to remove header on a direct printout
o Rows with all no-stitch stitches no longer throw exception when pattern instructions
generated
Version 2.0, January 2008
Many features have been added to version 2.0. This list covers the major functionality additions. You
might find other new smaller features sprinkled throughout Knit Visualizer that aren't detailed here. The
core functionality of Knit Visualizer remains the same. Please read the appropriate section in the manual
for more details on each new feature.
• Save File Converter – tool to convert your Knit Visualizer 1.x save files into the new format for
version 2.0
• Stitch Library to create custom stitches
• Color! Color stitches, backgrounds and borders
• Stitch Replacment tool
• New keyboard combinations to handle different modes (Select, Paint, Color, Eyedropper). "m"
toggles between all four modes. Use "1" to go into Select mode, "2" for draw mode, "3" for color
mode, "4" for eyedropper mode.
• Application preferences: Option to paint colors (or not) when in Draw mode.
• Chart Properties
o Starting Row number
o Grid Color
o Aspect Ratio (can make stitches wider than tall)
• Preview (for printing and exporting)
o High resolution option
o Include color in legend
• New color themes available – also available on Mac platform
• Toolbar & Menu icons have been added/updated
Version 1.2a (Windows version and Manual)
• Made Knit Visualizer 1.2 compatible with Vista.
• Documentation in Manual about installing on a Vista system.
Copyright 2005 -2009 © The Knit Foundry
http://www.knitfoundry.com
Knit Visualizer 2.1 Manual
•
Page 12 of 75
All other features remain the same – there have been no updates to the Knit Visualizer software
itself; just the installation.
To determine if you have the 1.2a version of Knit Visualizer, navigate to the Help -> About Knit
Visualizer window. You should see VISTA in the date of the build.
Version 1.2 (of Manual) August, 25, 2006
• Added information about screen resolution
Version 1.2, August 9, 2006
• Added Insert menu with commands to Insert Column(s) to the Right/Left & Insert Row(s)
above/below
• Added stitch definition for sl2kwk1p2sso (was missing previously)
• Added new stitches: k4tog, k5tog, k6tog, k7tog, p4tog, p5tog, p6tog, p7tog, nupp, incr4, incr5,
incr6, incr7
• Changed Stitch Palette to separate knit related decreases from purl related decreases
• Bug fix: Exception being thrown when parsing a multi-cell stitch on as a wrong side row
• Bug fix: pattern instructions generated for multi-cell stitches were incorrectly counting number of
times to repeat the stitch.
• Enhanced pattern instruction generation to recognize when a multi-cell stitch is interrupted by
another stitch and change instructions accordingly
• Changed Chart Preferences to Chart Properties to better describe what it does
• Added Application Preferences to allow user to set stitch used when deleting cells, and inserting
new rows/columns
Version
•
•
•
•
•
•
•
•
•
•
•
•
1.1
Mac OS X version available
Added ability to generate written out instructions from your chart from the Preview window
Modfied layout of Print Preview Window, set default view percentage to 50%
Added key bindings for common commands in the File menu
New Chart Preferences Key Binding : Control-[ (left square bracket)
Cancel out of Preview, Print Preview, Chart Preferences dialogs using the Escape key
Changed key bindings for increase/decrease font size from arrow keys to +/- keys
Added Border Keybindings (using the keystroke is just like pushing the button):
o Control-T Add Top Border to current selection
o Control-B Add Bottom Border to current selection
o Control-R Add Right Border to current selection
o Control-L Add Left Border to current selection
o Control-0 (that's a zero), Remove all borders from within the current selection
o Control-; (that's a semicolon), Add borders around all edges of the current selection
Added binding to "S" key. Type S to switch between paint and select mode. Keep an eye on your
cursor to see which mode you're currently in
Remember the last Layout used in the Preview window; even after quitting Knit Visualizer
New Symbols: make 1 right, make 1 left
On startup, re-loads the last chart you were working on when you quit
Copyright 2005 -2009 © The Knit Foundry
http://www.knitfoundry.com
Knit Visualizer 2.1 Manual
Page 13 of 75
Converting from Version 1.x to Version 2.x
For previous users of Knit Visualizer; you will need to convert all your saved charts from the old format to
the new format. Version 1.x of Knit Visualizer used the .kct format – once you go through this one time
conversion process you'll have new copies of all your charts with the .kvc extension on them.
Also, in previous versions of Knit Visualizer, you might have used the charts directory underneath
C:\Program Files\Knit Visualizer to store your charts. I highly recommend that you copy your charts out
of that folder, and to somewhere else on your filesystem, such as Documents or "My Documents" or
anywhere else that makes sense to you.
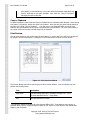
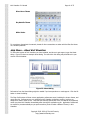
When you run the Save File Converter, you'll see the first page of the wizard, which lets you select the
files you'd like to convert. While it's not necessary, you can save time by first consolidating all your old
charts into one directory. Simply click on the "Select Files/Directories" button and you'll be shown a
dialog where you can choose .kct files. If you leave the "Include files found in subdirectories" checked,
the Save File Converter will also scan any subdirectories of any folders that you select to find files to
convert.
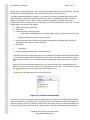
Figure 1 shows what the screen looks like after we have selected some files to convert.
Figure 1: Save File Converter, select files
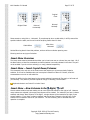
Click the "Next >>" button to proceed to the next screen, where you will be prompted to choose a
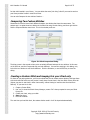
destination for all of your new files.
Figure 2: Save File Converter, choose destination
Copyright 2005 -2009 © The Knit Foundry
http://www.knitfoundry.com
Knit Visualizer 2.1 Manual
Page 14 of 75
The easiest choice is to let the converter create the new files in the same place as the original. Your old
chart files will not be overwritten; as the new files will have a different filename extension. If you'd like
all your files dumped into a single directory, you can choose that place here. Click on "Next >>" to come
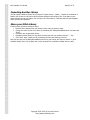
to the final screen in the conversion process. (Figure 3)
Figure 3: Save File Converter, perform conversion
Now that you have selected your files and destination, you're on the final step of the conversion process.
Notice that the "Next >>" button is grayed out – that's because you'll need to click the "Begin Converting
Files" button to actually perform the conversion after you check all the settings. If you decide to not
convert your files at this time, you can use the "Close" button to exit out of the Save File Converter tool.
If there were errors in conversion (and this happens rarely); you'll see a dialog with details. If you
happen to run the conversion process more than once on the same file, the Converter will not overwrite
an already existing .kvc file. It will instead append -1 or -2 or -3 (up to -9) to the filename it creates.
Copyright 2005 -2009 © The Knit Foundry
http://www.knitfoundry.com
Knit Visualizer 2.1 Manual
Page 15 of 75
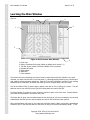
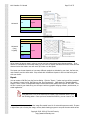
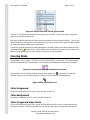
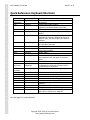
Learning the Main Window
There are several different areas of the screen that you should familiarize yourself with, as shown in
Figure 4.
7
4
3
5
1
2
Figure 4: Knit Visualizer Main Window
1.
2.
3.
4.
5.
6.
7.
6
Chart area
Pattern Instruction Entry area (hidden by default as of version 2.1)
Title Bar, shows location of file and indicator if file is unsaved
Menubar & Toolbar
Stitch Palette
Status Bar
Color swatches
This Manual will cover everything you need to know to create charts with Knit Visualizer. As a quick
overview, you work with the chart in the Chart Area (1), selecting/copying/inserting rows, columns and
cells, painting stitches and other operations. Each cell in the chart represents one stitch in your knitting.
Sometimes it's a combination of stitches that make up a more complex stitch, such as a cable.
You use the Pattern Entry (2) area to type in pattern rows such as "k1 p2 (k2tog yo) 5 times". This will
add new rows to your chart at the top (just like knitting adds new rows at the top).
The Stitch Palette (5) is what you use to select the stitches to paint in the Chart Area. Custom Stitches
you create will be available in the section at the top.
The Status Bar (6) gives you information about the size and type of your current selection, the currently
selected stitch and the font size used to display the chart on the screen and when printed.
When the application first starts up, the chart area will either contain a blank 10x10 chart, automatically
created for you, or the last chart that you had open (as long as it was also successfully saved). If the
Copyright 2005 -2009 © The Knit Foundry
http://www.knitfoundry.com
Knit Visualizer 2.1 Manual
Page 16 of 75
chart area is empty (such as it would be after creating a New chart with 0 rows and 0 columns, or using
the Clear Chart command), there is still a chart present – it just happens to contain no rows or columns.
It is often best to begin using the Pattern Entry area with an empty chart. Alternately you can create a
'blank canvas' chart, that contains all knits, purls or Empty stitches from the New Chart dialog. Read the
relevant sections for more details on how to use Pattern Entry and the Chart drawing tools.
Menus & Toolbar buttons
All the commands you need to access can be found either in the menus and/or in the toolbar. Many of
these commands have keyboard shortcuts associated with them. This section will go over each of these
commands and tell you what they do. While most of these commands are common to most software
applications, there is information here that goes beyond how to open a file.
Each section also lists the keyboard shortcut, if there is one, for that command. On Windows system this
shortcut will always start with Control. Mac OS X users would use Cmd (the fully little apple symbol)
instead. Also, on the Mac OS X platform, some menu items are included in a menu that is named "Knit
Visualizer" instead of on the File or Help menus.*
Knit Visualizer Menu – About Knit Visualizer
[ Mac only ] This command performs the same task as described below in the Help Menu – About Knit
Visualizer.
Knit Visualizer Menu – Preferences
[ Mac only ] This command performs the same task as described in View Menu – Application Preferences.
Knit Visualizer Menu – Quit Knit Visualizer
[ Mac only ] Exits the application, prompting you to save the current chart if unsaved changes have been
made.
Command-Q will invoke this command
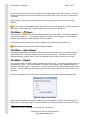
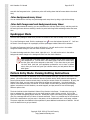
File Menu –
New Chart
Creates a new chart with prefilled cells.
Figure 5: New Chart Dialog
*
If you are using a Theme on the Mac, your menu bar will be half across the top of your screen, and half
in the window of the application. Yes, it's a bit odd, but that's what you get for trying to not look like a
Mac app anymore. If you really want all your menu items in the screen menu bar, use the Default
theme.
Copyright 2005 -2009 © The Knit Foundry
http://www.knitfoundry.com
Knit Visualizer 2.1 Manual
Page 17 of 75
You can enter the number of rows and columns, and a default stitch for each cell to contain. To create
an empty chart when you want to use the Pattern Entry mode, enter 0 (zero) for both # of Rows and #
of Columns.
Before creating a new chart you will be prompted to save the existing chart if there were unsaved
changes.
Use the Tab key to move between fields. The Enter key will close the dialog, as if you had pressed the
"Ok" button. Use the space bar to select a radio button, once you have tabbed to it.
File Menu –
Open…
This allows you to open a chart you have previously saved to your file system. Knit Visualizer chart files
all have the kvc extension*. It is recommended that you create a charts directory in your Documents
directory, but you can store them anywhere on your file system.
If the existing chart is unsaved, you will be prompted to save it before opening another one.
Keyboard Shortcut: Control-O will invoke the Open command
File Menu – Open Recent
Knit Visualizer keeps track of the last ten charts you opened/saved in this list for you to easily choose a
recently opened file. Selecting a filename from this list will open the file. As always, if the currently
displayed chart has not been saved, you will be prompted to save it before opening the new chart.
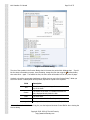
File Menu – Import
There are times when you want to easily combine two charts into one. The import functionality gives you
a simple way to do this. Have the destination chart open in Knit Visualizer, then navigate through the
File menu, and select Import -> Select a File … to bring up a File Chooser dialog that lets you pick a .kvc
chart file. If you've opened the other chart recently, you can choose it from the list of files shown in the
sub menu.
Once you've selected a file you will be shown a dialog that asks you where to put the imported chart.
Figure 6: Import Chart dialog
When you import another chart into the existing one, you are adding to the chart, not overwriting your
current chart. If you select "Right", the new chart will be put on the right side of the existing one, and
*
Remember, version 1.x files were .kct; so look for .kvc files now!
Copyright 2005 -2009 © The Knit Foundry
http://www.knitfoundry.com
Knit Visualizer 2.1 Manual
Page 18 of 75
so on. The chart will remain rectangular; adding new rows or columns as necessary. Any new cells
created that weren't in the open or imported chart will be created according to the Application Preference
"Stitch used when adding new Columns/Rows" which can be a knit, purl or the 'no stitch'.
If you happen to make a mistake importing your chart, or don't like the positioning of it, simply use the
Undo feature (Control-z) right after doing the import.
Note: Import Chart is a new feature available in version 2.1
File Menu –
Save and
Save As…
At any point when working on a chart, you can save it to your file system as a .kvc file. This allows you to
work on the chart again later, or share it with your friends who also have Knit Visualizer. If the chart has
already been saved once, using "Save" will save it again to the same location. "Save As…" lets you give a
new filename to the chart. All charts are saved with the "kvc" filename extension.
Keyboard Shortcut: Control-S will invoke Save when you are in the main window.
You can tell if a chart has not been saved by looking at the Knit Visualizer's title bar. The filename of the
current chart is shown there. A chart that has never been saved will be shown as "untitled". If the chart
has been saved, the filename will be shown, and an asterisk (*) will be in front of the filename when it
has not been saved.
Figure 7: Title Bar showing unsaved changes
At any time if you try to do something that would close the current chart with unsaved changes, you will
be shown this dialog:
Figure 8: Unsaved Changes Dialog
Answer "Yes" to save the chart. "No" means don't save, and continue whatever task prompted the dialog.
"Cancel" will abort the task (such as Exiting the program) and take you back to the main window, leaving
the unsaved chart still open.
It is always a good idea to save your work often in case the cat happens to walk across the keyboard, or
your dog steps on the power plug and turns the machine off.
To dismiss the dialog without using your mouse, use the Tab key to navigate to the desired button.
Press the "Space" key to invoke that button.
Copyright 2005 -2009 © The Knit Foundry
http://www.knitfoundry.com
Knit Visualizer 2.1 Manual
Page 19 of 75
Don't try and open a kvc file with a text editor. While it looks like plain text, it's a
special format that must exist in a specific order and have specific data in it.
You could accidentally modify something in your file and lose all your hard work.
If you still want to take a peek inside, that's OK (I understand, really!), but
make sure to not save it after opening it outside Knit Visualizer.
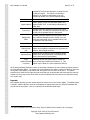
File Menu –
Page Setup
The Page Setup dialog lets you view and change printing related options. You can select a paper size &
source, the Orientation of the chart on the page, the margin sizes and the printer to use. The specific
options available in this screen are dependent on your operating system and specific printer options
available. Changes made in the Page Setup dialog are in effect until you close Knit Visualizer.
You must close the Page Setup dialog either via the OK or Cancel buttons before you can go back to the
main Knit Visualizer window.
Figure 9: Example Page Setup Dialog
File Menu –
Print… &
Export as PNG
The two menu items Print… and Export as PNG both open the same dialog, the Preview Dialog. This
dialog exists to allow you to choose what items you want included in your printout or image file. (See
Figure 10). Both are included in the File menu to remind you of these important features.
Keyboard shortcut: Control-P will bring up the Preview window
By default the Preview Dialog shows the Title, Source, Chart, Legend and Pattern text. These field values
are entered in the Chart Properties dialog (See the View Menu –
Chart Properties section for more
details). A scroll bar shows up along the right side of the window if there is more information than can
easily fit on the screen. Knit Visualizer tries to make the Preview Dialog as big as it can if you have a
large chart. This is to show you as much as possible, and minimize the amount of scrolling you need to
do.
Copyright 2005 -2009 © The Knit Foundry
http://www.knitfoundry.com
Knit Visualizer 2.1 Manual
Page 20 of 75
Figure 10: Preview Dialog
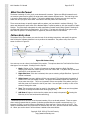
The size of the symbols in the Preview Dialog chart is the same size as the Main Window chart. If you'd
like the chart to be smaller on paper, close the dialog, change the font size using the
toolbar button,
then select Print… again. The smaller the font, the more chart will be able to fit on one piece of paper.
Uncheck or check the appropriate checkboxes to affect what you see in the Preview Dialog*. What you
see on this screen is exactly what will be printed, exported or copied to the clipboard.
Field
Description
Title
The title is displayed in a larger font across the very
top of the chart.
Source
The source of the chart, in a smaller font than the
title, displayed directly under the title.
Chart
The chart itself.
Notes
The notes entered in the Chart Properties Dialog.
Legend
The legend for the stitches in the chart. Only stitches
*
To hide "Created in Knit Visualizer" tag line, use the keyboard shortcut Control-Shift-K when viewing the
Preview dialog
Copyright 2005 -2009 © The Knit Foundry
http://www.knitfoundry.com
Knit Visualizer 2.1 Manual
Page 21 of 75
included in the chart are displayed. Uncheck this box
to hide the legend. The amount of information
placed in the Legend is determined by the row
numbering options in the Chart Properties dialog.
Pattern
Printed instructions to knit the chart.
Select "Simple" to see only the stitch name in the
legend. Select "Full" to see knitting instructions for
each stitch.
Legend Options
Text Colors
Include a different legend entry every time a stitch
changes color. This way you can have a red purl, and
a blue purl as separate entries in the legend.
Background
Colors
Include a different legend entry every time a stitch
has a different background color. Useful if you are
using the background color to indicate knitting color
in Intarsia or Fair Isle knitting.
Layout Type
How the elements are arranged together. See below.
Pattern
Options/Loom
Knit
Select this box if you're a loom knitter and want to
always see the pattern instructions are right side row
stitches, but knit back and forth.
High Resolution
Show
Header/Filename
in printout
Select this box to export a higher resolution image
(takes more memory and time, recommended only
for the final version of your pattern)
Selecting this box will always create a header for
your printout that includes the filename in it. This
option has no effect on a chart exported to PNG file.
All the auto generated information shown in this dialog is based on the row numbering options chosen in
the Chart Properties dialog. The legend will show instructions for knitting a symbol on both the right and
wrong sides if the pattern is not circular and wrong side rows are shown in the chart. The pattern
instructions will mark the first right side and wrong side row as appropriate and the wrong side rows will
contain the wrong side version of the stitch to knit (sometimes this is the same as the right side version,
as in a yarn over)
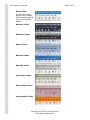
Layouts
Knit Visualizer provides you with several layouts to choose from in the Preview Dialog. The default layout
is Vertical. Select a different layout in the dropdown to change the layout, the effect is immediate and
you will see the new layout. Here is a summary of the different layout types.*
*
All charts generated by Knit Visualizer using "Copy to clipboard" and resized to fit on the page
Copyright 2005 -2009 © The Knit Foundry
http://www.knitfoundry.com
Knit Visualizer 2.1 Manual
Page 22 of 75
Title
Source
Chart
Vertical
Legend
Notes
Pattern
Title
Source
Chart
Vertical,
Centered
Legend
Notes
Pattern
Title
Source
Vertical,
Wide
Chart
Legend
Notes
Pattern
Copyright 2005 -2009 © The Knit Foundry
http://www.knitfoundry.com
Knit Visualizer 2.1 Manual
Page 23 of 75
Title
Source
Horizontal
Chart
Legend
Notes
Pattern
Title
Source
Horizontal
(Long
Legend)
Chart
Legend
Notes
Pattern
We've shown the layout maps in color so you can see how each element type changes position. If an
element is unselected in the Preview Dialog (eg. the notes or legend) that area will not be shown and the
elements below the hidden ones will move up to take over that space.
The layout you choose depends on how many different symbols are included in your chart, the font size,
note contents, and the chart width. Play around with the different layouts to find one that looks good
with your charts.
Export
You can create a PNG file from the Preview Dialog. Click the "Export…" button and you will be prompted
for a location to save the file. PNG files use the .png file extension. PNG stands for "Portable Network
Graphic" and is a form of compressed image file that offers better quality than both GIF and JPEG. Once
the file is saved to your hard drive, you can open it with any graphics imaging software, web browser, or
similar application.*
Using PNG files is one of the best ways to include a Knit Visualizer chart in your
own knitting pattern. Once you have created the PNG file, you can insert it into
*
On very small charts, sometimes the image file created has a bit of extra white space around it. If space
is tight where you are using the image, use any basic drawing program to crop out the extra white areas.
Copyright 2005 -2009 © The Knit Foundry
http://www.knitfoundry.com
Knit Visualizer 2.1 Manual
Page 24 of 75
your pattern (in Microsoft Word, or any other editor that accepts image files) and
resize it according to the space available. Also check out "Copy to Clipboard"
that skips the save to disk step.
Copy to Clipboard
For pattern designers, both Export and Copy to Clipboard will be extremely useful features. When writing
your pattern, you want to include your chart in the pattern. Once you have the chart looking exactly as
you want it to, select "Copy to Clipboard". You now have in your clipboard buffer your chart (and
whatever else you decided to show) ready to be pasted into your document.* All of the charts shown in
the Layout section above were inserted using Copy to Clipboard.
Print Preview
You can print directly to your printer using the Print button, or you can see how it will fit on the page(s)
by using the Print Preview feature. Clicking the Print Preview button will show you this window:
Figure 11: Print Preview window
The Preview Dialog closes when you bring up the Print Preview window. From this window you can
perform the following tasks:
Task
Description
Page Setup
View and change paper size, orientation, margins, etc. This is
the same command as File -> Page Setup
Print
Print the document as shown
*
This has been tested on Windows XP, with Microsoft Office 2003. If you have an older version of
Microsoft Word, Copy to Clipboard might not work for you. Export to a PNG file first, then include that
image in your document.
Copyright 2005 -2009 © The Knit Foundry
http://www.knitfoundry.com
Knit Visualizer 2.1 Manual
Page 25 of 75
Close
Close the dialog without doing anything
View Page at %
Select a percentage for viewing the pages. The smaller the
percentage the more pages on the screen at once.
Print Scale %
Change the scale of the chart in the printout. This lets you
squeeze the chart onto less pages.
Note that the Print Preview is fairly memory intensive as it has to render each page. When you change
the Page or Print scale percentages, all pages are re-rendered at the specified values.
Print
You can print directly from the Preview Dialog without going through the Print Preview window by
clicking the Print button. It will use the options as last set in the Page Setup dialog and print exactly
what you see in the Preview Dialog.
Knit Visualizer places a header on the top of each printed page containing the page number out of total
number of pages, and the save location of the chart file, if the chart has been saved.
File Menu – Exit
[ PC only ] When you choose this option, you are closing Knit Visualizer. If the chart you've been
working on isn't saved – you will be given a chance to save it before exiting. You can also exit the
application by clicking on the "x" in the upper right corner of the Main Window (on Windows machines)
or the red circle on a Macintosh.
Edit Menu Concepts
Many of the Edit menu commands are only available when there is something selected in the chart; or
when a previous selection has been copied or cut into the buffer. For details on how to select cells, rows
or columns in your chart, see the Select Mode section.
A selection can be either a selection of rows, columns or individual cells. All selections are contiguous,
meaning that you can only have one group of rows/columns/cells selected at one time, and only one type
of selection at one time. There is an off-screen storage space, the buffer, where a temporary copy is
stored when you do a Copy or Cut. This section of the Manual will explain details and limitations on each
operation.
Edit Menu –
Undo
Many operations in Knit Visualizer can be undone by clicking the Undo button or menu item. Any
alterations to the chart: painting, deleting, inserting, pattern entry parsing (once it has been entered into
the chart) can be undone. If you close your chart without saving, that can not be undone. You are given
50 levels of undo.
Some operations only count as one undo, even though it might have affected more than one cell in the
chart. For instance, when you use the Shift key to paint the same symbol many times; all of the symbols
painted while holding the mouse down are part of the same undo action.
Keyboard shortcut: use Control-Z to invoke Undo
Copyright 2005 -2009 © The Knit Foundry
http://www.knitfoundry.com
Knit Visualizer 2.1 Manual
Edit Menu –
Page 26 of 75
Redo
Once you have invoked the Undo command, you will be able to Redo that same command. If you Undo,
then Redo – it is as if you didn't invoke either.
Keyboard shortcut: use Control-Y to invoke Redo
Edit Menu –
Cut,
Copy &
Paste
All of these operations require that something a selection be present in the chart.
Cut will make a copy of the current selection into the buffer, and replace everything in the selection with
the "No Stitch" symbol.
Copy will copy the contents of the current selection into the buffer.
Paste will fill the current selection with the contents of the copy-buffer. If the selection is larger than
what the buffer contains, Knit Visualizer will repeat the buffer across and/or down to fill the space. You
may not paste rows into a column Selection and vice versa, but you can paste cells into either row or
column selections.
Keyboard shortcuts: Cut = Control-x Copy = Control-c Paste = Control-v
Edit Menu – Duplicate
Duplicates the current rows/columns selection to the top/right of the chart. You cannot duplicate a
selection of cells.
Keyboard shortcut: use Control-D to invoke Duplicate
Edit Menu –
Delete
Deletes the current selection. For cell selections, all cells are replaced with the symbol specified in the
Application Preferences dialog. For row and column selections, the selected rows/columns are deleted
out of the chart completely.
Keyboard shortcut: use the Delete key to invoke Delete
Edit Menu – Clear Chart
To create a completely empty (no rows, no columns) new chart, select Clear Chart. If the current chart
has unsaved changes, you will be prompted to save them. This command has the same effect as File ->
New Chart and entering 0 for both # of Rows and # of Columns.
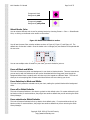
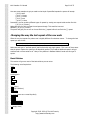
Edit Menu – Mirror Selection ( Horizontal &
Vertical)
You can take the contents of a selection, and have Knit Visualizer mirror it vertically or horizontally. When
you invoke Mirror, it takes the current selection and flips it around in the specified direction. This is not
the same as rotating the selection. Note the position of the purl stitches in the following diagrams:
Copyright 2005 -2009 © The Knit Foundry
http://www.knitfoundry.com
Knit Visualizer 2.1 Manual
Page 27 of 75
Original
Chart
Original Chart
Mirrored
Vertically
Mirrored
Horizontally
Some caveats on using Mirror - Horizontal. If you attempt to mirror a cable stitch, it will flip around the
symbols inside the cable, and it won't look like anything useful when it's done:
Cable Before
After Mirror
Horizontal
Vertical Mirroring doesn't have that problem, as there will be no stitches spanning rows.
Mirroring works on any type of selection.
Insert Menu Overview
The insert menu contains commands that allow you to insert new rows or columns into your chart. All of
the New Column or New Row commands work with whatever is currently selected in the chart. They will
not be enabled if you do not have column(s) or row(s) selected respectively.
Insert Menu – Insert Copied Rows/Columns
This command is the only one on the Insert menu that requires you to have previously Copied a
selection. It will not be enabled unless you have copied a selection of Rows or Columns, since this
command does not work on cell selections.
Inserts the buffer into the chart based on the current selection's topmost cell (for rows) or left most cell
(for columns). Only works if you have copied full row(s) or column(s) into the buffer.
Keyboard shortcut: use Control-I to invoke Insert
Insert Menu – New Columns to the
Right/
Left
Once a column selection has been made, you can now insert new columns to the right or left. However
many columns are selected is how many new columns will be created. For instance if you have 1 column
selected, and choose "New Columns To the Right", a single column will be inserted to the right of your
current selection. If you have 3 columns selected, and choose New Columns to the Left, then 3 new
columns will be created to the left of your selection. The new column(s) will be selected when the
operation is complete.
Copyright 2005 -2009 © The Knit Foundry
http://www.knitfoundry.com
Knit Visualizer 2.1 Manual
Page 28 of 75
Insert Menu – New Rows
Above/
Below
To insert new rows into your chart, select one or more rows, then choose New Rows Above or New Rows
Below. Just like with the New Columns command, however many rows you have selected will determine
the number of rows created. The newly created rows will now be selected in the chart.
Format Menu –
Increase &
Decrease Font
You can change the size of the font used to display the symbols in the chart using the Increase/Decrease
Font commands. The font size is saved with the chart; so when you re-open the chart, it will have the
same font size it did when you saved it.
Keyboard shortcut: Control-+ to increase font size, and Control-- to decrease the font size.
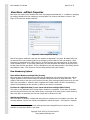
Format Menu – Replace Stitch
If there is a stitch in your chart that you want to replace completely with another stitch (e.g. all ssk with
k2tog) you can do so using the Replace Stitch tool. When you select Replace Stitch from the format
menu, you'll see the dialog shown in Figure 12.
Figure 12: Replace Stitch Dialog
The top dropdown under Select Stitch to Replace, only contains stitches that are in your chart. You'll see
the name of the stitch and the symbols used in that stitch.
The bottom list under New Stitch contains all the stitches from the User and System stitch libraries that
contain the same number of symbols in the chart stitch. The OK button won't be enabled until you select
something from the bottom list.
Once you select a stitch and a replacement, you can hit "OK" and all instances of that stitch will be
replaced with the new one, including the colors of the new stitch. Borders (and any color associated with
borders) will remain in place. This operation is also undoable – so if you make a mistake you can
immediately use Undo to go back to where you started.
Copyright 2005 -2009 © The Knit Foundry
http://www.knitfoundry.com
Knit Visualizer 2.1 Manual
Page 29 of 75
Format Menu – Justify
The items in the Justify menu only affect a chart that has the No Stitch included in it, and then only if
those are on the edge. First though, we need to know what a "No Stitch" is.
The No Stitch Concept
In some charts, all the cells in the chart are real stitches. In other charts, the final piece has shape, such
as in a sleeve, or a triangular shawl. Some lace patterns have increases on one row, and decreases on
another row. To make the yarn-overs line up and look more like the final knitting, we need the ability to
say "skip this space, it doesn't really exist" on those rows that have the decreases. Knit Visualizer uses
the "No Stitch" symbol to represent these areas.
The Justify commands only affect a chart if there are No Stitch cells on the outside edges of the chart.
Knit Visualizer decides how to allocate the No Stitch cells, based on the desired Justification. We will use
an example chart to show the differences as you select the different Justifications
.
Original
Chart
None
Leave Justification as is. No changes to the chart, no
matter how the No Stitch cells are placed.
Left
Justify with all symbols to the left, and No Stitches to
the right
Center
Justify with No Stitches to the left and right, balanced
as possible. If there are an odd number of No Stitch
cells, one side will have an extra No Stitch, but it will
always be the same side.
Right
Justify with all the symbols to the Right, and all No
Stitches to the left
Copyright 2005 -2009 © The Knit Foundry
http://www.knitfoundry.com
Knit Visualizer 2.1 Manual
Page 30 of 75
If there were any No Stitch cells in the center of the chart, those would be ignored, no matter what the
justification setting. It is only the No Stitch cells on the left and right edges that are affected by the
justification setting.
Keep in mind the purl stitches in the example could be anything; knits, increases, decreases and so on.
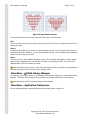
Format Menu – Borders
Many knitting charts like to indicate repeats within the chart by a line; or on very large charts mark every
10 columns and 10 rows. You can also use borders to help emphasize the cables in your cable patterns.
See Figure 13 below.
Figure 13: Cable pattern that uses borders for emphasis
Each of the Border buttons operates on the current selection, using the currently selected Border color
(shown in the toolbar) and with the exception of the Borders – None command, will add the border
indicated by the command.
None
For every cell in the selection (not just edge cells),
remove all borders from those cells.
Control-0 (zero)
Copyright 2005 -2009 © The Knit Foundry
http://www.knitfoundry.com
Knit Visualizer 2.1 Manual
Page 31 of 75
Draw borders around the outside perimeter of the
selection. Interior cells are ignored.
All
Control-;
Draws a border on the left side of the selection
Left
Control-L
Draws a border on the top side of the selection
Top
Control-T
Right
Draws a border on the right side of the selection
Control-R
Bottom
Draws a border on the bottom side of the selection
Control-B
Format Menu – Color
Starting with Knit Visualizer 2.0; you can use color in your chart. A stitch can have color (this is the
foreground color); by default your stitches will use black. The area behind the stitch (the background)
can have color as well. You can combine any of these to create the effect you want.
The first two commands in the Format -> Color submenu are Select Foreground Color and Select
Background Color. These commands can also be invoked quickly by clicking on one of the color swatches
in the toolbar.
Foreground
swatch
Background
swatch
Figure 14: Foreground and Background color swatches
The color swatches in the toolbar also show you the currently selected foreground and background
colors. When you first start Knit Visualizer, the swatches will be set to the default colors of black
foreground, white background (shown in Figure 15).
Figure 15: Default colors
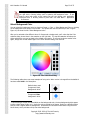
Select Foreground Color
If you click on the foreground swatch, or choose "Select Foreground Color" from the Format -> Color
menu, you'll see the dialog in Figure 16.
Copyright 2005 -2009 © The Knit Foundry
http://www.knitfoundry.com
Knit Visualizer 2.1 Manual
Page 32 of 75
Currently
selected color
black, default
foreground
Color wheel
White, default
background
Specify specific RGB
values. Use up arrow to
push the color into the
wheel.
Slider to
change from
dark to light
Figure 16: Foreground color selection dialog
The dialog will always show the currently selected color in the wheel portion, and the rectangle across
the top. In Figure 16 it's black because that's what we started with. If you play with the slider to the
right of the wheel and click elsewhere in the color wheel, you'll reveal a whole world of color, shown in
Figure 17.
Figure 17: Choosing a color
You can move the slider down to make that color darker (adding more black into it). Or you can type in
a specific RGB (Red, Green & Blue) value into the small boxes on the bottom left of the window; then
press the up arrow to push that color into the color wheel.
Once you have chosen a color you like, click "Ok" to close the dialog and go back to the main window.
You'll see that the foreground swatch now matches the color you chose:
Figure 18: Changed foreground color swatch
You can now click the three paintbrushes
in the toolbar to enter Coloring mode, and click on a symbol
in your chart to paint that symbol pink. You can paint the background color in Coloring mode by right
clicking on a symbol.
Copyright 2005 -2009 © The Knit Foundry
http://www.knitfoundry.com
Knit Visualizer 2.1 Manual
Page 33 of 75
Coloring mode only lets you paint foreground or background colors, not both. If
you right click in coloring mode, you'll be painting the background color. If you
want to paint both colors at the same time you can change your application
preference when in Drawing mode to paint both. See View Menu – Application
Preferences.
Select Background Color
You can select the background color by choosing Format -> Color -> Select Background Color, or clicking
on the background color swatch in the toolbar. The window will look the same as you see in Figure
Figure 16, but have the title "Select Background color".
After you've selected a few different colors for foreground or background, you'll notice that the Color
selection dialog shows those in the swatches on the right side. The top two swatches will always be
white and black so you can get back to the default colors easily. If you want to choose another color
again, simply click on that swatch again in the Color selection dialog, then click Ok.
Figure 19: Color selection dialog
The following table shows you some examples of using color. When a color is changed from the default it
has been made bold in the description.
Default colors used.
Foreground: black
Background: white*
Foreground: blue
background: white
*
If you're using a Theme, and select White as the background color, the true background might appear
to have a slight tinge of color to it – that's the color provided by the theme. Switch to a different theme
and you'll see a slightly different background. Screenshots for this section were taken using the Silver
Moon theme, which provides a fairly true white background.
Copyright 2005 -2009 © The Knit Foundry
http://www.knitfoundry.com
Knit Visualizer 2.1 Manual
Page 34 of 75
Foreground: black
Background: pink
Foreground: purple
Background: pale yellow
Select Border Color
You can select a different color to use for painting borders by choosing Format -> Color -> Select Border
Color, or clicking on the Border color swatch on the toolbar:
Figure 20: Border color swatch in toolbar
You will see the same Color selection window as shown in Figure 16, Figure 17, and Figure 19. The
default color for borders is black. Once the border color is changed, any new borders will be painted with
the new color.
Figure 21: Using colored borders
You can use multiple colors of borders in your chart; you aren't limited to just one.
Force all Black and White
This tool will cause every stitch and background in your chart to black and white. There are cases where
you can end up with knit stitches that have a color associated with the foreground (even though the
foreground doesn't have a symbol) and it will show up in the Legend as a different stitch. This tool will
allow you to set everything back to black and white and then start over coloring your chart.
Force Selection to Black and White
This tool will only affect the selected area in your chart; making the symbols black and the background
white.
Force all to Stitch Defaults
This tool will cause all stitches in the chart to go back to their default colors. For system stitches this will
be black on white, for custom stitches, they might have another default that you can set using the Stitch
Library Manager.
Force selection to Stitch Defaults
This tool will cause all selected cells to go back to their default colors. For system stitches this will be
black on white, for custom stitches, they might have another default that you can set using the Stitch
Library Manager.
Copyright 2005 -2009 © The Knit Foundry
http://www.knitfoundry.com
Knit Visualizer 2.1 Manual
View Menu –
Page 35 of 75
Chart Properties
Each chart you create in Knit Visualizer has a set of properties associated with it. In addition to changing
the settings related to the row numbering, you may add a Title, Source, and Notes for a chart. See
Figure 22 for what this window looks like.
Figure 22: Chart Properties Dialog
Each of the options modifies the way the row numbers are displayed in the chart. No actual chart rows
are removed if the row numbering options are changed; just the location of the row numbers. Chart
Properties are saved with your chart's save file, so when you open the chart again later, all the options
will be reloaded as well. If you create a New chart, the Chart Properties will remain as currently set by
the last chart until they are edited. Click the Ok button to save the changes made in this dialog, and see
them affect the chart. Click Cancel to close the dialog without saving any changes.
Row Numbering Options*
Show All Row Numbers as Right Side (Circular)
When this option is selected, the row numbers are all displayed on the right side of the chart, and the
Legend generated in the Preview Dialog only includes knitting instructions for Right Side rows. This
signals to the knitter to knit every row from the front side, since you begin knitting each row on the side
where the row number is. When the chart is marked as a Circular Pattern, All other row numbering
options will be disabled; as they will have no effect on the chart's row numbers.
First Row is a Right Side Row (in v1.x it was Odd # Rows on Right Side of Chart)
This option is only applicable if the Circular Pattern checkbox is unselected. If this option is checked,
then the chart will have the first row number shown on the right of the chart (which is most common).
When this option is unchecked, the first row number will be shown on the left.
Hide Wrong Side Rows
When this option is selected, it means that wrong side row numbers are not included in the chart. No
rows are removed, only the row numbers are adjusted to reflect this option. If this option is selected,
*
The labels of some of the options and meanings have been changed from prior versions of Knit
Visualizer to clarify their effect on your chart.
Copyright 2005 -2009 © The Knit Foundry
http://www.knitfoundry.com
Knit Visualizer 2.1 Manual
Page 36 of 75
then there are no Wrong Side rows included in the chart, so the Legend generated in the Preview Dialog
will not include Wrong Side instructions.
Starting Row Number
New in Knit Visualizer 2.0; you can specify the starting row number of your chart. This is useful if you
want to use several smaller charts in your pattern and continue the row numbering from the previous
chart. You can enter a negative number here, 0 (zero) or positive numbers. The very first row number
shown on your chart will be this number and all other row numbers in the chart calculated according to
the row numbering rules selected in the checkboxes.
Please note that Knit Visualizer is designed to only show row or column
numbers up to three digits in length, so starting your row numbering at 999 is
not a good idea.
Chart Options
Grid Color
You can change the shade of the grid lines in the chart, by selecting something different in this drop
down. To hide the gridlines completely, choose "None". Please note that whatever color you choose
here for your gridline color will also be the color of the No Stitch background.
Show Symbol for Empty Stitches
The No Stitch stitch can also be called an empty stitch. The empty stitch will be depicted as an X on a
grey background (matching the grid color) if this option is selected. If this option is not selected, then
No Stitch cells will be shown with only the grey background, and no X symbol.
Aspect Ratio
To change the size of the cells in your chart to rectangular instead of square, you'll want to change the
aspect ratio. To calculate your aspect ratio, you need to know how many stitches and how many rows
are in square area of knitting, then divide the number of rows by the number of stitches.
For instance, a gauge swatch tells you that a 4 inch by 4 inch swatch contains 27 rows and 21 stitches.
You would divide 27 by 21 to get the aspect ratio of 1.28.
21 rows
4 inches
27 sts
27
= 1.28
21
4 inches
While you can enter a number that is less than 1, and numbers greater than 2; it isn't recommended.
Stitches in the chart may not have as much vertical space when you change the aspect ratio to a number
other than 1; so keep that in mind as you are viewing your chart, and the look you want it to have.
Here is the same chart with an aspect ratio of 1, and then an aspect ratio of 1.4:
Copyright 2005 -2009 © The Knit Foundry
http://www.knitfoundry.com
Knit Visualizer 2.1 Manual
Page 37 of 75
Figure 23: Aspect Ratio example
The second chart will look much more like your knitting will in size and shape.
Title
You can give your chart a title, by entering the text in this field. This title is displayed when you Print or
Export your chart.
Source
It's always a good idea to give credit to the original pattern source. You can list your name, the book
and pattern the chart is based on, or any other information desired. This information can be displayed
when you Print or Export your chart.
Notes
This area is for any notes related to knitting the chart. This can include information on where repeats
begin and end, suggested yarn, even the text of a pattern to knit using the chart. The notes can be
displayed when you Print or Export your chart.
Keyboard shortcut: Use Control-[ to open the Chart Properties dialog. Use Enter to save preferences
and close the dialog. Use the Tab key to move between fields.
View Menu –
Stitch Library Manager
To create your own custom stitches, or edit already created custom stitches, you use the Stitch Library
Manager. The Stitch Library Manager will be covered in a separate section later in this document.
Keyboard shortcut: Use F3 to open the Stitch Library Manager.
View Menu – Application Preferences
You can change application wide preferences using the dialog shown in Figure 24.
Copyright 2005 -2009 © The Knit Foundry
http://www.knitfoundry.com
Knit Visualizer 2.1 Manual
Page 38 of 75
Figure 24: Application Preferences Dialog
Stitch used when deleting cells
When you select some cells (not rows or columns) and hit the Delete key, the application removes all the
symbols associated with those cells. It has to fill the cells with something, and by default it fills with No
Stitch symbols. If you'd like to always fill cells with something else, such as a knit stitch, change the
option here. You can select from knit, purl and No Stitch.
Stitch used when adding new Columns/Rows
Inserting empty rows by default will contain the knit stitch, you may decide to use a knit, purl or No
Stitch by selecting it here.
Colors to use in Draw mode
When painting symbols from the stitch palette, you have the choice to use default colors (black on white
background) or use the currently selected color in the toolbar for the foreground or background, or both.
If selecting something other than "default colors" for this option, you will use the colors selected and
showing in the toolbar
, unless painting a custom stitch that has a foreground and/or background
color defined for that custom stitch.
Strings to build chart and legend
You can change the strings shown in the Preview Dialog associated with the Legend, Notes, Pattern and
so on. This is very useful if you want to create a chart and legend in another language. This preference
will affect all charts created using Knit Visualizer and is not chart specific. The different fields and where
they are used are described in the following table:
Legend
Pattern
RS
WS
Heading used when showing the Legend. Displays
directly above the legend
Heading used when displaying pattern instructions.
Displayed inside the box, at the top, above the
pattern instructions
Label used to indicate a right side row in both the
pattern instructions and in the legend when using
the Full legend.
Label used to indicate a wrong side row in both the
Copyright 2005 -2009 © The Knit Foundry
http://www.knitfoundry.com
Knit Visualizer 2.1 Manual
Page 39 of 75
Row Prefix ( R )
Notes
Tagline
pattern instructions and in the legend
Text used to prefix each row number in the pattern
instructions
Header used to indicate the Notes section. (Notes
are entered in the Chart Properties dialog)
Displayed underneath the chart in a smaller font
than the other headers.
You can make any of these values blank (for instance, the tagline if you don't want to see it).
To go back to the default values, simply click the "(use defaults)" button and then click OK to save the
change.
All application preferences are remembered even after closing Knit Visualizer. If you Clear Preferences
from the About Knit Visualizer dialog, these settings will go back to their defaults.
Pressing cancel will abort any changes you made in the dialog. Pressing OK will cause the selections to
go into effect immediately and be saved.
Keyboard shortcut: use Control-comma to open this dialog quickly.
View Menu – Hide Pattern Entry Fields
To see the pattern entry fields, make sure there is no check next to this menu item. The Pattern Entry
fields are hidden by default (since version 2.1).
To give as much space as possible on the screen to the chart, you can hide all the pattern entry fields.
Simply select the Hide Pattern Entry Fields checkbox and the Pattern Entry fields are hidden from view.
To show them again, select Hide Pattern Entry Fields again (which will uncheck the checkbox, and show
all the fields)
View Menu – Themes
New with version 2.0 both Mac and Windows users can change the theme used to display the windows,
charts and other elements within Knit Visualizer. Each Theme has a slightly different set of colors* and
also affects the colors used in the chart that is printed/exported.
The default Theme choice you will see the first time you run Knit Visualizer is the Blue Ice Theme, or on
Mac the Mac OS theme. The application will remember the last Theme you selected; and start with that
Theme the next time you run. The currently selected theme is indicated by the selected Radio Button in
the View Menu.
On the Mac, you will need to restart Knit Visualizer before you'll see the theme change, and you'll be
shown a nice dialog reminding you of that when you change themes. The other caveat with themes on
the Mac is that you'll have a split menu bar. There will be the full screen menu bar across the top that
contains the Knit Visualizer About and Properties items; but the rest of the menu items will be attached to
the application window.
The following windows show you a sampling of the colors for each theme.
*
Differences in monitors may affect the actual colors you see when you run Knit Visualizer.
Copyright 2005 -2009 © The Knit Foundry
http://www.knitfoundry.com
Knit Visualizer 2.1 Manual
Page 40 of 75
Default Theme
Will most closely match
the look of the operating
system. Example shown at
right is on the Windows
platform.
Black Star Theme
Black Moon Theme
Blue Ice Theme
Blue Moon Theme
Blue Steel Theme
Green Dream Theme
Mauve Metallic Theme
Orange Metallic Theme
Copyright 2005 -2009 © The Knit Foundry
http://www.knitfoundry.com
Knit Visualizer 2.1 Manual
Page 41 of 75
Silver Moon Theme
Sky Metallic Theme
White Vision
For consistency throughout the manual, almost all other screenshots are taken with the Blue Ice theme
on a windows platform.
Help Menu – About Knit Visualizer
To learn what version of Knit Visualizer you have installed, and where to get support, open the About
dialog. Figure 25 shows an example About dialog. The text within this dialog may be different in your
version of Knit Visualizer.
Figure 25: About dialog
Information from the About dialog might be needed if you have questions or need support. Click the Ok
button to close the dialog.
The Clear Prefs button will clear out any application preferences saved, including the chosen theme, and
recent files list. Preferences are not required for Knit Visualizer to function properly, but they are
designed to make it easier to use. Note that the Recently Opened files list is not cleared out completely
unless you close Knit Visualizer immediately after clearing the application prefs. Application Preferences
are saved for you automatically as you perform actions (such as select a different Theme) in Knit
Visualizer.
Copyright 2005 -2009 © The Knit Foundry
http://www.knitfoundry.com
Knit Visualizer 2.1 Manual
Page 42 of 75
Toolbar Buttons
The toolbar provides quick access to the most often used actions in Knit Visualizer. You can hold your
mouse pointer steady over a button to see a quick tool tip with information on what that button does.
The following table shows each toolbar button, and a short description of what it does.
Creates a new chart
Open a chart from your hard drive
Save the chart to the hard drive
Print/Export chart
View Chart Properties
Undo last edit
Redo last undo action
Copy selection
Cut selection
Paste selection
Delete selection
Zoom out, make the font smaller
Zoom in, make the font larger
Select mode
Draw mode
Coloring mode
Eyedropper mode (select color from chart)
Swatches showing currently in use colors (click on each
box to change foreground/background)
Justify, None
Justify, Center
Justify, Left
Justify, Right
Color used to draw borders (click on box to change)
Border, Remove all
Border, Add All edges
Border, Add Left
Border, Add Top
Border, Add Right
Copyright 2005 -2009 © The Knit Foundry
http://www.knitfoundry.com
Knit Visualizer 2.1 Manual
Page 43 of 75
Border, Add Bottom
Highlight all stitches in chart that match currently
selected stitch in palette.
Some toolbar buttons might be disabled, meaning that action cannot currently be performed. For
instance, the Paste
toolbar button is disabled if there is nothing in the buffer to be pasted. You'll see
some of these same icons next to items in the menus – those have the same operation as the toolbar
button.
Status Bar Information
The status bar is at the very bottom of the main window, and shows you some useful information as you
work with your chart. See Figure 26: Status Bar.
Figure 26: Status Bar
On the very left of the status bar is the stitch that was last selected from the Stitch Palette. This is useful
because the list of stitches in the Palette is very long, and the currently selected stitch might not be
visible on the screen.
On the far right of the status bar is the font size currently in use. This number is in points. A 14pt font is
as small as you can make the chart font in Knit Visualizer (otherwise you wouldn't be able to see any of
the symbols!) If you play around with the Increase Font
and Decrease Font
buttons, you'll see
this value change. If you wanted to pair two charts next to each other in a pattern (but not physically in
the same chart), and make sure the cells were the same size, you'd check to make sure the font size was
the same in both. The font size is saved as part of the chart, so whatever you select before you save the
chart is what will be used when you re-open it.
To the left of the Font Size, is the size and type of the current selection. For more information on
selections and how to use them, see the Selections section below.
Copyright 2005 -2009 © The Knit Foundry
http://www.knitfoundry.com
Knit Visualizer 2.1 Manual
Page 44 of 75
Knit Visualizer Modes
If you were reading carefully*, you'd have noticed that there are several toolbar buttons that let you
switch between the different modes in Knit Visualizer. Beginning with Knit Visualizer 2.0; there are more
modes for you to work with. The full list of modes:
Mode Name
Description
Select mode
Used for selecting rows, cells, columns in your chart to
then copy, duplicate, delete, etc.
Draw mode
Used to draw stitches into your chart from the Stitch
Palette
Coloring mode
Used to change the color of stitches already in your chart
Eyedropper mode
Lets you select a foreground or background color from a
stitch already painted and/or colored in your chart.
There is also a mode that doesn't have a toolbar button, because it's a special case: Parsing Mode. You
use the Pattern Entry portion of the screen for typing in pattern rows and automatically generating
symbols into new rows in the chart.
You can switch between modes in several ways. Click on the toolbar button for that mode, use a
keyboard shortcut to switch into that mode, or perform an action that will automatically put you in that
mode.
To enter Select mode, do one of the following:
button
• Click on the Select Mode
• Click on the chart's row numbers, or the chart's column numbers at any time
•
Use the keyboard shortcut "1" to switch to select mode
Flip between Select and Draw mode with the "s" keyboard shortcut
•
To enter Draw mode, do one of:
• Click on the Draw mode
toolbar button
• Click on a symbol in the Stitch Palette
•
Use the keyboard shortcut "2"
•
Flip between Select and Draw modes with the "s" keyboard shortcut
To enter Coloring mode:
• Click on the Coloring mode
button
•
Use the keyboard shortcut "3"
To enter Eyedropper mode:
• Click on the Eyedropper mode
button
•
Use the keyboard shortcut "4"
Use the "m" key to move through all the different modes in order.
*
You didn't know there'd be a test, did you?
Copyright 2005 -2009 © The Knit Foundry
http://www.knitfoundry.com
Knit Visualizer 2.1 Manual
Page 45 of 75
All keyboard shortcuts are only 'active' when you have been working in the chart. If you are in the parser
area, then you'll just end up typing 1 or m or s or whatever you tried to type into the parser field.
You can easily tell which mode you are in because the mouse cursor changes to
a different cursor in the chart area and the appropriate mode button in the
toolbar will be selected.
If you find that you have accidentally switched modes because you clicked in one of the areas mentioned
above, simply click the correct Mode button in the toolbar to switch back. If you accidentally drew a
stitch or colored a stitch, use Undo (Control-z) to remove that stitch.
Select Mode
The first mode (and the most intuitive for most computer users) is Select Mode. You'll be using
selections to (among other things) copy, paste, insert, duplicate and indicate where to add new columns
or rows. When you're in select mode, the cursor in your chart will be an arrow.
There are three types of selections in Knit Visualizer. The status bar will give details on the size and type
of the current or most recent selection.
Cell Selection
Once in Select Mode, click and hold in the first cell,
then drag your mouse to add to the selection. The
cells selected are highlighted in a different color.
Check the status bar for details on the size of the
selection
Column Selection
Click on a column header, hold, then drag to select
multiple columns
Row Selection
Click on a row header, hold, then drag to select
multiple rows
We've already covered the details of using Copy, Paste, Cut, Insert & Delete when going over the Edit
Menu. Knit Visualizer will give you a message if you try to Paste or Insert the wrong type of buffer into
the wrong type of selection. Remember, there is always the Undo (Control-z) feature to back out of the
operation you just performed.
Once a stitch has been painted into the chart, it can now be "split up" by doing
a delete, cut or paste through it. This is allowed for maximum flexibility when
designing your patterns. Be careful to not chop up your stitches that are wider
than one cell, unless you only want to knit the first few stitches of it. When the
Legend is generated it will include that whole stitch and
the knitting instructions for it even if only part of the
stitch is present. This chart has the top cable that is
still "complete" and the bottom cable has been split by
a purl stitch being painted/pasted into the middle of it
Copyright 2005 -2009 © The Knit Foundry
http://www.knitfoundry.com
Knit Visualizer 2.1 Manual
Page 46 of 75
Drawing mode
Drawing mode* is how you draw stitches into your chart by using your mouse. Think of if just like sitting
down at some graph paper with a pencil – you'll be drawing the symbols onto your chart. Of course with
Knit Visualizer your task is made much simpler because we can easily draw a whole cable with a single
click of the mouse.
You enter draw mode by clicking on the pencil
toolbar button, or by selecting a stitch from the Stitch
Palette. Once you're in Drawing mode the chart's cursor will change to be a pencil, just like the icon you
see in the toolbar button.
The whole point of using the Drawing mode is so you can paint your stitches from the Stitch Palette. The
Stitch Palette contains all the different stitches you can use in your chart. Each stitch is comprised of one
or more cells. You can see exactly what the stitch looks like by its entry in the Stitch Palette. Once you
select a stitch you can then paint it by simply left clicking on the chart at the desired location. The new
stitch will be painted from that cell and out to the right. The currently selected stitch (which is what will
be painted) is shown on the far left of the status bar.
If you want to paint the same stitch many times all in the same area, you can hold down the Shift key,
then left click and drag. Every new cell you touch will have the stitch painted into it (and in the cells to
the right, if the stitch spans multiple cells). The Undo command will undo the entire paint operation when
you are painting the same stitch many times using the Shift Key.
Drawing a stitch using Color
If you want to draw your stitch using the selected foreground and/or background colors as shown in the
toolbar swatches, check your Application Preferences. This will determine if the foreground & background
colors are used when drawing stitches.
The only way a stitch will never be drawn with the selected foreground and/or background colors, even if
your application preferences say to use the colors, is if you have a custom stitch defined with a specific
color. (For instance, a purple diamond with a light yellow background). A custom stitch with a defined
foreground or background will always win out and use its own colors when being drawn. You can change
the color associated with that stitch later by using the Coloring mode. A warning though – if you manually
color a custom stitch in your chart, any changes to the colors used in that custom stitch definition via the
Stitch Library Manager won't change that specific stitch in your chart. You will have overridden the colors
by manually coloring it. See the Stitch Library Manager section for more information.
Navigating the Stitch Palette
The stitch palette is organized into groups of stitches, to make it easy to find the stitch you need. The
first group in the Stitch Palette is "Custom Stitches" and will contain all the custom stitches you create
using the Stitch Library Manager. If you aren't interested in a group of stitches, you can hide that set by
clicking on the title of the group. As of version 2.0; if you have closed a group, Knit Visualizer will
remember that and keep it closed even if you quit the application. (See Figure 27).
To select a stitch, simply left click on it. It will now become the highlighted stitch, and you should see
that stitch on the bottom left of the status bar. Any stitch previously selected will be unselected. You can
only select one stitch at a time in the Stitch Palette. When you select a stitch in the palette, Knit
Visualizer will be automatically put into Draw mode.
*
This used to be called "Paint mode" in Knit Visualizer versions 1.x.
Copyright 2005 -2009 © The Knit Foundry
http://www.knitfoundry.com
Knit Visualizer 2.1 Manual
Page 47 of 75
Figure 27: Stitch Palette with several groups closed
In Figure 27, The Increases, Decreases & Misc groups are all closed. To open them again, simply click
again on the title bar for that group.
Each stitch comes pre-defined with a set of knitting instructions on how to make that stitch. You will see
these instructions in the Legend in the Preview window or you can view this from within the Stitch Palette
by holding your mouse steady over the stitch name.
If you'd like to see all instances of a stitch highlighted in the chart, select it in the Stitch Palette and click
toolbar button. Those stitches aren't a selection (you cannot copy and then paste
the Highlight Stitch
them), the highlighting is just a visual indicator to allow you to find them easier.
Coloring Mode
Coloring mode exists so you can paint colors into your chart. If you haven't read it yet, go read the
"Format Menu – Color" section. This tells you how you choose colors to color with. As a quick reminder,
you'll be coloring with the colors selected in your foreground and background swatches on the toolbar:
Figure 28: Foreground/Background swatches from toolbar
You can switch into the Coloring mode by clicking on the toolbar icon
or using the "3" keyboard
shortcut. When you are in coloring mode, the chart's cursor will switch to a blue paintbrush.
Figure 29:Blue paintbrush cursor
Color foreground
To paint the foreground color on a cell, simply left click on that cell.
Color background
To paint the background color on a cell, right click on that cell.
Color foreground many times
To color more than one cell at a time, you can use the shift key just like you do in Draw mode to paint
more than one stitch. Hold down the shift key, then left click and drag your mouse around to paint an
Copyright 2005 -2009 © The Knit Foundry
http://www.knitfoundry.com
Knit Visualizer 2.1 Manual
Page 48 of 75
area with the foreground color. (make sure you're still holding down that left mouse button the whole
time)
Color background many times
You can hold down the shift key and paint background many times by doing a right click and drag.
Color both foreground and background many times
If you're really talented at mousing, you can push down the shift key (hold it there), and then push the
left and right mouse buttons and drag it around to paint both foreground and background at the same
time.
Eyedropper Mode
You'll use the eyedropper mode when you want to reselect a color that is already in use in your chart.
To go into Eyedropper mode, Click the eyedropper icon
, or use the keyboard shortcut "4". You'll see
the chart's cursor change to an eyedropper, and the eyedropper toolbar button will be selected.
To select the foreground color from a stitch, left click on it. You will see the color in the toolbar
foreground swatch change to the color from the stitch clicked on.
To select the background color from a stitch, right click on it. You will see the color in the toolbar
background swatch change to the background color from the stitch clicked on.
Don't forget that a knit stitch (which has no symbol) can still have a foreground
color assigned to it. You can color a knit stitch green; and see no visible result;
but the green will still be assigned to that stitch. If you then drew a purl stitch
into that stitch (and had your application preferences set to draw in default
colors) then you would see green purl stitches where you had painted the knit
stitch green.
Pattern Entry Mode: Parsing Knitting Instructions
The Pattern Entry mode is an advanced mode in Knit Visualizer that helps you build a chart from a stitch
pattern. All knitters seem to have extensive libraries of pattern books, stitch patterns and magazines.
Not all of those pattern sources contain charts; but they do contain written out instructions. By using the
Pattern Entry mode, you can create a chart from the written out instructions. You should treat this
section of the Manual as more of a tutorial. It will be helpful to follow along by entering the example
pattern instructions into Knit Visualizer, see what happens, and play around to see what changing
different options does
The brains behind the Knit Visualizer's Pattern Entry function is the Parser. It reads what you type in,
tries to understand it, then adds a row to your chart based on what it thinks you said. It's a bit like
typing in German and getting English back out. Sometimes it won't know what you are saying and will
give you a message that tells you where it became confused. There is no possible way for the manual to
cover all the combinations you can enter in the parser; as the combinations are in some ways, endless.
The parser might also be modified in future patches to parse additional combinations of stitches. We will
cover the basics here to get you started.
Copyright 2005 -2009 © The Knit Foundry
http://www.knitfoundry.com
Knit Visualizer 2.1 Manual
Page 49 of 75
What Can Be Parsed
The basics consisting of: knits, purls, most decreases & increases. Cables are difficult because there is
no common syntax used to specify the same exact cable between different books. The best thing to do
is to use the Draw mode to fill in cables. This has the added bonus of letting you see which way the
cables turn and you get a much better visual idea of how the pattern will look knit up.
There are several ways to specify repeats within a pattern row (see details in sections following). The
parser was designed to parse most of the Barbara Walker Treasuries patterns, with the exception of cable
stitches. The parser does understand the cable specification formats used in Nicky Epstein's Knitting On
the Edge and Knitting Over the Edge books. (E.g. 2/2rpc) The best rule of thumb if you get an error
back from the parser is to always check for typos first, and then check for odd stitches.
Pattern Entry Area
The pattern Entry area is where you enter the text of the knitting instructions, and specify the options
that will help the software determine how to perform the translation. The pattern entry area of the
screen is shown in Figure 30.
1
2
3
6
4
5
8
7
Figure 30: Pattern Entry
You enter one row at a time in the Pattern Entry section. The options above the Text field tell the Parser
what type of row to expect. Starting from the top left:
1. Mode: Circular or Flat. Circular will mean we are always entering a Right Side Row.
Selecting Flat means we need to specify if the row is RS or WS. The parser will flip this back
and forth for us as we enter rows.
2. Right Side Row: If this box is selected, then you are entering a Right Side Row. Ignored if
Circular is selected.
3. Stitch Count: How many stitches will this row consume? This should match the number of
stitches in the row you already entered. The parser automatically adjusts this value for you
as you enter new rows*. This is very important if there are repeats in the pattern, and you
want the parser to fill across the size of your chart. You can type in a value, or click on the
arrows to change the value.
4. Text: The area where you type (or paste in) the pattern text (
arrow keys to change the Stitch Count while typing in text)
You can use the up/down
5. Add Row #: Button to click when the pattern text is ready to be parsed (
Enter key in the Text box does the same thing)
*
Pressing the
Sometimes you don't want this to be the exact number of the row already entered. There are cases
when entering repeats that the number of stitches specified after the repeat is excessively long. For
instance: k2 k2tog *yo ssk k1 k2tog yo sl2knitwise k1 p2sso rep from * end yo ssk k1 yo ssk k2. The
repeat is calculated before the parser sees the stitches after the "end"; and then tacks all those stitches
on. When you see the chart it will be obvious it added a few extra stitches.
Copyright 2005 -2009 © The Knit Foundry
http://www.knitfoundry.com
Knit Visualizer 2.1 Manual
Page 50 of 75
6. All k: A quick method to enter all knit stitches. Uses the value in Stitch Count for quantity of
stitches. Clicking this button is equivalent to typing in [k] and clicking Add Row #.
7. All p: A quick method to enter all purl stitches. Uses the value in Stitch Count for quantity of
stitches. Equivalent to [p]
8. All x: A quick method to enter all No Stitch (Empty) stitches. Uses the value in Stitch Count
for quantity of stitches. Equivalent to [x]
As you enter pattern rows, it is important to keep an eye on these values to make sure they are what you
expect. Sometimes just the Right Side Row checkbox being set incorrectly will give you very different
results! Before following along in these examples, please verify your Chart Properties are set to the
following: Circular Knitting OFF, Odd # Rows on Right ON, Hide Wrong Side Rows OFF.
The parser ignores all punctuation (commas, semicolons, etc) & most white space (with some notable
exceptions). You can type upper or lower case letters.
Simple Parser Example
If you have selected "Flat" knitting, after you enter a row, the parser will change the state of the Right
Side Row checkbox. For instance if you start with "Flat" selected, and Right Side Row selected. You are
telling the parser you are entering a pattern that was written for knitting back and forth, and the row you
are going to type in is a right side row. Stitch Count is set to 10. You then type in
k2 p2 yo k2tog p2 k2
and press the Enter key. The parser adds the first row to the chart:
Figure 31: A Simple row entered via Parser
Now, the Right Side Row checkbox is automatically unselected, in preparation for the next row. Also the
button Add Row# now has the text "Add Row #2". Hit Enter a few more times to see what happens.
Notice how the Right Side Row checkbox keeps turning itself off and on, and the Symbols entered for the
Wrong Side rows are different than those for the Right Side Rows. Also the Row # in the Add Row
button increments to tell you what the next row will be.
Now you can use the Undo key (Control-Z) to remove those rows you just added, until there is only one
left. The Add Row # button adjusts, but the Right Side Row checkbox doesn't check/uncheck during the
Undo. This is because the parser assumes you are Undo-ing an error in the last entry, and that error
might have been selecting the wrong type of row. It doesn't want to guess wrong, so it leaves it alone.
The lesson in this is always check to make sure the Right Side Row checkbox is selected/unselected as
you want it.
IMPORTANT: There are limitations to what the Parser can understand. There
are so many different ways of representing the same basic knitting stitches,
that it would be impossible to understand them all. The more complex the
pattern, the less likely you will be able to enter it exactly as written. It is best to
start with very simple examples, understand how the parser thinks (believe me,
it has a mind of it's own) before moving on to more complex patterns. This
section will give you ideas on how to make it understand the pattern you want to
enter, but there are no guarantees. It is possible the parser will pretend to
Copyright 2005 -2009 © The Knit Foundry
http://www.knitfoundry.com
Knit Visualizer 2.1 Manual
Page 51 of 75
understand the pattern, but spit out a different stitch than you think it should.
Always check your chart!
Entering Repeats
The parser can understand repeats and how to use them to fill out an entire pattern row. When entering
stitch patterns via the parser, it's best to do at least two repeats worth so you get an idea of how they
work together. Let's say we are working on the Lace Puff pattern from Barbara Walker's A Second
Treasury of Knitting Patterns (page 283)*. That pattern is a Multiple of 12 sts, plus 2. That means there
are 2 edge stitches, and 12 stitches in each repeat. If we want to enter this pattern, we should execute
Edit -> Clear Chart if another chart was present and set up the Parser as follows:
Stitch Count: 26 (We get this number from adding 12 + 12 + 2)
Mode: Flat
Right Side Row: Selected
Text: k1 * ssk k3 yo p2 yo k3 k2tog rep from * end k1
Resulting Row:
If you happen to have the BW books, you'll notice that the actual text in the book was this:
K1, * ssk, k3, yo, p2, yo, k3, k2 tog; rep from *, end k1
The parser ignores all those commas, so there's no point in typing them in. We leave the spaces for
clarity, although habit made me leave out the space in the "k2 tog" because I normally type k2tog. Either
will be recognized by the parser. For the parser to recognize the * rep from * repeat, you must include
the single spaces the the "rep from *" portion of the pattern. Given that adding spaces is a natural
tendency, this shouldn't be a problem; but it is something to keep in mind.
The Stitch Count you enter is important because it tells the parser how many times to repeat the stitches
in between the repeat indicators. If you accidentally enter 27, 28 or even 29; it's Ok, the parser will
probably make a good guess and still only create 26 stitches. It's not until you get up to 38 (which is 3
repeats + 2 edge stitches) that it will actually create 3 repeats in the chart. If you don't get the number
of repeats you expect, you can always use Undo, change the # of stitches and try again.
There are multiple ways to specify repeats, and the parser doesn't care which one you use. A lot of
patterns use the * <stitches> rep from * syntax, but you might also see it written like this:
k1 ( ssk k3 yo p2 yo k3 k2tog ) end k1
The means exactly the same thing as the original text. We've changed the first * to a ( and the rep from
* to a ). You can use pairs of parentheses () or square brackets [] or curly braces {} all in the same
fashion. Make sure you always use them in pairs; as the first one tells the parser, "Attention, I'm going
to enter some stitches to repeat" and the second one says, "The repeat is finished now, take all those
stitches and repeat as indicated". If one of them is missing, as in this line:
k1 ( ssk k3 yo p2 yo k3 k2tog end k1
you'll see an error message like this one:
*
You'll find the complete chart for this pattern in the Sample Charts directory, named
LacePuff_BW2_pg283.kvc
Copyright 2005 -2009 © The Knit Foundry
http://www.knitfoundry.com
Knit Visualizer 2.1 Manual
Page 52 of 75
Figure 32: Parser Error Dialog
Whoops! Click Ok, and go back to fix the text. Verify that the Right Side Row checkbox is selected before
re-adding the row.
Let's continue entering the Lace Puff pattern. We've successfully entered the first Row. Verify your
settings:
Stitch Count: 26 (We get this number from adding 12 + 12 + 2)
Mode: Flat
Right Side Row: UNSelected
Text: k1 *p2tog p2 yo k4 yo p2 p2tog-b rep from * end k1
After entering the second row, the chart now looks like:
Row 3: RS row, Text: k1 *ssk k1 yo p6 yo k1 k2tog rep from * end k1
And so on, until you have finished all 8 rows in the pattern. Edit the Chart Properties, and enter the title
(Lace Puff) and the source (BW#2, pg 283) and whatever notes you'd like. Make sure and save your
work! The finished chart looks like this:
Figure 33: Lace Puff Chart for Flat Knitting
When I created this image in the Preview Dialog, I selected Horizontal Layout, Turned Simple Legend On
to remove the stitch instructions, and didn't show any notes. I used Copy to Clipboard to bring the image
into this document.
If you look at the picture in the Barbara Walker book, you'll see that this image matches very closely to
the actually knitted item! If you'd like to convert this chart to knit something circularly, all you need to
do is remove the outer two columns, which are edge stitches for when it is knit flat; and change the
Chart Properties dialog to select "Circular" (modifying the location of the row numbers in the chart):
Copyright 2005 -2009 © The Knit Foundry
http://www.knitfoundry.com
Knit Visualizer 2.1 Manual
Page 53 of 75
Figure 34: Lace Puff Chart for Circular Knitting
Remember that there are two full repeats shown in Figure 34. You might want to indicate the repeats by
using borders, as shown in Figure 35.
Figure 35: Lace Puff using Borders to show repeats
A Few Caveats
The parser will also automatically change the Stitch Count to match the last row you entered. 95% of
the time this will work and you won't have to think about it. Every once in a while a row will be entered
that will be way too long for what you really want. This is due to the way it counts repeats and adds on
stitches after the repeats are completed. Usually it means one too many repeats has been entered. You
can use Undo, then change the Stitch Count to a smaller value, making sure the Right Side Row
checkbox is set correctly, then hitting Enter.
Quantified Repeats
In many patterns, there will be a grouping of stitches and a quantity to tell you how many times to work
those stitches. From another pattern, that has a Multiple of 10 sts plus 2:
Stitch Count: 22
Mode: Flat
Right Side Row: Selected
Text: k1 * (sl1 wyib, sl1 wyif ) twice, sl1 wyib, p5 rep from * end k1
In this pattern, the * indicates that a repeat is starting. The ( indicates another repeat is starting. After
the end ) is found, the parser sees the text 'twice', it knows to take the stitches in between the
parentheses and use them two times. Then the parser continues reading the text and sees "rep from *".
It knows that repeat is now completed; and fills out the remainder of the chart, ending with a single knit
stitch.
Copyright 2005 -2009 © The Knit Foundry
http://www.knitfoundry.com
Knit Visualizer 2.1 Manual
Page 54 of 75
Here are some examples to get you used to what style of quantified repeats the parser will accept:
( p2 k2) twice
( p2 k2 ) 2 times
[ p2 k2 ] 3 times
[ p2 k2 ] once
{ p2 k2 } 1 times
Remember, you can combine different types of repeats by nesting one repeat inside another like this:
[ p1 (k1 yo) 3 times ]
Make sure that you don't confuse the end parens though. This would be incorrect
WRONG: [ p1 (k1 yo] 3 times )
The parser will give you an error as it must finish the () repeat before it can finsh the [ ] repeat.
Changing the way the last repeat of the row ends
Often the very last repeat of a pattern row is slightly different for whatever reason. To change the last
repeat you can do this:
p4 *yo p2tog p9 p2tog-b yo p7 rep from * end last repeat p4
Make sure and type in "end last repeat" just like that with only single spaces. This is one of those cases
that the parser requires the spacing to be absolutely perfect. If you add an additional space it will get
confused and not know what to do. Many of the patterns in Barbara Walker's books use this type of
syntax.
Basic Stitches
This section will go over most of the basic stitches you can enter.
The following are all equivalent:
kkkk
k4
knit 4
or using purls
pppp
p4
purl 4
p2p2
sl1 (slip 1)
sl3 (slip 3 stitches)
sl wyif
sl wyib (same as a normal slip stitch)
k tbl
p tbl
k in st below
p in st below
x (empty stitch)
Copyright 2005 -2009 © The Knit Foundry
http://www.knitfoundry.com
Knit Visualizer 2.1 Manual
Page 55 of 75
Increase & Decreases
yo
m1
m3 (puts three m1 stitches right next to each other)
knit purl knit in 1 stitch
k2tog
k2tog tbl
ssk
k2tog b (same as k2tog tbl)
p3tog
k3tog
p3tog tbl (the parser does NOT like p3tog b even though this should mean the same thing)
sl1 k2tog psso
sl1 p2tog psso
There are so many combinations/variations of sl1 <stitch> psso that it's impossible to have symbols for
them all. There are a few provided in the Stitch Palette that you can use if you like them.
Special Stitches
cluster2
cluster5 (and all those in between. Won't go larger than 5)
mb (means Make Bobble)
Cables
The parser understands cables that follow this syntax:
cXoverY<l/r>[pb]
Read this as "Cable X stitches over Y stitches To the Left/Right (With Purl Background)". Some examples
will help clarify this:
Parser
Stitch Palette
Meaning
c1over3l
1 over 3, left
Cable 1 over 3 stitches, leaning left
c1over3r
1 over 3, right
Cable 1 over 3 stitches, leaning right
c3over2rpb
3 over 2, right P
Cable 3 over 2 stitches, leaning right with a purled
background
c4over1rpb
4 over 1, right P
Cable 4 over 1 stitches, leaning right with a purled
background
If you specify "pb" at the end, the instructions and symbol will have purled stitches behind the cable.
Using l for left means the cable crosses to the left, Using r for right means the cable crosses to the right.
When entering patterns that have cables, the parser will most likely not understand the format used in
your pattern. If you can't easily substitute the above syntax for cables for what the pattern specifies, use
a number of No Stitch cells to be place holders for a cable (x4 or x8), and then paint the cable in later
from the stitch Palette. Cables in Knit Visualizer can go all the way up to 4 over 4. The parser will
Copyright 2005 -2009 © The Knit Foundry
http://www.knitfoundry.com
Knit Visualizer 2.1 Manual
Page 56 of 75
understand larger cables, but there aren't symbols to display for them. You'll see a bunch of question
mark symbols in the chart where the cable would be.
How to Handle Non-Pattern Instructions
"Knit all the knits, Purl all the Purls"
Simply copy the last row worked, and Duplicate (Control-D) it to the top.
If you do this every other row (where you'd be doing Wrong Side rows), make sure "Circular" is selected,
and "Right Side Row" is selected, then you can simply hit ENTER twice to enter the same row again. If
there are more than just purls and knits in the row, use the stitch palette to fill in the correct stitches
"See Row X" or "Same as Row X"
Select the Row indicated by clicking on the row number (either to the right or left of the row) and
Duplicate (Control-D). The works when the pattern row is for the same side both times. This won't work
if Row X is a wrong side row, and the new row is a right side row. Then you'll have to type in the pattern
instructions for that row again so that Knit Visualizer can parse it as the correct side row.
"Row X: Knit"
This really means knit ALL stitches, not just knit one stitch. Make sure the stitch count is set correctly,
and then press "All k" button. Or you can type in "[k]" or "(k)" into the Instruction Field. The same
applies for rows that should be all Purl stitches.
You can create a bunch of blank rows at the top of the chart easily, but pressing the "All x" button. Each
time you press this, it will create a row that contains the "No Stitch" placeholder. You can then paint
stitches with the Stitch Palette.
How Many Repeats To Enter
When entering a pattern that has repeats, it's a good idea to enter at least two repeats. For instance if
your pattern is a "Multiple of 8 sts plus 1", you should enter "17" for the Stitch Count field. This is very
useful if you don't want to start the repeat in the same place the pattern did. Looking at multiple repeats
across (and down) will help you see it in a different way.
Keeping Track of Which Row Comes Next
The "Add" button will always tell you which row is the next one to be entered. This is true if you type in a
row, or select one and Duplicate it using Control-D. If you copy and paste a full row into the middle of
the chart, the button will adjust itself to use the next number in line.
Always check the "Right Side" checkbox to make sure it matches which side you are trying to enter next.
If you enter one, and Undo (Control-Z), it doesn't modify the checkbox's status.
Parser Limitations
It is impossible to know all the different names for knitting stitches in the various books & patterns. Knit
Visualizer has tried to come up with a good standard set to use, along with quite a few aliases for some
stitch names. (For instance you can enter either ktbl or k-b or kb)
What To Do When Things Look Really Wrong
If you get an error message, you are entering something the parser doesn't understand, or it's possible
you had a typo when you entered the pattern row. You could have the wrong number of stitches in the
Stitch Count field. The Right Side checkbox might have been selected when it shouldn't have been. Use
Undo (Control Z) to remove the last row entered, and verify the text you entered, then try again.
Copyright 2005 -2009 © The Knit Foundry
http://www.knitfoundry.com
Knit Visualizer 2.1 Manual
Page 57 of 75
Whenever using Undo or Duplicate always check to make sure the Right Side checkbox is selected
correctly for the next row.
You might also see a question mark symbol in the chart. That means the parser recognized something
that looked right, but it didn't know what symbol to assign to it.
Parsing vs The Stitch Palette
There are stitches on the palette, that you won't be able to put on your chart by parsing text. An
example is "yo twice". This, and other stitches are included in the palette so that you can include it in
your charts. If you find a strange stitch in your pattern instructions that the parser doesn't understand
it's best to enter a place holder for them. You can use any stitch you want, but it might be easiest to find
those placeholders by using something not commonly included in your patter such as the empty stitch:
k5 p2 x5 p2 k5
Here we've put in 5 empty stitches for a 5 stitch cable. The parser will include the empty stitch as place
holders, and we can paint the appropriate looking cable on top of them once we get far enough into the
pattern to decide what will look best.
Copyright 2005 -2009 © The Knit Foundry
http://www.knitfoundry.com
Knit Visualizer 2.1 Manual
Page 58 of 75
Stitch Library Manager
New in version 2.0; you can create your own Custom Stitches using the Stitch Library Manager. Once
created, your custom stitches will show up on the Stitch Palette just like standard stitches do (except in
their own special group, 'Custom Stitches', which is located at the top of the Palette); and you can click
and draw with them just like standard stitches.
To bring up the Stitch Library Manager, you need to select View -> Stitch Library Manager, or use the
"f3" keyboard shortcut.
Define
custom
stitch with
these fields
Your custom
stitches
listed here
Save location
for your Stitch
Library file
Figure 36: Stitch Library Manager window
When the window comes up, it is sized to be just slightly smaller than the Knit Visualizer main window*;
so you might not notice that the Knit Visualizer main window is still there. You can't go back to the main
window until you're done working in the Stitch Library Manager.
The first time you run Knit Visualizer's Stitch Library Manager, you won't have any custom stitches, so
you'll see exactly the screen in Figure 36.
From here you can create a new custom stitch, delete an existing one, edit a custom stitch, or import
someone else's stitch library.
A Note about fonts
You can specify which font to use when creating your custom stitch. The list of fonts includes ALL the
fonts on your system. Some fonts might have better symbols than others (Wingdings, Webdings for
instance). The built in Knit Visualizer fonts are the first ones in the list – KnitVisualizerSymbols and
KVJknit. These two fonts have symbols much more geared towards knitting symbols. KVJknit includes
*
This screen really really really really needs minimum 1024x768 resolution on your computer. Bigger
numbers are better. If you're running at 800x600 resolution, you won't be able to see all the elements on
the screen because there is just too much to display in that small of an area.
Copyright 2005 -2009 © The Knit Foundry
http://www.knitfoundry.com
Knit Visualizer 2.1 Manual
Page 59 of 75
some alternate cable symbols. If you pick a font that is available on your computer, you may or may not
be able to see that same custom stitch in Knit Visualizer on another computer. It should always work on
your current computer as long as that font remains installed.
For mac users (notably Tiger, aka 10.4.x) you'll notice that each font takes a bit of time to load before
you can see all these symbols. This is necessary so that we can ask the font which symbols are available
for your use. Once you've loaded the font once, it is cached into memory and will load faster the next
time until you quite Knit Visualizer. Due to this slow load time you might be better of exploring the fonts
on your system using Font Book to determine which font you want to use, and then select this font on
within the Stitch Library Manager. Font loading appears to be faster on the mac in Leopard (10.5.x).
Windows users shouldn't see any speed delays.
Create a Custom Stitch
To get started creating a custom stitch, press the "new" button above the empty list on the left side of
the screen (See Figure 37). This will enable all of the fields on the right which you'll need to define your
custom stitch and changes the title of that area of the screen to "Create New Stitch". The fields are
defined in the following table. Some fields are required, and some optional.
Custom Stitch Fields
Name*
The name is what you'll see in the Stitch Palette, and
used in the Legend for a chart. Required – you must
enter a name.
Example: knit
Abbrv*
Used in pattern generation; should be an abbreviation,
or very short form of the name of the stitch. Required
– you must enter an abbrv.
Example: k
Right Side Instr.
This text will be used in the legend as the right side
knitting instructions. Not required, but highly
recommended.
Wrong Side Instr.
This text will be used in the legend as instructions for
knitting the stitch when on the wrong side of your
knitting. Used for Flat back-and-forth knitting. Not
required, but highly recommended if you do charts for
flat knitting.
Foreground
The color used to draw the symbols. Default is black
Background
The color used to draw the area behind the symbols.
Default is white
Font
The font used to select the symbols. Only one font
may be used for each custom stitch
Symbols*
The symbols that make up this custom stitch. Required
- must choose at least one.
Copyright 2005 -2009 © The Knit Foundry
http://www.knitfoundry.com
Knit Visualizer 2.1 Manual
Page 60 of 75
Click on the
? to get a
bit of help
on screen.
Modify symbols
used for this
custom stitch
from this
toolbar
Star(s) means
you must
enter
something for
these fields
Double click
in this list on
the symbols
you want to
add them
Figure 37:Editing area of Stitch Library Manager
Before you start entering data, let's take a look at all those fields. Note the asterisks on the Name and
Abbrev fields. You'll also see one next to the Symbols field. These fields are required, and you cannot
create a custom stitch without them. The Create button will remain disabled until all three of these fields
have a value.
Let's create a different version of the knit stitch. By default, Knit Visualizer uses an empty cell to indicate
a knit. Most of the time that's great, but there are times you might want to use a vertical bar to indicate
a knit. Here is what the Stitch Library Manager looks like now that I've entered my values:
Figure 38: Creating a different "knit" with the Stitch Library Manager
If you've entered everything correctly, you'll have green checkmarks next to the Name and Abbrev fields,
and the Create button will be enabled. Hit the Create button to create the stitch. The stitch shows up in
the Stitch List on the left, with this icon next to it:
Copyright 2005 -2009 © The Knit Foundry
http://www.knitfoundry.com
Knit Visualizer 2.1 Manual
Page 61 of 75
This icon warns you that you haven't written this custom stitch to file yet. When the green book icon
is next to a stitch name, that stitch has been read from or saved to the Library file.
Even though you've created your stitch, it's not really saved yet. To persist it in
your own library, you need to save it out to an actual library file so that it will
continue to live in your Stitch Library even if you don't use it in a chart.
Write the Library to File
In order to save your custom stitches so that Knit Visualizer will have them the next time you run it, you
need to write out the Library file. The Library file will have an extension of .kvl (short for Knit Visualizer
Library) plus Knit Visualizer automatically remembers where you said to save your User Library.
Figure 39:Saving the User Library
At the very bottom of the Stitch Library Manager, you'll find a place to specify the User Library filename
to use. This needs to be a full pathname to your user library, and must have the .kvl extension on the
name. To make this easier - you can click the "…" to browse for the location and specify a filename, or
you can simply type in the full path and filename.
If you click the "Close & Save Library" button, your new stitch will be saved out to the library file and the
window will be closed. (If an error occurs when trying to write to the file, you'll get an error message,
and the window won't close). You can also just click "Save Library" to save the file and then keep
working in the Stitch Library Manager.
If you try to close the Stitch Library Manager without having saved the work you just did, you'll get a
warning prompting you to save to file. Remember – if you don't save to file – the custom stitches you
created might be gone when you close Knit Visualizer!
What's that Toolbar for?
The toolbar above the list of symbols is there to modify the selected symbols for your custom stitch
Figure 40:Custom stitch symbol toolbar
Most of the buttons on that little toolbar will only be enabled when you can use them. Here's what they
do:
Insert a symbol from the list below
Delete the selected symbol in the list above
Move the selected symbol to the left
Move the selected symbol to the right
Decrease the size of the font used to draw
these symbols
Copyright 2005 -2009 © The Knit Foundry
http://www.knitfoundry.com
Knit Visualizer 2.1 Manual
Page 62 of 75
Increase the size of the font used to draw
these symbols
Most of these buttons just move symbols around in your symbol list. The most important ones are the
buttons that change font size. Sometimes you'll load a font that's on your system and it might appear
that there isn't much there. Hit the A- button a few times to see if it makes any difference. You might
see symbols showing up in the big list that only show up when the font is adjusted smaller. Once they
are in your symbol list, check them again. If the font is built really large by default, you might not be able
to see those stitches when you use them in your chart at a really small size. Experiment and see what
works with the fonts you have on your system. Typically I needed to reduce my wingdings font by -2 to
get the symbols to show up nicely.
The text "Size Change: #" shows how much larger or smaller than 'standard' this symbol font is being
made. This font size changes applies to only this custom stitch. You'll notice that the size of the symbols
changes immediately. When you change the size of font used in your chart, your custom stitches will
scale with that change.
Delete a Custom Stitch
If you don't want a custom stitch in your library any more, select it in the list, and hit the "del" button.
Don't forget to Save your library file, otherwise that stitch will show back up the next time you run Knit
Visualizer.
If that stitch is currently being used by the open chart, you will see this warning:
Figure 41: Stitch in Use warning
If you select "yes", you will see ? symbols in your chart where you had that stitch before. Select "no" to
go back to the chart and replace that stitch with something else before deleting it from your library.
A few Caveats about Deleting Custom Stitches
If you delete a Custom Stitch named "Pink Diamond" and it's currently being used by the chart that's
loaded in Knit Visualizer; the stitch will revert to an unknown state with '?' as it's symbol; and it won't
have any definition in the legend if you export/print the chart.
The best way to deal with this is to load an empty chart, before deleting any custom stitches.
Custom Stitches and Chart files
Custom Stitch information is saved in two places. The first place is in your User Library file, which you
specify in the Stitch Library Manager. The second place is in a chart that uses that custom stitch.
Copyright 2005 -2009 © The Knit Foundry
http://www.knitfoundry.com
Knit Visualizer 2.1 Manual
Page 63 of 75
Anytime you use a custom stitch in a chart, that stitch information will be saved with the chart. This way
the definition of that custom stitch is "locked" into that chart as it is when you save it.
If you later change the definition of a stitch in your library (for instance, you decide your custom "knit"
stitch should use a really thick rectangle instead of a slim bar), any chart you saved with the original
definition will remain the same. When you go to load that chart again, the custom stitch will be
compared with the one in the library, and a new version of it will be created just for your chart. Here's a
walk through of a scenario to help explain:
•
•
•
Create custom stitch "pink thing"
Save library
Create chart using "pink thing" stitch.
o Save chart to coloredborder.kvc, information about "pink thing" stitch is saved with chart
•
…. Time passes (feel free to knit, or go see a movie) ….
•
•
Run Knit Visualizer with a different chart loaded, and edit entry for custom stitch "pink thing",
changing the color used to green for this stitch
Save library
•
…. Time passes ….
•
Run Knit Visualizer and load Chart "coloredborder.kvc"
Your chart looks correct; but how can that be? It's because Knit Visualizer saw that the custom stitch
in your chart was slightly different than what is in your Library. It doesn't want to presume that you
want to use the Library one; so it creates a different custom stitch using the definition on the chart
file.
When you run the Stitch Library Manager now, you'll see two entries for this particular stitch (see
Figure 42) The first one, which is still pink, is the one defined in your chart. You can tell this because
the
icon tells you that custom stitch has not been written to file.
The other is the one that was read in from the Library file.
Figure 42: Two similar custom stitches
So what now? Maybe you wanted to use the new definition of the stitch. Knit Visualizer doesn't want to
make any guesses so it just creates you a new stitch just in case you needed any of that information. If
you'd like to use the "pink thing" from your library that is now green, you can use the Replace Stitch tool
that you can get to from the Format menu. Save your chart, and now you'll have the same information
Copyright 2005 -2009 © The Knit Foundry
http://www.knitfoundry.com
Knit Visualizer 2.1 Manual
Page 64 of 75
for that stitch loaded in your library. You can delete the extra "pink thing" stitch if you need to work on
your library and don't want it saved for all time.
You can also Compare the two stitches. Read on….
Comparing Two Custom Stitches
Sometimes it's hard to know what's different between two stitches that have the same name. The
easiest way is to select those two stitches in the Stitch list using Control clicking, and then right click to
find the Compare Stitches menu item. This is the window you'd see:
Figure 43: Stitch Comparison Dialog
The blue arrows in the second column point out what's different between the two stitches. In this case
on the RS Instr, and the Foreground color are both different. You can't do anything in this dialog; only
look at the two stitches to see what's different. Click the Ok button, or use the ESC key to close the
dialog.
Creating a Custom Stitch and keeping it in your Chart only
For those of you paying attention, you'll have noticed that you can create custom stitches, and keep them
with the charts that use them, and you don't really have to save them in the User Stitch Library file at all.
(Unless you want to use them in other charts easily, without having to load the chart that has them
defined). If you want to do this:
1. Create a Custom Stitch
2. Use "esc" to close the Stitch Library Manager, answer "No" when prompted to save your Stitch
Library file
3. Create your chart, using your stitch
4. Save your chart
5. Exit Knit Visualizer
The next time you load this chart, the custom stitches used in it will be imported automatically.
Copyright 2005 -2009 © The Knit Foundry
http://www.knitfoundry.com
Knit Visualizer 2.1 Manual
Page 65 of 75
Importing Another Library
You can import a different library file by using the "Import Library…" button. Browse to the location of
another .kvl file and you will import all the custom stitches from that library file. If you want to save
these stitches into your own library, don't forget to hit "Save Library"; otherwise they will just disappear
when you close Knit Visualizer.
Share your Stitch Library
Create a library of custom stitches to share.
• Remove all the stitches from your library but the ones you want to share.
• Change the name of your User Library to something like "NancySharedStitches.kvl" and then click
"Save".
• Re-import your original stitch library
• Reselect the stitch library file you want to use to save ALL your stitches with the "…" key.
• Click "Save" again (make sure all the stitches you want are showing in the list).
Now you can send out the NancySharedStitches.kvl file to your friends, and they can import it. (Knit
Visualizer library files (.kvl) are plain text, so they shouldn't be a problem to attach into an email.)
Copyright 2005 -2009 © The Knit Foundry
http://www.knitfoundry.com
Knit Visualizer 2.1 Manual
Page 66 of 75
Tips and Tricks
For more tips and tricks, please see our website http://www.knitfoundry.com/software.html
•
To generate the pattern text for your chart, click on the Print button. You'll see the Preview
window and one of the elements in that window is the pattern text. You can print it directly from
there, or if you'd like to get just the text for the pattern for another document, select the pattern
text using your mouse cursor and type Control-C to copy. Change to the other application
(either notepad, MS Word, or other word processing software) and then type Control-V
•
To include your chart in a pattern where you want the legend in a separate location than the
chart, export one image file with only the chart, and one image file with only the legend. You can
then move them around independently to work with whatever formatting your pattern uses.
•
Remove all borders in the whole chart: Click on the "Select" Arrow to enter select mode; then use
Control-A to select all cells in the chart. Click the Borders – None button.
•
To fill an area very quickly with all purl stitches, or all knit stitches (or any stitch), copy a single
instance of that stitch, then select the area to fill. Paste (Control-V), and the area will be filled.
•
Does your chart look fuzzy when you paste it into another document? (either via Copy to
Clipboard or Export to PNG) Usually this means the other application is making the chart larger
than it was originally created. It's best to try and get the font size in Knit Visualizer as close as
possible to where you want it for your other document. Otherwise we recommend making the
font larger, then sizing the chart down in your other document.
•
Switch between Select and Draw mode quickly using the S key. If you're in Draw mode, tap S
and you're in Select mode. If you're already in draw mode, tap S and you're in Select mode now.
This tip will only work if you are NOT currently typing into the pattern entry field.
Copyright 2005 -2009 © The Knit Foundry
http://www.knitfoundry.com
Knit Visualizer 2.1 Manual
Page 67 of 75
Quick Reference: Keyboard Shortcuts
Command
Application
Preferences
Copy
Cut
Key Sequence
Control-,
Decrease Font
Delete
Control-Delete
Duplicate
Control-d
Duplicate
Control-d
Increase Font
Insert
Control-+
Control-i
Paste
Redo
Save
Control-v
Control-y
Control-s
Undo
Paint
Continuous
Control-z
Shift-left click,
held down
Show Chart
Properties
Border Top
Border Right
Border Left
Border Bottom
Border All
Border None
Control-[
Control-T
Control-R
Control-L
Control-B
Control-;
Control-0
New Chart
Open Chart
Show Preview
Control-N
Control-O
Control-P
Control-c
Control-x
Description
Shows dialog letting you edit Application wide
preferences
Copies current chart selection
Cuts the current selection to the buffer; and
replaces it with blank stitches in the chart
Zoom out; decreases the font size of the chart
Deletes the current selection (not copied to
buffer)
Only works when selecting Cells or Columns;
Duplicates & inserts the selection at the top of
chart for rows, and at the right of the chart for
columns
Duplicates the row or column selection to the top
or right side of the chart.
Zoom in; increases the font size of the chart
Inserts a full row or column that was previously
copied into the buffer
Pastes buffer
Redo the last Undo action
Save the current chart. If filename has already
been assigned it will save again in the same
place.
Reverses the last chart action (Edit, insert, etc)
Paints the same stitch over each cell the mouse
is dragged over while both shift and the left
mouse button are held down
Shows the Chart Properties dialog
Adds border on the top edge of the selection
Adds border on the right edge of the selection
Adds border on the left edge of the selection
Adds border on the bottom edge of the selection
Adds border around all edges of the selection
Removes all borders within all cells of the
selection
Opens the New Chart dialog
Prompts you to open a file containing a chart
Lets the user view the Preview dialog and from
there Print or Export to an image file
Print this page for a handy reference!
Copyright 2005 -2009 © The Knit Foundry
http://www.knitfoundry.com
Knit Visualizer 2.1 Manual
Page 68 of 75
Quick Reference: Stitches & Definitions
knit: knit stitch
purl: purl stitch
slip: Slip stitch as if to purl, holding yarn in back
slip wyif: Slip stitch as if to purl, with yarn in front
knit tbl: Knit stitch through back loop
purl tbl: Purl stitch through the back loop
k in st below: Knit into stitch below, inserting needle from front through the st in the row below
p in st below: Purl stitch in the row below, inserting needle from behind through the st in the row
below
k1 elongated: knit one stitch wrapping yarn twice. Drop extra wrap from needle on next row.
k1 elongated twice: knit one stitch wrapping yarn three times. Drop extra wraps from needle on next
row.
No Stitch: Placeholder - No stitch made.
make one: Make one by lifting strand in between stitch just worked and the next stitch, knit into
back of this thread.
make one right: Place a firm backward loop over the right needle, so that the yarn end goes towards
the back
make one left: Place a firm backward loop over the right needle, so that the yarn end goes towards
the front
yo: Yarn Over
kfb: Knit into the Front and Back of the stitch
(k1 p1 k1) in 1 st: knit, purl and knit again all in the same st to make 3 sts from 1
(k1 yo k1) in 1 st: k1 leave on needle, yo, then knit again into same st to make 3 sts from 1
(p1 yo p1) in 1 st: (p1, yo, p1) all in 1 st to make 3 sts from 1
Central Double Inc: (k1 through back loop, k1) in one stitch, then insert left needle point behind the
vertical strand that runs down between 2 sts just made, and k1 through back loop into this strand to
make 3rd stitch of group
yo twice: Yarn Over Twice
yo 3x: Yarn Over three times
yo 4x: Yarn Over four times
yo 5x: Yarn Over five times
yo 6x: Yarn Over six times
yo 7x: Yarn Over seven times
yo 8x: Yarn Over eight times
m4 sts in one: (k1 p1 k1 p1) in one stitch
m5 sts in one: (k1 yo k1 yo k1) in one stitch
m6 sts in one: (k1 p1 k1 p1 k1 p1) in one stitch
m7 sts in one: (k1 yo k1 yo k1 yo k1) in one stitch
Copyright 2005 -2009 © The Knit Foundry
http://www.knitfoundry.com
Knit Visualizer 2.1 Manual
Page 69 of 75
ssk: Slip one stitch as if to knit, Slip another stitch as if to knit. Insert left-hand needle into front of
these 2 stitches and knit them together
k2tog: Knit two stitches together as one stitch
k2tog tbl: Knit two stitches together in back loops as one
k3tog: Knit three stitches together as one
k3tog tbl: Knit three stitches together through back loops
Central Double Dec: Slip first and second stitches together as if to knit. Knit 1 stitch. Pass two slipped
stitches over the knit stitch.
k4tog: Knit four stitches together as one
k5tog: Knit five stitches together as one
k6tog: Knit six stitches together as one
k7tog: Knit seven stitches together as one
sl1 k psso: slip 1, knit 1, pass slipped stitch over knit 1
sl1 kwise k1 psso: Slip 1 as it to knit, knit 1 stitch, pass slipped stitch over knit stitch.
sl1 k2tog psso: slip 1, k2tog, pass slip stitch over k2tog
sl1 k3tog psso: Slip 1 stitch, k3tog, pass slipped stitch over k3tog
sl2 k3tog p2sso: Slip 2 stitches, k3tog, pass 2 slipped stitches over k3tog
sssk: (Slip 1 as if to knit) 3 times; insert left-hand needle from the front to the back of all stitches at
the same time and knit them together.
p2tog: Purl 2 stitches together
p2tog tbl: Purl two stitches together in back loops, inserting needle from the left, behind and into the
backs of the 2nd & 1st stitches in that order
p3tog: Purl three stitches together as one
p3tog tbl: Purl three stitches together as one, inserting needle from the left and behind
p4tog: Purl four stitches together as one
p5tog: Purl five stitches together as one
p6tog: Purl six stitches together as one
p7tog: Purl seven stitches together as one
sl1 p2tog psso: slip 1 stitch, p2tog, then pass slipped stitch over p2tog
bobble: To make bobble: (k1 yo k1 yo k1) in one stitch, turn and p5. Turn and k5. Turn and p2tog,
p1, p2tog. Turn and sl1-k2tog-psso, completing bobble
cluster2: Slip 2 stitches with yarn in back, pass yarn to front, Slip same three stitches back to left
needle, pass yarn to back. k3
cluster3: Slip 3 stitches with yarn in back, pass yarn to front, Slip same three stitches back to
left needle, pass yarn to back. k3
cluster4: Slip 4 stitches with yarn in back, pass yarn to front, Slip same 4 stitches back to
left needle, pass yarn to back. k4
cluster5: Slip 5 stitches with yarn in back, pass yarn to front, Slip same 5 stitches back
to left needle, pass yarn to back. k5
nupp: (k1 p1 k1 p1 k1) in stitch, take first 4 stitches created over the last
Left Twist: sl1 to CN, hold in front. k1, k1 from CN
Copyright 2005 -2009 © The Knit Foundry
http://www.knitfoundry.com
Knit Visualizer 2.1 Manual
Page 70 of 75
Left Twist, purl bg: sl1 to CN, hold in front. p1. k1 from CN
Purled Left Twist: sl1 to CN and hold to front. p1, p1 from CN
Right Twist: Skip the first stitch, knit into 2nd stitch, then knit skipped stitch. Slip both stitches
from needle together OR k2tog leaving sts on LH needle, then k first st again, sl both sts off needle.
Right Twist, purl bg: sl1 to CN, hold in back. k1, p1 from CN
Purled Right Twist: sl1 to CN, hold in back. p1, p1 from CN. OR p into 2nd st, then p 1st st
c1 over 2 left: sl 1 to CN, hold in front. k2, k1 from CN
c1 over 2 left P: sl 1 to CN, hold in front. p2, k1 from CN
c1 over 2 right: sl2 to CN, hold in back. k1, k2 from CN
c1 over 2 right P: sl2 to CN, hold in back. k1, p2 from CN
c1 over 3 left: sl1 to CN, hold in front. k3, k1 from CN
c1 over 3 left P: sl1 to CN and hold in front, p2, k1 from CN
c1 over 3 right: sl3 st to CN, hold in back. k1, k3 from CN
c1 over 3 right P: sl3 to CN, hold in back. k1, p3 from CN
c2 over 1 left: sl2 to CN, hold in front. k1, k2 from CN
c2 over 1 left P: sl2 to CN, hold in front. p1, k2 from CN
c2 over 1 right: sl1 to CN, hold in back. k2, k1 from CN
c2 over 1 right P: sl1 to CN, hold in back. k2, p1 from CN
c2 over 2 left: sl 2 to CN, hold in front. k2, k2 from CN
c2 over 2 left P: sl 2 to CN, hold in front. p2, k2 from CN
c2 over 2 right: sl2 to CN, hold in back. k2, k2 from CN
c2 over 2 right P: sl2 to CN, hold in back. k2, p2 from CN
c2 over 3 left: sl2 to CN, hold in front. k3, k2 from CN
c2 over 3 left P: sl2 to CN, hold in front. p3, k2 from CN
c2 over 3 right: sl3 to CN, hold in back. k2, then k3 from CN
c2 over 3 right P: sl3 to CN, hold in back. k2 then p3 from CN
c3 over 1 left: sl3 to CN, hold in front. k1, then k3 from CN
c3 over 1 left P: sl3 to CN, hold in front. p1, k3 from CN
c3 over 1 right: sl1 to CN, hold in back. k3, k1 from CN
c3 over 1 right P: sl1 to CN, hold in back. k3, p1 from CN
c3 over 2 left: sl3 to CN, hold in front. k2, then k3 from CN
c3 over 2 left P: sl3 to CN, hold in front. p2, then k3 from CN
c3 over 2 right: sl2 to CN, hold in back. k3, then k2 from CN
c3 over 2 right P: sl2 to CN, hold in back. k3, then p2 from CN
c3 over 3 left: sl3 to CN, hold in front. k3, k3 from CN
c3 over 3 left P: sl3 to CN, hold in front. p3, k3 from CN
c3 over 3 right: sl3 to CN, hold in back. k3, then k3 from CN
c3 over 3 right P: sl3 to CN, hold in back. k3 then p3 from CN
c1 over 4 left: sl1 to CN, hold in front. k4, k1 from CN
Copyright 2005 -2009 © The Knit Foundry
http://www.knitfoundry.com
Knit Visualizer 2.1 Manual
Page 71 of 75
c1 over 4 left P: sl1 to CN, hold in front. p4, k1 from CN
c1 over 4 right: sl4 to CN, hold in back. k1, then k4 from CN
c1 over 4 right P: sl4 to CN, hold in back. k1 then p4 from CN
c2 over 4 left: sl2 to CN, hold in front. k4, k2 from CN
c2 over 4 left P: sl2 to CN, hold in front. p4, k2 from CN
c2 over 4 right: sl4 to CN, hold in back. k2, then k4 from CN
c2 over 4 right P: sl4 to CN, hold in back. k2 then p4 from CN
c3 over 4 left: sl3 to CN, hold in front. k4, k3 from CN
c3 over 4 left P: sl3 to CN, hold in front. p4, k3 from CN
c3 over 4 right: sl4 to CN, hold in back. k3, then k4 from CN
c3 over 4 right P: sl4 to CN, hold in back. k3 then p4 from CN
c4 over 4 left: sl4 to CN, hold in front. k4, k4 from CN
c4 over 4 left P: sl4 to CN, hold in front. p4, k4 from CN
c4 over 4 right: sl4 to CN, hold in back. k4, then k4 from CN
c4 over 4 right P: sl4 to CN, hold in back. k4 then p4 from CN
c4 over 1 left: sl4 to CN, hold in front. k1, then k4 from CN
c4 over 1 left P: sl4 to CN, hold in front. p1, k4 from CN
c4 over 1 right: sl1 to CN, hold in back. k4, k1 from CN
c4 over 1 right P: sl1 to CN, hold in back. k4, p1 from CN
c4 over 2 left: sl4 to CN, hold in front. k2, then k4 from CN
c4 over 2 left P: sl4 to CN, hold in front. p2, then k4 from CN
c4 over 2 right: sl2 to CN, hold in back. k4, then k2 from CN
c4 over 2 right P: sl2 to CN, hold in back. k4, then p2 from CN
c4 over 3 left: sl4 to CN, hold in front. k3, k4 from CN
c4 over 3 left P: sl4 to CN, hold in front. p3, k4 from CN
c4 over 3 right: sl3 to CN, hold in back. k4, then k3 from CN
c4 over 3 right P: sl3 to CN, hold in back. k4 then p3 from CN
cross 1 over 1 left: sl2 to CN, hold in front. k1, sl center st from CN back to left hand needle
and knit it. k1 from CN
cross 1 over 1 left/purl bg: sl2 to CN, hold in front. k1, sl center st from CN back to left hand
needle and purl it. k1 from CN
cross 1 over 1 right: sl2 to CN, hold in back. k1, sl center st from CN back to left hand needle
and knit it. k1 from CN
cross 1 over 1 right/purl bg: sl2 to CN, hold in back. k1, sl center st from CN back to left hand
needle and purl it. k1 from CN
cross 2 over 2 left: sl3 to CN, hold in front. k2, sl center st from CN back to left hand
needle and knit it. k2 from CN
cross 2 over 2 left/purl bg: sl3 to CN, hold in front. k2, sl center st from CN back to left
hand needle and purl it. k2 from CN
cross 2 over 2 right: sl3 to CN, hold in back. k2, sl center st from CN to left hand needle
and knit it. k2 from CN
Copyright 2005 -2009 © The Knit Foundry
http://www.knitfoundry.com
Knit Visualizer 2.1 Manual
Page 72 of 75
cross 2 over 2 right/purl bg: sl3 to CN, hold in back. k2, sl center st from CN to left hand
needle and purl it. k2 from CN
cross 3 over 3 left: sl4 to CN, hold in front. k3, sl center st from CN to left hand
needle and knit it. k3 from CN
cross 3 over 3 left/purl bg: sl4 to CN, hold in front. k3, sl center st from CN to left
hand needle and purl it, k3 from CN
cross 3 over 3 right: sl 4 to CN, hold in back. k3, sl center st from CN to left hand
needle and knit it, k3 from CN
cross 3 over 3 right/purl bg: sl4 to CN, hold in back. k3, sl center st from CN to
left hand needle and purl it, k3 from CN
color1: none defined
color2: none defined
color3: none defined
color4: none defined
color5: none defined
color6: none defined
color7: none defined
color8: none defined
color9: none defined
color10: none defined
color11: none defined
color12: none defined
color13: none defined
color14: none defined
color15: none defined
color16: none defined
color17: none defined
color18: none defined
Copyright 2005 -2009 © The Knit Foundry
http://www.knitfoundry.com
Knit Visualizer 2.1 Manual
Page 73 of 75
Where to go for Support
Yahoo group: [email protected]
You can join this group by visiting: http://groups.yahoo.com/group/knit-visualizer-users
We have a group on Ravelry http://www.ravelry.com/groups/knit-visualizer-users
Both forums are monitored by The Knit Foundry. Additionally you can send email to
[email protected]. It might take us a while to get back to you; but we do read all comments and
suggestions.
Other Resources
There are a lot of books on knitting charts. First and foremost are the Barbara Walker Treasuries. (The
cable symbols used in Knit Visualizer are modeled after the cables drawn in Barbara Walker's Treasuries)
While not all of these books cover charts, they are a great resource for stitch patterns. Knit Visualizer
extensively used the patterns in these books to test and build the Pattern Entry parser.
A Treasury of Knitting Patterns
by Barbara G. Walker
Published by: Schoolhouse Press
ISBN: 0942018168
A Second Treasury of Knitting Patterns
by Barbara G. Walker
Published by: Schoolhouse Press
ISBN: 0942018176
Charted Knitting Designs: A Third Treasury of Knitting Patterns
by Barbara G. Walker
Published by: Schoolhouse Press
ISBN: 0942018184
A Fourth Treasury of Knitting Patterns
by Barbara G. Walker
Published by: Schoolhouse Press
ISBN: 0942018206
Online Resources
Knit Foundry has a tutorial for reading charts and knitting from them.
http://www.knitfoundry.com/freestuff.html
Kim Salazar at her string-or-nothing blog, wrote an excellent series of tutorials on charts & creating them
from patterns. The first tutorial is here:
http://www.string-or-nothing.com/2005/10/31/CHARTING101.aspx
A lot of what she describes in her tutorials, Knit Visualizer does for you, but it's very useful to understand
the concepts.
Copyright 2005 -2009 © The Knit Foundry
http://www.knitfoundry.com
Knit Visualizer 2.1 Manual
Page 74 of 75
Index
A
About Knit Visualizer...... 16, 41
Application info icon ............... 5
Aspect Ratio .......................... 36
B
Background Color.................. 31
Border Color.......................... 34
Borders, Adding .................... 30
C
Chart Files ............................. 13
Color
Draw Mode ........................ 46
Draw Mode ........................ 38
remove ............................... 34
Color swatches....................... 31
Coloring................................. 47
Create New Chart .................. 16
Custom Stitch
Back to defaults ................. 34
Comparison........................ 64
Create................................. 59
Delete................................. 62
Import ................................ 65
Save Locations................... 62
E
Edit Menu .............................. 25
Clear Chart......................... 26
Copy .................................. 26
Cut ..................................... 26
Delete................................. 26
Duplicate............................ 26
Mirror Selection................. 26
Paste................................... 26
Redo................................... 26
Undo .................................. 25
Empty Stitch Preferences....... 36
Exit Knit Visualizer ............... 25
Eyedropper Mode .................. 48
F
FAQ, online ............................. 6
File Menu......................... 25, 16
Exit .................................... 25
Import ................................ 17
New Chart.......................... 16
Open .................................. 17
Open Recent ...................... 17
Page Setup ......................... 19
Print ................................... 19
Saving ................................ 18
Foreground Color................... 31
Format Menu
Borders............................... 30
Color .................................. 31
Decrease Font..................... 28
Increase Font...................... 28
Justify................................. 29
Replace Stitch .................... 28
G
Modes.....................................44
N
No Stitch.................................29
Notes ......................................37
O
Other Resources .....................73
P
Images
Copy to Clipboard.............. 24
Exporting ........................... 23
Insert Menu ............................ 27
Insert Copied Rows/Columns
....................................... 27
New Columns..................... 27
New Rows.......................... 28
Installation ............................... 6
Mac OS X ............................ 9
Running Knit Visualizer .... 10
Uninstalling........................ 10
Windows Vista..................... 6
Windows XP ........................ 6
Paint Mode .............................46
Parser
# of Repeats........................56
Basic Stitches .....................54
Cables.................................55
Caveats ...............................53
Entering Repeats ................51
Error Messages...................56
Increases & Decreases........55
Other Types of Instructions 56
Quantify Repeats ................53
Simple Example .................50
Pattern Entry Area..................49
Pattern Entry Mode ................48
Pattern Entry text icon..............5
Pattern, Generating.................20
Preview Dialog
Options ...............................20
Printing
Layouts ...............................21
Page Setup ....................19, 24
Preview (Paged) .................24
Preview Dialog...................19
to Printer.............................25
K
R
Keyboard Shortcut icon ........... 5
Keyboard Shortcuts................ 67
Knit Visualizer
Change History .................. 11
What is it? ............................ 5
Read The Manual .....................5
Row Numbers
Begin with Right Side Row35
Circular...............................35
Ignore Wrong Side Rows ...35
L
S
Library File ............................ 61
Save Chart ..............................18
Select Mode............................45
Source.....................................37
Starting Row Number.............36
Status Bar ...............................43
Stitch Definitions....................68
Stitch Library Manager ..........58
Stitch Palette...........................46
Support ...................................73
Grid Lines .............................. 36
H
Help Menu
About Knit Visualizer ........ 41
Clear Preferences ............... 41
Highlight .......................... 43, 47
I
M
Mac
About Knit Visualizer ........ 16
Preferences......................... 16
Quit Knit Visualizer ........... 16
Main Window ........................ 15
Manual
How to Read ........................ 5
Copyright 2005 -2009 © The Knit Foundry
http://www.knitfoundry.com
Knit Visualizer 2.1 Manual
Page 75 of 75
T
V
Tips and Tricks ...................... 66
Title ....................................... 37
Toolbar Buttons ............... 16, 42
Version 1.1............................. 12
Version 1.2............................. 12
Version 1.2a ........................... 11
Version 2.0............................. 11
View Menu
Application Preferences ..... 37
U
Upgrade ................................. 13
Copyright 2005 -2009 © The Knit Foundry
http://www.knitfoundry.com
Chart Properties..................35
Hide Pattern Entry Fields ..37,
39
Themes ...............................39