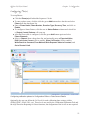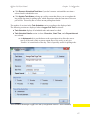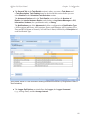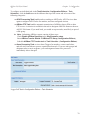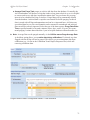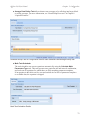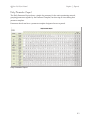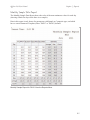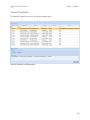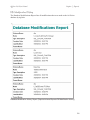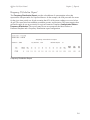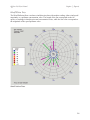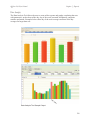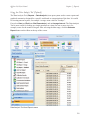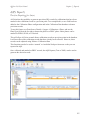
1
AirVision Produced by Agilaire LLC 2904-B Tazewell Pike, Suite A Knoxville, TN 37918 www.agilairecorp.com [email protected] Support: 865-927-9440 [email protected] September 2013 Agilaire AirVision Manual Table of Contents Introduction to AirVision Concepts_____________________ 9 Open Data Acquisition and Import _______________________ 9 Combined Data Editing and QA Tools ____________________ 9 Post-processing/Workflow _____________________________ 10 User-defined Shortcuts For Communication Activities ________ 11 Sophisticated Data Relationships________________________ 11 Chapter 1 Installing AirVision ________________________ 12 Installing Microsoft .NET Framework __________________ 12 Installing SQL Server _____________________________ 12 Installing the AirVision Database _____________________ 13 First-time Installation of the AirVision Database _________ 13 Installing the AirVision Server _______________________ 14 Installing the AirVision Client on Secondary Computers _____ 15 Running Standard or Enterprise SQL Server 2005 or 2008 __ 16 _____________________ 16 Logging In to AirVision ____________________________ 17 Accessing Profiles After Logging In _________________ 18 Chapter 2 Configuring AirVision ______________________ 19 Configuring System Preferences ________________________ 21 Importing (Converting) E-DAS Data ______________________ 22 Site and Parameter Setup _____________________________ 24 Adding and Editing Sites ______________________________ 24 Adding and Editing Parameters ________________________ 27 Configuring Parameter Templates _______________________ 31 Adding Loggers to Sites in Data Source Details ____________ 33 Running SQL Server Express 2 Agilaire AirVision Manual Table of Contents Adding Channels to Data Loggers____________________________ 34 Parameter Tag Editor _____________________________________ 38 System Configuration Export_______________________________ 38 Adding Communication Routes _________________________ 39 TCP/IP Routes _________________________________________ 39 Adding Serial Routes for Direct Communication __________ 41 Adding Remote Modems ______________________________ 42 Adding a Modem Route for Central Modem _______________ 44 Associating an Existing Route to a Logger_________________ 45 Testing Your Connection ______________________________ 46 Logger Download ____________________________________ 47 Setting Up Calibrations _______________________________ 48 Calibration Expected Values Editor _____________________ 49 Configuring Automatic Calibrations _____________________ 50 Configuring Phases __________________________________ 51 Externally Initiated Calibration _________________________ 52 Configuring Instrument Controlled Calibrations ___________ 54 Configuring Interactive (Menu) Calibrations ______________ 55 Configuring User-Initiated Calibrations __________________ 56 Configuring Input/Output Lines for Digital Events ___________ 57 Configuring Digital Timed Events _______________________ 57 Configuring Digital Triggered Events ____________________ 58 Setting Up Email Alarms_______________________________ 61 AIRNow/FTP Setup __________________________________ 65 Scheduling Tasks ____________________________________ 66 Task Scheduler ______________________________________ 66 Schedule Task Wizard ________________________________ 79 Task Display ________________________________________ 82 3 Agilaire AirVision Manual Table of Contents Favorites Editor _____________________________________ 83 Creating a Favorite _____________________________________ 83 Favorite Detail Tab _______________________________________ 83 Favorite Query Tab _______________________________________ 83 Configuring Security __________________________________ 85 User Editor _________________________________________ 85 My User Settings ____________________________________ 86 Groups Editor _______________________________________ 87 Group Permissions __________________________________ 88 GSI Driver Editor ____________________________________ 89 AQI Program Editor __________________________________ 90 Configuring Reports __________________________________ 92 Frequency Distribution and Concentration Distribution Editor 93 Wind Rose Levels Editor ______________________________ 94 Violation of Standards Editor __________________________ 95 Chapter 3 Reports ________________________________________ 96 Criteria Pane ________________________________________ 98 Filters _______________________________________________ 99 Additional Fields for Specific Reports _____________________ 101 Annotations Report __________________________________ 102 AQSCSV Report (AIRNow CSV Report) __________________ 103 Configuration Reports _______________________________ 104 Calibration Configuration Report _______________________ 105 Channel Configuration Report _________________________ 106 Parameter Configuration Report ________________________ 107 Scheduled Tasks Report ______________________________ 108 Site Configuration Report _____________________________ 109 4 Agilaire AirVision Manual Table of Contents Routine Reports _____________________________________ 110 Daily Summary Report ________________________________ 110 Basic Data Export Report _____________________________ 111 24-Hour Averages Summary Report _____________________ 112 Daily Parameter Report _______________________________ 113 Monthly Report ______________________________________ 114 Monthly Sample Data Report___________________________ 115 Calibration Results ___________________________________ 116 Calibration Trend Graph ______________________________ 117 LogBook Report _____________________________________ 120 Audit Trail Report ____________________________________ 121 Journal Controller ____________________________________ 122 Logger Reports _____________________________________ 123 Alarm Journal ______________________________________ 123 Central Messages ____________________________________ 124 Input Line Status Report ______________________________ 125 Power Failure Report _________________________________ 126 Internal Reports _____________________________________ 127 DB Modification HIstory ______________________________________ 128 Exception Journal Report ________________________________ 129 Journal Message Log _________________________________ 130 Software Version Report ______________________________ 131 Table Size Information ________________________________ 132 Quality Assurance/Analysis Report ______________________ 133 Concentration Distribution Report ______________________ 133 Frequency Distribution Report _________________________ 134 Data Recovery Report ________________________________ 135 Wind/Pollution Rose __________________________________ 136 Joint Frequency Distribution Report ____________________ 137 5 Agilaire AirVision Manual Table of Contents Data Analysis _______________________________________ 138 Using the Data Analysis Tool (Optional) ___________________ 139 Saving Grid Layouts as Favorites ________________________ 145 Chart Display _________________________________________ 146 Maximum Hourly Averages Report ______________________ 147 Statistical Report ____________________________________ 148 USEPA / Public Health Reports _________________________ 149 AIRNow Report ______________________________________ 149 AQI--Current ________________________________________ 150 AQI Report--Range _____________________________________ 151 AQI Report--Standard_________________________________ 152 AQS (Text) Report ____________________________________ 153 AQS (XML 2.0) Report ________________________________ 154 AQS Reports _______________________________________ 155 Precision Reporting for Gases ___________________________ 155 Violation of Standards Report __________________________ 156 Meteorological Report ________________________________ 157 Favorites __________________________________________ 158 Chapter 4 Data Editors ________________________________ 160 Average Data Editor __________________________________ 161 Linear Data Editor ______________________________________ 162 Cell Color Codes in Flags Editor _________________________ 163 Right-Click Options ____________________________________ 164 Cross-Tab Data Editor ___________________________________ 166 Matrix Data Editor ______________________________________ 167 Time Series Graph ______________________________________ 168 Scatter Plot Graph ___________________________________ 172 Histogram __________________________________________ 173 Batch Reading Update __________________________________ 174 6 Agilaire AirVision Manual Table of Contents Sample Data Editor __________________________________ 175 PM Calculator in Sample Data Editor ____________________ 176 Calibration Data Editor ________________________________ 177 Lock/Unlock Data ____________________________________ 179 LogBook Entry Editor _________________________________ 180 Cal Adjust Processor (Optional) _________________________ 181 Chapter 5 Help & Support __________________________ 183 Agilaire Support _____________________________________ 184 AirVision Manual ____________________________________ 184 AirVision Wiki _______________________________________ 184 How To--Step by Step ________________________________ 184 Chapter 6 List Editors _____________________________ 185 Log Book Category Editor _____________________________ 186 Math Editors ________________________________________ 187 Central Math Processor _______________________________ 187 Modem Types ___________________________________________ 189 Parameter Tag Editor _________________________________ 190 Unit Editor _________________________________________ 191 Chapter 7 Additional Features _______________________ 192 AQS XML Import Tool _________________________________ 193 AQS Text Import Tool _________________________________ 193 Fill Data Gaps ___________________________________________ 194 Table Export ________________________________________ 195 Table Import ________________________________________ 196 Chapter 8 Optional Features ________________________ 197 Automatic Data Validation Processor (ADVP) ______________ 198 Time-specific rules (day/night, rush hour) ________________ 203 Suggestions for Initial ADVP Rules _____________________ 204 7 Agilaire AirVision Manual Table of Contents File Import Configuration ______________________________ 205 Configuring File Import Templates _______________________ 206 Creating a Template ____________________________________ 206 Mapping Columns ___________________________________ 207 Enhanced File Import Tool _____________________________ 208 Flag Mapping Table __________________________________ 212 P & A (PARS) Editor __________________________________ 214 PARS Precision Editor ________________________________ 214 PARS Accuracy Editor ________________________________ 216 Data Rollup Processor ________________________________ 219 Appendix _______________________________________ 222 AQI Web Service ____________________________________ 222 8 Introduction to AirVision Concepts Welcome to AirVision, the first software that addresses current air monitoring needs while accommodating future technical innovations. Developed by industry veterans and engineered from the ground up in response to users’ needs, AirVision is the first software to successfully combine: Open data acquisition and import Combined Post-processing/Workflow User-defined Sophisticated -Data and Quality Assurance tools shortcuts for communication activities data relationships Open Data Acquisition and Import AirVision supports an open system of modular drivers that can be added to provide connectivity to any source of data. The driver manages the details of data collection and uses standard interface to exchange data with AirVision’s core. Third parties and end users can construct new drivers for AirVision, providing an open solution to manage future requirements. AirVision is designed specifically along the concept that eventually networks (or significant parts of networks) will consist of smart instruments connected to a central AirVision data management hub through broadband connections. To normalize these data sources, AirVision utilizes an open system that allows any end user or company to develop drivers for a particular data source. The driver incorporates all the necessary knowledge and logic to collect data and return data to the database through a standardized data access layer. Combined Data Editing and QA Tools To optimize quality assurance, AirVision opens up the process between data collection and final reporting through an open modular approach. Open Data Processors can be scheduled and triggered by the Task Manager to automate quality assurance while also controlling the points of data access and display, such as AIRNow and web presentation. 9 Agilaire AirVision Manual Introduction to AirVision Concepts The Automatic Data Validation Processor Module (ADVP) assigns a quality grade (1-10) for each data point based initially on instrument/data logger flags, but allows you to generate rules that affect the quality code. The ADVP can be triggered to run automatically after data collection to grade each data point, and the quality grade can be used to prevent suspect or bad data from being published to the web or shared with other organizations. The grades can also be used to focus quality assurance efforts on the most suspect data points Data can be compared against other parameters at the same site, different sites (spatial testing), or historical composite values for that particular parameter and/or site (e.g., comparing this hour’s value to the same hour and day of the week over the previous five years). ADVP functions also include persistency checks. Post-processing/Workflow AirVision’s post-processing of data is not limited to data editing and other manual functions. Its powerful and expandable data post-processing capabilities optimize the quality assurance process. AirVision opens up the process between data collection and final reporting through an open modular approach similar to Open Data Sources. Open Data Processors can be scheduled and triggered as defined by you in the Task Manager to automate quality assurance while also controlling the points of data access and display, such as AIRNow and web presentation. These post-processing tasks can include: AQI calculations and forecasts Automatic Zero Automated Web AIRNow Email Emailed Time data validation or other calibration data adjustments AQS coding publishing, tables, real-time charts and maps or real-time Exchange Network transfers alarms reports skewing tape sampler data The open approach also ensures that known data paths can be easily updated to meet changing requirements, such as future alterations in the AQI calculation process (changes based on new standards, possibly including more complex algorithms that take into consideration the synergistic health effects of PM and ozone, requiring a multi-variate algorithm to calculate a more representative measurement of health effect). 10 Agilaire AirVision Manual Introduction to AirVision Concepts User-defined Shortcuts For Communication Activities The parameter editor allows you to define parameter data. In AirVision a parameter can come from any kind of data source--it is no longer correlated with data logger channels. The parameter editor contains basics such as units, EPA reporting codes, and graph limits. This editor allows you to enter/modify a list of parameter types that each parameter can be referenced to, so the application can more easily correlate parameters with different names (e.g., "O3" vs. "OZ" vs. "OZONE"). In E-DAS Ambient, many of these configurations had to be repeated for the same parameter at multiple sites, or an assumption was made regarding parameter names, such as ozone, to avoid the need for repetitive configuration entries. AirVision avoids the problems associated with this approach by using EPA Parameter Names and Parameter Categories. Linking parameters to parameter types makes reporting easier and eliminates the necessity to link individual selections together (e.g., for AIRNow reporting). Instead, details can be configured for an EPA parameter type. The Parameter Template Editor can be used to add new template definitions if a suitable one cannot be found in the default list. Parameter information can be auto-filled by selecting a parameter template and the option to auto-fill EPA codes and units. Units are selected from a pick list, so that unit conversions (e.g., ppm to ppb) and unit types (e.g., whether rainfall or solar radiation is totaled, not averaged) are handled automatically. The parameter editor also supports the designation of alternate analyzer units that differ from reporting and editing units for digital data acquisition where the analyzer reports data in units different from from those the customer prefers (ppm vs. ppb). The conversion is handled at the time of data acquisition (polling, file import) and data is stored in the regular EPA units in the database. In both the site and parameter editors, you will be able to create meta-data fields to handle customer-specific data fields, such as analyzer serial number and installation date. Sophisticated Data Relationships Our Agilaire customers have requested that AirVision handle new and more complex data relationships such as managing data from parameters in a hierarchical fashion.For example, PM filter data that may exist both as a total mass/concentration value, but also may consist in detailed breakdowns from speciation monitors or XRF (X-ray fluorescence) lab data. AirVision supports these relationships as part of its original design, a feature unique in its industry rather than as an afterthought or modification to an existing database. Parameter configuration also allows the designation of a parent parameter to form parent-child relationships that can be used to drill down in the data editor. A typical example is designating analyzer diagnostic parameters, such as sample flow and box temperature, to be children of the primary analyzer pollutant value (e.g., NOx), so that a suspect reading could be investigated by drilling down in the data editor. Another use could be to group parents & children in a columnar data report. 11 Chapter 1 Installing AirVision AirVision must be installed on XP Pro / Server 2003 or better (through Windows 7/8 or Server 2008R2). 4GB of RAM is recommended. Before AirVision can be installed, the following software must be installed on your computer: SQL Server 2008, SQL Server 2012, or SQL Express with all available service packs, as well as .NET Framework includes versions 3.5SP1 and 4.0. SQL will request that the Windows Component Internet Information Services (IIS) be added, but IIS is NOT necessary for AirVision and does not have to be enabled. Installing Microsoft .NET Framework We need to revise the system requirements section (Kathleen is currently drafting the update for that I believe). Also note that .Net 4.5 will be required in 2014. If you don’t already have .NET Framework versions 3.5SP1 and 4.0 installed on your computer, you can download it from the Microsoft website. Follow the instructions in the installation wizard. Installing SQL Server Before SQL Server can be installed, .NET Framework both versions 3.5SP1 and 4.0 must be installed. Important! Although AirVision will operate with either SQL Server or SQL Express, SQL Express has a file size limit of 4G, so if you convert files from E-DAS Ambient to AirVision (i.e., to SQL files) you will run out of room quickly in SQL Express, especially if you are converting and collecting minute data. Even though SQL Express is a free download, Agilaire recommends that you start with the full version of SQL Server 2008 or 2012 to avoid upgrading later. SQL Express will stop functioning when it has reached its capacity of 4G. To install SQL Server or SQL Express, insert the CD or DVD and follow the instructions in the wizard. In the first screen check the box to accept the license agreement and click Next. The default features are sufficient in the Feature Selection screen, but you can select the program features you want installed. The most important feature to install is Client Tools. Click Next. • Selecting the 'default' install instance is acceptable. • System and Local Service accounts should be selected if not prepopulated. • A desired user should be added as a admin. 12 Agilaire AirVision Manual Chapter 1 Installation Agilaire recommends Windows Authentication Mode if AirVision and the SQL database reside on the same PC. The purpose of Authentication Mode is to specify the security used when connecting to SQL Server. If you select Windows Authentication Mode a password is not required. If the SQL database is on a different computer from AirVision, select Mixed Authentication Mode when you’re installing SQL. Mixed Authentication Mode is also recommended for AV-Trend systems if you intend to use remote synchronization functions. If you select Mixed Mode (a combination of Windows Authentication and SQL Server Authentication) you must enter and confirm a password for the System Administrator. Click Next to continue. The remaining setup screens are self-explanatory. Follow the directions and click Finish in the Completing Microsoft SQL Server 2008 Setup screen . Note: If you set up SQL in Windows Authentication mode, you must must log in to SQL with Windows Authentication, not SQL Server Authentication, or the AirVision Service won’t start. Note: If you install SQL ServerExpress, Management Studio (free download) is a separate installation. SQL Express must be installed first, before Management Studio. Management Studio will not work without SQL. Important! If SQL Express is installed on the same computer as AirVision Server, the SQL Express login name must be .\SQLExpress instead of your computer name. Installing the AirVision Database After you have installed SQL Server: 1. From the Windows Start menu, select All Programs > Microsoft SQL Server 2008 (or Microsoft SQL Server 2008) > SQL Server Management Studio. 2. Right-click the Databases folder and select New Database. For the Database name, enter AVData and click OK. 3. Click to select the database you just created (AVData). First-time Installation of the AirVision Database 1. If you are installing AirVision for the first time, insert the installation CD and browse to the folder Database_Freshinstall (double-click to open My Computer, then right-click the CD drive and select Open). Within the folder Database_Freshinstall double-click AVReleaseCreator.sql. The script should open in the AVData folder in SQL. 2. Click ! Execute to run the query. The query will install the SQL tables needed to run AirVision. The bottom of the query screen will display the results of the query. Any error messages will be listed by line number. Be sure to save any error messages in case you need to call Agilaire Support for help. I think we should only recommend mixed mode in the SQL install guidelines, it provides a 'backdoor' to access SQL in case of Windows authentication issues. 13 Agilaire AirVision Manual Chapter 1 Installation Installing the AirVision Server If you are upgrading to AirVision 2.1 or higher from a previous version, you no longer need to uninstall the old version before you run the new Server installation. Note: 1. After you have run the appropriate scrip to install the database for the first time or upgrade the database as described in the previous section, continue to browse the AirVision installation CD (double-click to open My Computer, then right-click the CD drive and select Open). Double-click to open the Server folder 2. Within the Server folder, double-click to open the file AVServerSetup.msi to install the server part of the AirVision software for new installations, or setup.exe for upgrades. 3. When the installation begins, most of the screens are self-explanatory. • You will want to review and accept the End-User License Agreement in order to proceed with the install. • The default install directory is C:\Program Files\Agilaire LLC\Server (you can also browse to change the install directory if desired). 4. Click Next to accept the default destination directory (C:\Program Files\Agilaire LLC\Server) or browse to change the directory and then click Next. 5. The final screen will say the AirVision Server has been successfully installed. Check the selection box to launch the Server Settings Editor and click Finish. 6. You will be prompted if you want to install the AirVision Client. If you do not want want to install the Client, unclick this box. 14 Agilaire AirVision Manual Chapter 1 Installation Installing the AirVision Client on Secondary Computers If you are upgrading AirVision from a previous version, you no longer have to uninstall the old version before you run the Client installation. Note: 1. After you have installed the AirVision Server and the AirVision SQL database, continue to browse the AirVision installation CD (double-click to open My Computer, then right-click the CD drive and select Open). Double-click to open the folder Client. Within the Client folder, double-click to run AirVisionClient_Installer.exe. Click Next in the first screen to continue. 2. Accept the license agreement and click Next. 3. Enter your User Name, Company Name (optional), and the unique Product ID (required) supplied by Agilaire. Click Next. 4. Click Next to accept the default destination directory (C:\Program Files\Agilaire LLC\Server) or browse to change the directory and then click Next. 5. The final screen will say the AirVision Client has been successfully installed. Click Finish. 15 Agilaire AirVision Manual Chapter 1 Installation Running Standard or Enterprise SQL Server 2008 or 2012 If you installed AirVision using either Standard or Enterprise SQL Server for your database, click the Test Connection button after the installation. You should see a message box saying your connection was successful. Running SQL Server Express If you are running SQL Express 2005 or 2008, you will need to make a change to the Database Server field in the Server Settings Editor (Windows Start menu/Agilaire LLC/AirVision/Server Settings Editor) for both the Default Connection Settings tab and the Advance Settings tab. Replace local with the name of the computer along with \SQLEXPRESS. For example, if the computer name is yourcomputername, then you would replace local with yourcomputername\SQLEXPRESS. Note: If you don’t know your computer name, right click the My Computer icon on the Windows Desktop, select > Properties > Computer Name tab, and find Full computer name: The name given before the first period in the path is the computer name. The name given after the first period is the domain name, which is not needed for this step. Don’t make any other changes. Don’t add any other characters or spaces or delete any previously existing characters or spaces because unnecessary changes can cripple the operation of the conversion utility. After you have replaced local with yourcomutername\SQLEXPRESS, save and close the file, then click the Test Connection button. If a successful message box pops up click OK, then click the Save button at the bottom right. You will not see anything happen when the Save button is clicked. After saving click the X button in the top right corner to close the screen. 16 Agilaire AirVision Manual Chapter 1 Installation Logging In to AirVision Double-click the AirVision icon on your desktop and log in to the AirVision Client. If you are logging in for the first time click the square button to open the Profiles screen. In the Profiles screen, click the Add Profile button and enter the name of your executive (computer where the AirVision server is installed) for the Profile Name. (If you don’t know the computer name, right-click the My Computer icon from the Windows Start menu on the computer where the AirVision server is installed. Select Properties and open the Computer Name tab.) AirVision Login Enter admin as the Username, click Set Password and enter Agilaire. Enter the Service Gateway URL, e.g., tcp://myserver:9885/ where “myserver” is the same as the Profile Name. The URL must match this format exactly, including the forward slash at the end. Click the Test Connection button to see if AVTrend is communicating with the database. Air Vision Profiles 17 Agilaire AirVision Manual Chapter 1 Installation Accessing Profiles After Logging In After you are logged into AirVision, you can access the Profiles screen by clicking the AirVision icon in the upper left corner of the screen (beside the Save icon). From this Profiles screen you can: Save Capture Print Close You You the AirVision screen the Profiles screen. can also open AirVision Options, which brings up the same Profiles screen you saw when you logged in. can close AirVision altogether by selecting the Exit button. AirVision Profiles seen by clicking the AirVison icon in the upper left corner of the AirVision screen after you have logged in 18 Chapter 2 Configuring AirVision AirVision provides nearly unlimited flexibility in setting up systems and configuring servers. This chapter explains how to set up the following parts of AirVision: Configuring System Preferences ConfigurationEditors>Site/Parameter Configuring Server Preferences ConfigurationEditors>ServerConfiguration Setting up Sites and Parameters ConfigurationEditors>Site/Parameter Configuring Parameter Templates ConfigurationEditors>ParameterTemplate Editor Configuring File Import Templates ConfigurationEditors>FileImport Configuration Adding Loggers to Sites ConfigurationEditors>ServerConfiguration Adding Channels to Data Loggers ConfigurationEditors>DataSourceDetails Adding Communication Routes ConfigurationEditors>ServerConfiguration Associating a Logger to a Logger Driver ConfigurationEditors>ServerConfiguration Testing Your Connection Utilities>LinktoLogger Downloading Configurations Utilities>LoggerDownload Setting up Calibrations ConfigurationEditors>DataSourceDetails Scheduling Tasks ConfigurationEditors>TaskScheduler 19 Agilaire AirVision Manual Chapter 2 Configuration Adding E-Mail Service to the Executive ConfigurationEditors>ServerConfiguration>Double-clickExecutiveinTreeMenu> ServiceComponentstab Adding Users and Email Addresses ConfigurationEditors>Security>UserEditor Configuring SMTP Settings ConfigurationEditors>ServerConfiguration>Double-clickEmailServicein TreeMenu Scheduling Email Alarms ConfigurationEditors>EmailAlarmTriggerEditor Adding Recipients to the Notification Subscriptions ConfigurationEditors>NotificationSubscriptions AIRNow / FTP Setup ConfigurationEditors>ReportConfigurations>AIRNow/FTPSetup Scheduling Tasks ConfigurationEditors>TaskScheduler Schedule Task Wizard ConfigurationEditors>TaskScheduler>RunScheduleWizard Task Display Utilities>ScheduledTaskStatus Favorites Editor ConfigurationEditors>FavoritesEditor Configuring Security ConfigurationEditors>Security GSI Driver Editors ConfigurationEditors>GSIDriverEditor AQI Program Editor ConfigurationEditors>ReportConfigurations>AQIProgramEditor Configuring Reports ConfigurationEditors>ReportConfigurations For information about starting the AirVision Service and logging in to AirVision, see “Chapter 1 Installation.” 20 Agilaire AirVision Manual Chapter 2 Configuration Configuring System Preferences To set up system preferences, open the Site/Parameter screen from Configuration Editors and double-click the System icon. The System is the agency or area, such as Knox County or State of Tennessee. Typically, each agency setup will only have one System, but it is possible to set up more than one by clicking the Add System button. (A second system could be used to help separate, for example, air toxics or water quality data from the other quality data). Enter the following: System Name County Code (provided by EPA) Agency Code (provided by EPA) Time Zone.(select from a drop-down list). Note: All fields must be filled in to run an AQSCSV Report. This optional report module supports the proposed changes for submission of data to the AIRNow site. Once configured, the report can be run, scheduled, and transmitted, just like the OBS-style AIRNow report. Click the Save icon. System Configuration from Site/Parameter Config Editor 21 Agilaire AirVision Manual Chapter 2 Configuration Importing (Converting) E-DAS Data If you will be using existing historical data from E-DAS Ambient systems, the AirVision E-DAS Import Utility (Utilities>EDAS Import) can convert it to AirVision data with sites and parameters configured. In the E-DAS Ambient to AirVision Conversion screen, browse to find the E-DAS Ambient Data Directory. Select: Data Type(s) to be converted: Configuration Hourly Data Auxiliary Minute Data Calibration Data Non Continuous Data Daily Data Date Range. Options are: Use Site Long name if they exist Append Logger ID to front of site name Append Channel Number to Parameter name Include RAW data Converted data will be in your SQL database in AVData and available when you open AirVision. Some configuration information may be missing, such as central modem settings and scheduled tasks. 22 Agilaire AirVision Manual Chapter 2 Configuration Converting E-DAS data to AirVision 23 Agilaire AirVision Manual Chapter 2 Configuration Site and Parameter Setup The Site/Parameter Editor from the Configuration menu allows administrators to add, edit, and delete sites and parameters. In AirVision, a Site is NOT a single data logger as it was in E-DAS. A Site is a logical organization of a physical monitoring area and can contain data from several sources, such as data loggers, PM samplers, and directly polled analyzers. screenshot needs updated Site Configuration from the Site/Parameter Editor in Configuration Editors Adding and Editing Sites To add a site, select Configuration Editors > Site/Parameter, and highlight your System name. Click the Add Site button and enter a Name for the Site.To edit a Site, double-click a Site from the Site/Parameter tree. To save new or edited sites, click the Save icon from the upper left-hand corner of the AirVision screen, or click the Agilaire icon and select Save. Fields in the Site Configuration Editor are described below. 24 Agilaire AirVision Manual Chapter 2 Configuration The Site Editor contains the following fields for information about the site: Name Alphanumeric characters to refer to the site, e.g., NKnox Description Brief description of the site, e.g., North Knoxville (optional) Abbreviation This field is used for special file import formats only. Time Select from drop-down list. Enabled Check the box to enable the site. If this box is not selected the site will not be polled. Latitude To comply with EPA standards, enter latitude in decimal format. For example, 75 degrees, 15 minutes, and 0 seconds would be entered as 75.250000. Enter up to 2 places and a minus sign if needed to the left of the decimal and up to 6 places to the right of the decimal. Longitude To comply with EPA standards, enter longitude in decimal format. For example, 75 degrees, 15 minutes, and 0 seconds would be entered as 75.250000. Enter up to 2 places and a minus sign if needed to the left of the decimal and up to 6 places to the right of the decimal EPA Two-character site code provided by EPA (Required) Zone (Required) (Required for polling) Site AIRNow Mnemonic Optional reference for internal use only--not used by EPA Surrogate Slope Used to calculate a projected (forward rolling) eight-hour average for ozone if needed, computed with the slope/intercept formula required by EPA Surrogate Offset Used to calculate a projected (forward rolling) eight hour average for ozone if needed, computed with the slope/intercept formula required by EPA 25 Agilaire AirVision Manual File Input Code Chapter 2 Configuration Single character used for file import templates in special cases only E PA County or Tribal code provided by EPA Address Physical address of the Site County or Tribal Code Additional Information You can add notes at the bottom of the Site Editor by clicking on the asterisk at the bottom of the screen. Enter a Name, for example “Distance to tree line,” and a Value, for example “70 feet.” When you have completed your entry press the Enter key on your computer keyboard. Your entry will be moved to the next row in the Additional Information section. 26 Agilaire AirVision Manual Chapter 2 Configuration Adding and Editing Parameters To add a parameter configuration, select a Site from the Site/Parameter tree and click the Add Parameter button near the top of the AirVision screen. To edit a parameter select a Site and then double-click a Parameter. Parameter Configuration from the Site/Parameter Editor in Configuration Editors 27 Agilaire AirVision Manual Chapter 2 Configuration The Parameter screen displays the following fields: Site The Site you selected in the Site/Parameter tree will automatically be displayed. Parameter Alphanumeric characters to identify the Parameter Parent A Parent Parameter can be designated to form relationships that can be used for drill-down in the Data Editor. For example, a primary analyzer pollutant such as NOx could be a parent and designated diagnostic parameters such as sample flow or box temperature could be children. Another example would be to assign particulate parameters as parents and metals for XRF (X-ray fluorescence) analysis as children. If the parameter has a parent parameter, select it from the drop-down list. Parameter Parameter Template Parameter information can be filled in automatically by selecting a Parameter Template, which will set up EPA codes and units. Basic Parameter Templates are provided in AirVision. They can also be configured in the Parameter Template Editor, which defines basics like units, EPA reporting codes, and graph limits. (See “Configuring Parameter Templates.”) You shouldn’t have to make changes to the Parameter Template unless the defaults become outdated by changing EPA regulations. If you want to automatically fill in parameter information using a template, select a parameter template from the drop-down list and click Apply. If you have converted your data from E-DAS and the information is already filled in, you can still select a template but no NOT click Apply or it will be overwritten. Enabled Check the box to enable the parameter. Enable For AIRNow parameters only, check the box to include this parameter in AIRNow reports. Submitting AIRNow reports consists of three steps: Check Enable AIRNow Reporting in the Site/Parameter setup, Enter AIRNow Transfer Details in AIRNow/FTP Setup (Configuration Editors), Schedule AIRNow FTP Transfer task in Task Scheduler (Configuration Editors). Filter AIRNow Reporting from Web Site Check the box to filter data from website. 28 Agilaire AirVision Manual Parameter Data Type Chapter 2 Configuration Select a data type: Average (Continuous), Composite Sample, or Particulate Sample (for manually entered data). Description Enter a brief description of the parameter (optional). EPA POC Enter an EPA Parameter Occurrence Code if needed. POC is used for different monitors measuring the same parameter at one site. EPA Method EPA sampling Method Code EPA Units Select EPA Units (including the EPA unit code) from the drop-down list (e.g., 007-parts per million, 015-degrees Fahrenheit). EPA Parameter Select a parameter (including EPA parameter codes) from the drop-down list (e.g., 44201 - Ozone). EPA Reported Digits Total number of digits, including decimal places, that will be reported to the EPA. EPA Reporting Precision Number of decimal places for reporting precision.X’s and Y’s to the right of the reporting precision field illustrate the format of the digits/precision, e.g., XX.YY indicates a total of four Reported Digits with a Reporting Precision of two. Truncate/Round Reported Analyzer Rule Determines whether data in reports will be rounded or truncated Units Units that will be used for reports e.g., PPM Units If the analyzer units are different from the primary parameter, select analyzer units from the drop-down list. Graph Minimum Lower y-axis limit for graph display Graph Maximum Upper y-axis limit to for graph display Calibration Span This field is determined by the instrument. Enter the configured calibration span value for the parameter to determine the parameter’s calibration error (at the data logger). 29 Agilaire AirVision Manual Instrument (DL) Limit Detection Limit of Quantization (LOQ) Chapter 2 Configuration Minimum concentration of an analyte that can be measured by an instrument. The DL is an estimate of concentrations at where you can be fairly certain that the compound is present. Concentrations below this limit may not be detected. Used for air toxics measurements only (can be blank if not needed). A minimum criterion or region for quantization that should be clearly above the detection limit. The lowest concentration of an analyte in a sample that can be determined (quantitated) with acceptable precision and accuracy under the stated operational conditions of the method. Traditionally, this is approximated as 10 times the signal-to-noise (S/N) ratio. Minimum Detectable Limit EPA defines the MDL as the minimum concentration of a substance that can be measured and reported with a 99% chance that the analyte concentration is greater than zero. Practical Quantization Limit The lowest concentration of an analyte that can be reliably measured within specified limits of precision and accuracy during routine laboratory operating conditions. (MDL) (PQL) Parameter Totalize Report Order in Reports Minimum in Reports Additional Information Parameters in reports are printed in the same order that they are shown under each site. Select Parameter Report Order to change the order parameters appear in reports. Report Order only applies to Daily Summary and Monthly Reports. If this option is selected, Monthly Reports will show a total of data rather than an average. Totalize in Reports is most commonly used for rainfall. If this option is selected, Monthly Reports will show a minimum of data rather than a Maximum. Minimum in Reports is most commonly used for rainfall. You can add notes at the bottom of the Parameter Editor by clicking on the asterisk at the bottom of the screen. Enter a Name, for example “Data Last Certified,” and a Value, for example “9/1/2008.” To add another row when you have completed your entry, press the Tab key on your computer keyboard. A blank row will be displayed. 30 Agilaire AirVision Manual Chapter 2 Configuration Configuring Parameter Templates Basic Parameter Templates are provided by AirVision (Configuration Editors > Site/Parameter), such as ozone, PM10, PM25, NO2. You shouldn’t have to make changes to the standard Parameter Templates unless the defaults become outdated by changing EPA regulations, but if you have unique setups you can configure new templates in Configuration Editors > Parameter Template Editor. The Parameter Template Editor defines basics like units, EPA reporting codes, and graph limits, and allows you to configure details for an EPA parameter type. In AirVision a parameter can come from any kind of data source--it is not correlated with data logger channels. Parameter templates allow you to avoid repeating configurations for the same parameter at multiple sites, for example, file import templates, report setups, ADVP rules. The Parameter Template Editor allows you to enter or modify a list of parameter types that each parameter can be referenced to, so AirVision can correlate parameters with different names (e.g., O3 , OZ, OZONE). Linking parameters to parameter types makes reporting easier and eliminates the necessity to link individual site/parameter selections together (e.g., for AIRNow reporting). All fields in the Parameter Template Editor were explained in the previous section “Adding and Editing Parameters.” Note: A Parameter Template is required for any parameter imported with the File Import Tool module. File Import is the the most common reason for a user to add to the Parameter Template table. 31 Agilaire AirVision Manual Chapter 2 Configuration screenshot needs updated Configuring Parameter Templates 32 Agilaire AirVision Manual Chapter 2 Configuration Adding Loggers to Sites in Data Source Details The next step, after configuring sites and parameters, is to add Loggers to sites. Note: Data loggers must be added to sites BEFORE channels are configured. Channels are added to loggers after the loggers are set up. Still in the Configuration Editor, select Data Source Details, select a Site, then click the Add button and select Logger. enter a Source Name, e.g., 01Logger, enter the Logger ID, e.g., 01, select a Logger Type from the drop down list, e.g., 8832, click Enabled. optionally, you can enter a Description and select Debounce Digital Inputs check Send Central Messages to LogBook to automatically put polled Central Messages into the Logbook as Logbook entries (Reports>Logger Reports>Central Messages click the Save button. Logger Configuration from Data Source Details in Configuration Editors 33 Agilaire AirVision Manual Chapter 2 Configuration Adding Channels to Data Loggers Still in the Configuration Editor, Data Source Details, select a Logger that has already been added to a Site (see “Adding Loggers to Sites”) click the Add button. select Add Channels and select a Channel Type, e.g., Standard Averaging, GSI, VWS, etc. select a Channel Number (a channel number will automatically be added in order) select a Parameter. When you select a parameter, the Channel Name will automatically be changed to match the Parameter name. For the remainder of the prompts on the form, consult the ESC Model 8816/8832 User Manual. Note: When you first open the Channel editor the Channel Name will be displayed as Chan1, Chan2, etc. When you select a Parameter, the Channel Name will automatically be changed to match the Parameter name; however, you can edit the Channel Name if you choose. After the channel is downloaded to the data logger, the Channel Name will be displayed as the Instrument Name in the logger. select an Average Interval and Storage for the Base Average, Extended Average 1, and Extended Average 2. Click the Save button Follow the same procedure to add calibrations, average alarms, and digital event triggers, as explained later. screenshot needs updated Adding channels to loggers in the Data Source Configuration from Configuration Editors 34 Agilaire AirVision Manual Chapter 2 Configuration Two channel types are handled differently in AirVision than in previous systems; both improve on digital data acquisition integration. The first channel type, the GSI (Generic Serial Interface) channel, is used for RS-232 based instruments. AirVision includes a library of GSI drivers for a wide variety of instruments. Choose the instrument, the parameter, and designate which serial port is connected. Using a dongle can be designated if the instrument connection requires a hardware dongle (e.g., C-Series Analyzers in a daisy-chain configuration, or Ecotech analyzers). GSI channel configuration 35 Agilaire AirVision Manual Chapter 2 Configuration The second channel type (and a better approach for digital data acquisition) is the Modbus channel. Designate an Instrument that has been previously configured in the Data Source Details editor, and select a parameter. Modbus channel configuration For AirVision Version 1.0 only, the server.config file is built externally and sent by FTP to the data logger. For AirVision 1.0.1 and after, the configuration and download is handled completely within AirVision. Note: Like the GSI channel, AirVision simplifies the configuration process by automatically creating and downloading the data logger’s server configuration file in the background. Since Modbus instruments have additional networking information that needs to be known, you must create an instance of the Modbus instrument in the Data Source Details editor before creating the Modbus channels for that instrument (this prevents the need to repeat entry of the networking information for each channel). 36 Agilaire AirVision Manual Chapter 2 Configuration To create the instrument, go to the Data Source Details editor, select the appropriate data logger object in the tree, and select Add > Logger Modbus Instrument on the ribbon. Modbus Instrument Details in Data Source Details You must then enter the following fields: Instrument Name--a user-defined label for the instrument Driver Type--select from picklist of known analyzers Modbus Code--also known as the Modbus Device ID, this is set in the analyzer, and is some value from 1-255 Modbus Command Type--defines which Modbus command is used to read data from the analyzer (3 for TECO, 4 for API, consult instrument documentation for other brands) Poll Interval- how often data should be requested from the instrument, in tenth of a second increments TCP Address--IP address of the instrument, as viewed from the logger’s perspective TCP Port--Port used by the instrument for Modbus requests, usually “502”. Timeout (MS)--Designates the time the logger will wait on an instrument for a Modbus response. Typical values are 250-750 MS Once the instrument is configured and saved, you can then use the Add Channel > Modbus in the Data Source Details editor. Under the Misc tab, select the defined analyzer and the parameter in the instrument from a picklist. If you need a parameter does not exist in the picklist, contact Agilaire Support (support@ agilairecorp.com) and we will add it to your system. Misc tab in Add Modbus 37 Agilaire AirVision Manual Chapter 2 Configuration Parameter Tag Editor The Parameter Tag Creation Tool (List Editors>Parameter Tag Editor) is used only to create entries in the database for parameter / average interval combinations if you want to use the Average Data Editor as the sole means of data input. It is not necessary to use this tool for parameters that are polled, imported using the File Import Tool, or manually entered through the Sample Data Editor, as AirVision creates the database tag entries automatically. System Configuration Export The Configuration Export tool (Utilities>System Configuration Export) allows any table in the AirVision database to be exported in XML format and re-imported. It is useful for copying system configuration settings to send to Agilaire support staff for troubleshooting. In the Export Options section, select the System to Export from the drop down list. Check Compress After Export if you want the file to be compressed into a zipped file. Check the box Executive/Polling Related Tables if you want these tables to be included in the exported file. Select the Browse button in the Location of File to Export field and browse to the location of the XML file to be exported. The path to the file and the file name will be displayed in the export field. Click the Process Export button on the Ribbon. The configuration will be exported to an XML file. Keep in mind that the export only gets basic essential settings and does not export the complete configuration of the system and should not be used as a primary backup file. System Configuration Export tool (Utilities>System Configuration Export) 'System Configuration Export' portion needs updated, it's now under Table Import/Export->Database export and the screenshot will also need updated 38 Agilaire AirVision Manual Chapter 2 Configuration Adding Communication Routes The next step is to identify to the AirVision Server how to communicate with each logger by setting up Communication Routes. After you configure the Source in Data Source Details from Configuration Editors, click Server Configuration to configure a Communication Route for each logger. Highlight the Server and click the Add TCP button to establish the communication route described below: TCP/IP Routes Note: TCP/IP connections are easier and faster than modems. For sites with a TCP/IP connection, Click the Add TCP Route button Enter a Route Name, e.g., Agilaire, Enter a Network Address, e.g., 172.16.1.240 The defaults are set for 8832 defaults, but can be changed based on your network/route definitions: Polling Port at 9881 Emulation Port at 9887. Note: Advanced Settings should ONLY be modified when recommended by Agilaire support (865-927-9440 press 2 for support or email [email protected]). AirVision is designed with defaults that are best for most applications. Read Timeout- This setting overrides the default timeout period for a TCP data read. Write Timeout- This setting overrides the default timeout period for a TCP data transmission. After- This setting controls the closing of a TCP connection after a period of inactivity. Normally, AirVision assumes the TCP connection should remain open for optimum polling efficiency; however, some wireless IP modems will close the connection from their end, and TCP does not allow the server to automatically detect this drop. In these cases, AirVision can be set to forcibly close and re-open the connection. Disconnect Inter-byte speed. Delay (ms)- This feature can be used to slow the inter character transmission Click the Save button. 39 Agilaire AirVision Manual Chapter 2 Configuration Adding a TCP Route in Configuration Editors > Data Source Details or Configuration>Server Configuration 40 Agilaire AirVision Manual Chapter 2 Configuration Adding Serial Routes for Direct Communication For sites with a serial route for a direct connection, the Server and click the Add Serial button in Server Configuration Enter a Route Name, e.g., Direct, Enter a Comm Port, e.g., COM4 Enter a Baud Rate or accept the default 9600 Data Bits should be 8 Stop Bits should be 1 Parity should be None. Note: Advanced Settings should ONLY be modified when recommended by Agilaire support (865-927-9440 press 2 for support or email [email protected]). AirVision is designed with defaults that are best for most applications. Highlight Read Timeout overrides the default timeout period for data read.. Write Timeout overrides the default timeout period for a data transmission. After controls the closing of a connection after a period of inactivity. Normally, AirVision assumes the direct connection should remain open for optimum polling efficiency; however, AirVision can be set to forcibly close and re-open the connection. Disconnect Delay (ms) can be used to slow the inter character transmission speed. Inter-byte Click the Save button. Note: Communication Routes can also be added in Configuration Editors > PC Configuration by highlighting the Server icon and clicking one of the Add buttons. Adding a Serial (Direct) Route in Configuration Editors > Data Source Details or Configuration>Server Configuration 41 Agilaire AirVision Manual Chapter 2 Configuration Adding Remote Modems For sites with a modem route, for the remote modem: Open Server Communication and click the Add Modem Route button in and select Enter MODEM a Route Name, e.g., Modem1 Enter a Phone number, e.g.,865-927-9440 Select a Modem from the drop-down list or leave the default of Use any available modem Preferred Modem Baud Rate. If set, AirVision will first seek a modem whose max baud rate matches this preferred speed. If none is available, it will use any of the other modems in the pool. Enter a number of Redial attempts (default is 1) Enter Time between redial attempts (default is 1 minute). Click the Save button. Adding a Remote Modem Route in Configuration Editors > Data Source Details 42 Agilaire AirVision Manual Chapter 2 Configuration Note: Advanced Settings should ONLY be modified when recommended by Agilaire support (865-927-9440 press 2 for support or email [email protected]). AirVision is designed with defaults that are best for most applications. Over ride Serial Baud Rate- If set, AirVision will force the COM port connection to a Over specific speed when communicating with the modem. ride Serial Read Timeout- Overrides the default timeout period for a serial transmission from the server to the remote. Over ride Serial Write Timeout- Overrides the default timeout period for a serial response from the remote after a command has been sent. Connection Timeout- Sets the time before a dialing attempt is aborted if the modem does not provide a valid response code indicating a connection. Hangup Idle Time- Sets the time before an idle modem connection is considered ready for disconnection Defaults to 5 seconds (this would be five seconds in addition to the Serial Read Timeout), but can be extended if responses from loggers are slow. 43 Agilaire AirVision Manual Chapter 2 Configuration Adding a Modem Route for Central Modem For communication via modem, add a Modem Route to dial out from the Central modem attached to your Executive PC. From Configuration Editors > Server Configuration: the COM1 icon (or COM2, COM3, etc.) click the Add Modem button. enter a Modem Name (such as Central modem) select a Modem Type from the drop down list, e.g., U.S. Robotics 28.8-33.6. Click the Save button. The modem will be added below the COM icon in the menu tree. highlight Note: Communication Routes can also be added in Configuration Editors > Server Configuration by highlighting the Server icon and clicking one of the Add buttons. screenshot needs updated Central Modem Configuration from Configuration Editors > Data Source Details > Communication tab > Create New Route button. 44 Agilaire AirVision Manual Chapter 2 Configuration Associating an Existing Route to a Logger Each logger must be associated with a Logger Driver. Open Configuration Editors > Data Source Details > Logger and select the Communication tab: Highlight the Route row Assign a Priority number Select Polling and/or Emulation if applicable (Emulation is for linking to the logger.) Optionally, enter an Initialization Command and and a Final Command Click the Save button. Click the Save button. To add a new Route, click the Create New Route button. Important:: Some configuration changes require you to restart the the AirVision Server. If a System Restart is necessary, you will be prompted by AirVision when you click Save. If you click Yes at the prompt, AirVision will restart the system automatically. If a required server restart is not done, you will not be able to link to logger. (Two server restarts may be necessary to synchronize the network for IP-based connections.) Note: If you need to restart the system manually, open the Utilities menu and select Server Restart. Select an Executive in the Server Restart screen, then click the Restart Executive Service icon in the upper left corner. Associating Data Logger with TCP/IP connection to Driver in Configuration Editors > Data Source Details > Communication tab 45 Agilaire AirVision Manual Chapter 2 Configuration Testing Your Connection To test your connection, select Link to Logger from the Utilities menu. Select a logger from the drop-down list and click Connect. Linking to the logger means that you connection is good but does not ensure that you will be able to download or poll. Important: If you have not restarted the AirVision service after making configuration changes, you must restart the AirVision service before you can link to logger. Open Utilities > Restart. Be sure the Executive is selected and click Restart Executive Service in the upper left corner. Sometimes two server restarts are required to synchronize the network for IP-based connections. screenshot needs updated Testing your connection from Utilities > Link to Logger 46 Agilaire AirVision Manual Chapter 2 Configuration Logger Download To download channel configurations: Open Utilities > Logger Download. Configuring channels was explained in the section “Adding Channels to Data Loggers.” Select the Site/Source Name Select the Download Type(s) from the following check list: Cold Start Time Sync Calibrations Digital I/O Labels Digital Events Digital Out Warm Start Channels. If you select Channels, the option to select All will be activated. Average Alarms Math Constants Modbus Master File In the Details section, select rows from a table with the following columns: Channel Number, Channel Name, Site Name, Parameter Name, Source Name, Channel Enabled, and Channel Type. click Download. The Log Viewer will display details of the download in the bottom section of the screen. Note: The Log Viewer can also be accessed directly from the Utilities menu. Note: Multiple loggers can be downloaded at the same time without a cold start. Logger Download in Utilities > Logger Download Special Case- External Channels The Model 8872 supports a new channel type “E” for External Channels. These allow the user to create a ‘fake’ channel associated with parameter from a directly polled instrument (e.g., BAM, E-Sampler, etc), where the logger is not doing real-time acquisition. It exists ONLY to create a channel number for use with logger polling. The External type channel requires no other special configuration, and is ignored by the Site Node Logger process. 47 Agilaire AirVision Manual Chapter 2 Configuration Setting Up Calibrations To configure calibrations: open Configuration Editors > Data Source Details highlight the Logger in the tree menu click the small arrow under the Add button select Calibrations from the drop-down list select one of the following calibration types: Automatic Externally Initiated Instrument Controlled Interactive (Menu) User Initiated For details about the remaining prompts, Consult the ESC Model 8816/8832 Data Logger Manual. Note: Configuration information must be downloaded to the data logger before a new sequence can be initiated. Adding calibrations in Configuration Editors > Data Source Details 48 Agilaire AirVision Manual Chapter 2 Configuration Calibration Expected Values Editor This mimics the “Quick Expected Values” editor in the Model 8832 data logger that allows the user to quickly update target values for the calibration without sorting through the Calibration configuration editor. The system shows all configured calibrations as expandable/collapsible boxes. Once opened, columns headers can be clicked to sort by phase name, expected value, etc. for easier data entry. 49 Agilaire AirVision Manual Chapter 2 Configuration Configuring Automatic Calibrations If you configure Automatic Calibrations, the cal you enable will be automatically initiated by the data logger’s internal clock. The Automatic Cal Sequence configuration screen has the following fields: Calibration Type will be already filled in (Automatic_A). Calibration Name is required to identify the cal program. Check Enabled if the calibration is to run. Number of Calibration Records determines how many cals the data logger will store before overwriting. Recovery Time specifies the time required to purge cal gas after phases. Repeated Interval determines how often cal sequence will repeat. Start Time determines what time cal sequence will start. Affected Channels determines which channels will be taken off-line during cal. Select from a list of previously configured parameters. Automatic Calibration configuration in Configuration Editors > Data Source Details 50 Agilaire AirVision Manual Chapter 2 Configuration Configuring Phases To set up Phases: Click the Phase(s) tab behind the Sequence Cal tab. To enter a phase name, click the click the green Add button above the tabs and select Phase from the drop-down list. . Enter a Phase Name, Phase Number, Duration Type, Recovery Time, and click to Enable. To configure a Status Pattern, click the row in Status Pattern column and a check list of Output Control Patterns will come up. After the Phase table is configured, click the green Add button again and select Phase Channels. Select a Channel from a drop-down list, and optionally enter an Expected Value, Drift Limit, Auto Correct (click to enable), Store Cal Results (click to enable), Write Result to Constant, Error Method, Write Expected Value to Constant, and Out of Control Limit. Configuring calibration phases in Configuration Editors > Data Source Details Optionally, the user can define the Cal Level for each calibration phase using a picklist (ZERO, PREC, SPAN, 20%, etc). These levels are used by the Calibration Adjustment Tool and the AQS Precision Reporting for Gases functions, but designation of the levels are not required. 51 Agilaire AirVision Manual Chapter 2 Configuration Externally Initiated Calibration Externally initiated calibration is identical to an automatic calibration except for the way it is initiated. The sequence is started when a specified pattern of input control lines is met. To configure the Start Pattern (Line Status Pattern), click the Start Pattern button. Individual phases are then initiated sequentially. As with an automatic calibration, the duration of each phase in the sequence can be specified. screenshot needs updated Configuring Externally Initiated Calibrations in Configuration Editors > Data Source Details 52 Agilaire AirVision Manual Chapter 2 Configuration When you click the Start Pattern button in the Externally Initiation Calibration screen, you will see a Line Status Pattern screen. Check the Select box to select an Input Line and select a Status of On or Off. Configuring Start Pattern (Line Status Pattern) in Externally Initiated Calibrations in Configuration Editors > Data Source Details 53 Agilaire AirVision Manual Chapter 2 Configuration Configuring Instrument Controlled Calibrations If you configure Instrument Controlled Calibrations, enabled calibrations will be initiated by the data logger when it detects a specified digital input pattern. Each phase will continue until the input line pattern changes. The Instrument Controlled Cal screen has the following fields: Calibration Type will be already filled in (InstrumentControlled_I). Calibration Name is required to identify the cal program. Check Enabled if the calibration is to run. Number of Calibration Records determines how many cals the data logger will store before overwriting. Recovery Time specifies the time required to purge cal gas after phases. Affected Channels determines which channels will be taken off-line during cal. Select from a list of previously configured parameters. Configuring Instrument Controlled Calibrations from Configuration Editors > Data Source Details 54 Agilaire AirVision Manual Chapter 2 Configuration Configuring Interactive (Menu) Calibrations If you configure Interactive Calibrations, enabled cals will be controlled by a user via a menu interface. Interactive cals are often used for highly manual procedures, such as testing opacity instruments against standard filter. Interactive Cal configuration screen has the following fields: Calibration Type will be already filled in (Interactive_M) Calibration Name is required to identify the cal program. Check Enabled if the calibration is to run. Number of Calibration Records determines how many cals the data logger will store before overwriting. Recovery Time specifies the time required to purge cal gas after phases Affected Channels determines which channels will be taken off-line during cal. Select from a list of previously configured parameters. Configuring Interactive (Menu) Calibrations 55 Agilaire AirVision Manual Chapter 2 Configuration Configuring User-Initiated Calibrations Initiated calibrations are started manually by linking to the data logger. When the cal sequence is started, each phase will be initiated in order. The duration of each phase is configured with the same fields as automatic cals. The User-Initiated Cal configuration screen has the following fields: Calibration Type will be already filled in (UserInitiated_U). Calibration Name is required to identify the cal program. Check Enabled if the calibration is to run. Number of Calibration Records determines how many cals the data logger will store before overwriting. Recovery Time specifies the time required to purge cal gas after phases. Affected Channels determines which channels will be taken off-line during cal. Select from a list of previously configured parameters. Configuring User-Initiated Calibrations 56 Agilaire AirVision Manual Chapter 2 Configuration Configuring Input/Output Lines for Digital Events The purpose of digital event programs is to control processes from 8816 or 8832 Data Loggers. Digitally Timed Events will turn on specified Output Lines for the configured Starting Time, Duration, and Repeat Interval. Digitally Triggered Events are initiated by a digital input pattern that will turn on one or more digital output lines. The output lines will remain active for the specified duration; at the end of this time, the output lines will be turned off unless the triggering digital input pattern still matches. Configuring Digital Timed Events 1. Highlight the Data Logger in Configuration Editors > Logger Channels tree menu. 2. Click the green Add button in the ribbon and select Add Digital Events > Timed Event. 3. Enter a Digital Event Program Name, a Starting Time, Output Durations, Repeat Interval, and check Enabled. 4. If the Digitally Timed Event is for a calibration, select a Calibration Name from the drop-down list. 5. Click the Output Lines button to bring up the Line Status Pattern screen and select a Line Number. Click OK. Configuring Digitally Timed Events 57 Agilaire AirVision Manual Chapter 2 Configuration Line Status Pattern for Output Lines Configuring Digital Triggered Events 1. Highlight the Data Logger in Configuration Editors > Logger Channels tree menu. 2. Click the green Add button in the ribbon and select Add Digital Events > Triggered Event. 3. Enter a Triggered Digital Event Program Name, an Output Duration and check Enabled. After the output duration time period, the program will check the digital input pattern to see if it still matches. If not, the output control lines will be switched off. If the pattern still matches, the output relays will remain on, and the duration time will begin again. 4. If the Digitally Triggered Event is for a calibration, select a Calibration Name from the drop-down list. 5. Click the Output Lines button to bring up the output Line Status Pattern screen and select which Output Line or Lines will be switched on when the triggered digital input pattern occurs. Click OK. 58 Agilaire AirVision Manual Chapter 2 Configuration 6. Click the Trigger Digital Event Pattern button to bring up the Line Status Pattern screen for Trigger Digital Input Pattern and select which Input Line or Lines turned On or Off will trigger the event and switch on the specified Output Line(s). 7. In the lower left corner of the screen, select And or Or. If you select And (the default), the digital event program will be triggered only if ALL the specified conditions occur. If you select Or, the digital event program will be triggered if ANY of the specified conditions occur. Click OK. Trigger Digital Input Line Status Pattern with OR/AND selection 59 Agilaire AirVision Manual Chapter 2 Configuration Note: AirVision supports download of logger I/O labels with a different number of inputs and of outputs. If the number of input and output cards on your data logger are not equal, you may encounter some download errors when downloading the labels. If this happens, define the actual number of physical inputs and outputs using the IO Labels tab. If you are using pseudo inputs/outputs, do NOT accept allowing the system to change the number of labels. Different number of Inputs and Outputs Configuration Editors > Logger Channels > double-click Logger in tree menu > I/O Labels tab 60 Agilaire AirVision Manual Chapter 2 Configuration Setting Up Email Alarms AirVision can email specific flag information (alarms), ADVP rule notices, or scheduled reports to selected recipients. To set up the email service, follow these steps: 1. Enable Email Service: Open Configuration Editors > Server Configuration and double-click the Executive in the tree menu. Click the Service Components tab and be sure Email Service Enabled and Auto Start are selected. If you make changes, click Save. 2. Add Users and Email Addresses: In Configuration Editors > Security > User Editor, click the Add User button and enter a User Name, Email Address, and click Set User Password. Name and Title are optional. Click Save. Adding Users in Configuration Editors > Security > User Editor 61 Agilaire AirVision Manual Chapter 2 Configuration 3. Configure SMTP settings: In Configuration Editors > Server Configuration, double-click the Email Service icon under Service Configuration in the tree menu and enter the following information): SMTP Server, for example, smtpout.secureserver.net Port number From Address for the sender of email, e.g., [email protected] If Authentication is Required, check the box and enter a Username and Password. Check Send email per recipient if each recipient will receive email alarms, or leave unchecked for one email with multiple recipients shown. Failed Email Retry Interval (in seconds, minutes, or hours) Number of Retry Attempts Polling Frequency in seconds Setting up Email Service in Configuration Editors > Server Configuration > Email Service 62 Agilaire AirVision Manual Chapter 2 Configuration 4. Define Email Alarms: In Configuration Editors > Email Alarm Trigger Editor, enter an Alarm Name, Average Interval, and a Site. Select which Parameters to Alarm On (send an email alarm), which Flags to use as a Trigger for those parameters, and which Flags to Inhibit. For example, you could configure an email alarm to be sent for the Parameter ozone when an Invalid flag is set except when a Calibration is set at the same time. For the Email Notification, enter a Subject with or without an Urgent Tag, and a text Message. Defining Email Alarms in Configuration Editors > Email Alarm Trigger Editor 63 Agilaire AirVision Manual Chapter 2 Configuration 5. Add Recipients to Notification Subscriptions: (Configuration Editors > Notification Subscriptions. Either entire User Groups, Individual Users, or a combination can be defined for each alarm. Click the Save icon. Adding recipients for email alarm notification from Configuration Editors > Notification Subscriptions 6. To Schedule Alarm Checks, see “Scheduling Tasks.” 64 Agilaire AirVision Manual Chapter 2 Configuration AIRNow/FTP Setup Submitting AIRNow reports consists of three steps: 1 Check Enable AIRNow Reporting in Site/Parameter setup (Configuration Editors) 2 Enter AIRNow Transfer Details in AIRNow/FTP Setup (Configuration Editors) 3 Schedule AIRNow FTP Transfer task in Task Scheduler (Configuration Editors) For AIRNow Transfer Details (step 2), open AIRNow/FTP Setup from the Configuration menu. To add a new transfer program select the Add FTP Program button on the Ribbon above the Main Navigation menu. As transfer programs are added they will appear in the AIRNow FTP Program Selection section. To open an existing transfer program, click the program name in the AIRNow FTP Program Selection section. To set up a new AIRNow Transfer program, click the Add FTP Program button and enter the following fields: Name – The name that you choose to use to identify the transfer program. FTP Host – EPA’s FTP address provided by EPA. Directory –Path to the destination directory provided by EPA. User Name – User ID provided by EPA. Agency – Agency Code provided by EPA. Enable – Enables the transfer program to function. AIRNow – Submits the report being transferred in AIRNow format. Port – Port 21 as required by EPA. Set User Password – Clicking this button brings up a password box where you enter and confirm the password provided by EPA. Click the Save icon. AIRNow FTP Setup in Configuration Editors 65 Agilaire AirVision Manual Chapter 2 Configuration Scheduling Tasks All automatic actions in AirVision are managed by the Task Scheduler (Configuration Editors > Task Scheduler), which runs as part of the background AirVision service. The following tasks can be configured in the Task Scheduler, depending on your licensed options: ADVP Processing Task AIRNow FTP Transfer Task Alarm Processing Task Average Data Purge Task Average Rollup Task Database Sync Task Fill Average Data Gaps Task Instrument Poll Task Journal Message Purge Task Logger Poll Task Scheduled Command Line Task Scheduled Report Task SQL Execution Task New Task Group Some automatic actions in the 8872 are managed by the Task Manager, which runs as part of the background AirVision service. The Task Manager has three user interfaces: Task Scheduler (Configuration Editors > Task Scheduler) allows you to add, review, and edit individual and grouped task events. Task Wizard (Configuration Editors > Task Scheduler >Run Schedule Wizard button in ribbon at top of screen) allows you to create grouped polling events as well as events triggered by polling . Task Display (Utilities > Scheduled Task Status) is a constantly updating display of all tasks within the system, including the last time run, next execution time, and errors experienced during the last run. Task Scheduler The Task Scheduler has five Task Schedule Options: Click the Add button to add a scheduled task from the list above. Click the Delete Scheduled Item button to delete a selected scheduled task. Click Run Schedule Wizard button to bring up the Task Wizard, which guides you through scheduling new tasks. Task Schedule Options (Configuration Editors > Task Scheduler 66 Agilaire AirVision Manual Chapter 2 Configuration Click Execute Scheduled Task Now if you don’t want to wait until the next time a selected task is scheduled to run. Click Update Task Status to bring up a utility screen that allows you to to update the last polled data time for polling tasks, which determines what the start time of the next poll will be. This utility has no effect on non-polling based tasks. The number of sections in the Task Scheduler varies according to the displayed task. The following sections are displayed when a Logger Poll Task is selected: Task Schedule displays all scheduled tasks and cannot be edited. Task Schedule Details section is where Executive, Start Time, and a Repeat Interval are selected. An Advanced tab is provided next to the repeat interval to allow the user to specify if the task is only to run on certain days of the week, or only in a ‘window’ of certain hours of the day. This is especially useful for polling tasks. Task Scheduler showing a Logger Poll Task (Configuration Editors > Task Scheduler) 67 Agilaire AirVision Manual Chapter 2 Configuration The General Tab in the Task Details section is where you enter a Task Name and a Task Description. Task Enabled must be checked in this section before you can select Enabled in the Scheduled Task Selection section. The Advanced Options tab in the Task Details section defines the Number of Retries, the Interval between Retries, and whether to Log Status Messages as Off, Information, Verbose (for a problematic task), or Debug. The Notifications part of the Advanced tab allows configuration of Notification Type (All Exceptions and Errors; All Exceptions, Errors, and Warnings; All Exceptions; First Error and RTN (Return to Normal); or Each Time it Runs) followed by a Description of each Notification Type. Task Details section of Task Scheduler showing Notification selections (Configuration Editors > Task Scheduler) The Logger Poll Options section defines the Logger, the Logger Command (e.g., Average Data), and the Average Interval. 68 Agilaire AirVision Manual Chapter 2 Configuration Task Scheduler showing a Logger Poll Task (Configuration Editors > Task Scheduler) 69 Agilaire AirVision Manual Chapter 2 Configuration To configure an individual task in the Task Scheduler (Configuration Editors > Task Scheduler), click the Add button in the ribbon at the top of the screen and select one of the following categories: ADVP Processing Task handles tasks according to ADVP rules. ADVP reviews data against configured ADVP rules for matches, and runs configured Actions. AIRNow FTP Task handles automatic transmission of AIRNow data to EPA or other FTP servers. A selection is available in the task to designate OBS file format or the new AQCSV file format. If you need both, you would set up two tasks, most likely as part of a task group. Submitting AIRNow reports consists of three steps: Check Enable AIRNow Reporting in the Site/Parameter setup, Enter AIRNow Transfer Details in AIRNow/FTP Setup (Configuration Editors), Schedule AIRNow FTP Transfer task in Task Scheduler (Configuration Editors). Note: Alarm Processing Task reviews alarm Triggers for matches, creates email alerts, and tells AirVision when to process a particular alarm rule. If you use task groups and designate tasks to run in sequence, you can designate alarms to be processed immediately after a data poll. Logger Poll Task in Configuration Editors > Task Scheduler 70 Agilaire AirVision Manual Chapter 2 Configuration Average Data Purge Task purges or archives old data from the database. Eventually, the AirVision database will become so big that it takes a long time to back it up, so it is helpful to remove and/or save old data, in particular minute data. You can choose any average interval to be scheduled for Purge or Archive. Purged data will be permanently deleted from the database. Archived data is copied to an external file before purging. Archived data is stored with all flags and annotations and can be re-imported later. AirVision uses specialized data keys so sites and channels can be renamed or renumbered and archived data can still be correctly imported. Select the age of the data to purge: Purge Data Older Than a specified number of seconds, minutes, hours, days, weeks, or years. We recommend purging 1-minute data older than 1 year to keep the database within allowable size. Note: Average Data can be purged manually via the Utilities menu>Purge Average Data. A checkbox option allows you to retain data during calibrations. If selected, any data flagged with the C flag will not be purged. This allows you to retain minute data from calibrations (e.g., for use in the Calibration Trend Graph’s Response Plot) while still removing old minute data. Purge or archive data in Configuration Editors > Task Scheduler 71 Agilaire AirVision Manual Chapter 2 Configuration Average Data Rollup Task allows shorter term averages to be rolled up into larger block or rolling averages. For more information, see “Data Rollup Processor” in Chapter 8 “Optional Features.” Automatic Rollup Task in Configuration Editors>Task Scheduler>Add Average Rollup Task Math Task Scheduler The task scheduler can execute equations automatically using the Calculate Math Parameters Type task. This task operates on a particular site and interval combination, and seeks out all equations for which there are fully matching parameter templates. If an equation in the table can’t be executed on that site for lack of parameter templates or available data, the equation is skipped. Math Task Scheduler Details 72 Agilaire AirVision Manual Chapter 2 Configuration Fill Average Data Gaps Task prepopulates Average Data Records to make them continuous where data is missing. This task inserts top of the day blank records in the database to improve reporting and data query performance. Filling average data gaps is critical for optimizing the performance of AirVision reporting, and should be configured to run every day after midnight in every system.Each system needs only one of these tasks. The screen defaults to a repeat interval of one day and a time to run of 00:00:00 (midnight). Note: Fill Data Gaps can be run manually from the Utilities menu. Fill Average Data Gaps Task from Configuration Editors > Task Scheduler fill data gaps should have wording updated as it is no longer a needed/required task 73 Agilaire AirVision Manual Chapter 2 Configuration Instrument Poll Task directly polls PM Samplers and Instruments such as BAMs without using data loggers. Note: Instruments can be polled manually by selecting Manual Instrument Poll from the Utilities Menu. screenshot needs updated and note entered about the 'advanced' field Manual Instrument Poll from Utilities Menu Journal Message Purge Task removes Event Log journal messages (internal error logs) that are older than a specified age in seconds, minutes, hours, days, weeks, or years. The purge occurs at a specified Repeat Interval. An option is available to Archive Data Before Purging. Note: Journal messages can be purged manually via the Utilities menu>Purge Journal Messages. 74 Agilaire AirVision Manual Chapter 2 Configuration Logger Poll Task polls a data logger at a specified Repeat Interval in seconds, minutes, hours, or days. The Task must be named and a data logger must be selected. Select a Logger Command from the following drop-down list: 56 46 IJ LL DD 23 NP BB JK KK EF Average Data Calibration Results Instantaneous Readings Poll Current Time Poll Input Status Lind Poll Current Digital Input Poll Alarm Journal Entries Synchronize Logger Time Poll Long Central Messages Poll Chart Memos Power Failure Log The logger also can be polled manually via Utilities >Manual Poll. Results are displayed in the Log Viewer below the query screen. Note: Manual Poll in Utilities Menu 75 Agilaire AirVision Manual Chapter 2 Configuration Scheduled Command Line Task can be used to automate any Windows command line function, such as NTBackup. Scheduled Report Task handles automatically printed or emailed reports. Any system can be scheduled for distribution to a designated printer and/or email recipients. 1. Select a Report from the list of available reports 2. Configure a Report Query (select average interval, sites, parameters, and time range). (This feature functions like the Favorites Editor.) 3. If the report will be printed, Enable Printing and designate the Printer Path. 4. If the report will be emailed, Enable Email Notification and give the report a name that will appear in the Notification Subscriptions Editor. (Users and/or User Groups must be designated in Configuration > Notification Subscriptions Editor.) screenshot and notes on scheduled report task need updated Scheduling printing and email notification of scheduled report in Configuration Editors > Task Scheduler 76 Agilaire AirVision Manual Chapter 2 Configuration The third tab in the output option section for scheduled reports is File Output Options This option can be used to write the scheduled report to a local or network drive, and/or to FTP the file to a particular FTP server. You must select the output file type (CSV, HTML, PDF, etc), and the base file name: File Output Options tab in Scheduled Reports 77 Agilaire AirVision Manual Chapter 2 Configuration You can optionally have the scheduled task append the current date/time to the file name (e.g., DailyParm200906271900). Note that Windows does not allow “/” or “:” characters in file names. This option ensures that new files do not overwrite existing files in the directory. If this option is left off, the task will overwrite the file each time the tasks runs. You can then select either of two options: Write to File Enabled-- select/browse to a directory folder for the destination file FTP Upload Enabled--select from a previously configured FTP program for automatic FTP of the file to a particular server. SQL Execution Task To add a SQL Execution Task, click the green Add button and select SQL Execution Task. Select the Executive, Start Time, and Repeat Interval. Name the SQL task or use the default name. Enter the SQL Command Text. Click the Save button. Note: SQL commands can be executed manually via Utilities>SQL Execution Tool. New Task Group Task Groups allow multiple tasks to be grouped together in one polling process instead of multiple individual tasks. Tasks can be defined to run groups in parallel, sequentially, or as sub-tasks of other task groups to allow mixing of parallel and sequential operations. To add a new sub task to the Task Group click Add Sub Task button and select the task from the drop-down list. The Sub Task drop-down list has the same options as the Add task button at the top of the Task Scheduler. When you select a Sub Task, a screen will pop up asking for the following information: Task Name displays the name of the sub task that was selected. The Task Name can be modified. Task Description is automatically filled in. Task Enabled must be selected if the sub task is to run under the Group Task. Advanced Options (not required) allows the configuration of Number of Retries and the Interval between Retries. Other fields vary according to which sub task is selected. When you click OK in the pop-up screen the new sub task will be added in the Sub Tasks section. Select Execute Tasks In Parallel in the Group Options section if all sub tasks are to run at the same time. If the sub tasks are to be run sequentially, enter a number in the Execution Order column in the Sub Tasks section. 78 Agilaire AirVision Manual Chapter 2 Configuration Select the Fail Group on Error column if you want the whole Task Group to stop running if an error occurs. Task Type indicates the sub tasks that are part of one group task. Edit Task allows you to make changes in the same pop-up window that came up when the Add Sub Task button was clicked. To remove a task from the Task Group select the task in the Sub Task section and click the Delete Selected Sub Task button. Schedule Task Wizard The Task Wizard can be used to manage dozens of polling tasks running in a single system. To set up task groups: Open the Task Wizard (Configuration Editors > Task Scheduler > Run Schedule Wizard button on ribbon at top of screen) and click Next Select Site and Source (including Source Type Description) and click Next. Selecting Site and Source Name in Task Scheduler Wizard (Configuration Editors > Task Scheduler > Run Schedule Wizard) 79 Agilaire AirVision Manual Chapter 2 Configuration Select Poll Types, or types of data to poll from the following checklist: Sync time, Averages, Calibrations, Input line changes, Alarm journal, Power failures, Chart memos, Central messages. Click Next. Poll Types in Task Scheduler Wizard (Configuration Editors > Task Scheduler > Run Schedule Wizard) 80 Agilaire AirVision Manual Chapter 2 Configuration Select the following configurations from drop-down lists: when the task should start, how often it should be repeated, and which server should execute the task. The next screen will ask you to Confirm Task Creation. Click Next to save new task to database. The last screen will say you have successfully completed the wizard. Click Finish. The Task Wizard can also be accessed directly from the Utilities menu. Note: screenshot needs updated (also may want to add something about the ADVP rule selection screen IF a user has ADVP) Task Schedule in Task Scheduler Wizard (Configuration Editors > Task Scheduler > Run Schedule Wizard) 81 Agilaire AirVision Manual Chapter 2 Configuration Task Display Task Display (Utilities > Scheduled Task Status) is a constantly updating display of all tasks within the system, including the last time run, next execution time, and errors experienced during the last run. By default, the display will not refresh, but Refresh Status Automatically can be selected at the top of the screen. Task Display from Utilities > Scheduled Task Status screenshot needs updated and notes should be added for the additional toolbar buttons/options 82 DONEfavorites path should be Configuration Editors > My FavoritesAgilaire Editor AirVision Manual Chapter 2 Configuration Favorites Editor the 'favorites menu' screenshot should be updated AirVision simplifies regular tasks with a list of userdefined Favorites, which function like Favorites in Internet browsers. Favorites can be created for most menu items, including reports, editors, configurations, journals, calibration functions, file import, security settings, logger functions, emails, and task scheduling. Favorites can be saved for different sites, parameters, average intervals, and date ranges. They can be saved for all users or for one user. Creating a Favorite Favorites menu To create a favorite, open Configuration Editors > My Favorites Editor. Click the red Add Favorite button on the left side of the ribbon. Favorite Detail Tab Under the Favorite Detail tab of the Favorites Editor: select a Menu Item from the drop-down list, enter a Favorite Name, enter a Favorite Description (optional), select a Favorite Scope from the dropdown list (User or All Users) and select from the following options: Launch on Application Startup to run the Favorite upon logging in to AirVision Query on Launch to execute data retrieval when the Favorite is selected. Run Favorite Query Tab Add a Favorite screen Next, open the Favorite Query tab if it is available. Note: The Favorite Query tab will only be in the Favorites Editor after a Menu Item is selected that requires a time range, interval, and parameter(s), such as the Average Data Report and the Average Data Editor. Select a Date Range, choose an Average Interval and select a Parameter. To select more than one parameter, drag the arrow in the blue left column or hold down the Ctrl key while you select parameters. 83 Agilaire AirVision Manual Chapter 2 Configuration To save a favorite when you’re in any data editor or report, complete a query, and select Favorites from the top menu. The ribbon bar will change to show the favorites menu. Select Save as Favorite to bring up the Add a Favorite screen. You can also configure the Favorite by selecting the Favorite Query tab after you select Save as Favorite. From this screen you can adjust the site/parameter list, date range, or average interval. These values can also be adjusted later in the Favorites Editor in the Configuration menu. To return to the ribbon controlling the current application, select the top menu function (above the ribbon), for example, Average Data Editor. To use an existing Favorite, select Favorites from the top menu (above the ribbon bar), select User Favorite or Global Favorites, and the saved Favorite. A copy button on the ribbon allows you to copy an existing favorite for slight modification, if needed. Favorite Query tab from Add a Favorite 84 Agilaire AirVision Manual Chapter 2 Configuration Configuring Security User security in AirVision is set up by administrative personnel and is similar to Microsoft Windows: Each system user has an identity, including a username and password A User may be a member of one or more User Groups Access and rights are assigned to User Groups User Groups in AirVision are usually assigned by job responsibility (e.g., Data QA, Site Technicians, System Administrators). A group can optionally have its access limited to only certain monitoring sites. Users can be members of more than one Group, and each site can have a different access group. User Editor Administrators can add or delete users: open Configuration Editors > Security > User Editor and click Add User or Delete User button. Enter a User Name and Set User Password. Enter an Email address for the user . In the Contact Addresses section of the screen you can click Add Contact Addresses and enter multiple email addresses for the same user to receive different notifications at different email addresses. Check the notifications to be emailed to each email address: Task, Report, Alarm, or ADVP. Each Label must have a different name or the database will not accept it. User Editor from Configuration Editors > Security > User Editor 85 Agilaire AirVision Manual Chapter 2 Configuration My User Settings Non-administrative personnel can change their own Password, Email, and Name, but not their User Name in the My User Settings screen in Configuration Editors > Security. If a User Name needs to be changed (for example, if a name is misspelled), an Administrator would have to delete the original User Name and add a new one. In the Contact Addresses section of the screen you can click Add Contact Addresses and enter multiple email addresses for the same user to receive different notifications at different email addresses. Check the notifications to be emailed to each email address: Task, Report, Alarm, or ADVP. Each Label must have a different name or the database will not accept it. Click Save. My User Settings screen in Configuration Editors > Security 86 Agilaire AirVision Manual Chapter 2 Configuration Groups Editor Next, create or modify groups with the Groups Editor. To add or delete groups, click the Add Group or Delete Group button. Select a group and add Users to that group as members of an existing or newly created group. To add a user, click on the asterisk (*) line in the right (gray) area to get a pick list of currently created users. Click Save. Groups Editor from Configuration Editors > Security > User Editor 87 Agilaire AirVision Manual Chapter 2 Configuration Group Permissions Finally, define the permissions for each User Group using the Configuration Editors > Security > Group Permissions Editor. Select a Group in the drop-down list. The list of configured users is displayed (and users can be added here as well). The right panel shows the various rights available in the system, and the status for the current group: Grayed = access disabled Black, underlined = access enabled Black, italic = access enabled by inheriting from another granted access. In this example, access has been granted to certain Security permissions (Groups, Users, and User Groups, but not Edit Tasks). Access is granted to all configuration items at the topmost level, and all sub-tasks are permitted by inheritance. For example, to turn off Edit ADVP Rules, first remove the overall Edit Configurations permission and then add the individual permissions that we need. Expand and Collapse the tree using the buttons on the ribbon. To define a group as having site-specific access, uncheck the Apply to All Sites in the lower left panel, and then add sites using the list form below. Group Permissions from Configuration Editors > Security > Group Permissions Editor 88 Agilaire AirVision Manual Chapter 2 Configuration GSI Driver Editor The purpose of the GSI Driver Editor (Editors>GSI Driver Editor) is to provide a way to add, delete, or modify GSI driver entries in an editor similar to the Parameter Template editor for GSI entries and GSI instruments. The GSI Driver Editor consists of an alphabetized pick-list of existing GSI entries for modification. Two editors may be required, one for instruments and one for entries, or two sections/tabs of the forms. Fields in the GSI Driver Entry tab include: GSI Entry Associated GSI Instrument and GSI Entry (pick-list of configured instruments) Send Name (string) Parse Name (string, up to 8 char) AutoSend String (string up to 8 char) Autosend Repeat Interval (1.60 seconds) Parse Sync String Modbus Register Fixed or Delimited Parsing Fixed: Number of Chars to Data (int, up to 3 digits) Data Field Width (int, up to 2 digits) Number of Chars in string (int, up to 3 digits) Delimited: Number of Delimiter Chars (string) Number of Delimiters of Delimiters to Data (int, up to 3 digits) Number of Delimiters In String (int, up to 3 digits) Data Field Type (pick-list- Hex, Binary, Float) In the GSI Driver Instrument tab: GSI Instrument Name Default TCP Port (integer, up to 6 digits) Default Modbus Code (integer, 0-255) Default Modbus Command Type (3 or 4) Please refer to the ESC Model 8832 Data Logger Manual for more information about GSI drivers and the definitions of these fields. 89 Agilaire AirVision Manual Chapter 2 Configuration AQI Program Editor The AQI Program Editor is accessed via the Configuration menu. The AQI Program Selection section is a table with the following columns: Program Name, e.g., CO, NO2, ozone8h Parameter Type, e.g., 44201-- ozone, 42602--nitrogen dioxide AQS Unit Type, e.g., parts per billion, micrograms/cubic meter Average Interval, e.g., 001h (hourly) AQI Program Editor from the Configuration menu Enabled--check to enable the AQI program in the row Averaging type, rolling or block, only relevant if the average period is >1. Averaging Direction, forward or backward, only relevant if the average period is >1. Rounding Method, truncate or round Decimal Positioner, number of places to the right of the decimal Average Period, e.g., 8 hours, 24 hours Scale Factor is the factor by which the reading of an instrument should be multiplied to give the true final value, for example, if you need to apply a multiplication factor to data for PPM to PPB conversion before comparing against break points. Alternately, the pollutant levels can be defined within a program to match the units. Percent Availability--percentage of valid data points required during the rolling average duration to mark the rolling average as valid Use Zero Scaling--if selected, defines that a zero concentration value equals an AQI value of zero. Use Surrogate Forecast--an estimation method that uses a combination of hourly particle concentrations from previous hours to estimate the Mid-24 average. Use Conroy Forecast--Computed 24 hr. average using surrogate model developed by Dave Conroy. To add AQI program, click the asterisk at the bottom of the screen and enter values for an additional row. To cancel adding a program press the Tab key or the Escape key. 90 Agilaire AirVision Manual Chapter 2 Configuration Each column in the table has a button that allows you to search for a row under that heading and a button to clear all filter criteria. You can change the column order by dragging the headings to a different place. You can drag a column heading above the table to change the way the information is grouped. The AQI Level Selection section is a table with the following columns: Pollutant Level--the upper limit on an AQI value for a particular group Sub Index--the actual data value in units Description and color--defaults to Good (green), Moderate (yellow), Unhealthy for Sensitive Groups (orange), Unhealthy (red), Very Unhealthy (purple), and Hazardous (maroon) Font Color--color for text (used in AgileWeb site) Sensitive Groups and Health Effects--describes people who are most sensitive to this level of pollution and the possible health results. Health Advisory--advise for people at risk for this level of pollution To add a pollutant level, click the asterisk at the bottom of the screen and enter values for an additional row. To cancel the addition, press the Tab key or the Escape key. Each column in the table has a button that allows you to search for a row under that heading and a button to clear all filter criteria. You can change the column order by dragging the headings to a different place. You can drag a column heading above the table to change the way the information is grouped. 91 Agilaire AirVision Manual Chapter 2 Configuration Configuring Reports The following reports require configuration to run: AIRNow Report (Configuration Editors > Report Configuration >AIRNow/FTP Setup) AQI F requency C oncentration Report (Configuration Editors > Report Configuration >AQI Program Editor) Distribution Report (Configuration Editors > Report Configuration > Frequency Distribution Editor) Distribution Report (Configuration Editors > Report Configuration > Frequency Distribution Editor) V iolation of Standards Report (Configuration Editors > Report Configuration > Violation of Standards Editor) Wind Rose (Configuration Editors > Report Configuration > Wind Rose Levels Editor). 92 Agilaire AirVision Manual Chapter 2 Configuration Frequency Distribution and Concentration Distribution Editor Frequency and Concentration Distribution Reports are configured in the same editor (Configuration Editors > Frequency Distribution Editor). You define the concentration values and statistical percentages to display in the report, with one definition entry for each Parameter Template. Frequency and Concentration Distribution Report Editor from Configuration Editors > Frequency Distribution Report 93 Agilaire AirVision Manual Chapter 2 Configuration Wind Rose Levels Editor In the Wind Rose Levels Editor (Configuration Editors > Wind Rose Levels Editor) you can designate the magnitude of wind speed values and pollutant concentrations for each color and width in the rose. You can create a profile for each combination of a wind direction type (scalar or vector) wind speed, or pollutant, via the designation of Parameter Templates. This report profile applies to all sites. Configuring Wind/Pollution Rose Reports in Configuration Editors > Wind Rose Levels Editor 94 Agilaire AirVision Manual Chapter 2 Configuration Violation of Standards Editor In the Violation of Standards Editor (Configuration Editors > Violation of Standards Editor, 87), you can designate the calculation method, averaging method, and limit for any parameter template. The limits can be single averages, rolling averages, block averages, or you can choose from several standard USEPA annual and multi-year defined calculations. For the 8-hour ozone standard, you should also designate the start and end of ozone season (or select Jan 1 – Dec 31 for year-round reporting). Violation of Standards Editor from Configuration Editors > Violation of Standards Editor 95 DONE report list needs updated, Calibration Report should be removed from the list of configuration reports Chapter 3 Reports After data has been polled, either by a scheduled task (Configuration Editor>Task Scheduler) or manually (Utilities>Manual Poll or Utilities >Manual Instrument Poll) AirVision can be run by selecting a report from the Reports menu. Note: Reports that are missing: 8 Hour Rolling Average, Average Data Graph, AQI Monthly, Calibration X Bar R, Data with Flags, Historical Log Viewer, Asset reports, Network Data Recovery Should Leak Check and Multi Phase Cal reports be added? Should reports in the manual be re-ordered to match the order in the clientmenu? You can now add your logo to the top of Daily Summary and Monthly reports. Open the Server directory in the Program directory where AirVision is installed (typically C:\Program Files\Agilaire LLC\AirVision Server) and paste logo.jpg into the Server Directory (C:\Program Files\Agilaire LLC\AirVision Server\logo.jpg). The Reports menu lists reports in alphabetical order with related reports grouped in folders. AIRNow CSV Text Report (AQSCSV Report) AIRNow Report Annotations Report AQI Reports AQI Report--Current AQI Report--Range AQI Report--Standard Voice AQI Report AQS Text Report XML Report AQS Reports Audit Trail Report Calibration Results Calibration Trend Graph AQS Configuration Reports Calibration Configuration Configuration Parameter Configuration Scheduled Tasks Report Site Configuration Report Channel Daily Daily Parameter Report Summary Report 96 Chapter 3 Reports Sample Data Reports sub folder and contents needs added(please indicate where-K) Internal Reports DB Modification History Exception Journal Journal Message Log Software Version Report Table Size Information LogBook Report Logger Reports Alarm Journal Central Messages Input Line Status Report Power Failure Report Met Reports Joint Frequency Distribution Report Report Wind/Pollution Rose Meteorological Monthly Monthly Report Sample Data Report PARS Reports Accuracy Precision Report Report SCAQMD Site 1m Data Export Health Report Statistical Reports Concentration Data Distribution Report Analysis Recovery Report Frequency Distribution Maximum Hourly Values Report Statistical Report Data Violation of Standards Report 97 Agilaire AirVision Manual Chapter 3 Reports Criteria Pane All reports use a Criteria Pane to select a time range and list of pollutants for the report. Report Criteria pane in Reports > Daily Summary Report You can select the Date Range any of the following ways: Manually Click Use Use type in a month, day, year, and time. in a date field (the month, date, year, hour, minute) and click the small up or down arrow keys to raise or lower that field (month, day, year, hour, minute). (It isn’t necessary to highlight the field, just put the cursor in it.) the bigger down arrow control to bring up a Calendar. You can click the arrows to change the month, or click the name of the month or year to bring up a list. the Star button to select from a pre-defined date range: Current Day Yesterday Current Week Last Week Current Month Last Month Current Quarter Last Quarter Current Year Number of days back from current day In addition, the time criteria (e.g., the star icon button) allows you to choose “shift forward one day” or “shift backward one day.” If you select one of these and hit apply, it acts similar to the “Data Forward” or “Data Backward” buttons, except always shifting by 24 hours, rather than the size of the data window. This is useful for reviewing calibration minute data for several days, where the calibration falls on the same time each day. 98 Agilaire AirVision Manual Chapter 3 Reports Scroll to select an Average Interval (most reports only support one average interval at a time). Click to select a site and parameter; use standard Windows Shift-Click and Control-Click conventions to select multiple parameters. In the Daily Summary section, select from the following check boxes: Show Flag Descriptions Show Calibrations Switch to Landscape Filters Filter fields are available in the top row of each column. Click in the row to use the filter to list a single site, parameter, or parameter template. Click the down-arrow to the right of each filter field to select a particular entry in the column. Choices in the drop-down list will be Custom, Blanks, Non-blanks, plus each entry in the column (site name, parameter names, or parameter templates) Filter fields in Reports criteria pane To write your own criteria, select Custom and configure the screen that pops up. custom filter criteria screenshot needs updated Custom filter criteria screen 99 Agilaire AirVision Manual Chapter 3 Reports Click the box with the letter A in the left side of each filter field to change the filter field from the default of Starts With to one of the following: Equals Does not equal Less than Less than or equal to Greater than or equal to Like Matches Regular Expression Starts with Contains Ends with Does not start with Does not contain Does not end with Does not match Not like For example, if you imported E-DAS data and used the option to put the channel number in front of the channel name, you might end up with some ozone channels that were “01_OZONE” while others were “03_OZONE” and “04_OZONE”. Using the boxed “A” filter, you could search for all parameters names that contain ““Ozone” and more easily select them from a large list of parameters. Using a filter makes it easy to see a Parameter Template was not set for O3_AMB_TEMP. Using a filter to determine which parameters don’t have a template 100 Agilaire AirVision Manual Chapter 3 Reports Additional Fields for Specific Reports For some reports, the Criteria Panel is expanded with additional fields. For the Maximum Hourly Values report, additional information is needed on how the data in the report should be filtered and calculated: DONE Maximum Hourly Aver Rolling hours, and time-tagging type ages should be corrected to Report highest average only for any day Maximum Hourly Values Allow report of overlapping maximums (for multiple hour rolling averages) Number of maximum averages to report Additional Report Criteria required for Maximum Hourly Values report Other reports with additional criteria include: Wind / Pollution Rose requires you to designate which Wind Rose report profile to use. AQS/XML Concentration Report requires you to choose which kinds of records to be assembled. Distribution, Frequency Distribution, Monthly Reports all allow you to designate an N-hour rolling average as an option. 101 Agilaire AirVision Manual Chapter 3 Reports Annotations Report The Annotations report may be run on any list of parameters, for any time range. It provides a summary of all annotations it finds. To see a report of annotations made in the Average Data Editor, open the Reports menu and select Annotations Report. Make the usual query selections of Start/End Date, Average Interval, and Parameter(s). Click the Generate Report icon on the ribbon. Annotations Report 102 Agilaire AirVision Manual Chapter 3 Reports AQSCSV Report (AIRNow CSV Report) The optional AQSCV Report module supports the proposed changes for submission of data to AIRNow. The new format requires a 3-digit County Code, so that field has been added to the System Configuration screen in Configuration Editors>Site/Parameter Editor. After all fields in the System Configuration editor have been configured, the AQSCV report can be run, scheduled, and transmitted, just like the OBS-style AIRNow report. A Send Now button is provided to test the AIRNow transmission, or to send manual updates to the AIRNow server. AQSCV Report (AIRNow CSV Report) 103 Agilaire AirVision Manual Chapter 3 Reports Configuration Reports Configuration reports consist of the following: Calibration Configuration Report Configuration Report Parameter Configuration Report Scheduled Tasks Reports Site Configuration Report Channel DONE Calibration Report should be removed from the list of configuration reports 104 Agilaire AirVision Manual Chapter 3 Reports Calibration Configuration Report To run a Calibration Configuration Report (Reports > Configuration folder > Calibration Configuration Report), select a site or sites and click the Generate Report icon on the Ribbon. Calibration Configuration Report (Reports > Configuration folder > Calibration Configuration Report) 105 Agilaire AirVision Manual Chapter 3 Reports Channel Configuration Report To run a Channel Configuration Report (Reports > Configuration folder > Channel Configuration Report), select a Site or Sites and a Parameter Name or Parameter Names. Click the Generate Report icon on the Ribbon. Channel Configuration Report (Reports > Configuration folder > Channel Configuration Report) 106 Agilaire AirVision Manual Chapter 3 Reports Parameter Configuration Report To run a Parameter Configuration Report, (Reports > Configuration folder > Parameter Configuration Report), select a Site or Sites and a Parameter Name or Parameters Names. Click the Generate Report icon on the Ribbon. Parameter Configuration Report, (Reports > Configuration folder > Parameter Configuration Report) 107 Agilaire AirVision Manual Chapter 3 Reports Scheduled Tasks Report To run a Scheduled Tasks Report, open Reports > Configuration folder > Scheduled Tasks Report and the report will be displayed automatically. No query is necessary. Scheduled Task Report (Reports > Configuration folder > Scheduled Tasks Report) 108 Agilaire AirVision Manual Chapter 3 Reports Site Configuration Report To run a Site Configuration Report, (Reports > Configuration folder > Site Configuration Report), select a Site or Sites and click the Generate Report icon on the Ribbon. Site Configuration Report, (Reports > Configuration folder > Site Configuration Report) 109 Agilaire AirVision Manual Chapter 3 Reports Routine Reports Daily Summary Report The Daily Summary Report is usually for the daily summary of hourly data for all parameters at a site or sites, but it can also be used to report any time range or average interval. Statistics (average, maximum, minimum, and count) are at the bottom of each column. If Totalize in Reports is selected in the Parameter configuration, a Total will be displayed in the Daily Summary Report. Daily Summary Report with Total 110 Agilaire AirVision Manual Chapter 3 Reports Basic Data Export Report This report is much like the Daily Summary Report, but allows for unlimited number of sites/parameters as columns, and any number of averages as rows, without page breaks or summary data. It is ideally suited for CSV export via the task scheduler to disk or FTP, for automating data export to legacy systems, web sites, etc. In this report, invalid data is represented as an empty value. 111 Agilaire AirVision Manual Chapter 3 Reports 24-Hour Averages Summary Report The 24-Hour Averages Report provides a report of 24-hour averages, one month per page. This report assumes that: either the data logger is storing and is polled for '1d' averages, or that the Data Rollup Utility is used to create 24 hour averages from hourly data. The 24-Hour Averages Summary Report is for average data only. 24 Hour Average Summary Report 112 Agilaire AirVision Manual Chapter 3 Reports Daily Parameter Report The Daily Parameter Report shows a single day summary for the entire monitoring network, grouping parameters together by the Parameter Template, but showing all sites sharing that parameter template. Parameters that do not have a parameter template designated are not reported. Daily Parameter Report 113 Agilaire AirVision Manual Chapter 3 Reports Monthly Report Monthly reports provide a matrix view of a single parameter, showing values for the entire month. Invalid or flagged data is shown with a color background or font change defining the data condition. Statistics are provided for each row (day) and column (hour). Monthly Report with Parameter Code If AQS Null Codes have been set for invalidated data, they are displayed in the Monthly Report. If Site Codes, and/or Parameter codes have been selected in the Configuration Menu they will be included in the Header. update notes to cover the user options for 'show flags' and 'show null codes' 114 Agilaire AirVision Manual Chapter 3 Reports Monthly Sample Data Report The Monthly Sample Data Report shows the value of the non-continuous values for each day (showing a blank for days where there is no sample). Data in this report is only shown for parameters with Sample or Composite type, and which have a certain Parameter Template (either "PM25" or "PM10") defined. Monthly Sample Report for PM 2.5 from the Reports Menu 115 Agilaire AirVision Manual Chapter 3 Reports Calibration Results Calibration reports show the calibration event and results for any zero/span, precision check, or other calibration program. Calibration Report The percentage of error is calculated as follows: If the Cal Span has not been set in the Parameter Editor, zero error is shown as an absolute difference, while span precision errors are shown as a % of the expected value. If the Cal Span has been set in the Parameter Editor the errors are all shown as a % of the Cal Span value. 116 Agilaire AirVision Manual Chapter 3 Reports Calibration Trend Graph Calibration Trend Graphs provide a long-term view of calibration zero/span results over a user-defined period of time (month, quarter, etc). Select a Start and End Date and a Parameter. Click the Generate Report icon on the ribbon. If you select Raw Data Graph from the ribbon at the top of the screen, you can view calibration data in a text table. Historical Calibration Trend Graph 117 Agilaire AirVision Manual Chapter 3 Reports If you select Historical Graph you can view data in a graph. Each color represents a different phase, as shown in the legend. You can change the color scheme by selecting a Graph Scheme from the drop down list at the bottom of the screen. Historical Calibration Trend Graph 118 Agilaire AirVision Manual Chapter 3 Reports If you select Response Graph from the ribbon at the top of the screen, you can review fine-resolution data during each calibration cycle to see instrument response. Each cal can be cycled through using the Forward/Back button. You can change the color scheme by selecting a Graph Scheme from the drop down list at the bottom of the screen. The graph has a filter at the top to define the specific calibration program to be graphed, in the event that a parameter has more than one calibration program associated with it. Calibration Trend Response Graph 119 Agilaire AirVision Manual Chapter 3 Reports LogBook Report The LogBook Report generates reports of logbook entries that were made in the LogBook Entries Editor. To query a LogBook Report select LogBook Report from the Reports menu. Select Start and End Dates and a Site Name from the top section of the screen and click the Generate Report icon in the upper left section of the screen. The user may also choose one or all Logbook Categories as a filter for the report. The logbook report will be displayed in the lower section of the screen. LogBook Report 120 Agilaire AirVision Manual Chapter 3 Reports Audit Trail Report The Audit Trail Report provides a record of modified data. Audit Trail Report 121 Agilaire AirVision Manual Chapter 3 Reports Journal Controller The Journal Controller is for use by Agilaire support only. Journal Controller in Utilities menu 122 Agilaire AirVision Manual Chapter 3 Reports Logger Reports The Logger Reports folder in the Reports menu contains the following reports: Alarm Journal Central Input Power Messages Line Status Report Failure Report Alarm Journal The Alarm Journal displays the Site Name, Channel Number, Channel Name, Alarm Program Name, Alarm Start/End Time, Reason Code, and Triggering Flag. To run an Alarm Journal, select Reports > Logger Reports > Alarm Journal. In the Report Criteria screen, select a Start/End Date and a Site/ Source Name. Click the Generate Report icon. A Logger Alarm Journal Report will be displayed in the bottom section of the screen. Logger Alarm Journal Report 123 Agilaire AirVision Manual Chapter 3 Reports Central Messages To run the Central Messages Report, Poll Central Messages must be selected in the Task Scheduler in one of the polling tasks. If you’re polling manually, select Central Message as a Data Type. To run the report, select Reports>Logger Reports>Central Messages, select a date range and Source then click Generate Report. Logger Central Message Report 124 Agilaire AirVision Manual Chapter 3 Reports Input Line Status Report The Input Line Status Report displays Site and Logger Name, Logger ID, Line Number, Line Name, Line State, Time of Change, and Line Description. To run an Input Line Status Report, select Reports > Logger Reports > Input Line Status Report. In the Report Criteria screen, select a Start/End Date and a Site/Source Name. Click the Generate Report icon. An Input Line Status Report will be displayed in the bottom section of the screen.Each site/logger is shown in a separate page. Input Line Report 125 Agilaire AirVision Manual Chapter 3 Reports Power Failure Report The Power Failure Report displays Site and Logger Name, Logger ID, Failure Time and Restored Time. To run a Power Failure Report, select Reports > Logger Reports > Power Failure Report. In the Report Criteria screen, select a Start/End Date and a Site/ Source Name. Click the Generate Report icon. A Power Failure Report will be displayed in the bottom section of the screen.Each site/logger is shown in a separate page. Power Failure Report 126 Agilaire AirVision Manual Chapter 3 Reports Internal Reports The Internal Reports folder contains the following reports: DB Modification History Exception Journal Software Table Journal Message Log Version Report Size Information 127 Agilaire AirVision Manual Chapter 3 Reports DB Modification HIstory The Database Modifications Report lists all modifications that were made to the AirVision database by Agilaire. Database Modification History Report (Reports>Internal Reports>DB Modification History) 128 Agilaire AirVision Manual Chapter 3 Reports Exception Journal Report The Exception Journal Report displays all AirVision Exception messages for the Date Range and Logging Type selected. Logging Types are selected from a drop-down list of the following: Unhandled, Nested, Rethrown, Asset, and Validation. Exception Journal Report (Reports>Internal Reports>Exception Journal) 129 Agilaire AirVision Manual Chapter 3 Reports Journal Message Log The Journal Message Log displays detailed messages about the Logging Types you select. Type selections are: Fatal, Exception, Error, Warning, Startup, Shutdown, Information, Communication, Verbose, Debug, Timed Event, or Select all. Journal Message Log (Reports>Internal Reports) 130 Agilaire AirVision Manual Chapter 3 Reports Software Version Report The Software Version Report (Reports>Internal Reports) displays Timestamps for Database Schemata and Builds, Version IDs, and Software Version. Software Version Report (Reports>Internal Reports) 131 Agilaire AirVision Manual Chapter 3 Reports Table Size Information The Table Size Information Report lists all tables in the database and their size. Table Report (Reports>Internal Reports) 132 Agilaire AirVision Manual Chapter 3 Reports Quality Assurance/Analysis Report Concentration Distribution Report Concentration Distribution reports show the number of readings that fall into user-defined concentration ranges. The user defines the concentration ranges for each parameter type in the Frequency/Concentration Report Editor. Concentration Distribution Report 133 Agilaire AirVision Manual Chapter 3 Reports Frequency Distribution Report The Frequency Distribution Report provides a breakdown of concentration values that represent the Nth percentile of a requested data set. In the example, the 95th percentile for ozone for the given time period was 46 ppb, meaning that 95% of the ozone readings were at or below 46 ppb. The report also lists minimum, maximum, means, and deviation. The report requires that percentile ranges be set up previously for a given Parameter Template (Configuration Editors> Frequency Distribution. The report cannot be run on a parameter that does not have a Parameter template and a Frequency Distribution report configuration. Frequency Distribution Report 134 Agilaire AirVision Manual Chapter 3 Reports Data Recovery Report The Data Recovery report provides a summary, by site, of each parameter and its rate of successful data capture, which allows you to summarize the reliability of the monitoring network. The Percent Recovery is a calculated by the number of valid averages divided by the number of possible averages in the reporting period. Data Recovery Report 135 Agilaire AirVision Manual Chapter 3 Reports Wind/Pollution Rose The Wind/Pollution Rose correlates wind direction data with another reading, either wind speed/ magnitude, or a pollutant concentration value. The length of the line corresponds to the frequency of readings in that direction and concentration value, while the line color corresponds to the magnitude of the speed/pollutant value. Wind/Pollution Rose 136 Agilaire AirVision Manual Chapter 3 Reports Joint Frequency Distribution Report The Joint Frequency Distribution (JFD) report provides a tabular summary of the same data that is represented in the Wind/Pollution Rose report. This data correlates a wind speed or pollutant value, by programmed value ranges, with the occurrence of that data in various wind direction sectors. The JFD report may only be run against the same Wind/Pollution Rose programs created in the Wind Rose Levels Editor. Joint Frequency Distribution Report 137 Agilaire AirVision Manual Chapter 3 Reports Data Analysis The Data Analysis Tool allows the user to create ad hoc reports and graphs correlating data sets with parameters, such as hour of the day, day of the week or month, and identify composite statistics and trends. Examples below show day of the week averages and hour of the day averages for larger data sets. Data Analysis Tool Sample Output 138 Agilaire AirVision Manual Chapter 3 Reports Using the Data Analysis Tool (Optional) The Data Analysis Tool (Reports > Data Analysis) is an open system used to create reports and graphical summaries designed for a specific task based on categorization of the data. It is useful for creating unusual reports, for example “average ozone value on Tuesdays”. First select Start and End dates Site/Parameter(s), and an Average Interval. The Data Analysis Tool is more useful for looking at a single parameter at a time (for one or more sites), for example, ozone for the month of August. After selecting the data range, click the Generate Report button on the ribbon at the top of the screen. Data Analysis Tool from Reports menu 139 Agilaire AirVision Manual Chapter 3 Reports After you generate the report, you can minimize the Report Criteria pane to make more space for the Report Output section by clicking the minus sign. Notice the gray field Drop Filter Fields Here. Default filters are Site, Parameter, and Report Value (Average). To add more Filter Fields, right-click in Drop Filter Fields area and select Show Field List. (or click Show Column Choose on the ribbon at the top of the screen .From the pop-up list you can either select and click the Add to Filter Area button, or click-drag to the Drag Filter Fields Here area. Data Analysis Tool with pop-up Filter Field List (Reports menu) 140 Agilaire AirVision Manual Chapter 3 Reports After you drag a new Filter Field to the Drop Filter Fields Here area (which is a “holding” area where fields are not active but available for immediate reactivation) the new field will not be activated until you drag it to the column area. After that the new field information will be displayed. The screen shot below shows the new Filter Field Week Day Name. Scroll to the bottom of the report to see Totals. If you select Week Day instead of Week Day Name, you will get a numerically ordered display. To remove a header, right-click the header and select Hide. To move a header back to the inactive area, click and drag it. Data Analysis Tool with new Filter Field (in this example,Week Day Name) dragged to column area (Reports menu) 141 Agilaire AirVision Manual Chapter 3 Reports For example, if you select the Filter Field, you could drag the Date field up to the Drag Filter Fields Here area and deactivate the Date column. Data Analysis Tool with Hour added as a new Filter Field (Reports menu) Data Analysis Tool with the Date column deactivated (Reports menu) 142 Agilaire AirVision Manual Chapter 3 Reports In these examples, only one Interval was selected (001h), so you could simplify the grid further by deactivating the Interval column, i.e., drag it to the Drop Filter Fields Here area. Data Analysis Tool with the Date and Interval columns deactivated (Reports menu) If you deactivate the Interval column (by dragging it to the Drop Filter Fields Here area), you can control how rows are displayed. For example, you could drag the Hour field into the Drag Row Fields Here area and the Week Day Name back into the column area. Data Analysis Tool with the Date and Interval columns deactivated, Hour dragged into Drag Row Fields area, and Week Day Name moved back into the column area (Reports menu) 143 Agilaire AirVision Manual Chapter 3 Reports Composite statistics for a month could be broken down by hour and day of the week or you could combine data for more than one site by using filters to break down data into different categories. If you move Site back to the “holding” area, the filter will be removed and data will be grouped together, which means you won’t have to scroll to see a second site. Similarly, multiple parameters could be grouped or merged, for example when ozone parameters go by different names. Data Analysis Tool with the Date and Interval columns deactivated, Hour dragged into Drag Row Fields area, Week Day Name moved back into the column area, and Site moved into “holding” area (Reports menu) 144 Agilaire AirVision Manual Chapter 3 Reports You can manipulate the way data is displayed in Data Analysis Report further as follows: W ith the cursor over a Filter name, click the small up or down arrow to change the sort order of that Filter. H over I f the cursor over a Filter name and Filter name showing arrow and filter icon click the small filter icon that appears in the upper right corner. to open a pop-up list of each aspect of the Filter. In this example, you could remove weekend days from analysis; if Hour was selected as a filter, you could toggle settings to include only commuting hours. you left-click Report Value, you can select from the following options: Count, Sum, Min, Max, Average (the default), StdDev, StdDevp, Var, Varp, and Custom. Changing this selection can be helpful for answering questions like “What is the highest value for Monday, 9 a.m. for the entire year?” Saving Grid Layouts as Favorites Display names for Week Day Name The Favorites editor only saves the data query itself, not the changes in filters. To save an analysis layout, click Save Grid Layout or Apply Grid Layout on the ribbon at the top of the screen. Save Grid Layout and Apply Grid Layout buttons in the ribbon at the top of the Data Analysis Report screen 145 Agilaire AirVision Manual Chapter 3 Reports Chart Display To display the data analysis report as a chart, click the Show Chart button in the ribbon at the top of the page and select a row, column, or range of cells. The following figure shows a Point graph by Hour. The Bar graph (shown earlier) is generally well-suited for any data selection. Data Analysis report displaying data as a Point graph 146 Agilaire AirVision Manual Chapter 3 Reports Maximum Hourly Averages Report The Maximum Hourly Averages report provides the ‘N’ highest averages for any parameter for any time range, list of sites, etc. You can define the number of maximum readings, whether multiple maximums are allowed in the same day, an optional rolling average duration, and other parameters for the calculation of the maximums. Maximum Hourly Averages Report 147 Agilaire AirVision Manual Chapter 3 Reports Statistical Report Statistical reports provide statistics for any defined time range, as well as a comparison against previous years of the same parameter and date/time range, with calculated ratios. This report is similar to the Statistical functions in the Data Editor and used to identify data that lies outside the norm. Statistical Report 148 Agilaire AirVision Manual Chapter 3 Reports USEPA / Public Health Reports AIRNow Report AIRNOW creates a report of data values in AIRS format that is sent via FTP to the EPA. Before an AIRNow Report can be generated in AirVision, the Agency Code must be entered in Configuration Editors>Site/Parameter by double-clicking the System icon. The Agency Code is provided by EPA. AIRNow Report 149 Agilaire AirVision Manual Chapter 3 Reports AQI-- Current The AQI Current report provides the current Air Quality Index (AQI) for any defined date/hour for the defined site(s). AQI--Current 150 Agilaire AirVision Manual Chapter 3 Reports AQI Report--Range The AQI Range report provides the current Air Quality Index (AQI) for any date range. AQI--Range 151 Agilaire AirVision Manual Chapter 3 Reports AQI Report--Standard The AQI Standard report provides the current Air Quality Index (AQI) for any defined 24 hour period for the selected site(s). AQI--Standard 152 Agilaire AirVision Manual Chapter 3 Reports AQS (Text) Report AQS Text Reports provide formatted data for transmission to USEPA in AQS (Re-Engineered AIRS) format. Select a Date Range, an Average Interval, Site(s), Parameter(s), and Record Type(s ): Average Data Record, Sample Data Record, Composite Data Record, Precision Data Records, and/or Accuracy Data Records. AQS Text Report (Reports>AQS Text Report) 153 Agilaire AirVision Manual Chapter 3 Reports AQS (XML 2.0) Report AQS XML 2.0 Reports provide formatted data for transmission to USEPA in AQS XML (Version 2.0) format. You have the option to select which Record Types you want to run: Average Data Record, Sample Data Record, Composite Data Record, Precision Data Records, and Accuracy Data Records. AQS XML Report 154 Agilaire AirVision Manual Chapter 3 Reports AQS Reports Precision Reporting for Gases AirVision has the capability to generate precision (RP) records for calibrations that have been marked in the calibration record as a precision point. To accomplish this, a new field has been added to the Calibration Phase configuration and in the Calibration Data database to denote precision records. To use this feature, use Data Source Details->Logger->Calibrations->Phase, and use the PhaseType field on the far right to denote the phase as a PREC phase. Other phases can be marked as ZERO, SPAN, etc if desired. This will allow AirVision to mark future calibration records as precision points in the database. It will not affect older calibration records that have already been collected. However, those records can be adjusted using Editors->Calibration Data This function can also be used to ‘unmark’ or ‘invalidate’ bad precision runs so they are not reported in AQS. Once collected and marked as PREC records, the AQS Reports (Text or XML) can be used to generate the desired records: 155 Agilaire AirVision Manual Chapter 3 Reports Violation of Standards Report Violation of Standards Reports provide a list of time periods where user-defined standards were violated. The user defines the violation limits and calculation methods (hourly, multi-hour, or USEPA annual standards) using the Violation of Standards configuration editor. Version 2.4 of AirVision includes SO2 NAAQS calculation in the Violation of Standards Report, which offers USEPA SO2 NAAQS calculation (requires multiple years of data to run). Violation of Standards Report 156 Agilaire AirVision Manual Chapter 3 Reports Meteorological Report The Meteorological Report shows meteorological data, such as wind direction, wind speed, temperature, rainfall, relative humidity, and stability class (based on lateral turbulence and wind speed method). Each site is shown separately for each day. Meteorological Report (Reports Menu) 157 Agilaire AirVision Manual Chapter 3 Reports Favorites AirVision simplifies regular tasks with a list of user-defined Favorites, which function like Favorites in Internet browsers, such as Internet Explorer. You can save a selection of sites, parameters, average intervals, and date ranges for the Average Data Editor or any Data Report. Favorites can be saved as a global favorite for all users, or as a favorite for an individual user. To create a favorite, go into any data editor or report, complete a query, and select Favorites from the top menu. The ribbon bar will change to show the favorites menu. Favorites menu Select Save as Favorite to bring up the Add a Favorite screen. Give the favorite a name, a description (optional), and select User or All Users (global) and select from the following options: Launch on Application Startup to run the Favorite upon logging in to AirVision. Query on Launch to execute data retrieval when the Favorite is selected. Run Add a Favorite screen 158 Agilaire AirVision Manual Chapter 3 Reports You can also configure the Favorite by selecting the Favorite Query tab after you select Save as Favorite. From this screen you can adjust the site/parameter list, date range, or average interval. These values can also be adjusted later in the Favorites Editor in the Configuration menu. To return to the ribbon controlling the current application, select the top menu function (above the ribbon), for example, Average Data Editor. To use an existing Favorite, select Favorites from the top menu (above the ribbon bar), select User Favorite or Global Favorites, and the saved Favorite. Favorite Query tab from Add a Favorite 159 Chapter 4 Data Editors add new Data Editors menu options Annotate Data, Batch Reading Updater, Calibration Adjust Tool, (Please indicate correct order-K) Air Vision provides the following Data Editors: Average Data Editor Sample Calibration Logbook Entry Editor Annotate Data Batch Calibration Adjust Data Editor Data Editor Reading Updater Tool DONE fix 'Calculation Data Editor' - should be 'Calibration Data Editor', remove 'Lock/Unlock Data' as an editor as its not its own menu item 160 Agilaire AirVision Manual Chapter 4 Data Editors Average Data Editor The AirVision Average Data Editor (Data Editors > Average Data Editor) combines multiple functions into a single tool: Editing details of data points Batch editing Comparison of current data with historical minimum, maximum, and mean Analyze/Exported In addition, you can toggle between the following six formats by clicking buttons in the ribbon at the top of the screen: Linear Table (the default display) Cross Tab Table Matrix Table Time Series Graph (can be used for single or multiple parameters, but the historical comparison tools in this X-Y scatter plot only appear in single- parameter queries) Scatter Plot graph (requires queries of two or more parameters) Histogram (for single parameter queries) screenshot needs updated Ribbon bar to toggle between Data Editor displays; arrows to scroll backward and forward through data To edit data in the Average Data Editor (Data Editors > Average Data Editor), enter and End Date (type dates or use arrow keys to select) Average Interval (for example, 001h Hourly average of 60 minutes) Parameter Selection (for example, Site Name NKNOX, Parameter Name NO2, Parameter Template NO2) Click the Retrieve Data button in the ribbon at the top of the screen The Average Data Editor will open the Linear Data Editor by default. Click buttons in the ribbon to change formats. Click the Data Back or Data Forward button to jump scroll to either the previous or following data set. For example, if your initial query was for a week of data, the scroll buttons will take you backward or forward to a week of data. Start 161 Agilaire AirVision Manual Chapter 4 Data Editors Linear Data Editor The Linear Data Editor allows access to all major database fields, displaying : Site Name, Parameter Name, Parameter Template Name Average Interval Start and End Dates Value (Hover the mouse pointer over data values to see any annotations.) Raw Value (can’t be edited) AQS Null Codes Data Logger Flags Qualifier Codes AirVision Data Grade (used by ADVP). To edit data values, double-click in the Value cell or right-click to bring up a pop-up menu. Average Data Editor from Data Editors menu 162 Agilaire AirVision Manual Chapter 4 Data Editors Cell Color Codes in Flags Editor All data is color-coded based on the flag-to-color mappings listed in the Flags Editor. AirVision is loaded with some default mappings, but you can customize this for your system. The color mappings are global to all users for consistency. Flags Editor in Configuration Editors 163 Agilaire AirVision Manual Chapter 4 Data Editors In addition, AirVision uses two font changes to represent data in the data editor: Bold values represent data that does not match the raw database (edited values) Italics values represent data that has an annotation. Hover the mouse pointer over data values to see details of annotations. Right-Click Options Each of the three non-graphical data editors support select, shift-select, CTRL-select, click-drag selection capabilities, and a right-click menu options. Right-click a data point in the Value column to bring up the following menu: Restore from Raw copies value from the raw database to the final Value and resets flags Set to Minimum Detectable Limit sets data value to MDL configured in Parameter Editor Set AQS Code brings up a pick list to apply new AQS null codes Set Qualifier Code brings up a selection box for AQS qualifier (exception) codes View All Flags (for single data points only) shows all data logger and system flags and allows you to change or clear flags. Multiple flags can be displayed in each cell. Set Annotations brings up an annotation screen so you can add an annotation Before you can use the Batch Editor, two or more data Values must be selected. In the Batch Edit screen, Enabled must be selected for each option to activate that option. Batch Edit provides the following functions: Update Values Scale two or more selected data values as mX+b ( Original Value times a Multiplier plus a Constant Value), for example, divide by 10 and clear the suspect flag. Set Annotations Set AQS Null Code Set Qualifier Codes Set Flags Set AQS Method Code If you select Set Flags, you have the option to Update Children Flags. 164 Agilaire AirVision Manual Chapter 4 Data Editors Batch Edit with Set Qualifier Codes Enabled Children brings up another instance of the Data Editor with the selected parameters and time range for the Child parameter(s) of the selected parameter. This function requires that Parent-Child Parameter relationships are configured in Configuration Editors > Site/Parameter. Drill Down Interval allows you to drill down to minute averages from hourly averages. Export to Excel exports the selected data range to an Excel document, including color, font, and layout details. This right-click option is different from the Export to Excel button in the ribbon at the top of the screen because the button on the ribbon exports the entire data set in the data editor and the right-click option exports only selected data. Show Click a column heading to sort data by a different heading, for example to group data according to flags. Default is to sort by date. Click-hold-drag columns to change the order of columns or to drag a column heading to the Drag a column header here to group by that column area. 165 Agilaire AirVision Manual Chapter 4 Data Editors Cross-Tab Data Editor The Cross-Tab Data Editor shows Parameters as columns and sequences rows by date/time in ascending order and provides the same right-click menu as the Linear Data Editor. Cross-Tab Data Editor from Data Editors menu Note: You can sort data by any column by clicking on a column header. You can find all flagged data easily. Each group can then be expanded and individually sorted. When you change editor modes, the groupings are not kept. Also, you can click-hold-and-drag columns to change the order, and click-drag columns to the Drag a column header here to group area to group data. If you do this accidentally or change your mind, you can drag it back. 166 Agilaire AirVision Manual Chapter 4 Data Editors Matrix Data Editor The Matrix Data Editor presents data in a format similar to the monthly report. If you select multiple parameters, they are grouped with a plus (+) symbol for expansion. Matrix Data Editor from Data Editors menu 167 Agilaire AirVision Manual Chapter 4 Data Editors Time Series Graph You can generate the Time Series Graph in two modes, for one or more parameters. In multi-parameter mode, you can group different parameters together for any time period. With the tools at the bottom or the screen, you can change the color scheme, remove or restore the legend, and print the graph. The minus (-) sign in the upper left corner of the screen minimizes the selection criteria to make more room for the graph. Time Series from Data Editors menu with multiple parameters selected 168 Agilaire AirVision Manual Chapter 4 Data Editors Use the mouse scroll wheel to zoom in or out; right-click and hold to drag the zoomed graph to a different data area. Hover the cursor over a data point to see the specific date, time, and data value. If there is a flag on the data point the flag will also be displayed. You can toggle between hiding or showing invalid data (e.g., data during calibration, maintenance, or analyzer failures). When graphing parameters with two dramatically different full scale ranges, you may choose to use the "Dual Y-Axis Scale" option. When choosing this option, you must also choose the percentage (e.g., 10%, 20%) of the full scale range that is used as the 'breakpoint' for the secondary Y-axis. A value of 20% is common. Note that this function requires that Graph Maximum and Graph Minimum be set in the Parameter configuration. Graphs that have any parameters without limits configured cannot use the Dual Y-Axis function. Suppress Flag Colors - If not selected, flagged data will be shown with “dots” with colors based on the Flag configuration. If selected, data will just be shown as the trend graph color. In both cases, hovering the cursor over the point will always show the flag, and the flag colors are still represented in the tabular/grid display. Dual Y-Axis function 169 Agilaire AirVision Manual Chapter 4 Data Editors For one parameter, you can choose previous intervals to be other than one year by selecting Show History from the options above the graph.If you bring up the Time Series Graph in single parameter mode, you get additional options at the top of the graph: Show Invalid as Empty Use Dynamic Scaling Show History displays N previous years of data alongside main graph Show Statistics displays cumulative statistics of N previous years--min, max, avg Lookback Count select number of years, months, or days from the drop-down list Lookback Gap select number of years, months, or days from the drop-down list Refresh button must be clicked to show any changes to selections. Time Series Graph with a single parameter selected 170 Agilaire AirVision Manual Chapter 4 Data Editors If the database contains data from previous years for the same parameter, those previous years can be graphed in the Time Series Graph alongside the current data by selecting Show History and the number of years you want to graph. Each previous year is graphed individually. Select Refresh to update the graph. Time Series Graph with a single parameter and Show History option and hover over displaying date, and time data value The “+/- Days” selector can be used to compile nearby days for the same hour into the comparison statistics. An example of how this is applied would be: Current Data = 1/15/09,. Number of Years = 3, +/- Days = 1 1/5/09 data at hour 00 would be compared against statistics using the following points: 1/4/06, hour 00 1/5/06, hour 00 1/6/06, hour 00 1/4/07, hour 00 1/5/07, hour 00 1/6/07, hour 00 1/4/08, hour 00 1/5/08, hour 00 1/6/08, hour 00 Obviously, selection of a large data set with a long look back period and large skews can be very processor intensive for the client and the SQL server for large data sets. Agilaire recommends this tool be used for data sets of roughly a week or less. 171 Agilaire AirVision Manual Chapter 4 Data Editors Scatter Plot Graph The Scatter Plot Graph allows any two parameters in the existing chart to be plotted in an X-Y chart. The Y axis parameter is the primary parameter and all data points are color coded according to the Data Flags color mappings to help distinguish outliers that have already been flagged. Scatter Plot Graph from Data Editors menu with hover over displaying date, time and data value 172 Agilaire AirVision Manual Chapter 4 Data Editors Histogram The Histogram provides a graph of the distribution of values for the entire data set, but it is designed to display only one parameter at a time, so be careful not to use multiple parameters. The default graph uses the graph maximum/minimum from Configuration Editors > Site/Parameter, but you can check Override to set a custom max/min specifically for the X axis of this graph. Histogram from Data Editors menu with hover over displaying date, time and data value 173 Agilaire AirVision Manual Chapter 4 Data Editors Batch Reading Update This editor allows the user to do ‘blind’ edits on very large data sets without having to retrieve the data into memory in the Average Data Editor. The user simply selects the sites, parameters, time period, and the required action, much like the Batch Edit options in the Average Data Editor. This tool also offers the option to “lock” data and prevent future edits until the data has been unlocked (again, using the Batch Edit tool). Locked data appears in the Average Data Editor with a padlock icon beside it. Batch Reading Updater 174 Agilaire AirVision Manual Chapter 4 Data Editors Sample Data Editor The Sample Data Editor allows manual entry of PM filter, air toxics samples, or other non-continuous data. Important! The parameter must have been configured in the Site/Parameter Table as either a (Particulate) Sample or Composite data type parameter for it to appear as a selection in the sample data editor. To create a new sample data record, use the Add button on the ribbon. The required fields will be marked to the right with a red “!” icon. You can optionally select a special blank type (field blank, lab blank) for appropriate notation in AQS reporting. You can also define the sample as a Scheduled Sample, whether it is considered a Creditable Sample, and also select to have the sample marked as non-reportable. The Sample Identifier is a free-form field to be used for the filter ID or some other ID code to trace the sample. The editor can also be used to retrieve and edit previous samples using the date range selection tool and the Retrieve Data toolbar icon. Sample data can also be imported automatically using the optional File Import Tool. screenshot needs updated Sample Data Editor 175 Agilaire AirVision Manual Chapter 4 Data Editors PM Calculator in Sample Data Editor A PM Calculator can be accessed from the Sample Data Editor by clicking the icon within the Sample Value field. PM Calculator accessed from the Sample Data Editor 176 Agilaire AirVision Manual Chapter 4 Data Editors Calibration Data Editor The Calibration Data Editor can be used to correct errors in calibration records collected from the data logger, or to add new records (e.g., to reflect a manually collected calibration). To edit existing records, select the appropriate site/parameter and date range, and use the Retrieve Data ribbon icon. You can edit dates, times, values, expected values, bottle/tracer IDs, or mark the record as non-reportable. However, there is no provision to delete a record. To add a new record, press the Add icon on the ribbon. You will be prompted for the site, parameter, calibration program and phase: The record will be created in the editor, and the remaining record characteristics can be entered. The user may also define the calibration level of a phase (ZERO, PREC, etc). This is used primarily by the Cal Adjustment Tool and the AQS Precision Report function. The level will normally be added automatically by the system if the cal level is defined in Data Source Details for the cal phase, but the Cal Editor allows for updating old records or correcting data. Calibration Data Editor 177 Agilaire AirVision Manual Chapter 4 Data Editors To add a new calibration record, press the Add icon on the ribbon. You will be prompted for the site, parameter, calibration program and phase: The record will be created in the editor, and the remaining record characteristics can be entered. Adding Calibration Data in the Calibration Data Editor via the Add button on the ribbon 178 Agilaire AirVision Manual Chapter 4 Data Editors Lock/Unlock Data This feature will be available in later versions of AirVision. 179 Agilaire AirVision Manual Chapter 4 Data Editors LogBook Entry Editor The LogBook Entry Editor allows you to make entries in a logbook that can then be seen in LogBook Reports. To make a logbook entry, open LogBook Entry Editor from the Editors menu. Click the New Log Entry button in the upper left corner of the screen In the bottom section of the screen enter a Log Entry Time, User Entry Time, select a Category from the drop-down list or select New Category and enter a different category, select a User and a Site from the drop-down lists Enter the LogBook message in the Entry Text box and click Save. The new entry information will be displayed in a row in the top section of the screen. Adding LogBook entries in the LogBook Entry Editor from the Editors menu By default, the logbook entries do not accept changes or addendums after the record has been saved. A system option is available to allow addendums to be made. To enable this, contact [email protected]. 180 Agilaire AirVision Manual Chapter 4 Data Editors Cal Adjust Processor The Cal Adjust Processor Tool allows you to apply zero adjustments or zero/span adjustments to data based on calibration results and expected value. Note: This tool is optional and not normally enabled, but can be enabled by contacting [email protected]. Note that AirVision will look for calibration records that have been marked ZERO and SPAN by the Cal Level defined in Data Source Details for the cal phase. If these records are not marked, AirVision attempts to identify zero and span data via the phase name. Note that the Calibration Data Editor allows for updating old records or correcting data. To use the Cal Adjust Tool, select a Data Range and Parameter(s). The tool can run on multiple sites/parameters, but review of the results can be confusing, so it may be preferable to use the tool with one parameter at a time at first. The filter fields could also be used to filter results for multiple site/parameters. Once selected, choose Analyze from the toolbar. The screen will show the number of points found that can be correlated with calibration data. The bottom part of the report shows the current values and the proposed changes. Calibration Adjust Processor 181 Agilaire AirVision Manual Chapter 4 Data Editors The changes depending on the modes set on the right part of the ribbon: Adjust for Span-Deselect this if you only want to do a zero correction. Sliding Scale- If span correction is adjusted, you may optionally choose to have the slope factor linearly interpolated between each cal (e.g., if the slope correction on cal#1 is 1.1, and the slope correction on cal #2 is 1.05, then the hourly data at the midpoint would have a slope correction of 1.075, the hour closest to cal#1 would be 1.1, the hour closest to cal#2 is 1.05, etc). Appy Forward- If selected, cal corrections are applied using the calibration results going forward in time (default). If de-selected, corrections are applied going backwards from each calibration. If you change the mode, you will need to select the "Analyze" button again to see the new proposed changes. Once you are satisfied, you may click the "Apply" button to make the changes to the database. Any data changed will be marked with the 'z' (Cal Adjusted) data flag, and the data is locked from second calibration adjustments. If the user wishes to return to original, the user can use the Batch Edit function in the Average Data Editor to return the data to original form. 182 Chapter 5 Help & Support Agilaire’s Help and Support menu offers four options: Agilaire Support AirVision Manual AirVision Wiki How-to Step by Step screenshot needs updated Agilaire Help and Support menu 183 Agilaire AirVision Manual Chapter 5 Help and Support Agilaire Support Agilaire Support is a link to the Agilaire website, www.agilairecorp.com. You can reach our support staff at:email: [email protected] phone: 865-927-9440, press 2 AirVision Manual If you select AirVision Manual, you will see a pdf of the latest User’s Manual. You can also download the manual from our website, www.agilairecorp.com. AirVision Wiki The AirVision Wiki is a link to Agilaire’s ongoing website that allows adding and editing of AirVision’s latest developments. The Wiki includes FAQs, AirVision Documentation, Training information, Release Notes, Technical Notes/Workarounds, Design Notes for Upcoming Features, Tricks and Tips, ADVP Rule Suggestions, EPA Conference Notes, and Step by Step Procedures. Customers who apply to be a writer add comments and suggestions. How To--Step by Step This options takes you to a section of the Agilaire Wiki that provides an overview of the full steps necessary for common activities in AirVision such as Data Logger configuration, Modbus Instrument and Channels, Internet Polling, Modem Connections, TCP/IP Connection to a logger, Database Backup, and Restoring a Database. 'software release info' needs added 184 Chapter 6 List Editors The AirVision List Editors Menu consists of four items: Log Book Category Editor Math Math Constants Editor Math Equation Editor Modem Types Parameter Tag Editor Unit Editor List Editors display items in these categories. Access to the List Editors is controlled by Administrative personnel in the Securities Menu List Editors Menu 185 185 Agilaire AirVision Manual Chapter 6 List Editors Log Book Category Editor Selection of a Log Book Category is required when you make an entry in the LogBook Entry Editor (Data Editors>LogBook Entry Editor). When you make an entry in the LogBook Entry Editor, you can either click in the category line and select from the drop-down list, or you can select New Category and write your own category. New categories will be saved in the list when you click the Save button. The default Log Book Categories are: Adjustment, Logger Message, Other, Repair, Routine Check, and Scheduled Maintenance. Logbook Category Editor New Categories can also be added in the LogBook Category Editor from the List Menu, which displays all Category Names. To add a Log Book Category, click on the asterisk on the bottom line and enter the category, then click the Save icon. 186 Agilaire AirVision Manual Chapter 6 List Editors Math Editors Central Math Processor AirVision includes the capability to perform mathematical calculations at the server, either on a manual basis, or as a scheduled task. To perform these calculations, you will need to define the mathematical calculation to be made in the Math Equation Editor (List Editors > Math > Math Equation Editor). Each equation is given a name to reference (e.g., “SO2_Adjustment”) which is then referenced in the math utility or the Task Scheduler. Equations may act on any defined average interval, and must reference Parameter Templates, rather than specific site/parameter combinations. This allows a general equation to be configured once, and used for multiple sites without having to repeat the same equation. To create a new equation, open List Editors > Math > Math Equation Editor and click the Add Equation button. Enter the Equation Name (required), and optional Description, and then the equation. The equation takes the form of parameter template names, operators, and functions. Parenthesis are supported. screenshot needs updated Math Equation Editor from List Editors Binary operators (operators on two variables) include: * Multiply / Divide + Add - Subtract % Modulo (remainder) 187 Agilaire AirVision Manual Chapter 6 List Editors Other binary and Uniary functions (functions that operate on one variable or one result of another embedded equation) include: Name Description Abs Returns the absolute value of a specified number. Abs(-1) Acos Acos(1) Cos Returns the angle whose cosine is the specified number. Returns the angle whose sine is the specified number. Returns the angle whose tangent is the specified number. Returns the cosine of the specified angle. Exp Returns e raised to the specified power. Exp(0) Log Returns the logarithm of a specified number. Log(1, 10) Log10 Log10(1) Max Returns the base 10 logarithm of a specified number. Returns the larger of two specified numbers. Min Returns the smaller of two numbers. Min(1, 2) Pow Sign Returns a specified number raised to the specified Pow(3, 2) power. Rounds a value to the nearest integer or specified Round(3.222, 2) number of decimal places. The mid number behaviour can be changed by using EvaluateOption.RoundAwayFromZero during construction of the Expression object. Returns a value indicating the sign of a number. Sign(-10) Sin Returns the sine of the specified angle. Sin(0) Sqrt Returns the square root of a specified number. Sqrt(4) Tan Returns the tangent of the specified angle. Tan(0) Truncate Calculates the integral part of a number. Truncate(1.7) Asin Atan Round Usage Asin(0) Atan(0) Cos(0) Max(1, 2) Important! These equations MUST be referred to by the case-specific version of the equation. You must use “Max(x,y)”, not “MAX(x,y).” For equations, Information flags are not propogated, while Validity flags are propagated from constituent channels. Consult the Flags Editor for details on which flags are considered Informational and Validation flags. 188 Agilaire AirVision Manual Chapter 6 List Editors Modem Types Modem Types in the List Editors Menu lists all the modem types that are available in the drop-down list when you add a Modem and select a Modem Type in Configuration Menu>Server Configuration. New Modem Types can be added in the List Editors Menu by clicking on the asterisk on the bottom line of the list. Modem Types in the List Editors Menu 189 Agilaire AirVision Manual Chapter 6 List Editors Parameter Tag Editor The Parameter Tag Editor in the List Editors Menu lists all the parameter tags in AirVision. To add another Parameter Tag, click on the asterisk in the bottom line of the menu and add a tag. Parameter Tag Editor in the List Editors Menu 190 Agilaire AirVision Manual Chapter 6 List Editors Unit Editor The Unit Editor in the List Editors Menu lists Units used in AirVision, the Unit Type, Slope, Intercept, and Description. To add a Unit, click on the asterisk on the bottom line. Unit Editor in List Editors Menu 191 Chapter 7 Additional Features The following additional features are available in the Utilities menu: AQS XML Import Tool Fill Data Gaps Table Import/Export 192 Agilaire AirVision Manual Chapter 7 Additional Features AQS XML Import Tool AQS XML Data is imported by matching the codes in the file with the codes set in the sites and parameters so data is imported to the correct location in the database. To run the AQS XML Import Tool from the Utilities menu Click the Browse button to bring up a Select Import File box to locate the AQS XML file that you want to import. Once the file has been selected, the file name and path will be displayed. Select the Process Import button on the left side on the Ribbon above the Main Navigation menu. AQS XML Import Tool from Utilities menu AQS Text Import Tool The AQS Text Import Tool works much like the AQS XML import tool, but can also import sample data records (the XML Import tool is currently limited to just averaged data). The import tool compares Site Codes, Parameter Codes, and POCs with the Parameter Configuration to find the correct site and parameter to associate with the imported data records. 193 Agilaire AirVision Manual Chapter 7 Additional Features Fill Data Gaps The Fill Data Gaps utility from the Utilities menu generates empty data records that are placeholders to ensure data is continuous in reports even where data is missing. To make sure there are no gaps in reports, Fill Data Gaps should be set in the Task Scheduler to run daily, especially on the first day of polling. In the Fill Data Gaps screen, select the Start and End Dates, select the sites and parameters to be enabled, and click the Create Data button on the Ribbon above the Main Navigation menu. The range of the query will determine how long the process requires. When it is finished the progress bar will disappear. Fill Data Gaps from the Utilities menu 194 Agilaire AirVision Manual Chapter 7 Additional Features Table Export Important! Table Export/Import should be used only when advised by Agilaire support staff. The Table Export tool allows any table in the AirVision database to be exported in XML format. It can be useful for copying system configuration settings for archive purposes or for transmission to Agilaire support staff for troubleshooting. Select a table or tables, designate a destination folder, and click the Process Export button to export. One file is created for each table, so an export of multiple tables is best contained in a designated folder. Table Export from Utilities menu needs updated for Database Export menu item 195 Agilaire AirVision Manual Chapter 7 Additional Features Table Import Important! Table Export/Import should be used only when advised by Agilaire support staff. The Table Import tool allows any table that has been exported from the AirVision database to be imported in XML format. It is useful for importing previously exported system configuration settings to archive or for Agilaire support staff to troubleshoot. Browse to select a table and the path will be displayed in the Location of Table Export File to Import field. Click the Process Import button to import the file. One file is created for each exported table, so tables must be imported one at a time. Table Import from Utilities menu need to add Average Data Archiver option 196 Chapter 8 Optional Features AirVision can provide additional features according to the terms of your contract with Agilaire. For more information, contact Agilaire at 927-9440 or [email protected]. This chapter describes the following features: AirVision’s optional patented Automatic Data Validation Processor (ADVP) File File Import Tool, which automates data import P& A (PARS) Editor, which allows administrative Import Configuration Editor, which enables you to develop a File Import Template for the File Import Tool from a variety of data sources personnel to create data records that are used later to submit RA (accuracy) and RP (precision) records to the Air Quality System (AQS). Data Rollup Processor, which allows shorter term averages to be rolled up into larger block or rolling averages. Enhanced File Import Tool in AirVision 2.3 handles new data types better, especially for PM lab samples and Air Toxics. add Asset Tracking 197 Agilaire AirVision Manual Chapter 8 Optional Features Automatic Data Validation Processor (ADVP) AirVision’s optional patented Automatic Data Validation Processor (ADVP) allows an unlimited number of logical rules to be applied to data, resulting in data that is flagged, graded, annotated, coded, and/or emailed to designated users. Each ADVP rule consists of two main components: a trigger and a resultant action. If the conditions of the trigger are met for a given data point, the action is taken; if not, nothing happens, and the next rule is evaluated. A trigger consist of a number of conditions linked by logical combination (e.g., AND/OR). The following is an example of a data rule: If Ozone is greater than 50 ppb and the ambient temperature is less than 72 degrees F, then mark the data suspect. The trigger is composed of the following two conditions: If Ozone is greater than 50 ppb (Condition #1)| AND the ambient temperature is less than 72 degrees F (Condition #2) The action is: mark the data suspect data multiple AND/OR links are evaluated in sequential order. For example, a four-condition trigger such as: Condition 1: 1 > 2 link AND Condition 2: 2 > 3 link: OR Condition 3: 3 > 4 link: AND Condition 4: Note: Is evaluated as follows: (((Condition1 AND Condition 2) OR Condition 3) AND Condition 4) in other words, having Condition 3 and 4 as true would cause the action to be taken. Each trigger condition uses a Parameter Template, and optionally can be associated with a particular site. If the site field is left blank, the rule is applied to all sites with parameters that match the templates. Example: To do a simple wind vane stuck rule, you could point at the parameter template for WDR and set the trigger condition to be Variance, Less Than, 5%. To create the rule, click the New Rule button on the ribbon, and we give the rule a name and enable it. Designate the average interval, and hit the Save button to add the first condition by clicking the Add Condition button at the bottom. Fill in the first condition and select Variance for the Characteristic, set the Relationship to Less Than, and designate the Parameter Template to apply. Finally, set the limit for the comparison to 5%. NOTE: conversion to InDesign included this pink text. It did not appear in previous PDF. Leave in or take out?-K 198 Agilaire AirVision Manual Chapter 8 Optional Features Note: Delete Condition button can be used to remove a condition that is no longer desired. The trigger condition can use certain characteristics and make certain comparisons: Characteristic Comparisons Allowed Compared To Average Value Greater Than Less Than Equals Differs Greater Than Differs Less Than Another Parameter (Template), same site or specified site. Flag Contains Doesn’t Contain List of logger/system flags Annotation Contains Doesn’t Contain User-defined text Variance (change from a previous average value) Greater Than Less Than Equal To User-defined percentage Historical Average (fixed historical averages- see end of chapter) Historical Composite (a dynamic average of previous years of the same date/hour, similar to the Historical Composite used in the Average Data Editor. 199 Agilaire AirVision Manual Chapter 8 Optional Features Example: To do a simple wind vane stuck rule, you could point at the parameter template for WDR and set the trigger condition to be Variance, Less Than, 5%. To create the rule, click the New Rule button on the ribbon, and we give the rule a name and enable it. Designate the average interval, and hit the Save button to add the first condition by clicking the Add Condition button at the bottom. Fill in the first condition and select Variance for the Characteristic, set the Relationship to Less Than, and designate the Parameter Template to apply. Finally, set the limit for the comparison to 5%. Stuck Wind Direction Program in ADVP Editor 200 Agilaire AirVision Manual Chapter 8 Optional Features The rule can be further improved by adding another condition that the wind direction be below a value, for example, 10 mph, to avoid cases of steady winds accidentally triggering the rule. Set the Relation to Next Condition at the bottom to AND, and use Add Condition to create, filling in the values and designated WSP for the comparison parameter template. Since you are using parameter templates, this one rule can be applied to all sites where WSP and WDR labeled parameter exist. Further improving the ADVP setup 201 Agilaire AirVision Manual Chapter 8 Optional Features Actions can consist of any or all of the previous steps, and they can be applied to any parameter (template), not necessarily the one that triggered the rule: a Fixed Value Apply a Flag Clear a Flag Apply a Null Cole Clear a Null Code Add Annotation Text Assign a data Grade (1 .. . 10) Send an Email via Subscriptions Notifications The action can be applied to any parameter at the same site, or a specific site can be designated (most likely approach). In the previous example, you could mark data invalid and set the null code AW for Wildlife Damage. You could optionally email QA, in case the sensor failed. Assign Setting Null Code and emailing QA as a result of ADVP rule 202 Agilaire AirVision Manual Chapter 8 Optional Features Time-specific rules (day/night, rush hour) Agilaire is planning to expand Version 2 of the ADVP to include time-specific rules. For Version 1 of AirVision, Agilaire recommends using the Math Pack function in the data logger to use HRDAY() to determine the hour of the day, daytime, nighttime, etc. It is also possible to use the JULDAY() function in an equation to add a seasonal adjustment factor to HRDAY(), or to directly calculate sunrise/sunset. For example, you could go to http://www.arachnoid.com/lutusp/sunrise/, put in your location, and get a table of sunrise and sunset times. (You will need to know your latitude and longitude before you can generate the table). In Excel, you can use a graph trendline to develop a Math Pack equation to calculate sunrise and sunset times for any given day. For Knoxville, TN, the equation might look like: SUNSET = 5E-09*JDAY()^3 - 6E-06*JDAY^2 + 0.0015*JDAY() + 0.7102 SUNRISE = 3E-06*JDAY^2 - 0.0012*JDAY + 0.3466 TIME = HRDAY() + MINHR() / 60 You can then add conditions to determine day/night conditions, such as illustrated below: Adding conditions to determine day/night Another condition for TIME < SUNSET can be added as well. 203 Agilaire AirVision Manual Chapter 8 Optional Features Suggestions for Initial ADVP Rules Flagging high pollutant values when environmental conditions would not allow those values, e.g., high ozone during low temperature. Flagging abnormal solar radiation during nighttime or rainfall Detecting stuck met sensors (frozen sensor, birds perching) Cross-flagging instrument diagnostic values to invalidate/mark suspect primary analyzer readings. Comparing nearby sites for similar parameters (ambient temperature, pollutant readings) and marking large differences as suspect. Checking sigma theta conditions against average wind speed, solar radiation, vertical wind speed, etc. Noting high PM concentrations during firework events, such as Fourth of July (Julian day = 185 in non-leap years) 204 Agilaire AirVision Manual Chapter 8 Optional Features File Import Configuration AirVision allows you to create an import template for each site.Each template contains the actual hard links to the parameter/average interval combination (e.g, dbs ID). To configure an import template: the Configuration Editors select File Import Configuration and either select a previously configured template from the sidebar or click the New Template button from the upper section of the screen. From In Enter Select Select Select Select Click Select In To the File Schema section: a Template Name and select the Number of Header Rows to skip before parsing data and the Number of Footer Rows to ignore at the end of file. a Maximum Number of Columns to allow a Field Delimiter to determine how imported data is delimited (comma or pipe) File Import Configuration a Sample Type (Standard or a particular custom type) whether parameters will be matched by Column Number or Header Name or Row. the check box if you want to Overwrite Existing Data during the file import. This selection only applies when using the manual File Import function in the Utilities menu; it does not apply to File Imports performed by the Instrument Polling system. a Parameter Data Type--Average (Continuous) with an Average Interval, Composite Sample with a Composite Type, or Particulate Sample with the Duration and Frequency Codes. An appropriate drop-down list will be displayed according to the data type selected. the File Column Mapping section, column headings include Data Type, Parameter Template, and Parse Format. Parameter Match Name and Column vary according to which type of Parameter Matching was selected in the Parameter Information section. add a column mapping row, click the Add Column Mapping button at the bottom of the screen. A blank row will be added to the table. Click the Save icon in the upper left corner of AirVision to save changes to the database. 205 Agilaire AirVision Manual Chapter 8 Optional Features Configuring File Import Templates AirVision’s File Import Tool (Configuration Editors > File Import Tool) automates data import from a variety of data sources. AirVision allows your to define a template describing the layout of particular files so files can be automatically imported into the database. With this system, particulate and laboratory data can be copied into a folder to be imported into AirVision. The standard File Import Tool assumes that data is arranged using different parameters as columns and different points in time as rows. This arrangement matches most instrument outputs, filter data sets, and other commonly accessed data. The Advanced File Import Tool (Version 2 of AirVision) is used where each data point exists as an independent row, with columns representing different aspects of that data point (value, null code, sample time), as with air toxics data. To eliminate the need to create individual templates for each site (to define site/parameter associations), the File Import tool maps columns to Parameter Templates, not any individual site/parameter combination. Thus a single template can be applied to any site in the system. However, you must have a parameter template defined for each column that you want to import, either one of the AirVision defaults or one you add through the Template Editor. Creating a Template AirVision is pre-loaded with some common instrument templates (BAM-1020, Thermo TEOM and Partisol 2025 FRM interval data). To create a new template, open Configuration Editors > File Import Configuration. Click the New Template button on the ribbon to create a new template. Red exclamation point icons (!) indicate the following required fields in the File Schema section of the screen: Template Number Name of Header Rows (rows to skip before importing data). Even if the value is zero, this value has to be edited to be saved. Number of Footer Rows (rows at the end of the file to skip). Even if the value is zero, this value has to be edited to be saved. Delimiter (comma or pipe) Field Sample Parameter Type (select “Standard” unless you have a customized driver) Data Type Average (Continuous), Composite Sample, or Particulate Sample Optional fields are: Maximum Number of Columns Parameter Overwrite Matching (match parameters by column number or header) Existing Data If selected, an import will overwrite data that is already in the database. If de-selected, the import will skip data points where data already exists. Based on the Parameter Data Type, select one of the following: Average Interval (for Average/Continuous Data) Composite Type (for Composite Data) Duration and Frequency Code (for Particulate Sample). After the basic template is completed, Save the template to enable the “Add Column Mapping” button at the bottom. Column Mapping cannot be done until the base template is saved. 206 Agilaire AirVision Manual Chapter 8 Optional Features Mapping Columns If you want imported data to go in specific columns, save the File Schema entries (top half of the screen) and click the Add Column Mapping button at the bottom of the screen. Enter the following information: Column Number for each column in the file where you want data to be imported. Not every column needs to be configured (e.g., if you only want columns 1, 2, and 5 out of a 10-column file, only those 3 records need to be configured). Data Type Select one of the following from a drop-down list: Date Time Date and Time Floating Point Value (to map to a parameter) Template can be selected from a drop-down list of all parameter templates only if you selected Floating Point Value for the Data Type Parse Format can be selected for date and/time data only (not floating point); for example, MM/dd/yyyy HH:mm. Select from a drop-down list. Click the Add Column Mapping button to add another record. Parameter To delete a column mapping record, select the row and press the Delete key on the keyboard. To delete an entire File Import Template, select it from the Template Name section of the screen and click the Delete button in AirVision. Save the template again. Use the Manual File Import tool to test your file import template. 207 Agilaire AirVision Manual Chapter 8 Optional Features Enhanced File Import Tool In Version 2.3, AirVision significantly enhances the File Import Tool (Configuration Editors > File Import Tool) to better handle new data types, primarily meta data for PM lab sample data and AirToxics data. In the original model, the File Import Tool assumed each row in the file contained data for different parameters, and could only import the numerical values for that data, as in the following example: Example of File Import Tool before AirVision Version 2.3 208 Agilaire AirVision Manual Chapter 8 Optional Features In the Enhanced Tool, the ‘several parameters on one row’ templates have been enhanced to be able to denote that columns represent additional data properties for the parameter data point, including: Flags (see “Flag Mapping Table” below) AQS Method Code AQS Null Codes Qualifier Code (one) Enhanced File Import Tool in the Utilities menu 209 Agilaire AirVision Manual Chapter 8 Optional Features The Enhanced File Import Tool also includes the capability to do ‘row-wise’import, where a single row represents a single data point, with several additional properties associated with that single data point. This is a common case for air toxics data. In this mode, it is even common to have the same file represent multiple sites and parameters, so it is necessary to create a key string for each site/parameter to match the identifier that is used within the imported file. First, go into the Site/Parameter editor and use the ‘Metatags’editor at the bottom of the Site form and the Parameter form to identify the string in the imported file. Once this is done, set up a template to look for that particular string in the file: Template for File Mapping 210 Agilaire AirVision Manual Chapter 8 Optional Features Available Fields include: Site / Parameter Identifier (by meta tag) Flag Final Value Tare / Final Weight Sample Volume, Temp, Barometric Pressure Null Code, Qualifier Code Sample ID, Cannister ID Parameter Occurrence Code (POC) Sample Retrieved Date, Time, Date/Time Sample Analyzed Date, Time, Date/Time Minimum Detectable Value Uncertainty Frequency Code Duration Code Sample End Date, Time, Date/Time Enhanced File Import Tool in the Utilities menu Note: To import the POC, a meta tag must be created at the bottom of the parameter record that uses ‘POCIdentifier’ in the “Name” field, with the POC Value set to 1, 2, 3, etc. 211 Agilaire AirVision Manual Chapter 8 Optional Features Flag Mapping Table Some devices provide data flags in the form of a string, which can be mapped into AirVision’s standard flags. Supported formats include: Binary string (e.g., “1101010”, where each digit represents presense/absence of a flag) Hex (e.g., “1F0A”, were each hex char represents a 4-bit binary map, each bit = 1 flag) Decimal Binary (e.g., “1024”, where if the decimal number is converted to binary, each bit represents a possible flag String (e.g, “FD<”, where each character represents a flag, but does not map equally to AirVision’s standard flag table. By allowing the user to create a table to map the instrument’s particular flags to AirVision’s flags, each Flag Mapping Table can be referenced in the File Import Tool to map that column and its content into AirVision flags (Configuration Editors > Flag Mapping Editor). For example, the Met One BAM provides a series of “1”and “0”fields to represent flags in the BAM. Station, 1 Time,Conc(mg/m3),Qtot(m3),no(V),WS(MPS),WS(MPS),RH(%),Delta(C),WS(MPS),E,U,M,I,L,R,N,F,P,D, C,T, 02/06/09 12:00, 0.380, 0.000, 0.189, 2.5, 2.2, 31, 52.7, 35.9,0,0,1,0,0,0,0,1,0,0,0,1, Since each column maps to a different flag, we actually have to create multiple Flag Map table entries and map each column to its own flag map. Example: Flag Mapping Table 212 Agilaire AirVision Manual Chapter 8 Optional Features However, Met One is considering an ‘all in one’ field, where the commas are removed and the binary pattern is given in one column, e.g.: Station, 1 Time,Conc(mg/m3),Qtot(m3),no(V),WS(MPS),WS(MPS),RH(%),Delta(C),WS(MPS),FLAGS 02/06/09 12:00, 0.380, 0.000, 0.189, 2.5, 2.2, 31, 52.7, 35.9,001000010001, This makes the flag map table easier--only one entry. Note that we define bit 0 as the rightmost bit, and bit N as the leftmost bit, which is actually the opposite of the way the old string is listed. 213 Agilaire AirVision Manual Chapter 8 Optional Features P & A (PARS) Editor Precision and Accuracy (P & A), formerly Precision and Accuracy Reporting System (PARS), is a utility that allows administrative personnel to create data records that are used later to submit RA (accuracy) and RP (precision) records to the Air Quality System (AQS). P&A is collected to ensure that data collected at monitoring sites is of high quality. Systems of checks produce data that reflects the results of these evaluations. Data edited in the PARS Editor will not be published on the public website; the PARS Editor is a tool for administrative access only. PARS Precision Editor Precision checks are determined by performing repeated measurements of ambient-level “calibration” gases at two-week intervals for continuous analyzers, or by obtaining duplicate results from collocated samplers for manual methods. The Precision Data record is uniquely identified by the combination of monitor and date. Precision records have a single value for each record representing Actual and Indicated values with Indicated values coming from a co-located sampler/analyzer similar to the primary (actual reading) analyzer. The Precision Report displays a daily listing of reported precision data in a tabular format. The report displays the sample values entered into the system and then calculates a percent difference between the reported values, consistent with the requirements of OAQPS (Office of Air Quality Planning and Standards) Quality Assurance guidelines. The PARS Precision Editor lists parameters in a table along with their Duration Code, Precision Check Date, and Precision Identifier Number. The parameter that is selected (by clicking Select in the left column of the table) will be displayed below the table with the following information: Precision Test Information Precision Check Date: The calendar date for which the accuracy audit information pertains. Precision Identifier Number: A sequentially assigned number used to identify a particular precision check from others, when multiple checks are performed on the same day Precision Sample Identifier: The unique identity (ID) number of the reference sample used to challenge the instrument Precision Type Identifier: Describes the type of precision test performed Audit Agency Code: Agency responsible for performing a role for the monitor Monitor Information Parameter: The code assigned to the parameter measured by the monitor. (A “monitor” in AQS represents not a device but the pollutant measured by a device.) Parameters may be pollutants or non-pollutants. Duration Code: The length of time (interval) used to acquire raw samples that are analyzed by monitors Parameter Type: A description of the type of parameter (e.g., ozone) Unit Code: AQS code for the standard parameter unit (e.g., ppm) 214 Agilaire AirVision Manual Chapter 8 Optional Features POC: Parameter Occurrence Code (or Pollutant Occurrence Code), an identifier used to distinguish between multiple monitors at the same site that are measuring the same parameter. For example, the first monitor established to measure carbon monoxide (CO) at a site could have a POC of 1. If an additional monitor is established at the same site to measure CO, that monitor could have a POC of 2. However, if a new instrument is installed to replace the original instrument used as the first monitor, that would be considered the same monitor and it would still have a POC of 1. For criteria pollutants, data from different sampling methods should only be stored under the same POC if the sampling intervals are the same and the methods are reference or equivalent. For sites where duplicate sampling is being conducted by multiple agencies or by one agency with multiple samplers, multiple POCs must be utilized to store all samples. For non-criteria pollutants, data from multiple sampling methods can be stored under the same POC if the sampling intervals are the same and there is only one sample for the time reported. If multiple open path monitors are reporting data for the same parameter, each open path would be assigned a different POC. Actual Method Code: Identifies the particular method for collecting and analyzing a precision check value State Code: A Federal Information Processing Standards (FIPS) code that identifies one of the 50 states, U. S. territories, Washington, DC, or foreign countries. For batch loading data formats only, it may be set to TT to indicate that the County Code/Tribal Code field contains a Tribal Code. County/Tribal Code: A Federal Information Processing Standards (FIPS) code that identifies a county, or other geo-political entity, such as tribe, parish or independent city. For foreign countries, it identifies the geo-political equivalent to U. S. states, such as Mexican states or Canadian provinces. Site Code: A numeric identifier (ID) that uniquely identifies each air monitoring site within a county, and if it is a tribal site, within all counties included in a tribal area. There is no requirement that Site IDs be assigned continuously or in any particular order. Regional or local organizations are thus free to allocate Site IDs in any way they choose, as long as there is no duplication within a county or the counties that include a common tribal area. A specific Site ID is associated with a specific physical location and address. Any change in address requires a new Site ID to be assigned. This address change could include a change from the roof of one building to another. A change in location on the same roof should not normally require a new Site ID. Although an address change would routinely mean a new Site ID, some changes that do not change the site's location in respect to surrounding sources and its measurement scale would require no change. An EPA regional office should be consulted for assistance in determining whether a new site ID is required. If a new Site ID is needed for a site not operated by the air pollution control agency, that agency should be contacted to assist in the ID assignment, to ensure that the ID is unique within the county and, if appropriate, the adjoining counties sharing a common tribal area. In other words, when a new Site ID is assigned, it must be different from any other Site ID already existing for that combination of State Code and County Code and Tribal Area. 215 Agilaire AirVision Manual Chapter 8 Optional Features Collocated Monitor Collocated Parameter: The code assigned to the duplicate sampler that is paired with the primary monitor (i.e., routine monitor) to determine precision and accuracy data Collocated POC: The Parameter Occurrence Code (POC) of the duplicate sampler. Only applies to collocated data where the duplicate value is a recorded daily raw data point. Indicated Method Code: Identifies the particular method for collecting and analyzing a precision check value. Test Results Actual Value: For precision and accuracy data the actual value is the concentration produced from the primary sampler (i.e., routine monitor) in a collocated sampler pair. Indicated Value: The measurement recorded by a monitor for a standard gaseous concentration with which it has been challenged. PARS Accuracy Editor Accuracy assessments indicate the agreement between an analyzer measurement and a known audit standard concentration for continuous analyzers, or the agreement between an observed value and a known or reference value for manual methods. An Accuracy Data record is uniquely identified by the combination of monitor, audit class, accuracy type, date, and Accuracy Audit ID Number. Accuracy records are similar to calibration--up to five runs that categorize “Actual” values and “Indicated” values. Actual values are from the primary analyzer, while Indicated values are from some other external reference device. The Accuracy Report provides an output of raw accuracy value pairs and their percent differences. The data is grouped by Parameter, Tribal Area or State, and Reporting Organization. The PARS Accuracy Editor lists parameters in a table along with their Duration Code, Accuracy Date, and Accuracy Audit Number. The parameter that is selected (by clicking Select in the left column of the table) will be displayed below the table with the following information: Accuracy Test Information Accuracy Date: The calendar date for which the accuracy audit information pertains. Accuracy Audit Number: A sequentially assigned number used to identify a particular precision check from others, when multiple checks are performed on the same day Accuracy Type: A description of the type of accuracy test performed Local Primary Standard: A description of the source of the local primary standards Local Standard Expiration Date: The expiration date for the local primary standard Audit Sample Identifier Audit Scheduled Date Audit Type: Description of who performed the audit and how the audit standard was certified Audit Class: Description of the class of audit taken at the monitor 216 Agilaire AirVision Manual Chapter 8 Optional Features Monitor Information Parameter: The code assigned to the parameter measured by the monitor. (A “monitor” in AQS represents not a device but the pollutant measured by a device.) Parameters may be pollutants or non-pollutants. Duration Code: The length of time (interval) used to acquire raw samples that are analyzed by monitors Parameter Type: A description of the type of parameter (e.g., ozone) Unit Code: AQS code for the standard parameter unit (e.g., ppm) POC: Parameter Occurrence Code or Pollutant Occurrence Code, an identifier used to distinguish between multiple monitors at the same site that are measuring the same parameter. For example, the first monitor established to measure carbon monoxide (CO) at a site could have a POC of 1. If an additional monitor were established at the same site to measure CO, that monitor could have a POC of 2. However, if a new instrument is installed to replace the original instrument used as the first monitor, that would be the same monitor and it would still have a POC of 1. For criteria pollutants, data from different sampling methods should only be stored under the same POC if the sampling intervals are the same and the methods are reference or equivalent. For sites where duplicate sampling is being conducted by multiple agencies or by one agency with multiple samplers, multiple POCs must be utilized to store all samples. For non-criteria pollutants, data from multiple sampling methods can be stored under the same POC if the sampling intervals are the same and there is only one sample for the time reported. If multiple open path monitors are reporting data for the same parameter, each open path would be assigned a different POC. Method Code: Identifies the particular method for collecting and analyzing a precision check value State Code: A Federal Information Processing Standards (FIPS) code that identifies one of the 50 states, U. S. territories, Washington, DC, or foreign countries. For batch loading data formats only, it may be set to TT to indicate that the County Code/Tribal Code field contains a Tribal Code. County/Tribal Code: A Federal Information Processing Standards (FIPS) code that identifies a county, or other geo-political entity, such as tribe, parish or independent city. For foreign countries, it identifies the geo-political equivalent to U. S. states, such as Mexican states or Canadian provinces. Site Code: A numeric identifier (ID) that uniquely identifies each air monitoring site within a county, and if it is a tribal site, within all counties included in a tribal area. There is no requirement that Site IDs be assigned continuously or in any particular order. Regional or local organizations are thus free to allocate Site IDs in any way they choose, as long as there is no duplication within a county or the counties that include a common tribal area. A specific Site ID is associated with a specific physical location and address. Any change in address requires a new Site ID to be assigned. This address change could include a change from the roof of one building to another. A change in location on the same roof should not normally require a new Site ID. Although an address change 217 Agilaire AirVision Manual Chapter 8 Optional Features would routinely mean a new Site ID, some changes that do not change the site's location in respect to surrounding sources and its measurement scale would require no change. An EPA regional office should be consulted for assistance in determining whether a new site ID is required. If a new Site ID is needed for a site not operated by the air pollution control agency, that agency should be contacted to assist in the ID assignment, to ensure that the ID is unique within the county and, if appropriate, the adjoining counties sharing a common tribal area. In other words, when a new Site ID is assigned, it must be different from any other Site ID already existing for that combination of State Code and County Code and Tribal Area. Test Results Zero Span Value: A measurement obtained with gas from a zero concentration. Zero span is the observed value read from the instrument when the concentration of the specific parameter used to test the monitor was zero. Levels 1-5--Actual Value: For precision and accuracy data the actual value is the concentration produced from the primary sampler (i.e., routine monitor) in a collocated sampler pair. Levels 1-5--Indicated Value: The measurement recorded by a monitor for a standard gaseous concentration with which it has been challenged. 218 Agilaire AirVision Manual Chapter 8 Optional Features Data Rollup Processor The Data Rollup Processor is an optional module, usually included as part of an Instrument Polling license. The Data Rollup Processor allows shorter-term averages to be rolled up into larger block or rolling averages. Examples of this would include: Re-creating hourly data from 1-minute data Rolling up 5-minute or other odd intervals from a directly polled instrument to hourly data Rolling up hourly averages to daily averages Creating a new parameter with an 8-hour rolling average (e.g., ozone) calculated within AirVision. The calculation can be done both manually (Utilities->Manual Average Data Rollup) or it can be scheduled in Configuration Editors>Task Scheduler. Before doing the calculation, set up the rollup programs and tie them to specific Parameter Tags. A Tag is a term for a combination of a parameter and an average interval (e.g., hourly ozone, 1-minute CO). The intervals are specific to the frequency at which data is inserted into the database, so the system can't distinguish between OZONE:1h that comes from a block average of minute data and OZONE:1h that is an 8-hour rolling average, updated on the hour. For rolling averages, create a new parameter in the Site/Parameter editor to store the rolling average data. If you need to create new tags (e.g., create a daily average tag, or create the 1-hour tag for your new OZONE_8HR parameter), open List Editors->Parameter Tag Editor. Create new tags in List Editors>Parameter Tag Editor 219 Agilaire AirVision Manual Chapter 8 Optional Features Once all the tags you need exist, use the Configuration->Average Tag Rollup Editor to create your new rollup programs: Utilities>Manual Average Data Rollup To run a program manually, go to Utilities>Manual Average Data Rollup, select the Rollup Type, Date Range, and Parameter Tag Selection. Click the Process Rollup button. To run a program manually, Utilities>Manual Average Data Rollup 220 Agilaire AirVision Manual Chapter 8 Optional Features To run a Rollup Task automatically, create a new Average RollupTask in Configuration Editors>Task Scheduler>Average Rollup Task, and select an Average Data Rollup Task. Then select the specific Task Type, Start Time, Repeat Interval, and Task Description. Automatic Rollup Task in Configuration Editors>Task Scheduler>Add Average Rollup Task 221 Appendix AQI Web Service E-DAS Customers upgrading to AirVision will notice that the Access database has been replaced with the SQL Server database that now stores all data for the system. A variety of data views are available for querying the data for web publishing. One data type that is dynamically generated but is not available in a view is the AQI. Since it is mostly used for web site publishing, we have simplified the access to that data by adding a Web Service to the regular AirVision service on the server. This web server does not require the installation of Internet Information Services (IIS). Rather, it is exposed via WCF as an http web service. Normally a developer would write a custom client application to consume it. (It should be consumable from basically any modern language that supports web services.) There are two service methods, one which accepts a SiteID (the unique identifier) and a dateTime; the other accepts a SystemName/SiteName/DateTime in case you prefer to query it by natural keys (site name, parameter name) rather than the GUID (globally unique identifier--a special type of identifier used in software). Both return the same result. SiteAQIResultData CalculateSiteAQIById Guid source SiteID, DateTime,aqiDateTime); SiteAQIResultData CalculateSiteAQIByNaturalKey(string systemName,string siteName, DateTime, AQIDateTime); The base URL is this (replace “machine name”): http://machinename:9888/AirVision.Services. WebServices.AQI/AQIService/ That is the URL that consuming clients use. Also if you pull that up in a web browser you'll get a friendly display page (although the generated link on there will be susceptible to the localhost problem, as described later). 222 Agilaire AirVision Manual Appendix The WSDL is located at the same address + "?wsdl", like this: http://machinename:9889/AirVision.Services.WebServices.AQI/AQIService/?wsdl The schema of the inputs/outputs are located at the base url + "?xsd=xsd0",like this: http://machinename:9889/AirVision.Services.WebServices.AQI/AQIService/?xsd=xsd0 This defines the input/output data structures used by the service operations. These URLs/ports (and all the other WCF options such as protocol, bindings, etc) can be changed in the service's app.config file. You can tweak it locally on your server, or the default can be updated in one in our source controls if needed. A useful test tool called WcfTestClient.exe comes with MS VS.NET. It automatically discovers the service and lets you fill in the input arguments manually, then executes the service method, and displays the result. However, these test tools seem to pull in the server's internal representation of the URL (e.g. http://localhost:9889/....) which causes problems if the client isn't on the same machine. To get around it you have to tweak the app.config of the service to have the actual machine name in there. A real app client can work with it as-is (no tweaking required), but these "automagical" test tools pull additional information from WCF to generate everything dynamically and they are the only case where the localhost issue is a problem. 223