1
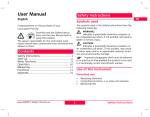
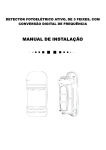
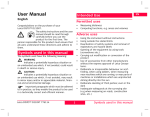
THE ORIGINAL LASER DISTANCEMETER User Manual Version 1.0 English The Safety Instructions (738266) in a separate brochure form a part of this User Manual. Carefully read the Safety Instructions and the User Manual before using this product. Contents Keypad .......................................................................... 1 Display .......................................................................... 2 How to Use the Instrument ..................................... 3 1st Function level ....................................................... 3 2nd Function level..................................................... 10 User Information ...................................................... 12 Technical Data .......................................................... 13 Message Codes ........................................................ 14 Leica DISTO™ plus hand-held laser meter Congratulations on your purchase of a Leica DISTO™ plus. Leica DISTO™ plus 1.0.0 GB Product identification The identification label for your product is fitted on the front. The serial number is under the endpiece. Enter model and serial number in your User Manual, and always refer to this information when you need to contact your agency or service center. Model: Leica DISTO™ plus ............................................... Serial no.: ......................................................................... Date of purchase: ............................................................. International Manufacturer’s Warranty Leica Geosystems offers its customers a two (2) year warranty on Leica DISTO™ plus instruments. For more information, refer to www.disto.com. In case of a defect, please contact the dealership near you. Symbols used The symbols used in the User Manual have the following meanings: CAUTION: Indicates a potentially hazardous situation or an unintended use which, if not avoided, may result in minor injury and/or in appreciable material, financial and environmental damage. ) GB Important paragraphs which must be adhered to in practice as they enabled the product to be used in a technically correct and efficient manner. fr Keypad The Leica DISTO™ plus has two function levels. The first level contains direct functions like ON/OFF, +/- etc. The second level is for data transfer functions and software control. Press to switch between the function levels. Is displayed on the screen. it es WARNING: Indicates a potentially hazardous situation or an unintended use which, if not avoided, will result in death or serious injury. 1 de nl Keypad ja de 2 1 3 4 5 6 7 8 18 2nd function level 18 delete 19 enter 20 direction left upward 21 direction left 22 direction left downward 19 GB Display fr 9 it es nl ja 23 direction upward 24 direction downward 25 direction right downward 26 direction right 27 direction right upward 10 26 24 22 20 27 25 23 21 19 26 22 24 11 13 15 17 20 25 27 21 23 12 14 16 1 D5-Z1 function level 1 Distance measuring, 10 Menu Tracking 2 2nd - function level 1 or 2 11 Illumination 3 Meas. reference 12 Multiply [ x ]/ Timer Release 4 Areas, Volumes 13 ON/OFF key 5 Measuring 14 Clear 6 min. / max. Tracking 15 Mermory, Stack 7 BLUETOOTH® ON/OFF 16 Equals, Enter 8 Pythagoras functions 17 Minus [ - ] 9 Plus [ + ] 1st Display 18 4 6 17 2 16 3 15 5 14 7 8 9 10 11 12 13 D5-Z2 1 Laser "on" 2 Measurement reference (front/ tripod/ rear) 2 3 Information 4 BLUETOOTH® ON/OFF 5 Display of the mathematical signs/operations 6 Main display (e.g. measured distance) 7 Distance measurement 8 Tracking 9 Area/ Volume 10 min. Tracking 11 max. Tracking 12 Pythagoras function 13 Pythagoras function with partial height 14 Units with exponents (²/ ³) 15 Time symbol for time delay release 16 Save constant 17 Contact customer service 18 3 auxiliary displays (e.g. previous values) 19 SET 20 RESET 21 Battery display 22 2nd function level 23 Recall stored constant (max. 10) 24 Recall last 15 values 25 Illumination (on/ off) 26 Beep (on/ off) 27 Offset setting Leica DISTO™ plus 1.0.0 GB How to Use the Instrument 1st Function level Inserting / replacing the batteries Leica DISTO™ plus switching ON/OFF 1 Depress the locking clip and slide end piece to the right. ) ) The instrument switches off automatically after 90 seconds if no key is pressed. An unwanted switching off of the BLUETOOTH®-dataconnection is blocked by special precautions. Please refer to page 11. 2 Remove battery cover. Replace batteries. Appears on the display if battery voltage is too low. Clear key For type of battery, refer to Technical Data. In Menu Mode it resets to Normal Mode. During a function (area, volume or Pythagoras) the single measurements can be deleted step by step and remeasured. ) ) Fit batteries the right way round. Use only Alkaline batteries. 3 Push in end piece and listen for locking click sound. Leica DISTO™ plus 1.0.0 GB Press briefly. GB Illumination is switched ON/OFF with a key press. ) Illumination switches off after 30 seconds if no key is pressed. fr Reference setting Press until desired reference setting appears. it es The clear key may be pressed before or after a measurement/ calculation. 3 de Illumination Briefly press. The illumination, Battery and Beep symbols are displayed until the first key press. The instrument can be switched off from any menu point. D5-Z3 In the menu settings, the program is terminated if the Equal (=) and Enter keys are not pressed. nl How to Use the Instrument ja de A second press starts the distance measurement. Possible settings Continuous measurement (Tracking) The result is displayed immediately in the selected unit. ) ) With the instrument on and the laser off, it is in "Normal Mode". GB With the laser on, it is in "Pointing Mode". appears on the display. Continuous measurement is started and the result is displayed. Press to end Tracking Mode. Last result is shown in the display. Measuring from flat planes fr Press until Example: Stake off distance D5-Z4 front it es tripod rear ) ) At the back of the instrument is a 1/4" camera thread for the tripod. Settings remain valid until the reference level is changed or the instrument is automatically or manually switched off. ) ) Measuring from corners D5-Z5 For stable measuring turn endpiece 90°. D5-Z7 Laser in continous operation Basic setting: rear reference Press until a long "beep" is heard. Now the laser is activated permanently. Measuring nl A distance measurement is triggered each time the key is pressed. Distance measurement D5-Z6 Press and the laser is switched on, the instrument is in "Pointing Mode". ja 1st Function level 4 Press to end continuous laser operation. Leica DISTO™ plus 1.0.0 GB Time delay release Instrument must be in Pointing Mode. Press and hold until desired time delay has been reached (max. 60 seconds). de Press to toggle between the functions. Calculations Area Press until GB appears on the display. Once the key is released, the remaining seconds (e.g. 59, 58, 57...) are displayed, until measuring. The last 5 seconds are counted down with a "beep". After the last "beep", the measurement is made and the value displayed. Example: Measuring without any key activation. appears on the display. The side to be measured blinks. Make 2 measurements (l x w). The result and the two partial results appear on the display. Press until 4 5 6 7 appears on the display. The side to be measured blinks. Menü aufrufen: Volume Make 3 measurements (l x w x h). The result and the three partial results appear on the display. D5-Z8 Menu/ Settings The menus allow a free selection of the settings that are to remain valid after switching off the instrument. The functions follow each other endlessly (rollmode). Leica DISTO™ plus 1.0.0 GB fr D5-Z9 5 Measure with offset (add/reduce) Selecting measuring units Beep Reset Press until desired menu point appears or with key [+ / -] switch between the various menu points. it es Confirm selection, activate menu point. or with key [+ / -] change setting as desired. 1st Function level nl ja de ) Selecting units (menu) Selectable units: fr it After making/changing settings, it is imperative that a test measurement is performed. blinks on the display. "Clear Entry" may also be used (e.g. to cancel a selection). GB ) Call up menu point. Confirm selection, reset to Normal Mode. – m (mm) = 0.000 m – 14’ 06’’ 1/16 = ’ ’’ 1/16 – m (cm) = 0.00 m – in = 0.0 in – ft = 0.00 ft – in 1/16 = 0 1/16in – ft in 1/16 = 0.00 1/16ft in With key [+ / -] set desired offset (=shifting reference) (e.g. 0,015m); quick set by keeping key pressed. For larger steps hold additionally. ) Offset can be positive (add) or negative (reduce)! Confirm setting. Is displayed continuously if offset Measure with offset (menu) ) ≠ 0. Subject to set offset, the measured results are displayed. Using this function you can measure with rough size, as an example! Please make this a rule: After rough size measurement always set the Leica DISTO™ plus to offset 0.000: Call up function as described Press. es nl D5-Z10 Resetting (menu) Call up menu point. starts blinking on the display. With key [+ / -] select components to be reset. To choose from: Stack/ Mermory Stack and Constant If additional symbols e.g. units are shown in the display, the following values are reset: – Offset (=0), Beep (On) and Units (meter) Selected components are reset; back to Measuring Mode. Save values (constants) Measure/ calculate desired value (e.g. height of room, area, volume). Press longer. Confirm function. ja 1st Function level 6 Leica DISTO™ plus 1.0.0 GB starts to blink on the display. With key [+ / -] adjust value as desired (e.g. from 2.297m to 2.300m). For larger steps press and hold additionally. Press to adjust unit (²/³). ) The adjustment is for m, m² and m³ rsp. ft, ft² and With key [+ / -] select desired mermory (1 to 10). Confirm; value is ready to be used for (e.g. calculating an area) or Recall last measured value (Stack) Briefly press twice and the last value in the display is shown. Confirm. With key [+ / -] select desired value (max. 15!). Confirm; value is ready to be used for (e.g. calculating an area). and a number (=memory location) starts to blink. Tracking - Minimum ft³ only. Leica DISTO™ plus 1.0.0 GB GB Move the Leica DISTO™ plus a large amount around the target point. Stop continuous measurement. fr The smallest measurement is displayed (e.g. 3.215m = height of room). ) it Tracking - Maximum es Recalling the constant and the contents of the first constant memory location are displayed (e.g. 2.300m). Aim Leica DISTO™ plus approximately at the target point. Activate continuos measurement with a brief press. Both planes (e.g. floor/ ceiling, walls) must be nearly parallel to each other. With key [+ / -] select memory location (1-10). Save value. Briefly press. de appears on the display. D5-Z11 Determine the minimum dimension, e.g. ceiling height, without having to precisely align to the normal. Press until nl D5-Z12 7 1st Function level ja de Determine maximum dimension, e.g. to determine the (room) diagonal. Press until GB fr appears on the display. Move the Leica DISTO™ plus a large amount around the target point. Activate continuous measurement with a brief press. it Slowly rotate the Leica DISTO™ plus to the right/ left past the corner. Stop continuous measurement. es The largest measurement is displayed (e.g. 12.314m = diagonal of room). ja ) In the same way chain values (= any amount of distance measurements) and sums of areas/ volumes can be added up. ) Add by [ + ] key. Make additional measurements. = Sum (=half circumference) With key [ + ] repeat, double measured value. = Sum (=circumference) During calculations "Clear" is available as long as the function has not been executed! Multiplication Make measurement (e.g. 8.375m). Multiplication by pressing [ x ] key. Additional measurements (e.g. 8.375m). = Area (e.g. 29.313m²) ) The volume can be calculated by an additional multiplication following an area calculation. This function can be used for calculating areas or volumes with individual partial heights/ partial distances. Pythagoras, height/ width measurement Partial heights, partial distances Doubling a measured value Make measurement. Add by [ + ] key/ Subtract by[ - ] key. It is easy to double the measured values, e.g. to determine the length of walls in a room: Make measurement. any case! Calculations nl Make additional measurements. = Result. 1st Function level 8 D5-Z13 ) ) The measuring sequence must be adhered to in All three (two) points must be on a vertical or horizontal line in the plane of the wall! Leica DISTO™ plus 1.0.0 GB ) With each of the distance measurements you can use: • a simple distance measurement, • a value from stack/ mermory or • a measurement with time delay release. ) ) For short distances, a good base behind the instrument is sufficient for mechanical alignment. You will obtain the best results if the Leica DISTO™ plus is rotated around a fixed point (rear edge, thread position) and the axis of the laser beam passes through this axis. The Leica DISTO™ plus should not be placed on a camera tripod without an adapter, as the axis of the laser beam would be 70 to 100 mm above the instrument’s axis of rotation. Without the adapter this would lead to significant height deviations in the measurements. Determination with two points For estimating the height/ width of buildings. Very useful for making measurements from standing position (no bending) if the height is determined with two or three distances. Leica DISTO™ plus 1.0.0 GB Press until Detemination with 3 points de appears on the display; laser is activated and "1 ---" starts blinking. GB Aim at the upper point (1). Trigger measurement; do not move the instrument! Value is accepted. appears on the display and "2 ---" starts blinking. Point the Leica DISTO™ plus approximately horizontal (2). Press, a continuous measurement is triggered. Move the Leica DISTO™ plus a large amount around the ideal measurement point. Stop of continuous measurement. The height and width are displayed from measurements (Pythagoras). 9 Press until fr appears on the display; laser is activated and "1 ---" starts blinking. Aim at the upper point (1). it Trigger measurement; do not move the instrument! Value is accepted. appears on the display and "2 ---" starts blinking. Point the Leica DISTO™ plus approximately horizontal (2). Press, a continuous measurement is triggered. 1st Function level es nl ja de GB fr Move the Leica DISTO™ plus a large amount around the ideal measurement point. Stop of continuous measurement. Press until Value is accepted and and on the display "3 ---" starts blinking. Aim at the lower point (3). Aim at the upper point (1). Only in the second level can measured values be transferred or corrected with the Leica DISTO™ plus. The type and number of functions that can be activated in the second function level depend on the software used. Trigger measurement; do not move the instrument! Switching on the BLUETOOTH® Trigger measurement; do not move the instrument! The height and width are displayed from three measurements (Pythagoras). it Determination of a partial height with 3 points Height determination between point 1 and point 2 with three measured points. es nl ja 2nd Function level 2nd Function level appears on the display; laser is activated and "1 ---" starts blinking. ) Press briefly. Value is accepted and on the display "2 ---" starts blinking. Trigger measurement; do not move the instrument! Value is accepted. appears on the display and "3 ---" starts blinking. Press, a continuous measurement is triggered. Move the Leica DISTO™ plus a large amount around the ideal measurement point. Stop of continuous measurement. The height and width are displayed between point 1 and 2 (Pythagoras). 10 If BLUETOOTH® is switched on, this icon appears in the display. The data connection must be built up by the application software on a Pocket PC or PC. As long as the connection is being built up, this icon will be blinking. ) If during 120 seconds after switching on the BLUETOOTH® no connection is established with the Pocket PC or PC, then the BLUETOOTH® is switched off automatically. If five minutes after the connection has been established, no data transfer has occurred, then the BLUETOOTH® is switched off automatically. After a further 90 seconds, the Leica DISTO™ plus is also switched off. Leica DISTO™ plus 1.0.0 GB Switching off the BLUETOOTH® ) The direction arrows Press the arrow key briefly. A a thin line will be drawn to scale. Before switching off the BLUETOOTH® , always change to the first function level Press briefly. ) de Transfer of the measured values GB BLUETOOTH® is switched off,when this icon is no longer visible If still in the second function level, the BLUETOOTH® cannot be swictched off. This is a safety precaution to prevent an accidential interruption of the BLUETOOTH® connection. Before the Leica DISTO™ plus can be switched off, the BLUETOOTH® function has to be switched off. Leica DISTO™ plus 1.0.0 GB fr D5-Z14 The eigth arrow keys in the lower part of the Leica DISTO™ plus keyboard are used to input directions (orthogonal and diagonal) when generating a spatial drawing. Trigger a measurement in the usual way (even if the second level is active, these keys remain functional), the value appears in the display. Select the arrow key that corresponds to the direction needed for your spatial drawing. When this arrow key is pressed, the distance is transferred according to value and direction to the data receiver (Pocket PC or PC). Depending on the software used, the arrow keys can also control the cursor (e.g. Excel). 11 D5-Z15 Confirmation (or deletion) of a transferred measuring value it es nl D5-Z16 2nd Function level ja de Press briefly to confirm that the correct line was drawn. The line is then drawn thicker with the measurement dispayed. Press briefly to clear a wrong line. GB fr . Is the measurement is still displayed in the Leica DISTO™ plus, it can be transferred again by pressing the correct arrow key. Other functions are described in the manual of the software used. During data transfer it es As long as there is no confirmation of a successful data transfer from the Pocket PC or PC, no new measurement can be triggered. Appears and "240" blinks, if after 2 seconds no data transfer occurs. Press briefly to acknowledge the display. Repeat measurement and data transfer. nl Remark to the software The two free software progams "PlusDraw" and "PlusXL" are included to demonstrate the basic applications of the Leica DISTO™ plus and are designed to perform simple ja User Information tasks (spatial drawings with measurements , data transfer into an Excel table etc.) Leica Geosystems gives no warranty on the free software nor on their functionality and does not offer any support. Leica Geosystems is not liable for any damage resulting from the use of the free software and is not obligated to make corrections on them or to develop additional functions for them (updates, upgrades etc.). There are a number of commercially available software programs that provide the required functions. Please visit our homepage www.disto.com for details. User Information Range In daylight (outdoors) always work with a laser viewfinder (see page 13). If neceesary, shade the target. If required, use a target plate. Increased range: At night, at dusk and when target area is in the shade. 12 Reduced range / increased measuring time: Against mat and dark surfaces (also plants and trees) a reduction of the range may occurs as well as an increase in measuring time. Rough surfaces On a rough surface (e.g. coarse plaster) measure against the centre of the illuminated area. To avoid measuring to the bottom of plaster joints: Use target plate, 3M "Post-it" or board. Transparent surfaces To avoid measuring errors, do not measure towards colorless liquids (e.g. water) or (dust free) glass, styropor. or similar semi- permeable surfaces. For materials and liquids unfamiliar to you always take a trial measurement. ) When aiming through panes of glass, or if there are several objects in the line-of-sight erroneous measurements can occur. Leica DISTO™ plus 1.0.0 GB Wet, smooth or high-gloss surfaces 1 Aiming at a "obtuse" angle deflects the laser beam. The Leica DISTO™ plus may receive a signal that is too weak (error message 255). 2 If aiming at a right angle, the Leica DISTO™ plus may receive a signal that is too strong (error message 256). With measurements from a distance of 25 m the laser spot is in the centre of the crosshairs. Below a distance of 25 m the laser spot moves to the edge of the crosshairs. Inclined, round surfaces Can be measured with the laser. Requirement: There is enough area on the target surface for the laser spot. D5 Z_telescop Using a target plate Use target plates 563875 (DIN C6) or 723385 (DIN A4’), if the signal is too weak (e 255), if the targeted surface is too rough, if the surface has poor reflection or during dayligh when measuring from more than 30 meters away. • White surfaces: to up approx. 30 m • Brown surfaces: from approx. 30m to 200 m In the field Leica DISTO™ plus is equipped with an integrated telescopic viewfinder (2x magnification). Leica DISTO™ plus 1.0.0 GB 13 de Technical Data Measuring accuracy typ.: ± 1.5mm / max.: ± 3mm* (2x standard deviation) Smallest unit displayed 1mm** Range (from about 30m, use 0.2m up to 200 m target plate) Time for a measurement dist / trc 0.5...ca.4s / 0.16...ca.1s ∅ Laser spot (at distance) 6 / 30 / 60 mm (10 / 50 / 100 m) Integrated telescopic viewfinder Illumination Multiline display Multifunctional endpiece Time delay release Pocket calculator ® BLUETOOTH Tracking Constant 10 values min./ max. Tracking. Pythagoras Mermory (Stack) 15 values Battery, Type AA, 2x 1.5V up to 10’000 measurements *** (only with Alkaline batteries!) Splash and dustproof IP54 acc. IEC529: splash and dustproof Dimension and weight 172 x 73 x 45 mm, 335g Measuring accuracy of bubble 1° Temperature range Storage -25°C to +70°C (-13°F to +158°F) Operating -10°C to +50°C (-14°F to +122°F) Technical Data GB fr it es nl ja de * Maximum deviation occurs under unfavorable conditions, such as in bright sunlight or when measuring to inadequately reflecting surfaces. For distances over 30m-without using a target plate- themaximum deviation may increase by ±0.1mm/m to maximum ± 10mm. For more information, refer to www.disto.com. GB ** As of 100m the measuring units are displayed in cm. *** Reduced when using the fr BLUETOOTH® function Message Codes Error message it appears beside the message number on the display. Message Code es 203 204 240 252 nl ja 253 Cause Remedy Wrong sequence with Pythagoras meas. Calculation error Transmission error Temperature too high, above 50°C (measuring) Temperature too low, below -10°C (measuring) Carry out measurement in correct sequence Repeat procedure Repeat procedure Cool down instrument Message Codes Message Code 255 256 257 260 Cause Remedy Receiver signal too weak, measurement time too long, distance <200 mm Received signal too powerful Wrong measurement, ambient brightness too high Laser beam interrupted All other messages Use target plate measurement time >10 sec. Use target plate (correct side) Use target plate Repeat measurement Call service "System" Please call your local dealership and specify the message code. Should the message continue to appear after several starts, then the instrument is defective. Care Look after the optical surfaces with the same care that you would apply to spectacles, cameras and field glasses. The most current information can be found on our homepage: www.disto.com We publish the addresses of specialized software mannufacturers . However, we are not responsible for the correctness of their specifications or for the performance of their software. For software developers, the Leica DISTO™ plus OnlineInterface description is available. All illustrations, descriptions and technical specifications are subject to change without prior notice. Warm up instrument 14 Leica DISTO™ plus 1.0.0 GB Leica Geosystems AG, Heerbrugg, Switzerland has been certified as being equipped with a quality system which meets the International Standards of Quality Management and Quality Systems (ISO standard 9001) and Environmental Management Systems (ISO standard 14001). Total Quality Management - Our commitment to total customer satisfaction Ask your local Leica Geosystems agent for more information about our TQM program. Pat. No. • • • • • • Printed in Switzerland - Copyright Leica Geosystems AG, Heerbrugg, Switzerland 2003 738266-1.0.0 US 5,815,251 US 5,949,531 US 6,336,277 US 6,463,393 EP 0738 899 EP 0932 835 Leica Geosystems AG CH-9435 Heerbrugg (Switzerland) www.leica-geosystems.com