1
Version date stamp : 2011 May 16th
PAGE
1 on 73
RKnot BUILDER
or
Regular Knot Builder
VERSION 3
How to use it
With appendix for Version higher than V3.1.0.8 added at the end of the
document
RKBuilder USER’s TIPS Copyright(annexes excepted) : Claude HOCHET
Version date stamp : 2011 May 16th
PAGE
CONTENTS
Page_4------------------------------------------------------ DEFINITION OF REGULAR KNOT
- WHAT WILL RKBUILDER DO
- WHAT RKBUILDER WILL NOT DO
- PRE-REQUISITE
Page_5------------------------------------------------------ HOPED FOR BUT NOT REALLY NECESSARY HERE
- VISUAL DESCRIPTION OF RKBUILDER
- MENU AND TOOLS BARS
Page_6------------------------------------------------------ TABS
- CREATION
Page_8------------------------------------------------------ DATAGRID
- DATAGRID1
- EDITION
Page_9------------------------------------------------------ FUNCTIONNAL DESCRIPTION
- CREATION TAB
Page_14------------------------------------------------------ DATAGRID TAB
- DATAGRID 1 OR XL YB TAB
Page_15------------------------------------------------------ EDITION TAB
- ENTRY MATRIX TAB
Page_20------------------------------------------------------ MENU BAR
Page_21------------------------------------------------------ TOOL BAR
Page_32------------------------------------------------------ SOURCES USED FOR RKBUILDER
Page_33------------------------------------------------------ ADDITIONS WITH V3
Page_52------------------------------------------------------ I WANT IT TO WORK IMMEDIATELY
- INSTALLING the application
RKBuilder USER’s TIPS Copyright(annexes excepted) : Claude HOCHET
2 on 73
Version date stamp : 2011 May 16th
PAGE
3 on 73
Page_53------------------------------------------------------ REGISTERING THE APPLICATION
Page_54-----------------------------------------------------ANNEXE
- PART 1 : CIRCULARITY – MODULO - MODULUS
- PART 2 : SHORT REVIEW ON HALF-PERIODS
Page_56------------------------------------------------------ PART 3 : SHADOW
Page_58------------------------------------------------------ PART 4 : CORDAGE ROUTE AND PATTERN
- PART 5 : FRAME OF REFERENCE AND TYPE OF CODING
Page_60------------------------------------------------------ PART 6 : COMPARISON OF PATTERNS
Page_61------------------------------------------------------ PART 7 : AVOID / AND \
Page_63------------------------------------------------------ PART 8 : MANDREL versus CYLINDER
Page_64------------------------------------------------------ PART 9 : WORD : CODE
Page_65------------------------------------------------------ PART 10 : MISCELLANIES
Page_65------------------------------------------------------
PART 11 : THERE IS NO INTERSECTION
IN A KNOT, ONLY CROSSINGS
RKBuilder USER’s TIPS Copyright(annexes excepted) : Claude HOCHET
Version date stamp : 2011 May 16th
PAGE
4 on 73
REGULAR KNOTS BUILDER (RKBuilder ©) USER’s TIPS
REGULAR KNOTS (RK) are defined as:
Single strand knots made on a Turk’s head (THK) cordage route (or shadow topological term -. The shadow is the knot diagram *without* any indication of the
nature of the crossings existing in it). When the nature, OVER / UNDER, of the
crossings is added then “the coding” of the knot is also added.
THK are but only one very special
OVER-UNDER (UNDER-OVER).
type of RK with a strictly alternating coding
Any knot *not* having this coding even if using a THK cordage route is NOT A
THK.(this essential point seems ignored by 99.9%).
WHAT RKBuilder CAN DO :
it will do the coding of each HALF-PERIOD in *any* SINGLE STRAND knot WHATEVER
ITS TYPE OF CODING as long as it is made on a THK shadow or cordage route. (see
shadow in annexe).
It will also give you the ENLARGEMENT of a
entered plus the THK from which this
entered THK can be made, its ROOT knot.
THK
WHAT RKBuilder DOES NOT DO :
it will not do knots that are *not* Regular
Knots in Schaake’s perspective. Does not
do multi-strand for example.
PRE-REQUISITE:
- knowing about the different TYPE OF CODING and what that entails.
- not confusing between a THK and other knots made on a THK cordage route but
using another coding than the strict O1 – U1 (or U1 – O1) of the THK, knowing those
knots and the particularities that make each quite different from the other. Of
course one can use this program without knowing that ; to make use of a French
expression: just as ‘ a savant monkey” can do and still produce knots.
- not confusing between the two different frames of reference: vertical cylinder or
horizontal mandrel and the consequences of this choice upon the appellation of
the TYPE OF CODING in each frame of reference. If you happen to be not quite clear
about that read SCHAAKE or shorter way see the Turk’s Head pages at :
http://tinyurl.com/38mrcp
or if you are shy of using a tiny url directly then at the preview :
http://preview.tinyurl.com/38mrcp
- knowing what a PIN-STEP is and the use of PINS NUMBERS when making a knot.
RKBuilder USER’s TIPS Copyright(annexes excepted) : Claude HOCHET
Version date stamp : 2011 May 16th
PAGE
5 on 73
- having no trouble making a knot using the coding for each of the HALF-PERIOD in
it (HP : see annexe for Half Period definition).
HOPED FOR BUT NOT FULLY NECESSARY HERE
(many ‘dimensions’ of knots will be given but not knowing what they apply to it will
be of no great use to you : just use the program as a “recipe giver” and see the
Half-Period coding only).
- knowing how to calculate PIN-STEPS to get the number of LEADS specifically
wanted with a given Number of BIGHTS.
- knowing about Delta* and (-L modulus B), Delta and (L modulus B)
- knowing about complementary and periodic or cyclic BIGHT - number
schemes
- making no confusion between BIGHT- Index Number and BIGHT - Number
As much as humanly possible RKBuilder© has been made fool-proof (It has been
extensively tested on XP / VISTA / WIN-7).
IN PAGE 30 YOU HAVE THE “ I WANT TO USE IT IMMEDIATELY TO JUDGE IT IMMEDIATELY
“.
VISUAL DESCRIPTION OF RKnot Builder
There exist a number of TOOL-TIPS that open when the mouse pointer is kept over
a field or label.
MENU AND TOOLS BAR
MENU
[ Files ] / Fichiers
[Edition ] / Edition
[Tools ] / Outils
[Knots ] / Nœuds
[Help ] / Aide
Explore the different options in MENU : mostly they are self-explanatory.
TOOLBAR
The icons just under the MENU bar.
RKBuilder USER’s TIPS Copyright(annexes excepted) : Claude HOCHET
Version date stamp : 2011 May 16th
PAGE
6 on 73
TABS
CREATION (Création) -----------------------------------------------------------------------------*** First choice to be made is the TYPE OF CODING among FOUR AVAILABLE (see
annexe for type of coding) using radio buttons.
- THKnot they are Column AND Row
Coded, computable using only Columns
- Column Coded (THK are included but
why use that as you have a THKnot
option without any obligation to enter a
coding. ALL THK and ONLY THK have the
strict OVER ONE / UNDER ONE coding).
- Row Coded (ALL of them, whether they are with or without a REPEAT of a subpattern. The Schaake’s slide-rule can do only the Row-Coded with a REPEAT).
- Neither Column Nor Row Coded
DEPENDING
upon that choice:
- THKnot = no entry field will appear as the THK O1-U1 code is in-built in the
program. O1 stand for ‘crossing Over time 1’ and U for ‘crossing Under time 1’.
- Column-Coded = a field will open in which you will have to enter the (L-1)(that
means LEADS-1; just as 2*B means BIGHTS time 2) crossings as they can be
seen on the Half-Period Number ONE in the FINISHED knot reading it from LEFT to
RIGHT (as with any ODD-numbered HP).
RKBuilder USER’s TIPS Copyright(annexes excepted) : Claude HOCHET
Version date stamp : 2010 Nov 24th
PAGE
7 on 73
By the way: do you see the picture of a knot in the upper right side corner ? This
picture will change with each start of the application and you can also change it by
over flying it with the mouse pointer (no need to hover).
ABBREVIATIONS USED :
L will stand for LEADS so (L-1) means Number of LEADS minus ONE
B will stand for BIGHTS so (B*2) means Number of BIGHTS time 2
RKBuilder USER’s TIPS Copyright : Claude HOCHET
Version date stamp : 2010 Nov 24th
PAGE
8 on 73
- Row-coded = a field will open in which you will have to enter the Row Coding of
the knot. Entering is done following a special manner and order: the chain of the
first crossing at the extreme LEFT side of each ROW.
- Neither Column - Nor Row = a button will send you to the tag appropriate for
the entry of the full matrix of the knot.
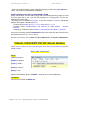
*** Second choice to be done : ENTER
and Number of BIGHTS
complying with the GCD rule (PGCD for
French). The GCD will be printed on
screen : if L and B do not comply with
the rule the entry will be rejected. Each
entry is to be validated by [ENTER].
Number of LEADS
If L & B entries are accepted then all the
fields that were in light grey colour get
digits written in them : they are the
results of automated calculations (they
are helpful if you want to study
Schaake and Turner’s writing and allow
you to do some paper and pencil
decoding).
The program works using them.
RKBuilder USER’s TIPS Copyright : Claude HOCHET
Version date stamp : 2010 Nov 24th
PAGE
9 on 73
*** Once the field (if any) where to seed the code has been written using only ‘0’,
‘1’ and ‘space’ (any other character will be rejected) has been validated by
[ENTER] or by using the button {CALCULATION} / CALCUL the other TABS can be
accessed, they contain the calculation results.
Entries for code may be, say for example:
00011100 or 0 0 0 1 1 1 0 0 or 0 00 11 10
0
The program formats it after validation by [ENTER] and then prints it on screen as
0-0-0-1-1-1-0-0
Of course there are constraints to comply with for the ‘seed code’ entries :
- (L-1) crossings for the HP1 of the Column-Coded,
- (2*B) crossings for the Row-coded ,
- a matrix of (L-1) Columns by (2*B) Rows for the Neither-Nor-Coded
Once again = there are tools-tips available as reminder of those constraints.
DATAGRID (Grille des données) --------------------------------------------------------------The content of this tab is to be used by the program itself not by user it is
standardized so as to be « EXPORTED » in a .TXT file using [Files] {Save As}
(Fichiers suivi d’Enregistrer). It summarizes the whole knot.
DATAGRID1 (Grille des données_1) ---------------------------------------------------------The LABEL of THIS TAB CHANGES after CALCULATION and becomes xL yB according
to the numbers entered for L (LEADS) and B (BIGHTS)
There you have all the HALF-PERIODS in the knot entered with their CODE.
EDITION (Edition) ----------------------------------------------------------------------------------This tab allows you to put on the screen only one HALF-PERIOD at a time (while
having easy access to Before and Next HALF-PERIODS)
NEITHER COLUMN - NOR ROW ENTRIES (Saisie de NI Colonne Ni Rang) ----This one is for entering the full matrix of Neither Column Nor Row – Coded
knots.
in fact, there is here, in hiding, a FACTOTUM or JACK-of-ALL-TRADES. If
you enter correctly the matrix of ANY REGULAR KNOT whatever its TYPE OF CODING
you will get a correct calculation of each and every HALF-PERIODS in it.
NOTE : that,
RKBuilder USER’s TIPS Copyright : Claude HOCHET
Version date stamp : 2010 Nov 24th
PAGE
10 on 73
FUNCTIONNAL DESCRIPTION
Now more about ’how does that work or how is it to be used’
Curtains open on the:
Formatted: Font: (Default)
Liberation Sans, English (U.K.)
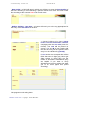
CREATION tab---------------------------------------------------------------------------------All entries (except for the matrix) are done here and most of the essential
calculations (save the individual HP codes) are printed on screen in this tab.
As shown in the next illustration you see available ‘tool tips’ when you ‘hover over’
the fields having a white background, those white fields are for user. (the fields
with the blue grey background are for the application to use, not for user)
*** pushing the command button |Calculation| (Calcul) will launch the
calculation of the HALF-PERIODS (H-P’s or HPs). Calculation is also launched by
validating with [ENTER].
*** pushing the command button |Exit| (Quitter) will close the application, which
can also be done with [Fichier]{Quitter}
*** The use of the set of radio buttons for choosing the TYPE OF CODING is fairly
immediate and intuitive.
RKBuilder USER’s TIPS Copyright : Claude HOCHET
Version date stamp : 2010 Nov 24th
PAGE
11 on 73
Using the framed set of radio buttons select your choice of TYPE OF CODING (see
ANNEXE if you are not fully aware of those types)
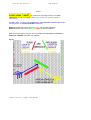
The FRAME OF REFERENCE for the appellation of the TYPE is Schaake’s : the
HORIZONTAL MANDREL with a Bight rim (or border, or frontier) on the LEFT side
and a Bight rim on the RIGHT side such as in this diagram taken from Schaake.
Note: the HP-1 in yellow ; all ODD-numbered HPs go from LEFT to RIGHT and the
HP-2 ( HP2) in blue ( EVEN-numbered HPs go from RIGHT to LEFT ).
Formatted: Font: (Default)
Liberation Sans, English (U.K.)
*** The fields where the LEADS and BIGHTS numbers for the knot are to be entered
are in the upper left corner.
Each entry must be validated by [ENTER].
When the Number of BIGHTS is validated (after Number of LEADS has been
validated) a control of the GCD rule is applied. GCD / PGCD is given in the field next
to the Number of BIGHTS field.
If there is no problem with the GCD then all calculations are done and printed on
screen in the appropriate fields in this tab.
*** You *may not* access the field where you write the seed code before L and B
entries have been validated by [ENTER] and controlled for compliance with GCD.
IN Creation (Création) ANY ENTRY IN ANY FIELD MUST BE VALIDATED BY [ENTER]
PLEASE NO MOUSE CLICK.(Computer Mouse is for moves or selections in this
program)
Choice THKnot -------------------------------------------------------------------------------------No entry field will open for the code. THK code O1-U1 or 1o-1u (respectively U1O1…) is in-built.
RKBuilder USER’s TIPS Copyright : Claude HOCHET
Version date stamp : 2010 Nov 24th
PAGE
12 on 73
Choice Column-Coded --------------------------------------------------------------------------Enter the sequence of crossings seen on the HP1 of the finished knot (or on the
complete grid diagram of thereof) as read by the SPart-WEnd vector (Standing
Part / Dormant and Working End / Courant).
HP1 starts on the LOWER LEFT side (of the horizontal mandrel diagram for
Schaake), at the crossing between SPart ( Standing Part / Dormant ) and goes
UPPER RIGHT to the other Bight rim.
There are (L – 1) crossings to be noted.
The type of crossing is as ‘read’ by the HP1 *vector* or HP1 directional arrow.
Don’t make too short an entry as it will be rejected ; if it is too long it will be
shortened to the correct size (L – 1) by amputation on the rightmost entries.
ALWAYS CHECK THE FORMATED ENTRY THE PROGRAM PUTS ON SCREEN AFTER
[ENTER]. Application does not make mistakes here but YOU may have made one.
IT IS ABSOLUTELY NECESSARY TO USE, EITHER BY DIRECT TYPING OR BY CUT/COPY
AND PASTE (from a .txt file) ONLY DIGIT ‘0’ DIGIT ‘1’ and ‘ SPACE’ IN THE CODE FIELD
Formatted: Font: (Default)
Liberation Sans, English (U.K.)
Choice Row-Coded -----------------------------------------------------------------------------In the same conditions that you entered the HP1 ( ‘0’, ‘1’ and ‘space’ only ,
complying this time with the adequate length of 2*B) you will need to enter the
Row-Coding. The HP1 code corresponds to 1001100110011001
The Row-Coding is the coding of EACH row in the finished knot.
RKBuilder USER’s TIPS Copyright : Claude HOCHET
Version date stamp : 2010 Nov 24th
PAGE
13 on 73
Formatted: Font: Liberation
Sans, English (U.K.)
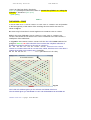
As in a Row-coded ALL the crossings in a given row are of the same type (either
OVER or UNDER) the whole row is easily represented by only one of its crossings:
the very first one on this row, the leftmost one crossing that is. (see diagram just
above)
The ‘pile’ code in the above figure correspond to 110011001100
Note:
The *matrix* starts at row ZERO (Modulus oblige) and goes DOWNWARD continually
till row numbered (2*B) *BUT ON THE DIAGRAM AND ALSO FOR THE ROW-CODING*
the rows begin at ROW ZERO which is the one in direct alignment with the crossing
(on the left side Bight rim) made by the SPart and the WEnd.
First go UPWARD till no rows are left (here last row up is 9) and start again at the
very bottom of the diagram (here Row 10) and go UPWARD toward row ZERO.
When ALL the rows have been noted ONCE and ONCE ONLY verify your entries
again before validating the whole matrix.
Each crossing in this upward zig-zag is “as read” by an ODD numbered HP and
*not* in succession by ODD and EVEN numbered HPs. This is *very* important as
for example a \ is an UNDER when read by ODD-numbered HPs *but* is an OVER
when read by an EVEN-numbered HP (vice versa for a
/)
Choice Neither-Nor -------------------------------------------------------------------------------Don’t try to access the field that choice will open (it is not enabled for that).
Use the MATRIX INPUT (Saisie Matrice) button which will send you to the Manual
entry tab.
After final validation the fully formatted matrix is written in the adequate field of
CREATION tab. Only the program may write in there.
YOU MUST
make the entries in THE SERIES OF BOXES;
RKBuilder USER’s TIPS Copyright : Claude HOCHET
Version date stamp : 2010 Nov 24th
PAGE
14 on 73
Formatted: Font: (Default)
Liberation Sans, English (U.K.)
Important note: each row is ‘read’ from LEFT to RIGHT to get the order of the
crossings and ‘as read’ by an ODD-numbered HP for the nature of each crossing.
There is a whole set of functionalities in this Neither Column-Nor Row-Coded
tab:
The entries here are strictly constrained and controlled by the application.
(There will be more said farther along in the topic Neither Column-Nor RowCoded tab)
- You may gain access to the ‘Entries Neither Nor’ tab ONLY if GCD= 1
-
With L EVEN (L-1) is ODD so you need one Row with an ODD number of boxes
and one Row with an V number of boxes ; first Row entered being ODD.
With L ODD then (L-1) is EVEN you get ROWS of equal LENGTH and they are all
with an EVEN number of boxes of course).
The number of boxes that you get is based upon the L number entered.
- The MATRIX validation (only if the number of ROWS entered is correct) is made
using the proper Button, this will transfer you back to the CREATION tag without
erasing the entries validated in the MATRIX tab.
When the MATRIX ENTRY button in CREATION tab is pushed that action erases all
entries made in ‘Entries Neither-Nor’ tab.
Note that in the MENU bar in [FILES] you may access {SAVE AS} if you want to save
the MATRIX.
There is also an automatic backup upon closing.(see {CONFIGURATION} in
[TOOLS].
RKBuilder USER’s TIPS Copyright : Claude HOCHET
Version date stamp : 2010 Nov 24th
PAGE
15 on 73
DATAGRID tab---------------------------------------------------------------------------------This is the program’s personal work desk and it is used to save the knot with
[Files]{Save as} [Fichier]{Enregistrer}
Best to use for that is EditPad Lite
(free at http://www.editpadpro.com/editpadlite.html )
Formatted: Font: (Default)
Liberation Sans, English (U.K.)
xL yB, former DATAGRID1 tab--------------------------------------------------------------This is the place where you get the coding of each HALF-PERIOD of the knot you
entered.
Formatted: Font: (Default)
Liberation Sans, English (U.K.)
Note that you can easily adjust the PINS, HP columns width as you want them
just by using the mouse pointer to move the appropriate index.
You may also change the FONT (size and type) using Tools in the MENU bar at the
top of the application window.
A command button | Inversion | (LEFT Click) will change ‘O’ to ‘U’ and ‘U’ to ‘O’.
RKBuilder USER’s TIPS Copyright : Claude HOCHET
Version date stamp : 2010 Nov 24th
PAGE
16 on 73
The application is set to always give first the version of the knot with the
greater number of OVER.
A (Double LEFT Click) on a HP selects it in blue and launches Edition
Mouse wheel may be used to go from one HP to another.
A LEFT mouse click can select a whole HP
A RIGHT mouse click on a HP opens a menu with Edition that will send you to the
Edition tab.
EDITION tab -----------------------------------------------------------------------------------------It should be the one in use when you are making your knot using the screen as
documentation.
Formatted: Font: (Default)
Liberation Sans, English (U.K.)
Here you will have only one HP, the one you selected in xL yB tab.
TWO command buttons allow you to get the PREVIOUS or the NEXT HP (the current
one being the starting point )
Here you get all the necessary indications about the PINS and the TYPE OF
CROSSINGS to be made.
RKBuilder USER’s TIPS Copyright : Claude HOCHET
Version date stamp : 2010 Nov 24th
PAGE
17 on 73
You even get a visual indication of the Bight rim you are on and the one you are
to go to:
TOP is [TOP of vertical cylinder, that is the horizontal mandrel rotated Pi/2 radians
in the trigonometric direction (or 90° ANTI-CLOCKWISE)] for the RIGHT side Bight
rim in the mandrel
and BOTTOM is for the LEFT side Bight rim.
A double LEFT mouse Click on a crossing turns it RED providing an easy and
useful visual marker of where you are”.
A double LEFT mouse Click on a crossing marked in RED removes that RED
marking (mistake correction).
You may also select a crossing then use RIGHT mouse Click to open the menu
and use Done: the selected crossing(s) will turn RED.
A LEFT Click and moving the mouse pointer over one HP selects it and highlights
it in blue .
A RIGHT Click opens {Edition} , a LEFT Click on {Edition} transfers the selected
HP to the Edition tab
Mouse WHEEL moves, forward or backward, allow you to go from one HP to the
other
Entry matrix Neither Nor tab -------------------------------------------------------------------After selecting radio-button ‘Neither – Nor’ in CREATION tab , *not forgetting* to
enter LEADS and BIGHTS, the activation of button [Entry Matrix] will send you to
this tab (when using a pre-entered Neither-Nor knot using MENU/KNOTS you only
need to push the [Entry Matrix] button and then when in the Entry Neither Nor
tab you will need (after making a full verification) to push the button [Matrix
Validation].
The frame of the matrix has been built for you = (L-1) columns numbered from 1
to (L-1): numbering is for ‘orientation’ of user, a special column, the leftmost one
titled ‘Row’ holds the numbering of the ROWS ( 2*B, starting from ‘0’) as seen and
numbered in the ‘à la Schaake’ diagram of the finished knot.
Between button [Matrix Validation] and the matrix proper you find one blue cell
(leftmost in the line) with red digit(s).
Digit(s) denote the ACTIVE ROW in the matrix.
To the right side of this blue cell are (L-1) cells of alternate colouring.
RKBuilder USER’s TIPS Copyright : Claude HOCHET
Version date stamp : 2010 Nov 24th
PAGE
18 on 73
Formatted: Font: (Default)
Liberation Sans, Font color:
Dark Blue, English (U.K.)
The dark brown cells are just “place holder” to conform to what can be seen in the
finished knot diagram. They ‘hold the place’ where ‘in this’ COLUMN for ‘this’ ROW
there is no crossing.
The very pastel light beige cells are the cells where the TYPE of the crossing is to
be entered by user : ‘0’ for UNDER and ‘1’ for OVER (nothing else is allowed).
Formatted: Font: (Default)
Liberation Sans, Font color:
Dark Blue, English (U.K.)
The application ‘jumps’ automatically to the next cell to be given an entry.
You may go back, by selection with the mouse pointer, to a cell which already
holds a digit.
If in a particular row where there is still a cell without its digit you select a previous
cell holding a digit then keying in [ENTER] will erase this entire row ; using key “0”
or key “1” will change the digit in the selected cell and cause a jump to the next
cell.
RKBuilder USER’s TIPS Copyright : Claude HOCHET
Version date stamp : 2010 Nov 24th
PAGE
19 on 73
If the row is full and you continue to key in either “0” or “1” you just go for another
“round”.
When you want to validate a particular row that you are finished entering just key
in [ENTER] and the row is then written in the matrix itself and the blue cell written
with the number of the following ROW to be now entered.
Note that a LEFT DOUBLE mouse click with the point of the mouse pointer on the
digit in the ‘Row’ column will put that particular row in the ENTRY CELLS for
correction.
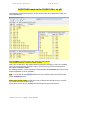
In the illustration just under you can see that the columns show the full number
attributed to the column: that is because in ‘Configuration’ the column width has
been set to 35 (with a narrower setting this would not be the case).
Formatted: Font: (Default)
Liberation Sans, English (U.K.)
With the very same L & B with the width left to its default value (or to any value
under 34) you would have what is shown under:
Formatted: Font: (Default)
Liberation Sans, Font color:
Dark Blue, English (U.K.)
A part of the number is hidden so giving the appearance of a MODULO numbering.
There is a possible short cut for entering ROWS: You can COPY ROWS that you
have already entered and PASTE them. There is a control on the PARITY of the
number of the ROWS used: the ‘COPY’ ROW and the ‘PASTE’ ROW must be of same
PARITY. (Both EVEN-numbered, or both ODD-numbered).
To COPY you may either use the keyboard manoeuvres or the mouse.
The COPY function is fully conforming to Windows.
The ROW selected is indicated by the blue highlighting of the ROW number and by
a change in the colour of the “0” and “1” digits in that ROW
RKBuilder USER’s TIPS Copyright : Claude HOCHET
Version date stamp : 2010 Nov 24th
PAGE
20 on 73
Those liking keyboard short cuts are not in need of any help as they are surely
more adept than mouse users may be, so let us speak only of the manoeuvres
with the mouse.
The illustration here under is the possible result of TWO different manners of doing
things:
Formatted: Font: (Default)
Liberation Sans, English (U.K.)
First what I will call the ‘analytic’ method:
* Put the mouse pointer smack on the number of the ROW to be selected.
* LEFT mouse click
* RIGHT mouse click
Second what I will call the ‘synthetic’ or ‘integrated’ method:
* Put the mouse pointer smack on the number of the ROW to be selected.
* RIGHT mouse click
Those TWO methods exist with the multiple selections.
The easiest way to do things is shown in the next illustration.
Here I illustrated the RIGHT upward to LEFT downward but you may use a
LEFT downward to RIGHT upward way.
RKBuilder USER’s TIPS Copyright : Claude HOCHET
Version date stamp : 2010 Nov 24th
PAGE
21 on 73
*** position the mouse pointer on the 'start' line, in the last cell of the START ROW,
this cell is in the rightmost COLUMN (L-1)
*** RIGHT mouse Click, maintain it and go to position the point of mouse pointer on
the digit in the "arrival' row.
*** now, and only now, release the’ till now’ maintained RIGHT mouse button.
Selection is now done AND the CONTEXTUAL MENU is opened.
You may use a LEFT Click but then after the selection has been done you will
need a RIGHT Click inside the selection to open the contextual menu
Note: the ONLY REAL FUNCTIONAL HIGHLIGHTING in the selected zone is the BLUE
one. It is there that the point of the mouse pointer must be positioned during the
activation of COPY.
To PASTE what was just COPIED:
*** chose the adequate ROW,
*** position the point of the mouse pointer on the ROW number in ‘Row’ column,
*** RIGHT mouse Click to open the contextual menu and
*** choose ‘PASTE’
This is for a SINGLE selection but it will work as well for a MULTIPLE selection.
MENU bar---------------------------------------------------------------------------------------------[Files]
--- Save as
--- Open
--- Exit ( or Quit )
[Edition]
[Tools]
--- Font size
--- Configuration where you can choose :
RKBuilder USER’s TIPS Copyright : Claude HOCHET
Version date stamp : 2010 Nov 24th
PAGE
22 on 73
Formatted: Font: (Default)
Liberation Sans, English (U.K.)
* the folder to and from which you may be moving files
* the column width (largeur de colonne) for the matrix in the Entry Matrix Neither
Nor ( 34 or 35 is the minimum to get a full Column Number on the screen)
* the number of files for the automated “save” upon closing the application
* The style of the HPs writing: O1 U1 or 1o 1u
* Fix your preferred type of knots which will be pre-selected at start time.
* Select your choice of language.
Chosen configuration of language and type of knot will be activated only after
re-starting the application. All other changes should be immediate.
[Knots] where you get a selection of pre-written knots.
[Help] which is rather an ‘About RKBuilder’.
TOOL bar----------------------------------------------------------------------------------------------Tool-tips will open if you let the mouse pointer stay on an icon.
From LEFT to RIGHT you get:
New : put all the fields “as new”
Open : used when you want to ‘IMPORT’ a knot’s file
Save
Cut
Copy
Paste
The ‘?’ will open Help or About RKBuilder©
RKBuilder USER’s TIPS Copyright : Claude HOCHET
Version date stamp : 2010 Nov 24th
PAGE
23 on 73
VERSION 2 : FEATURE ADDED
*ALWAYS* verify the time-stamp and/or version number of this manual and use the
most recent version.
We would strongly recommend that you read the RKB User's Manual and annexes
as you familiarise yourself with the program as this will help clarify concepts such as
"Half-Period" (HP).
Always maximize windows as much as your computer screen size/resolution allows.
A feature in TOOLS/CONFIGURATION allows you to check an “always open
maximized” option
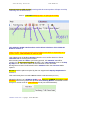
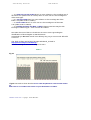
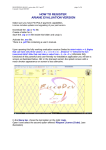
A much awaited feature: the ‘IMAGE MAKING’.
Fig 1
The rightmost tab (flagged red for the sake of Fig 1 only - it is in fact a text in the
application) is where the tracing will be done.
When opened for the first time in a session the tracing area is ‘blank’.
Command button for the Step by Step tracing of the successive HPs is flagged in
Fig 2 by a green marker (text label in the application).
Fig 2
RKBuilder USER’s TIPS Copyright : Claude HOCHET
Version date stamp : 2010 Nov 24th
PAGE
24 on 73
A count of the already traced HALF-PERIODS is shown in the small window to the right
side of the command button. (Fig 3)
This number represents the very last HP traced which is distinguished from previous
HPs crossings being traced in RED (in this case 2 OVER and 2 UNDER)
(colour setting is made with Crossing Colour 2 OVER and Crossing Colour 2
UNDER) while previous HPs have their crossings in black colour (setting the colours
with Crossing Colour 1 option. For further details see the CONTEXTUAL MENU
below).
Fig 3
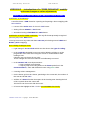
The last HP drawn is with crossings in RED, but one more click on the Step by Step
command button or one more LEFT mouse click will make all the crossings go black
as shown in Fig 4 which is a composite.
The CONTEXTUAL MENU offers a ‘FINISHED KNOT’ option that at any moment during the
drawing allows you to complete the whole knot with all crossings in the chosen
Crossing Colour 1.
A RIGHT click on the mouse gives you the same option of completing the knot.
RKBuilder USER’s TIPS Copyright : Claude HOCHET
Version date stamp : 2010 Nov 24th
PAGE
25 on 73
Fig 4
LEFT
mouse Click is functionally equivalent to a push on the Step by Step button.
While making the knot with the cordage using the screen as you would use a book
page (only more user friendly than a book and more versatile) you need to quickly
perceive the individual crossings. The individual crossings have been made
“separated” entities for ease and speed of visual acquisition of their type.
A better ‘feeling’ for the appearance of the ‘finished’ knot will be obtained by making
the crossings “joined” each to its neighbour with the same orientation.
There is an option for changing the width and the length of crossings as well as to
change the thickness of the isometric lines (refer to the CONTEXTUAL MENU paragraph
for more details.)
The RED FRAME MUST BE VISIBLE ALL ROUND YOUR GRID TO ENSURE YOU ARE SHOWN
THE ENTIRE KNOT. (knots grids can extend well beyond the window area)
If the UPPER HORIZONTAL LINE of the RED FRAME is not visible in the window,
maximise the window to the limit of your screen size/resolution.
If the full RED FRAME is still not visible it means that some ROWS, in fact BIGHTS,
COULD NOT BE PRINTED IN THE AVAILABLE AREA.
RKBuilder USER’s TIPS Copyright : Claude HOCHET
Version date stamp : 2010 Nov 24th
PAGE
26 on 73
If the RIGHT SIDE VERTICAL LINE of the RED FRAME is not visible in the window,
maximise the window to the limit of your screen size/resolution.
If it is still not there it means some COLUMNS, in fact LEADS, COULD NOT BE PRINTED IN
THE AVAILABLE AREA.
ASHLEY (page 234 of ABoK) limits the ‘reasonable’ to 40 L 26B
Fig 5
(Those dimensions are traced by
RKnotBuilder and the grid should be
visible in the window on most modern
screens)
RKnotBuilder will draw all of those. (the
calculation for the HPs coding is not
limited to any number of LEADS and
BIGHTS )
The visible part of the drawing is limited
to the screen area and a human brain
is unable to manage 2 or more screen
widths and/or 2 or more screen
heights. So it was decided that
‘scrolling sliders’ were just a waste of
time.
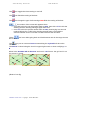
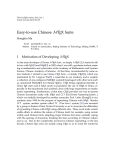
Fig 6 (a composite image) should be self-explanatory, but in case it is not:
The bottom left corner grid is that of a grid in the making at its 8th HP and shows the
default size for crossings.
The right grid in this composite Fig 6 shows more realistic crossings of bigger length
inducing a contact, a visual continuity between adjacent crossings of identical
orientation.
Fig 6
RKBuilder USER’s TIPS Copyright : Claude HOCHET
Version date stamp : 2010 Nov 24th
Fig 7
RKBuilder USER’s TIPS Copyright : Claude HOCHET
PAGE
27 on 73
Version date stamp : 2010 Nov 24th
PAGE
28 on 73
In both Fig 6 & Fig 7 the standard settings for line thickness and crossings are
shown.
Default sizes in pixels: Isometric line thickness = 1
length = 8
Crossing thickness = 6
Crossing
The CONTEXTUAL MENU offers a number of “customization’” choices.( Fig 7)
A RIGHT mouse Click made anywhere in the drawing area opens the CONTEXTUAL
MENU
You have in Fig 6 to Fig 8 the DEFAULT COLOURS setting is action.
Note that in Fig 9 the CROSS RULING option is checked.
Fig 8
In Fig 8 an unchecked Cross Ruling
Option is shown.
Fig 9
On activation of any of the
following options
containing the word
“colour”:
BACKGROUND COLOUR
ISO LINE COLOUR
CROSSING COLOUR 1
CROSSING COLOUR 2
OVER
RKBuilder USER’s TIPS Copyright : Claude HOCHET
Version date stamp : 2010 Nov 24th
PAGE
29 on 73
CROSSING COLOUR 2 UNDER
the contextual window shown in Fig 9 opens.
CHOICES MADE ARE AUTOMATICALY SAVED
The colour options are not just to allow users to play with colours but have a more
important motivation of allowing for:
Colour vision impairment or
Impairment in Appreciation of Contrast
FINISHED KNOT Option does the whole tracing “AT ONCE”.
COPY Option of the CONTEXTUAL MENU: COPY THE ENTIRE RED FRAMED AREA to the
clipboard IF ALL FOUR RED SIDES of the RED FRAME are present.
In other words you get the whole knot as long as the entire RED FRAME is visible,
otherwise you copy what is visible in the working screen.
You may PASTE the clipboard content into any application that accepts such pasting.
A function that is a bit different from COPY of image is available through:
TOOL ICON Save As or FILE/Save AS (see below for more details about these
functions).
Options chosen in the CONTEXTUAL MENU TAKE EFFECT IMMEDIATELY
Fig 10 is an example of customized settings (optimized for normal colour vision and
contrast)
Fig 10
RKBuilder USER’s TIPS Copyright : Claude HOCHET
Version date stamp : 2010 Nov 24th
PAGE
Crossing Colour 1
(the ‘First Come’ crossings or already laid
crossings) are in YELLOW.
30 on 73
Fig 11
Crossing Colour 2
(The ‘New Comer’, the very last laid HalfPeriod crossings) are in BLUE.
You can also opt to have both the OVER
and the UNDER crossings the same or
different colours.
This option is only available for the current
HP.
The Default setting is RED for OVER AND UNDER in CURRENT HP.
The horizontal line in orange yellow is ROW ZERO
The ZOOM Option in the CONTEXTUAL MENU is self-explanatory.
MAXIMUM NUMBER OF LEADS AND BIGHTS COMPLETELY
PRINTED on a 17” (diagonal) screen with default settings:
Fig 12
1440 * 900px window should allow
59L 27B Fig 12
1280 * 800px window should allow
52L 23B not illustrated
Fig 13
1024 * 768px window 41L 22B Fig 13
800 * 600px window should allow 31L 16B
not illustrated
RKBuilder USER’s TIPS Copyright : Claude HOCHET
Version date stamp : 2010 Nov 24th
PAGE
31 on 73
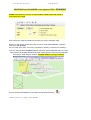
PRE-VISUALISATION OF A KNOT
Fig 14
IFF a knot entered can be drawn on your computer (screen size/resolution allowing)
inside a maximized window while still showing the FOUR SIDES OF ITS RED FRAME
AND IF Number of LEADS is at most 31 and Number of BIGHTS is at most 23 then a
miniature of it appears in the upper right side corner of CREATION TAB. (any size of
grid can be compute but is not always visible !)
If the mouse pointer slides (does not need to hover) across the miniature it scrolls the
illustration to the next available image in the collection.
To get the miniature back on screen push the command button CALCULATION
SAVING WHAT IS DRAWN IN THE GRID TRACING TAB IN AN
IMAGE FILE.
At any moment of the tracing from HP1 to the finished knot you may SAVE what has
been drawn directly to a file.
Fig 15
We have seen the use of the
contextual menu to COPY the grid
where you want it (The GIMP, a mail,
Photoshop, Paint NET, and
PhotoFiltre) use PASTE and SAVE.
BUT THIS WAY IS A DIRECT SAVING IN A
FILE and makes use of
RKBuilder USER’s TIPS Copyright : Claude HOCHET
Version date stamp : 2010 Nov 24th
FILES / Save As
drawing TAB
PAGE
32 on 73
or TOOL ICON SAVE AS BUT to save THE IMAGE you need to be in the
It is always the ACTIVE TAB that is concerned by Save As
Fig 16
Using SAVE AS in either the menu FILES or the ICON TOOL) in ANY active
EXCEPT THE ONE WHERE THE DRAWING IS DONE, will save a .TXT FILE with
COMPUTATIONS.
TAB,
the KNOTS
Using SAVE AS when the DRAWING TAB is the active tab offers the options of saving
of an image .JPG file and other formats that are indicated for the ‘AS’
Always watch for the destination folder in which saving is done so as to easily find it
again! Certainly that goes without saying but it goes much better with saying it as
they say in French!
Saving is done in the WORKING DIRECTORY specified in CONFIGURATION found in
TOOLS menu.
By default the application puts as the Working Directory the folder were the
application .exe is installed.
CONFIGURATION
in the TOOLS menu is explained in RKnot Builder User’s Manual.
RKBuilder USER’s TIPS Copyright : Claude HOCHET
Version date stamp : 2010 Nov 24th
VERSION 3
PAGE
33 on 73
introduction of a “FREE DRAWING” module
and some changes or rather adjustments.
QUICKLY OVER FLYING THE CHANGES BROUGHT SINCE VERSION 2
Modification of the Save As
A new file format : .RKB format for exporting and importing a knot complying with
RKnot Builder.
•
EXPORT
•
Saving of knots GRIDS in .JPG format
•
Automated saving of MATRICES in .RKB format
of the entire DATA of a knot in .TXT format
Modification of the file OPEN or IMPORT : the only file format presently recognized
(from any tab) is the .RKB format.
You may not access any other tabs than CREATION prior having entered LEAD and
BIGHT, (GCD complying)
Now a listing of changes made :
•
Light change in the DATA tab which now also shows the Type of Coding.
•
In the xLyB tab checkable boxes were added allowing a follow on of the
progression of the work when using the screen as documentation while
making a knot.
Columns may now be put in any order.
Those changes in boxes and columns are deliberately not saved.
•
In the DRAWING tab some improvements :
* a more realistic zoom function.
* a step by step zoom using clicks on the Zoom option line in the
Contextual Menu ; same with backward zoom using RIGHT clicks.
•
Crossing colours management.
•
On the drawn grid now are shown, pertaining to the current HP, the number of
the start and arrival PINS.
•
Addition of a Post-It function that opens in the drawing area showing the info
of the xLyB tab about the current HP.
This Post-It can be moved with the mouse.
•
Of course the highlight of this V3 is the FREE DRAWING functionality.
RKBuilder USER’s TIPS Copyright : Claude HOCHET
Version date stamp : 2010 Nov 24th
PAGE
34 on 73
•
Two different sort of menu bar for this.
•
Suppression of the Step by Step Button which is now replaced by a LEFT
mouse click inside the drawing area.
•
Adaptative labelling of the DRAWING Tab according to the current mode of
drawing in use
•
Corrections of some minor unsatisfying traits in the V2.
With the V3 RKnot
Builder now has TWO graphic modes.
*** The first one is simply the V2 mode which is the tracing of a knot the
characteristics of which are ALL known (LEAD, BIGHT, Type of Coding and Code) ;
those characteristics are summarize in the label given to the drawing tab in this mode
: Step by Step – 7L 5B – Neither Row Nor Column.
*** With the V3 a new graphic mode appears : the FREE DRAWING MODE.
As indicated by its name it allows the user to freely draw, on an empty grid, his
personal patterns using the mouse or to take an existing knot and modify it.
It was already possible with the V2 to get a drawing of a personal pattern but this
required a deep knowledge of those knots and of their coding
•
Two ways to enter this FREE mode:
*** Either, after entering L and B and Type of Coding (COLumn coded, ROW
coded, Neither-Nor coded ; the THK do not benefit from this mode) make a
click on the DRAWING tab which will be renamed to Free Drawing xLyB Type
of coding. If the THK coding was the select coding type you may not get the
Free Drawing mode.
*** Or
*** either choose a knot in the library of pre-entered knots
*** or enter all the characteristics of a knot (its code included of course)
then click on the DRAWING tab which will now be set in the Step by
Step mode (its default mode).
If a click is done on the Free Drawing button then the mode is switched
to FREE DRAWING mode. Note : the initial code is lost in this mode
switch.
mode version 3
In this mode users have to enter their patterns with the mouse and accessorily with
the keyboard.
FREE DRAWING
RKBuilder USER’s TIPS Copyright : Claude HOCHET
Version date stamp : 2010 Nov 24th
PAGE
35 on 73
There are different modalities for different coding type.
•
coded : each click on or very nearly on a Row and Column
intersection (see annexe) will put crossings of a same type on each Row of
THIS Column, a second click on one crossing will keep the crossings in place
but will change their type, ‘O’ to ‘U’ or ‘U’ to ‘O’.
You may also change the type of the crossings by immediately using the
keyboard ‘ C lowercase or uppercase ’Key
•
ROW
•
row NOR column coded : crossings are put in one by one. Each time a
second click on a crossing will change its type.
With the mouse pointer on a crossing ‘C lowercase or uppercase’ Key will
change the type of the crossing(s) in a whole Column, ‘R lowercase or
uppercase’ Key will change the type of the crossing(s) in a whole Row
COLUMN
coded : each click on or very nearly on a Row and Column intersection
will put crossings of a same type on each Column of THIS Row, a second click
on one of them will keep the crossings in place but will change their type, ‘O’
to ‘U’ or ‘U’ to ‘O’.
You may also change the type of the crossings by immediately using the
keyboard ‘R lowercase or uppercase’ Key.
NEITHER
In those three types of coding you may also select an area with the mouse in the
usual way : maintain LEFT click, move, release. The selection (which stays valid till a
click is made in the drawing area) having been made you can then use FOUR icons
to put crossings in the selected area : /, \ , /if=0, \if=0.
/ and \ put a crossing AT EACH intersection (empty or with a crossing) in the selection
/if=0, \if=0 put a crossing on each intersection THAT IS EMPTY OF ANY PREVIOUS
CROSSING.
When all its crossings have been placed the knot is said to be “completed” (it is also
“complete” in the meaning of having now ALL its characteristics defined).
It can now be computed by RKnot Builder when the button “FINISH KNOT” is pushed.
Calculations results are immediately made available in the xLyB tab as with any knot
that would have been fully entered in the CREATION tab.
A click made inside the drawing area will begin the tracing of the knot HP by HP as
that click switched the tab to its Step by Step mode. The change of labelling
happens at the moment “FINISH KNOT” is pushed.
The
icon allows switching back to the FREE DRAWING mode to modify one or
several crossings.
When finished with your modification(s), using the FINISH KNOT button will bring you
back to the Step by Step mode.
The Step by Step mode can only be accessed with a completed (all crossings
there), so complete knots (ALL characteristics known) otherwise you get a warning on
screen.
BEWARE please : pushing the FREE DRAWING button will put every thing in a virginal
state!
RKBuilder USER’s TIPS Copyright : Claude HOCHET
Version date stamp : 2010 Nov 24th
PAGE
36 on 73
The
icon toggle the crisscrossing on and off.
The
icon finish the tracing of the knot.
The
icon change the type of all crossings AND finish the tracing of the knot.
•
•
the number of the current HP appears there.
One click in this box set the number back to ZERO, then with a click inside the
drawing area the drawing will begin again from HP1.
One click in this box put the number back to ZERO, then keying in a new HP
number followed by a click in the drawing area will trace a grid with the
selected number of HP. From then on clicks will draw the next HPs.
Those
HP to HP1.
two icons allow going back and forth between HPs in the range Current
icon puts on screen a Post-It summarizing the xLyB tab info about the
The
current HP.
The Post-It is closed using the icon in its upper right corner or when modifying L or
B.
When in the DRAWING tab the Save As are done in .JPG format : the grid “as it is on
the screen” is saved.
(/END of over fly)
RKBuilder USER’s TIPS Copyright : Claude HOCHET
Version date stamp : 2010 Nov 24th
PAGE
37 on 73
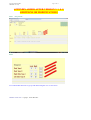
ADDITIONS made in the THIRD TAB = xL yB
The following composite illustration shows all the asked for modifications which are
now implemented :
The COLUMNS can now be put in any order you may prefer.
This modified order is *not* saved upon closing.
This is an “on the spot” only option asked by someone wanting, in case of a mistake
on some crossing(s) in a real knot, to go in reverse not only in the actual knot but
also when reading this TAB
For making room for a new disposition of the headers the INVERSION Button has been
pushed rightward as far as possible.
NEW : a LEFT click in the nO mU header acts in the same manner as a push made
on the INVERSION button.
to keep the count of all the HPs already done or to point
the current HP being worked upon.
Cases are PASSIVE and do nothing else than keep a trace on the screen.
CHECKABLE CASES ADDED
RKBuilder USER’s TIPS Copyright : Claude HOCHET
Version date stamp : 2010 Nov 24th
MODIFICATION OF
PAGE
38 on 73
THE SAVE AS FUNCTION
The Save As is changed.
There are now 3 different files formats that can be saved :
.TXT
.RKB
.JPG
ONLY .RKB files can be imported to the application.
.TXT and .JPG CANNOT be IMPORTED BACK to RKnot Builder to be worked on.
.TXT files are for use OUTSIDE of RKB
The .TXT files contain ALL the calculations and data in RKB has
Importing a .TXT file to RKB is technically possible but cumbersome and bothersome
to program due to the formatting, translation and controls to be done.
Anyway those calculations are useless as 'IMPORT' : RKB will do the whole set of
them.
So it was decided to go for a minimal format : .RKB format containing only the
necessary and sufficient data for RKB.
Note that this .RKB file is written in pure TEXT (for those who want to access it to get
their work back)
There are constraints to comply with:
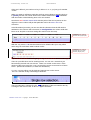
*** the very first line in the .RKB file MUST contain (each STRICTLY separated from the
other by ONLY ONE "space" character):
LEAD BIGHT Type of Knot
(THK = 0 ; Column code = 1 ; Row coded = 2 ; Neither Nor = 3)
e.g : 17 4 0 stands for a 17L 4B THK.
A control is done on this line and ANY error detected stops the importation and user is
informed by an error message about the file type not being acceptable.
The code or matrix as is the case is on the second line.
*** If it is a COLUMN coded the code for the HP1 must be valid, if too long it will be
shortened to (LEAD – 1), if too short : an error message is given.
*** If it is a ROW coded then the coding of the rows zig zag must be valid, if too long it
will be shortened to (BIGHT*2), if too short : an error message is given.
*** If it is a NEITHER NOR coded : the matrix must have valid dimensions and format
even if not completed in all cells.
.TXT files are no longer usable from inside RKB BUT the .RKB files may be imported
not only from the CREATE tab as previously but also from other tabs.
RKBuilder USER’s TIPS Copyright : Claude HOCHET
Version date stamp : 2010 Nov 24th
PAGE
39 on 73
SUMMARY :
•
CREATION Tab : saves its content in .RKB format.
•
DATA Tab : saves its contents in .TXT format.
•
xLyB Tab, EDITION Tab : save in .TXT the content of DATA tab.
•
ENTRY MATRIX Tab : save its contents in .RKB.
•
DRAWING Tab : save the grid drawn in the drawing area in .JPG.
•
Automated save of MATRIX is in .RKB format, the file is generated all along
the entries made in rows and at each validation of row. If L or B is modified
then save is done in a distinct file so as not to lose the work already done.
A SMALL WORD TO THE WISE ABOUT ONE OF THOSE THINGS THAT GOES WITHOUT SAYING
BUT GOES SO MUCH BETTER FOR HAVING BEEN SAID ! :
Please remember to clean your saved documents at regular interval.
They do tend to clutter a hard disk with the greatest ease if not kept in check
A suggest good practice is to create inside the RKB installation folder a sub-folder
that will be used as Working Repertory for the saved files. (set it as such using RKB
CONFIGURATION)
RKBuilder USER’s TIPS Copyright : Claude HOCHET
Version date stamp : 2010 Nov 24th
PAGE
40 on 73
ADDITIONS and CHANGES in the rightmost TAB : DRAWING
USING FREE MANUAL ENTRY of CROSSINGS USER NOW CAN DRAW A
CUSTOM KNOT GRID
First choose the TYPE OF CODING for the knot you want to manually draw.
Second, to get access to the other tabs you MUST enter LEAD and BIGHT, (validate
each entry with [ENTER])
DO NOT enter ANY CODE ; NO code is equivalent to stating “I want the free drawing “
Now you may open the DRAWING TAB (this tab which when CREATION TAB-or any other
TAB is opened is labelled DRAWING will, upon being opened, have its name changed
according to what was just entered : Graphic mode xL yB Type of Knot).
Icon for opening the Post-It is now (different in illustration above) :
RKBuilder USER’s TIPS Copyright : Claude HOCHET
Version date stamp : 2010 Nov 24th
PAGE
41 on 73
The Post-It can be moved to another place using the mouse as in any windows
application : maintain LEFT button Click, move, release mouse button when in the
chosen place.
The font in use in this Post-It is the same as in EDITION TAB (Post-It is a copy of what
is in EDITION TAB)
The Post-It size will be proportional to the font size up to size 24.
The currently opened Post-it is suppressed when LEAD and/or BIGHT change.
You close it with the icon in its upper right corner.
!
’ ’ THIS WARNING Icon will appear if some forbidden manoeuvre is made.
A mouse click anywhere in the pale green drawing area or on another icon will erase
it.
RKBuilder USER’s TIPS Copyright : Claude HOCHET
Version date stamp : 2010 Nov 24th
PAGE
42 on 73
TYPE OF CODING:
Turk’s Head Knot (THK): NO manual drawing available as none would be useful
since RKB with LEAD and BIGHT entered in the appropriate fields will draw any of them
giving priority to the knot version with the maximum of OVER but an INVERSION
function will put on screen the version with the maximum of UNDER.
Column Coded: a LEFT button mouse click on one row-column intersection will draw
the crossings of the ENTIRE COLUMN in which this row-column intersection is.
A second click then gives the other type of crossing : an OVER if it was an UNDER and
vice versa.
Note that is you select with the mouse all or a part of one or several Rows then it is
each Column inside this selection that is drawn.
That is equivalent to drawing full or partial Row(s) while being in Column-coded.
Row Coded: a LEFT button mouse click on one row-column intersection will draw the
crossings of the ENTIRE ROW in which this chosen row-column intersection is.
A second click then gives the other type of crossing : an OVER if it was an UNDER and
vice versa.
Note that is you select with the mouse all or a part of one or several Columns then it
is each Row inside this selection that is drawn.
That is equivalent to drawing full or partial Column(s) while being in Row-coded.
Neither Row Nor Column Coded: this is probably where the FREE DRAWING will be
the most attractive as not every one will like the Entry Matrix. Some will prefer the
rigor and ease of control of Entry Matrix which has been kept available.
On the choice of TYPE OF CODING will depend what you get in the rightmost tab, the
one for drawing.
DISPARITION : Button Step by Step is no longer present but its function is still there
as LEFT mouse button click in green drawing area.
RKBuilder USER’s TIPS Copyright : Claude HOCHET
Version date stamp : 2010 Nov 24th
PAGE
43 on 73
CHANGES made in the CONTEXTUAL MENU
A CHECKABLE option was added : Crossing Length Finish Knot Max
IF CHECKED then when asking for “FINISH KNOT” it will be the maximal allowable
crossing length that will be used and not the length that you checked in the option
just above : Crossing Length
of options for Crossing Colours: Now you may have a maximum of FOUR
colours in use
ADDITION
Type “2” is for crossings in the current HP
Type “1” is for crossings in the previously laid HP
To get a visual understanding experiment using one of the knots in the library of
knots (Upper MENU bar -- Knots.)
ZOOM
* a more realistic zoom function.
* a step by step zoom using clicks on the Zoom option line in the Contextual
Menu ; same for backward zoom using RIGHT clicks.
RKBuilder USER’s TIPS Copyright : Claude HOCHET
Version date stamp : 2010 Nov 24th
PAGE
44 on 73
APPARITION OF NEW ICONS (hovering with the mouse pointer will open a tool-tip
reminding user of the function)
Case 1 : TAB NAME IS Step by Step : xL yB Type of coding
This STEP BY STEP TAB functions are the direct inheritors of the STEP BY
STEP in Version 2.
There is a SET OF ICONS specific to this rightmost tab which is depending on its
function mode : FREE DRAWING or STEP BY STEP
This rightmost tab is labelled DRAWING when the LEAD and/or the BIGHT field in
CREATION TAB are missing their number.
After entering LEAD and BIGHT, upon being opened, this DRAWING TAB will be
renamed to xL yB Type of the knot whether it is in FREE DRAWING mode or in Step
by Step mode. This mode will be the first indication in the new label.
Having been renamed it will switch back to DRAWING when the CREATION TAB is
opened.
BUTTON 1 took
Version 2.
the place occupied by the now suppressed Step by Step Button in
This new button place can take TWO DIFFERENT APPEARANCES (functions).
Illustration above is of a STEP BY STEP TAB. Button is “ARMED” for going to FREE
DRAWING mode and if pushed this present Free Drawing Button will transform itself
and put on screen a tab in FREE DRAWING mode (see next illustration).
RKBuilder USER’s TIPS Copyright : Claude HOCHET
Version date stamp : 2010 Nov 24th
PAGE
45 on 73
ICON 2 :
It allows user to modify the grid of a knot (any CODING TYPE except the
THK choice which does not enable Free Drawing) by going into FREE
DRAWING mode. A push on the FINISH KNOT Button will switch back to the
STEP by STEP mode.
ICON 3:
This icon will put the grid in a finish state.
Finished state is with the crossing length set in the Contextual Menu
unless you CHECKED the Crossing Length Finish Knot Max option in
Contextual Menu
ICON 4:
Thanks to this icon there is no need to go back to xL yB Tab to use the
INVERSION button and then return to the drawing tab.
Pushing this icon change O into U and U into O (RKnot Builder always
prioritize the knot aspect with the maximum number of OVER but you may
want to have the aspect with the maximum of UNDER). Using it makes sense only on
a knot with its full complement of crossings.
FIELD 5:
In this field is inscribed the number of the current HP.
“Things can be done” to this field as we will see later in the
topic about “space and time travel” with HPs.
ICON 6:
This one is COMMON to the TWO MODES of the DRAWING TAB.
It toggles ON/OFF the CROSS RULING in the knot grid.
This is a way to ‘modulate’ the effect of checking or not checking the
CROSS RULING option in the CONTEXTUAL MENU, which is a ‘saved’ option.
RKBuilder USER’s TIPS Copyright : Claude HOCHET
Version date stamp : 2010 Nov 24th
PAGE
46 on 73
AN ASKED FOR NEW FEATURE :
You will see in the Step by Step or HP after HP grid small numbers in RED : those
are the PINS NUMBERS FOR THE CURRENT HP.
In the illustration on the left it is an
EVEN-Numbered HP (N°2) so it goes
FROM
RIGHT BIGHT RIM (PIN NUMBER N° 4)
TO
LEFT BIGHT RIM (PIN NUMBER N° 7)
If in this Step by Step mode/tab with a knot that
is not “complete” in the sense that ALL its
characteristics (L, B, type of coding, code) are
*not* known you ask for a FINISH KNOT using the
icon you will get a warning : the Step by Step is
not enabled.
[ / END of Case 1]
RKBuilder USER’s TIPS Copyright : Claude HOCHET
Version date stamp : 2010 Nov 24th
PAGE
47 on 73
Case 2 : TAB NAME IS FREE DRAWING. THIS IS THE REAL NOVELTY of V3
UNDER ILLUSTRATION IS THE DRAWING TAB IN ITS FREE ENTRY BY USER
MODE.
The SET OF ICONS here is different from the one in the previous illustration.
BUTTON 1 : : we are in the FREE DRAWING TAB so it is “ARMED” for switching to its
FINISH KNOT function and when pushed it transforms itself and puts the tab into its
FINISH KNOT STEP BY STEP form (see next illustration)
User may SELECT an area in the grid : selection with LEFT mouse button maintained
down, mouse pointer is moved then button is released just as in any Windows
application.
Selection can be used in any of the three TYPE OF CODING enabled for FREE
DRAWING.
As long as NO MOUSE BUTTON CLICK IS DONE IN THE GREEN AREA the SELECTION will
stay active (a click will make it disappear) : USING ONE OF THE FOUR CROSSING ICONS
will trace the crossing(s) on the intersection(s) in the selection.
As long as no click is made elsewhere than on the crossing icons the SELECTION will
stay memorized and the two icons
use of any of the four crossing icons.
can be used for correction after a first
ICON 2 : traces BOTTOM LEFT TO TOP RIGHT slash at intersections or crossing inside
a SELECTION
It will trace crossing(s) whether the intersection is still empty or already holds
a crossing
RKBuilder USER’s TIPS Copyright : Claude HOCHET
Version date stamp : 2010 Nov 24th
PAGE
48 on 73
ICON 3 : traces BOTTOM RIGHT TO TOP LEFT anti-slash at intersections or crossings
inside a SELECTION
It will trace crossing(s) whether the intersection is still empty or already holds
a crossing
ICON 4 : traces a BOTTOM LEFT TO TOP RIGHT slash at intersections inside a
SELECTION
It will trace ONLY at intersections (no previously entered crossing).
ICON 5 : traces a BOTTOM RIGHT TO TOP LEFT anti-slash at intersections inside a
SELECTION
It will trace ONLY at intersections (no previously entered crossing).
One way to «put in» crossings if
and only if the CODING TYPE
selected is NEITHER-NOR is :
→ to put the mouse pointer on
one crossing or an intersection
then mouse clic
→ then immediately use the
KEYBOARD
[Ctrl]+[C] or [C] will do the
ENTIRE COLUMN containing the
crossing.
[Ctrl]+[R] or [R] will do the
ENTIRE ROW containing the
crossing.
ICON 6 : this one is COMMON to
the TWO FORMS of DRAWING TAB.
It toggles the CROSS RULING
ON/OFF in the knot grid.
This is a way to ‘modulate’ the effect of checking or not checking the CROSS
option in the CONTEXTUAL MENU.
RULING
Next illustration : IF you click outside the RED frame then the default result of your
action will be “to do something” in the LEFTMOST COLUMN in a Column coded.
(Alternatively in a Row coded it will affect the TOPMOST ROW.)
RKBuilder USER’s TIPS Copyright : Claude HOCHET
Version date stamp : 2010 Nov 24th
PAGE
49 on 73
IT MAY HAPPEN THAN FOLLOWING SOME UNAUTHORIZED
COMMANDS YOU GET THIS ERROR MESSAGE:
Just click on Continue and do the correct commands. Please DO NOT forgets to send
a mail to [email protected] with a copy of the details and a description of the
circumstances.
RKBuilder USER’s TIPS Copyright : Claude HOCHET
Version date stamp : 2010 Nov 24th
PAGE
50 on 73
GOING BACKWARD IN THE STEP BY STEP DRAWING
One tester asked for the possibility, when in the making of a knot while using the
Step by Step mode as documentation, to go ‘back in time and space’ to a mistaken
HP / crossing for correction of the ‘in the cordage’ knot still using the screen.
THREE MEANS FOR A REWINDING :
*** The two icons : one for the ONE HP BACKWARD, one for the ONE HP FORWARD (two
upper figures of the composite illustration just above). NO HP IS ERASED using that.
It is the crossings highlighting that goes backward and forward in time (previous or
following) and in space (different HP) with the action on the appropriate icon.
In the illustration we went from highlighting of the last HP entered which was HP9
back to the highlighting of the crossings on HP7
RKBuilder USER’s TIPS Copyright : Claude HOCHET
Version date stamp : 2010 Nov 24th
PAGE
51 on 73
*** The HP field which holds the HP number (two bottom figures of the composite
illustration just above).
This time SOME HPs WERE ERASED and the diagram went back from HP12 to HP5
simply by entering “ 5 “ in the HP field followed by a LEFT mouse click in the green
drawing area. From that point you may go on with the tracing of HPs.
*** A RADICAL NEW START FROM ZERO : ERASE THE WHOLE GRID AND START AGAIN :
LEFT mouse click in the HP field put it back to “ 0 ”, then LEFT mouse click in the
green drawing area starts the HP tracing from HP1.
RKBuilder USER’s TIPS Copyright : Claude HOCHET
Version date stamp : 2010 Nov 24th
PAGE
52 on 73
SOURCES USED FOR RKBuilder©
(apart from THE BRAIDER – 60 issues)
Schaake & Turner are published by The Department of Mathematics and
Statistics. University of Waikato –Hamilton – New-Zealand
A.G. SCHAAKE – J.C. TURNER
*** New And Automatic Methods For Constructing Knots and Braids- REGULAR
KNOTS (1988) it was mainly this one that was used.
*** The Braiding of COLUMN-CODED REGULAR KNOTS (1992 Pamphlet N°7)
*** The Braiding of LONG COLUMN-CODED REGULAR KNOTS (Supplement to
Pamphlet N° 7)
*** The Braiding of ROW-CODED REGULAR KNOTS
(1993 Pamphlet N° 9)
VERY RECOMMENDED READING
A.G. SCHAAKE – J.C. TURNER – D.A. SEDGWICK
*** Braiding REGULAR FIADOR KNOTS (1990)
*** Braiding Standard HERRINGBONE PINEAPPLE KNOTS (1991)
A.G. SCHAAKE – T. HALL - J.C. TURNER
(T.HALL contribution is just drawing and it was a first and last)
*** Braiding Standard HERRINGBONE KNOTS (1992)
QUITE USEFUL READING
(but absolutely NO THEORETICAL RIGOR OR KNOWLEDGE, JUST GOOD OLD PRACTICAL)
ALL of Ron EDWARDS but in particular the 2 volumes of Advanced Leatherwork: Vol 1.
Interesting Braids and Flat Braids
Vol2. Round Knots and Braids
To get them see Martin COMBS http://www.angelfire.com/ak/skateworld/index.html
and of course RAMSKULL http://www.ramsskullpress.com/crafts.html
RKBuilder USER’s TIPS Copyright : Claude HOCHET
Version date stamp : 2010 Nov 24th
PAGE
53 on 73
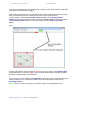
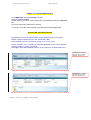
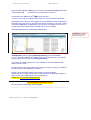
I WANT IT TO WORK IMMEDIATELY
Go to MENU bar and open [Knots] / Noeuds
Select a TYPE OF CODING.
Double click on your choice; this choice will be immediately entered in CREATION
tab
(You may explore the other tabs of course)
You need to read the whole manual to get the full use of this application.
INSTALLING THE APPLICATION
FRAMEWORK 3.5 must be fully installed on the computer used to
Builder. MINIMAL SCREEN RESOLUTION: SVGA 800 * 600
RKnot Builder has been extensively tested on XP / VISTA / WIN-7
run RKnot
Put the .ZIP file EXACTLY WHERE you want the application to be. (chose partition,
repertory, folder..). Create your folder
D:\Program Files\ RKnot Builder was the choice made for the illustrations here.
Formatted: Font: (Default)
Liberation Sans, Font color:
Dark Blue, English (U.K.)
Formatted: Font: (Default)
Liberation Sans, Font color:
Dark Blue, English (U.K.)
RKBuilder USER’s TIPS Copyright : Claude HOCHET
Version date stamp : 2010 Nov 24th
PAGE
54 on 73
Copy the RKnot Builder .zip file (if you received a SomeName.000 file RENAME it
to SomeName.zip
– this .000 is to by-pass filters on the Net –
Uncompress the .zip (the free 7-zip is good for that)
You are ready to go. Eventually make a short-cut and use the icon provided.
Nothing has been written in your register by the installation itself (only Windows
itself and .NET may have, in the usual way of their behaviour to do such a thing).
This makes RKBuilder an application you can put on a USB pen drive and run
anywhere provided FRAMEWORK is installed on the host machine.
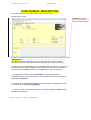
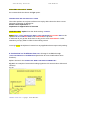
The following illustration is showing the RKB folder:
Formatted: Font: (Default)
Liberation Sans, Font color:
Dark Blue, English (U.K.)
‘Configuration’ needs a place (Working Directory) for saved .txt files.
For ex: where the .exe file is installed can be your choice but you can specify
your personal choice in the field: working directory.
If you want one make a shortcut on your desktop or use RKnot Builder.exe
directly from the folder.
No more than 3 copies of the files may be made (a copy is a copy on a different
computer) before the application is blocked.
Anyway you can always explain your trouble to Claude HOCHET.
Claude will also be quite pleased to be contacted about making this program a
thing ‘on the move’ with additions and modifications.
E-mail to: [email protected]
REGISTERING THE APPLICATION
See the separate .PDF titled REGISTERING
------------------------------------------------------------------------------------------------------------
RKBuilder USER’s TIPS Copyright : Claude HOCHET
Version date stamp : 2010 Nov 24th
PAGE
55 on 73
ANNEXE
Several testers specifically asked for the addition of these topics which they felt were
obscure for many.
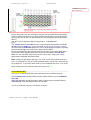
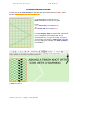
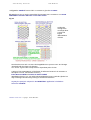
PART 1
NEVER FORGET THE “GOES AROUND” OR CIRCULARITY OR
MODULUS IN CYLINDRICAL KNOTS
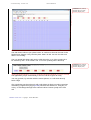
Fig 1
0 1 2 3 4 5 0 1 2 3 4 5 0 1 2 3 4 5 0 1 2 3 4 5 0 1 2 3 4 5 0 1
2 3 4 5
So look at grids as being flattened cylinders.
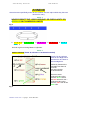
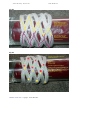
PART 2
SHORT REVIEW (frame of reference = horizontal mandrel)
A period is the cordage
run from one Bight rim to
the other rim and back to
the start Bight rim.
Obviously between the
two Bight rims there is
room for
ONE HALF-PERIOD
in each direction.
There are EVENnumbered HPs going
from the RIGHT side to
the LEFT side and ODD –
numbered HPs going
from the LEFT side to the
RIGHT side
Fig 2
RKBuilder USER’s TIPS Copyright : Claude HOCHET
Version date stamp : 2010 Nov 24th
PAGE
56 on 73
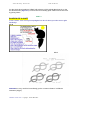
HALF-PERIOD
Fig 3
Remember school? and period / periodic / periodical = THAT WHICH COMES AGAIN
Cosinus and Sinus curves but
understood in periodicity)
AFTER A GIVEN SPAN OF TIME AND/OR SPACE (here are
thinks MOON PHASES for something more immediately
For Regular Knots = A PERIOD IS MEASURED STARTING FROM ONE BIGHT ON A RIM THEN
RETURNING TO THE NEXT BIGHT - IN THE LOGIC OF THE KNOT SEQUENCE - ON THE
STARTING RIM.
Fig 4
YELLOW PERIOD is made up of the HALF-PERIODS A1 and A2.
Similarly the BLUE PERIOD is made of B3 and B4.
The RED PERIOD is made of C5 (which seems broken) and C6
C5 appears as being broken but THINK CIRCULAR and you will understand
NOT broken (Fig 5)
Fig 5
RKBuilder USER’s TIPS Copyright : Claude HOCHET
that it is
Version date stamp : 2010 Nov 24th
PAGE
57 on 73
For the whole knot imagine a billiard ball trajectory which after 2* B rebounds on the
two lateral bands (Bight rims) comes back to its starting point: WEnd closes the curve
by joining SPart.
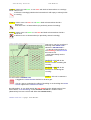
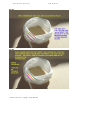
PART 3
SHADOW OF A KNOT
A VERY USEFUL TOOL not
only for topologists but also for knot tyers who want to gain
knowledge
Fig 6
Fig 7
SHADOWS are very useful to immediately get the “common feature” in different
structures.( Fig 7)
RKBuilder USER’s TIPS Copyright : Claude HOCHET
Version date stamp : 2010 Nov 24th
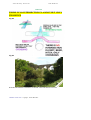
SHADOWS
PAGE
58 on 73
allow the study of inter-relationship as in Fig 7 & Fig 8
ALL REGULAR KNOTS (Schaake’s nomenclature) ARE SINGLE STRAND KNOTS MADE ON A
TURK’S HEAD SHADOW or TURK’S HEAD CORDAGE ROUTE - THE SHADOW GIVES THE
ROUTE TO BE FOLLOWED ( but does not "describe" the nature of any of the crossings).
Fig 8
Don’t make the mistake of thinking that the above is theoretical and is not based on
reality, consider Fig 9.
Fig 9
RKBuilder USER’s TIPS Copyright : Claude HOCHET
Version date stamp : 2010 Nov 24th
PAGE
59 on 73
PART 4
Fig 10
THE PATTERN (OVERALL CODING TYPE USED) IS
NOT TO BE CONFUSED WITH THE SHADOW or
ROUTE.
PATTERN and CORDAGE ROUTE ARE TWO VERY
SEPARATED CONCEPTS
On a GIVEN CORDAGE ROUTE it is possible to make
VERY DIFFERENT KNOTS by applying a different
coding ( or pattern) for each.
PART 5
FRAME OF REFERENCE AND CODING TYPE
Fig 11
MANDREL is seen as HORIZONTAL so there is
BIGHT RIM on the LEFT SIDE and ONE on the
RIGHT SIDE
Fig 12
is seen as VERTICAL so
there is a BIGHT RIM at the TOP and
ONE at the BOTTOM
CYLINDER
RKBuilder USER’s TIPS Copyright : Claude HOCHET
a
Version date stamp : 2010 Nov 24th
PAGE
60 on 73
In Fig 11 the mandrel is turned 90° CLOCKWISE to give the CYLINDER.
Fig 13 gives a way to use the same label for MANDREL OR CYLINDER AS IT IS FRAME
INDEPENDENT AND ONLY BELONGS TO THE KNOT ITSELF.
Fig 13
Adding the
coding of the
crossings allow
a strict and
logical
differentiation
of knots
Note that the ROW and COLUMN coded appellation are QUITE MYOPIC and change
drastically with the frame of reference.
It is *never* a good idea to keep a frame-dependant point of view.
A point of view INDEPENDENT of the frame of reference because it is INTRINSIC to
the object is much, much better hence my
INTER-BIGHTS coded and PARALLEL BIGHTS coded
appellations that do NOT vary with Horizontal Mandrel versus Vertical Cylinder but
stay unchanged because they belong to the knots themselves.
Anyway the ‘parti pris’ adopted in the RKBuilder© application is Schaake’s
horizontal mandrel.
RKBuilder USER’s TIPS Copyright : Claude HOCHET
Version date stamp : 2010 Nov 24th
PAGE
61 on 73
---- In a ROW AND COLUMN-CODED knot in a GIVEN column ALL the crossings are of
the SAME TYPE (either OVER or UNDER) and in a GIVEN row ALL the crossings are
of the same type.
---- In a COLUMN-CODED knot in a GIVEN column ALL the crossings are of the
SAME TYPE (either OVER or UNDER).
---- In a ROW-CODED knot in a GIVEN row ALL the crossings are of the SAME
TYPE (either OVER or UNDER).
---- In a Neither Column Nor Row –coded Columns AND Row may be with
crossings of different type = a mix of OVER and UNDER.
Now take also note of the FACT that there are STRICT RULES governing the
classification of those Regular or Standard Knots.
In particular you MAY NOT extend in an arbitrary way, say a GAUCHO and still call it
a GAUCHO.
The ‘basic coding’ can be found in page turksheads_22.html in
http://preview.tinyurl.com/38mrcp
for those wishing to understand things a bit more.
PART 6
Fig 14
Fig 14 was made to show how the EXACT SAME SEQUENCE OF CODE APPLIED EITHER
AS
ROW-CODE or as COLUMN-CODE LEADS TO QUITE DIFFERENT PATTERNS!
RKBuilder USER’s TIPS Copyright : Claude HOCHET
Version date stamp : 2010 Nov 24th
PAGE
62 on 73
PART 7
AVOID USING
/ and \
as symbols for crossings as they are QUITE
AMBIGUOUS except in drawings. (thanks to you Scott for your questions leading to
improvements)
DO NOT them in writing coding UNLESS you state PRECISELY WHICH TYPE of HP is
'reading' them and IN WHICH FRAME of reference
ODD-numbered HPs move LEFT to RIGHT on horizontal mandrels.
EVEN-numbered HPs move RIGHT to LEFT on vertical cylinders.
HPs are not “just lines”, they are to be considered as VECTORS or LINES WITH A
with point and feathers.
DIRECTION. ARROWS
Fig 17
RKBuilder USER’s TIPS Copyright : Claude HOCHET
Version date stamp : 2010 Nov 24th
PAGE
63 on 73
PART 8
MANDREL versus CYLINDER ( quotes from mails, so the style is rather unguarded
but is was deemed better to keep the spontaneity, those not liking that option are under no obligation
to read)
Q: . [open quote] To me a mandrel is a tool and a cylinder is a shape. In my
humble opinion it would be less confusing to use cylinder only with a qualifier of
horizontal bight rims or vertical bight rims. [end quote]
I may be missing something here and would appreciate you enlightening me if you
will.
A: . [open quote] All this is a question of CONVENTION so it is ARBITRARY and
serves to build a " common ground" …
never be automatically equated with SENSELESS or WITHOUT GOOD
ARBITRARY should
REASON FOR...
…the MANDREL frame of reference is used so as not to perturb persons knowing
Schaake’s work and because (other) Australian Authors use it too.
…
MANDREL : that word does not figure in my CAMBRIDGE International Dictionary of
English.
… in fact a mandrel is a part of a machine … which is a piece for the lathe…
Fig 18
To make things simple AND AS FAR AS
KNOT AND BRAIDS ARE CONCERNED:
Mandrel is SLIM and ‘stick-like’.
It has a small diameter compared to
length.
Its length is many diameters large so
being “slim’ anatomically for the human
hand the easiest gesture is to hold it
palm downward (in pronation) and the
‘stick’ more horizontal than vertical.
See Fig 18 fair quote from p371 of Bruce
GRANT Encyclopedia of Rawhide and
Leather Braiding/
** yes Encyclopedia and not as it should
be Encyclopaedia.
Cylinder is STUBBY : its diameter is a large part of its length so anatomically it is best
to hold it palm going a bit ”upward” (in semi-supination.
Whatever the name you use there WILL STILL BE TWO DIFFERENT FRAMES OF
REFERENCE (VERTICAL & HORIZONTAL) TO KEEP IN MIND AND IT IS GOOD
DISAMBIGUATION TO ATTACH A DIFFERENT NAME TO EACH RATHER THAN
ADDING A QUALIFIER TO A SINGLE NOUN.
RKBuilder USER’s TIPS Copyright : Claude HOCHET
Version date stamp : 2010 Nov 24th
PAGE
64 on 73
Here is an idea from Jimbo The Kinky:
[open quote]Perhaps to include the notion of "around the cylinder" vs. "along the
cylinder"? Somehow? [end quote]
…[end quote]
PART 9
THE WORD : CODE
IT MAY BE USED AS IN ‘TYPE OF CODING’
or ‘CODE TYPE’ or ‘CODING TYPE’ and pertains
to the homogeneity of the nature of the crossings in ROWS and/or COLUMNS as
shown in Fig 13.
But some may be lost when it comes again as HALF-PERIOD CODE or CODING.
While in the case of Fig 13 ‘TYPE OF CODING’ or ‘CODE TYPE’ or ‘CODING TYPE’
CLEARLY PERTAINED TO THE WHOLE KNOT here it is attached to the HALF-PERIOD,
a
small piece of the whole knot.
In Fig 19 the HALF-PERIOD CODE or CODING is for the 18th HP so EVEN-numbered so
going from RIGHT to LEFT this HP which does not have the complete collection of
possible crossings for this knot so its CODE or CODING is :
U1 - O2 - U1 - O1 - U1 - O3 - U1- O1-U1 - O1-U2 but IN FACT the TYPE OF
CODING IS COLUMN-CODED and its COLUMN-CODE, which, this time, MUST COME from a
COMPLETE HP taken on a FINISHED KNOT, looks like:
O4 U2 O3 U3 O4 U2……………….O U (28 columns as it is a 29L)
Fig 19
The TYPE OF CODING gives you the VISUAL PATTERN of the knot.
The HP-CODE gives you the MEAN TO LAY THE CROSSINGS IN A GIVEN HP
RKBuilder USER’s TIPS Copyright : Claude HOCHET
Version date stamp : 2010 Nov 24th
PAGE
65 on 73
PART 10
MISCELLANIES (making use of existing illustrations which are quite deliberately used “as
they are”)
Fig 20
Fig 21
RKBuilder USER’s TIPS Copyright : Claude HOCHET
Version date stamp : 2010 Nov 24th
Fig 22
Fig 23
RKBuilder USER’s TIPS Copyright : Claude HOCHET
PAGE
66 on 73
Version date stamp : 2010 Nov 24th
Fig 24
Fig 25
RKBuilder USER’s TIPS Copyright : Claude HOCHET
PAGE
67 on 73
Version date stamp : 2010 Nov 24th
PAGE
68 on 73
Fig 26
A reminder about the way of numbering of PINS you have to comply with if you want
to use the PINS NUMBERS INDICATION of RKnot Builder. I will let you ponder it.
Fig 27
RKBuilder USER’s TIPS Copyright : Claude HOCHET
Version date stamp : 2010 Nov 24th
PAGE
69 on 73
PART 11
THERE IS NO INTERSECTION IN A KNOT BUT ONLY
CROSSINGS
Fig 28
Fig 29
RAILROAD BRIDGE CROSSING A RIVER AND THE RIVER VALLEY
RKBuilder USER’s TIPS Copyright : Claude HOCHET
Version date stamp : 2010 Nov 24th
PAGE
70 on 73
If wanting some writing describing and depicting on Turk’s head and other regular
knots and much more: just try your luck exploring (the shortest way) the Turk’s head
pages there
Direct: http://tinyurl.com/233x43q
Preview: http://preview.tinyurl.com/233x43q
For a FULL EXPOSITION TO SCHAAKE and TURNER works just buy (AND READ) a CD
with 5 books (NOT The Braider)
BRAIDING REGULAR FIADOR KNOTS
173 pages
BRAIDING REGULAR KNOTS 127 pages
BRAIDING STANDARD HERRINGBONE KNOTS 209 pages
BRAIDING STANDARD HERRINGBONE PINEAPPLE KNOTS 203 pages
SPECIAL BRAID FORMS ( Part One) 191 pages
US$ 15 payable to Dr John TURNER.
Instructions are to be found by those interested at either of those two links
http://tinyurl.com/2ubdabs
http://preview.tinyurl.com/2ubdabs
RKBuilder USER’s TIPS Copyright : Claude HOCHET
Copyright Claude HOCHET
APPENDIX 2011 May
Page 71 sur 73
APPENDIX ADDED AFTER VERSION 3. 1. 0. 8
ADDITIONS OR MODIFICATIONS
FIG 1 The first tab
FIG 2
FOUR
buttons that allow user to go up and down along the THK
RKBuilder USER’s TIPS Copyright : Claude HOCHET
ENLARGEMENTs
Copyright Claude HOCHET
APPENDIX 2011 May
Page 72 sur 73
FIG 3 The last tab
FIG 4
MODIFIED ICONS IN THE LAST TAB
First Note the way you can get a grid without obtrusive crossings : in the contextual menu
choose the smallest dimensions for the width and length of the crossings. (That is why a new
option was added in the contextual menu – see FIG 5 )
1
PDF This create a .pdf file in the Working Repertory ( Configuration ). This PDF
contains the characteristics of the knots, the codes and the grid.
2
Init HP ( put HP number to zero) This reset the HP number to ZERO
3
One of the two blue arrows icons was suppressed ( the one for forward )
4 The POST-IT icon is now this one and in the text on the POST-IT now appears the whole
count of Over and Under for the knot on the screen so that just a glance allow to know in
which configuration user is.
RKBuilder USER’s TIPS Copyright : Claude HOCHET
Copyright Claude HOCHET
APPENDIX 2011 May
Page 73 sur 73
FIG 5 New option in contextual menu
Checking this option WITHOUT CROSSings is « this session only » (until un-checking ) as it is
not saved in the Configuration file.
RKBuilder USER’s TIPS Copyright : Claude HOCHET