1
Introduction to Operating Systems Abstractions
Using Plan 9 from Bell Labs
(Draft 9/28/2007)
Francisco J Ballesteros
Copyright © 2006 Francisco J Ballesteros
Plan 9 is Copyright © 2002 Lucent Technologies Inc. All Rights Reserved.
Preface
Using effectively the operating system is very important for anyone working with computers. It can
be the difference between performing most tasks by hand, and asking the computer to perform them.
Traditionally, Operating Systems courses used UNIX to do this. However, today there is no such
thing as UNIX. Linux is a huge system, full of inconsistencies, with programs that do multiple tasks and do
not perform them well. Linux manual pages just cannot be read.
These lecture notes use Plan 9 from Bell Labs to teach a first (practical!) course on operating systems. The system is easy to use for programmers, and is an excellent example of high-quality system design
and software development. Studying its code reveals how simplicity can be more effective than contortions
made by other systems.
The first Operating Systems course at Rey Juan Carlos University is focused on practice. Because in
theory, theory is like practice, but in practice it is not. What is important is for you to use the system, and
to learn to solve problems. Theory will come later to fill the gaps and try to give more insight about what a
system does and how can it be used.
The whole text assumes that you have been already exposed to computer, and used at least a computer running Windows. This is so common that it makes no sense to drop this assumption. Furthermore,
we assume that you already know how to write programs. This is indeed the case for the lecture this text is
written for. One last assumption is that you attended a basic computer architecture course, and you know at
least basic concepts. There is a quick review appendix in case you need to refresh your memory.
Through the text, the boldface font is used when a new concept is introduced. This will help you to
make quick reviews and to double check that you know the concepts. All important concepts are listed in
the index, at the end of the book. The constant width teletype font is used to refer to machine data,
including functions, programs, and symbol names. In many cases, text in constant width font reproduces a
session with the system (e.g., typing some commands and showing their output). The text written by the
user (and not by the computer) is slightly slanted, but still in constant width. Note the difference with
respect to the font used for text written by a program, which is not slanted. Italics are used to emphasize
things and to refer to the system manual, like in intro(1). Regarding numeric values, we use the C notation
to represent hexadecimal and octal numeric bases.
Unlike in most other textbooks for operating systems courses, bibliographic references are kept to the
bare minimum. We cite a particular text when we think that it may be worth reading to continue learning
about something said in this book. So, do not quickly dismiss references. We encourage you to read them,
to learn more. There are not so many ones. If you want to get a thorough set of references for something
discussed in the test, we suggest looking at a more classical operating systems textbook, like for example
[1].
It is important to note that this book is not a reference for using an operating system nor a reference
for Plan 9 from Bell Labs. The user’s manual that comes installed within the system is the proper reference
to use. These lecture notes just shows you how things work, by using them. Once you have gone through
the course, you are expected to search and use the user’s manual as a reference.
One final note of caution. This text is to be read with a computer side by side. The only way to learn
to use a system is by actually using it. Reading this without doing so is meaningless.
I am grateful go to other colleagues who suffered or helped in one way or another to write this book.
First, authors of Plan 9 from Bell Labs made an awesome system, worth describing for an Operating Systems Course. It cannot be overemphasized how much help the authors of Plan 9 provide to anyone asking
-2-
questions in the 9fans list. For what is worth, I have to say that I am deeply grateful to people like Rob
Pike, Dave Presotto, Jim McKie, Russ Cox, and many others. In particular, Russ Cox seems to be a program listening for questions at 9fans, at least his response time suggests that. I have learned a lot from
you all (or I tried). Other colleagues from Rey Juan Carlos University helped me as well. Pedro de las
Heras was eager to get new drafts for this manuscript. Sergio Arévalo was an unlimited supply of useful
comments and fixes for improving this book, specially for using it as a textbook. José Centeno was scared
to hell after reading our initial description of computer networks, and helped to reach a much better description.
Francisco J. Ballesteros
Laboratorio de Sistemas,
Rey Juan Carlos University of Madrid
Madrid, Spain
2006
Table of Contents
1.
Getting started
1.1.
1.2.
1.3.
1.4.
1.5.
1.6.
1.7.
1.8.
1.9.
1.10.
1.11.
1.12.
1.13.
1.14.
2.
Programs and Processes
2.1.
2.2.
2.3.
2.4.
2.5.
2.6.
2.7.
2.8.
3.
4.
5.
55
55
60
64
65
67
72
75
83
Running a new program
Process creation
Shared or not?
Race conditions
Executing another program
Using both calls
Waiting for children
Interpreted programs
Communicating Processes
5.1.
5.2.
5.3.
5.4.
5.5.
5.6.
29
31
35
40
42
45
47
49
Input/Output
Write games
Read games
Creating and removing files
Directory entries
Listing files in the shell
Buffered Input/Output
Parent and Child
4.1.
4.2.
4.3.
4.4.
4.5.
4.6.
4.7.
4.8.
1
3
6
6
8
10
12
15
18
20
22
24
25
25
29
Processes
Loaded programs
Process birth and death
System call errors
Environment
Process names and states
Debugging
Everything is a file!
Files
3.1.
3.2.
3.3.
3.4.
3.5.
3.6.
3.7.
1
What is an Operating System?
Entering the system
Leaving the system
Editing and running commands
Obtaining help
Using files
Directories
Files and data
Permissions
Writing a C program in Plan 9
The Operating System and your programs
Where are the files?
The Shell, commands, binaries, and system calls
The Operating System and the hardware
Input/Output redirection
Conventions
Other redirections
Pipes
Using pipes
Notes and process groups
83
84
88
91
91
93
94
97
101
101
106
106
107
112
117
-2-
5.7.
5.8.
5.9.
6.
Reading, notes, and alarms
The file descriptor bulletin board
Delivering messages
Network communication
6.1.
6.2.
6.3.
6.4.
6.5.
6.6.
7.
8.
9.
10.
11.
179
179
180
183
186
190
193
198
201
201
205
210
214
219
224
229
Synchronization
Locks
Queueing locks
Rendezvous
Sleep and wakeup
Shared buffers
Other tools
Threads and Channels
11.1.
153
155
157
158
159
164
166
167
169
170
172
174
Regular expressions
Sorting and searching
Searching for changes
AWK
Processing data
File systems
Concurrent programming
10.1.
10.2.
10.3.
10.4.
10.5.
10.6.
10.7.
153
Programs are tools
Lists
Simple things
Real programs
Conditions
Editing text
Moving files around
More tools
9.1.
9.2.
9.3.
9.4.
9.5.
9.6.
135
139
141
144
150
151
Resource fork
Protecting from notes
Environment in shell scripts
Independent children
Name spaces
Local name space tricks
Device files
Unions
Changing the name space
Using names
Sand-boxing
Distributed computing revisited
Using the Shell
8.1.
8.2.
8.3.
8.4.
8.5.
8.6.
8.7.
135
Network connections
Names
Making calls
Providing services
System services
Distributed computing
Resources, Files, and Names
7.1.
7.2.
7.3.
7.4.
7.5.
7.6.
7.7.
7.8.
7.9.
7.10.
7.11.
7.12.
120
123
125
Threads
229
232
239
246
248
252
255
261
261
-3-
11.2.
11.3.
11.4.
11.5.
11.6.
12.
Thread names
Channels
I/O in threaded programs
Many to one communication
Other calls
User Input/Output
12.1.
12.2.
12.3.
12.4.
12.5.
12.6.
12.7.
12.8.
12.9.
13.
14.
289
292
295
298
300
303
309
312
313
321
Disk storage
The file system protocol
Semaphores for Plan 9
Speaking 9P
9P requests
Semaphores
Semaphores as files
A program to make things
Debugging and testing
Security
14.1.
14.2.
14.3.
14.4.
14.5.
14.6.
14.7.
14.8.
289
Console input
Characters and runes
Mouse input
Devices for graphics
Graphics
A graphic slider
Keyboard input
Drawing text
The window system
Building a File Server
13.1.
13.2.
13.3.
13.4.
13.5.
13.6.
13.7.
13.8.
13.9.
264
269
274
277
285
Secure systems
The local machine
Distributed security and authentication
Authentication agents
Secure servers
Identity changes
Accounts and keys
What now?
321
325
331
332
336
338
341
349
354
357
357
358
359
362
368
371
374
375
-4-
1 Getting started
______
1.1. What is an Operating System?
The operating system is the software that lets you use the computer. What this means depends
on the user’s perspective. For example, for my mother, the operating system would include not
just Windows, but most programs in the computer as well. For a programmer, many applications
are not considered part of the system. However, he would consider compilers, libraries, and other
programming tools as part of it. For a systems programmer, the software considered part of the
system might be even more constrained. We will get back to this later.
This book aims to teach you how to effectively use the system (in many cases, we say just
system to refer to the operating system). This means using the functions it provides, and the
programs and languages that come with it to let the machine do the job. The difference between
ignoring how to ask the system to do things and knowing how to do it, is the difference between
requiring hours or days to accomplish many tasks and being able to do it in minutes. You have to
make your choice. If you want to read a textbook that describes the theory and abstract concepts
related to operating systems, you may refer to [1].
So, what is an operating system? It is just a set of programs that lets you use the computer.
The point is that hardware is complex and is far from the concepts you use as a programmer.
There are many different types of processors, hardware devices for Input/Output (I/O), and other
artifacts. If you had to write software to drive all the ones you want to use, you would not have
time to write your own application software. The concept is therefore similar to a software
library. Indeed, operating systems begun as libraries used by people to write programs for a
machine.
When you power up the computer, the operating system program is loaded into memory.
This program is called the kernel. Once initialized, the system program is prepared to run user
programs and permits them use the hardware by calling into it. From this point on, you can think
about the system as a library. There are three main benefits that justify using an operating system:
1
You don’t have to write the operating system software yourself, you can reuse it.
2
You can forget about details related to how the hardware works, because this library provides more abstract data types to package services provided by the hardware.
3
You can forget about how to manage and share the hardware among different programs in
the same computer, because this library has been implemented for use with multiple programs simultaneously.
Most of the programs you wrote in the past used disks, displays, keyboards, and other devices.
You did not have to write the software to drive these devices, which is nice. This argument is so
strong that nothing more should have to be said to convince you. It is true that most programmers
underestimate the effort made by others and overestimate what they can do by themselves. But
surely you would not apply this to all the software necessary to let you use the hardware.
Abstract data types are also a convenience to write software. For example, you wrote programs using files. However, your hard disk knows nothing about files. Your hard disk knows
how to store blocks of bytes. Even more, it only knows about blocks of the same size. However,
you prefer to use names for a piece of persistent data in your disk, that you imagine as contiguous
storage nicely packaged in a file. The operating system invents the file data type, and provides
you with operations to handle objects of this type. Event the file’s name is an invention of the
system.
This is so important, that even the hardware does this. Consider the disk. The interface
used by the operating system to access the disk is usually a set of registers that permits transferring blocks of bytes from the disk to main memory and vice-versa. The system thinks that blocks
are contiguous storage identified by an index, and therefore, it thinks that the disk is an array of
-2blocks. However, this is far from being the truth. Running in the circuitry of a hard disk there is a
plethora of software inventing this lie. These days, nobody (but for those working for the disk
manufacturer) knows really what happens inside your disk. Many of them use complex geometries to achieve better performance. Most disks have also memory used to cache entire tracks.
What old textbooks say about disks is no longer true. However, the operating system still works
because it is using its familiar disk abstraction.
Using abstract data types instead of the raw hardware has another benefit: portability. If the
hardware changes, but the data type you use remains the same, your program would still work.
Did your programs using files still work when used on a different disk?
Note that the hardware may change either because you replace it with more modern one, or
because you move your program to a different computer. Because both hardware and systems are
made with backward-compatibility in mind, which means that they try hard to work for programs written for previous versions of the hardware or the system. Thus, it might even be unnecessary to recompile your program if the basic architecture remains the same. For instance, your
Windows binaries would probably work in any PC you might find with this system. When they
do not work, it is probably not because of the hardware, but due to other reasons (a missing
library in the system or a bug).
This is the reason why operating systems are sometimes called (at least in textbooks) a
virtual machine. They provide a machine that does not exist, physically, hence it is virtual. The
virtual machine provides files, processes, network connections, windows, and other artifacts
unknown to the bare hardware.
With powerful computers like the ones we have today, most machines are capable of executing multiple programs simultaneously. The system makes it easy to keep these programs running, unaware of the underlying complexity resulting from sharing the machine among them.
Did you notice that it was natural for you to write and execute a program as if the computer
was all for itself? However, I would say that at least an editor, a web browser, and perhaps a
music player were executing at the same time. The system decides which parts of the machine,
and at which times, are to be used by each program. That is, the system multiplexes the maching
among different applications. The abstractions it provides try to isolate one executing program
from another, so that you can write programs without having to consider all the things that happen inside your computer while they run.
Deciding which resources are used by which running programs, and administering them is
called, not surprisingly, resource management. Therefore the operating system is also a resource
manager. It assigns resources to programs, and multiplexes resources among programs.
Some resources must be multiplexed on space, i.e. different parts of the resource are given
to different programs. For example, memory. Different programs use different parts of your
computer’s memory. However, other resources cannot be used by several programs at the same
time. Think on the processor. It has a set of registers, but a compiled program is free to use any
of them. What the system does is to assign the whole resource for a limited amount of time to a
program, and then to another one in turn. In this case, the resource is multiplexed on time.
Because machines are so fast, you get the illusion that all the programs work nicely as if the
resource was always theirs.
People make mistakes, and programs have bugs. A bug in a program may bring the whole
system down if the operating system does not take countermeasures. However, the system is not
God, and magic does not exist (or does it?). Most systems use hardware facilities to protect executing programs, and files, from accidents.
For example, one of the first things that the system does is to protect itself. The memory
used to keep the system program is marked as privileged and made untouchable by nonprivileged software. The privilege-level is determined by a bit in the processor and some information given to the hardware. The system runs with this bit set, but your programs do not. This
means that the system can read the memory used by your program, but not the other way around.
Also, each program can read and write only its own memory (assigned to it by the system). This
-3means that a misleading pointer in a buggy program would not affect other programs. Did you
notice that when your programs crash the other programs seem to remain unaffected? Can you say
why?
To summarize, the operating system is just some software that provides convenient abstractions to write programs without dealing with the underlying hardware by ourselves. To do so, it
has to manage the different resources to assign them to different programs and to protect ones
from others. In any case, the operating system is just a set of programs, nothing else.
1.2. Entering the system
In this course you will be using Plan 9 from Bell Labs. There is a nice paper that describes the
entire system in a few pages [2]. All the programs shown in this book are written for this operating system. Before proceeding, you need to know how to enter the system, edit files and run
commands. This will be necessary for the rest of this book. One word of caution, if you know
UNIX, Plan 9 is not UNIX, you should forget what you assume about UNIX while using this system.
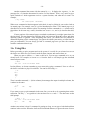
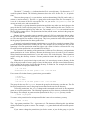
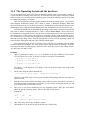
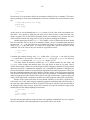
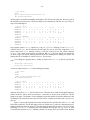
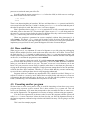
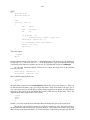
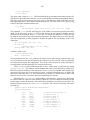
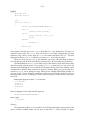
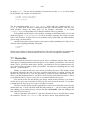
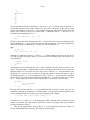
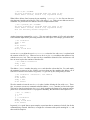
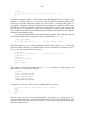
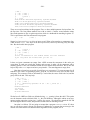
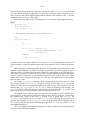
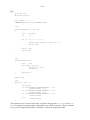
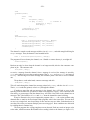
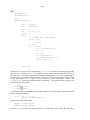
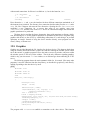
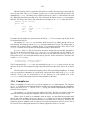
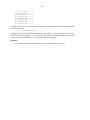
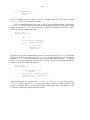
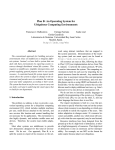
In a Plan 9 system, you use a terminal to perform your tasks. The terminal is a machine
that lets you execute commands by using the screen, mouse, and keyboard as input/output
devices. See figure 1.1. A command is simply some text you type to ask for something. Most
likely, you will be using a PC as your terminal. The window system, the program that implements and draws the windows you see in the screen, runs at your terminal. The commands you
execute, which are also programs, run at your terminal. Editing happens at your terminal. However, none of the files you are using are stored at your terminal. Your terminal’s disk is not used
at all. In fact, the machine might be diskless!
...
...
...
...
...
...
network
...
.
...
Command execution,
Window system, ...
...
....
network
...
.
....
....
...
...
....
....
...
...
...
.
. .. .
....
Files,
Accounts, ...
Command execution,
Window system, ...
Figure 1.1: You terminal provides you with a window system. Your files are not there.
There is one reason for doing this. Because your terminal does not keep state (i.e., data in your
files), it can be replaced at will. If you move to a different terminal and start a session there, you
will see the very same environment you saw at the old terminal. Because terminals do not keep
state, they are called stateless. Another compelling reason is that the whole system is a lot easier
to administer. For example, none of the terminals at the university had to be installed or customized to be used with Plan 9. There is nothing to install because there is no state to keep within
the terminal, remember?
Your files are kept at another machine, called the file server. The reason for this name is
that the machine serves (i.e., provides) files to other machines in the network. In general, in a
-4network of computers (or programs) a server is a program that provides any kind of service (e.g.,
file storage). Other programs order the server to perform operations on its files, for example, to
store new files or retrieve data. These programs placing orders on the server are called clients. In
general, a client sends a message to a server asking it to perform a certain task, and the server
replies back to the client with the result for the operation.
To use Plan 9, you must switch on your terminal. Depending on the local installation, you
may have to select PXE as the boot device (PXE is a facility that lets the computer load the system from the network). But perhaps the terminal hardware has been configured to boot right from
the network and you can save this step. Once the Plan 9 operating system program (you know, the
kernel) has been loaded into memory, the screen looks similar to this:
PBS...
Plan 9
cpu0: 1806MHz GenuineIntel P6 (cpuid: AX 0x06D8 DX 0xFE9FBBF)
ELCR: 0E20
#l0: AMD79C970: 10Mbps port 0x1080 irq 10: 000c292839fc
#l1: AMD79C970: 10Mbps port 0x1400 irq 9: 000c29283906
#U/usb0: uhci: port 0x1060 irq 9
512M memory: 206M kernel data, 305M user, 930M swap
root is from (local, tcp)[tcp]:
There are various messages that show some information about your terminal, including how
much memory you have. Then, Plan 9 asks you where do you want to take your files from. To do
so, it writes a prompt, i.e., some text to let you know that a program is waiting for you to type
something. In this prompt, you can see tcp between square brackets. That is the default value
used if you hit return without further typing. Replying tcp to this prompt means to use the TCP
network protocol to reach the files kept in the machine that provides them to your terminal
(called, the file server). Usually, you just have to hit return at this stage. This leads to another
prompt, asking you to introduce your user name.
You may obtain a user name by asking the administrator of the Plan 9 system to provide
one for you (along with a password that you will have to specify). This is called opening an
account. In this example we will type nemo as the user name. What follows is the dialog with
the machine to enter the system.
user[none]: nemo
time...version...
!Adding key: dom=dat.escet.urjc.es proto=p9sk1
user[nemo]: Return
password: type your password here and press return
!
This dialog shows all conventions used in this book. Text written by the computer (the system, a
program, ...) is in constant width font, like in user[none]. Text you type is in a slightly
slanted variant of the same font, like in nemo. When the text you type is a special key not shown
in the screen, we use boldface, like in Return. Any comment we make is in italics, like in type
your password. Now we can go back to how do we enter the system.
At the user prompt, you told your terminal who you are. Your terminal trusts you. Therefore, there is no need to give it a password. At this point you have an open account at your terminal! This is to say that you now have a program running on your name in the computer. By the
way, entering the system is also called loging into the system. Leaving the system is called usually loging out.
However, the file server needs some proof to get convinced that you are who you say you
are. That is why you will get immediately two more prompts: one to tell you user name at the file
server, and one to ask for your secret password for that account. Usually, the user name for your
account in the file server is also that used in the terminal, so you may just hit return and type your
password when prompted.
-5If you come from UNIX, beware not to type your password immediately after you typed
your user name for the first time. That would be the file server user name, and not the password.
All your password would be in the clear in the screen for anyone to read.
You are in! If this is the first time you enter a Plan 9 system you have now the prompt of a
system shell (after several error messages). A shell is a program that lets you execute commands
in the computer. In Windows, the window system itself is the system shell. There is another shell
in Windows, if you execute Run command in the start menu you get a line of text where you
can type commands. That is a command line.
At this point in your Plan 9 session, you can also type commands to the shell that is running
for you. The shell is a program, rc in this case, that writes a prompt, reads a command (text) line,
executes it, waits for the command to complete, and then repeats the whole thing.
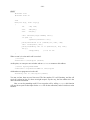
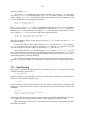
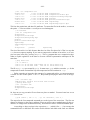
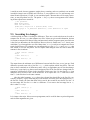
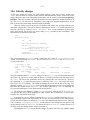
The shell prompt may be term%, or perhaps just a semicolon (which is the prompt we use
in this book). Because you never entered the system, and because your files are yours, nobody
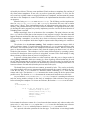
created a few files necessary to automatically start the window system when you enter the system.
This is why you got some error messages complaining about some missing files. The only file
created for you was a folder (we use the name directory) where you can save your files. That
directory is your home directory.
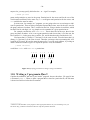
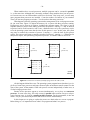
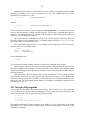
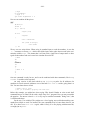
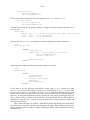
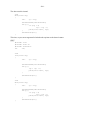
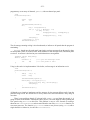
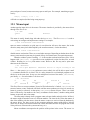
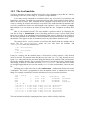
Figure 1.2: Your terminal after entering rio. Isn’t it a clean window system?
Proceeding is simple. If you execute
; /sys/lib/newuser
the newuser program will create a few files for you and start rio, the Plan 9 window system.
To run this command, type /sys/lib/newuser and press return. All the commands are executed that way, you type them at the shell prompt and press return.
Running newuser is only necessary the first time you enter the system. Once executed,
this program creates for you a profile file that is executed when you enter the system, and
starts rio for you. The profile for the user nemo is kept in the file
/usr/nemo/lib/profile. Users are encouraged to edit their profiles to add any command
they want to execute upon entering the system, to customize the environment for their needs. To
let you check if things went right, figure 1.2 shows your screen once rio started.
-6-
1.3. Leaving the system
To leave your terminal you have all you need. Press the terminal power button (don’t look at the
window system for it) and switch it off. Because the files are kept in the file server, any file you
changed is already kept safe in the file server. Your terminal has nothing to save. You can switch
it off at any time.
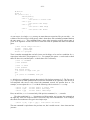
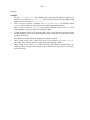
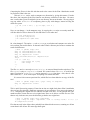
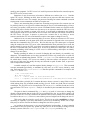
1.4. Editing and running commands
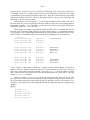
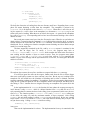
The window system is a program that can be used to create windows. Initially, each window runs
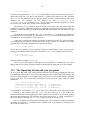
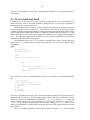
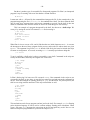
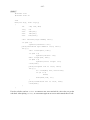
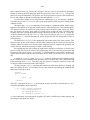
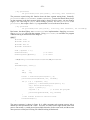
the Plan 9 shell, another program called rc. To create a window you must press the right mouse
button (button-3) and hold it. A menu appears and you can move the mouse (without releasing the
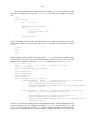
button) to select a particular command. You can select New (see figure 1.3) by releasing the
mouse on top of that command.
Because rio is now expecting one argument, the pointer is not shown as an arrow after
executing New, it is shown as a cross. The argument rio requires is the rectangle where to show
the window. To provide it, you press button-3, then sweep a rectangle in the screen (e.g., from the
upper left corner to the bottom right one), and then release button-3. Now you have your shell.
The other rio commands are similar. They let you resize, move, delete, and hide any window.
All of them require that you identify which window is to be involved. That is done by a single
button-3 click on the window. Some of them (e.g., Resize) require that you provide an additional rectangle (e.g., the new one to be used after the resize). This is done as we did before.
Figure 1.3: The rio menu for mouse button-3.
The window system uses the real display, keyboard, and mouse, to provide multiple (virtual)
ones. A command running at a window thinks that it has the real display, keyboard, and mouse.
That is far from being the truth! The window system is the one providing a fake set of display,
keyboard, and mouse to programs running in that window. You see that a window system is simply a program that multiplexes the real user I/O devices to permit multiple programs to have their
own virtual ones.
It will not happen in a while, but in the near future we will be typing many commands in a
window. As commands write text in the window, it may fill up and reach the last (bottom) line in
the window. At this point, the window will not scroll down to show more text unless you type the
down arrow key, , in the window. The up arrow key, , can be used to scroll up the window.
-7You can edit all the text in the window. However, commands may be typed only at the end. You
can always use the mouse to click near the end and type new commands if you changed. The
Delete key can be used to stop a command, should you want to do so.
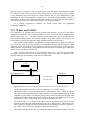
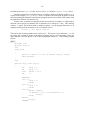
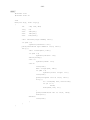
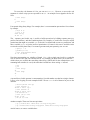
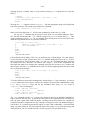
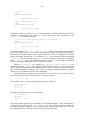
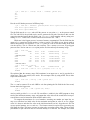
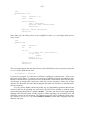
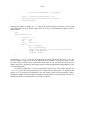
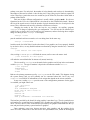
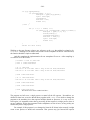
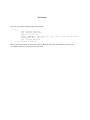
To edit files, and also to run commands and most other things (hence its name), we use
acme, a user interface for programmers developed by Rob Pike. When you run acme in your
new window it would look like shown in figure 1.4. Just type the command name, in the new
window (which has a shell accepting commands) and press return.
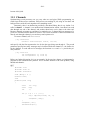
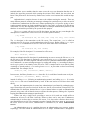
Figure 1.4: Acme: used to edit, browse system files, and run commands.
As you can see, acme displays a set of windows using two columns initially. Acme is
indeed a window system! Each window in acme shows a file, a folder, or the output of commands. In the figure, there is a single window showing the directory (remember, this is the name
we use for folders) /usr/nemo. For Nemo, that is the home directory. As you can see, the horizontal text line above each window is called the tag line for the window. In the figure, the tag
line for the window showing /usr/nemo contains the following text:
/usr/nemo Del Snarf Get | Look
Each tag line contains on the left the name of the file or directory shown. Some other words follow, which represent commands (buttons!). For example, our tag line shows the commands Del,
Snarf, Get, and Look.
Within acme, the mouse left mouse button (button-1) can be used to select a portion of text,
or to change the insertion point (the tiny vertical bars) where text is to be inserted. All the text
shown can be edited. If we click before Look with the left button, do not move the mouse, and
type Could, the tag line would now contain:
/usr/nemo Del Snarf Get | Could Look
The button-1 can be also used to drag a window and move it somewhere else, to adjust its position. This is done by dragging the tiny square shown near the left of the tag line for the window.
Resizing a window is done in the same way, but a single click with the middle button (button-2)
in the square can maximize a window if you need more space. The shaded boxes near the top-left
corner of each column can be used in the same way, to rearrange the layout for entire columns.
The middle button (button-2) is used in acme to execute commands. Those shown in the figure are understood by acme itself. For example, a click with the button-2 on Del in our tag line
-8would execute Del (an acme command), and delete the window. Any text shown by acme can be
used as a command. For commands acme does not implement, Plan 9 is asked to execute them.
Some commands understood by acme are Del, to delete the window, Snarf, to copy the
selected text to the clipboard, Get, to reread the file shown (and discard your edits), and Put, to
store your edits back to the file. Another useful command is Exit, to exit from acme. For example, to create a new file with some text in it:
1
Execute Get with a button-2 click on that word. You get a new window (that has no file
name).
2
Give a name to the file. Just click (button-1) near the left of the tag line for the new window
and type the file name where it belongs. The file name typed on the left of the tag line is
used for acme to identify which file the window is for. For example, we could type
/usr/nemo/newfile (you would replace nemo with your own user name).
3
Point to the body of the window and type what you want.
4
Execute Put in that window. The file (whose name is shown in the tag line) is saved.
You may notice that the window for /usr/nemo is not showing the new file. Acme only does
what you command, no more, no less. You may reload that window using Get and the new file
should appear.
The right button (button-3) is used to look for things. A click with the button on a file name
would open that file in the editor. A click on a word would look for it (i.e., search for it) in the
text shown in the window.
Keyboard input in acme goes to the window where the pointer is pointing at. To type at a
tag line, you must place the pointer on it. To type at the body of a window, you must point to it.
This is called point to type. Note that in rio things are different. Input goes to the window where
you did click last. This is called click to type.
Although you can use acme to execute commands, we will be using a rio window for that in
this book, to make it clear when you are executing commands and to emphasize that doing so has
nothing to do with acme.
But to try it at least once, type date anywhere in acme (e.g., in a tag line, or in the window
showing your home directory. Then execute it (again, by a click with button-2 on it). You will see
how the output of date is shown in a new window. The new window will be called
/usr/nemo+Errors. Acmes creates windows with names terminated in +Errors to display
output for commands executed at the directory whose name precedes the +Errors. In this case,
to display output for commands executed at /usr/nemo. If you do not know what at means
in the last sentences, don’t worry. Forget about it for a while.
There is a good description of Acme in [3], although perhaps a little bit too detailed for us at
this moment. It may be helpful to read it ignoring what you cannot understand, and get back to it
later as we learn more things.
1.5. Obtaining help
Most systems include their manual on-line, for users to consult. Plan 9 is not an exception. The
Plan 9 manual is available in several forms. From the web, you can consult
http://plan9.bell-labs.com/sys/man for a web version of the manual. At Rey Juan
Carlos University, we suggest you use http://plan9.lsub.org/sys/man instead, which
is our local copy.
And there is even more help available in the system! The directory /sys/doc, also available at http://plan9.bell-labs.com/sys/doc, contains a copy of most of the papers
relevant for the system. We will mention several of them in this book. And now you know where
to find them.
The manual is divided in sections. Each manual page belongs to a particular section
-9depending on its topic. For us, it suffices to know that section 1 is for commands, section 8 is for
commands not commonly used by users (i.e., they are intended to administer the system), and
section 2 is for C functions and libraries. To refer to a manual page, we use the name of the page
followed by the section between parenthesis, as in acme(1). This page refers to a command,
because the section is 1, and the name for the page (i.e., the name of the command) is acme.
From the shell, you can use the man command to access the system manual. If you don’t
know how to use it, here is how you can learn to do it.
; man man
Asks the manual to give its own manual page.
; man man
MAN(1)
Plan 9 4th edition
MAN(1)
NAME
man, lookman, sig - print or find pages of this manual
SYNOPSIS
man [ -bnpPStw ] [ section ... ] title ...
lookman key ...
sig function ...
DESCRIPTION
Man locates and prints pages of this manual named title in
the specified sections. Title is given in lower case. Each
....
As you can see, you can give to man the name of the program or library function you are interested in. It displays a page with useful information. If you are doing this in the shell, you can use
the down arrow key, , to page down the output. To read a manual page found at a particular
section, you can type the section number and the page name after the man command, like in
; man 1 ls
If you look at the manual page shown above, you can see several sections. The synopsis section
of a manual page is a brief indication on how to use the program (or how to call the function if
the page is for a C library). This is useful once you know what the program does, to avoid rereading the page again. In the synopsis for commands, words following the command name are
arguments. The words between square brackets are optional. They are called options. Any option
starting with - represents individual characters that may be given as flags to change the program behavior. So, in our last example, 1 and ls are options for man, corresponding to section
and title in the synopsis of man(1).
The description section explains all you need to know to use the program (or the C functions). It is suggested to read the manual page for commands the first time you use them. Even if
someone told you how to use the command. This will always help in the future, when you may
need to use the same program in a slightly different way. The same happens for C functions.
The source section tells you where to find the source code for programs and libraries. It will
be of great value for you to read as much source as you can from this system. Programming is an
art, and the authors of this system dominate that art well. The best way for you to quickly
become an artist yourself is to study the works of the best ones. This is a good opportunity.
From time to time you will imagine that there must be a system command to do something,
or a library function. To search for it, you may use lookman, as the portion of man(1) reproduced before shows. Using lookman is to the manual what using search engines (e.g., Google)
is to the Web. You don’t know how to use the manual if you don’t know how to search it well.
- 10 Another command that comes with the manual is sig. It displays the signature, i.e., the
prototype for a C function documented in section 2 of the manual. That is very useful to get a
quick reminder of which arguments receives a system function, and what does it return. For
example,
; sig chdir
int chdir(char *dirname)
When a new command or function appears in this book, it may be of help for you to take a look at
its manual page. For example, intro(1) is a kind introduction to Plan 9. The manual page rio(1)
describes how to use the window system. The meaning of all the commands in rio menus can be
found there. In the same way, acme(1) describes how to use acme, and rc(1) describes the shell,
rc.
If some portions of the manual pages seem hard to understand, you might ignore them for
the time being. This may happen for some time while you learn more about the system, and about
operating systems in general. After completing this course, you should have no problem to
understand anything said in a manual page. Just ignore the obscure parts and try to learn from the
parts you understand. You can always get back to a manual page once you have the concepts
needed to understand what it says.
1.6. Using files
Before proceeding to write programs and use the system, it is useful for you to know how to use
the shell to see which files you created, search for them, rename, and remove them, etc.
When you open a window, rio starts a shell on it. You can type commands to it, as you
already know. For example, to execute date from the shell we can simple type the command
name and press return:
; date
Sat Jul
8 01:13:54 MDT 2006
In what follows, we do not remember to press return after typing a command. Now we will use
the shell in a window to play a bit with files. You can list files using ls:
; ls
bin
lib
tmp
;
There is another command, lc (list in columns), that arranges the output in multiple columns, but
is otherwise the same:
; lc
bin
;
lib
tmp
If you want to type several commands in the same line, you can do so by separating them with a
semicolon. The only ; we typed here is the one between date and lc. The other ones are the
shell prompt:
; date ; lc
Sat Jul 8 01:18:54 MDT 2006
bin
lib
tmp
;
Another convenience is that if a command is getting too long, we can type a backslash and then
continue in the next line. When the shell sees the backslash character, it ignores the start of a new
- 11 line and pretends that you typed an space instead of pressing return.
; date ; \
;;
date ; \
;;
date
Sat Jul 8 01:19:54 MDT 2006
Sat Jul 8 01:19:54 MDT 2006
Sat Jul 8 01:19:54 MDT 2006
;
The double semicolon that we get after typing the backslash and pressing return is printed by the
shell, to prompt for the continuation of the previous line (prompts might differ in your system).
By the way, backslash, \, is called an escape character because it can be used to escape from the
special meaning that other characters have (e.g., to escape from the character that starts a new
line).
We can create a file by using acme, as you know. To create an empty file, we can use
touch, and then lc to see our outcome.
; touch hello
; lc
bin
hello
;
lib
tmp
The lc command was not necessary, of course. But that lets you see the outcome of executing
touch. In the following examples, we will be doing the same to show what happens after executing other commands.
Here, we gave an argument to the touch command: hello. Like functions in C, commands accept arguments to give parameters to them. Command arguments are just strings.
When you type a command line, the shell breaks it into words separated by white space (spaces
and tabs). The first word identifies the command, and the following ones are the arguments.
We can ask ls to give a lot of information about hello. But first, lets list just that file.
As you see, ls lists the files you give as arguments. Only if you don’t supply a file name, all files
are listed.
; ls hello
hello
;
We can see the size of the file we created giving an option to ls. An option is an argument that
is used to change the default behavior of the command. Some options specify certain flags to
adjust what the command does. Options that specify flags always start with a dash sign, -. The
option -s of ls can be used to print the size along with the file name:
; ls -s hello
0 hello
;
Touch created an empty file, therefore its size is zero.
You will be creating files using acme. Nevertheless, you may want to copy an important file
so that you don’t loose it by accidents. We can use cp to copy files:
; cp hello goodbye
; lc
bin
goodbye hello
;
lib
tmp
We can now get rid of hello and remove it, to clean things up.
- 12 ; rm hello
; lc
bin
goodbye lib
;
tmp
Many commands that accept a file name as an argument also accept multiple ones. In this case,
they do what they know how to do to all the files given:
; lc
bin
goodbye lib
tmp
; touch mary had a little lamb
; lc
a
goodbye lamb
little
bin
had
lib
mary
; rm little mary had a lamb
; lc
bin
goodbye lib
tmp
tmp
Was rm very smart? No. For rm, the names you gave in the command line were just names for
files to be removed. It did just that.
A related command lets you rename a file. For example, we can rename goodbye to
hello again by using mv (move):
; mv goodbye GoodBye
; lc
GoodBye bin
lib
;
tmp
Let’s remove the new file.
; rm goodbye
rm: goodbye: ’goodbye’ file does not exist
What? we can see it! What happens is that file names are case sensitive. This means that
GoodBye, goodbye, and GOODBYE are entirely different names. Because rm could not find the
file to be removed, it printed a message to tell you. We should have said
; rm GoodBye
; lc
bin
lib
tmp
In general, when a command can do its job, it prints nothing. If it completes and does not complaint by printing a diagnostic message, then we know that it could do its job.
Some times, we may want to remove a file and ignore any errors. For example, we might
want to be sure that there is no file named goodbye, and would not want to see complaints from
rm when the file does not exist (and therefore cannot be removed). Flag -f for rm achieves this
effect.
; rm goodbye
rm: goodbye: ’goodbye’ file does not exist
; rm -f goodbye
Both command lines achieve the same effect. Only that the second one is silent.
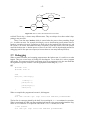
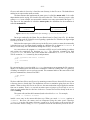
1.7. Directories
As it happens in Windows and most other systems, Plan 9 has folders. But it uses the more venerable name directory for that concept. A directory keeps several files together, so that you can
group them. Two files in two different directories are two different files. This seems natural. It
- 13 doesn’t matter if the files have the same name. If they are at different directories, they are different.
/
386
usr
tmp
nemo glenda mero
bin
lib
tmp
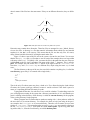
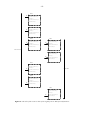
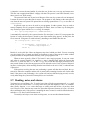
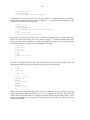
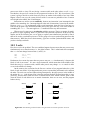
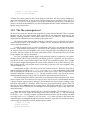
Figure 1.5: Some files that user Nemo can find in the system.
Directories may contain other directories. Therefore, files are arranged in a tree. Indeed, directories are also files. A directory is a file that contains information about which files are bounded
together in it, but that’s a file anyway. This means that the file tree has only files. Of course,
many of them would be directories, and might contain other files.
Figure 1.5 shows a part of the file tree in the system, relevant for user Nemo. You see now
that the files bin, lib, and tmp files that we saw in some of the examples above are kept within
a directory called nemo. To identify a file, you name the files in the path from the root of the tree
(called slash) to the file itself, separating each name with a slash, /, character. This is called a
path. For example, the path for the file lib shown in the figure would be /usr/nemo/lib.
Note how /tmp and /usr/nemo/tmp are different files, depite using the name tmp in both
cases.
The first directory at the top of the tree, the one which contains everything else, is called the
root directory (guess why?). It is named with a single slash, /.
; ls /
386
usr
tmp
...other files omitted...
;
That is the only file whose name may have a slash on it. If we allowed using the slash within a
file name, the system would get confused, because it would not know if the slash is part of a
name, or is separating different file names in a path.
Typing paths all the time, for each file we use, would be a burden. To make things easier for
you, each program executing in the system has a directory associated to it. It is said that the program is working in that directory. Such directory is called the current directory for the program,
or the working directory for the program.
When a program uses file names that are paths not starting with /, these paths are walked in
the tree relative to its current directory. For example, the shell we have been using in the previous examples had /usr/nemo as its current directory. Therefore, all file names we used were
relative to /usr/nemo. This means that when we used goodbye, we were actually referring to
the file /usr/nemo/goodbye. Such paths are called relative paths. By the way, paths starting with a slash, i.e., from the root directory, are called absolute paths.
- 14 Another important directory is /usr/nemo, it is called the home directory for the user
Nemo. The reason for this name is that Nemo’s files are kept within that directory, and because
the shell started by the system when Nemo logs in (the one that usually runs the window system),
is using that directory initially as its current directory. That is the reason why all the (shells running at) windows we open in rio have /usr/nemo as their initial current directory. What follows is a simple way to know which users have accounts in the system:
; lc /usr
esoriano
;
glenda
nemo
mero
paurea
There is an special file name for the current directory, a single dot: .". Therefore, we can do two
things to list the current directory in a shell
; lc
bin
; lc .
bin
;
lib
tmp
lib
tmp
Note the dot given as the file to list to the second command. When ls or lc are not given a
directory name to list, they list the current directory. Therefore, both commands print the same
output. Another special name is .., called dot-dot. It refers the parent directory. That is, it
walks up one element in the file tree. For example, /usr/nemo/.. is /usr, and
/usr/nemo/../.. is simply /.
To change the current directory in the shell, we can use the cd (change dir) command. If we
give no argument to cd, it changes to our home directory. To know our current working directory, the command pwd (print working directory) can be used. Let’s move around and see where
we are:
; cd
; pwd
/usr/nemo
; cd / ; pwd
/
; cd usr/nemo/lib ; pwd
/usr/nemo/lib
; cd ../.. ; pwd
/usr
This command does nothing. Can you say why?
; cd .
;
Now we know which one is the current working directory for commands we execute. But, which
one would be the working directory for a command executed using acme? It depends. When you
execute a command in acme, its working directory is set to be that shown in the window (or containing the file shown in the window). So, the command we executed time ago in the acme window for /usr/nemo had /usr/nemo as its working directory. if we execute a command in the
window for a file /usr/nemo/newfile, its working directory would be also /usr/nemo.
Directories can be created with mkdir (make directory), and because they are files, they can be
also removed with rm. Although, because it may be dangerous, rm refuses to remove a directory
that is not empty.
- 15 ; cd
; mkdir dir
; lc
bin
dir
; rm dir
; lc
bin
lib
;
lib
tmp
tmp
The command mv, that we saw before, can move files from one directory to another. Hence its
name. When the source and destination files are within the same directory, mv simply renames
the file (i.e., changes the name for the file in the directory).
; touch a
; lc
a
bin
; mkdir dir
; lc
a
bin
; mv a dir/b
; lc
bin
dir
; lc dir
b
;
lib
tmp
dir
lib
lib
tmp
tmp
Now we have a problem, ls can be used to list a lot of information about a file. For example, flag
-m asks ls to print the name of the user who last modified a file, along with the file name. Suppose we want to know who was the last user who created or removed a file at dir. We might do
this, but the output is not what we could perhaps expect:
; ls -m dir
[nemo] dir/b
;
The output refers to file b, and not to dir, which was the file we were interested in. The problem
is that ls, when given a directory name, lists its contents. Option -d asks ls not to list the contents, but the precise file we named:
; ls -md dir
[nemo] dir
Like other commands, cp works with more than one file at a time. It accepts more than one
(source) file name to copy to the destination file name. In this case it is clear that the destination
must be a directory, because it would make no sense to copy multiple files to a single one. This
copies the two files named to the current directory:
; cp /LICENSE /NOTICE .
; lc
LICENSE NOTICE bin
dir
lib
tmp
1.8. Files and data
Like in most other systems, in Plan 9, files contain bytes. Plan 9 does not know (nor cares) about
what is in a file. It just provides the means to let you create, remove, read, and write files. If you
store a notice in a file, it is you who knows that it is a notice. For Plan 9, that is just bytes. We
can use cat (catenate) to display what is in a file:
- 16 ; cat /NOTICE
Copyright © 2002 Lucent Technologies Inc.
All Rights Reserved
;
This program reads the files you name and prints their contents. Of course, if you name just one,
it prints just its content. If you cat a very long file in a Plan 9 terminal, beware that you might
have to press the down arrow key in your keyboard to let the terminal scroll down.
What is stored at /NOTICE? We can see a dump of the bytes kept within that file using the
program xd (hexadecimal dump). This program reads a file and writes its contents so that it is
easy for us to read. Option -b asks xd to print the contents as a series of bytes:
; xd -b /NOTICE
0000000 43 6f 70
0000010 32 20 4c
0000020 6f 67 69
0000030 69 67 68
000003f
;
79
75
65
74
72
63
73
73
69
65
20
20
67
6e
49
52
68
74
6e
65
74
20
63
73
20
54
2e
65
c2
65
0a
72
a9
63
41
76
20
68
6c
65
32
6e
6c
64
30 30
6f 6c
20 52
0a
The first column in the program output shows the offset (the position) in the file where the bytes
printed on the right can be found. This offset is in hexadecimal (we write hexadecimal numbers
starting with 0x, as done in C). For example, the byte at position 0x10, which is the byte at position 16 (decimal) has the value 0x32. This is the 17th byte! The first byte is at position zero,
which makes arithmetic more simple when dealing with offsets.
So, why does cat display text? It’s all numbers. The program cat reads bytes, and writes
them to its output. Its output is the terminal in this case, and the terminal assumes that everything
it shows is just text. The text is represented using a binary codification known as UTF-8. This format encodes runes (i.e, characters, kanjis, and other glyphs) as a sequence of bytes. For most of
the characters we use, UTF-8 uses exactly the same format used by ASCII (another standard that
codifies each character using a single byte). The program implementing the terminal (the window) decodes UTF-8 to obtain the runes to display, and renders them on the screen.
We can ask xd to do the same for the file contents. Adding option -c, the program prints
the character for each byte when feasible:
; xd -b -c /NOTICE
0000000 43 6f 70 79
0
C o p y
0000010 32 20 4c 75
10
2
L u
0000020 6f 67 69 65
20
o g i e
0000030 69 67 68 74
30
i g h t
000003f
72
r
63
c
73
s
73
s
69 67 68 74
i g h t
65 6e 74 20
e n t
20 49 6e 63
I n c
20 52 65 73
R e s
20 c2
c2
54 65
T e
2e 0a
. \n
65 72
e r
a9
a9
63
c
41
A
76
v
20 32
2
68 6e
h n
6c 6c
l l
65 64
e d
30 30
0 0
6f 6c
o l
20 52
R
0a
\n
Here we see how the value 0x43 represents the character C. If you look after the text
Copyright, you see 0xc2 0xa9, which is the UTF-8 representation for the © sign. This program does not know and all it can do is print the byte values.
Another interesting thing is shown near the end of each line in the file. After the text in the
first line, we see a \n. That is a byte with value 0x0a. The same happens at the end of the second line (the last line in the file). The syntax \n is used to represent control characters, i.e.,
characters not to be printed as text. The character \n is just a 0x0a byte stored in the file, but xd
printed it as \n to let us recognize it. This systax is understood by many programs, like for example the C compiler, which admits it to embed control characters in strings (like in "hello\n").
Control characters have meaning for many programs. That is way they seem to do things
- 17 (but of course they do not!). For example, \n is the new-line character. It can be generated
using the keyboard by pressing the Return key. When printed, it causes the current line to terminate and the following text will be printed starting at the left of the next line.
If you compare the output of xd and the output of cat you will see how each one of the
two lines in /NOTICE terminates with an end of line character that is precisely \n. That is the
convention in Plan 9 (and UNIX). The new line character terminates a line only because programs
in Plan 9 (and UNIX) follow the convention that lines terminate with a \n character. The terminal shows a new line when it finds a \n, programs that read files a line at a time decide that they
get a line when a \n character is found, etc. It is just a convention.
Windows (and its ancestor MSDOS) uses a different format to encode text lines, and terminates each line with two characters: \r\n (or carriage-return, and new-line). This comes from
the times when computers used a typewriter machine for console output. The former character,
\r, makes the carriage in the typewriter return to its left position. We have to admit, there are no
typewriters anymore. But the character \r makes the following text appear on the left of the line.
The \n character advances (the carriage, we are sorry) to the next line. That is why \n is also
known as the line-feed character. A consequence is that if you display in Plan 9 a Windows text
file, you will see one little control character at the end of each line:
; cat windowstext
This is one line#
and this is another#
;
That is the \r. Going the other way around, and displaying in Windows a text typed in Plan 9,
may produce this output
This is one line
and this is another
because Windows misses the carriage-return character.
Now that we can see the actual contents of a file, there is another interesting thing to note.
There is no EOF (end of file) character! Such thing is an invention of some programming languages. For Plan 9, the file terminates right after the last byte that has been stored on it.
Another interesting control character is the tabulator, generated pressing the Tab key in the
keyboard. It is used in text files to cause editors and terminals to advance the text following the
tabulator character to the next tab-stop. On typewriters (sorry once more), the carriage could be
quickly advanced to particular columns (called tab-stops) by hitting a Tab key. This control character achieves the same effect. Of course, there is no carriage any more and Tab advances to, say,
the next column that is a multiple of 8 (column 8, 16, etc.). This value is called the tab-width.
The file scores contains several tabs.
; cat scores
Real Madrid
Barcelona
; xd -c scores
0000000
R e
0000010
r c
000001a
1
0
a
e
l
l
o
M
n
a d
a \t
r i
0 \n
d \t
1 \n
B
a
Note how in the output for cat, the terminal tabulates the scores to form a column after the
names. The number 0 is shown right below the number 1. However, the output from xd reveals
that there are no spaces after Madrid and Barcelona. Following each name, there is a single
\t character, which is the notation for Tab. In general, \t is used to tabulate data and to indent
source code. The appearance of the output text depends on the tab width used by the editor or the
terminal (which was 8 characters in our case). The net effect is that it is a bad idea to mix spaces
and tabs to indent code or tabulate data. Depending on the editor, a single tab may displace the
- 18 following text 8, 4, 2, or any other number of characters (it depends on where the editor considers
the tab stop to be).
The point is that characters like \n, \r, and \t are control characters, with special meaning, just because there are programs that use them to represent actions and not to represent literal
text. Table 1.1 shows some usual control characters and their meaning.
___________________________________________________________
Byte value
Character Keyboard
Description
___________________________________________________________
04
control-d
end of transmission (EOT)
08
\b
Backspace
remove previous character
09
\t
Tab
horizontal tabulation
0a
\n
line feed
0d
\r
Return
carriage return
1b
Esc
escape
___________________________________________________________
Table 1.1: Some control characters understood by most systems and programs.
The table shows the usual escape syntax (a backslash and a character) used by most programs to represent control characters (including the C compiler), and how to generate the characters using the keyboard. Not all the control characters are shown and not all the cells in the table
contain information. We included just what you should know to avoid discomfort while using the
system.
To summarize, files contain just data that has no meaning per-se. Only programs and users
give meaning to data. This is what you could see here.
1.9. Permissions
Each file in Plan 9 can be secured to provide some privacy and restrict what people can do with
the file. The security mechanism to control access to files is called an access control list. This is
like the list given to security guards to let them know who are allowed to get into a party and
what are they allowed to do inside. In this case, the system is the security guard, and it keeps an
access control list (or ACL) for each file. To be more precise, the program that keeps the files,
i.e., the file server, keeps an ACL for each file.
The ACL for a file describes if the file can be read, can be written, and can be executed.
Who can be allowed by the ACL to do such things? The file server keeps a list of user names.
You had to give your user name to log into the system and access your files in the file server.
Depending on your user name, you may be allowed or not to read, write, and execute a particular
file. It depends on what the file’s ACL says.
Because it would be too inconvenient to list these permissions for all the users in the ACL
for each file, a more compact representation is used. Each file belongs to a user, the one who created it. And each user is entitled to a group of users. The ACL lists read, write, and execute permissions for the owner of the file, for any other user in the group of users, and for the rest of the
world. That is just nine permissions instead of a potentially very long list.
In the file server, each user account can be used as a group. This means that your user name
is also a group name. The group that contains just you as the only member. This is the output of
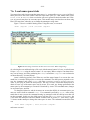
ls when called to print long listing for a file. It list permissions and ownership for the file:
; cd
; ls -l lib/profile
--rwxrwxr-x M 19 nemo nemo 1024 May 30 16:31 lib/profile
;
You see a user name listed twice. The first name is the owner for the file. It is nemo in this case.
The second name is the user group for the file, which is also nemo in this case. This group contains a single user, nemo.
- 19 The initial - printed by ls indicates that the file is a not a directory. For directories, a d
would be printed instead. The following characters show the ACL for the file, i.e., its permissions.
There are three groups of rwx permissions, each one determining if the file can be read (r),
written (w) and executed (x). The first rwx group refers to the owner of the file. For example, if r
is set on it, the owner of the file can read the file. As you see for lib/profile, nemo (its
owner) can read, write, and execute this file.
The second rwx group determines permissions applied to any other user who belongs to the
group for the file. In this case the group is also nemo, which contains just this user. The last rwx
group sets permissions applied to any other user. For example, esoriano can read and execute
this file, but he cannot write it. The permissions for him (not the owner, and not in the group) are
r-x, which mean this.
Because it does not makes sense to grant the owner of a file less permissions than to others,
the file owner has a particular permission if it is enabled for the owner, the group, or for the others. The same applies for members of the group. They have permission when either permissions
for the group or permissions for others grant access.
In general, read permission means permission to access the file to consult its contents. Write
permission means permission to modify the file. This includes not just writing the file, but also
truncating it. Execute permission means the right to ask a Plan 9 kernel to execute the file. Any
file with execution permission is an executable file in Plan 9.
For directories, the meaning of the permissions is different. For a directory, read permission
means permission to list the directory. Because the directory has to be read to list its contents.
Write permission means permission to create and remove files in the directory. These operations
require writing the directory contents. Execute permission means the right to enter, i.e., to cd
into it.
When there is a project involving several users, it is convenient to create a directory for the
files of the project and to create a group of users for that project. All files created in that directory
will be entitled to the group of users that the directory is entitled to. For example, this directory
keeps documents for a project called Plan B:
; ls -ld docs
d-rwxrwxr-x M 19 nemo planb 0 Jul
9 21:28 docs
If we create a file in that directory, permissions get reasonable:
; cd docs
; touch memo
; ls -l memo
--rw-rw-r-- M 19 nemo planb 0 Jul
9 21:30 memo
The group for the new file is planb, because the group for the directory was that one. The file
has write permission for users in the group because that was the case for the directory.
To modify permissions, the chmod (change mode) command can be used. Its first argument
grants or revocates permissions. The following arguments are files where to perform this permission change. For example, to grant execution permission for file program, you may execute
; chmod +x program
To remove write permission for an important file that is not to be overwritten, you may
; chmod -w file
The + sign grants permission. The - sign removes it. The characters following this sign indicate
which permissions to grant or remove. For example, +rx grants both read and execution permissions.
If you want to change the permissions just for the owner, or just for the group, or just for
- 20 anyone else, you may specify this before the + or - sign. For example,
; chmod g+r docs
grants read permission to users in the group. Permissions for the owner and for the rest of the
world remain unaffected. In the same way u+r would grant read permission for the owner, and
o+r would do the same for others.
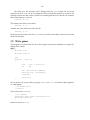
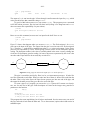
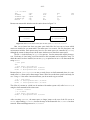
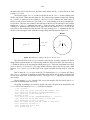
In some cases, for example, in C programs, you are going to have to use an integer to indicate file permissions. There are three permissions repeated three times, once for the user, once for
the group, and once for others. This is codified as nine bits. Using a number in octal base, which
has three bits for each digit, it is very simple to write a number for a given permission set.
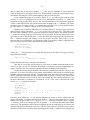
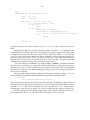
For example, consider the ACL rwxr-xr-x. That is three bits for the user, three for the
group, and three for others. A bit is set to grant permission and clear to deny it. For the user, the
bits would be 111, for the group, they would be 101, and for the others they would also be 101.
You know that 111 (binary) is 7 decimal. It is the same in octal. You also know that 101
(binary) is 5 decimal. It is the same in octal. Therefore, an integer value representing this ACL
would be 0755 (octal). We use the same format used by C to write octal numbers, by writing an
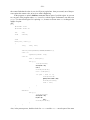
initial 0 before the number. Figure 1.6 depicts the process. Thus, the command
; chmod 755 afile
would leave afile with rwxr-xr-x permissions.
r w x
r - x
r - x
1 1 1
1 0 1
1 0 1
7
5
5
Figure 1.6: Specifying permissions as integers using octal numbers.
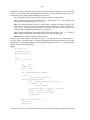
1.10. Writing a C program in Plan 9
Consider the traditional take me to your leader! programq, that we show here. We typed it into
a file named take.c. When we show a program that is stored in a particular file, the file name
is shown in a little box before the file contents.
________________
q Because we talk about Plan 9, this program is more appropriate than the one you are thinking on. If you
don’t know why, you did not use Internet to discover why this system has this name.
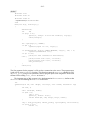
- 21 ______
take.c
#include <u.h>
#include <libc.h>
void
main(int, char*[])
{
print("take me to your leader!\n");
exits(nil);
}
This program is just text stored in a file. To execute it, we must compile it and then link the program with whatever libraries are necessary (in this case, the C library). There is one command for
each task:
; 8c take.c
; 8l take.8
;
# compile it
# link the resulting object
As you see, the shell ignores text following the # sign. That is the line-comment character for rc.
That is usual in most shells found in other systems, like UNIX. The C compiler for Intel architectures is 8c (80x86 compiler) and 8l is the linker (In Plan9, 8l is called a loader, because it prepares the way for loading the resulting program into memory). Object files generated by 8c use
the extension .8, to make it clear that the object is for an Intel (it reminds of 8086). The binary
file produced by linking the object file(s) and the libraries implied is named 8.out, when using
8l. This binary has execute permission and can be executed.
In Plan 9 there are many C compilers. One for each architecture where the system runs.
And, as it could be expected, each compiler has been compiled for all the architectures where the
system runs. For example, for the Arm, the compiler is 5c and the linker 5l. We have these
programs available for all the architectures (e.g., PCs, and Arms). To compile for one architecture you only have to use the compiler that generates code for it. But you can compile from any
other architecture because the compiler itself is available for all of them.
For the Arm, the files generated by the compiler and the linker would be take.5 and
5.out. This makes it easy to compile a single program for execution at different platforms in
the same directory. We still know which file is for which architecture. Now you may have the
pleasure of executing your first hand-made Plan 9 program
; 8.out
take me to your leader!
;
The Plan 9 C dialect is not ANSI (nor ISO) C. It is a variant implemented by Ken Thompson.
One of the authors of UNIX. It has a few differences with respect to the C language you can use
in other system. You already noticed some. Most programs include just two files, u.h, which
contains machine and system definitions, and libc.h, which contains most of the things you
will need. The header files include a hint for the linker that is included in the object file. For
example, this is the first line in the file libc.h:
#pragma lib
"libc.a"
The linker uses this to automatically link against the libraries with headers included by your programs. There is no need to supply a long list of library names in the command line for 8l!.
There are several flags that may be given to the compiler to make it more strict regarding
the source code. It is very sensible to use them always. The 8c(1) manual page details them, and
we hope you just take them as a custom:
- 22 ; 8c -FVw take.c
The binary file generated by 8l is 8.out, by default. But it may be more convenient to give a
better name to this file. This can be done with the -o option for the linker. If we use a file name
like take, the file should be kept at a directory where it is clear which architecture it has been
compiled for. For example, for PCs, binaries are kept at /386/bin or at
/usr/nemo/bin/386 for the user nemo. This is what is done when the program is installed
for people to use. People enjoy typing just the program name.
But otherwise, it is a custom to generate a binary file with a name that states clearly the
architecture it requires. Think that you may be compiling a program today while using a PC as a
terminal. Tomorrow morning you might be doing the same on an Alpha. You wouldn’t like to get
confused.
The tradition to name the binary file is to use the name 8.out if the directory contains the
source code for just one program, or a name like 8.take if there are multiple programs that can
be compiled in the same directory. This is our case.
In this text we will always compile for the same architecture, an Intel PC, unless said otherwise, and generate the binary in the directory where we are working. For example, for our little
program, this would be the command used to generate its binary:
; 8l -o 8.take take.8
For the first few programs, we will explicitly say how we compiled them. Later, we start assuming that you remember that the binary for a file named take.c was compiled and linked using
; 8c -FVw take.c
; 8l -o 8.take take.8
;
and the resulting executable is at 8.take.
There is an excellent paper for learning how to use the Plan 9 C compiler [4]. It is a good
thing to read if you want to learn more details not described here about how to use the compiler.
1.11. The Operating System and your programs
So far so good. But, what is the actual relation between the system and your programs? How can
you understand what happens? You will see that things are more simple than you did image. But
lets revisit what happens to your program after your write it, before introducing the operating
system in the play. We can use some commands to do this. By now, ignore what you cannot
understand.
; ls -l take.c take.8
--rwxr-xr-x M 19 nemo
--rw-r--r-- M 19 nemo
--rw-r--r-- M 19 nemo
8.take
nemo 36280 Jul
nemo
388 Jul
nemo
110 Jul
2 18:46 8.take
2 18:46 take.8
2 18:46 take.c
The command ls tells us that take.c has 110 bytes in it. That is the text of our program. After
8c compiled it, the resulting object file take.8 has just 388 bytes in it. The contents are
machine instructions for our program plus initial values for our variables (e.g., the string printed)
and some other information. If we take this object file, and give it to 8l to link it against the C
library and produce the binary file 8.take, we get a file with 36.280 bytes on it.
Let’s try to gather more information about these files. The command nm (name list) displays
the names of symbols (i.e., procedure names, variables) that are contained or required by our
object and executable files.
- 23 ; nm take.8
U exits
T main
U print
; nm 8.take
... more output...
1131 T exits
1020 T main
118d T print
... more output...
;
It seems that take.8 contains a procedure called main. We call text to binary program code,
and nm prints a T before names for symbols that are text and are contained in the object file.
Besides, our object file requires at least two other procedures, exits, and print to build a
complete binary program. We know this because nm prints U (undefined, but required) before
names for required things.
If we look at the output for the executable file, you will notice that the three procedures are
in there. Furthermore, they now have addresses! The code for exits is at address 1131 (hexadecimal), and so on. The code that is now linked to our object file comes from the C library. It
was included because we included the library’s header libc.h in our program and called some
functions found in that library. The linker, 8l, knew where to find that code.
But there is more code that is used by our program and is not contained in the binary file.
When our program calls print, this function will write bytes to the output (e.g., the window).
But the procedure that knows how to write is not in our program, nor is in the C library. This procedure is within the operating system kernel. A procedure provided by the system is known as a
system call, calling such procedure is known as making a system call.
Your program
Other program
main() { ...}
procedure
call
print() { ...}
main() { ...}
system call
System kernel
write() { ...}
Figure 1.7: System calls, user programs, and the system kernel.
Figure 1.7 depicts two different programs, e.g., the one you executed before and another
one, and the system kernel. Those programs are executing, not just files sitting on a disk. Your
program contains all the code it needs to execute, including portions of the C library. Your main
procedure calls print, with a local procedure call. The code for print was taken from the C
library and linked into your program by 8l. To perform its job, print calls another procedure,
write, that is contained within the operating system kernel. That is a system call. As you can
see in the figure, the other program might perform its own system calls as well.
In general, you don’t mind if a particular function is a system call or is defined in the standard system library (the C library). Many functions that are part of the interface of the system are
not actual system calls (i.e., are not implemented within the kernel), but library functions. For
example, the manual page for read(2) gives multiple functions that can be used to read a file.
- 24 However, only one, or maybe a few, are actual system calls. The others are implemented within
the C library in terms of the real system call(s). Going from one version of the system to another,
we may find that an old system call is now a library function, and vice-versa. What matters is that
the function is part of the programmer’s interface for a system provided abstraction. Indeed, in
what follows, we may refer to functions within the C library as system calls. Be warned. But in
any case, the entire section 2 of the manual describes the functions available.
As a remark, programmer’s interfaces are usually called APIs, for Application
Programmer’s Interface.
1.12. Where are the files?
If you remember, we said that your files are not kept in the machine you use to execute Plan 9
commands and programs. Plan 9 calls the machine you use, a terminal, and the machine where
the files a kept, a file server. The Plan 9 that runs at your terminal lets you use the files that you
have available at other places in the network, and there can be many of them. For simplicity, we
assume that all your files are stored at a single machine behaving as the file server.
How does this work? What we said about how a program performs a system call to the kernel, to write into a file, is still true. But there was something missing in the description we made
in the last section. To do the write you requested, your Plan 9 kernel is likely to need to talk to
another machine. Most probably, your terminal does not have the file, and must get in touch with
the file server to ask him to write the file.
Figure 1.8 shows the steps involved for doing the same print shown in the last section.
This time, it shows how the file server comes into play, and it shows only your program. Other
programs running at your terminal would follow a similar path.
Your program
main(){
...
}
1. call
6. return
5. return
Your terminal’s kernel
print(){
...
}
2. system call
File server
write(){
write(){
3. message: write!
...........................................................................................
...
........................................................................................... ...
4. message: done!
}
}
Figure 1.8: Your system kernel makes a remote procedure call to write a file in the file server.
1
2
3
4
Your program makes a procedure call, to the function print in the C library.
The function makes a system call to the kernel in your machine. This is similar to a procedure call, but calls a procedure that is implemented by your kernel and shared among all the
programs in your terminal. Because the kernel protects itself to prevent your program from
calling arbitrary procedures in the kernel, a software interrupt is the mechanism used to perform this call. This is called a trap, and is mostly irrelevant for you now.
The code for the write function (the system call) in the kernel, must send a message
through the network to the machine that keeps the file, to the file server. This message contains a request to perform the write operation and all the information needed to perform it,
e.g., all the values and data you supplied as parameters for the write.
The remote machine, the file server, performs the operation and replies sending a message
- 25 through the network back to your terminal. The message reports if the operation was completed or not, and contains any output result for the operation performed, e.g., the number of
bytes that could be written into the file.
5
You kernel does some bookkeeping and returns to your system call, returning the result of
the operation (as reported by the other machine).
6
The library function returns to your program when everything was printed.
Steps 3 and 4 are called a remote procedure call. This is not as complex as it sounds, but it is
not a procedure call either. A remote procedure call is a call made by one program to another that
is at a different place in the network. Because your processor cannot call procedures kept at different machines, what the system does is to send a message with a request to do something, and
to receive a reply back with any result of interest.
1.13. The Shell, commands, binaries, and system calls
It is important to know how these elements come into play. As you know, the operating system
provides the implementation of several functions, known as system calls. These functions provide
the interface for the abstract data types invented by the system, to make it easier to use the computer.
In general, the only way to use the system is to write a program that makes system calls.
However, there many programs already compiled in your system, ready to run. To provide you
some mean to run them, another program is provided: the shell. When you type a command name
at the shell prompt, the shell searches for a file with the same name located at a directory that, by
convention, keeps the executable files for the system. If the shell finds such file, it asks the system to execute it.
read
shell
command line
execute
/bin/ls
ls
system kernel
Figure 1.9: Executing commands.
Figure 1.9 shows what happens when you type ls at the shell prompt. First, the shell reads
your command line. It looks for a file named /bin/ls, and because there is such file, the shell
executes it. To read the command line, and to execute the corresponding file for the command
you typed, the shell uses system calls. Only the operating system knows what it means to read
and to execute a file. Remember, the hardware knows nothing about that!
The consequence of your command request is that the program contained in /bin/ls is
loaded into memory by the operating system and gets executed as a new program. Note that if
you create a new executable file, you have created a new command. All you have to do to run it is
to give its (file) name to the shell.
When you run a window system, things are similar. The only difference is that the window
system must read input from both the mouse and the keyboard and writes at a graphics terminal
instead of at a text display. Of course, when the window system creates (i.e., invents) a new
window, it has to ask the system to run a shell on it.
- 26 -
1.14. The Operating System and the hardware
As you can imagine now, most of the time, the operating system is not even executing. Usually, it
is your code the one running in the processor. At least, until the point in time when your program
makes a system call. At that point, the operating system code takes control (because its code starts
executing) and performs your request.
However, the hardware may also require attention from the operating system. As you know
from computer architecture courses, this is done by means of hardware interrupts. When data
arrives from the network, or you hit a keyboard key, the hardware device interrupts the processor.
What happens later is that the interrupt handler runs after the hardware saves the processor state.
The interrupt handlers are kept within the operating system kernel. The kernel contains the
code used to operate each particular device. That is called a device driver. Device drivers use
I/O instructions to operate the devices, and the devices interrupt the processor to request the attention of their drivers. Thus, while your program is executing, a device might interrupt the processor. The hardware saves some state (registers mostly) and the operating system starts executing to
attend the interrupt. Many times, when the interrupt has been serviced, the operating system will
return from the interruption and your code would be running again.
You can think that the kernel is a library but not just for your programs, also for things
needed to operate the hardware. You make system calls to ask the system to do things. The hardware issues interrupts for that purpose. And most of the time, the system is idle sitting in memory, until some one makes a call.
Problems
1
Open a system shell, execute ip/ping to determine if all of the machines at the network
213.128.4.0 are alive or not. To do this, you have to run these 254 commands:
; ip/ping -n 1 213.128.4.1
; ip/ping -n 1 213.128.4.2
...
; ip/ping -n 1 213.128.4.254
2
The option -n with argument 1 tells ping to send just one probe and not 64, which would
be its default.
Do the same using this shell command line:
; for (m in ‘{seq 1 254}) { ip/ping 213.128.4.$m }
3
4
5
This line is not black magic. You are quite capable of doing things like this, provided you
pass this course.
Start the system shell in all the operating systems where you have accounts. If you know of
a machine running an unknown system where you do not have an account, ask for one and
try to complete this exercise there as well.
Does your TV set remote control have its own operating system? Why does your mobile
phone include an operating system? Where is the shell in your phone?
Explain this:
; lc .
bin
lib
tmp
; ls.
ls.: ’/bin/ls.’ file does not exist
6
7
How many users do exist in your Plan 9 system?
What happens if you do this in your home directory? Explain why.
- 27 ; touch a
; mv a a
8
What would happen when you run this? Try it and explain.
;
;
;
;
9
mkdir dir
touch dir/a dir/b
rm dir
mv dir /tmp
And what if you do this? Try it and explain.
;
;
;
;
mkdir dir dir/b
cd dir/b
rm ../b
pwd
- 28 .
- 29 -
2 Programs and Processes
______
2.1. Processes
A running program is called a process. The name program is not used to refer to a running program because both concepts differ. The difference is the same that you may find between a cookie
recipe and a cookie. A program is just a bunch of data, and not something alive. On the other
hand, a process is a living program. It has a set of registers including a program counter and a
stack. This means that it has a flow of control that executes one instruction after another as you
know.
The difference is quite clear if you consider that you may execute simultaneously the same
program more than once. For example, figure 2.1 shows a window system with three windows.
Each one has its own shell. This means that we have three processes running /bin/rc, although
there is only a single program for those processes. Namely, that kept stored in the file /bin/rc.
Furthermore, if we change the working directory in a shell, the other two ones remain unaffected.
Try it! Suppose that the program rc keeps in a variable the name for its working directory. Each
shell process has its own current working directory variable. However, the program had only one
such variable declared.
Figure 2.1: Three /bin/rc processes. But just one /bin/rc.
So, what is a process? Consider all the programs you made. Pick one of them. When you
execute your program and it starts execution, it can run independently of all other programs in
the computer. Did you have to take into account other programs like the window system, the system shell, a clock, a web navigator, or any other just to write your own (independent) program
and execute it? Of course not. A brain with the size of the moon would be needed to be able to
take all that into account. Because no such brains exist, operating systems provide the process
abstraction. To let you write and run one program and forget about other running programs.
Each process gets the illusion of having its own processor. When you write programs, you
think that the machine executes one instruction after another. But you always think that all the
instructions belong to your program. The implementation of the process abstraction included in
your system provides this fantasy.
- 30 When machines have several processors, multiple programs can be executed in parallel.
i.e., at the same time. Although this is becoming common, many machines have just one processor. In some cases we can find machines with two or four ones. But in any case, you run many
more programs than processors are installed. Count the number of windows at your terminal.
There is at least one program per window. You do not have that many processors.
What happens is that the operating system makes arrangements to let each program execute
for just some time. Figure 2.2 depicts the memory for a system with three processes running.
Each process gets its own set of registers, including the program counter. The figure is just an
snapshot made at a point in time. During some time, the process 1 running rio may be allowed
to proceed, and it would execute its code. Later, a hardware timer set by the system may expire,
to let the operating system know that the time for this process is over. At this point, the system
may jump to continue the execution of process 2, running rc. After the time for this process
expires, the system would jump to continue execution for process 3, running rio. When time for
this process expires, the system may jump back to process 1, to continue where it was left at.
PC
...
...
addl bx, di
cmpl si, di
addl bx, si
jls label
Rio
(process #1)
subl $4, di
movl bx, cx
PC
movl bx, cx
Rio
(process #3)
addl bx, si
...
...
...
addl bx, di
addl bx, si
PC
subl $4, di
Rc
(process #2)
movl bx, cx
...
System
Memory
Figure 2.2: Concurrent execution of multiple programs in the same system.
All this happens behind the scene. The operating system program knows that there is a single flow of control per processor, and jumps from one place to another to transfer control. For the
users of the system, all that matters is that each process executes independently of other ones, as
if it had a single processor for it.
Because all the processes appear to execute simultaneously, we say they are concurrent
processes. In some cases, they will really execute in parallel when each one can get a real processor. In most cases, it would be a pseudo-parallel execution. For the programmer, it does not
matter. They are just concurrent processes that seem to execute simultaneously.
In this chapter we are going to explore the process we obtain when we execute a program.
Before doing so, it is important to know what’s in a program and what’s in a process.
- 31 -
2.2. Loaded programs
When a program in source form is compiled and linked, a binary file is generated. This file keeps
all the information needed to execute the program, i.e., to create a process that runs it. Different
parts of the binary file that keep different type of information are called sections. A binary file
starts with a few words that describe the following sections. These initial words are called a
header, and usually show the architecture where the binary can run, the size and offset in the file
for various sections.
One section (i.e., portion) of the file contains the program text (machine instructions). For
initialized global variables of the program, another section contains their initial values. Note that
the system knows nothing about the meaning of these values. For uninitialized variables, only the
total memory size required to hold them is kept in the file. Because they have no initial value, it
makes no sense to keep that in the file. Usually, some information to help debuggers is kept in the
file as well, including the strings with procedure and symbol names and their addresses.
In the last chapter we saw how nm can be used to display symbol information in both
object and binary files. But it is important to notice that only your program code knows the
meaning of the bytes in the program data (i.e., the program knows what a variable is). For the
system, your program data has no meaning. The system knows nothing about your program. It’s
you the one who knows. The program nm can display information about the binary file because it
looks at the symbol table stored in the binary for debugging purposes.
We can see this if we remove the symbol table from our binary for the take.c program.
The command strip removes the symbol table. To find the binary file size, we can use option
-l for ls, which (as you know) lists a long line of information for each file, including the size in
bytes.
; ls -l 8.take
--rwxr-xr-x M 19 nemo nemo 36348 Jul
; strip 8.take
; ls -l 8.take
--rwxr-xr-x M 19 nemo nemo 21713 Jul
6 22:49 8.take
6 22:49 8.take
The number after the user name and before the date is the file size in bytes. The binary file size
changed from 36348 bytes down to 21713 bytes. The difference in size is due to the symbol table.
And without the symbol table, nm knows nothing. Just like the system.
; nm 8.take
;
Well, of course the system has a convention regarding which one is the address where to start
executing the program. But nevertheless, it does not care much about which code is in there.
A program stored in a file is different from the same program stored in memory while it
runs. They are related, but they are not the same. Consider this program. It does nothing, but has
a global variable of one megabyte.
- 32
global.c
________
#include <u.h>
#include <libc.h>
char global[1 * 1024 * 1024];
void
main(int, char*[])
{
exits(nil);
}
Assuming it is kept at global.c, we can compile it and use the linker option -o to specify that
the binary is to be generated in the new file 8.global. It is a good practice to name the binary
file for a program after the program name, specially when multiple programs may be compiled in
the same directory.
; 8c -FVw global.c
; 8l -o 8.global global.8
; ls -l 8.global global.8
--rwxr-xr-x M 19 nemo nemo 3380 Jul
--rw-r--r-- M 19 nemo nemo 328 Jul
6 23:06 8.global
6 23:06 global.8
Clearly, there is no room in the 328 bytes of the object file for the global array, which needs
one megabyte of storage. The explanation is that only the size required to hold the (not initialized) array is kept in the file. The binary file does not include the array either (change the array
size, and recompile to check that the size of the binary file does not change).
When the shell asks the system (making a system call) to execute 8.global, the system
loads the program into memory. The part of the system (kernel) doing this is called the loader.
How can the system load a program? By reading the information kept in the binary:
"
The header in the binary file reports the memory size required for the program text, and the
file keeps the memory image of that text. Therefore, the system can just copy all this into
memory. For a given system and architecture, there is a convention regarding which
addresses the program must use. Therefore, the system knows where to load the program.
"
The header in the binary reports the memory size required for initialized variables (globals)
and the file contains a memory image for them. Thus, the system can copy those bytes to
memory. Note that the system has no idea regarding where does one variable start or how
big it is. The system only knows how many bytes it has to copy to memory, and at which
address should they be copied.
"
For uninitialized global variables, the binary header reports their total size. The system
allocates that amount of memory for the program. That is all it has to do. As a courtesy,
Plan 9 guarantees that such memory is initialized with all bytes being zero. This means that
all your global variables are initialized to null values by default. That is a good thing,
because most programs will misbehave if variables are not properly initialized, and null values for variables seem to be a nice initial value by default.
We saw how the program nm prints addresses for symbols. Those addresses are memory
addresses that are only meaningful when the program has been loaded. In fact, the Plan 9 manual
refers to the linker as the loader. The addresses are virtual memory addresses, because the system uses the virtual memory hardware to keep each process in its own virtual address space.
Although virtual, the addresses are absolute, and not relative (offsets) to some particular origin.
Using nm we can learn more about how the memory of a loaded program looks like. Option -n
- 33 asks nm to sort the output by symbol address.
; nm -n 8.global
1020
1033
1073
10e2
1124
1180
1188
11fb
122a
12e7
130a
1315
1442
1455
T
T
T
T
T
T
T
T
T
T
T
T
T
T
main
_main
atexit
atexitdont
exits
_exits
getpid
memset
lock
canlock
unlock
atol
atoi
sleep
145d
1465
146d
14a0
14ac
14b4
2000
2004
2008
200c
2010
2014
2024
2024
212c
10212c
T
T
T
T
T
T
D
D
D
d
D
d
B
B
B
B
open
close
read
_tas
pread
etext
argv0
_tos
_nprivates
onexlock
_privates
_exits
edata
onex
global
end
Figure 2.3 shows the layout of memory for this program when loaded. Looking at the output of
nm we can see several things. First, the program code uses addresses starting at 0x1020 up to
0x14b4.
The last symbol in the code is etext, which is a symbol defined by the linker to let you
know where the end of text is. Data goes from address 0x2000 up to address 0x10212c. There is
a symbol called end, also defined by the linker, at the end fo the data. This symbol lets you know
where the end of data is. This symbol is not to be confused with edata, which reports the
address where initialized data terminates.
Text segment Data segment
Program
text
0x0
Initialized
data
etext
edata
BSS segment
Stack segment
Uninitialized
data
...
stack
end
Figure 2.3: Memory image for the global program.
In decimal, the address for end is 1.057.068 bytes! That is more than 1 Mbyte, which is a
- 34 lot of memory for a program that was kept in a binary file of 3 Kbytes. Can you see the difference?
And there is more. We did not take into account the program stack. As you know, your program needs a stack to execute. That is the place in memory used to keep track of the chain of
function calls being made, to know where to return, and to maintain the values for function arguments and local variables. Therefore, the size of the program when loaded into memory will be
even larger. To know how much memory a program will consume, use nm, do not list the binary
file.
The memory of a loaded program, and thus that of a process, is arranged as shown in figure
2.3. But that is an invention of the operating system. That is the abstraction supplied by the system, implemented using the virtual memory hardware, to make your life easier. This abstraction
is called virtual memory. A process believes that it is the only program loaded in memory. You
can notice by looking at the addresses shown by nm. All processes running such program will
use the same addresses, which are absolute (virtual) memory addresses. And more than just one
of such processes might run simultaneously in the same computer.
The virtual memory of a process in Plan 9 has several, so called, segments. This is also an
abstraction of the system and has few to do with the segmentation hardware found at some popular processors. A memory segment is a portion of contiguous memory with some properties.
Segments used by a Plan 9 process are:
"
The text segment. It contains instructions that can be executed but not modified. The hardware is used by the system to enforce these permissions. The memory is initialized by the
system with the program text (code) kept within the binary file for the program.
"
The data segment. It contains the initialized data for the program. Protection is set to allow
both read and write operations on it, but you cannot execute instructions on it. The memory
is initialized by the system using the initialized data kept within the binary file for the program.
"
The uninitialized data segment, called bss segment is almost like the data segment. However, this one is initialized by zeroing its memory. The name of the segment comes from an
arcane instruction used to implement it on a machine that no longer exists. How much
memory is given depends on the size recorded in the binary file. Moreover, this segment can
grow, by using a system call that allocates more memory for it. Function libraries like
malloc cause this segment to grow when they consume all the available memory in this
segment. This is the reason for the gap between this segment and the stack segment (shown
in figure 2.3), to leave room for the segment to grow.
"
The stack segment is also used for reading and writing memory. Unlike other segments,
this segment seems to grow automatically when more space is used. It is used to keep the
stack for the process.
All this is important to know because it has a significant impact on your programs and processes.
Usually, not all the code is loaded at once from the binary file into the text (memory) segment.
Binaries are copied into memory one virtual memory page at a time as demanded by references to
memory addresses. This is called demand paging, (or loading on demand). It is important to
know this because, if you remove a binary file for a program that is executing, the corresponding
process may get broken if it needs a part of the program that was not yet loaded into memory.
And the same might happen if you overwrite a binary file while a process is using it to obtain its
code!
Because memory is virtual, and is only allocated when first used, any unused part of the
BSS segment is free! It consumes no memory until you touch it. However, if you initialized it
with a loop, all the memory will be allocated. One particular case when this may be useful is
when you implement large hash tables that contain few elements (called sparse). You might
implement them using a huge array, not initialized. Because it is not initialized, no physical memory will be allocated for the array, initially. If the program uses later a portion of the array for the
first time, the system will allocate memory and zero it. The array entries would be all nulls.
- 35 Therefore, in this example, initializing by hand the array would have a big impact on memory
consumption.
2.3. Process birth and death
Programs are not called, they are executed. Besides, programs do not return, their processes terminate when they want or when they misbehave. Being this said, we can supply arguments to
programs we run, to control what they do.
When the shell asks the system to execute a program, after it has been loaded into memory,
the system provides a flow of control for it. This means just that a full set of processor registers
is initialized for the new running program, including the program counter and stack pointer, along
with an initial (almost empty) stack. When we compile a C program, the loader puts main at the
address where the system will start executing the code. Therefore, our C programs start running at
main. The arguments supplied to this program (e.g., in the shell command line) are copied by
the system to the stack for the new program.
The arguments given to the main function of a program are an array of strings (the argument vector, argv) and the number of strings kept in the array. We can write a program to print
its arguments.
______
echo.c
#include <u.h>
#include <libc.h>
void
main(int argc, char* argv[])
{
int
i;
for (i = 0; i < argc; i++)
print("%d: %s\n ", i, argv[i]);
exits(nil);
}
If we execute it we can see which arguments are given to the program for a particular command
line:
; 8c -FVw echo.c
; 8l -o 8.echo echo.8
; ./8.echo one little program
0: ./8.echo
1: one
2: little
3: program
;
There are several things to note here. First, the first argument supplied to the program is the program name! More precisely, it is the command name as given to the shell. Second, this time we
gave a relative path as a command name. Remember, ./8.echo, is the file 8.echo within the
current working directory for our shell. which is a relative path. And that was the value of
argv[0] for our program. Programs know their name by looking at argv[0], which is very
useful to print diagnostic messages while letting the user know which program was the one that
had a problem.
There is a standard command in Plan 9 that is almost the same, echo. This command
- 36 prints its arguments separated by white space and a new line. The new line can be suppressed
with the option -n.
; echo hi there
hi there
;
; echo -n hi there
hi there;
Note the shell prompt right after the output of echo. Despite being simple, echo is invaluable to
know which arguments a program would get, and to generate text strings by using echo to print
them.
Our program is not a perfect echo. At least, the standard echo has the flag -n, to ask for a
precise echo of its arguments, without the addition of the final new line. We could add several
options to our program. Option -n may suppress the print of the additional new line, and option
-v may print brackets around each argument, to let us know precisely where does an argument
start and where does it end. Without any option, the program might behave just like the standard
tool and print one argument after another. The problem is that the user may call the program in
any of the following ways, among others:
8.echo
8.echo
8.echo
8.echo
8.echo
repeat after me
-n repeat after me
-v repeat after me
-n -v repeat after me
-nv repeat after me
It is customary that options may be combined in any of the ways shown. Furthermore, the user
might want to echo just -word-, and echo might be confused because it would think that
-word- was a set of options. The standard procedure is to do it like this.
8.echo -- -word--
The double dash indicates that there are no more options. Isn’t it a burden to process argc and
argv to handle all these combinations? That is why there are a set of macros to help (macros are
definitions given to the C preprocessor, that are replaced with some C code before actually compiling). The following program is an example.
- 37 _______
aecho.c
#include <u.h>
#include <libc.h>
void
main(int argc, char* argv[])
{
int
nflag = 0;
int
vflag = 0;
int
i;
ARGBEGIN{
case ’v’:
vflag = 1;
break;
case ’n’:
nflag = 1;
break;
default:
fprint(2, "usage: %s [-nv] args\n", argv0);
exits("usage");
}ARGEND;
for (i = 0; i < argc; i++)
if (vflag)
print("[%s] ", argv[i]);
else
print("%s ", argv[i]);
if (!nflag)
print("\n");
exits(nil);
}
The macros ARGBEGIN and ARGEND loop through the argument list, removing and processing
options. After ARGEND, both argc and argv reflect the argument list without any option.
Between both macros, we must write the body for a switch statement (supplied by
ARGBEGIN), with a case per option. And the macros take care of any feasible combination of
flags in the arguments. Here are some examples of how can we run our program now.
; 8.aecho repeat after me
repeat after me
; 8.aecho -v repeat after me
[repeat] [after] [me]
; 8.aecho -vn repeat after me
[repeat] [after] [me] ;
we gave a return here.
; 8.aecho -d repeat after me
usage: 8.aecho [-nv] args
; 8.aecho -- -d repeat after me
-d repeat after me
- 38 In all but the last case, argc is 3 after ARGEND, and argv holds just repeat, after, and me.
Another convenience of using these macros is that they initialize the global variable argv0
to point to the original argv[0] in main, that is, to point to the name of the program. We used
this when printing the diagnostic about how the program must be used, which is the custom when
any program is called in a erroneously way.
In some cases, an option for a program carries an argument. For example, we might want to
allow the user to specify an alternate pair of characters to use instead of [ and ] when echoing
with the -v option. This could be done by adding an option -d to the program that carries as its
argument a string with the characters to use. For example, like in
8.aecho -v -d"" repeat after me
This can be done by using another macro, called ARGF. This macro is used within the case for
an option, and it returns a pointer to the option argument (the rest of the argument if there are
more characters after the option, or the following argument otherwise). The resulting program
follows.
______
_becho.c
#include <u.h>
#include <libc.h>
void
usage(void)
{
fprint(2, "usage: %s [-nv] [-d delims] args\n", argv0);
exits("usage");
}
void
main(int argc, char* argv[])
{
int
nflag = 0;
int
vflag = 0;
char*
delims = "[]";
int
i;
ARGBEGIN{
case ’v’:
vflag = 1;
break;
case ’n’:
nflag = 1;
break;
case ’d’:
delims = ARGF();
if (delims == nil || strlen(delims) < 2)
usage();
break;
default:
usage();
}ARGEND;
- 39 for (i = 0; i < argc; i++)
if (vflag)
print("%c%s%c ", delims[0], argv[i], delims[1]);
else
print("%s ", argv[i]);
if (!nflag)
print("\n");
exits(nil);
}
And this is an example of use for our new program.
; 8.becho -v -d"" repeat after me
"repeat" "after" "me"
; 8.becho -vd "" repeat after me
"repeat" "after" "me"
; 8.becho -v
note the space before the ""
; 8.becho -v -d
usage: 8.becho [-nv] [-d delims] args
A missing argument for an option usually means that the program calls a function to terminate
(e.g., usage), the macro EARGF is usually preferred to ARGF. We could replace the case for our
option -d to be as follows.
case ’d’:
delims = EARGF(usage());
if (strlen(delims) < 2)
usage();
break;
And EARGF would execute the code given as an argument when the argument is not supplied. In
our case, we had to add an extra if, to check that the argument has at least the two characters we
need.
Most of the Plan 9 programs that accept multiple options use these macros to process their
argument list in search for options. This means that the invocation syntax is similar for most programs. As you have seen, you may combine options in a single argument, use multiple arguments, supply arguments for options immediately after the option letter, or use another argument,
terminate the option list by giving a -- argument, and so on.
As you have probably noticed after going this far, a process terminates by a call to exits,
see exits(2) for the whole story. This system call terminates the calling process. The process may
leave a single string as its legacy, reporting what it has to say. Such string reports the process
exit status, that is, what happen to it. If the string is null, it means by convention that everything
went well for the dying process, i.e., it could do its job. Otherwise, the convention is that string
should report the problem the process had to complete its job. For example,
sic.c
_____
#include <u.h>
#include <libc.h>
void
main(int, char*[])
{
exits("sic!");
}
would report sic! to the system when exits terminates the process. Here is a run that shows
that by echoing $status we can learn how it went to this depressive program.
- 40 ; 8.sic
; echo $status
8.sic 2046: sic!
;
Commands exit with an appropriate status depending on what happen to them. Thus, ls reports
success as its status when it could list the files given as arguments, and it reports failure otherwise. In the same way, rm reports success when it could remove the file(s) indicated, and failure
otherwise. And the same applies for other commands.
We lied before when we said that a program starts running at main, it does not. It starts
running at a function that calls main and then (when main returns), this function calls exits to
terminate the execution. That is the reason why a process ceases existing when the main function
of the program returns. The process makes a system call to terminate itself. There is no magic
here, and a process may not cease existing merely because a function returns. A flow of control
does not vanish, the processor always keeps on executing instructions. However, because processes are an invention of the operating system, we can use a system call that kills the calling process. The system deallocates its resources and the process is history. A process is a data type after
all.
In few words, if your program does not call exits, the function that calls main will do so
when main returns. But you better call exits in your program. Otherwise, you cannot be sure
about what value is being used as your exit status.
2.4. System call errors
In this chapter and the following ones we are going to make a lot of system calls from programs
written in C. In many cases, there will be no problem and a system call we make will be performed. But in other cases we will make a mistake and a system call will not be able to do its
work. For example, this will happen if we try to change our current working directory and supply
a path that does not exist.
Almost any function that we call (and system calls are functions) may have problems to
complete its job. In Plan 9, when a system call encounters an error or is not able to do its work,
the function returns a value that alerts us of the error condition. Depending on the function, the
return value indicating the error may be one or another. In general, absurd return values are used
to report errors.
For example, we will see how the system call open returns a positive small integer. However, upon failure, it returns -1. This is the convention for most system calls returning integer values. System calls that return strings will return a null string when they fail, and so on. The manual
pages report what a system call does when it fails.
You must always check out for error conditions. If you do not check that a system call
could do its work, you do not know if it worked. Be warned, not checking for errors is like driving blind, and it will surely put you into a debugging Inferno (limbo didn’t seem bad enough).
An excellent book, that anyone programming should read, which teaches practical issues regarding how to program is [5].
Besides reporting the error with an absurd return value from the system call, Plan 9 keeps a
string describing the error. This error string is invaluable information for fixing the problem.
You really want to print it out to let the user know what happen.
There are several ways of doing so. The more convenient one is using the format %r in
print. This instructs print to ask Plan 9 for the error string and print it along with other output. This program is an example.
- 41 _____
err.c
#include <u.h>
#include <libc.h>
void
main(int , char* [])
{
if (chdir("magic") < 0){
print("chdir failed: %r\n");
exits("failed");
}
/* ... do other things ... */
exits(nil);
}
Let’s run it now
; 8.err
chdir failed: ’magic’ file does not exist
The program tried to use chdir to change its current working directory to magic. Because it
did not exist, the system call failed and returned -1. A good program would always check for
this condition, and then report the error to the user. Note the use of %r in print and compare to
the output produced by the program.
If the program cannot proceed because of the failure, it is sensible to terminate the execution
indicating that the program failed. This is so common that there is a function that both prints a
message and exits. It is called sysfatal, and is used like follows.
if (chdir("magic") < 0)
sysfatal("chdir failed: %r");
In a few cases you will need to obtain the error string for a system call that failed. For example, to
modify it and print a customary diagnostic message. The system call rerrstr reads the error
string. It stores the string at the buffer you supply. Here is an example
char
error[128];
...
rerrstr(error, sizeof error);
After the call, error contains the error string.
A function implemented to be placed in a library also needs to report errors. If you write
such function, you must think how to do that. One way is to use the same mechanism used by
Plan 9. This is good because it allows any programmer using your library to do exactly the same
to deal with errors, no matter if the error is being reported by your library function or by Plan 9.
The system call werrstr writes a new value for the error string. It is used like print.
Using it, we can implement a function that pops an element from a stack and reports errors
nicely:
- 42 int
pop(Stack * s)
{
if (isempty(s)){
werrstr("pop on an empty stack");
return -1;
}
... do the pop otherwise ...
}
Now, we could write code like the following,
...
if (pop(s) < 0){
print("pop failed: %r\n");
...
}
and, upon an error in pop this would print something like:
pop failed: pop on an empty stack
2.5. Environment
Another way to supply arguments to a process is to define environment variables. Each process is supplied with a set of name=value strings, that are known as environment variables. They
are used to customize the behavior of certain programs, when it is more convenient to define a
environment variable than to give a command line argument every time we run a program. Usually, all processes running in the same window share the environment variables.
For example, the variable home has the path for your home directory as its value. The command cd uses this variable to know where your home is. Otherwise, how could it know what to
do when given no arguments? Both names and values of environment variables are strings.
Remember this.
We can define environment variables in a shell command line by using an equal sign.
Later, we can use the shell to refer to the value of any environment variable. After reading each
command line, the shell replaces each word starting with a dollar sign with the value of the environment variable whose name follows the dollar. For example, the first command in the following
session defines the variable dir:
; dir=/a/very/long/path
; cd $dir
; pwd
/a/very/long/path
;
The second command line used $dir, and therefore, the shell replaced the string $dir with the
string that is the value of the dir environment variable: /a/very/long/path. Note that cd
knows nothing about $dir. We can see this using echo, because we know it prints the arguments received verbatim.
; echo $dir
/a/very/long/path
;
The next two commands do the same. However, one receives one argument and the other does
not. The output of pwd would be the same after any of them.
- 43 ; cd $home
; cd
In some cases it is convenient to define an environment variable just for a command. This can be
done by defining it in the same command line, before the command, like in the following example:
; temp=/tmp/foobar echo $temp
/tmp/foobar
; echo $temp
;
At this point, we can understand what $status means. It is the value of the environment variable status. This variable is updated by the shell once it finds out how it went to the last command it executed. This is done before prompting for the next command. As you know, the value
of this variable would be the string given to exits by the process running the command.
Another interesting variable is path. This variable is a list of paths where the shell should
look for executable files to run the user commands. When you type a command name that does
not start with / or ./, the shell looks for an executable file relative to each one of the directories
listed in $path, in the same order. If a binary file is found, that is the one executed to run the
command. This is the value of the path variable in a typical Plan 9 shell:
; echo $path
. /bin
;
It contains the working directory, and /bin, in that order. If you type ls, the shell tries with
./ls, and if there is no such file, it tries with /bin/ls. If you type ip/ping, the shell tries
with ./ip/ping, and then with /bin/ip/ping. Simple, isn’t it?
Two other useful environment variables are user, which contains the user name, and
sysname, which contains the machine name. You may define as many as you want. But be
careful. Environment variables are usually forgotten while debugging a problem. If some program
input value should be a command line argument, use a command line argument. If somehow you
need an environment variable to avoid passing an argument all the times a program is called, perhaps the command arguments should be changed. Sensible default values for program arguments
can avoid the burden of having to supply always the same arguments. Command line arguments
make the program invocation explicit, more clear at first sight, and therefore, simpler to grasp and
debug. On the other hand, environment variables are used by programs without the user noticing.
Because of the syntax in the shell for environment variables, we may have a problem if we
want to run echo, or any other program, supplying arguments containing either the dollar sign, or
the equal sign. Both characters we know are special. This can be done by asking the shell not to
do anything with a string we type, and to take it literally. Just type the string into single quotes
and the shell will not change anything between them:
; echo $user
nemo
; echo ’$user’ is $user
$user is nemo
;
Note also that the shell behaves always the same way regarding command line text. For example,
the first word (which is the command name) is not special, and we can do this
- 44 ; cmd=pwd
; $cmd
/usr/nemo
;
and use variables wherever we want in command lines. Also, quoting works always the same
way. Let’s try with the echo program we implemented before:
; 8.echo ’this is’ weird
0: echo
1: this is
2: weird
;
As you may see, argv[1] contains the string this is, including the white space. The shell
did not split the string into two different arguments for the command. Because you quoted it!
Even the new line can be quoted.
; echo ’how many
;; lines’
how many
lines
The prompt changed because the shell had to read more input, to complete the quoted string. That
is its way of telling us. Quoting also removes the special meaning of other characters, like the
backslash:
; echo \
;;
waiting for the continuation of the line
;
...until we press return
echo prints the empty line
; echo ’\’
\
;
To obtain the value for a environment variable, from a C program, we can use the getenv system call. An of course, the program must check out for errors. Even getenv can fail. Perhaps the
variable was not defined. In this case getenv returns a null string.
____
_env.c
#include <u.h>
#include <libc.h>
void
main(int, char*[])
{
char*
home;
home = getenv("home");
if (home == nil)
sysfatal("we are homeless");
print("home is %s\n", home);
exits(nil);
}
Running it yields
- 45 ; 8.env
home is /usr/nemo
A related call is putenv, which accepts a name and a value, and sets the corresponding environment variable accordingly. Both the name and value are strings.
2.6. Process names and states
The name of a process is not the name of the program it runs. That is convenient to know, nevertheless. Each process is given a unique number by the system when it is created. That number is
called the process id, or the pid. The pid identifies, and therefore names, a process.
The pid of a process is a positive number, and the system tries hard not to reuse them. This
number can be used to name a process when asking the system to do things to it. Needless to say
that this name is also an invention of the operating system. The shell environment variable pid
contains the pid for the shell. Note that its value is a string, not an integer. Useful for creating
temporary files that we want to be unique for a given shell.
To know the pid of the process that is executing our program, we can use getpid:
_____
pid.c
#include <u.h>
#include <libc.h>
void
main(int, char*[])
{
int
pid;
pid = getpid();
print("my pid is %d\n", pid);
exits(nil);
}
Executing this program several times may look like this
; 8.pid
my pid is 345
; 8.pid
my pid is 372
;
The first process was the one with pid 345, but we may say as well that the first process was the
345, for short. The second process started was the 372. Each time we run the program we would
get a different one.
The command ps (process status) lists the processes in the system. The second field of each
line (there is one per process) is the process id. This is an example
; ps
nemo
nemo
nemo
nemo
nemo
280
0:00
281
0:02
303
0:00
305
0:00
306
0:00
... more output omitted ...
0:00
0:07
0:00
0:00
0:00
13
13
13
13
13
13
13
13
13
13
1148K
1148K
1148K
248K
1148K
Pread
Pread
Await
Await
Await
rio
rio
rio
rc
rio
- 46 The last field is the name of the program being run by the process. The third field going right to
left is the size of the (virtual) memory being used by the process. You may now know how much
memory a program consumes when loaded.
The second field on the right is interesting. You see names like Pread and Await. Those
names reflect the process state. The process state indicates what the process is doing. For example, the first processes 280 and 281, running rio, are reading something, and everyone else in the
listing above is awaiting for something to happen. To understand this, it is important to get an
idea of how the operating system implements processes.
There is only one processor, but there are multiple processes that seem to run simultaneously. That is the process abstraction. Multiple programs that execute independently of each
other. None of them transfer control to others. However, the processor implements only a single
flow of control.
What happens is that when one process enters the kernel because of a system call, or an
interrupt, the system may store the process state (its registers mostly) and then jump to the previously saved state for another process. Doing this quickly, with the amazingly fast processors we
have today, makes it appear that all processes can run at the same time. Each process is given a
small amount of processor time, and later, the system decides to jump to another one. This
amount of processor time is called a quantum, and can be 100ms, which is a very long time
regarding the number of machine instructions that you can execute in that time.
A transfer of control from one process to another, by saving the state for the old process and
reloading the state for the new one, is called a context switch, because the state for a process (its
registers, stack, etc.) is called its context. But note that it is the kernel the one that transfers control. You do not include jumps to other processes in your programs!
The part of the kernel deciding which process runs each time is called the scheduler,
because it schedules processes for execution. And the decisions made by the scheduler to multiplex the processor among processes are collectively known as scheduling. In Plan 9 and most
other systems, the scheduler is able to move a process out of the processor even if it does not call
the operating system (and gives it a chance to move the process out). Interrupts are used to do
this. Such type of scheduling is called preemptive scheduling.
With a single processor, just one process may be running at a time, and many others may
be ready to run. These are two process states, see figure 2.4. The running process becomes ready
when the system terminates its time in the processor. Then, the system picks up a ready process to
become the next running one. States are just constants defined by the system to cope with the process abstraction.
Many times, a process would be reading from a terminal, or from a network connection, or
any other device. When this happens, the process has to wait for input to come. The process could
wait by using a loop, but that would be a waste of the processor. The idea is that when one process starts waiting for input (or output) to happen, the system can switch to another process and
let it run. Input/output devices are so slow compared with the processor that the machine can execute a lot of code for other processes while one is waiting. The time the processor needs to execute some instructions, compared to the time needed by I/O devices to perform their job, is like
the time you need to move around in your house and the time you need to go to the moon.
This idea is central to the concept of multiprogramming, which is the name given to the
technique that allows multiple programs to be loaded at the same time on a computer.
To let one process wait out of the processor, without considering it as a candidate to be put
into the running state, the process is flagged as blocked. This is yet another process state. All the
processes listed above where blocked. For example, Pread and Await mean that the process is
blocked (i.e., the former shows that the process is blocked waiting for a read to complete). When
the event a blocked process is waiting for happens, the process state is changed to ready. Sometime in the future it will be selected for execution in the processor.
In Plan 9, the state shown for blocked processes reflects the reason that caused the process
- 47 -
Running
Birth
Ready
Broken
Death
Blocked
Figure 2.4: Process states and transitions between them.
to block. That is why ps shows many different states. They are a help to let us know what is happening to our processes.
There is one last state, broken, which is entered when the process does something illegal
(i.e., it suffers an error). For example, dividing by zero or dereferencing a null pointer causes a
hardware exception (an error). Exceptions are dealt with by the hardware like interrupts are, and
the system is of course the handler for these exceptions. Upon this kind of error, the process
enters the broken state. A broken process will never run. But it will be kept hanging around for
debugging until it dies upon user request (or because there are too many broken processes).
2.7. Debugging
When we make a mistake, and a running program enters the broken state, it is useful to see what
happen. There are several ways of finding out what happen. To see them, let’s write a program
that crashes. This program says hello to the name given as an argument, but it does not check that
the argument was given, nor does it use the appropriate format string for print.
____
hi.c
#include <u.h>
#include <libc.h>
void
main(int, char*argv[])
{
/* Wrong! */
print("hi ");
print(argv[1]);
exits(nil);
}
When we compile this program and execute it, this happens:
; 8.hi
8.hi 788: suicide: sys: trap: fault read addr=0x0 pc=0x000016ff
The last line is a message printed by the shell. It was waiting for 8.hi to terminate its execution.
When it terminated, the shell saw that something bad happen to the program and printed the diagnostic so we could know. If we print the value of the status variable, we see this
; echo $status
8.hi 788: sys: trap: fault read addr=0x0 pc=0x000016ff
- 48 Therefore, the legacy, or exit status, of 8.hi is the string printed by the shell. This status does
not proceed from a call to exits in 8.hi, we know that. What happen is that we tried to read
the memory address 0x0. That address is not within any valid memory segment for the process,
and reading it leads to an error (or exception, or fault). That is why the status string contains
fault read addr=0x0. The status string starts with the program name and the process pid,
so we could know which process had a problem. There is more information, the program counter
when the process tried to read 0x0, was 0x000016ff. We do some post-mortem analysis now.
The program src knows how to obtain the source file name and line number that corresponds to that program counter.
; src -n -s 0x000016ff 8.hi
/sys/src/libc/fmt/dofmt.c:37
We gave the name of the binary file as an argument. The option -n causes the source file name
and line to be printed. Otherwise src would ask your editor to display that file and line. Option
-s permits you to give a memory address or a symbol name to locate its source. By the way, this
program is an endless source of wisdom. If you want to know how to implement, say, cat, you
can run src /bin/cat.
Because of the source file name printed, we know that the problem seems to be within the C
library, in dofmt.c. What is more likely? Is there a bug in the C library or did we make a mistake when calling one of its functions? The mystery can be solved by looking at the stack of the
broken process. We can read the process stack because the process is still there, in the broken
state:
; ps
...many other processes...
nemo
788
;
0:00
0:00
24K Broken
8.hi
To print the stack, we call the debugger, acid:
; acid 788
/proc/788/text:386 plan 9 executable
/sys/lib/acid/port
/sys/lib/acid/386
acid:
This debugger is indeed a powerful tool, described in [6], we will use just a couple of its functions. After obtaining the prompt from acid, we ask for a stack dump using the stk command:
acid: stk()
dofmt(fmt=0x0,f=0xdfffef08)+0x138 /sys/src/libc/fmt/dofmt.c:37
vfprint(fd=0x1,args=0xdfffef60,fmt=0x0)+0x59 /sys/src/libc/fmt/vfprint.c:30
print(fmt=0x0)+0x24 /sys/src/libc/fmt/print.c:13
main(argv=0xdfffefb4)+0x12 /usr/nemo/9intro/hi.c:8
_main+0x31 /sys/src/libc/386/main9.s:16
acid:
The function stk() dumps the stack. The program crashed while executing the function
dofmt, at file dofmt.c. This function was called by vfprint, which was called by print,
which was called by main. As you can see, the parameter fmt of print is zero! That should
never happen, because print expects its first parameter to be a valid, non-null, string. That was
the bug.
We can gather much more information about this program. For example, to obtain the values of the local variables in all functions found in the stack
- 49 acid: lstk()
dofmt(fmt=0x0,f=0xdfffef08)+0x138 /sys/src/libc/fmt/dofmt.c:37
nfmt=0x0
rt=0x0
rs=0x0
r=0x0
rune=0x15320000
t=0xdfffee08
s=0xdfffef08
n=0x0
vfprint(fd=0x1,args=0xdfffef60,fmt=0x0)+0x59 /sys/src/libc/fmt/vfprint.c:30
f=0x0
buf=0x0
n=0x0
print(fmt=0x0)+0x24 /sys/src/libc/fmt/print.c:13
args=0xdfffef60
main(argv=0xdfffefb4)+0x12 /usr/nemo/9intro/hi.c:8
_main+0x31 /sys/src/libc/386/main9.s:16
When your program gets broken, using lstk() in acid is invaluable. Usually, that is all you
need to fix your bug. You have all the information about what happen from main down to the
point where it crashed, and you just have to think a little bit why that could happen. If your program was checking out for errors, things can be even more easy, because in many case the error
diagnostic printed by the program may suffice to fix up the problem.
One final note. Can you see how main is not the main function in your program? It seems
that _main in the C library called what we thought was the main function.
The last note about debugging is not about what to do after a program crashes, but about
what to do before. There is a library function called abort. This is its code
void
abort(void)
{
while(*(int*)0)
;
}
This function dereferences a nil pointer! You know what would happen to the miserable program
calling abort. It gets broken. While you program, it is very sensible to prepare for things that in
theory would not happen. In practice they will happen. One tool for doing this is abort. You
can include code that checks for things that should never happen. Those things that you know in
advance that would be very hard to debug. If your code detects that such things happen, it may
call abort. The process will enter the broken state for you to debug it before things get worse.
2.8. Everything is a file!
We have seen two abstractions that are part of the baggage that comes with processes in
Plan 9: Processes themselves and environment variables. The way to use these abstractions is to
perform system calls that operate on them.
That is nice. But Plan 9 was built considering that it is natural to have the machine connected to the network. We saw how your files are not kept at your terminal, but at a remote
machine. The designers of the system noticed that files (another abstraction!) were simple to use.
They also noticed that it was well known how to engineer the system to permit one machine use
files that were kept at another.
Here comes the idea! For most abstractions provided by Plan 9, to let you use your hardware, a file interface is provided. This means that the system lies to you, and makes you believe
- 50 that many things, that of course are not, are files. The point is that they appear to be files, so that
you can use them as if that was really the case.
The motivation for doing things this way is that you get simple interfaces to write programs
and use the system, and that you can use also these files from remote machines. You can debug
programs running at a different machine, you can use (almost) anything from any other computer
running Plan 9. All you have to do is to apply the same tools that you are using to use your real
files at your terminal, while keeping them at a remote machine (the file server).
Consider the time. Each Plan 9 machine has an idea of what is the time. Internally, it keeps
a counter to notice the time passing by and relies on a hardware clock. However, for a Plan 9
user, the time seems to be a file:
; cat /dev/time
1152301434
1152301434554319872
...
Reading /dev/time yields a string that contains the time, measured in various forms: Seconds
since the epoch (since a particular agreed-upon point in time in the past), nanoseconds since the
epoch, and clock ticks since the epoch.
Is /dev/time a real file? Does it exist in your disk with rest of the files? Of course not!
How can you keep in a disk a file that contains the current time? Do you expect a file to change
by some black magic so that each different nanosecond it contains the precise value that matches
the current time? What happens is that when you read the file the system notices you are reading
/dev/time, and it knows what to do. To give you the string representing the current system
time.
If this seems confusing, think that files are an abstraction. The system can decide what reading a file means, and what writing a file means. For real files sitting on a disk, the meaning is to
read and write data from and to the disk storage. However, for /dev/time, reading means
obtaining the string that represents the system time. Other operating systems provide a time
system call that returns the time. Plan 9 provides a (fake!) file. The C function time, described in
time(2), reads this file and returns the integer value that was read.
Consider now processes. How does ps know which processes are in the system? Simple. In
Plan 9, the /proc directory does not exist on disk either. It is a virtual (read: fake) directory that
represents the processes running in the system. Listing the directory yields one file per process:
; lc /proc
1
1320
10
135
...
2
20
246
247
268
269
30
300
32
320
348
367
But these files are not real files on a disk. They are the interface for handling running processes in
Plan 9. Each of the files listed above is a directory, and its name is the process pid. For example,
to go to the directory representing the shell we are using we can do this:
; echo $pid
938
; cd /proc/938
; lc
args
fd
ctl
fpregs
kregs
mem
note
noteid
notepg
ns
proc
regs
status
profile segment text
wait
These files provide the interface for the process with pid 938, which was the shell used. Many of
these (fake, virtual) files are provided to permit debuggers to operate on the process, and to permit
programs like ps gather information about the process. For example, look again at the first lines
printed by acid when we broke a process in the last section:
; acid 788
/proc/788/text:386 plan 9 executable
- 51 Acid is reading /proc/788/text, which appears to be a file containing the binary for the program. The debugger also used /proc/788/regs, to read the values for the processor registers
in the process, and /proc/788/mem, to read the stack when we asked for a stack dump.
Besides files intended for debuggers, other files are for you to use (as long as you remember
that they are not files, but part of the interface for a process). We are now in position of killing a
process. If we write the string kill into the file named ctl, we kill the process. For example,
this command writes the string kill into the ctl file of the shell where you execute it. The
result is that you are killing the shell you are using. You are not writing the string kill on a disk
file. Nobody would record what you wrote to that file. The more probable result of writing this is
that the window where the shell was running will vanish (because no other processes are using it).
; echo kill >/proc/$pid/ctl
... where is my window? ...
We saw the memory layout for a process. It had several segments to keep the process memory.
One of the (virtual) files that is part of the process interface can be used to see which segments a
process is using, and where do they start and terminate:
; cat /proc/$pid/segment
Stack
defff000 dffff000
Text
R 00001000 00016000
Data
00016000 00019000
Bss
00019000 0003f000
1
4
1
1
The stack starts at 0xdefff000, which is a big number. It goes up to 0xdffff000. The process is not
probably using all of this stack space. You can see how the stack segment does not grow. The
physical memory actually used for the process stack will be provided by the operating system on
demand, as it is referenced. Having virtual memory, there is no need for growing segments. The
text segment is read-only (it has an R printed). And four processes are using it! There must be
four shells running at my system, all of them executing code from /bin/rc.
Note how the first few addresses, from 0 to 0x0fff, are not valid. You cannot use the first
4K of your (virtual) address space. That is how the system catches null pointer dereferences.
We have seen most of the file interface provided for processes in Plan 9. Environment variables are not different. The interface for using environment variables in Plan 9 is a file interface.
To know which environment variables we have, we can list a (virtual) directory that is invented
by Plan 9 to represent the interface for our environment variables. This directory is /env.
; lc /env
’*’
0
MKFILE
afont
apid
auth
bootdisk
bootfile
cflag
cfs
cmd
;
cpu
cputype
disk
ether0
facedom
’fn#sigexit’
font
fs
home
i
ifs
init
location
menuitem
monitor
mouseport
nobootprompt
objtype
part
partition
path
pid
planb
plumbsrv
prompt
rcname
role
rootdir
sdC0part
sdC1part
service
status
sysaddr
sysname
tabstop
terminal
timezone
user
vgasize
wctl
wsys
Each one of these (fake!) files represents an environment variable. For you and your programs,
these files are as real as those stored in a disk. Because you can list them, read them, and write
them. However, do not search for them on a disk. They are not there.
You can see a file named sysname, another named user, and yet another named path.
This means that your shell has the environment variables sysname, user, and path. Let’s double
check:
- 52 ; echo $user
nemo
; cat /env/user
nemo;
The file /env/user appears to contain the string nemo, (with no new line at the end). That is
precisely the value printed by echo, which is the value of the user environment variable. The
implementation of getenv, which we used before to return the value of an environment variable,
reads the corresponding file, and returns a C string for the value read.
This simple idea, representing almost everything as a file, is very powerful. It will take
some ingenuity on your part to fully exploit it. For example, the file /dev/text represents the
text shown in the window (when used within that window). To make a copy of your shell session,
you already know what to do:
; cp /dev/text $home/saved
The same can be done for the image shown in the display for your window, which is also represented as a file, /dev/window. This is what we did to capture screen images for this book.
The same thing works for any program, not just for cp, for example, lp prints a file, and this
command makes a hardcopy of the whole screen.
; lp /dev/screen
Problems
1
Why was not zero the first address used by the memory image of program global?
2
Write a program that defines environment variables for arguments. For example, after calling the program with options
; args -ab -d x y z
the following must happen:
; echo
yes
; echo
yes
; echo
yes
; echo
x y z
3
4
$opta
$optb
$optc
$args
What would print /bin/ls /blahblah (given that /blahblah does not exits).
Would ls /blahblah print the same? Why?
What happens when we execute
; cd
;
after executing this program. Why?
#include <u.h>
#include <libc.h>
void
main(int, char*[])
{
putenv("home", "/tmp");
exits(nil);
}
- 53 5
What would do these commands? Why?
; cd /
; cd ..
; pwd
6
7
8
9
10
After reading date(1), change the environment variable timezone to display the current
time in New Jersey (East coast of US).
How can we know the arguments given to a process that has been already started?
Give another answer for the previous problem.
What could we do if we want to debug a broken process tomorrow, and want to power off
the machine now?
What would happen if you use the debugger, acid, to inspect 8.out after executing the
next command line? Why?
; strip 8.out
- 54 .
- 55 -
3 Files
______
3.1. Input/Output
It is important to know how to use files. In Plan 9, this is even more important. The abstractions
provided by Plan 9 can be used through a file interface. If you know how to use the file interface,
you also know how to use the interface for most of the abstractions that Plan 9 provides.
You already know a lot about files. In the past, we have been using print to write messages. And, before this course, you used the library of your programming language to open, read,
write, and close files. We are going to learn now how to do the same, but using the interface provided by the operating system. This is what your programming language library uses to do its job
regarding input/output.
Consider print, it is a convenience routine to print formatted messages. It writes to a file,
by calling write. Look at this program:
______
_write.c
#include <u.h>
#include <libc.h>
void
main(int , char* [])
{
char
msg[] = "hello\n";
int
l;
l = strlen(msg);
write(1, msg, l);
exits(nil);
}
This is what it does. It does the same that print would do given the same string.
; 8.write
hello
The function write writes bytes into a file. Isn’t it a surprise? To find out the declaration for this
function, we can use sigq.
; sig write
long write(int fd, void *buf, long nbytes)
The bytes written to the file come from buf, which was msg in our example program. The number of bytes to write is specified by the third parameter, nbytes, which was the length of the
string in msg. And the file were to write was specified by the first parameter, which was just 1
for us.
Files have names, as we learned. We can use a full path, absolute or relative, to name a file.
Files being used by a particular process have names as well. The names are called file
________________
q Remember that this program looks at the source of the manual pages, in section 2, to find a function with
the given name in any SYNOPSIS section of any manual page. Very convenient to get a quick reminder of
which arguments receives a system function, and what does it return.
- 56 descriptors and are small integers. You know from your programming courses that to read/write
a file you must open it. Once open, you may read and write it until the file is closed. To identify
an open file you use a small integer, its file descriptor. This integer is used by the operating system as an index in a table of open files for your process, to know which file to use for reading or
writing. See figure 3.1.
Process
Standard
input
File descriptor
table
0
1
2
3
n
Standard
output
...
Standard
error
Figure 3.1: File descriptors point to files used for standard input, standard output, and standard error.
All processes have three files open right from the start, by convention, even if they do not
open a single file. These open files have the file descriptors 0, 1, and 2. As you could see, file
descriptor 1 is used for data output and is called standard output, File descriptor 0 is used for
data input and is called standard input, File descriptor 2 is used for diagnostic (messages) output
and is called standard error.
To read an open file, you may call read. Here is the function declaration:
; sig read
long read(int fd, void *buf, long nbytes)
It reads bytes from file descriptor fd a maximum of nbytes bytes and places the bytes read at
the address pointed to by buf. The number of bytes read is the value returned. Read does not
guarantee that we would get as many bytes as we want, it reads what it can and lets us know.
This program reads some bytes from standard input and later writes them to standard output.
______
read.c
#include <u.h>
#include <libc.h>
void
main(int , char* [])
{
char
buffer[1024];
int
nr;
nr = read(0, buffer, sizeof buffer);
write(1, buffer, nr);
exits(nil);
}
And here is how it works:
- 57 ; 8.read
from stdin, to stdout!
from stdin, to stdout!
If you type this
the program writes this
When you run the program it calls read, which awaits until there is something to read. When
you type a line and press return, the window gives the characters you typed to the program. They
are stored by read at buffer, and the number of bytes that it could read is returned and stored
at nr. Later, the program uses write to write so many bytes into standard output, echoing what
we wrote.
Many of the Plan 9 programs that accept file names as arguments work with their standard
input when given no arguments. Try running cat.
; cat
...it waits until you type something
It reads what you type and writes a copy to its standard output
; cat
from stdin, to stdout!
from stdin, to stdout!
and again
and again
control-d
;
If you type this
cat writes this
until reaching the end of the file. The end of file for a keyboard? There is no such thing, but you
can pretend there is. When you type a control-d by pressing the d key while holding down
Control, the program reading from the terminal gets an end of file.
Which file is standard input? And output? Most of the times, standard input, standard output, and standard error go to /dev/cons. This file represents the console for your program.
Like many other files in Plan 9, this is not a real (disk) file. It is the interface to use the device
that is known as the console, which corresponds to your terminal. When you read this file, you
obtain the text you type in the keyboard. When you write this file, the text is printed in the screen.
When used within the window system, /dev/cons corresponds to a fake console invented
just for your window. The window system takes the real console for itself, and provides each window with a virtual console, that can be accessed via the file /dev/cons within each window.
We can rewrite the previous program, but opening this file ourselves.
______
read.c
#include <u.h>
#include <libc.h>
void
main(int , char* [])
{
char
buffer[1024];
int
fd, nr;
fd = open("/dev/cons", ORDWR);
nr = read(fd, buffer, sizeof buffer);
write(fd, buffer, nr);
close(fd);
exits(nil);
}
- 58 This program behaves exactly like the previous one. You are invited to try. To open a file, you
must call open specifying the file name (or its path) and what do you want to do with the open
file. The integer constant ORDWR means to open the file for both reading and writing. This function returns a new file descriptor to let you call read or write for the newly open file. The
descriptor is a small integer that we store into fd, to use it later with read and write. Figure
3.2 shows the file descriptors for the process running this program after the call to open. It
assumes that the file descriptor for the new open file was 3.
Process
File descriptor
table
0
1
2
3
...
n
/dev/cons
Figure 3.2: File descriptors for the program after opening /dev/cons.
When the file is no longer useful for the program, it can be closed. This is achieved by calling close, which releases the file descriptor. In our program, we could have open /dev/cons
several times, one for reading and one for writing
infd = open("/dev/cons", OREAD);
outfd = open("/dev/cons", OWRITE);
using the integer constants OREAD and OWRITE, that specify that the file is to be open only for
reading or writing. But it seemed better to open the file just once.
The file interface provided for each process in Plan 9 has a file that provides the list of open
file descriptors for the process. For example, to know which file descriptors are open in the shell
we are using we can do this.
; cat /proc/$pid/fd
/usr/nemo
0 r M
94 (0000000000000001
0 00)
1 w M
94 (0000000000000001
0 00)
2 w M
94 (0000000000000001
0 00)
3 r c
0 (0000000000000002
0 00)
4 w c
0 (0000000000000002
0 00)
5 w c
0 (0000000000000002
0 00)
6 rw |
0 (0000000000000241
0 00)
7 rw |
0 (0000000000000242
0 00)
8 rw |
0 (0000000000000281
0 00)
9 rw |
0 (0000000000000282
0 00)
10 r M
10 (00003b49000035b0 13745 00)
11 r M
94 (0000000000000001
0 00)
;
8192
18 /dev/cons
8192
2 /dev/cons
8192
2 /dev/cons
0
0 /dev/cons
0
0 /dev/cons
0
0 /dev/cons
65536
38 #|/data
65536 81320369 #|/data1
65536
0 #|/data
65536
0 #|/data1
8168
512 /rc/lib/rcmain
8192
18 /dev/cons
The first line reports the current working directory for the process. Each other line reports a file
- 59 descriptor open by the process. Its number is listed on the left. As you could see, our shell has
descriptors 0, 1, and 2 open (among others). All these descriptors refer to the file /dev/cons,
whose name is listed on the right for each descriptor. Another interesting information is that the
descriptor 0 is open just for reading (OREAD), because there is an r listed right after the descriptor number. And as you can see, both standard output and error are open just for writing
(OWRITE), because there is a w printed after the descriptor number. The /proc/$pid/fd file
is a useful information to track bugs related to file descriptor problems. Which descriptors has
the typical process open? If you are skeptic, this program might help.
sleep.c
_______
#include <u.h>
#include <libc.h>
void
main(int, char*[])
{
print("process pid is %d. have fun.\n", getpid());
sleep(3600*1000); // one hour to play
exits(nil);
}
It prints its PID, and hangs around for one hour. After running this program
; 8.sleep
process pid is 1413. have fun.
...and it hangs around for one hour.
we can use another window to inspect the file descriptors for the process.
; cat /proc/1413/fd
/usr/nemo/9intro
0 r M
94 (0000000000000001
1 w M
94 (0000000000000001
2 w M
94 (0000000000000001
3 r c
0 (0000000000000002
4 w c
0 (0000000000000002
5 w c
0 (0000000000000002
6 rw |
0 (0000000000000241
7 rw |
0 (0000000000000242
8 rw |
0 (0000000000000281
9 rw |
0 (0000000000000282
0
0
0
0
0
0
0
0
0
0
00)
00)
00)
00)
00)
00)
00)
00)
00)
00)
8192
87 /dev/cons
8192
936 /dev/cons
8192
936 /dev/cons
0
0 /dev/cons
0
0 /dev/cons
0
0 /dev/cons
65536
38 #|/data
65536 85044698 #|/data1
65536
0 #|/data
65536
0 #|/data1
You process has descriptors 0, 1, and 2 open, as they should be. However, it seems that there are
many other ones open as well. That is why you cannot assume that the first file you open in your
program is going to obtain the file descriptor number 3. It might already be open. You better be
aware.
There is one legitimate question still pending. After we open a file, how does read know
from where in the file it should read? The function knows how many bytes we would like to read
at most. But its parameters tell nothing about the offset in the file where to start reading. And the
same question applies to write as well.
The answer comes from open, Each time you open a file, the system keeps track of a file
offset for that open file, to know the offset in the file where to start working at the next read or
write. Initially, this file offset is zero. When you write, the offset is advanced the number of
bytes you write. When you read, the offset is also advanced the number of bytes you read.
Therefore, a series of writes would store bytes sequentially, one write at a time, each one right
after the previous one. And the same happens while reading.
- 60 The offset for a file descriptor can be changed using the seek system call. Its second
parameter can be 0, 1, or 2 to let you change the offset to an absolute position, to a relative one
counting from the old value, and to a relative one counting from the size of the file. For example,
this sets the offset in fd to be 10:
seek(fd, 10, 0);
This advances the offset 5 bytes ahead:
seek(fd, 5, 1);
And this moves the offset to the end of the file:
seek(fd, 0, 2);
We did not use the return value from seek, but it is useful to know that it returns the new offset
for the file descriptor.
3.2. Write games
This program is a variant of the first one in this chapter, but writes the salutation to a regular file,
and not to the console
_______
fhello.c
#include <u.h>
#include <libc.h>
void
main(int , char* [])
{
char
msg[] = "hello\n";
int
fd;
fd = open("afile", OWRITE);
write(fd, msg, strlen(msg));
close(fd);
exits(nil);
}
We can create a file to play with by copying /NOTICE to afile, and then run this program to
see what happens.
; cp /NOTICE afile
; 8.fhello
This is what was at /NOTICE:
; cat /NOTICE
Copyright © 2002 Lucent Technologies Inc.
All Rights Reserved
;
and this is what is in afile:
- 61 ; cat afile
hello
ght © 2002 Lucent Technologies Inc.
All Rights Reserved
At first sight, it seems that something weird happen. The file has one extra line. However, part of
the original text has been lost. These two things seem contradictory but they are not. Using xd
may reveal what happen:
; xd -c afile
0000000
h e
0000010
2
0000020
o g
0000030
i g
000003f
; xd -c /NOTICE
0000000
C o
0000010
2
0000020
o g
0000030
i g
000003f
l
L
i
h
l
u
e
t
o \n
c e
s
s
g
n
I
R
h
t
n
e
t
p
L
i
h
y
u
e
t
r
c
s
s
g
n
I
R
h
t
n
e
t
i
e
c
s
c
s
c2 a9
T e c
. \n A
e r v
h
l
e
2 0
n o
l
d \n
0
l
R
c2 a9
T e c
. \n A
e r v
h
l
e
2 0
n o
l
d \n
0
l
R
Our program opened afile, which was a copy of /NOTICE, and then it wrote hello\n.
After the call to open, the file offset for the new open file was set zero. This means that write
wrote 6 bytes into afile starting at offset 0. The first six bytes in the file, which contained
Copyri, have been overwritten by our program. But write did just what it was expected to
do. Write 6 bytes into the file starting at the file offset (0). Nothing more, nothing less. It does not
truncate the file (it shouldn’t!). It does not insert. It just writes.
If we change the program above, adding a second call to write, so that it executes this
code
write(fd, "hello\n");
write(fd, "there\n");
we can see what is inside afile after running the program.
; cat afile
hello
there
2002 Lucent Technologies Inc.
All Rights Reserved
; xd -c afile
0000000
h e
0000010
2
0000020
o g
0000030
i g
000003f
l
L
i
h
l
u
e
t
o \n
c e
s
s
t
n
I
R
h
t
n
e
e
c
s
r e \n
T e c
. \n A
e r v
h
l
e
2 0
n o
l
d \n
0
l
R
After the first call to write, the file offset was 6. Therefore, the second write happen starting at
offset 6 in the file. And it wrote six more bytes. Once more, it did just it job, write bytes. The file
length is the same. The number of lines changed because the number of newline characters in the
file changed. The console advances one line each time it encounters a newline, but it is just a single byte.
Figure 3.3 shows the elements involved in writing this file, after the first call to write, and
before the second call. The file descriptor, which we assume was 3, points to a data structure containing information about the open file. This data structure keeps the file offset, to be used for the
following read or write operation, and record what the file was open for, e.g., OWRITE. Plan
9 calls this data structure a Chan (Channel), and there is one per file in use in the system. Besides
- 62 the offset and the open mode, it contains all the information needed to let the kernel reach the file
server and perform operations on the file. Indeed, a Chan is just something used by Plan 9 to
speak to a server regarding a file. This may require doing remote procedure calls across the network, but that is up to your kernel, and you can forget.
Process
File descriptor
table
0
1
2
3
Chan
offset: 6
mode: OWRITE
file:
...
n
h e l
l o \n
...
afile
Figure 3.3: The file offset for next operations is kept separate from the file descriptor.
We can use seek to write at a particular offset in the file. For example, the following code
writes starting at offset 10 into our original version of afile.
int
fd;
fd = open("afile", OWRITE);
seek(fd, 10, 0);
write(fd, "hello\n", 6);
close(fd);
The contents of afile have six bytes changed, as it could be expected.
; xd -c afile
0000000
C o
0000010
2
0000020
o g
0000030
i g
000003f
p
L
i
h
y
u
e
t
r
c
s
s
i
e
g
n
I
R
h
t
n
e
t
c
s
h
T e
. \n
e r
e
c
A
v
l
h
l
e
l o \n
n o l
l
R
d \n
How can we write new contents into afile, getting rid of anything that could be in the file
before we write? Simply by specifying to open that we want to truncate the file besides opening
it. To do so, we can do a bit-or of the desired open mode and OTRUNC, a flag that requests file
truncation. This program does so, and writes a new string into our file.
- 63 _______
thello.c
#include <u.h>
#include <libc.h>
void
main(int , char* [])
{
int
fd;
fd = open("afile", OWRITE|OTRUNC);
write(fd, "hello\n", 6);
close(fd);
exits(nil);
}
After running this program, afile contains just the 6 bytes we wrote:
; 8.thello
; cat afile
hello
;
The call to open, caused the file afile to be truncated. If was empty, open for writing on it,
and the offset for the next file operation was zero. Then, write wrote 6 bytes, at offset zero. At
last, we closed the file.
What would the following program do to our new version of afile?
__________
seekhello.c
#include <u.h>
#include <libc.h>
void
main(int , char* [])
{
int
fd;
fd = open("afile", OWRITE);
seek(fd, 32, 0);
write(fd, "there\n", 6);
close(fd);
exits(nil);
}
All system calls are very obedient. They do just what they are asked to do. The call to seek
changes the file offset to 32. Therefore, write must write six bytes at offset 32. This is the output for ls and xd on the new file after running this program:
- 64 ; 8.seekhello
; ls -l afile
--r--r--r-- M 19 nemo nemo 38 Jul 9 18:14 afile
; xd -c afile
0000000
h e l l o \n 00 00 00 00 00 00 00 00 00 00
0000010 00 00 00 00 00 00 00 00 00 00 00 00 00 00 00 00
0000020
t h e r e \n
0000026
The size is 38 bytes. That is the offset before write, 32, plus the six bytes we wrote. In the contents you see how all the bytes that we did not write were set to zero by Plan 9. And we know a
new thing: The size of a file corresponds to the highest file offset ever written on it.
A variant of this program can be used to create files of a given size. To create a 1 Gigabyte
file you do not need to write that many bytes. A single write suffices with just one byte. Of
course, that write must be performed at an offset of 1 Gigabyte (minus 1 byte).
Creating large files in this way is different from writing all the zeroes yourself. First, it
takes less time to create the file, because you make just a couple of system calls. Second, it can be
that your new file does not consume all its space in the disk until you really use it. Because Plan 9
knows the new size of the file, and it knows you never did write most of it, it can just record the
new size and allocate disk space only for the things you really wrote. Reading other parts of the
file yield just zeroes. There is no need to store all those zero bytes in the disk.
This kind of file (i.e., one created using seek and write), is called a file with holes. The
name comes from considering that the file has holes on it, where you did never write anything.
Of course, the holes are not really stored in a disk. It is funny to be able to store files for a total
amount of bytes that exceeds the disk capacity, but now you know that this can happen.
To append some data to a file, we can use seek to set the offset at the end of the file before
calling write, like in
fd = open("afile", OWRITE);
seek(fd, 0, 2); // move to the end
write(fd, bytes, nbytes);
For some files, like log files used to append diagnostic messages, or mail folders, used to append
mail messages, writing should always happen at the end of the file. In this case, it is more appropriate to use an append only permission bit supported by the Plan 9 file server:
; chmod +a /sys/log/diagnostics
; ls -l /sys/log/diagnostics
a-rw-r--r-- M 19 nemo nemo 0 Jul 10 01:11 /sys/log/diagnostics
This guarantees that any write will happen at the end of existing data, no matter what the offset is.
Doing a seek in all programs using this file might not suffice. If there are multiple machines
writing to this file, each machine would keep its own offset for the file. Therefore, there is some
risk of overwriting some data in the file. However, using the +a permission bit fixes this problem
once and for all.
3.3. Read games
To read a file it does not suffice to call read once. This point may be missed when using this
function for the first few times. The problem is that read does no guarantee that all the bytes in
the file could be read in the first call. For example, early in this chapter we did read from the console. Before typing a line, there is no way for read to obtain its characters. The result in that
when reading from the console our program did read one line at a time. If we change the program
to read from a file on a disk, it will probably read as much as it fits in the buffer we supply for
reading.
- 65 Usually, we are supposed to call read until there is nothing more to read. That happens
when the number of bytes read is zero. For example, this program reads the whole file /NOTICE,
and prints what it can read each time. The program is unrealistic, because usually you should
employ a much larger read buffer. Memory is cheap these days.
______
read.c
#include <u.h>
#include <libc.h>
void
main(int , char* [])
{
char
buffer[10];
int
nr;
int
fd;
fd = open("/NOTICE", OREAD);
if (fd < 0)
sysfatal("open: %r");
for(;;){
nr = read(fd, buffer, sizeof buffer);
if (nr <= 0)
break;
if (write(1, buffer, nr) != nr)
sysfatal("write: %r");
}
exits(nil);
}
Although we did not check out error conditions in most of the programs in this chapter. This program does so. When open fails , it returns -1. The program issues a diagnostic and terminates if
that is the case. Also, after calling read, it does not just check for nr == 0, which means that
there is nothing more to read. Instead, it checks for nr <= 0, because read returns -1 when it
fails. The call to write might fail as well. It returns the number of bytes that could be written,
and it is considered an error when this number differs from the one you specified.
3.4. Creating and removing files
The create system call creates one file. It is very similar to open. After creating the file, it
returns an open file descriptor for the new file, using the specified mode. It accepts the same
parameters used for open, plus an extra one used to specify permissions for the new file encoded
as a single integer.
This program creates its own version of afile, without placing on us the burden of creating it. It does not check errors, because it is just an example.
- 66
create.c
________
#include <u.h>
#include <libc.h>
void
main(int , char* [])
{
int
fd, n;
char
msg[] = "a new file\n";
fd = create("afile", OWRITE, 0664);
write(fd, msg, strlen(msg));
close(fd);
exits(nil);
}
To test it, we remove our previous version for afile, run this program, and ask ls and cat to
print information about the file and its contents.
; rm afile
; ls afile
ls: afile: ’afile’ file does not exist
; 8.create
; ls -l afile
--rw-r--r-- M 19 nemo nemo 11 Jul 9 18:39 afile
; cat afile
a new file
In fact, there was no need to remove afile before running the program. If the file being created
exists, create truncates it. If it does not exist, the file is created. In either case, we obtain a new
file descriptor for the file.
Directories can be created by doing a bit-or of the integer constant DMDIR with the rest of
the permissions given to create. This sets a bit (called DMDIR) in the integer used to specify
permissions, and the system creates a directory instead of a file.
fd = create("adir", OREAD, DMDIR|0775);
You cannot write into directories. That would be dangerous. Instead, when you create and
remove files within the directory, Plan 9 updates the contents of the directory file for you. If you
modify the previous program to try to create a directory, you must remove the line calling
write. But you should still close the file descriptor.
Removing a file is simple. The system call remove removes the named file. This program
is similar to rm.
- 67 _____
rm.c
#include <u.h>
#include <libc.h>
void
main(int , char* [])
{
int
i;
for (i = 1; i < argc; i++)
if (remove(argv[i]) < 0)
fprint(2, "%s: %r\n", argv[0]);
exits(nil);
}
It can be used like the standard rm(1) tool, to get rid of multiple files. When remove fails it
alerts the user of the problem.
; 8.rm rm.8 x.c afile
8.rm: ’x.c’ file does not exist
Like other calls, remove returns -1 when it fails. In this case we print the program name
(argv[0]) and the error string. That suffices to let the user know what happen and take any
appropriate action. Note how the program iterates through command line arguments starting at 1.
Otherwise, it would remove itself!
A directory that is not empty, and contains other files, cannot be removed using remove.
To remove it, you must remove its contents first. Plan 9 could remove the whole file tree rooted
at the directory, but it would be utterly dangerous. Think about rm /. The system command rm
accepts option -r to recursively descend the named file and remove it and all of its contents. It
must be used with extreme caution. When a file is removed, it is gone. There is nothing you can
do to bring it back to life. Plan 9 does not have a wastebasket. If you are not sure about removing
a file, just don’t do it. Or move it to /tmp or to some other place where it does not gets in your
way.
Now that we can create and remove files, it is interesting to see if a file does exist. This
could be done by opening the file just to see if we can. However, it is more appropriate to use a
system call intended just to check if we can access a file. It is called, perhaps surprisingly,
access. For example, this code excerpt aborts the execution of its program when the file name
in fname does not exist:
if (access(fname, AEXIST) < 0)
sysfatal("%s does not exist", fname);
The second parameter is an integer constant that indicates what do you want access to check
the file for. For example, AWRITE checks that you could open the file for writing, AREAD does
the same for reading, and AEXEC does the same for executing it.
3.5. Directory entries
Files have data. There are many examples above using cat and xd to retrieve the data stored in a
file. Besides, files have metadata, i.e., data about the data. File metadata is simply what the system needs to know about the file to be able to implement it. File metadata includes the file name,
the file size, the time for the last modification to the file, the time for the last access to the file,
and other attributes for the file. Thus, file metadata is also known as file attributes.
- 68 Plan 9 stores attributes for a file in the directory that contains the file. Thus, the data structure that contains file metadata is known as a directory entry. A directory contains just a
sequence of entries, each one providing the attributes for a file contained in it. Let’s see this in
action:
; lc
; cat .
;
An empty directory is an empty file.
; touch onefile
; xd -c .
0000000
B 00 M 00 13 00 00 00 00
0000010 00 00 00 00 00 a4 01 00 00
0000020
D 00 00 00 00 00 00 00 00
0000030
l e 04 00 n e m o 04
0000040
n e m o
0000044
00 00 00 00 bf a1 01
\r I b1 D \r I b1
07 00 o n e f i
00 n e m o 04 00
After creating onefile in this empty directory, we see a whole bunch of bytes in the directory.
Nothing that we could understand by looking at them, although you can see how there are several
strings, including nemo and onefile within the data kept in the directory.
For each file in the directory, there is an entry in the directory to describe the file. The format is independent of the architecture used, which means that the format is the same no matter the
machine that stored the file. Because the machine using the directory (e.g., your terminal) may
differ from the machine keeping the file (e.g., your file server), this is important. Each machine
could use a different format to encode integers, strings, and other data types.
We can double-check our belief by creating a second file in our directory. After doing so,
the directory has twice the size:
; touch another
; xd -c .
0000000
B 00 M 00 13 00 00 00
0000010 00 00 00 00 00 a4 01 00
0000020
D 00 00 00 00 00 00 00
0000030
e r 04 00 n e m o
0000040
n e m o B 00 M 00
0000050 00 bf a1 01 00 00 00 00
0000060
D \r I b1 D 00 00 00
0000070
n e f i l e 04 00
0000080
m o 04 00 n e m o
0000088
00
00
00
04
13
00
00
n
00
!
07
00
00
a4
00
e
00
I
00
n
00
01
00
m
00
b1
a
e
00
00
00
o
00
D
n
m
00
00
00
04
c0
!
o
o
00
\r
07
00
a1
I
t
04
00
I
00
n
01
b1
h
00
00
b1
o
e
When programming in C, there are convenience functions that convert this portable (but not
amenable) data structure into a C structure. The C data type declared in libc.h that describes a
directory entry is as follows:
- 69 typedef
struct Dir {
/* system-modified
ushort type;
/*
uint
dev;
/*
/* file data */
Qid
qid;
/*
ulong
mode;
/*
ulong
atime; /*
ulong
mtime; /*
vlong
length; /*
char
*name; /*
char
*uid;
/*
char
*gid;
/*
char
*muid; /*
} Dir;
data */
server type */
server subtype */
unique id from server */
permissions */
last read time */
last write time */
file length */
last element of path */
owner name */
group name */
last modifier name */
From the shell, we can use ls to obtain most of this information. For example,
; ls -lm onefile
[nemo] --rw-r--r-- M 19 nemo nemo 0 Jul
"
9 19:24 onefile
The file name is onefile. The field name within the directory entry is a string with the
name. Just with the name. An absolute path to refer to this file would include all the names
from that of the root directory down to the file; each component separated by a slash. But
the file name is just onefile.
"
The times for the last access and for the last modification of the file (this one printed by ls)
are kept at atime and mtime respectively. These dates are codified in seconds since the
epoch, as we saw for /dev/time.
"
The length for the file is zero. This is stored at field length in the directory entry. The
file is owned by user nemo and belongs to the group nemo. These values are stored as
string, using the fields uid (user id) and gid (group id) respectively.
"
The field mode records the file permissions, also known as the mode (that is why chmod
has that name, for change mode). Permissions are encoded in a single integer, as we saw.
For this file mode would be 0644.
"
The file was last modified by user nemo, and this value is encoded as a string in the directory entry, using field muid (modification user id).
"
The fields type, dev, and qid identify the file. They deserve a separate explanation on
their own that we defer by now.
To obtain the directory entry for a file, i.e., its attributes, we can use dirstat. This function
uses the actual system call, stat, to read the data, and returns a Dir structure that is more convenient to use in C programs. This structure is stored in dynamic memory allocated with malloc
by dirstat, and the caller is responsible for calling free on it.
The following program gives some information about /NOTICE, nothing that ls could not
do, and produces this output when run:
; 8.stat
file name: NOTICE
file mode: 0444
file size: 63 bytes
;
- 70
____
_stat.c
#include <u.h>
#include <libc.h>
void
main(int , char* [])
{
Dir*
d;
d = dirstat("/NOTICE");
if (d == nil)
sysfatal("dirstat: %r");
print("file name: %s\n", d->name);
print("file mode: 0%o\n", d->mode);
print("file size: %d bytes\n", d->length);
free(d);
exits(nil);
}
Note that the program called free only once, for the whole Dir. The strings pointed to by
fields in the structure are stored along with the structure itself in the same malloc-allocated
memory. Calling free once suffices.
An alternative to using this function is using dirfstat, which receives a file descriptor
instead of a file name. This function calls fstat, which is another system call similar to stat
(but receiving a file descriptor instead of a file name). Which one to use depends on what do you
have at hand, a name, or a file descriptor.
Because directories contain directory entries, reading from a directory is very similar to
what we have just done. The function read can be used to read directories as well as files. The
only difference is that the system will read only an integral number of directory entries. If one
more entry does not fit in the buffer you supply to read, it will have to wait until you read again.
The entries are stored in the directory in a portable, machine independent, and not amenable, format. Therefore, instead of using read, it is more convenient to use dirread. This
function calls read to read the data stored in the directory. But before returning to the caller, it
unpacks them into a, more convenient, array of Dir structures.
As an example, the next program lists the current directory, using dirread to obtain the
entries in it.
Running the program yields the following output. As you can see, the directory was being
used to keep a few C programs and compile them.
; 8.lsdot
8.lsdot
create.8
create.c
lsdot.8
lsdot.c
;
- 71
_____
_lsdot.c
#include <u.h>
#include <libc.h>
void
main(int , char* [])
{
Dir*
dents;
int
ndents, fd, i;
fd = open(".", OREAD);
if (fd < 0)
sysfatal("open: %r");
for(;;){
ndents = dirread(fd, &dents);
if (ndents == 0)
break;
for (i = 0; i < ndents; i++)
print("%s\n", dents[i].name);
free(dents);
}
exits(nil);
}
The array of directory entries is returned from dirread using a pointer parameter passed by reference (We know, C passes all parameters by value; The function receives a pointer to the
pointer). Such array is allocated by dirread using malloc, like before. Therefore, the caller
must call free (once) to release this memory. The number of entries in the array is the return
value for the function. Like read would do, when there are no more entries to be read, the function returns zero.
Sometimes it is useful to change file attributes. For example, changing the length to zero
may truncate the file. A rename within the same directory can be achieved by changing the name
in the directory entry. Permissions can be changed by updating the mode in the directory entry.
Some of the attributes cannot be updated. For example, it is illegal to change the modification
type, or any of the type, dev, and qid fields.
The function dirwstat is the counterpart of dirstat. It works in a similar way, but
instead of reading the attributes, it updates them. New values for the update are taken from a Dir
structure given as a parameter. However, the function ignores any field set to a null value, to
allow you to change just one attribute, or a few ones. Beware that zero is not a null value for
some of the fields, because it would be a perfectly legal value for them. The function nulldir
is to be used to null all of the fields in a given Dir.
Here is an example. The next program is similar to chgrp(1), change group, and can be
used to change the group for a file. The main function iterates through the file name(s) and calls
a chgrp function to do the actual work for each file.
- 72
______
_chgrp.c
#include <u.h>
#include <libc.h>
void
chgrp(char* gid, char* fname)
{
Dir
d;
nulldir(&d);
d.gid = gid;
if (dirwstat(fname, &d) < 0)
fprint(2, "chgrp: wstat: %r\n");
}
void
main(int argc, char* argv[])
{
int
i;
if (argc < 3){
fprint(2, "usage: %s gid file...\n", argv[0]);
exits("usage");
}
for (i = 2; i < argc; i++)
chgrp(argv[1], argv[i]);
exits(nil);
}
The interesting part is the implementation of the chgrp function. It is quite simple. Internally,
dirwstat packs the structure into the portable format, and calls wstat (the actual system call).
As a remark, there is also a dirfwstat variant, that receives a file descriptor instead of a file
name. It is the counterpart of dirfstat and uses the fwstat system call. Other attributes in
the directory entry can be updated as done above for the group id.
The resulting program can be used like the real chgrp(1)
; 8.chgrp planb chgrp.c chgrp.8
; ls -l chgrp.c chgrp.8
--rw-r--r-- M 19 nemo planb 1182 Jul 10 12:09 chgrp.8
--rw-r--r-- M 19 nemo planb 377 Jul 10 12:08 chgrp.c
;
3.6. Listing files in the shell
It may be a surprise to find out that there is now a section with this title. You know all about listing files. It is a matter of using ls and other related tools. Well, there is something else. The shell
on its own knows how to list files, to help you type names. Look at this session:
- 73 ; cd $home
; lc
bin
lib
; echo *
bin lib tmp
tmp
First, we used lc to list our home. Later, we used just the shell. It is clear that echo is simply
echoing its arguments. It knows nothing about listing files. Therefore, the shell had to supply
bin, lib, and tmp, as the arguments for echo (instead of supplying the *). It could be either
the shell or echo the one responsible for this behavior. There is no magic, and no other program
was involved on this command line.
The shell gives special meaning to certain characters (we already saw two: $, and ’).
One of them is *. When the a command line contains a word that is *, it is replaced with the
names for all the files in the current directory. Indeed, * works for all directories:
; lc bin
386
rc
; echo bin/*
bin/386 bin/rc
;
In this case, the shell replaced bin/* with two names before running echo: bin/386 and
bin/rc. This is called globbing, and it works as follows. When the shell reads a command
line, it looks for file name patterns. A pattern is an expression that describes file names. It can
be just a file name, but useful patterns can include special characters like *. The shell replaces
the pattern with all file names matching the pattern.
For example, * matches with any sequence of characters not containing /. Therefore, in
this directory
; lc
bin
book
lib
tmp
the pattern * matches with bin, book, lib, and tmp:
; echo *
bin book lib tmp
The pattern b* matches with any file name that has an initial b followed by *, i.e, followed
by anything. This means
; echo b*
bin book
The pattern *i* matches with anything, then an i, and then anything:
; echo *i*
bin lib
Another example
; echo *b*
bin book lib
showing that the part of the name matched by * can be also an empty string! Patterns like this one
mean the file name has a b in it.
Patterns may appear within path names, to match against different levels in the file tree. For
example, we might want to search for the file containing ls, and this would be a brute force
approach:
- 74 ; ls /ls
ls: /ls: ’/ls’ file does not exist
Not there. Let’s try one level down
; ls /*/ls
/bin/ls
Found! But let’s assume it was not there either.
; ls /*/*/ls
It might be at /usr/bin/ls. Not in a Plan 9 system, but we did not know. Each * in the pattern /*/*/ls matches with any file name. Therefore, this patterns means any file named ls,
inside any directory, which is inside any directory that is found at /.
This mechanism is very powerful. For example, this directory contains a lot of source and
object files. We can use a pattern to remove just the object files.
; lc
8.out
creat.8
creat.c
dirread.8
dirread.c
echo.8
; rm *.8
echo.c
err.8
err.c
global.c
hi.8
hi.c
home.c
open.8
open.c
read.8
read.c
rm.c
sic.c
sleep.c
stat.8
stat.c
take.c
trunc.8
trunc.c
write.8
write.c
wstat.8
wstat.c
The shell replaced the pattern *.8 with any file name terminated with .8. Therefore, rm
received as arguments all the names for object files.
; lc
8.out
creat.c
dirread.c
echo.c
err.c
global.c
hi.c
home.c
open.c
read.c
rm.c
sic.c
sleep.c
stat.c
take.c
trunc.c
write.c
wstat.c
Patterns may contain a ?, which matches a single character. For example, we know that the
linkers generate output files named 8.out, 5.out, etc. This removes any temporary binary that
we might have in the directory:
; rm ?.out
Any file name containing a single character, and then .out, matches this pattern. The shell
replaces the pattern with appropriate file names, and then executes the command line. If no file
name matches the pattern, the pattern itself is untouched by the shell and used as the command
argument. After the previous command, if we try again
; rm ?.out
rm: ?.out: ’?.out’ file does not exist
Another expression that may be used in a pattern is a series of characters between square brackets.
It matches any single character within the brackets. For example, instead of using ?.out we
might have used [58].out in the command line above. The only file names matching this
expression are 5.out and 8.out, which were the names we meant.
Another example. This lists any C source file (any string followed by a single dot, and then
either a c or an h).
; lc *.[ch]
As a shorthand, consecutive letters or numbers within the brackets may be abbreviated by using a
- between just the first and the last ones. An example is [0-9], which matches again any single
- 75 digit.
The directory /n/dump keeps a file tree that uses names reflecting dates, to keep a copy of
files in the system for each date. For example, /n/dump/2002/0217 is the path for the dump
(copy) made in February 17th, 2002. The command below uses a pattern to list directories for
dumps made the 17th of any month not after June, in a year beyond 2000, but ending in 2 (i.e.,
just 2002 as of today).
; ls /n/dump/2*2/0[1-6]17
/n/dump/2002/0117
/n/dump/2002/0217
/n/dump/2002/0317
/n/dump/2002/0417
/n/dump/2002/0517
/n/dump/2002/0617
In general, you concoct patterns to match on file names that may be of interest for you. The shell
knows nothing about the meaning of the file names. However, you can exploit patterns in file
names using file name patterns. Confusing?
To ask the shell not to touch a single character in a word that might be otherwise considered
a pattern, the word must be quoted. For example,
; lc
bin
lib
; touch ’*’
; echo *
* bin lib tmp
tmp
Because the * for touch was quoted, the shell took it verbatim. It was not interpreted as a pattern. However, in the next command line it was used unquoted and taken as a pattern. Removing
the funny file we just created is left as an exercise. But be careful. Remember what
; rm *
would do!
3.7. Buffered Input/Output
The interface provided by open, close, read, and write suffices many times to do the task
at hand. Also, in many cases, it is just the more convenient interface for doing I/O to files. For
example, cat must just write what it reads. It is just fine to use read and write for implementing such a tool. But, what if our program had to read one byte at a time? or one line at a
time? We can experiment using the program below. It is a simple cp, that copies one file into
another, but using the size for the buffer that we supply as a parameter.
____
_bcp.c
#include <u.h>
#include <libc.h>
static void
usage(void)
{
fprint(2, "usage: %s [-b bufsz] infile outfile\n", argv0);
exits("usage");
}
- 76 void
main(int argc, char* argv[])
{
char*
buf;
long
nr, bufsz = 8*1024;
int
infd, outfd;
ARGBEGIN{
case ’b’:
bufsz = atoi(EARGF(usage()));
break;
default:
usage();
}ARGEND;
if (argc != 2)
usage();
buf = malloc(bufsz);
if (buf == nil)
sysfatal("no more memory");
infd = open(argv[0], OREAD);
if (infd < 0)
sysfatal("%s: %s: %r", argv0, argv[0]);
outfd = create(argv[1], OWRITE, 0664);
if (outfd < 0)
sysfatal("%s: %s: %r", argv0, argv[1]);
for(;;){
nr = read(infd, buf, bufsz);
if (nr <= 0)
break;
write(outfd, buf, nr);
}
close(infd);
close(outfd);
exits(nil);
}
We are going to test our new program using a file created just for this test. To create the file, we
use dd. This is a tool that is useful to copy bytes in a controlled way from one place to another
(its name stands for device to device). Using this command
; dd -if /dev/zero -of /tmp/sfile -bs 1024 -count 1024
1024+0 records in
1024+0 records out
; ls -l /tmp/sfile
--rw-r--r-- M 19 nemo nemo 1048576 Jul 29 16:20 /tmp/sfile
we create a file with 1 Mbyte of bytes, all of them zero. The option -if lets you specify the input
file for dd, i.e., where to read bytes from. In this case, we used /dev/zero, which a (fake!) file
that seems to be an unlimited sequence of zeroes. Reading it would just return as many zeroes as
bytes you tried to read, and it would never give an end of file indication. The option -of lets you
specify which file to use as the output. In this case, we created the file /tmp/sfile, which we
are going to use for our experiment.
This tool, dd, reads from the input file one block of bytes after another, and writes each
block read to the output file. A block is also known as a record, as the output from the program
shows. In our case, we used -bs (block size) to ask dd to read blocks of 1024 bytes. We asked
dd to copy just 1024 blocks, using its -count option. The result is that /tmp/sfile has
1024 blocks of 1024 bytes each (therefore 1 Mbyte) copied from /dev/zero.
We are using a relic that comes from ancient times! Times when tapes and even more weird
- 77 artifacts were very common. Many of such devices required programs to read (or write) one
record at a time. Using dd was very convenient to duplicate one tape onto another and similar
things. Because it was not common to read or write partial records, the diagnostics printed by dd
show how many entire records were read (1024 here), and how many bytes were read from a last
but partial record (+0 in our case). And the same for writing. Today, it is very common to see
always +0 for both the data read in, and the data written out. By the way, for our little experiment we could have used just dd, instead of writing our own dumb version for it, but it seemed
more appropriate to let you read the code to review file I/O once more.
So, what would happen when we copy our file using our default buffer size of 8Kbytes?
; time 8.bcp /tmp/sfile /tmp/dfile
0.01u 0.01s 0.40r
8.bcp /tmp/sfile /tmp/dfile
Using the command time, to measure the time it takes for a command to run, we see that using a
8Kbyte buffer it takes 0.4 seconds of real time (0.40r) to copy a 1Mbyte file. As an aside,
time reports also that 8.bcp spent 0.01 seconds executing its own code (0.01u) and 0.01 seconds executing inside the operating system (0.01s), e.g., doing system calls. The remaining
0.38 seconds, until the total of 0.4 seconds, the system was doing something else (perhaps executing other programs or waiting for the disk to read or write).
What would happen reading one byte at a time? (and writing it, of course).
; time 8.bcp -b 1 /tmp/sfile /tmp/dfile
9.01u 56.48s 755.31r
8.bcp -b 1 /tmp/sfile /tmp/dfile
Our program is amazingly slow! It took 755.31 seconds to complete. That is 12.6 minutes, which
is an eon for a computer. But it is the same program, we did not change anything. Just this time,
we read one byte at a time and then wrote that byte to the output file. Before, we did the same but
for a more reasonable buffer size.
Let’s continue the experiment. What would happen if our program reads one line at a time?
The source file does not have lines, but we can pretend that all lines have 80 characters of one
byte each.
; time 8.bcp -b 80 /tmp/sfile /tmp/dfile
0.11u 0.74s 10.38r
8.bcp -b 80 /tmp/sfile /tmp/dfile
Things improved, but nevertheless we still need 10.38 seconds just to copy 1 Mbyte. What happens is that making a system call is not so cheap, at least it seems very expensive when compared
to making a procedure call. For a few calls, it does not matter at all. However, in this experiment
it does. Using a buffer of just one byte means making 2,097,152 system calls! (1,048,576 to read
bytes and 1,048,576 to write them). Using an 8Kbyte buffer requires just 128 calls (.e., 1,048,576
/ 8,196). You can compare for yourself. In the intermediate experiment, reading one line at a
time, it meant 26,214 system calls. Not as many as 2,097,152, but still a lot.
How to overcome this difficulty when we really need to write an algorithm that reads/writes
a few bytes at a time? The answer, as you probably know, is just to use buffering. It does not matter if your algorithm reads one byte at a time. It does matter if you are making a system call for
each byte you read.
The bio(2) library in Plan 9 provides buffered input/output. This is an abstraction that,
although not provided by the underlying Plan 9, is so common that you really must know how it
works. The idea is that your program creates a Bio buffer for reading or writing, called a
Biobuf. You program reads from the Biobuf, by calling a library function, and the library
will call read only to refill the buffer each time you exhaust its contents. This is our (in)famous
program, but this time we use Bio.
- 78 _______
biocp.c
#include <u.h>
#include <libc.h>
#include <bio.h>
static void
usage(void)
{
fprint(2, "usage: %s [-b bufsz] infile outfile\n", argv0);
exits("usage");
}
void
main(int argc, char* argv[])
{
char*
buf;
long
nr, bufsz = 8*1024;
Biobuf* bin;
Biobuf* bout;
ARGBEGIN{
case ’b’:
bufsz = atoi(EARGF(usage()));
break;
default:
usage();
}ARGEND;
if (argc != 2)
usage();
buf = malloc(bufsz);
if (buf == nil)
sysfatal("no more memory");
bin = Bopen(argv[0], OREAD);
if (bin == nil)
sysfatal("%s: %s: %r", argv0, argv[0]);
bout = Bopen(argv[1], OWRITE);
if (bout == nil)
sysfatal("%s: %s: %r", argv0, argv[1]);
for(;;){
nr = Bread(bin, buf, bufsz);
if (nr <= 0)
break;
Bwrite(bout, buf, nr);
}
Bterm(bin);
Bterm(bout);
exits(nil);
}
- 79 The first change you notice is that to use Bio the header bio.h must be included. The data structure representing the Bio buffer is a Biobuf. The program obtains two ones, one for reading the
input file and one for writing the output file. The function Bopen is similar to open, but returns
a pointer to a Biobuf instead of returning a file descriptor.
; sig Bopen
Biobuf* Bopen(char *file, int mode)
Of course, Bopen must call open to open a new file. But the descriptor returned by the underlying call to open is kept inside the Biobuf, because only routines from bio(2) should use that
descriptor. You are supposed to read and write from the Biobuf.
To read from bin, our input buffer, the program calls Bread. This function is exactly like
read, but reads bytes from the buffer when it can, without calling read. Therefore, Bread
does not receive a file descriptor as its first parameter, it receives a pointer to the Biobuf used
for reading.
; sig Bread
long Bread(Biobufhdr *bp, void *addr, long nbytes)
The actual system call, read, is used by Bread only when there are no more bytes to be read
from the buffer, e.g., because you already read it all.
To write bytes to a BIobuf, the program uses Bwrite. This is to write what Bread is
to read.
; sig Bwrite
long Bwrite(Biobufhdr *bp, void *addr, long nbytes)
The call to Bterm releases a Biobuf, including the memory for the data structure. This closes
the file descriptor used to reach the file, after writing any pending byte still sitting in the buffer.
; sig Bterm
int Bterm(Biobufhdr *bp)
As you can see, both Bterm and Bflush return an integer. That is how they report errors. They
can fail because it can be that the file cannot really be written (e.g., because the disk is full), but
you will only know when you try to write the file, which does not necessarily happen in Bwrite.
How will our new program behave, now that it uses buffered input/output? Let’s try it.
; time 8.bcp /tmp/sfile /tmp/dfile
0.00u 0.03s 0.38r
8.bcp /tmp/sfile /tmp/dfile
; time 8.out -b 1 /tmp/sfile /tmp/dfile
0.00u 0.13s 0.31r
8.bcp -b 1 /tmp/sfile /tmp/dfile
; time 8.out -b 80 /tmp/sfile /tmp/dfile
0.00u 0.02s 0.20r
8.bcp -b 80 /tmp/sfile /tmp/dfile
Always the same!. Well, not exactly the same because there is always some uncertainty in every
measurement. In this case, give or take 2/10th of a second. But in any case, reading one byte at a
time is far from taking 12.6 minutes. Bio took care of using a reasonable buffer size, and calling
read only when necessary, as we did by ourselves when using 8Kbyte buffers.
One word of caution. After calling write, it is very likely that our bytes are already in the
file, because there is probably no buffering between your program and the actual file. However,
after a call to Bwrite it is almost for sure that your bytes are not in the file. They will be sitting
in the Biobuf, waiting for more bytes to be written, until a moment when it seems reasonable
for a Bio routine to do the actual call to write. This can happen either when you fill the buffer,
or when you call Bterm, which terminates the buffering. If you really want to flush your buffer,
i.e., to send all the bytes in it to the file, you may call Bflush.
- 80 ; sig Bflush
int Bflush(Biobufhdr *bp)
To play with this, and see a couple of other tools provided by Bio, we are going to reimplement
our little cat program but using Bio this time.
biocat.c
________
#include <u.h>
#include <libc.h>
#include <bio.h>
void
main(int , char* [])
{
Biobuf bin;
Biobuf bout;
char*
line;
int
len;
Binit(&bin, 0, OREAD);
Binit(&bout,1, OWRITE);
while(line = Brdline(&bin, ’\n’)){
len = Blinelen(&bin);
Bwrite(&bout, line, len);
}
Bterm(&bin);
Bterm(&bout);
exits(nil);
}
This program uses two Biobufs, like the previous one. However, we now want one for reading
from standard input, and another to write to standard output. Because we already have file
descriptors 0 and 1 open, it is not necessary to call Bopen. The function Binit initializes a
Biobuf for an already open file descriptor.
; sig Binit
int Binit(Biobuf *bp, int fd, int mode)
You must declare your own Biobuf. Note that this time bin and bout are not pointers, they
are the actual Biobufs used. Once we have our bin and bout buffers, we might use any other
Bio function on them, like before. The call to Bterm terminates the buffering, and flushes any
pending data to the underlying file. However, because Bio did not open the file descriptor for the
buffer, it will not close it either.
Unlike the previous program, this one reads one line at a time, because we plan to use it
with the console. The function Brdline reads bytes from the buffer until the end-of-line delimiter specified by its second parameter.
; sig Brdline
void* Brdline(Biobufhdr *bp, int delim)
We used ’\n’, which is the end of line character in Plan 9. The function returns a pointer to the
bytes read, or zero if no more data could be read. Each time the program reads a line, it writes the
line to its standard output through bout. The line returned by Brdline is not a C string.
- 81 There is not a final null byte after the line. We could have used Brdstr, witch returns the line
read in dynamic memory (allocated with malloc), and terminates the line with a final null byte.
But we did not. Thus, how many bytes must we write to standard output? The function
Blinelen returns the number of bytes in the last line read with Brdline.
; sig Blinelen
int Blinelen(Biobufhdr *bp)
And that explains the body of the while in our program. Let’s now play with our cat.
; 8.biocat
one little
cat was walking.
control-d
one little
cat was walking.
;
No line was written to standard output until we typed control-d. The program did call Bwrite,
but this function kept the bytes in the buffer. When Brdline returned an EOF indication, the
call to Bterm terminated the output buffer and its contents were written to the underlying file. If
we modify this program to add a call to
Bflush(&bout);
after the one to Bwrite, this is what happens.
; 8.biocat
Another little cat
Another little cat
did follow
did follow
control-d
;
The call to Bflush flushes the buffer. Of course, it is now a waste to use bout at all. If we are
flushing the buffer after each write, we could have used just write, and forget about bout.
Problems
1
Use the debugger, acid, to see that a program reading from standard input in a window is
indeed waiting inside. read while the system is waiting for you to type a line in the window.
Hint: Use ps to find out which process is running your program.
2
Implement the cat(1) utility without looking at the source code for the one in your system.
3
Compare your program from the previous problem with the one in the system. Locate the
one in the system using a command. Discuss the differences between both programs.
4
Implement a version of chmod(1) that accepts an octal number representing a new set of
permissions, and one or more files. The program is to be used like in
; 8.out 0775 file1 file2 file3
5
Implement your own program for doing a long listing like
; ls -l
6
would do.
Write a program that prints all the files contained in a directory (hierarchy) along with the
total number of bytes consumed by each file. If a file is a directory, its reported size must
include that of the files found inside. Compare with du(1).
- 82 .
- 83 -
4 Parent and Child
______
4.1. Running a new program
In chapter 2 we inspected the process that is executing your code. This process was created by
Plan 9 in response to a request made by the shell. Until now, we have created new processes only
by asking the shell to run new commands. In this chapter we explore how to create new processes
and execute new programs by ourselves.
You may think that the way to start a new process to run a program is by executing a single
system call (something like run("/bin/ls") for executing ls). That is not the case. There
are two different system calls involved in the process. One creates a new process, the other executes a new program. There are several reasons for this:
"
One reason is that you may want to start a new process just to have an extra flow of control
for doing something. In this case, there would be no new program to execute. Thus, it
makes sense to be able to create a new process (e.g., a new flow of control) just for its own
sake.
"
Another reason is that you may want to customize the environment for the new process
(e.g., adjust its file descriptors, change its working directory, or any other thing) before it
executes the new program. It is true that a run() system call might include parameters to
specify all things you may want to customize. Such call would have countless parameters! It
is far more simple to let you use the programming language to customize whatever you
want in the process before it runs a new program.
Before going any further, this is a complete example using both system calls. This program creates a new process by calling fork, and executes /bin/ls in the new process by calling
execl:
______
_runls.c
#include <u.h>
#include <libc.h>
void
main(int, char*[])
{
switch(fork()){
case -1:
sysfatal("fork failed");
case 0:
execl("/bin/ls", "ls", nil);
break;
default:
print("ls started\n");
}
exits(nil);
}
The process running this program proceeds executing main, and then calls fork. At this point,
a new process is created as an exact clone of the one we had. Both processes continue execution
returning from fork. For the original process (the parent process), fork returns the pid for the
new process. Because this is a positive number, it enters the default case. For the new process
- 84 (the child process), fork returns zero. So, the child process continues executing at case 0.
The child calls execl, which clears its memory and loads the program at /bin/ls for execution.
We will now learn about each call at a time, to try to understand them well.
4.2. Process creation
The system call fork creates an exact clone of the calling process. What does this mean? For
this program
_________
onefork.c
#include <u.h>
#include <libc.h>
void
main(int, char*[])
{
print("one\n");
fork();
print("fork\n");
exits(nil);
}
This is the output
; 8.onefork
one
fork
fork
The first print was first executed. After that, we can see twice the text for the second print.
Indeed, it executed twice. When we asked the shell to run 8.onefork, it created a process to
run our program. This process provides the flow of control that, for us, starts at main and proceeds until the call to exits. Our process obeys the behavior we expect. It executes the first
line, then the next, and so on until it dies. At some point, this process makes a call to fork, and
that creates another process that proceeds executing from fork one line after another until it
dies.
This can be seen in figure 4.1. The figure depicts the state for both processes at different
points in time. Time increases going down in the figure. The arrows in the figure represent the
program counter. Initially, only the parent exists, it executes the instructions for the first print.
Later, the parent calls fork. Later, during the system call, a clone, i.e, the child, is created as a
copy of the original. This means that the memory of the child is a copy of the memory of the parent. This memory includes the code, all the data, and the stack! Because the child is a copy, it
will return from the fork call like the parent will; Its registers are also (almost) a copy.
From now on, we do not know in which order they will execute, and we do not know for
how much time one process will be executing each time it is given the processor. The figure
assumes that the child will execute now print("fork\n") and then the parent will have
enough time to complete its execution, and the child will at last execute its remaining
instructions. But we do not know. The system may assign the processor in turns to these and
other processes in any other way. Perhaps the parent has time to complete right after calling
fork and before the child starts executing, or perhaps it will happen just the opposite.
The child executes independently from the parent. For it, it does not matter what the parent
does. For the parent, it does not matter what the child does. That is the process abstraction. You
- 85 -
Parent
PC
print("one\n");
fork();
print("fork\n");
exits(nil);
Parent
PC
print("one\n");
fork();
print("fork\n");
exits(nil);
Parent
PC
print("one\n");
Child
PC
print("one\n");
fork();
fork();
print("fork\n");
print("fork\n");
exits(nil);
exits(nil);
Flow of control
Child
print("one\n");
PC
fork();
print("fork\n");
exits(nil);
Parent
print("one\n");
PC
fork();
Child’s flow
print("fork\n");
exits(nil);
Parent
print("one\n");
fork();
PC
print("fork\n");
exits(nil);
Child
print("one\n");
fork();
PC
print("fork\n");
exits(nil);
Figure 4.1: The call to fork creates a clone of the original process. Both proceed from there.
- 86 get a new, separate, stand-alone, flow of control together with everything it needs to do its job.
To write your programs, did you have to think about what the shell program was doing?
You never did. You wrote your own program (executed by your own process) and you forgot
completely about other processes in the system. The same happens here. In Plan 9, when a process
has offspring, the child leaves the parent’s house immediately.
Because the child is a copy, and all its memory is a copy of the parent’s, variables in the
child start with the values they had by the time of the fork. From there on, when you program,
you must keep in mind that each variable you use may have one value for the parent and another
for the child. You just have to fork (hence the system call name) the flow of control at the fork,
and think separately from there on for each process. To check out that you really understand this,
try to say what this program would print.
_______
_intfork.c
#include <u.h>
#include <libc.h>
void
main(int, char*[])
{
int
i;
i = 1;
fork();
i++;
print("i=%d\n", i);
exits(nil);
}
The variable i is initialized to 1 by the only process we have initially. After calling fork, each
process (parent and child) increments it’s own copy of the variable. The variable i of the parent
becomes 2, and that of the child becomes 2 as well. Finally, each process will print its variable,
but we will always get this output:
; 8.intfork
i=2
i=2
After calling fork, you may want to write an if that makes the child do something different
from the parent. If you could not do this, they would be viruses, not processes. Fortunately, it is
simple. We have seen how fork returns two times. Only the parent calls it, but it returns for the
parent (in the parent process) and for the child (in the child process). The return value differs.
This program
- 87
child.c
_______
#include <u.h>
#include <libc.h>
void
main(int, char*[])
{
switch(fork()){
case -1:
sysfatal("fork failed\n");
case 0:
print("I am the child\n");
break;
default:
print("I am the parent\n");
}
exits(nil);
}
produces the following output
; 8.child
I am the child
I am the parent
To the parent, fork returns the pid of the child, which we know is greater than zero. To the
child, fork always returns zero. Therefore, we can write different code to be executed in the parent and the child after calling fork. Both processes have their own copy for all the code, but they
can follow different paths from there on.
When fork fails, it returns -1, and we should always check for errors. Of course when it
fails there would be no child. But otherwise, both processes execute different code after fork. In
which order? We do not know. And we should not care! Did you care if your shell executed its
code before or after the code in your programs? You forgot about the shell when writing your
programs. Do the same here. The program above might produce this output instead
; 8.child
I am the parent
I am the child
Let’s have some fun. This is a runaway program. It creates a child and then dies. The child continues playing the same game. This is a nasty program because it is very hard (or impossible) to
kill. When you are prepared to kill it, the process has gone and there is noone to kill. But there is
another process taking its place!
- 88 _________
diehard.c
#include <u.h>
#include <libc.h>
void
main(int, char*[])
{
while(fork() == 0)
;
// catch me!
exits(nil);
}
This version is even more nasty. It creates processes exponentially, which might happen to you
some day when you make a mistake calling fork. Once the system cannot cope with more processes, there will be nothing you could do but rebooting the machine. Try it as the last thing do
you in one of your sessions so that you could see what happens.
_______
_rabbits.c
#include <u.h>
#include <libc.h>
void
main(int, char*[])
{
// just like rabbits...
while(fork())
;
exits(nil);
}
4.3. Shared or not?
Fork creates a clone process. Because the child is a clone, it has its own set of file descriptors.
When fork returns, the descriptors in the child are a copy of those in the parent. However, that is
the only thing copied.
Of course, the files referenced by the descriptors are not copied. The Chan data structures
that maintain the offset for the open files are not copied either. Figure 4.2 shows both a parent
and a child just after calling fork, showing file descriptors for both. This figure may correspond
to the following program.
- 89 -
Parent
process
Child
process
File descriptor
table
0
1
2
3
File descriptor
table
0
1
2
3
/dev/cons
offset: 3245
...
n
afile
offset: 6
...
n
Figure 4.2: The child has a copy of the file descriptors that the parent had.
_______
_before.c
#include <u.h>
#include <libc.h>
void
main(int, char*[])
{
int
fd;
fd = create("afile", OWRITE, 0644);
write(fd, "hello\n", 6);
if (fork() == 0)
write(fd, "child\n", 6);
else
write(fd, "dad\n", 4);
close(fd);
exits(nil);
}
Initially, the parent had standard input, output, and error open. All of them went to file
/dev/cons. Then, the parent opens (i.e., creates) afile, and file descriptor 3 is allocated. It
points to a (Chan) data structure that maintains the offset (initially 0), and the reference to the
actual file. After writing 6 bytes, the offset becomes 6.
At this point, fork creates the child as a clone. It has a copy of the parent’s file descriptors,
but everything else is shared. Of course, if either process opens new files, their offsets would not
be shared. For each open you get an all new file offset. What would be the contents for afile
after running this program?
- 90 ; 8.before
; cat afile
hello
child
dad
;
Each process calls write. the child’s write updates the file and advances the offset by 6. The
next write does the same. The order of child and dad may differ in the output, depending on
which process executes first its write. Both will be there.
Compare what happen before with the behavior for the next program. The program is very
similar. The parent tries to write dad to a file, and the child tries to write chid. According to
our experience, the file should have both strings in it after the execution.
_____
_after.c
#include <u.h>
#include <libc.h>
void
main(int, char*[])
{
int
fd;
if (fork() == 0){
fd = open("afile", OWRITE);
write(fd, "child\n", 6);
} else {
fd = open("afile", OWRITE);
write(fd, "dad\n", 4);
}
close(fd);
exits(nil);
}
But this is what happens:
; rm afile
; touch afile
; 8.after
; cat afile
dad
d
; xd -c afile
0000000
d a
0000006
d \n
d \n
Why? Because each process had its own file descriptor for the file, that now is not sharing anything with the other process. In the previous program, the descriptors in both processes came from
the same open: They were sharing the offset. When the child wrote, it advanced the offset. The
parent found the offset advanced, and could write past the child’s output.
But now, the parent opens the file, and gets its own offset (starting at 0). The child does the
same and gets its own offset as well (also 0). One of them writes, in this case the child wrote
first. That advances its own offset for the file. The other offset stays at 0. Therefore, both
- 91 processes overwrite the same part of the file.
It could be that the parent executes its write before the child, in which case we would get
this, which would be also an overwrite:
; cat afile
child
There is one interesting thing to learn here. We have said that either write (parent’s and child’s)
can execute before the other one. Couldn’t it be that part of a write is executed and then part of
the other? In principle it could. But in this case, it will never happen.
Plan 9 guarantees that a single write to a particular file is fully executed and not mixed
with other writes to the same file. This means that if there are two write calls being made for
the same file, one must execute before the other. For different files, they could execute simultaneously (i.e., concurrently), but not for the same file in Plan 9.
When one operation is guaranteed to execute completely without being interrupted, it is
called atomic. The Plan 9 write system call is atomic at least for writes on the same file and
when the number of bytes is not large enough to force the system to do several write operations to
implement your system call. In our system this happens for writes of at most 8Kbytes.
4.4. Race conditions
What you just saw is very important. It is not to be forgotten, or you risk going into a debugging
Inferno. When multiple processes work on the same data, extra care is to be taken. You saw how
the final value for afile depends on which process is faster, i.e., gets more processor time, and
reaches a particular point in the code earlier than another process. Because the final result depends
on this race, its said that the program has a race condition.
You are entering a dangerous world. It is called concurrent programming. The moment
you use more than one process to write an application, you have to think about race conditions
and try to avoid them as much as you can. The name concurrent is used because you do not
know if all your processes execute really in parallel (when there is more than one processor) or
relying on the operating system to multiplex a single processor among them. In fact, the problems
would be the same: Race conditions. Therefore, it is best to think that they execute concurrently,
try to avoid races, and forget about what is really happening underneath.
Programs with race conditions are unpredictable. They should be avoided. Doing so is a
subject for a book or a course by itself. Indeed, there are many books and courses on concurrent
programming that deal with this topic. In this text, we will deal with this problem by trying to
avoid it, and showing a few mechanisms that can protect us from races.
4.5. Executing another program
We know how to create a new process. Now it would be interesting to learn how to run a new
program using a process we have created. This is done with the exec system call. This call
receives two parameters, a file name that corresponds to the executable file that we want to execute, and its argument list. The argument list is an array of strings, with one string per argument.
If we know the argument list in advance (when we write the program), another system call
called execl is more convenient. It does the same, but lets you write the arguments directly as
the function arguments, without having to declare and initialize an array. We are going to use this
call here.
This is our first example program
- 92
execl.c
_______
#include <u.h>
#include <libc.h>
void
main(int, char*[])
{
print("running ls\n");
execl("/bin/ls", "ls", "-l", "/usr/nemo", nil);
print("exec failed: %r\n");
}
When run, it produces the following output:
; 8.execl
running ls
d-rwxrwxr-x M 19 nemo nemo
d-rwxrwxr-x M 19 nemo nemo
d-rwxr-xr-x M 19 nemo nemo
0 Jul 11 18:11 /usr/nemo/bin
0 Jul 11 21:24 /usr/nemo/lib
0 Jul 11 21:13 /usr/nemo/tmp
The output is produced by the program found in /bin/ls. Clearly, our program did not read a
directory nor print any file information. Furthermore, the output is the same printed by the next
command:
; ls -l /usr/nemo
d-rwxrwxr-x M 19 nemo nemo
d-rwxrwxr-x M 19 nemo nemo
d-rwxr-xr-x M 19 nemo nemo
0 Jul 11 18:11 /usr/nemo/bin
0 Jul 11 21:24 /usr/nemo/lib
0 Jul 11 21:13 /usr/nemo/tmp
This is what the execl call did. It loaded the program from /bin/ls into our process, and
jumped to its main procedure supplying the arguments ls, -l, and /usr/nemo. Remember that argv[0] is the program name, by convention. The last parameter to the execl call
was nil to let it know when to stop taking parameters from the parameter list.
There is an important thing that the output for our program does show. Indeed, that it does
not show. The print we wrote after calling execl is missing from the output! This makes
sense if you think twice. Because execl loads another program (e.g., that in /bin/ls) into our
process, our code is gone. If execl works, the process no longer has our program. It has that of
ls instead. Also, our process no longer has our data, nor our stack. Initial data and stack for ls is
there instead. What a personality change!
Now consider the same program but replacing the call to execl with this one:
execl("ls", "-l", "/usr/nemo", nil);
This is the output now when the program is run:
; 8.execl
running ls
exec failed: ’ls’ file does not exist
This time, both calls to print execute! Because execl failed to do its work, it did not load any
program into our process. Our mind is still here, and the second printed message shows up. Why
did execl fail? We forgot to supply the file name as the first parameter. Therefore, execl tried
to access the file ./ls to load a program from it. Because such file did not exist, the system call
could do nothing else but to return an error. What value returns execl when it fails? It does not
matter. If it returns, it must be an error.
Now replace the call with the next one. What would happen?
- 93 execl("/bin/ls", "-l", "/usr/nemo", nil);
This is what happens:
; 8.execl
running ls
/usr/nemo/bin
/usr/nemo/lib
/usr/nemo/tmp
Clearly ls did run in our process. Its output is there and our second print is not. However, where
is the long listing we requested? Nowhere. For ls, argv[0] was -l and argv[1] was
/usr/nemo. We executed ls /usr/nemo. Even worse, we told ls that its name was -l.
Now that we master execl, let’s try doing one more thing. If we replace the call with this
other one, what happens?
execl("/bin/ls", "ls", "-l", "$home", nil);
The answer is obvious only when you think which program takes care of understanding $home.
It is the shell, and not ls. The shell replaces $home with its value, /usr/nemo in this case. It
seems natural now that this is he output for the program:
; 8.execl
running ls
ls: $home: ’$home’ file does not exist
What we executed was the equivalent of the shell command line
; ls -l ’$home’
which we know well now. Should we want to run the program for $home, we must take care of
the environment variable by ourselves:
#include <u.h>
#include <libc.h>
void
main(int, char*[])
{
char*
home;
print("running ls\n");
home = getenv("home");
execl("/bin/ls", "ls", "-l", home, nil);
print("exec failed: %r\n");
}
4.6. Using both calls
Most of the times you will not call exec using the process that initially runs your program. Your
program would be gone. You combine both fork and exec to start a new process and run a program on it, as saw first in this chapter. We are going to implement a function called run, which
receives a command including its arguments and runs it at a separate process. This is useful
whenever you want to start an external program from your own one.
The header for the function will be:
int run(char* file, char* argv[]);
and its parameters have the same meaning that those of exec: The file to execute and the
- 94 argument vector. This is the code.
int
run(char* cmd, char* argv[])
{
switch(fork()){
case -1:
return -1;
case 0:
// child
exec(cmd, argv);
sysfatal("exec: %r");
default:
// parent
return 0;
}
}
The function creates a child process, unless forks fails, in which case it reports the error by
returning -1. The parent process returns zero to indicate that it could fork. The child calls exec
to run the new program. Should it fail, there is nothing we could do but to terminate the execution
of this process reporting the error. Note that the child process should never return from the function. When a program calls run, only one flow of control performs the call, and you expect only
one flow of control coming out and returning from it.
This function has one problem. The command file might not exist, or lack execution permission, but the program calling run would never know. This can be a temporary fix, until we
learn more in the next section:
int
run(char* cmd, char* argv[])
{
if (access(cmd, AEXEC) < 0)
return -1;
switch(fork()){
case -1:
return -1;
case 0:
// child
exec(cmd, argv);
sysfatal("exec: %r");
default:
return 0;
}
}
Before creating the child, we try to be sure that the file for the command has access for executing
it. The access system call checks this when given the AEXEC flag.
After calling access, and before doing the exec, things could change. So, there is a
potential race condition here. It could be that access thinks that the command can be executed,
and then something changes, and exec fails! What is really needed is a way to let the child process tell the parent about what happen. The parent is only interested in knowing if the child could
actually perform its work, or not.
4.7. Waiting for children
Did you notice that the shell awaits until one command terminates before prompting for the next?
How can it know that the process executing the command has completed its execution? Also, if
you create a process for doing something, how can you know if it could do its job?
When a process dies, it always dies by a call to exits (remember that there is one after
- 95 returning from main). The string the process gives to exits is its exit status. This was not new.
The new point is that the parent may wait until a child dies and obtain its exit status. The function
used to do this is wait:
; sig wait
Waitmsg* wait(void)
where Waitmsg is defined like follows.
typedef
struct Waitmsg
{
int
ulong
char
} Waitmsg;
pid;
time[3];
*msg;
/* of loved one */
/* of loved one & descendants */
A call to wait blocks until one child dies. At that point, it returns a wait message that contains
information about the child, including its pid, its status string, and the time it took for the child to
execute. If one child did already die, there is no need to wait and this call returns immediately. If
there is no children to wait for, the function returns nil.
Now we can really fix the problem of our last program.
int
run(char* cmd, char* argv[])
{
Waitmsg*
m;
int
ret;
switch(fork()){
case -1:
return -1;
case 0:
// child
exec(cmd, argv);
sysfatal("exec: %r");
default:
m = wait();
if (m->msg[0] == 0)
ret = 0;
else {
werrstr(m->msg);
ret = -1;
}
free(m);
return ret;
}
}
After calling fork, the parent goes through the default case and calls wait. If by this time the
child did complete its execution by calling exits, wait returns immediately Waitmsg with
information about the child. If the child is still running, wait blocks until the child terminates.
The data structure returned by wait is allocated using malloc, and the caller of wait is
responsible for releasing this memory.
Another detail is that the routine updates the process error string in the parent process when
the child fails. That is where the caller program expects to find out the diagnostic for a failed (system) call.
In this case we know that there is at least one child, and wait cannot return nil. The convention in Plan 9 is that an empty string in the exit message means everything ok. That is the
- 96 information returned by run. The field m in the Waitmsg contains a copy of the child’s exit
message.
This code still has flaws. The program that calls run might have created another child
before calling our function. In this case, it is not sure that wait returns information about the
child it created. This is a better version of the same function.
int
run(char* cmd, char* argv[])
{
Waitmsg*
m;
int
ret;
int
pid;
pid = fork();
switch(pid){
case -1:
return -1;
case 0:
// child
exec(cmd, argv);
sysfatal("exec: %r");
default:
while(m = wait()){
if (m->pid == pid){
if (m->msg[0] == 0)
ret = 0;
else {
werrstr(m->msg);
ret = -1;
}
free(m);
return ret;
}
free(m);
}
}
}
The routine, when executed by the parent process, makes sure that the message comes from the
right (death) child. Its manual page should now include a warning stating clearly that this routine
waits for any child until the one it creates is waited for. Callers must know this. Otherwise, what
would happen to programs like this one?
...
if (fork() == 0){
... do something in this child ...
} else {
run(cmd, args);
...
m = wait();
// wait for our child
...
free(m);
}
The wait in this code seems to be for the child created by the fork. However, the call to run
would probably wait for the 2 children, and wait is likely to return nil!
When a program is not interested in the exit message, it can use waitpid instead of wait.
This function returns just the pid of the death child. Both functions are implemented using the
real system call, await. But that does not really matter.
- 97 Although the shell waits by default until the process running a command completes, before
prompting for another line, it can be convinced not to wait. Any command line with a final
ampersand is not waited for. Try this
; sleep 3
;
...no prompt for 3 seconds.
and this
; sleep 3 &
;
...and we get a new prompt right away.
This is used when we want to execute a command in the background, i.e., one that does not read
from our terminal and does not make the shell wait for it. We can start a command and forget it is
still there. The shell puts into $apid the pid for the last process started in the background, to let
you know its pid for things like killing it.
Any output from the command will still go to the console, and may disturb us. However,
the shell arranges for the command to have its standard input coming from /dev/null, a file
that always seems to be empty when read.
This can be double checked. The read command reads a single line of text from its input,
and then writes it to its standard output.
; read
hello
hello
;
you type this...
...and it writes this.
Look what happens here:
; read &
;
The program did not print anything. Because it could not read anything from its input.
Some programs may want to execute in the background, without making the shell wait for
them until terminated. For example, a program that opens a new window in the window system
should avoid blocking the shell until the new window is closed. You want a new window, but you
still want your shell.
This effect can be achieved without using & in the command line. The only thing needed is
to perform the actual work in a child process, and allow the parent process to die. Because the
shell waits for the parent process (its child), it will prompt for a new command immediately after
this process dies. The first program of this chapter is an example (even though it makes not sense
to do this just to run ls).
4.8. Interpreted programs
An executable is a file that has the execute permission set. If it is a binary file for the architecture
we are running on, it is understandable what happens. If it is a binary for another architecture, the
kernel will complaint. This was executed using an Intel-based PC:
; 5c ls.c
; 5l ls.5
; ./5.out
./5.out: exec header invalid
The header for the binary file has a constant, weird, number in it. It is placed there by the loader
and checked by the kernel, which is doing its best to be sure that the binary corresponds to the
architecture executing it.
- 98 But there is another type of executable files. Interpreted programs. For Plan 9, an interpreted
program is any file starting with a text line that has a format similar to
#!/bin/rc
It must start with #!, followed by the command that interprets the file. In the example above, the
program interpreting the file is /bin/rc, i.e., the standard Plan 9 shell. You know what the shell
does. It reads lines, interprets them, and execute commands as a result. For the shell, it does not
matter if commands come from the console or from a file. Both things are files actually!
This is an example of a program interpreted by the shell, also known as a shell script. We
can try it by storing the text in a file named hello and executing it:
; cat hello
#!/bin/rc
echo hello there!
; chmod +x hello
; hello
hello there!
;
When Plan 9 tries to execute a file, and it finds that the two initial characters are #!, it executes
the interpreter as the new binary program for the process, and not the file whose name was given
to exec. The argument list given to exec is altered a little bit by the kernel to include the script
file name as an argument. As a result, executing hello is actually equivalent to doing this
; rc hello
To say it explicitly, a shell script is always executed by a new shell. Commands in the script are
read by the child shell, and not by the original one. Look at this
; cat cdtmp
#!/bin/rc
cd /tmp
; pwd
/usr/nemo
; chmod +x cdtmp
; cdtmp
; pwd
/usr/nemo
Is Plan 9 disobeying? Of course not. We executed cdtmp. But commands in the script are not
executed by the shell we are using. A new shell was started to read and execute the commands in
the file. That shell changed its working directory to /tmp, and then died. The parent process (the
shell we are using) remains unaffected. This may confirm what we said
; cat cdtmp
#!/bin/rc
cd /tmp
pwd
; pwd
/usr/nemo
; cdtmp
/tmp
; pwd
/usr/nemo
This mechanism works for any program, and not just for the shell. For example, hoc is a floating
point calculator language. It can be used to evaluate arbitrary floating point calculations. When
given a file name, hoc interprets the expressions in the file and prints any result. Now we can
make an interpreted program that lets you know the output of 2+2:
- 99 ; cat 2+2
#!/bin/hoc
2 + 2
; chmod +x 2+2
; 2+2
4
;
Amazing!
Because the shell can be used to write programs, it is a programming language. It includes
even a way to write comments. When the shell finds a # character, it ignores it and the rest of the
line. That is why the special format for the first line of interpreted programs in Plan 9 starts with
that character! When the shell interprets the script, it reads the first line as well. However, that
line is a comment and, therefore, ignored.
Scripts have arguments, as any other executable program has. The shell interpreting the
script stores the argument list in the environment variable named *. This is echo using echo:
______
_rcecho
#!/bin/rc
echo $*
And this is what it does
; rcecho hello world
hello world
As an additional convenience, within a shell script, $0 is equivalent to argv[0] in a C program,
$1 to argv[1], and so on.
Problems
1
Trace (by hand) the execution of this program. Double check by executing it in the machine.
#include <u.h>
#include <libc.h>
void
main(int, char*[])
{
fork();
fork();
print("hi\n");
}
2
3
4
5
Compile and execute the first program shown in this chapter. Explain the output.
Fix the program from the previous problem using wait(2).
Implement your own version of the time(1) tool. This program runs a single command and
reports the time the command took to execute (elapsed time, time spent executing user code,
and time spent executing kernel code).
Implement a function
char* system(char* cmd);
6
That receives a command line as an argument and must execute it in a child process like the
Plan 9 shell would do. Think of a reasonable return value for the function.
Hint: Which program did we say that knows how to do this type of work?
Write a script that interprets another script, for example, by using rc. Can you specify that
- 100 -
7
a program interpreter is also an interpreted file? Explain.
How could you overcome the limitation expossed in the previous problem?
- 101 -
5 Communicating Processes
______
5.1. Input/Output redirection
Most commands we have executed so far write their output to the console, because their standard
output file descriptor is usually leading to the console.
In some cases, it may be useful to redirect the output for a command to store the data produced in a file. For example, to record the date for an important moment, we can execute date
and store its output in a file, for posterity. The shell knows how to do this:
; date > rememberthis
;
This command line means: Execute the command date as usual, but send its output to
rememberthis. The obedient Plan 9 shell makes the arrangements to get the output for the
command sent to file, and not to the console. As a result, date did now write anything in the
console. But it did write. Its output is here instead.
; cat rememberthis
Thu Jul 13 12:10:38 MDT 2006
This can be done to any command, as you may expect. When the shell finds a > in a command
line, it takes the next word as the name of a file where to send the output for the command. This
is a poor’s man editor. We use cat to read what we write in the terminal, and write it into a file.
; cat >/tmp/note
must leave at 8
control-d
; cat /tmp/note
must leave at 8
The > character is an operator, and has a special meaning. To use it just as a character, it must
be quoted. We already knew, but just as a reminder:
; echo ’>’ > file
; cat file
>
;
Another example. If our machine seems to be heavily loaded, we may want to conserve the list of
running processes, to inspect it later. That is simple:
; ps > processlist
;
Now that we have the list of processes stored in a file, we can take our time to inspect what is
happening to the machine. For example, we may use cat to print the list. It reads the file and
prints all the bytes read to the standard output.
; cat processlist
nemo
nemo
nemo
nemo
... other lines omitted ...
1
2
3
4
0:00
5:03
0:00
0:00
0:00
0:00
0:00
0:00
2308K
0K
0K
0K
Await
Wakeme
Wakeme
Wakeme
bns
genrandom
alarm
rxmitproc
We can count how many processes there were in the system by the time we stored the list. To do
so, we can count the lines in the file processlist, because we know there is one line in that
- 102 file per process. The program wc (word count) counts lines, words, and characters in a file, and
prints what it finds.
; wc processlist
147
1029
;
8795 processlist
The file processlist has 147 lines, 1929 words, and 8795 characters in it. This means that we
had 147 processes in the machine at that time. Because we are only interested in the number of
lines, we might have used the option -l to wc, as said in wc(1), to ask just for the number of
lines:
; wc -l processlist
147 processlist
;
As we said before, most commands that accept a file name as an argument, work with their standard input when no file name is given. And wc is not an exception. For example,
; wc
when I see it, I believe it
control-d
1
7
28
;
counts the lines, words, and characters that we type until pressing a control-d.
The shell is able to redirect the standard input for a command, and not just its output. The
syntax is similar to a redirection for output, but using < instead of >. To remember, imagine
the bytes entering through the wide part of the symbol, going out through the little hole in the
other end. We can now do this
; cat < rememberthis
Thu Jul 13 12:10:38 MDT 2006
and it would have the same effect that doing this
; cat rememberthis
Thu Jul 13 12:10:38 MDT 2006
Both commands produce the same output, but they are very different. In the first case, the shell
makes the arrangements so that the standard input for cat comes from rememberthis and not
from the console. The cat program has no arguments (other than argv[0]) and therefore starts
reading from its standard input. But cat does not even know the name of the file it is reading! In
the second case, the shell is not doing anything to the standard input for cat. The program itself
has to open the file, and read from it.
For those rare cases when there is a command that requires a file name as its input, and you
still want to run the command to work on its standard input, Plan 9 provides files named /fd/0,
/fd/1, etc. These are not real files, but other interface to use your file descriptors. For example,
this is another way of running cat to copy its standard input:
; cat /fd/0
...and cat reads what you type.
and this is achieves the same effect:
; cp /fd/0 /fd/1
...and cp copies what you type back to the console
In the last chapter, we did see that a command line executed in the background, i.e., terminated
with &, is not allowed to read from the console. What happens is that the shell redirects the
- 103 command’s standard input to /dev/null, the file that seems to be always empty. You can
achieve a similar effect doing this.
; cat </dev/null
;
Therefore, the input redirection here is redundant:
; cat </dev/null &
;
How can the shell redirect the standard input/output for a command? Think about it. The program
cat reads from file descriptor 0, when given no arguments. That is the convention for standard
input. For output, cat writes at file descriptor 1. If the shell manages to get the file descriptor 1
for cat open for writing into rememberthis, the bytes written by cat will go into
rememberthis. And of course cat would know nothing about where does its standard output
go. They are written into an open file descriptor that must lead to some file. Also, if the shell
manages to get the file descriptor 0 for cat open for reading from /dev/null, cat would be
reading from /dev/null.
Input/output redirection must be done in the process that is going to execute the command.
Otherwise, the shell would loose its own standard input or output. It must be done before doing
the exec for the new command. It would not make sense to do it after, because there would be
no I/O redirection, and because when exec works, your program is gone!
Consider this program
_______
iredir.c
#include <u.h>
#include <libc.h>
void
main(int, char*[])
{
switch(fork()){
case -1:
sysfatal("fork failed");
case 0:
close(0);
// WRONG!
open("/NOTICE", OREAD);
execl("/bin/cat", "cat", nil);
sysfatal("exec: %r");
default:
waitpid();
}
exits(nil);
}
and its output.
; 8.iredir
Copyright © 2002 Lucent Technologies Inc.
All Rights Reserved
We supplied no argument to cat in the call to execl. Therefore, cat was reading from standard input. However, because of the two previous calls, file descriptor 0 was open to read
- 104 /NOTICE. The program cat reads from there, and writes a copy to its output.
This is a real kludge. We do not know that open is going to return 0 as the newly open file
descriptor for /NOTICE. At the very least, the program should check that this is the case, and
abort its execution otherwise:
fd = open("/NOTICE", OREAD);
assert(fd == 0);
At least, if fd is not zero, assert receives false (i.e., 0) as a parameter and prints the file and
line number before calling abort.
The system call dup receives a file descriptor and duplicates it into another. This is what
we need. The code
fd = open("/NOTICE", OREAD);
dup(fd, 0);
close(fd);
opens /NOTICE for reading, then duplicates the descriptor just open into file descriptor 0. After
the call, file descriptor 0 leads to the same place fd was leading to. It refers to the same file and
shares the same offset. This is shown in figure 5.1, which assumes that fd was 3 (As you can see,
both descriptors refer now to the same Chan). At this point, the descriptor whose number is in fd
is no longer necessary, and can be closed. The program in cat is only going to read from 0. It
does not even know that we have other file descriptors open.
Child
process
Child
process
File descriptor
table
0
1
2
3
File descriptor
table
/dev/cons ORDWR
offset: 3245
0
1
2
3
...
n
/dev/cons ORDWR
offset: 3245
...
/NOTICE OREAD
offset: 0
Before dup(3, 0)
n
/NOTICE OREAD
offset: 0
After dup(3, 0)
Figure 5.1: File descriptors before and after duplicating descriptor 3 into descriptor 0.
This is the correct implementation for the program shown before. Its output remains the
same, but the previous program could fail (Note that in this section we are not checking for errors,
to keep the programs more clear to see).
- 105 void
main(int, char*[])
{
int
fd;
switch(fork()){
case -1:
sysfatal("fork failed");
case 0:
fd = open("/NOTICE", OREAD);
dup(fd, 0);
close(fd);
execl("/bin/cat", "cat", nil);
sysfatal("exec: %r");
default:
waitpid();
}
exits(nil);
}
There are some pitfalls that you are likely to experience by accident in the future. One of them is
redirecting standard input to a file descriptor open for writing. That is a violation of the convention that file descriptor 0 is open for reading. For example, this code makes such mistake:
fd = create("outfile", OWRITE, 0664);
dup(fd, 0);
close(fd);
// WRONG!
Using this code in the previous program puts cat in trouble. A write call for a descriptor open
just for reading is never going to work:
; 8.iredir
cat: error reading <stdin>: inappropriate use of fd
;
Output redirections made by the shell use create to open the output file, because most of the
times the file would not exist. When the file exists, it is truncated by the call and nothing bad happens:
fd = create("outfile", OWRITE, 0664);
dup(fd, 1);
close(fd);
A common mistake is redirecting both input and output to the same file in a command line, like
we show here:
; cat <processlist >processlist
;
When the shell redirects the output, create truncates the file! There is nothing there for cat to
read, and your data is gone. If you ever want to do a similar thing, it must be done in two steps
; cat <processlist >/tmp/temp
; cp /tmp/temp processlist
; rm /tmp/temp
- 106 -
5.2. Conventions
Why does standard error exist? Now you can know. Consider what happens when we redirect the
output for a program and it has a problem:
; lc /usr/nemos >/tmp/list
ls: /usr/nemos: ’/usr/nemos’ file does not exist
; cat /tmp/list
Clearly, the diagnostic printed by lc is not the output data we expect. If the program had write
this message to its standard output, the diagnostic message would be lost between the data. Two
bad things would happen: We would be unaware of the failure of the command, and the command
output would be mixed with weird diagnostic messages that might be a problem if another program has to process such output.
In the beginning, God created the Heaven and the Earth [ ... ], and God said, Let there be
Light, and there was Light. Yes, you are still reading the same operating systems book. This cite
seemed appropriate because of the question, How did my process get its standard input, output,
and error? and, How can it be that the three of them go to /dev/cons?
The answer is simple. Child processes inherit a copy of the parent’s file descriptors. In the
beginning, Plan 9 created the first process that executes in the system. This process had no file
descriptor open, initially. At that point, this code was executed:
open("/dev/cons", OREAD);
open("/dev/cons", OWRITE);
open("/dev/cons", OWRITE);
Later, all the descendents had their descriptors 0, 1, and 2 open and referring to /dev/cons.
This code would do the same.
open("/dev/cons", OREAD);
open("/dev/cons", OWRITE);
dup(1, 2);
5.3. Other redirections
Output can be redirected to a file appending to its contents. In this case, the shell seeks to the end
of the file used for output before executing the command. To redirect output appending, use >>
instead of use >.
; echo hello >/tmp/note
; echo there >>/tmp/note
; echo and there >>/tmp/note
; cat /tmp/note
hello
there
and there
; echo again >/tmp/note
; cat /tmp/note
again
The code executed by the shell to redirect the output appending is similar to this one,
fd = open("outfile", OWRITE);
if (fd < 0)
fd = create("outfile", OWRITE, 0664);
seek(fd, 0, 2);
dup(fd, 1);
close(fd);
- 107 which creates the output file only when it does not exist. If the program used create, it would
truncate the file to a zero-length. If it used just open, the output redirection would not work
when file does not exist. Also, the call to seek is utterly important, to actually append to the file.
FIle descriptors other than 0 and 1 can be redirected from the shell. You must write the
descriptor number between square brackets after the operator. For example, this discards any error
message from the command by sending its standard error to /dev/null.
; lc *.c >[2] /dev/null
open.c seek.c
;
This file in is another invention of the system, like most other files in /dev. When you write
into it, it seems that the write was done. However, the system did not write anything anywhere.
That is why this file is used to throw away data sent to a file.
The shell can do more things regarding I/O redirection. The <> operator redirects both
standard input and output to the file whose name follows. However, it opens the file just once for
both reading and writing. For example, this leaves file empty:
; echo hola>file
; cat <file >file
;
But this does not:
; echo hola >file
; cat <> file
hola
;
More useful is being able to redirect one file descriptor to another one. Errors are to be written to
standard error, but echo writes to standard output. To report an error from a shell script, this can
be done
; echo something bad happen >[1=2]
which is equivalent to a dup(1,2) in a C program.
Redirections are applied left to right, and these two commands do different things:
; ls /blah >/dev/null >[2=1]
; ls /blah >[2=1] >/dev/null
ls: /blah: ’/blah’ file does not exist
;
The first one redirects its output to /dev/null, which throws away all the output, and then
sends its standard error to the same place. Throwing it away as well. The second one send its
standard error to where standard output is going (the console), and then throws away the output
by sending it to /dev/null.
5.4. Pipes
There is a whole plethora of programs in Plan 9 that read some data, perform some operation on
it, and write some output. We already saw some. Many tasks can be achieved by combining these
programs, without having to write an entire new program in C or other language.
For example, this book is typeset using troff(1), and the input text is kept at files named
ch1.ms, ch2.ms, and so on, each one with the text for one chapter. A rough estimate of the
book size would be to count the number of words for all the files containing troff input for chapters. We can use a program to count words. Option -w for wc does just that:
- 108 ; wc -w
12189
9252
8153
6470
3163
61
592
39880
ch*.ms
ch1.ms
ch2.ms
ch3.ms
ch4.ms
ch5.ms
ch6.ms
chXX.ms
total
This gives a good break-down of the number of words in each file, and also of the total (as of
today, when we are writing this). However, to obtain just the total we can give a single file to wc
; cat ch*.ms >/tmp/all.ms
; wc -w /tmp/all.ms
39880 /tmp/all.ms
If we suspect that we use the word file too many times in the book, and what to check that out, we
can count the number of lines that contain that word as an estimate. The program grep writes to
its output only those lines that contain a given word. We can run
; grep file </tmp/all.ms >/tmp/lineswithfile
;
to generate a file lineswithfile that contains only the lines that mention file, and then use
wc on that file
; wc -w /tmp/lineswithfile
7355 /tmp/lineswithfile
This is inconvenient. We have to type a lot, and require temporary files just to use the output of
one program as the input for another. There is a better way:
; cat ch*.ms | wc -w
39880
executes both cat and wc. The standard output for cat is conveyed by the | into the standard
input for wc. We get the output we wanted in a simple way. This is how we count just the lines
using the word file:
; cat ch*.ms | grep file | wc -l
7355
;
Here, the output of cat was conveyed to grep, whose output was conveyed to wc. A small
command line performed a quite complex task. By the way, because grep accepts as arguments
the names for its input files, a more compact command could be used:
; grep file ch*ms | wc -l
7355
;
The conveyer represented by the vertical bar is called a pipe. Its function is the same. Think of
input as bytes flowing into a command, for processing, and output as bytes flowing out the command. If you have a pipe, you can plumb one output to one input. But you must use a pipe. Otherwise, bytes would pour on the floor!
Before, we have used ps to lists processes. Usually, there are many lines printed by the
command, but we can be interested in a particular one. There is no need to scroll down the terminal and search through many lines just to find the information for a broken process:
- 109 ; ps | grep Broken
nemo
1633
;
0:00
0:00
24K Broken
8.out
The output of ps is sent into the pipe. It flows through it and becomes the input for grep, which
writes just those lines that contain the string Broken.
To get rid of this broken process, we can execute broke. This program prints a command
to kill the broken processes, but does not kill them itself (killing is too dangerous and broke
does not want to take responsibility for your actions):
; broke
echo kill>/proc/1633/ctl # 8.out
;
But to execute this command, we must use it as input for the shell. Now we can.
; broke |rc
; ps | grep Broken
;
Figure 5.2 shows what happens when you execute broke|rc The file descriptor 1 for broke
gets sent to the input of the pipe. The output from the pipe is used as source for file descriptor 0
in rc Therefore, rc reads from its standard input what broke writes on its output. In the figure,
processes are represented by circles. Arrows going out from circles are file descriptors open for
writing. The descriptor number is the value or variable printed in the arrow. Arrows pointing into
circles are file descriptors open for reading. Of course, the process represented by the circle is the
one who reads. Pipes and files do not read, they are not alive!
0
broke
1
pipe
0
rc
1
Figure 5.2: Using a pipe to connect the output of broke to the input of rc.
The pipe is an artifact provided by Plan 9 to let you interconnect processes. It looks like
two files connected to each other. What you write into one of them, is what will be read from the
the other. That is why in the figure, the input for one process goes into one end of the pipe, and
the output for the other process may go to the other end of the pipe.
To create a pipe in a C program, you can use the pipe system call. It returns two descriptors, one for each end of the pipe. Both descriptors are stored at the integer array passed as a
parameter to the function.
int
fd[2];
pipe(fd);
// fd[0] has the fd for one end
// fd[1] has the fd for the other.
This program does some stupid thing, but it helps to understand. It writes some text to one end of
the pipe, and reads it back from the other end. To see the outcome, it prints what it did read to its
standard output.
- 110 ______
pipe.c
#include <u.h>
#include <libc.h>
void
main(int, char*[])
{
int
fd[2];
char
buf[128];
int
nr;
if (pipe(fd) < 0)
sysfatal("can’t create a pipe: %r");
write(fd[1], "Hello!\n", 7);
nr = read(fd[0], buf, sizeof(buf));
write(1, buf, nr);
exits(nil);
}
This is the output
; 8.pipe
Hello!
;
Because standard output is file descriptor 1, and standard input is file descriptor 0, the tradition is
to read from fd[0] and write into fd[1], as the program does. Pipes are bi-directional in Plan
9, and doing it the other way around works as well. It is said that Plan 9 pipes are full-duplex.
Let’s try now something slightly different. If we replace the single write in the program
with two ones, like
write(fd[1], "Hello!\n", 7);
write(fd[1], "there\n", 6);
this is what the program prints now.
; 8.pipe
Hello!
;
the same! Plan 9 pipes preserve write boundaries (known also as message delimiters). That is to
say that for each read from a pipe, you will get data from a single write made to the pipe. This is
very convenient when you use the pipe to speak a dialog between two programs, because different
messages in the speech do not get mixed. But beware, UNIX does not do the same. This is the
output from the same program in a UNIX system:
$ pipe
Hello!
there
$
In Plan 9, we need a second read to obtain the data sent through the pipe by the second write.
The pipe has some buffering (usually, a few Kbytes), and that is where the bytes written by
the program were kept until they were read from the pipe. Plan 9 takes care of those cases when
data is written to the pipe faster than it is read from the pipe. If the buffer in the pipe gets full (the
- 111 pipe is full of bytes), Plan 9 will make the writer process wait until some data is read and there is
room in the pipe for more bytes. The same happens when data is read faster than written. If the
pipe is empty, a read operation on it will wait until there is something to read.
You can see this. This program fills a pipe. It keeps on writing into the pipe until Plan 9
puts the process in the blocked state (because the pipe is full).
____
_fill.c
#include <u.h>
#include <libc.h>
void
main(int, char*[])
{
int
fd[2];
char
buf[1024];
int
nw;
if (pipe(fd) < 0)
sysfatal("can’t create a pipe: %r");
for(;;){
nw = write(fd[0], buf, sizeof(buf));
print("wrote %d bytes\n", nw);
}
exits(nil);
}
This is the output. The pipe in my system can hold up to 30 Kbytes.
; 8.fill
wrote 1024 bytes
wrote 1024 bytes
wrote 1024 bytes
... 29 lines including these two ones...
wrote 1024 bytes
... and it blocks forever
And this is what ps says for the process:
; ps | grep 8.fill
nemo
2473
0:00
0:00
24K Pwrite
8.fill
It is trying to write, but will never do.
In the shell examples shown above, it is clear that the process reading from the pipe gets an
end of file (i.e., a read of 0 bytes) after all data has gone through the pipe. Otherwise, the commands on the right of a pipe would never terminate. This is the rule: When no process can write
to one end of the pipe, and there is nothing inside the pipe, reading from the other end yields 0
bytes. Note that when the pipe is empty, but a process can write to one end, reading from the
other end would block.
This is easy to check using our single-process program. If we do this
close(fd[1]);
nr = read(fd[0], buf, sizeof(buf));
the value of nr becomes zero, and read does not block. However, removing the close line
- 112 makes the program block forever.
Writing to a pipe when no one is going to read what we write is a nonsense. Plan 9 kills any
process doing such think. For example executing this program
____________
brokenpipe.c
#include <u.h>
#include <libc.h>
void
main(int, char*[])
{
int
fd[2];
char
buf[128];
int
nr;
if (pipe(fd) < 0)
sysfatal("can’t create a pipe: %r");
close(fd[0]);
write(fd[1], "Hello!\n", 7);
print("could write\n");
exits(nil);
}
yields
; 8.brokenpipe
; echo $status
8.out 2861: sys: write on closed pipe pc=0x00002b43
5.5. Using pipes
One useful thing would be to be able to send from a C program an arbitrary string as the standard
input for a command. This can be used for many things. For example, the mail program is used
to send electronic mail from the command line. The body of the message is read from standard
input, and the subject and destination address can be supplied in the command line. This is an
example using the shell.
; mail -s ’do you want a coffee?’ [email protected]
Hi,
If you want a coffee, let’s meet down at 5pm.
see u.
control-d
To do something similar from a C program, we must create a child process to execute mail on it.
Besides, we need a pipe to redirect to it the standard input for mail and write what we want from
the other end of the pipe.
This seems a general tool. We are likely to want to execute many different commands in
this way. Therefore, we try to write a function as general as possible for doing this job. It accepts
a string containing a shell command line as a parameter, and executes it in a child process. It
returns a file descriptor to write to a pipe that leads to the standard input of this process.
- 113
_______
_pipeto.c
#include <u.h>
#include <libc.h>
int
pipeto(char* cmd)
{
int
fd[2];
pipe(fd);
switch(fork()){
case -1:
return -1;
case 0:
close(fd[1]);
dup(fd[0], 0);
close(fd[0]);
execl("/bin/rc", "rc", "-c", cmd, nil);
sysfatal("execl");
default:
close(fd[0]);
return fd[1];
}
}
void
main(int, char*[])
{
int
fd, i;
char*
msgs[] = {
"warning: the world is over\n",
"spam: earn money real fast!\n",
"warning: it was not true\n" };
fd = pipeto("grep warning");
if (fd < 0)
sysfatal("pipeto: %r");
for (i = 0; i < nelem(msgs); i++)
write(fd, msgs[i], strlen(msgs[i]));
close(fd);
exits(nil);
}
To see a complete example, where this function is used, the main function uses pipeto to send
several messages to the input of a process running grep warning. Messages are sent by writing the the file descriptor returned from pipeto. When nothing more has to be sent, the file
descriptor is closed. The child process will receive an end-of-file indication as soon as it
- 114 consumes what may still be going through the pipe. This is the output for the program.
; 8.pipeto
; warning: the world is over
warning: it was not true
Because the parent process finishes before the child is still processing the input that comes from
the pipe, the shell prompt gets printed almost immediately. If this is a problem, the parent must
wait for the child after writing all the data to the pipe. Otherwise, the waitpid call would block
waiting for the child to die, and the child would block waiting for the end of file indication
(because the parent has the pipe open for writing).
Figure 5.3 shows the processes involved, all their descriptors, and the pipe. We use the
same conventions used for the last figure, which we will follow from now on.
2
0
Parent
Process
1
2
fd
pipe
0
grep
1
Figure 5.3: A process using a pipe to send input to a command.
All the interesting things happen in the function pipeto. It executes the Plan 9 shell, suppling the command line as the argument for option -c, this asks rc to execute the argument as a
command, and not to read commands from standard input.
First, before creating the child process, the parent process makes a pipe. It is very important
to understand that the pipe must be created before we call fork. Both processes must share the
pipe. If the pipe is created after forking, in the child process, the parent process does not have the
descriptor to write to the pipe. If it is created by the parent, after calling fork, the child will not
have the descriptor to read from the pipe.
Even if both processes create a pipe, after the child creation, there are two different pipes.
Each process can use only its own pipe, but they cannot talk. It does not matter if the numbers
returned from pipe for the two descriptors are the same (or not) for both processes: They are different descriptors because each process made its own call to pipe. Therefore, pipes are created
always by a common ancestor of the processes communicating through the pipe.
Another important detail is that all the descriptors are closed (by all processes) as soon as
they are no longer useful. The child is going to call execl, and the new program will read from
its standard input. Thus, the child must close both pipe descriptors after redirecting its standard
input to the end for reading from the pipe. The parent process is going to write to the pipe, but it
is not going to read. It closes the end for reading from the pipe. Not doing so risks leaving open
the pipe for writing, and in this case the reader process would never get its end of file indication.
Why does the child redirect its standard input to the pipe and not the parent? We wrote the
code for the parent. We know that it has fd[1] open for writing, and can just use that descriptor
for writing. On the other hand, the child does not know! After the child executes grep, how can
grep possibly know that it should use a file descriptor other than zero for reading?
The following example is a counterpart to what we made. This function creates a child process that is used to execute a command. However, this time, we return the output produced by the
- 115 command. For example, calling
nr = cmdoutput("wc *.c", buf, sizeof buf);
will fill in buf a string taken from what wc *.c prints to its standard output. This is not the best
interface for the task, because we do not know how much the command will print, but it is useful
nevertheless. The caller must take the precaution of supplying a buffer large enough. The number
of bytes read is the result from the function. This is its code:
long
cmdoutput(char* cmd, char*buf, long len)
{
int
fd;
long
tot;
if (pipe(fd) < 0)
return -1;
// failed to create a pipe
switch(fork()){
case -1:
return -1;
case 0:
close(fd[0]);
dup(fd[1], 1);
close(fd[1]);
execl("/bin/rc", "-c", cmd, nil);
sysfatal("exec");
default:
close(fd[1]);
for(tot = 0; len - tot > 1; tot += nr){
nr = read(fd[0], buf+tot, len - tot);
if (nr <= 0)
break;
}
close(fd[0]);
waitpid();
buf[tot] = 0;
// terminate string
return tot;
}
}
In this function, we wait for the child to complete before returning, but after having read all the
data from the pipe. It is a serious mistake to wait for the child before having read all its output. If
the output does not fit into the pipe, the child will block as soon as the pipe is full. It will be waiting forever, because the parent is not going to read until waitpid completes, and this call is not
going to complete until the child dies.
This is called a deadlock. One process is waiting for another to do something, and that
requires the former to do another thing, which cannot be done because it is waiting. You know
when you have a deadlock because the processes involved freeze. Deadlocks must be avoided.
We avoided one here simply by doing the things in a sensible order, and waiting for the child
after we have read all its output.
What we have seen is very useful. Many programs do precisely this, or other similar things.
The editor Acme admits commands to be applied to a portion of text selected by the user. For
example, using the button-2 in Acme to run the command |t+ asks Acme to execute the program
t+ with the selected text as the input for t+, and to replace that text with the output from the
command. Of course, Acme uses pipes to send text to the input of t+ and to read its output. The
command t+ is a shell script used to indent text by inserting a tab character at the start of each
line.
The shell is also a heavy user of pipes, as you might expect. Rc includes several interesting
- 116 constructs that are implemented along the lines of what we saw before.
When Rc finds a command inside ‘{...}, it executes the command, and substitutes the
whole ‘{...} text with the output printed by the command. We did something alike in the C program when reading the output for a command using a pipe. This time, Rc will do it for us, and
relieve us from typing something that can be generated using a program. This is an example.
; date
Fri Jul 21 16:36:37 MDT 2006
; today=‘{date}
; echo $today
Fri Jul 21 16:36:50 MDT 2006
Another example, using a command that writes numbers in sequence, follows.
; seq 1 5
1
2
3
4
5
; echo ‘{seq 1 5}
1 2 3 4 5
;
As you can see, the second command was equivalent to this one:
; echo 1 2 3 4 5
The shell executed seq 1 5, and then did read the text printed by this command through its
standard output (using a pipe). Once all the command output was read, Rc replaced the whole
‘{...} construct with the text just read. The resulting line was the one executed, instead of the
one that we originally typed. Because a newline character terminates a command, the shell
replaced each \n in the command output with a space. That is why executing seq directly yields
5 lines of output, but using it with ‘{...} produces just one line of output.
A related expression provided by the shell is <{...}. Like before, Rc executes the command
within the brackets, when it finds this construct in a command line. The output of the command is
sent through a pipe, and the whole <{...} is replaced by a file name that represents the other end
of the pipe (pipes are also files!, as we will see in a following chapter).
There are several interesting uses for <{...}, one of them is to be able to give a file name for
the input file for a command, but still use as input another command that writes to its standard
output.
; wc <{seq 1 5} /LICENSE
5
5
10 /fd/13 This is the pipe!
261
1887
13006 /LICENSE
266
1892
13016 total
;
But, perhaps, the most amazing use for this construct is to build non-linear pipelines. That is, to
use the output of several commands as input for another one. For the latter, the output of the former ones would be just a couple of file names. An interesting example is comparing the output of
two commands. The shell command cmp compares two files, and informs us whether they have
the same contents or not.
; cp /LICENSE /tmp/l
; cmp /LICENSE /tmp/l
; cmp /LICENSE /NOTICE
/LICENSE /NOTICE differ: char 1
- 117 Therefore, if you want to execute two commands and compare what they write to their standard
output, you can now use cmp as well.
; cmp <{seq 1 3} <{echo 1 ; echo 2 ; echo 3}
; cmp <{seq 1 3} <{echo 1 2 3}
/fd/14 /fd/13 differ: char 2
;
You will get used to ‘{...} and <{...} after using them in the couple of chapters that discuss programming in Rc.
5.6. Notes and process groups
Pipes are a synchronous communication mechanism. A process using a pipe must call read or
write to receive or send data through the pipe, and communication happens only when the process makes these calls. Sometimes, the world is not so nice and we need an asynchronous
communication mechanism. For example, if a process gets out of control and you want to stop it,
you may want to post a note saying interrupt to the process. The process is not reading from
anywhere to obtain the message you want to send, but you still can send the message at any
moment. The message will interrupt the normal execution of the process, so this mechanism is to
be used with care.
Posting notes can be dangerous, when the process is not paying attention to the note posted
it is killed by the system.
This is our first example, we are going to use the window system to interrupt a process.
When cat is given no arguments, it reads from the console. It will be doing so unless you type a
control-d to ask the window to signal a (fake) end of file. This time, we are not going to do so.
Run this command and press Delete.
; cat
Delete
;
cat waits reading...
...until you press delete,
and cat is gone!.
What happen to cat? Let’s ask the shell:
; echo $status
cat 735: interrupt
;
According to the shell, cat died because of interrupt.
When you type characters, the window system reads them from the real console. Depending
on which window has the focus, i.e. on which one did you click last, it sends the characters to the
corresponding window. If the window system reads a Delete key, it understands that you want to
interrupt the process in the window that has the focus, and it posts a note with the text
interrupt for all the processes sharing the window. The shell is paying attention (and ignoring) the note, therefore it remains unaffected. However, cat is not paying attention to it, and gets
killed in action.
Let’s do it by hand. We need a victim.
; sleep 3600 &
;
And this one gives us one hour to play with it. The process is alive and in well shape:
- 118 ; ps | grep sleep
nemo
1157
; echo $apid
1157
0:00
0:00
8K Sleep
sleep
We check out that it is our process, looking at $apid. No tricks here. To post a note to a process, the note text is written to a file in /proc that provides the interface to post notes to it.
Remember that this file is just an interface for the process, and not a real file. For this process, the
file would be /proc/1157/note. To do exactly the same that the window system is doing,
we want to post the note to all processes sharing its window. Writing the note to
/proc/1157/notepg does this:
; echo interrupt >/proc/1157/notepg
; ps | grep 1157
;
It is gone!
The file is called notepg because it refers to a process group. Processes belong to groups
only for administrative reasons. For example, Delete should affect all the processes active in a
window. Otherwise, you would not be able to interrupt a command line with more than one process, like a pipeline.
Usually, there is a process group per window, and it is used to deal with all the programs on
the window at once. When a window is deleted using the mouse, you expect the programs running on it to die. The window system posts a hangup note when the window is deleted. The note
is posted to all the processes in the window, i.e., to the process group of the shell running in the
window. We can also try this.
; echo hangup >/proc/$pid/notepg
And the window is gone!
This required having an abstraction, i.e., a mechanism, to be able to group those processes and
post a note just for them. The process group is this abstraction.
By the way, notes are the mechanism used by the system to signal exceptional conditions,
like dividing by zero. Notes posted by the system start with suicide:, and put the process into
the broken state, for debugging.
Processes can use atnotify to register a notification handler that listens for notes. The
function receives a note handler as a parameter, and installs the handler if the second parameter is
true, or removes the handler otherwise.
; sig atnotify
int atnotify(int (*f)(void*, char*), int in)
The handler is a function that receives a pointer to the process registers as they were when it
noted the note. This is usually ignored. The second parameter is more interesting, it is a string
with the text from the note. When the note is recognized by the handler, it must return true, to
indicate that the note was attended. Otherwise, it must return false. This is required because there
can be many handlers installed for a process, e.g., one for each type of note. When a note is
posted, each handler is called until one returns true. If no handler does so, the note is not
attended, and the process is killed.
This program may provide some insight about notes. It registers a handler that prints the
note received and pretends that it was not attended (returning zero).
- 119 _______
pnote.c
#include <u.h>
#include <libc.h>
int
handler(void*, char* msg)
{
print("note: %s\n", msg);
return 0;
}
void
main(int, char*[])
{
atnotify(handler, 1);
sleep(3600 * 1000);
print("done (%r)\n");
exits(nil);
}
// one hour to play
If we run the program, and press Delete while it is running, this is what happens:
; 8.pnote
the program runs until we press Delete. And then, ...
Delete
note: interrupt
; echo $status
8.pnote 1543: interrupt
;
The program is killed, because it did not handle the note. When we pressed Delete, the program
was executing whatever code it had to execute. In this case, it was blocked waiting inside sleep
for time to pass by. The note caused the system call to be interrupted, and the process jumped to
execute its handler where it printed its message. Because no handler recognized the note, the process was killed.
Notes are asynchronous, and this means that the handler for a note may run at any time,
when it pleases Plan 9 to instruct your process to stop what it was doing and jump into the note
handler. This is similar to the model used for interrupts, which is quite different from the process
model: One single continuous flow of control, easy to understand.
We are now going to modify the handler to return true, and not zero. This is what the new
program does.
; 8.pnote
the program runs until we press Delete. And then, ...
Delete
note: interrupt
done (interrupted)
; echo $status
;
The program was executing the sleep system call, it was blocked waiting for time to pass. After
hitting Delete, a note was posted. The natural flow of control for the process was interrupted, and
- 120 it jumped to execute the note handler. It prints the text for the note, interrupt, and returns true.
The note was recognized and Plan 9 is happy with that. The process is not killed. Instead, it continues were it was. Well, mostly.
The process did not wait for one hour! Because of the note, the system call was interrupted.
It returns an error to report that. But it returns. The program is still running at the same point it
was when the note was posted. We printed the error string reported from sleep to see that it is
interrupted.
In general, notes are not to be used in your programs. In other systems, they are used to
remove temporary files if a program is interrupted. In Plan 9, there is a better way for doing this.
Any file that you open with the ORCLOSE flag, for example,
fd = open("/tmp/tempfile", ORDWR|ORCLOSE);
is automatically removed by the system when the file descriptor is closed. If your program dies
because of a note, the descriptor is closed as part of the natural dying process. At that point, the
file is removed. Using notes it could be done by installing a note handler like this one
int cleanup(void*, char* msg)
{
if (strcmp(msg, "interrupt") == 0)
remove("/tmp/tempfile");
return 0;
}
But this is an horrible idea. Notes can happen at any time, behind your back. You are executing
your nice single flow of control, and there are functions as nasty as the pop-ups in other window
systems, that run at unexpected times and may cause your program to fail.
When are notes posted by Plan 9? The kernel is not a magic program. It can post a note
only when it executes. Besides, for simplicity, a note is handled from within the process that
receives it. A write into the note or the notepg file records that the target process(es) has a
note posted. Sooner or later, the target process will be allowed to run (if only to process the pending note), At that point, when returning from the kernel back to the user’s code, is when the note
is processed.
If the process receiving the note was performing a system call that does not block, the system call is allowed to complete and the note is posted while returning from the call. On the other
hand, if the process was performing a slow system call, and was blocked trying to read, or write,
or any other thing, the system call is interrupted, as we saw before.
5.7. Reading, notes, and alarms
You know how to read from a file. To read n bytes from a file the program must call read until
all the n bytes are read, because read may return less bytes than requested. This is so common,
that a library function readn exists that keeps on calling read until all the n bytes have been
read. However, This function may return less bytes than requested, because of a note. Of course
this would happen only if the process is attending the note, because it would be killed otherwise,
and what readn does would not matter at all.
To actually read n bytes even when receiving notes, we can use this alternate function:
- 121 long
robustreadn(int fd, char* buf, long n)
{
long
nr, tot;
char
err[128];
for (tot = 0; tot < n; tot += nr){
nr = read(fd, buf+tot, n-tot);
if (nr == 0)
break;
if (nr < 0){
rerrstr(err, sizeof(err));
if (strcmp(err, "interrupted") == 0)
nr = 0; // retry; did not read anything
else
break;
}
}
return tot;
}
It requires the process to install a handler for the interrupted note, or the process will be
killed.
Surprisingly enough, there are times when the problem is not that read is interrupted, but,
on the contrary, the problem is that it is not interrupted. For example, a process may need to read
a message sent from anywhere else in the network. This is achieved by calling read on a file that
is used to connect the process with the one that is supposed to send it a message. Similar to a
pipe, but crossing the network. There is a problem in this case. If the other (remote) process
hangs, because of a bug or any other reason, it may never send its message. The poor process that
is reading will be blocked awaiting, forever, for the message to arrive.
To recover from this circumstance, it is usual to employ a timeout. A timeout is an alarm
timer used to be sure that there is a limit in the amount of time that we wait for some operation to
complete. In this case, it seems reasonable to use a timeout of 30 seconds. That is an incredibly
long time for a computer, even when considering the delays involved in crossing the network to
send or receive a message.
Plan 9 provides an alarm timer for each process. The timer is started by calling alarm, giving as a parameter the number of milliseconds that must pass before the timer expires.
; sig alarm
long alarm(unsigned long millisecs)
There is no guarantee that the timer will last for exactly that time. It might take a little bit more if
the system is busy doing any other thing. However, real soon after the specified number of milliseconds, an alarm note will be posted for the process that did call alarm. And you know
what happens, when the note is posted, any system call that kept the process awaiting (e.g.,
read) will be interrupted. The following program reads a line from the terminal, and prints it to
the standard output. However, it will wait at most 30 seconds for a line to be typed.
- 122
______
_alarm.c
#include <u.h>
#include <libc.h>
int
handler(void*, char* msg)
{
if (!strcmp(msg, "alarm")){
fprint(2, "timed out\n");
return 1;
}
return 0;
}
void
main(int, char*[])
{
char
buf[1024];
long
nr;
atnotify(handler, 1);
print("type something: ");
alarm(30 * 1000);
// 30 secs.
nr = read(0, buf, sizeof buf);
alarm(0);
if (nr >= 0)
write(1, buf, nr);
exits(nil);
}
Right before calling read, the program installs an alarm timer of 30 seconds. That much time
later, it will post the alarm note. If we type something and read completes before that time, the
program calls alarm(0) to cancel the timer. Otherwise, the timer expires and read is interrupted.
; 8.alarm
type something: Hi there
Hi there
; 8.alarm
type something: timed out
;
We did not type anything for 30secs
In general, timers are to be used with caution. They make programs unpredictable. For example,
it could happen that right after we typed our line the timer expires. This could happen at any
time, not necessarily while we are waiting in read, but perhaps when we are in our way to cancel the timer. At least, it is wise to give plenty of time for a timeout, to make things more predictable, and it is even better not to use it unless it is absolutely necessary.
- 123 -
5.8. The file descriptor bulletin board
Sometimes, processes need to talk through a pipe, but they do not have an appropriate ancestor
where to create the pipe. This happens when, after a process has been created, a newcomer wants
to talk to that process.
The program that implements the file system, fossil, is a perfect example. It is started (in
the file server machine) during the boot process. Once started, programs may use files by talking
to the file server using the network.
But there is a problem. The file system, see fossil(4), has to be able to accept commands
from a human operator, to carry out administration tasks. For fossil, a simple way is to create
a pipe and attend one end of the pipe, reading commands and writing replies (pipes are bidirectional). Any process used by a human at the other end of the pipe may talk to the file system, to administer it. Here is an example of a conversation between a human and the file system:
main: fsys
main
main: sync
main sync: wrote 0 blocks
main: who
console
/srv/boot
nemo
/srv/fossil
nemo
/srv/vfossil nemo
/srv/fboot
nemo
When we wrote fsys, fossil replied with the list of file systems. When we typed sync, fossil
synchronized its changes with disk (any change to a file that was not yet copied to the disk, was
copied immediately). When we typed who, the file system wrote the list of users using the file
system.
How can we reach the pipe used to talk to fossil? The directory /srv is special. It is a
file descriptor bulletin board. A process can post a file descriptor into this bulletin board by creating a file on it. For example, in my system, /srv/fscons is a file that corresponds to the end
of the pipe used to talk to fossil.
The idea is not complex, once you realize that files in Plan 9 are not real files, most of the
times. The file /srv/fscons is not a file, it looks like, but it is just a file interface for a file
descriptor that fossil has open. Because /srv/fscons looks like a file, you can open it and
gain access to the file descriptor. And you do not require a common ancestor with fossil!
For example, this, when executed in the file server, asks fossil to write any pending
change to the disk.
; echo sync >>/srv/fscons
When the shell opens /srv/fscons, it is not opening yet another file. It is obtaining a file
descriptor that is similar to the one posted into /srv/fscons by fossil. The result is the
same of calling dup to duplicate the descriptor kept inside /srv/fscons, however, you cannot
call dup. You do not have the file descriptor to duplicate, because it belongs to another process.
This program is an example of how to use this bulletin board. It creates one pipe and reads
text from it, printing a copy to standard output, so we could see what is read. The other end of the
pipe is posted at /srv/echo, for us to use.
- 124 _________
srvecho.c
#include <u.h>
#include <libc.h>
void
main(int, char*[])
{
int
fd[2];
int
srvfd;
char
buf[128];
int
nr;
if (pipe(fd) < 0)
sysfatal("pipe: %r");
srvfd = create("/srv/echo", OWRITE, 0664);
if (srvfd < 0)
sysfatal("can’t create at /srv: %r");
if (fprint(srvfd, "%d", fd[1]) < 0)
sysfatal("can’t post file descriptor: %r");
close(fd[1]);
for (;;){
nr = read(fd[0], buf, sizeof buf);
if (nr <= 0)
break;
write(1, buf, nr);
}
print("exiting\n");
exits(nil);
}
The create call for /srv/echo creates a file where the program can post a file descriptor.
The way to do the post is by writing the file descriptor number into the file, and closing it. The
created file at /srv is just an artifact. What matters is that now there is another way to get to the
descriptor in fd[1]. Because the program does not use that descriptor itself, it closes it. Note
that the pipe end is not closed at this point. The descriptor kept inside /srv/echo is also leading to that end of the pipe, which therefore remains open. From now on, the program reads from
the other end of the pipe to do the echo.
; 8.srvecho &
; lc /srv
boot
echo
cs_net
fscons
; echo hi there! >>/srv/echo
hi there!
; ps | grep 8.srvecho
nemo
2553
0:00
plumb.nemo.264
slashdevs
0:00
slashmnt
vol
24K Pread
8.srvecho
If we remove the file /srv/echo, and no process has the file descriptor open for that end of the
pipe, our program would receive an end of file indication at the other end of the pipe, and terminate.
- 125 ; rm /srv/echo
exiting
;
Files in /srv are just file descriptors. They only difference is that they are published in a bulletin
board for anyone to see. How is this done? In a simple way, each file for /srv contains a reference to the Chan of the descriptor posted in it. Figure 5.4 shows the elements involved in the session we have just seen.
Echo
process
File
/srv/echo
File descriptor
table
0
1
file: pipe ORDWR
offset: 0
2
3
...
n
file: pipe ORDWR
offset: 0
pipe
Figure 5.4: A file descriptor posted at /srv/echo used to talk to a process through a pipe.
5.9. Delivering messages
Presenting every resource as a file may be an inconvenience when programs need to act after
some success happens. For example, the program faces (see figure 5.5) shows a small face
image for each email received by the user, displaying an image that describes the sender for each
mail. When a mail arrives, faces must show a new face to alert the user of the new incoming
mail. In this case, usually, the program must check out the files of interest to see if the thing of
interest happen. This is called polling, and the thing of interest is called an event.
Figure 5.5: The program faces shows small faces for persons that sent email to us.
Polling has the problem of consuming resources each time a poll is made to check out if an
- 126 interesting event happen. Most of the times, nothing happens and the poll is a waste. Therefore, it
would be very inefficient to be all the time polling for an event and, as a result, programs that poll
usually call sleep between each two polls. The following two programs wait until the file given
as a parameter changes, and then print a message to let us know. The first one performs a continuous poll for the file, and the second one makes one poll each 5 seconds.
poll.c
______
#include <u.h>
#include <libc.h>
void
main(int argc, char* argv[])
{
Dir*
d;
ulong
mtime, nmtime;
if (argc != 2){
fprint(2, "usage: %s file\n", argv[0]);
exits("usage");
}
d = dirstat(argv[1]);
if (d == nil)
sysfatal("dirstat: %r");
mtime = d->mtime;
free(d);
do {
d = dirstat(argv[1]);
if (d == nil)
break;
nmtime = d->mtime;
free(d);
} while(nmtime == mtime);
print("%s changed\n", argv[1]);
exits(nil);
}
______
_pollb.c
...everything the same, but for the call to sleep
do {
sleep(5 * 1000);
d = dirstat(argv[1]);
if (d == nil)
break;
nmtime = d->mtime;
free(d);
} while(nmtime == mtime);
It is interesting to see how loaded is the system while executing each program. The system load
- 127 is a parameter that represents how busy the system is, and it is usually an indicative of how much
work the system is doing. The load is measured by determining which percentage of the time the
system is running a process and which percentage of the time the system is not. In a typical system, most of the time there is just nothing to do. Most processes will be blocked waiting for
something to happen (e.g., inside a read waiting for the data to arrive). However, from time to
time, there will be some processes with a high demand of CPU time, like for example, a compiler
trying to compile a program, and the system load will increase because there’s now some process
that is often ready to run, or running.
We can use the stats tool to display the system load. This tool shows a graphic depicting
the system load and other statistics. For example, both figures 5.6 and 5.7 show a window running stats. Figure 5.6 shows the system load for our first experiment regarding polling. It is
hard to see in a book, but the graph displayed by stats is always scrolling from right to left as
time goes by. Around the middle of the graph it can be seen how the load increased sharply, and
went to a situation where almost always there was something to do. The system started to be
heavily loaded. This was the result of executing the following.
; 8.poll poll.c
"...and the machine got very busy until we hit Delete
Delete
;
Figure 5.6: A window running stats while the intensive polling program increased the load.
The process 8.poll was always polling for a change on its file. Therefore, there was always
something to do. Despite being run on a very fast machine, 8.poll never ceased to poll. When
the system decided that 8.poll got enough processor time, and switched to execute any other
process, our polling process ceased to poll for a tiny fraction of time. Later on, it will be put again
in the processor and consume all the time given to it by the system. When all processes are
blocked waiting for something to happen, 8.poll is still very likely to be ready to run. As a
result, the system load is at its maximum. Later, we pressed delete and killed 8.poll, and the
system load came back to a more reasonable value.
Note that a high load does not mean that the system is unresponsive, i.e., that it cannot cope
with any more work to do. It just means that there is always something to do. Of course, given the
sufficient amount of things to do, the system will become unresponsive because no process will
be given enough processor time to complete soon enough. But that does not need to be the case if
the load is high.
Compare what you saw with the load while executing our second version for the polling
program, which calls sleep to perform one poll each 5 seconds. The window running stats
while we executed this program is shown in figure 5.7. This program behaved nicely and did not
alter much the system load. Most of the time it was sleeping waiting for the time for its next poll.
As an aside, it is interesting to say that Plan 9 typically exhibits a much lower system load than
both figures show. The system used to capture both images is a derivative of Plan 9, called Plan
B, which uses polling for many things. When there are many processes polling, the load naturally
increases even if the processes sleep between polls.
The sleep used by programs that poll introduces another problem: delays. If the event
- 128 -
Figure 5.7: The system load is not altered if the program sleeps between polls.
does occurs and the polling program is sleeping, it will not take an appropriate action until the
sleep completes. And this is a delay. If the process waiting for the event produces, as a result,
another event, the delay of any other process polling for the later event is added to the chain.
The consequence of what we have discussed so far is that most operating systems provide
an abstraction to deliver events and to wait for them. The abstraction is usually called an event
channel, and is used to convey events from the ones that produce them to the ones that await for
them.
An event is a particular data structure, that contains the information about the success it represents. This means that events can be used as a communication means between the processes that
produce them and the ones that consume them.
In Plan 9, there is a service called plumbing that provides a message delivery service. The
name of the program is plumber because it is meant to do the plumbing to convey data from
message producers to consumers. In effect, it provides a nice event delivery service. The plumber
is built upon the assumption that once you look at a particular piece of data it is clear what to do
with it. For example, if a message looks like http://lsub.org/... then it is clear that it
should probably be delivered to a web browser. If a message looks like pnote.c:15, then it is
likely that it should be delivered to an editor, to open that file and show the line after the colon.
Like many other programs, the plumber is used through a file interface. The files that make
up the interface for the plumber are usually available at /mnt/plumb.
; lc /mnt/plumb
edit
exec
image
man
msntalk
msword
none
postscript
rules
seemail
send
sendmail
showmail
song
voice
www
Each one of these files (but for rules and send) is called a port, and can be used to dispatch
messages to applications reading from them. The send file is used to send a message to the
plumber, which will choose an appropriate port for it and then deliver the message to any process
reading from it.
For example, figure 5.8 shows what would happen when a process writes to the send port
a message carrying the data http://lsub.org/. Because the data looks like something for a
www port, the plumber delivers the message to any process reading from that port. If more than
one process is reading from the port (as shown in the figure for images), the message is delivered
to all of them.
Even if you didn’t notice, you have been using the plumber a lot. Every time you click with
the mouse button-3 at something in Acme, the editor sends a message to the plumber with the text
where you did click. Most of the times, the plumber determines that the message is for processes
reading the port edit, i.e., editors. Thus, the message is conveyed back to Acme in many cases.
You may try it by hand. If you have an Acme running and you execute
- 129 -
sender
process
editor
web
browser
send
edit
www
image
viewer
image
viewer
image
http://lsub.org/
message delivered by the plumber
Figure 5.8: The plumber provides ports, used to deliver messages to applications.
; plumb /NOTICE
;
on a shell, the file /NOTICE will show up in your editor. The plumber even knows that if there’s
no editor reading from the edit port, an editor should be started. You can try by executing again
the plumb command above, but this time, while no editor is running.
How does the plumber know what to do? The file $home/lib/plumbing is read by the
plumber when it starts (usually from your $home/lib/profile while entering the system).
This file has rules that instruct the plumber to which port should each message be sent according
to the message data. Furthermore, the file may instruct the plumber to start a particular application (e.g., an editor) when no one is listening at a given port. After the plumber has been started,
its rules can be updated by copying whatever rules are necessary to the /mnt/plumb/rules
file.
It is still too early for us to inspect this file, because it uses regular expressions, that are yet
to be discussed. However, it is useful to know that by default certain messages are processed in a
particular way:
"
Files with particular formats, like MS Word files, are delivered usually to the program
page, which converts them to postscript and shows their contents on a window.
"
Most other files go to the editor. Optionally, there may be a : followed by an address after
the file name, to instruct the editor to go to a particular piece of text in the file. For example,
/NOTICE:2 would make an editor show line 2 of /NOTICE. There are other types of
addresses, besides line numbers. A very useful one is of the form /text. That is, some
text after a /, like in /NOTICE:/cent. This causes the editor to search for the text (for
cent in this case). The text that you type is actually a regular expression, and not just a
string. This is a more powerful mechanism to search for things, that will be seen in a later
chapter.
"
Mail addresses get a new window running the mail program.
"
A file name ending in .h is looked for at /sys/include, and then passed to the editor.
For example, a plumb of libc.h would open /sys/include/libc.h
"
A name for a manual page, like ls(1) causes the editor to display the formatted manual
page. Very convenient when using acme. Type the manual page, and click with the button-3
on it.
We went this far, but we still do not know what a plumber message is. A plumber message does
not only carry data. Along with the data, there is some metadata that supplies additional information about the data. Thus, each message has a set of attributes and their values, besides the data.
Some attributes are always present in a message (although their values might be empty). Other
- 130 attributes are used by programs using a particular kind of message, and there can be any number
of them. You may also invent any attribute that you need if you use plumber messages for a particular thing. These are the standard attributes for a message:
src A string that names the source for the message, usually a program name.
dst A string that names the destination port for the message. If it is not supplied, the
plumber tries to choose using the rules file.
wdir The working directory used by a process that is sending a message carrying a file
name. This is necessary to let the receipt of the message determine to which file the message refers to. Note that a file name may be a relative path, and you need to know with
respect which (current working) directory it is relative to.
type A string describing the type of data. Most of the times the type is just text, which is
later, perhaps, interpreted as a file name or as the name for a manual page.
ndata Number of bytes in the data for the message.
How can you use the plumber? From the shell, the plumb program lets you send messages, as
you saw. From a C program, there is a library called plumb(2) that provides an interface for using
the plumber. The following program listens for plumb messages sent to the edit port, and prints
the file name for each such message.
_____
_edits.c
#include <u.h>
#include <libc.h>
#include <plumb.h>
void
main(int , char* [])
{
int
fd;
Plumbmsg*m;
char*
addr;
fd = plumbopen("edit", OREAD);
if (fd < 0)
sysfatal("edit port: %r");
while(m = plumbrecv(fd)){
addr = plumblookup(m->attr, "addr");
if (addr == nil)
addr = "none";
print("msg: wdir=’%s’ data=’", m->wdir);
write(1, m->data, m->ndata);
print("’ addr=’%s’\n", addr);
plumbfree(m);
}
fprint(2, "plumbrecv: %r");
close(fd);
exits(nil);
}
The function plumbopen opens the plumb port given as its first parameter (using the open mode
- 131 indicated by the second one). It returns an open file descriptor where we can read or write plumb
messages. In this case, we open the edit port. The function opens /mnt/plumb/edit if we
do not supply a path for the file name. To receive a message, the program calls plumbrecv,
which blocks reading from the port until the plumber supplies the data from the message. This
function may have to read several times, until an entire message has been read. It returns a
pointer to the message read, which has this data structure:
typedef struct Plumbattr Plumbattr;
typedef struct Plumbmsg Plumbmsg;
struct Plumbmsg
{
char
char
char
char
Plumbattr
int
char
};
struct Plumbattr
{
char
char
Plumbattr
};
*src;
*dst;
*wdir;
*type;
*attr;
ndata;
*data;
// linked list of attributes
*name;
*value;
*next;
The program looks in the attribute list for the message, pointed to by the attr field, for an
attribute named addr, which is the address following the file name in the plumbed message. To
do so, it calls plumblookup, giving the attr list and the name of the desired attribute. The
working directory for the message, the data, and the address attribute’s value are printed next. At
last, the message data structure is deallocated by a call to plumbfree.
We can deliver messages to our program by doing clicks on Acme, with the mouse button 3,
and also by running plumb from the shell like we do below.
;
;
;
;
;
plumb
plumb
plumb
plumb
/NOTICE:2
edits.c
/sys/doc/9/9.ps
edits.c:/main
The corresponding output for our program, which we did run at a different window, follows. Note
how the message for 9.ps was not sent to the edit port, and therefore is not received by our
program. It was sent to a different program, page, to display the postscript file.
; 8.edits
msg: wdir=’/usr/nemo/9intro’ data=’/NOTICE’ addr=’2’
msg: wdir=’/usr/nemo/9intro’ data=’/usr/nemo/9intro/edits.c’ addr=’’
msg: wdir=’/usr/nemo/9intro’ data=’/usr/nemo/9intro/edits.c’ addr=’/main’
One last question. Which format is used to actually write and read messages from the file that is
the plumb port? Is it a esoteric format? No. It is simply a set of lines with the source application,
destination port, working directory, message type, message attributes, and number of bytes of
data, followed by the indicated number of bytes carrying the data. This is easy to see by using
cat to read from the edit port while executing the same plumb commands used above.
- 132 ; cat /mnt/plumb/edit
plumb
edit
/usr/nemo/9intro
text
addr=2
7
/NOTICE
New line supplied by us
plumb
edit
/usr/nemo/9intro
text
addr=
24
/usr/nemo/9intro/edits.c
plumb
edit
/usr/nemo/9intro
text
addr=/main
24
/usr/nemo/9intro/edits.c
Delete
;
New line supplied by us
New line supplied by us
Sending a plumb message is very simple, given the helper routines in plumb(2). The routine
plumbsend sends a message as described by a Plumbmsg structure. The routine
plumbsendtext is a even more simple version, for those cases when the message is just a text
string.
; sig plumbsend plumbsendtext
int plumbsend(int fd, Plumbmsg *m)
int plumbsendtext(int fd, char *src, char *dst, char *wdir, char *data)
For example, this would send a message with the text /NOTICE.
int
fd;
fd = plumbopen("send", OWRITE);
if (fd < 0)
sysfatal("open: %r");
if (plumbsendtext(fd, argv0, nil, nil, "/NOTICE") < 0)
sysfatal("send: %r");
A similar effect can be achieved by initializing and sending a Plumbmsg as follows.
Plumbmsg m;
int
fd;
fd = plumbopen("send", OWRITE);
if (fd < 0)
sysfatal("open: %r");
m.src = m.dst = m.wdir = nil;
m.type = "text";
m.attr = nil;
m.data = "/NOTICE";
m.ndata = strlen(m.data);
if (plumbsend(fd, &m) < 0)
sysfatal("send: %r");
- 133 Problems
1
What would this command do?
cp /fd/1 /fd/0
2
Why do you think that the code to initialize standard input, output, and error in the first process differs from this?
open("/dev/cons, ORDWR);
dup(0, 1);
dup(0, 2);
3
The code
fd = open("/NOTICE", OREAD);
dup(fd, 0);
close(fd);
4
5
may fail and leave standard input closed. When does this happen? Why do you think this
code was used for a program that redirected standard input to /notice?
Show that a process that reads from an empty pipe gets blocked and will never run. Which
state is reported by ps for such process?
Modify the code for the srvecho program to perform the echo through the pipe, and not to
the console. Use the program con(1) to connect to the pipe through /srv/echo and test
that it works.
- 134 .
- 135 -
6 Network communication
______
6.1. Network connections
Plan 9 is a distributed system. But even if it was as its ancestor, UNIX, a centralized system that
was designed just for one machine, it is very important to be able to use the network to provide
services for other machines and to use services from others. All the operating systems that are in
use today provide abstractions similar to the one whose interface is described here, to let you use
the network.
This chapter may be hard to understand if you have not attended a computer networks
course, but we try to do our best to explain how to use the network in any case. All the programs
you have used to browse the Web, exchange electronic mail, etc. are implemented using interfaces that are similar to the ones described below (they use to be more complex, though).
In general, things work as for any other service provided by the operating system. First, the
system provides some abstraction for using the network. As we will be seeing, Plan 9 uses also
the file abstraction as its primary interface for using networks. Of course, files used to represent a
network have a special meaning, i.e., behave in a particular way, but they are still used like files.
Other operating systems use a whole bunch of extra system calls instead, to provide the interface
for their network abstraction. Nevertheless, the ideas, and the programmatic interface that we will
see, are very similar.
Upon such system-provided abstraction, library functions may provide a more convenient
interface for the application programmer. And of course, in the end, there many programs already
installed in the system that, using these libraries, provide some services for the user.
A network in Plan 9 is a set of devices that provide the ability to talk with other machines
using some physical medium (e.g, some type of wire or the air for radio communication).
A network device in Plan 9 may be an actual piece of hardware, but it can also be a piece of
software used to speak some protocol. For example, most likely, your PC includes an ethernet
card. It uses an RJ45 connector to plug your computer to an ethernet network (just some type of
cabling and conventions). The interface for the ethernet device in Plan 9 is just a file tree, most
likely found at /net/ether0
; lc /net/ether0
0
1
2
addr
clone
ifstats stats
Machines attached to the wire have addresses, used by the network hardware to identify different
machines attached to the wire. Networks using wireless communication are similar, but use the
air as their wire. We can use the file interface provided by Plan 9 for our ethernet device to find
out which one is its address:
; cat /net/ether0/addr
000c292839fc;
As you imagine, this file is just an interface for using your ethernet device, in this case, for asking
for its address.
Once you have the hardware (e.g., the ethernet card) for exchanging messages with other
machines attached to the same medium (wiring or air), your machine and exchange bytes with
them. The problem remains of how to send messages to any machine in the Internet, even if it is
not attached to the same wire your machine is attached at. One protocol very important to the
Internet, IP (Internet Protocol), is provided in Plan 9 by a device driver called IP. This protocol is
called a network protocol because it gives an address to each machine in the Internet, its IPaddress, and it knows how to reach any machine, given its address. The interface for the IP network in Plan 9 is similar to the one we saw for Ethernet:
- 136 ; lc /net/ipifc
0
1
clone
stats
This is not yet enough for communicating with programs across the internet. Using IP, you may
talk to one machine (and IP cares about how to reach that machine through the many different
wires and machines you need to cross). But you need to be able to talk to one process. This is
achieved by using another protocol, built upon the network protocol. This kind of protocol gives
addresses for mailboxes within each machine, called ports. Therefore, an address for this protocol is a combination of a machine address (used to reach that machine through the underlying network protocol) and a port number.
In few words, the network protocol gives addresses for each machine and knows how to
exchange messages between machines. Today, you are going to use IP as your network protocol.
The transport protocol gives port numbers for processes to use, and knows how to deliver messages to a particular port at a particular machine. Think of the network address as the address for a
building, and the port number as the number for a mailbox in the building.
Some transport protocols provide an abstraction similar to the postal service. They deliver
individual messages that may arrive out of order and may even get lost in the way. Each such
message is called a datagram, which is the abstraction provided by this kind of transport. In the
Internet, the datagram service is usually UDP. The IP device driver in Plan 9 provides an interface
for using UDP, similar to the ones we saw for other protocols and network devices:
; lc /net/udp
0
1
clone
stats
Other transports use the ability to send individual messages to build a more convenient abstraction for maintaining dialogs, similar to a pipe. This abstraction is called a connection. It is similar to a pipe, but differs from it in that it can go from one port at one machine to another port at a
different machine in the network. This type of communication is similar to a phone call. Each end
has an address (a phone number), they must establish a connection (dial a number, pickup the
phone), then they can speak to each other, and finally, they hangup. The analogy cannot be
pushed too far, for example, a connection may be established if both ends call each other, which
would not be feasible when making a phone call. But you get the idea. In the Internet, the most
popular protocol that provides connections is TCP, it provides them using IP as the underlying
transport protocol (hence the name TCP/IP for this suite of protocols). The IP device driver in
Plan 9 provides the interface for using TCP. It has the now familiar file interface for using a network in Plan 9:
; lc /net/tcp
0
11
1
12
10
13
14
15
16
17
18
19
2
20
21
22
23
24
stats
26
clone
Each network is represented in Plan 9 as a directory, that has at least one clone file, and several
other directories, called line directories. Opening the clone file reserves a new connection, and
creates a directory that represents the interface for the new line used to establish a connection.
Line directories are named with a number, and kept within the directory for the network. For
example, /net/tcp/14 is the interface for our TCP connection number 14. It doesn’t need to
be a fully established connection, it may be in the process of getting established. But in any case,
the directory represents what can be a particular, individual, TCP connection. The program that
opens clone may read this file to discover the number assigned to the line directory just created.
As shown in figure 6.1, for each connection Plan 9 provides at least a ctl file and a data
file. For example,
; lc /net/tcp/14
ctl
data
err
listen
local
remote
status
The file ctl can be used to perform control operations to the connection. For example, to hangup
- 137 -
/net/tcp
clone
0
1
2
n
...
ctl
data
ctl
data
ctl
data
ctl
data
Figure 6.1: The file interface for a network (protocol) in Plan 9.
(break) this connection, we can just
; echo hangup >/net/tcp/14
The data file is used to send and receive bytes through the connection. It can be used very much
like one end of a pipe. Writing to the data file delivers bytes through the connection that are to be
received at the other end. Reading from the data file retrieves bytes sent from the process writing
at the other end. Just like a pipe. Only that, if a transport provides datagrams, each write to a
data file will send a different datagram, and it may arrive out of order or get lost.
There are more differences. An important one is that many transport protocols, including
TCP, do not respect message boundaries. This means that data sent through a connection by several writes may be received at the other end by a single read. If your program has to receive messages from a network connection, it must know how much to read for each message. A single call
to read may return either part of a message or perhaps more than one message.
In the line directory for our TCP connection, the local file has the local address (including the port number) for the connection. This identifies the local end of the pipe. The remote
file serves the same purpose for the other end of the connection.
A network address in Plan 9 is a string that specifies the network (e.g., the protocol) to use,
the machine address, and the port number. For example, tcp!193.147.81.86!564 is a network address that says: Using the TCP protocol, the machine address is 193.147.81.86, and the
port number is 564. Fortunately, in most cases, we may use names as well. For example, the
address tcp!whale!9fs is equivalent to the previous one, but uses the machine name,
whale, and the service name, 9fs, instead of the raw addresses understood by the network software. Often, ports are used by programs to provide services to other programs in the network. As
a result, a port name is also known as a service name.
From the shell, it is very easy to create connections. The srv program dials a network
address and, once it has established a connection to that address, posts a file descriptor for the
connection at /srv. This descriptor comes from opening the data file in the directory for the
connection, but you may even forget this. Therefore,
; srv tcp!whale!9fs
post...
posts at /srv/tcp!whale!9fs a file descriptor that corresponds to an open network connection from this machine to the port named 9fs at the machine known as whale, in the network
speaking the protocol tcp.
To connect to the web server for LSUB, we may just
; srv tcp!lsub.org!http
post...
Here, tcp is just a shorthand for /net/tcp, which is the real (file) name for such network in
Plan 9. Now we can see that /srv/tcp!lsub.org!http is indeed a connection to the web
- 138 server at lsub.org by writing an HTTP request to this file and reading the server’s reply.
; echo GET /index.html >>/srv/tcp!lsub.org!http
Get the main web page
; cat /srv/tcp!lsub.org!http
<html>
<head>
<title> Laboratorio de Sistemas --- ls </title>
<link rev="made" href="mailto:[email protected]">
</head>
<body BGCOLOR=white>
<h1>
ls --- Laboratorio de Sistemas [ubicuos] del GSyC </h1>
...and more output omitted here...
;
If we try to do the same again, it will not work, because the web server hangs up the connection
after attending a request:
; echo GET / >>/srv/tcp!lsub.org!http
; cat /srv/tcp!lsub.org!http
cat: error reading /srv/tcp!lsub.org!http: Hangup
; echo GET / >>/srv/tcp!lsub.org!http
echo: write error: Hangup
And, as you can see, it takes some time for our machine to notice. The first write seemed to succeed. Our machine was trying to send the string GET... to the web server, but it couldn’t really
send it. The connection was closed and declared as hung up. Any further attempt to use it will be
futile. What remains is to remove the file from /srv.
; rm /srv/tcp!lsub.org!http
There is a very popular command named telnet, that can be used to connect to servers in the
Internet and talk to them. It uses the, so called, telnet protocol. But in few words, it dials an
address, and thereafter it sends text from your console to the remote process at the other end of
the connection, and writes to your console the text received. For example, this command connects to the e-mail server running at lsub.org, and we use our console to ask this server for
help:
; telnet -r tcp!lsub.org!smtp
connected to tcp!lsub.org!smtp on /net/tcp/52
220 lsub.org SMTP
help
250 Read rfc821 and stop wasting my time
Delete
We gave the option -r to telnet, to ask it not to print carriage-return characters (its protocol
uses the same convention for new lines used by DOS). When telnet connected to the address we
gave, it printed a diagnostic message to let us know, and entered a loop to send the text we type,
and to print the text it receives from the other end. Our mail server wrote a salutation through the
connection (the line starting 220...), and then we typed help, which put our mail server into a
bad mood. We interrupted this program by hitting Delete in the terminal, and the connection was
terminated when telnet died. A somewhat abrupt termination.
It is interesting to open several windows, and connect from all of them to the same address.
Try it. Do you see how each telnet is using its own connection? Or, to put it another way, all
the connections have the same address for the other end of the connection, yet they are different
connections.
To name a connection, it does not suffice to name the address for one of its ends. You must
give both addresses (for the two ends) to identify a connection. It is the four identifiers local
address, local port, remote address, and remote port, what makes a connection unique.
- 139 It is very important to understand this clearly. For example, in our telnet example, you
cannot know which connection are you talking about just by saying The connection to
tcp!lsub.org!smtp. There can be a dozen of such connections, all different, that happen to
reach that particular address. They would differ in the addresses for their other extremes.
6.2. Names
Above, we have been using names for machines and services (ports). However, these names must
be translated into addresses that the network software could understand. For example, the
machine name whale must be translated to an IP address like 193.147.81.86. The network
protocol (IP in Internet) knows nothing about names. It knows about machine addresses. In the
same way, the transport protocol TCP knows nothing about the service with name http. But it
does know how to reach the port number 80, which is the one that corresponds to the HTTP service.
Translating names into addresses (including machine and service names) is done in a different way for each kind of network. For example, the Internet has a name service known as DNS
(domain name service) that knows how to translate from a name like whale.lsub.org into an
IP address and vice-versa. Besides, for some machines and services there may be names that
exist only within a particular organization. Your local system administrator may have assigned
names to machines that work only from within your department or laboratory. In any case, all the
information about names, addresses, and how to reach the Internet DNS is kept in a (textual) database known as the network database, or just ndb. For example, this is the entry in our
/lib/ndb/local file for whale:
dom=whale.lsub.org ip=193.147.81.86 sys=whale
When we used whale in the examples above, that name was translated into 193.147.81.86
and that was the address used. Also, this is the entry in our /lib/ndb/common file for the service known as 9fs when using the TCP protocol:
tcp=9fs port=564
When we used the service name 9fs, this name was translated into the port number 564, that
was the port number used. As a result, the address tcp!whale!9fs was translated into
tcp!193.147.81.86!564 and this was used instead. Names are for humans, but (sadly) the
actual network software prefers to use addresses.
All this is encapsulated into a program that does the translation by itself, relieving from the
burden to all other programs. This program is known as the connection server, or cs. We can
query the connection server to know which address will indeed be used when we write a particular network address. The program csquery does this. It is collected at /bin/ndb along with
other programs that operate with the network data base.
; ndb/csquery
> tcp!whale!9fs
/net/tcp/clone 193.147.81.86!564
>
The > sign is the prompt from csquery, it suggests that we can type an address asking for its
translation. As you can see, the connection server replied by giving the path for the clone file
that can be used to create a new TCP connection, and the address as understood by TCP that corresponds to the one we typed. No one else has to care about which particular network, address, or
port number corresponds to a network address.
All the information regarding the connections in use at your machine can be obtained by
looking at the files below /net. Nevertheless, the program netstat provides a convenient
way for obtaining statistics about what is happening with the network. For example, this is what
is happening now at my system:
- 140 ; netstat
tcp 0
nemo
Listen
tcp 1
Established
tcp 2
nemo
Established
tcp 3
nemo
Established
tcp 4
nemo
Listen
tcp 5
nemo
Established
tcp 6
nemo
Established
tcp 7
nemo
Established
tcp 8
nemo
Listen
...many other lines of output for tcp...
udp 0
network
Closed
udp 1
network
Closed
audio
5757
5765
5759
what
5761
5766
5763
kbd
0
9fs
ads
9fs
0
ads
ads
9fs
0
::
whale.lsub.org
whale.lsub.org
whale.lsub.org
::
whale.lsub.org
whale.lsub.org
whale.lsub.org
::
0
0
0
0
::
::
Each line of output shows information for a particular line directory. For example, the TCP connection number 1 (i.e., that in /net/tcp/1) is established. Therefore, it is probably being used
to exchange data. The local end for the connection is at port 5757, and the remote end for the connection is the port for service 9fs at the machine with name whale.lsug.org. This is a connection used by the local machine to access the 9P file server at whale. It is being used to
access our main file server from the terminal where I executed netstat. The states for a connection may depend on the particular protocol, and we do not discuss them here.
In some cases, there may be problems to reach the name service for the Internet (our DNS
server), and it is very useful to call netstat with the -n flag, which makes the program print
just the addresses, without translating them into (more readable) names. For example,
; netstat -n
tcp 0
nemo
tcp 1
tcp 2
nemo
tcp 3
nemo
tcp 4
nemo
tcp 5
nemo
...many other lines of output
Listen
Established
Established
Established
Listen
Established
11004
5757
5765
5759
11003
5761
0
564
11010
564
0
11010
::
193.147.71.86
193.147.71.86
193.147.71.86
::
193.147.71.86
It is very instructive to compare the time it takes for this program to complete with, and without
using -n.
To add yet another tool to your network survival kit, the ip/ping program sends particular messages that behave like probes to a machine (to an IP address, which is for a network interface found at a machine, indeed), and prints one line for each probe reporting what happen. It is
very useful because it lets you know if a particular machine seems to be alive. If it replies to a
probe, the machine is alive, no doubt. If the machine does not reply to any of the probes, it might
be either dead, or disconnected from the network. Or perhaps, it is your machine the one disconnected. If only some probes get replied, you are likely to have bad connectivity (your network is
loosing too many packets). Here comes an example.
; ip/ping lsub.org
sending 32 64 byte
0: rtt 152 µs, avg
1: rtt 151 µs, avg
2: rtt 149 µs, avg
...
messages 1000 ms apart
rtt 152 µs, ttl = 255
rtt 151 µs, ttl = 255
rtt 150 µs, ttl = 255
In the output, rtt is for round trip time, the time for getting in touch and receiving the reply.
- 141 -
6.3. Making calls
For using the network from a C program, there is a simple library that provides a more convenient
interface that the one provided by the file system from the network device. For example, this is
our simplified version for srv. It dials a given network address to establish a connection and
posts a file descriptor for the open connection at /srv.
_____
srv.c
#include <u.h>
#include <libc.h>
void
main(int argc, char* argv[])
{
int
fd, srvfd;
char*
addr;
char
fname[128];
if (argc != 2){
fprint(2, "usage: %s netaddr\n", argv[0]);
exits("usage");
}
addr = netmkaddr(argv[1], "tcp", "9fs");
fd = dial(addr, nil, nil, nil);
if (fd < 0)
sysfatal("dial: %s: %r", addr);
seprint(fname, fname+sizeof(fname), "/srv/%s", argv[1]);
srvfd = create(fname, OWRITE, 0664);
if (srvfd < 0)
sysfatal("can’t post %s: %r", fname);
if (fprint(srvfd, "%d", fd) < 0)
sysfatal("can’t post file descriptor: %r");
close(srvfd);
close(fd);
exits(nil);
}
Using argv[1] verbatim as the network address to dial, would make the program work only
when given a complete address. Including the network name and the service name. Like, for
example,
; 8.srv tcp!whale!9fs
Instead, the program calls netmkaddr which is a standard Plan 9 function that may take an
address with just the machine name, or perhaps the network name and the machine name. This
function completes the address using default values for the network and the service, and returns a
full address ready to use. We make tcp the default value for the network (protocol) and 9fs as
the default value for the service name. Therefore, the program admits any of the following, with
the same effect that the previous invocation:
- 142 ; 8.srv tcp!whale
; 8.srv whale
The actual work is done by dial. This function dials the given address and returns an open file
descriptor for the connection’s data file. A write to this descriptor sends bytes through the connection, and a read can be used to receive bytes from it. The function is used in the same way for
both datagram protocols and connection-oriented protocols. The connection will be open as long
as the file descriptor returned remains open.
; sig dial
int dial(char *addr, char *local, char *dir, int *cfdp)
The parameter local permits specifying the local address (for network protocols that allow
doing so). In most cases, given nil suffices, and the network will choose a suitable (unused)
local port for the connection. When dir is not nil, it is used by the function as a buffer to copy
the path for the line directory representing the connection. The buffer must be at least 40 bytes
long. We changed the previous program to do print the path for the line directory used for the
connection:
fd = dial(addr, nil, dir, nil);
if (fd < 0)
sysfatal("dial: %s: %r", addr);
print("dial: %s0, dir);
And this is what it said:
; 8.srv tcp!whale!9fs
dial: /net/tcp/24
The last parameter for dial, cfdp points to an integer which, when passing a non-nil value, can
be used to obtain an open file descriptor for the connection. In this case, the caller is responsible
for closing this descriptor when appropriate. This can be used to write to the control file requests
to tune properties for the connection, but is usually unnecessary.
There is a lot of useful information that we may obtain about a connection by calling
getnetconninfo. This function returns nothing that could not be obtained by reading files
from files in the line directory of the connection, but it is a very nice wrap that makes things more
convenient. In general, this is most useful in servers, to obtain information to try to identify the
other end of the connection, (i.e., the client). However, because it is much easier to make a call
than it is to receive one, we prefer to show this functionality here instead.
Parameters for netconninfo are the path for a line directory, and one of the descriptors
for either a control or a data file in the directory. When nil is given as a path, the function uses the
file descriptor to locate the directory, and read all the information to be returned to the caller. The
function allocates memory for a NetConnInfo structure, fills it with relevant data, and returns
a pointer to it
typedef struct NetConnInfo NetConnInfo;
struct NetConnInfo
{
char
*dir;
/* connection directory */
char
*root;
/* network root */
char
*spec;
/* binding spec */
char
*lsys;
/* local system */
char
*lserv;
/* local service */
char
*rsys;
/* remote system */
char
*rserv;
/* remote service */
char
*laddr;
/* local address */
char
*raddr;
/* remote address */
};
- 143 This structure must be released by a call to freenetconninfo once it is no longer necessary.
As an example, this program dials the address given as a parameter, and prints all the information
returned by getnetconninfo. Its output for dialing tcp!whale!9fs follows.
_________
_conninfo.c
#include <u.h>
#include <libc.h>
void
main(int argc, char* argv[])
{
int
fd, srvfd;
char*
addr;
NetConnInfo*i;
if (argc != 2){
fprint(2, "usage: %s netaddr\n", argv[0]);
exits("usage");
}
addr = netmkaddr(argv[1], "tcp", "9fs");
fd = dial(addr, nil, nil, nil);
if (fd < 0)
sysfatal("dial: %s: %r", addr);
i = getnetconninfo(nil, fd);
if (i == nil)
sysfatal("cannot get info: %r");
print("dir:\t%s\n", i->dir);
print("root:\t%s\n", i->root);
print("spec:\t%s\n", i->spec);
print("lsys:\t%s\n", i->lsys);
print("lserv:\t%s\n", i->lserv);
print("rsys:\t%s\n", i->rsys);
print("rserv:\t%s\n", i->rserv);
print("laddr:\t%s\n", i->laddr);
print("raddr:\t%s\n", i->raddr);
freenetconninfo(i);
close(fd);
exits(nil);
}
- 144 ; 8.out
dir:
root:
spec:
lsys:
lserv:
rsys:
rserv:
laddr:
raddr:
tcp!whale!9fs
/net/tcp/46
/net
#I0
212.128.4.124
6672
193.147.71.86
564
tcp!212.128.4.124!6672
tcp!193.147.71.86!564
The line directory for this connection was /net/tcp/46, which belongs to the network interface at /net. This connection was using #I0, which is the first IP interface for the machine.
The remaining output should be easy to understand, given the declaration of the structure above,
and the example output shown.
6.4. Providing services
We know how to connect to processes in the network that may be providing a particular service.
However, it remains to be seen how to provide a service. In what follows, we are going to implement an echo server. A client for this program would be another process connecting to this service to obtain an echo service. This program provides the service (i.e., provides the echo) and is
therefore a server. The echo service, surprisingly enough, consists on doing echo of what a client
writes. When the echo program reads something, writes it back through the same connection, like
a proper echo.
The first thing needed is to announce the new service to the system. Think about it. To
allow other processes to connect to our process, it needs a port for itself. This is like allocating a
mailbox in the building to be able to receive mail. The function announce receives a network address and announces it as an existing place where others may send messages. For example,
announce("tcp!alboran!echo", dir);
would allocate the TCP port for the service named echo and the machine named alboran.
This makes sense only when executed in that machine, because the port being created is an
abstraction for getting in touch with a local process. To say it in another way, the address given to
announce must be a local address. It is a better idea to use
announce("tcp!*!echo", dir);
instead. The special machine name * refers to any local address for our machine. This call
reserves the port echo for any interface used by our machine (not just for the one named
alboran). Besides, this call to announce now works when used at any machine, no matter its
name.
This function returns an open file descriptor to the ctl file of the line directory used to
announce the port. The second parameter is updated with the path for the directory. Note that
this line directory is an artifact which, although has the same interface, is not a connection. It is
used just to maintain the reservation for the port and to prepare for receiving incoming calls.
When the port obtained by a call to announce is no longer necessary, we can close the file
descriptor for the ctl file that it returns, and the port will be released.
This program announces the port 8899, and sleeps forever to let us inspect what happen.
- 145
ann.c
______
#include <u.h>
#include <libc.h>
void
main(int argc, char* argv[])
{
int
cfd;
char
dir[40];
cfd = announce("tcp!*!9988", dir);
if (cfd < 0)
sysfatal("announce: %r");
print("announced in %s\n", dir);
for(;;)
sleep(1000);
}
We may now do this
; 8.ann &
; announced in /net/tcp/52
; netstat | grep 9988
tcp 52
nemo
Listen
We typed return here, to let you see
9988
0
::
According to netstat, the TCP port number 9988 is listening for incoming calls. Note how the
path printed by our program corresponds to the TCP line number 52.
Now let’s try to run the program again, without killing the previous process.
; 8.out
announce: announce writing /net/tcp: address in use
It fails! Of course, there is another process already using the TCP port number 9988. This new
process cannot announce that port number again. It will be able to do so only when nobody else is
using it:
; kill 8.ann|rc
; 8.ann &
; announced in /net/tcp/52
Our program must now await for an incoming call, and accept it, before it could exchange data
with the process at the other end of the connection. To wait for the next call, you may use
listen. This name is perhaps misleading because, as you could see, after announce, the TCP
line is already listening for calls. Listen needs to know the line where it must wait for the call, and
therefore it receives the directory for a previous announce.
Now comes an important point, to leave the line listening while we are attending a call, calls
are attended at a different line than the one used to listen for them. This is like an automatic transfer of a call to another phone line, to leave the original line undisturbed and ready for a next call.
So, after listen has received a call, it obtains a new line directory for the call and returns it. In
particular, it returns an open file descriptor for its ctl file and its path.
We have modified our program to wait for a single call. This is the result.
- 146 _______
listen.c
#include <u.h>
#include <libc.h>
void
main(int argc, char* argv[])
{
int
cfd, lfd;
char
adir[40];
char
dir[40];
cfd = announce("tcp!*!9988", adir);
if (cfd < 0)
sysfatal("announce: %r");
print("announced in %s (cfd=%d)\n", adir, cfd);
lfd = listen(adir, dir);
print("attending call in %s (lfd=%d)\n", dir, lfd);
for(;;)
sleep(1000);
// let us see
}
When we run it, it waits until a call is received:
; 8.listen
announced in /net/tcp/52 (cfd=10)
At this point, we can open a new window and run telnet to connect to this address
; telnet tcp!$sysname!9988
connected to tcp!alboran!9988 on /net/tcp/46
which makes our program receive the call:
attending call in /net/tcp/54 (lfd=11)
You can see how there are two lines used. The line number 52 is still listening, and the call
received is placed at line 54, where we might accept it. By the way, the line number 46 is the
other end of the connection.
Now we can do something useful. If we accept the call by calling accept, this function
will provide an open file descriptor for the data file for the connection, and we can do our echo
business.
- 147 _________
netecho.c
#include <u.h>
#include <libc.h>
void
main(int argc, char* argv[])
{
int
cfd, lfd, dfd;
long
nr;
char
adir[40];
char
ldir[40];
char
buf[1024];
cfd = announce("tcp!*!9988", adir);
if (cfd < 0)
sysfatal("announce: %r");
print("announced tcp!*!9988 in %s\n", adir);
for(;;){
lfd = listen(adir, ldir);
if (lfd < 0)
sysfatal("listen: %r");
dfd = accept(lfd, ldir);
if (dfd < 0)
sysfatal("can’t accept: %r");
close(lfd);
print("accepted call at %s\n", ldir);
for(;;){
nr = read(dfd, buf, sizeof buf);
if (nr <= 0)
break;
write(dfd, buf, nr);
}
print("terminated call at %s\n", ldir);
close(dfd);
}
}
If we do as before, and use telnet to connect to our server and ask for a nice echo, we get the
echo back. After quitting telnet, we can connect again to our server and it attends the new call.
- 148 ; telnet -r tcp!$sysname!9988
connected to tcp!alboran!9988 on /net/tcp/46
Hi there!
Hi there!
Delete
; telnet -r tcp!$sysname!9988
connected to tcp!alboran!9988 on /net/tcp/54
Echo echo...
Echo echo...
Delete
;
And this is what our server said in its standard output:
; 8.netecho
announced tcp!*!9988 in /net/tcp/52
accepted call at /net/tcp/54
terminated call at /net/tcp/54
accepted call at /net/tcp/55
terminated call at /net/tcp/55
The program is very simple. To announce our port, wait for call, and accept it, it has to call just
announce, listen, and accept. At that point, you have an open file descriptor that may be
used as any other one. You just read and write as you please. When the other end of the connection gets closed, a reader receives an EOF indication in the conventional way. This means that
connections are used like any other file. So, you already know how to use them.
Out program has one problem left to be addressed. When we connected to it using telnet,
there was only one client at a time. For this program, when one client is connected and using the
echo, nobody else is attended. Other processes might connect, but they will be kept on hold waiting for this process to call listen and accept. This is what is called a sequential server,
because it attends one client after another. You can double check this by connecting from two
different widows. Only the first one will be echoing. The echo for the second to arrive will not be
done until you terminate the first client.
A sensible thing to do would be to fork a new process for each client that connects. The parent process may be kept listening, waiting for a new client. When one arrives, a child may be
spawned to serve it. This is called a concurrent server, because it attends multiple clients concurrently. The resulting code is shown below.
There are some things to note. An important one is that, as you know, the child process has
a copy of all the file descriptors open in the parent, by the time of the fork. Also, the parent has
the descriptor open for the new call received after calling listen, even though it is going to be
used just by the child process. We close lfd in the parent, and cfd in the child.
We might have left cfd open in the child, because it would be closed when the child terminates by calling exits, after having received an end of file indication for its connection. But in
any case, it should be clear that the descriptor is open in the child too.
Another important detail is that the child now calls exits after attending its connection,
because that was its only purpose in life. Because this process has (initially) all the open file
descriptors that the parent had, it may be a disaster if the child somehow terminates attending a
client and goes back to call listen. Well, it would be disaster because it is not what you expect
when you write the program.
- 149 _______
cecho.c
#include <u.h>
#include <libc.h>
void
main(int argc, char* argv[])
{
int
cfd, lfd, dfd;
long
nr;
char
adir[40];
char
ldir[40];
char
buf[1024];
cfd = announce("tcp!*!9988", adir);
if (cfd < 0)
sysfatal("announce: %r");
print("announced tcp!*!9988 in %s\n", adir);
for(;;){
lfd = listen(adir, ldir);
if (lfd < 0)
sysfatal("listen: %r");
switch(fork()){
case -1:
sysfatal("fork: %r");
case 0:
close(cfd);
dfd = accept(lfd, ldir);
if (dfd < 0)
sysfatal("can’t accept: %r");
close(lfd);
print("accepted call at %s\n", ldir);
for(;;){
nr = read(dfd, buf, sizeof buf);
if (nr <= 0)
break;
write(dfd, buf, nr);
}
print("terminated call at %s\n", ldir);
exits(nil);
default:
close(lfd);
}
}
}
- 150 -
6.5. System services
You know that certain machines provide several services. For example, the machine known as
lsub.org in the Internet is a Plan 9 system. The machine name is indeed aquamar, but it is
registered in DNS as lsub.org. This particular machine provides web, mail, and several other
services, including echo!
; telnet tcp!lsub.org!echo
Hi
Hi
Delete
;
How can it be? Before reading this book, you might think that the operating system was arranging
for this services to run at that machine. But now you know that the operating system is doing
nothing, but for supplying the abstractions used to provide such services.
When this particular machine starts, Plan 9 executes an rc script as part of the normal boot
process. This script runs the program aux/listen, which listens for incoming connections and
executes programs to attend them. The machine provides services because certain programs are
started to attend incoming connections targeted to ports.
Following the modular design of the rest of the system, listen does not even decide
which ports are to be listened. This program looks at the /rc/bin/service directory, for files
with names like tcp7, tcp25, and so on. Each file corresponds to a service provided by the
machine, and has a name that corresponds to the protocol and port number where connections for
the service may arrive.
; lc /rc/bin/service
il17007
tcp17007
il17009
tcp17009
il17010
tcp17010
tcp113
tcp17013
tcp143
tcp19
tcp220
tcp25
tcp53
tcp565
tcp7
tcp9
tcp993
tcp995
telcodata
For many services, there are conventions for which ports to use for them in the Internet (you
might call it a standard). For example, TCP port 7 corresponds to the echo service. And this is
how it is implemented in Plan 9:
; cat /rc/bin/service/tcp7
#!/bin/rc
/bin/cat
;
Indeed, each one of the files in the service directory is an executable program that implements
a service. All that listen has to do, is to listen for calls to the ports determined by the file
names, and execute the files to attend each incoming call. Listen arranges for the standard input
and output of the process attending a call to be redirected to the connection itself. For a service,
reading from standard input is reading from the connection, and writing to standard output is writing to the connection.
This is a nice example of how simple things can be. Listen is in charge of listening and
spawning processes for attending services. The directory keeps the set of files that corresponds to
services. We can use familiar programs like lc to list them! Each service is provided by a separate, independent program. And everything fits together.
By the way, there is an important lesson to be learned here. It is much more simple to use
cat to implement an echo server than it is to write our own program. If we do not search the
manual and try to see if what we are trying to do is already done, we get a lot of extra work as a
penitency for this sin.
- 151 -
6.6. Distributed computing
The time has come to reveal another lie we told. There are three kind of machines in a Plan 9
network, not just two. You already know about terminals and file servers. There are also CPU
servers. A CPU server is meant to let the user execute commands on it, in particular, commands
that make intensive use of the processor. Today, with the powerful machines that we have available, most terminals can cope with anything you might what to execute on them.
But CPU servers have found their way in this new world and are still very useful for running the file server program (which used to be a different kernel), executing periodic user tasks
automatically, and providing services like Web, mail, and the like.
A CPU server runs the same system software used in a terminal, however, its kernel is compiled with the variable cpuserver set to true, and it behaves slightly differently. The main difference is that the boot program executes the script /rc/bin/cpurc instead of
/rc/bin/termrc to initialize the system for operation. You may remember that one of the
things this script does is running aux/listen to run several system services upon incoming
calls from clients.
Other systems, most notably UNIX, start most existing system services during the boot process, in a similar way. That is why you can connect to a UNIX machine to execute commands on
it (e.g., using telnet or ssh), but you cannot do the same to your Plan 9 terminal. If you want
to connect to your terminal to use a particular service, you must start that service first (i.e., run
listen or its variant that listens just for one service, listen1).
By the way, if you ever wandered what is the difference between the different flavors of
Windows for running on a PC, it is the same. They compiled the system with different parameters
for optimizing (they same so, we are not to be held responsible) the system for different kinds
of usage. Also, they arranged for the system to start different services depending on the kind of
edition.
The cpu command makes a connection to a CPU server, using by default that named by
$cpu, as set by your system administrator. The connection is used to run a program in the CPU
server, which is rc by default. The net effect is that you can connect to a shell at any CPU server,
and run commands on it. This is an example:
; echo $sysname
alboran
; cpu
cpu% echo $sysname
aquamar
control-d
; echo $sysname
alboran
Your profile, executed each time you enter the system, changes the prompt for the shell to
advice you that it is not running at your terminal. When an initial shell is started for you at a
machine (a CPU server, a terminal, etc.), it executes your $home/lib/profile file. Now, the
process that started the shell for you defined a environment variable to indicate which kind of session you are using. For terminals, the variable service has terminal as its value. However,
on CPU servers this variable may have cpu or rx as its value, depending on how did you connect to the CPU server. Your profile may do different things (like adjusting the shell prompt),
depending on $terminal.
A more rudimentary alternative is provided, for those cases when you want to execute just
one command at another machine. It is called rx, and accepts a machine name and a command to
run on it.
; rx aquamar ’echo $sysname’
aquamar
;
- 152 Note how we had to quote the whole command, which is to be executed verbatim by the remote
machine,
Problems
1
Use /net to see which networks are available at your terminal. Determine the local
address for your terminal for each one of the networks.
2
Repeat the second problem of chapter 1 for the terminals in your network. Use
/lib/ndb/local to locate other terminals.
3
Start the echo server implemented in this chapter, and try to hangup its connection using the
shell.
4
Which processes are listening to the network in your terminal? What do they do? (use the
manual)
5
Which one is the IP address for google.com? Is the machine alive? Try to determine that
in several different ways.
6
Implement a time of day service. It must return the local time to any client. Use telnet to
test it.
7
Implement a client program for the server from the previous problem.
8
Print all the information you can determine for all clients connecting to your time of day
server.
9
Change your server so it could be started using aux/listen1. Test it.
10 Change your profile to adjust the shell prompt according to the machine name. It must work
both for terminals and connections to CPU servers.
- 153 -
7 Resources, Files, and Names
______
7.1. Resource fork
In chapter 4 we used fork to create new processes. We said that fork was a system call. We
lied. It is not a venial lie, like when saying that getenv is a system call (because it is a library
function). It is a terrible lie, because Plan 9 processes are not just clones. Now it is time to tell
the truth.
A Plan 9 process is mostly what you imagine because of what we have said so far. It is a
flow of control known by the kernel, which creates the illusion of having a dedicated processor to
run it. Each process has certain resources that are abstractions provided by Plan 9 to let it perform
its job. We have seen many of such resources: Memory, environment variables, file descriptors,
and note groups.
When we discussed fork, we said that a child process is a copy of the parent process.
Therefore, it seemed that all resources for the parent were copied to build a (child) clone. Because
fork is so hard to understand the first time you use it, we decided to lie.
But the truth is that to create a Plan 9 process you do not have to copy all the resources from
the parent process. You may specify which resources are to be copied, which ones are to be
shared with the parent, and which ones are to be brand new (and empty) just for the child.
The system call doing this is rfork, and fork is equivalent to a call to rfork asking for
a copy of the parent’s file descriptor table, a new flow of control, and a copy of the parent’s memory. On the other hand, environment variables, and the note group are shared with the parent.
This is the complete list of resources for a process, which can be controlled using rfork:
"
The flow of control There is not much we can do about it, but to ask for new one. Each one
is called a process.
"
The file descriptor table. Also known as the file descriptor group. You can ask for a copy,
or for sharing with the child when creating a process, or for a new table with all descriptors
closed.
"
Environment variables. Also known as the environment group. Like before, You can ask
for a copy, or for sharing with the child when creating a process, or for a new set of environment variables with no variable defined on it.
"
The name space. Utterly important, and central to Plan 9. We have been ignoring this until
now. This is the resource that maps file names to files. We study it in this chapter.
"
The working directory and the root directory, used to walk the file tree for relative and
absolute paths.
"
The memory segments. You can ask for sharing the data with the child, when creating a
process, or to make a copy for the child. The text, or code, is always shared. It is read-only,
and it would be a waste to copy memory that is going to remain the same. The stack is never
shared, because each process has its own flow of control and needs its own stack.
"
The note group. You can ask for sharing it with the child, when creating a process, or to
obtain your own group to be isolated from others.
"
The rendezvous group. A resource used to make groups of processes that can use the
rendezvous system call to coordinate among them. This is yet to be seen.
Besides the requests mentioned above, there are several other things that rfork can do, that we
will be seen in this chapter along with them.
Before proceeding, we are going to do a fork, but in a slightly different way:
- 154 ________
rforkls.c
#include <u.h>
#include <libc.h>
void
main(int, char*[])
{
switch(rfork(RFFDG|RFREND|RFPROC)){
case -1:
sysfatal("fork failed");
case 0:
execl("/bin/ls", "ls", nil);
break;
default:
waitpid();
}
exits(nil);
}
This program is like the one we saw, runls, which did run ls in a child process. This time it is
using the actual system call, rfork. This call receives a set of flags, packaged into its single
parameter using a bit-or. All the flags for rfork have names that start with RF. The most
important one here is RFPROC. It asks for a new process, i.e., a new flow of control.
When you do not specify RFPROC, the operations you request with other flags are done to
your own process, and not to the child. When you do specify it, the other flags refer to the child.
The default behavior of rfork is to make a copy of the memory for the child, and to share
most other things with the parent. To do exactly a fork, we must ask for a copy of the file
descriptor table including the RFFDG (RFork File Descriptor Group). But for the memory, which
is duplicated by default, other resources are shared by default. When you give the flag for a
resource to rfork, you are asking for a copy. When you use a slightly different flag, that has a C
in it (for clean), you are asking for a brand new, clean, resource. Because of what we said, you
can imagine that RFREND is asking for a another rendezvous group, but this does not really matter by now.
Running this program executes ls, as expected.
; 8.rforkls
rforkls.c
rforkls.8
8.rforkls
;
But let’s change the call to rfork with this other one
rfork(RFCFDG|RFREND|RFPROC)
and try again
; 8.rforkls
;
Nothing!
The explanation is that RFCFDG provided a clean file descriptor table (or group) to the child
process. Because standard output was not open in the child, ls could not print its output.
- 155 Furthermore, because its standard error was closed as well, it could not even complaint about it.
Now we are going to do the same, to our own process.
rforkhi.c
_________
#include <u.h>
#include <libc.h>
void
main(int, char*argv[])
{
print("hi\n");
rfork(RFCFDG);
print("there\n");
exits(nil);
}
This produces this output
; 8.rforkhi
; hi
;
The second message was not shown. The RFCFDG flag to rfork asks for a clean file descriptor
set (group). This works like in the previous program, but this time we did not specify RFPROC
and therefore, the request was applied to our own process.
7.2. Protecting from notes
The note group is shared by default when doing a fork, because no flag is specified regarding
this resource. This means that when we run our program in a window, pressing Delete in the window will kill our process. The window system posts an interrupt note to the note group of the
shell in the window, and our process is a child of the shell, sharing its note group.
This may be an inconvenience. Suppose we are implementing a web server, that is meant to
be always running. This program is meant to run in the background, because it does not need a
console to read commands. The user is expected to run our server as in
; httpd &
;
to be able to type more commands in the shell. However, if the user now hits Delete to stop
another program, the web server is killed as well. This can be avoided by calling
rfork(RFNOTEG);
in the program for httpd. This puts the process in a new note group. We are no longer affected
by notes to the group of the shell that runs in our window. To try this, run this program commenting out the call to rfork, and hit Delete.
- 156
noterfork.c
___________
#include <u.h>
#include <libc.h>
void
main(int, char*[])
{
int
i;
rfork(RFNOTEG);
for(i = 0; i < 5; i++){
sleep(1000);
print("%d ", i);
}
print("\n");
exits(nil);
}
The program gets killed.
; 8.noterfork
0 1 2 Delete
;
With the call in place, the program happily ignores us until it completes.
; 8.noterfork
0 1 2 Delete 3 4 5
;
Imagine this program is our httpd server. If the user forgets to type the ampersand, it will block
the shell forever (it is waiting for the child to die). The only way to kill it is to open a new window and kill manually the process by writing to its ctl file, as we saw before. To be more nice,
our program could fork a child and let its original process die. The shell prompt would be right
back. Because we still want to protect from notes, we must get a new note group as well.
The program, shown next, produces the same output, and convinces the shell that it should
read another line immediately after we start.
; 8.noterfork
; 0 1 2 Delete
; 3 4 5
Because the shell is reading a command line, when we type Delete, it understands that we want to
interrupt what we typed and prints another prompt, but our fake httpd program is still alive. The
RFNOTEG flag applies to our child process, because we said RFPROC as well.
- 157 _______
httpd.c
#include <u.h>
#include <libc.h>
void
main(int, char*[])
{
int
i;
switch(rfork(RFPROC|RFNOTEG)){
case 0:
for(i = 0; i < 5; i++){ // Isn’t this a nice http
sleep(1000);
// implementation?
print("%d ", i);
}
print("\n");
exits(nil);
case -1:
sysfatal("rfork: %r");
default:
break;
}
exits(nil);
}
7.3. Environment in shell scripts
Environment variables are shared by default. This means that if we change any environment variable, our parent and other sibling process sharing the environment variables will be able to see
our change.
Shell scripts are executed by a child shell process, and this applies to them as well. when
you define a variable in a shell script, the change remains in the environment variable table after
the script has died. For example, this script copies some source and documentation files to several directories for a project. It defines the projectdir environment variable.
_____
copy
#!/bin/rc
projectdir=/sys/src/planb
echo cp *.[ch] $projectdir/cmd
echo cp *.ms $projectdir/docs
Look what happens:
; copy
; lc /env/projectdir
projectdir
After executing copy, the environment variable is not yet known to our shell. The reason is that
the shell caches environment variables. Starting a new shell shows that indeed, the variable
projectdir is in our environment. This is also seen by listing /env. The file representing the
- 158 variable is defined there.
; echo $projectdir
; rc
; echo $projectdir
/sys/src/planb
How can we avoid polluting the set of environment variables for the parent shell? By asking in
the script for our own copy of the parent process’ environment. This, in a C program, would be
done calling rfork(RFENVG). In the shell, we can run the command
rfork e
that achieves the same effect. The command is a builtin, understood and executed by rc itself. it
is very sensible to start most scripts doing this:
#!/bin/rc
rfork ne
...
This creates a copy of the environment variables table (e) and the name space (n) for the process
executing the request. Because it is a copy, any change does not affect the parent. When the shell
interpreting the script dies, the copy is disposed.
7.4. Independent children
All the programs we have done, that create a child process and do not wait for it, are wrong. They
did not fail, but they were not too nice with Plan 9.
When a child process dies, Plan 9 must maintain its exit message until the parent process
waits for it. However, if the parent process is never going to wait for the child, Plan 9 does not
know for how long to keep the message. Sooner or later the message will be disposed of, e.g.,
after the parent dies.
But if we are not going to wait, it is best to tell Plan 9 that the child is dissociated from the
parent. When the child dies, it will leave no message because no one is going to wait for it. This
is achieved by specifying the flag RFNOWAIT along with RFPROC when the new, dissociated,
child is being created. For example, this is the correct version for our child program that used
fork to create a child process.
#include <u.h>
#include <libc.h>
void
main(int, char*[])
{
switch(rfork(RFFDG|RFREND|RFPROC|RFNOWAIT)){
case -1:
sysfatal("fork failed0);
case 0:
print("I am the child0);
break;
default:
print("I am the parent0);
}
exits(nil);
}
The flags RFFDG|RFREND|RFPROC are equivalent to calling fork, but this time we say
RFNOWAIT as well.
- 159 -
7.5. Name spaces
In Plan 9, we use file names like /usr/nemo. A name is just a string. It is a sequence of characters. However, because it is a file name, we give some meaning to the string. For example, the
name /usr/nemo means:
1
Start at the file named /, which is also known as the root directory.
2
Walk down the file tree to the file with name usr,
3
Walk down again to the file named nemo. You have arrived.
This name specifies a path to walk through the tree of files to reach a particular file of interest, as
shown in figure 7.1. What is a file? Something that you can open, read, write, etc. As long
as the file implements these operations, both you and Plan 9 are happy with it.
/
386
arm
usr
n
tmp
nemo glenda mero
Figure 7.1: A file name is a path to walk in the tree of files.
But how can /, which is just a name, refer to a file? Where does it come from? And why
can a name like /dev/cons refer to different files at different windows? The answers come
from the abstraction used to provide names for files, the name space. In this case, names are for
files, and we will not be saying this explicitly. It should be clear by the context.
A name space is just a set of names that you can use (all the file paths that you might ever
use in your file tree). Somewhat confusingly, the abstraction that provides a name space is also
called a name space. To add more confusion, this is also called a name service.
The name space takes a name, i.e., a string, and translates this name into something that can
be used as a file in Plan 9. This translation is called resolving a name. It takes a name and yields
a Chan, the data structure used to represent a file within the Plan 9 kernel. Thus, you might say
that resolving a name takes a string and yields a file. The translation is done by walking through
the file tree as shown above.
Because Plan 9 is a distributed system, your kernel does not have any data structure to
implement files. This may be a surprise, because in Plan 9 everything is a file, or at least looks
like a file. But Plan 9 does not provide the files itself. Files are provided by other programs that
may be running far away in the network, at different machines. These programs are called file
servers.
File servers implement and maintain file trees, and you may talk to them across the network
to walk their trees and use their files. But you cannot even touch nor see the files, they are kept
inside a file server program, far away. What you can do is to talk to the file server program to ask
it to do whatever you may want to do to the files it keeps. The protocol used to talk (i.e., the language spoken) is called 9P. The section 5 of the system manual documents this protocol. Any
program speaking 9P can be used as a file server for Plan 9.
The conversation between Plan 9 and a file server is made through a network connection. If
- 160 you have not attended to a computer networks course, you can imagine it is a phone call, with
Plan 9 at one end, and the file server at the other. In the last chapter we saw how to establish network connections, i.e., how to make calls. This makes a network connection to the program we
use as our file server:
; srv tcp!whale!9fs
post...
; ls -l /srv/tcp!whale!9fs
--rw-rw-rw- s 0 nemo nemo 0 May 23 17:44 /srv/tcp!localhost!9988
;
The program srv dialed the address tcp!whale!9fs and, after establishing a connection,
posted the file descriptor for the connection at /srv/tcp!whale!9fs. This file (descriptor)
has a file server program that speaks 9P at the other end of the connection.
However, to access files in the file server, we must be able to see those files in our file tree,
i.e., in our name space. Otherwise we would not be able to write paths leading to such files. We
can do it. The Plan 9 mount system call modifies the name space and instructs it to jump to a
new file when you reach a given file. The shell command mount does the same.
/
386
arm
usr
tmp
nemo glenda mero
n
whale
mount
386
/
arm
usr
...
Figure 7.2: The file tree reached through tcp!whale!9fs is mounted at /n/whale.
This may seem confusing at first, but it is quite simple. For example, we may change our
name space so that when we walk through our file tree, and reach the directory /n/whale, we
continue our walk, not at /n/whale, but at the root directory of the file server reached through
/srv/tcp!whale!9fs. For example,
; lc /n/whale
; mount -c /srv/tcp!whale!9fs /n/whale
; lc /n/whale
386
acme
cron
LICENSE
adm
dist
LICENSE.afpl
alpha
lib
LICENSE.gpl
arm
lp
NOTICE
cfg
mail
mnt
n
power
rc
sys
tmp
usr
Before executing mount, the directory /n/whale was empty. After executing it, the original
directory is still empty, but our name space is instructed to jump to the root directory of file
server at /srv/tcp!whale!9fs, whenever we reach /n/whale. Therefore, lc is not really
listing /n/whale, but the root for our file server. The nice thing is that lc is happy, because the
name space keeps it unaware of where the files might be. Figure 7.2 shows how lc walked the
- 161 file tree, and makes it clear why it listed the root directory in the file server. The dashed boxes
and the arrow represent the mount we made.
The data structure that implements the name space is called the mount table. It is a table
that maintains entries saying: Go from this file to this other file. This is what we just saw. After
calling mount in our example, our mount table contains a new entry represented in the figure 7.3.
The source for the translation is called the mount point, the destination for the translation is
called the mounted file.
Chan for
/n/whale
Chan for /
at tcp!whale!9fs
Figure 7.3: New entry in mount table after mounting tcp!whale!9fs at /n/whale.
Do not get confused by the Chans. For your Plan 9 kernel, a Chan is just a file. It is the data
structure used to speak 9P with a file server regarding a particular file. Therefore, the figure might
as well say File for /n/whale.
Each time the name space walks one step in the file tree to resolve a name, the mount table
is checked out to see if walking should continue at a different file, as happen to /n/whale. If
there is no such entry, the walk continues through the file tree, as expected.
As a convenience, the program srv can mount a 9P file server, besides dialing its address
and posting the connection file descriptor at /srv. The following command line dials
tcp!whale!9fs, like before, but it also mounts that connection at /n/whale, like we did.
The file created at /srv is named by the second parameter.
; srv tcp!whale!9fs whale /n/whale
post...
; lc /srv/whale
whale
;
By convention, there is a script called /bin/9fs, that accepts as an argument the file system to
mount. It is customized for each local Plan 9 installation. Therefore, looking into it is a good way
of finding out which file servers you have around. This command achieves the same effect of the
previous command line, when used at URJC:
; 9fs whale
post...
;
We have added new files to our file tree, by mounting a remote file tree from a 9P file server into
a directory that we already had. The mechanism used was a translation going from one file to
another. When we have two files in our file tree, the same mechanism can be applied to translate
from one to another. That is, we can ask our name space to jump to a file already in our tree
when we reach another that we also have in the tree. A mount for two files already in the tree is
called a binding.
The system call (and the shell command) used to do a bind is bind. For example,
; bind -c /n/whale /n/other
installs a new entry in the mount table that says: When you reach /n/other, continue at
/n/whale. But note, the names used are interpreted using the name space! Therefore,
/n/whale is not the old (empty) directory it used to be. It now refers to the root of the file
server at whale. And so, listing /n/other yields the list for the root directory of our file server.
- 162 ; lc /n/other
386
LICENSE
LICENSE.afpl
LICENSE.gpl
NOTICE
acme
adm
alpha
arm
cfg
cron
dist
lib
lp
mail
mnt
n
power
rc
sys
tmp
usr
Because our mount table includes now the entries shown in figure 7.4.
Chan for
/n/whale
Chan for /
at tcp!whale!9fs
Chan for
/n/other
Chan for /
at tcp!whale!9fs
Figure 7.4: Entries in the mount table after the bind from /n/other to /n/whale.
How can we know how does our name space looks like? Or, how can we know which
entries are installed in our mount table? The name space is a resource, like file descriptors, and
environment variables. Each process may have its own name space (as controlled by rfork),
although the custom is that processes in the same window use to share their name spaces.
The file ns in the directory in /proc for a process, lists the mount table used by that process. Each entry is listed using a text line similar to the command used to install the entry. To
obtain the entries we have installed, we can use grep, to print lines in our ns file that contain the
string whale:
; echo $pid
843
; grep whale /proc/843/ns
mount -c #s/tcp!whale!9fs /n/whale
mount -c #s/tcp!whale!9fs /n/other
Because lines at /proc/$pid/ns are not yet ready for use as shell commands, there is a command called ns (name space) that massages them a little bit to make them prettier and ready for
use. Using ns is also more convenient because you do not need to type so much:
; ns | grep whale
mount -c ’#s/tcp!whale!9fs’ /n/whale
mount -c ’#s/tcp!whale!9fs’ /n/other
The effect of a mount (or a bind) can be undone with another system call, called unmount, or
using the shell command of the same name:
; unmount /n/whale
; lc /n/whale
; grep whale /proc/843/ns
mount -c #s/tcp!whale!9fs /n/other
;
After executing unmount, the name space no longer jumps to the root of the file server at
whale when reaching /n/whale, because the entry in the mount table for /n/whale has been
removed. What would happen now to /n/other?
- 163 ; lc /n/other
386
LICENSE
LICENSE.afpl
LICENSE.gpl
NOTICE
acme
adm
alpha
arm
cfg
cron
dist
lib
lp
mail
mnt
n
power
rc
sys
tmp
usr
Nothing! It remains as before. We removed the entry for /n/whale, but we did not say anything
regarding the bind for /n/other. This is simple to understand if you think that your name
space, i.e., your mount table, is just a set of translations from one file to another file. Here,
/n/other leads to the file that had the name /n/whale. This file was the root of our file
server, and not the empty directory. To undo the mount for this directory, we know what to do:
; unmount /n/other
; lc /n/other
;
In some cases, a single file server may provide more than one file tree. For example, the file system program used in Plan 9, fossil, makes a snapshot of the entire file tree each day, at 5am,
and archives it for the posterity. It archives only the changes with respect to the last archive, but
provides the illusion that the whole tree was archived as it was that day.
Above, we mounted the active file tree provided by the fossil file server running at
whale. But we can mount the archive instead. This can be done supplying an optional argument
for mount, that specifies the name of the file tree that you want to mount. When you do not
name a particular file tree served from the file server, its main file tree is mounted. For fossil, the
name of the main file tree is main/active. This command mounts the archive (also known as
the dump) for our main file server, and not the active file tree (i.e., that of today):
; mount /srv/tcp!whale!9fs /n/dump main/archive
; lc /n/dump
2001
2002
2003
2004
2005
2006
; ls /n/dump/2004
0101
0102
0103
0104
... and may more directories. One per day, until...
1230
1231
;
This is very useful. You may copy files you had years ago, you may compare them to those you
have today, and you may even used them! The following commands change your name space to
use the C library you were using on May 4th, 2006:
; bind /n/dump/2006/0504/386/lib/libc.a /386/lib/libc.a
; bind /n/dump/2006/0504/sys/include/libc.h /sys/include/libc.h
Remember what bind does. When your compiler and linker try to use libc.a, and libc.h,
the name space jumps to those archived in the dump. If you suspect that a program is failing
because of a recent bug in the C library, you can check that out by compiling your program using
the library you had time ago, and running it again to see if it works this time.
The script 9fs also knows how to mount the dump. So, we could have said
; 9fs dump
; bind /n/dump/2006/0504/386/lib/libc.a /386/lib/libc.a
; bind /n/dump/2006/0504/sys/include/libc.h /sys/include/libc.h
instead of mounting the dump using srv and mount.
- 164 -
7.6. Local name space tricks
You must always take into account that name spaces, i.e., mount tables, are per-process in Plan 9.
Most processes in the same window share the same name space (i.e., their mount table), and a
mount, bind, or unmount done at a window will not in general be noticed at other ones. However, any process may have its own name space. This catches many users that have not been using
Plan 9 for some time, when they try to change the namespace using Acme.
Figure 7.5 shows a window running Acme. Using this acme, we executed
mkdir /tmp/dir ; bind /usr/nemo /tmp/dir
Figure 7.5: Executing a bind on Acme does not seem to work. What is happening?
(by selecting the text and then doing a click on it with the mouse button-2). Later, we asked Acme
to open /tmp/dir, using the mouse button-3. It was empty! What a surprise! Our home directory was not empty, and after performing the bind, it seems that /tmp/dir was not bound to
our home directory. Is Acme broken?
Acme is behaving perfectly fine. When we used the mouse button 2 to execute the command line, it created a child process to execute the command. The child process prepared to execute the command and called rfork with flags RFNAMEG|RFENVG|RFFDG|RFNOTEG.
Acme is just trying to isolate the child process. The flag RFNAMEG caused the child process to
obtain its own copy of the name space used by Acme. As a result, any change performed to the
name space by the command you executed is unnoticed by Acme. The command starts, changes
its own name space, and dies.
To change this behavior, and ask Acme not to execute the child in its own name space, you
must use Acme’s built-in command Local. If a command is prefixed by Local, Acme understands that it must execute the command sharing its namespace with the child process that will
run the command. In this case, the child process will just call rfork(RFFDG|RFNOTEG), but
it will share the namespace and environment variables with its parent (i.e., with Acme). Figure
7.6 shows another attempt to change the name space in Acme. The command executed this time
was
Local mkdir /tmp/dir ; bind /usr/nemo /tmp/dir
and Acme executed
- 165 mkdir /tmp/dir ; bind /usr/nemo /tmp/dir
within its own name space. Note that Local refers to the whole text executed as a command line,
and not just to the first command. This time, opening /tmp/dir after the bind shows the
expected directory contents.
Figure 7.6: Commands executed with Local share their name space with Acme.
A related surprise may come from using the plumber, when you change the name space
after starting it. The plumber has its own name space, that in effect for the shell that executed
your $home/lib/profile, in case it was started from that file. When the window system
starts, it takes that name space as well. However, the window system puts each window (process)
in its own name space.
If there are three different windows running Acme, and you plumb a file name, the file will
be open by all the Acmes running. This is simple to understand, because all the editors are sharing the files at /mnt/plumb. When you plumb a file name, the plumber sends the message to
all editors reading from the edit port, as we saw.
But let’s change the name space in a window, for example, by executing
; 9fs whale
to mount at /n/whale the file server named whale. Here comes the surprise. When we try to
plumb /n/whale/NOTICE, this is what we get.
; plumb /n/whale/NOTICE
; echo $status
plumb 1499: error
The plumber was unable to locate /n/whale/NOTICE. After we mounted whale on
/n/whale!
But reconsider what happen. The shell running in the window is the one that mounted
/n/whale, the plumber is running using its own name space, far before our window was
brought to life. Therefore, the plumber does not have anything mounted at /n/whale. It is our
shell the one that has something mounted on it.
To change the name space for the plumber, a nice trick is used. The plumbing file (containing the rules to customize plumbing) usually has one specific rule for messages starting with
- 166 the string Local. This rule asks the plumber to execute the text after Local in a shell started
by the plumber. For example, we could do this:
; plumb ’Local 9fs whale’
; plumb /n/whale/NOTICE
; echo $status
;
The first command plumbs Local 9fs whale, which makes the plumber execute 9fs
whale in a shell. Now, this shell is sharing the name space with the plumber. Thus, the command plumbed changes the name space for the plumber. Afterwards, if we plumb
/n/whale/NOTICE the plumber will see that file and there will be no problem.
Is the problem solved? Maybe. After an editor is running at a different window, receives the
plumb message for /n/whale/NOTICE, it will not be able to open this file, because its name
space is also different. In general, this is not a problem at all, provided that you understand how
you are using your name spaces.
Another consequence of the per-process name spaces and the plumbing tool is that you can
isolate an editor regarding plumbing. Just do this:
; plumber
; acme
and the Acme will have its own set of plumbing files. Those files are supplied by the plumber that
you just started, which are different from the ones in use before executing these commands.
7.7. Device files
If you understood the discussion in the last section, this is a legitimate question: How could my
name space get anything mounted in the first place? To do a mount, you must have a file where to
mount. That is, you need a mount point. Initially, your machine is not even connected to the file
server and you have just what is inside your machine. You must have something that you could
mount at / in the first place.
Besides, you must be able to use your devices to reach the file server. This includes at least
the network, and maybe the disk if you have your files stored locally in a laptop. In Plan 9, the
interface for using devices is a file tree provided by each device driver (Remember, a device
driver is just the program that drives your device, and is usually linked inside the kernel). That is
to say that Plan 9 device drivers are tiny file servers that are linked to the system.
You need to use the files provided by your drivers, which are their interface, if you want to
use the devices. You want to use them to reach your file server across the network. So, you have
to mount these file trees for devices. And we are where we started.
The answer to this chicken-and-the-egg problem is a new kind of name that we have silently
omitted until now. You have absolute paths that start walking at /, you have relative paths that
start walking at your current directory, and you also have device paths. that start walking at the
root of the file tree of a device.
A device path starts with a hash # sign and a character (a rune in unicode) that is unique
for each device. The file /dev/drivers lists your device drivers, along with their paths:
- 167 ; cat /dev/drivers
#/ root
#c cons
#P arch
#e env
#| pipe
#p proc
#M mnt
#s srv
... others omitted
For example, the path #e corresponds to the root directory of the file tree provided by the device
that keeps the environment variables. Listing #e (quoted, because the # is special for the shell)
gets the same file list than listing /env. That is because #e is bound at /env by convention.
; lc /env
’*’
0
...and many others.
; lc ’#e’
’*’
0
...and many others.
cpu
cputype
init
location
planb
plumbsrv
sysname
tabstop
cpu
cputype
init
location
planb
plumbsrv
sysname
tabstop
We have also seen that files at /proc represent the processes in the system. Those files are provided by the proc device. To list the files for the process running the shell, we can
; lc /proc/$pid
args
fd
kregs
ctl
fpregs mem
note
noteid
notepg
ns
proc
regs
status
profile segment text
wait
note
noteid
notepg
ns
proc
regs
status
profile segment text
wait
But we can also
; lc ’#p’/$pid
args
fd
ctl
fpregs
kregs
mem
When a device path is used, the file tree for the device is automatically mounted by the kernel.
You might not even have where to mount it! The rest of the name is resolved from there. Thus,
device file names are always available, even if you have no entries in your name space.
Where does / come from? It comes from #/, that is a tiny file tree that provides mount
points to let you mount files from other places. The device is called the root device and includes
the few programs necessary to reach your file server.
; lc ’#/’
bin
dev
boot
env
fd
mnt
net
proc
net.alt root
srv
This directory is bound to /, a few other mounts and binds made, and now you have your tree.
The programs needed to do this are also in there:
; lc ’#//boot’
boot
factotum
fossil
ipconfig
7.8. Unions
The mounts (and binds) we made so far have the effect of replacing the mount point file with the
mounted file. This is what a mount table entry does. However, you can also add a mounted file to
the mount point. To see how this works in a controlled way, let’s create a few files.
- 168 ;
;
;
;
a
mkdir adir other
touch adir/a adir/b adir/c
touch other/a other/x other/y
lc adir
b
c
If we bind other into adir, we know what happens. From now on, dir refers to other.
; bind other adir
; lc adir
a
x
y
After undoing the effect of the bind, to leave adir undisturbed, we do another bind. But this
time, we bind other into adir after what it previously had, by using the -a flag for bind.
And this is what we get:
; bind -a other adir
; lc adir
a
a
b
c
x
y
You can see how the file that used to be adir now leads to a union of both the old adir and
other. Its contents appear to be the union of the contents for both directories. Because there are
two files named a, one at the old adir and another at other, we see that file name twice. Furthermore, look what happens here:
;
;
a
;
;
a
;
a
rm adir/b
lc adir
a
rm adir/y
lc adir
a
lc other
x
c
x
c
x
y
Removing adir/b removed the b file from the original adir. And removing the file adir/y
removed the file y, and of course the file is no longer at other either. Let’s continue the game:
; echo hola >other/a
; cat other/a
hola
; cat adir/a
;
We modify the file a in other, and write something on it. Reading other/a yields the
expected result. However, adir/a is still an empty file. Because we bound other after, using
the -a flag for bind, the name a is found in the old adir, which is before the file with the same
name in other. Therefore, although we see twice a, we can only use the one that is first found.
; rm adir/a
; lc adir
a
c
; lc other
a
x
x
Removing adir/a removes the file a from the original adir. But there is another file at
other named a, and we still see that name. Because we bound other into adir, after what it
previously had, the remove system call finds first the name adir/a at the old adir, and that
is the one removed.
What happens to our name space? How can it be what we saw above? The answer is that
you can bind (or mount) more than one file for the same mount point. The mount table entry
- 169 added by the bind we made in this section is shown in figure 7.7.
Chan for
adir
Chan for
adir
Chan for
other
Figure 7.7: A union mount. The mount entry after bind -a other adir.
This entry has a mount point, adir. When that file is reached, the name space jumps and
continues walking at the mounted file. However, here we have two mounted files for this entry.
When we bound other after what was initially at adir, Plan 9 added adir as a file mounted
here, and then other was linked after as another mounted file. This can be seen if you use ns to
look for entries referring to adir:
; ns | grep adir
bind /tmp/adir /tmp/adir
bind -a /tmp/other /tmp/adir
When a mount entry is a union, and has several mounted files, the name space tries each one in
order, until one works for the name being resolved. When reading the directory, all of the feasible
targets are read. Note that unions only make sense when the files are directories. By the way, to
mount or bind before the previous contents of a union, use the flag -b for either program.
Unions can be confusing, and when you create files you want to be sure about where in the
union are you creating your files. To help, the flag -c can be supplied to either bind or mount
to allow you to create files in the file tree being mounted. If you do not supply this flag, you are
not allowed to create files in there. When trying to create a file in a union, the first file in the
union mounted with -c is the one used.
7.9. Changing the name space
To adjust the name space in a C program, two system calls are available. They are similar to the
shell commands used above, which just call these functions according to their command line
arguments
; sig bind mount
int bind(char *name, char *old, int flag)
int mount(int fd, int afd, char *old, int flag, char *aname)
The system call used by the mount command we saw above is mount. It takes a file descriptor,
fd, used to reach the file server to mount. It must be open for reading and writing, because a 9P
conversation will go through it. The descriptor is usually a pipe or a network connection, and
must have a 9P speaker at the other end of the pipe. To be on the safe side, Plan 9 closes fd for
your process after the mount has been done. This prevents you from reading and writing that
descriptor, which would disrupt the 9P conversation between Plan 9 and the file server.
After the call, the old file has the file server reached through fd mounted on it. The
parameter aname corresponds to the optional argument for the mount command that names a
particular file tree to be mounted. To mount the server’s main file free, supply an empty (not
null!) string.
The options given to the shell command mount are specified here using a bit-or of flags.
You may use one of the integer constants MREPL, MBEFORE, and MAFTER. Using MREPL asks
for replacing the old file (the mount point) with the new file tree. Using instead MBEFORE asks
mount to mount the new file tree before the previous contents for the old file (equivalent to -b
in the shell command). Using MAFTER instead asks for mounting the file tree after the old one
(like giving a -a to the shell command). To allow creation of files in the mounted tree, do a bitor of the integer constant MCREATE with any other flag.
- 170 This program mounts the main file tree of our file server at /n/whale, and the archive at
/n/dump.
______
_whale.c
#include <u.h>
#include <libc.h>
#include <auth.h>
void
main(int, char*[])
{
int
fd;
// for amount
fd = open("/srv/tcp!whale!9fs", ORDWR);
if (fd < 0)
sysfatal("can’t open /srv/tcp!whale!9fs: %r");
if (amount(fd, "/n/whale", MREPL|MCREATE, "") < 0)
sysfatal("mount: %r");
if (amount(fd, "/n/dump", MREPL, "main/archive") < 0)
sysfatal("mount: %r");
exits(nil);
}
Because the dump cannot be modified, we do not use MCREATE for it, it would make no sense to
try to create files in the (read-only) archive. Running this program is equivalent to executing
; mount -c /srv/tcp!whale!9fs /n/whale
; mount /srv/tcp!whale!9fs /n/dump main/archive
As you could see, the program calls amount and not mount. The function amount is similar
to mount, but takes care of authentication, i.e., convincing the file server that we are who we say
we are. This is necessary or the file server would not allow attaching to its file tree with the access
rights granted to our user name. After amount convinces the file server, it calls mount supplying an authentication file descriptor as the value for the mount parameter afd. The other
parameters for mount are just those we gave to amount.
The other system call, bind, is used in the same way. Its flags are the same used for mount.
However, unlike mount, it receives a file name instead of a file descriptor. As you could expect
after having using the shell command bind.
7.10. Using names
We have seen that the shell has an environment variable, path, to determine where to search for
commands. There are several interesting things to note about this. First, there are only two directories where to search.
; echo $path
. /bin
;
This is really amazing if you compare this with the list of directories in the PATH in other systems, which uses to be much larger. For example, this is the variable used in a UNIX system we
have around:
- 171 $ echo $PATH
/bin:/usr/bin:/sbin:/usr/sbin:/usr/local/bin:/opt/bin:/usr/local/plan9/bin:.
$
In UNIX, the variable uses to have the same name in upper-case, and directories are separated by
colons instead of space.
Also, how do you get at /bin only those binaries for the architecture you are using?
After your machine has completed its boot process, and mounted the file server, it runs a
program called init. This program initializes a new namespace for your terminal and runs
/bin/rc within such namespace, to execute commands in /rc/bin/termrc, that start system services necessary for using the system. The namespace is initialized by a call to the function
newns,
; sig newns
int newns(char *user, char *nsfile);
which reads a description for an entire namespace from a file, nsfile, and builds a new namespace for a given user that matches such description. This is is an excerpt from the file
/lib/namespace, which is the nsfile used by default:
# root
mount -aC #s/boot /root $rootspec
bind -a /root /
# kernel devices
bind #c /dev
bind #d /fd
bind -c #e /env
bind #p /proc
bind -c #s /srv
...several other binds...
# standard bin
bind /$cputype/bin /bin
bind -a /rc/bin /bin
# User mounts
bind -c /usr/$user/tmp /tmp
bind -bc /usr/$user/bin/$cputype /bin
bind -bc /usr/$user/bin/rc /bin
cd /usr/$user
As you can see, a namespace file for use with newns contains lines similar to shell commands
used to adjust the namespace, that are like the ones in /proc/*/ns files. The file #s/boot is
a connection to the file server used to boot the machine. This is what you find at /srv/boot,
after the line
bind -c #s /srv
in the namespace file has been processed. Ignoring some details, you can see how this file server
is mounted at /root, and then this directory is added to /. Both directories come from your
root device, #/, which is always available. The dance around /root and / adds the root of the
file server to those files already in /root.
The next few lines bind device driver file trees at conventional places. For example, #c is
the cons driver, which is bound at /dev and provides files like /dev/null, /dev/time, and
other common files for the machine. Also, #d provides the file interface for your file descriptors,
and is bound at /fd as expected. The same is done for other drivers.
Now look at the sections marked as standard bin, and user mounts. They answer our
- 172 question regarding /bin.
The program init defined several environment variables. For example, $user holds your
user name, $sysname your machine name, and $home your home directory. It also defined
another variable, $cputype, which holds the name for the architecture it was compiled for. That
is, for the architecture you are using now! Therefore,
bind /$cputype/bin /bin
bind -a /rc/bin /bin
binds /386/bin into /bin, on a PC. All the binaries compiled for a 386 are now available at
their conventional place, /bin. Besides, portable Rc scripts found at /rc/bin, which can be
interpreted by rc at any architecture, are added to /bin, after the binaries just bound. You have
now a complete /bin, all set for using. It that was not enough, the lines
bind -bc /usr/$user/bin/$cputype /bin
bind -bc /usr/$user/bin/rc /bin
add your own binaries and Rc scripts, that are stored at bin/386 (in this case) and bin/rc in
your home directory.
If you want to add, or remove, more binaries at /bin, you can just use bind, to customize
/bin as you please. There is no need for a longer $path, because /bin may have just what
you want. And you always know where your binaries are, i.e., just look at /bin.
Another detail that you see is that the directory /tmp is indeed /usr/$user/tmp. You
have your own directory for temporary files, although all programs create them at /tmp, by convention. Even if the file system is being shared by multiple users, each user has its own /tmp, to
avoid disturbing others, and being disturbed.
We are going to continue showing how to use the name space to do a variety of things. Nevertheless, if you want to read a nice introduction to using name spaces for doing things, refer to
[7].
7.11. Sand-boxing
Being able to customize the name space for a particular process is a very powerful tool. For
example, the window system does a
rfork(RFNAMEG)
to make a duplicate of the namespace it runs in, for each window (actually, for each shell that is
started for a new window). The shell script
; window
creates a new Rio window, with a new shell on it. This shell is provided with its own copy of the
namespace, customized to use the console, mouse, and screen just for that window. These are the
commands:
rfork ne
mount /srv/rio.nemo.39 /mnt/wsys
bind -b /mnt/wsys /dev
Mounting the file server for the window system creates a new window, and binding its file tree at
/dev replaces the files that represent the console. All the programs are unaware of this.
Many other things can be done. To freeze the time in your system, just provide a file interface that never changes:
- 173 ; cp /dev/time /dev/bintime /tmp/
; bind /tmp/time /dev/time
; bind /tmp/bintime /dev/bintime
One interesting use of namespaces is in creating sandboxes for processes to run. A sandbox is a
container of some kind that isolates a process to prevent it from doing any damage, like when you
do a sand box in the beach to contain the water. This program creates a sandbox to run some
code inside. It uses newns to build a whole new namespace according to a file given as a parameter. Because of the call to rfork(RFNOMNT) that follows, the process will not be allowed to
mount any other file tree. It may access just those files that are in the namespace described in the
file. That is a very nice sand box.
____
_box.c
#include
#include
#include
void
main(int
{
<u.h>
<libc.h>
<auth.h>
// for newns
argc, char* argv[])
char*
user;
if (argc != 2){
fprint(2, "usage: %s ns prog\n", argv0);
sysfatal("usage");
}
switch(rfork(RFPROC|RFNAMEG)){
case -1:
sysfatal("fork: %r");
default:
waitpid();
exits(nil);
case 0:
user = getuser();
if (newns(user, argv[1]) < 0)
sysfatal("newns: %r");
rfork(RFNOMNT);
execl(argv[1], argv[1], nil);
sysfatal("exec: %r");
}
}
The call to getuser returns a string with the user name. We have already seen all other calls
used in this program. The program can be used like in
; 8.box sandbox /bin/rc
Where sandbox is a file similar to /lib/namespace, but with mounts and binds appropriate
for a sandbox.
- 174 -
7.12. Distributed computing revisited
In the last chapter, we learned about CPU servers and connected on one of them to execute commands. But there is one interesting thing about that kind of connection. Indeed, you have already
seen it, but perhaps it went unnoticed. This thing may become more visible if you connect to a
cpu server and execute rio. The result is shown in figure 7.8.
Figure 7.8: Rio run in a Rio window. The inner rio runs at a CPU server, not at your terminal.
; cpu
cpu% rio
...and you get a whole window system in your window!
You just started the window system, but it is running at the CPU server, and not at your terminal.
However, it is using your mouse, your keyboard, and your screen to do its job! Not exactly,
indeed, it is using the virtual mouse, keyboard, and screen provided by the Rio in your terminal
for the window you used to connect to the CPU server. Is it magic?
The answer may come if you take a look at the name space used by a shell obtained by connecting to a CPU server. This shell has a namespace that has at /mnt/term the whole namespace you had available in the window where you did run cpu. Furthermore, some of the files at
/mnt/term/dev were bound to /dev. Therefore, many of the devices used by the shell (or
any other process) in the CPU server do not come from the CPU server itself. They come from
your terminal!
The namespace at your terminal includes files like /dev/cons, /dev/draw, and
/dev/mouse. This name space was initialized by a process that called newns using
/lib/namespace, as we saw in another example before, and then perhaps you customized it
further by doing mounts or binds in your profile. The same happens for the shell started for you in
the CPU server. It gets a namespace initialized by a call to newns, and perhaps by your profile.
However, the program initializing a namespace for you in the CPU server mounted at
/mnt/term the name space exported from your terminal, and made a few binds to adjust /dev
to use your terminal’s devices instead.
This includes the files we mentioned above that are the interface for your console, for drawing graphics, and for using the mouse. At least, they are within your terminal’s window. At a different window, you know that rio provides different files that represent the interface for the console, graphics, and mouse for that other window.
- 175 Now the question remains. How can a namespace be exported? Change the question. How
can a namespace be imported? To import anything into your namespace, you must mount a 9P
file server. Therefore, if your namespace is explored using a file server, it can be imported. It
turns out that there is a program for doing just that. Well, there are two.
The real work is done by exportfs. This program uses the venerable calls open,
close, read, write, etc. to access your namespace, and exports it by speaking 9P through a
network connection, like any other file server. When a 9P client of exportfs asks this program
to return the result of reading a file, it reads the file and replies. When a 9P client asks
exportfs to write into a file, by sending a 9P write request to it, the program uses the write
system call to write to the file. The effect is that for anyone mounting the file tree provided by
exportfs, that file tree is exactly the same than the one in effect in the namespace where
exportfs runs.
The second program that can be used to export a namespace, srvfs, is just a convenience
wrapper, that calls exportfs in a way that is more simple to use from the shell. It receives the
name for a file to be created at /srv, that when mounted, grants access to the file tree rooted at
the directory given as the second argument.
To see that srvfs, i.e., exportfs, is indeed exporting a namespace, we can rearrange a
little bit our namespace, export a part of it, and see how after mounting it we gain access to the
rearranged file tree that we see, and not the real one from the file server.
; mkdir /tmp/exported /tmp/exported/doc /tmp/exported/src
; bind $home/doc /tmp/exported/doc
; bind $home/src /tmp/exported/src
;
; srvfs x /tmp/exported
;
; mount -c /srv/x /n/imported
; lc /n/imported
doc
src
; lc /n/imported/src
9
gs
misc
UGrad
lang
os
bbug
limbo
prj
chem
mem
sh
A nice example of use for this program can be found in the srvfs(4) manual page.
; cpu
cpu% srvfs procs /mnt/term/proc
cpu%
This posts at /srv/procs, in the CPU server, a file descriptor that can be used to mount the
file tree seen at /mnt/term/proc in the namespace where srvfs is executed. That is, the
/proc file tree at the terminal used to run the cpu command. Therefore, mounting
/srv/procs in the CPU server permits obtaining access to the /proc interface for the user’s
terminal.
cpu% mount -c /srv/proc
cpu% lc /n/procs
1
20
257
10
21
259
11
213
26
111
214
260
12
22
265
13
23
266
;
/n/procs
30
300
305
306
310
311
33
330
334
335
34
346
367
37
38
387
389
39
662
663
669
674
676
677
Remember, because almost every resource looks like a file, you can now export whatever
- 176 resource you may want.
Indeed, we do not even need to use cpu to connect to the CPU server to mount the exported
/proc, we can import the directory /srv from the CPU server, and mount it at our terminal:
; import $cpu /srv /n/cpusrv
; mount -c /n/cpusrv/proc /n/procs
The program import is the counterpart of exportfs. It imports a part of a remote namespace
into our namespace. What it does is to connect to the remote system, and start an exportfs
there, to export file tree of interest. And then, it mounts the now exported file tree in our namespace.
For example, the file name #S is the root directory for the storage device driver. This driver
provides one directory per hard disk, which contains one file per partition in the disk. It doesn’t
really matter how a disk interface looks like, or how a disk is managed in Plan 9. What matters is
that this is the way to get access to the disks in your system, for example, to format them. My terminal has two hard disks and a DVD reader.
; lc ’#S’
sdC0
sdC1
sdD0
sdctl
They are named sdC0, sdC1, and sdD0.Because #S is usually added to /dev using bind,
some of these files are likely to show up in your /dev.
If you want to format a hard disk found at a remote machine, you may do so from your terminal. Imagine the disk is at your CPU server, you might do what follows.
; import $cpu ’#S’ /n/cpudisks
; lc /n/cpudisks
sdC0
sdC1
sdD0
sdD1 sdctl
;
If you do not have a floppy reader unit at your terminals (which is the common case today for laptops), there is no need to worry. You can import #f, the root directory for the floppy disk driver,
from another machine. And then use the script a:, which mounts the DOS formatted floppy of
your terminal at /n/a.
;
;
;
;
import -bc barracuda ’#f’ /dev
a:
cp afile /n/a/afile.txt
unmount /n/a
As you could see, import admits the same familiar options for mount and bind, to mount the
imported tree before, after, or replacing part of your namespace.
This applies to the the serial port, the audio card, and any other resource that any other
machine might have, provided it is represented as a file. As a final example, firewalls are
machines that are connected to two different networks, one protected network for local use, and
the internet. In many cases, connecting directly to the internet from the local network is forbidded, to create a firewall for viruses and malicious programs. Nevertheless, if the firewall network
for connecting to the Internet is /net.alt, at the firewall machine, this grants your machine
direct connection to the internet as well (at the price of some danger).
; import -c firewall /net.alt /net
Problems
1
Add the line
rfork(RFNAMEG);
to the program whale, before doing the calls to amount, and see what happens when you
- 177 -
2
3
4
5
6
execute it. Explain.
Enumerate the file servers available at your local Plan 9 site.
Print down the name space used by the plumber in your session.
Reproduce your name space at a different machine.
Make your system believe that it has an extra CD unit installed. Use it.
Put any server you have implemented in a sand-box. Try to break it.
- 178 .
- 179 -
8 Using the Shell
______
8.1. Programs are tools
In Plan 9, programs are tools that can be combined to perform very complex tasks. In most other
systems, the same applies, although it tends to be a little more complex. The idea is inherited
from UNIX, each program is meant to perform a single task, and perform it well.
But that does not prevent you to combine existing programs to do a wide variety of things.
In general, when there is a new job to be done, these are your options, listed from the easiest one
to the hardest one:
1
Find a program that does the job. It is utterly important to look at the manual before doing
anything. In many cases, there will be a program that does what we want to do. This also
applies when programming in C, there are many functions in the library that may greatly
simplify your programs.
2
Combine some programs to achieve the desired effect. This is where the shell gets relevance. The shell is the programming language you use to combine the programs you have in
a simple way. Knowing how to use it may relieve you from your last resort.
3
The last resort is to write your own program for doing the task you are considering.
Although the libraries may prove invaluable as helpers, this requires much more time, specially for debugging and testing.
To be able to use shell effectively, it helps to follow conventions that may be useful for automating certain tasks by using simple shell programs. For example, writing each C function using the
style
void
func(...args...)
{
}
permits using this command line to find where function foo is defined:
; grep -n
’^foo\(’ *.c
By convention, we declared functions by writing their names at the beginning of a new line,
immediately followed by the argument list. As a result, we can ask grep to search for lines that
have a certain name at the beginning of line, followed by an open parenthesis. And that helps to
quickly locate where a function is defined.
The shell is very good for processing text files, and even more if the data has certain regularities that you may exploit. The shell provides a full programming language where commands
are to be used as elementary statements, and data is handled in most cases as plain text.
In this chapter we will see how to use rc as a programming language, but no one is going
to help you if you don’t help yourself in the first place. Machines love regular structures, so it is
better to try to do the same thing in the same way everywhere. If it can be done in a way that can
simplify your job, much better.
Plan 9 is a nice example of this is practice. Because all the resources are accessed using the
same interface (a file interface), all the programs that know how to do particular things to files
can be applied for all the resources in the system. If many different interfaces were used instead,
you would need many different tools for doing the same operation to the many different resources
you find in the computer.
This explains the popularity of XML and other similar data representations, which are
attempts to provide a common interface for operating on many different resources. But the idea is
just the same.
- 180 -
8.2. Lists
The shell includes lists as its primary data structure, as its only data structure, indeed. This data
type is there to make it easier for you to write shell programs. Because shell variables are just
environment variables, lists are stored as strings, the only value a environment variable may have.
This is the famous abc list:
; x=(a b c)
; echo $x
a b c
It is just syntax. It would be the same if we had typed any of the following:
;
;
a
;
;
a
x=(a (b c))
echo $x
b c
x=(((a) (b)) (c))
echo $x
b c
It does not matter how you nest the same values using multiple parenthesis. All of them will be
the same, namely, just (a b c). What is the actual value of the environment variable for x?
We can see it.
; xd -c /env/x
0000000
a 00
0000006
b 00
c 00
Just the three strings, a, b, and c. Rc follows the C convention for terminating a string, and separates all the values in the list with a null byte. This happens even for environment variables that
are a list of a single word.
; x=3
; xd -c /env/x
0000000
3 00
0000002
The implementation for the library function getenv replaces the null bytes with spaces, and that
is why a getenv for an rc list would return the words in the list separated by white space. This
is not harmful for C, as a 0 would be because 0 is used to terminate a string in C. And it is what
you expect after using the variable in the shell.
The variable holding the arguments for the shell interpreting a shell script is also a list. The
only difference is that the shell initializes the environment variable for $* automatically, with the
list for the arguments supplied to it, most likely, by giving the arguments to a shell script.
Given a variable, we can know its length. For any variable, the shell defines another one to
report its length. For example,
;
;
1
;
;
3
x=hola
echo $#x
x=(a b c)
echo $#x
The first variable was a list with just one word in it. As a result, this is the way to print the number of arguments given to a shell script,
echo $#*
because that is the length of $*, which is a list with the arguments (stored as an environment variable).
- 181 To access the n-th element of a list, you can use $var(n). However, to access the n-th
argument in a shell script you are expected to use $n. An example for our popular abc list follows:
; echo $x(2)
b
; echo $x(1)
a
Lists permit doing funny things. For example, there is a concatenation operator that is best shown
by example.
; x=(a b c)
; y=(1 2 3)
echo $x^$y
a1 b2 c3
The ^ operator, used in this way, is useful to build expressions by building separate parts (e.g,
prefixes and suffixes), and then combining them. For example, we could write a script to adjust
permissions that might set a variable ops to decide if we should add or remove a permission, and
then a variable perms to list the involved permissions. Of course in this case it would be easier
to write the result by hand. But, if we want to generate each part separately, now we can:
; ops=(+ - +)
; perms=(r w x)
; echo $ops^$perms afile
+r -w +x afile
Note that concatenating two variables of length 1 (i.e., with a single word each) is a particular
case of what we have just seen. Because this is very common, the shell allows you to omit the ^,
which is how you would do the same thing when using a UNIX shell. In the example below, concatenating both variables is exactly the same than it would have been writing a1 instead.
; x=a
; y=1
; echo $x^$y
a1
; echo $x$y
a1
;
A powerful use for this operator is concatenating a list with another one that has a single element.
It saves a lot of typing. Several examples follow. We use echo in all of them to let you see the
outcome.
; files=(stack run cp)
; echo $files^.c
stack.c run.c cp.c
; echo $files^.h
stack.h run.h cp.h
; rm $files^.8
; echo (8 5)^.out
8.out 5.out
; rm (8 5)^.out
Another example. These two lines are equivalent:
; cp (/source/dir /dest/dir)^/a/very/long/path
; cp /source/dir/a/very/long/path /dest/dir/a/very/long/path
And of course, we can use variables here:
- 182 ; src=/source/dir
; dst=/dest/dir
; cp ($src $dst)^/a/very/long/path
Concatenation of lists that do not have the same number of elements and do not distribute,
because none of them has a single element, is illegal in rc. Concatenation of an empty list is also
forbidden, as a particular case of this rule.
; ops=(+ - +)
; perms=(w x)
; echo $ops^$perms
rc: mismatched list lengths in concatenation
; x=()
; echo (a b c)^$x
rc: null list in concatenation
In some cases it is useful to use the value of a variable as a single string, even if the variable contains a list with several strings. This can be done by using a " before the variable name. Note
that this may be used to concatenate a variable that might be an empty list, because we translate
the variable contents to a single word, which happens to be empty.
; x=(a b c)
; echo $x^1
a1 b1 c1
; echo $"x^1
a b c1
; x=()
; echo (a b c)^$"x
a b c
;
There are two slightly different values that can be used to represent a null variable. One is the
empty string, and the other one is the empty list. Here they are, in that order.
; x=’’
; y=()
; echo $x
; echo $y
; xd -c /env/x
0000000 00
0000001
; xd -c /env/y
0000000
0000000
; echo $#x $#y
1 0
Both values yield a null string when used, yet they are different. An empty string is a list with
just the empty string. When expanded by getenv in a C program, or by using $ in the shell, the
result is the empty string. However, its length is 1 because the list has one (empty) string. For an
empty list, the length is zero. In general, it is common to use the empty list as the nil value for
environment variables.
- 183 -
8.3. Simple things
We are now prepared to start doing useful things. To make a start, we want to write a couple of
shell scripts to convert from decimal to hexadecimal and vice-versa. We should start most scripts
with
rfork e
to avoid modifying the set of environment variables in the calling shell.
The first thing needed is a program to perform arithmetic calculations. The shell knows
nothing about numbers, not to talk about arithmetic. The shell knows how to combine commands
together to do useful work. Therefore, we need a program to do arithmetic if we want to do arithmetic with the shell. We may type numbers, but for shell, they would be just strings. Lists of
strings indeed. Let’s search for that program.
; lookman arithmetic expression
man 1 2c # 2c(1)
man 1 awk # awk(1)
man 1 bc # bc(1)
man 1 hoc # hoc(1)
man 1 test # test(1)
man 8 prep # prep(8)
There are several programs shown in this list that we might use to do arithmetic. In general, hoc
is a very powerful interactive floating point calculation language. It is very useful to compute
arbitrary expressions, either by supplying them through its standard input or by using its -e
option, which accepts as an argument an expression to evaluate.
; hoc -e ’2 + 2’
4
; echo 2 + 2 | hoc
4
Hoc can do very complex arithmetic. It is a full language, using a syntax similar to that of C. It
reads expressions, evaluates them, and prints the results. The program includes predefined variables for famous constants, with names E, PI, PHI, etc., and you can define your own, using the
assignment. For example,
; hoc
r=3.2
PI * r^2
32.16990877276
control-d
;
defines a value for the radius of a circle, and computes the value for its area.
But to do the task we have at hand, it might be more appropriate another calculation program, called bc. This is program is also a language for doing arithmetic. The syntax is also similar to C, and it even allows to define functions (like Hoc). Like before, this tool accepts expressions as the input. It evaluates them and prints the results. The nice thing about this program is
that it has a simple way of changing the numeric base used for input and output. Changing the
value for the variable obase changes the base used for output of numeric values. Changing the
value for the variable ibase does the same for the input. It seems to be just the tool. Here is a
session converting some decimal numbers to hexadecimal.
- 184 ; bc
obase=16
10
a
20
14
16
10
To print a decimal value in hexadecimal, we can write obase=16 and the value as input for bc.
That would print the desired output. There are several ways of doing this. In any case, we must
send several statements as input for bc. One of them changes the output base, the other prints the
desired value. What we can do is to separate both bc statements with a ;, and use echo to
send them to the standard input of bc.
; echo ’obase=16 ;
200
512’ | bc
We had to quote the whole command line for bc because there are at least two characters with
special meaning for rc, and we want the string to be echoed verbatim. This can be packaged in a
shell script as follows, concatenating $1 to the rest of the command for bc.
____
d2h
#!/bin/rc
echo ’obase=16;
’$1 | bc
Although we might have inserted a ^ before $1, rc is kind enough to insert one for free for us.
You will get used to this pretty quickly. We can now use the resulting script, after giving it execute permission.
; chmod +x d2h
; d2h 32
20
We might like to write each input line for bc using a separate line in the script, to improve readability. The compound bc statement that we have used may become hard to read if we need to
add more things to it. It would be nice to be able to use a different echo for each different command sent to bc, and we can do so. However, because the output for both echoes must be sent to
the standard input of bc, we must group them. This is done in rc by placing both commands
inside brackets. We must still quote the first command for bc, because the equal sign is special
for rc. The resulting script can be used like the one above, but this one is easier to read.
#!/bin/rc
{
echo ’obase=16’
echo $1
} | bc
Here, the shell executes the two echoes but handles the two of them as it they were just one
command, regarding the redirection of standard output. This grouping construct permits using
several commands wherever you may type a single command. For example,
; { sleep 3600 ; echo time to leave! } &
;
executes both sleep and echo in the background. Each command will be executed one after
another, as expected. The result is that in one hour we will see a message in the console reminding that we should be leaving.
How do we implemented a script, called h2d, to do the opposite conversion? That is, to
convert from hexadecimal to decimal. We might do a similar thing.
- 185 #!/bin/rc
{
echo ’ibase=16’
echo $1
} | bc
But this has problems!
; h2d abc
syntax error on line 1, teletype
syntax error on line 1, teletype
0
The problem is that bc expects hexadecimal digits from A to F to be upper-case letters. Before
sending the input to bc, we would better convert our numbers to upper-case, just in case. There is
a program that may help. The program tr (translate) translates characters. It reads its input files
(or standard input), performs its simple translations, and writes the result to the output. The program is very useful for doing simple character transformations on the input, like replacing certain
characters with other ones, or removing them. Some examples follow.
; echo x10+y20+z30
y10+y20+z30
; echo x10+y20+z30
z10+z20+z30
; echo x10+y20+z30
X10+Y20+Z30
; echo x10+y20+z30
10+20+30
| tr x y
| tr xy z
| tr a-z A-Z
| tr -d a-z
The first argument states which characters are to be translated, the second argument specifies to
which ones they must be translated. As you can see, you can ask tr to translate several different
characters into a single one. When many characters are the source or the target for the translation,
and they are contiguous, a range may be specified by separating the initial and final character
with a dash. Under flag -d, tr removes the characters from the input read, before copying the
data to the output. So, how could we translate a dash to other character? Simple.
; echo a-b-c | tr - X
aXbXc
This may be a problem we need to translate some other character, because tr would get confused
thinking that the character is an option.
; echo a-b-c | tr -a XA
tr: bad option
But this can be fixed reversing the order for characters in the argument.
; echo a-b-c | tr a- AX
AXbXc
Now we can get back to our h2d tool, and modify it to supply just upper-case hexadecimal digits
to bc.
____
h2d
#!/bin/rc
{
echo ’ibase=16’
echo print $1 | tr a-f A-F
} | bc
The new h2d version works as we could expect, even when we use lower-case hexadecimal digits.
- 186 ; h2d abc
2748
Does it pay to write h2d and d2h? Isn’t it a lot more convenient for you to use your desktop calculator? For converting just one or two numbers, it might be. For converting a docen or more, it
is for sure it pays to write the script. The nice thing about having one program to do the work is
that we can now use the shell to automate things, and let the machine work for us.
8.4. Real programs
Our programs h2d and d2h are useful, for a casual use. To use them as building blocks for doing
more complex things, more work is needed. Imagine you need to declare an array in C, and initialize it, to use the array for translating small integers to their hexadecimal representation.
char* d2h[] = {
"0x00",
"0x11",
...
"0xff"
};
To obtain a printable string for a integer i in the range 0-255 you can use just d2h[i]. Would
you write that declaration by hand? No. The machine can do the work. What we need is a command that writes the first 256 values in hexadecimal, and adjust the output text a little bit before
copying it to your editor.
We could change d2h to accept more than one argument and do its work for all the numbers given as argument. Calling d2h with all the numbers from 0 to 255 would get us close to
obtaining an initializer for the array. But first things first. We need to iterate through all the command line arguments in our script. Rc includes a for construct that can be used for that. It takes a
variable name and a list, and executes the command in the body once for each word in the list. On
each pass, the variable takes the value of the corresponding word. This is an example, using x as
the variable and (a b c) as the list.
; for (x in a b c)
;; echo $x
a
b
c
Note how the prompt changed after typing the for line, rc wanted more input: The command
for the body. To use more than one command, we may use the brackets as before, to group them.
First attempt:
; for (num in 10 20 30) {
;; echo ’obase=16’
;; echo $num
;; }
obase=16
10
obase=16
20
obase=16
30
;
It is useful to try the commands before using them, to see what really happens. The for loop
gave three passes, as expected. Each time, $num kept the value for the corresponding string in the
list: 10, 20, and 30. Remember, these are strings! The shell does not know they mean numbers
- 187 to you. Setting obase in each pass seems to be a waste. We will do it just once, before iterating
through the numbers. The numbers are taken from the arguments given to the script, which are
kept at $*.
_____
d2h2
#!/bin/rc
rfork e
{
echo ’obase=16’
for (num in $*)
echo $num
} | bc
Now we have a better program. It can be used as follows.
; d2h 10 20 40
a
14
28
We still have the problem of supplying the whole argument list, a total of 256 numbers. It happens that another program, seq, (sequences) knows how to write numbers in sequence. It can do
much more. It knows how to print numbers obtained by iterating between two numbers, using a
certain step.
; seq 5 from 1 to 5
1
2
3
4
5
; seq 1 2 10
1
3
5
7
9
;
from 1 to 10 step 2
What we need is to be able to use the output of seq as an argument list for d2h. We can do so!
Using the ‘{...} construct that we saw while discussing how to use pipes. We can do now what
we wanted.
; d2h ‘{seq 0 255}
0
1
...and many other numbers up to...
fd
fe
ff
That was nice. However, most programs that accept arguments, work with their standard input
when no argument is given. If we do the same to d2h, we increase the opportunities to reuse it
for other tasks. The idea is simple, we must check if we have arguments. If there are some, we
proceed as before. Otherwise, we can read the arguments using cat, and then proceed as before.
We need a way to decide what to do, and we need to be able to compare things. Rc provides both
things.
- 188 The construction if takes a command as an argument (within parenthesis). If the
command’s exit status is all right (i.e., the empty string), the body is executed. Otherwise, the
body is not executed. This is the classical if-them, but using a command as the condition (which
makes sense for a shell), and one command (or a group of them) as a body.
; if (ls -d /tmp) echo /tmp is there!
/tmp
/tmp is there!
;
; if (ls -d /blah) echo blah is there
ls: /blah: ’/blah’ file does not exist
In the first case, rc executed ls -d /tmp. This command printed the first output line, and,
because its exit status was the empty string, it was taken as true regarding the condition for the
if. Therefore, echo was executed and it printed the second line. In the second case, ls -d
/blah failed, and ls complained to its standard error. The body command for the if was not
executed.
It can be a burden to see the output for commands that we use as conditions for ifs, and it
may be wise to send the command output to /dev/null, including its standard error.
; if (ls -d /tmp >/dev/null >[2=1]) echo is there
is there
; if (ls -d /blah >/dev/null >[2=1]) echo is there
;
Once we know how to decide, how can we compare strings? The ~ operator in rc compares one
string to other onesq, and yields an exit status meaning true, or success, when the compare succeeds, and one meaning false otherwise.
; ~ 1 1
; echo $status
; ~ 1 2
; echo $status
no match
; if (~ 1 1) echo this works
this works
So, the plan is as follows. If $#* (the number of arguments for our script) is zero, we must do
something else. Otherwise, we must execute our previous commands in the script. Before implementing it, we are going to try just to do different things depending on the number of arguments.
But we need an else! This is done by using the construct if not after an if. If the command
representing the condition for an if fails, the following if not executes its body.
____
_args
#!/bin/rc
if (~ $#* 0)
echo no arguments
if not
echo got some arguments: $*
And we can try it.
________________
q We will see how ~ is comparing a string to expressions, not just to strings.
- 189 ; args
no arguments
; args 1 2
got some arguments: 1 2
Now we can combine all the pieces.
____
d2h
#!/bin/rc
rfork e
if (~ $#* 0)
args=‘{cat}
if not
args=$*
{
echo ’obase=16’
for (num in $args)
echo $num
} | bc
We try our new script below. When using its standard input to read the numbers, it uses the
‘{...} construct to execute cat, which reads all the input, and to place the text read in the environment variable args. This means that it will not print a single line of output until we have
typed all the numbers and used control-d to simulate an end of file.
; d2h3
20
30
control-d
14
1e
;
; d2h3 3 4
3
4
;
Our new command is ready for use, and it can be combined with other commands, like in seq
10|d2h. It would work as expected.
An early exercise in this book asked to use ip/ping to probe for all addresses for
machines in a local network. Addresses were of the form 212.128.3.X with X going from 1 to
254. You now know how to it fast!
; nums=‘{seq 1 254}
; for (n in $nums) ip/ping 212.128.3.$n
Before this example, you might have been saying: Why should I bother to write several shell
command lines to do what I can do with a single loop in a C program? Now you may reconsider
the question. The answer is that in rc it is very easy to combine commands. Doing it in C, that
is a different business.
By the way. Use variables! They might save a lot of typing, not to talk about making commands more simple to read. For instance, the next commands may be better than what we just
did. If we have to use 212.128.3 again, which is likely if we are playing with that network,
we might just say $net.
- 190 ; nums=‘{seq 1 254}
; net=212.128.3.
; for (n in $nums) ip/ping $net^$n
8.5. Conditions
Let’s go back to commands used for expressing conditions in our shell programs. The shell operator ~ uses expressions. They are the same expressions used for globbing. The operator receives at
least two arguments, maybe more. Only the first one is taken as a string. The remaining ones are
considered as expressions to be matched against the string. For example, this iterates over a set of
files and prints a string suggesting what the file might be, according to the file name.
___
_file
#!/bin/rc
rfork e
for (file in $*) {
if (~ $file *.c *.h)
echo $file: C source code
if (~ $file *.gif)
echo $file: GIF image
if (~ $file *.jpg)
echo $file: JPEG image
}
And here is one usage example.
; file
x.c: C
a.h: C
b.gif:
x.c a.h b.gif z
source code
source code
GIF image
Note that before executing the ~ command, the shell expanded the variables, and $file was
replaced with the corresponding argument on each pass of the loop. Also, because the shell
knows that ~ takes expressions, it is not necessary to quote them. Rc does it for you.
The script can be improved. It would be nice to state that file does not know what a file is
if its name does not match any of the expressions we have used. We could add this if as a final
conditional inside the loop of the script.
if (! ~ $file *.[ch] *.gif *.jpg)
echo $file: who knows
The builtin command ! in rc is used as a negation. It executes the command given as an argument. If the command exit status meant ok, then ! fails. And vice-versa.
But that was a poor way of doing things. There is a switch construct in rc that permits
doing multiway branches, like the construct of the same name in C. The one of rc takes one
string as the argument, and executes the branch with a regular expression that matches the string.
Each branch is labeled with the word case followed by the expressions for the branch. This is an
example that improves the previous script.
- 191 #!/bin/rc
rfork e
for (file in $*) {
switch($file){
case *.c *.h
echo $file:
case *.gif
echo $file:
case *.jpg
echo $file:
case *
echo $file:
}
}
C source code
GIF image
JPEG image
who knows
As you can see, in a single case you may use more than one expression, like you can with ~. As
a matter of fact, this script is doing poorly what is better done with a standard command that has
the same name, file. This command prints a string after inspecting each file whose name is
given as an argument. It reads each file to search for words or patterns and makes an educated
guess.
; file ch7.ms ch8.ps src/hi.c
ch7.ms:
Ascii text
ch8.ps:
postscript
src/hi.c: c program
There is another command that was built just to test for things, to be used as a condition for if
expressions in the shell. This program is test. For example, the option -e can be used to check
that a file does exist, and the option -d checks that a file is a directory.
; test -e /LICENSE
; echo $status
; test -e /blah
; echo $status
test 52313: false
; if (test -d /tmp) echo yes
yes
; if (test -d /LICENSE) echo yes
;
Rc includes two conditional operators that remind of the boolean operators in C. The first one is
&&, it represents an AND operation and executes the command on its right only if the one on its
left completed with success. Only when both commands succeed, the operator does so. For
example, we can replace the switch with the following code in our naive file script.
~ $file *.[ch]
~ $file *.gif
~ $file *.jpg
&& echo $file: C source code
&& echo $file: GIF image
&& echo $file: JPEG image
Here, on each line, echo is executed only if the previous command, i.e., ~, succeeds.
The other conditional is ||. It represents an OR operation, and executes the command on
the right only if the one on the left fails. It succeeds if any of the commands do. As an example,
this checks for an unknown file type in our simple script.
~ $file *.[ch] *.gif *.jpg || echo $file: who knows
The next command is equivalent to the previous one, but it would execute ~ three times and not
just once.
- 192 ~ $file *.[ch] || ~ $file *.gif || ~ $file *.jpg || echo $file: who knows
As you can see, the command is harder to read besides being more complex. But it works just fine
as an example.
Many times you would want to execute a particular command when something happens. For
example, to send you an email when a print job completes, to alert you when a new message is
posted to a web discussion group, etc. We can develop a tiny tool for the task. Let’s call it when.
Our new tool can loop forever and check the condition of interest from time to time. When the
condition happens, it can take an appropriate action.
To loop forever, we can use the while construct. It executes the command used as the condition for the loop. If the command succeeds, the while continues looping. Let’s try it.
; while(sleep 1)
;; echo one more loop
one more loop
one more loop
one more loop
Delete
;
The command sleep always succeeds! It is a lucky command. Now, how can we express the
condition we are watching for? And how do we express the action to execute when the condition
holds? It seems that supplying two commands for each purpose is both general and simple to
implement. The script when is going to accept two arguments, a command to execute that must
yield success when the condition hold, and a command to perform the action. For example,
; when ’changed http://indoecencias.blogspot.com’ \
;; ’mail -s ’’new indoecencias’’ nemo’ &
;
sends a mail to nemo when there are changes in http://indoecencias.blogspot.com,
provided that changed exits with null status when there are changes in the URL. Also,
; when ’test /sys/src/9/pc/main.8 -older 4h’ \
;; ’cd /sys/src/9/pc ; mk clean’ &
;
watches out for an object file main.8 older than 4 hours. When this happens, we assume that
someone forgot to clean up the directory /sys/src/9/pc after compiling a kernel, and we
execute the command to do some clean up and remove the object files generated by the compilation.
Nice, but, how do we do it? It is best to experiment first. First try.
; cond=’test -e /tmp/file’
; cmd=’echo file is there’
;
; $cond && $cmd
test -e /tmp/file: ’/bin/test -e ’ file does not exist
The aim was to execute the command in $cond and, when it succeeds, the one in $cmd. However, the shell understood that $cond is a single word. This is perfectly reasonable, as we quoted
the whole command. We can use echo to echo our variable within a ‘{...} construct, that will
break the string into words.
- 193 ;
;
;
3
;
4
lcond=‘{echo $cond}
lcmd=‘{echo $cmd}
echo $#lcond
echo $#lcmd
And we get back our commands, split into different words as in a regular command line. Now we
can try them.
; $lcond && $lcmd
;
There was no file named /tmp/file
And now?
; touch /tmp/file
; $lcond && $lcmd
file is there
We are now confident enough to write our new tool.
when
______
#!/bin/rc
rfork e
if (! ~$#* 2){
echo usage $0 cond cmd >[1=2]
exit usage
}
cond=‘{echo $1}
cmd=‘{echo $2}
while(sleep 15){
{$cond} >/dev/null >[2=1] && { {$cmd} ; exit ’’ }
}
We placed braces around $cond and $cmd as a safety measure. To make it clear how we want to
group commands in the body of the while. Also, after executing the action, the script exits. The
condition held and it has no need to continue checking for anything.
8.6. Editing text
Before, we managed to generate a list of numbers for an array initializer that we did not want to
write by ourselves. But the output we obtained was not yet ready for a cut-and-paste into our editor. We need to convert something like
1
2
...
into something like
"0x1",
"0x2",
...
that can be used for our purposes. There are many programs that operate on text and know how to
do complex things to it. In this section we are going to explore them.
To achieve our purpose, we might convert each number into hexadecimal, and store the
- 194 resulting string in a variable. Later, it is just a matter of using echo to print what we want, like
follows.
; num=32
; hexnum=‘{{ echo ’obase=16’ ; echo $num } | bc}
; echo "0x^$hexnum^",
"0x20",
We used the ‘{...} construct execute hexnum=..., with the appropriate string on the right hand
side of the equal sign. This string was printed by the command
{ echo ’obase=16’ ; echo $num } | bc
that we now know that prints 20. It is the same command we used in the d2h script.
For you, the " character may be special. For the shell, it is just another character. Therefore, the shell concatenated the "0x with the string from $hexnum and the string ",. That
was the argument given to echo. So, you probably know already how to write a few shell command lines to generate the text for your array initializer.
; for (num in ‘{seq 0 255}) {
;;
number=‘{{ echo ’obase=16’ ; echo $num } | bc}
;;
echo "0x^$number^",
;; }
"0x0",
"0x1",
"0x2",
...and many others follow.
Is the problem solved? Maybe. This is a very inefficient way of doing things. For each number,
we are executing a couple of processes to run echo and then another process to run bc. It takes
time for processes to start. You know what fork and exec do. That must take time. Processes
are cheap, but not free. Wouldn’t it be better to use a single bc to do all the computation, and
then adjust the output? For example, this command, using our last version for d2h, produces the
same output. The final sed command inserts some text at the beginning and at the end of each
line, to get the desired output.
; seq 1 255 | d2h | sed -e ’s/^/"0x/’ -e ’s/$/",/’
"0x0",
"0x1",
"0x2",
...and many others follow.
To see the difference between this command line, and the direct for loop used above, we can use
time to measure the time it takes to each one to complete. We placed the command above using
a for into a /tmp/for script, and the last command used, using sed, at a script in
/tmp/sed. This is what happen.
; time /tmp/sed >/dev/null
0.34u 1.63s 5.22r
/tmp/sed
; time /tmp/for >/dev/null
3.64u 24.38s 74.30r
/tmp/for
The time command uses the wait system call to obtain the time for its child (the command we
want to measure the time for). It reports the time spent by the command while executing user
code, the time it spent while inside the kernel, executing system calls and the like, and the real
(elapsed) time until it completed. Our loop, starting several processes for each number being processed, takes 74.3 seconds to generate the output we want! That is admittedly a lot shorter than
doing it by hand. However, the time needed to do the same using sed as a final processing step
in the pipeline is just 5.22 seconds. Besides, we had to type less. Do you think it pays?
- 195 The program sed is a stream editor. It can be used to edit data as it flows through a pipeline. Sed reads text from the input, applies the commands you give to edit that text, and writes the
result to the output. In most cases, this command is used to perform simple tasks, like inserting,
deleting, or replacing text. But it can be used for more. As with most other programs, you may
specify the input for sed by giving some file names as arguments, or you may let it work with
the standard input otherwise.
In general, editing commands are given as arguments to the -e option, but if there is just
one command, you may omit the -e. For example, this prints the first 3 lines for a file.
; sed 3q /LICENSE
The Plan 9 software is provided under the terms of the
Lucent Public License, Version 1.02, reproduced below,
with the following notable exceptions:
;
All sed commands have either none, one, or two addresses and then the command itself. In the
last example there was one address, 3, and one command, q. The editor reads text, usually line
by line. For each text read, sed applies all the editing commands given, and copies the result to
standard output. If addresses are given for a command, the editor applies the command to the text
selected by those addresses.
A number is an address that corresponds to a line number. The command q, quits. What
happen in the example is that the editor read lines, and printed them to the output, until the
address 3 was matched. That was at line number 3. The command quit was applied, and the rest
of the file was not printed. Therefore, the previous command can be used to print the first few
lines for a file.
If we want to do the opposite, we may just delete some lines, from the one with address 1,
to the one with address 3. As you can see below, both addresses are separated with a comma, and
the command to apply follows. Therefore, sed searched for the text matching the address pair
1,3 (i.e., lines 1 to 3), printing each line as it was searching. Then it copied the text selected to
memory, and applied the d command. These lines were deleted. Afterwards, sed continued
copying line by line to its memory, doing nothing to each one, and copying the result to standard
output.
; sed 1,3d /LICENSE
1. No right is granted to create derivative works of or
to redistribute (other than with the Plan 9 Operating System)
...more useful stuff for your lawyer...
Supplying just one command, with no address, applies the command to all lines.
; sed d /LICENSE
;
Was the /LICENSE deleted? Of course not. This editor is a stream editor. It reads, applies commands to the text while in the editor’s memory, and outputs the resulting text.
How can we print the lines 3 to 5 from our input file? One strategy is to use the sed command to print the text selected, p, selecting lines 3 to 5. And also, we must ask sed not to print
lines by default after processing them, by giving the -n flag.
; sed -n 3,5p /LICENSE
with the following notable exceptions:
1. No right is granted to create derivative works of or
The special address $ matches the end of the file. Therefore, this deletes from line 3 to the end of
the file.
- 196 ; sed ’3,$d’ /LICENSE
The Plan 9 software is provided under the terms of the
Lucent Public License, Version 1.02, reproduced below,
What follows deletes lines between the one matching /granted/, i.e., the first one that contains that word, and the end of the file. This is like using 1,3d. There are two addresses and a d
command. It is just that the two addresses are more complicated this time.
; sed ’/granted/,$d’ /LICENSE
The Plan 9 software is provided under the terms of the
Lucent Public License, Version 1.02, reproduced below,
with the following notable exceptions:
;
Another interesting command for sed is r. This one reads the contents of a file, and writes them
to the standard output before proceeding with the rest of the input. For example, given these files,
; cat salutation
Today I feel
FEEL
So be warned
; cat how
Really in bad mood
;
we can use sed to adjust the text in salutation so that the line with FEEL is replaced with
the contents of the file how. What we have to do is to give sed an address that matches a line
with the text FEEL in it. Then, we must use the d command to delete this line. And later we will
have to insert in place the contents of the other file.
; sed /FEEL/d <salutation
Today I feel
So be warned
The address /FEEL/ matches the string FEEL, and therefore selects that line. For each match,
the command d removes its line. If there were more than one line matching the address, all of
such lines would have been deleted. In general, sed goes line by line, doing what you want.
; cat
Today
So be
Today
So be
salutation
I feel
warned
I feel
warned
salutation | sed /FEEL/d
We also wanted to insert the text in how in place, besides deleting the line with FEEL. Therefore, we want to execute two commands when the address /FEEL/ matches in a line in the input.
This can be done by using braces, but sed is picky regarding the format of its program, and we
prefer to use several lines for the sed program. Fortunately, the shell knows how to quote it all.
; sed -e ’/FEEL/{
;; r how
;; d
;; }’<salutation
Today I feel
Really in bad mood
So be warned
In general, it is a good idea to quote complex expressions that are meant not for shell, but for the
command being executed. Otherwise, we might use a character with special meaning for rc, and
there could be surprises.
- 197 This type of editing can be used to prepare templates for certain files, for example, for your
web page, and then automatically adjust this template to generate something else. You can see the
page at http://lsub.org/who/nemo, which is generated using a similar technique to state
whether Nemo is at his office or not.
The most useful sed command is yet to be seen. It replaces some text with another. Many
people who do not know how to use sed, know at least how to use sed just for doing this. The
command is s (for substitute), and is followed by two strings. Both the command and the strings
are delimited using any character you please, usually a /. For example, s/bad/good/ replaces
the string bad with good.
; echo Really in bad mood | sed ’s/bad/good/’
Really in good mood
The quoting was unnecessary, but it does not hurt and it is good to get used to quote arguments
that may get special characters inside. There are two things to see here. The command, s, applies
to all lines of input, because no address was given. Also, as it is, it replaces only the first appearance of bad in the line. Most times you will add a final g, which is a flag that makes s substitute
all occurrences (globally) and not just the first one.
This lists all files terminating in .h, and replaces that termination with .c, to generate a list
of files that may contain the implementation for the things declared in the header files.
; ls *.h
cook.h
gui.h
; ls *.h | sed ’s/.h/.c/g’
cook.c
gui.c
You can now do more things, like renaming all the files terminated in .cc to files terminated in
.c, (in case you thought it twice and decided to use C instead of C++). We make some attempts
before writing the command that does it.
; echo foo.cc | sed ’s/.cc/.c/g’
foo.c
; f=foo.cc
; nf=‘{echo $f | sed ’s/.cc/.c/g’}
; echo $nf
foo.c
; for (f in *.cc) {
;; nf=‘{echo $f | sed ’s/.cc/.c/g’}
;; mv $f $nf
;; }
;
all of them renamed!
At this point, it should be easy for you to understand the command we used to generate the array
initializer for hexadecimal numbers
sed -e ’s/^/"0x/’ -e ’s/$/",/’
It had two editing commands, therefore we had to use -e for both ones. The first one replaced the
start of a line with 0x, thus, it inserted this string at the beginning of line. The second inserted
", at the end of line.
- 198 -
8.7. Moving files around
We want to copy all the files in a file tree to a single directory. Perhaps we have one directory per
music album, and some files with songs inside.
; du -a
1
./alanparsons/irobot.mp3
1
./alanparsons/whatgoesup.mp3
2
./alanparsons
1
./pausini/trateilmare.mp3
1
./pausini
1
./supertramp/logical.mp3
1
./supertramp
4
.
But we may want to burn a CD and we might need to keep the songs in a single directory. This
can be done by using cp to copy each file of interest into another one at the target directory. But
file names may not include /, and we want to preserve the album name. We can use sed to substitute the / with another character, and then copy the files.
; for (f in */*.mp3) {
;; nf=‘{echo $f | sed s,/,_,g}
;; echo cp $f /destdir/$nf
;; }
cp alanparsons/irobot.mp3 /destdir/alanparsons_irobot.mp3
cp alanparsons/whatgoesup.mp3 /destdir/alanparsons_whatgoesup.mp3
cp pausini/trateilmare.mp3 /destdir/pausini_trateilmare.mp3
cp supertramp/logical.mp3 /destdir/supertramp_logical.mp3
;
Here, we used a comma as the delimiter for the sed command, because we wanted to use the
slash in the expression to be replaced.
To copy the whole file tree to a different place, we cannot use cp. Even doing the same
thing that we did above, we would have to create the directories to place the songs inside. That is
a burden. A different strategy is to create an archive for the source tree, and then extract the
archive at the destination. The command tar, (tape archive) was initially created to make tape
archives. We no longer use tapes for achieving things. But tar remains a very useful command.
A tape archive, also known as a tar-file, is a single file that contains many other ones (including
directories) bundled inside.
What tar does is to write to the beginning of the archive a table describing the file names
and permissions, and where in the archive their contents start and terminate. This header is followed by the contents of the files themselves. The option -c creates one archive with the named
files.
; tar -c * >/tmp/music.tar
We can see the contents of the archive using the option t.
; tar -t </tmp/music.tar
alanparsons/
alanparsons/irobot.mp3
alanparsons/whatgoesup.mp3
pausini/
pausini/trateilmare.mp3
supertramp/
supertramp/logical.mp3
Option -v, adds verbosity to the output, like in many other commands.
- 199 ; tar -tv </tmp/music.tar
d-rwxr-xr-x
0 Jul 21
--rw-r--r-13 Jul 21
--rw-r--r-13 Jul 21
d-rwxr-xr-x
0 Jul 21
--rw-r--r-13 Jul 21
d-rwxr-xr-x
0 Jul 21
--rw-r--r-13 Jul 21
00:02
00:01
00:02
00:02
00:02
00:02
00:02
2006
2006
2006
2006
2006
2006
2006
alanparsons/
alanparsons/irobot.mp3
alanparsons/whatgoesup.mp3
pausini/
pausini/trateilmare.mp3
supertramp/
supertramp/logical.mp3
This lists the permissions and other file attributes. To extract the files in the archive, we can use
the option -x. Here we add an v as well just to see what happens.
; cd otherdir
; tar xv </tmp/music.tar
alanparsons
alanparsons/irobot.mp3
alanparsons/whatgoesup.mp3
pausini
pausini/trateilmare.mp3
supertramp
supertramp/logical.mp3
; lc
alanparsons
pausini
supertramp
The size of the archive is a little bit more than the size of the files placed in it. That is to say that
tar does not compress anything. If you want to compress the contents of an archive, so it occupies less space in the disk, you may use gzip. This is a program that uses a compression algorithm to exploit regularities in the data to use more efficient representation techniques for the
same data.
; gzip music.tar
; ls -l music.*
--rw-r--r-- M 19 nemo nemo 10240 Jul 21 00:17 music.tar
--rw-r--r-- M 19 nemo nemo
304 Jul 21 00:22 music.tgz
The file music.tgz was created by gzip. In most cases, gzip adds the extension .gz for the
compressed file name. But tradition says that compressed tar files terminate in .tgz.
Before extracting or inspecting the contents of a compressed archive, we must uncompress
it. Below we also use the option -f for tar, that permits specifying the archive file as an argument.
; tar -tf music.tgz
/386/bin/tar: partial block read from archive
; gunzip music.tgz
; tar -tf music.tar
alanparsons/
alanparsons/irobot.mp3
...etc...
So, how can we copy an entire file tree from one place to another? You now know how to use
tar. Here is how.
; @{cd /music ; tar -c *}
| @{ cd /otherdir ; tar x }
The output for the first compound command goes to the input of the second one. The first one
changes its directory to the source, and then creates an archive sent to standard output. In the second one, we change to the destination directory, and extract the archive read from standard input.
A new thing we have seen here is the expression ,@{...} which is like ,{...} but executes the
command block in a child shell. We need to do this because each block must work at a different
- 200 directory.
Problems
1
The file /lib/ndb/local lists machines along with their IP addresses. Suppose all
addresses are of the form, 121.128.1.X. Write a script to edit the file and change all the
addresses to be of the form 212.123.2.X.
2
Write a script to generate a template for a /lib/ndb/local, for machines named
alphaN, where N must correspond to the last number in the machine address.
3
Write a script to locate in /sys/src the programs using the system call pipe. How
many programs are using it? Do dot do anything by hand.
4
In many programs, errors are declared as strings. Write a script that takes an error message
list and generates both an array containing the message strings and an enumeration to refer
to entries in the array.
Hint: Define a common format for messages to simplify your task.
5
Write a script to copy just C source files below a given directory to $home/source/.
How many source files do you have? Again, do not do anything by hand.
6
Write a better version for the file script developed in this chapter. Use some of the commands you know to inspect file contents to try to determine the type of file for each argument of the script.
- 201 -
9 More tools
______
9.1. Regular expressions
We have used sed to replace one string with another. But, what happens here?
; echo foo.xcc | sed ’s/.cc/.c/g’
foo..c
; echo focca.x | sed ’s/.cc/.c/g’
f.ca.x
We need to learn more.
In addresses of the form /text/ and in commands like s/text/other/, the string
text is not a string for sed. This happens to many other programs that search for things. For
example, we have used grep to print only lines containing a string. Well, the string given to
grep, like in
; grep string file1 file2 ...
is not a string. It is a regular expression. A regular expression is a little language. It is very useful to master it, because many commands employ regular expressions to let you do complex
things in an easy way.
The text in a regular expression represents many different strings. You have already seen
something similar. The *.c in the shell, used for globbing, is very similar to a regular expression. Although it has a slightly different meaning. But you know that in the shell, *.c matches
with many different strings. In this case, those that are file names in the current directory that happen to terminate with the characters .c. That is what regular expressions, or regexps, are for.
They are used to select or match text, expressing the kind of text to be selected in a simple way.
They are a language on their own. A regular expression, as known by sed, grep, and many others, is best defined recursively, as follows.
"
Any single character matches the string consisting of that character. For example, a matches
a, but not b.
"
A single dot, ., matches any single character. For example, . matches a and b, but not
ab.
"
A set of characters, specified by writing a string within brackets, like [abc123], matches
any character in the string. This example would match a, b, or 3, but not x. A set of characters, but starting with ^, matches any character not in the set. For example, [^abc123]
matches x, but not 1, which is in the string that follows the ^. A range may be used, like in
[a-z0-9], which matches any single character that is a letter or a digit.
"
A single ^, matches the start of the text. And a single $, matches the end of the text.
Depending on the program using the regexp, the text may be a line or a file. For example,
when using grep, a matches the character a at any place. However, ^a matches a only
when it is the first character in a line, and ^a$ also requires it to be the last character in the
line.
"
Two regular expressions concatenated match any text matching the first regexp followed by
any text matching the second. This is more hard to say than it is to understand. The expression abc matches abc because a matches a, b matches b, and so on. The expression
[a-z]x matches any two characters where the first one matches [a-z], and the second
one is an x.
"
Adding a * after a regular expression, matches zero or any number of strings that match the
expression. For example, x* matches the empty string, and also x, xx, xxx, etc. Beware,
ab* matches a, ab, abb, etc. But it does not match abab. The * applies to the preceding
- 202 regexp, with is just b in this case.
Adding a + after a regular expression, matches one or more strings that match the previous
regexp. It is like *, but there has to be at least one match. For example, x+ does not match
the empty string, but it matches every other thing matched by x*.
"
Adding a ? after a regular expression, matches either the empty string or one string matching the expression. For example, x? matches x and the empty string. This is used to make
parts optional.
"
Different expressions may be surrounded by parenthesis, to alter grouping. For example,
(ab)+ matches ab, abab, etc.
"
Two expressions separated by | match anything matched either by the first, or the second
regexp. For example, ab|xy matches ab, and xy.
"
A backslash removes the special meaning for any character used for syntax. This is called a
escape character. For example, ( is not a well-formed regular expression, but \( is, and
matches the string (. To use a backslash as a plain character, and not as a escape, use the
backslash to escape itself, like in \\.
That was a long list, but it is easy to learn regular expressions just by using them. First, let’s fix
the ones we used in the last section. This is what happen to us.
"
; echo foo.xcc | sed ’s/.cc/.c/g’
foo..c
; echo focca.x | sed ’s/.cc/.c/g’
f.ca.x
But we wanted to replace .cc, and not any character and a cc. Now we know that the first argument to the sed command s, is a regular expression. We can try to fix our problem.
; echo foo.xcc | sed ’s/\.cc/.c/g’
foo.xcc
; echo focca.x | sed ’s/\.cc/.c/g’
focca.x
It seems to work. The backslash removes the special meaning for the dot, and makes it match just
one dot. But this may still happen.
; echo foo.cc.x | sed ’s/\.cc/.c/g’
foo.c.x
And we wanted to replace only the extension for file names ending in .cc. We can modify our
expression to match .cc only when immediately before the end of the line (which is the string
being matched here).
; echo foo.cc.x | sed ’s/\.cc$/.c/g’
foo.cc.x
; echo foo.x.cc | sed ’s/\.cc/.c/g’
foo.x.c
Sometimes, it is useful to be able to refer to text that matched part of a regular expression. Suppose you want to replace the variable name text with word in a program. You might try with
s/text/word/g, but it would change other identifiers, which is not what you want.
- 203 ; cat f.c
void
printtext(char* text)
{
print("[%s]", text);
}
; sed ’s/text/word/g’ f.c
void
printword(char* word)
{
print("[%s]", word);
}
The change is only to be done if word is not surrounded by characters that may be part of an
identifier in the program. For simplicity, we will assume that these characters are just
[a-z0-9_]. We can do what follows.
; sed ’s/([^a-z0-9_])text([^a-z0-9_])/\1word\2/g’ f.c
void
printtext(char* word)
{
print("[%s]", word);
}
The regular expression [^a-z0-9_]text[^a-z0-9_] means any character that may not be
part of an identifier, then text, and then any character that may not be part of an identifier.
Because the substitution affects all the regular expression, we need to substitute the matched
string with another one that has word instead of text, but keeping the characters matching
[^a-z0-9_] before and after the string text. This can be done by surrounding in parentheses
both [^a-z0-9_]. Later, in the destination string, we may use \1 to refer to the text matching
the first regexp within parenthesis, and \2 to refer to the second.
Because printtext is not matched by [^a-z0-9_]text[^a-z0-9_], it was
untouched. However, #text) was matched. In the destination string, \1 was a white space,
because that is what matched the first parenthesized part. And \2 was a right parenthesis, because
that is what matched the second one. As a result, we left those characters untouched, and used
them as context to determine when to do the substitution.
Regular expressions permit to clean up source files in an easy way. In may cases, it makes
no sense to keep white space at the end of lines. This removes them.
; sed ’s/[ ]*$//’
We saw that a script t+ can be used to indent text in Acme. Here it is.
; cat /bin/t+
#!/bin/rc
sed ’s/^/ /’
;
This other script removes one level of indentation.
; cat /bin/t#!/bin/rc
sed ’s/^
//’
;
How many mounts and binds are performed by the standard namespace? How many others of
your own did you add? The file /lib/namespace is used to build an initial namespace for
you. But this file has comments, on lines starting with #, and may have empty lines. The simplest thing would be to search just for what we want, and count the lines.
- 204 ; sed 7q /lib/namespace
# root
mount -aC #s/boot /root $rootspec
bind -a $rootdir /
bind -c $rootdir/mnt /mnt
# kernel devices
bind #c /dev
; grep ’^(bind|mount)’ /lib/namespace
mount -aC #s/boot /root $rootspec
bind -a $rootdir /
bind -c $rootdir/mnt /mnt
...
; grep ’^(bind|mount)’ /lib/namespace | wc -l
41
; grep ’^(bind|mount)’ /proc/$pid/ns | wc -l
72
We had 41 binds/mounts in the standard namespace, and the one used by our shell (as reported by
its ns file) has 72 binds/mounts. It seems we added many ones in our profile.
There are many other useful uses of regular expressions, as you will be able to see from here to
the end of this book. In many cases, your C programs can be made more flexible by accepting
regular expressions for certain parameters instead of mere strings. For example, an editor might
accept a regular expression that determines if the text is to be shown using a constant width
font or a proportional width font. For file names matching, say .*\.[ch], it could use a constant width font.
It turns out that it is trivial to use regular expressions in a C program, by using the regexp
library. The expression is compiled into a description more amenable to the machine, and the
resulting data structure (called a Reprog) can be used for matching strings against the expression. This program accepts a regular expression as a parameter, and then reads one line at a time.
For each such line, it reports if the string read matches the regular expression or not.
_______
_match.c
#include <u.h>
#include <libc.h>
#include <regexp.h>
void
main(int argc, char* argv[])
{
Reprog* prog;
Resub
sub[16];
char
buf[1024];
int
nr, ismatch, i;
if (argc != 2){
fprint(2, "usage: %s regexp\n", argv[0]);
exits("usage");
}
- 205 prog = regcomp(argv[1]);
if (prog == nil)
sysfatal("regexp ’%s’: %r", buf);
for(;;){
nr = read(0, buf, sizeof(buf)-1);
if (nr <= 0)
break;
buf[nr] = 0;
ismatch = regexec(prog, buf, sub, nelem(sub));
if (!ismatch)
print("no match\n");
else {
print("matched: ’");
write(1, sub[0].sp, sub[0].ep - sub[0].sp);
print("’\n");
}
}
exits(nil);
}
The call to regcomp compiles the regular expression into prog. Later, regexec executes the
compiled regular expression to determine if it matches the string just read in buf. The parameter
sub points to an array of structures that keeps information about the match. The whole string
matching starts at the character pointed to by sub[0].sp and terminates right before the one
pointed to by sub[0].ep. Other entries in the array report which substring matched the first
parenthesized expression in the regexp, sub[1], which one matched the second one, sub[2],
etc. They are similar to \1, \2, etc. This is an example session with the program.
; 8.match ’*.c’
regerror: missing operand for * The * needs something on the left!
; 8.match ’\.[123]’
x123
no match
.123
matched: ’.1’
x.z
no match
x.3
matched: ’.3’
9.2. Sorting and searching
One of the most useful task achieved with a few shell commands is inspecting the system to find
out things. In what follows we are going to learn how to do this, using several assorted examples.
Running out of disk space? It is not likely, given the big disks we have today. But anyway,
which ones are the biggest files you have created at your home directory?
The command du (disk usage) reports disk usage, measured in disk blocks. A disk block is
usually 8 or 16 Kbytes, depending on your file system. Although du -a reports the size in
blocks for each file, it is a burden to scan by yourself through the whole list of files to search for
the biggest one. The command sort is used to sort lines of text, according to some criteria. We
can ask sort to sort the output of du numerically (-n) in decreasing order (-r), which biggest
numbers first, and then use sed to print just the first few lines. Those ones correspond to the biggest files, which we are interested in.
- 206 ; du -a bin | sort -nr | sed 15q
4211
bin
3085
bin/arm
864
bin/arm/enc
834
bin/386
333
bin/arm/madplay
320
bin/arm/madmix
319
bin/arm/deco
316
bin/386/minimad
316
bin/arm/minimad
280
bin/arm/mp3
266
bin/386/minisync
258
bin/rc
212
bin/arm/calc
181
bin/arm/mpg123
146
bin/386/r2bib
;
This includes directories as well, but point us quickly to files like bin/arm/enc that seem to
occupy 864 disk blocks!
But in any case, if the disk is filling up, it is a good idea to locate the users that created files
(or added data to them), to alert them. The flag -m for ls lists the user name that last modified
the file. We may collect user names for all the files in the disk, and then notify them. We are
going to play with commands until we complete our task, using sed to print just a few lines until
we know how to process all the information. The first step is to use the output of du as the initial
data, the list of files. If we remove everything up to the file names, we obtain a list of files to
work with.
; du -a bin | sed ’s/.* //’ | sed 3q
bin/386/minimad
bin/386/minisync
bin/386/r2bib
Now we want to list the user who modified each file. We can change our data to produce the commands that do that, and send them to a shell.
; du -a bin | sed ’s/.* //’ | sed ’s/^/ls -m /’ | sed 3q
ls -m bin/386/minimad
ls -m bin/386/minisync
ls -m bin/386/r2bib
;
; du -a bin | sed ’s/.* //’ | sed ’s/^/ls -m /’ | sed 3q | rc
[nemo] bin/386/minimad
[none] bin/386/minisync
[nemo] bin/386/r2bib
;
We still have to work a little bit more. And our command line is growing. Being able to edit the
text at any place in a Rio window does help, but it can be convenient to define a shell function
that encapsulates what we have done so far. A shell function is like a function in any other language. The difference is that a shell function receives arguments as any other command, in the
command line. Besides, a shell function has command lines in its body, which is not a surprise.
Defining a function for what we have done so far can save some typing in the near future. Furthermore, the command we have just built, to list all the files within a given directory, is useful
by itself.
- 207 ; fn lr {
;; du -a $1 | sed ’s/.* //’ | sed ’s/^/ls -m /’ | rc
;; }
;
This defined a function, named lr, that executes exactly the command line we developed. In the
function lr, we removed the sed 3q because it is not reasonable for a function listing all files
recursively to stop after listing three of them. If we want to play, we can always add a final sed
in a pipeline. Arguments given to the function are accessed like they would be in a shell script.
The difference is that the function is executed by the shell where we call it, and not by a child
shell. By the way, it is preferable to create useful commands by creating ia shell, functions can
not be edited as scripts, and are not automatically shared among all shells like files are. Functions
are handy to make modular scripts.
Rc stores the function definition using an environment variable. Thus, most things said for
environment variables apply for functions as well (e.g., think about rfork e).
; cat /env/’fn#lr’
fn lr {du -a $1|sed ’s/.*
;
//’|sed ’s/^/ls -m /’|rc}
The builtin function whatis is more appropriate to find out what a name is for rc. It prints the
value associated to the name in a form that can be used as a command. For example, here is of
whatis says about several names, known to us.
; whatis lr
fn lr {du -a $1|sed ’s/.*
; whatis cd
builtin cd
; whatis echo path
/bin/echo
path=(. /bin)
;
//’|sed ’s/^/ls -m /’|rc}
This is more convenient than looking through /bin, /env, and the rc(1) manual page to see
what a name is. Let’s try our new function.
; lr bin
[nemo] bin/386/minimad
[none] bin/386/minisync
[nemo] bin/386/r2bib
[nemo] bin/386/rc2bin
...and many other lines of output...
;
To obtain our list of users, we may remove everything but the user name.
; lr bin | sed ’s/.([a-z0-9]+).*/\1/’ | sed 3q
nemo
none
nemo
;
And now, to get a list of users, we must drop duplicates. The program uniq knows how to do it,
it reads lines and prints them, lines showing up more than once in the input are printed once. This
program needs an input with sorted lines. Therefore, we do what we just did, and sort the lines
and remove duplicate ones.
- 208 ; lr bin | sed ’s/.([a-z0-9]+).*/\1/’ | sort | uniq
esoriano
nemo
none
;
Note that we removed sed 3q from the pipeline, because this command does what we wanted to
do and we want to process the whole file tree, and not just the first three ones. It happens that
sort also knows how to remove duplicate lines, after sorting them. The flag -u asks sort to
print a unique copy of each output line. We can optimize a little bit our command to list file owners.
; lr bin
| sed ’s/.([a-z0-9]+).*/\1/’ | sort -u
What if we want to list user names that own files at several file trees? Say, /n/fs1 and
/n/fs2. We may have several file servers but might want to list file owners for all of them. It
takes time for lr to scan an entire file tree, and it is desirable to process all trees in parallel. The
strategy may be to use several command lines like the one above, to produce a sorted user list for
each file tree. The combined user list can be obtained by merging both lists, removing duplicates.
This is depicted in figure 9.1.
lr /n/fs1
sed
sort
sort -mu
lr /n/fs2
sed
sorted list
sort
Figure 9.1: Obtaining a file owner list using sort to merge two lists for fs1 and fs2
We define a function lrusers to run each branch of the pipeline. This provides a compact
way of executing it, saves some typing, and improves readability. The output from the two pipelines is merged using the flag -m of sort, which merges two sorted files to produce a single list.
The flag -u (unique) must be added as well, because the same user could own files in both file
trees, and we want each name to be listed once.
; fn lrusers { lr $1 | sed ’s/.([a-z0-9]+).*/\1/’ | sort }
; sort -mu <{lrusers /n/fs1} <{lrusers /n/fs2}
esoriano
nemo
none
paurea
;
For sort, each <{...} construct is just a file name (as we saw). This is a simple way to let us use
two pipes as the input for a single process.
To do something different, we can revisit the first example in the last chapter, finding function definitions. This script does just that, if we follow the style convention for declaring functions that was shown at the beginning of this chapter. First, we try to use grep to print just the
source line where the function cat is defined in the file /sys/src/cmd/cat.c. Our first try
is this.
- 209 ; grep cat /sys/src/cmd/cat.c
cat(int f, char *s)
argv0 = "cat";
cat(0, "<stdin>");
cat(f, argv[i]);
Which is not too helpful. All the lines contain the string cat, but we want only the lines where
cat is at the beginning of line, followed by an open parenthesis. Second attempt.
; grep ’^cat\(’ /sys/src/cmd/cat.c
cat(int f, char *s)
At least, this prints just the line of interest to us. However, it is useful to get the file name and line
number before the text in the line. That output can be used to point an editor to that particular file
and line number. Because grep prints the file name when more than one file is given, we could
use /dev/null as a second file where to search for the line. It would not be there, but it would
make grep print the file name.
; grep ’^cat\(’ /sys/src/cmd/cat.c /dev/null
/sys/src/cmd/cat.c:cat(int f, char *s)
Giving the option -n to grep makes it print the line number. Now we can really search for functions, like we do next.
; grep -n ’^cat\(’ /sys/src/cmd/*.c
/sys/src/cmd/cat.c:5: cat(int f, char *s)
And because this seems useful, we can package it as a shell script. It accepts as arguments the
names for functions to be located. The command grep is used to search for such functions at all
the source files in the current directory.
#!/bin/rc
rfork e
for (f in $*)
grep -n ’^’$f’\(’
*.[cCh]
How can we use grep to search for -n? If we try, grep would get confused, thinking that we
are supplying an option. To avoid this, the -e option tells grep that what follows is a regexp to
search for.
; cat text
Hi there
How can we grep for -n?
Who knows!
; grep -n text
; grep -e -n text
how can we grep for -n?
This program has other useful options. For example, if may want to locate lines in the file for a
chapter of this book where we mention figures. However, if the word figure is in the middle of
a sentence it would be all lower-case. When it is starting a sentence, it would be capitalized. We
must search both for Figure and figure. The flag -i makes grep become case-insensitive.
All the text read is converted to lower-case before matching the expression.
; grep -i figure ch1.ms
Each window shows a file or the output of commands.
figure are understood by acme itself. For commands
shown in the figure would be
...and other matching lines
Figure
A popular searching task is determining if a file containing a mail message is spam or not. Today,
- 210 it would not work, because spammers employ heavy armoring, and even send their text encoded
in multiple images sent as HTML mail. However, it was popular to see if a mail message contained certain expressions, if it did, it was considered spam. Because there will be many expressions, we may keep them in a file. The option -f for grep takes as an argument a file containing all the expressions to search for.
; cat patterns
Make money fast!
Earn 10+ millions
(Take|use) viagra for a (better|best) life.
; if (grep -i -f patterns $mailfile ) echo $mailfile is spam
9.3. Searching for changes
A different kind of search is looking for differences. There are several tools that can be used to
compare files. We saw cmp, that compares two files. It does not give much information, because
it is meant to compare files that are binary and not textual, and the program reports just which one
is the first byte that makes the files different. However, there is another tool, diff, that is more
useful than cmp when applied to text files. Many times, diff is used just to compare two files to
search for differences. For example, we can compare the two files /bin/t+ and /tmp/t-, that
look similar, to see how they differ. The tool reports what changed in the first file to obtain the
contents in the second one.
; diff /bin/t+ /bin/t2c2,3
< exec sed ’s/^/
--> exec sed ’s/^ //’
>
/’
The output shows the minimum set of differences between both files, here we see just one. Each
difference reported starts with a line like 2c2,3, which explains which lines differ. This tool
tries to show a minimal set of differences, and it will try to agglutinate runs of lines that change.
In this way, it can simply say that several (contiguous) lines in the first file have changed and correspond to a different set of lines in the second file. In this case, line 2 in the first file (t+) has
changed in favor of lines 2 and 3 in the second file. If we replace line 2 in t+ with lines 2 and 3
from t-, both files have be the same contents.
After the initial summary, diff shows the relevant lines that differ in the first file, preceded by an initial < sign to show that they come from the file on the left in the argument list, i.e.,
the first file. Finally, the lines that differ in this case for the second file are shown. The line 3 is
an extra empty line, but for diff that is a difference. If we remove the last empty line in t-,
this is what diff says:
; diff /bin/t^(+ -)
2c2
< exec sed ’s/^/
--> exec sed ’s/^ //’
/’
Let’s improve the script. It does not accept arguments, and it would be better to print a diagnostic
and exit when arguments are given.
- 211
___
_tab
#!/bin/rc
if (! ~ $#* 0){
echo usage: $0 >[1=2]
exit usage
}
exec sed ’s/^/ /’
This is what diff says now.
; diff /bin/t+ tab
1a2,5
> if (! ~ $#* 0){
>
echo usage: $0 >[1=2]
>
exit usage
> }
;
In this case, no line has to change in /bin/t+ to obtain the contents of tab. However, we must
add lines 2 to 5 from tab after line 1 of /bin/t+. This is what 1a2,5 means. Reversing the
arguments of diff produces this:
; diff tab /bin/t+
2,5d1
< if (! ~ $#* 0){
<
echo usage: $0 >[1=2]
<
exit usage
< }
Lines 2 to 5 of tab must be deleted (they would be after line 1 of /bin/t+), if we want tab to
have the same contents of /bin/t+.
Usually, it is more convenient to run diff supplying the option -n, which makes it print
the file names along with the line numbers. This is very useful to easily open any of the files
being compared by addressing the editor to the file and line number.
; diff -n /bin/t+ tab
/bin/t+:1 a tab:2,5
> if (! ~ $#* 0){
>
echo usage: $0 >[1=2]
>
exit usage
> }
Although some people prefer the -c (context) flag, that makes it more clear what changed by
printing a few lines of context around the ones that changed.
; diff -n /bin/t+ tab
/bin/t+:1,2 - tab:1,6
#!/bin/rc
+ if (! ~ $#* 0){
+
echo usage: $0 >[1=2]
+
exit usage
+ }
exec sed ’s/^/
/’
;
Searching for differences is not restricted to comparing just two files. In many cases we want to
compare two file trees, to see how they differ. For example, after installing a new Plan 9 in a disk,
and using it for some time, you might want to see if there are changes that you made by mistake.
- 212 Comparing the file tree in the disk with that used as the source for the Plan 9 distribution would
let you know if that is the case.
This tool, diff, can be used to compare two directories by giving their names. If works
like above, but compares all the files found in one directory with those in the other. Of course,
now it can be that a given file might be just at one directory, but not at the other. We are going to
copy our whole $home/bin to a temporary place to play with changes, instead of using the
whole file system.
; @{ cd ; tar c bin } | @{ cd /tmp ; tar x }
;
Now, we can change t+ in the temporary copy, by copying the tab script we recently made. We
will also add a few files to the new file tree and remove a few other ones.
; cp tab /tmp/bin/rc/t+
; cp rcecho /tmp/bin/rc
; rm /tmp/bin/rc/^(d2h h2d)
;
So, what changed? The option -r asks diff to go even further and compare two entire file
trees, and not just two directories. It descends when it finds a directory and recurs to continue the
search for differences.
; diff -r ($home /tmp)^/bin
Only in /usr/nemo/bin/rc: d2h
Only in /usr/nemo/bin/rc: h2d
Only in /tmp/bin/rc: rcecho
diff /usr/nemo/bin/rc/t+ /tmp/bin/rc/t+
1a2,5
> if (! ~ $#* 0){
>
echo usage: $0 >[1=2]
>
exit usage
> }
;
The files d2h and h2d are only at $home/bin/rc, we removed them from the copied tree. The
file rcecho is only at /tmp/bin/rc instead. We created it there. For diff, it would be the
same if it existed at $home/bin/rc and we removed rcecho from there. Also, there is a file
that is different, t+, as we could expect. Everything else remains the same.
It is now trivial to answer questions like, which files have been added to our copy of the file
tree?
; diff -r ($home /tmp)^/bin | grep ’^Only in /tmp/bin’
Only in /tmp/bin/rc: rcecho
;
This is useful for security purposes. From time to time we might check that a Plan 9 installation
does not have files altered by malicious programs or by user mistakes. If we process the output of
diff, comparing the original file tree with the one that exists now, we can generate the commands needed to restore the tree to its original state. Here we do this to our little file tree. Files
that are only in the new tree, must be deleted to get back to our original tree.
; diff -r ($home /tmp)^/bin >/tmp/diffs
; grep ’^Only in /tmp/’ /tmp/diffs | sed -e ’s|Only in|rm|’ -e ’s|: |/|’
rm /tmp/bin/rc/rcecho
Files that are only in the old tree have probably been deleted in the new tree, assuming we did not
create them in the old one. We must copy them again.
- 213 ; grep ’^Only in /usr/nemo/bin’ /tmp/diffs |
;; sed ’s|Only in /usr/nemo/bin/(.+): ([^ ]+)|cp /usr/nemo/bin/\1/\2 /tmp/bin/\1|’
cp /usr/nemo/bin/rc/d2h /tmp/bin/rc
cp /usr/nemo/bin/rc/h2d /tmp/bin/rc
In this command, \1 is the path for the file, relative to the directory being compared, and \2 is
the file name. We have not used $home to keep the command as clear as feasible. To complete
our job, we must undo any change to any file by coping files that differ.
; grep ’^diff ’ /tmp/diffs | sed ’s/diff/cp/’
cp /usr/nemo/bin/rc/t+ /tmp/bin/rc/t+
All this can be packaged into a script, that we might call restore.
_______
restore
#!/bin/rc
rfork e
if (! ~ $#* 2){
echo usage $0 olddir newdir >[1=2]
exit usage
}
old=$1
new=$2
diffs=/tmp/restore.$pid
diff -r $old $new >$diffs
grep ’^Only in ’^$new /tmp/diffs | sed -e ’s|Only in|rm|’ -e ’s|: |/|’
fromstr=’Only in ’^$old^’/(.+): ([^ ]+)’
tostr=’cp ’^$old^’/\1/\2 ’^$new^’/\1’
grep ’^Only in ’^$old $diffs | sed -e ’s|’^$fromstr^’|’^$tostr^’|’
grep ’^diff ’ $diffs | sed ’s/diff/cp/’
rm $diffs
exit ’’
And this is how we can use it.
; restore
rm /tmp/bin/rc/rcecho
cp /usr/nemo/bin/rc/d2h /tmp/bin/rc
cp /usr/nemo/bin/rc/h2d /tmp/bin/rc
cp /usr/nemo/bin/rc/t+ /tmp/bin/rc/t+
; restore|rc
after having seen what this is going to do!
We have a nice script, but pressing Delete while the script runs may leave an unwanted temporary
file.
; restore $home/bin /tmp/bin
Delete
; lc /tmp
A1030.nemoacme
ch6.ms
;
omail.2558.body
restore.1425
To fix this problem, we need to install a note handler like we did before in C. The shell gives special treatment to functions with names sighup, sigint, and sigalrm. A function sighup
is called by rc when it receives a hangup note. The same happens for sigint with respect to
the interrupt note and sigalrm for the alarm note. Adding this to our script makes it
- 214 remove the temporary file when the window is deleted or Delete is pressed.
fn sigint { rm $diffs }
fn sighup { rm $diffs }
This must be done after defining $diffs. To check that it works,
9.4. AWK
There is another tool is use extremely useful, which remains to be seen. It is a programming language called AWK. Awk is meant to process text files consisting of records with multiple fields.
Most data in system and user databases, and much data generated by commands looks like this.
Consider the output of ps.
; ps | sed 5q
nemo
nemo
nemo
nemo
nemo
1
2
3
5
6
0:00
1:09
0:00
0:00
0:00
0:00
0:00
0:00
0:00
0:00
1392K
0K
0K
0K
268K
Await
Wakeme
Wakeme
Wakeme
Pread
bns
genrandom
alarm
rxmitproc
factotum
We have multiple lines, which would be records for AWK. All the lines we see contain different
parts carrying different data, tabulated. In this case, each different part in a line is delimited by
white space. For AWK, each part would be a field. This is our first AWK program. It prints the
user names for owners of processes running in this system. Similar to what could be achieved by
using sed.
; ps | awk ’{print $1}’
nemo
nemo
...
; ps | sed ’s/ .*//’
nemo
nemo
...
The program for AWK was given as its only argument, quoted to escape it from the shell. AWK
executed the program to process its standard input, because no file to process was given as an
argument. In this case, the program prints the first field for any line. As you can see, AWK is very
handy to cut columns of files for further processing. There is a command in most UNIX
machines named cut, that does precisely this, but using AWK suffices. If we sort the set of user
names and remove duplicates, we can know who is using the machine.
; ps | awk ’{print $1}’ | sort -u
nemo
none
;
In general, an AWK program consists of a series of statements, of the form
pattern { action }.
Each record is matched against the pattern, and the action is executed for all records with a
matching one. In our program, there was no pattern. In this case, AWK executes the action for all
the records. Actions are programmed using a syntax similar to C, using functions that are either
built into AWK or defined by the user. The most commonly used one is print, which prints its
arguments.
In AWK we have some predefined variables and we can define our own ones. Variables can
be strings, integers, floating point numbers, and arrays. As a convenience, AWK defines a new
- 215 variable the first time you use it, i.e., when you initialize it.
The predefined variable $1 is a string with the text from the first field. Because the action
where $1 appears is executed for a record, $1 would be the first field of the record being processed. In our program, each time print $1 is executed for a line, $1 refers to the first field for
that line. In the same way, $2 is the second field and so on. This is how we can list the names for
the processes in our system.
; ps | awk ’{print $7}’
genrandom
alarm
rxmitproc
factotum
fossil
...
It may be easier to use AWK to cut fields than using sed, because splitting a line into fields is a
natural thing for for former. White space between different fields might be repeated to tabulate
the data, but AWK managed nicely to identify field number 7.
The predefined variable $0 represents the whole record. We can use it along with the variable NR, which holds an integer with the record number, to number the lines in a file.
_______
_number
#!/bin/rc
awk ’{ printf("%4d %s\n", NR, $0); }’ $*
We have used the AWK function printf, which works like the one in the C library. It provides
more control for the output format. Also, we pass the entire argument list to AWK, which would
process the files given as arguments or the standard input depending on how we call the script.
; number number
1 #!/bin/rc
2 awk ’{ printf("%4d %s0, NR, $0); }’ $*
;
In general, it is usual to wrap AWK programs using shell scripts. The input for AWK may be processed by other shell commands, and the same might happen to its output.
To operate on arbitrary records, you may specify a pattern for an action. A pattern is a relational expression, a regular expression, or a combination of both kinds od expressions. This
example uses NR to print only records 3 to 5.
; awk ’NR >= 3 && NR <=5 {print $0}’ /LICENSE
with the following notable exceptions:
1. No right is granted to create derivative works of or
Here, NR >=3 && NR <= 5 is a relational expression. It does an and of two expressions. Only
records with NR between 3 and 5 match the pattern. As a result, print is executed just for lines
3 through 5. Because syntax is like in C, it is easy to get started. Just try. Printing the entire
record, i.e., $0, is so common, that print prints that by default. This is equivalent to the previous command.
; awk ’NR >=3 && NR <= 5 {print}’ /LICENSE
Even more, the default action is to print the entire record. This is also equivalent to our command.
; awk ’NR >=3 && NR <= 5’ /LICENSE
By the way, in this particular case, using sed might have been more simple.
- 216 ; sed -n 3,5p /LICENSE
with the following notable exceptions:
1. No right is granted to create derivative works of or
;
Still, AWK may be preferred if more complex processing is needed, because it provides a full
programming language. For example, this prints only even lines and stops at line 6.
; awk ’NR%2 == 0 && NR <= 6’ /LICENSE
Lucent Public License, Version 1.02, reproduced below,
to redistribute (other than with the Plan 9 Operating System)
It is common to search for processes with a given name. We used grep for this task. But in some
cases, unwanted lines may get through
; ps | grep rio
nemo
39
nemo
275
nemo
2602
nemo
277
nemo
2607
nemo
280
...
0:04
0:01
0:00
0:00
0:00
0:00
0:16
0:07
0:00
0:00
0:00
0:00
1160K
1160K
248K
1160K
248K
1160K
Rendez
Pread
Await
Pread
Await
Pread
rio
rio
rioban
rio
brio
rio
We could filter them out using a better grep pattern.
; ps | grep ’rio$’
nemo
39
nemo
275
nemo
277
nemo
2607
nemo
280
...
; ps | grep ’ rio$’
nemo
39
nemo
275
nemo
277
nemo
280
...
0:04
0:01
0:00
0:00
0:00
0:16
0:07
0:00
0:00
0:00
1160K
1160K
1160K
248K
1160K
Rendez
Pread
Pread
Await
Pread
rio
rio
rio
brio
rio
0:04
0:01
0:00
0:00
0:16
0:07
0:00
0:00
1160K
1160K
1160K
1160K
Rendez
Pread
Pread
Pread
rio
rio
rio
rio
1160K
1160K
1160K
1160K
Rendez
Pread
Pread
Pread
rio
rio
rio
rio
But AWK just knows how to split a line into fields.
; ps | awk ’$7 ~ /^rio$/’
nemo
39
0:04
nemo
275
0:01
nemo
277
0:00
nemo
280
0:00
...
0:16
0:07
0:00
0:00
This AWK program uses a pattern that requires field number 7 to match the pattern /^rio$/.
As you know, by default, the action is to print the matching record. The operator ~ yields true
when both arguments match. Any argument can be a regular expression, enclosed between two
slashes. The pattern we used required all of field number 7 to be just rio, because we used ^ and
$ to require rio to be right after the start of the field, and before the end of the field. As we said,
^ and $ mean the start of the text being matched and its end. Whether the text is just a field, a
line, or the entire file, it depends on the program using the regexp.
It is easy now to list process pids for rio that belong to user nemo.
- 217 ; ps | awk ’$7 ~ /^rio$/ && $1 ~ /^nemo$/ {print $2}’
39
275
277
280
...
How do we kill broken processes? AWK may help.
; ps | awk ’$6 ~ /Broken/ {printf("echo kill >/proc/%s/ctl0, $2);}’
echo kill >/proc/1010/ctl
echo kill >/proc/2602/ctl
The 6th field must be Broken, and to kill the process we can write kill to the process control
file. The 2nd field is the pid and can be used to generate the file path. Note that in this case the
expression matched against the 6th field is just /Broken/, which matches with any string containing Broken. In this case, it suffices and we do not need to use ^ and $.
Which one is the biggest process, in terms of memory consumption? The 6th field from the
output of ps reports how much memory is using a process. We could use our known tools to
answer this question. The argument +4r for sort asks for a sort of lines but starting in the field
4 as the sort key. This is a lexical sort, but it suffices. The r means reverse sort, to get biggest
processes first. And we can use sed to print just the first line and only the memory usage.
; ps | sort +4r
nemo
3899
0:01
0:00
11844K Pread
nemo
18
0:00
0:00
9412K Sleep
...and more fossils
nemo
33
0:00
0:00
1536K Sleep
nemo
39
0:09
0:33
1276K Rendez
nemo
278
0:00
0:00
1276K Rendez
nemo
275
0:02
0:14
1276K Pread
...and many others.
; ps | sort +4r | sed 1q
nemo
3899
0:01
0:00
11844K Pread
; ps | sort +4r | sed -e ’s/.* ([0-9]+K).*/1/’ -e 1q
11844K
gs
fossil
bns
rio
rio
rio
gs
We exploited that the memory usage field terminates in an upper-case K, and is preceded by a
white space. This is not perfect, but it works. We can improve this by using AWK. This is more
simple and works better.
; ps | sort +4r | sed 1q | awk ’{print $5}’
11844K
The sed can be removed if we ask AWK to exit after printing the 5th field for the first record,
because that is the biggest one.
; ps | sort +4r | awk ’{print $5; exit}’
11844K
And we could get rid of sort as well. We can define a variable in the AWK program to keep
track of the maximum memory usage, and output that value after all the records have been processed. But we need to learn more about AWK to achieve this.
To compute the maximum of a set of numbers, assuming one number per input line, we
may set a ridiculous low initial value for the maximum and update its value as we see a bigger
value. It is better to take the first value as the initial maximum, but let’s forget about it. We can
use two special patterns, BEGIN, and END. The former executes its action before processing any
field from the input. The latter executes its action after processing all the input. Those are nice
placeholders to put code that must be executed initially or at the end. For example, this AWK
- 218 program computes the total sum and average for a list of numbers.
; seq 5000 | awk ’
;; BEGIN { sum=0.0 }
;; { sum += $1 }
;; END { print sum, sum/NR }
;; ’
12502500 2500.5
Remember that ;; is printed by the shell, and not part of the AWK program. We have used seq
to print some numbers to test our script. And, as you can see, the syntax for actions is similar to
that of C. But note that a statement is also delimited by a newline or a closed brace, and we do not
need to add semicolons to terminate them. What did this program do? Before even processing the
first line, the action of BEGIN was executed. This sets the variable sum to 0.0. Because the
value is a floating point number, the variable has that type. Then, field after field, the action without a pattern was executed, updating sum. At last, the action for END printed the outcome. By
dividing the number of records (i.e., of lines or numbers) we compute the average.
As an aside, it can be funny to note that there are many AWK programs with only an action
for BEGIN. That is a trick played to exploit this language to evaluate complex expressions from
the shell. Another contender for hoc.
; awk ’BEGIN {print sqrt(2) * log(4.3)}’
2.06279
; awk ’BEGIN {PI=3.1415926; print PI * 3.7^2}’
43.0084
This program is closer to what we want to do to determine which process is the biggest one. It
computes the maximum of a list of numbers.
; seq 5000 | awk ’
;; BEGIN { max=0 }
;; {
if (max < $1)
;;
max=$1
;; }
;; END { print max }
;; ’
5000
Correct?
This time, the action for all the records in the input updates max, to keep track of the biggest
value. Because max was first used in a context requiring an integer (assigned 0), it is integer.
Let’s try now our real task.
; ps | awk ’
;; BEGIN { max=0 }
;; {
if (max < $5)
;;
max=$5
;; }
;; END { print max }
;; ’
9412K
Wrong! because it should have said...
; ps | sort +4r | awk ’{print $5; exit}’
11844K
What happens is that 11844K is not bigger than 9412K. Not as a string.
; awk ’BEGIN { if ("11844K" > "9412K") print "bigger" }’
;
Watch out for this kind of mistake. It is common, as a side effect of AWK efforts to simplify
things for you, by trying to infer and declare variable types as you use them. We must force
- 219 AWK to take the 5th field as a number, and not as a string.
; ps | awk ’
;; BEGIN { max=0 }
;; {
mem= $5+0
;;
if (max < mem)
;;
max=mem
;; }
;; END { print max }
;; ’
11844
Adding 0 to $5 forced the (string) value in $5 to be understood as a integer value. Therefore,
mem is now an integer with the numeric value from the 5th field. Where is the K? When converting the string to an integer, AWK stopped when it found the K. Therefore, this forced conversion has the nice side effect of getting rid of the final letter after the memory size. It seems
simple to compute the average process (memory) size, doesn’t it? AWK lets you do many things,
easily.
; ps | awk ’
;; BEGIN { tot=0}
;; { tot += $5+0 }
;; END { print tot, tot/NR }
;; ’
319956 2499.66
9.5. Processing data
Each semester, we must open student accounts to let them use the machines. This seems to be
just the job for AWK and a few shell commands, and that is the tool we use. We take the list for
students in the weird format that each semester the bureaucrats in the administration building
invent just to keep as entertained. This format may look like this list.
list
____
# List of students in the random format for this semester
# you only know the format when you see it.
2341|Rodolfo Martínez|Operating Systems|B|ESCET
6542|Joe Black|Operating Systems|B|ESCET
23467|Luis Ibáñez|Operating Systems|B|ESCET
23341|Ricardo Martínez|Operating Systems|B|ESCET
7653|José Prieto|Computer Networks|A|ESCET
We want to write a program, called list2usr that takes this list as its input and helps to open
the student accounts. But before doing anything, we must get rid of empty lines and the comments nicely placed after # signs in the original file.
- 220 ; awk ’
;; /^#/ { next }
;; /^$/ { next }
;;
{ print }
;; ’ list
2341|Rodolfo Martínez|Operating Systems|B|ESCET
6542|Joe Black|Operating Systems|B|ESCET
23467|Luis Ibáñez|Operating Systems|B|ESCET
23341|Ricardo Martínez|Operating Systems|B|ESCET
7653|José Prieto|Computer Networks|A|ESCET
There are several new things in this program. First, we have multiple patterns for input lines, for
the first time. The first pattern matches lines with an initial #, and the second matches empty
lines. Both patterns are just a regular expression, which is a shorthand for matching it against $0.
This is equivalent to the first statement of our program.
$0 ~ /^#/
{ next }
Second, we have used next to skip an input record. When a line matches a commentary line,
AWK executes next. This skips to the next input record, effectively throwing away the input
line. But look at this other program.
; awk ’
;;
{ print }
;; /^#/ { next }
;; /^$/ { next }
;; ’ list
# List of students in the random format for this semester
# you only know the format when you see it.
...
It does not ignore comments nor empty lines. AWK executes the statements in the order you
wrote them. It reads one record after another and executes, in order, all the statements with a
matching pattern. Lines with comments match the first and the third statement. But it does not
help to skip to the next input record once you printed it. The same happens to empty lines.
Now that we know how to get rid of weird lines, we can proceed. To create accounts for all
students in the course in Operating Systems, group B, we must first select lines for that course
and group. This semester, fields are delimited by a vertical bar, the course field is the 3rd, and the
group field is the 4th. This may help.
; awk ’-F|’ ’
;; /^#/ { next }
;; /^$/ { next }
;; $3 ~ /Operating Systems/ && $4 ~ /B/ { print $2 }
;; ’ list
Rodolfo Martínez
Joe Black
Luis Ibáñez
Ricardo Martínez
;
We had to tell AWK how fields are delimited using -F|, quoting it from the shell. This option
sets the characters used to delimit fields, i.e., the field delimiter. Although it admits as an argument a regular expression, saying just | suffices for us now. We also had to match the 3rd and
4th fields against desired values, and print the student name for matching records.
Our plan is a follows. We are going to assume that a program adduser exists. If it does
not, we can always create it for our own purposes. Furthermore, we assume that we must give the
desired user name and the full student name as arguments to this program, like in
- 221 ; adduser rmartinez Rodolfo Martínez
Because it is not clear how to do all this, we experiment using the shell before placing all the bits
and pieces into our list2usr shell script.
One way to invent a user name for each student is to pick the initial for the first name, and
add the last name. We can use sed for the job.
; name=’Luis
; echo $name
LIbáñez
; name=’José
; echo $name
JMartínez
Ibáñez’
| sed ’s/(.)[^ ]+[ ]+(.*)/\1\2/’
Martínez’
| sed ’s/(.)[^ ]+[ ]+(.*)/\1\2/’
But the user name looks funny, we should translate to lower case and, to avoid problems for this
user name when used in UNIX, translate accented characters to their ascii equivalents. Admittedly, this works only for spanish names, because other names might use different non-ascii characters and we wouldn’t be helping our UNIX systems.
; echo LIbáñez | tr A-Z a-z | tr ’[áéíóúñ]’ ’[aeioun]’
libanez
;
But the generated user name may be already taken by another user. If that is the case, we might
try to take the first name, and add the initial from the last name. If this user name is also already
taken, we might try a few other combinations, but we won’t do it here.
; name=’Luis Ibáñez’
; echo $name | sed ’s/([^ ]+)[ ]+(.).*/\1\2/’ |
;; tr A-Z a-z | tr ’[áéíóúñ]’ ’[aeioun]’
luisi
How do we now if a user name is taken? That depends on the system where the accounts are to be
created. In general, there is a text file on the system that lists user accounts. In Plan 9, the file
/adm/users lists users known to the file server machine. This is an example.
; sed 4q /adm/users
adm:adm:adm:elf,sys
aeverlet:aeverlet:aeverlet:
agomez:agomez:agomez:
albertop:albertop::
The second field is the user name, according to the manual page for our file server program,
fossil(4). As a result, this is how we can know if a user name can be used for a new user.
; grep -s ’^[^:]+:’^$user^’:’ /adm/users && echo $user exists
nemo exists
; grep -s ’^[^:]+:’^rjimenez^’:’ /adm/users && echo rjimenez exists
The flag -s asks grep to remain silent, and only report the appropriate exits status, which is
what we want. In our little experiment, searching for $user in the second field of
/adm/users succeeds, as it could be expected. On the contrary,, there is no rjimenez known
to our file server. That could be a valid user name to add.
There is still a little bit of a problem. User names that we add can no longer be used for new
user names. What we can do is to maintain our own users file, created initially by copying
/adm/users, and adding our own entry to this file each time we produce an output line to add a
new user name.
We have all the pieces. Before discussing this any further, let’s show the resulting script.
- 222 _______
list2usr
#!/bin/rc
rfork e
users=/tmp/list2usr.$pid
cat /adm/users > $users
fn sigint { rm $users } ; fn sighup { rm -f $users }
fn listusers {
awk ’-F|’ ’
/^#/
{ next }
/^$/
{ next }
$3 ~ /Operating Systems/ && $4 ~ /B/
’ $*
}
{ print $2 }
fn uname1 {
echo $* | sed ’s/(.)[^ ]+[ ]+(.*)/\1\2/’
}
fn uname2 {
echo $* | sed ’s/([^ ]+)[ ]+(.).*/\1\2/’
}
fn add {
if (grep -s ’^[^:]+:’^$1^’:’ $users)
status=exist
if not {
echo $1:$1:$1: >>$users
echo adduser $*
status=’’
}
}
listusers $* | tr A-Z a-z | tr ’[áéíóúñ]’
while(name=‘{read}){
add ‘{uname1 $name} $name
add ‘{uname2 $name} $name
echo ’#’ cannot determine
}
’[aeioun]’ |
||
||
user name for $name
rm -f $users
exit ’’
We have defined several functions, instead of merging it all in a single, huge, command line. The
listusers function is our starting point. It encapsulates nicely the AWK program to list just
- 223 the student names for our course and group. The script arguments are given to the function, which
passes them to AWK. The next couple of commands are our translations to use only lower-case
ascii characters for user names.
The functions uname1 and uname2 encapsulate our two methods for generating a user
name. They receive the full student name and print the proposed user name. But we may need to
try both if the first one yields an existing user name. What we do is to read one line at a time the
output from
listusers $* | tr A-Z a-z | tr ’[áéíóúñ]’ ’[aeioun]’
using a while loop and the read command, which reads a single line from the input. Each line
read is placed in $name, to be processed in the body of the while. And now we can try to add a
user using each method.
To try to add an account, we defined the function add. It determines if the account exists
as we saw. If it does, it sets status to a non-null value, which is taken as a failure by the one
calling the function. Otherwise, it sets a null status after printing the command to add the
account, and adding a fake entry to our users file. In the future, this user name will be considered to exist, even though it may not be in the real /adm/users.
Finally, note how the script catches interrupt and hangup notes by defining two functions, to remove the temporary file for the user list. Note also how we print a message when the
program fails to determine a user name for the new user. And this is it!
; list2usr list
adduser rmartinez rodolfo martinez
adduser jblack joe black
adduser libanez luis ibanez
adduser ricardom ricardo martinez
We admit that, depending on the number of students, it might be more trouble to write this program than to open the accounts by hand. However, in all semesters to follow, we can prepare the
student accounts amazingly fast! And there is another thing to take into account. Humans make
mistakes, programs do not so as often. Using our new tool we are not likely to make mistakes by
adding an account with a duplicate user name.
After each semester, we must issue grades to students. Depending on the course, there are
several separate parts (e.g., problems in a exam) that contribute to the total grade. We can reuse a
lot from our script to prepare a text file where we can write down grades.
__________
list2grades
#!/bin/rc
rfork e
nquestions=3
fn listusers {
awk ’-F|’ ’
/^#/
{ next }
/^$/
{ next }
$3 ~ /Operating Systems/ && $4 ~ /B/
’ $*
}
{ print $2 }
- 224 listusers $* | awk ’
BEGIN
{
printf("%-30s\t", "Name");
for (i = 0; i < ’$nquestions’; i++)
printf("Q-%d\t", i+1);
printf("Total\n");
}
{
printf("%-30s\t", $0);
for (i = 0; i < ’$nquestions’; i++)
printf("-\t", i+1);
printf("-\n");
}
exit ’’
Note how we interpolated $nquestions in the AWK program, but closing the quote for the
program right before it, and reopening it again. This program produces this output.
; list2grades list
Name
Rodolfo Martínez
Joe Black
Luis Ibáñez
Ricardo Martínez
Q-1
-
Q-2
-
Q-3
-
Total
-
We must just fill the blanks, with the grades. And of course, it does not pay to compute the final
(total) grade by hand. The resulting file may be processed using AWK for doing anything you
want. You might send the grades by email to students, by keeping their user names within the list.
You might convert this into HTML and publish it via your web server, or any other thing you see
fit. Once the scripts are done after the first semesters, they can be used forever.
And what happens when the bureaucrats change the format for the input list? You just have
to tweak a little bit listusers, and it all will work. If this happens often, it might pay to put
listusers into a separate script so that you do not need to edit all the scripts using it.
9.6. File systems
There are many other tools available. Perhaps surprisingly (or not?) they are just file servers. As
we saw, a file server is just a process serving files. In Plan 9, a file server serves a file tree to provide some service. The tree is implemented by a particular data organization, perhaps just kept in
the memory of the file server process. This data organization used to serve files is known as a file
system. Before reading this book, you might think that a file system is just some way to organize
files in a disk. Now you know that it does not need to be the case. In many cases, the program
that understands (e.g., serves) a particular file system is also called a file system, perhaps confusingly. But that is just to avoid saying the file server program that understands the file system...
All device drivers, listed in section 3 of the manual, provide their interface through the file
tree they serve. Many device drivers correspond to real, hardware, devices. Others provide a particular service, implemented with just software. But in any case, as you saw before, it is a matter
of knowing which files provide the interface for the device of interest, and how to use them. The
same idea is applied for many other cases. Many tools in Plan 9, listed in section 4 of the manual, adopt the form of a file server.
For example, various archive formats are understood by programs like fs/tarfs (which
understands tape archives with tar(1) format), fs/zipfs (which understands ZIP files), etc.
Consider the tar file with music that we created time ago,
- 225 ; tar tf /tmp/music.tar
alanparsons/
alanparsons/irobot.mp3
alanparsons/whatgoesup.mp3
pausini/
pausini/trateilmare.mp3
supertramp/
supertramp/logical.mp3
We can use tarfs to browse through the archive as if files were already extracted. The program
tarfs reads the archive and provides a (read-only) file system that reflects the contents in the
archive. It mounts itself by default at /n/tapefs, but we may ask the program to mount itself
at a different path using the -m option.
; fs/tarfs -m /n/tar /tmp/music.tar
; ns | grep tar
mount -c ’#|/data1’ /n/tar
The device #| is the pipe(3) device. Pipes are created by mounting this device (this is what
pipe(2) does). The file ’#|/data1’ is an end for a pipe, that was mounted by tar at /n/tar.
At the other end of the pipe, tarfs is speaking 9P, to supply the file tree for the archive that we
have mounted.
The file tree at /n/tar permits browsing the files in the archive, and doing anything with
them (other than writing or modifying the file tree).
; lc /n/tar
alanparsons
pausini
supertramp
; lc /n/tar/alanparsons
irobot.mp3
whatgoesup.mp3
; cp /n/tar/alanparsons/irobot.mp3 /tmp
;
The program terminates itself when its file tree is finally unmounted.
; ps | grep tarfs
nemo
769
; unmount /n/tar
; ps | grep tarfs
;
0:00
0:00
88K Pread
tarfs
The shell along with the many commands that operate on files represent a useful toolbox to do
things. Even more so if you consider the various file servers that are included in the system.
Imagine that you have an audio CD and want to store its songs, in MP3 format, at
/n/music/album. The program cdfs provides a file tree to operate on CDROMs. After
inserting an audio CD in the CD reader, accessed through the file /dev/sdD0, we can list its
contents at /mnt/cd.
; cdfs -d /dev/sdD0
; lc /mnt/cd
a000
a002
a004
a001
a003
a005
a006
a007
a008
a009
a010
ctl
Here, files a000 to a010 correspond to audio tracks in the CD. We can convert each file to MP3
using a tool like mp3enc.
; for (track in /mnt/cd/a*) {
;; mp3enc $track /n/music/album/$track.mp3
;; }
...all tracks being encoded in MP3...
- 226 It happens that cdfs knows how to (re)write CDs. This example, taken from the cdfs(4) manual
page, shows how to duplicate an audio CD.
First, insert the source audio CD.
; cdfs -d /dev/sdD0
; mkdir /tmp/songs
; cp /mnt/cd/a* /tmp/songs
; unmount /mnt/cd
Now, insert a black CD.
; cdfs -d /dev/sdD0
; lc /mnt/cd
; ctl
wa
wd
; cp /tmp/songs/* /mnt/cd/wa
; rm /mnt/cd/wa
; unmount /mnt/cd
to copy songs as audio tracks
to fixate the disk contents
For a blank CD, cdfs presents two directories in its file tree: wa and wd. Files copied into wa
are burned as audio tracks. File copied into wd are burned as data tracks. Removing either directory fixates the disk, closing the disk table of contents.
If the disk is re-writable, and had some data in it, we could even get rid of the previous contents by sweeping through the whole disk blanking it. It would be as new (a little bit more thinner, admittedly).
; echo blank >/mnt/cd/ctl
blanking in progress...
When you know that it will not be the last time you will be doing something, writing a small shell
script will save time in the future. Copying a CD seems to be the case for a popular task.
_______
cdcopy
#!/bin/rc
rfork ne
fn prompt { echo -n $1 ; read }
prompt insert the source CD
cdfs -d /dev/sdD0 || exit failed
if (! test -e /mnt/cd/a* ) {
echo not an audio CD
exit failed
}
echo copying CD contents...
mkdir /tmp/songs.$pid
cp /mnt/cd/a* /tmp/songs.$pid
unmount /mnt/cd
prompt insert a blank CD
cdfs -d /dev/sdD0 || exit failed
if (! test -e /mnt/cd/wa ) {
echo not a blank CD
exit failed
}
- 227 echo burning...
cp /tmp/songs.$pid/* /mnt/cd/wa
echo fixating...
rm /mnt/cd/wa
rm -r /tmp/songs.$pid
echo eject >/mnt/cd/ctl
unmount /mnt/cd
The script copies a lot of data at /tmp/songs.$pid. Hitting Delete, might leave those
files there by mistake. One fix would be to define a sigint function. However, provided that
machines have plenty of memory, there is another file system that might help. The program
ramfs supplies a read/write file system that is kept in-memory. It uses dynamic memory to keep
the data for the files created in its file tree. Ramfs mounts itself by default at /tmp. So, adding
a line
ramfs -c
before using /tmp in the script will ensure that no files are leaved by mistake in $home/tmp
(which is what is mounted at /tmp by convention).
Like most other file servers listed in section 4 of the manual, ramfs accepts flags -abc to
mount itself after, before, and allowing file creation. Two other popular options are -m dir, to
choose where to mount its file tree, and -s srvfile, to ask ramfs to post a file at /srv, for
mounting it later. Using these flags, we may able to compile programs in directories where we do
not have permission to write.
; ramfs -bc -m /sys/src/cmd
; cd /sys/src/cmd
; 8c -FVw cat.c
; 8l -o 8.cat cat.8
; lc 8.* cat.*
8.cat
cat.8
cat.c
; rm 8.cat cat.8
After mounting ramfs with -bc at /sys/src/cmd, new files created in this directory will be
created in the file tree served by ramfs, and not in the real /sys/src/cmd. The compiler and
the loader will be able to create its output files, and we will neither require permission to write in
that directory, nor leave unwanted object files there.
The important point here is not how to copy a CD, or how to use ramfs. The important
thing is to note that there are many different programs that allow you to use devices and to do
things through a file interface.
When undertaking a particular task, it will prove to be useful to know which file system
tools are available. Browsing through the system manual, just to see which things are available,
will prove to be an invaluable help, to save time, in the future.
Problems
1
Write a script that copies all the files at $home/www terminated in .htm to files terminated in .html.
2
Write a script that edits the HTML in those files to refer always to .html files and not to
.htm files.
3
Write a script that checks that URLs in your web pages are not broken. Use the hget command to probe your links.
4
Write a script to replace duplicate empty lines with a single empty line.
5
Write a script to generate (empty) C function definitions from text containing the function
prototypes.
6
Do the opposite. Generate C function prototypes from function definitions.
- 228 7
8
9
Write a script to alert you by e-mail when there are new messages in a web discussion
group. The mail must contain a portion of the relevant text and a link to jump to the relevant
web page.
Hint: The program htmlfmt may be of help.
Improve the scripts resulting from answers to problems for the last chapter using regular
expressions.
- 229 -
10 Concurrent programming
______
10.1. Synchronization
In the discussion of rfork that we had time ago, we did not pay attention to what would happen
when a new process is created sharing the parent’s memory. A call like
rfork(RFPROC|RFMEM)
is in effect creating a new flow of control within our program. This is not new, but what may be
new is the nasty effects that this might have if we are not careful enough.
We warned you that, in general, when more than one process is sharing some data, there
may be race conditions. You could see how two processes updating the same file could lead to
very different contents in the file after both processes complete, depending on when did they their
updates with respect to each other. Sharing memory is not different.
What happens is that the idea that you have of sequential execution for your program in an
isolated world is no longer true. We saw that when more than one process was trying to update
the same file, the resulting file contents might differ from one run to another. It all depends on
when did each process change the data. And this is what we called a race condition. Consider
this program.
______
_rincr.c
#include <u.h>
#include <libc.h>
int
cnt;
void
main(int, char*[])
{
int
i;
if (rfork(RFPROC|RFMEM|RFNOWAIT) < 0)
sysfatal("fork: %r");
for (i = 0; i < 2; i++)
cnt++;
print("cnt is %d\n", cnt);
exits(nil);
}
It creates a child process, and each one of the processes increment a counter twice. The counter is
shared, because the call to rfork uses the RFMEM flag, which causes all the data to be shared
between parent and child. Note that only cnt, which is a global, is shared. The local variable i
lives on the stack which is private, as it should be.
Executing the program yields this output.
; 8.rincr
cnt is 2
cnt is 4
;
- 230 We now declare an integer local variable, loc, and replace the body of the loop with this code,
equivalent to what we were doing.
loc = cnt;
loc++;
cnt = loc;
It turns out that this is how cnt++ is done, by copying the memory value into a temporary variable (kept at a register), then incrementing the register, and finally updating the memory location
for the variable with the incremented value. The result for this version of the program remains the
same.
; 8.rincr
cnt is 2
cnt is 4
;
But let’s change a little bit more the program. Now we replace the body of the loop with these
statements.
loc = cnt;
sleep(1);
loc++;
cnt = loc;
The call to sleep does not change the meaning of the program, i.e., what it does. However, it
does change the result! The call to sleep exposed a race condition present in all the versions of
the program.
; 8.rincr
cnt is 2
cnt is 2
Both processes execute one instruction after another, but you do not know when will the operating system (or any external event) move one process out of the processor or move it back to it.
The result is that we do not know how the two sequences of instructions (one for each process),
will be merged in time. Despite having just one processor that executes only a sequence of
instructions, any merge of instructions from the first and the second process is feasible. Such a
merge is usually called an interleaving.
Perhaps one process executes all of its statements, and then second. This happen to the for
loop in all but the last version of the program. On the other hand, perhaps one process executes
some instructions, and then the other, and so on. Figure 10.1 shows the interleaving of statements
that resulted from our last modification to the program, along with the values for the two local
variables loc, and the global cnt. The initial call to rfork is not shown. The statements corresponding to the loop itself are not shown either.
What you see is that something happens while one process is happily incrementing the variable, by copying the global counter to its local, incrementing the local, and copying back the local
to the shared counter, While one process is performing its increment, the other process gets in the
way. In the sequence of statements
loc = cnt;
loc++;
cnt = loc;
we assume that right after the the first line, loc has the value that is kept in the shared variable.
We further assume that when we execute the last line, the global variable cnt has the value it had
when we executed the first line.
That is no longer true. Because there is another process that might change cnt while we are
doing something else. The net effect in this case is that we loose increments. The counter should
- 231 -
Parent
loc: ?
Child
cnt: 0
loc: ?
cnt: 0
loc: ?
loc = cnt
sleep
loc: 0
loc = cnt
sleep
loc: 0
cnt: 0
loc: 0
cnt: 1
loc: 0
loc++
cnt = loc
loc = cnt
sleep
loc: 1
loc++
cnt = loc
loc = cnt
sleep
loc: 1
cnt: 1
loc: 1
cnt: 2
loc: 1
loc++
cnt = loc
loc = cnt
sleep
loc: 2
loc++
cnt = loc
loc = cnt
sleep
loc: 2
cnt: 2
loc: 2
print
print
Figure 10.1: One interleaving of statements for the two processes (last version of the program).
end up with a value of 4. But it has the value 2 at the end. The same would had happen if the
interleaving had been like follows.
1
Process 1: Consult the variable
2
Process 2: Consult the variable
3
Process 1: Increment
4
Process 2: Increment
5
Process 1: Update the variable
6
Process 2: Update the variable
This interleaving also looses increments. This is because of the race condition resulting from
using the shared cnt in two different processes without taking any precaution.
Why did our last program exhibit the race condition but others did not? Because calling
sleep puts the process to sleep, in the blocked state, and the system is very likely to let the other
- 232 process run while we sleep. We are forcing a context switch at the place where we call sleep.
Nevertheless, the previous versions for the program are broken as well. We do not know if the
system is going to decide to switch from one process to another in the middle of our loop. What
happen is that in our case, the system did not switch. It was not too probable to have a context
switch right in the middle, but it could happen.
Instructions are said to execute atomically, because one instruction is not interrupted in the
middle to do something else. Interrupts happen at the end of instructions, but not in the middle.
However, even cnt++ is implemented using several instructions, along the lines of our late versions for the program. This means that another process may get in the way, even in the middle of
something like cnt++. The same applies to if conditions and to any other statement.
What we need is some way to synchronize multiple processes. That is, to arrange for multiple process to agree regarding when is a good time to do particular operations. In the rest of this
chapter, and in the following one, we are going to explore some abstractions provided by Plan 9
that can be used to synchronize processes. We are going to focus on synchronizing processes that
share memory. When they do not share memory, pipes are excellent synchronization means, and
you have already used them.
10.2. Locks
How do we solve the problem? The race condition happens because more than one process may
simultaneously use a shared resource, i.e. the global counter. This is what breaks the assumption
that cnt does not change between lines (1) and (3) in
(1)
(2)
(3)
loc = cnt;
loc++;
cnt = loc;
Furthermore, the reason why more than one process may use cnt simultaneously is because this
block of code is not atomic. It is not a single instruction, which means that in the middle of the
block there may be a context switch, and the other process may change cnt or consult it while
we are in the middle of a change.
On the contrary, the executions for the first two versions of our program behaved as if this
block of code was atomic. It just happen that one process executed the problematic code, and then
the other. The code was executed without being interrupted by the other process in the middle of
the update for cnt. And the net effect is that the program worked! We now know that we were
just lucky, because there could have been a context switch in the middle. But the point is that
when the block of code behaves as an atomic instruction, there are no races, and the program
behaves nicely.
Parent
Child
Parent
cnt: 0
Child
cnt: 0
cnt++
cnt++
cnt: 1
cnt: 1
cnt++
cnt++
cnt: 2
cnt: 2
(a)
(b)
Figure 10.2: Incrementing a shared counter using an atomic increment operation. No races.
- 233 Why is this so? Consider our two processes trying to increment the global counter, as shown
in figure 10.2. Imagine also that cnt++ was a single instruction. One of the two processes is
going to execute cnt++ before the other. It could happen what figure 10.2 (a) shows, or what is
shown in 10.2 (b). There is no other case. As we are assuming that this is an atomic (non divisible) instruction, the increment is performed correctly. There can be no context switch in the middle. Now, when the other process executes its cnt++, it finds cnt already incremented, and no
increment is missed. There is no race. The only two possibilities are those depicted in figure 10.2.
Of course, we do not know the order in which increments are going to be made. Perhaps
the parent in our program does its two increments, and then the child, or perhaps the other way
around, or perhaps in some interleaved way. No matter the order, the program will yield the
expected result if the increments are atomic, as we just discussed.
The code where we are using a shared resource, which posses problems when not executed
atomically, is called a critical region. It is just a piece of code accessing a shared resource. A
context switch while executing within the critical region may be a problem. More precisely, the
problem is not having a context switch, but switching to any other process that might also use or
change the shared resource. For example, it does not matter if while we are incrementing our
counter, Acme runs for a while. Acme does not interfere because we are not sharing our counter
with it. This is the last program, with the critical region shown inside a box.
______
_rincr.c
#include <u.h>
#include <libc.h>
int
cnt;
void
main(int, char*[])
{
int
i;
int
loc;
if (rfork(RFPROC|RFMEM|RFNOWAIT) < 0)
sysfatal("fork: %r");
for (i = 0; i < 2; i++){
__________________________________________________________________
loc = cnt;
sleep(1);
loc++;
cnt = loc;
__________________________________________________________________
}
print("cnt is %d\n", cnt);
exits(nil);
}
Given our critical region, If we could guarantee that at most one process is executing inside it,
there would be no race conditions. The reason is that the region would appear to be atomic, at
least with respect to the processes trying to execute it. There could be any number of context
switches while executing the region, but no other process would be allowed to enter it until the
one executing it does leave the region. Thus, only one process would be using the shared resource
at a given time and that is why there would be no races.
Guaranteeing that no more than one process is executing code within the critical region is
- 234 called achieving mutual exclusion, because one process executing within the region excludes any
other one from executing inside (when there is mutual exclusion).
How can we achieve mutual exclusion for our critical region? The idea is that when a process is about to enter the critical region, if must wait until it is sure that nobody else is executing
code inside it. Only in that case it may proceed. To achieve this we need new abstractions.
A lock is a boolean variable (or an integer used as a boolean) used to indicate if a critical
region is occupied or not. A process entering the critical region sets the lock to true, and resets the
lock to false only after leaving the region. To enter the region, a process must either find the lock
set to false or wait until it becomes false, otherwise there would be more than one process executing within the critical region and we would have race conditions.
The intuition is that the lock is a variable that is used to lock a resource (the region). A process wanting to use the shared resource only does so after locking it. After using the resource, the
process unlocks it. While the resource is locked, nobody else will be able to lock it and use it.
Using locks, we could protect our critical region by declaring a Lock variable, cntlck,
calling lock on it (to set the lock) before entering the critical region, and calling unlock on it
(to release the lock) after leaving the region. By initializing the variable to zero, the lock is initially released (remember that globals are initialized to zero by default).
; sig lock unlock
void lock(Lock *l)
void unlock(Lock *l)
The resulting program is shown next.
______
lock.c
#include <u.h>
#include <libc.h>
int
Lock
cnt;
cntlck;
void
main(int, char*[])
{
int
i;
if (rfork(RFPROC|RFMEM|RFNOWAIT) < 0)
sysfatal("fork: %r");
for (i = 0; i < 2; i++){
lock(&cntlck);
cnt++;
unlock(&cntlck);
}
print("cnt is %d\n", cnt);
exits(nil);
}
Just to make it more clear, we can replace cnt++ with
- 235 loc = cnt;
sleep(1);
loc++;
cnt = loc;
and the program will in any case work as expected. Each process would loop and do its two increments, without interference from the other process.
When our two processes try to execute the critical region, one of them is going to execute
lock(&cntlck) first. That one wins and gains the lock. The region is now locked. When the
second process calls lock(&cntlck) it finds the lock set, and waits inside the function lock
until the lock is released and can be set again. The net effect is that we achieve mutual exclusion
for our critical region.
Note that the output from the program may still be the same than that of our first two versions, but those versions were incorrect. They are poltergeists, awaiting for the worst time to happen. When you do not expect them to misbehave, they would miss an increment, and the program
with the race will fail in a mysterious way that you would have to debug. That is not fun.
By the way, did we lie? We said that locks are boolean variables, but we declared cntlck
as a structure Lock. This is how Lock is defined in libc.h
typedef
struct Lock {
int
} Lock;
val;
The lock is also a shared variable. It would not make sense to give each process its own lock. The
lock is used to synchronize both processes, to make them agree upon when is it safe to do something. Therefore, it must be shared. That means that if you write two C functions for implementing lock and unlock, they would have race conditions!
The implementation for unlock is simple, it sets Lock.val to false. The implementation
for lock is more delicate. It is made in assembly language to use a single machine instruction
capable of consulting the lock and modifying it, all that within the same instruction. That is reasonable. If we do not both consult the lock (to see if it is set) and update it within an atomic
instruction, there would be race conditions. There are several kinds of test-and-set instructions,
that test a variable for a value but also modify it. A famous one is precisely called TAS, or test
and set.
Using TAS, here is a description of how to implement a lock function.
loop:
MOVL
TAS
BNE
RTS
lock, A0 put address of lock in register A0
(A0)
test-and-set word at memory address in A0
loop
if the word was set, continue the loop
return otherwise
To emphasize it even more, the key point why this works at all is because TAS is atomic. It puts a
non-zero value at the address for the lock and sets the processor flag to reflect if the previous
value was not-zero or was zero.
In this loop, if a process is trying to set the lock and finds that it was set, TAS will set an
already set lock (store 1 in the lock that already was 1), and that operation would be harmless. In
this case, TAS would report that the lock was set, and the process would be held in the loop waiting for the lock to be released. On the other hand, if the process trying to set the lock executes
TAS while the lock was not set, this instruction will both set the lock and report that it was clear.
When more than one process call lock(), one of them is going to run TAS first. That one wins.
To play with locks a little bit, we are going to implement a tiny program. This program has
two processes. One of them will always try to increment a counter. The other, will be trying to
decrement it. However, we do not allow the counter to be negative. If the process decrementing
- 236 the counter finds that the value is zero, it will just try again later. Once per second, one of the processes prints the counter value, to let us see what is happening.
In the program, we print in boldface statements that are part of a critical region. As you can
see, any part of the program where cnt is used is a critical region. Furthermore, note that even
print is in the critical region if it is printing cnt, because we do not want cnt to change in the
middle of a print.
_____
cnt.c
#include <u.h>
#include <libc.h>
int
Lock
cnt;
cntlck;
void
main(int, char*[])
{
long
last, now;
switch(rfork(RFPROC|RFMEM|RFNOWAIT)){
case -1:
sysfatal("fork: %r");
case 0:
last = time(nil);
for(;;){
lock(&cntlck);
assert(cnt >= 0);
cnt++;
unlock(&cntlck);
now = time(nil);
if (now - last >= 1){
lock(&cntlck);
print("cnt= %d\n", cnt);
unlock(&cntlck);
last = now;
}
}
default:
for(;;){
lock(&cntlck);
assert(cnt >= 0);
if (cnt > 0)
cnt--;
unlock(&cntlck);
}
}
}
Also, in the parent process, both the check for cnt>0 and the cnt-- must be part of the same
- 237 critical region. Otherwise, the other process might have changed cnt between the if and its
body.
The idea is simple. If you want to be sure that no other process is even touching the shared
resource while you are doing something, you must provide mutual exclusion for your critical
region. As you see, one way is to use a Lock along the shared resource, to lock it. An example
execution follows.
; 8.cnt
cnt= 2043
cnt= 1
cnt= 1
cnt= 0
cnt= 4341
cnt= 1
cnt= 2808
cnt= 0
cnt= 1
cnt= 1400
cnt= 1
The value moves in bursts, up as the child manages to increment it, and down when the parent
manages to decrement it many times. The value printed was 1 when the child finds a zero
counter, increments it, and prints its value. The value printed is zero when, after the parent increments the counter, the child manages to decrement it before the parent prints its value.
It is very important to maintain critical regions as small as possible. If a process keeps a
resource locked most of the time, other processes will experience many delays while trying to
acquire the resource. Or even worse, if we are not careful, it may be that a process is never able to
acquire a lock it needs, because it always finds the resource locked. Look at this variant of our
last program, that we call cnt2.
switch(rfork(RFPROC|RFMEM|RFNOWAIT)){
case 0:
last = time(nil);
for(;;){
lock(&cntlck);
assert(cnt >= 0);
cnt++;
print("%d\n", cnt);
unlock(&cntlck);
}
default:
for(;;){
lock(&cntlck);
assert(cnt >= 0);
if (cnt > 0)
cnt--;
print("%d\n", cnt);
unlock(&cntlck);
}
}
Now look at this:
; 8.cnt2 | grep -v 0
and no number is ever shown!
We asked grep to print only lines that do not contain a 0. It seems that all lines in the output
report a zero value for cnt. Is it that the child process is not executing? We can use the debugger
to print the stack for the child.
- 238 ; ps | grep 8.cnt2
nemo
5153
nemo
5155
0:00
0:00
0:01
0:00
28K Pwrite
28K Sleep
8.cnt2
8.cnt2
; acid 5155
/proc/5155/text:386 plan 9 executable
/sys/lib/acid/port
/sys/lib/acid/386
acid: stk()
sleep()+0x7 /sys/src/libc/9syscall/sleep.s:5
lock(lk=0x702c)+0x47 /sys/src/libc/port/lock.c:16
main()+0x90 /usr/nemo/9intro/cnt2.c:19
_main+0x31 /sys/src/libc/386/main9.s:16
acid:
The child process is always trying to lock the resource, inside lock()! What happens is that the
parent is holding the lock almost at all times. The parent only releases the lock for a very brief
time, between the end of an iteration and the beginning of the next iteration. Only if during this
time there is a context switch, and the child is allowed to run, will the child be able to acquire the
lock. But it seems that in our case the system always decides to let the child run while the parent
is holding the lock.
This is called starvation. A process may never be able to acquire a resource, and it will
starve to death. It can be understood that this may happen to our program, because only for a
very little fraction of time the lock is released by the parent. The most probable thing is that once
a process gets the lock, the other one will never be able to acquire it.
Look at the stack trace shown above. Did you notice that lock calls sleep? You know
that the system gives some processor time to each process, in turns. If the implementation for
lock was the one we presented before in assembly language, we would be wasting a lot of processor time. Figure 10.3 depicts the execution for our two processes, assuming that lock is
implemented as we told before. In the figure, a solid line represents a process that is running, in
the processor. A dotted line represents a process that is ready to run, but is not running in the processor. The figure shows how the system gives some time to each process for running, in turns.
Parent
Run.
Rdy.
.....................
Run.
.....................
Rdy.
Run.
Rdy.
Run.
.....................
Rdy.
unlock
lock
Rdy.
Child . . . . . . . . . . . . . . . . . . . . .
Run.
.....................
calls lock, which spins around trying to acquire it.
Time
Figure 10.3: Two processes using a shared resource protected by a spin lock.
Initially, the parent calls lock, and acquires the lock because it was initially released.
Later, the parent process releases the lock by a call to unlock, but it quickly calls lock again,
and re-acquires the lock. Now it is the time for the child process to run. This poor process calls
lock, but you know what happens. The routine cannot acquire the lock, which is held by the parent process. Therefore, it waits in its loop calling TAS to try to gain the lock. That is all this process would do while it is allowed to remain running. The very thick line in the figure represents
the process executing this while, spinning around desperately hoping for TAS to succeed and
obtain the lock. Because of this, this kind of lock is called a spin lock.
- 239 One problem with this execution, as you already know, is that the child suffers starvation,
and is very likely to never acquire its lock. This can be solved by trying to hold locks as few time
as feasible, unlike we are doing in our program. The other problem that you may see is that the
child is wasting processor time. When the child calls lock, and finds that the lock was held and
it cannot acquire it, it is pointless to keep on trying to acquire it. Unless the child leaves the processor, and the process holding the lock is able to run, nobody is going to release the lock. Therefore, it is much better to let other processes run instead of insisting. This may give the one holding the lock a chance to release it. And that is better for us, because we want to acquire it.
In the actual implementation of lock in Plan 9, when lock finds that the lock is held and
cannot be set, it calls sleep. This moves the process out of the processor, while it is blocked
during the sleep. Hopefully, after sleeping a little bit, the lock will be already released. And, at
the very least, we will not be wasting processor time spinning around inside lock without any
hope of acquiring the lock before leaving the processor. Figure 10.4 depicts the same scenario for
our two processes, but showing what happens when lock calls sleep. Compare it with the
previous one.
Parent
Run.
Rdy.
Run.
.......
Rdy.
....
Run.
unlock
lock
Child
Rdy.
.....................
Run.
Blk.
Rdy.
...........
Blk.
Rdy.
...............
No luck. Calls sleep again.
calls lock, which calls sleep this time
Time
Figure 10.4: Same scenario, but using a lock that calls sleep to save processor time.
One last remark. Because of the call to sleep, Plan 9 locks are not real spin locks. They do
not spin around in a while all the time. As you now know, they call sleep(0), just to abandon
the processor and let others run if the lock was held. However, because they are very similar, and
loop around, many people refer to them as spin locks.
10.3. Queueing locks
How can avoid starvation in our program? The code for both processes was very similar, and had
a nice symmetry. However, the execution was not fair. At least for the child process. There is a
different kind of lock (yet another abstraction) that may be of help.
A queueing lock is a lock like the ones we know. It works in a similar way. But unlike a
spin lock, a queueing lock uses a queue to assign the lock to processes that want to acquire it.
The data type for this lock is QLock, and the functions for acquiring and releasing the lock are
qlock and qunlock.
; sig qlock qunlock
void qlock(QLock *l)
void qunlock(QLock *l)
- 240 When a process calls qlock, it acquires the lock if the lock is released. However, if the lock is
held and cannot be acquired yet, the process is put in a queue of processes waiting for the lock.
When the lock is released, the first process waiting in queue for the lock is the one that acquires
it.
There is a huge difference between Locks and QLocks because of the queue used to wait
for the lock. First, a process is not kept spinning around waiting for a lock. It will be waiting, but
blocked, sitting in the queue of waiting processes. Second, the lock is assigned to processes in a
very fair way. The first process that entered the queue to wait for the lock would be the first to
acquire it after the lock is released. Because of both reasons, it is always a good idea to use
QLocks instead of Locks. The spin locks are meant for tiny critical regions with just a few
instructions. For example, the data structure used to implement a QLock is protected by using a
Lock. Such spin lock is held just for a very short time, while updating the QLock during a call
to qlock or qunlock.
Our (in)famous program follows, but using queueing locks this time.
______
qcnt.c
#include <u.h>
#include <libc.h>
int
QLock
cnt;
cntlck;
void
main(int, char*[])
{
long
last, now;
switch(rfork(RFPROC|RFMEM|RFNOWAIT)){
case -1:
sysfatal("fork: %r");
case 0:
last = time(nil);
for(;;){
qlock(&cntlck);
assert(cnt >= 0);
cnt++;
print("%d\n", cnt);
qunlock(&cntlck);
}
- 241 default:
for(;;){
qlock(&cntlck);
assert(cnt >= 0);
if (cnt > 0)
cnt--;
print("%d\n", cnt);
qunlock(&cntlck);
}
}
}
Note the huge difference in behavior. An execution for this program follows. As you can see, this
time, both processes take turns. This happens because of the queue. The lock is assigned in a very
fair way, and both processes get a chance to do their job.
; 8.qcnt
0
0
1
0
1
0
To do something more useful, we are going to implement a tool to update ticker-tape panels at an
airport. This program is going to read lines from standard input. When a new message must be
displayed at the airport panels, the user is supposed to type the message in the keyboard and press
return.
Once a new message has been read, all the panels must be updated to display it instead of
the old one. Because updating a panel is a very slow operation, we do not want to use a loop to
update each one in turn. Instead, we create one process per panel, as shown in figure 10.5.
panel write
process
read
reader update
process
message
poll
panel write
process
panel write
process
Figure 10.5: Process structure for the ticker-tape panels application for the airport.
The parent process will be the one reading from the input. After reading a new message, it
will increment a version number for the message along with the message text itself. The panel
processes will be polling the version number, to see if their messages are out of date. If they are,
they will just write the new message to their respective panels, and record the version for the message. This is our data structure.
- 242 typedef struct Msg Msg;
struct Msg {
QLock
lck;
// to protect the other fields from races
char*
text;
// for the message
ulong
vers;
// for the message
};
Msg msg;
The code for the message reader is as follows. It works only when reading from the terminal,
because it is using just read to read a line from the input.
void
reader(void)
{
char
int
buf[512];
nr;
for(;;){
nr = read(0, buf, sizeof(buf)-1);
if (nr <= 0)
break;
buf[nr] = 0;
qlock(&msg.lck);
free(msg.text);
msg.text = strdup(buf);
msg.vers++;
qunlock(&msg.lck);
}
exiting = 1;
exits(nil);
}
The critical region, updating the message text and its version, is protected by the QLock kept at
msg.lck. This lock is kept within msg because it is used to protect it. If the program grows and
there are more data structures, there will be no doubt regarding what data structure is protecting
msg.lck.
Each panel process will be running a panelproc function, and receive a file descriptor
that can be used to write a message to the file representing the panel.
void
panelproc(int fd)
{
ulong
lastvers = -1;
do {
qlock(&msg.lck);
if(msg.text != nil && lastvers != msg.vers){
write(fd, msg.text, strlen(msg.text));
lastvers = msg.vers;
}
qunlock(&msg.lck);
sleep(5 * 1000);
} while(!exiting);
fprint(2, "panel exiting\n");
exits(nil);
}
The local lastvers keeps the version for the message shown at the panel. Basically,
panelproc loops and, once each 5 seconds, checks out if msg.vers changed. If it did, the
- 243 new text for the message is written to the panel. The initial value for lastvers is just a kludge
to be sure that the message is updated the very first time (in that case, there is no previous version). Note how the critical region includes both the checks in the condition of the if and the
statements used to access msg in the body.
Before discussing other details of this program, let’s see how the whole program looks like.
______
_ticker.c
#include <u.h>
#include <libc.h>
enum { Npanels = 2 };
...all the code shown above for Msg, reader, and panelproc...
void
main(int, char*[])
{
int
i;
for (i = 0; i < Npanels; i++)
if (rfork(RFPROC|RFMEM|RFNOWAIT) == 0)
panelproc(1);
reader();
/* does not return */
}
It creates one process per panel, and then executes the reader code using the parent process. To
test the program, we used the standard output as the file descriptor to write to each one of the panels.
When a program is built using multiple processes, it is important to pay attention to how the
program is started and how is it going to terminate. In general, it is best if the program works no
matter the order in which processes are started. Otherwise, initialization for the program will be
more delicate, and may fail mysteriously if you make a mistake regarding the order in which processes are started. Furthermore, you do not know how fast they are going to run. If you require
certain order for the starting up of processes, you must use a synchronization tool to guarantee
that such order is met.
For example, a panelproc should not write a message to its panel before there is at least
one message to print. All panelprocs should be waiting, silently, until reader has got the
chance of reading the first message and updating the data structure. The program does so by
checking that msg.text is not nil in panelproc before even looking at the message. The
msg.text will be a null value until the reader initializes it for the first time. As a result, if we
start the panel processes after starting the reader, the program will still work.
Termination is also a delicate thing. Now that there are multiple processes, when the program terminates, all the processes should exit. How to achieve this in a clean way, it depends on
the problem being solved. In this case we decided to use a global flag exiting. No
panelproc will remain in its while when exiting is true. Therefore, all we have to do to
terminate the program is to set exiting to 1, as we do in the reader after reaching the end of
file. Later, as panel processes awake from their sleep and check exiting, they will call exits
and terminate themselves.
This is an example execution for the program. Note how the panel processes terminate after
we have sent the end of file indication.
- 244 ; 8.ticker
Iberia arriving
Iberia arriving
Iberia arriving
Iberia arriving
Iberia arriving
Iberia arriving
control-d
; panel exiting
panel exiting
late
late
late
very
very
very
for flight 666
for flight 666
for flight 666
late for flight 666
late for flight 666
late for flight 666
If you look at the program, you will notice that after we have updated the message, the panel processes will acquire the msg.lck in sequence as they write their panels, one after another. If the
data structure msg is consulted a lot, the whole program will be very slow due to delays caused
by the use of a QLock to protect the data. While a panel process is writing to the panel, no other
panel process will be able to even touch the message. We can improve things a little bit by writing to the panel outside of the critical region. By doing so, other panel processes will be allowed
to gain the lock and consult the message as well.
void
panelproc(int fd)
{
ulong
lastvers = -1;
char*
text;
do {
text = nil;
qlock(&msg.lck);
if(msg.text != nil && lastvers != msg.vers){
text = strdup(msg.text);
lastvers = msg.vers;
}
qunlock(&msg.lck);
if (text != nil){
write(fd, text, strlen(text));
free(text);
}
sleep(5 * 1000);
} while(!exiting);
fprint(2, "panel exiting\n");
exits(nil);
}
Here, we moved the write outside of the critical region. Because the panel itself (i.e., its file) is
not being shared in our program, we do not need to protect from races while writing it. We created one process for each panel and that was nice.
But we can do much better. Are there races when multiple processes are just reading a data
structure? While nobody is changing anything, there are no races! During a long time, all the
panel processes will be polling msg, reading its memory, and the input process will be just
blocked waiting for a line. It would be nice to let all the panel processes to access the data structure at the same time, in those periods when nobody is modifying msg.
Plan 9 has read/write locks. A read/write lock, or RWLock, is similar to a queuing lock.
However, it makes a distinction between readers and writers of the resource being protected by
the lock. Multiple readers are admitted to hold the very same RWLock, at the same time. However, only one writer can hold a RWLock, and in this case there can be no other reader or writer.
This is also called a multiple-reader single-writer lock.
Processes that want to acquire the lock for reading must use rlock and runlock.
- 245 ; sig rlock runlock
void rlock(RWLock *l)
void runlock(RWLock *l)
Processes that want to acquire the lock for writing must use wlock, and wunlock.
; sig wlock wunlock
void wlock(RWLock *l)
void wunlock(RWLock *l)
The improved version for our program requires a change in the data structure, that must use a
RWLock now.
struct Msg {
RWLock
char*
ulong
}
lck;
text;
vers;
// multiple readers for this data, just one writer.
// for the message
// for the message
The new code for panelproc must acquire a lock for reading, but is otherwise the same.
void
panelproc(int fd)
{
...as before...
rlock(&msg.lck);
if(msg.text != nil && lastvers != msg.vers){
text = strdup(msg.text);
lastvers = msg.vers;
}
runlock(&msg.lck);
...as before...
}
And the process writing to the data structure now requires a write lock.
void
reader(void)
{
...as before...
wlock(&msg.lck);
free(msg.text);
msg.text = strdup(buf);
msg.vers++;
wunlock(&msg.lck);
...as before...
}
If you want to feel the difference between the version using QLocks and the one using
RWLocks, try to increase the number of panels to 15, and make the panelprocs take a little
bit more time to read msg, for example, by using sleep to make them hold the lock for some
time. In the first time, messages will slowly come out to the panels (or your standard output in
this case). If each process holds the lock for a second, the 15th process acquiring the lock will
have to wait at least 15 seconds. In the second case, all of the pannels will be quickly updated.
Furthermore, using the RWLock keeps the resource locked for less time, because the readers are
now allowed to overlap.
This is shown in figures 10.6 and 10.7. Both figures assume that initially, the writer and all
the readers try to acquire the lock (the time advances to the right). When using a queueing lock,
look at what happens to the readers. Compare with the next figure, which corresponds to using a
read/write lock.
- 246 -
Writer
resource
locked
Reader 1
.....................
Reader 2
.........................................
Reader 3
.............................................................
.............................................................
resource
locked
.........................................
resource
locked
.....................
resource
locked
Figure 10.6: Multiple readers make turns to read when using a queuing lock.
Writer
resource
locked
Reader 1
.....................
Reader 2
.......................
Reader 3
.........................
.............................................................
resource
locked
resource
locked
resource
locked
.........................................
.......................................
.....................................
Figure 10.7: Multiple readers may share the lock at the same time using a read/write lock.
When there is not much competition to acquire the lock, or when there are not many readers, the difference may be unnoticed. However, locks heavily used with many processes that just
want to read the data, can make a difference between both types of locks.
10.4. Rendezvous
A primitive provided to synchronize several processes is rendezvous. It has this name
because it allows two different processes to rendezvous, i.e., to meet, at a particular point in their
execution. This is the interface.
; sig rendezvous
void* rendezvous(void* tag, void* value)
When a process calls rendezvous with a given tag, the process blocks until another process
calls rendezvous with the same tag. Thus, the first process to arrive to the rendezvous
will block and wait for the second to arrive. At that point, the values both processes gave as
value are exchanged. That is, rendezvous for each process returns the value passed to the
call by the other process. See figure 10.8.
The tag used for the rendezvous represents the meeting-point where both processes want
to rendezvous. The ability to exchange values makes the primitive more powerful, and converts it
into a generic communication tool for use when synchronization is required. In general, any two
processes may rendezvous. It is not necessary for them to share memory. Of course, the values
supplied as tags and values cannot be used to point to shared variables when the processes
- 247 -
Process A
Process B
calls: rendezvous(tag, "hi").
..
..
.. Waiting...
...
.
call returns: "there"
time
rendezvous
calls: rendezvous(tag, "there")
call returns: "hi"
time
Figure 10.8: Two processes doing a rendezvous.
are not sharing memory, but that is the only limitation. The values are still exchanged even if
memory is not shared.
The following program creates a child process, which is supposed to run an HTTP server.
To execute nicely in the background, all the job is done by the child, and not by the parent. This
way, the user does not need to add an additional & when starting the program from the shell.
However, before doing the actual work, the child must initialize its data structures and perhaps
read some configuration files. This is a problem, because initialization could fail. If it fails, we
want the parent process to exits with a non-null status, to let the shell know that our program
failed.
One way to overcome this problem is to make the parent process wait until the child has
been initialized. At that point, it is safe for the parent to call exits, and let the child do the work
if everything went fine. This can be done using rendezvous like follows.
________
rendez.c
void
main(int, char*[])
{
int
i;
int
childsts;
switch(rfork(RFPROC|RFNOTEG|RFNOWAIT)){
case -1:
sysfatal("rfork: %r");
case 0:
if (httpinit() < 0)
rendezvous(&main, (void*)-1);
else
rendezvous(&main, (void*)0);
httpservice(); // do the job.
exits(nil);
- 248 default:
childsts = (int)rendezvous(&main, (void*)0);
if (childsts == 0)
exits(nil);
else {
fprint(2, "httpinit failed\n");
exits("httpinit failed");
}
}
}
Note that each process calls rendezvous once. The parent calls it to rendezvous with the child,
after it has initialized. The child calls it to rendezvous with the parent, and report its initialization
status. As the tag, we used the address for main. It does not really matter which tag we use, as
long as it is the same address. Using &main seemed like a good idea to make it explicit that we
are doing a rendezvous just for this function. As values, the child gave -1 (as a pointer, sic) to
report failure, or 0 (as a pointer) to report success. As we said, rendezvous works although
these processes are not sharing memory.
To test this program, we used an utterly complex implementation for HTTP
void
httpservice(void)
{
sleep(50000);
}
That is the best we could do given the so many standards that are in use today for the Web. Also,
we tried the program with two implementations for httpinit, one returning 0 and another
returning -1, like this one.
int
httpinit(void)
{
sleep(2000);
return 0;
}
And this is an example execution for both versions of the program.
; 8.rendez
httpinit failed
; 8.rendez
; ps | grep 8.rendez
nemo
7076
After two seconds we got another prompt.
0:00
0:00
24K Sleep
8.rendez
10.5. Sleep and wakeup
Going back to our airport panels program, it is a resource waste to keep all those
panelprocs polling just to check if there is a new message. Another abstraction, provided by
the functions rsleep, rwakeup, and rwakeupall may be more appropriate. By the way, do
not confuse this with the function sleep(2) that puts the process to sleep for some time. It is
totally different.
The idea is that a process that wants to use a resource, locks the resource. The resource is
protected by a lock, and all operations made to the resource must keep the lock held. That is not
new. In our program, processes updating or consulting msg must have msg locked during these
operations.
Now suppose that, during an operation (like consulting the message), the process decides
- 249 that it cannot proceed (e.g., because the message is not new, and we only want new messages).
Instead of releasing the lock and trying again later, the process may call rsleep. This puts the
process to sleep unconditionally. The process goes to sleep because it requires some condition to
be true, and it finds out that the condition does not hold and calls rsleep.
At a later time, another process may make the condition true (e.g., the message is updated).
This other process calls rwakeup, to wake up one of the possibly many processes waiting for the
condition to hold.
The idea is that rsleep is a temporary sleep waiting for a condition to hold. And it always
happens in the middle of an operation on the resource, after checking out if the condition holds.
This function releases the lock before going to sleep, and re-acquires it after waking up. Therefore, the process can nicely sleep inside its critical region, because the lock is not held while
sleeping. If the lock was kept held while sleeping, the process would never wake up. To wake up,
it requires another process to call rwakeup. Now, a process can only call rwakeup while holding the resource, i.e., while holding the lock. And to acquire the lock, the sleeper had to release it
before sleeping.
The behavior of rwakeup is also appropriate with respect to the lock of the resource. This
function wakes up one of the sleepers, but the caller continues with the resource locked and can
complete whatever remains of its critical region. When this process completes the operation and
releases the lock, the awaken one may re-acquire it and continue.
Re-acquiring the lock after waking up might lead to starvation, when there is always some
process coming fast to use the resource and acquiring the lock even before the poor process that
did wake up can acquire it again. To avoid this, it is guaranteed that a process that is awaken will
acquire the lock sooner than any other newcomer. In few words, you do not have to worry about
this.
A variant of rwakeup, called rwakeupall, wakes up all the processes sleeping waiting
for the condition to hold. Although many processes may be awaken, they will re-acquire the lock
before returning from rsleep. Therefore, only one process is using the resource at a time and
we still have mutual exclusion for the critical region.
The data structure Rendez represents the rendezvous point where processes sleeping and
processes waking up meet. You can think of it as a data structure representing the condition that
makes one process go to sleep.
typedef
struct Rendez
{
QLock
...
} Rendez;
*l;
The field l must point to the QLock protecting the resource (used also to protect the Rendez).
Using this abstraction, and its operations,
; sig rsleep rwakeup rwakeupall
void rsleep(Rendez *r)
int rwakeup(Rendez *r)
int rwakeupall(Rendez *r)
we can reimplement our airport panels program. We start by redefining our data structure and
providing two operations for using it.
- 250 typedef struct Msg Msg;
struct Msg {
QLock
lck;
// to protect the other fields from races
Rendez newmsg; // to sleep waiting for a new message.
char*
text;
// for the message
};
void
char*
wmsg(Msg* m, char* newtext);
rmsg(Msg* m);
The operation wmsg writes a new the text for the message. The operation rmsg reads a new text
for the message. The idea is that a call to rmsg will always sleep until the message changes.
When wmsg changes the message, it will wake up all the processes waiting for the new message.
This is rmsg. It locks the message, and goes to sleep waiting for the condition (need a new
message) to hold. After waking up, we still have the lock. Of course, any other process could use
the resource while we were sleeping, but this is not a problem because all we wanted was to wait
for a new message, and now we have it. Thus, the function makes a copy of the new message,
releases the lock, and returns the new message to the caller.
char*
rmsg(Msg* m)
{
char*
new;
qlock(&m->lck);
rsleep(&m->newmsg);
new = strdup(m->text);
qunlock(&m->lck);
return new;
}
And this is wmsg. It locks the resource, and updates the message. Before returning, it wakes up
anyone waiting for a new message.
void
wmsg(Msg* m, char* newtext)
{
qlock(&m->lck);
free(m->text);
m->text = strdup(newtext);
rwakeupall(&m->newmsg);
qunlock(&m->lck);
}
Now things are simple for our program, the panel process may just call rmsg to obtain a new
message. There is no need to bother with concurrency issues here. The function rmsg is our
interface for the message, and it cares about it all.
- 251 void
panelproc(int fd)
{
ulong
lastvers = -1;
char*
text;
while(!exiting){
text = rmsg(&msg);
write(fd, text, strlen(text));
free(text);
}
fprint(2, "panel exiting\n");
exits(nil);
}
In the same way, the reader process is also simplified. It calls wmsg and forgets about concurrency as well.
void
reader(void)
{
char
int
buf[512];
nr;
for(;;){
nr = read(0, buf, sizeof(buf)-1);
if (nr <= 0)
break;
buf[nr] = 0;
wmsg(&msg, buf);
}
exiting = 1;
exits(nil);
}
The rest of the program stays the same. However, this initialization is now necessary, because the
Rendez needs a pointer to the lock.
msg.newmsg.l = &msg.lck;
If you try this program, you will notice a difference regarding its responsiveness. There are no
polls now, and no delays. As soon as a new message is updated, the panels are updated as well.
Because of the interface we provided, the write for the panels is kept outside of the critical region.
And because of dealing with concurrency inside the resource operations, callers may be kept
unaware of it. Been this said, note that the program still must care about how to start and terminate in a clean way.
It is very usual to handle concurrency in this way, by implementing operations that lock the
resource before the do anything else, and release the lock before returning. A module implemented following this behavior is called a monitor. This name was used by some programming
languages that provided syntax for this construct, without requiring you to manually lock and
unlock the resource on each operation. The abstractions used to wait for conditions inside a monitor, similar to our Rendez, are called condition variables, because those languages used this
name for such time.
- 252 -
10.6. Shared buffers
The bounded buffer is a classical problem, useful to learn a little bit of concurrent programming, and also useful for the real life. The problem states that there is a shared buffer (bounded in
size). Some processes try to put things into the buffer, and other processes try to get things out of
the buffer. The formers are called producers, and the latter are called consumers. See figure 10.9
producer
consumer
producer
consumer
producer
Figure 10.9: The bounded buffer problem.
The problem is synchronizing both producers and consumers. When a producer wants to put
something in the buffer, and the buffer is full, the producer must wait until there is room in the
buffer. In the same way, when a consumer wants to take something from an empty buffer, it must
wait until there is something to take. This problem happens for many real life situations, whenever some kind of process produces something that is to be consumed by other processes. The
buffer kept inside a pipe, together with the process(es) writing to the pipe, and the ones reading
from it, make up just the same problem.
To solve this problem, we must declare our data structure for the buffer and two operations
for it, put, and get. The buffer must be protected, and we are going to use a QLock for that
purpose (because we plan to use rsleep and rwakeup). The operation put will have to sleep
when the buffer is full, and we need a Rendez called isfull to sleep because of that reason.
The operation get will go to sleep when the buffer is empty, which makes necessary another
isempty Rendez. To store the messages we use an array to implement a queue. The array is
used in a circular way, with new messages added to the position pointed to by tl. Messages are
extracted from the head, pointed to by hd.
typedef struct Buffer Buffer;
struct Buffer {
QLock
lck;
char*
msgs[Nmsgs];
int
hd;
int
tl;
int
nmsgs;
Rendez isfull;
Rendez isempty;
};
//
//
//
//
//
//
messages in buffer
head of the queue
tail. First empty slot.
number of messages in buffer.
to sleep because of no room for put
to sleep when nothing to get
This is our first operation, put. It checks that the buffer is full, and goes to sleep if that is the
case. If the buffer was not full, or after waking up because it is no longer full, the message is
added to the queue.
- 253 void
put(Buffer* b, char* msg)
{
qlock(&b->lck);
if (b->nmsgs == Nmsgs)
rsleep(&b->isfull);
b->msgs[b->tl] = strdup(msg);
b->tl = ++b->tl % Nmsgs;
b->nmsgs++;
if (b->nmsgs == 1)
rwakeup(&b->isempty);
qunlock(&b->lck);
}
Note how this function calls rwakeup(&b->isempty) when the buffer ceases to be empty. It
could be that some processes were sleeping trying to get something, because the buffer was
empty. This function, which changes that condition, is responsible for waking up one of such processes. It wakes up just one, because there is only one thing to get from the buffer. If there are
more processes sleeping, trying to get, they will be waken up as more messages are added by further calls to put in the future.
The function get is the counterpart for put. When there is no message to get, it sleeps at
isempty. Once we know for sure that there is at least one message to consume, it is removed
from the head of the queue and returned to the caller.
char*
get(Buffer* b)
{
char*
msg;
qlock(&b->lck);
if (b->nmsgs == 0)
rsleep(&b->isempty);
msg = b->msgs[b->hd];
b->hd = ++b->hd % Nmsgs;
b->nmsgs--;
if (b->nmsgs == Nmsgs - 1)
rwakeup(&b->isfull);
qunlock(&b->lck);
return msg;
}
Note how get is also responsible for awakening one process (that might be sleeping) when the
buffer is no longer full. Both functions are quite symmetric. One puts items in the buffer (and
requires empty slots), the other puts empty slots in the buffer (and requires items).
The data structure is initialized by calling init.
void
init(Buffer *b)
{
// release all locks, set everything to null values.
memset(b, 0, sizeof(*b));
// set the locks used by the Rendezes
b->isempty.l = &b->lck;
b->isfull.l = &b->lck;
}
To play with our implementation, we are going to create two processes the produce messages and
two more process that consume them and print the consumed ones to standard output. Also, to
exercise the code when the buffer gets full, we use a ridiculous low size.
- 254
___
_pc.c
#include <u.h>
#include <libc.h>
enum {Nmsgs = 4 };
...definitions for Buffer, put, get, and init here...
void
producer(Buffer* b, char id)
{
char
msg[20];
int
i;
for (i = 0; i < 5 ; i++){
seprint(msg, msg+20, "%c%d", id, i);
put(b, msg);
}
put(b, nil);
exits(nil);
}
void
consumer(Buffer* b)
{
char*
msg;
while(msg = get(b)){
print("%s ", msg);
free(msg);
}
exits(nil);
}
Buffer buf;
void
main(int, char*[])
{
init(&buf);
if (rfork(RFPROC|RFMEM|RFNOWAIT) == 0)
producer(&buf, ’a’);
if (rfork(RFPROC|RFMEM|RFNOWAIT) == 0)
producer(&buf, ’b’);
if (rfork(RFPROC|RFMEM|RFNOWAIT) == 0)
consumer(&buf);
else
consumer(&buf);
}
The producers receive a letter as their name, to produce messages like a0, a1, etc., and b0, b1,
etc. To terminate the program cleanly, each producer puts a final nil message. When a consumer
receives a nil message from the buffer, it terminates. And this is the program output.
- 255 ; 8.pc
a0 b0 a1 b1 a2 b2 a3 b3 a4 b4 ;
As you can see, messages are inserted in a very fair way. Changing a little bit put, and get,
would let us know if the buffer is ever found to be full or empty. This is the change for get.
char*
get(Buffer* b)
{
...as before...
if (b->nmsgs == 0){
print("<empty>\n");
rsleep(&b->isempty);
}
...as before...
}
The change for put is done in a similar way, but printing <full> instead. And this is what we
find out.
; 8.pc
<empty> <empty> a0 b0 <full> <full>
newline supplied by us
a1 b1 <full> <full> a2 b2 <full> <full> a3 b3 a4 b4 ;
It seems that initially both consumers try to get messages out of the buffer, and they find the
buffer empty. Later, producers insert a0 and b0, and consumers seem to be awaken and proceed.
Because both consumers were sleeping and the synchronization mechanism seems to be fair, we
can assume that a0 is printed by the one consumer and b0 by the other. It seems that by this time
both consumers keep on inserting items in the buffer until it gets full. Both go to sleep. And for
the rest of the time it looks like producers are faster and manage to fill the buffer, and consumers
have no further problems and will never find the buffer empty from now on.
In any case, the only thing we can say is that the code for dealing with a full buffer (and an
empty buffer) has been exercised a little bit. We can also affirm that no process seems to remain
waiting forever, at least for this run.
; ps | grep 8.pc
;
However, to see if the program is correct or not, the only tool you have is just careful thinking
about the program code. Playing with example scenarios, trying hard to show that the program
fails. There are some formal tools to verify if an implementation for a concurrent program has
certain properties or not, but you may make mistakes when using such tools, and therefore, you
are on your own to write correct concurrent programs.
10.7. Other tools
A popular synchronization tool, not provided by Plan 9, is a semaphore. A semaphore is an
abstraction that corresponds to a box with tickets to use a resource. The inventor of this abstraction made an analogy with train semaphores, but we do not like trains.
The idea behind a semaphore is simple. To use a resource, you need a ticket. The operation
wait waits until there is a ticket in the semaphore, and picks up one. When you are no longer
using the resource, you may put a ticket back into the semaphore. The operation signal puts a
new ticket into the semaphore. Because of the analogy with train semaphores, wait is also
known as down (to low a barrier) and signal is also known as up (to move up a barrier). But
in general, you will find either up and down as operations, or signal and wait.
Internally, a semaphore is codified using an integer to count the number of tickets in the box
represented by the semaphore. When processes call wait and find no tickets in the semaphore,
- 256 wait guarantees that they are put into sleep. Furthermore, such processes will be awaken (upon
arrival of new tickets) in a fair way. An initial integer value may be given to a semaphore, to represent the initial number of tickets in the box. This could be the interface for this abstraction.
Sem*
void
void
newsem(int n); // create a semaphore with n tickets
wait(Sem* s);
// acquire a ticket, possibly waiting for it.
signal(Sem* s); // add a ticket to the semaphore.
Mutual exclusion can be implemented using a semaphore with just one ticket. Because there is
only one ticket, only one process will be able to acquire it. This should be done before entering
the critical region, and the ticket must be put back into the semaphore after exiting from the critical region. Such a semaphore is usually called a mutex. This is an example.
Sem* mutex = newsem(1);
...
wait(mutex);
critical region here
signal(mutex);
...
Also, because a wait on an empty semaphore puts a process to sleep, a semaphore with no tickets can be used to sleep processes. For example, this puts the process executing this code to sleep,
until another process calls signal(w);
Sem* w = newsem(0);
...
wait(w);
...
This tool can be used to synchronize two processes, to make one await until the other executes
certain code. Remember the HTTP server initialization example shown before. We could use an
empty semaphore, and make the parent call
wait(w)
to await for the initialization of the child. Then, the child could call
signal(w)
to awake the parent once it has initialized. However, this time, we cannot exchange a value as we
could using rendezvous.
As a further example, we can implement our bounded-buffer program using semaphores.
The data type must have now one semaphore with just one ticket, to achieve mutual exclusion for
the buffer. And we need two extra semaphores. Processes that want to put an item in the buffer
require a hole where to put it. Using a semaphore with initially Nmsgs tickets, we can make the
producer acquire its holds nicely. One ticket per hole. When no more holes are available to put a
message, the producer will sleep upon a call to wait(sholes). In the same way, the consumer
requires messages, and there will be zero messages available, initially.
typedef struct Buffer Buffer;
struct Buffer {
Sem*
mutex;
char*
msgs[Nmsgs];
int
hd;
int
tl;
int
nmsgs;
Sem*
smsgs;
Sem*
sholes;;
};
//
//
//
//
//
//
//
with 1 ticket. for mutual exclusion.
messages in buffer
head of the queue
tail. First empty slot.
number of messages in buffer.
(0 tickets) acquire message in buffer
(Nmsgs tickets) acquire a hole in the buffer.
The implementation for put is similar to before. But there are some remarkable differences.
- 257 void
put(Buffer* b, char* msg)
{
wait(b->sholes);
wait(b->mutex);
b->msgs[b->tl] = strdup(msg);
b->tl = ++b->tl % Nmsgs;
b->nmsgs++;
signal(b->mutex);
signal(b->smsgs);
}
Before even trying to put anything in the buffer, the producer tries to get a hole. To do so, it
acquires a ticket from the semaphore representing the holes available. If there are no tickets, the
producer sleeps. Otherwise, there is a hole guaranteed. Now, to put the message in the hole
acquired, a semaphore called mutex, with just one ticket for providing mutual exclusion, is
used. Upon acquiring the only slot for executing in the critical region, the producer adds the message to the buffer. Also, one we have done our work, there is a new message in the buffer. A new
ticket is added to the semaphore representing tickets to maintain it consistent with the reality.
The code for a consumer is equivalent.
char*
get(Buffer* b)
{
char*
msg;
wait(b->smsgs);
wait(b->mutex);
msg = b->msgs[b->hd];
b->hd = ++b->hd % Nmsgs;
b->nmsgs--;
signal(b->mutex);
signal(b->sholes);
return msg;
}
Semaphores are to be handled with care. For example, changing the first two lines above with
wait(b->mutex);
wait(b->smsgs);
is going to produce a deadlock. First, the consumer takes the mutex (ticket) for itself. If it happens now that the buffer is empty, and smsgs has no tickets, the consumer will block forever.
Nobody would be able to wake it up, because the producer will not be able to acquire the mutex
for itself. It is very dangerous to go to sleep with a lock held, and it is also very dangerous to go
to sleep with a mutex taken. Only a few times it might be the right thing to do, and you must be
sure that there is no deadlock produced as a result.
Note that a semaphore is by no means similar to rsleep and rwakeup. Compare
rwakeup(r);
rsleep(r);
with
signal(s);
wait(s);
The former wakes up any sleeper at r, and the goes to sleep. Unconditionally. The latter, adds a
ticket to a semaphore. If nobody consumes it between the two sentences, the call to wait will not
- 258 sleep. Remember that a semaphore is used to model slots available for using a particular
resource. On the other hand, sleep/wakeup are more related to conditions that must hold for you
to proceed doing something.
We said that Plan 9 does not supply semaphores. But there is an easy way to implement
them. You need something to put tickets into. Something that when wanting to get a ticket,
blocks until there is one ticket available. And returns any ticket available immediately otherwise.
It seems that pipes fit right into the job. This is our semaphore:
typedef struct Sem Sem;
struct Sem {
int fd[2];
};
To create a semaphore, we create a pipe and put as many bytes in it as tickets must be initially in
the semaphore.
Sem*
newsem(int n)
{
Sem*
s;
s = malloc(sizeof(Sem));
if (pipe(s->fd) < 0){
free(s);
return nil;
}
while(n-- > 0)
write(s->fd[1], "x", 1);
return s;
}
A signal must just put a ticket in the semaphore.
void
signal(Sem* s)
{
write(s->fd[1], "x", 1);
}
A wait must acquire one ticket.
void
wait(Sem* s)
{
char buf[1];
read(s->fd[0], buf, 1);
}
We do not show it, but to destroy a semaphore it suffices to close the pipe at both ends and
release the memory for the data structure. Given the implementation we made, the only limitation
is that a semaphore may hold no more tickets than bytes are provided by the buffering in the pipe.
But that seems like a reasonable amount of tickets for most purposes.
Another restriction to this implementation is that the semaphore must be created by a common ancestor (e.g., the parent) of processes sharing it. Unless such processes are sharing their file
descriptor set.
- 259 Problems
1
Locate the synchronization construct in programming languages you use.
2
Do shell programs have race conditions?
3
Implement a concurrent program simulating a printer spooler. It must have several processes. Some of them generate jobs for printing (spool print jobs) and two other ones print
jobs. Needless to say that the program must not have race conditions.
4
Implement a semaphore using shared variables protected with (spin) locks. Would you use
it? Why?
5
Assume you have monitors (invent the syntax). Implement a sempahore using monitors.
- 260 .
- 261 -
11 Threads and Channels
______
11.1. Threads
Processes are independent flows of control known to Plan 9. The kernel creates then, it terminates them, and it decides when to move one process out of the processor and when to put a
process back on it. Because of the unpredictability of context switches between processes, they
must synchronize using locks, rendezvous, sleep/wakeup, or any other means if they want to
share memory without race conditions.
But there is an alternative. The thread(2) library provides an abstraction similar to a process, called a thread. A thread is just a flow of control within a process. In the same way that
Plan 9 multiplexes the flow of control of a single processor among multiple processes, the thread
library multiplexes the flow of control of a single process among multiple threads.
Thread 1.
Process 1:
..
..
..
Thread 2
Process 2:
...
..
..
run
..
..
..
.
rdy.
ready run
ready
ready
ready
..
..
..
..
..context
..
..
..
..
switch
run
.
.. run
...
..
...
..
...
ready
..
...
...
...
Figure 11.1: Threads are flows of control implemented using the single flow of control of a process.
Figure 11.1 shows an example. If there are two processes, Plan 9 may put process 1 to run at
the processor for some time. During this time, process 2 would be ready to run. After the time
passes, there is a context switch and Plan 9 puts process 2 to run and leaves process 1 as ready to
run. In this figure, the process 1 has two threads in it. Each thread thinks that it is a single, independent, flow of control (like all processes think). However, both threads are sharing the time in
the processor that was given to process 1. Looking at the process 1 in the figure shows that,
while this process is running, the time is used to execute two different flows of control, one for
each thread.
For Plan 9, there are no threads. The kernel puts process 1 to run and what process 1 does
with the processor is up to it. Therefore, when the process 1 is moved out of the processor in the
context switch, both threads cease running. In fact, it is the single flow of control for process 1
which ceased running.
Why should you ever want to use threads? Unlike for processes, that are moved out of the
processor when the system pleases, a thread may not be moved out of the processor (preempted)
unless you call functions of the thread library to synchronize with other threads. What does this
mean? There will be no context switch between threads unless you allow it. There will be no
races! You are free to touch any shared data structure as you please, and nobody would interrupt
in the middle of a critical operation, provoking a race.
This is the same program used as an example in the beginning of the last chapter. It increments a shared counter using two different flows of control. This time, we use two threads to
increment the counter. As any other program using the thread library, it includes thread.h, that
contains the definitions for thread data types and functions. Also, note that the program does not
have a main function. That function is provided by the thread library. It creates a single thread
within the process that starts executing the function threadmain. This is the function that you
are expected to provide as your entry point.
- 262
_____
_tincr.c
#include <u.h>
#include <libc.h>
#include <thread.h>
int
cnt;
void
incrthread(void*)
{
int
i;
for (i = 0; i < 2; i++)
cnt++;
print("cnt is %d\n", cnt);
threadexits(nil);
}
void
threadmain(int, char*[])
{
int
i;
threadcreate(incrthread, nil, 8*1024);
for (i = 0; i < 2; i++)
cnt++;
print("cnt is %d\n", cnt);
threadexits(nil);
}
The program calls threadcreate to create a new thread (the second in this process!) that starts
executing the function incrthread. After this call, there are two independent flows of control.
One is executing threadmain, after the call to threadcreate. The other is starting to execute incrthread. The second parameter given to threadcreate is passed by the library as
the only argument for the main procedure for the thread. Because incrthread does not require
any argument, we pass a nil pointer. The third argument to threadcreate is the thread’s
stack size. The stack for a thread is allocated as a byte array in the data segment, like other
dynamic variables, it lives in the heap (within the data segment).
It is interesting to see that threads call threadexits to terminate, instead of calling
exits. Calling exits would terminate the entire process (the only flow of control provided by
Plan 9). When all the threads in the process have terminated their main functions, or called
threadexits, the thread library will call exits to terminate the entire process. The exit status for the whole process is that given as a parameter to the last thread to exit, which is a reasonable behavior. By the way, there is a more radical function for exiting that terminates all the
threads in the process, it is called threadexitsall and is used in the same way.
And is this is what we get for using threads instead of processes. The program will always
produce this output (although the order of prints may vary)
- 263 ; 8.tincr
cnt is 2
cnt is 4
And there are no races! When a thread starts executing, it will continue executing until it calls
threadexits. We did not call any function of the thread library, and there is no magic. There
is no way the thread could suffer a context switch in a bad moment. The program is safe, although
it does not use even a single lock. Of course, if a thread loops for a long time without giving
other threads the chance of running, the poor other threads will wait a very long time until they
run. But this is seldom the case.
What if we modify the program as we did with the one with processes? You may think that
using a sleep may lead to a context switch, and expose a possible race condition. Although this
is not the case, let’s try it.
______
_tincr2.c
#include <u.h>
#include <libc.h>
#include <thread.h>
int
cnt;
void
incrthread(void*)
{
int
i;
int
loc;
for (i = 0; i < 2; i++){
loc = cnt;
loc++;
sleep(0);
cnt = loc;
}
print("cnt is %d\n", cnt);
threadexits(nil);
}
void
threadmain(int, char*[])
{
threadcreate(incrthread, nil, 8*1024);
incrthread(nil);
}
Executions for this program yield the same result we expect.
; 8.tincr2
cnt is 2
cnt is 4
No race was exposed. Indeed, no thread was ever moved out of the processor by the call to
- 264 sleep. If the first thread was executing incrthread, the call to sleep moved the whole process out of the processor, as shown in figure 11.2. When later, the process was put back into the
running state, the first thread was still the one running. Remember, the underlying Plan 9 kernel
knows nothing about threads. The call to sleep puts the process to sleep. Of course, the thread
went to sleep as a result, like all other threads in the process. But in any case, you did not call any
function from the thread library, and there was no context switch between threads. For the thread
library, it seems that the first thread is still executing in very much the same way that if you never
called sleep.
1st thread
Our process:
2nd thread
Another process:
ready
ready
.
.
. sleep
.. . . . .
.
.
.
.
.
.
.
.
.context
.
.
.
.
.
.
.
.
.
.
.
run
ready
switch because of
run
.
.
.
.
.
.
ready
.
.
.
.
.
.
sleep
.
.
.
.
.
.
.
.
.
.
.
ready
.
...
...
...
Figure 11.2: A call to sleep from a thread moves the entire process out of the processor.
Only when the first thread calls threadexits, the second thread gets a chance to run.
The thread library releases the resources for the exiting thread, and switches to the other thread in
the process (that was ready to run). This thread runs to completion, like its sibling, and after calling threadexits, the whole process is terminated by the thread library (by a call to exits),
because there are no more threads in this process.
How can a thread abandon voluntarily the processor? E.g., to favor other threads. The function yield in the thread library makes a context switch between threads. Any other thread ready
to run will be put to execute. Of course, if no more threads are ready to run yield will return
immediately to the calling thread. Therefore, this change to incrthread creates a bug in our
program.
for (i = 0; i < 2; i++){
loc = cnt;
loc++;
yield();
cnt = loc;
}
The call to yield forces a context switch at the worst moment. But note that, unlike when using
processes, this time you had to ask for the context switch.
11.2. Thread names
Like processes, threads have identifiers. The thread library assigns a unique integer to each
thread, known as its thread id. Do not confuse the thread id with the PID for the process where
the thread is running. The former is known by the thread library, and unknown to the underlying
Plan 9. The next program creates several threads, that print their own ids. The call to threadid
returns the identifier of the thread that calls the function.
The function threadcreate returns the identifier for the thread it created, and the program prints this value as well, to let you see how things match. In general, threadid is used
when a thread wants to know its own identifier. However, to know the ids for some threads
- 265 created, it suffices to record the return values when threadcreate is called. The program
prints the PID along with the thread ids, to let you clearly see the difference.
____
_tid.c
#include <u.h>
#include <libc.h>
#include <thread.h>
void
threadfunc(void*)
{
print("thread id= %d\tpid=%d\n", threadid(), getpid());
threadexits(nil);
}
void
threadmain(int, char*[])
{
int
i, id;
print("thread id= %d\tpid=%d\n", threadid(), getpid());
for (i = 0; i < 2; i++){
id = threadcreate(threadfunc, nil, 8*1024);
print("\tcreated thread %d\n", id);
}
}
This is the output from the program.
; 8.tid
thread id= 1
created
created
thread id= 2
thread id= 3
pid=3904
thread 2
thread 3
pid=3904
pid=3904
What would happen if we implement cnt from the last chapter, but using threads? This program
used two flow of controls. One was kept incrementing a counter. The other one tried always to
decrement the counter, but not below zero. The next program creates two threads. One runs this
function.
void
incr(void* arg)
{
int*
cp = arg;
threadsetname("incrthread");
for(;;){
*cp = *cp + 1;
print("cnt %d\n", *cp);
}
threadexits(nil);
}
- 266 The other runs this instead.
void
decr(void* arg)
{
int*
cp = arg;
threadsetname("decrthread");
for(;;){
if (*cp > 0)
*cp = *cp - 1;
print("cnt %d\n", *cp);
}
threadexits(nil);
}
This time, we pass an an argument for both threads a pointer to the shared counter.
_____
_tcnt.c
#include <u.h>
#include <libc.h>
#include <thread.h>
int
cnt;
void
incr(void* arg)
{
int*
cp = arg;
threadsetname("incrthread");
for(;;){
*cp = *cp + 1;
print("cnt %d\n", *cp);
}
threadexits(nil);
}
void
decr(void* arg)
{
int*
cp = arg;
threadsetname("decrthread");
for(;;){
if (*cp > 0)
*cp = *cp - 1;
print("cnt %d\n", *cp);
}
threadexits(nil);
}
- 267 void
threadmain(int, char*[])
{
threadsetname("main");
threadcreate(incr, &cnt, 8*1024);
threadcreate(decr, &cnt, 8*1024);
threadexits(nil);
}
One of the threads will never run!. It will starve. When we executed the program, the thread
incrementing the counter was the lucky one. It started running, and because it does not call any
synchronization function from the thread library, it will never leave the processor in favor of the
other thread.
; 8.tcnt
cnt 1
cnt 2
cnt 3
cnt 4
cnt 5
cnt 6
...and so on ad nauseum.
We can double check by using the debugger. First, let’s locate the process that is running our program.
; ps
nemo
| grep 8.tcnt
4546
0:00
0:00
120K Pwrite
8.tcnt
Now we can run acid on the process 4546.
; acid -l thread 4546
/proc/4546/text:386 plan 9 executable
/sys/lib/acid/port
/sys/lib/acid/thread
/sys/lib/acid/386
acid:
The option -l thread loads functions into acid for debugging threaded programs. For example, the function threads lists the threads in the process.
acid: threads()
p=(Proc)0x169b8
pid 4546
t=(Thread)0x19a68
t=(Thread)0x1bb28
acid:
Running
Running
Ready
/usr/nemo/tcnt.c:14 incr [incrthread]
?file?:0 {}
There are two threads. Reasonable, because the main thread called threadexits by this time.
Both threads are listed (a line each) after one line describing the process where the threads run.
This process has pid 4546, as we knew, and is running. The lucky running thread is executing at
line 14 of tcnt.c, in the function named incr. The debugger does even show a name for the
thread: incrthread. That is what the calls to threadsetname in our program were for.
This function assigns a (string) name to the calling thread, for debugging. This string can be also
obtained using threadgetname, for example, to print diagnostics with the name of the thread
issuing them.
The second thread is ready to run, but it did not even touch the processor. In fact, it did not
have time to initialize some of its data, and the debugger gets confused regarding which file, line
number, and thread name correspond to the second thread.
- 268 We are going to modify the program a little bit, by calling yield on each thread to let the
other run. For example, this is the new incrthread. The other one is changed in a similar
way.
void
incr(void* arg)
{
int*
cp = arg;
threadsetname("incrthread");
for(;;){
*cp = *cp + 1;
print("cnt %d\n", *cp);
yield();
}
threadexits(nil);
}
This is what results from the change. Each thread yields to the other one, and both onces execute
making turns. There will always be one pass in the for and then a context switch, forced by
yield.
; 8.tcnt
cnt 1
cnt 0
cnt 1
...
Another debugger function defined when called with -l thread knows how to print the stacks
for all threads in the process. Now that both threads had a chance to run, you can see how the
debugger clearly identifies one thread as incrthread, and the other one as decrthread.
; ps | grep 8.tcnt
nemo
4571
0:00
0:00
; acid -l thread 4571
/proc/4571/text:386 plan 9 executable
120K Pwrite
8.tcnt
/sys/lib/acid/port
/sys/lib/acid/thread
/sys/lib/acid/386
acid: stacks()
p=(Proc)0x169b8
pid 4571 Running
t=(Thread)0x19a68
Ready
/usr/nemo/tcnt.c:15 incr [incrthread]
yield()+0x5 /sys/src/libthread/sched.c:186
incr(arg=0xd010)+0x39 /usr/nemo/tcnt.c:15
launcher386(arg=0xd010,f=0x1020)+0x10 /sys/src/libthread/386.c:10
0xfefefefe ?file?:0
t=(Thread)0x1bb28
Running
/usr/nemo/tcnt.c:30 decr [decrthread]
pwrite()+0x7 /sys/src/libc/9syscall/pwrite.s:5
...
print(fmt=0x1136a)+0x24 /sys/src/libc/fmt/print.c:13
decr(arg=0xd010)+0x3b /usr/nemo/tcnt.c:30
launcher386(arg=0xd010,f=0x105f)+0x10 /sys/src/libthread/386.c:10
0xfefefefe ?file?:0
This is a very useful tool to debug programs using the thread library. It makes debugging as easy
as when using processes. The debugger reports that incrthread was executing yield, and
decrthread was executing its call to print, by the time the stack dump was made. Note how
the process was running, but only one of the threads is running. The other one is ready to run,
- 269 because it did yield.
11.3. Channels
Synchronizing several processes was very easy when we used pipes. While programming, we
could forget all about race conditions. Each process was making its job, using its own data, and
both processes could still work together to do something useful.
Fortunately, there is an abstraction provided by the thread library that is very similar. It is
called a channel. A channel is an unidirectional communication artifact. One thread can send
data through one end of the channel, and another thread may receive data at the other end.
Because channels are meant to send data of a particular type, a channel delivers messages of a
given size, decided when the channel is created. This is not a restriction. If data of different sizes
must be sent through a channel, you can always send a pointer to it.
To create a channel, call chancreate
; sig chancreate
Channel* chancreate(int elsize, int nel)
and specify with the first argument the size for the data type being sent through it. The second
parameter specifies how many messages may be buffered inside the channel (i.e., the buffer size
for the channel). To send and receive messages, the functions send and recv provide the primary interface.
; sig send recv
int send(Channel *c, void *v)
int recv(Channel *c, void *v)
Before any further discussion, let’s see an example. In the previous chapter we implemented a
program for the bounded-buffer problem. This is another solution to the same problem, using
threads and channels.
_____
tpc.c
#include <u.h>
#include <libc.h>
#include <thread.h>
enum {Nmsgs = 4 };
Channel* bufc;
void
producer(void *arg)
{
char*
id = arg;
char*
msg;
int
i;
for (i = 0; i < 5 ; i++){
msg = smprint("%s%d", id, i);
send(bufc, &msg);
}
send(bufc, nil);
threadexits(nil);
}
- 270 void
consumer(void*)
{
char*
msg;
do {
recv(bufc, &msg);
if (msg != nil){
// consume it
print("%s ", msg);
free(msg);
}
} while(msg != nil);
threadexits(nil);
}
void
threadmain(int, char*[])
{
bufc = chancreate(sizeof(char*), Nmsgs);
threadcreate(producer, "a", 8*1024);
threadcreate(producer, "b", 8*1024);
threadcreate(consumer, nil, 8*1024);
consumer(nil);
}
The channel is created to send messages with the size of a char*, and with enough buffering for
Nmsgs messages. Thus, the channel is our bounded buffer.
bufc = chancreate(sizeof(char*), Nmsgs);
The program will never destroy the channel, ever. Should we want to destroy it, we might call
chanfree(bufc);
But that can only be done when the channel is no longer needed, after the last consumer completes its job. The consumer calls
recv(bufc, &msg);
to receive a message from the channel. Once a message is received, the message is stored by
recv at the address given as the second argument. That is, recv receives a char* and stores it
at &msg. After having received the message, the consumer prints it and tries to receive another
one.
The producer, on the other hand, concocts a message and calls
send(bufc, &msg);
This call sends through the channel the message pointed to by &msg, with the size of a char*.
That is, send sends the (pointer) value in msg through the channel.
If producers start first and put messages in the channel, they will block as soon as the
buffering in the channel fills up (similar to what would happen in a pipe). If the consumers start
first and try to get messages from the channel, they will block if the buffer in the channel has no
messages. This is the behavior of send and recv when the channel has some buffering.
It may be illustrative for you to compare this program with pc.c, the version without using
channels that we made in the last chapter. Both programs achieve the same effect. This one does
not use even a single lock, nor sleep/wakeup. It does not have any race either. Each thread uses its
own data, like when you connect multiple processes using pipes. Race conditions are dealt with
by avoiding them in a natural way.
The next program does a ping-pong between two threads. Each one sends an integer value
to the other, which increments the number before sending it back to the former (see figure 11.3).
- 271 The program uses channels with no buffering.
pong.c
_______
#include <u.h>
#include <libc.h>
#include <thread.h>
Channel* pingc; // of int
Channel* pongc; // of int
void
pingthread(void*)
{
int
msg;
for(;;){
recv(pingc, &msg);
msg++;
print("%d\n", msg);
send(pongc, &msg);
}
}
void
pongthread(void*)
{
int
msg;
for(;;){
recv(pongc, &msg);
msg++;
print("\t%d\n", msg);
send(pingc, &msg);
}
}
void
threadmain(int, char*[])
{
int
kickoff;
pingc = chancreate(sizeof(int), 0);
pongc = chancreate(sizeof(int), 0);
threadcreate(pingthread, nil, 8*1024);
threadcreate(pongthread, nil, 8*1024);
kickoff = 0;
send(pingc, &kickoff);
threadexits(nil);
}
Each channel is created to send messages with the size of an int, and with no buffering.
pingc = chancreate(sizeof(int), 0);
pongc = chancreate(sizeof(int), 0);
The ping thread calls
recv(pingc, &msg);
- 272 to receive a message from the channel pingc. The message is stored by recv at the address
given as the second argument. That is, recv receives an integer and stores it at &msg. Once the
integer has arrived, ping increments it and calls
send(pongc, &msg);
to send through pongc the message pointed to by &msg. That is, to send the integer msg
(because the channel was created to send messages with the size of a integer).
Initially, both threads would block at recv, because nobody is sending anything yet. To
kick off the ping-pong, the main thread sends an initial zero to the pingc channel. See figure
11.3.
pongc
ping
pong
pingc
0
main
Figure 11.3: A ping pong with threads and channels.
The output from the program is a nice ping pong. Note that context switches between
threads happen when we call send and recv. Any synchronization function from the thread
library is likely to produce a context switch.
; 8.out
1
2
3
4
...
A channel with no buffering is producing a rendezvous between the thread sending and the one
receiving. A recv from such a channel will block, until there is something to receive. Because
the channel has no buffering, there can be nothing to receive until another thread calls send for
the same channel. In the same way, a send to a channel with no buffering is going to block if
nobody is receiving on it. It will block until another thread calls recv and the message can be
sent.
We could exploit this in our program to synchronize more tightly both threads and use just
one channel. This is useful to better understand how channels can be used, but (perhaps arguably)
it leads to a more obscure, yet compact, program.
Suppose that initially ping sends a message to pong and pong receives it. The former
calls send and the later calls recv. If ping calls send first, it is going to block until pong
calls recv on the channel (which had no buffering). And vice-versa.
Now comes the point. When ping completes its send it is for sure that pong has completed its recv. Or we could say that when pong completes its recv it is certain that ping
completed its send. Therefore, the same channel can be used again to send a number back. This
time, pong calls send and ping calls recv. Again, both calls will rendezvous, the first call
made will block and wait for the other. There is no doubt regarding which recv is going to
receive for which send. So, the code would work along these lines.
- 273 ping() {
(1)
send(c, &msg);
(2)
recv(c, &msg);
}
pong() {
(3)
recv(c, &msg);
(4)
send(c, &msg);
}
// sends to (3)
// receives from (4)
// receives from (1)
// sends to (2)
But both threads look fairly similar. In fact, considering their loops, they look the same. Receive
something, increment it, send it back. Only that while one is receiving the other one is sending.
Therefore, we could use the same code for both threads, like the next program does.
pong2.c
________
#include <u.h>
#include <libc.h>
#include <thread.h>
void
pingpongthread(void*a)
{
ulong
msg;
Channel*c = a;
for(;;){
msg = recvul(c);
msg++;
print("%d\n", msg);
sendul(c, msg);
// i.e., recv(c, &msg);
// i.e., send(c, &msg);
}
}
void
threadmain(int, char*[])
{
Channel* c;
int
kickoff;
c = chancreate(sizeof(int), 0);
threadcreate(pingpongthread, c, 8*1024);
threadcreate(pingpongthread, c, 8*1024);
kickoff = 0;
sendul(c, kickoff);
threadexits(nil);
}
Initially, both threads (now running pingpongthread) will block at recv. They are ready
for their match. When the main thread sends an initial zero through the only channel, the thread
that called recv first will be the one receiving the message. Which one does receive it? We do
not care. If both players run the same code, why should we care?
At this point things work as discussed above. The thread that received the initial zero is now
after its recv, preparing to send 1 to the other. The other thread is still waiting inside recv.
The send from the former will deliver the number to the later. And both calls will meet in time
because of the lack of buffering in the channel. Later, the very same channel will be free to send
- 274 another number back.
The program uses sendul and recvul, instead of send and recv. These functions are
convenience routines that send and receive an unsigned integer value. They are very convenient
when the channel is used to send integers. There are other similar functions, called sendp and
recvp that send and receive pointers instead.
; sig sendul recvul sendp recvp
int sendul(Channel *c, ulong v)
ulong recvul(Channel *c)
int sendp(Channel *c, void *v)
void* recvp(Channel *c)
They are exactly like send and recv for messages of the size of integers and messages of the
size of pointers, respectively.
11.4. I/O in threaded programs
Performing I/O from a thread that shares the process with other threads is usually a bad idea. It is
not harmful to call print and other I/O functions for debugging and similar purposes. But it
may be harmful to the program to read from the console or to read from or write to a network
connection.
Consider the airport panels application from the last chapter. We are going to make an
implementation using threads. The application must convey a message typed at a console to the
multiple panels in the airport. This implies several different activities:
1
Reading messages from the console.
2
Broadcasting each new message to all the panels.
3
Updating each panel
Using the thread library, we can program the application in a very modular way. Each activity
may be performed by a different thread, without even thinking on what the other threads would
do. To make all the threads work together, we can use channels.
For example, a consread thread may be in charge of reading one line at a time from the
console, and send each new message read through a channel to a bcast thread.
void
consreadthread(void*)
{
Biobuf bin;
char*
ln;
threadsetname("consread");
Binit(&bin, 0, OREAD);
while (ln = Brdstr(&bin, ’\n’, 0))
sendp(bcastc, ln);
sendp(bcastc, nil);
Bterm(&bin);
threadexits(nil);
}
The code can now be almost as simple as the definition for the thread’s task. We have used
Brdstr from bio(2) to read a line at a time from standard input. Unline Brdline, this function
returns a C string allocated with malloc that contains the line read. The final argument 0 asks
Brdstr not to remove the trailing \n in the string, which is just what we need. To make things
terminate cleanly, upon EOF from standard input, we send a nil message as an indication to exit.
Another thread, bcast, will be only concerned about broadcasting messages to pannels.
When it receives a new message, it sends one copy of the message to each panel. To do this, the
- 275 program may use an array of channels, panelc, with one channel per panel.
void
bcastthread(void*)
{
char*
msg;
int
i;
threadsetname("bcast");
do {
msg = recvp(bcastc);
for (i = 0; i < Npanels; i++)
if (msg != nil)
sendp(panelc[i], strdup(msg));
else
sendp(panelc[i], nil);
free(msg);
} while(msg != nil);
threadexits(nil);
}
The nil message meaning exiting is also broadcasted, to indicate to all panels that the program is
terminating.
A panel thread (one for each panel) can simply read new messages from the panel’s channel and update a panel. It needs to know which channel to read messages from, and which panel
to write to. A structure is declared to pass such information as an argument.
typedef struct PArg PArg;
struct PArg {
Channel* c;
// to get new messages from
int
fd;
// to the panel’s file.
};
Using it, this can be its implementation. Like before, a nil message is an indication to exit.
void
panelthread(void* a)
{
PArg*
arg = a;
char*
msg;
threadsetname("panel");
while(msg = recvp(arg->c)){
write(arg->fd, msg, strlen(msg));
free(msg);
}
threadexits(nil);
}
All threads were simple to implement, and the structure for the program follows easily from the
problem being solved. We did not have to worry about races since each thread is only using its
own data.
There is one problem, though. If a thread calls Brdstr, to read from the console, it is
going to block all the threads. It blocks the entire process. The same happens while updating the
slow panels using a write to their files. This problem is easy to solve. Instead of creating a
thread to run consreadthread, and one more thread to run each panelthread function, we
can create processes. The function proccreate creates a new process (using rfork) with a
single thread in it. Otherwise, it works like threadcreate.
- 276 ; sig proccreate
int proccreate(void (*fn)(void*), void *arg, uint stacksize)
The processes created using this function share the data segment among them. Internally,
proccreate calls rfork(RFPROC|RFMEM|RFNOWAIT), because the thread library keeps
its data structures in the data segment, which must be shared. In a few cases, you may want to
supply a few extra flags to rfork, when creating a process. The call procrfork is like
proccreate, but accepts a final flags argument that is or-ed to the ones shown above.
; sig procrfork
int procrfork(void (*fn)(void*), void *arg, uint stacksize, int rforkflag)
But beware, the thread library uses rendezvous in its implementation. Supplying a RFREND
flag to procrfork will break the program. Using proccreate, we can make our program
without blocking all the threads while doing I/O.
________
tticker.c
#include
#include
#include
#include
<u.h>
<libc.h>
<bio.h>
<thread.h>
enum { Npanels = 2 };
Channel*bcastc;
Channel*panelc[Npanels];
// of char*
// of char*
...code for PArg, consreadthread, bcastthread, and panelthread ...
void
threadmain(int, char*[])
{
int
i;
PArg*
arg;
bcastc = chancreate(sizeof(char*), 0);
proccreate(consreadthread, nil, 16*1024);
for (i = 0; i < Npanels; i++){
panelc[i] = chancreate(sizeof(char*), 0);
arg = malloc(sizeof(*arg));
arg->c = panelc[i];
arg->fd = 1;
// to test the program.
proccreate(panelthread, arg, 8*1024);
}
// The current thread is used for bcast.
bcastthread(nil);
}
The process structure is shown in figure 11.4, which represents each separate process with a
dashed box and each thread with a circle. This time, we ended with a single thread within each
process. But usually, a central process has multiple threads to do the actual work, and there some
other processes created just for doing I/O without blocking all the threads.
- 277 -
panelc[0]
panel
...
consread
bcastc
bcast
panelc[i]
panel
...
panelc[n]
panel
Figure 11.4: Process structure for the airport panels program, using threads.
There is another benefit that arises from using threads that communicate through channels.
This time, we do not need to optimize our program to maintain the write for updating the panel
outside of the critical region, to permit all panels to be updated simultaneously. All panels are
updated simultaneously in a natural way, because each one uses its own process and does not lock
any shared data structure. There are locks in this program, but they are hidden deep under the
implementation of send and recv.
11.5. Many to one communication
The program that we built is nice. But it would be nicer to display in the panels, along with
each message, the current time and the temperature outside of the airport building. For example,
if the operator types the message
AA flight 847 delayed
we would like pannels to show the message
AA flight 847 delayed (17:45 32ºC)
We could modify the code for the panel thread to do it. But it would not be very appropriate. A
pannel thread is expected to write messages to a panel, and to write them verbatim. The same
happens to other threads in this program. They do a very precise job and are modular building
blocks for building a program. Instead, it seems better to put another thread between consread
and bcast, to decorate messages with the time and the temperature. We call this new thread
decorator.
There is still the problem of updating the panels when either the time changes (the minute,
indeed) or the temperature changes. It would not be reasonable to display just the time and temperature for the moment when the operator typed the message shown.
As a result, the new decorator thread must have three different inputs. It receives messages, but it must also receive time and temperature updates. The leave us with the problem of
how do we generate the two additional input streams. To follow our modular design, two new
threads will be in charge of providing them. The resulting process design is that shown in figure
11.5. And the code of the whole program may look like this.
- 278 -
panelc[0]
timer
panel
timerc
...
consread
consc
decorator
bcastc
bcast
panelc[i]
panel
...
temp
tempc
panelc[n]
Figure 11.5: Process structure for the enhanced airport application.
_________
etticker.c
#include
#include
#include
#include
<u.h>
<libc.h>
<bio.h>
<thread.h>
enum { Npanels = 2 };
Channel*timerc;
//
Channel*consc;
//
Channel*tempc;
//
Channel*bcastc;
//
Channel*panelc[Npanels];
of
of
of
of
char*
char*
char*
char*
// of char*
typedef struct PArg PArg;
struct PArg {
Channel* c;
// to get new messages from
int
fd;
// to the panel’s file.
};
void
consreadthread(void*)
{
Biobuf bin;
char*
ln;
threadsetname("consread");
panel
- 279 -
Binit(&bin, 0, OREAD);
while (ln = Brdstr(&bin, ’\n’, 1))
sendp(consc, ln);
sendp(consc, nil);
Bterm(&bin);
threadexits(nil);
}
void
bcastthread(void*)
{
char*
msg;
int
i;
threadsetname("bcast");
do {
msg = recvp(bcastc);
for (i = 0; i < Npanels; i++)
if (msg != nil)
sendp(panelc[i], strdup(msg));
else
sendp(panelc[i], nil);
free(msg);
} while(msg != nil);
threadexits(nil);
}
void
panelthread(void* a)
{
PArg*
arg = a;
char*
msg;
threadsetname("panel");
while(msg = recvp(arg->c)){
write(arg->fd, msg, strlen(msg));
free(msg);
}
threadexits(nil);
}
void
timerthread(void* a)
{
Channel* c = a;
- 280 -
ulong
now;
Tm*
tm;
char
msg[10];
for(;;){
now = time(nil);
tm = localtime(now);
seprint(msg, msg+10, "%d:%d", tm->hour, tm->min);
sendp(c, strdup(msg));
sleep(60 * 1000);
}
}
void
tempthread(void* a)
{
Channel* c = a;
char
temp[10];
char
last[10];
int
fd, nr;
last[0] = 0;
fd = open("/dev/temp", OREAD);
if (fd < 0)
sysfatal("/dev/temp: %r");
for(;;){
nr = read(fd, temp, sizeof(temp) - 1);
if (nr <= 0)
sysfatal("can’t read temp");
temp[nr] = 0;
if (strcmp(last, temp) != 0){
strcpy(last, temp);
sendp(c, strdup(temp));
}
sleep(60 * 1000);
}
}
void
decoratorthread(void*)
{
char*
lcons, *ltimer, * ltemp;
char*
consmsg, *timermsg, *tempmsg;
char*
msg;
Alt
alts[] = {
{ timerc,&timermsg, CHANRCV },
- 281 -
{ consc, &consmsg, CHANRCV },
{ tempc, &tempmsg, CHANRCV },
{ nil,
nil, CHANEND } };
lcons = strdup(""); ltimer = strdup(""); ltemp = strdup("");
for(;;){
msg = nil;
switch(alt(alts)){
case 0: // operation in alts[0] made
msg = smprint("%s (%s %s)\n", lcons, timermsg, ltemp);
free(ltimer);
ltimer = timermsg;
break;
case 1: // operation in alts[1] made
msg = smprint("%s (%s %s)\n", consmsg, ltimer, ltemp);
free(lcons);
lcons = consmsg;
break;
case 2: // operation in alts[2] made
msg = smprint("%s (%s %s)\n", lcons, ltimer, tempmsg);
free(ltemp);
ltemp = tempmsg;
break;
}
sendp(bcastc, msg);
}
}
void
threadmain(int, char*[])
{
int
i;
PArg*
arg;
timerc = chancreate(sizeof(char*), 0);
consc = chancreate(sizeof(char*), 0);
tempc = chancreate(sizeof(char*), 0);
proccreate(timerthread, timerc, 8*1024);
proccreate(consreadthread, consc, 16*1024);
proccreate(tempthread, tempc, 8*1024);
for (i = 0; i < Npanels; i++){
panelc[i] = chancreate(sizeof(char*), 0);
arg = malloc(sizeof(*arg));
arg->c = panelc[i];
arg->fd = 1;
// to test the program.
- 282 -
proccreate(panelthread, arg, 8*1024);
}
bcastc = chancreate(sizeof(char*), 0);
threadcreate(decoratorthread, nil, 8*1024);
bcastthread(nil);
}
Sending time updates is simple. A timer thread can send a message each minute, with a string
representing the time to be shown in the panels. It receives as a parameter the channel where to
send events to.
void
timerthread(void* a)
{
Channel* c = a;
ulong
now;
Tm*
tm;
char
msg[10];
for(;;){
now = time(nil);
tm = localtime(now);
seprint(msg, msg+10, "%d:%d", tm->hour, tm->min);
sendp(c, strdup(msg));
sleep(60 * 1000);
}
}
The function localtime was used to break down the clock obtained by the call to time into
seconds, minutes, hours, and so on. This thread does not generate a very precise clock. It sends
the time once per minute, but it could send it when there is only one second left for the next
minute. In any case, this part of the program can be refined and programmed independently of the
rest of the application.
To read the temperature, we need a temperature meter device. We assume that the file
/dev/temp gives the current temperature as a string each time when read. To implement the
thread temp, we measure the temperature once per minute. However, the thread only sends a
temperature update when the temperature changes (and the first time it is measured). Once more,
the channel where to send the updates is given as a parameter.
- 283 void
tempthread(void* a)
{
Channel* c = a;
char
temp[10];
char
last[10];
int
fd, nr;
last[0] = 0;
fd = open("/dev/temp", OREAD);
if (fd < 0)
sysfatal("/dev/temp: %r");
for(;;){
nr = read(fd, temp, sizeof(temp) - 1);
if (nr <= 0)
sysfatal("can’t read temp");
temp[nr] = 0;
if (strcmp(last, temp) != 0){
strcpy(last, temp);
sendp(c, strdup(temp));
}
sleep(60 * 1000);
}
}
What remains to be done is to implement the decorator thread. This thread must receive alternatively from one of three channels, timerc, tempc, or consc. When it receives a new message from either channel, it must concoct a new message including up to date information from
the three inputs, and deliver the new message through bcastc to update all the panels. Because
we do not know in which order we are going to receive inputs, we cannot use recvp. The function alt implements many-to-one communication. It takes a set of channel operations (sends or
receives) and blocks until one of the operations may proceed. At that point, the operation is executed and alt returns informing of which one of the channel operations was done. Before discussing it, it is easier to see the decorator thread as an example.
- 284 void
decoratorthread(void*)
{
char*
lcons, *ltimer, * ltemp;
char*
consmsg, *timermsg, *tempmsg;
char*
msg;
Alt
alts[] = {
{ timerc,&timermsg, CHANRCV },
{ consc, &consmsg, CHANRCV },
{ tempc, &tempmsg, CHANRCV },
{ nil,
nil, CHANEND } };
lcons = strdup(""); ltimer = strdup(""); ltemp = strdup("");
for(;;){
msg = nil;
switch(alt(alts)){
case 0: // operation in alts[0] made
chanprint(bcastc, "%s (%s %s)\n", lcons, timermsg, ltemp);
free(ltimer);
ltimer = timermsg;
break;
case 1: // operation in alts[1] made
if (msg == nil)
threadexitsall("terminated by user");
chanprint(bcastc, "%s (%s %s)\n", consmsg, ltimer, ltemp);
free(lcons);
lcons = consmsg;
break;
case 2: // operation in alts[2] made
chanprint(bcastc, "%s (%s %s)\n", lcons, ltimer, tempmsg);
free(ltemp);
ltemp = tempmsg;
break;
}
}
}
The call to alts receives an array of four Alt structures. The first three ones are the channel
operations we are interested in. The fourth entry terminates the alts array, so that alt could
know where the array ends. When the thread calls alt, it blocks. And it remains blocked until
any of the three channel operations represented by Alt entries in the array may be performed.
For example, if right before calling alt the timer thread sent an update, alt will immediately return, reporting that a receive from timerc was made. In this case, alt returns zero,
which is the index in the alts array for the operation performed. That is how we know which
operation was made, its index in the array is the return value from alt.
Each Alt entry in the array is initialized with the channel where the operation is to be performed, a constant that can be CHANRCV or CHANSEND to indicate that we want to receive or
send in that channel, and a pointer to the message for the operation. The constant CHANEND is
used as the operation to mark the end of the array, as seen above. To say it in another way, the
call to alt above is similar to doing any of the following
recv(timerc, &timermsg);
recv(consc, &consmsg);
recv(tempc, &tempmsg);
But alt works without requiring a precise order on those operations. That is a good thing,
because we do not know in which order we are going to receive updates. We do not know which
particular channel operation is going to be picked up by alt if more than one can be performed.
- 285 But we know that alt is fair. Adding a loop around alt guarantees that all the channel operations that may be performed will be performed without starvation for any channel.
Now that alt is not a mystery, we should mention some things done by the decorator
thread. This thread uses chanprint to send messages to the bcastchannel. A call to
chanprint is similar to calling smprint (to print the arguments in a string allocated in
dynamic memory), and then sending the resulting string through the channel. This function is
very convenient in many cases.
At any time, the operator might send an end-of-file indication, typing control-d. When the
decorator thread receives a nil message (sent by consthread upon EOF), it calls
threadexitsall. This function terminates all the processes and threads of the program, terminating it.
11.6. Other calls
In general, it is safe to use whatever functions from the C library (or from any other one) in a program using the thread library. We have done so through this chapter. Function libraries try not to
use global variables, and when they do, they try to protect from races so that you could call them
from a concurrent program. In other systems, things are not so nice and you should look into the
manual pages for warnings regarding multi-threaded programs. For example, many UNIX manual
pages have notes stating that functions are MT-Safe, i.e., safe for use in multithreaded programs.
That is, in programs with multiple threads.
Even in Plan 9, some other functions and system calls are not to be used when using the
thread library. In general, this happens whenever a function deals with the flow of control for the
process. A threaded program has multiple flows of control, and it would make no sense to operate
on the underlying flow of control of the process used to implement the various threads.
We have seem that threadexits must be used instead of exits, because of the obvious
reason. This case was clear. A less clear one may be proccreate, which we used instead of
calling rfork or fork. The thread library knows about the processes it creates. It tries hard to
supply the same interface for both threads and processes, so that all its operations work in the
same way for both entities. Indeed, proccreate creates a single thread in a new process. Thus,
you might say that all operations from the library work just on threads. In any case, using rfork
to operate on the resources for your process is safe. For example, to make a copy of environment
variables, put the process in a new note group, etc.
In a similar way, procexec (or procexecl) should be used instead of exec (or
execl). A call to exec would replace the program for the process, making void all the threads
that might running on it. But a call to procexec works nicely when using processes and
threads. Of course, it only makes sense to call procexec when there is a single thread in the
process making the call. Otherwise, what would happen to the other threads? Their code and data
would be gone!
In most cases, there is no need to call wait to wait for other processes. The processes you
create can synchronize with the rest of your program using channels, if you need to convey a
completion status or something else. That is not the case when using procexec. The program
executed by procexec knows nothing about your program. Therefore, a substitute for wait is
appropriate for this case. The function threadwaitchan returns a channel that can be used to
receive Waitmsgs for processes what we used to execute other programs.
The following program is a complete example regarding how to execute an external program and wait for it.
- 286
______
_texec.c
#include <u.h>
#include <libc.h>
#include <thread.h>
Channel*waitc;
Channel*pidc;
void
cmdproc(void* arg)
{
char*
cmd = arg;
procexecl(pidc, cmd, cmd, nil);
sysfatal("procexecl: %r");
}
void
threadmain(int,
{
char
int
Waitmsg
char*[])
ln[512];
pid, nr;
*m;
write(1, "cmd? ", 5);
nr = read(0, ln, sizeof(ln)-1);
if (nr <= 1)
threadexits(nil);
ln[nr-1] = 0;
// drop \n
pidc = chancreate(sizeof(ulong), 1);
waitc= threadwaitchan();
proccreate(cmdproc, ln, 8*1024);
pid = recvul(pidc);
print("started new proc pid=%d\n", pid);
if (pid >= 0){
m = recvp(waitc);
print("terminated pid=%d sts=%s\n", m->pid, m->msg);
free(m);
}
threadexits(nil);
}
The initial thread reads a file name and executes it. The actual work is done by proccreate,
which creates the process to execute the file, and by procexecl, which executes the new program in the calling process.
The first parameter for procexecl may be either nil or point to a channel of unsigned
- 287 integers. In the later case, the pid for the process used to execute the command is sent through the
channel. This is useful for more than to obtain the pid for the process running the external command. It is guaranteed that the arguments supplied to procexec will not be used after sending
the pid. In our case, ln is in the stack of the initial thread. After receiving the pid, we could terminate threadmain, which deallocates ln. However, before receiving the pid, the arguments
for procexec must still exist, and cannot be deallocated yet.
The program calls threadwaitchan to obtain a channel for notifying the termination of
the external program. Receiving from this channel yields the Waitmsg that wait would return
for a program not using threads.
This is an example run.
; 8.texec
cmd? /bin/date
started new proc pid=1436
Sat Aug 5 19:51:05 MDT 2006
terminated pid=1436 sts=
; 8.texec
cmd? date
procexecl: ’date’ file does not exist
;
To conclude, handling of notes is similar in threaded programs than in other ones. Only that
threadnotify must be used instead of atnotify. But the interface is otherwise the same.
Problems
1
Implement a concurrent program simulating a printer spooler. It must have several processes. Some of them generate jobs for printing (spool print jobs) and two other ones print
jobs. Needless to say that the program must not have race conditions. You must use threads
and channels as the building blocks for the program.
2
One way to determine if a number is prime is to filter all natural numbers to remove numbers that are not prime. Using different thread for filtering numbers that divide candidate
numbers, write a program to write prime numbers.
3
There are different cars trying to cross a bridge. There are cars on both sides of the bridge.
Simulate this scenario using threads and channels. Avoid accidents.
4
The dining philosophers problem is a very famous one in concurrent programming. There
are philosophers who loop forever trying to think, and then to eat. All of them are sitted
around a round table, with a single chopstick between each two philosophers. To eat, a
philosopher needs both the chopstick on the left and the one on the right. Write a program to
simulate this scenario using threads for the different philosophers.
5
Avoid starvation in the previous problem.
- 288 .
- 289 -
12 User Input/Output
______
12.1. Console input
In chapter 7 we saw that #c is the root of the file tree exported by the cons(3) driver. It is conventionally bound at /dev, and provides the familiar /dev/cons file. Reading #c/cons obtains
input from the console keyboard. Writing to #c/cons writes characters in the console screen.
When rio, the window system, is running, it reads #c/cons to obtain the characters you
type. Writing them in the screen is a different story that we will tell later. Reading and writing
#c/cons while running the window system is not a good idea. If more than one program is
reading this file, the characters typed will go to either program. In the following experiment, we
ask cat to read #c/cons, storing what it could read into /tmp/out, so you could see what
happens.
; cat ’#c/cons’ >/tmp/out
hlo
We typed "hello"
Delete
To restore things to a normal behavior
; cat /tmp/out
el;
Despite typing hello, rio could only read hlo. The other characters were read by cat. Rio
expects to keep the real #c/cons for itself, because it multiplexes this file nicely, providing a
virtual version of it on each window’s /dev/cons.
A write to #c/cons is also processed by the cons device, even when rio is running. As a
result, it prints in the screen behind rio’s back. This command
; echo ’where will this go?’ > ’#c/cons’
will produce an ugly message printed in the screen, which might look like the one shown in figure
12.1. In a very few occasions, the kernel itself may write a message for you in the console. The
same would happen. Programs started prior to running rio, that might also issue some diagnostics, would produce the same effect. All of them are writing to the console output device.
Figure 12.1: A write to the actual console may write to the screen even when rio is running.
- 290 Writing some more things in the real console may cause a scroll, and the images in the
screen will scroll along with the text. Poor rio, it will never know that the screen is messed up.
To prevent this from happening, the file #c/kprint may be used. If a process has #c/kprint
open for reading, the kernel will not print in the screen whatever is written at #c/cons. Instead,
all that text is used to satisfy reads for #c/kprint. For example, executing cat on this file,
prior to doing the echo above, produces this effect:
; cat /dev/kprint
where will this go?
All text sent to the console will now go to that window. For the record, it might help to print also
/dev/kmesg, which records all the messages printed in the console so far, before reading
kprint.
; cat /dev/kmesg /dev/kprint
Plan 9
E820: 00000000 0009f800 memory
E820: 0009f800 000a0000 reserved
...
where will this go?
When we implemented programs to read from the console, it gave us a line at a time. We could
even edit the line before hitting return. However, this time, using cat to read #c/cons returned
characters, as we typed them. What is going on?
Usually, the console device driver reads characters from the keyboard’s hardware, and
cooks what you type a little bit, before supplying such characters to any process reading
/dev/cons. This is the cooking recipe used by the console:
"
A backspace, removes the previous character read from the keyboard.
"
A control-u removes all the characters read from the keyboard, thus it cancels the current
input line.
"
A newline terminates the cooking from the current line, which is made available to the
application reading from the console.
"
The compose (usually Alt) key, followed by a few other keys, produces a character that is a
function of the other keys. This is used to type characters not usually found in the keyboard,
like ± and .
"
Any other character stands for itself, and is queued to be cooked along with the rest of the
line.
The virtual version for /dev/cons provided by the window system gives also a special meaning to a few other characters, most notably:
"
Delete posts an interrupt note to the process group associated to the window.
"
Arrow keys and scroll backward and forward.
"
Arrow keys and move the text insertion point to the right and to the left.
"
The Escape key puts the window in a, so called, hold mode. All the text typed while in hold
mode is not supplied to any application reading from /dev/cons. Therefore, you can
freely edit multiple lines of text. When Escape is preseed again, and the window leaves hold
mode, the text is given to any process reading from /dev/cons.
This is called the console’s cooked mode. When it is enabled, lines can be edited as dictated by
the rules stated above. This is also called a line discipline. But the console can be also put in a, so
called, raw mode. In raw mode, the console does not cook the characters at all. It gives them to
the process reading from the console, as they arrive from the keyboard.
The file /dev/consctl can be used to activate and de-activate the raw mode. A write of
the string rawon into such file puts the console in raw mode, until the file is closed or the string
rawoff is written. The next program echoes what it can read from the console. But it puts the
- 291 console in raw mode when called with -r.
_____
_raw.c
#include <u.h>
#include <libc.h>
void
usage(void)
{
fprint(2, "usage: %s [-r]\n", argv0);
exits("usage");
}
void
main(int argc, char*argv[])
{
char
buf[512];
int
raw = 0;
int
cfd = -1;
int
nr;
ARGBEGIN{
case ’r’:
raw++;
break;
default:
usage();
}ARGEND;
if (argc != 0)
usage();
if (raw){
cfd = open("/dev/consctl", OWRITE);
write(cfd, "rawon", 5);
}
for(;;) {
nr = read(0, buf, sizeof(buf)-1);
if (nr <= 0)
break;
buf[nr] = 0;
print("[%s]\n", buf);
}
if (raw)
close(cfd);
exits(nil);
}
This is what happens when we run it using the console’s cooked mode and its raw mode.
; 8.raw
hi
[hi
]
Delete
;
- 292 ; 8.raw
[h]
[i]
[
]
[#]
[#]
-r
the program reads "\n"
the program reads "Del"
If we type "Esc", the program reads "Esc"
There are some things to note. First, in cooked mode we can see the characters we type as we type
them. We could type hi, and its characters were echoed to the screen by the console. The program 8.raw did not read anything as we typed them. Not yet. However, in raw mode, the console does not echo back to the screen what we type. It assumes that the program reading in raw
mode does want to do it all by itself, and echo is suppressed.
Another effect of raw mode is that the program reads one character at a time, as we type
them. In cooked mode, only when we type a newline the program will get its input.
A final and interesting difference is that we cannot interrupt the program pressing Delete.
In fact, if /dev/cons was #c/cons, it would know nothing about Delete. This key is an
invention of the cooked mode in consoles provided for windows by the window system. In raw
mode, rio decides not to do anything special with this key, and the application can read it as any
other key.
Using the hold mode (provided by rio’s consoles in cooked mode) this is what happens.
; 8.out
Escape
hi
hold mode is active...
there
we can edit this until...
Escape
[hi
]
[there
]
The behavior is like in cooked mode (one line at a time), but we could type and edit while in hold
mode.
To answer our pending question. The program cat, that we used to experiment with reading #c/cons, got characters and not lines because rio keeps the system console in raw mode.
The file #c/cons returns characters as we type them. These characters are processed by rio,
which uses them to supply a virtual console for the window were you are typing. Again, the virtual console for this window has both cooked and raw modes. In shell windows, that operate in
cooked mode, the window cooks the characters before giving lines to programs reading them.
When acme is run in a window, it puts its (virtual) console device in raw mode, to do the editing
by itself.
12.2. Characters and runes
But that was not all about the console. The console, line most other devices using text, and like
all Plan 9 programs using text, does not use characters. This may be a surprise, but think about
characters like , ±, and . For languages like english or spanish, all text is made up with characters, that might be letters, numbers, and other symbols. Spanish has also accented letters like á
and ñ. And this is just the start of the problem. Other languages use symbols to represent concepts, or what would be words or lexemes, for a spanish person. When computers were used for
english text, the standard ASCII for codifying characters as bytes was enough. Today, it is not.
There are many symbols and one byte is not enough.
Plan 9 uses Unicode, which is a standard for representing symbols used for text writing.
Indeed, Plan 9 was the first system to use Unicode. The writing symbols used to write text are
- 293 not called characters, but runes. Each rune is represented in Plan 9 as a 16-bit (two bytes) number. Most programs processing text are expected to use runes to do their job. The data type Rune
is defined in libc.h, as a short integer.
However, using a stream of 16-bit numbers to exchange text between different programs
would be a nightmare because it would break all the programs written to use just ASCII, which
uses a single byte for each character. Furthermore, many C programs use strings codified as a
sequence of bytes terminated by a final null byte. Sending a stream of 16-bit runes to such programs will make them fail.
To maintain compatibility with the huge amount of software that existed when Unicode was
invented, a encoding was designed to transform an array of runes into a byte stream that could be
backward compatible with ASCII. This encoding is called UTF-8, (Universal character set Transformation Format, 8 bits) or just UTF (for short). UTF-8 was invented by Ken Thompson (apparently in a dinner’s table, shared with Rob Pike). Runes like , ±, and do not use a single byte
when codified in UTF. A rune may use up to three bytes in Plan 9’s UTF.
A program reading text, reads a UTF byte stream, that is exactly the same used by ASCII
when the text contains characters present in 7-bit ASCII (most characters but for accentuated letters and other special symbols). After having read some text, if it is to be processed as such, the
program converts the UTF representation into unicode. Then it is processed. Afterwards, to output some text as a result, the program is expected to convert the text from unicode back into UTF,
before sending it to the output stream. Files that keep text used as input (or coming as output) for
programs, are also maintained in UTF.
The file /dev/cons does not provide characters when read. It provides runes. In many
cases, a rune may fit in a single byte. In other cases, it will not. The console keyboard driver
knows how to compose multiple keys to type runes not in the keyboard. The whole set of rules is
described in keyboard(6). Many runes may be generated by using the compose key, usually Alt,
and a couple of keys that remind the rune generated. For example, typing Alt - > will produce .
Alt < - will produce . Alt s o leads to p , and Alt s a leads to ª. Greek letters can be generated
by typing Alt * and their roman counterparts. Thus, Alt * m leads to ¼. The file
/lib/keyboard lists many runes that can be composed using several other keys in this way.
In general, any Unicode rune may be also generated by typing Alt X nnnn, where nnnn is the
code in Unicode for the rune. So, Alt X 00fe leads to þ. The file /lib/unicode lists unicode
runes along with their codes.
Programs that read and write data without assuming that it is text, may still operate one byte
at a time, if they want. Or many at a time. However, programs reading text and looking into it,
should use the functions in rune(2), or they would misbehave for non-english text. The functions
in the C library described in rune(2) provide conversion from UTF to runes and vice-versa.
Among others, we have these ones.
; sig runetochar chartorune
int runetochar(char *s, Rune *r)
int chartorune(Rune *r, char *s)
Now we can read characters properly from the console, for the first time. The next program converts what it reads to uppercase.
- 294
_____
_rune.c
#include <u.h>
#include <libc.h>
void
main(int, char*[])
{
char
buf[512];
char
out[UTFmax];
Rune
r;
int
nr, irl, orl;
char*
s;
for(;;) {
nr = read(0, buf, sizeof(buf));
if (nr <= 0)
break;
s = buf;
while (nr > 0){
irl = chartorune(&r, s);
s += irl;
nr-= irl;
r = toupperrune(r);
orl = runetochar(out, &r);
write(1, out, orl);
}
}
exits(nil);
}
It processes one rune at a time. The function chartorune extracts a rune from the byte string
pointed to by s, and places it at &r. The number of bytes occupied by the rune in UTF (that is, in
the string at s), is the return value from the function. The function runetochar does the opposite conversion, and returns also the number of bytes used. It is guaranteed that a rune will not
occupy more than UTFmax bytes (3 bytes in Plan 9). Other convenience routines, like
toupperrune, replace the traditional ones for characters. Our program works perfectly with
runes that do not fit in ASCII.
; 8.out
I feel
I FEEL
today.
TODAY.
An equivalent program, but unaware of unicode, would fail. Using this loop to do the conversion
instead of the Rune routines
for (i = 0; i < nr; i++)
buf[i] = toupper(buf[i]);
produces this result for this input.
España includes Espuña.
ESPAñA INCLUDES ESPUñA.
The letter ñ was not properly capitalized into Ñ. It could have been worse. We could have
- 295 processed part of a rune, because runes may span several bytes. For example, translating to uppercase by
buf[i] = buf[i] + ’A’ - ’a’
will lead to a surprise (besides being wrong anyway).
12.3. Mouse input
Another popular input device is the mouse. The mouse interface is provided by the mouse driver
through a few files in #m.
; lc ’#m’
cursor
;
mouse
mousectl
This name is usually bound along with other devices at /dev. The file mousectl is used to
write strings to configure and adjust mouse settings. For example,
; echo accelerated >/dev/mousectl
turns on mouse acceleration (a quick move in one direction will move the mouse fast in that
direction, many more pixels than implied by the actual movement). On the other hand,
; echo linear >/dev/mousectl
disables mouse acceleration. There are several other messages. Depending on the hardware for the
mouse, some control requests may be ignored (if they do not make sense for a particular mouse).
When the window system is running, rio is the one that reads and writes these files. Like it
happens with /dev/cons, rio provides its own (multiplexed) version for these files, on each
window. Reading #m/mouse yields mouse events. However, this file may not be open more
than once at the same time.
; cat ’#m/mouse’
cat: can’t open #m/mouse: ’#m/mouse’ device or object already in use
Since rio has open #m/mouse, to read mouse events, nobody else will be able to open it until
rio terminates and the file is closed. This is a safety measure to avoid multiple programs to use
this device at the same time. In any case, the multiplexed version of the mouse, /dev/mouse,
provided by rio for each window is for us to read.
; cat /dev/mouse
m
670
68
0
0
2257750 m
66
2257730 m
680
0
2257710 m
677
77
676
74
0
2257770
This file will never seem to terminate. No end of file indication for it. Indeed, /dev/mouse is a
stream of mouse events. Each read will block until the mouse produces an event (it is moved or a
button is pressed or released). At that point, /dev/mouse returns 49 bytes. There is an initial
letter m followed by four numbers: the x and y coordinates for the mouse, a number stating which
buttons are pressed, and a time stamp.
The time stamp is handy when a program wants to detect double and triple clicks. In Plan 9,
the mouse might be attached even to a different machine. The time for the clicks that matters is
that of the machine with the mouse, when the mouse events were received from the hardware by
the mouse driver. The time as seen by the program reading the mouse might differ a little bit
(there may be delays between different mouse events introduced because our program moved out
of the processor, or because the system went busy, etc.).
Mouse coordinates correspond to the position of the pointer in the screen. The screen is a
- 296 matrix of pixels. A typical screen size is 1024x768 (1024 pixels wide, on the x axis, and 768 pixels of height, on the y axis). Other popular screen sizes are 1280x1024 or 1600x1200. The origin
is coordinate (0,0), at the upper left corner of the screen. Thus, for a 1024x768 screen, the bottom
right corner would be (1023,767). There are increasing values for x as you move to the right, and
increasing y values as you move down.
The first mouse event reported by cat was for the coordinate (670,66). That is, the tip of
the arrow used as a cursor was pointing at the pixel number 670 on the x axis (counting from 0)
and number 66 on the y axis. The mouse was then moved a little bit down-right, and the next
coordinate reported by cat was (676,68).
Following the two numbers reporting the pointer position, there is a number that lets you
know the state for mouse buttons (always zero in the example above). To experiment with this,
we are going to write a small program that reads the mouse and prints one mouse event per line,
which is easier to read. Before looking at the source for the program, this is an example run.
; 8.mouse
mouse pos=[896 189]
mouse pos=[895 190]
mouse pos=[894 190]
...
buttons=0
buttons=0
buttons=0
we move the mouse...
mouse
mouse
mouse
mouse
...
pos=[887
pos=[887
pos=[887
pos=[887
191]
191]
191]
191]
buttons=1
buttons=3
buttons=1
buttons=0
button-1 down
button-2 down
button-2 up
button-1 up
mouse
mouse
mouse
mouse
;
pos=[887
pos=[887
pos=[887
pos=[887
191]
191]
191]
191]
buttons=0
buttons=1
buttons=3
buttons=7
button-1 down
button-2 down
button-3 down
As you could see, each button is codified as a single bit in the number. Button-1 is the bit 0,
button-2 is the bit 1, button-3 is the bit 2, and so on. A click for button one will yield 1 while it is
down, and 0 when released. A click for button 3 will yield 4 (i.e., 100 in binary) when it is down
and 0 when released. Our program exits when all the three buttons are down, that is, when the
number is 7 (i.e., 111 in binary).
Instead of reading /dev/mouse by itself, the program uses the mouse(2) library. This
library provides a mouse interface for threaded programs. Programs using the mouse are likely to
do several things concurrently (attend the keyboard, do something for their user interface, etc.).
Therefore, it is natural to write a threaded program when the application requires a graphical user
interface.
_______
_mouse.c
#include
#include
#include
#include
#include
<u.h>
<libc.h>
<thread.h>
<draw.h>
<mouse.h>
- 297 void
threadmain(int , char*[])
{
Mousectl*mctl;
Mouse
m;
fmtinstall(’P’, Pfmt);
mctl = initmouse("/dev/mouse", nil);
if (mctl == nil)
sysfatal("initmouse: %r");
while(recv(mctl->c, &m) >= 0){
print("mouse pos=%P\tbuttons=%d\n", m.xy, m.buttons);
if (m.buttons == 7)
break;
}
closemouse(mctl);
exits(nil);
}
The program must include mouse.h, which contains the definitions for the library, along with
draw.h, which defines some data types used by the library. The function initmouse initializes the mouse interface provided by the library. It creates a process to read the file given as an
argument and obtain mouse events.
; sig initmouse
Mousectl *initmouse(char *file, Image *i)
The return value is a pointer to a Mousectl structure:
typedef struct Mousectl Mousectl;
struct Mousectl
{
Channel *c;
/* chan(Mouse) */
Channel *resizec;
/* chan(int)[2] */
...
};
that contains a channel, Mousectl.c, where mouse events are sent by the process reading the
mouse. Therefore, to obtain mouse events all we have to do is to call recv on this channel. Each
mouse event is codified as a Mouse structure, containing the buttons, the coordinates, and the
time stamp for the mouse (as read from the mouse file).
typedef struct Mouse Mouse;
struct Mouse
{
int
buttons;
Point
xy;
ulong
msec;
};
/* bit array: LMR=124 */
Thus, the call
recv(mctl->c, &m)
is the one reading mouse events in the program. The program prints the coordinates, kept at
Mouse.xy, and the buttons, kept at Mouse.buttons. Using coordinates is so common that
draw.h defines a Point, along with some functions to operate on points.
- 298 typedef struct Point Point;
struct Point
{
int
x;
int
y;
};
So, the x coordinate for the mouse event stored at m would be m.xy.x, and the y coordinate
would be m.xy.y.
To print Points, the function Pfmt, declared by draw.h, can be installed as a format
function for the print function family. The call
fmtinstall(’P’, Pfmt);
instructs print to use Pftmt to print any argument that corresponds to a %P in its format
string. This is very convenient for printing coordinates. By the way, there are many other format
functions defined in the standard library. And you may define your own ones. It is all explained
in fmtinstall(2), which details the support for user-defined print formats.
Finally, the function closemouse closes the mouse file and releases any resource related
to the Mousectl structure (most notably, its memory, the channel, and the process reading the
mouse).
The rest of the mouse interface (not used by this program) will wait until we see something
about graphics.
12.4. Devices for graphics
The whole idea behind graphic terminals is quite simple. A portion of memory is used to keep the
image(s) to be shown at the terminal. The hardware device that updates the monitor image by
reading this memory is called a graphics card. But things are not so simple anymore.
Ultimately, graphics are supported by extremely complex hardware devices like VGA cards
(Video Graphic Arrays). Such devices use system memory (and/or memory attached directly to
the graphics card) to store images to be shown at the monitor. In turns out that monitors are also
very complex these days. You only have to consider that graphic cards and monitors speak
together using particular protocols through the video cable that goes from the card to the monitor
Games and other popular applications demanding graphics have lead to graphic cards that
know by themselves how to do many 2D and 3D graphics operations. Sometimes, this is called
hardware acceleration for video and graphics operations.
Fortunately, all this is hidden behind the device driver for the video card used in your terminal. The vga(3) device is in charge for dealing with the VGA card in your PC. Its file interface is
available at #v.
; lc ’#v’
vgabios
vgactl
vgaovl
vgaovlctl
The most interesting file is vgactl, which is the interface for configuring the card for a proper
operation. Other files provide access to extra features, like overlaid images, and for the software
kept in ROM in the PC (called BIOS, for Basic Input/Output System, but not basic) that is useful
to deal with the card.
Initially, while the system is booting, the graphics card operates in an ancient text-only setting. It uses some memory to display a matrix of characters in the screen, usually of 80 columns
and 24 rows, or 80x24. But the hardware can do much more. It knows how to display graphics.
When the card operates to show graphics, it can be adjusted to show a particular number of pixels. We saw a little bit of this when describing the coordinates used by the mouse.
Most graphic cards can show 640x480 pixels, 1024x768 pixels, 1280x1024 pixels, and
- 299 perhaps even more. For each pixel, the number of colors that the card can show is determined by
the number of bits used to encode a value for the pixel. Using 8 bits per pixel leads to at most 256
colors. Therefore, a particular screen size would not just be 1024x768, but rather 1024x768x8 or
perhaps 1024x768x24.
Each one of these different configurations is usually called a graphics mode. So, the configuration for the VGA size 1280x1024x24 is also known as the 1280x1024x24 mode. Because
the size of the actual screen is fixed, the number of pixels determines the size of each pixel in the
screen. Thus, different modes are also referred to as different resolutions.
Changing the mode in the VGA card can be very complex. An auxiliary program,
aux/vga is in charge of adjusting the vga configuration. You will use the file interface provided by the vga device driver just to adjust a few parameters, and not for doing other complex
things. For that, you have aux/vga. For example,
aux/vga -l text
puts the machine back into text mode, as it was during boot. In the same way,
aux/vga -l 1024x768x8
loads the mode for 1024x768x8. On the other hand, if our graphics card is not properly handled
by our device driver, we may disable hardware acceleration by using the interface at #v instead of
aux/vga.
; echo hwaccel off >/dev/vgactl
Also, writing blank to vgactl will blank the screen, until we move the mouse. And
; echo blanktime 30 >/dev/vgactl
will make the screen blank after 30 minutes of (mouse) inactivity.
The size used by aux/vga to set the mode for the graphics card is kept in the environment
variable vgasize. The type of monitor is kept in the environment variable monitor.
; echo $vgasize
1280x800x24
; echo $monitor
cinema
Both are the primary parameters used by aux/vga to set the VGA mode. This happens during
the system startup, and you will probably not be concerned about this, but in any case,
$vgasize is a useful bit of information to write scripts that depend on the screen resolution.
In any case, reading vgactl provides most of the configuration parameters for the graphics card that you might want to use.
; cat /dev/vgactl
type vmware
size 1280x800x32 x8r8g8b8
blank time 30 idle 0 state on
hwaccel on
hwblank off
panning off
addr p 0xfa000000 v 0xe0000000 size 0xa8c000
The interface provided by the kernel for using graphics is not that of vga. That is a particular control interface for a particular kind of graphics card. Graphics are provided by the draw(3) device
driver. The draw device relies on the facilities provided by the graphics card attached to the system, and provides the primary system interface to graphics.
Draw maintains connections between processes using graphics, and the graphics device
itself. Of course, connections to the draw device are represented as files, similar to what happen
- 300 with network connections. Its file tree is available at #i, but is also bound at /dev.
; lc /dev/draw
1
2
42
; lc /dev/draw/1
colormap
new
ctl
data
refresh
Here, directories 1, 2, and 42 are the interface for three different connections maintained as of
this moment in my terminal. The directory for a connection (besides other files) has a ctl and a
data file, like it happen with network line directories. Opening the file /dev/draw/new
establishes a new connection. So, a process that wants to use graphics must open
/dev/draw/new, and then write to the data file for its connection messages that encode the
graphic operations to be performed.
The draw device provides the Image abstraction, along with operations to allocate, deallocate, and drawing on it. All the graphics operations are performed by this device. Programs using
graphics talk directly to the device, by establishing connections to it, and asking it to perform
operations on images. Instead of using the device interface directly, most programs use the
draw(3) library, as shown next.
12.5. Graphics
Graphics are provided through the file interface for the draw device. This happens both when
using the console (before the window system runs) and after running the window system. When
run in the console, a graphics program will use the entire screen as its window, when run within
the window system, it will use just the window. That is the only difference regarding graphics,
which is why you can execute rio in a window, as we did time ago when connecting to a CPU
server.
The following program draws the entire screen in black for 10 seconds. Like many other
programs, it uses the functions from the draw library, as described in graphics(2), and draw(2),
instead of speaking to the draw device by itself.
_______
black.c
#include <u.h>
#include <libc.h>
#include <draw.h>
void
main(int, char*argv[])
{
Rectangle rect;
Image*
black;
fmtinstall(’R’, Rfmt);
if(initdraw(nil, nil, argv[0]) < 0)
sysfatal("initdraw: %r");
rect = screen->r;
black = display->black;
draw(screen, rect, black, nil, Pt(rect.min.x+20,rect.min.x+20));
flushimage(display, 1);
sleep(5 * 1000);
closedisplay(display);
print("rectangle was %R\n", rect);
exits(nil);
}
The program calls initdraw to establish a connection to the draw device. This function
- 301 initializes some global variables, including screen, and display, that are used later in the
program.
; sig initdraw
int initdraw(void (*errfun)(Display*, char*), char *font, char *label)
The first parameter points to a function called by the library upon errors. Passing a nil pointer
means that the draw library will use its own, which prints a diagnostic message and terminates the
program. Usually, that is all you will want to do. The second parameter states which font to use
for drawing text. Again, passing a nil value means that the library will use a reasonable default.
The last parameter is simply a textual label for the window, which we define to be the program
name. The function writes the text in label to the file /dev/label, to let rio know how the
window is named, in case it is hidden.
The display variable points to a Display structure that represents the connection to the
draw device. It maintains all the information necessary to speak with the device, for drawing. In
particular, it keeps the file descriptor for the /dev/draw/n/data file, that is, for the connection to the device. Calling closedisplay(display) as the program does after 10 seconds,
closes the connection and releases any graphic resources associated to it.
Another useful global variable, also initialized by initdraw, is screen. This variable
points to a structure representing the screen (i.e., the memory) where you may draw and use
graphics. When running in the console, screen corresponds to the entire screen. When running
inside a rio window, screen corresponds to the part of the screen used by the window. In
what follows, we will always speak about the window used by the program. But it should be clear
that such window may be the entire screen if no window system is running.
To which data type does screen point to? Where can you draw things on? It turns out that
the screen is an image, the data abstraction provided by draw(3). It represents a piece of memory
used as an image by the graphics card. It is just a rectangular picture. A program may draw by
changing bits in the image for its screen. Most of things a program uses for drawing are also
images. For example, colors are images (with pixels in the appropriate color), to write text in the
screen a program draws images for the appropriate characters, a window is essentially an image
(that a program will use as its screen), the entire screen (also called the display) is an image as
well. The data type Image, is defined in draw.h.
typedef struct Image Image;
struct Image
{
Display
*display;
int
id;
Rectangle
r;
Rectangle
clipr;
int
depth;
ulong
chan;
int
repl;
Screen
*screen;
};
/*
/*
/*
/*
/*
/*
/*
/*
display; connection to draw(3) */
id of draw(3) Image */
rectangle for the image */
clipping rectangle */
number of bits per pixel */
how to encode colors */
flag: replicated to tile clipr */
or nil if not a window */
Together, display and id identify an image as the one named id in the draw device at the other
end of the connection represented by the display.
An interesting piece of information in this structure is Image.r, It describes the rectangle
in the entire screen used by the image. Thus, screen->r describes the (rectangular) area used
in the screen by our window. Like coordinates (or Points), rectangles are a popular data type
when doing graphics. The draw library defines the appropriate data type.
- 302 typedef struct Rectangle Rectangle;
struct Rectangle
{
Point
min;
Point
max;
};
A rectangle is defined by two points (the upper left corner and the bottom right one). Choosing
(0,0) as the origin simplifies arithmetic operations for points. In accordance with this, the convention is that a rectangle includes its min point (upper left corner) but does not include its max
point (bottom right corner). The point with biggest coordinates inside a rectangle would be
(max.x-1,max.y-1).
We are close to understand the line
draw(screen, screen->r, display->black, nil, ZP);
that calls the function draw
; sig draw
void draw(Image *dst, Rectangle r, Image *src, Image *mask, Point p)
You might think that after understanding how to use this function, there will come many other
ones that will be hard to understand. That is not the case. The function draw is the only thing
you need for drawing. There are other routines as a convenience to draw particular things, but all
of them use just draw.
Basically, draw takes a image as the source and draws it (over) on a destination image.
That is, each pixel (i, j) in the source is copied to the pixel (i, j) in the destination. Here, screen
was the destination image, and display->black was the source image.
The source image represents the color black, because it is an image with all its pixels in that
color. Although we could draw the entire screen by copying black pixels from
display->black, this image is not that large. Images that have their repl field set to true are
used as tiles. The implementation for draw tiles the image as many times as necessary to fill the
rectangle where it is to be drawn. So, display->black might have just one black pixel. Only
that before copying any pixel from it, draw replicated it to obtain an image of the appropriate
size.
The second parameter is the rectangle where to confine the drawing of the source in the target. This is called a clip rectangle, because no drawing occurs outside it. The program used
screen->r, and so it draws in the screen the whole rectangle used by screen. Drawing in a
target image will not draw outside that image. Thus, the drawing is confined to the intersection of
the target image’s rectangle and the rectangle given to draw. In this case, we draw in the intersection of screen->r (the target’s rectangle) and screen->r (the parameter for draw). That
is, of course, just screen->r.
The image for the screen uses real screen coordinates. In other cases, you may have images
that do not use screen coordinates. To draw one of these images you must translate the coordinates for the source so that they match the area in the target where you want to draw. The last
parameter for draw is a point that indicates which translation to do. Passing the point (0,0),
which is defined as ZP in draw.h, performs no translation: each pixel (i, j) in the source is
copied to the pixel (i, j) in the destination. Passing other point will ask draw to translate the
source image (coordinates) so that the given point is aligned with the top-left corner of the rectangle where to draw.
The mask parameter allows an image to be used as a mask. This is useful to draw things
like cursors and the like. In most cases you may use nil, and not use a mask. We do not discuss
this parameter here, the draw(2) manual page has all the details.
One thing that remains to be discussed about our program is the call to flushimage.
Writing to the draw device for each single operation performed by the draw library would be very
- 303 costly. To improve efficiency, the library includes buffering for writes to the draw device’s files.
This is similar to what we saw regarding buffered input/output. Only that in this case, draw is
always doing buffered output. As a result, if you draw, it many happen that your operations are
still sitting in the buffer, and the actual device may not have received them. A call to
flushimage(display ,1)
flushes the buffer for the display. The last parameter is usually set to true, to indicate to the driver
that it must update the actual screen (in case it also maintains another buffer for it).
If you remove this line from the program, it will draw, but the window will remain white
(because the operation will not take effect). Fortunately, you will not need to worry about this in
many cases, because the functions for drawing graphics and text call flushimage on their own.
Nevertheless, you may have to do it by yourself if you use draw.
12.6. A graphic slider
We want to implement a small graphical application, to let the user adjust a value between 0%
and 100%. This is a graphical slider, that can be run in a window. The program will print to its
standard output the value corresponding to the position of the slider as set by the user using the
mouse or the keyboard.
The real display does not have that problem, but windows can be resized. The window system supplies its own menus and mouse language to let the user resize, move, and even hide and
show windows. For our program, this means that the screen might change!
Rio assumes that a program using graphics is also reading from the mouse. And note that
the mouse is the virtual mouse file rio provides for the window! Upon a resize, rio delivers a
weird mouse event to the program reading /dev/mouse. This event does not start with the
character m, it starts with the character r, to alert of the resize. After the program is alerted, it
should update the image it is using as its screen (that is, as the window). The program can do
so because the file /dev/winname contains the name for the image to be used as a window,
and this can be used to lookup the appropriate image for the window using its name.
The function getwindow updates the screen variable, after locating the image to be
used as the new window. As a curiosity, the window system draws a border for the window in
the image for the screen. However, your program is unaware of this because getwindow
adjusts screen to refer to the portion of the image inside the border.
But how do we know of resize events from the mouse? Simple. Look back to see the fields
for a Mousectl structure, which we obtained before by calling initmouse. You will notice
that besides the channel Mouse.c, used to report mouse events, it contains a channel
Mouse.resizec. Resize events are sent through this channel. The receipt of an integer value
from this channel means that the window was resized and that the program must call
getwindow to reestablish its screen for the new window.
The following program draws the entire window in black, like before. However, this program re-acquires its window when it is resized. It creates a separate thread to attend the mouse,
and another one to process resizes of the window, removing all that processing from the rest of
the program. In this case, it may be considered an overkill. In more complex programs, placing
separate processing in separate threads will simplify things. After starting the thread for attending
the mouse, and the one attending resizes, the program calls the function blank that draws the
entire window in black.
- 304 _______
resize.c
#include <u.h>
#include <libc.h>
#include <thread.h>
#include <draw.h>
#include <mouse.h>
...code for blank, resizethread, and mousethread...
void
threadmain(int, char*argv[])
{
Mousectl*mctl;
Mouse
m;
mctl = initmouse("/dev/mouse", nil);
if (mctl == nil)
sysfatal("initmouse: %r");
if(initdraw(nil, nil, argv[0]) < 0)
sysfatal("initdraw: %r");
threadcreate(resizethread, mctl, 8*1024);
threadcreate(mousethread, mctl, 8*1024);
blank();
threadexits(nil);
}
Try running the program 8.black and using the arrow keys to scroll up/down the window. It
scrolls! Rio thinks that nobody is using graphics in the window. That does not happen to
8.resize, which keeps the mouse file open.
The implementation for blank is taken from our previous program. It draws the entire window image in black and flushes the draw operations to the actual device.
void
blank(void)
{
draw(screen, screen->r, display->black, nil, ZP);
flushimage(display, 1);
}
Mouse processing for our program is simple. Any button click terminates the program. But users
expect the action to happen during the button release, and not during the previous press. Therefore, mousethread loops receiving mouse events. When a button is pressed, the function reads
more events until no button is pressed. At that point, closedisplay terminates the connection
to the display, closemouse closes the mouse device, and the program exits.
- 305 void
mousethread(void* arg)
{
Mousectl*mctl = arg;
Mouse
m;
for(;;){
recv(mctl->c, &m);
if(m.buttons){
do {
recv(mctl->c, &m);
} while(m.buttons);
closedisplay(display);
closemouse(mctl);
threadexitsall(nil);
}
}
}
Note how by placing mouse processing in its own thread, the programming language can be used
to program the behavior of the mouse almost like when describing it in natural language.
The new and interesting part in this program is the code for the thread reading resize events.
void
resizethread(void* arg)
{
Mousectl*mctl = arg;
for(;;){
recvul(mctl->resizec);
if (getwindow(display, Refnone) < 0)
sysfatal("getwindow: %r");
blank();
}
}
After receiving a resize event, through mctl->resizec, the program calls getwindow on the
display, which updates screen. Afterwards, it blanks the image for the new window. The second parameter to getwindow has to do with window overlapping. It identifies the method used
to refresh the window contents after being hidden. When two windows overlap, someone must
maintain a copy of what is hidden behind the window at the top. This backup is called backing
store. Rio provides backing store for windows, and the constant Refnone asks for no further
backup (i.e., no refresh method).
We now want this program to draw a slider, like those of figure 12.2. The slider draws in
yellow a bar representing the value set by the slider, and fills the rest of the window with the
same background color used by rio. Using the mouse, it can be adjusted to the left (the one
above in the figure) and to the right (the one below in the figure). When the slider is at the left, it
represents a value of 0 (or 0% of a value set by the slider). When it is at the right, it represents a
value of 100.
Maintaining the slider is a separate part of the processing done by the program, which uses a
different thread for that purpose. We will call it sliderthread. The existing code also
requires changes. First, threadmain must create now a channel to send new values for the
slider to the slider thread, and must create the thread itself. Also, we must get rid of the call to
blank() in threadmain. This program does not blank its window. Since we decided that
sliderthread is in charge of the slider, threadmain will no longer draw anything. Instead,
it may send a value to the slider, to adjust it to a reasonable initial value (and draw it).
- 306 -
Figure 12.2: Two example windows for the slider application. One at 30%, another at 84%.
_______
slider.c
...Initially, all the code as before, but for the changes explained in the text...
Channel*sliderc;
...
void
threadmain(int, char*argv[])
{
...all code here as before...
sliderc = chancreate(sizeof(ulong), 0);
threadcreate(sliderthread, sliderc, 8*1024);
sendul(sliderc, 50);
threadexits(nil);
}
The application must redraw the window when the resize thread receives a resize event. To do so,
resizethread will no longer call blank. Instead, it asks the slider thread to redraw the
slider on the new window (as if the value had changed). Because only values between 0 and 100
are meaningful to the slider, we can adopt the convention that when the slider receives any number not in the range [0,100], it simply redraws for its current value. So, we replace
blank();
in resizethread with
sendul(sliderc, ~0);
// Any number not in 0..100
This is the code for the new thread. It will be blocked most of the time, waiting for a value to
arrive through sliderc. Upon receiving a value, the slider value kept in val is updated if the
value is in range. Otherwise, the value is discarded. In any case, the slider is drawn and its value
printed in the output. That is the utility of the program, to generate a value adjusted by the user
using the slider. As an optimization, we do not draw the slider if the value received through the
channel is the current value for the slider. The code for drawing the slider will be encapsulated in
drawslider, to keep the function readable.
- 307 void
sliderthread(void*)
{
uint
val, nval;
val = ~0;
for(;;){
nval = recvul(sliderc);
if (nval >= 0 && nval <= 100){
if (nval == val)
continue;
val = nval;
}
drawslider(val);
print("%d\n", val);
}
}
Note how different parts of the program can be kept simple, and without race conditions. This
thread is the only one in charge of the value for the slider. Each other thread is also in charge of
other type of processing, using its own data. Communication between threads happens through
channels, which at the same time synchronizes them and allows them to exchange data.
To draw the slider, we must draw three elements: A yellow rectangle for the part set, a grey
rectangle for the unset part, and a black thick line to further mark them apart. After defining rectangles set, unset, and mark, for each element, we can draw the slider as follows.
draw(screen, setrect, setcol, nil, ZP);
draw(screen, unsetrect, unsetcol, nil, ZP);
draw(screen, markrect, display->black, nil, ZP);
Provided that setcol is an image for the color of the set part, and unsetcol is an image for
the color of the unset part. An image for the black color was available, but we also needed two
other colors.
The function allocimage can be used to allocate a new image. We are going to use it to
build two new images for the yellow and the grey colors used for the set and the unset parts. We
declare both images as globals, along with sliderc,
Channel*sliderc;
Image* setcol;
Image* unsetcol;
and add these two lines to threadmain, right after the call to initdraw.
setcol = allocimage(display, Rect(0,0,1,1), screen->chan, 1, DYellow);
unsetcol = allocimage(display, Rect(0,0,1,1), screen->chan, 1, 0x777777FF);
A call to allocimage allocates a new image, associated to the Display given as an argument.
; sig allocimage
Image *allocimage(Display *d, Rectangle r, ulong chan, int repl, int col)
When the display is closed (and the connection to draw is closed as a result), the images are deallocated. Note that the images are kept inside the draw device. The function talks to the device, to
allocate the images, and initializes a couple of data structures to describe the images (you might
call them image descriptors).
The second argument for allocimage is the rectangle occupied by the image. In this
case, we use a rectangle with points (0,0) and (1,1) as its min and max points. If you remember
the convention that the minimum point is included in the rectangle, but the maximum point is not
(it just marks the limit), you will notice that both images have just one pixel. That is, the point
- 308 with coordinates (0,0). For declaring a literal (i.e., a constant) for a Rectangle data type, we
used Rect, which returns a Rectangle given the four integer values for both coordinates of
both extreme points. Another function, useful to obtain a Rectangle from two Point values,
is Rpt.
; sig Rect Rpt
Rectangle Rect(int x0, int y0, int x1, int y1)
Rectangle Rpt(Point p, Point q)
By the way, the function Pt does the same for a Point. Indeed, ZP is defined as Pt(0,0).
; sig Pt
Point Pt(int x, int y)
Images for colors need just one pixel, because we ask allocimage to set the repl flag for
both images. This is done passing true as a value for its repl parameter. Remember that when
this flag is set, draw tiles the image as many times as needed to fill the area being drawn.
Two arguments for allocimage remain to be described, but we will not provide much
detail about them. The argument chan is an integer value that indicates how the color will be
codified for the pixels. There are several possible ways to codify colors, but we use that employed
by the screen image. So, we used screen->chan as an argument. The last parameter is the
value that states which one is the code for the color. Given both chan and the number for the
color, allocimage can specify to the draw device which color is going to use the pixels in the
new image.
In our program, we used the constant DYellow for the color of the set part, and the number
0x777777FF for the unset part. This number codifies the a color by giving values for red, blue,
and green. We borrowed the constant by looking at the source code for rio, to use exactly its
background color.
At last, this is drawslider.
void
drawslider(int val)
{
Rectangle setrect, unsetrect, markrect;
int
dx;
dx = Dx(screen->r) * val / 100;
setrect = unsetrect = markrect = screen->r;
setrect.max.x = setrect.min.x + dx;
markrect.min.x = setrect.max.x;
markrect.max.x = setrect.max.x + 2;
unsetrect.min.x = markrect.max.x;
draw(screen, setrect, setcol, nil, ZP);
draw(screen, unsetrect, unsetcol, nil, ZP);
draw(screen, markrect, display->black, nil, ZP);
flushimage(display, 1);
}
If the value represented by the slider is val, in the range [0,100], and our window is Dx pixels
wide, then, the offset for the x coordinate in the window that corresponds to val is defined by
val
x = Dx× ____
100
A zero value would be a zero offset. A 100 value would mean a Dx offset. The function Dx
returns the width of a rectangle (there is also a Dy function that returns its height). So,
dx = Dx(screen->r) * val / 100;
- 309 computes the offset along the x axis that corresponds to the value for the slider. Once we know
dx, defining the rectangle for setrect is straightforward. We take initially the rectangle for the
window and change the max.x coordinate to cut the rectangle at the offset dx in the window.
The markrect is initialized in the same way, but occupies just the next two pixels on the x axis,
past setrect. The rectangle unsetrect goes from that point to the end of the x axis.
What remains to be done is to change mousethread to let the user adjust the slider using
the mouse. The idea is that holding down the button 1 and moving it will change the slider to the
point under the mouse.
void
mousethread(void* arg)
{
Mousectl*mctl = arg;
Mouse
m;
int
dx, val;
for(;;){
recv(mctl->c, &m);
if(m.buttons == 1){
do {
dx = m.xy.x - screen->r.min.x;
val = dx * 100 / Dx(screen->r);
sendul(sliderc, val);
recv(mctl->c, &m);
} while(m.buttons == 1);
}
}
}
Executing the program, moving the slider, and pressing Delete to kill it, leads to this output.
; 8.slider > /tmp/values
Delete
; cat /tmp/values
50
32
30
...
Usually, the output for the program will be the input for an application requiring a user adjustable
value. For example, the following uses the slider to adjust the volume level for the sound card in
the terminal.
; 8.out | while(v=‘{read}) echo audio out $v >>/dev/volume
Changing the slider changes the volume level...
12.7. Keyboard input
Using Delete to terminate the program is rather unpolite. The program might understand a few
keyboard commands. Typing q might terminate the slider. Typing two decimal digits might set
the slider to the corresponding value. The library keyboard(2) is similar to mouse(2), but provides
keyboard input instead of mouse input. Using it may fix another problem that we had with the
slider. The program kept the console in cooked mode. Typing characters in the slider window will
make the console device (provided by rio) echo them. That was ugly.
To process the keyboard, one character at a time, hence putting the console in raw mode, the
main function may call initkeyboard.
- 310 ; sig initkeyboard
Keyboardctl *initkeyboard(char *file)
This function opens the console file given as an argument, and creates a process that reads characters from it. The console is put in raw mode by assuming that if the file is named
/a/cons/file, there will be another file named /a/cons/filectl that accepts a rawon
command. So, giving /dev/cons as an argument will mean that rawon is written to
/dev/consctl (and the file is kept open).
The function returns a pointer to a Keyboardctl structure, similar to a Mousectl. It
contains a channel where the I/O process sends runes (not characters!) as they are received.
typedef struct Keyboardctl Keyboardctl;
struct Keyboardctl
{
Channel *c;
/* chan(Rune)[20] */
...
};
Like we did for the mouse, to process the keyboard input, we will change threadmain to call
initkeyboard and to create a separate thread for processing keyboard input. This is the resulting code for the program, omitting the various functions that we have seen, and a couple of other
ones that are shown later.
_______
slider.c
#include
#include
#include
#include
#include
#include
<u.h>
<libc.h>
<thread.h>
<draw.h>
<mouse.h>
<keyboard.h>
Channel*
Image*
Image*
Keyboardctl*
Mousectl*
sliderc;
setcol;
unsetcol;
kctl;
mctl;
...code for auxiliary functions, including thread entry points...
- 311 void
threadmain(int, char*argv[])
{
Mouse
m;
mctl = initmouse("/dev/mouse", nil);
if (mctl == nil)
sysfatal("initmouse: %r");
kctl = initkeyboard("/dev/cons");
if (kctl == nil)
sysfatal("initkeyboard: %r");
if(initdraw(nil, nil, argv[0]) < 0)
sysfatal("initdraw: %r");
setcol = allocimage(display, Rect(0,0,1,1), screen->chan, 1, DYellow);
unsetcol = allocimage(display, Rect(0,0,1,1), screen->chan, 1, 0x777777FF);
sliderc = chancreate(sizeof(ulong), 0);
threadcreate(resizethread, mctl, 8*1024);
threadcreate(mousethread, mctl, 8*1024);
threadcreate(keyboardthread, kctl, 8*1024);
threadcreate(sliderthread, sliderc, 8*1024);
sendul(sliderc, 50);
threadexits(nil);
}
The function keyboardthread is executed on its own thread. It receives runes from kctl.c
and processes them without paying much attention to the rest of the program.
void
keyboardthread(void* a)
{
Keyboardctl*kctl = a;
Rune
r,rr;
int
nval;
for(;;){
recv(kctl->c, &r);
switch(r){
case Kdel:
case Kesc:
case ’q’:
terminate();
break;
default:
if (utfrune("0123456789", r) != nil){
recv(kctl->c, &rr);
if (utfrune("0123456789", rr) != nil){
nval = (r-’0’)*10 + (rr-’0’);
sendul(sliderc, nval);
}
}
}
}
}
The constants Kdel and Kesc are defined in keyboard.h with the codes for the Delete and
the Escape runes. We terminate the program when either key is pressed, or when a q is typed.
Otherwise, if the rune received from kctl->c is a digit, we try to obtain another digit to build a
slider value and send it through sliderc.
To terminate the program, we must now call closekeyboard, which releases the
Keyboardctl structure and puts the console back in cooked mode. So, both control structures
- 312 were kept as globals in this version for the program. The next function does all the final cleanup.
void
terminate(void)
{
closekeyboard(kctl);
closemouse(mctl);
closedisplay(display);
threadexitsall(nil);
}
12.8. Drawing text
With all the examples above it should be clear how to use the abstractions for using the devices
related to graphical user interfaces. Looking through the manual pages to locate functions (and
other abstractions) not described here should not be hard after going this far.
Nevertheless, it is instructive to see how program can write text. For example, the implementation for the console in rio writes text. Both because the echo and because of writes to the
/dev/cons file. But can this be on a graphic terminal?
There are many convenience functions in draw(2) to draw lines, polygons, arcs, etc. One of
them is string, which can be used to draw a string. Note: not to write a string.
; sig string
Point string(Image *dst, Point p, Image *src, Point sp, Font *f, char *s)
Suppose that we want to modify the slider program to write the slider value using text, near the
left border of the slider window. This could be done by adding a line to sliderthread, similar
to this one
string(screen, pos, display->black, ZP, font, "68");
This draws the characters in the string 68 on the image screen (the destination image). The
point pos is the pixel where drawing starts. Each character is a small rectangular image. The
image for the first character has its top-left corner placed at pos, and other characters follow to
the right. The source image is not the image for the characters. The source image is the one for
the black color in this example. Character images are used as masks, so that black pixels are
drawn where each character shape determines that there has to be a pixel drawn. To say it in
another way, the source image is the one providing the pixels for the drawing (e.g., the color).
Characters decide just which pixels to draw. The point given as ZP is used to translate the image
used as a source, like when calling draw. Here, drawing characters in a solid color, ZP works
just fine.
But where are the images for the characters? Even if they are used as masks, there has to be
images for them. Which images to use is determined by the Font parameter.
A font is just a series of pictures (or other graphical descriptions) for runes or characters.
There are many fonts, and each one includes a lot of images for characters. Images for font runes
are kept in files under /lib/font. Many files there include images just for a certain contiguous range of runes (e.g., letters, numbers, symbols, etc.) Other files, conventionally with names
ending in .font, describe which ones of the former files are used by a font for certain ranges of
unicode values.
The draw library provides a data type representing a font, called Font. It includes functions like
Font* openfont(Display *d, char *file)
that reads a font description from the file given as an argument and returns a pointer to a Font
that may be used to employ that font.
- 313 To use a loaded font, it suffices to give it as an argument to functions like string. We
used font, which is a global for the font used by default. To see which font you are using by
default, you may see which file name is in the $font environment variable.
; echo $font
/lib/font/bit/VeraMono/VeraMono.12.font
That variable is used to locate the font you want to use. The window system supplies a reasonable
default otherwise.
The following function, that may be called from sliderthread, draws the slider value
(given as a parameter) in the window.
void
writeval(int val)
{
Point
sz, pos;
char
str[5]; // "0%" to "100%"
seprint(str, str+5, "%d%%", val);
sz = stringsize(font, str);
if (sz.x > Dx(screen->r)/2 || sz.y > Dy(screen->r))
return;
pos = screen->r.min;
pos.x += 10;
pos.y += (Dy(screen->r)- sz.y) / 2;
string(screen, pos, display->black, ZP, font, str);
}
It prints the integer value as a string, in str. adding a % sign after the number. The window
could be so small (or perhaps the font so big) that there could be not enough space to draw the
text. The function stringsize returns the size for a string in the given font. We use it not
know how much screen space will the string need. To avoid making our window too bizarre,
writeval does not draw anything when the window is not as tall as the height for the string,
that is, when sz.y > Dy(screen->r). Also, the string is not shown either when it needs
more than the half of the width available in the window.
12.9. The window system
A window is an abstraction provided by the window system, rio in this case. It mimics the
behavior of a graphic terminal, including its own mouse and keyboard input, and both text and
graphics output.
In other systems, the abstraction used for windows differs from the one used for the entire
console. Programs must be aware of the window system, and use its programming interface to
create, destroy, and operate windows.
Instead, the model used in Plan 9 is that each application uses the console, understood as the
terminal devices used to talk to the user, including the draw device and the mouse. In this way,
applications may be kept unaware of where are they actually running (the console or a window).
Running the window system in a window is also a natural consequence of this.
Nevertheless, it may be useful to know how to use the window system from a program.
Like other services, the window system is also a file server. You already know that its primary
task is to multiplex the files for the underlying console and mouse to provide virtual ones, one per
window. Such files are the interface for using the window, like the real ones are the interface for
using the real console.
Each time the rio file system is mounted, it creates a new window. The attach specifier
(the optional file tree name given to mount) must be new, possibly followed by some flags for the
newly created window. Rio posts at a file in /srv a file descriptor that can be used to mount it.
- 314 The name for this file is kept at the environment variable $wsys. Therefore, these commands
create a new window.
; echo $wsys
/srv/rio.nemo.557
; mount $wsys /n/rio new
After doing this, the screen might look like the one shown in figure 12.3, where the empty window is the one that has just been created. Which files are provided by rio? We are going to use
the window were we executed the previous commands to experiment at little bit.
Figure 12.3: Mounting rio creates a new window. In this one, no shell is running.
; lc /n/rio
cons
kbdin
consctl label
cursor mouse
screen
snarf
text
wctl
wdir
window
winid
winname
wsys
We see cons, consctl, cursor, and mouse, among others. The are virtual versions for the
ones that were mounted at /dev prior to running rio. The convention in Plan 9 is to mount the
window system files at /mnt/wsys, and not at /n/rio. We use /n/rio just to make it clear
that these files come from the file tree that we have mounted. In your system, you may browse
/mnt/wsys and you will see a file tree with same aspect.
Binding /n/rio (before other files) at /dev will make any new process in our window to
use not this window, but the new one that we have created. So, these commands
; bind -b /n/rio /dev
; stats
cause stats to use the new window instead of the one we had, like shown in figure 12.4. For
stats, using the screen, mouse, and keyboard is just a matter of opening files at /dev. It does
not really care about where do the files come from. Regarding /dev/draw, that device multiplexes by its own means among multiple processes (each one keeps a separate connection to the
device, as we saw). The other files are provided by rio.
Hitting Delete in the new window will not kill stats. The window system does not know
where to post the interrupt note for that window. To interrupt the program, we must hit Delete in
the old window, where the command was running. This can be fixed. Unmounting the files for
- 315 -
Figure 12.4: Binding the files for the new window at /dev makes stats use it.
the new rio window will destroy it (nobody would be using it).
; unmount /n/rio /dev
; unmount /n/rio
and the window goes away
And now we mount rio again (creating another window). This time, we use the option -pid
within the attach specifier to let rio know that notes for this window should go the process
group for the process with pid $pid. That is, to our shell. Afterwards, we start stats like
before.
; mount $wsys /n/rio ’new -pid ’$pid
; bind -b /n/rio /dev
; stats It uses the new window
;
Until hitting Delete in that window
This time, hitting Delete in either window will stop stats. The new window has been
instructed to post the note to the note process group of our shell. It will do so. Our old window, of
course, does the same.
In almost all the cases, the window command (a script) is used to create new windows. It
creates a new window like we have done. Most of its arguments are given to rio to let it know
where to place the window and which pid to use to deliver notes. Window accepts as an argument the command to run in the new window, which is /bin/rc by default. For example,
; window -r 0 0 90 100 stats
creates a new window in the rectangle going from the point (0,0) to the point (90,100). It will run
stats. There is a C library, window(2), that provides a C interface for creating windows
(among other things related to windows). The window system and the graphics library use may
use it, but it is not likely you will ever need to use it from your programs. Your programs are
expected to use their console, whatever that might be.
Going back to the files served by rio, the files winid and winname contain strings that
identify the window used. You can see them for the new window at /n/rio. And because of
the (customary) bind of these files at /dev, you will always see them at /dev/winid and
/dev/winname. In what follows, we will use file names at /dev, but it should be clear that
they are provided by rio.
- 316 ; cat /dev/winid
3 ;
newline supplied by us
; cat /dev/winname
window.3.3; ; newline supplied by us
The window id, kept at winid, is a number that identifies the window. The directory
/dev/wsys contains one directory per window, named after its identifier. In our case, rio is
running just two windows.
; lc /dev/wsys
1
3
; lc /dev/wsys/3
cons
cursor label
consctl kbdin
mouse
screen
snarf
text
wctl
wdir
window
winid
wsys
winname
Each window directory contains all the files we are accustomed to expect for using the console
and related devices. For each window, rio
makes its files also available in its root directory, so that a bind of the rio file system at /dev
will leave the appropriate files in /dev, and not just in /dev/wsys/3 or a similar directory.
The file winname contains the name for the image in the draw device that is used as the
screen for the window. The draw device may keep names for images, and the window system
relies on this to coordinate with programs using windows. Rio creates the image for each window, and gives a name to it that is kept also in winname. The function getwindow, called by
initdraw, uses this name to locate the image used for the window. That is how your graphic
programs know which images are to be used as their screens.
The file label contains a text string for labeling the window. That is, the file
/dev/label for the current window, or /dev/wsys/3/label for the window with identifier 3, contain strings to let us know which program is using which window.
; cat /dev/label
rc 839;
; cat /dev/wsys/3/label
stats;
A convenience script, wloc, lists all the windows along with their labels.
; wloc
window -r 125 32 576 315 rc 839 # /dev/wsys/1
window -r 69 6 381 174 stats # /dev/wsys/3
;
Basically, it lists /dev/wsys to see which windows exist, and reads /dev/label for each
one, to describe it. The following command would do something similar.
; for (w in /dev/wsys/*)
;; echo window ‘{cat $w/label}
window rc 839
window stats
Other useful files are /dev/screen, /dev/window, and /dev/text. They are provided
for each window. The first one is an image for the entire screen. It can be used to take an snapshot
for it. The second one is the same, but only for the window image. The last one contains all the
text shown in the window (although it is read-only). For example, this can be used to see the first
three lines in the current window.
- 317 ; sed 3q /dev/text
; echo $wsys
/srv/rio.nemo.832
; mount $wsys /n/rio new
;
Note that we only typed the first one. The next command prints all the mount commands that
we executed in our window, assuming the prompt is the one used in this book.
; grep ’^; mount’ /dev/text
; mount $wsys /n/rio new
In the same way, this executes the first mount command that we executed in our window
; grep ’^; mount’ /dev/text | sed 1q | rc
Each window provides a control interface, through its wctl file. Many of the operations that can
be performed by the user, using the mouse and the menus provided by rio, can be performed
through this file as well.
Windows may be hidden, to put them apart without occupying screen space while they are
not necessary by the moment. The Hide command from button-3 menu in rio hides a window.
While hidden, the window label is shown in that menu, and selecting it shows the window again.
The next command line hides the window for 3 seconds using its control file.
; echo hide >/dev/wctl ; sleep 3 ; echo unhide >/dev/wctl
hidden for 3 seconds... and back again!
;
We typed the three commands in the same line because after
; echo hide >/dev/wctl
the window would no longer be visible to accept input. This remains of the input focus. The
window where you did click last is the one receiving keyboard input and mouse input. The place
where the window system sends input events is also known as the focus because you seem to be
focusing on that window. Manually, focus can be changed by using the mouse to click on a different window. From a program, the wctl file can be used.
; echo current >/dev/wsys/3/ctl
Sets the focus to window 3. It is also said that window 3 becomes the current window, hence the
control command name. By the way, most of the control operations done to a wctl file make its
window current. Only the top and bottom commands do not affect the focus.
Windows may overlap. The window system maintains a stack of windows. Those down in
the stack are in the back, and may be obscured by windows more close to the top of the stack
(which are up front). You may reclaim a window to the top of the stack to make it fully visible.
With the mouse, a click on the window suffices. From a program, you can move it to the top easily.
; echo top >/dev/wsys/3/ctl
And also to the back, something that you cannot do directly using the mouse.
; echo bottom >/dev/wsys/3/ctl
By now, you know that windows may scroll down automatically or not, depending on their scroll
status, as selected by the Scroll and Noscroll options from their button-2 menu. This is how to do
it through the control file, this time, for window 3.
- 318 ; echo scroll >/dev/wsys/3/wctl puts the window number 3 in scroll mode
; echo noscroll >/dev/wsys/3/wctl
;
There are several other control commands described in the rio(4) manual page, including some
that might seem to be available only when using the mouse to perform them manually. The next
command resizes a window to be just 100 pixels wide.
; echo ’resize -dx 100’ >/dev/wctl
resizes our window to 100 pixels wide
It is not important to remember all the commands accepted, but it is to know that they can be used
to automate things that would have to be done manually otherwise. Tired of manually adjusting a
window, after running acme, to use most available screen space? Just write a shell script for the
task.
The first thing to be done by the script is to determine how much space is available at our
terminal. This was recorded in $vgasize. Later, we can define variables for the width and
height (in pixels) that we might use.
; echo $vgasize
1280x800x24
; wid=‘{echo $vgasize | sed ’s/x.*//’}
; echo $wid
1280
; ht=‘{echo $vgasize | sed ’s/.*x(.*)x.*/1/’}
; echo $ht
800
Because most of the times we want some space to use rio (e.g., to recall its menus), we may
save 90 pixels from the height. To keep an horizontal row with 90 pixels of height just for other
rio windows and menus.
; ht=‘{echo $ht - 90 | hoc}
; echo $ht
710
And now, we can resize the window, placing it in the rectangle computed for our screen.
echo resize -r 0 0 $wid $ht >/dev/wctl
The arguments for the move and resize commands (understood by the wctl file) are similar
to those of the window command.
If in the future you find yourself multiple times carefully adjusting windows to a particular
layout that is easy to compute, you know what to do.
Problems
1
Record mouse events and try to reproduce them later.
2
Use the window system to provide virtual desktops. You do not need to implement anything
to answer this problem.
3
Write a program that implements console cooked mode by itself. It must write to standard
output one line at a time, but it must use raw mode.
4
Write a program that draws the pixels under the mouse while a button is pressed.
5
Make the program draw text when a key is pressed. The text to draw is the character typed
and the position would be the last position given by the mouse
6
There is an alternate library, called event that provides event-driven mouse and keyboard
processing. Implement the previous programs using this library. Compare.
7
The /dev/kbmap file provides keyboard maps. Look through the manual and try to
- 319 change the map. Locate one defining several keyboard keys as mouse buttons.
- 320 .
- 321 -
13 Building a File Server
______
13.1. Disk storage
The file server we are going to build will not be using a disk to provide file storage, it will provide a rather different service. But before building our new file server, it may be instructive to
look a little bit to what would be needed to actually store files on a disk.
There are many file servers involved in disk storage, not just one. To store files on disk,
you need a disk. Like all other devices, disks are files in Plan 9. This may be a surprise, as disks
are also used to store files. The device sd(3) provides storage devices. This is a list of files served
by the device driver.
; lc ’#S’
sdC0
sdC1
sdD0
sdctl
Each such file (but for sdctl) is a directory that represents a disk, or perhaps a CD or DVD
reader or writer. The file name for each device is similar to sdC0, where the C0 names the particular hardware device. In this case, it is the first disk (0) in the first controller board (C). The tree
from #S is bound at /dev, so that /dev/sdC0 is the conventional name for #S/sdC0.
Each directory for a disk contains several files. At the terminal we are using now, sdD0 is
a CD reader. These are the files used as its interface.
; lc /dev/sdD0
ctl
data
raw
Reading the control file reports some information about the device,
; cat /dev/sdD0/ctl
inquiry NECVMWarVMware IDE CDR101.00
config 85C4 capabilities 0F00 dma 00550004 dmactl 00550004
part data 0 54656
The line starting with inquiry describes the disk. It seems to be a CD reader (CDR) plugged to
an IDE controller board. Here, NECVMWarVMware is the vendor name for the disk, which is
funny for this one.
The line starting with config describes some capabilities for the device. It seems that the
device knows how to do DMA, to transfer bytes from the disk to the memory of the machine
without direct intervention from the processor. We know this because the number right after dma
is not zero. We can use the ctl file to ask the device driver not to use DMA for this device
; echo dma off >/dev/sdD0/ctl
; grep dma /dev/sdD0/ctl
config 85C4 capabilities 0F00 dma 00550004 dmactl 00000000
And this time we see 00000000 and not 00550004 as the value for the attribute dmactl. It
does not really matter what this is, but it matters that it is zero, meaning that there would be no
further DMA for this disk. This can slow down the system, and it is better to enable it again.
; echo dma on >/dev/sdD0/ctl
; grep dma /dev/sdD0/ctl
config 85C4 capabilities 0F00 dma 00550004 dmactl 00550004
Lines starting with part, read from the ctl file, deserve further explanation.
The abstraction provided by the hardware for a disk is usually an array of sectors. Each sector is typically an array of 512 bytes. The disk knows how to read from disk into memory a given
sector, and how to write it.
- 322 The last line read from the ctl file describes a part of the disk, that goes from sector number 0 to sector number 54656. Such part has the name data, and represents the actual data on
the disk. Did you notice that there is a file /dev/sdD0/data? That is the abstraction for using
this disk in Plan 9. This file is the data in the disk. Reading the first 512 bytes from this file
would be reading the first sector from the disk’s data. To read or write a particular sector, any
program can use seek to set the file position at the appropriate offset, and then call read or
write. The device driver would understand that the program wants to read or write from the
disk, and would do just that.
In case you wonder, the file raw is used to execute commands understood by the device
that have a very low-level of abstraction, as a back-door to provide raw access to the device, without the cooking provided by the abstraction.
Disks may contain multiple parts, named partitions. A partition is just a contiguous portion of the disk kept separate for administrative purposes. For example, most machines with Windows come preinstalled with two partitions in your hard disk. One of them corresponds to the C:
unit, and contains system files. The other corresponds to the D: unit, and contains user files. Both
ones are just partitions in the hard disk.
Reading the ctl file for a disk reports all the list of partitions, with their names, start sector, and end sector. This is the one for our hard disk.
; cat /dev/sdC0/ctl
inquiry VMware Virtual IDE Hard Drive
config 427A capabilities 2F00 dma 00550004 dmactl 00550004 rwm 16 rwmctl 0
geometry 16777216 512 17475 15 63
part data 0 16777216
part plan9 63 16771860
part 9fat 63 204863
part fs 204863 13626132
part swap 13626132 14674708
part cache 14674708 16771860
Although we might have listed them, perhaps just to see the file sizes.
; ls -l /dev/sdC0
--rw-r----- S 0 nemo
--rw-r----- S 0 nemo
--rw-r----- S 0 nemo
--rw-r----- S 0 nemo
--rw-r----- S 0 nemo
--rw-r----- S 0 nemo
-lrw------- S 0 nemo
--rw-r----- S 0 nemo
nemo
nemo
nemo
nemo
nemo
nemo
nemo
nemo
104857600
1073741824
0
8589934592
6871689728
8587160064
0
536870912
May
May
May
May
May
May
May
May
23
23
23
23
23
23
23
23
17:44
17:44
17:44
17:44
17:44
17:44
17:44
17:44
/dev/sdC0/9fat
/dev/sdC0/cache
/dev/sdC0/ctl
/dev/sdC0/data
/dev/sdC0/fs
/dev/sdC0/plan9
/dev/sdC0/raw
/dev/sdC0/swap
For each file representing a partition, the file size reports the partition size (in bytes), as could be
expected. This disk has just 8 Gbytes of data (8589934592 bytes). That would be the data file.
Some partitions have been made for this disk, to name different parts of it and use them separatedly. For example, there is a 9fat partition going from sector 63 (included) to sector 204863
(not included). And then a fs partition, going from sector 204863 to sector 13626132. And several other ones.
For us, /dev/sdC0/9fat is just a like a little disk (that is what a partition is for), only
that it lives inside /dev/sdC0/data. Also, /dev/sdC0/fs is another little disk, also living
inside /dev/sdC0/data. Indeed, both 9fat and fs leave inside a partition named plan9,
as you may see by looking where these partitions start and end.
The convention in Plan 9 is to make a partition, named plan9, in the disk. This partition is
known to other operating systems, because it is declared using a partition table (kept in the disk)
following a particular convention that most systems follow. Within this partition, Plan 9 maintains its own partitions, by declaring them in another table known to the storage device driver
- 323 (kept in disk, of course). This is done so because many disks are only able to support 4 (so called)
primary partitions.
How can we create a partition? By filling an entry in the partition name to declare it, including the information about where does it start and where does it end. The command fdisk can be
used to modify the partition table for the whole disk. The command prep can be used to modify
the one used by Plan 9 (kept within the the Plan 9 partition in the disk).
In any case, we can add a partition to our disk by writing a control command to the disk’s
ctl file. For example, this creates a partition named check on the sdC1 disk.
; echo part check 63 2001 >/dev/sdC1/ctl
; grep check /dev/sdC1/ctl
part check 63 2001
To remove it, we may write a delpart command to the disk’s control file.
; echo delpart check >/dev/sdC1/ctl
In general, it is wiser to use the programs fdisk and prep to create partitions, because they
update the tables besides informing the storage device about the new partitions. We are going to
create some partition for a new disk. As you may see, we tell fdisk that the disk to use is
/dev/sdC1/data. That is just a file. For fdisk, that would be the disk.
; disk/fdisk /dev/sdC1/data
cylinder = 8225280 bytes
empty
0 522
>>>
(522 cylinders, 3.99 GB)
After running fdisk, it prints the list of partitions found. None so far. The >>> is the prompt
from fdisk, where we can type commands to handle the disk. The command a, adds a new partition.
>>> a p1
start cylinder: 0
end [0..522] 522
We added a partition called p1 occupying the entire disk. Following the convention used for IDE
disks on PCs, the table may name up to 4 primary partitions. The name p1 identifies this partition
as the primary partition number 1.
Now, we can print the new table, write it to disk after being sure, and quit from this program.
>>>
’
>>>
>>>
p
p1
w
q
0 522
(522 cylinders, 3.99 GB) PLAN9
And this is what we can see now.
; cat /dev/sdC1/ctl
inquiry VMware Virtual IDE Hard Drive
config 427A capabilities 2F00 dma 00550004 dmactl 00550004 rwm 16 rwmctl 0
geometry 8388608 512 8322 16 63
part data 0 8388608
part plan9 63 8385930
; lc /dev/sdC1
ctl
data
plan9
raw
There is a new partition, a new file at /dev/sdC1. Its name is plan9 because fdisk declared
the partition to be one for use with Plan 9 (writing a particular integer value in the partition entry
that identifies the type for the partition).
- 324 Within this partition (known to any other system sharing the same machine), we can create
several Plan 9 partitions using prep.
; disk/prep -a 9fat -a fs /dev/sdC1/plan9
no plan9 partition table found
9fat 204800
fs 8181067
’ 9fat
0 204800
(204800 sectors, 100.00 MB)
’ fs
204800 8385867
(8181067 sectors, 3.90 GB)
>>>
Note how prep uses /dev/sdC1/plan9 as its disk! It is just a file. We asked prep to automatically choose appropriate sizes and locations for partitions named 9fat and fs within
/dev/sdC1/plan9. It printed the proposed table before prompting for more commands. And
finally, we can write this partition table to disk and quit.
>>> w
>>> q
That before seeing the effect.
; lc /dev/sdC1
9fat
ctl
data
fs
plan9
raw
At this point we have two partitions named fs and 9fat that can be used for example to install a
stand-alone Plan 9 on them (one that may run without using an external file server). Both programs, fdisk and prep used the file given as an argument to access the disk. That file was the
disk. They informed the storage device about the new partitions by writing control commands to
the disk ctl file. At last, we can use the files supplied at #S to use our new partitions.
But how can we create files in our partition? We need a program that knows how to store
files on disk, using a particular data structure to keep them stored, access them, and update them.
This is what a file server is. But this time, files served by this program would be actual files in a
disk.
There are several programs that can be used for this task. The standard file server for Plan 9
is fossil. This program is used by the (central) file server machine to serve files to terminals.
Another, more ancient program is kfs. We are going to use this one.
; disk/kfs -f /dev/sdC1/fs
File system main inconsistent
Would you like to ream it (y/n)?
This command started kfs (a file server program) using /dev/sdC1/fs as the disk (partition)
where to keep files. For kfs, it does not matter what fs is. It is just a file. Upon starting, kfs
noticed that there was none of its data structures stored in fs. It understood that there was an
inconsistent (corrupt) data structure stored in the disk, and asks us to reinitialize it. We will let it
do it.
Would you like to ream it (y/n)? y
kfs: reaming the file system using 1024 byte blocks
Now kfs is initializing the data in fs, as it pleases to store a file tree in there. After finishing
with disk initialization, the partition contains the kfs data structures. It is said that the partition
has been formatted for kfs, or that it has a kfs format.
At last, we can mount the (empty) file tree served by kfs. When we create files in the new
mounted directory, kfs will use write on /dev/sdC1/fs to keep them stored in that partition. Indeed, it will be the storage device the one that will update the disk, upon calls to write
for one of its files.
- 325 ; mount -c /srv/kfs /n/kfs
; touch /n/kfs/anewfile
;
All other file systems (stored in disk) work along the same lines. All other systems include programs that understand how to use the disk (like the storage device) and how to store files in it
(like kfs). As you see, each program is just using an abstraction provided by yet another program. Even inside the disk hardware you may find programs that provide the abstraction of a contiguous array of disk sectors.
13.2. The file system protocol
So far, we have seen two interfaces for using Plan 9, system calls and the shell. There is another
interface: the 9P file system protocol. Plan 9 provides all the abstractions needed to use the
machine, including processes, virtual address spaces, devices, etc. However, many abstractions
are provided by external file servers, and not by the system itself.
The protocol spoken between Plan 9 and any external file server is called 9P, and is documented in the section 5 of the manual. For example, intro(5) summarizes the protocol and provides a good introduction to it.
A word of caution. If you ever have to implement a file server, you should read the whole
section 5 of the manual before doing so. It describes all the messages in the protocol, what they
do, and how a file server should behave. Here we are interested just in describing how the protocol works, and how it relates to the system calls made to Plan 9. The description here is far from
being complete, but you have the manual.
As a user, you might probably ignore which particular protocol is spoken by your system.
Windows speaks CIFS, Linux speaks NFS, and Plan 9 speaks 9P. In general, you do not have to
care. However, this is a good time to take a look into 9P for two different reasons. First, it might
give you more insight regarding how the system works and how to use it more effectively. Second, looking into 9P is an excellent excuse to learn how to develop a file server program, using
what we learned so far.
Looking back at figure 1.8 will let you see the elements involved. Processes using Plan 9
make system calls, including open, close, read, and write. Plan 9 implements such system
calls by speaking 9P with the file server involved. In the figure, steps 3 and 4 correspond to 9P
messages exchanged to implement write. The last element involved is the file server process,
which attends the messages sent by Plan 9 to do the file operations requested by Plan 9.
All the 9P dialog between Plan 9 and a file server is based on remote procedure calls. Plan 9
sends a request to the server and receives a reply from it. The file server is called a server because
it accepts requests (represented by messages), and it attends each request before sending a reply
back (also represented by a message). In the same way, the program making requests (Plan 9 in
this case) is called a client because of a similar reason. Each request and reply is just a particular
data structure, sent as an array of bytes through a network connection, a pipe, or any other communication means.
Before discussing 9P any further, let’s take a look at an example. The command ramfs, as
many other file servers, prints the 9P dialog when called with the flag -D. Any 9P message
received by ramfs, carrying a request, is printed and then processed. Any 9P message sent back
as a reply from ramfs is printed as well. Of course, ramfs does not print in the console the
actual messages as exchanged through the network. Instead, it prints the relevant data carried by
each message in a format that could be understood by a human.
; ramfs -D -s ram
postfd /srv/ram
postfd successful
;
- 326 Using -s we asked ramfs to post at /srv/ram the end of a pipe that we can mount to access
the files it provides. This is what happens when we mount its file tree.
; mount -c /srv/ram /n/ram
<-12- Tversion tag 65535 msize 8216 version ’9P2000’
-12-> Rversion tag 65535 msize 8216 version ’9P2000’
<-12- Tauth tag 16 afid 435 uname nemo aname
-12-> Rerror tag 16 ename auth no required
<-12- Tattach tag 16 fid 435 afid -1 uname nemo aname
-12-> Rattach tag 16 qid (0000000000000000 0 d)
;
The mount command makes a mount system call. To perform the mount system call, Plan 9
sent three different requests to this ramfs file server. The file server printed the messages (and
attended the requests and sent the replies) before Plan 9 could complete the mount call.
Ramfs prints a line for each 9P message exchanged. The first field of each line shows if it
is a message received from Plan 9 (the arrow points to the left) or sent by the server (the arrow
points to the right). The former ones are requests, and the latter ones are replies. The file descriptor used to receive (or send) the message is the number printed in the middle of each arrow. In
this case, ramfs is attending an end of a pipe, open in file descriptor 12. The other end of the
pipe was posted at /srv/ram, which is the file we used in mount.
The second field printed for each 9P message shows the message type. A message is just a
data structure. Different messages for different requests and replies mean different things, and
have different data fields. The type of a message is identified by a number. However, ramfs
printed a string with the name of the type, instead of the number. In our case, three different
requests were sent by Plan 9, Tversion, Tauth, and Tattach. The file server replied with
three different replies, Rversion, Rerror, and Rattach. All 9P requests have names that
start with T, for transaction. The replies for each request have the name of the request, but starting
with R instead. Thus, Tversion is a version request, and Rversion is a version reply.
Following the message type, the names and contents of most important fields for each message are printed as well. For example, the tag field of the Tattach message had 65535 as its
value. As you can see, all the messages have a tag field, besides a type field. The protocol dictates that each reply must carry the same number in the tag that was used by its corresponding
request. This is useful to have multiple outstanding (not yet replied) requests through the same
connection. Tags let the client know which reply corresponds to each request. Because of this, a
tag used in a request cannot be used again until its reply has been received.
Before anything else, Plan 9 sent a Tversion message to ramfs, which replied by sending an Rversion message back. This message is used to agree on a particular version of the
protocol to speak. The request carries the version proposed by Plan 9. The reply carries the version proposed by the server. The string 9P2000, sent by Plan 9 (and acknowledged by ramfs)
identifies the version in this case. For the rest of the conversation, both programs agreed to use
messages as defined in the 9P2000 version of the 9P protocol.
Furthermore, this message is also used to agree on a maximum message size for the 9P conversation that follows. In our case, they agreed on using 8 Kbytes as the maximum size for a message (the value of the msize fields in Tversion and Rversion). This is useful to let both
parties know how big their buffers should be for holding data being exchanged.
The second request sent by Plan 9 was Tauth. This has to do with security, which is discussed later. The purpose of the message is to convince the file server that the user mounting the
file tree is who he says he is. In this case, ramfs is credulous and does not need any proof to let
Plan 9 use it, so it replies with an diagnostic message that states that there is no need for authentication. This is the Rerror message that you see. When a request cannot be processed or causes
some error, the file server does not send its corresponding reply message back. Instead, it sends
an Rerror message to the client that both indicates the failure and explains its cause. The explanation is just an string, sent in the ename field. The error was auth not required in this
- 327 case.
The first two requests were just establishing a 9P conversation between both parties. The
third one, Tattach, was the one used by Plan 9 to mount the file tree:
<-12- Tattach tag 16 fid 435 afid -1 uname nemo aname
-12-> Rattach tag 16 qid (0000000000000000 0 d)
The attach request lets Plan 9 obtain a reference to the root of the file tree from the server. The
field uname tells the file server which user is attaching to the tree. The field aname tells to
which file tree in the server we are attaching. It corresponds to the last (optional) argument for
mount. In this case, the empty string is the conventional name for the main file server’s tree.
How can Plan 9 obtain a reference to a file in the server? References are pointers, which
point into memory, and cannot cross the network! Numbers, called fids (or file identifiers) are
used to do that. The point is that both Plan 9 and the file server may agree that a particular fid
number identifies a particular file in the server.
As figure 13.1 and the attach messages above show, Plan 9 sent a fid number in Tattach.
It was 435. Which number it was, it does not matter. It is just a number proposed as a fid (i.e., a
file identifier, or a file reference) by Plan 9 to the file server. After the server accepts the attach
request, and replies with Rattach, both Plan 9 and the server agree that the fid proposed will
now be a reference to the root of the file tree mounted. So, from now on, the fid 435 can be used
in other 9P requests to mean / within the file server.
Ramfs
.
Mount table entry
/
......
......
.
.
.
.
.
.
fid
435
.
.
.
.
.
Chan for
Chan for . . . . . . . . . . . . . . . . . .
/n/ram
server’s fid 435
x
y
z
Plan 9
Figure 13.1: After an attach Plan 9 has a fid number that refers to the file server’s / file.
The figure depicts the scenario after completing the mount system call that issued the
attach request. There is a new entry in the name space where we mounted the file server. The new
entry in the mount table says that whenever we reach the file /n/ram, while resolving a file
name, we should continue at the root for the file server instead. As we saw time ago, a Chan is
the data structure used in Plan 9 to refer to a file in a particular server. The Chan identifies the file
server that contains the file, and also includes a fid number. The fid is used when speaking 9P
with the file server containing the file, to identify the file.
Fids let the 9P client refer to a file in a request made to the server. But another kind of file
identifier is needed. Consider the mount table entry shown in the figure. It says, when you get to
a file that is /n/ram, you must continue at [ ... ]. How can Plan 9 know that it has reached the
file /n/ram? To know if that happens, Plan 9 must check if the Chan (i.e., the file) it is working
with refers to the file /n/ram. Plan 9 needs to be able to compare two Chans for equality, that
is, to determine if they refer to the same file.
To help with this, other type of file identifiers, called qids, univocally identify files within a
file server. All 9P file servers promise that each file will be assigned an unique number, called its
- 328 qid. Furthermore, a qid used for a file will not be used for any other file even after the file is
removed. So, two files with the same qid within the same file server are the same file. Otherwise,
files are different.
Each Chan contains the qid for the file it refers to. In our 9P dialog, the Rattach message
sent a qid back to the client, and Plan 9 knows which qid corresponds to the / of our ramfs file
tree. If you look back to see the Dir data structure returned by dirstat, with attributes for a
file, you will see that one of the fields is a Qid.
We said that a qid is a number. But a qid is indeed a tiny structure that contains three numbers.
typedef
struct Qid
{
uvlong
ulong
uchar
} Qid;
path;
vers;
type;
The path field is the actual value for the qid, the unique number for the file within its file server.
Beware, this is not a string with a file name, but it identifies a file in the file server and that is the
reason for calling it path. The vers field is a number that represents the version for the file. It
is incremented by the file server whenever the file is updated. This is useful to let Plan 9 know if
a cached file is up to date or not. It is also useful to let applications know if a file has changed or
not. The field type contains bits that are set to indicate the type for a file, including these ones:
#define QTDIR
#define QTAPPEND
#define QTEXCL
0x80
0x40
0x20
/* type bit for directories */
/* type bit for append only files */
/* type bit for exclusive use files */
For example, the QTDIR bit is set in Qid.type for directories, unset for other files. The
QTAPPEND bit is set for append-only files. The QTEXCL bit is set for files with the exclusive use
permission set (files that can be open by at most one process at the same time). Looking back to
the Rattach message sent by ramfs, its root directory has a qid whose path was
0000000000000000, i.e., 0. Its version was 0, and it had the QTDIR bit set (printed as a d).
In the figure 13.1 we assumed that the file tree served by ramfs had three files in its root
directory. Before continuing, we are going to create three such empty files using this command:
; touch /n/ram/^(x y z)
...9P dialog omitted...
;
What would now happen if we write the string hello to /n/ram/x? We can use echo to do
it. The shell will open /n/ram/x for writing, and echo will write its argument to the file. This
is the 9P conversation spoken between Plan 9 and ramfs as a result.
; echo -n hola >/n/ram/x
<-12- Twalk tag 14 fid 435 newfid 476 nwname 1 0:x
-12-> Rwalk tag 14 nwqid 1 0:(0000000000000000 1 )
<-12- Topen tag 14 fid 476 mode 17
fid mode is 0x11
-12-> Ropen tag 14 qid (0000000000000000 1 ) iounit 0
<-12- Twrite tag 14 fid 476 offset 0 count 4 ’hola’
-12-> Rwrite tag 14 count 4
<-12- Tclunk tag 14 fid 476
-12-> Rclunk tag 14
First, Plan 9 took the name /n/ram/x and tried to open it for writing. It walked the file tree
using the name space, as we learned before. After reaching /n/ram, it knows it has to continue
- 329 the walk at the root for our file server. So, Plan 9 must walk to the file /x of the file server. That
is what Twalk is for.
The first 9P request, Twalk, is used to walk the file tree in ramfs. It starts walking from
the file with fid 435. That is the root of the tree. The walk message contains a single step, walking
to x, relative to wherever fid 435 points to. The field nwname contains how many steps, or
names, to walk. Just one in this case. The field wname in the message is an array with that number of names. This array was printed in the right part of the line for the message. It had a single
component, wname[0], containing the name x. If the file exists, and there is no problem in
walking to it, both Plan 9 and the file server agree that the fid number in newfid (476 in this
case) refers to the resulting file after the walk. The reply message, Rwalk, mentions the qids for
the files visited during the walk. After this message, things stand as shown in figure 13.2.
Ramfs
..
....
..............
. . . . . . . 435
. .fid
.............
...
.. .. .. .. .. . . . . . . .
Plan 9
.....
............
...........
fid 476
.......
............
.....
x
/
y
z
Figure 13.2: Fids after walking to the file x in the file server.
After the walk, Plan 9 sent a Topen request to open the file. Actually, to prepare the fid for
doing further reads and writes on it. The message mentions which fid to open, 476 in this case, or
/x within the file server. It also mentions which mode to use. The mode corresponds to the flags
given to open(2), or to create(2). The reply informs about the qid for the file just open. Both
requests, Twalk and Topen are the result of the system call made from the shell to create the
file.
Now its time for echo to write to the file. To implement the write system call, Plan 9
sent a Twrite 9P request. I mentions to which fid to write (which must be open), at which offset
to write, how many bytes, and the bytes to write. The reply, Rwrite, indicates how many bytes
were written.
The last request, Tclunk, releases a fid. It was sent when the file was closed, after echo
exited and its standard output was closed.
The dialog for reading a file would be similar. Of course, the open mode would differ, and
Tread will be used instead of Twrite. Look this for example.
; cat /n/ram/x
<-12- Twalk tag 14 fid 435 newfid 486 nwname 1 0:x
-12-> Rwalk tag 14 nwqid 1 0:(0000000000000000 2 )
<-12- Topen tag 14 fid 486 mode 0
fid mode is 0x0
-12-> Ropen tag 14 qid (0000000000000000 2 ) iounit 0
<-12- Tread tag 14 fid 486 offset 0 count 8192
-12-> Rread tag 14 count 4 ’hola’
hola<-12- Tread tag 14 fid 486 offset 4 count 8192
-12-> Rread tag 14 count 0 ’’
<-12- Tclunk tag 14 fid 486
-12-> Rclunk tag 14
- 330 The program cat opens /n/ram/x. It all works like before. The Twalk request manages to
get a new fid, 486, referring to file /x within the file server. However, the following Topen
opens the file just for reading (mode is zero). Now, cat calls read, to read a chunk of bytes
from the file. It asked for reading 8192 bytes. The reply, Rread, sent only 4 bytes as a result. At
this point, the system call read terminated and cat printed what it could read, the file contents.
The program had to call read again, and this time there was nothing else to read (the number of
bytes in Rread is zero). So, cat closed the file.
A file can be created by sending a Tcreate request to a file server. This is the 9P dialog
for creating the directory /n/ram/a.
; mkdir /n/ram/a
<-12- Twalk tag 14 fid 435 newfid 458 nwname 1 0:a
-12-> Rerror tag 14 ename file not found
<-12- Twalk tag 14 fid 435 newfid 474 nwname 1 0:a
-12-> Rerror tag 14 ename file not found
<-12- Twalk tag 14 fid 435 newfid 474 nwname 0
-12-> Rwalk tag 14 nwqid 0
<-12- Tcreate tag 14 fid 474 name a perm d-rwxr-xr-x mode -2147483137
-12-> Rcreate tag 14 qid (0000000000000003 0 d) iounit 0
<-12- Tclunk tag 14 fid 474
-12-> Rclunk tag 14
Plan 9 tried to access /n/ram/a several times, to see if it existed. It could be mkdir, calling
access, or Plan 9 itself. It does not really matter. What matters is that the file server replied
with Rerror, stating that there was an error: file not found. Then, a last Twalk was
issued to obtain a new fid referring to the directory where the file is being created. In this case,
the fid 474 was obtained to refer to the root directory in the file server. At last Tcreate asks to
create a file with the name indicated in the name field, i.e., a. After the call, the fid in the message refers to the newly created file, and it is open. Because we are creating a directory, the bit
DMDIR would be set in the perm field, along with other file permissions. This is similar to what
we did when using create(2).
There are several other messages. Removing a file issues a Tremove message. The
Tremove request is similar to Tclunk. However, it also removes the file identified by the fid.
Tstat obtains the attributes for a file. Twstat updates them.
; rm /n/ram/y
<-12- Twalk tag 14 fid 435 newfid 491 nwname 1 0:y
-12-> Rwalk tag 14 nwqid 1 0:(0000000000000001 0 )
<-12- Tremove tag 14 fid 491
-12-> Rremove tag 14
; ls -l /n/ram/z
<-12- Twalk tag 14 fid 435 newfid 458 nwname 1 0:z
-12-> Rwalk tag 14 nwqid 1 0:(0000000000000002 0 )
<-12- Tstat tag 14 fid 458
-12-> Rstat tag 14 stat ’z’ ’nemo’ ’nemo’ ’nemo’ q (0000000000000002 0 ) m 0644 at 11
<-12- Tclunk tag 14 fid 458
-12-> Rclunk tag 14
--rw-r--r-- M 125 nemo nemo 0 Aug 20 01:28 /n/ram/z
- 331 -
; chmod -w /n/ram/z
<-12- Twalk tag 14 fid 435 newfid 458 nwname 1 0:z
-12-> Rwalk tag 14 nwqid 1 0:(0000000000000002 0 )
<-12- Tstat tag 14 fid 458
-12-> Rstat tag 14 stat ’z’ ’nemo’ ’nemo’ ’nemo’ q (0000000000000002 0 ) m 0644 at 11
<-12- Tclunk tag 14 fid 458
-12-> Rclunk tag 14
<-12- Twalk tag 14 fid 435 newfid 458 nwname 1 0:z
-12-> Rwalk tag 14 nwqid 1 0:(0000000000000002 0 )
<-12- Twstat tag 14 fid 458 stat ’’ ’’ ’’ ’’ q (ffffffffffffffff 4294967295 dalA) m 04
-12-> Rwstat tag 14
<-12- Tclunk tag 14 fid 458
-12-> Rclunk tag 14
At this point, we know enough of 9P and what a file server does to start building a new file
server.
13.3. Semaphores for Plan 9
For most tasks, it would be probably better to use channels, from the thread library, instead of
using semaphores. Semaphores are a synchronization abstraction prone to errors. But assuming
that we need semaphores due to some reason, it may be useful to write a file server to provide
them. Before, we used pipes to implement semaphores. This is reasonable and works well within
a single machine. But what if you want to use semaphores to synchronize processes that run at
different machines? Also, using a byte of buffering in the pipe for each ticket in the semaphore
looks like wasting resources.
We are going to implement a program, semfs, that provides semaphores as if they were
files. It will export a single (flat) directory. Each file in the directory represents a semaphore. And
we have to think of an interface for using a semaphore by means of file operations. It could be as
follows.
"
Creating a file in our file server creates a semaphore, with no tickets inside. That is, its initial value is zero.
"
To put tickets in a semaphore, a process may write into its file a string stating how many
tickets to add to the semaphore. We prefer to write the string 3 instead of the binary number
3 because strings are portable (all machines store them in the same way).
"
To get a ticket from a semaphore, a process may read from its file. Each read would have to
await until there is a ticket to get, and it will return some uninteresting data once a ticket is
available.
Before implementing anything, we want to be sure that the interface could be used. We can use
some wishful thinking and assume that it has been already implemented. And now we can try to
use it, just to see if we can. For example, we can start by providing a C interface for using the
semaphores. The function newsem can create a semaphore and give it an initial number of tickets.
- 332 int
newsem(char* sem, int val)
{
int
fd;
fd = create(sem, OWRITE, 0664);
if (fd < 0)
return -1;
print(fd, "%d", val);
close(fd);
return 0;
}
Removing a semaphore is easy, we can use remove. To do ups and downs we can use the following functions.
int
up(char* sem)
{
int
fd;
fd = open(sem, OWRITE);
if (fd < 0)
return -1;
write(fd, "1", 1);
close(fd);
return 0;
}
int
down(char* sem)
{
char
buf[1];
int
fd;
fd = open(sem, OREAD);
if (fd < 0)
return -1;
read(fd, buf, 1);
return 0;
}
The interface seems to be convenient, because we can even use the shell to initialize and list our
semaphores. An invented session could be as follows, provided that semfs has been mounted at
/mnt/sem.
; echo 1 >/mnt/sem/mutex
; touch /mnt/sem/items
; ls /mnt/sem
mutex
items
;
create a semaphore for mutual exclusion
create a semaphore with 0 tickets
list semaphores
13.4. Speaking 9P
It is quite easy to build a file server that speaks 9P using the 9p(2) library, known also as lib9p.
It provides most of the machinery needed to maintain the data structures necessary for a file
server, and many of the common functions found in most file servers.
The main data structure provided by lib9p is Srv. The task of a 9P file server is to serve
- 333 9P requests. For each 9P message received, it must execute a function to perform the actions
requested by the message, and reply with an appropriate message to the client. This is what Srv
represents, the implementation of a file server. Srv is a structure that contains pointers to functions to implement each 9P message. This is an excerpt of its declaration.
typedef struct Srv Srv;
struct Srv {
void
(*attach)(Req*);
void
(*auth)(Req*);
void
(*open)(Req*);
void
(*create)(Req*);
void
(*read)(Req*);
void
(*write)(Req*);
void
(*remove)(Req*);
void
(*stat)(Req*);
void
(*wstat)(Req*);
void
(*walk)(Req*);
void
(*flush)(Req*);
char*
(*clone)(Fid*, Fid*);
char*
(*walk1)(Fid*, char*,
int
infd;
// T-messages
int
outfd; // R-messages
void*
aux;
// for you to
...
};
Qid*);
read from here
written here
use
A file server program initializes a Srv structure with pointers to appropriate implementations.
Then, it calls a function from lib9p that takes care of almost everything else. For example,
postmountsrv takes a server implementation (i.e., a Srv structure), a name for a file to be
posted at /srv, and a path for a mount point (as well as flags for mount).
; sig postmountsrv
void postmountsrv(Srv *s, char *name, char *mtpt, int flag)
This function creates a separate process to run the server, as implemented by Srv. It creates a
pipe and puts the server process in a loop, reading 9P requests from one end of the pipe and calling the corresponding function in Srv for each request. See figure 13.3. The other end of the pipe
is posted at /srv, using the name given as an argument. At this point, the file in /srv can be
mounted to reach the file server. Furthermore, postmountsrv mounts the file server at the
directory given in mtpt, using flag as flags for mount. So, postmountsrv provides all the
main-loop logic for a file server, and makes it available to other processes. It is optional to give
name, and mtpt. Passing nil as either value makes postmountsrv not to post or not to
mount the file server respectively.
One thing to note is that the process created by postmountsrv will not share its name
space with the parent process (the one calling postmountsrv). It could not be otherwise. If it
was, a process would have to reply to 9P requests for the file tree it is using. This would lead to
deadlocks. For example, opening a file would make the process wait for Plan 9 to speak 9P with
the server, that would wait until the server attends 9P requests, and the server would be waiting
for the open to complete. The flag RFNAMEG, RFFDG, and RFMEM are given to rfork by
postmountsrv. This means that the child process shares memory with the parent process, but
does not share the name space nor the file descriptors with the parent.
Things work as shown in figure 13.3. The child process created by postmountsrv executes the main server loop. This loop, implemented by the srv function from lib9p, keeps on
reading 9P messages from the pipe. When it reads a Tread message, it calls the function
Srv.read to process the request. The function is expected to perform the read and then reply to
the client, by sending perhaps an Rread back to the client. In the same way, Twrite messages
are processed by Srv.write, and so on.
- 334 -
client
(Plan 9)
9P
pipe
Tread
Rread
server
loop
call to
srv.read
read
function
Srv
attach
auth
read
write
...
walk
(child) server process
Figure 13.3: A 9P server process created by a call to postmountsrv.
The main server loop function, srv may be used directly when postmountsrv does not
do exactly what we want. It reads messages from Srv.infd, and sends replies to Srv.outfd.
These descriptors usually refer to the pipe created by postmountsrv, but that does not have to
be the case.
Not all functions in Srv have to be implemented. In many cases, leaving a nil function
pointer for a 9P request in Srv provides a reasonable default. For example, If files cannot be
written, the pointer Srv.write may be set to nil, and the main loop will respond with an appropriate Rerror reply upon write attempts. The details about which functions must be provided,
which ones do not have to be, and what should such functions do, are described in the 9p(2) manual page. In any case, if a function is provided for a message, it is responsible for responding.
As an additional help, because walk may be complicated to implement, two functions that
are building blocks for walk may be implemented instead of walk. This functions are walk1
and clone.
At this point, we can start to implement semfs. To attend 9P messages, we must implement several functions and place pointers to them in a Srv structure. All the functions correspond
with 9P requests, but for fswalk1 and fsclone, used by the library to implement walk, and
for freefid, which will be addressed later. Given this structure, it is simple to construct a file
server by using postmountsrv, or its version for programs using the thread library,
threadpostmountsrv.
_______
semfs.c
#include
#include
#include
#include
#include
#include
#include
<u.h>
<libc.h>
<auth.h>
<thread.h>
<fcall.h>
<9p.h>
"sem.h"
// required by lib9p
// required by lib9p
// definitions for lib9p
// our own definitions
- 335 static
static
static
static
static
static
static
static
static
void fsattach(Req* r) { ... }
void fscreate(Req* r) { ... }
void fsread(Req* r){ ... }
void fswrite(Req* r){ ... }
char* fswalk1(Fid* fid, char* name, Qid* qid){ ... }
char* sclone(Fid* fid, Fid* newfid){ ... }
void fsstat(Req* r){ ... }
void fsremove(Req* r){ ... }
void freefid(Fid* fid){ ... }
static Srv sfs=
{
.attach =
.create =
.remove =
.read
=
.write =
.walk1 =
.clone =
.stat
=
.destroyfid=
};
fsattach,
fscreate,
fsremove,
fsread,
fswrite,
fswalk1,
fsclone,
fsstat,
freefid,
void
usage(void)
{
fprint(2, "usage: %s [-D] [-s srv] [-m mnt]\n", argv0);
threadexitsall("usage");
}
void
threadmain(int argc, char **argv)
{
char*
mnt;
char*
srv;
srv = nil;
mnt = "/mnt/sem";
ARGBEGIN{
case ’D’:
chatty9p++;
break;
case ’s’:
srv = EARGF(usage());
break;
case ’m’:
mnt = EARGF(usage());
break;
default:
usage();
}ARGEND;
if(argc!= 0)
usage();
threadpostmountsrv(&sfs, srv, mnt, MREPL|MCREATE);
threadexits(nil);
}
The call to threadpostmountsrv starts a process (containing a single thread) to serve 9P
- 336 requests, and dispatches to functions linked at sfs, which attend the different requests. This program mounts itself (i.e., the file tree served by the child process) at /mnt/sem, but accepts the
conventional option -m to specify a different mount point. In the same way, the option -s can be
used to specify a file in /srv where to post a pipe to mount the file server. To aid the debugging
process, the flag -D increments the global flag chatty9p, defined by lib9p. When this global
is non-zero, the library prints 9P messages as they are exchanged with the client. Like we saw for
ramfs.
13.5. 9P requests
The first function we are going to implement is fstattach. This particular function
attends Tattach messages. Its implementation introduces several important data structures provided and used by lib9p.
static void
fsattach(Req* r)
{
r->fid->qid = (Qid){0,0,QTDIR};
r->ofcall.qid = r->fid->qid;
respond(r, nil);
}
Like all other functions for 9P messages, fstattach receives a pointer to a Req, a C structure
representing a 9P request. Its definition may be found at /sys/include/9p.h, and includes
the following fields:
typedef struct Req Req;
struct Req
{
ulong
tag;
Fcall
ifcall;
Fcall
ofcall;
Fid*
fid;
Dir
d;
void*
aux;
Srv*
srv;
...
};
The tag field is the tag for the request. It is must be the same in the T- message and in the Rmessage used to respond. The actual message that was received (as a request) from the client is
kept at ifcall. This structure contains the message unpacked as a C structure, reflecting the
actual message received as an array of bytes from the connection to the client. The purpose of the
function is to attend the request as found in Req.ifcall, and then fill up a response message.
The response message is actually Req.ofcall. This field contains a structure similar to that of
Req.ifcall, but this one is for the response message instead of being for the request message.
The function respond (see in fstattach above) builds a response message by looking
into Req.ofcall and packing the message in an array of bytes, which is then sent back to the
client. It does so if the second argument is nil. Otherwise, the second argument is taken as an
error string, and respond responds with an Rerror message instead. In our fstattach
implementation, we never respond with errors and accept any request. After the request has been
responded respond releases the Req data structure. A request should never be used again after
responding to it. As you can see in our function, there is no need to fill all fields in the response.
The library takes care of many of them, including setting the tag and the type in the reply to correspond to those in the request. So, for fsattach, we only had to fill up the qid sent in the
reply.
The data structure Fcall, defined in /sys/include/fcall.h, is used in Plan 9 to
- 337 represent a 9P message. It is used both for Req.ifcall and Req.ofcall. The meaning of
its fields is exactly the meaning of the fields in the 9P message represented by the Fcall, as
described in the section 5 of the manual.
typedef
struct Fcall
{
uchar
type;
u32int fid;
ushort tag;
union {
struct {
u32int
char
msize;
*version;
/* Tversion, Rversion */
/* Tversion, Rversion */
oldtag;
/* Tflush */
*ename;
/* Rerror */
qid;
iounit;
/* Rattach, Ropen, Rcreate */
/* Ropen, Rcreate */
aqid;
/* Rauth */
afid;
*uname;
*aname;
/* Tauth, Tattach */
/* Tauth, Tattach */
/* Tauth, Tattach */
perm;
*name;
mode;
/* Tcreate */
/* Tcreate */
/* Tcreate, Topen */
};
struct {
ushort
};
struct {
char
};
struct {
Qid
u32int
};
struct {
Qid
};
struct {
u32int
char
char
};
struct {
u32int
char
uchar
};
struct {
u32int
ushort
char
newfid;
/* Twalk */
nwname;
/* Twalk */
*wname[MAXWELEM];
/* Twalk */
};
struct {
ushort
Qid
nwqid;
/* Rwalk */
wqid[MAXWELEM];
/* Rwalk */
};
struct {
vlong
u32int
char
offset;
count;
*data;
/* Tread, Twrite */
/* Tread, Twrite, Rread */
/* Twrite, Rread */
nstat;
*stat;
/* Twstat, Rstat */
/* Twstat, Rstat */
};
struct {
ushort
uchar
};
};
} Fcall;
- 338 Most 9P requests refer to a particular fid, which is a number that represents a particular file
in use by the client. Thus, a Req contains a pointer to a Fid data structure that represents a fid,
maintained by lib9p. The library keeps a table for fids in use, and a Fid data structure for each
one. When the protocol dictates that a new fid is allocated, the library creates a Fid and updates
the table. The library also releases fids when they are no longer in use. A Fid looks like follows.
typedef struct Fid Fid;
struct Fid
{
ulong
fid;
char
omode; /* -1 = not open */
Qid
qid;
void*
aux;
...
};
It contains the fid number, the open mode for the fid (or -1 if it is not open), and the qid for the
file referenced by the fid.
The purpose of fsattach is to let clients attach to our tree, by making the fid refer to our
root directory and replying with an Rattach message informing of its qid. The library helps in
mapping fids to qids, because it handles all the Fid structures and keeps their qids in each
Fid.qid. But the file server must still map different qids to different files.
In semfs, there is a flat (root) directory that may contain files representing semaphores.
The qid for the directory must have QTDIR set in its type field. Having just one directory, we
may use Qid.type to see if a qid refers to the root or to any other file in our tree. The path
field for the qid (i.e., the actual qid number) may be just zero, as the version field. Therefore, this
is what fstattach does.
r->fid->qid = (Qid){0,0,QTDIR};
r->ofcall.qid = r->fid->qid;
The fid represented by r->fid (the one mentioned by the Tattach) now refers to the root
directory of our tree. The response message carries the qid back to the client. That is all we had to
do.
We still must invent a scheme for assigning qids to files representing semaphores. A simple
way is to keep all the semaphores in a single array, and use the array index as the Qid.path for
each file. Given a qid, we would know if it is the directory or a file. Should it be a file,
Qid.path would be the unique index for each semaphore in the array.
13.6. Semaphores
What is a semaphore? For our server, it is just an instance of a Sem data structure. We can place
in sem.h its declaration and all the definitions needed to use the implementation for semaphores,
that we may keep at sem.c. The file semfs.c is kept just with the implementation for the different file server requests.
The structure Sem needs to keep the number of tickets. Besides, we need to record the
name for the file representing the semaphore and its index in the array (used to build its qid).
When a down is made on a semaphore with no tickets, we must hold the operation until
there is one ticket available. In our case, when a Tread request is received for a semaphore that
has no tickets, we must hold the request until there is one ticket and we can reply. Therefore, the
semaphore needs to maintain a list of requests to be replied when tickets arrive. For now, this is
all we need. The resulting data structure is as follows (Ignore the field Ref by now).
- 339 ______
sem.h
typedef struct Sem Sem;
typedef struct QReq QReq;
struct Sem {
Ref;
int
id;
// index in array; qid.path
char*
name;
// of file
int
tickets;
QReq*
reqs;
// reads (i.e., downs) pending
};
struct QReq {
QReq*
Req*
};
extern Sem*
next;
r;
// in pending request list
// the request pending
sems[Nsems];
Before proceeding, we are going to complete the implementation for the semaphore abstraction
by implementing its operations. We need to create semaphores. The function newsem does that.
The Sem structure is initialized to contain no tickets. The id field keeps the index in the
array, and the name for the file representing the semaphore is kept as well.
_____
_sem.c
...
Sem*
sems[Nsems];
Sem*
newsem(char* name)
{
int
i;
for (i = 0; i < Nsems; i++)
if (sems[i] == nil)
break;
if (i == Nsems)
return nil;
sems[i] = emalloc9p(sizeof(Sem));
memset(sems[i], 0, sizeof(Sem));
sems[i]->ref = 2;
sems[i]->id = i;
sems[i]->name = estrdup9p(name);
return sems[i];
}
The function locates a free entry in sems, where to keep the new semaphore. When a semaphore
is no longed needed, and is released, we will deallocate it and set its entry to nil in the array. So,
the function sweeps the array from the beginning, looking for the first available entry.
All the semaphores will be kept in the array sems, indexed by their qids. This violates a little bit the convention that a qid number is never reused for a different file. A semaphore using an
array entry that was used before by an old semaphore (now removed) is going to have the same
- 340 qid used by the old one. This may cause problems if binds are done to semaphore files, and also if
any client caches semaphores. In our case, we prefer to ignore this problem. To fix it, the file
server can keep a global counter to assign qid numbers to semaphores, and increment the counter
each time a new semaphore is created. Nevertheless, the implementation shown here suffices for
our purposes.
Instead of using malloc, we must use emalloc9p. The 9P library provides implementations for emalloc9p, erealloc9p, and estrdup9p that mimic the ones with a similar
name in the C library. These implementations take an appropriate action when there is no more
memory, and guarantee that they will always return new memory. The appropriate action is simply aborting the entire program, but you may implement your own versions for these functions if
something better is needed.
Perhaps surprisingly, there is no function to free a semaphore. The point is that we can only
free a Sem when we know that no data structure in our program is using it. But when does that
happen? Requests mention fids, that may refer to Sem data structures. If a user wants to remove a
file representing a semaphore, we can only do so when no references remain to that semaphore.
Calling free on a semaphore while there might be requests and/or fids pointing to it would be a
disaster.
The solution is to do reference counting. Each semaphore contains one integer, which is
called a reference counter. For each reference that points to a Sem we count one reference using
the counter. New references made to the semaphore increment the counter. When a reference is
gone, we decrement the reference counter. Only when the counter gets down to zero it is safe to
release the data structure. This technique is used in many different places by operating systems,
to release file descriptors when no process is using them, to remove files when nobody is using
them, to destroy windows when no process is using them, etc.
In general, releasing data structures or other resources when they are no longer needed is
called garbage collection. Reference counting is a form of garbage collection that may be used
for any data structures that do not form cycles. If there are cycles, there may be circular lists not
referenced from outside, that would never be deallocated by reference counting because there is at
least one reference for each node (from the previous node in the cycle).
The thread library provides reference counters, protected by locks. They can be used safely
even when multiple processes are incrementing and decrementing the counters, which by the way,
is not the case here. A Ref structure is a reference counter, containing a ref field with the
counter and a lock. The function incref increments the counter (using the lock to protect from
possible races). The function decref decrements the counter and returns the new value for it.
As you could see, newsem sets sems[i]->ref to 2, because it is returning one reference
and also storing another reference in the array of semaphores. Both references must go away
before releasing the semaphore. To release one reference, the function closesem can be called.
void
closesem(Sem* s)
{
if (s != nil && decref(s) == 0){
assert(s->reqs == nil);
assert(sems[s->id] == s);
sems[s->id] = nil;
free(s->name);
free(s);
}
}
It decrements the reference counter for s, but releases the data structure only when no other references exist, i.e., only when decref reports that s->ref is zero after discounting one reference.
To allow calls to closesem with nil pointers, a check for s!=nil was added as well.
Let’s proceed with other operations for our data type. To add tickets we can simply handle
- 341 Sem.tickets as we please. To remove tickets we can do the same. The only operations that
remain to be provided are those handling the list of pending requests in the semaphore. They are
simply implementing a queue of requests using Sem.reqs. This function enqueues a new pending request in the semaphore, adding it to the tail of the queue.
void
queuereq(Sem* s, Req* r)
{
QReq*
q;
QReq** l;
q = emalloc9p(sizeof(QReq));
q->r = r;
q->next = nil;
for (l = &s->reqs; *l != nil; l = &(*l)->next)
;
*l = q;
}
The next one returns the first request in the queue, and removes it from the head.
Req*
dequeuereq(Sem* s)
{
QReq*
q;
Req*
r;
if (s->reqs == nil)
return nil;
q = s->reqs;
s->reqs = q->next;
r = q->r;
free(q);
return r;
}
Because we might change this part of the implementation in the future, we add a function to
check if there is any queued request, so that nobody would need to touch Sem.reqs.
int
queuedreqs(Sem* s)
{
return s->reqs != nil;
}
13.7. Semaphores as files
We have all the tools needed to complete our file server. The following function serves
Tcreate requests, which create semaphores. To do so, it allocates a new Sem data structure by
calling newsem.
- 342 static void
fscreate(Req* r)
{
Fid*
fid;
Qid
q;
Sem*
s;
fid = r->fid;
q = fid->qid;
if (!(q.type&QTDIR)){
respond(r, "not a directory");
return;
}
s = newsem(r->ifcall.name);
fid->qid = (Qid){s->id, 0, 0};
fid->aux = s;
fid->omode = r->ifcall.mode;
incref(s);
r->ofcall.qid = fid->qid;
respond(r, nil);
}
In a Tcreate, the fid in the request (represented by r->fid) should point to a directory. The
server is expected to create a file with the name specified in the request (which is
r->ifcall.name here) within that directory. Also, after the Tcreate, the fid must point to
the newly created file and must be open according to the mode specified in the request. This is
what the function does.
If the qid is not for the directory (the QTDIR bit is not set in its qid), an Rerror message
is sent back to the client, instead of creating the file. This is achieved by calling respond with a
non-null string as the error string. Otherwise, we create a Sem data structure by calling newsem.
The qid in the fid and the response, r->ofcall, is also updated to refer to the new file.
To make things more simple for us, we place a pointer to the Sem implied by the qid in the
Fid.aux field of each fid. All of Fid, Req, and Srv data structures contain an aux field that
can be used by your programs to keep a pointer to any data of interest for your file server. In our
case, fid->aux will always point to the Sem structure for the file referenced by the fid. We do
so for all fids referring to semaphore files.
The fsclone routine is called by the library when a new fid is created as a clone of an
existing one, as part of the implementation for the Twalk message (that creates new fids by cloning old ones). The implementation updates the aux field for the new fid and the reference
counter for the semaphore involved (which is now pointed to by a new fid). The function might
return a non-null string to signal errors, but this implementation will never fail.
static char*
fsclone(Fid* fid, Fid* newfid)
{
Sem*
s;
s = fid->aux;
if (s != nil)
incref(s);
newfid->aux = s;
return nil;
}
The library uses reference counting to know when a Fid is no longer used (e.g., because of a
Tclunk that removed the last reference to a fid). When a fid is released the library calls
Srv.destroyfid, which we initialized to point to freefid. This function releases one
- 343 reference to the semaphore for the fid. If this was the last one pointing to the semaphore, it will be
released. Note that there will always be one reference from the array of semaphores, as long as the
file has not been removed.
static void
freefid(Fid* fid)
{
Sem*
s;
s = fid->aux;
fid->aux = nil;
closesem(s);
}
Removing of files is done by fsremove, which releases the reference from the array as well as
the one from the fid.
static void
fsremove(Req* r)
{
Req*
q;
Sem*
s;
s = r->fid->aux;
while(r = dequeuereq(s))
respond(q, "file has been removed");
closesem(s);
r->fid->aux = nil;
closesem(s);
// release reference from sems[]
respond(r, nil);
}
Before actually removing anything, all the poor requests waiting for future tickets are responded,
with an error message that reports that the semaphore was removed.
One word about reference counting before continuing. A semaphore may point to requests,
that point to fids, that may point to the semaphore. So, at first sight, we have a data structure with
cycles and we should not use reference counting to release it. However, upon a Tremove, all the
requests in the semaphore are released. From this point, the semaphore will not create any cycle
in the data structure, and reference counting may be safely used.
The 9P message Tread is attended by fsread. This function implements reading from a
fid (i.e., a file). But note that the root directory may be one of the files read by the client, e.g., to
list its contents. This is very different from reading for a semaphore file, and the function must
take a different course of action if QTDIR is set in the qid for the file being read.
static void
fsread(Req* r)
{
Fid*
fid;
Qid
q;
Sem*
s;
char
nl[2] = "\n";
fid = r->fid;
q = fid->qid;
if (q.type&QTDIR){
dirread9p(r, getdirent, nil);
respond(r, nil);
return;
}
- 344 s = fid->aux;
if (s->tickets > 0){
s->tickets--;
readstr(r, nl);
respond(r, nil);
} else
queuereq(s, r);
}
We defer the discussion of reading from the root directory until later. Regarding from a semaphore file means obtaining a ticket from the semaphore. The semaphore is pointed to by
fid->aux. So, it all depends on the value of s->tickets. When there is one ticket to satisfy the request (i.e., to do a down in the semaphore), we decrement s->tickets, to give one
ticket to the process reading. When there are no tickets, the request r is queued in the semaphore
by a call to queuereq. Not responding until we have one ticket means blocking a down until it
obtains its ticket.
But a read must return some bytes from the file (maybe none). What do we read when we
obtain a ticket? To permit using the command read to obtain tickets using the shell, we return a
newline character for each ticket read. For the read command, a new line terminates the line it
should read. For us, reading once from the semaphore means obtaining one ticket. Both concepts
match if we read an empty line.
The data supposedly contained in the file, read by a Tread request is contained in the
string nl. Just an empty line. To satisfy a Tread, the program must look at
r->ifcall.offset and r->ifcall.count, which contains the offset in the file where to
start reading and the number of bytes to return at most. Then, the program must update
r->ofcall.count and r->ofcall.data to reply later with an Rread containing the
number of bytes in the message and the bytes themselves. In our case, we could ignore the offset
and do it as follows.
r->ofcall.count = r->ifcall.count;
if (r->ofcall.count > 1)
r->ofcall.count = 1;
memmove(r->ofcall.data, "\n", r->ofcall.count);
respond(r, nil);
We read one byte at most, the new line. And then we respond with the Rread message.
If we did not ignore the offset in the request, further reads from the file (at offsets bigger
than zero) would always return zero bytes, and not a new line. But in any case, reading from a
semaphore file still would have the semantics of blocking until a ticket is obtained, and then
returning something (perhaps just nothing). Nevertheless, we have been assuming that processes
using our file system will open the file for a semaphore before each operation, and then close it
after doing it. The C interface that we designed for using our semaphore file system did it this
way.
In the implementation for fsread, the function did not update the response message by
itself. Instead, it calls readstr, which is a helper function from lib9p that fills an Rread
reply assuming that file contents are those in the string given as a parameter (in this case, the contents of nl). The function updates r->ofcall.count and r->ofcall.data, taking care
of the offset, the string size, and the maximum number of bytes requested. After calling
readstr, the only thing pending is calling respond to reply to the client. By the way, another
helper called readbuf is similar to readstr, but reads from an arbitrary array of bytes, and
not just from a string. Calling readstr is similar to calling
readbuf(r, str, strlen(str));
in any case.
That was the implementation for a down. The implementation for an up is contained in the
- 345 function that attends Twrite messages. Our convention was that a write with a number (printed
as a string) would add so many tickets to the semaphore.
static void
fswrite(Req* r)
{
Fid*
fid;
Qid
q;
Sem*
s;
char
str[10];
Req*
qr;
char
nl[2] = "\n";
fid = r->fid;
q = fid->qid;
if (q.type&QTDIR){
respond(r, "permission denied");
return;
}
if (r->ifcall.count > sizeof(str) - 1){
respond(r, "string too large");
return;
}
memmove(str, r->ifcall.data, r->ifcall.count);
str[r->ifcall.count] = 0;
s = fid->aux;
s->tickets += atoi(str);
while(s->tickets > 0 && queuedreqs(s)){
qr = dequeuereq(s);
qr->ofcall.count = 1;
s->tickets--;
readstr(qr, nl);
respond(qr, nil);
}
respond(r, nil);
}
Writing to directories is not permitted and he function checks that QTDIR is not set in the qid for
the file being written. When writing to a file, the function takes the bytes written from
r->ifcall.data, and moves the bytes in there to a buffer, str. The number of bytes sent in
the write request is reported by r->ifcall.count. The offset for the write, kept at
r->ifcall.offset, is ignored.
We had to move the bytes to str to terminate the string written with a final null byte, so
we could use atoi to convert the string to a number, and add so many tickets to s->tickets.
If might seem simpler to write an integer directly, but then we could not use echo to update
semaphores, and we would have to agree on the endianness for the integers written to the file. It is
more simple in this way.
Once the semaphore has been updated, the implementation still has to complete any pending
down that may proceed due to the new tickets added. The last while does just that. While there
are tickets and pending requests, we reply to each one of such requests with an empty line, like
fsread did when tickets were available.
That is all we had to do. But we still have pending reading from the file that is the root
directory. The code used by fsread to attend such requests was as follows.
- 346 if (q.type&QTDIR){
dirread9p(r, getdirent, nil);
respond(r, nil);
return;
}
Reading from a directory must return an integral number of directory entries, formatted as an
array of bytes, neutral to all architectures, so that reading from a directory would return meaningful data no matter the architecture of the machine used by the file server and the one used as a
client. Attending such reads can be a burden. The function dirread9p, provided by the library,
is a helper routine that fills r->ofcall.data and r->ofcall.count to read correctly
from a directory.
But how can dirread9p know which entries are kept in the directory? That is, how can it
know what bytes should be read? A function, called here getdirent, and called dirgen by
the 9p(2) manual page, is given as an argument to dirread9p.
What happens is that dirread9p calls getdirent to obtain the first entry in the directory, then the second, then the third, etc. until it has enough entries to fill the Rread message in
r->ofcall. The parameter n of getdirent shows which file is the one whose directory
entry should be copied into *d by the function. Each call to getdirent (to a dirgen function) must fill a Dir structure for the n-th file in the directory, and return zero. Or it must return
-1 to signal that there is no n-th file in the directory. Another usual convention is that an index
of -1 given to a dirgen refers to the directory itself, and not to any of its entries. Although we
do not depend on that, we follow it as well. This is the implementation for getdirent.
static int
getdirent(int n, Dir* d, void*)
{
d->atime= time(nil);
d->mtime= d->atime;
d->uid = estrdup9p(getuser());
d->gid = estrdup9p(d->uid);
d->muid= estrdup9p(d->uid);
if (n == -1){
d->qid = (Qid){0, 0, QTDIR};
d->mode = 0775;
d->name = estrdup9p("/");
d->length = 0;
} else if (n >= 0 && n < nsems && sems[n] != nil){
d->qid = (Qid){n, 0, 0};
d->mode = 0664;
d->name = estrdup9p(sems[n]->name);
d->length = sems[n]->tickets;
} else
return -1;
return 0;
}
We pretend that the access time and last modification time for the file is just now. Regarding the
owner (and group and last modifier user) for the file we use the username of the owner of our process. That is reasonable.
Now things differ depending on which entry is requested by the caller to getdirent. If n
is -1, we assume that d must be filled with a directory entry for the directory itself. In this case,
we update the qid, permissions, file name, and length to be those of our root directory. Note that
conventionally directories have a length of zero. Note also how strings kept by the directory entry
must be allocated using estrdup9p, or maybe using emalloc9p.
If n is a valid identifier (index) for a semaphore, we update the qid, permissions, file name,
- 347 and length in d. Otherwise we return -1 to signal that there is no such file. Note how
d->qid.path is the index for the semaphore. Also, we report as the file size the number of
tickets in the semaphore. In this way, ls can be used to see if a semaphore has any available tickets in it.
The last parameter in getdirent corresponds to the last parameter we gave to
dirread9p. This function passes such argument verbatim to each call of getdirent. It can
be used to pass the data structure for the directory being iterated through calls to getdirent.
In our case, we have a single directory and do not use the auxiliary argument.
Having implemented getdirent makes it quite easy to implement fsstat, to serve
Tstat requests. The function fsstat must fill r->d with the directory entry for the file
involved. Later, respond will fill up an appropriate Rstat message by packing a directory
entry using the network format for it (similar to directory entries traveling in Rread messages for
directories).
static void
fsstat(Req* r)
{
Fid*
Qid
fid;
q;
fid = r->fid;
q = fid->qid;
if (q.type&QTDIR)
getdirent(-1, &r->d, nil);
else
getdirent(q.path, &r->d, nil);
respond(r, nil);
}
When the file for Tstat is the directory, we call getdirent to fill r->d with the entry for the
file number -1, i.e., for the directory itself. Once getdirent did its job, we only have to call
respond.
We are now close to completing our file server. We must still implement the function
fswalk1, used by the library (along with fsclone) to implement walk. This function
receives a fid, a file name and a qid. It should walk to the file name from the one pointed to by
fid. For example, if fid refers to the root directory, and name is mutex, the function should
leave the fid pointing to /mutex. If later, the function is called with the same fid but the name is
.., the function should leave the fid pointing to /. Walking to .. from / leaves the fid
unchanged. The convention is that /.. is just /. Like it happen with fsclone, the function
must return a nil string when it could do its job, or a string describing the error when it failed.
Besides, both fid->qid and *qid must be updated with the qid for the new file after the walk.
Furthermore, because we keep a pointer to a Sem in the fid->aux field, the function must
update such field to point to the right place after the walk.
static char*
fswalk1(Fid* fid, char* name, Qid* qid)
{
Qid
q;
int
i;
Sem*
s;
q = fid->qid;
s = fid->aux;
- 348 if (!(q.type&QTDIR)){
if (!strcmp(name, "..")){
fid->qid = (Qid){0,0,QTDIR};
*qid = fid->qid;
closesem(s);
fid->aux = nil;
return nil;
}
} else {
for (i = 0; i < nsems; i++)
if (sems[i] && !strcmp(name, sems[i]->name)){
fid->qid = (Qid){i, 0, 0};
incref(sems[i]);
closesem(fid->aux);
fid->aux = sems[i];
*qid = fid->qid;
return nil;
}
}
return "no such file";
}
Walking to the root directory releases any reference to the Sem that might be pointed to by
fid->aux. Walking to a file adds a new reference to the semaphore for the file. But otherwise,
the function should be simple to understand.
And this completes the implementation for our semaphore file server. After compiling it,
we can now use it like follows.
; 8.semfs -s sem -m /mnt/sem
; echo 1 >/mnt/sem/mutex
; echo 3 >/mnt/sem/other
; ls -l /mnt/sem
--rw-rw-r-- M 174 nemo nemo 1 Aug 23 00:16 /mnt/sem/mutex
--rw-rw-r-- M 174 nemo nemo 3 Aug 23 00:16 /mnt/sem/other
; read </mnt/sem/other
; ls -l /mnt/sem/other
--rw-rw-r-- M 174 nemo nemo 2 Aug 23 00:16 /mnt/sem/other
; read </mnt/sem/other
; read </mnt/sem/other
; read </mnt/sem/other
This blocks until a ticket is added. And then....
;
The program we built uses a single process to attend all the 9P requests. Nevertheless, we
decided to show how to use the thread library together with lib9p. If we decide to change the
program to do something else, that requires multiple threads or processes, it is easy to do so.
Once again, it is important to note that by processing all the requests in a single process, there is
no race condition. All the data structures for the semaphores are free of races, as long as they are
touched only from a single process.
For example, if this program is ever changed to listen for 9P clients in the network, it might
create a new process to attend each connection. That process may just forward 9P requests
- 349 through channels to a per-client thread that attends the client requests. Once again, there would be
no races because of the non-preemption for threads.
There are several other tools for building file servers in Plan 9. Most notably, there is a
implementation of file trees, understood by lib9p. File servers that only want to take care of
reading and writing to their files may create a file tree and place a pointer to it in the Srv structure. After doing so, most of the calls that work on the file tree would be supplied by the library.
In general, only reading and writing to the files must be implemented (besides creation and
removal of files). We do not discuss this here, but the program /sys/src/cmd/ramfs.c is
an excellent example of how to use this facility.
13.8. A program to make things
For all the previous programs, compiling them by hand could suffice. For our file server program,
it is likely that we will have to go through the compile-test-debug cycle multiple times. Instead
of compiling and linking it by hand, we are going to use a tool that knows how to build things.
The program mk is similar to the UNIX program make. Its only purpose is to build things
once you tell it how to build them. The instructions for building our products must be detailed in
a file called mkfile, read by mk to learn how to build things.
We placed the source code, along with an initial version for our mkfile, in a directory for
our file server program.
; lc
mkfile sem.c
sem.h
semfs.c
; cat mkfile
8.semfs: semfs.8 sem.8
8l -o 8.semfs semfs.8 sem.8
semfs.8: semfs.c sem.h
8c -FVw semfs.c
sem.8: sem.c sem.h
8c -FVw sem.c
;
Now, running mk in this directory has the following effect.
; mk
8c -FVw semfs.c
8c -FVw sem.c
8l -o 8.semfs semfs.8 sem.8
;
The mkfile contains rules, that describe how to build one file provided you have other ones.
For example, this was one rule:
8.semfs: semfs.8 sem.8
8l -o 8.semfs semfs.8 sem.8
It says that we can build 8.semfs if we have both semfs.8 and sem.8. The way to build
8.semfs according to this rule is to execute the command
8l -o 8.semfs semfs.8 sem.8
All the rules have this format. There is a target to build, followed by a : sign and a list of
dependencies (that is, things that our target depends on). The target and the list of dependencies
must be in the same line. If a line gets too long, the backslash character, \, can be used to continue writing on the next line as if it was a single one. A rule says that provided that we have the
files listed in the dependencies list, the target can be built. It is also said that the target depends on
- 350 the files listed after the : sign. Following this line, sometimes called the header of the rule, a
rule contains one or more lines starting with a tabulator character. Such lines are executed as shell
commands to build the target. These lines are sometimes called the body for the rule.
When we executed mk, it understood that we wanted to build the first target mentioned in
the mkfile. That was 8.semfs. So, mk checked out to see if it had semfs.8 and sem.8
(the dependencies for 8.semfs). Neither file was there! What could mk do? Simple. The program searched the mkfile to see if, for each dependency, any other rule described to to build it.
That was the case. There is a rule for building sem.8, and one for building semfs.8.
So, mk tried to build semfs.8, using its rule. The rule says that given semfs.c and
sem.h, semfs.8 can be built.
semfs.8: semfs.c sem.h
8c -FVw semfs.c
Both semfs.c and sem.h are there, and mk can proceed to build semfs.8. How? By executing the command in the body of the rule. This command runs 8c and compiles semfs.c.
Note one thing. The body of the rule does not use the file sem.h. We know that the object
file semfs.8 comes from code both in semfs.c and sem.h. But mk does not! You see the
same invariant all the times. Programs usually know nothing about things. They just do what they
are supposed to do, but there is no magic way of telling mk which files really depend on others,
and why the commands in the body can be used to build the target.
In the same way, mk uses the rule for the target sem.8, to build this file. This is the last
dependency needed for building 8.semfs.
sem.8: sem.c sem.h
8c -FVw sem.c
After executing the body, and compiling sem.c, both dependencies exist, and mk can proceed to
build, finally, 8.semfs. How? You already know. It runs the command in the body of the rule
for 8.semfs. This command uses 8l to build a binary program from the object files.
Mk chains rules in this way, recursively, trying to build the target. A target may be given as
an argument. If none is given, mk tries to build the first target mentioned.
Suppose we now run mk again. This is what happens.
; mk
mk: ’8.semfs’ is up to date
;
No rule was executed. The program mk assumes that a target built from some other files, if newer
than the other files, is already up to date and does not need to be built. Because we did not modify any file, the file 8.semfs is newer than semfs.8 and sem.8. This means that 8.semfs
is up to date with respect to its dependencies. Before checking this out, mk checks if the dependencies themselves are up to date. The file semfs.8 is newer than its dependencies, which
means that it is up to date as well. The same happens to sem.8. In few words, the target given
to mk is up to date and there is nothing to make.
Suppose now that we edit sem.c, which we can simulate by touching the file (updating its
modification time). Things change.
; touch sem.c
; mk
8c -FVw sem.c
8l -o 8.semfs semfs.8 sem.8
;
The file sem.8, needed because 8.semfs depends on it, is not up to date. One of the files it
depends on, sem.c, is newer than sem.8. This means that the target sem.8 is old, with respect
- 351 to sem.c, and must be rebuilt to be up to date. Thus, mk runs the body of its rule and compiles
the file again.
The other dependency for the main target, semfs.8, is still up to date. However, because
sem.8 is now newer than 8.semfs, this file is out of date, and the body for its rule is executed.
In few words, mk executes only what is strictly needed to obtain an up to date target. If nothing
has to be done, it does nothing. Of course mk only knows what the mkfile says, you should not
expect mk to know C or any other programming language. It does not know anything about your
source code.
What if we want to compile semfs for an ARM, and not for a PC. We must use 5c and 5l
instead of 8c and 8l. Adjusting the mkfile for each architecture we want to compile for is a
burden at least. It is better to use variables.
An mkfile may declare variables, using the same syntax used in the shell. Environment
variables are created for each variable you define in the mkfile. Also, you many use environment variables already defined. That is to say that mk uses environment variables in very much
the same way the shell uses it. The next mkfile improves our previous one.
_____
_mkfile
CC=8c
LD=8l
O=8
$O.semfs: semfs.$O sem.$O
$LD -o $O.semfs semfs.$O sem.$O
semfs.$O: semfs.c sem.h
$CC -FVw semfs.c
sem.$O: sem.c sem.h
$CC -FVw sem.c
The mkfile defines a CC variable to name the C compiler, an LD variable to name the loader,
and an O variable to name the character used to name object files for the architecture. The behavior of mk when using this mkfile is exactly like before. However, we can now change the definitions for CC, LD, and O as follows
CC=5c
LD=5l
O=5
Running mk again will compile for an ARM.
; mk
5c -FVw semfs.c
5c -FVw sem.c
5l -o 5.semfs semfs.5 sem.5
;
As another example, we can prepare for adding more source files in the future, and declare a variable to list the object files used to build our program. The resulting mkfile is equivalent to our
previous one, like in all the examples that follow.
- 352
_____
_mkfile
CC=8c
LD=8l
O=8
OFILES=semfs.$O sem.$O
$O.semfs: $OFILES
$LD -o $O.semfs $OFILES
...other rules...
There are several variables defined by mk, to help us to write rules. For example, $target is the
target being built, for each rule. Also, $prereq are the dependencies (prerequisites) for the rule.
So, we could do this.
_____
_mkfile
CC=8c
LD=8l
O=8
OFILES=semfs.$O sem.$O
$O.semfs: $OFILES
$LD -o $target $prereq
...other rules...
Using these variables, all the rules we are using for compiling a source file look very similar.
Indeed, we can write just a single rule to compile any source file. It would look as follows
%.$O: %.c sem.h
$CC -FVw $stem.c
This rule is called a meta-rule. It defines many rules, one for each thing that matches the % character. In our case, it would be like defining a rule for semfs.$O and another for sem.$O. The
rule says that anything (the %) terminated in $O can be built from the corresponding file, but terminated in .c. The command in the body of the rule uses the variable $stem, which is defined
by mk to contain the string matching the % in each case.
All this lets you write very compact mkfiles, for compiling your programs. But there is
even more help. We can include files in the mkfile, by using a < character. And we can use
variables to determine which files to include! Look at the following file.
_____
_mkfile
</$objtype/mkfile
OFILES=semfs.$O sem.$O
$O.semfs: $OFILES
$LD -o $target $prereq
%.$O: %.c sem.h
$CC -FVw $stem.c
It includes /386/mkfile when $objtype is 386. That is our case. The file /386/mkfile
- 353 defines $CC, $LD, and other variables to compile for that architecture. Now, changing the value
of objtype changes all the tools used to compile, because we would be including definitions for
the new architecture. For example,
; objtype=arm mk
5c -FVw sem.c
5l -o 5.semfs semfs.5 sem.5
;
This way, it is very easy to cross-compile. And that was not all. There are several mkfiles that
can be included to define appropriate targets for compiling a single program and for compiling
multiple ones (one per source file). What follows is once more our mkfile.
_____
_mkfile
</$objtype/mkfile
OFILES=semfs.$O sem.$O
HFILES=sem.h
TARG=$O.semfs
BIN=$home/bin/$objtype
</sys/src/cmd/mkone
The file mkone defiles targets for building our program. It assumes that the variable OFILES list
the object files that are part of the program. Also, it assumes that the variable HFILES list the
headers (which are dependencies for all the objects). Each object is assumed to come from a C
file with the same name (but different extension). The variable BIN names the directory where to
copy the resulting target to install it, and the variable TARG names the target to be built. Now we
can do much more than just compiling our program, there are several useful targets defined by
mkone.
; mk
8c -FVw semfs.c
8c -FVw sem.c
8l -o 8.out semfs.8 sem.8
; mk install
cp 8.out /usr/nemo/bin/386/8.semfs
; mk clean
rm -f *.[578qv] [578qv].out y.tab.? y.debug y.output 8.semfs $CLEANFILES
As before, changing $objtype changes the target we would be compiling for.
It might seem confusing that install and clean were used as targets. They are not files.
That point is that targets do not need to be files. A target may be a virtual thing, invented by you,
just to ask mk to do something. For example, this might be the rule for install.
install:V: $O.semfs
cp $O.semfs $BIN
The rule is declared as a virtual target, using the :V: in the header for the rule. This means that
mk will consider install to be something that is not a file and is never up to date. Each time
we build the target install, mk would execute the body for the rule. That is how mkone could
define targets for doing other things.
One final advice. This tool can be used to build anything, and not just binaries. For example, the following is an excerpt of the mkfile used to build a PDF file for this book.
- 354 CHAPTERS=‘{echo ch?.ms ch??.ms}
PROGRAMS=‘{echo src/*.ms}
...
%.ps:%.ms
eval ‘{doctype $stem.ms} | lp -d stdout > $stem.ps
We defined variables to contain the source files for chapters (named ch*.ms), and for formatted
text for programs. These were used by rules not shown here, but you can still see how the shell
can be combined with mk to yield a very powerful tool. The meta-rule that follows, describes
how to compile the source for chapters (or any other document formatted using troff) to obtain a
postscript file.
The program doctype prints the shell commands needed to compile a troff document, and
the eval shell built-in executes the string given as an argument as if it was typed, to evaluate
environment variables or other artifacts printed by doctype. Again, this is just an example. If it
seems confusing, experiment with the building blocks that you have just seem. Try to use them
separately, and try to combine them to do things. That is what Plan 9 (and UNIX!) is about.
There are several other features, described in the mk(1) manual page, that we omit. What has
been said is enough to let you use this tool. For a full description, [8] is a good paper to read.
13.9. Debugging and testing
Having executed our program a couple of times is not enough to say that semfs is reliable
enough to be used. At the very least, it should be used for some time besides being tested. Also,
some tools available in Plan 9 may help to detect common problems. Reading a book that
addresses this topic may also help [5].
To test the program, we might think on some tests to try to force it to the limit and see if it
crashes. Which tests to perform heavily depend on the program being tested. In any case, the shell
can help us to test this program.
The idea is to try to use our program and then check if it behaved correctly. To do this, we
can see if the files served behave as they should. At least, we could do this for some simple
things. For example, if the file system is correct, it must at least allow us to create semaphores
and to remove them. So, executing
; 8.semfs
; for (i in ‘{seq 1 100}) { echo 1 >/mnt/sem/$i }
should always leave /mnt/sem with the same files. One hundred of semaphore files with names
1, 2, etc., up to 100. This means that executing
; for (i in ‘{seq 1 100}) { echo 1 >/mnt/sem/$i }
; ls /mnt/sem
should always produce the same output, if the program is correct. In the same way, if semaphores
behave correctly, the following will not block, and the size for the semaphore file after the loop
should be zero. Thus, the following is also a program that should always produce the same output
if the file system is correct.
; echo 4 >/mnt/sem/mutex
; for (i in ‘{seq 1 4}) { read </mnt/sem/mutex }
; if (test -s /mnt/sem/mutex)
;;
echo not zero sized
;
For all these checks we can think of how to perform them in a way that they always produce the
same output (as long as the program is correct). The first time we run a check, we check the output by hand and determine if it seems correct. If that is the case, we may record the output for
later. For example, suppose the first check above is contained in the script chk100.rc, and the
- 355 last check is contained in the script chkdowns.rc. We could proceed as follows.
; 8.semfs
; chk100.rc >chk100.rc.out
..inspect chk1.out to see if it looks ok, and proceed....
; chkdowns.rc >chkdowns.rc.out
...do the same for this new check...
Now, if we make a change to the program and want to check a little bit if we broke something, we
can use the shell to run our tests again, and compare their output with previous runs. This is
called regression testing. That is, testing one program by looking at the output of previous versions for the same program.
; for (chk in chk*.rc) {
;;
cmp <{$chk} $chk.out || echo check $chk failed
;;
}
This loop could perhaps be included in a rule for the target check in our mkfile, so that typing
; mk check
suffices.
What we said does not teach how to test a program, nor tries to. We tried to show how to
combine the shell and other tools to help you in testing your programs. That is part of development and Plan 9 helps a lot in that respect.
There are many other other things that you could check about your program. For example,
listing /proc/$pid/fd for the program should perhaps show the same number of file descriptors for the same cases. That would let you know if a change you make leaks any file descriptor
(by leaving it open). The same could be done by looking into memory usage and alerting about
huge increases of memory.
There are other tools to help you optimize your programs, including a profiler that reports
where the program spends time, and several tools for drawing graphics and charts to let you see if
changes improve or not the time spent by the program (or the memory) for different usages. All
of them are described in the manual. Describing them here would require many more space, and
there are good books that focus just on that topic.
To conclude with this notes about how to check your program once it has been executed a
couple of times, we must mention the leak tool. This tool helps a lot to find memory leaks, a
very common type of error while programming. A memory leak is simply memory that you have
allocated (using malloc or a routine that calls malloc) but not released. This tool uses the
debugger (with some help from the library implementing dynamic memory) to detect any such
leak. For example,
; leak -s page
leak -s 1868 1916 1917 1918
tries to find memory leaks for the process running page. The program prints a command that
can be executed to scan the different processes for that program for memory leaks. Executing
such command looks like follows:
; leak -s page|rc
;
There was no output, which meant that there seems to be no memory leaks. However, doing the
same for a program called omero, reported some memory leaks.
- 356 ; leak -s omero|rc
src(0x0000dd77); //
src(0x000206a8); //
src(0x000213bc); //
src(0x00027e68); //
src(0x00027fe7); //
src(0x00002666); //
src(0x0000c6ff); //
7
3
3
3
2
1
1
Each line can be used as a command for the debugger to find the line where the memory (leaked)
was allocated. Using
; src -s 0x0000dd77 omero
would point our editor to the offending source line that leaked 7 times some memory, as reported
by the first line in the output of leak. Once we know where the memory was allocated, we may
be able to discover which call to free is missing, and fix the program.
Problems
1
Convert the printer spooler program from a previous problem into a file server.
- 357 -
14 Security
______
14.1. Secure systems
Security is a topic that would require a book on its own. Here we just show the abstractions and
services provided by Plan 9 to secure the computer system. But in any case you should keep in
mind that the only secure system is one that is powered down (and also kept under a lock!). As
long as the system can perform tasks, there is a risk that some attacker convinces the system to do
something that it should not legitimately do.
In general, there is a tradeoff between security and convenience. For example, a stand-alone
Plan 9 machine like a laptop that is not connected to the network does not ask for a password to
let you use it. Thus, any person that gets the laptop may power it up and use it. However, you do
not have to type a password to use it, which is more convenient. If, on the contrary, your laptop
requires a password to be used, typing the password would be an inconvenience. Nevertheless,
you might think that this makes the laptop more secure because it requires to know a password
just to use it.
By the way, this is not true because as long as a malicious person has your laptop in his or
her hands, the laptop will be broken into and the only question is how much time and effort it will
require to do so. So, using a password to protect the laptop would be given a false feeling that the
system is secure. Furthermore, although it is common for laptops that might be used on its own,
terminals in Plan 9 are not supposed to have local storage nor any other local resource to protect!
A Plan 9 terminal is just a machine to connect to the rest of services in the network.
What does security mean? It depends. For example, the dump in the file server protects
your files from accidental removals or other errors. At least, it protects them in the sense that you
may still access a copy of the entire file tree, as it was yesterday, even if you loose today’s files.
Furthermore, because old files kept in disk will never be overwritten by the file server once they
are in the dump, it is very unlikely that a bug or a software problem will corrupt them. The dump,
like other backup tools, is preserving the integrity of your data (of your files). This is also part of
the security provided by the computing system. In any case, it is usual to understand security in a
computer as the feature that prevents both
1
unauthorized use of the system (e.g., running programs), and
2
unauthorized access to data in the system (e.g., reading or modifying files).
We will focus on security understood in this way, that is, as something to determine who can do
which operations to which objects in the system. But keep in mind that security is a much more
wide subject.
We have already seen several abstractions that have to do with security, understood this
way. First, the persons who can perform actions on things in the computer system are represented
by users. A user is represented in the system by a user name, as you saw. Users rely on networked machines or systems to do things in the computing system. Machines execute programs.
Indeed, the only way for a user to do something on a machine is to execute a program (or to use
one already running). Protecting the system to permit using it only to authorized users means just
protecting machines so that only authorized users may convince already running processes to do
things for them. Things like, for example, running new programs and reading and writing files.
In Plan 9, some of the machines are terminals for the users. Other machines are CPU servers
that accept connections from other machines to execute commands on them. Besides, you have
one or more file servers, that are machines whose solely purpose is providing files by running
programs similar to the one we developed in the previous chapter. Most (if not all) the objects in
the computer system are represented by files. Thus, the objects that must be protected by the system are files. Protecting access to files means deciding if a particular process (acting on behalf of
a user) may or may not do a particular operation on a file.
- 358 -
14.2. The local machine
You know that there are many machines involved in your computing system. But let’s start by
considering just the one you are using, or, in general, a single machine.
A user may execute commands in a terminal, and use any of its devices, by booting it and
supplying a user name. Terminals are not supposed to keep state (local storage) in Plan 9 and so
there is no state to protect. Also, terminals are not supposed to export their devices to the network, by listening to network calls made to access them. This means that nobody should be able
to access a terminal, but for the user who brought it into operation. Also, a terminal is a singleuser machine. It is not meant to be shared by more than one user. Computers are cheap these
days.
How is your terminal secured? The local machine is protected merely by identifying the
user who is using it. Identification is one of the things needed to secure a system. Plan 9 must
know who is trying to do something, before deciding if that action is allowed or not. In Plan 9,
the user who switched on the machine is called the machine owner and allowed to do anything to
the machine. This applies not just for terminals, but for any other Plan 9 machine as well.
The console device, cons(3), provides several files that identify both the machine and its
owner. The file /dev/hostowner names the user who owns the machine, and
/dev/sysname names the machine itself.
; cat /dev/hostowner
nemo;
; cat /dev/sysname
nautilus;
It may be a surprise, but the machine name is irrelevant for security purposes. Only the host
owner is relevant. This terminal trusts that the user who owns it is nemo, only because one user
typed nemo when asked for the user name during the booting of the machine. That is all that matters for this machine. Initially, Plan 9 created a boot process, described in boot(8). Besides doing
other things, it asked for a user name and wrote /dev/hostowner. But note that in our example it might happen that the user was not actually nemo! For the local machine, it does not matter.
Deciding who is able to do what is called authorization. Authorization for the host owner
is automatic. The kernel is programmed so that the machine owner is authorized to do many
things. For example, ownership of console and other devices is given to the host owner.
; ps | sed 4q
nemo
nemo
nemo
nemo
; ls -l ’#c’
--rw-rw-r-- c
--rw-rw---- c
---w--w---- c
--r--r--r-- c
--r--r--r-- c
...
1
2
3
5
0
0
0
0
0
nemo
nemo
nemo
nemo
nemo
0:00
0:58
0:00
0:00
0:00
0:00
0:00
0:00
1276K
0K
0K
0K
Await
Wakeme
Wakeme
Wakeme
bns
genrandom
alarm
rxmitproc
nemo 24 May 23 17:44 ’#c/bintime’
nemo 0 May 23 17:44 ’#c/cons’
nemo 0 May 23 17:44 ’#c/consctl’
nemo 72 May 23 17:44 ’#c/cputime’
nemo 0 May 23 17:44 ’#c/drivers’
This can be double checked by changing the host owner, which is usually a bad idea.
- 359 ; echo -n pepe >/dev/hostowner we set a new host owner...
; ls -l ’#c’
--rw-rw-r-- c 0 pepe pepe 24 May 23 17:44 ’#c/bintime’
--rw-rw---- c 0 pepe pepe 0 May 23 17:44 ’#c/cons’
---w--w---- c 0 pepe pepe 0 May 23 17:44 ’#c/consctl’
...
; echo -n nemo >/dev/hostowner ...and now restore the original one
The host owner can do things like adjusting permissions for files in /proc, which are owned by
him. There is nothing that prevents this user from adding permissions to post notes, for example,
to kill processes.
; ls -l /proc/$pid/note
--rw-r----- p 0 nemo nemo
0 May 23 17:44 /proc/1235/note
; chmod a+w /proc/$pid/note
; ls -l /proc/$pid/note
--rw-rw--w- p 0 nemo nemo 0 May 23 17:44 /proc/1235/note
The truth is that users do not exist. For the system, processes are the ones that may perform
actions. There is no such thing as a human. For example, the human using the window system is
represented by the user name of the process(es) implementing the window system. Therefore,
each process is entitled to a user, for identification purposes. In a terminal, all the processes are
usually entitled to the host owner. But how can this happen?
What happens is that the initial process, boot was initially running on the name of the user
none, which represents an unknown user. After a user name was given to boot, while booting
the terminal, it wrote such user name to /dev/user and, from there on, the boot process was
running on the name of nemo. The file /dev/user provides the interface for obtaining and
changing the user name for the current process (for the one reading or writing the file). The user
name can only be set once, initially. From there on, the user name can only be read but not
changed. For example, the following happens when using the user name for our shell.
; cat /dev/user
nemo;
; echo -n pepe >/dev/user
echo: write error: permission denied
Child processes inherit the user name from their parents. So, all the processes in your terminal are
very likely to be owned by you, because they all descend from the boot process, that changed its
ownership to your user name.
It is important for you to notice that only the local machine trusts this. And that you might
perfectly change the kernel in your terminal to admit doing weird things like changing
/dev/user. Other machines do not trust this information at all. As a result, running a custom
made kernel just to break into the system would only break into the terminal running that kernel,
and not into other machines.
This does not happen on other systems. For example, UNIX was made when a computing
system was just a single machine. Networks came later and it was considered very unlikely that a
user could own a machine, attach it to the network, and run a fake kernel just to break into the
system. The result is that most UNIX machines tend to trust the users responsible for the kernels
at different machines within the same organization. Needless to say that this is a severe security
problem.
14.3. Distributed security and authentication
We have seen that a terminal is secured just by not sharing it. It trusts whoever boots it. This
allows you to run processes in your terminal and use its devices. However, the terminal needs
files to do anything. For example, unless you have a binary file you cannot execute a new
- 360 program. There are some programs compiled into the kernel, kept at /boot, just to get in touch
with the file server machine, but that does not suffice to let the user do any useful work.
Files are provided by file server programs, like the ones we have seen before. Each file
server is responsible for securing its own files. Therefore, there is no such thing as an account in
Plan 9. Strictly speaking, each file server has a list of user (and group) names known to it, and is
responsible for deciding if a user at the other end of a 9P connection is allowed to do something
on a file or not.
Each file server has some mechanism to open accounts and authorize users. How to do this
is highly dependent on the particular file server used. For example, each fossil has a file
/adm/users that lists users known to it. Any user that wants to mount a particular fossil
file server must be listed in the /adm/users file kept within that fossil. My file server
knows me because its administrator included nemo in its users file.
; grep ’^nemo’ /adm/users
nemo:nemo:nemo:
In this case, the fossil administrator used the uname and users commands in the fossil console
to create my user in that file server.
main: uname nemo nemo
main: users -w
add the user nemo
and update the /adm/users file in disk
But to use other file servers I need other accounts. One per file server. For each file server program its manual page must provide some help regarding how to let it know which user names
exist.
Note that a user name in a file server is only meaningful to that file server. Different file
servers may have different lists of users. Within a single organization, it is customary to have a
central, main, file server and to use its /adm/users file to initialize the set of users for other
secondary file servers also installed. This is how users are authorized to use file servers.
Besides, a file server must also identify the user who is using it. This is done using 9P.
When a process mounts a file server in its name space, the user name is sent in the Tattach
request. As you know, the attach operation gives a handle, a fid, to the client attaching to the file
system. This permits the file server to identify the user responsible for operations requested on
that fid. When new fids are obtained by walking the file tree, the file server keeps track of which
user is responsible for which fids.
Access control, that is, deciding if a particular operation is to be allowed or not, is performed by the file server when a user opens a file, walks a directory, and tries to modify its
entries (including creating and removing files). When a process calls open on a file, the system
sends a Topen request to the file server providing the file. At this point, the file server takes the
user name responsible for the request and decides whether to grant access or not. You know,
from the first chapter, that this is done using per-file access control lists, that determine which
operations can be performed on which file. Once a file has been open for a particular access
mode (reading, writing, or both), no further access control check is made. The file descriptor, (or
the fid for that matter) behaves like a capability (a key) that allows the holder to perform file
operations consistent with the open mode.
These are all the elements involved in securing access to files, but for an important one. It is
necessary to determine if the user, as identified for a file server, is who he or she claims to be.
Users can lie! This operation is called authentication. Authenticating a user means just obtaining some proof that the user is indeed the one identified by the user name. Most of the machinery
provided for security by Plan 9 is there just to authenticate users.
And here comes the problem. In general, the way a program has to convince another of
something is to have a secret also known to the other. For example, when an account is open for a
user in a Plan 9 environment, the user must go near the console of a server machine and type a
password, a secret. The same secret is later typed by the same user at a terminal. Because the
- 361 terminal and the server machine share the same secret, the sever can determine that the user is
indeed who typed the password while opening the account. Well, indeed, the server does not
know if the password is also known by another user, but the server assumes this would not happen.
Authentication is complex because it must work without trusting the network. There are
many different protocols consisting on messages exchanged in a particular way to allow an end of
a connection to authenticate the other end, without permitting any evil process spying or intercepting network messages to obtain unauthorized access. Once more, we do not cover this subject
in this book. For use, the important point is that there are multiple authentication protocols, and
that there is an interface provided by the system for this purpose.
The mount system call receives two file descriptors, and not just one (even though a file
descriptor for a connection to a file server is all we need to speak 9P with it).
; sig mount
int mount(int fd, int afd, char *old, int flag, char *aname)
The fd descriptor is the connection to the file server. The second one, afd, is called an
authentication file descriptor, used to authenticate to the file server. Before calling mount, a process calls fauth to authenticate its user to a file server at the other end of a connection.
; sig fauth
int fauth(int fd, char *aname)
For example, if the file descriptor 12 is connected to a file server,
afd = fauth(12, "main")
obtains an authentication file descriptor for authenticating our user to access the file tree main in
the file server. This descriptor is obtained by our system using a Tauth 9P request. And now
comes the hard part. We must negotiate with the file server a particular authentication protocol to
use. Furthermore, we must exchange messages by reading and writing afd according to that protocol, to give proof of our identity to the file server. This is complex and is never done by hand.
Assuming we already made it, afd can be given to mount, to prove that we have been already
authenticated. For example, like in
mount(12, afd, "/n/remote", MREPL, "main");
In most cases, the library function amount does this. So, it would have been the same to do just
amount(12, "/n/remote", MREPL, "main");
instead of calling fauth, following an authentication protocol, and calling mount. It is easier
to let amount take care of authentication by itself. In the next section we will show how could
this be.
By now, the important point is to note how authentication is performed by exchanging messages between the two processes involved. In this case, the file server and our client process. The
authentication file descriptor obtained above is just a channel where to speak an authentication
protocol, using some sort of shared secret to convince the other process, nothing else. It permits
keeping the authentication messages apart from 9P.
If there was only a single server, providing a secret to it for each user would suffice to
authenticate all users in the Plan 9 network. However, there can be may ones. Furthermore,
authentication is used not just to convince file servers. It is also used to convince other servers
providing different services, like command execution. Instead of having to open an account with
the user’s secret for each server, authentication is centralized in, so called, authentication
servers.
An authentication server is a machine that runs an authentication server process, perhaps
surprisingly. The idea behind an authentication server is simple. Authentication is delegated to
- 362 this server. Instead of sharing a secret, and trusting each other because of the shared secret, both
the client process and the server process trust a third process, the authentication server. This
means that both processes must share a secret with the third trusted one.
No matter how many servers there are, the client only needs one secret, for using the
authentication server. Using it, the client asks the authentication server for tickets to gain access
to servers. Each ticket is a piece of data than is given to a client, and can be used to convince the
server that the client is indeed who it claims to be. This can be done because the authentication
server may use the secret it shares with the server to encrypt some data in the ticket given to the
client. When the client sends the ticket to the server, the server may know that the ticket was
issued by someone knowing its own secret, i.e., by the authentication server.
The authentication server in Plan 9 is implemented by the program authsrv, described in
auth(8). It runs on a machine called the authentication server, as you might guess. In many cases,
this machine may be the same used as the main file server, if it runs such process as well.
Things are a little bit more complex, because a user might want to use servers maintained by
different organizations. It would not be reasonable to ask all Plan 9 file servers in the world to
share a single authentication server. As a result, machines are grouped into, so called,
authentication domains. An authentication domain is just a name, representing a group of
machines that share an authentication server, i.e., that are grouped together for authentication purposes. Each Plan 9 machine belongs to an authentication domain, set by the machine boot process
(usually through the same protocol used to determine the machine’s IP address, i.e., DHCP).
The file /dev/hostdomain, provided by the cons(3) device, keeps the authentication
domain for the machine.
; cat /dev/hostdomain
dat.escet.urjc.es;
;
Regarding authentication, a user is identified not just by the user name (e.g., that in
/dev/hostowner), but also by the associated authentication domain. A single user might have
different accounts, for using different servers, within different authentication domains. In many
cases, the same user name is used for all of them. However, a user might have different user
names for each different authentication domain.
14.4. Authentication agents
In any case, we still have to answer some questions. How does a client (or a sever) run the
authentication protocol? How do they speak with the authentication server? Where do they keep
the secrets? Strictly speaking, in Plan 9, neither process does any of these tasks! All the authentication protocols are implemented by a program called factotum. This program is what is
known as an authentication agent, i.e., a helper process to take care of authentication. A factotum keeps the secrets for other processes, and is the only program that knows how to perform the
client or the server side of any authentication protocol used in Plan 9.
Factotum keeps keys. A key is just a secret, along with some information about the secret
itself (e.g., which protocol is the secret for, which user is the secret for, etc.) Factotum is indeed a
file system, started soon after the the machine boots, which mounts itself at /mnt/factotum.
Its interface is provided through the files found there.
; lc /mnt/factotum
confirm ctl
log
needkey proto
rpc
The file ctl is used to control the set of secrets kept by the factotum. Reading it, reports the list
of keys known (without reporting the actual secrets!)
- 363 ; cat /mnt/factotum/ctl
key proto=p9sk1 dom=dat.escet.urjc.es user=nemo !password?
key proto=p9sk1 dom=outside.plan9.bell-labs.com user=nemo !password?
key proto=vnc dom=dat.escet.urjc.es server=aquamar !password?
key proto=pass dom=urjc.es server=orson service=ssh user=nemo !password?
key proto=rsa service=ssh size=1024 ek=10001 n=DE6D279ECC0F5D08B49C9B1F44B
9CA26114005BD2EB1B255A92F42D475B49D3EF9C923B9EC980D882033FA4886990DDF17108
FE4237A2FD6E1CB2C040C1E319206B8A9FBA59429AF5361F03352DAE67243B62CE2664663B
E0AE1F1933CDF935 !dk? !p? !q? !kp? !kq? !c2?
Each one of the lines above corresponds to a single key kept by this factotum process, and starts
with key. The last line is so large, that it required four output files in the terminal session reproduced above.
The first line shown above corresponds to the key used to authenticate to file servers using
the P9SK1 authentication protocol (Plan 9 Shared Key, 1st).
key proto=p9sk1 dom=dat.escet.urjc.es user=nemo !password?
As you can see, a key is a series of attribute and value pairs. In this key, the attribute proto has
as value p9sk1. The purpose of this attribute is to identify the protocol that uses this key. Other
attributes depend on the particular authentication protocol for the key. In P9SK1 keys, dom identifies the authentication domain for a key. This is just the name that identifies a set of machines,
for organizative purposes, that share an authentication server. The attribute user identifies our
user name within that domain. Note that we might have different P9SK1 keys for different
authentication domains, and might have different user names for them. The attribute password
has as its value a secret, that is not shown by factotum.
New keys can be added to factotum by writing them to the ctl file, using the same syntax.
The next command adds a key for using P9SK1, as the user nemo, for the foo.com authentication domain.
; echo ’key proto=p9sk1 dom=foo.com user=nemo !password=whoknows’ \
;; >/mnt/factotum/ctl
; grep foo.com /mnt/factotum/ctl
proto=p9sk1 dom=foo.com user=nemo !password?
;
The value for the attribute password is the shared secret used to authenticate the user nemo, by
using the authentication server for the foo.com domain. Because the attribute name was prefixed with a ! sign, factotum understands that it is an important secret, not to be shown while
reading ctl. In general, factotum does its best to avoid disclosing secrets. It keeps them for
itself, for use when speaking the authentication protocols involved. Look what happens below.
; ps | grep factotum
nemo
6
0:00
0:00
; acid 6
/proc/6/text:386 plan 9 executable
268K Pread
factotum
<stdin>:1: (error) setproc: open /proc/6/mem: permission denied
/sys/lib/acid/port
/sys/lib/acid/386
no symbol information
acid:
You cannot debug factotum! It protects its memory, to prevent any process from reading its memory and obtaining the keys it maintains. This can be done to any process by by writing the string
private to the process ctl file. That is what factotum did to itself to keeps its memory
unreadable from outside. In the same way, factotum wrote noswap to its process control file, to
ask Plan 9 not to swap its memory out to disk when running out of physical memory.
It is now clear how add keys to factotum. But now, how can a process authenticate? A
- 364 process can authenticate to another peer process by relying messages between its factotum and the
other peer. As figure 14.1 shows, during authentication, a client process would simply behave as
an intermediary between its factotum and the server. When its factotum asks the process so send a
message to the other end, it does so. When it asks the process to receive a message from the other
end, and give it to it, the process obeys. In the same way, a server process relies messages to and
from its own factotum to authenticate clients.
factotum
client
process
network
connection
client
process
server
process
network
connection
factotum
server
process
Figure 14.1: A process relies messages to and from its factotum to authenticate.
The protocol is only understood by the factotum. So, if both the client and the server have a
factotum, it is both factotums the ones speaking the authentication protocol. The only peculiarity
is that messages exchanged for authentication between both factotums pass through the client and
the server processes, which behave just as relies. As the figure shows, different servers might
have different factotums. The same happens for clients. And of course, more than one process
may use the same factotum. Which factotum is used is determined by which factotum is mounted
at /mnt/factotum.
For example, executing a new factotum mounts another factotum at /mnt/factotum,
isolating the processes that from now on try to authenticate in our name space.
; auth/factotum
; cat /mnt/factotum/ctl
;
This one has no keys!
There is another important thing to note. A process may use a factotum even if the other peer does
not. For example, the server shown below in the figure does not use a factotum and is implementing the authentication protocol on its own. As long as a process speaks properly the necessary
authentication protocol, it does not matter if it is the one actually speaking, or just a rely for a factotum.
The connection kept between a process and its factotum during an authentication session is
provided by the /mnt/factotum/rpc file. This file provides a distinct channel each time it is
open. It is named rpc because the process performs RPCs to the factotum by writing requests
through this file (and reading replies from factotum), to ask what it should do and rely messages.
The auth(2) library provides authentication tools that work along with factotum. Among
other things, it includes a function called auth_proxy that takes care of authentication by relying messages between the factotum reached through /mnt/factotum/ctl and the other end
of a connection. It returns a data structure with some authentication information.
; sig auth_proxy
AuthInfo* auth_proxy(int fd, AuthGetkey *getkey, char *fmt, ...);
To show how to use this function, the following program mounts a file server and performs any
authentication necessary to gain access to the server’s file tree. The auth library provides
amount to do this. Instead of using it, the program implements its own version for this function.
- 365 _________
amount.c
#include <u.h>
#include <libc.h>
#include <auth.h>
...implementation for authmount here...
void
main(int argc, char*argv[])
{
AuthInfo*ai;
int
fd;
if (argc != 4){
fprint(2, "usage: %s file mnt aname\n", argv[0]);
exits("usage");
}
fd = open(argv[1], ORDWR);
if (fd < 0)
sysfatal("open %s: %r", argv[1]);
if (authmount(fd, argv[2], MREPL|MCREATE, argv[3], &ai) < 0)
sysfatal("authmount: %r");
if (ai == nil)
print("no auth information obtained\n");
else {
print("client uid: %s\n", ai->cuid);
print("server uid: %s\n", ai->suid);
auth_freeAI(ai);
}
exits(nil);
}
The first argument for the program is a file used as a connection to the server. The program opens
it and calls its own authmount function. This function returns the Authinfo obtained by calling auth_proxy using its last parameter, and our program prints some diagnostics about such
structure before calling auth_freeAI to release it.
The important part of this program is the implementation for authmount, similar to that
of amount but for returning the Authinfo to the caller.
int
authmount(int fd, char *mntpt, int flags, char *aname, AuthInfo** aip)
{
int afd, r;
afd = fauth(fd, aname);
if (afd < 0){
*aip = nil;
fprint(2, "fauth: %r\n");
return mount(fd, afd, mntpt, flags, aname);
}
*aip = auth_proxy(afd, amount_getkey, "proto=p9any role=client");
if (*aip == nil)
return -1;
- 366 r = mount(fd, afd, mntpt, flags, aname);
close(afd);
if (r < 0){
auth_freeAI(*aip);
*aip = nil;
}
return r;
}
The function is used by a client process to authenticate to a (file) server process. First, the client
process must obtain a connection to the server and pass its descriptor in fd. Before authentication takes place, the function calls fauth to obtain a file descriptor that can be used to send and
receive messages for authenticating with the server, and keeps it in afd. In general, clients may
use the initial connection to a server to authenticate. However, for a 9P file server, you know that
a separate (authentication) descriptor is required instead.
In any case, the point is that calling auth_proxy with a descriptor to reach the server process, afd in this case, suffices to authenticate our user to the server. Auth_proxy opens
/mnt/factotum/ctl, and loops asking factotum what to do, by doing RPCs through this
ctl file. If factotum says so, auth_proxy reads a message from the peer, by reading afd, and
writes it to factotum (to the ctl file). If factotum, instead, asks for a message to be sent to the
peer, auth_proxy takes the message from the ctl file and writes it to afd.
Which protocol to speak, and which role to take in that protocol (client or server), is determined by the last parameters given to auth_proxy. Such parameters are similar to the arguments for print, to permit may different invocations depending on the program needs. In our
case, we gave just the format string
"proto=p9any role=client"
But passing more arguments in the style of print can be done, for example, to specify the user
for the key, like here:
char* user;
auth_proxy(afd, getkey, "proto=p9any role=client user=%s", user);
Such string is given to factotum, which matches it against the keys it keeps. It is used as a template to select the key (and protocol) to use. In this case, any key matching the p9any protocol
can be used, using the role of a client. The p9any protocol is not exactly a protocol, but a way to
say that we do not care about which particular Plan 9 authentication protocol is used. When this
meta-protocol is used, both the client and the server negotiate the actual authentication protocol
used, like for example, P9SK1.
Once auth_proxy completes, if may have succeeded authenticating the user or not. If it
does, it returns an Authinfo structure, which is a data structure that contains authentication
information returned from factotum.
typedef struct AuthInfo AuthInfo;
struct AuthInfo
{
char
*cuid;
/*
char
*suid;
/*
char
*cap;
/*
int
nsecret;
/*
uchar
*secret;
/*
};
caller id */
server id */
capability (only valid on server side) */
length of secret */
secret */
For example, this is what results from using 8.amount to mount several file servers. First, we
start a new ramfs, which does not require any authentication, and mount it.
- 367 ; ramfs -s ram
; 8.amount /srv/ram /n/ram ’’
fauth: authentication not required
no auth information obtained
The call to fauth (which sends a Tauth request to the server) fails with the error
authentication not required. So, the function authmount simply called mount
using -1 as afd, after printing a diagnostic for us to see. As a result, no AuthInfo is obtained
in this case.
Second, we use 8.amount to mount our main file server, wich does require authentication
(the key for authenticating to the server using P9SK1 was known to the factotum used).
; 8.amount /srv/tcp!whale!9fs /n/whale main/archive
client uid: nemo
server uid: nemo
In this case, auth_proxy was called and could authenticate using factotum. The
AuthInfo structure returned contains nemo in its cuid field (client uid). That is the actual user
id we are using at our terminal. It also contains nemo in its suid field (server uid). That is the
user id as known to the server. In our case, both user names were the same, but they could differ
if I was given a different user name for the account at whale.
In most cases, a client is only interested in knowing if it could authenticate or not. Like in
our example (and in amount), most clients would just call auth_freeAI, to release the
AuthInfo structure, after a successful authentication. For server programs, things may be different. They might employ the information returned from factotum as we will see later.
But what would happen when factotum does not know the key needed to authenticate to
the server? In the call to auth_proxy, the function amount_getkey was given as a parameter. This function is provided by the auth(2) library and is used to ask the user for a key when factotum does not have the key needed for the protocol chosen. For example, below we try to mount
the file server whale, in the window where we started a new factotum, which starts with no
keys.
; auth/factotum
; cat /mnt/factotum/ctl
;
This one has no keys!
; 8.amount /srv/tcp!whale!9fs /n/whale main/archive
!Adding key: dom=dat.escet.urjc.es proto=p9sk1
user[nemo]:
we pressed return
password:
we typed the password here
!
client uid: nemo
server uid: nemo
Here, auth_proxy called the function amount_getkey, given as a parameter, to ask for a
key to mount whale. At this point, the message starting !Adding key... was printed, and we
were asked for a user name and password for the P9SK1 protocol within the
dat.escet.urjc.es authentication domain. That information was given to factotum, to
install a new key, and authentication could proceed. After that, factotum has the new key for use
in any future authentication that requires it.
; cat /mnt/factotum/ctl
key proto=p9sk1 dom=dat.escet.urjc.es user=nemo !password?
We will never be prompted for that key again as long as we use this factotum.
- 368 -
14.5. Secure servers
Handling authentication in a server can be done in a similar way. In general, the server calls
auth_proxy to rely messages between the client and factotum. The only difference is that
the role is now server, instead of client.
For 9P servers, the 9p(2) library provides helper routines that handle authentication. A 9P
server that implements authentication for its clients must create (fake) authentication files in
response to Tauth requests. Such files exist only in the protocol, and not in the file tree served.
They are just a channel to exchange authentication messages by using read and write in the
client.
To secure our semfs file server (developed in a previous chapter), we first provide a key
template in the Srv structure that defines the implementation for the server. The function
auth9p provided by the library can be used as the implementation for the auth operation in
Srv. It allocates authentication files, flagging them by setting QTAUTH in their Qid.types.
static Srv sfs=
{
.auth
=
.attach =
.create =
.remove =
.read
=
.write =
.walk1 =
.clone =
.stat
=
.destroyfid=
.keyspec =
};
auth9p,
fsattach,
fscreate,
fsremove,
fsread,
fswrite,
fswalk1,
fsclone,
fsstat,
freefid,
"proto=p9any role=server"
Because there are authentication files, the implementation of fsread and fswrite must
behave differently when the file read/written is an authentication file. In this case, the data must
be relied to factotum and not to a file served. The new implementation for fsread would be as
follows.
static void
fsread(Req* r)
{
Fid*
Qid
Sem*
char
fid;
q;
s;
nl[2] = "0;
fid = r->fid;
q = fid->qid;
if (q.type&QTAUTH){
authread(r);
return;
}
...everything else as before...
}
It calls the helper function authread, provided by lib9p, to handle reads from authentication
files (i.e., to obtain data from the underlying factotum to be sent to the client). In the same way,
fswrite must include
- 369 if (q.type&QTAUTH){
authwrite(r);
return;
}
to take a different course of action for writes to authentication files. The library function
authwrite takes care of writes for such files.
Fids for authentication files keep state to talk to the underlying factotum. The function
authdestroy must be called for fids that refer to authentication files. This means that we must
change the function freefid, which we used to release the semaphore structure for a fid, to
release resources for authentication fids.
static void
freefid(Fid* fid)
{
Sem*
s;
if (fid->qid.type&QTAUTH)
authdestroy(fid);
else {
s = fid->aux;
fid->aux = nil;
closesem(s);
}
}
The purpose of the entire authentication process is to demonstrate in the Tattach request that
the user was who he/she claimed to be. So, fstattach must be changed as well. The library
function authattach makes sure that the user is authenticated. When it returns -1, to signal a
failure, it has already responded with an error to the caller, and the server should not respond.
Otherwise, the user has been authenticated.
static void
fsattach(Req* r)
{
if (authattach(r) < 0)
return;
r->fid->qid = (Qid){0,0,QTDIR};
r->ofcall.qid = r->fid->qid;
respond(r, nil);
}
After compiling the new program into 8.asemfs, we can try it. As you may remember,
8.asemfs mounts itself at /mnt/sem (the parent process spawns a child to speak 9P, and
mounts it). Using the flag -D, we asked for a dump of 9P messages to see what happens. First,
we execute it while using a factotum that has no keys.
- 370 ; 8.asemfs -D
<-11- Tversion tag 65535 msize 8216 version ’9P2000’
-11-> Rversion tag 65535 msize 8216 version ’9P2000’
<-11- Tauth tag 10 afid 485 uname nemo aname
-11-> Rauth tag 10 qid (8000000000000001 0 A)
<-11- Tread tag 10 fid 485 offset 0 count 2048
-11-> Rerror tag 10 ename authrpc botch
<-11- Tattach tag 10 fid 487 afid 485 uname nemo aname
-11-> Rerror tag 10 ename authrpc botch
<-11- Tclunk tag 10 fid 485
-11-> Rclunk tag 10
8.asemfs: mount /mnt/sem: authrpc botch
;
This time, the server replied to Tauth with an Rauth message, and not with an Rerror to
indicate that authentication was not required. Because of this, the amount call made by the client
(the parent process) calls auth_proxy to authenticate the user to the server.
You may see how the poor client tries to read the authentication fid (485), to obtain a message from the server as part of the authentication protocol. It fails. The server’s factotum informed
with an authrpc botch error that it could not authenticate. This is not a surprise, because the
factotum for the server had no keys. The optimistic (but still poor) client tried to attach to the
server, anyway. The server refused this time, because the client was not authenticated. Things are
different when the server’s factotum is equipped with a key for P9SK1.
; 8.asemfs -D
<-11- Tversion tag 65535 msize 8216 version ’9P2000’
-11-> Rversion tag 65535 msize 8216 version ’9P2000’
<-11- Tauth tag 10 afid 465 uname nemo aname
-11-> Rauth tag 10 qid (8000000000000001 0 A)
<-11- Tread tag 10 fid 465 offset 0 count 2048
-11-> Rread tag 10 count 24 ’7039736b 31406461 ....’
<-11- Twrite tag 10 fid 465 offset 24 count 24 ’7039736b 31206461 ...’
-11-> Rwrite tag 10 count 24
<-11- Twrite tag 10 fid 465 offset 48 count 8 ’7501af21 166c2391’
-11-> Rwrite tag 10 count 8
<-11- Tread tag 10 fid 465 offset 56 count 141
-11-> Rread tag 10 count 141 ’016e656d 6f000000 ....’
<-11- Twrite tag 10 fid 465 offset 197 count 85 ’f63182df 120add32 ...’
-11-> Rwrite tag 10 count 85
<-11- Tread tag 10 fid 465 offset 282 count 13
-11-> Rread tag 10 count 13 ’2be8ff3e d96f0f29 ...’
<-11- Tattach tag 10 fid 234 afid 465 uname nemo aname
authenticate nemo/: ok
-11-> Rattach tag 10 qid (0000000000000000 0 d)
<-11- Tclunk tag 10 fid 465
-11-> Rclunk tag 10
In this output, you see how the client sends read and write requests, successfully, to the authentication fid 465. Such operations obtain messages and send them to the server’s factotum, respectively. After a series of messages authenticate the client using the P9SK1 protocol, the client
sends a Tattach request providing the authentication file (fid 465) as a proof of identity. The
server accepts the proof, and the client manages to attach to the server. At this point, the authentication file is no longer useful and is clunked by the client (because its afid was closed).
This was the idea. Both the client and the server managed to speak P9SK1 to authenticate
without having a single clue about that authentication protocol. They just arranged for their factotums to speak the protocol, on their behalf.
- 371 -
14.6. Identity changes
At this point, despite our efforts, we could ask the question: is the server secure? In this case,
semfs does not listen to requests in the network, and authenticates clients. That seems secure
enough. However, there is an important common sense rule in security, called the least privilege
principle. This rule says that a program should have no more rights than needed to perform its
job. The semfs file server serves semaphores. But a bug in the program might make it access
files or do any other weird thing. Attackers might exploit this.
What we can do is to put the server in a sandbox, and remove any privileges that the user
who starts it might have. This can be done by changing our user to none, which can always be
done for a process by writing none to /dev/user. Also, we can rebuild the process name
space from scratch, for the new user name, using newns, provided by the auth library. This
function may be called to become none.
void
becomenone(void)
{
int
fd;
fd = open("#c/user", OWRITE);
if (fd < 0)
sysfatal("#c/user: %r");
if (write(fd, "none", 4) < 0)
sysfatal("can’t become none");
close(fd);
newns("none", nil);
}
The second parameter to newns names a namespace file, which is /lib/namespace by
default. After modifying our asemfs file server to call becomenone early in fstattach,
we can see the effect.
; 8.asemfs -s sem
; ps | grep asemfs
nemo
1410
0:00
; mount -c /srv/sem /mnt/sem
; ps | grep asemfs
none
1410
0:00
0:00
204K Pread
8.asemfs
0:00
240K Pread
8.asemfs
The first command started 8.asemfs, asking it to post at /srv/sem a file descriptor to mount
its file tree. As you can see, at this point the process is owned by the user who started the server,
i.e., nemo. The server may potentially access any resource this user could access. However,
after mounting it, ps reports that the process is entitled to user none. It no longer can access
files using nemo as its identity. This limits the damage the server can do, due to any bug. Furthermore, reading /proc/1410/ns would report that this process now has a clean namespace,
built from the scratch for the user none. Any resource obtained by nemo, by mounting file
servers into its namespace, is now unaccessible for this process.
We could go even further by calling rfork(RFNOMNT) near the end of becomenone.
This prevents the process from mounting any other resource into its namespace. It will be confined for life, with almost no privilege.
In general, for a server, calling a function like becomenone would be done early in main,
before attending requests from the network. In our case, we cannot do this in the main function,
because the process that has to belong to none is the one implementing the file server. This process is started by threadpostmountsrv, and therefore we must arrange for such process (and
not the parent) to call becomenone. We placed the call in fstattach, because the server is
not likely to do any damage before a client can mount it.
Becoming the user none was an identity change. In general, this is the only identity change
- 372 made by most programs. In CPU servers it is usual for processes that listen for network requests,
like HTTP servers, to run as none.
Sometimes, it may be necessary to become a different user, and not just none. Consider
again CPU servers. Running on them, there are other server processes that must execute commands on behalf of a user. For example, the processes listening for remote command execution
requests must execute commands on behalf of a remote user.
There is one interesting thing to learn here. Executing new processes for a remote user can
be perfectly done by a server process without changing its user id. After authenticating a client, a
server may just spawn a child process to execute a command for the remote user. But this works
as long as the process for the remote user does not try to use resources outside the CPU server. As
soon as it tries, for example, to mount a file server, it would need to authenticate and identify
itself using the client user id, and not the user id for the server that provides remote execution in
the CPU server. Of course, in practice, a process for a remote user is very likely to access
resources outside the CPU server and therefore requires some mean to change its user id.
And there is an even more interesting thing to see now. When you connect to a CPU server
to execute a command on it, the name space from your terminal is exported to the server process
that runs the command in the CPU server. We saw this time ago. The name space is exported
using the connection to the CPU server, after authentication has been performed. As a result, the
process started for you in the CPU server does not require to change its ownership to use any of
the files re-exported from your terminal for it. Is has all of them in its name space. Of course,
mounting something while running in a CPU server is a different thing, and requires an identity
change as you now know.
Because speaking for others (as a result of changing the user identity) is potentially very
dangerous. The authentication server takes precautions to allow only certain users to speak for
others within its authentication domain. The file /lib/ndb/auth lists which users may speak
for which others. Usually, CPU servers are started by fake users whose sole purpose is to boot
such servers. Such users are usually the only ones allowed to speak for other users, to prevent a
user to impersonate as another.
A notable example of a tool that requires identity changes is auth/cron. This command
executes commands periodically, as mandated by each user, on a CPU server chosen by each
user. Each user has a file /cron/$user/cron that lists periodic commands. For example, this
is the cron file for nemo.
; cat /cron/nemo/cron
#m h dm m dw host
0 0 * * * whale chmod +t /mail/box/nemo/spam
0 0 * * * aquamar /usr/web/cursos/mkcursos >/usr/web/cursos/index.html
Each line describes a periodic job. It contains the times when to execute it, using fields to select
which minute, hour, day of month, month, and day of week. In this case, both jobs are executed
at midnight. The first job is to be executed at the CPU server whale, and the second one is to be
executed at the CPU server aquamar. Each job is described by the command found last in each
line.
The point is that for commands like cron and cpu to work, it is necessary to change the
identity of the processes that run in the CPU server on behalf of a user. As you know, initially, all
processes in the CPU server are entitled to the machine owner (but for perhaps a few that decided
to switch to the user none). However, some of these processes might want to change the user id.
This can be done by using the cap(3) device. This device provides capabilities to change
ownership. A capability is just a key that allows a process to do something. In this case, a capability may be used to convince the kernel to change the user id for a process.
As you know, the host owner is very powerful within the local machine. A process running
on the name of the host owner may permit any other process in the machine to change its user
identity by means of the files /dev/caphash and /dev/capuse provided by cap.
- 373 The idea is as follows. When a user authenticates to a server, the factotum for the server
process, if running on the name of the host owner, may help the server to change its identify to
that of the user who authenticated. After a successful authentication, the function auth_proxy
returns an AuthInfo structure with authentication information for the user. This happens also
for a server process, when it uses auth_proxy (i.e., factotum) to authenticate the client.
Besides the cuid and suid fields, with the user ids for the client and the server, an AuthInfo
contains a cap field with some data that is a capability for changing the user id to that of the user
authenticated.
What happens is that cap(3) trusts factotum, because it runs on the name of the host
owner. Besides returning the AuthInfo to the user, factotum used the cap device to ask the
kernel to allow any process holding the data in Authinfo.cap to change its id to the user who
authenticated. It did so by writing a hash of the capability to /dev/caphash. Later, our server
process may write to /dev/capuse the capability in Authinfo.cap, and change its identity.
The function auth_chuid, from the auth library, takes care of using the capability in
AuthInfo for changing the user id. Also, as an extra precaution, it builds a new name space
according to the name space file supplied, or /lib/namespace if none is given. The following
code might be used by a server program to authenticate a client and then changing its user id to
continue execution on the user’s name.
int
fd;
// file descriptor to the client process
AuthInfo*ai;
...
ai = auth_proxy(fd, getkey, keyspec);
if (ai == nil)
sysfatal("authentication failed");
auth_chuid(ai, nil);
auth_freeAI(ai);
This should be done by the process attending the client. In some cases, the process attending the
client is the initial process for the server, if the server is started by listen. That is because this
program spawns one server process for each client. In other cases, this has to be done after creating a child process in the server program just to serve a connection to a client.
One program that uses auth_chuid is auth/login. It can be used to simulate a user
login at a terminal. The program prompts for a user name and a password, and then changes the
user identity to that of the new user, adjusting also the name space and the conventional environment variables. We use it now to become the user elf.
; cat /mnt/factotum/ctl
key proto=p9sk1 dom=dat.escet.urjc.es user=nemo !password?
; auth/login elf
Password:
% cat /mnt/factotum/ctl
key proto=p9sk1 dom=dat.escet.urjc.es user=elf !password?
% cat /dev/user
elf%
% cat /dev/hostowner
nemo%
control-d
;
Initially, the factotum used contains just the key for nemo, to authenticate with Plan 9 servers in
dat.escet.urjc.es. After running auth/login, we obtain a new shell. This one is running with the user id elf, and not nemo. As you see, the program started a new factotum for the
new shell, which was given a key for using Plan 9 servers as the user elf.
A program might do the same by calling the function auth_login, which does just this.
It uses a code like the following one.
- 374 /* authenticate */
ai = auth_userpasswd(user, pass);
if(ai == nil || ai->cap == nil)
sysfatal("login incorrect");
/* change uid */
auth_chuid(ai, "/lib/namespace");
First, it calls the library function auth_userpasswd to authenticate a user given its user name
and is secret. Then, auth_chuid is used to become the new user.
14.7. Accounts and keys
We are near the end of the discussion about security tools provided by the operating system, but
we did not show how can the authentication server know which users there are, and which secrets
can be used to authenticate them. Furthermore, we still need to know how the initial password for
a user is established, and how can a user change it.
Secrets, that is, keys, are not are maintained by the authentication server process. Instead,
another server keeps them. All the keys for users are handled by a file server, called keyfs.
The keys and other information about the user accounts are actually stored in the file
/adm/keys, stored in the file server. To avoid disclosure of the keys, the file is encrypted using
the secret of the host owner in the authentication server machine. The program keyfs decrypts
this file, and serves a file tree at /mnt/keys that is the interface for authentication information
used by other programs, including the authentication server authsrv.
For example, the directory /mnt/keys/nemo contains information about the account for
the user nemo. In particular, /mnt/keys/nemo/key is the key for such user. That is how the
authentication server can access the secret for nemo to know if a remote user is indeed nemo or
not. All the operations to create, remove, enable, and disable user accounts are done through this
file system. Creating another directory under /mnt/keys would create another user entry in
/adm/keys. And so on.
In any case, it is not usual to use the file interface directly for handing user accounts.
Instead, commands listed in auth(8) provide a more convenient interface. For example, a new
user account is created using likeauth/changeuser,
; auth/changeuser nemo
...
This command is executed in the authentication server. It prompts for the secret for the new user
(which should be only known to that user, and therefore is typed by him or her), along with some
administrative information. For example, the program asks when should the account expire, how
can the user be reached by email, etc.
The account created is just a key along with a new user name, that will be kept encrypted in
/adm/keys. But this does not allow the new user to use any file servers! Each file server maintains its own list of users, as you saw. Accounts in the authentication servers are just for authentication purposes.
Sometime later, a user might decide to change the secret used for authentication. This is
done with the passwd command, which talks directly to the authentication server to change the
secret for the user. This server updates the key using the /mnt/keys/$user/key file for the
user.
Because of what we said, you might think that it is necessary for an administrator to come
near each authentication server to type the password for the host owner. Otherwise, how could
keyfs decrypt /adm/keys? And the same might apply to file servers and CPU servers. They
need the secret of the host owner to authenticate themselves.
- 375 This is not the case. CPU servers and file servers keep the authentication domain, the user id
of the host owner, and its secret in non-volatile RAM or nvram. Here, nvram is just an abstraction, usually implemented using a partition called nvram in the hard disk. When a server
machine is installed, it is supplied with the information needed to authenticate. The program
auth/wrkey prompts for such information and stores it in the nvram. From that point on, the
machine can boot unattended. This is very convenient, specially when considering that CPU
servers tend to reboot by themselves when they loose the connection to the file server.
There is another place where keys are kept. The nvram for the server machines would suffice, because each user knows the relevant password and can perfectly type it to the factotum
used when needed. However, users tend to have so many keys these days that it would be a burden for the user to have to type all of them whenever they are needed.
The program secstore provides, so called, single sign on to the system. A single sing on
facility is one that allows a user to give just one password (to sign on just once). After that, the
user may just access any of the services he is authorized to use without providing any other
secret.
The secstore is a highly secure file server (it uses strong encryption algorithms) that
may store files for each user. The storage used by the secstore is encrypted using the host
owner key. Besides, to prevent the host owner from accessing the secure files for a user, the files
stored are encrypted with the user key before sending them to the secstore.
The most popular use for secstore is keeping a file with all the keys for a user, using the
format expected by factotum. When a user has an account in the secstore file server,
factotum prompts the user for the secret used to access such store. Then, it retrieves a file
named factotum from the secure store for the user that is supposed to contain all the user keys.
Because all the keys are now known to factotum, the user is no longer bothered to supply
secrets.
14.8. What now?
Before concluding, it seemed necessary to note that there are many other tools for security in Plan
9, like in most other systems. Not to talk about tools for cryptography, which are the building
blocks for security protocols and therefore, also available in the system.
For example, it is important in a distributed system to encrypt the connections between processes running at different machines so that causal users tapping on the network do not see the
data exchanged in clear.
While using Plan 9, the commands provided by the system try to make sure that the system
remains secure. For example, passwd may be run only on a terminal, to change the password.
Running it on a CPU server would mean that the characters might be sent in clear from the terminal to the CPU server. These days, connections to CPU servers are usually encrypted, but time
ago this was an issue and passwd refused to run at a CPU server.
The AuthInfo structure contains two fields, nsecret and secret with a shared secret
provided from the authentication server to both the client and the server. This shared secret could
be used to encrypt and secure the communication channel, before exchanging data between the
client and the server process. We did not show how to do this, but that is why you have manual
pages, which contain examples.
The tls(3) devices provides transparent encryption for network connections. It was not discussed here. But it is important to exchange data with servers or clients requiring TLS to secure
their connections.
Libraries functions, like those described in encrypt(2), provide facilities to encrypt and
decrypt data. These ones in particular use the DES encryption algorithm.
You have gone a long way. It is likely that you have found many different and new concepts
while reading this book. What remains is to practice, and use them. Hopefully, now that you
- 376 understand what an operating system is, and how its abstractions, calls, and commands help you
use the machine, you will not be scared of reading the reference manual that is usually contained
along with each operating system. Good luck.
Problems
1
Use Plan 9 to do things you know how to do with other systems.
2
Optimize answers to the previous question
- 377 References
1.
2.
3.
4.
5.
6.
7.
8.
A. S. Tanembaum, Operating Systems Design and Implementation, Prentice-Hall, Inc.,
Englewood Cliffs, New Jersey, 2004.
R. Pike, D. Presotto, K. Thompson and H. Trickey, Plan 9 from Bell Labs, EUUG Newsletter 10, 3 (Autumn 1990), 2-11.
R. Pike, Acme: A User Interface for Programmers, Proceedings for the Winter USENIX
Conference, 1994, 223-234. San Francisco, CA..
R. Pike, How to Use the Plan 9 C Compiler, Plan 9 Programmer’s Manual. AT&T Bell
Laboratories. Murray Hill, NJ., 1995.
B. W. Kernighan and R. Pike, The practice of programming, Addison-Wesley, 1999.
P. Winterbottom, Acid Manual, Plan 9 Programmer’s Manual. AT&T Bell Laboratories.
Murray Hill, NJ., 1995.
R. Pike, D. Presotto, K. Thompson, H. Trickey and P. Winterbottom, The Use of Name
Spaces in Plan 9, Operating Systems Review 25, 2 (April 1993.), .
A. G. Hume and B. Flandrena, Maintaining files on Plan 9 with Mk, Plan 9 Programmer’s
Manual. AT&T Bell Laboratories. Murray Hill, NJ., 1995.
Index
, 139,
386, 172
5c, 97
5l, 97
9P, 62, 159, 325
file, 327
implementation, 336
library, 332
message handler, 334
request, 325, 336
security, 360
server, 325
$#*, 180
$*, 180
/, 159, 166
] command, 188
_main, 49
5c, 21, 351
5l, 21
8c, 21
8l, 21
flag -o, 22
8.out, 21
partition, 322
9fs, 137, 139
rc script, 161, 163
messages, 325
9P2000, 326
9PANY, 363
9PSK1, 363
$ address, 195
! command, 190
&& command, 191
|| command, 191
#/ device driver, 166
#| device driver, 225
# file names, 166
--, option, 36
* pattern, 73
? pattern, 74
, Qid, 328
A
a process, killing, 51
abort, 49
absolute paths, 13
abstract data types, 2
abstraction, 2
acceleration, hardware, 298299
accept connection, 146
accept, 146
access
authorized, 357
checking for, 67
access, 67, 94
Access control, 360
access
control list, 18
control lists, 360
sequential, 59
time, 346
time, file, 69
access mode
AEXEC, 67, 94
AEXIST, 67
AREAD, 67
AWRITE, 67
account, 4, 18, 360, 374
new, 374
open, 4
student, 219
acid, 48, 50, 267, 355
command, lstk, 48
command, stk, 48
threads function, 267
ACL, see access control list
acme commands, 7
acme, 7, 164
pipe command, 115
plumbing, 128
acquiring window, 303
adding
key, 367
partitions, 323
address
construction, 141
EOF, 195
file, 129
local, 142
network, 135, 137138
pair, 195
space, virtual, 32
text, 195
address, $, 195
/adm/keys, 374
/adm/users, 221
aecho.c, 37
AEXEC access mode, 67, 94
AEXIST access mode, 67
afd, 361, 366
after.c, 90
agent, authentication, 362
-2-
airport
application, 241, 274
panels, 241, 274
alarm
cancel, 122
process, 121
alarm, 121
alarm.c, 122
allocation, image, 307
allocimage, 307
Alt, 284
alternate window, 314
alternative channel operation, 284
alts, 284
amount, 170, 364
amount_getkey, 367
amount.c, 365
aname, 169
and, logical, 191
announce, 144
port, 144
announce, 144
apid, 97, 118
append
only, 64
redirection, 106
application, airport, 241, 274
architecture, 97
independent, 68
archive, 163, 198
compressed, 199
extraction, 199
file, 75
tape, 198
AREAD access mode, 67
ARGBEGIN, 37
ARGEND, 37
ARGF, 38
args rc script, 188
argument, 11
command, 9, 11
option, 38
script, 180
thread, 266
vector, 92
arguments
program, 35
script, 99, 189
argv, 35, 44, 92
argv0, 38, 92
arithmetic
expression, 98, 183
language, 183
arm, 21
array initializer, 186
arrow keys, 290
ASCII, 292
assert, 104
asynchronous communication, 117, 119
atnotify, 118, 287
atomic, 91
instruction, 232
atomic write, 91
attach, 326, 338
specifier, 163, 313
attribute, plumb message, 131
attributes
file, 67
plumb message, 129
audio CD, 225
auth library, 364
auth_chuid, 373
auth_freeAI, 365
auth_login, 373
auth_proxy, 364
auth9p, 368
authdestroy, 369
authentication, 360, 374
agent, 362
domain, 363
domains, 362
file, 361, 368
file descriptor, 170
handling, 368
information, 365
mount, 170
protocol, 361
server, 374
servers, 361
AuthInfo, 373
Authinfo, 365
authorization, 358
authorized access, 357
authread, 368
authsrv, 362, 374
authwrite, 369
automatic
layout, 318
partitioning, 324
aux/listen, 150
aux/vga, 299
average process, 219
Await, 46
await, 96
AWK, 214
AWK command, next, 220
awk flag -F, 220
AWK
-3-
pattern, 215
program, 220
statement, 214
variables, 214
AWK script, list, 219
AWRITE access mode, 67
axis, 309
B
background, 184
command, 97, 103
backing store, 305
backslash, 44, 202
backspace, 290
backward-compatibility, 2
base
input, 183
output, 183
bc, 183, 194
bcp.c, 76
become none, 371
before.c, 89
BEGIN pattern, 217
Bflush, 79
bidirectional pipe, 110
/bin, 43, 171
BIN, 353
binary, 97
file, 2122, 25, 31, 171
bind, 161, 163, 169
flag -a, 168
flag -b, 168
flag -c, 169
binding, 161
Binit, 80
bio, 77
Biobuf, 77
file descriptor, 80
flushing, 79
termination, 79
biocat.c, 80
biocp.c, 79
bio.h, 79
BIOS, 298
birth, process, 35
black, 302
black.c, 300
blank
CD, 226
screen, 299
blank, 303
Blinelen, 81
block, file, 76
blocked, 46
process, 112
state, 231
board, file descriptor, 123
boldface, 236
/boot, 360
boot, 123, 150
program, 151
boot, 151, 359
booting, 4, 172, 359
Bopen, 79
bottom window, 317
boundaries, write, 110, 137
bounded buffer, 252, 256
box.c, 173
branch, multiway, 190
Brdline, 80, 274
Brdstr, 81, 274
Bread, 79
broadcast, 274
broke, 109
Broken, 109, 217
broken, 47
pipe, 112
process, kill, 109
broken, 49
bss segment, 34, 51
Bterm, 79
buffer, 77
bounded, 252, 256
flushing, 81
shared, 252
buffered I/O, 75, 77, 274
buffering, channel, 270
building things, 349
builtin command, 158
burn, CD, 225
busy waiting, 46, 125, 238
button, mouse, 6
button-1, mouse, 296, 309
button2, mouse, 296
button-3, mouse, 128
Bwrite, 79
C
C declaration, 186
#c device driver, 171, 289
C
language, 20
library, 68
program, 20
calculator, 98
call
error, system, 40, 67, 92
receiving, 146
-4-
remote procedure, 25
system, 23, 25, 46, 83
calls, making, 141
cancel, alarm, 122
capabilities, 372
capability device, 372
carriage return, 138
carriage-return character, 17
case
conversion, 185
insensitive, 209
case, 190
cat, 15, 57, 75, 80
$CC, 351
#c/cons, 289
cd, 14
CD
audio, 225
blank, 226
burn, 225
copy, 227
file system, 225
write, 198
cdcopy rc script, 227
cdfs, 225
cdtmp rc script, 98
cecho.c, 149
Chan, 61, 88, 125, 159, 161, 327
chan, image, 308
chancreate, 270
CHANEND, 284
chanfree, 270
change
current directory, 14
identity, 372373
permissions, 19
uid, 373
changeuser, 374
channel, 62, 269, 305
buffering, 270
communication, 269
event, 128
mouse event, 297
operation, alternative, 284
operation, simultaneous, 284
unbuffered, 271
channel
print, 285
Waitmsg, 285
chanprint, 285
CHANRCV, 284
CHANSEND, 284
character
carriage-return, 17
control, 16
echo, 292
escape, 11, 44, 202
line-feed, 17
new-line, 16
range, 201
range pattern, 74
set, 201
chartorune, 293
chatty9p, 336
chdir, 41
check, permission, 360
checking
for access, 67
program, 354
chgrp, 71
chgrp.c, 72
child
dissociated, 158
process, 84, 8788, 98, 153, 157
process, independent, 158
process, pipe to, 112
process, wait for, 114
child.c, 87
children, wait for, 94
chmod, 19, 64, 69
flag +a, 64
click, 309
to type, 8
client, 144, 325
connection, 148
uid, 367
clients, 4
clip, 302
clone, fid, 342
clone file, 136
close, connection, 148
close, 58, 75, 114
closed pipe, 112
closedisplay, 301
closekeyboard, 311
closemouse, 298, 304
cmp, 116, 210
cnt.c, 236
code
generation, 186
unicode, 293
collection, garbage, 340
color, 307
combining commands, 179
command, 3, 25, 43, 83, 179
argument, 9, 11
background, 97, 103
builtin, 158
-5-
compound, 10, 107, 184, 199
conditional, 188
diagnostic, 12
execution, remote, 151
flag, 9
interpreter, 25
invocation syntax, 39
line, 5, 25, 42, 97, 101, 116, 191, 194
option, 9
substitution, 116, 187
typing a, 10
command
!, 190
&&, 191
||, 191
, 188
acme pipe, 115
cpu, 151
file, 190
for, 186
if, 188
listen, 150
lstk acid, 48
plumb, 130
read, 97
rfork, 158, 183
stk acid, 48
time, 194
window, 172
commands
acme, 7
combining, 179
executing, 6
commands, rio, 6
comment
character, shell, 21
ignore, 220
shell, 99
communication
asynchronous, 117, 119
channel, 269
multiway, 277
process, 109, 269
synchronous, 117
comparation, file, 210
compare
file, 116
operator, 188
compilation, kernel, 192
compiler, 21, 31
flags, 21
regular expression, 205
compose, 290
compound command, 10, 107, 184, 199
compound sed command, 196
compressed archive, 199
computer
laptop, 357
network, 135
computing, distributed, 151, 174
concatenation
distributive, 182
list, 181
operator, 181
concurrent
processes, 30
programming, 91, 229
server, 148
updates, 232
condition, 190
race, 91, 229
variables, 251
conditional
command, 188
construct, 190
execution, 188
pipe, 191
conditionals, rc, 190
connection, 136
accept, 146
client, 148
close, 148
draw, 299
hangup, 137
information, network, 142
network, 135136, 140, 159
server, 139
connection ctl file, 142
conninfo.c, 143
console, 57, 117, 313
device, 171, 289
echo, 292
fossil, 123
multiplexing, 313
read, 290
reader, 242
virtual, 292
write, 290
construct, conditional, 190
construction, address, 141
content, file, 15
contention, lock, 246
context, 46
match, 203
switch, 46, 231, 261, 264
context diff, 211
control
Access, 360
-6-
character, 16
flow, 153154, 261
flow of, 46
list, access, 18
lists, access, 360
control-d, 57, 102
control-u, 290
conventions, Qid, 339
conversion
case, 185
rune, 294
cooked mode, 290
coordinate
mouse, 295
translation, 302
coordinates, window, 302
copy
CD, 227
directory, 198
file, 11, 75
image, 302
copy rc script, 157
count, word, 102, 107
counter
program, 30
shared, 229, 261
counting, reference, 340
cp, 11, 15, 75
cpu, 174
command, 151
CPU
server, 174, 372
servers, 151
time, 127
type, 172
cpu variable, 151
$cputype, 172
create, 65, 105, 107, 124, 329
create.c, 66
creation
directory, 66, 330
file, 65, 76
network port, 144
pipe, 114
process, 8384, 153, 275
window, 313
critical region, 233, 235
cron, 372
cross-compiler, 21
csquery, 139
ctl, 51
file, 300
file, connection, 142
file, network, 136
file, process, 51
current
directory, 13, 29, 58
directory, change, 14
directory, print, 14
window, 317
D
#d device driver, 171
d2h rc script, 184
data, 15
meaning of, 18
processing, 219
processing, 179
segment, 34, 51
types, abstract, 2
user, 342
data file, 300
network, 136
#|/data1, 225
database, network, 139
datagram, 136
date, 8, 10, 101
dd, 76
deadlock, 115, 257
death, process, 35
debug protection, 363
debugger, 48, 267
debugging, 40, 43, 4748, 179, 354
file server, 336
remote, 175
thread, 267
declaration, C, 186
decref, 340
definition, function, 207
Del, 8
Delete, 6, 119, 155, 290, 314
delete text, 195
deleting partitions, 323
deletion, file, 66
delimiter, field, 220
delimiters, message, 110, 137
delivering, message, 128
demand paging, 34
dependencies, file, 349
DES, 375
description, disk, 321
descriptor
authentication file, 170
board, file, 123
duplicate file, 104
file, 56, 58, 88, 102
group, file, 154
image, 307
-7-
post, file, 123, 160
process group, file, 153
redirection, file, 101
table, file, 56, 153
descriptor, Biobuf file, 80
destroyfid, 342, 369
/dev, 174, 289
/dev/cons, 57, 106, 289, 314
/dev/consctl, 314
/dev/cursor, 314
/dev/draw, 174, 300
/dev/drivers, 166
/dev/hostdomain, 362
/dev/hostowner, 358
device, 107
capability, 372
console, 171, 289
draw, 299
driver, 26, 166
driver, storage, 176
hardware, 26
mouse, 295
network, 135
path, 166
pipe, 225
root, 166
storage, 321
to device, 76
vga, 298
device driver
#/, 166
#|, 225
#c, 171, 289
#d, 171
#e, 51, 167
#i, 300
#m, 295
#p, 50, 162, 167
#S, 176, 321
#s, 123
#v, 298
devices, graphic, 298
/dev/kmesg, 290
/dev/kprint, 290
/dev/label, 301, 316
/dev/mouse, 174, 295, 314
/dev/mousectl, 295
/dev/null, 97, 171, 188
/dev/screen, 52
/dev/sysname, 358
/dev/text, 316
/dev/text, 52
/dev/time, 50, 69, 171
/dev/user, 359
/dev/window, 52
/dev/winid, 315
/dev/winname, 303, 315
/dev/wsys, 316
/dev/zero, 76
diagnostic, 106
command, 12
diagnostics, script, 211
dial, 142
dialing, 141
diehard, 88
diff, 210
context, 211
flag -n, 211
differences, file, 210
Dir, 6970, 328
directory, 5, 12
change current, 14
copy, 198
creation, 66, 330
current, 13, 29, 58
dot, 14
dot-dot, 14
empty, 67
entry, 68, 328
home, 5, 14, 42, 172
line, 136, 145, 300
list, 72
permissions, 19
print current, 14
read, 70
reads, 345
root, 13, 153
working, 153
dirfstat, 70
dirfwstat, 72
dirgen, 346
dirread, 70
dirread9p, 346
dirstat, 69, 71, 328
dirwstat, 71
discard, output, 107
discipline, line, 290
disk, 321322
description, 321
file, 321
initialization, 324
local, 324
partitioning, 324
space, 64
storage, 321
usage, 198, 205
Display, 301, 307
display, file, 15
-8-
display, 301
dissociated child, 158
distributed
computing, 151, 174
system, 135
distributive concatenation, 182
DMA, 321
dma, 321
DMA, setting up, 321
DMDIR, 66, 330
DNS, 139
doctype, 354
document viewer, 129
domain, authentication, 363
domains, authentication, 362
dot directory, 14
dot-dot directory, 14
down, 338
down, 255
draw
connection, 299
device, 299
operation flush, 302
string, 312
draw, 302
drawing
functions, 312
graphics, 301
slider, 306
text, 312
drive unit, 322
driver
device, 26, 166
storage device, 176
driver
#/ device, 166
#c device, 171, 289
#d device, 171
#e device, 51, 167
#i device, 300
#m device, 295
#p device, 50, 162, 167
#S device, 176, 321
#v device, 298
dst, 130
du, 198, 205
dump
file, 75
file hexadecimal, 16
file system, 163
message, 369
stack, 237
thread stack, 268
dup, 104105, 123
in rc, 107
duplicate file descriptor, 104
duplicates, remove, 207
Dx, 308
Dy, 308
DYellow, 308
E
#e device driver, 51, 167
EARGF, 39
echo
character, 292
console, 292
server, 123
server, network, 147
service, TCP, 150
echo, 35, 73
flag -n, 36
echo.c, 35, 44
edata, 33
edit plumb port, 128
editing, 6
text, 193
editor, stream, 194
edits.c, 130
efficiency, 125, 194
elapsed time, 77
element, picture, 295
emalloc9p, 340
empty
directory, 67
list, 182
encrypt, 375
end of
file, 17, 111
line, 201
pipe, 225
text, 201
end, 33
END pattern, 217
entering the system, 3
entry
directory, 68, 328
point, program, 35
/env, 157
file system, 51
env.c, 44
environment
group, 158
process, 83
process group, 153
variable, 49, 51, 73, 93, 153, 157, 180
Environment variables, 153
environment variables, 42
-9-
EOF, 17
address, 195
epoch, 50
erealloc9p, 340
err.c, 41
errfun, 301
error, 47
redirection, standard, 188
standard, 5657, 106
string, 40, 67, 95
system call, 40, 67, 92
+Errors, see acme
Escape, 290
escape
character, 11, 44, 202
key, 290
etext, 33
ether0, 135
ethernet, 135
etticker.c, 282
event, 125, 128
channel, 128
channel, mouse, 297
mouse, 295
processing, mouse, 304
resize, 303, 305
everything is a file, 49
evil, 357
exception, 47, 118
exclusion, mutual, 234235, 256
exclusive open, 295
exec, 83, 91, 93
header, 97
execl, 83, 9192, 103, 114
execl.c, 92
executable, 97
file, 19
executing commands, 6
execution
conditional, 188
independent, 29, 84
parallel, 30
process, 230
program, 26, 83, 91, 285
pseudo-parallel, 30
remote, 174
remote command, 151
Exit, 8
exit status, 39, 43, 48, 95, 188
exits, 23, 39, 84, 95, 243, 262
expansion, variable, 73
export, file system, 175
exportfs, 175
expression
arithmetic, 98, 183
compiler, regular, 205
inner, 202
regular, 129, 201
extraction, archive, 199
F
faces, 125
factotum, 362, 375
fault, 47
fauth, 361
Fcall, 336
fd file, process, 58
/fd file system, 102, 171
fdisk, 323
fhello.c, 60
Fid, 338
fid
clone, 342
new, 329
fids, 327
field delimiter, 220
fields, line, 215
file, 7, 49
9P, 327
access time, 69
address, 129
archive, 75
attributes, 67
authentication, 361, 368
binary, 2122, 25, 31, 171
block, 76
comparation, 210
compare, 116
content, 15
copy, 11, 75
creation, 65, 76
deletion, 66
dependencies, 349
descriptor, 56, 58, 88, 102
descriptor, authentication, 170
descriptor board, 123
descriptor, duplicate, 104
descriptor group, 154
descriptor post, 123, 160, 326
descriptor process group, 153
descriptor redirection, 101
descriptor table, 56, 153
differences, 210
disk, 321
display, 15
dump, 75
executable, 19
font, 312
- 10 -
group, 69
head, 195
here, 116
hexadecimal dump, 16
identifier, 327
include, 196
interface, 49, 179
length, 69
list, 72
mode, 69
modification time, 69
mounted, 161
move, 15
name, 12, 58, 69, 73, 153, 159
name patterns, 73
object, 22
offset, 59, 61
owner, 69
ownership, 18
permissions, 18
Qid, 327
read, robust, 120
remove, 11, 343
rename, 15, 197
searching, 74
server, 3, 24, 62, 123124, 159, 224, 321
server debugging, 336
server mount, 327
server program, 163, 321
server root directory, 327
size, 11
system, 166, 224
system, CD, 225
system dump, 163
system export, 175
system mount, 160
system protocol, 159, 325
system, ram, 227
system, remote, 174
system, semaphore, 331
system snapshot, 163
system, terminal, 174
temporary, 213
tree, 13, 153, 159
version, 328
who last modified, 15
with holes, 64
file
clone, 136
ctl, 300
data, 300
descriptor, Biobuf, 80
local, 137
names, #, 166
namespace, 203
network data, 136
patterns, 210
process ctl, 51
process fd, 58
process mem, 51
process note, 118, 120
process notepg, 118, 120
process ns, 162
remote, 137
rpc, 364
system, /env, 51
system, /fd, 102, 171
system, /mnt/plumb, 128
system, /net, 135
system, /proc, 50, 118, 162
system, rio, 172, 313
system, /srv, 123
file
command, 190
rc script, 190
files
header, 21
move, 198
temporary, 45
text, 179
using, 10
fill.c, 111
firewall, 176
flag, command, 9
flag
-a, bind, 168
+a, chmod, 64
-b, bind, 168
-c, bind, 169
-c, rc, 114
-d, ls, 15
-d, test, 191
-d, tr, 185
-e, grep, 209
-e, sed, 195
-e, test, 191
-F, awk, 220
-f, grep, 210
-f, rm, 12
-i, grep, 209
-l, ls, 31
-m, ls, 15
-n, diff, 211
-n, echo, 36
-n, grep, 209
-n, netstat, 140
-n, nm, 32
-n, sed, 195
- 11 -
-n, sort, 205
-o, 8l, 22
-older, test, 192
-r, rm, 67
-r, sort, 205
-r, telnet, 138
-s, grep, 221
-s, ls, 11
-u, sort, 208
-w, wc, 108
flags, 11
compiler, 21
flow
control, 153154, 261
of control, 29, 46
flush, draw operation, 302
flushimage, 302
flushing, buffer, 81
flushing, Biobuf, 79
fmtinstall, 298
fn, 206
focus, 117
input, 317
$font, 313
Font, 312
font, 301, 312
file, 312
for command, 186
fork, resource, 153
fork, 8384, 86, 88, 93, 114, 153, 158
return value, 84
format
install, 298
network, 68, 70
format, P, 298
formatted, 324
output, 55
fossil console, 123
fossil, 123, 163, 221, 324
free, 69
freenetconninfo, 143
frozen process, 115
fs partition, 322
fstat, 70
full-duplex, 110
function
definition, 207
library, 23
shell, 206
function, acid threads, 267
functions, drawing, 312
fwstat, 72
G
garbage collection, 340
generation, code, 186
Get, 8
get, 253
getenv, 44, 52, 153, 180
getnetconninfo, 142
getpid, 45
getuser, 173
getwindow, 303, 316
gid, 69
global
substitution, 197
variable, 32, 229
global.c, 32
globbing, 73, 190, 201
God, 106
good luck, 232, 376
graphic
devices, 298
slider, 303
graphics, 300
drawing, 301
initialization, 300
mode, 298
greek letter, 293
grep, 108, 162, 179, 201
flag -e, 209
flag -f, 210
flag -i, 209
flag -n, 209
flag -s, 221
silent, 221
group, 18
environment, 158
environment process, 153
file, 69
file descriptor, 154
file descriptor process, 153
id, 69
note, 153, 155
note process, 153
process, 42, 117118
rendezvous, 153154
gzip, 199
H
h2d rc script, 185
handler, note, 118, 120
handling authentication, 368
hangup, connection, 137
hangup note, 118, 213, 223
hardware, 26
acceleration, 298299
- 12 -
device, 26
interrupt, 26
head, file, 195
header files, 21
header, exec, 97
height, rectangle, 308
hello rc script, 98
help, 8
here file, 116
hexadecimal, 183
dump, file, 16
HFILES, 353
Hide, 6
hide, window, 317
hoc, 98
option -e, 183
hold mode, 290
holes, file with, 64
$home, 93, 172
home directory, 5, 14, 42, 172
hostdomain, 362
hostowner, 362
HTTP, 137
I
#i device driver, 300
id
group, 69
modification user, 69
process, 45
thread, 264
user, 69
Identification, 358
identifier, 203
file, 327
thread, 264
unique, 327
identity, 360
change, 372373
if
command, 188
not, 188
ifcall, 336
ignore comment, 220
Image, 301
image, 300
allocation, 307
chan, 308
copy, 302
descriptor, 307
memory, 32
replicated, 308
screen, 52
window, 52
implementation, 9P, 336
implicit rule, 352
import, 174
in octal, permissions, 20
in
pipes, rc, 109
rc, dup, 107
include file, 196
includes, standard, 21
incref, 340
indent, text, 203
independent
architecture, 68
child process, 158
execution, 29, 84
indexing, list, 181
information
authentication, 365
network connection, 142
inheritance, 106
init, 172
initdraw, 300
initialization
disk, 324
graphics, 300
keyboard, 309
mouse, 297
initializer, array, 186
initkeyboard, 309
initmouse, 297
inner expression, 202
input
and output redirection, 107
base, 183
focus, 317
keyboard, 309
mouse, 295
record, 220
redirection, 103
standard, 5657, 102103
inquiry, 321
insensitive, case, 209
install, format, 298
install, mk, 353
installation, stand-alone, 324
instruction
atomic, 232
order, 233
instruction, tas, 235
integrity, 357
Intel, 21
interface, file, 49, 179
interleaving, 230
internet
- 13 -
probe, 189
protocol, 135
interpreted program, 97
interpreter, 98
command, 25
interrupt, 117, 232
hardware, 26
process, 118
program, 292
software, 24
interrupt note, 117, 120, 155, 213, 223, 314
intfork.c, 86
into, loging, 4
invocation syntax, command, 39
I/O, 55
buffered, 75, 77, 274
redirection, 101
thread, 274
user, 289
IP, 135
ip/ping, 140, 189
iredir.c, 103
is a file, everything, 49
K
Ken Thompson, 21, 293
kernel, 1, 24, 46, 159, 261, 359
compilation, 192
key, 374
adding, 367
escape, 290
reading, 367
key, 363
keyboard, 293
initialization, 309
input, 309
library, 309
Keyboardctl, 310
keyboardthread, 311
keyfs, 374
keys, 362
arrow, 290
kfs, 324
kill
broken process, 109
process, 119
kill, 51, 217
killing a process, 51
L
label, window, 301, 316
language
arithmetic, 183
C, 20
programming, 179
laptop computer, 357
layout
automatic, 318
screen, 318
lc, see ls
lc, 72
$LD, 351
leak, memory, 355
leak, 355
least privilege principle, 371
leaving the system, 6
length
file, 69
line, 81
variable, 180
letter, greek, 293
lib9p, 332
memory allocation, 340
libc.h, 21, 68
/lib/namespace, 173, 203, 371
/lib/ndb/auth, 372
libraries, 1
library, 21, 135
9P, 332
C, 68
function, 23
keyboard, 309
mouse, 296
thread, 261
library
auth, 364
plumb, 130
window, 315
line
command, 5, 25, 42, 97, 101, 116, 191, 194
directory, 136, 145, 300
discipline, 290
end of, 201
fields, 215
length, 81
new, 61
number, 209
read, 80
start of, 201
line-feed character, 17
lines
print, 195
unique, 207
linker, 31
list
access control, 18
concatenation, 181
directory, 72
- 14 -
empty, 182
file, 72
indexing, 181
null, 182
process, 101
list AWK script, 219
list2grades rc script, 224
list2usr, 221
listen, 148
listen, 145, 148
command, 150
listen1, 151
listen.c, 145
lists, access control, 360
lists, rc, 180
load
machine, 101
system, 126
loaded program, 31
loader, 21, 32
program, 32
loading
on demand, 34
program, 83
Local, 164
local
address, 142
disk, 324
storage, 357
local file, 137
localtime, 282
Lock, 234
lock, 232, 234
contention, 246
queueing, 239
resource, 234
spin, 238
lock, 234
lock.c, 234
locks, read/write, 244
logical
and, 191
or, 191
login, 4
login, 373
loging
into, 4
out, 4, 6
logout, 4, 6
lookman, 9, 183
loop, server, 334
loop, rc, 186
lp, 52
lr, 207
lrusers, 208
ls, 10, 69, 72
flag -d, 15
flag -l, 31
flag -m, 15
flag -s, 11
lsdot.c, 71
lstk acid command, 48
luck, good, 232
M
#m device driver, 295
machine
load, 101
owner, 358
services, 150
stand-alone, 357
start script, 151
virtual, 2
machines, 357
MAFTER mount flag, 169
magic, 2
mail, 135
server, 151
mail, 112, 125, 192
main, 35, 49, 83
main/active, 163
make, 349
making calls, 141
malicious person, 357
malloc, 34, 69, 355
man, 9
manager, resource, 2
manual, 8
page, 129
search, 183
mask, 302
match
context, 203
string, 188, 190
sub-expression, 202
match.c, 205
matching, 73
text, 201
maximum, 218
MBEFORE mount flag, 169
MCREATE mount flag, 169
meaning
of, data, 18
of program, 230
measurement, performance, 194
mem file, process, 51
memory
image, 32
- 15 -
leak, 355
private, 363
process, 46, 84
segment, 34, 48, 51
segment, virtual, 153
shared, 229, 333
usage, 217
virtual, 32, 34, 46
memory allocation, lib9p, 340
menu, rio, 6, 317
message
attribute, plumb, 131
attributes, plumb, 129
delimiters, 110, 137
delivering, 128
dump, 369
handler, 9P, 334
plumb, 128
reader, 242
receive, plumb, 131
size, 326
tag, 326
type, 326
messages, 9P, 325
metadata, 67
meta-protocol, 366
meta-rule, 352
mk, 349
install, 353
predefined variables, 352
rules, 349
targets, 349
variables, 351
mkdir, 14
mkfile, 349, 355
mkone, 353
/mnt/plumb file system, 128
/mnt/sem, 332
/mnt/term, 174
/mnt/wsys, 314
mode
cooked, 290
file, 69
graphics, 298
hold, 290
octal, 20
open, 58
privileged, 2, 24
raw, 290
scroll, 317
text, 298
mode, AEXEC access, 94
modification
time, 346
time, file, 69
user id, 69
$monitor, 299
monitor, 251, 298
mount
authentication, 170
file server, 327
file system, 160
point, 161, 166, 168
specifier, 163, 169
table, 160161
union, 167
mount flag
MAFTER, 169
MBEFORE, 169
MCREATE, 169
MREPL, 169
mount, 160, 169, 361
mounted file, 161
Mouse, 297
mouse
button, 6
button-1, 296, 309
button2, 296
button-3, 128
coordinate, 295
device, 295
event, 295
event channel, 297
event processing, 304
initialization, 297
input, 295
library, 296
position, 296
Mousectl, 297
mousethread, 304
Move, 6
move
file, 15
files, 198
MREPL mount flag, 169
MS Word viewer, 129
mtime, 69
MT-Safe, 285
multiple reader, 244
multiplexing
console, 313
resource, 2
multiprogramming, 46
multiway
branch, 190
communication, 277
mutex, 256, 347
mutual exclusion, 234235, 256
- 16 -
mv, 15
N
name
file, 12, 58, 69, 73, 153, 159
patterns, file, 73
process, 45
program, 92
resolution, 159
service, 159
service, 137, 139, 144
space, 153, 159, 169
space, new, 171
space, standard, 173
system, 43, 172
thread, 264
translation, 139
user, 4, 43, 172, 359
window, 303
names, # file, 166
namespace, new, 371
namespace file, 203
ndata, 130
ndb, 139
ndb/cs, 139
ndb/csquery, 139
/n/dump, 75
negation, 190
/net file system, 135
NetConnInfo, 142
netecho.c, 147
/net/ipifc, 136
netmkaddr, 141
netstat, 139, 145
flag -n, 140
network
address, 135, 137138
computer, 135
connection, 135136, 140, 159
connection information, 142
database, 139
device, 135
echo server, 147
format, 68, 70
port, 136
port creation, 144
protocol, 139
services, 135, 150
status, 139
network
ctl file, 136
data file, 136
New, 6
new
account, 374
fid, 329
line, 61
name space, 171
namespace, 371
process, 154
user, 360, 374
window, 6, 314
newline, 290
new-line character, 16
newns, 171, 371
newuser, 5
next AWK command, 220
nm, 22
flag -n, 32
no attach, 173
none, 371
become, 371
non-linear pipe, 117, 208
noswap, 363
not, if, 188
note
group, 153, 155
handler, 118, 120
handler, shell, 213
post, 117
process group, 153
note
handler, rc, 223
hangup, 118, 213, 223
interrupt, 117, 120, 155, 213, 223, 314
note file, process, 118, 120
notepg file, process, 118, 120
noterfork.c, 156
notes, 117, 287
/NOTICE, 60
nread.c, 65
ns, 162
file, process, 162
null
list, 182
pointer, 51
variable, 182
number
line, 209
port, 136, 138
version, 241
NVRAM, 375
nvram, 375
nwname, 329
- 17 -
O
$O, 351
object file, 22
$objtype, 353
octal
mode, 20
permissions, 69
of
control, flow, 46
file, end, 17, 111
identity, proof, 360
ofcall, 336
offset, 16, 60
file, 59, 61
shared, 90
OFILES, 353
on
demand, loading, 34
single sign, 375
onefork.c, 84
only, append, 64
open
account, 4
exclusive, 295
mode, 58
plumb port, 130
open
flag, ORCLOSE, 120
mode, OREAD, 5859
mode, OTRUNC, 62
mode, OWRITE, 5859, 61
open, 58, 61, 65, 75, 159
openfont, 312
operating system, 1
operation
alternative channel, 284
permitted, 360
simultaneous channel, 284
operator
compare, 188
concatenation, 181
option, 11
argument, 38
command, 9
option
--, 36
-e, hoc, 183
optional string, 202
or, logical, 191
ORCLOSE open flag, 120
order, instruction, 233
OREAD open mode, 5859
origin, screen, 302
OTRUNC open mode, 62
out, loging, 4, 6
output
base, 183
discard, 107
formatted, 55
redirection, 101
redirection, standard, 105
standard, 5657
verbose, 198
overlap, window, 317
owner
file, 69
machine, 358
ownership, file, 18
OWRITE open mode, 5859, 61
P
#p device driver, 50, 162, 167
P format, 298
page, manual, 129
page, 129, 355
paging, demand, 34
pair, address, 195
panel process, 241
panels, airport, 241, 274
parallel, 30
execution, 30
parent process, 83, 88, 153
parsing, 192
partition, 321
partition
9fat, 322
fs, 322
plan9, 322
partitioning
automatic, 324
disk, 324
partitions, 322
adding, 323
deleting, 323
passwd, 374
password, 357, 363
$path, 43
path, 13, 58, 153, 159
device, 166
relative, 35
path, 51
Qid, 328
variable, 170
paths
absolute, 13
relative, 13
pattern, 191
AWK, 215
- 18 -
character range, 74
pattern
*, 73
?, 74
BEGIN, 217
END, 217
patterns, file name, 73
patterns file, 210
pc.c, 254
performance, 77
measurement, 194
permission check, 360
permissions, 69
change, 19
directory, 19
file, 18
in octal, 20
octal, 69
permitted operation, 360
person, malicious, 357
Pfmt, 298
picture element, 295
$pid, 45, 58
PID, 265
pid, 45
shell, 45
window, 315
pid.c, 45
Pike, Rob, 7, 293
ping, 140, 189
ping-pong, 270
pipe, 107108, 110, 117, 124, 128, 136, 184, 252
bidirectional, 110
broken, 112
closed, 112
conditional, 191
creation, 114
device, 225
end of, 225
non-linear, 117, 208
to child process, 112
pipe command, acme, 115
pipe, 109
pipe.c, 110
pipeto, 114
pipeto.c, 112
pixel, 295
plan9 partition, 322
plumb
message, 128
message attribute, 131
message attributes, 129
message receive, 131
port open, 130
plumb port, edit, 128
plumb, 131
command, 130
library, 130
Plumbattr, 131
plumber port, 128
plumber
rules, 128
send, 128
plumber, 128, 165
plumbing, 128, 165
plumbing, acme, 128
plumbing, 129, 165
Plumbmsg, 131
plumbopen, 130
plumbrecv, 131
plumbsend, 132
plumbsendtext, 132
Point, 297
point
mount, 161, 166, 168
program entry, 35
to type, 8
pointer, null, 51
pollb.c, 126
poll.c, 126
polling, 125, 127, 248
pong.c, 271
port, 128
announce, 144
creation, network, 144
network, 136
number, 136, 138
plumber, 128
position, mouse, 296
post
file descriptor, 123, 160, 326
note, 117
postmountsrv, 333
PostScript viewer, 129
practice, programming, 40
pragma, 21
Pread, 46
predefined variables, mk, 352
preemptive scheduling, 46
prep, 323
$prereq, 352
principle, least privilege, 371
print
current directory, 14
lines, 195
print, 23, 40
channel, 285
privacy, 18
- 19 -
private memory, 363
privilege principle, least, 371
privileged mode, 2, 24
probe, internet, 189
/proc file system, 50, 118, 162
proccreate, 275
procedure call, remote, 25
process, 29, 46, 49, 83, 261
alarm, 121
average, 219
birth, 35
blocked, 112
child, 84, 8788, 98, 153, 157
communication, 109, 269
creation, 8384, 153, 275
death, 35
environment, 83
execution, 230
frozen, 115
group, 42, 117118
group, environment, 153
group, file descriptor, 153
group, note, 153
id, 45
independent child, 158
interrupt, 118
kill, 119
kill broken, 109
list, 101
memory, 46, 84
name, 45
new, 154
panel, 241
parent, 83, 88, 153
resource, 153
runaway, 87
server, 333, 357
stack, 237, 262
state, 4546, 127
structure, 276
synchronization, 243
termination, 39, 84, 158, 243
time, 95
process
ctl file, 51
fd file, 58
mem file, 51
note file, 118, 120
notepg file, 118, 120
ns file, 162
processes, concurrent, 30
processing
data, 179
data, 219
mouse event, 304
read, 344
stat, 347
walk, 348
write, 345
procexec, 285
procexecl, 285
producer/consumer, 252, 257
profile, 151
profile, 5, 129
program
arguments, 35
AWK, 220
boot, 151
C, 20
checking, 354
counter, 30
entry point, 35
execution, 26, 83, 91, 285
file server, 163, 321
interpreted, 97
interrupt, 292
loaded, 31
loader, 32
loading, 83
meaning of, 230
name, 92
running, 29
shell, 180
source, 48
symbols, 22
termination, 254, 275
text, 22
programming
concurrent, 91, 229
language, 179
practice, 40
prompt, 4
proof of identity, 360
protection, debug, 363
protocol, 136
authentication, 361
file system, 159, 325
internet, 135
network, 139
telnet, 138
transport, 136
providing services, 144
ps, 45, 50, 101, 108
pseudo-parallel execution, 30
Pt, 308
Put, 8
put, 252
putenv, 45
- 20 -
pwd, 14, 42
Pwrite, 111
PXE, 4
Q
qcnt.c, 241
QID, 69
Qid
, 328
conventions, 339
file, 327
Qid
path, 328
type, 328
qids, 327
QLock, 239, 244
qlock, 239, 244, 252
QTAPPEND, 328
QTAUTH, 368
QTDIR, 328, 342
QTEXCL, 328
quantum, 46
queue, 341
queueing lock, 239
qunlock, 239
quoting, 43, 75, 184
R
r, 40
rabbits.c, 88
race condition, 91, 229
ram file system, 227
ramfs, 227, 325
range
character, 201
pattern, character, 74
Rattach, 326
Rauth, 361
raw mode, 290
raw.c, 291
rawoff, 290
rawon, 290, 310
rc, 5
conditionals, 190
flag -c, 114
in pipes, 109
lists, 180
loop, 186
note handler, 223
script, 183
script, 9fs, 161, 163
script, args, 188
script, cdcopy, 227
script, copy, 157
script, d2h, 184
script, file, 190
script, h2d, 185
script, list2grades, 224
script, when, 192193
using, 179
/rc/bin/service, 150
rcecho rc script, 99
rcinr.c, 233
Rclunk, 328
read
console, 290
directory, 70
line, 80
processing, 344
robust file, 120
simultaneous, 289
string, 81
read, 56, 58, 75, 77, 79, 120
command, 97
readbuf, 344
read.c, 56, 58
reader
console, 242
message, 242
multiple, 244
reading, key, 367
readn, 120
reads, directory, 345
readstr, 344
read/write locks, 244
Ready, 127, 261
ready, 46
receive, plumb message, 131
receiving, call, 146
record
input, 220
skip, 220
Rect, 308
Rectangle, 301
rectangle
height, 308
width, 308
rectangle, screen, 301
recv, 269, 297
recvp, 274
recvul, 274
redirection
append, 106
file descriptor, 101
input, 103
input and output, 107
I/O, 101
output, 101
- 21 -
standard error, 188
standard output, 105
Ref, 340
reference counting, 340
Refnone, 305
regcomp, 205
regexp, 204
region, critical, 233, 235
registers, 84
registry, 123
regression testing, 355
regular expression, 129, 201
compiler, 205
relative
path, 35
paths, 13
relying, 364
remote
command execution, 151
debugging, 175
execution, 174
file system, 174
procedure call, 25
remote file, 137
remove
duplicates, 207
file, 11, 343
remove, 66
rename, file, 15, 197
Rendez, 249, 252
rendez.c, 248
rendezvous, 272
group, 153154
tag, 246
rendezvous, 153, 246
repl, 308
replace string, 194
replicated image, 308
representation, text, 292
Reprog, 204
Req, 336
request, 9P, 325, 336
Rerror, 326
rerrstr, 41
Resize, 6
resize
event, 303, 305
window, 303, 318
resize.c, 304
resizethread, 305
resolution
name, 159
screen, 299
resource
fork, 153
lock, 234
manager, 2
multiplexing, 2
process, 153
shared, 89, 91
sharing, 98, 153, 157
respond, 336
Return, 4
return, carriage, 138
return value, fork, 84
reverse sort, 217
RFENVG rfork flag, 158
RFFDG rfork flag, 154
RFMEM rfork flag, 229
RFNOMNT rfork flag, 173, 371
RFNOTEG rfork flag, 155
RFNOWAIT rfork flag, 158
rfork, 153, 164, 229, 237, 276
command, 158, 183
flag, RFENVG, 158
flag, RFFDG, 154
flag, RFMEM, 229
flag, RFNOMNT, 173, 371
flag, RFNOTEG, 155
flag, RFNOWAIT, 158
flag, RFPROC, 154
rforkls.c, 154
RFPROC rfork flag, 154
RFREND, 276
rincr.c, 229
rio, 5, 42, 52, 289, 313
commands, 6
file system, 172, 313
menu, 6, 317
RJ45, 135
rlock, 244
rm, 11, 14, 66, 7475
flag -f, 12
flag -r, 67
rm.c, 67
Rob Pike, 7, 293
robust file read, 120
robustreadn, 121
role, 366
ROM, 298
/root, 171
root
device, 166
directory, 13, 153
directory, file server, 327
Ropen, 328
round trip time, 140
rpc file, 364
- 22 -
Rpt, 308
rsleep, 248
RTT, 140
rule, implicit, 352
rules, mk, 349
rules, plumber, 128
runaway process, 87
Rune, 293
rune, 16, 292
conversion, 294
rune.c, 294
runetochar, 293
runlock, 244
runls.c, 83
Running, 127
running, 46
program, 29
Rversion, 326
rwakeup, 248
rwakeupall, 248
Rwalk, 328
Rwrite, 328
rx, 151
S
#S device driver, 176, 321
#s device driver, 123
sandbox, 173
sandboxing, 172, 371
scheduler, 46
scheduling, 4546, 230, 261
preemptive, 46
screen, 295, 300
blank, 299
image, 52
layout, 318
origin, 302
resolution, 299
size, 295, 318
screen, 301, 316
rectangle, 301
script, 97
argument, 180
arguments, 99, 189
diagnostics, 211
machine start, 151
shell, 9899, 157, 183
script, rc, 183
scroll mode, 317
sdC0, 176
search
manual, 183
text, 129, 201
word, 108
searching, 205
file, 74
secret, 374
shared, 360
secstore, 375
secure
server, 368
store, 375
system, 357
security, 357
9P, 360
sed, 194, 201
command, compound, 196
flag -e, 195
flag -n, 195
seek, 60, 6263, 322
seekhello.c, 63
segment
bss, 34, 51
data, 34, 51
memory, 34, 48, 51
stack, 34, 51
text, 34, 51
virtual memory, 153
Sem, 338
semaphore, 255, 331
file system, 331
tickets, 255
value, 255
semfs, 331
send, 269
plumber, 128
sendp, 274
sendul, 274
seq, 116, 187, 218
sequences, 187
sequential
access, 59
server, 148
server, 144, 325
9P, 325
authentication, 374
concurrent, 148
connection, 139
CPU, 174, 372
echo, 123
file, 3, 24, 62, 123124, 159, 224, 321
loop, 334
mail, 151
network echo, 147
process, 333, 357
program, file, 163
secure, 368
sequential, 148
- 23 -
threaded, 148
uid, 367
servers
authentication, 361
CPU, 151
service, 137
name, 137, 139, 144
name, 159
TCP echo, 150
service, 151
services
machine, 150
network, 135, 150
providing, 144
set, character, 201
setting up DMA, 321
shared
buffer, 252
counter, 229, 261
memory, 229, 333
offset, 90
resource, 89, 91
secret, 360
sharing, resource, 98, 153, 157
shell, 5, 25
comment, 99
comment character, 21
function, 206
note handler, 213
pid, 45
program, 180
script, 9899, 157, 183
variable, 73, 180
sic.c, 39
sig, 10, 55
sigalrm, 213
sighup, 213
sigint, 213
sign on, single, 375
signal, 255
silent grep, 221
simultaneous
channel operation, 284
read, 289
single
sign on, 375
writer, 244
single-user, 358
size
file, 11
message, 326
screen, 295, 318
skip record, 220
slash, 13, 153
sleep, 248
sleep, 59, 97, 119, 126127, 192, 231, 264
sleep.c, 59
slider
drawing, 306
graphic, 303
slider.c, 311
smprint, 285
snapshot, file system, 163
Snarf, 8
software interrupt, 24
sort
reverse, 217
text, 205
sort, 205
flag -n, 205
flag -r, 205
flag -u, 208
sorting, 205
source, program, 48
space
disk, 64
name, 153, 159, 169
new name, 171
virtual address, 32
spam, 210
speak for, 372
specifier
attach, 163, 313
mount, 163, 169
spin lock, 238
split, string, 192
src, 130
src, 48
/srv, 123, 137, 175, 313
Srv, 332
srv, 137, 160
/srv file system, 123
srv.c, 141
srvecho.c, 123
srvfs, 175
/srv/ram, 326
stack
dump, 237
dump, thread, 268
process, 237, 262
segment, 34, 51
thread, 262
stamp, time, 295
stand-alone
installation, 324
machine, 357
standard
error, 5657, 106
- 24 -
error redirection, 188
includes, 21
input, 5657, 102103
name space, 173
output, 5657
output redirection, 105
start
of line, 201
of text, 201
script, machine, 151
starvation, 238, 249, 267
stat processing, 347
stat, 6970
stat.c, 70
state
blocked, 231
process, 4546, 127
stateless, 3
statement, AWK, 214
statistics, system, 127
stats, 127, 314
$status, 39, 43
status
exit, 39, 43, 48, 95, 188
network, 139
$stem, 352
stk acid command, 48
storage
device, 321
device driver, 176
disk, 321
local, 357
store
backing, 305
secure, 375
stream, 295
editor, 194
string, 180
draw, 312
error, 40, 67, 95
match, 188, 190
optional, 202
read, 81
replace, 194
split, 192
substitute, 197
string, 312
stringsize, 313
strip, 31
structure, process, 276
student account, 219
sub-expression match, 202
subshell, 157
substitute string, 197
substitution
command, 116, 187
global, 197
switch
context, 46, 231, 261, 264
thread, 264
switch, 190
symbol, 48
table, 31
text, 292
undefined, 23
symbols, program, 22
synchronization, 229, 246
process, 243
thread, 272
synchronize, 232, 235
synchronous communication, 117
syntax, command invocation, 39
sysfatal, 41
/sys/include, 129
$sysname, 43, 172
sysname, 51
system
call, 23, 25, 46, 83
call error, 40, 67, 92
distributed, 135
dump, file, 163
file, 166, 224
load, 126
mount, file, 160
name, 43, 172
operating, 1
protocol, file, 159
secure, 357
snapshot, file, 163
statistics, 127
time, 77
window, 3, 6, 25, 117, 172, 289, 313
system
/env file, 51
/fd file, 102, 171
/mnt/plumb file, 128
/proc file, 50, 118, 162
rio file, 172
T
t+, 115, 203
t-, 203
Tab, 17
tab wdith, 17
table
file descriptor, 56, 153
mount, 160161
symbol, 31
- 25 -
tag, 8
message, 326
rendezvous, 246
Tags, 326
take.c, 20
tape, 76
archive, 198
tar, 198
tarfs, 224
TARG, 353
$target, 352
targets, mk, 349
tas instruction, 235
Tattach, 326, 360
Tauth, 361, 368
Tclunk, 328
tcnt.c, 267
TCP echo service, 150
tcp7, 150
Tcreate, 341
telnet protocol, 138
telnet, 138
flag -r, 138
temporary
file, 213
files, 45
terminal, 3, 24, 313, 358
file system, 174
termination
process, 39, 84, 158, 243
program, 254, 275
termination, Biobuf, 79
termrc, 151, 171
test, 191
flag -d, 191
flag -e, 191
flag -older, 192
test-and-set, 235
testing, 354
regression, 355
texec.c, 286
text
address, 195
delete, 195
drawing, 312
editing, 193
end of, 201
files, 179
indent, 203
matching, 201
mode, 298
program, 22
representation, 292
search, 129, 201
segment, 34, 51
sort, 205
start of, 201
symbol, 292
window, 52, 316
the system
entering, 3
leaving, 6
thello.c, 63
things, building, 349
thinking, wishful, 331
Thompson, Ken, 21, 293
thread, 261
argument, 266
debugging, 267
id, 264
identifier, 264
I/O, 274
library, 261
name, 264
stack, 262
stack dump, 268
switch, 264
synchronization, 272
timer, 282
threadcreate, 262, 275
threaded server, 148
threadexits, 262
threadexitsall, 262
threadgetname, 267
threadid, 264
threadmain, 262
threadname, 305
threadnotify, 287
threadpostmountsrv, 334
threads function, acid, 267
threadsetname, 267
threadwaitchan, 285
ticker.c, 243
tickets, 362
semaphore, 255
tid.c, 265
tiling, 302
time, 50
access, 346
CPU, 127
elapsed, 77
file access, 69
file modification, 69
modification, 346
of day, 282
process, 95
round trip, 140
stamp, 295
- 26 -
system, 77
user, 77
time, 50, 77, 282
command, 194
timeout, 121
timer, 122
thread, 282
tincr.c, 262
TLS, 375
to
device, device, 76
type, click, 8
type, point, 8
tools, 179
top window, 317
Topen, 328, 360
touch, 11
toupperrune, 294
tr, 185
flag -d, 185
translation
coordinate, 302
name, 139
transport protocol, 136
trap, 24, 47
tree, file, 13, 153, 159
Tremove, 343
trinc.c, 263
troff, 107, 354
truncate, 62, 66, 105
Tstat, 330
Tversion, 326
Twalk, 328
Twrite, 328
Twstat, 330
type, 130
CPU, 172
message, 326
type, Qid, 328
types, abstract data, 2
typesetting, 107
typing a command, 10
U
UDP, 136
u.h, 21
uid, 359
change, 373
client, 367
server, 367
uid, 69
unbuffered channel, 271
undefined symbol, 23
Unicode, 292
unicode code, 293
union, 168, 172
mount, 167
uniq, 207
unique
identifier, 327
lines, 207
unit, drive, 322
UNIX, 3, 17, 21, 110, 135, 151, 179, 285, 349
unlock, 234
unmount, 162
up, 338
up, 255
updates, concurrent, 232
usage
disk, 198, 205
memory, 217
usage, 39
$user, 43, 172
user, 357
data, 342
id, 69
id, modification, 69
I/O, 289
name, 4, 43, 172, 359
new, 360, 374
time, 77
user, 51
users, 357
using files, 10
using rc, 179
UTF-8, 293
UTF8, 16
UTFmax, 294
V
#v device driver, 298
value, semaphore, 255
variable
environment, 49, 51, 73, 93, 153, 157, 180
expansion, 73
global, 32, 229
length, 180
null, 182
shell, 73, 180
variable
cpu, 151
path, 170
variables
AWK, 214
condition, 251
Environment, 153
environment, 42
variables, mk, 351
- 27 -
vector, argument, 92
verbose output, 198
version
file, 328
number, 241
VGA, 298
vga device, 298
vga, 299
vgactl, 298
$vgasize, 299, 318
viewer
document, 129
MS Word, 129
PostScript, 129
virtual
address space, 32
console, 292
machine, 2
memory, 32, 34, 46
memory segment, 153
virus, 86
W
wait for
child process, 114
children, 94
wait, 95, 156, 194, 255, 285
waiting, busy, 46, 125, 238
Waitmsg, 95
channel, 285
waitpid, 96, 114115
wakeup, 248
walk, 159160, 328
processing, 348
wastebasket, 67
wc, 102, 107
flag -w, 108
wdir, 130
wdith, tab, 17
web, 135
werrstr, 41, 95
whale, 137
whatis, 207
when rc script, 192193
who last modified, file, 15
width, rectangle, 308
window, 42, 57, 165, 313
acquiring, 303
alternate, 314
bottom, 317
coordinates, 302
creation, 313
current, 317
hide, 317
image, 52
label, 301, 316
name, 303
new, 6, 314
overlap, 317
pid, 315
resize, 303, 318
system, 3, 6, 25, 117, 172, 289, 313
text, 52, 316
top, 317
window, 315
command, 172
library, 315
wishful thinking, 331
with holes, file, 64
wlock, 245
wname, 329
word
count, 102, 107
search, 108
working directory, see current directory
working directory, 153
write
boundaries, 110, 137
CD, 198
console, 290
processing, 345
write, 23, 55, 58, 61, 64, 75, 90
atomic, 91
write.c, 55
writer, single, 244
wrkey, 375
WRLock, 244
wstat, 72
$wsys, 314
wunlock, 245
X
xd, 16, 6162
XML, 179
Y
yield, 264
Z
zipfs, 224
ZP, 302, 312
- 28 -
Post-Script
This book was formatted using the following command:
@{
eval ‘{doctype title.ms}
eval ‘{doctype preface.ms}
mktoc toc | troff -ms
labels $CHAPTERS | bib | pic| tbl | eqn | slant
idx/mkindex index | troff -ms
eval ‘{doctype epilog.ms}
} | lp -d stdout > 9intro.ps
| troff -ms -mpictures
Many of the tools involved are shell scripts. Most of the tools come from UNIX and Plan 9. Other tools
were adapted, and a few were written just for this book.